

Honda Power Equipment HRC7020, HRC7018 User Manual
Keep this owner’s manual handy, so you can refer to it
anytime, and make sure the manual stays with the lawn
mower if you sell it.
This owner’s manual is considered a permanent part of the
lawn mower. It must be available to all operators of the
mower and should remain with the mower if resold.
The information and specifications in this publication were in
effect at the time of approval for printing. American Honda
Motor Co., Inc. reserves the right to discontinue or change
specifications or design at any time without notice and
without incurring any obligation whatever.
Your mower is not equipped with a spark arrestor and it may
be illegal to operate the mower in some areas. Check local
laws and regulations. An optional spark arrestor is available
from authorized Honda servicing dealers.
Honda lawn mowers meet Consumer Product Safety
Commission (CPSC) blade safety requirements for
walk-behind rotary mowers.
The engine exhaust from this product
contains chemicals known to the State of
California to cause cancer, birth defects
and other reproductive harm.

Congratulations on your selection of the Honda Commercial
Mower. We are certain you will be pleased with your
purchase.
You can enhance the performance of your new mower by
taking time to study ttiis manual. In it you’ll learn how to use it
safely and efficiently. The service interval and maintenance
recommendations in this manual were developed to give you
the optimum performance and service life of your mower. We
suggest you follow them.
Please take time to read the warranty policy so that you fully
understand the coverages and the responsibilities of
ownership. The warranty policy is a separate document that
should have been given to you by your dealer.
Your Honda Commercial Mower dealer and his staff are
specially trained in the service and maintenance of your
mower and are supported by the parts and service divisions
of American Honda. Your Honda dealer is dedicated to your
satisfaction and will be pleased to answer your questions and
concerns.
When you contact your Honda dealer about your mower,
he’ll need to know the serial numbers of the engine, power
unit, and mower deck. Write those numbers in the space
below for future reference.
Best wishes,
Power Equipment Division
American Honda Motor Co., Inc.
Engine number
Power Unit number
Mower Deck number
ii

Safety Messages
Your safety and the safety of others is very important. We
have provided important safety messages in this manual and
on the lawn mower. Please read these messages carefully.
A safety message alerts you to potential hazards that can
hurt you and others. Each safety message is preceded by a
safety alert symbol a and one of three words: DANGER,
WARNING, or CAUTION.
These mean:
0
.
You WILL be KILLED or
SERIOUSLY HURT if you don’t
follow instructions.
You CAN be KILLED or
SERIOUSLY HURT if you don’t
follow instructions.
You CAN be HURT if you don’t
follow instructions.
I!r
B
m
Each message tells you what the hazard is, what can
happen, and what you can do to avoid or reduce injury.
D’
A -
A
Damage PreventSon Messages
You will also see other important messages that are
preceded by the word NOTICE.
This word means:
psiEq
Your lawn mower or other property
can be damaged if you don’t follow
instructions.
The purpose of these messages is to help prevent damage
to your lawn mower, other property, or the environment.

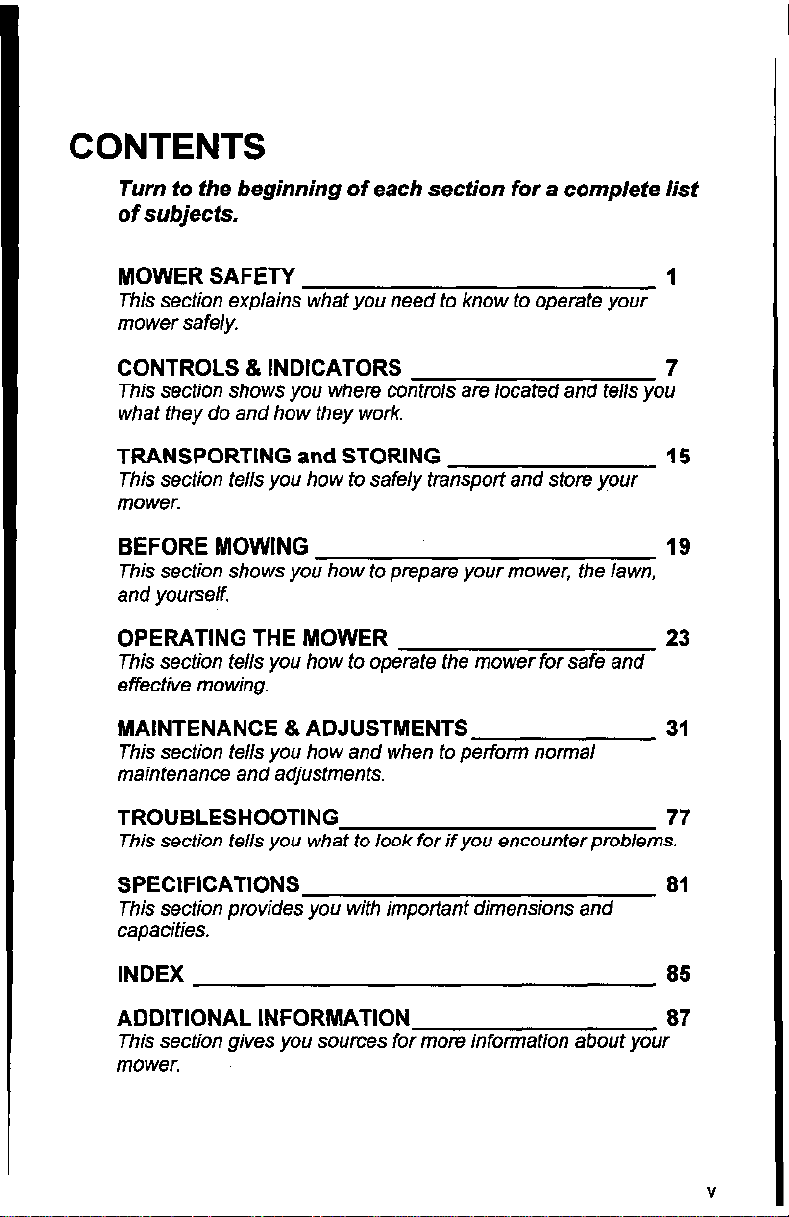
CONTENTS
Turn to the beginning of each section for a complete list
of subjects.
MOWER SAFETY
This section explains what you need to know to operate your
mower safely.
CONTROLS 8, INDICATORS
This section shows you where controls are located and tells you
what they do and how they work.
TRANSPORTING and STORING
This section tells you how to safely transporf and store your
mower.
BEFORE MOWING
This section shows you how to prepare your mower, the lawn,
and yourself.
OPERATING THE MOWER
This section tells you how to operate the mower for safe and
effective mowing.
MAINTENANCE &ADJUSTMENTS
This section tells you how and when to perform normal
maintenance and adjustments.
TROUBLESHOOTING
This section tells you what to look for if you encounter problems.
1
7
15
19
23
31
77
SPECIFICATIONS
This section provides you with important dimensions and
capacities.
INDEX
ADDITIONAL INFORMATION
This section gives you sources for more information about your
mower.
81
85
87
V

C
-.
MOWER SAFETY
This section explains what you need to know to operate
your mower safely.
Safety Information
Important Message to Employers
Safety Label Locations
2
3
4
1

MOWER SAFETY
I
Safety Information
Most accidents with walk-behind mowers can be prevented if
you follow all instructions in this manual and on the mower.
The most common hazards, according to accident statistics,
are discussed below, along with the best way to protect
yourself and others.
Avoid Rotating Blades
A rotating blade can cause serious cuts and even amputate
fingers, hands, toes, or feet. Keep away from the mower
deck whenever the engine is running. If you need to work
around the deck to clear a grass accumulation, adjust the
cutting height, or for any other reason, always shut off the
engine and remove the key. Wear heavy gloves when you
need to clean the mower deck or handle a blade.
Clear Mowing Area
Mower blades can throw rocks and other objects with
enough force to cause serious injury. Before mowing,
carefully inspect the area and remove all sticks, stones,
pieces of wire, and other loose objects. Never operate the
blades over gravel.
-
Keep Shields in Place
Guards and shields are designed to protect you from being
hit by thrown objects and from touching hot engine parts and
moving components. For your safety and the safety of
others, keep all shields in place when the engine is running.
Refuel with Care
Gasoline is extremely flammable and gasoline vapor can
explode. Refuel only outdoors in a well-ventilated area with
the engine OFF. Never smoke near gasoline, and keep other
flames and sparks away. Always store gasoline in an
approved container.
2
-

MOWER SAFETY
Wear Protective Clothing
Wearing protective clothing will reduce your risk of injury.
Long pants and eye protection reduce the risk of injuries from
thrown objects. Sturdy shoes with aggressive soles will help
protect your feet and give you better traction on slopes or
uneven ground. Ear protection and a helmet may be req
by local ordinances or insurance policies.
Turn Engine Off When Not Mowing
If you need to leave the mower for any reason, even just to
inspect the lawn ahead, always turn the engine off. And take
the key if you go farther away.
Important Message to Employers
As an employer, you have special responsibilities to the
people who work for you.
Before you ask anyone to operate this mower, you need to
determine whether the person is old enough, large enough,
and strong enough to safely handle and control the mower.
If you decide they are, make sure the employee reads and
understands all instructions and warnings in this manual and
on the labels before operating the mower.
ired
v
Allow adequate time for hands-on training by a qualified
instructor, and personally supervise practice sessions until
you feel sure the employee is ready to operate the machine.
Also be sure employees wear proper clothing and have eye
protection and any other gear that may be required by local
ordinances or your insurance company.
Remember, too, that you are responsible for keeping the
mower properly maintained and in safe operating condition.
Your commitment to safety on the job can help prevent
accidents and result in longer and more productive years of
service.
3

MOWER SAFETY
Safety Label Locations
These labels warn you of potential hazards that can cause
serious injury. Read them carefully.
If a label comes off or becomes hard to read, contact your
Honda Commercial Mower dealer for a replacement.
PARfflNG SAFETY
I park the mower 0” s nml, level smfsw whsn posslbls.
I II ths mower must be parked on a slope,
block the wheels 00 the ~OWB~ can not roll.
IDonotopenthebypssevaivsewhenpmkedon.9ebpe.
I When possible, psrlr machIne on level sullsca.
4
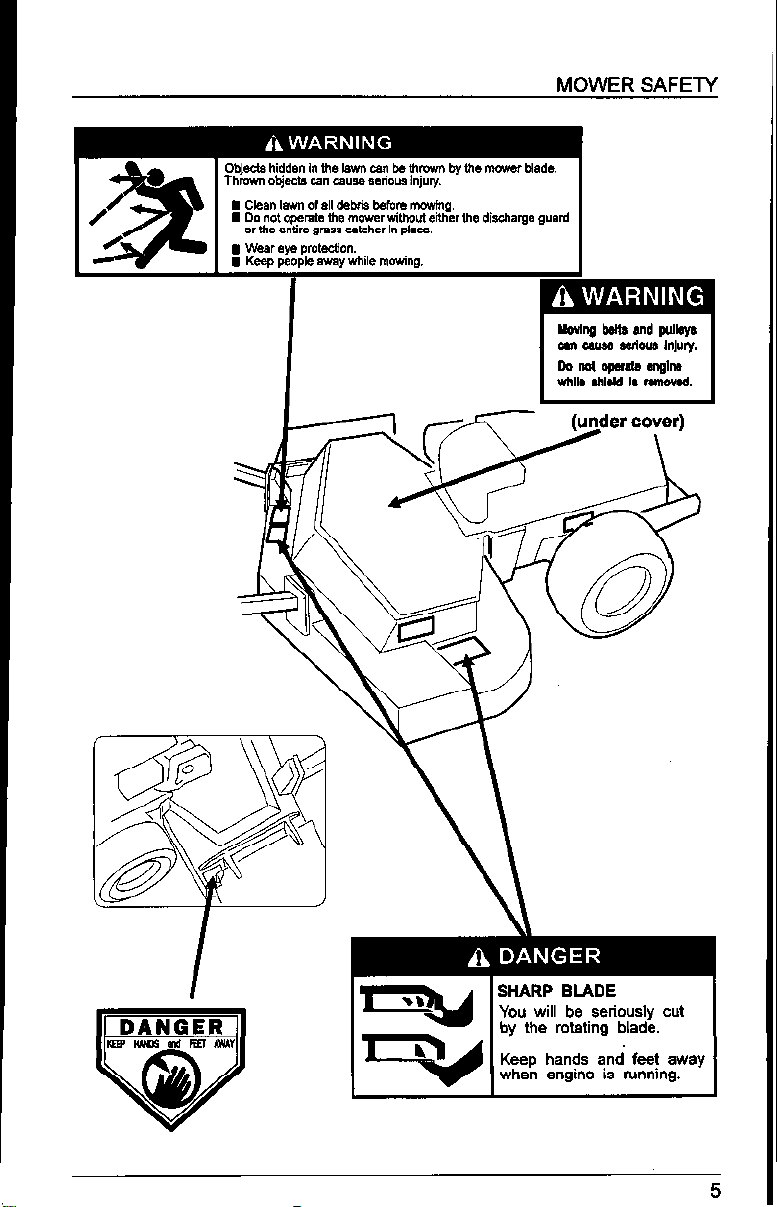
Object8 hidden in the lawn can be thrown by the mower blade.
Thrown objects can cause serious injuly.
I Clean lawn of all debris befom mowing.
I Do not operate the mower without either the discharge guard
or the entire grass catcher In place
I Wear eye protection.
I Keep people away while mowing.
I
MOWER SAFETY
You will be seriously cut
by the rotating blade.
Keep hands and feet away
when engine is running.
MOWER SAFETY

CONTROLS & INDICATORS
This section shows you where controls are located and
tells you what they do and how they work.
Locations
Controls
Indicators
8
11
13
7

CONTROLS 81 INDICATORS
Locations
This shows where to find the most frequently used controls.
HYDROSTATIC
OIL FILLER
-
FUEL FILLER
\ -
FRONT WHEEL
ADJUSTMENT SPACERS
\
-
VALVE
8
CONTROLS 8, INDICATORS
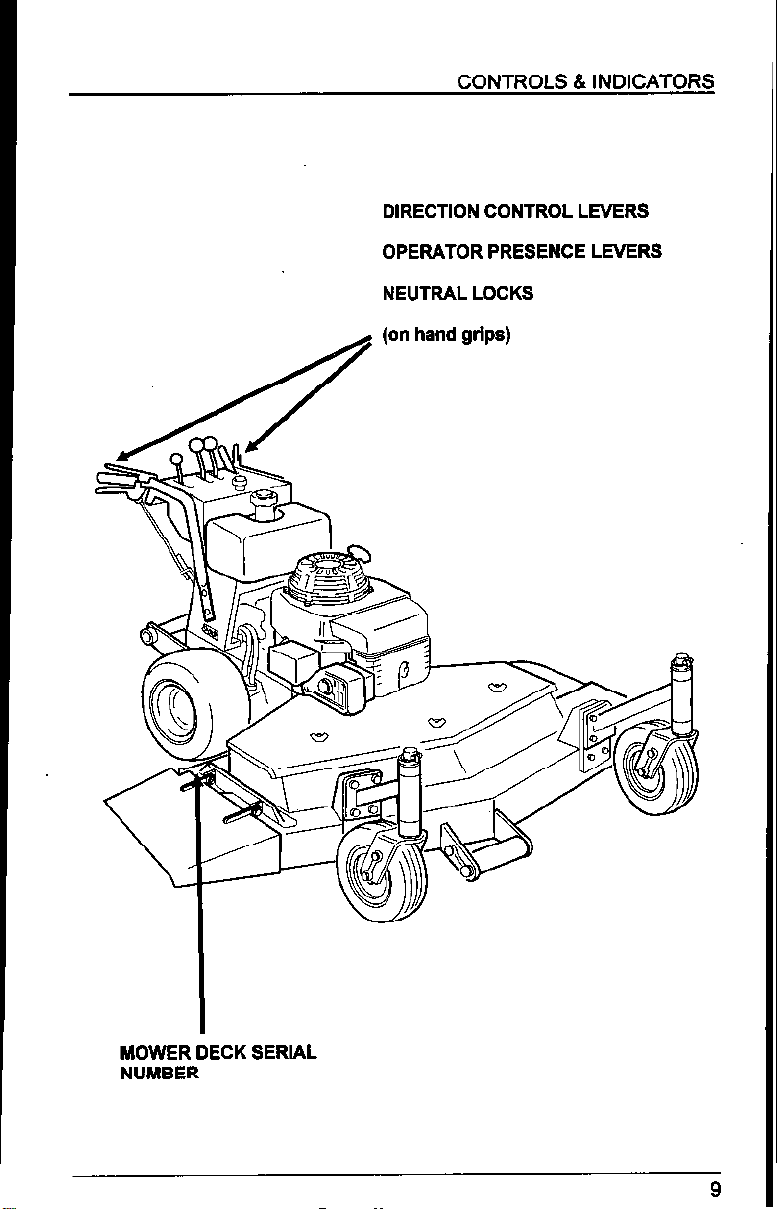
DIRECTION CONTROL LEVERS
OPERATOR PRESENCE LEVERS
NEUTRAL LOCKS
MOWER DECK SERlAL
NUMBER
9

CONTROLS & INDICATORS
BLADE
CONTROL
FORWARD SPEED
CONTROL LEVERS
POWER UNIT
SERIAL NUMBER
PUMP BYPASS
VALVES
ENGINE SERIAL NUMBER
\
REAR WHEEL
ADJUSTMENT BAR

CONTROLS & INDICATORS
Controls
You will use these controls every time you operate the mower
Fuel Valve
ON
/
The valve is located in the fuel
line between the tank and the
pump. Rotate it to ON to allow
fuel to flow, or turn it 90” for OFF.
Ignition -Switch
The ignition switch controls the engine ignition system. Turn
the key clockwise to the ON position, or turn the key counter
clockwise to the OFF position. On electric-start models, the
START position engages the starter.
Throttle
The throttle lever controls engine speed. Pull it rearward to
the SLOW position for idle. Push it forward to the FAST
position for mowing.
Forward Speed Control
The forward speed control levers set the maximum forward
speed of the mower. The rear position is NEUTRAL. As the
levers are pushed forward, the maximum speed of the
mower progressively increases. See page 28 for details.
Choke
Pull the knob to apply the choke for starting a cold engine.
Blade Control
The blade control lever engages engine power to the mower
deck. The forward position is ON, The rear position is OFF.
11
CONTROLS & INDICATORS
Operator Presence Levers
The operator presence levers above the hand grips are part
of the safety interlock system. When the blade control is ON
or
the forward speed controls are forward of NEUTRAL, you
must hold at least one lever down on the hand grips. If you
don’t, the engine will shut off.
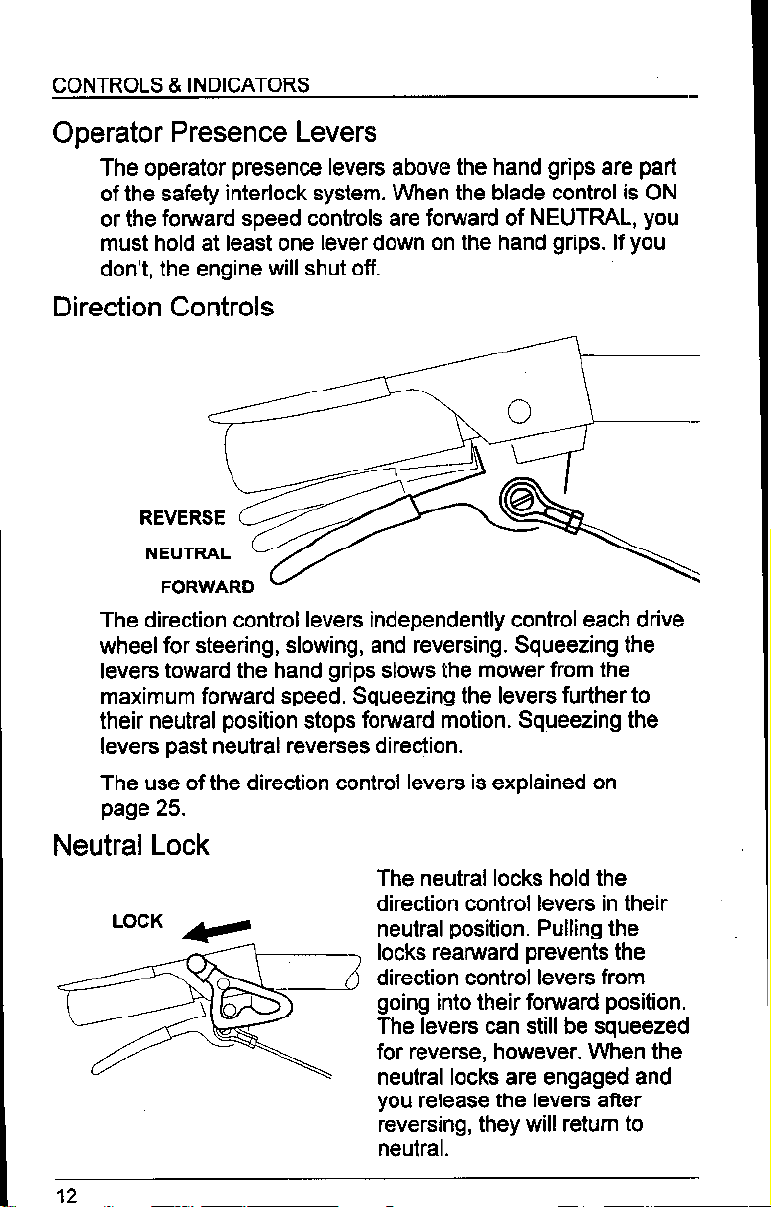
Direction Controls
The direction control levers independently control each drive
wheel for steering, slowing, and reversing. Squeezing the
levers toward the hand grips slows the mower from the
maximum forward speed. Squeezing the levers further to
their neutral position stops fonnrard motion. Squeezing the
levers past neutral reverses direction.
The use of the direction control levers is explained on
page 25.
Neutral Lock
The neutral locks hold the
direction control levers in their
neutral position. Pulling the
locks rearward prevents the
direction control levers from
going into their forward position.
The levers can still be squeezed
for reverse, however. When the
neutral locks are engaged and
you release the levers after
reversing, they
neutral.
1
b
0
will return to
CONTROLS 8, INDICATORS
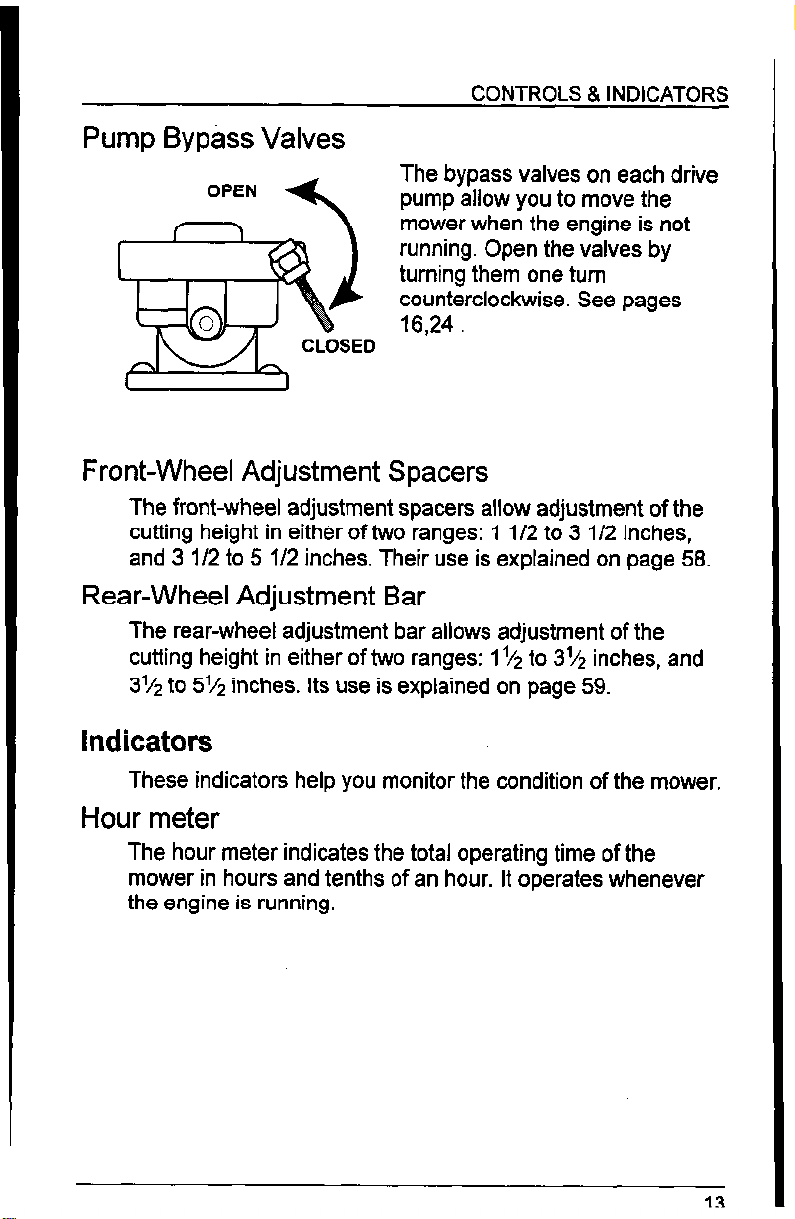
Pump Bypass Valves
The bypass valves on each drive
pump allow you to move the
mower when the engine is not
running. Open the valves by
turning them one turn
counterclockwise. See pages
16,24 .
Front-Wheel Adjustment Spacers
The front-wheel adjustment spacers allow adjustment of the
cutting height in either of two ranges: 1 112 to 3 l/2 inches,
and 3 l/2 to 5 l/2 inches. Their use is explained on page 58.
Rear-Wheel Adjustment Bar
The rear-wheel adjustment bar allows adjustment of the
cutting height in either of two ranges: 1’12 to 3’4 inches, and
3’/2 to 5’1” inches. Its use is explained on page 59.
indicators
These indicators help you monitor the condition of the mower.
Hour meter
The hour meter indicates the total operating time of the
mower in hours and tenths of an hour. It operates whenever
the engine is running.
13


TRANSPORTING and STORING
This section tells
you bow
your mower.
Transporting your Mower
Storing your Mower
Removing From Storage
to
safely transport
and store
16
17
18
15

TRANSPORTING and STORING
There is one very important thing to
remember when transporting your
mower: when you open the pump
bypass valves to move the mower
without the running engine, you
disable all braking action. For this
reason:
l
Always close both pump bypass valves after moving the
mower by hand.
l
Always drive the mower under its own power on any
incline.
l
If you must move the mower on an incline without
running the engine, use a suitable device (winch,
tackle, come-a-long). Remember that the mower weighs
over 600 pounds.
l
When moving the mower without running the engine, do
not move it at more than a walking speed or more than
100 yards. Be sure the bypass valves are open at least
one turn but not more than two turns.
block &
See page 24 for more information on operating the bypass
valves.
Transporting your Mower
Use a loading ramp to get the mower on and off the vehicle.
Be sure both the ramps and vehicle are able to support the
weight of the mower and operator.
When the mower is in position, turn the fuel valve OFF to
prevent the possibility of fuel leaking.
Tie the mower down, front and rear, with ropes or straps.
You may use the front caster brackets and the rear cross
member to tie the mower down. Be careful not to damage
hoses or linkages when tightening the ropes or straps.
Remember that the engine and exhaust system, become hot
during operation. Avoid touching them.

TRANSPORTING and STORING
Storing your Mower
Whether you’re leaving your mower unattended for an hour
or a month, always:
l
Turn the key off and remove it from the ignition switch.
l
Turn the fuel valve off.
l
If you opened the pump bypass valves, close both of
them.
l
If you’re leaving the mower on a slope - even a slight
one - block both drive wheels front and rear.
For Over 30 Days. . .
1. Wash any accumulated grass clippings from the mower deck.
(NOTICEI
Spraying water on a hot engine or hot mower deck bearings
can cause them to be damaged from cooling too quickly.
Keep water away from controls, cable ends, and all other
places that are difficult to dry, as water may promote rust.
2. After washing:
l
i,ove as much standing water as possible with a dry
l
Start the engine and let it run until it reaches normal
operating temperature to evaporate any remaining water.
l
Engage the blade control to expel water from the mower
deck.
3. Stop the engine and allow it to cool.
4. After the mower is clean and dry; touch up any damaged
paint and coat other areas that may rust with a light film of oil.
5. If the storage period is to be less than 6 months, you may
add a commercially available fuel stabilizer to the fuel rather
than draining the tank. Follow the instructions on the
container of the stabilizer.
6. Loosen the carburetor drain
screw and drain the fuel into
an approved container.
Tighten the screw securely
after draining.
47
TRANSPORTING and STORING
18
7. Change the engine oil (page 42).
8. Lubricate all grease fittings (page 50).
9. Recharge the battery once a month while the mower is in
storage (page 74).
10. Check the hydrostatic oil and top off if necessary (page 49).
11.
Check tire pressures (see page 57).
12. Cover to keep off dust and moisture. Don’t use ,a plastic tarp;
it will trap moisture underneath it, promoting corrosion and
rust. If possible, avoid storage areas with high humidity,
because that promotes rust and corrosion.
If your mower will be stored with gasoline in the fuel tank and
carburetor, reduce the hazard of gasoline vapor ignition.
Select a well ventilated storage area away from any
appliance that operates with a flame, such as a furnace,
water heater, or clothes dryer. Also avoid any area with a
spark producing electric motor, or where power tools are
operated.
Leave the fuel valve in the OFF position to reduce the
possibility of fuel leakage.
For Over 60 Days. . .
1. Remove the spark plug (page 44).
2. Squirt about an ounce of clean engine oil into the cylinder.
3. Pull the starter rope twice to spread the oil.
4. Reinstall the spark plug.
Removing From Storage
1. Remove the spark plug and clean off any oil with a suitable
solvent.
2. Pull the starter rope twice with the spark plug removed.
3. Install the spark plug (page 44).
If the cylinder was coated with oil during storage preparation,
the engine will smoke briefly after starting. This is normal.
4.
Service the battery (page 74).
5. Follow normal pre-operation procedures (page 20).

BEFORE MOWING
This section shows you how to prepare your mower, the
lawn, and yourself.
Check the Mower
Check the Lawn
Prepare Yourself
20
21
21
19

BEFORE MOWING
Check the Mower
For your safety and the service life of your equipment,
always inspect your mower before using it. Before beginning
your pre-operation check, be sure:
l
The mower is parked on a level surface.
l
The blade control lever is disengaged and the ground
speed control levers are in NEUTRAL.
l
The ignition switch is off and the key is removed.
Walk around the mower and check its general condition,
Look around and underneath it for signs of fluid leaks.
Remove any excessive dirt and debris, especially around
moving components. Look for signs of damage. Check nuts,
bolts, screws, and pins for tightness.
Never operate the mower with the safety interlock system
inoperative. Do not attempt to bypass or defeat the system.
Keep all shields and covers in place while operating the
mower. If you find any problems or defects, have them
repaired before mowing.
-
Blades
Before each use, check each mower blade for damage or
abnormal wear. See page 62 for details.
Be’lts
Check the blade, deck, and pump belts for wear and correct
tension. See page 66 for details.
Engine Oil
Check the level on the dipstick. Running the engine with a
low oil level will cause engine damage. See page 41 for
details.
Hydrostatic Oil
Check the oil level in the reservoir. See page 49 for details.
Fuel
Remove the cap on the tank and check the fuel level, See
page 38 for refueling details.
20

BEFORE MOWING
Air Filter
Check that the air cleaner elements are clean and in good
condition. See page 37 for information on servicing the air
cleaner.
Cutting Height
The cutting height of your mower should be set for the
mowing conditions and should be in the same position, front
and rear. See page 58 to adjust cutting height.
Tire Pressure
Check the tires for proper inflation (page 57).
Battery (electric start models)
Check state of charge and electrolyte level (page 74).
Check the Lawn
For your safety and the safety of others, always inspect the
area before mowing.
0 bjects
Anything which can be picked up by the blades and thrown is
a potential hazard to you and others. Look for things like
stones, sticks, bones, and wire, and remove them from the
mowing area.
People
People and animals near the mowing area can move into
your mowing path or into a position where they could be
struck by thrown objects. Clear the area of people, especially
children and pets. Their safety is your responsibility.
Lawn
Check the length and condition of the grass. Adjust your
mowing speed and cutting height accordingly.
Avoid mowing wet grass. Not only does mowing wet grass
result in poor cut quality, it also affords poor traction,
increasing your risk of losing your footing.
21
BEFORE MOWING
Prepare Yourself
Your safety is your responsibility. A little time spent in
preparation will significantly reduce your risk.
Knowledge
Read and understand this manual. Know what the controls
do and how to operate them.
Familiarize yourself with the mower and its operation before
you begin mowing. Know what to do in case of emergencies.
Clothing
Wearing protective clothing will reduce your risk of injury.
Long pants and eye protection reduce the risk of injuries from
thrown objects.
Sturdy shoes with aggressive soles will help protect your feet
and give you better traction on slopes or uneven ground.
While the sound level of the mower is well within safe limits,
hearing protection will further protect your hearing.
22
 Loading...