

Honda Power Equipment HR195PDA User Manual

Thank you for purchasing a Honda lawn mower.
This manual describes operation and maintenance of Honda HR195PDA rotary
mowers. All information in this publication is based on the latest product
information available at the time of printing. Honda Power Equipment Mfg.,
Inc. reserves the right to make changes at any time without notice and without
incurring any obligation.
No part of this publication may be reproduced without written permission.
This manual is a permanent part of the mower, and it must stay with the mower
if resold.
Honda HR195PDA mowers meet CPSC blade safety requirements for walk-
behind rotary mowers.
Honda HR195PDA mowers are not factory-equipped with spark arresters. In
some areas, it is illegal to operate an engine without a USDA qualified spark
arrester. Check local laws and regulations before operating. An optional spark
arrester is available from authorized Honda lawn mower dealers.
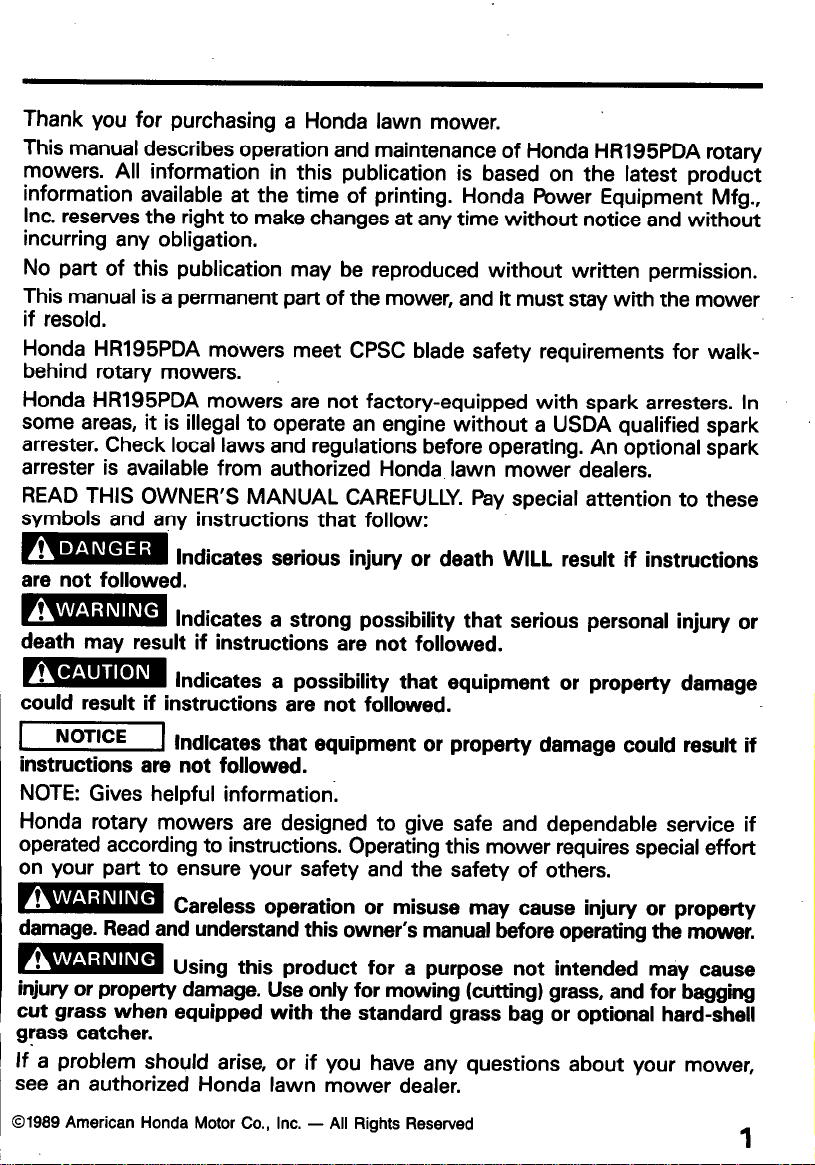
READ THIS OWNER’S MANUAL CAREFULLY. Pay special attention to these
symbols and any instructions that follow:
B
Indicates serious injury or death WILL result if instructions
are not followed.
B
Indicates a strong possibility that serious personal injury or
death may result if instructions are not followed.
m
Indicates a possibility that equipment or property damage
could result if instructions are not followed.
1 NoT’CE
1 Indicates that equipment or property
damage
could result if
instructions are not followed.
NOTE: Gives helpful informationl
Honda rotary mowers are designed to give safe and dependable service if
operated according to instructions. Operating this mower requires special effort
on your part to ensure your safety and the safety of others.
B
Careless operation or misuse may cause injury or property
damage. Read and understand this owner’s manual before operating the mower.
B
Using this product for a purpose not intended mtiy cause
injury or property damage. Use only for mowing (cutting) grass, and for bagging
cut grass when equipped with the standard grass bag or optional hard-shell
grass catcher.
If a problem should arise, or if you have any questions about your mower,
see an authorized Honda lawn mower dealer.
01989 American Honda Motor Co., Inc. - All Rights Reserved
1
CONTENTS
l.SAFETY ...........................................
” .“.“. ‘Safety ,Label Locations
.. ,;Safety Information
: lmportant’M.essage to’ Parents
2. COMPONENT IDENTIFICATION
3.CONTROLS
Fuel Va!ve
Throttle Lever
Flywheel .Brake Lever
....
Cutting Height Adjustment Levers
4:“ATTACH’MENTS
5. PRE-OPERATION CHECK.
Blade
Grass Bag
Optional Attachments
Engine Oil
Fuel.............................................16
Air Cleaner
Cutting Height.
......................................
..........................................
.............. :
............... :
.............................
........................................
......... ; ... .:.
........................................ 18
...........
........ 4 .,
........
................................ 10
................ :
...............................
..........................
1 ..........................
.......................... 7
..........................
..lO
; . 10
...................... 1.0
........................
.......................
....... ;
..1...........13
......................... 15
.......................
:.
....... 13
4
5
8
11
12
14
14
19
6. OPERATION
Starting the Engine
Clearing a Flooded Engine
Mower Operation.
Stopping the Engine.
High Altitude Operation
..................................... :
2
............... .',.'
..............
.... :
............................. 23
................................. 25
.............................. 26
................. 20
......... ; ... 22
:
...
20

CONTENTS
7. MOWING RECOMMENDATIONS ........................
8. TRANSPORTING
9. MAINTENANCE
Maintenance Schedule
Engine Oil Change.
Air Cleaner Service
Spark Plug Service
Spark Arrester Maintenance (optional equipment)
Flywheel Brake Cable Adjustment ......................
Throttle Cable Adjustment ...........................
Carburetor Adjustment.
Grass Bag Cleaning and Replacement ...................
Blade Removal and Installation ........................
10. STORAGE
Preparation for Storage
Storage
Removal from Storage
11. TROUBLESHOOTING
.........................................
........................................
...................................
....................................
...............................
................................
................................
................................
.............................
.............................
..............................
................................
...........
27
30
31
31
32
34
36
37
38
39
40
41
42
44
44
46
47
48
12. SPECIFICATIONS
13. WARRANTY SERVICE.
...................................
...............................
50
51
3

1. SAFETY
Read all safety instructions before operating the mower.
UNDER NORMAL USAGE, THIS BAG MATERIAL
IS SUBJECT TO DETERIORATION AND WEAR,
AND SHOULD BE CHECKED FREQUENTLY FOR
BAG REPLACEMENT. THIS BAG CONFORMS TO
A.N.S.I. STANDARD 871.1, ANY REPLACEMENT
MUST MEET THIS STANDARD.
I
DO NOT START
IS CLOSED OR BAG IS IN PLACE.
READ OWNER’S MANUAL BEFORE OPERATING.
DISCONNECT THE SPARK PLUG CAP BEFORE CUTTER
DECK AND CUTTER BLADE SERVICING.
DO NOT ALLOW ANYONE TO STAND IN FRONT OF MOWER
TO PREVENT ,NJURY FROM THROWN OBJECTS: CLEAR
AREA OF DEBRIS KEEP OTHERS AWAY.
TO PREVENT SERIOUS INJURY. DO NOT REACH INSIDE
WHEN ENGINE IS RUNNING.
DO NOT REMOVE GUARDS.
UNLESS~REAR
DOOR
[DANGER IKEEP
HA&S
and FEET AWAY
1. SAFETY
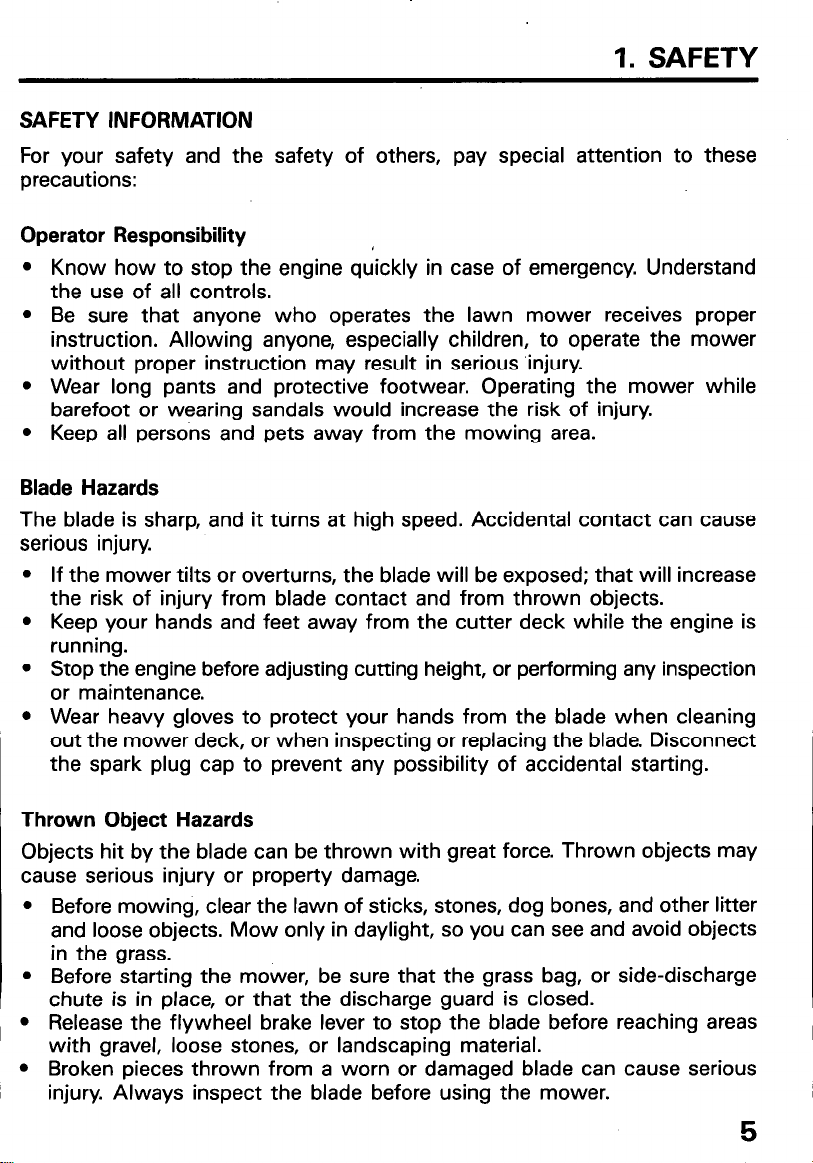
SAFETY INFORMATION
For your safety and the safety of others, pay special attention to these
precautions:
Operator Responsibility
l
Know how to stop the engine quickly in case of emergency. Understand
the use of all controls.
l
Be sure that anyone who operates the lawn mower receives proper
instruction. Allowing anyone, especially children, to operate the mower
without proper instruction may result in serious ‘injury.
l
Wear long pants and protective footwear. Operating the mower while
barefoot or wearing sandals would increase the risk of injury.
l
Keep all persons and pets away from the mowing area.
Blade Hazards
The blade is sharp, and it ttirns at high speed. Accidental contact can cause
serious injury.
l
If the mower tilts or overturns, the blade will be exposed; that will increase
the risk of injury from blade contact and from thrown objects.
l
Keep your hands and feet away from the cutter deck while the engine is
running.
l
Stop the engine before adjusting cutting height, or performing any inspection
or maintenance.
l
Wear heavy gloves to protect your hands from the blade when cleaning
out the mower deck, or when inspecting or replacing the blade. Disconnect
the spark plug cap to prevent any possibility of accidental starting.
Thrown Object Hazards
Objects hit by the blade can be thrown with great force. Thrown objects may
cause serious injury or property damage.
l
Before mowing, clear the lawn of sticks, stones, dog bones, and other litter
and loose objects. Mow only in daylight, so you can see and avoid objects
in the grass.
l
Before starting the mower, be sure that the grass bag, or side-discharge
chute is in place, or that the discharge guard is closed.
l
Release the flywheel brake lever to stop the blade before reaching areas
with gravel, loose stones, or landscaping material.
l
Broken pieces thrown from a worn or damaged blade can cause serious
injury. Always inspect the blade before using the mower.
5
1. SAFETY
Fire and Burn Hazards
Gasoline is extremely flammable, and gasoline vapor can explode. Use extreme
care when handling gasoline. KEEP OUT OF REACH OF CHILDREN.
l
Refuel in a well-ventilated area with the engine stopped. Keep flames and
sparks away, and do not smoke in the area.
l
Refuel carefully to avoid spilling fuel. Avoid overfilling the fuel tank (there
should be no fuel in the filler neck). After refueling, tighten the filler cap
securely. If any fuel is spilled, make sure the area is dry before starting the
engine.
l
- After use, turn the fuel valve 0FF;and store the mower on a level surface.
Be sure the storage area is well-ventilated, and away from appliances, such
as water heaters and clothes dryers.
Dry grass and leaves are flammable.
l
Always empty the grass bag when you’ve finished mowing, even if it’s not
-
full. Stored lawn clippings are a fire hazard.
l
Honda HR195PDA mowers are not factory-equipped with spark arresters.
It is illegal in some areas to operate an engine without a USDA qualified
spark arrester. Check local laws and regulations. An optional spark arrester
is available from authorized Honda lawn mower dealers.
The engine and exhaust system become very hot during operation and remain
hot for a while after stopping. Contact with hot engine components can cause
burns and may ignite some materials.
l
Avoid touching a hot engine or exhaust system.
l
Allow the engine to cool before performing maintenance, transporting the
mower,~ or storing the mower indoors.
Carbon Monoxide Poisoning Hazard
Exhaust contains poisonous carbon monoxide, a colorless and odorless gas.
Breathing exhaust can cause loss of consciousness and may lead to death.
l
If you run the engine in an area that is confined, or even partially enclosed,
the air can become contaminated with a dangerous amount of exhaust gas.
To keep exhaust gas from building up, provide adequate ventilation.
6

1. SAFETY
IMPORTANT MESSAGE TO PARENTS
YOUR CHILDREN’S SAFETY IS VERY IMPORTANT to Honda. That’s why we
urge you to read this message before letting your youngster operate this lawn
mower. Lawn mowers are tools, not toys. As with any equipment, bad
judgments can result in serious injuries. You can help prevent accidents by
making good decisions about it when, and how your youngster operates this
equipment.
The first question you’ll need to ask is whether your youngster is capable of
operating this mower safely. Remember, young people vary widely, and AGE
IS NOT THE ONLY FACTOR.
Physically, a youngster must be LARGE ENOUGH AND STRONG ENOUGH to
easily start the mower and control its direction. The youngster also needs
enough size, strength, and coordination to comfortably reach and operate the
controls.
Another, tougher question you need to ask is if your youngster has enough
MATURITY AND RESPONSIBILITY to safely operate this mower. Does the
young person think through problems and come to logical solutions? Be honest!
Anyone who takes unnecessary risks and doesn’t obey rules should not operate
this lawn mower.
If you decide that your son or daughter can handle the mower safely,
CAREFULLY READ THE OWNER’S MANUAL with your youngster. Make sure
you both understand all instructions and warnings. Also, be sure your youngster
wears sturdy shoes and other protective clothing when operating or handling
the mower.
SUPERVISION is also very important. Walk with your youngster during the first
few minutes of mowing. Even after the youngster has become confident with
the mower, do not let the young person use the mower without good adult
supervision. An adult should also be present during refueling and maintenance.
In fact, it’s up to parents to make sure that the mower is properly maintained
and kept in safe operating condition.
’ By always placing safety first, your youngster will acquire useful skills and a
sense of accomplishment. And you’ll both get the best results from your lawn
mower.
7
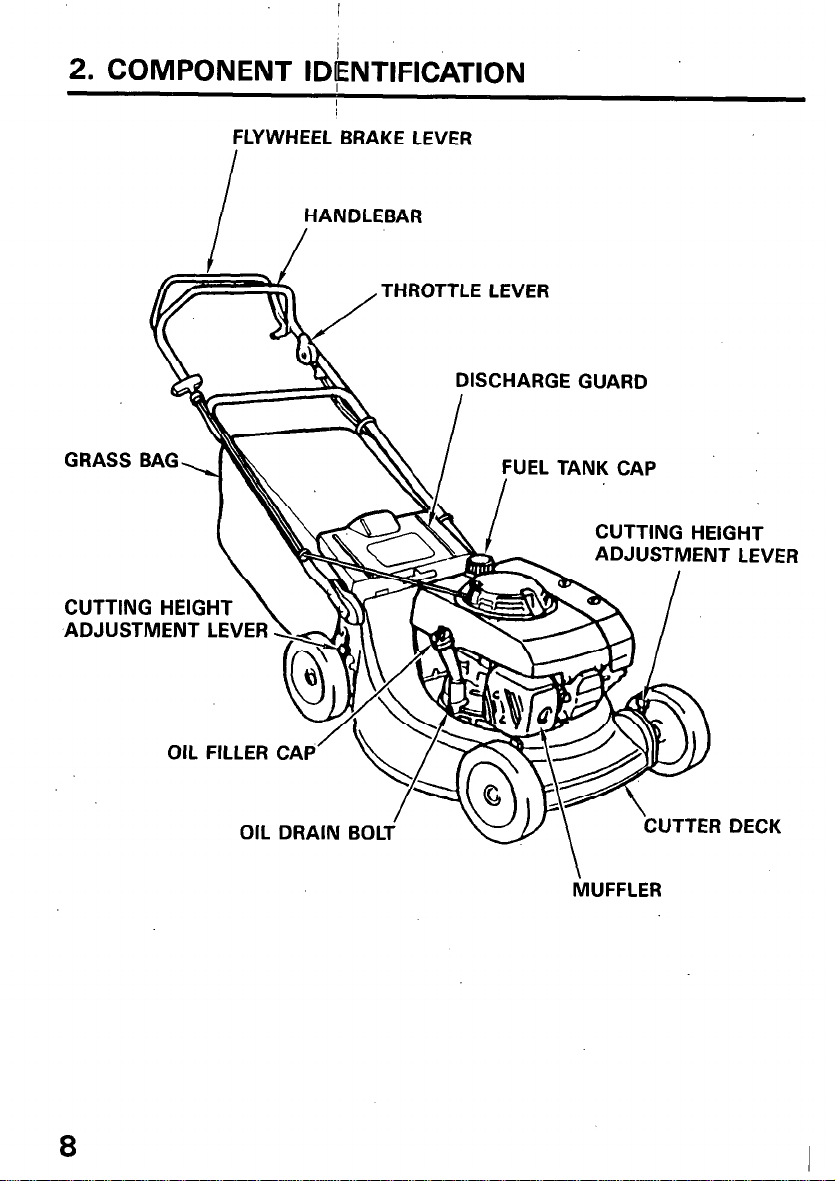
2. COMPONENT IDkNTIFICATION
FLYWHEEL BRAKE LEVER
cu
TTING HEIGHT
AD
JUSTMENT LEVER
OIL FILLER CAP
I
HANDLEBAR
THROTTLE LEVER
ISCHARGE GUARD
FUEL TANK CAP
CUTTING HEIGHT
ADJUSTMENT LEVER
8
OIL DRAIN
BOL:
‘CUTTER DECK
\
MUFFLER
-u’.,
CUTTING HEIGHT
ADJUSTMENT LEVER
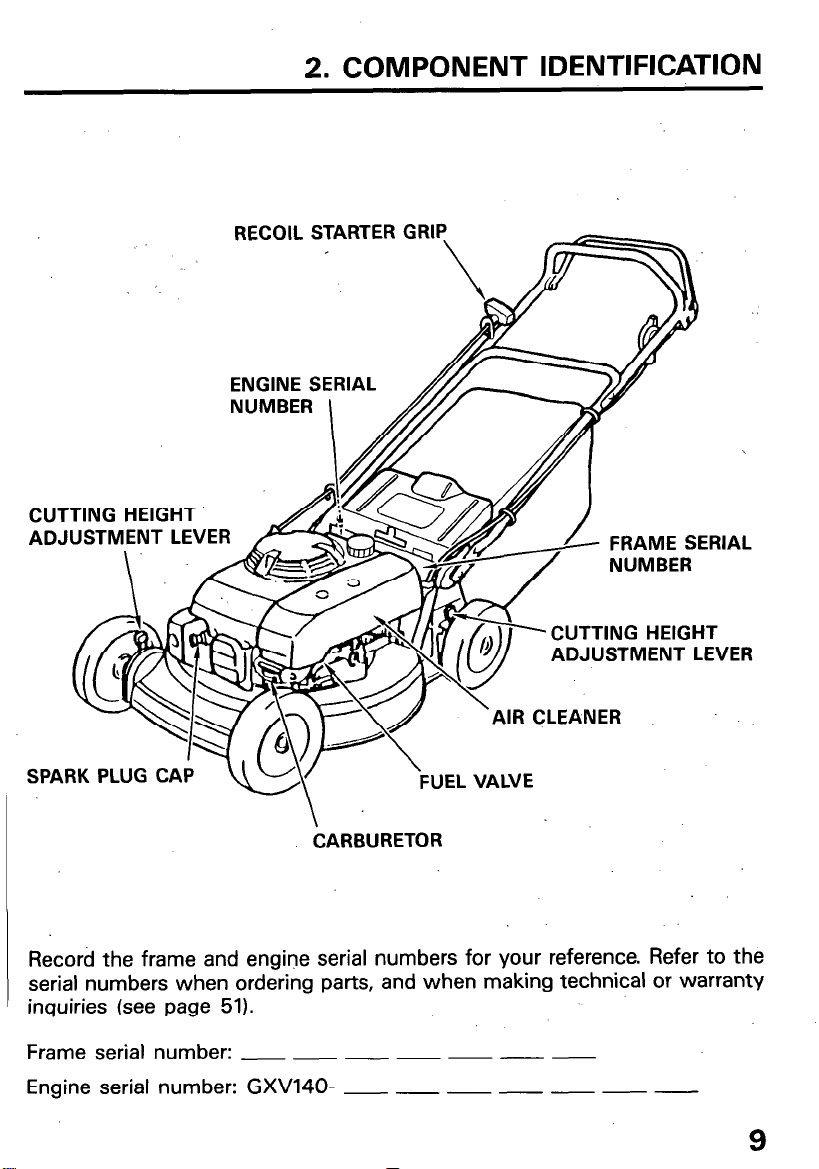
2. COMPONENT IDENTIFICATION
RECOIL STARTER GRlq
\
’ D
ENGINE SERIAL
NUMBER \
,
FRAME SERIAL
NUMBER
CUTTING HEIGHT
ADJUSTMENT LEVER
AIR CLEANER
SPARK PLUG CAP
Record the frame and engine serial numbers for your reference. Refer to the
1 serial numbers when ordering parts, and when making technical or warranty
inquiries (see page .51).
Frame serial number: __ - - - - - -
Engine serial number: GXV140- - - - __ __ - -
W’
\
CARBURETOR
\
FUEL VALVE
9

3. CONTROLS
FUEL VALVE
The fuel valve opens and closes the
connection between the fuel tank and
the carburetor.
The fuel valve must be in the ON
position for the engine to run.
When the mower is not in use, turn the
fuel valve. to the OFF position to
prevent the poss’ibility of carburetor
flooding, and to reduce the possibility
of fuel leakage.
flammable, _ and gasoline vapor can
explode, cauhing injury or death. Turn
the fuel val&e to the OFF position
&en the mQwer is not in use.
THROTTLE LEVER
CHOKE position: For starting
FAST position (* 1: For mowing
SLOW position (-1: For idling
1
1
FLYWHEEL @RAKE LEVER
FUEL VALVE
. THROTTLE LEVER-
This lever is connected to the engine
flywheel brake and the ignition switch.
The engine ‘will not start and run
unless this lever is moved forward.
To start the engine and blade, push the
lever forward and hold it against the
handlebar while operating the recoil
starter. Continue to hold the lever
against the handlebar while mowing.
To stop the engine and blade, release
the lever. i:
10

3. CONTROLS
CUTTING HEIGHT ADJUSTMENT LEVERS
m
The blade can cause
serious injury. Stop the engine before
adjusting cutting height. i I
There are six cutting height settings:
3/4 in (2.0 cm), 1-l /4 in (3.2 cm),
l-3/4 in (4.4 cm), 2-l /4 in (5.5 cm),
2-5/8 (6.6 cm), and 3 in (7.7 cm).
These are approximate figures, as the
actual height of cut grass will vary
with lawn and soil conditions.
To adjust cutting height, pull each
adjusting lever toward the wheel, and
move it into another notch. Set all four
adjusting levers to the same cutting
height position.
,, ,
314 in
1-1/4 in (2.0 cm)
ADJUSTING LEVERS
Select the correct’cutting height for your mowing requirements. Cutting height
settings of l-1/4 in (3.2 cm) to 2-l/4 in (5.5 cm) are appropriate for most
lawns during cool weather. A higher cut may be needed to protect the lawn
during hot summer months. Consult a local nursery or lawn and garden center
for advice about specific types of grasses and growing conditions in your area.
If you are not certain which cutting height to select, check the appearance
of the lawn after mowing a small area, then readjust cutting height if necessary.
I
ADJUSTING LEVER
II
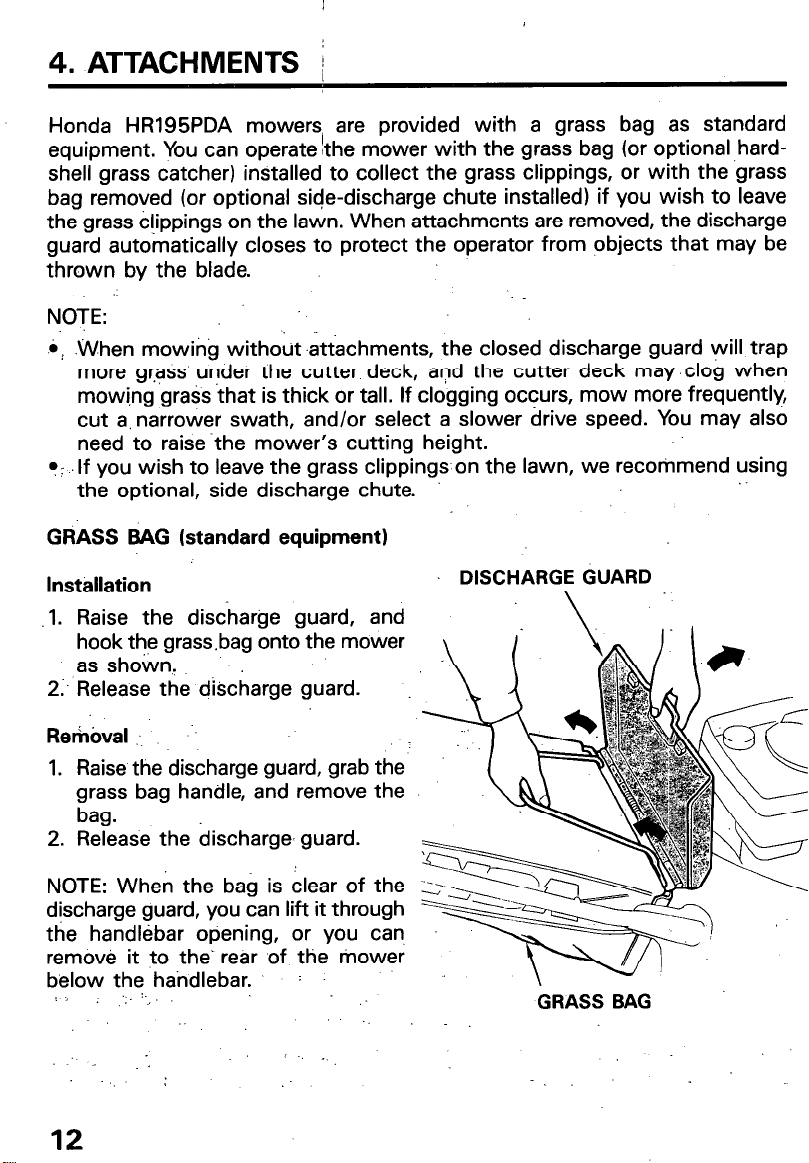
4. ATTACHMENTS i
Honda HR195PDA mowers are provided with a grass bag as standard
equipment. You can operate !the mower with the grass bag (or optional hardshell grass catcher) installed to collect the grass clippings, or with the ‘grass
bag removed (or optional side-discharge chute installed) if you wish to leave
the grass c!ippings on the lawn. When attachments are removed, the discharge
guard automatically closes to protect the operator from objects that may be
thrown by the blade.
NOTE:
.i: .When mowing without -&tachments, the closed discharge guard will trap
more g[Fss under the cutter deck, and the cutter deck may .clog when
mowi.ng grass that is thick or tall. If clogging occurs, mow more frequently,
cut a, narrower swath, and/or select a slower drive speed. You may also
need to raise -the mower’s cutting height.
F: If you wish to leave the grass clippings on the lawn, we recommend using
the optional, side discharge chute.
GRASS BAG (standard equipment)
Installation
.l. Raise the discharge guard, and
hook the grass.bag onto the mower
as shown.
2;. Release the discharge guard.
Rerhval : .,
1. Raise the discharge guard, grab the’
grass bag handle, and remove the
bag.
2. Release the bischarge. guard.
NOTE: When the bag is &ear of the
djscharge guard, you can lift it through
the handlebar opening, or you can,
removg it to the‘ rear of the mower
below the handlebar. :
.::. .:
.-
12
DISCHARGE GUARD
\
GRASS BAG
5. PRE-OPERATION CiiECK
Check
the following items before
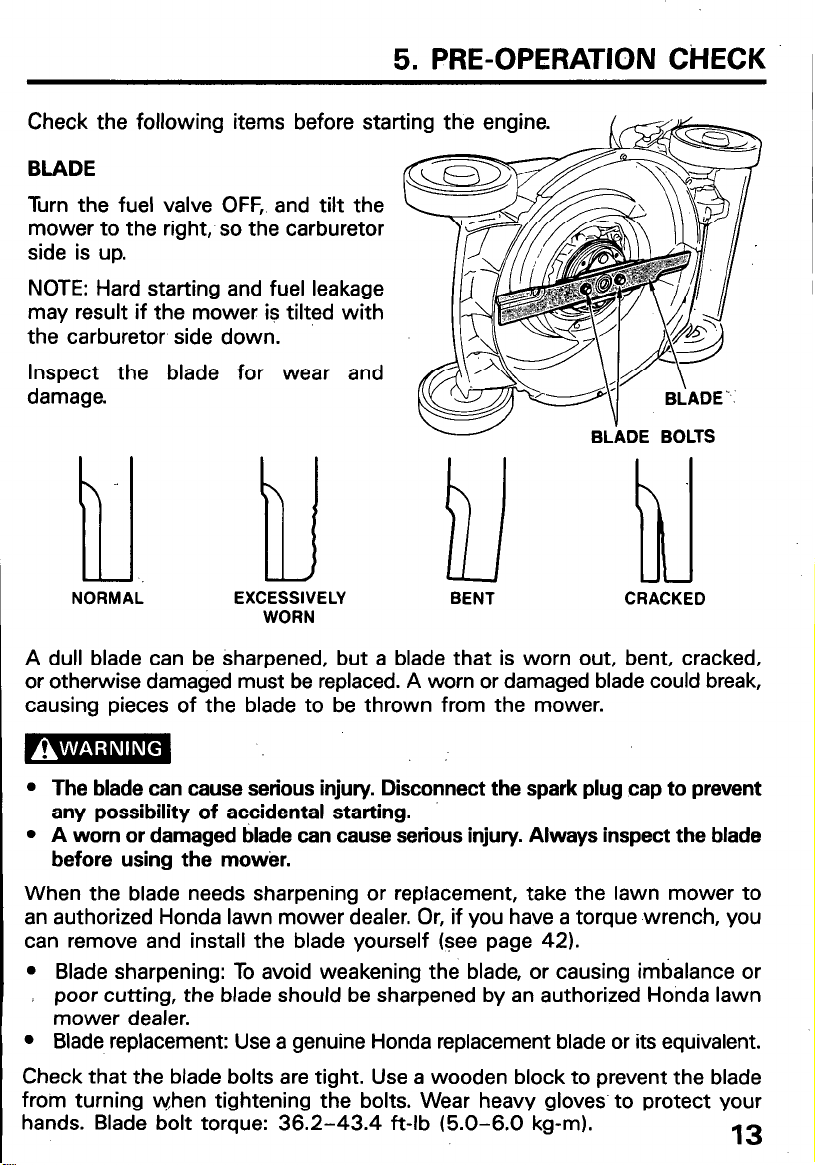
BLADE
Turn the fuel valve OFF, and tilt the
mower to the right, so the
side is up.
NOTE: Hard starting and fuel leakage
may result if the mower is tilted with
the carburetor side down.
Inspect the blade for wear and
damage.
NORMAL
A dull blade can be sharpened, but a blade that is worn out, bent, cracked,
or otherwise damaged must be replaced. A worn or damaged blade could break,
causing pieces of the blade to be thrown from the mower.
carburetor
BLhE BOLTS
BENT CRACKED
l
The blade can cause serious injury. Disconnect the spark plug cap to prevent
any possibility of accidental starting.
l
A worn or damaged blade can cause serious injury. Always inspect the blade
before using the mower.
When the blade needs sharpening or replacement, take the lawn mower to
an authorized Honda lawn mower dealer, Or, if you have a torque wrench, you
can remove and install the blade yourself (see page 42).
l
Blade sharpening: To avoid weakening the blade, or causing imbalance or
poor cutting, the blade should be sharpened by an authorized Honda lawn
mower dealer.
l
Blade replacement: Use a genuine Honda replacement blade or its equivalent.
Check that the blade bolts are tight. Use a wooden block to prevent the blade
from turning when tightening the bolts. Wear heavy gloves. to protect your
hands. Blade bolt torque: 36.2-43.4 ft-lb (5.0-6.0 kg-m).
13

5. PRE-OPERATION /CHECK
GRASS BAG
Check that the grass bag is in good condition and not clogged.
A clogged grass bag will not collect grass efficiently. When the bag needs
cleaning, wash it with a garden hose, and allow it to dry thoroughly before
use; a wet bag will clog quickly.
The grass bag wears during normal use and will eventually require replacement.
If you operate the. mower with a damaged or worn out bag, objects picked
up by the blade may be thrown through the bag material.
B
Objects thrown through a worn or damaged grass bag may
cause serious injury. Install a new grass bag when required.
5. PRE-OPERATION CHECK
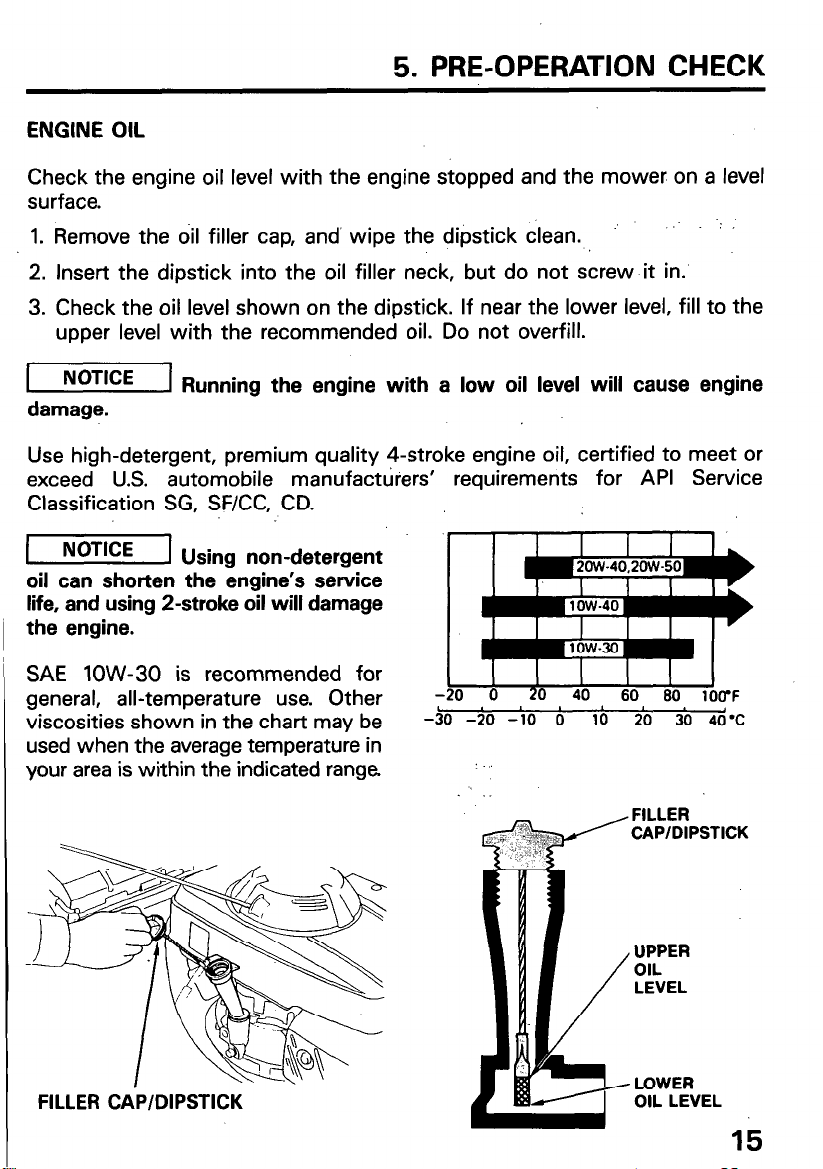
ENGINE OIL
Check the engine oil level with the engine stopped and the mower on a level
surface.
1. Remove the oil filler cap, and’ wipe the dipstick clean.
-’ .’
2. Insert the dipstick into the oil filler neck, but do not screw it in.
3. Check the oil level shown on the dipstick. If near the lower level, fill to the
upper level with the recommended oil. Do not overfill.
rTiFiEq
Running the engine with a low oil level will cause engine
damage.
Use high-detergent, premium quality 4-stroke engine oil, certified to meet or
exceed U.S. automobile manufacturers’ requirements for API Service
Classification SG, SF/CC, CD.
(1
Using non-detergent
oil can shorten the engine’s service
life, and using 2-stroke oil will damage
1 the engine.
SAE low-30 is recommended for
general, all-temperature use. Other
viscosities shown in the chart may be
used when the average temperature in
your area is within the indicated range.
1
-30 -20 -10
.
10
0
20 30 40-c
FILLER
CAP/DIPSTICK
FILLER CA-P/DIPSTICK
I
UPPER
OIL
LEVEL
/
I LOWER
OIL LEVEL

I
5. PRE-OPERATION bHECK
FUEL
Fuel tank capacity: 0.26 US gal (1.0 P)
Remove the filler cap and check the fuel level. Refill the tank if the fuel level
is low. Refuel carefully to avoid overfilling or spilling fuel. There should be no
fuel in the filler neck.
B ”
explode, causing serious injury or death. Use extreme care when handling
gasoline. KEEP OUT OF REACH OF CHILDREN.
Refuel in a well-ventilated area with the engine stopped. Do not smoke or allow
flames or sparks in the area where the engine, is refueled or where gasoline
is stored; Avoid’ repeated or prolonged contact wit,h skin or breathing of vapor.
After refueling, tighten the fuel tank cap securely. If any fuel was spilled,.make
sure the area is dry before starting the engine.
FUEL TANK CAP-
FUEL
FILLER
NECK
Gasoline. is extremely flammable, and gasoline vapor can
16
 Loading...