

Page 1
Page 2

Page 3
Thank you for purchasing a Honda water pump. We want to help you
get the best results from your new water pump and to operate it
safely. This manual contains the information on how to do that;
lease read it carefully.
?
his manual covers the operation and maintenance of Honda water
pump: WB15
All information in this publication is based on the latest roduct
information available at the time of printing. Honda Motor 8 o., Ltd.
reserves the right to make changes at any time without notice and
without incurring any obligation. No part of this publication may be
reproduced without written permission.
This manual should be considered a permanent part of the water
ump and should remain with it if it is resold.
t is ille al in some areas to operate an engine without a U.S.D.A.
P
qualifie spark arrester: Check local laws and regulations. An optional
spark arrester for this water pump is available from your authorized
Honda water pump dealer.
Safety Messages
Your safety and the safety of others is very important. We have
provided important safety messages in this manual and on the water
pump. Please read these messages carefully.
A safety message alerts you to potential hazards that could hurt you
or others. Each safety message is receded by a safety alert symbol
These mean:
m
follow instructions.
m
follow instructions.
,m
3
A
and one of three words: DAN 0 ER, WARNING, or CAUTION.
You WILL be KILLED or SERIOUSLY HURT if you don’t
You CAN be KILLED or SERIOUSLY HURT if you don’t
You CAN be HURT if you don’t follow instructions.
Each message tells you what the hazard is, what can happen, and
what you can do to avoid or reduce injury.
Damage Prevention Messages
You will also see other important messages that are preceded by the
word NOTICE.
This word means:
[
you don’t follow instructions.
The purpose of these messages is to help prevent damage to your
water pump, other property, or the environment.
Your water pump or other property could be damaged if
1
Page 4
CONTENTS
WATER PUMP SAFETY.. .....................................................................
1.
COMPONENT IDENTIFICATION.. .......................................................
2.
PREPARATION .....................................................................................
3.
STARTING THE ENGINE
4.
OPERATION .......................................................................................
5.
STOPPING THE ENGINE
6.
High altitude operation
0
MAINTENANCE .................................................................................
7.
8. TRANSPORTING/STORAGE
9. TROUBLESHOOTING
SPECIFICATIONS.. .............................................................................
10.
CUSTOMER SERVICE INFORMATION..
11.
INDEX .................................................................................................
12.
...................................................................
...................................................................
.................................................................
..............................................................
........................................................................
..............................
.3
.5
.6
.I1
.I3
.I4
.I5
.I6
21
.24
.26
. ............ .27
.28
2
Page 5
1. WATER PUMP SAFETY
To ensure safe operation -
l
For safety, never pump flammable or corrosive liquids such as
gasoline or acid. Also, to avoid pump corrosion, never pump sea
water, muddy water, chemical solutions, or caustic liquids such as
used oil, wine, or milk.
. Operate the pump on a level surface. If the engine is tilted, fuel
spillage may result.
l
To prevent fire hazards and to provide adequate ventilation, keep
the pump at least 1 meter (3 feet) away from building walls and
other equipment during operation. Do not place flammable objects
close to the pump.
l
Do not allow children to operate the pump. Keep children and pets
away from the area of operation.
l
Know how to stop the pump quickly, and understand the operation
of all controls. Never permit anyone to operate the pump without
proper instructions.
l
Gasoline is extremely flammable and is explosive under certain
conditions.
- Refuel in a well-ventilated area with the engine stopped. Do not
smoke or allow flames or sparks in the area where the engine is
refueled or where gasoline is stored.
- Do not overfill the fuel tank (there should be no fuel in the filler
neck). After refueling, make sure the tank cap is closed properly
and securely.
l
Be careful not to spill fuel when refueling. Spilled fuel or fuel vapor
may ignite. If any fuel is spilled, make sure the area is dry before
starting the engine.
l
Never run the engine in an enclosed or confined area. Exhaust gas
contains poisonous carbon monoxide gas; exposure can cause loss
of consciousness and may lead to death.
l
The muffler becomes very hot during operation and remains hot for
a while after stopping the engine. Be careful not to touch the
muffler while it is hot. Let the engine cool before storing the pump
indoors.
l
A spark arrester is available as an optional part for this pump. It is
illegal in some areas to operate an engine without a spark arrester.
Check local laws and regulations before operating.
l
Exhaust gas contains poisonous carbon monoxide. Avoid inhalation
of exhaust gas. Never run the pump in a closed garage or confined
area.
3
Page 6
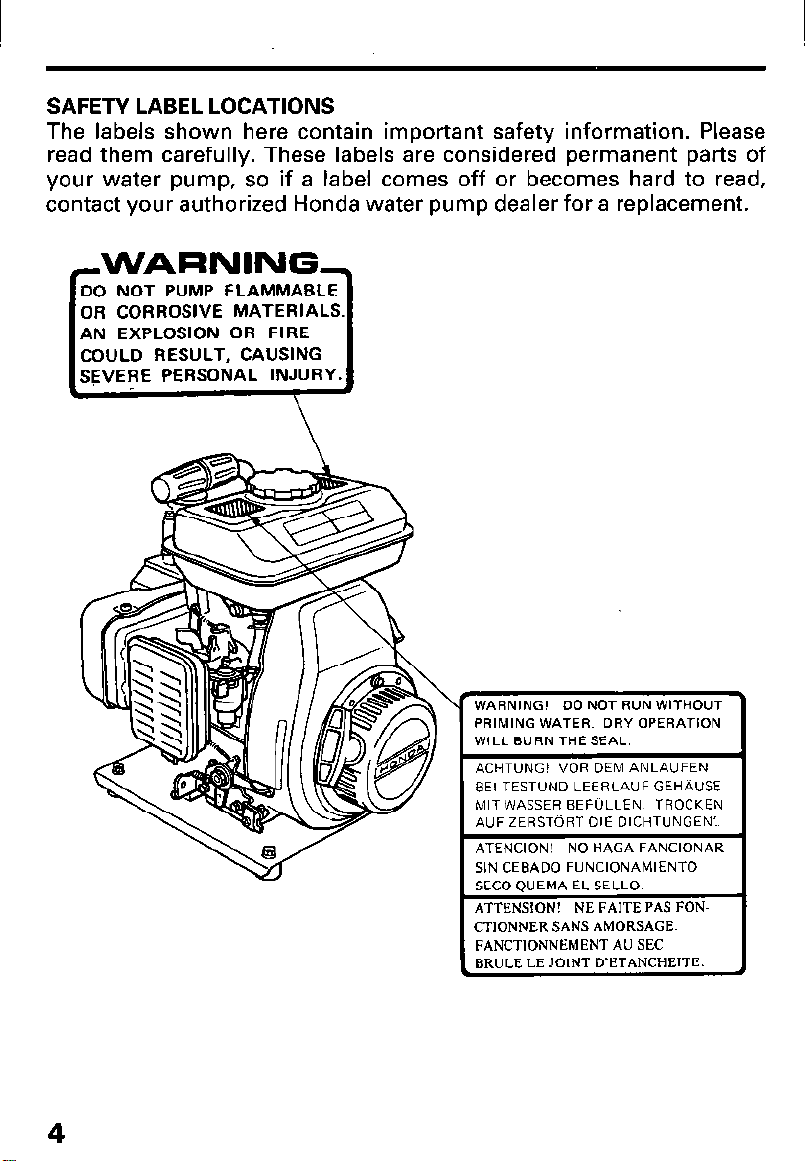
SAFETY LABEL LOCATIONS
The labels shown here contain important safety information. Please
read them carefully. These labels are considered permanent parts of
your water pump, so if a label comes off or becomes hard to read,
contact your authorized Honda water pump dealer for a replacement.
,WARNlNGp
DO NOT PUMP FLAMMABLE
OR CORROSIVE MATERIALS.
AN EXPLOSION OR FIRE
COULD RESULT, CAUSING
SEVERE PERSONAL INJURY.
4
WARNING! DO NOT RUN WITHOUT
PRIMING WATER. DRY OPERATION
WILL BURN THE SEAL.
ACHTUNG! VORDEMANLAUFEN
BEI TESTUND LEERLAUF GEHAUSE
MIT WASSER BEFliLLEN TROCKEN
AUF ZERSTORT DIE DICHTUNGEN:.
ATENCION! NO HAGA FANCIONAR
SIN CEBADO FUNCIONAMIENTO
SEC0 QUEMA EL SELLO.
ATTENSION! NE FAITE PAS FONCTIONNER SANS AMORSAGE.
FANCTIONNEMENT AU SEC
BRULE LE JOINT D’ETANCHEITE.
Page 7
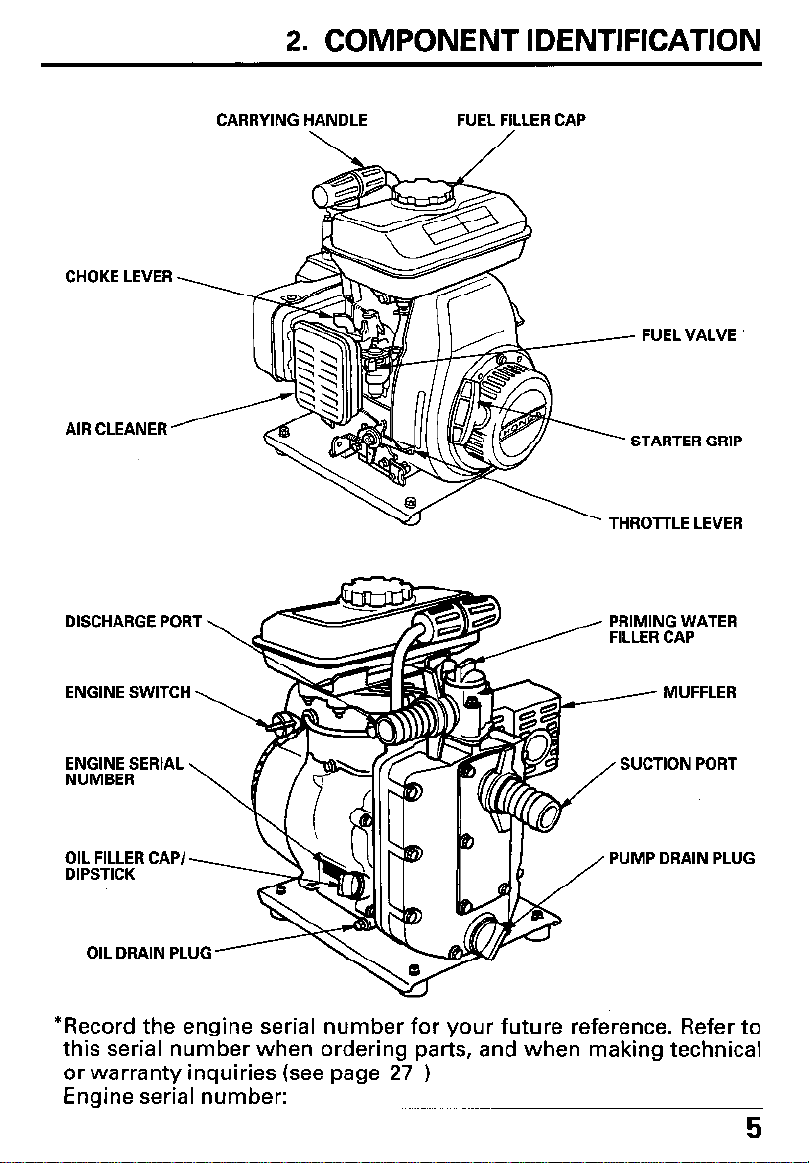
2. COMPONENT IDENTIFICATION
CHOKE LEVER
AIR CLEANER
DISCHARGE PORT q
ENGINE SWITCH
\
CARRYING HANDLE
FUEL FILLER CAP
\ THROlTLE LEVER
FUEL VALVE
STARTER GRIP
PRIMING WATER
FILLER CAP
MUFFLER
ENGINE SERIAL
NUMBER
OIL FILLER CAP/DIPSTICK
OIL DRAIN PLUG
SUCTION PORT
PUMP DRAIN PLUG
*Record the engine serial number for your future reference. Refer to
this serial number when ordering parts, and when making technical
or warranty inquiries (see page 27 )
Engine serial number:
5
Page 8
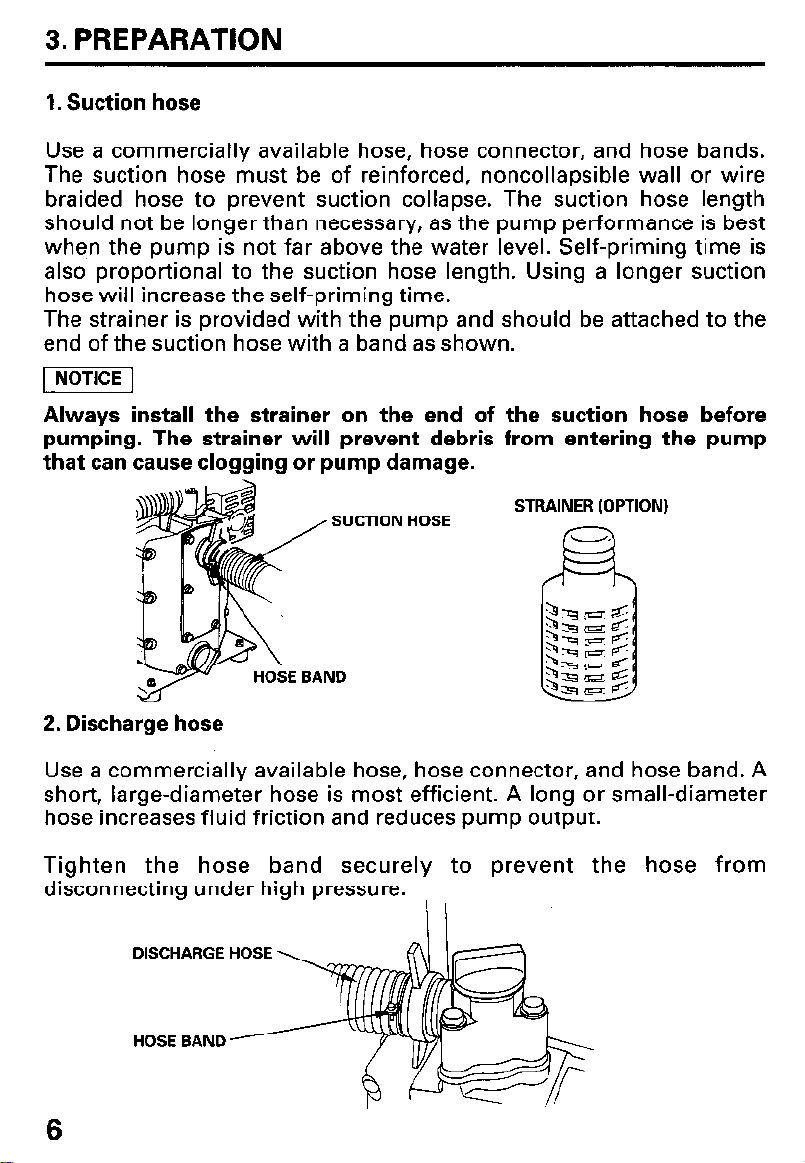
3. PREPARATION
1. Suction hose
Use a commercially available hose, hose connector, and hose bands.
The suction hose must be of reinforced, noncollapsible wall or wire
braided hose to prevent suction collapse. The suction hose length
should not be longer than necessary, as the pump performance is best
when the pump is not far above the water level. Self-priming time is
also proportional to the suction hose length. Using a longer suction
hose will increase the self-priming time.
The strainer is provided with the pump and should be attached to the
end of the suction hose with a band as shown.
[I
Always install the strainer on the end of the suction hose before
pumping. The strainer will prevent debris from entering the pump
that can cause clogging or pump damage.
SUCTION HOSE
STRAINER (OPTION)
2. Discharge hose
Use a commercially available hose, hose connector, and hose band. A
short, large-diameter hose is most efficient. A long or small-diameter
hose increases fluid friction and reduces pump output.
Tighten the hose band securely to prevent the hose from
disconnecting under high pressure.
I I
DISCHARGE HOSE
HOSE BAND
6
Page 9

3. Engine oil
[NOTlCE]
l
Engine oil is a major factor affecting engine performance and
service life. Nondetergent oils and P-stroke oils are not
recommended because they have inadequate lubricating
characteristics.
l
Check the oil level with the pump on a level surface and the engine
stopped.
Use Honda 4-stroke oil, or an equivalent high detergent, premium quality
motor oil certified to meet or exceed U.
S. automobile manufacturer’s re-
quirements for Service Classification
SG, SF. Motor oils classified SG, SF
will show this designation on the container.
TEMP-20 0 20 40 60 80 1OO'F
-30 -20 -10 0 10 20 30 4O'C
AMBIENT TEMPERATURE
,
SAE lOW/30 is recommended for general, all-temperature use.
Other viscosities shown in the chart may be used when the average
temperature in your area is within the indicated range.
1. Remove the oil filler cap/dipstick and wipe it clean.
2. Insert the filler cap/dipstick into the oil filler neck, but do not screw it
in.
3. If the level is low, fill to the top of the oil filler neck with the recommended oil.
piEiq (
Running the engine with insufficient oil can cause serious engine
damage.
UPPER LIMIT
DIPSTICK
7
Page 10

Fuel Recommendation
1. Remove the filler cap check fuel level.
2.
Refill the tank if the fuel level is low. Do not fill above the shoulder
of the fuel strainer.
l
Gasoline is extremely flammable and is explosive under certain
conditions.
l
Refuel in a well-ventilated area with the engine stop
smoke or allow flames or sparks in the area where t
ed. Do not
Ii
e engine is
refueled or where gasoline is stored.
l
Do not overfill the fuel tank (there should be no fuel in the filler
neck). After refueling, make sure the tank cap is closed properly
and securely.
l
Be careful not to spill fuel when refueling. Spilled fuel or fuel vapor
may ignite. If any fuel is spilled, make sure the area is dry before
starting the engine.
l
Avoid repeated or prolonged contact with skin or breathing of
vapor.
KEEP OUT OF REACH OF CHILDREN.
Fuel tank capacity:
1.4 0 (0.37 US gal, 0.31 Imp gal)
MAXIMUM FUEL LEVEL
Use unleaded gasoline with a pump octane rating of 86 or higher.
This engine is designed to operate on unleaded
Unleaded gasoline produces fewer engine an spark plug deposits
asoline.
1
and extends exhaust system life.
piieiq
Fuel can
dama
spill fuel when
e paint and some types of plastic. Be careful not to
9
illing your fuel tank. Damage caused by spilling fuel is
not covered under warranty.
Never use stale or contaminated
Avoid getting dirt or water in the fue
8
I
asoline or oil/gasoline mixture.
7
tank.
Page 11

Occasionally you may hear light “spark knock” or “pinging” (metallic
rapping noise) while operating under heavy loads. This
concern.
If spark knock or pin ing
normal load, change %
persists, see an authorized Honda water pump dealer. Is
piimq
Running the engine with persistent spark knock or pinging can cause
engine damage.
Running the engine with persistent spark knock or pinging is misuse,
and the Distributor’s Limited Warranty does not cover parts damaged
by misuse.
Oxygenated Fuels
Some conventional gasolines are being blended with alcohol or an
ether compound. These gasolines are collectively referred to as
oxygenated fuels. To meet clean air standards, some areas of the
United States and Canada use oxygenated fuels to help reduce
emissions.
If you use an oxygenated fuel, be sure it is unleaded and meets the
minimum octane rating requirement.
Before using an oxygenated fuel, try to confirm the fuel’s contents.
Some states/provinces require this information to be posted on the
occurs at a steady engine speed, under
rands of gasoline. If spark knock or pinging
IS
no cause for
,/
? P 1: dllowing are the EPA approved percenta
ETHANOL - (ethyl or grain alcohol) 10% %
You may use
by volume. l!
marketed under the name “Gasohol”.
MTBE - (methyl tertiary butyl ether) 15% by volume
$rrzy use gasoline contarnrng up to 15% MTBE by
METHANOL - @;th$;r wood alcohol) 5% by vo!ume
methano by volume as long as it also contains
cosolvents and corrosion inhibitors to protect the
fuel system. Gasoline containing more than 5%
methanol by volume may cause starting and/or
performance problems. It may also damage metal,
rubber, and plastic parts of your fuel system.
If you notice any undesirable operating symptoms, try another service
station or switch to another brand of gasoline.
Fuel system dama e or performance problems resulting from the use
of an oxygenate 2
oxygenates mentioned above are not covered under warranty.
fuel containing more than the percentages of
asoline containing up to 10% ethanol
asoline containing ethanol may be
use gasoline containing up to 5%
Y
es of oxygenates:
y volume
9
Page 12

4. Air cleaner
Loosen the wing nut and remove the air cleaner cover.
Check the air cleaner element to be sure it is clean and in good
condition. Clean or replace the element if necessary (p. 18 1.
AIR CLEANER
ELEMENT
AIR CLEANER
COVER
WING NUT
Never run the engine without the air cleaner. Rapid engine wear will
result from contaminants, such as dust and dirt being drawn into the
engine.
5. Priming water
The pump chamber should be completely filled before operating.
I
Do not operate the pump without priming water or the pump will
overheat. Operating the pump dry will destroy the pump seal. If the
unit has been operated dry, stop the engine immediately and allow
the pump to cool before adding priming water.
TER
Page 13

4. STARTING THE ENGINE
1 .Turn the fuel valve ON.
2. Close the choke lever.
Do not use the choke if the engine is warm or the ambient temperature
is high.
FUEL VALVE
ON
3. Turn the engine switch to the ON position.
CHOKE LEVER
ENG!NE SWITCH
11
Page 14

4. Move the throttle lever downward slightly, just past the idle position.
THROlTLE LEVER
5. Pull the starter grip lightly until resistance is felt, then pull it briskly.
I
I
Do not allow the starter grip to snap back against the engine. Return
it slowly to prevent damage to the starter.
12
Page 15

5. OPERATION
1. As the engine warms up, gradually open the choke.
CHOKE LEVER
2. Set the throttle at the desired speed.
LEVER
13
Page 16

I
6. STOPPING THE ENGINE
In an emergency:
l.To stop the engine in an emergency, turn the engine switch to the
OFF position.
ENGINE SWITCH
In normal use:
1. Move the throttle lever all the way up.
2. Turn the engine switch to the OFF position.
3. Turn the fuel valve OFF.
14
FUEL
VALVE
Page 17

High altitude operation
At high altitude, the standard carburetor air-fuel mixture will be too
rich. Performance will decrease, and fuel consumption will increase. A
very rich mixture will also foul the spark plug and cause hard starting.
High altitude performance can be improved by specific modifications
to the carburetor. If you always operate your pump at altitudes above
6,000 feet (1,800 meters) have an authorized Honda water pump dealer
perform this carburetor modification.
If any case, engine horsepower will decrease about 3.5% for each
1,000 foot (300 meter) increase in altitude.
pi6E-j
When the carburetor has been modified for high altitude operation,
the air-fuel mixture will be too lean for low altitude use. Operation at
altitudes below 6,000 feet (1,800 meters) with a modified carburetor
may cause the engine to overheat and result in serious engine
damage. For use at low altitudes, have an authorized Honda water
pump dealer return the carburetor to original factory specifications.
15
Page 18

7. MAINTENANCE
The purpose of the Maintenance Schedule is to keep the pump in the
best operating condition. Inspect and service as indicated in the
Maintenance Schedule below.
Shut off the engine before performing any maintenance. If the engine
must be operated, make sure the area is well-ventilated. The exhaust
contains poisonous carbon monoxide gas; exposure can cause loss of
consciousness and may lead to death.
pciq
Use only genuine HONDA parts or their equivalent for maintenance or
repair. Replacement parts which are not of equivalent quality may
damage the pump.
Maintenance Schedule
Fuel tank cleaning
Fuel line
Impeller inspection
Casing cover inspection
Inlet valve inspection
NOTE:
(1) Service more frequently when used in dusty areas.
(2)These items should be serviced by an authorized Honda water pump dealer,
unless the owner has the proper tools and is mechanically proficient. See the
Honda Shop Manual.
16
I
every 2 years (Replace if necessary)
012)
0
(2)
0
(2)
O(2)
Page 19

1. Changing oil
Drain the oil while the engine is still warm to assure rapid and
complete draining.
1. Remove the oil filler cap/dipstick and the drain plug to drain the oil.
2. Reinstall the drain plug and tighten securely.
3. Refill with the recommended oil (see page 7 1 to the specified level.
OIL CAPACITY: 0.45 0 (0.48 US qt ,0.40 Imp qt)
OIL FILLER CAP/
DIPSTICK
Please dispose of used motor oil in a manner that is compatible with
the environment. We suggest you take it in a sealed container to your
local recycling center or service station for reclamation. Do not throw it
in the trash or pour it on the ground.
Page 20

2. Air cleaner service
A dirty air cleaner will restrict air flow to the carburetor. To prevent
carburetor malfunction, service the air cleaner regularly. Service more
frequently when operating the pump in extremely dusty areas.
B
Never use gasoline or low flash point solvents for cleaning the air
cleaner element. A fire or explosion could result.
pizEiEq
Never run the engine without the air cleaner. Rapid engine wear will
result from contaminants, such as dust and dirt being drawn into the
engine.
1. Unscrew the wing nut, remove the air cleaner cover and remove the
foam element.
2. Wash the element in a solution of household detergent and warm
water, then rinse thoroughly, or wash in nonflammable or high flash
point solvent. Allow the element to dry thoroughly.
3. Soak the element in clean engine oil and squeeze out the excess oil.
The engine will smoke during initial start-up if too much oil is left in
the element.
4. Reinstall the air cleaner element and the cover.
18
Page 21

3. Spark plug service
Recommended spark plug: BPM-4A, BPMR4A (NGK)
To ensure proper engine operation, the spark plug must be properly
gapped and free of deposits.
1. Remove the spark plug.
B
The muffler becomes very hot during operation and remains hot for a
while after stopping the engine. Be careful not to touch the muffler
while it is hot.
2.Visually inspect the spark plug. Discard it if the insulator is cracked
or chipped. Clean the spark plug with a wire brush if it is to be
reused.
3. Measure the plug gap with a feeler gauge.
Correct as necessary by bending the side electrode.
The gap should be:
0.60-0.70 mm (0.024-0.028 in)
0.60-0.70 mm
(0.024-0.028 in)
19
Page 22

4.Check that the spark plug washer is in good condition, and thread
the spark plug in by hand to prevent cross-threading.
5.After the spark plug is seated, tighten with a spark plug wrench to
compress the washer.
-If installing a new spark plug, tighten l/2 turn after the spark plug
seats to compress the washer.
- If reinstalling a used spark plug, tighten l/8- l/4 turn after the spark
plug seats to compress the washer.
1 NOTICE (
l
The spark plug must be securely tightened. An improperly
tightened spark plug can become very hot and may cause engine
damage.
l
Use only the recommended spark plug or equivalent. A spark plug
which has an improper heat range may cause engine damage.
20
Page 23

8.TRANSPORTING/STORAGE
When transporting the water pump, turn the engine switch and the
fuel valve OFF. Keep the water pump level to prevent fuel spillage.
Fuel vapor or spilled fuel may ignite.
Contact with a hot engine or exhaust system can cause serious burns
or fires. Let the engine cool before transporting or storing the water
pump.
Before storing the pump for an extended period;
1. Be sure the storage area is free of excessive humidity and dust.
2. Clean the pump interior.....
Sediment will settle in the pump if it has been used in muddy or
sandy water, or water containing heavy debris. Pump clean water
through the pump before shutting down or the impeller may be
damaged when restarting. After flushing, remove the pump drain
plug, and drain as much water as possible from the pump housing.
After the pump is dry, spray HONDA MULTI PURPOSE LUBE AND
RUST PENETRANT into the pump housing through the inlet port,
outlet port, and drain hole, then install the drain plug.
DRAIN PLUG
21
Page 24

3. Service the fuel system according to the table below:
Gasoline is extremely flammable and is explosive under certain
conditions. Perform this task in a well-ventilated area with the engine
stopped. Do not smoke or allow flames or sparks in the area during
this procedure.
a. With the fuel valve OFF, remove
the carburetor drain screw.
b.Drain the gasoline from the
carburetor into a suitable
container.
c. If the tank is to be drained, turn
the fuel valve ON and drain the
fuel in the tank into a suitable
container.
d.Reinstall the drain screw and
turn the fuel valve OFF.
STORAGE TIME RECOMMENDED SERVICE PROCEDURE
TO PREVENT HARD STARTING
SEDIMENT CUP
Less than 1 month
1 to 2 months
2 months to 1 year
1 year or more
*Use gasoline conditioners that are formulated to extend storage
life. Contact your authorized Honda water pump dealer for
recommendations of gasoline conditioners.
No preparation required
Fill with fresh gasoline and add gasoline
conditioner *.
Fill with fresh gasoline and add gasoline
conditioner *.
Drain the carburetor float bowl.
Fill with fresh gasoline and add gasoline
conditioner *.
Drain the carburetorfloat bowl.
After removal from storage, drain the
stored gasoline into a suitable container,
and fill with fresh gasoline before starting.
22
Page 25

4.Remove the spark plug, and pour about a tablespoon of clean
engine oil into the cylinder. Crank the engine several revolutions to
distribute the oil, then reinstall the spark pulg.
5.Slowly pull the starter grip until resistance is felt. At this point, the
piston is coming up on its compression stroke and both the intake
and exhaust valves are closed.Storing the. engine in this position will
help to protect it from internal corrosion.
6. Change the engine oil (see page 17).
7. Check the air cleaner and clean as necessary (see page 18).
8. Cover the water pump to keep out dust.
23
Page 26

9. TROUBLESHOOTING
When the engine will not start:
1. Is the engine switch ON?
2. Is there fuel in the fuel tank?
3. Is the fuel valve ON?
4. Is gasoline reaching the carburetor?
To check, remove the float bowl drain screw and turn the fuel valve
ON.
Fuel should flow out freely.
B
If any fuel is spilled, make sure the area is dry before testing the spark
plug or starting the engine. Spilled fuel or fuel vapor may ignite.
DRAIN SCREW
5. Is there a spark at the spark plug?
a. Remove the spark plug cap. Clean any dirt from around the spark
plug base, then remove the spark plug.
b. Install the spark plug in the plug cap.
c. Turn the engine switch ON.
d.Ground the side electrode to any engine ground, pull the recoil
starter to see if sparks jump across the gap.
e. If there are no sparks, replace the plug.
If OK, install the plug and try to start the engine.
6. If the engine still does not start, take the pump to an authorized
Honda water pump dealer.
24
Page 27

When the pump does not pump water:
I. Is the pump fully primed?
2. Is the strainer clogged?
3. Are the suction hose bands installed securely?
4. Is the suction hose damaged?
5. Is the suction hose connector washer installed?
6. Is the suction head too high?
7. If the pump still does not pump the water, take the pump to an
authorized Honda water pump dealer.
25
Page 28

IO. SPECIFICATIONS
Dimensions and Weight
Length
Width
Height
Dry weight
Engine
Model
Engine type
Displacement
[Bore X Stroke]
Max. output
Max. torque
Cooling system
Ignition system
PTO shaft rotation
Pump
Suction port diameter
Discharge port diameter
Rated revolutions
Total head
Suction head
Capacity
Self-priming time
335 mm (13.2 in)
270 mm (10.6 in)
350 mm (13.8 in)
13.0 kg (28.7 Ibs)
GIOO K2
4-stroke, side valve, 1 cylinder
97 cm3 (5.9 cu-in)
52 x 46 mm (2.0 x 1.8 in)
1.8 kW (2.5 PS, 2.5 bhp) at 4,200 rpm
4.5 Nom (0.45 kg-m, 3.3 ft-lb) at 3,000 rpm
Forced air
Transistorized magneto
Counterclockwise
38 mm (1.5 in)
38 mm (1.5 in)
3,800 rpm
38 m (124.7 ft)
7 m (23.0 ft)
200 !J (52.8 US gal, 44.0 Imp gal)/min
120secat5m(16.5ft)
26
Page 29

11. CUSTOMER SERVICE INFORMATION
Honda power equipment dealership personnel are trained
professionals. They should be able to answer any question you may
have. If you encounter a problem that your dealer does not solve to
your satisfaction, please discuss it with the dealership’s management.
The Service Manager or General Manager can help. Almost all
problems are solved in this way.
If you are dissatisfied with the decision made by the dealership’s
management, contact the Honda Power Equipment Customer Service
Office. You can write to:
American Honda Motor Co., Inc.
Honda Power Equipment Division
Customer Service Office
4475 River Green Parkway
Duluth, Georgia 30136-2565
Or telephone: (404)497-6400
When you write or call, please give us this information:
l
Model and serial number (see page 5 )
l
Name of dealer who sold the water pump to you
l
Name and address of dealer who services your water pump
l
Date of purchase
l
Your name, address, and telephone number
l
A detailed description of the problem
27
Page 30

12. INDEX
COMPONENT IDENTIFICATION
CUSTOMER SERVICE INFORMATION
MAINTENANCE
Air cleaner service
Changing oil ...........................................................................................
Spark plug service
OPERATION
High altitude operation ........................................................................
PREPARATION
Air cleaner
Discharge hose
Engine oil
Fuel recommendation
Priming water
Suction hose
STARTING THE ENGINE
SPECIFICATIONS
STOPPING THE ENGINE.. ........................................................................
TRANSPORTING/STORAGE..
TROUBLESHOOTING.. .............................................................................
WATER PUMP SAFETY..
........................................................................................
................................................................................
................................................................................
..............................................................................................
.............................................................................................
..............................................................................................
........................................................................................
..................................................................................................
.............................................................................
.........................................................................................
............................................................................................
..........................................................................
.......................................................................................
............................................................................
................................................................. 5
................................................... .27
.................................................................. .21
.I6
.I8
17
.I9
.I3
.I5
6
10
6
7
8
10
6
.I1
26
.I4
.24
.3
28
Page 31

Page 32

 Loading...