

Page 1
Page 2

Page 3

Page 4

Page 5
Thank you for purchasing a Honda rotary mower.
This manual describes operation and maintenance of Honda HRA215 rotary mowers
All information in this publication is based on the latest product information available
at the time of printing. Honda Power Equipment Mfg., Inc. reserves the right to
make changes at any time without notice and without incurring any obligation.
No part of this publication may be reproduced without written permission.
This manual is a permanent part of the mower and must remain with the mower
if resold.
Honda HRA215 mowers meet CPSC blade safety requirements for walk-behind
rotary mowers.
Honda HRA215 mowers are not factory-equipped with spark arresters. In some
areas, it is illegal to operate an engine without a USDA qualified spark arrester.
Check local laws and regulations before operation. An optional spark arrester is
available from authorized Honda lawn mower dealers.
READ THIS OWNER’S MANUAL CAREFULLY Pay special attention to these
svmbols and any instructions that follow:
w
are not followed.
Indicates serious injury or death WILL result if instructions
B
may result if instructions are not followed.
B
structions are not followed.
lMPCRTANT NCTlCE Indicates that equipment or property damage could
result if instructions are not followed.
NOTE: Gives helpful information
Honda rotary mowers are designed to give safe and dependable service if operated
according to instructions. Operating this mower requires special effort on your part
to ensure vour safetv and the safetv of others.
w* ’
damage. Read and understand this owner’s manual before operating the
mower.
w
injury or property damage. Use only for mowing (cutting) grass, and for
bagging cut grass when equipped with the standard grass bag or optional
hard-shell grass catcher.
If a problem should arise, or if you have any questions about your mower, see
an authorized Honda lawn mower dealer.
01989
American
Indicates a strong possibility that serious injury or death
Indicates a possibility that minor injury could result if in-
Careless operation or misuse may cause injury or property
Using this product for a purpose not intended may cause
Honda Mot& Co., Inc. - All Rights Reserved
1
Page 6
CONTENTS
;
1. SAFETY .......................................
Safety Label Locations. ........................
Safety Information ............................
Important Message to Parents ...................
2. COMPONENT IDENTIFICATION ...................
3. CONTROLS ....................................
Fuel Valve ...................................
Throttle Lever ................................
ROTO-STOP Lever ............................
Drive Clutch Lever IHRA215SXA) ................
Shift Lever fHRA215SXA) ......................
Handlebar Locking Knobs ......................
Cutting Height Adjustment Levers ...............
4. ATTACHMENTS ................................
Grass Bag (standard) ..........................
Hard-Shell Grass Catcher (optional) ...............
Side-Discharge Chute (optional). .................
5. PRE-OPERATION CHECK .........................
Blade..
Grass Bag ...................................
Optional Attachments. .........................
Engine Oil ...................................
Fuel ........................................
Air Cleaner ..................................
Cutting Height ................................
6. OPERATION ...................................
Starting the Engine ............................
Clearing a Flooded Engine ......................
Mower Operation ..............................
Stopping the Engine.
High Altitude Operation ........................
7. MOWING RECOMMENDATIONS ..................
8. TRANSPORTING ...............................
9. MAINTENANCE
Maintenance Schedule .........................
Engine Oil Change ............................
Air Cleaner Service. ...........................
Spark Plug Service ............................
Spark Arrester Maintenance (optional equipment)
ROTO-STOP Cable Adjustment ..................
Drive Clutch Cable Adjustment (HFfA215SXA).
Throttle Cable Adjustment. .....................
Carburetor Adjustment .........................
Grass Bag Cleaning and Replacement
Blade Removal and Installation ..................
10. STORAGE .....................................
Preparation for Storage ........................
Storage .....................................
Removal from Storage .........................
11. TROUBLESHOOTING ............................
12. SPECIFICATIONS ...............................
13. WIRING DIAGRAM ..... : .......................
14. WARRANTY SERVICE ...........................
.....................................
..........................
................................
............
.....
...
. .
.
. .
. .
.
,
.
. .
.
.
. .
. .
.
.
. . .
.
. .
. . .
. .
. . . .
.
. .
.
.
.
.
.
.
. . .
. .
. .
.
. .
.
.
.
.
.
.
.
. .
.
.
.
. . .
.
.
. .
. .
.
.
.
.
. .
.
. .
.
.
.
.
. .
.
. .
.
. . .
.
.
.
.
.
. .
.
. . .
. .
.
. .
.
. . .
. .
.
. .
. .
. .
. .
.
. .
.
.
.
. .
. . .
.
.
. . .
.
.
.
. . .
. . .
.
.
. .
.
. . .
. . . .
.
. . .
. .
. .
. . .
.
. .
. .
. .
. .
. .
. .
. . .
. . .
.
.
.
. .
. .
. .
.
.
.
.
. .
.
.
. . . .
.
.
.
.
. .
.
. .
.
.
. .
.
.
.
. .
.
. .
. . .
. .
. . . .
.
.
.
.
.
. .
. .
. .
.
.
.
. .
.
.
.
3
3
. 4
6
7
9
9
9
.
10
. . . 11
. . 12
. .
12 ,
.
13
. . . 14
. . . 14
. 15
15
. . 16
. . . 16
. 17
. . . 17
. . . 18
. . . 19
. . . 21
22
.
23
23
. . . 25
26
. . . 28
. . . 29
. 30
. . 33
. 35
..* 35
. 36
38
*
. 40
. . . 41
42
.
43
44
45
.
. . . 46 i
47
.
49
49
.
51
. .
52
. . . 53
55
56
. . . 57
2
Page 7
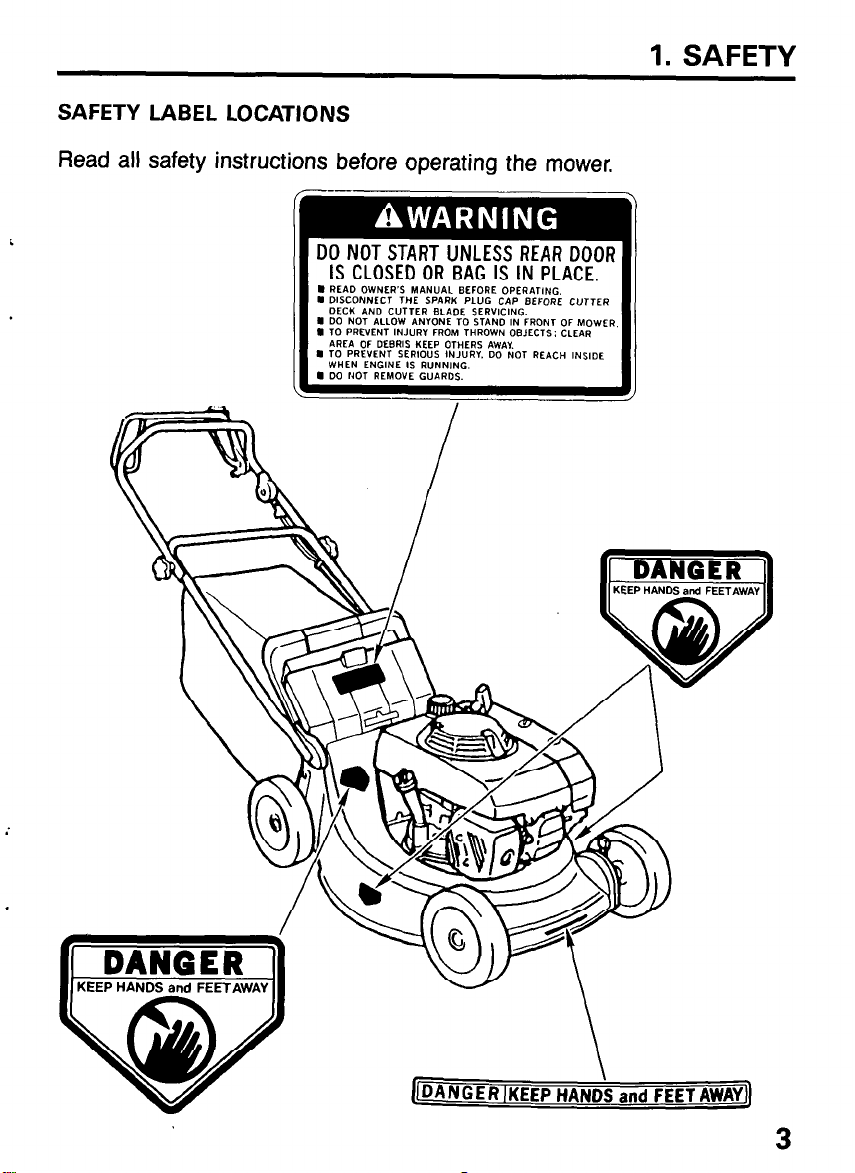
SAFETY LABEL LOCATIONS
Read all safety instructions before operating the mower.
DO NOT START UNLESS REAR DOOR
IS CLOSED OR BAG IS IN PLACE.
8 READ OWNER’S MANUAL BEFORE OPERATING.
. DISCONNECT THE SPARK PLUG CAP BEFORE CVTTER
DECK AN0 CUTTER BLADE SEFNICING.
. 00 NOT ALLOW ANlONE TO STAND IN FRONT OF MOWER.
I TO PIWENT INJURY FROM THROWN OBJECTS: CLEAR
AREA OF DEBRIS KEEP OTHERS AWAY.
. TO PREVENT SERIOUS INJUR”. DO NOT REACH ,NS,OE
WHEN ENGINE IS RUNNING.
I 00 NOT REMOVE GUAROS.
1. SAFETY
Page 8
1. SAFETY
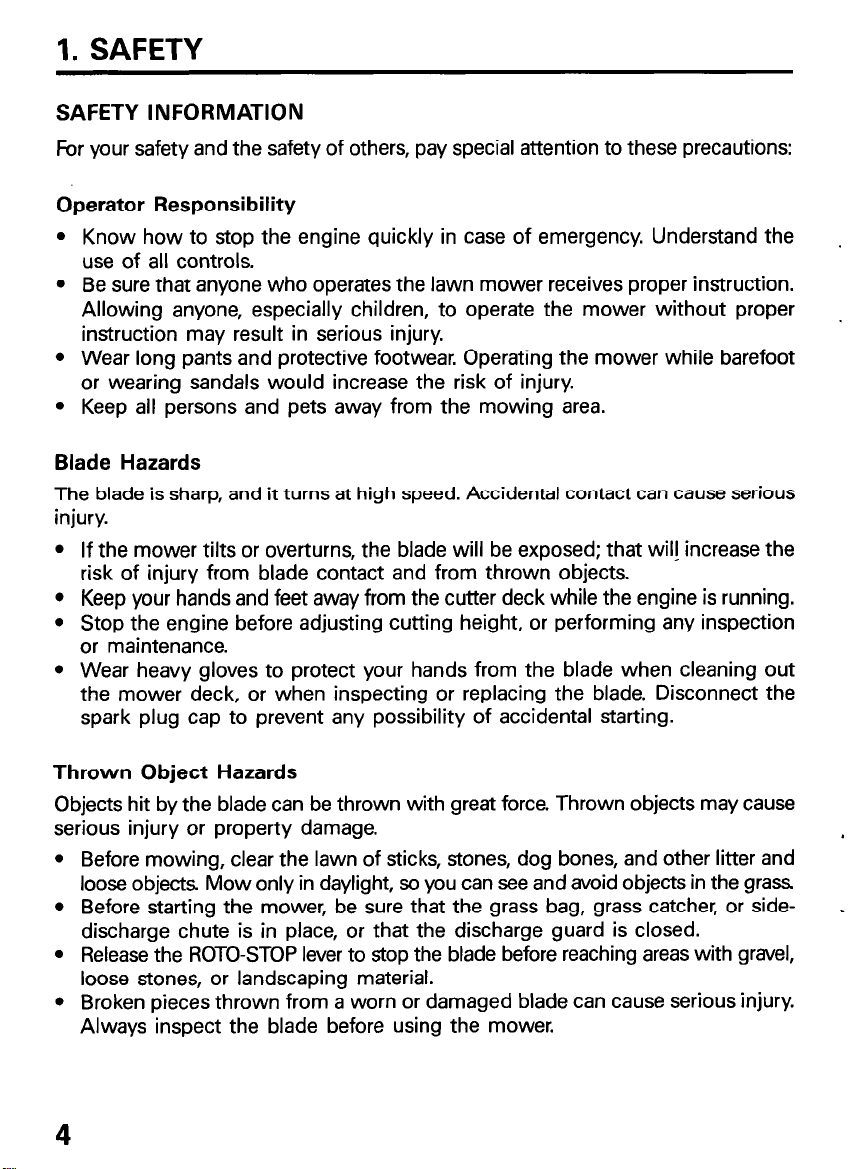
SAFETY INFORMATION
For your safety and the safety of others, pay special attention to these precautions:
Operator Responsibility
l
Know how to stop the engine quickly in case of emergency. Understand the
use of all controls.
l
Be sure that anyone who operates the lawn mower receives proper instruction.
Allowing anyone, especially children, to operate the mower without proper
instruction may result in serious injury.
l
Wear long pants and protective footwear. Operating the mower while barefoot
or wearing sandals would increase the risk of injury.
l
Keep all persons and pets away from the mowing area.
Blade Hazards
The blade is sharp, and it turns at high speed. Accidental contact can cause serious
injury.
l
If the mower tilts or overturns, the blade will be exposed; that wil! increase the
risk of injury from blade contact and from thrown objects.
l
Keep your hands and feet away from the cutter deck while the engine is running.
l
Stop the engine before adjusting cutting height, or performing any inspection
or maintenance.
l
Wear heavy gloves to protect your hands from the blade when cleaning out
the mower deck, or when inspecting or replacing the blade. Disconnect the
spark plug cap to prevent any possibility of accidental starting.
Thrown Object Hazards
Objects hit by the blade can be thrown with great force. Thrown objects may cause
serious injury or property damage.
l
Before mowing, clear the lawn of sticks, stones, dog bones, and other litter and
loose objects Mow only in daylight, so you can see and avoid objects in the grass
l
Before starting the mower, be sure that the grass bag, grass catcher, or sidedischarge chute is in place, or that the discharge guard is closed.
l
Release the ROTO-STOP lever to stop the blade before reaching areas with gravel,
loose stones, or landscaping material.
l
Broken pieces thrown from a worn or damaged blade can cause serious injury.
Always inspect the blade before using the mower.
4
Page 9
1. SAFETY
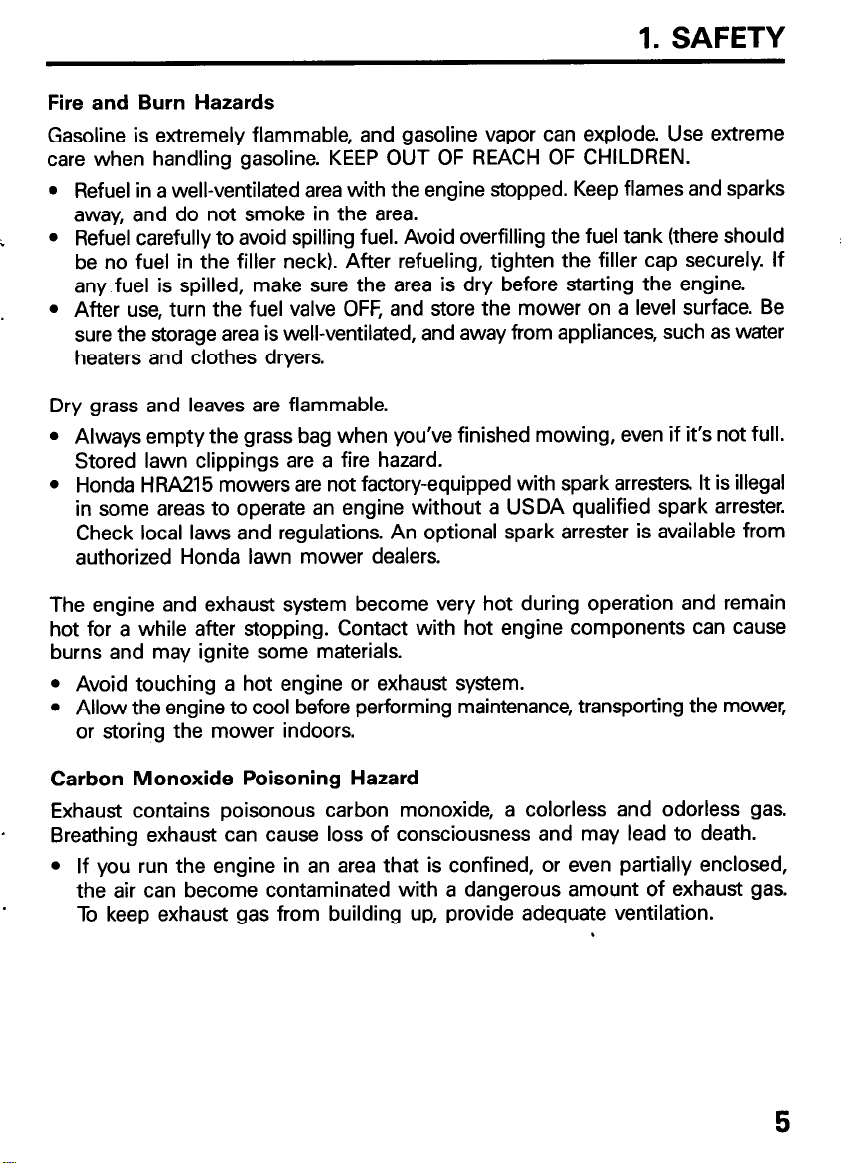
Fire and Burn Hazards
Gasoline is extremely flammable, and gasoline vapor can explode. Use extreme
care when handling gasoline. KEEP OUT OF REACH OF CHILDREN.
l
Refuel in a well-ventilated area with the engine stopped. Keep flames and sparks
away, and do not smoke in the area.
l
Refuel carefully to avoid spilling fuel. Avoid overfilling the fuel tank (there should
be no fuel in the filler neck). After refueling, tighten the filler cap securely. If
any fuel is spilled, make sure the area is dry before starting the engine.
l
After use, turn the fuel valve OFF, and store the mower on a level surface. Be
sure the storage area is well-ventilated, and away from appliances, such as water
heaters and clothes dryers.
Dry grass and leaves are flammable.
l
Always empty the grass bag when you’ve finished mowing, even if it’s not full.
Stored lawn clippings are a fire hazard.
l
Honda HRA215 mowers are not factory-equipped with spark arresters It is illegal
in some areas to operate an engine without a USDA qualified spark arrester.
Check local laws and regulations. An optional spark arrester is available from
authorized Honda lawn mower dealers.
The engine and exhaust system become very hot during operation and remain
hot for a while after stopping. Contact with hot engine components can cause
burns and may ignite some materials.
l
Avoid touching a hot engine or exhaust system.
l
Allow the engine to cool before performing maintenance, transporting the mower,
or storing the mower indoors.
Carbon Monoxide Poisoning Hazard
Exhaust contains poisonous carbon monoxide, a colorless and odorless gas.
Breathing exhaust can cause loss of consciousness and may lead to death.
l
If you run the engine in an area that is confined, or even partially enclosed,
the air can become contaminated with a dangerous amount of exhaust gas.
To keep exhaust gas from building up, provide adequate ventilation.
Page 10
1. SAFETY
IMPORTANT MESSAGE TO PARENTS
YOUR CHILDREN’S SAFETY IS VERY IMPORTANT to Honda. That’s why we urge
you to read this message before letting your youngster operate this lawn mower.
Lawn mowers are tools, not toys. As with any equipment, bad judgments can result
in serious injuries. You can help prevent accidents by making good decisions about
it when, and how your youngster operates this equipment.
The first question you’ll need to ask is whether your youngster is capable of
operating this mower safely. Remember, young people vary widely, and AGE IS
NOT THE ONLY FACTOR.
Physically, a youngster must be LARGE ENOUGH AND STRONG ENOUGH to easily
start the mower and control its direction. The youngster also needs enough size,
strength, and coordination to comfortably reach and operate the controls.
Another, tougher question you need to ask is if your youngster has enough
MATURITY AND RESPONSIBILITY to safely operate this mower. Does the young
person think through problems and come to logical solutions ? Be honest ! Anyone
who takes unnecessary risks and doesn’t obey rules should not operate this lawn
mower.
If you decide that your son or daughter can handle the mower safely, CAREFULLY
READ THE OWNER’S MANUAL with your youngster. Make sure you both
understand all instructions and warnings Also, be sure your youngster wears sturdy
shoes and other protective clothing when operating or handling the mower.
SUPERVISION is also very important. Walk with your youngster during the first
few minutes of mowing. Even after the youngster has become confident with the
mower, do not let the young person use the mower without good adult supervision.
An adult should also be present during refueling and maintenance. In fact, it’s up
to parents to make sure that the mower is properly maintained and kept in safe
operating condition.
By always placing safety first, your youngster will acquire useful skills and a sense
of accomplishment. And you’ll both get the best results from your lawn mower.
Page 11
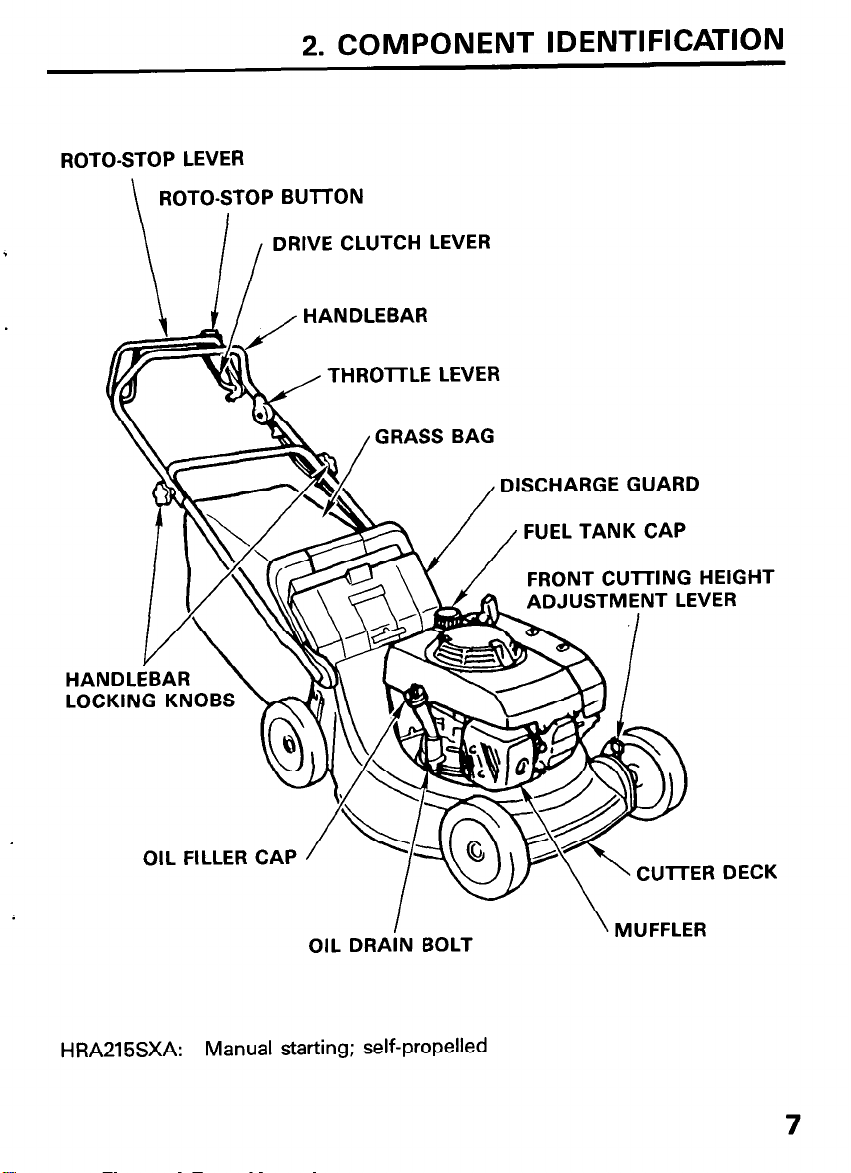
ROTO-STOP LEVER
ROTO-STOP BUTTON
2. COMPONENT IDENTIFICATION
DRIVE CLUTCH LEVER
HANDLEBAR
/
THROlTLE LEVER
GRASS BAG
, DISCHARGE GUARD
FUEL TANK CAP
FRONT CUlTING HEIGHT
ADJUSTMENT LEVER
OIL FILLER CAP
u \ ‘CUTER DECK
,
I
OIL DRAIN BOLT
HRA215SXA: Manual starting; self-propelled
\ MUFFLER
7
Page 12
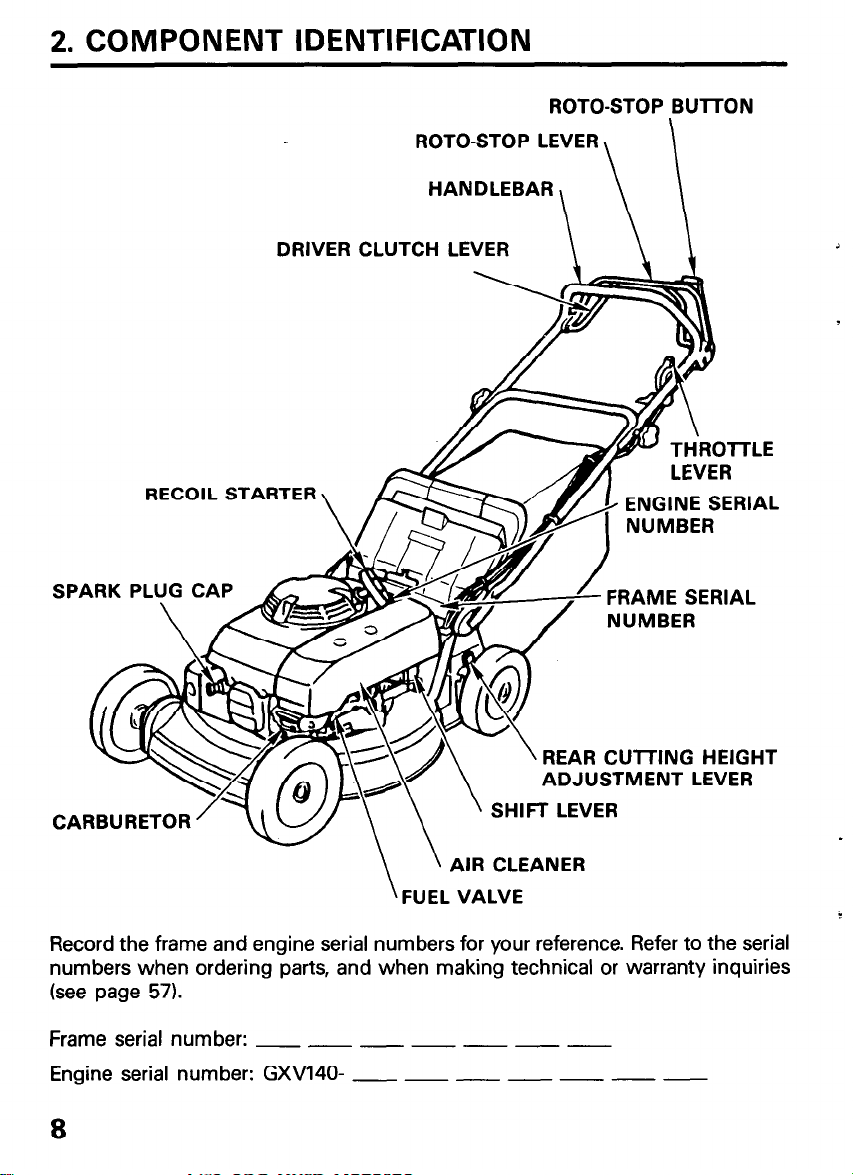
2. COMPONENT IDENTIFICATION
ROTO-STOP LEVER
HANDLEBAR HANDLEBAR
ROTO-STOP BUlTON
\ I
RECOIL STARTER RECOIL STARTER
CARBURETOR CARBURETOR
DRIVER CLUTCH DRIVER CLUTCH
LEVER LEVER
ENGINE SERIAL
REAR ClJlTING HEIGHT
ADJUSTMENT LEVER
SHIFT LEVER
AIR CLEANER
AIR CLEANER
FUEL VALVE FUEL VALVE
Record the frame and engine serial numbers for your reference. Refer to the serial
numbers when ordering parts, and when making technical or warranty inquiries
(see page 57).
Frame serial number: - - - - - - Engine serial number: GXVl40- - - __ - - - -
Page 13
3. CONTROLS
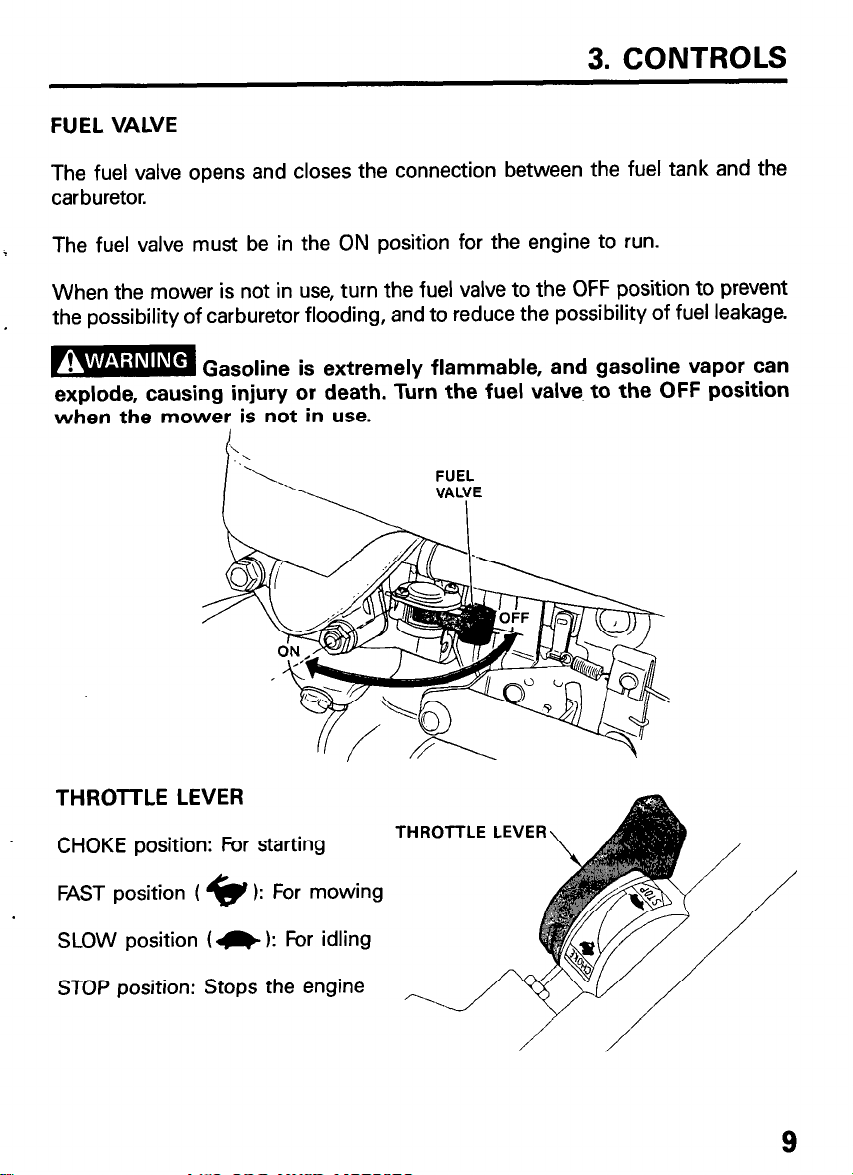
FUEL VALVE
The fuel valve opens and closes the connection between the fuel tank and the
carburetor.
The fuel valve must be in the ON position for the engine to run.
When the mower is not in use, turn the fuel valve to the OFF position to prevent
the possibility of carburetor flooding, and to reduce the possibility of fuel leakage.
w
explode, causing injury or death. Turn the fuel valve to the OFF position
when the mower is not in use.
THROTTLE LEVER
CHOKE position: For starting
FAST position (
SLOW position (C, 1: For idling
Gasoline is extremely flammable, and gasoline vapor can
THROTTLE LEVER
\
): For mowing
4Y
STOP position: Stops the engine
/\
9
Page 14
3. CONTROLS
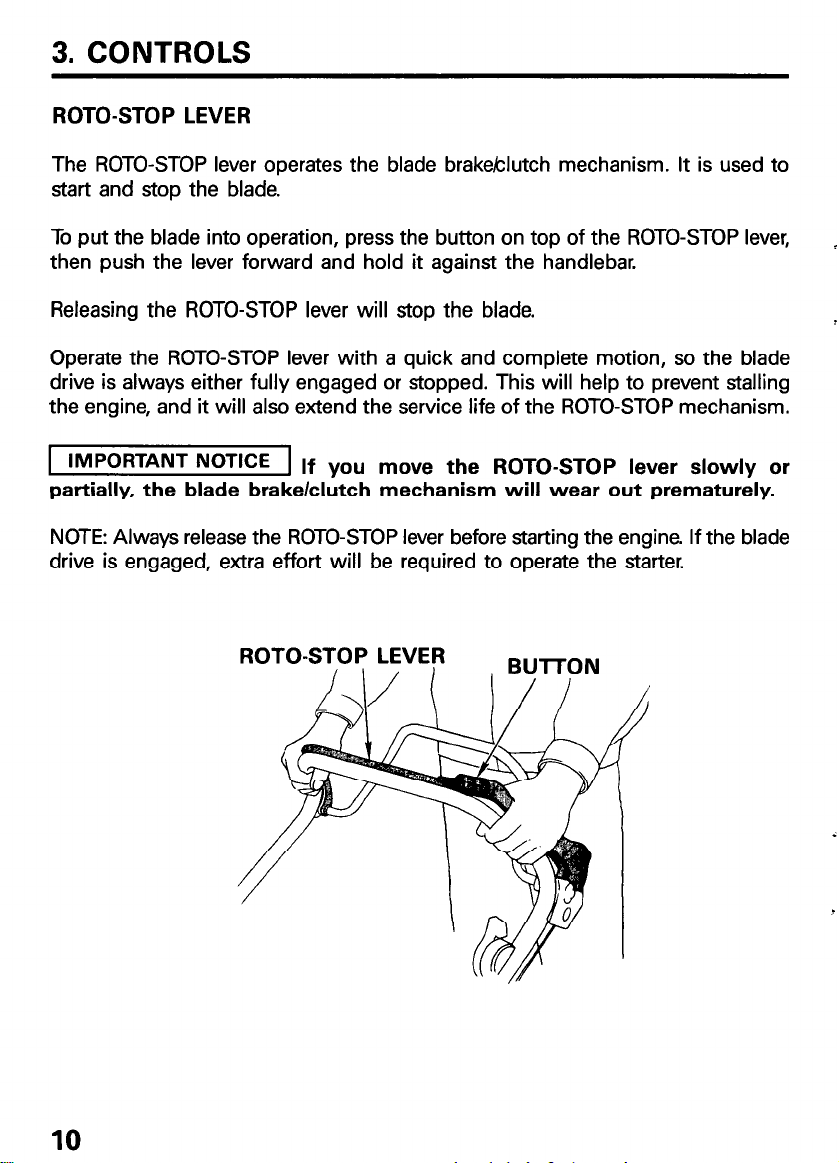
ROTO-STOP LEVER
The ROTO-STOP lever operates the blade brakeblutch mechanism. It is used to
start and stop the blade.
lb put the blade into operation, press the button on top of the ROTO-STOP lever,
then push the lever forward and hold it against the handlebar.
Releasing the ROTO-STOP lever will stop the blade.
Operate the ROTO-STOP lever with a quick and complete motion, so the blade
drive is always either fully engaged or stopped. This will help to prevent stalling
the engine, and it will also extend the service life of the ROTO-STOP mechanism.
1 IMPORTANT NoTKE 1 If you move the ROTO-STOP lever slowly or
partially, the blade brake/clutch mechanism will wear out prematurely.
NOTE: Always release the ROTO-STOP lever before starting the engine. If the blade
drive is engaged, extra effort will be required to operate the starter.
10
ROTO-STOP LEVER
/
Page 15
3. CONTROLS
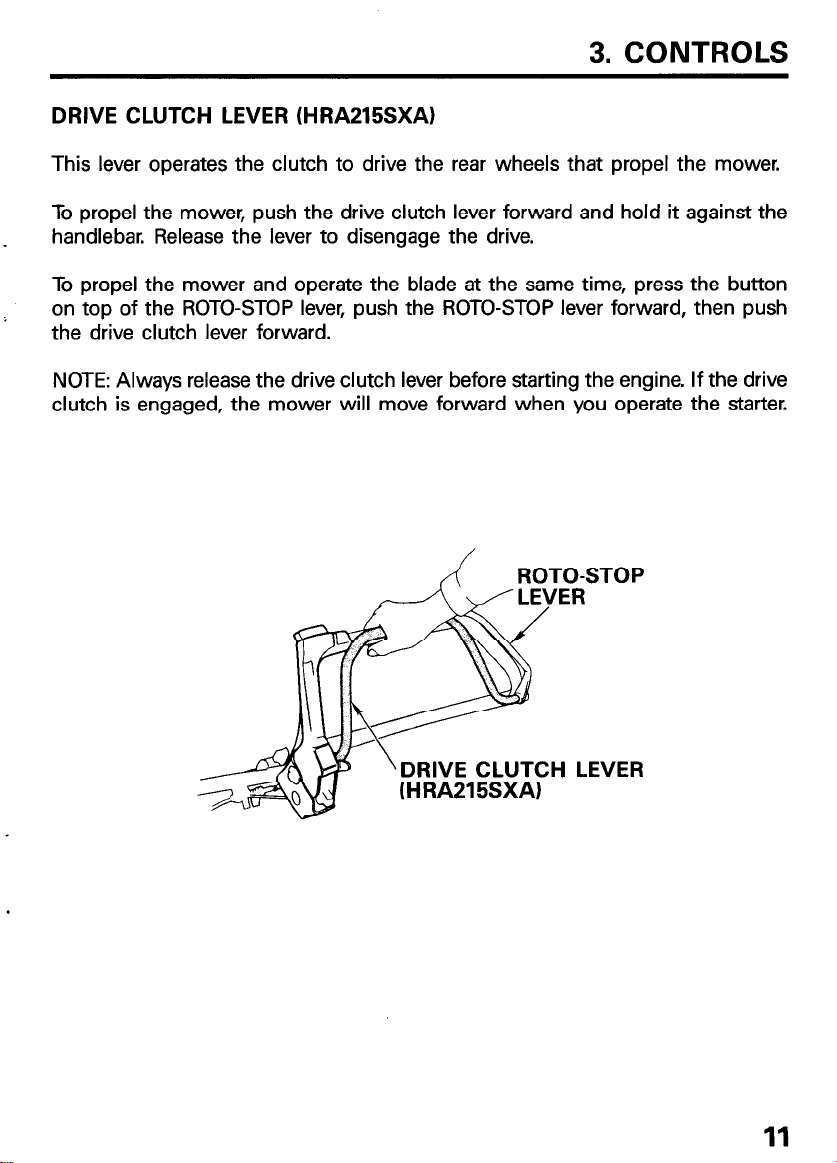
DRIVE CLUTCH LEVER (HRA215SXA)
This lever operates the clutch to drive the rear wheels that propel the mower.
To propel the mower, push the drive clutch lever forward and hold it against the
handlebar. Release the lever to disengage the drive.
To propel the mower and operate the blade at the same time, press the button
on top of the ROTO-STOP lever, push the ROTO-STOP lever forward, then push
the drive clutch lever forward.
NOTE: Always release the drive clutch lever before starting the engine. If the drive
clutch is engaged, the mower will move forward when you operate the starter.
‘DRIVE CLUTCH LEVER
(HRA215SXA)
11
Page 16

3. CONTROLS
SHIFT LEVER
The shift lever selects the drive speed for the mower. Move the shift lever to select
the pace at which you wish to mow.
NOTE:
l
The mower will lurch if you shift gears while the drive clutch is engaged. Release
the drive clutch lever before moving the shift lever.
l
To avoid incomplete gear engagement, be sure the shift lever is centered in
one of the three detent positions.
Position 1: SLOW; 2.6 ftlsec (0.8 mlsec) maximum speed
Position 2: MEDIUM; 3.9 ftlsec (1.2 mkec) maximum speed
Position 3: FAST;
4.6 ftlsec (1.4 mlsec) maximum speed
HANDLEBAR LOCKING KNOBS
The handlebar locking knobs must be
tightened to secure the handlebar in the
mowing position. These knobs can be
loosened to fold the handlebar for
storage or transport convenience (see
page 52).
12
HANDLEBAR LOCKING KNOBS
Page 17
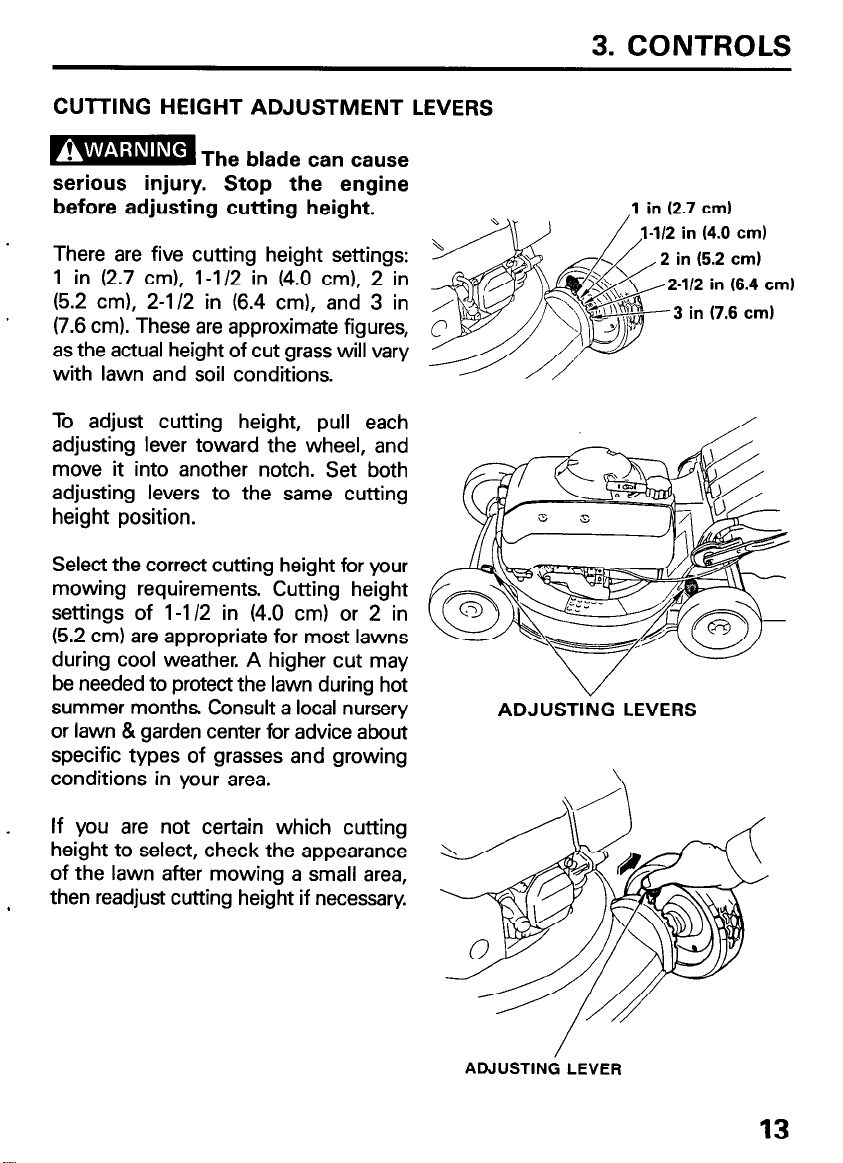
CUTTING HEIGHT ADJUSTMENT LEVERS
3. CONTROLS
B
serious injury. Stop the engine
before adjusting cutting height.
There are five cutting height settings:
1 in (2.7 cm), l-l 12 in (4.0 cm), 2 in
(5.2 cm), 2-l 12 in (6.4 cm), and 3 in
(7.6 cm). These are approximate figures,
as the actual height of cut grass will vary
with lawn and soil conditions.
To adjust cutting height, pull each
adjusting lever toward the wheel, and
move it into another notch. Set both
adjusting levers to the same cutting
height position.
Select the correct cutting height for your
mowing requirements. Cutting height
settings of l-l 12 in (4.0 cm) or 2 in
(5.2 cm) are appropriate for most lawns
during cool weather. A higher cut may
be needed to protect the lawn during hot
summer months Consult a local nursery
or lawn & garden center for advice about
specific types of grasses and growing
conditions in your area.
The blade can cause
1 in (2.7 cm1
ADJUSTlkG LEVERS
If you are not certain which cutting
height to select, check the appearance
of the lawn after mowing a small area,
then readjust cutting height if necessary.
ADJUSTING LEVER
Page 18
4. ATTACHMENTS
Honda HRA215 mowers are provided with a grass bag as standard equipment.
You can operate the mower with the grass bag (or optional hard-shell grass catcher)
installed to collect the grass clippings, or with the grass bag removed (or optional
side-discharge chute installed) if you wish to leave the grass clippings on the lawn.
When attachments are removed, the discharge guard automatically closes to protect
the operator from objects that may be thrown by the blade.
NOTE:
l
When mowing without attachments, the closed discharge guard will trap more
grass under the cutter deck, and the cutter deck may clog when mowing grass
that is thick or tall. If clogging occurs, mow more frequently, cut a narrower
swath, and/or select a slower drive speed. You may also need to raise the mower’s
cutting height.
l
If you wish to leave the grass clippings on the lawn, we recommend using the
optional, side discharge chute (see page 15).
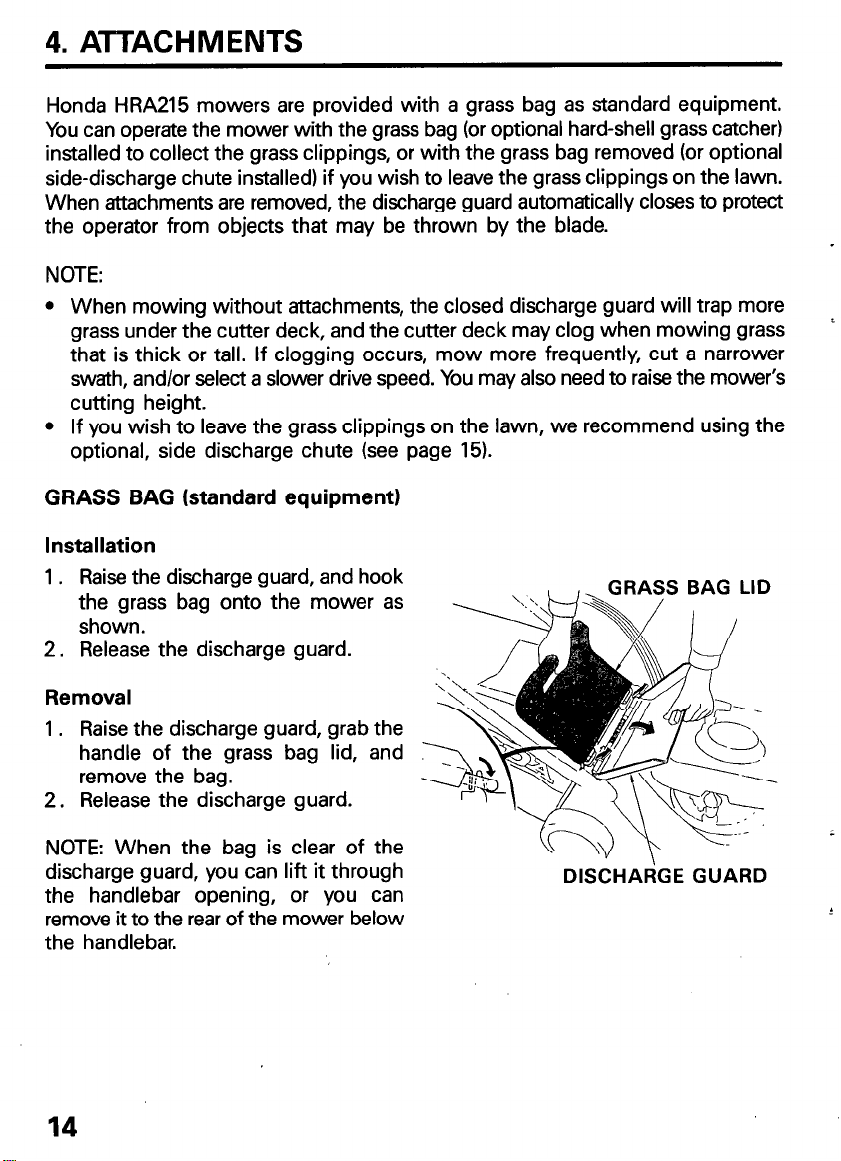
GRASS BAG (standard equipment)
Installation
Raise the discharge guard, and hook
1.
the grass bag onto the mower as
shown.
2.
Release the discharge guard.
S BAG LID
I /
Removal
1 . Raise the discharge guard, grab the
handle of the grass bag lid, and
remove the bag.
2. Release the discharge guard.
NOTE: When the bag is clear of the
discharge guard, you can lift it through
the handlebar opening, or you can
remove it to the rear of the mower below
the handlebar.
14
DISCHARGE GUARD
Page 19
4. ATTPCHMENTS
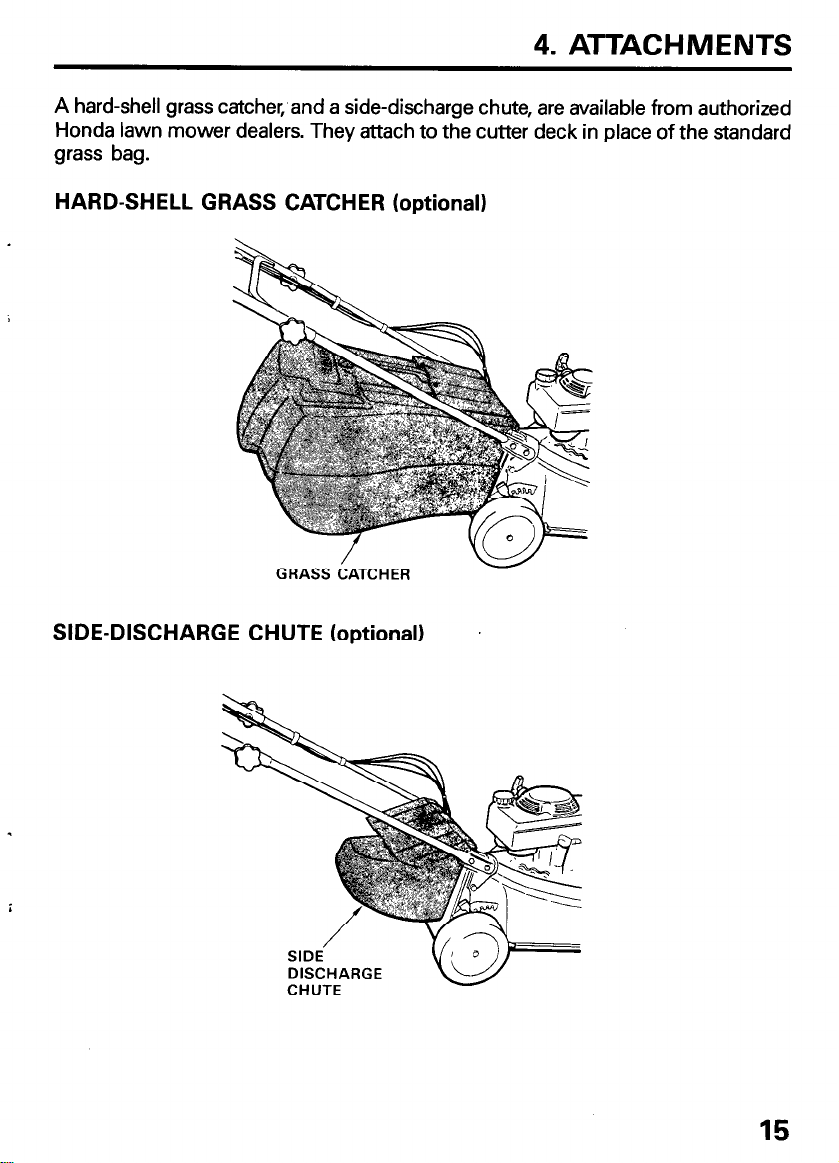
A hard-shell grass catcher, and a side-discharge chute, are available from authorized
Honda lawn mower dealers. They attach to the cutter deck in place of the standard
grass bag.
HARD-SHELL GRASS CATCHER (optional)
SIDE-DISCHARGE CHUTE (optional)
SIDE
DISCHARGE
CHUTE
15
Page 20

5. PRE-OPERATION CHECK
Check the following items before starting the engine.
BLADE
Turn the fuel valve OFF, and tilt the
mower to the right, so the carburetor
side is up.
NOTE: Hard starting and fuel leakage
may result if the mower is tilted with the
carburetor side down.
Inspect the blade for wear and damage
NORMAL EXCESSIVELY
A dull blade can be sharpened, but a blade that is worn out, bent, cracked, or
otherwise damaged must be replaced. A worn or damaged blade could break,
causing pieces of the blade to be thrown from the mower.
w
inspect the blade before using the mower.
When the blade needs sharpening or replacement, take the lawn mower to an
authorized Honda lawn mower dealer. Or, if you have a torque wrench, you can
remove and install the blade yourself (see page 47).
l
Blade sharpening: To avoid weakening the blade, or causing imbalance or poor
cutting, the blade should be sharpened by an authorized Honda lawn mower
dealer.
l
Blade replacement: Use a genuine Honda replacement blade or its equivalent.
A worn or damaged blade may cause serious injury. Always
WORN
BENT
BLADE BOLTS
CRACKED
i
r
Check that the blade bolts are tight. Be sure the ROTO-STOP lever is released,
so the blade will not move when tightening the bolts Wear heavy gloves to protect
your hands. Blade bolt torque: 36.2-43.4 ft lb (5.0-6.0 kg-m).
16 ,
Page 21

GRASS BAG
Check that the grass bag is in good
condition and not clogged.
A clogged grass bag will not collect
grass efficiently. When the bag needs
cleaning, wash it with a garden hose,
and allow it to dry thoroughly before use;
a wet bag will clog quickly.
The grass bag wears during normal use
and will eventually require replacement.
If you operate the mower with a
damaged or worn out bag, objects
picked up by the blade may be thrown
through the bag material.
5. PRE-OPERATION CHECK
a
through a worn or damaged grass
bag may cause serious injury. Install
a new grass bag when required.
OPTIONAL ATTACHMENTS
If you have the hard-shell grass catcher, or the side-discharge chute (page 151, check
those attachments to be sure they are in good condition. Operating the mower
with a damaged attachment will increase risk of injury from objects thrown by
the blade.
m
Replace damaged attachments before using the mower.
Check that the screws are tight in the hard-shell grass catcher, and that the screen
at the back of the unit is not clogged. The screen must be cleaned occasionally
to maintain grass-bagging efficiency.
Objects thrown
Objects thrown by the blade may cause serious injury.
17
Page 22

5. PRE-OPERATiON CHECK
ENGINE OIL
Check the engine oil level with the engine stopped and the mower on a level surface
1. Remove the oil filler cap, and wipe the dipstick clean.
2. Insert the dipstick into the oil filler neck, but do not screw it in.
3. Check the oil level shown on the dipstick. If near the lower level, fill to the
upper level with the recommended oil.
1 IMPORTANT NoTlCE 1 Running the engine with a low oil level will cause
engine damage.
Use high-detergent, premium quality 4-stroke engine oil, certified to meet or exceed
U.S. automobile manufacturers’ requirements for API Service Classification
SG, SF/CC, CD.
IMPORTANT NOTICE Using non-
detergent oil can shorten the
engine’s service life, and using
2-stroke oil will damage the engine.
SAE low-30 is recommended for
general, all-temperature use. Other
viscosities shown in the chart may be
used when the average temperature in
your area is within the indicated range.
FILLER CAP/DIPSTICK
18
_
I
-30 -20 -10 0 10
------I OIL LEVEL
20 30 4O’C
Page 23

5. PRE-OPERATION CHECK
FUEL
Fuel tank capacity: 0.26 US gal (1.0 PI
Remove the filler cap and check the fuel level. Refill the tank if the fuel level is
low. Refuel carefully to avoid overfilling or spilling fuel. There should be no fuel
in the filler neck.
B
explode, causing serious injury or death. Use extreme care when handling
gasoline. KEEP OUT OF REACH OF CHILDREN.
Refuel in a well-ventilated area with the engine stopped. Do not smoke or allow
flames or sparks in the area where the engine is refueled or where gasoline is
stored. Avoid repeated or prolonged contact with skin or breathing of vapor.
After refueling, tighten the fuel tank cap securely. If any fuel was spilled, make
sure the area is dry before starting the engine.
Gasoline is extremely flammable, and gasoline vapor can
FUEL TANK CAP
FUEL
FILLER
19
Page 24

5. PRE-OPERATION CHECK
Fuel Recommendation
Pump octane rating: 86 or higher.
We recommend unleaded fuel because it produces fewer engine and spark plug
deposits and extends exhaust system life.
Never use stale or contaminated gasoline or an oillgasoline mixture. Avoid getting
dirt or water in the fuel tank.
Occasionally you may hear light “spark knock” or “pinging” (metallic rapping noise)
while operating under heavy loads. This is no cause for concern.
If spark knock or pinging occurs at a steady engine speed, under normal load,
change brands of gasoline. If spark knock or pinging persists, see an authorized
Honda lawn mower dealer.
1 IMPORTANT NCTfCE 1 Running the engine with persistent spark knock
or pinging can cause engine damage.
NOTE: Running the engine with persistent spark knock or pinging is considered
misuse, and the Distributor’s Limited Warranty does not cover parts damaged by
misuse.
GASOLINES CONTAINING ALCOHOL
If you decide to use a gasoline containing alcohol (gasohol), be sure its pump octane
rating is 86 or higher. There are two types of “gasohol”: one containing ethanol,
and the other containing methanol.
IMPORTANT NOTICE
ethanol, or gasoline containing methanol (methyl or wood alcohol) that does
not also contain cosolvents and corrosion inhibitors for methanol, can cause
serious fuel system damage and poor engine performance.
Never use gasoline containing more than 5% methanol, even if it has cosolvents
and corrosion inhibitors.
Honda does not endorse the use of fuels containing methanol, since evidence of
their suitability is as yet incomplete.
NOTE: Fuel system damage, or engine performance problems resulting from the
use of fuels that contain alcohol, is not covered under the warranty.
Before buying fuel from an unfamiliar station, first determine if the fuel contains
alcohol; if it does, find out the type and percentage of alcohol used.
NOTE: If you notice any undesirable operating symptoms while using a gasoline
that contains alcohol, or one that you think contains alcohol, switch to a gasoline
that you know does not contain alcohol.
Using gasohol that contains more than 10%
20
1
Page 25

5. PRE-OPERATION CHECK
AIR CLEANER
Check that the air filter is clean and in good condition. A dirty air filter will restrict
air flow to the carburetor, reducing engine performance. A damaged air filter will
allow dirt to enter to engine, causing rapid engine wear.
1 . Remove the cover screws, then remove the air cleaner cover.
2. Inspect the paper and foam elements of the air filter. Replace the filter if either
of the filter elements are damaged. Clean or replace the filter if the filter elements
are dirty. See page 38 for cleaning instructions.
3. Reinstall the air filter and air cleaner cover. Tighten the cover screws securely.
IMPORTANT NOTICE
damaged air filter, will cause rapid engine wear.
Operating the engine with no air filter, or a
k!zwT
AIR CLEANER
PAPER ELEMENT
AIR FILTER
FOAM ELEMENT
21
Page 26

5. PRE-OPERATION CHECK
CUTTING HEIGHT
Check the cutting height settings, and make any necessary adjustments (see
page 13). Set both adjusting levers to the same cutting height position.
m
adjusting cutting height.
ADJUSTING LEVERS
The blade can cause serious injury. Stop the engine before
ADJUSTlNd LEVER
22
Page 27

STARTING THE ENGINE
If you run the engine in an area that is
confined, or even partially enclosed, the
air can become contaminated with a
dangerous amount of exhaust gas.
.
B
poisonous carbon monoxide, a
;
colorless and odorless gas.
Breathing exhaust can cause loss of
consciousness and may lead to
death. To keep exhaust gas from
building up, provide adequate
ventilation.
1. Turn the fuel valve to the ON
position.
2. FOR STARTING A COLD ENGINE:
Move the throttle lever to the CHOKE
position.
Exhaust contains
I
6. OPERATION
FUEL VALVE
FOR RESTARTING A WARM
ENGINE: Move the throttle lever to
the FAST ( @ 1 position.
NOTE: Use the CHOKE position, unless
the engine was recently running and is
still thoroughly warm. If thoroughly
warm, the engine will start easier using
the FAST position.
I
23
Page 28

6. OPERATION
3. Operate the starter.
NOTE:
l
Always release the ROTO-STOP lever before starting the engine. If the blade
drive is engaged, extra effort will be required to operate the starter.
l
HRA215SXA: Always release the drive clutch lever before starting the engine.
If the drive clutch is engaged, the mower will move forward when you operate
the starter.
Place your foot on the step of the cutter
deck. Pull the starter grip lightly until you
feel resistance, then pull briskly.
When the engine starts, return the starter
rope gently.
IMPORTANT NOTICE
the starter grip snap back against the
engine, it may damage the starter.
I If you let
5
.
24
Page 29

6. OPERATION
4. When the engine warms up, move
the throttle lever away from the
CHOKE oosition. Set the lever in
FAST (@ 1 position
or in SLOW (-1 position for ’ MO1
idling.
NOTE: If restarting a warm engine
in the CHOKE position, move the
throttle lever away from CHOKE as
soon as the engine starts.
CLEARING A FLOODED ENGINE
If the engine won’t start, after you have operated the starter several times, the engine
may be flooded with excess fuel. Use the following procedure to clear and start
a flooded engine:
1 . Move the throttle lever to STOP, and turn the fuel valve OFF.
2. Remove the spark plug, dry it, then reinstall it.
for mowing,
CACT
THROTTLE
LEVER \
NOTE: Install the spark plug carefully, by hand, to avoid cross-threading. After
the spark plug is seated, tighten 118 to 114 turn with a spark plug wrench to
compress the washer.
3. Turn the fuel valve ON, and move the throttle lever to FAST (lb 1.
4. Operate the starter with the throttle lever in the FAST ( e ) position.
,
25
Page 30

6. OPERATION
MOWER OPERATION
To mow, set the throttle lever in the FAST
( * 1 p
ROTO-STOP lever, then move the ROTO-STOP
lever forward and hold it against the handlebar.
The blade will operate while the ROTO-STOP
lever is held forward.
NOTE: For best grass cutting and bagging
performance, and to avoid stalling the engine,
always mow with the throttle lever in the FAST
( * 1 position.
Release the ROTO-STOP lever to stop the blade
before reaching areas with gravel, loose stones,
or landscaping material. Objects hit by the blade
can be thrown with great force.
w
cause serious injury and property damage.
Stop the blade before reaching any area with
loose objects.
Operate the ROTO-STOP lever with a quick and
complete motion, so the blade is always either
fully engaged or disengaged. This will help to
prevent stalling the engine, and it will also extend
the service life of the ROTO-STOP mechanism.
OSI ton, press the button on top of the
3’
Thrown obiects may
ROTO-STOP LEVER
1 IMPORTANT NOTICE 1
the ROTO-STOP lever slowly or p&dally, the
blade brake/clutch mechanism will wear out
prematurely.
To propel the mower (HRA215SXA), push the
drive clutch lever forward and hold it against the
handlebar. Release the drive clutch lever to
disengage the drive.
Hold the ROTO-STOP lever forward with the drive
clutch lever for self-propelled mowing in open
areas.
When mowing around trees and other obstacles,
release the drive clutch lever (HRA215SXA) while
holding the ROTO-STOP lever forward. Push the
mower for better directional control.
If you move
26
DRIVE CLUTCH
(HRA215SXA)
STOP
c
LEVER
Page 31

I
6. OPERATION
I 1
1
B
that will increase the risk of injury from blade contact and from thrown
objects and debris. For your safety, keep all four wheels on the ground,
and be careful not to lose your footing and your control of the mower.
Keep a firm grip on the handlebar, and walk, never run, with the mower. Be very
careful when mowing uneven or rough ground. Mow across slopes, never up and
down. Be careful when changing the direction of the mower on a slope. Do not
use the mower on a steep slope of more than 209
Use extra care when mowing over objects imbedded in the lawn, such as sprinkler
heads, paving, edging, etc. Avoid anything that sticks up above the surface of the
lawn. Striking objects may damage the blade, bend the crankshaft, and/or break
the cutter deck or other mower components.
If the mower tilts or overturns, the blade will be exposed;
MAXIMUM SLOPE: 20’
, m
by the blade and may cause serious injury. Stop the engine immediately
if you suspect the blade is damaged.
c
If the blade hits something, or if the mower starts to vibrate, follow these steps:
1. Stop the engine.
2. Inspect the blade and other mower components for damage.
3. Replace any damaged parts before operating the mower.
NOTE: The Distributor’s Limited Warranty does not cover parts damaged by accident
or collision.
A damaged blade may break. Broken pieces can be thrown
27
Page 32

6. OPERATION
STOPPING THE ENGINE
1. Release the drive clutch lever
(HRA215SXA) and ROTO-STOP lever
(all models).
2. Move the throttle lever to the STOP
position.
STOP
When the mower is not in use, turn the
fuel valve to the OFF position to prevent
the possibility of carburetor flooding, and
to reduce the possibility of fuel leakage.
m
flammable, and gasoline vapor can
explode, causing injury or death.
Turn the fuel valve to the OFF
position when the mower is not in
use.
Gasoline is extremely
28
FUEL VALVE
Page 33

6. OPERATION
HIGH ALTITUDE OPERATION
At high altitude, the standard carburetor air-fuel mixture will be too rich. Performance
will decrease, and fuel consumption will increase. A very rich mixture may also
foul the spark plug and cause hard starting.
High altitude performance can be improved by installing a smaller diameter main
fuel jet in the carburetor and readjusting the pilot screw. If you always operate
the mower at altitudes higher than 6,000 feet above sea level, have an authorized
Honda lawn mower dealer perform this carburetor modification.
Even with carburetor modification, engine horsepower will decrease about 3.5%
for each 1,000 foot increase in altitude. The effect of altitude on horsepower will
be greater than this if no carburetor modification is made. A reduction in engine
horsepower will reduce mowing performance.
When the carburetor is modified for good high altitude operation, the air/fuel mixture
will be ,too lean at low altitude. Performance will decrease, and the engine will
overheat.
To avoid an excessively lean air/fuel mixture, reinstall the standard main fuel jet
and readjust the pilot screw for operation at altitudes lower than 6,000 feet above
sea level.
29
Page 34

7. MOWING RECOMMENDATIONS
A cutting height of l-l 12 in (4.0 cm) or 2 in (5.2 cm) is appropriate for most lawns
during cool weather. A higher cut may be needed to protect the lawn during hot
summer months. Consult a local nursery or lawn & garden center for advice about
specific types of grasses and growing conditions in your area.
Most grasses should be mowed when they have grown half an inch to an inch
above the recommended height. If allowed to
to the stems, the grass may not recover well, and the lawn will have brown patches.
As a general rule, do not cut off more than a third of the total height of the grass
in one mowing. If tall grass is reduced in height a little at a time, and is allowed
to recover between mowings, the grass will be healthier, and the lawn mower will
work better and will leave a better lawn finish.
For good mowing conditions, the grass should be relatively dry, but the ground
should not be so dry that the mower stirs up a lot of dust. Too much dust will
clog
the
carburetor air filter, reducing engine performance.
If dust is a problem, water your lawn the day before mowing, allowing the grass
to dry while the soil remains moist.
Always wait for wet grass to dry. Wet grass may clog the cutter deck, and it does
not bag well.
grow
too tall, and then cut back
Grass clippings may be left on the lawn, or removed, whichever you prefer. Clippings
return nutrients to the soil, but they don’t look neat when left on the lawn. Heavy
clumps of clippings should always be removed; grass must remain uncovered to
grow properly.
If you wish to leave the grass clippings on the lawn, we recommend using the
optional, side-discharge chute (see page 15).
Mowing without the grass bag or other attachments will leave the grass clippings
on the lawn, but the closed discharge guard will trap more grass under the cutter
deck, and the cutter deck may clog when mowing grass that is thick or tall. If
clogging occurs, mow more frequently, cut a narrower swath, and/or use a slower
forward speed. You may also need to raise the mower’s cutting height.
If you must clean out a clogged cutter deck, turn the fuel valve OFF, and tilt the
mower so the carburetor side is up. Hard starting and fuel leakage may result if
the mower is tilted
with the carburetor side down.
30
Page 35

7. MOWING RECOMMENDATIONS
For best results, start at the outer edges
of the lawn, and work toward the center
in a clockwise direction.
If you use the standard grass bag, or the
optional hard-shell grass catcher, a
clockwise mowing pattern, starting at
the outer edges of the lawn, will give the
best bagging performance, leaving the
least amount of clippings on the lawn.
The mower will bag most efficiently with
this mowing pattern, due to cutter deck
design and the direction in which the
blade rotates.
If you use the optional side-discharge
chute, use the same clockwise mowing
pattern. This will prevent clippings from
piling up in the path of the mower.
RECOMMENDED MOWING PATTERN
31
Page 36

7. MOWING RECOMMENDATIONS
If the grass is not very thick or tall, you can mow a wide swath, and/or you can
move the shift lever (HRA215SXA) to select a fast drive speed. Keep the wheels
close to the swath line for maximum cutting width.
If the grass is very thick or tall, cutting a wide swath may slow or stall the engine,
clog the cutter deck, and cause poor bagging performance. For thick or tall grass,
cut a narrower swath, and/or push the mower more slowly or move the shift lever
(HRA215SXA) to select a slower drive speed. If necessary, mow twice; first with
a high cut, then at final cutting height.
For best grass cutting and bagging
performance, the blade must spin very
fast. Always use the FAST throttle setting
when mowing, and keep the engine
running at or near maximum rpm. If you
hear engine speed decrease, that means
you should mow a narrower swath,
and/or use a slower forward speed. You
may also need to raise the mower’s
cutting height.
Always empty the grass bag or hard-
shell grass catcher before it becomes
filled to the limit of its capacity. Bagging
performance will diminish after the bag
or grass catcher becomes about 90%
filled. Also, the bag or grass catcher is
easier to empty when it is not packed
full.
Always empty the grass bag or hard-
shell grass catcher when you have
finished mowing, even if it is not full.
Stored lawn clippings are a fire hazard.
A clogged grass bag will not collect
grass efficiently. If the bag becomes
clogged with dirt, wash it with a garden
hose, and allow it to dry completely
before use; a wet bag will clog quickly.
32
Page 37

8. TRANSPORTING
w
and remain hot for a while after stopping. Contact with hot engine
components can cause burns and can ignite some materials.
Avoid touching the engine or exhaust system for at least 15 minutes after the engine
has stopped. Allow the engine to cool before transporting the mower.
Before Loading
l
Turn the fuel valve to the OFF position.
This will prevent the possibility of
carburetor flooding and will reduce
the possibility of fuel leakage.
tremely flammable, and gasoline
vapor can explode, causing injury
or death. Turn the fuel valve to the
OFF position when the mower is
not in use.
l
Remove the grass bag.
The
engine
and exhaust system become hot during operation
I
FUEL YALVE
33
Page 38

8. TRANSPORTING
Loading/Unloading
lb reduce the possibility of fuel leakage, keep the mower level while transporting,
and avoid tilting the mower excessively when loading and unloading.
l
Use a loading ramp with a slope of not more than 15O for pushing the mower
on and off the vehicle. If a suitable loading ramp is not available, two people
should lift the mower on and off the vehicle, while holding the mower level.
l
Position the mower so all 4 wheels are on the bed of the vehicle. Tie the mower
down with rope or straps, and block the wheels. Keep the tie-down rope or
straps away from controls, adjustment levers, cables, governor arm, carburetor,
and the fuel line.
1 IMPORTANT NOTICE 1 HRA215S)(A
while rolling backward, down the loading ramp, the drive system may
become damaged. Avoid moving the drive clutch lever while loading and
unloading.
NOTE: The handlebar can be folded by loosening the handlebar locking knobs
(see page 52).
- If the drive clutch is engaged
34
Page 39

9. MAINTENANCE
Periodic maintenance and adjustment are necessary to keep the mower in good
operating condition. Service and inspect according to the MAINTENANCE
SCHEDULE.
To avoid carbon monoxide poisoning, shut the engine off before performing any
maintenance.
To avoid serious burns, let the engine cool for at least 15 minutes before performing
maintenance.
Use genuine Honda parts or their equivalent for maintenance and repair. Parts of
lower quality may damage the mower.
Maintenance Schedule
REGULAR SERVICE PERIOD
bolt tightness
Air filter
Spark Arrester
(optional equipment)
ROTO-STOP
ROTOSTOP cable
Drive clutch cable
Throttle cable
Valve clearance
Fuel tank and filter
Fuel line
VOTE: (1) Service more frequently when used in dusty areas.
(2) These items should be serviced by an authorized Honda lawn mower dealer, unless you
have the proper tools and are mechanically proficient. Refer to the Honda shop manual
(3) For professional commercial use, log hours of operation to determine proper maintenanc
intervals.
Clean
Check
Adjust
Adjust
Adjust
Adjust
Clean
Check Every 2 years (2)
I
0 (2) 0 (2)
0 0
0 0
0 0
I
i 1 I 0 (2:
0
1 0 12:
35
Page 40

9. MAINTENANCE
ENGINE OIL CHANGE
Engine oil capacity: 0.63 US qt (0.6 4)
Drain the oil while the engine is warm to assure rapid and complete draining.
1 . Place a suitable container under the cutter deck to catch the used oil.
2. Remove the oil filler cap and the oil drain bolt, using a 10 mm box or socket
wrench. The used oil will flow along the cutter deck channel to the drain hole
under the muffler.
DRAIN HOLE
NOTE: Please dispose of used motor oil in a manner that doesn’t harm the
environment. We suggest you take it in a sealed container to your local service
station for reclamation. Do not throw it in the trash or pour it on the ground or
down a drain.
Page 41

Install the oil drain bolt and tighten
3.
it securely.
Fill with the recommended oil (see
4.
page 18) to the upper level on the
dipstick.
Install the filler cap/dipstick.
5.
Wipe the cutter deck drain channel
6.
clean to reduce dirt build-up when
the mower is used.
NOTE: Used motor oil may cause skin
cancer if repeatedly left in contact with
the skin for prolonged periods Although
this is unlikely, unless you handle used
oil on a daily basis, it is still advisable
to thoroughly wash your hands with
soap and water as soon as possible after
handling used oil.
9. MAINTENANCE
/
FILLER CAP/
DIPSTICK
CAP/DIPSTICK
DRAIN
BOLT
37
Page 42

9. MAINTENANCE
AIR CLEANER SERVICE
A dirty air filter will restrict air flow to the carburetor, reducing engine performance
If you operate the mower in very dusty areas, clean the air filter more often than
specified in the MAINTENANCE SCHEDULE.
IMPORTANT NOTICE
damaged air filter, will cause rapid engine wear.
1.
Remove the two cover screws, then remove the air cleaner cover. Remove the
air filter, and separate the filter elements Carefully check both elements for holes
or tears, and replace the filter if damaged.
2.
Foam element: Clean in warm soapy water, rinse, and allow to dry thoroughly.
Or clean in nonflammable solvent and allow to dry. Dip the element in clean
engine oil and squeeze out all excess oil. The engine will smoke during initial
running if too much oil is left in the foam.
B
element can lead to a fire or explosion. Use only soapy water or
nonflammable solvent.
3.
Paper element: Tap the element several times on a hard surface to remove excess
dirt, or blow compressed air (not exceeding 30 psi) through the filter from the
inside. Never try to brush off dirt; brushing will force dirt into the fibers.
4.
Wipe dirt from the inside of the air cleaner housing and cover, using a moist
rag. Be careful to avoid dropping dirt into the air cleaner duct that leads to the
carburetor.
5.
Reinstall the air filter and cover.
Using gasoline or flammable solvent to clean the filter
0
perating
the engine with no air filter, or a
38
Page 43

9. MAINTENANCE
AIR FILTER
PAPER ELEMENT
AIR CLEANER
COVER
1.
AIR FILTER
FOAM ELEMENT
39
Page 44

9. MAINTENANCE
SPARK PLUG SERVICE
Recommended spark plugs: NGK BPR5ES
ND 16EPR-U
CHAMPION RN12Y
1 IMPORTANT NOTICE 1 s
engine damage.
For good performance, the spark plug must be properly gapped and free of deposits
1.
Disconnect the spark plug cap, and remove any dirt from around the spark
plug area.
m
cause burns. Let the engine cool before servicing.
2.
Remove the spark plug with a spark plug wrench.
3.
Inspect the spark plug. Replace it if the electrodes are worn, or if the insulator
is cracked or chipped. Clean the spark plug with a wire brush if you are going
to reuse it.
4.
Measure the spark plug electrode gap with a feeler gauge. The gap should
be 0.024-0.028 in (0.6-0.7 mm). Correct the gap as necessary by carefully
bending the side electrode.
5.
Install the spark plug carefully, by hand, to avoid cross-threading.
6.
After the spark plug is seated, tighten with a spark plug wrench to compress
the washer.
Touching the engine or exhaust system while hot can
park plugs of the wrong heat range can cause
IMPORTANT NOTICE A I
the engine. Over-tightening may damage the threads.
NOTE: If installing a new spark plug, tighten 112 turn after the spark plug seats
to compress the washer. If reinstalling a used spark plug, tighten 1 B-1 14 turn after
the spark plug seats.
7. Install the spark plug cap on the spark plug.
oose spark plug can get hot enough to damage
0.024-0.026 in.
(0.6-0.7 mm)
SPARK PLUG WRENCH
40
Page 45

9. MAINTENANCE
SPARK ARRESTER MAINTENANCE (optional equipment)
The spark arrester must be serviced every 100 hours to keep it functioning as
designed.
B
burns. Let the engine cooLbefore servicing.
1. Remove the two nuts from the muffler shield, using a 10 mm wrench.
2. Remove the muffler shield, identification plate, muffler, and gasket.
3. Remove the spark arrester from the muffler.
4. Check for carbon deposits on the spark arrester and the exhaust port. Brush
carbon deposits away. Be careful to avoid damaging the spark arrester screen.
5. Install the spark arrester in the muffler.
6. Install the muffler components on the engine, and tighten the two nuts securely.
MUFFLER
Touching the engine or exhaust system while hot can cause
SPARK ARRESTER
(OPTIONAL PART)
6mm
NUTS
IDENTIFICATION PLATE
(OPTIONAL PART)
SPARK ARRESTER
SCREEN
41
Page 46

9. MAINTENANCE
ROTO-STOP CABLE ADJUSTMENT
1. Measure free play at the tip of the lever, while holding the button down. Free
play should be g/16-3/4 in (15-20 mm).
2. If adjustment is necessary, loosen the lock nuts with a 10 mm wrench, and
move the adjuster up or down as required. Tighten the lock nuts and recheck
free play.
NOTE: When mowing, check that the ROTO-STOP lever operates properly. If the
blade does not start or stop as it should, and lever free play is correctly adjusted,
take the mower to an authorized Honda lawn mower dealer for repair.
42
Page 47

9. MAINTENANCE
DRIVE CLUTCH CABLE ADJUSTMENT
1. Measure free play at the top of the lever, as shown. Free play should be
3116-318
2. If adjustment is necessary, loosen the lock nuts with a 10 mm wrench, and
move the adjuster up or down as required. Tighten the lock nuts and recheck
free play.
3. Start the engine and operate the drive clutch lever. Check to be sure the drive
clutch engages and releases properly. If the drive clutch does not operate
properly, and lever free play is correctly adjusted, take the mower to an authorized
Honda lawn mower dealer for repair.
in (5-10 mm).
3116-316 in
(5-10 mm)
43
Page 48

9. MAINTENANCE
THROlTLE CABLE ADJUSTMENT
1.
When the throttle lever is moved to
the CHOKE position, the carburetor
choke arm should move all the way
counterclockwise, as far as it will go.
Push the choke arm with your finger
to check that it moves as far as it
will go.
2.
If adjustment is necessary, loosen
the throttle control cable lock nuts
with a 10 mm wrench, and move the
adjuster up or down as required.
Tighten the lock nuts and recheck
carburetor choke arm movement.
I
3. Start the engine, and check to be
sure the engine stops when the
throttle lever is moved to the STOP
position. Readjust the cable if
necessary.
44
Page 49

9. MAINTENANCE
CARBURETOR ADJUSTMENT
1 . Start the engine outdoors, and allow it to warm up to normal operating
temperature.
B
colorless and odorless gas. Breathing exhaust can cause loss of
consciousness and may lead to death. To keep exhaust gas from building
up, provide adequate ventilation.
2. Set the throttle lever in the SLOW CC, ) position.
3. Turn the pilot screw
The correct setting will usually be approximately 2 turns out from the fully
closed position.
4. After the pilot screw is correctly adjusted, turn the throttle stop screw to obtain
the standard idle speed.
Standard idle speed: 2,000 f 150 rpm
Exhaust contains poisonous carbon monoxide, a
in or out to the setting that produces the highest idle rpm.
PILOT iCREW
THROTTLE STOP
SCREW
45
Page 50

9. MAINTENANCE
GRASS BAG CLEANING AND REPLACEMENT
When the bag needs cleaning, wash it
with a garden hose, and allow it to dry
completely before use; a wet grass bag
will clog quickly.
Replace a frayed, torn, or deteriorated
bag with a Honda replacement bag or
its equivalent.
BAG REMOVAL
1. Pull off one of the cap nuts, using
pliers. Or pry off, using two
screwdrivers, at opposite sides of
the cap nut flange.
NOTE:
l
To avoid marring the plastic lid
while prying off the cap nut, place
a thick rag, or other material, under
the screwdrivers.
l
These cap nuts are not reusable.
Discard the cap nut after removal.
Obtain a new cap nut for bag
installation.
2. Remove the rod and the bag lid.
3. Unclip the plastic edges of the bag,
and remove the bag from the frame.
BAG INSTALLATION
1. Insert the bag frame in the bag as
shown.
2. Clip the plastic edges of the bag onto
the frame as shown.
3. Insert the rod through the lid, frame,
and bag.
4. Secure the rod with a new cap nut.
Hit the cap nut with a hammer to
drive it onto the rod.
Page 51

9. MAINTENANCE
BLADE REMOVAL AND INSTALLATION
When the blade needs sharpening or replacement, take the lawn mower to an
authorized Honda lawn mower dealer. Or, if you have a torque wrench, you can
remove and install the blade yourself. Wear heavy gloves to protect your hands.
l
Blade sharpening: To reduce the possibility of weakening the blade, or causing
imbalance or poor cutting performance, have the blade sharpened by an
authorized Honda lawn mower dealer.
l
Blade replacement: Use a genuine Honda replacement blade or its equivalent.
Blade Removal
Turn the fuel valve OFF, and rest the
1.
mower on its right side, so the
carburetor side is up.
NOTE: Hard starting and fuel leakage
may result if the mower is placed
with the carburetor side down.
2.
Remove the two blade bolts with a
14 mm socket wrench. Be sure the
ROTO-STOP lever is released, so the
blade will not move when removing
the bolts.
Remove the blade and blade holder.
3.
BLADE BOLTS
47
Page 52

9. MAINTENANCE
Blade Installation
1. Clean dirt and grass from the blade mounting area.
2. Position the blade and blade holder on the ROTO-STOP assembly, and-install
the blade bolts.
NOTE:
l
Be sure the blade is positioned right side up (rear edges turn upward; center
hole rim projects downward). If the blade is installed upside down, the edges
cannot cut properly, and the center may jam the ROTO-STOP
l
The blade bolts are specially designed for this application and must not be
replaced with any other bolts.
3. Tighten the blade bolts with a torque wrench. Be sure the ROTO-STOP lever
is released, so the blade will not move when tightening the bolts. If you do
not have a torque wrench, have an authorized Honda lawn mower dealer tighten
the blade bolts.
Blade bolt torque: 36.2-43.4 ft-lb (5.0-6.0 kg-m)
TORQUE WRENCH
48
BLADE
Page 53

10. STORAGE
Preparation for Storage
When the mower will not be used for one month or longer, proper storage
preparation will help to prevent rust and corrosion, and will make it easier to start
the engine when the mower is removed from storage.
1. Clean all surfaces of the mower, including the area underneath the cutter deck.
Wear heavy gloves to protect your hands.
NOTE: Before cleaning under the cutter deck, turn the fuel valve OFF, and rest
the mower on its right side, so the carburetor side is up. Hard starting and fuel
leakage may result if the mower is placed with the carburetor side down.
If you use a garden hose to wash the mower, observe the following precautions:
l
If the mower has been running, allow the engine to cool for at least half
an hour before spraying water on it. Never spray water on a hot engine.
l
Wash the mower using low water pressure, and keep water away from
controls, cable ends, wheel hubs, and all other places that are difficult to
dry if water enters.
l
After washing, start the engine outdoors, and let it run until it reaches normal
operating temperature to evaporate any water remaining on the engine .
Operate the ROTO-STOP lever to expel water from the ROTO-STOP
mechanism; allow the blade to spin for 3 or 4 minutes to ensure that no
water remains.
l
Stop the engine, turn the fuel valve OFF, and allow the engine to cool before
placing the mower in storage.
2. Wash the grass bag, and allow it to dry completely.
IMPORTANT NOTICE
Stored lawn clippings are a fire hazard. Always
empty the grass bag after use.
3. Coat areas that may rust with a light film of oil. Lubricate all control cable cores
with a silicone spray lubricant.
49
Page 54

10. STORAGE
4. For prolonged storage, perform these additional steps:
For storage of 1 or 2 months:
For storage of 1 or 2 months, be sure the fuel tank is full. If partially filled, air
in the tank will promote fuel oxidation and deterioration, resulting in bad fuel
that may cause hard starting. Deteriorated fuel may also clog carburetor passages,
requiring carburetor repair or replacement.
NOTE: The Distributor’s Limited Warranty does not cover fuel system damage
or engine performance problems resulting from neglected storage preparation.
a. Fill the fuel tank with fresh gasoline, and add a gasoline conditioner, such
as HONDA GAS CONDITIONER, which is formulated to extend fuel storage
life.
b. Run the engine outdoors for 10 minutes to be sure that treated gasoline
has replaced the untreated gasoline in the carburetor.
c . Stop the engine, turn the fuel valve OFF, and allow the engine to cool before
placing the mower in storage.
For storage of more than 2 months:
a.
Change the engine oil (see page 36).
b.
Remove the spark plug (see page 40).
Pour a tablespoon of clean engine oil
into the cylinder. Pull the starter rope
several times to distribute the oil in
the cylinder. Reinstall the spark plug.
SPARK PLUG HOLE
NOTE: While the spark plug is _
removed, inspect the plug, and clean,
gap, or replace it if necessary.
C.
Pull the starter rope until you feel
resistance. This closes the valves,
which helps to protect the cylinder
from corrosion.
50
Page 55

10. STORAGE
For storage of more than 2 months (continued):
d. Disconnect the fuel line from the fuel valve, and drain the fuel tank into an
approved gasoline container.
B
explode, causing serious injury or death. Use extreme care when handling
gasoline. KEEP OUT OF REACH OF CHILDREN.
e. Remove the carburetor drain bolt, and drain the carburetor into an approved
gasoline container. Tilt the mower to drain all the gasoline from the carburetor.
f.
Install the carburetor drain bolt, and tighten it securely. Connect the fuel line.
Turn the fuel valve OFF.
FUEL VALVE
Gasoline is extremely flammable, and gasoline vapor can
Storage
Select a storage area away from appliances (water heater or clothes dryer) that
use an open flame as a heat source. Power tools, and some battery operated toys,
have electric motors that produce sparks that can ignite gasoline vapors.
w
explode.
Avoid storing the mower where it will be exposed to high humidity and dust.
Place the mower with its wheels on a level surface. Tilting the mower may result
in fuel leakage.
Gasoline is extremely flammable, and gasoline vapor can
51
Page 56

10. STORAGE
The handlebar can be folded for compact storage. loosen the handlebar locking
knobs, and fold the handlebar as shown. When folding, be careful to avoid kinking
or pinching the control cables.
Cover the mower to keep out dust.
NOTE: Plastic sheets should not be used as dust covers; they trap moisture under
the covers, promoting rust and corrosion.
Removal from Storage
Check all items described in the PRE-OPERATION CHECK section of this manual
(pages 16-22).
NOTE:
l
Fill the fuel tank with fresh gasoline. If you keep a container of gasoline for
refueling, be sure that it contains only fresh gasoline. Gasoline oxidizes and
deteriorates over time, resulting in bad fuel that may cause hard starting.
B
explode, causing serious injury or death. Use extreme care when handling
gasoline. KEEP OUT OF REACH OF CHILDREN.
l
If the cylinder was coated with oil during storage preparation, the engine will
smoke briefly at start up. This is normal.
Gasoline is extremely flammable, and gasoline vapor can
52
Page 57

ENGINE
ENGINE WILL
NOT START
1. Check control
positions
2. Check fuel.
3. Remove and inspect
spark plug.
4. Take mower to dealer
for service or repair.
11. TROUBLESHOOTING
POSSIBLE CAUSE
Fuel valve OFF. Turn fuel valve ON (p. 23).
Throttle lever in wrong Move throttle lever to CHOKE position,
position. unless the engine is warm (p. 23).
Out of fuel. Refuel tp 19).
Bad fuel; mower stored without Drain fuel tank and carburetor fp. 51).
treating or draining gasoline, or Refuel with fresh gasoline fp. 19).
refueled with bad gas
Spark plug faulty, fouled, or
improperly gapped.
Spark plug wet with fuel.
Fuel filter clogged, carburetor
malfunction, ignition
malfunction, valves stuck, etc.
Clean, gap, or replace spark plug
(p 40).
Dry spark plug and clear flooded
engine tp. 25)
Take mower to dealer, or refer to shop
manual.
CORRECTION
LOSS OF POWER
1. Check under cutter
deck.
2. Check air filter.
3. Check fuel.
4. Check vent inside
fuel tank cap
5. Take mower to dealer
for service or repair.
POSSIBLE CAUSE
Cutter deck clogged.
Air filter clogged.
Bad fuel; mower stored without
treating or draining gasoline, or
refueled with bad gas
Fuel tank cap vent clogged.
Fuel filter clogged, carburetor
malfunction, valve clearance
out of adjustment, low
compression, etc.
CORRECTION
Clean out the cutter deck fp. 30).
Clean or replace air filter (p. 38).
Drain fuel tank and carburetor (p. 51).
Refuel with fresh gasoline fp. 19).
Clean fuel tank cap vent.
Take mower to dealer, or refer to shop
manual.
53
Page 58

11. TROUBLESHOOTING
GRASS CUlTlNG
POOR CUT QUALITY
OR POOR CUlTlNG
PERFORMANCE
1. Check that throttle
lever is in FAST cut well.
position.
2. Reduce forward
speed.
3. Check cutting height
adjustment levers
4. Check grass bag.
5. Check cutter deck
and blade
GRASS BAGGING
POOR GRASS
BAGGING
1. Check grass bag.
2. Check cutter deck
and blade.
POSSIBLE CAUSE
Engine speed is too slow to Move throttle lever to FAST position
Mower is moving too fast for
lawn conditions.
Adjustment levers set at
different positions
Grass bag is overfilled or
clogged.
Cutter deck is clogged. Blade
is dull, v&n, or damaged.
POSSIBLE CAUSE CORRECTION
Grass bag is overfilled or Empty grass bag, and wash the bag if
clogged.
Cutter deck is clogged. Blade
is worn or damaged.
CORRECTION
(p. 9).
Try a slower forward speed. HRA215SXA:
Try shift lever positions 1 or 2 fp 12).
Set both levers in the same cutting
height position (p 13).
Empty grass bag, and wash the bag if
necessary.
Clean out cutter deck. Check blade
installation. Sharpen or replace blade if
necessary fp. 16 & 47).
necessary.
necessary (a 16 & 47).
VIBRATION
EXCESSIVE
VIBRATION
1. Check blade.
2. Take mower to dealer
for repair.
54
POSSIBLE CAUSE
Blade is loose, bent, damaged,
or unbalanced by improper
sharpening.
Mechanical damage, such a
bent crankshaft.
CORRECTION
Tighten loose blade bolts Replace
blade if necessary fp. 16 & 47).
Take mower to dealer, or refer to shop
manual.
Page 59

MOWER MODELS
12. SPECIFICATIONS
HRA215SXA
DIMENSIONS
Maximum length
(handlebar extended) HRA215SXA: 65.4 in (166 cm)
Width at cutter deck
Maximum Height (cutting height
adjusted to 3 in; 7.6 cm)
Minimum Height (cutting height
adjusted to 1 in; 2.7 cm)
Dry Weight
(including grass bag)
Manual starting; self-propelled
22.2 in (56.5 cm)
42 in (107 cm)
40 in (102 cm)
HRA215SXA:
103.6 lb (47 kg)
Grass Bag Capacity 2.36 bushels; 21.9 US gal (83 k’)
Cutting Width
Cutting Height (adjustable)
ENGINE
Engine Model GXVl40
Engine Type
Displacement ’ 8.2 cu in (135 cc)
Bore and Stroke 2.52 x 1.65 in (64 x 42 mm)
Ignition System Transistorized magneto
Ignition Timing
Idle Speed
Fuel Tank Capacity
Engine Oil Capacity
Spark Plug
Spark Plug Gap
NOTE: Specifications are subject to change without notice.
20.9 in (53 cm)
1 in (2.7 cm), l-l 12 in (4.0 cm), 2 in (5.2 cm),
2-l 12 in (6.4 cm), 3 in (7.6 cm)
4-stroke, overhead-valve, single cylinder,
forced air-cooled
25O BTDC
2,000 f 150 rpm
0.26 US gal (1.0 e)
0.63 US qt (0.6 PI
NGK BPR5ES; ND WlGEPR-U; Champion RN12Y
0.024-0.028 in (0.6-0.7 mm)
55
Page 60

13. Wl.RING DIAGRAM
_ _
SPARK
PLUG
INTEGRATED
CIRCUIT :
1
)
: ENGINE
SWITCH
Y
-
56
Page 61

14. WARRANTY SERVICE
Owner Satisfaction
Your satisfaction and goodwill are important to your dealer and to us. All Honda
warranty details are explained in the Distributor’s Limited Warranty. Normally, any
problems concerning the product will be handled by your dealer’s service
department. If you have a warranty problem that has not been handled to your
satisfaction, we suggest you take the following action:
l
Discuss your problem with a member of the dealership management. Often
complaints can be quickly resolved at that level. If the problem has already been
reviewed with the Service Manager, contact the owner of the dealership or the
General Manager.
l
If your problem still has not been resolved to your satisfaction, contact the
Power Equipment Division of American Honda Motor Co., Inc.
American Honda Motor Co., Inc.
Power Equipment Division
P.O. Box 100021
Duluth, Georgia 30136-9421
Telephone: (404) 497-6400
We will need the following information in order to assist you:
- Your name, address, and telephone number
- Product model and serial number
- Date of purchase
- Dealer name and address
- Nature of problem
After reviewing all the facts involved, you will be advised of what action can be
taken. Please bear in mind that your problem will likely be resolved at the dealership,
using the dealer’s facilities, equipment, and personnel, so it is very important that
your initial contact be with the dealer.
Your purchase of a Honda product is greatly appreciated by both your dealer and
American Honda Motor Co., Inc. We want to assist you in every way possible to
assure your complete satisfaction with your purchase.
57
Page 62

Page 63

Page 64

 Loading...