

Page 1
.I,\# D);
I
l @ -
0
0 -
OPERATOR’S MANUAL
c c
FRONT LOADER
MODEL FL6555
FOR
HONDA H6522(A4) COMPACT TRACTOR
1.-L' "
'
'
"
"
' " " "
" " "
I I I I I I
' "
Page 2
Thank you for’ purchasing an HTA FL6555 Front Loader Attachment for your Honda H6522
(A4) Compact Tractor.
This manual covers the assembly, operation, and maintenance of the HTA Model FL6555 Front
Loader. For your convenience, a repair and parts guide is also included in this publication.
NOTE: The illustrations in this manual are intended to serve as a reference and may not
necessarily depict the actual model listed above. The information in this publication is based
on the latest product information available at the time of printing. American Honda Motor Co.,
Inc. reserves the right to make changes at any time without notice and without incurring any
obligation.
No part of this publication may be reproduced without written permission.
This manual is considered a perart of the Front Loader and it must stay with the Loader
if resold.
Safety Messages
Your safety and the safety of others are very important. We have provided important
safety messages in this manual and on the front loader. Please read these messages
carefully.
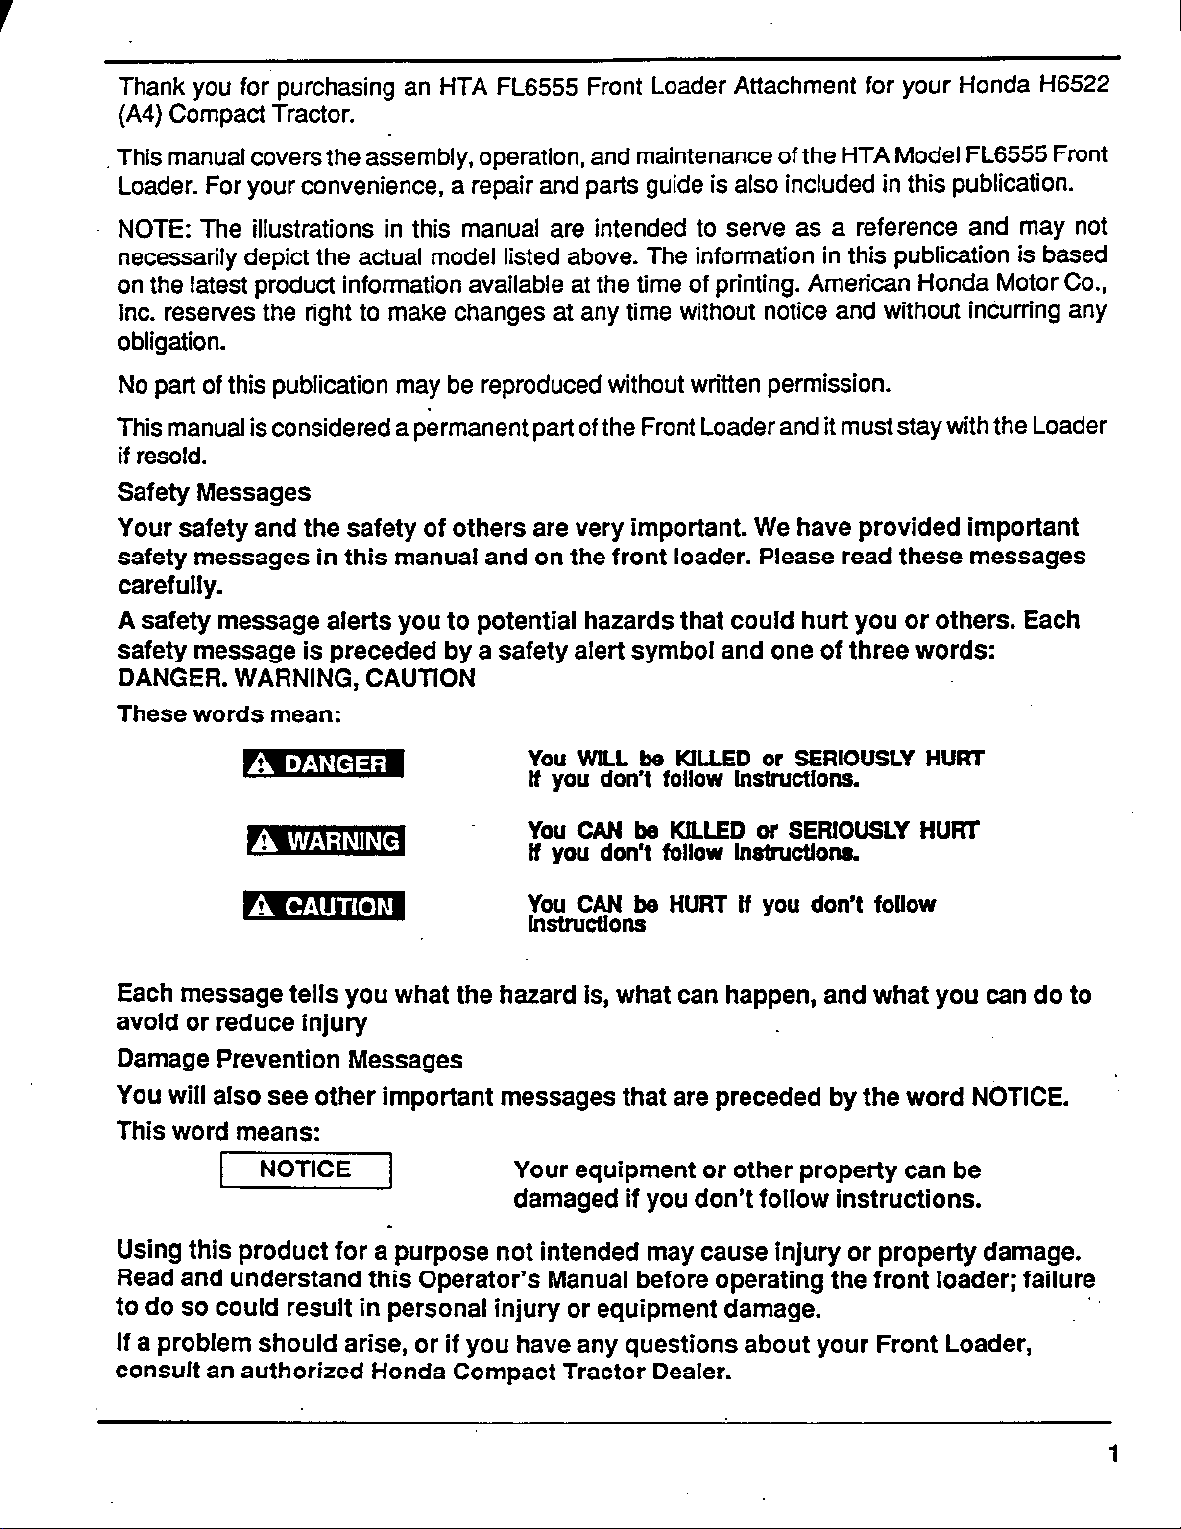
A safety message alerts you to potential hazards that could hurt you or others. Each
safety message is preceded by a safety alert symbol and one of three words:
DANGER. WARNING, CAUTlON
These words mean:
You WlLL be KILLED or SERIOUSLY HURT
If you don’t follow Instructlons.
You CAN be KILLED or SERfOUSLY HURT
tf you don’t follow lnstructlons.
F!w&X.~~ HURT If you don’t follow
Each message tells you what the hazard is, what can happen, and what you can do to
avoid or reduce injury
Damage Prevention Messages
You will also see other important messages that are preceded by the word NOTICE.
This word means:
1 NOTICE 1
Your equipment or other property can be
damaged if you don’t follow instructions.
Using this product for a purpose not intended may cause injury or property damage.
Read and understand this Operator’s Manual before operating the front loader; failure
to do so could result in personal injury or equipment damage.
*
.
If a problem should arise, or if you have any questions about your Front Loader,
consult an authorized Honda Compact Tractor Dealer.
1
Page 3

TABLE OF CONTENTS
SAFETY
General information
Safe operating rules
Operation safety
.......................
Maintenance safety
Safety label locations
.....................
.....................
.....................
....................
.3
-4
.5
.7
.8
SHIPPING INVENTORY . . . . . . . . . . . . . . . . . . . . . .9
TRACTOR PREPARATION . . . . . . . . . . . . . . . . . . . -11
FRONT LOADER SPECIFICATIONS
SET-UP INSTRUCTIONS
Torque specifications
....................
....................
Sub frame installation and removal
Hydraulic valve package installation
Loader assembly installation
Start-up procedures
Pre-Delivery checklist
......................
....................
.................
. . . . . . . . . . . . . . -12
.13
.14
.............
.............
.15
-19
.21
.22
.24
OPERATION . . . . . . . :. . . . . . . . . . . . . . . . . . . .25
Loader subframe installed with MM60 Mower Deck . . . . . .29*
LOADER REMOVAL AND INSTALLATION . . . . . . . . . . . .31
Storage . . . . . . . . . . . . . . . . . . . . . . . . . . . . .33
LUBRICATION AND MAINTENANCE . . . . . . . . . . . . . . -35
SERVICE ‘. . . . . . . . . . . . . . . . . . . . . . . . . . . . . -37
Lift and bucket cylinders . . . . . . . . . . . . . . . . .
. .39
Hydraulic valve . . . . . . . . . . . . . . . . . . . . . 1 1’ . .41
TROUBLESHOOTING
HYDRAULIC SYSTEM SCHEMATIC
PARTS LIST
.............................
WARRANTY ASSISTANCE
2
.......................
...............
.....................
.45
.50
.51
.61
Page 4
General Information
General Information
Introduction
The purpose of this manual is to assist you in maintaining and operating your HTA FL6555
Front Loader. Read it carefully; it furnishes information and instructions that will help you
achieve years of dependable performance. Some information may be general in nature due to
unknown and varying conditions. However, through experience and these instructions, you
should be able to develop operating procedures suitable to your particular situation.
‘Right”and ‘Left” as used throughout this manual are determined by facing the direction the
machine will travel when in use.
Illustrations and data used in this manual are current at the time of printing, but due to possible
in-line production changes, your machine may vary slightly in detail. Extra equipment that may
be shown on the machine is optional at extra cost. The manufacturer reserves the right to
redesign and change the machine as may be necessary without notification.
Illustrations used in this manual may not show all safety equipment that is recommended to
ensure safe operation of tractor/loader. Refer to Safety Section of this manual and the tractor
owner’s manual for information concerning safety equipment. Consult your Dealer for further
information.
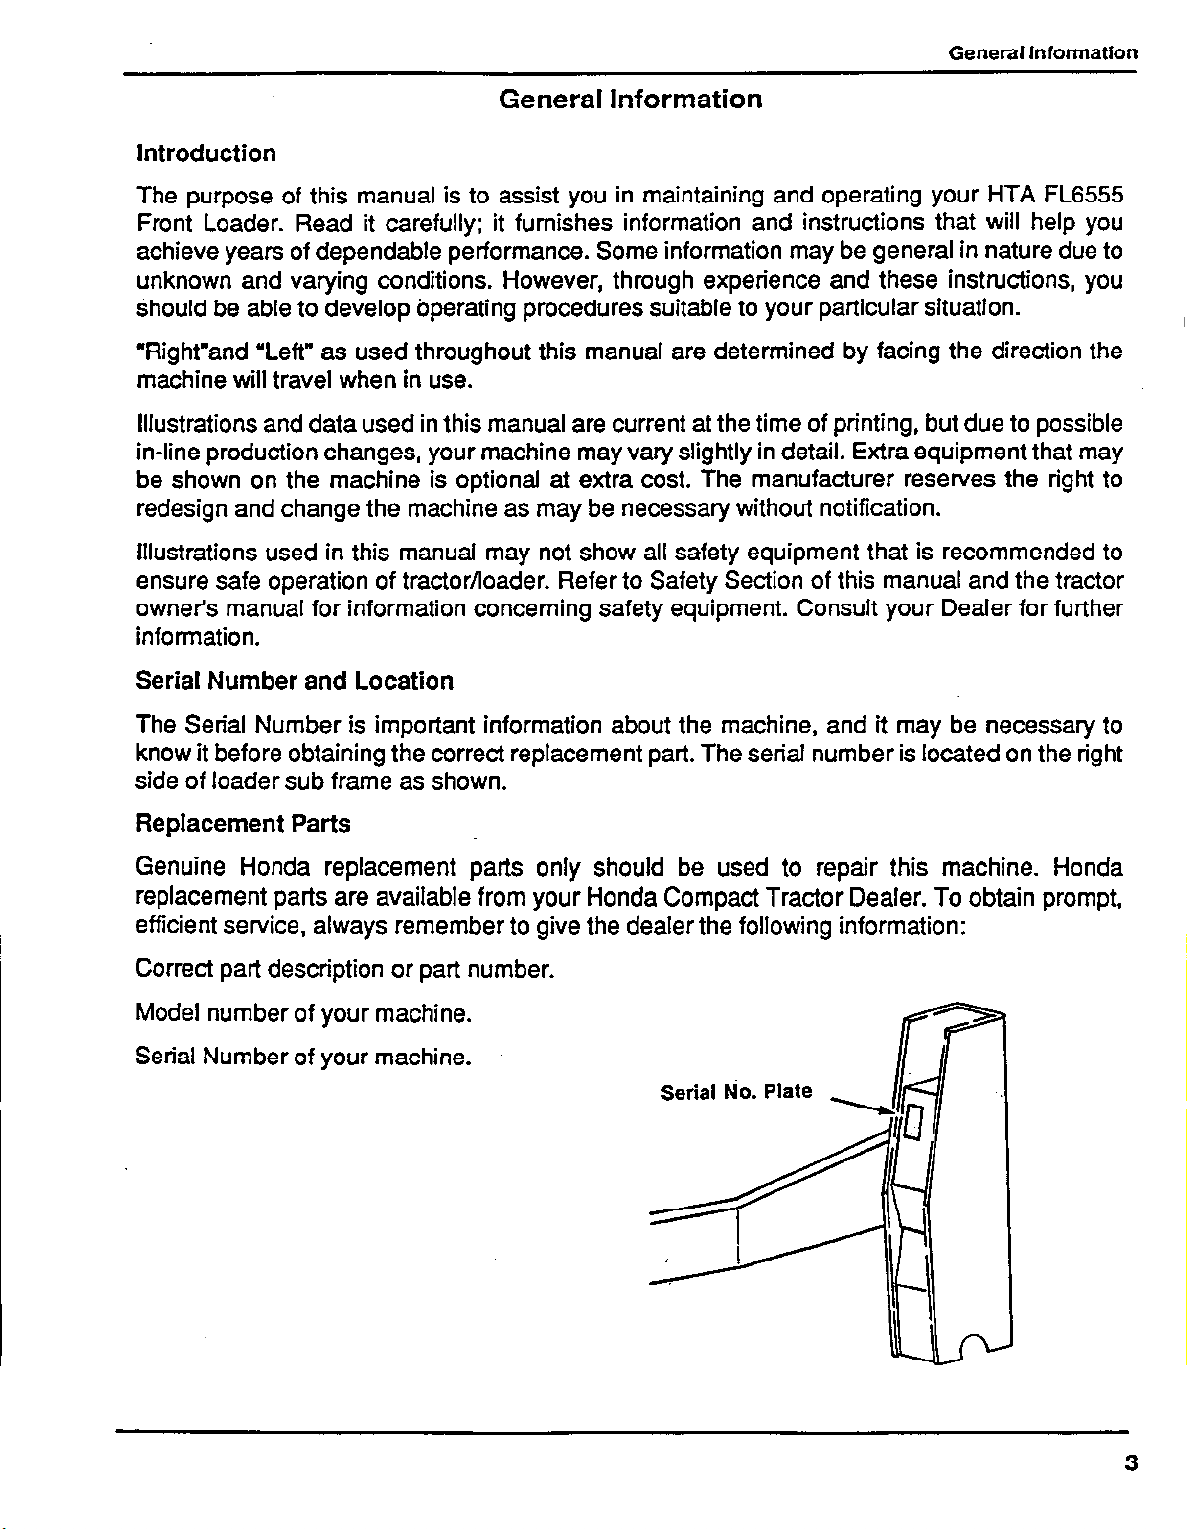
Serial Number and Location
The Serial Number is important information about the machine, and it may be necessary to
know it before obtaining the correct replacement part. The serial number is located on the right
side of loader sub frame as shown.
Replacement Parts
Genuine Honda replacement parts only should be used to repair this machine. Honda
replacement parts are available from your Honda Compact Tractor Dealer. To obtain prompt,
efficient service, always remember to give the dealer the following information:
Correct part description or part number.
Model number of your machine.
Serial Number of your machine.
3
Page 5
SAFEN
SAFETY
Front Loader Safety
Operation of the Tractor and Front Loader requires special efforts on your part to ensure your
safety and the safety of others. Know these requirements before you operate the Tractor or the
Front Loader.
SAFE OPERATING RULES
l Severe personal injury or equipment damage may result if the operation instructions on pages
5 and 6 are not followed.
To avoid severe personal injury or equipment damage, observe the following precautions:
0
All parts, especially guards and shields, should be in good condition and securely fastened in
place. .
.
Do not remove any guards, warning labels, shields or safety devices; they are installed for your
safety.
.
The tractor roll over protection structure (ROPS) will only protect you from injury, if;
- you are also wearing the seat belt.
- the ROPS is securely attached and has not been modified or structurally damaged.
.
.
Always wear sturdy shoes and avoid wearing bulky or loose clothing while operating the tractor
or the front loader.
. .
Never operate the tractor or the front loader when tired or while under the influence of drugs or
alcohol.
.
In case of emergency, know how to stop the engine and thoroughly understand the operation of
ALL controls.
0
Never permit anyone to operate the tractor or the front loader without proper instructions.
.
Children should not be permitted to operate the tractor or the front loader.
.
KEEP CHILDREN AND PETS AT A SAFE DISTANCE DURING OPERATION.
0
The tractor is an operator only vehicle, do not allow passengers to ride on the tractor or the front
loader.
.
Never allow anyone to get under the front loader bucket or reach through the lift arms when the
bucket is raised or the tractor engine is running.
.
The exhaust contains poisonous carbon monoxide gas that can cause loss of consciousness
and may lead to death if the tractor and front loader are operated in an enclosed area.
4
Page 6
BEFORE STARTING
l The use of heavy equipment and/or pulling or lifting excessive loads may adversely affect
vehicle stability and control. To avoid loss of control that can result in severe personal injury:
- Only use recommended tractor hitch attachment points.
- Limit loads to those within tractor and front loader limitations as stated in this manual and in
the tractor owner’s manual.
- Be extra careful when turning or backing up, and when on uneven terrain.
- Use counterweights as indicted in this manual and the tractor owner’s manual.
l Before installing or using the front loader, carefully read all instructions and precautions.
SAFETY
\
1
OPERATION
.
Be sure to fasten the seat belt whenever driving the tractor with the Rollover Protective Structure
(ROPS) attached. Use of either device (Seat belt or ROPS) without the other will increase the
chance of injury in a rollover.
.
Adjust the seat belt so that it is snug.
.
Be sure that the main transmission lever is in “Neutral” and the Power Take Off (PTO) levers are
in the “OFF” position and brake is engaged before starting the engine.
.
Operate the tractor and the loader at slow speeds until you become familiar with, all of the
operating characteristics and controls.
.
Do not operate the tractor or the loader until you are sure the area in front and behind is clear of
people and pets.
l
Sudden stops of the tractor and loader during operation could cause the tractor to overturn. Be
especially careful during sharp turns and when the front loader bucket has material in it.
l
Carry the front loader arms at a low position during transport. This will enhance vehicle stability
and front vision.
l
Using the front loader for handling large objects such as round hay bales, logs or oil drums is not
recommended. These items can easily shift or roll down the loader arms causing equipment
damage or severe personal injury.
.
Never operate the tractor or front loader when visibility is diminished by darkness or by bad
weather, your ability to see obstacles will become impaired.
.
Avoid loose fill, rocks and holes. They may cause vehicle instability or cause the vehicle to
overturn.
.
The front loader is intended for relatively flat terrain.
.
Avoid overhead wires and obstacles when the front loader is in the raised position. Contacting
electric wires can cause electrocution. .
.
Allow for the added length of the front loader attachment when making turns to prevent striking
people or objects.
.
When operating the front loader on a slope, always drive up and down the face of the grade.
Turning or driving across the face of a slope may cause the tractor to ‘overturn.
5
Page 7
SAFETY
Operate the front loader arms gradually by “feathering” the loader controls to prevent abrupt
movements that could cause damage to the front loader or tractor.
Use added caution when working with shifting or loose loads in the front loader bucket. It could
cause vehicle instability or fall out of the bucket and cause severe personal injury.
Attempting to change gears while operating the front loader on a slope may adversely affect
vehicle stability and control and severe personal injury could result
Do not back down, or rapidly accelerate up a sloping surface.
To avoid loss of control or overturning, do not turn or stop on sloping surfaces.
Do not operate the front loader near the edge of a ditch or an embankment. Slipping off the edge
could lead to severe personal injury and equipment damage.
When descending a slope, disengaging the clutch or shifting to neutral can cause loss of control
that may result in severe personal injury.
Never use individual brakes during front loader operation. Use of individual brakes during front
loader operation can cause abrupt movements of the tractor causing severe personal injury or
equipment damage.
Be sure to follow instructions below whenever applying the tractor differential lock during front
loader use.
- Do not apply the tractor differential lock while turning, use the differential lock only while driving
in a straight line.
- Never apply the tractor differential lock on paved surfaces.
TO avoid injury to yourself and others, before leaving the front loader unattended, ALWAYS:
- Park on level ground.
- Lower the front loader bucket flat to the ground.
- Disengage the front loader drive system.
- Lock the parking brake.
- Stop the engine.
- Remove the key.
If YOU find it necessary to park on a grade, be sure to lock the parking brake and securely block
the wheels.
6
Page 8
MAINTENANCE SAFETY
MAINTENANCE SAFETY
.
Before performing maintenance/inspections, read the instructions thoroughly.
.
Before cleaning, inspecting or servicing the loader, be sure to;
- lower the front loader bucket flat to the ground.
- stop the engine and remove the key.
.
Always wear safety goggles when servicing or replacing the front loader cylinder pins. Use a
brass drift and hammer. Failure to do so could result in eye injury from possible flying metal
fragments.
Operating the front loader or the tractor with damaged, worn, or broken parts may result in
severe personal injury.
Before disconnecting any hydraulic lines, relieve all hydraulic pressure by moving the hydraulic
control lever through all positions with the engine off.
Escaping hydraulic fluid under pressure can have sufficient force to penetrate the skin, causing
serious personal injury. If injured by escaping fluid, obtain medical treatment immediately. Oil
must be surgically removed within a few hours by a doctor familiar with this type of injury or
gangrene may result.
0
Do not tamper with relief valve settings. The relief valve is factory set to the proper pressure.
Changing the setting can cause damage to the loader and tractor and lead to severe personal
injury.
.
All nuts, bolts and fasteners must be properly secured.
.
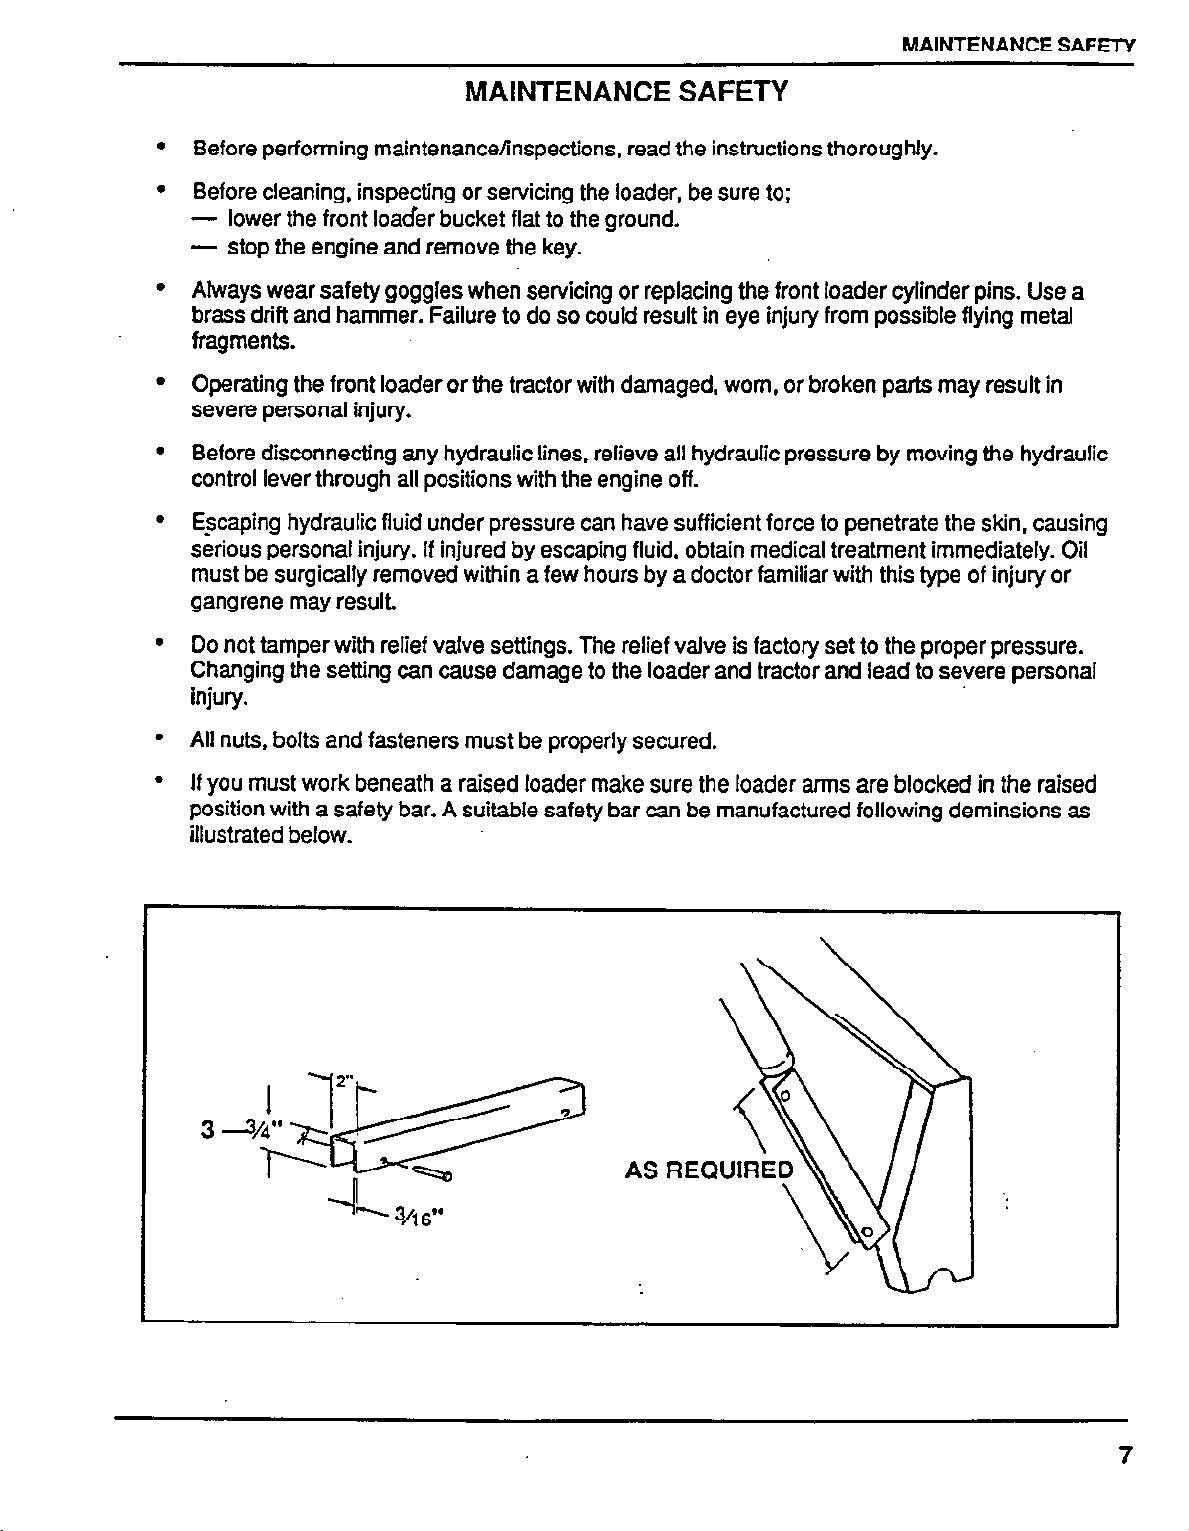
If you must work beneath a raised loader make sure the loader arms are blocked in the raised
position with a safety bar. A suitable safety bar can be manufactured following deminsions as
illustrated below.
AS
7
Page 9
Safety Label Locations
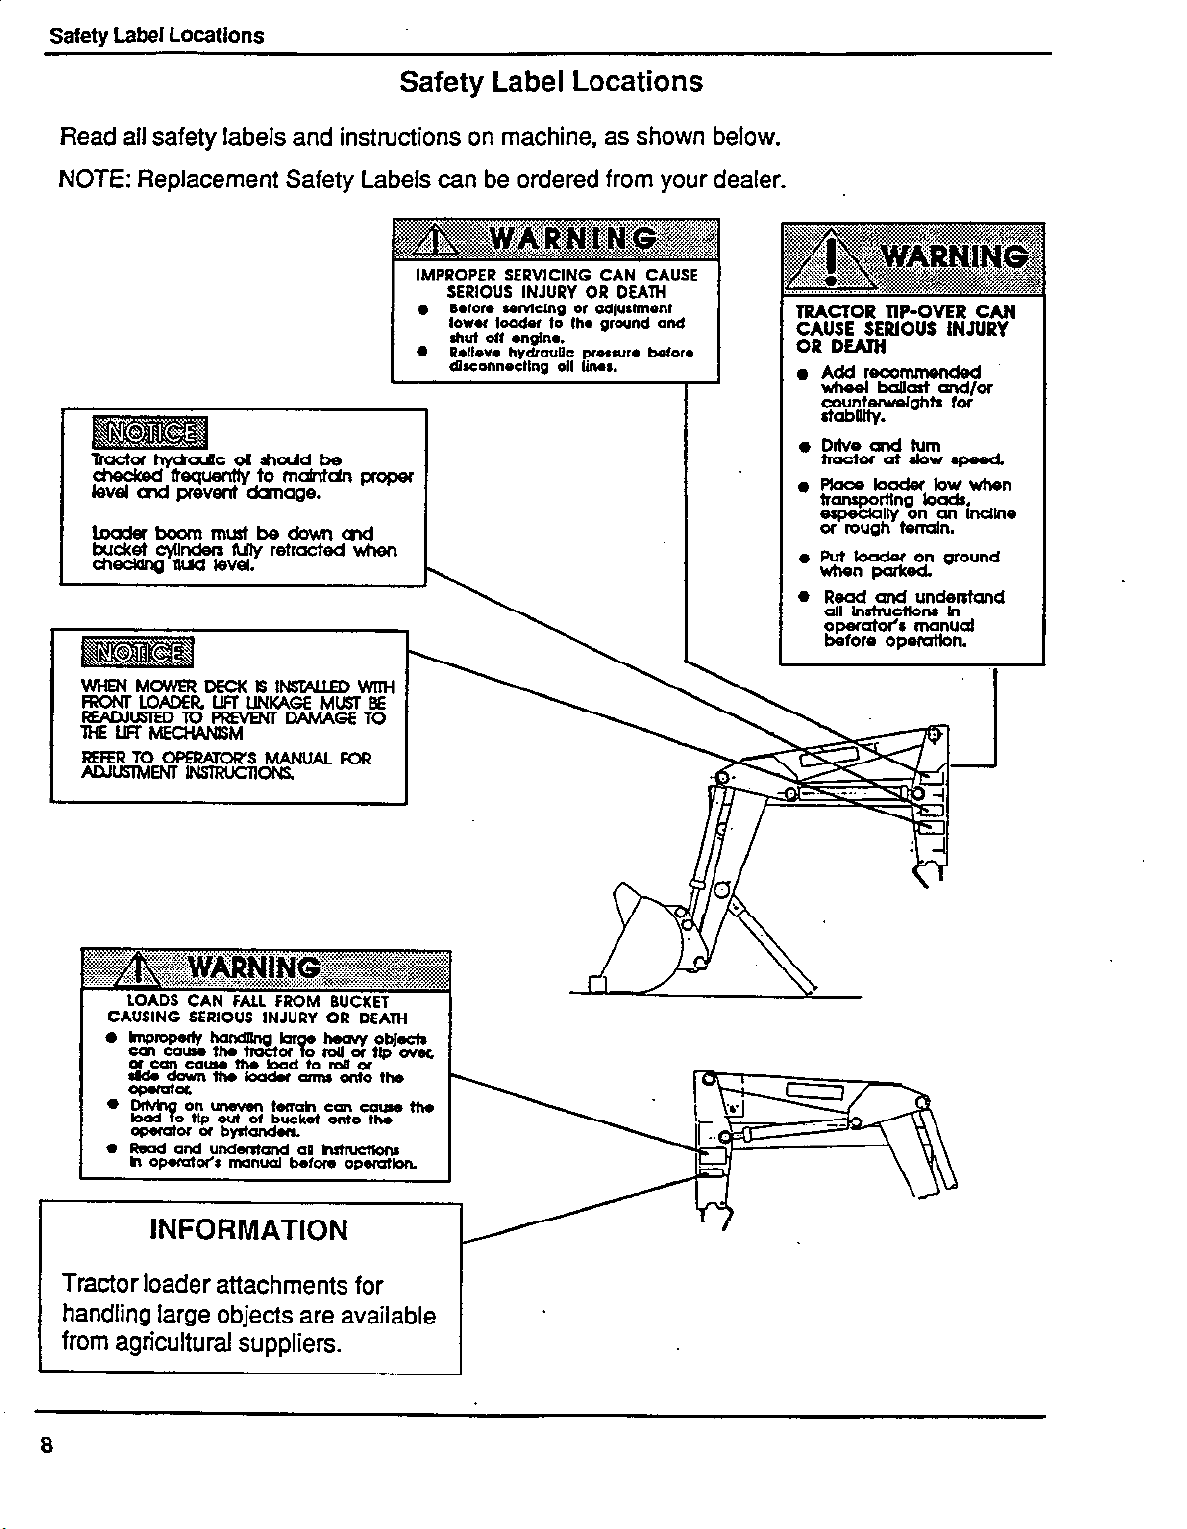
Safety Label Locations
Read all safety labels and instructions on machine, as shown below.
NOTE: Replacement Safety Labels can be ordered from your dealer.
IMPROPER SERVICING CAN CAUSE
SERIOUS INJURY OR DEATH
l Boforo rervtcing or adjurhnent
lowor loader to the ground and
shut off ongino.
l Polleve hvdraullc nmsuro before
QsmnnoCtlng oil hr.
1
Tractor hydadc 04 &toUd be
checked hqwnti~ to mdntdn proper
level a7d prevent damage.
boderboommustb43downcnd
buuqilikvf$y retracted when
.
TRACTOR TIP-OVER CAN
~~U;%&t.lOUS INJURY
0 Addrecommended
wlwel ballast and/or
counterwelghta for
stablllty.
l Dftve and turn
trEtoratdowspaed.
l Placekaderlowwhen
~$%Eindlne
01 rough terrain.
l Put loader on ground
when park34
l R$xl~cl~le~stand
operatar% manud
before opemtfon.
wHENMowEl?DEcKISINST;i9UEDwmi
FRONT LOADER l.lFl LINKAGE MUST BE
REAAIUSTEDTOPREVEMDAMAGETO
lHEuFfh+lEcwmM
RfFER TO OPERATOR’S MANUAL FOR
AAJusrMENr~oNs.
.mmhandang~ymow
ccncaumthotmctor oroUortfpov0c
orcancaunthobadtoroffor
s--=--dotb
-9
0 Read and undtiand al Mfuda~
onuneventemahcancauwthe
toad o tip out of bucket anto the
operator or byatanden
h opuatoCr manual befom opemtkm.
INFORMATION
‘I
Tractor loader attachments for
handling large objects are available
from agricultural suppliers.
a
Page 10
SHIPPING INVENTORY
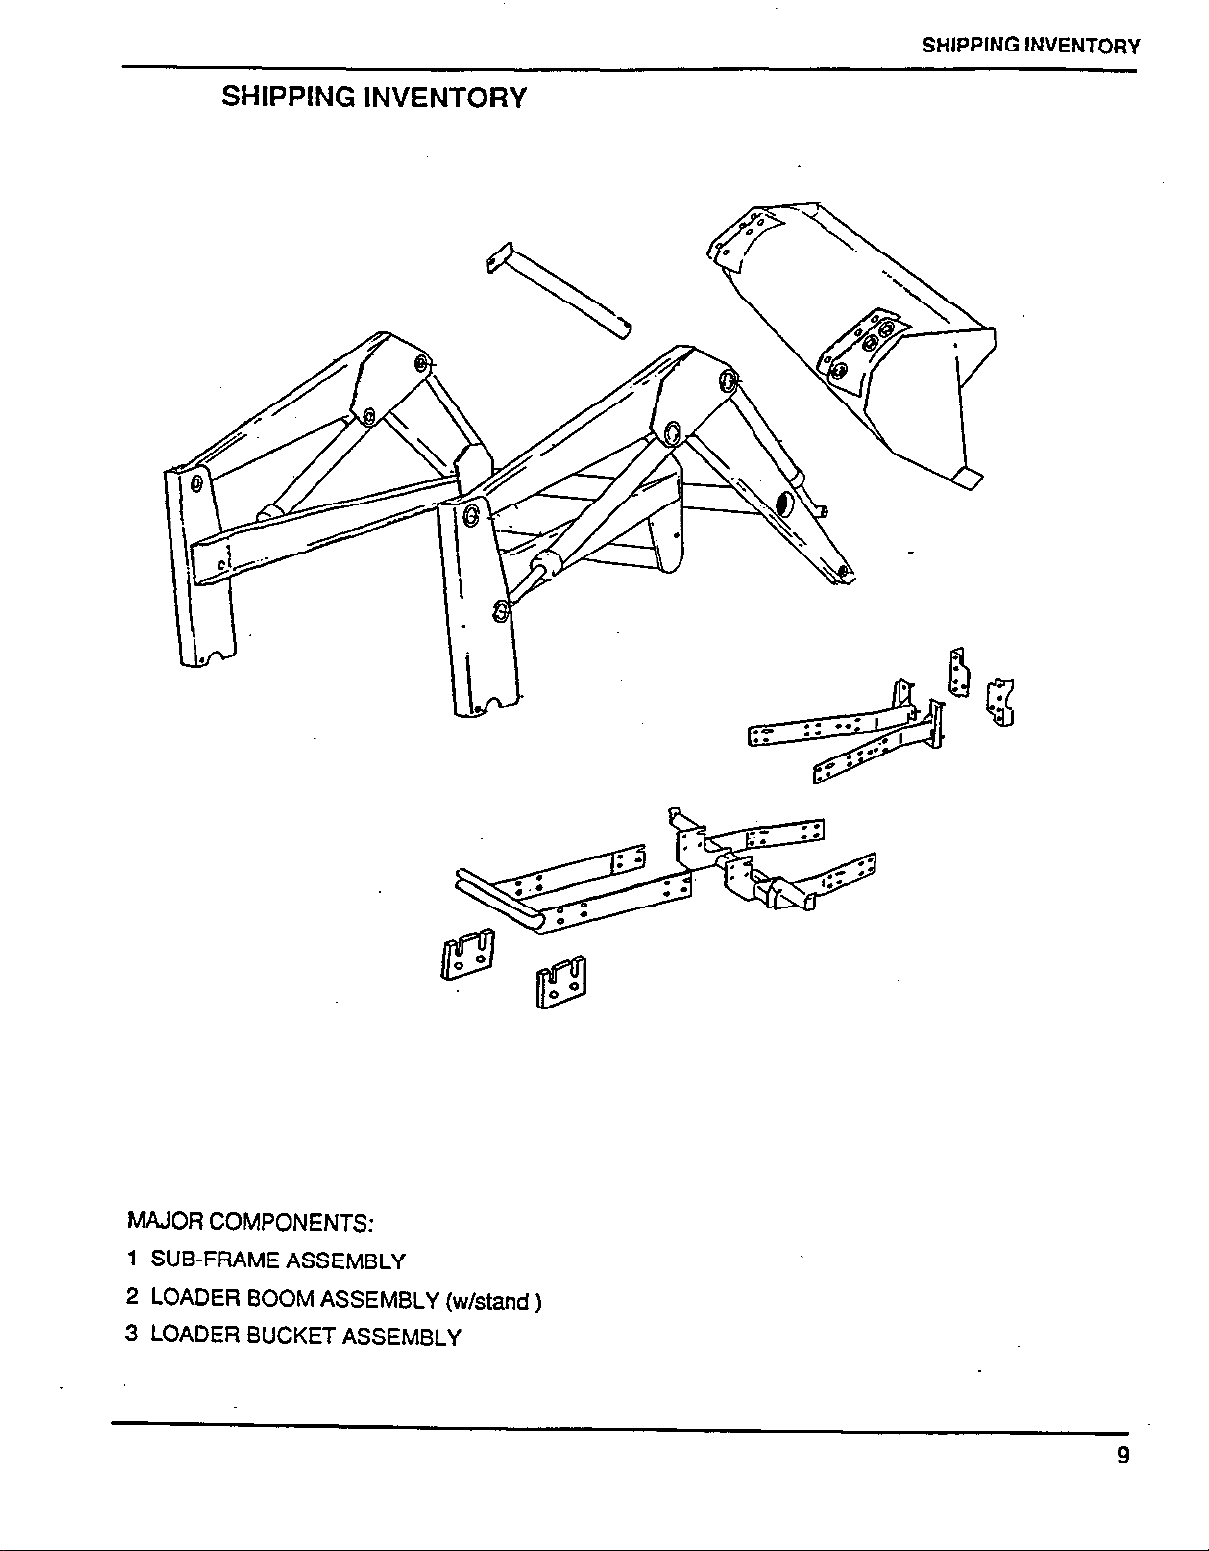
SHIPPING INVENTORY
MAJOR COMPONENTS:
1 SUB-FRAME ASSEMBLY
2 LOADER BOOM ASSEMBLY (w/stand )
3 LOADER BUCKET ASSEMBLY
9
Page 11
SHIPPING INVENTORY
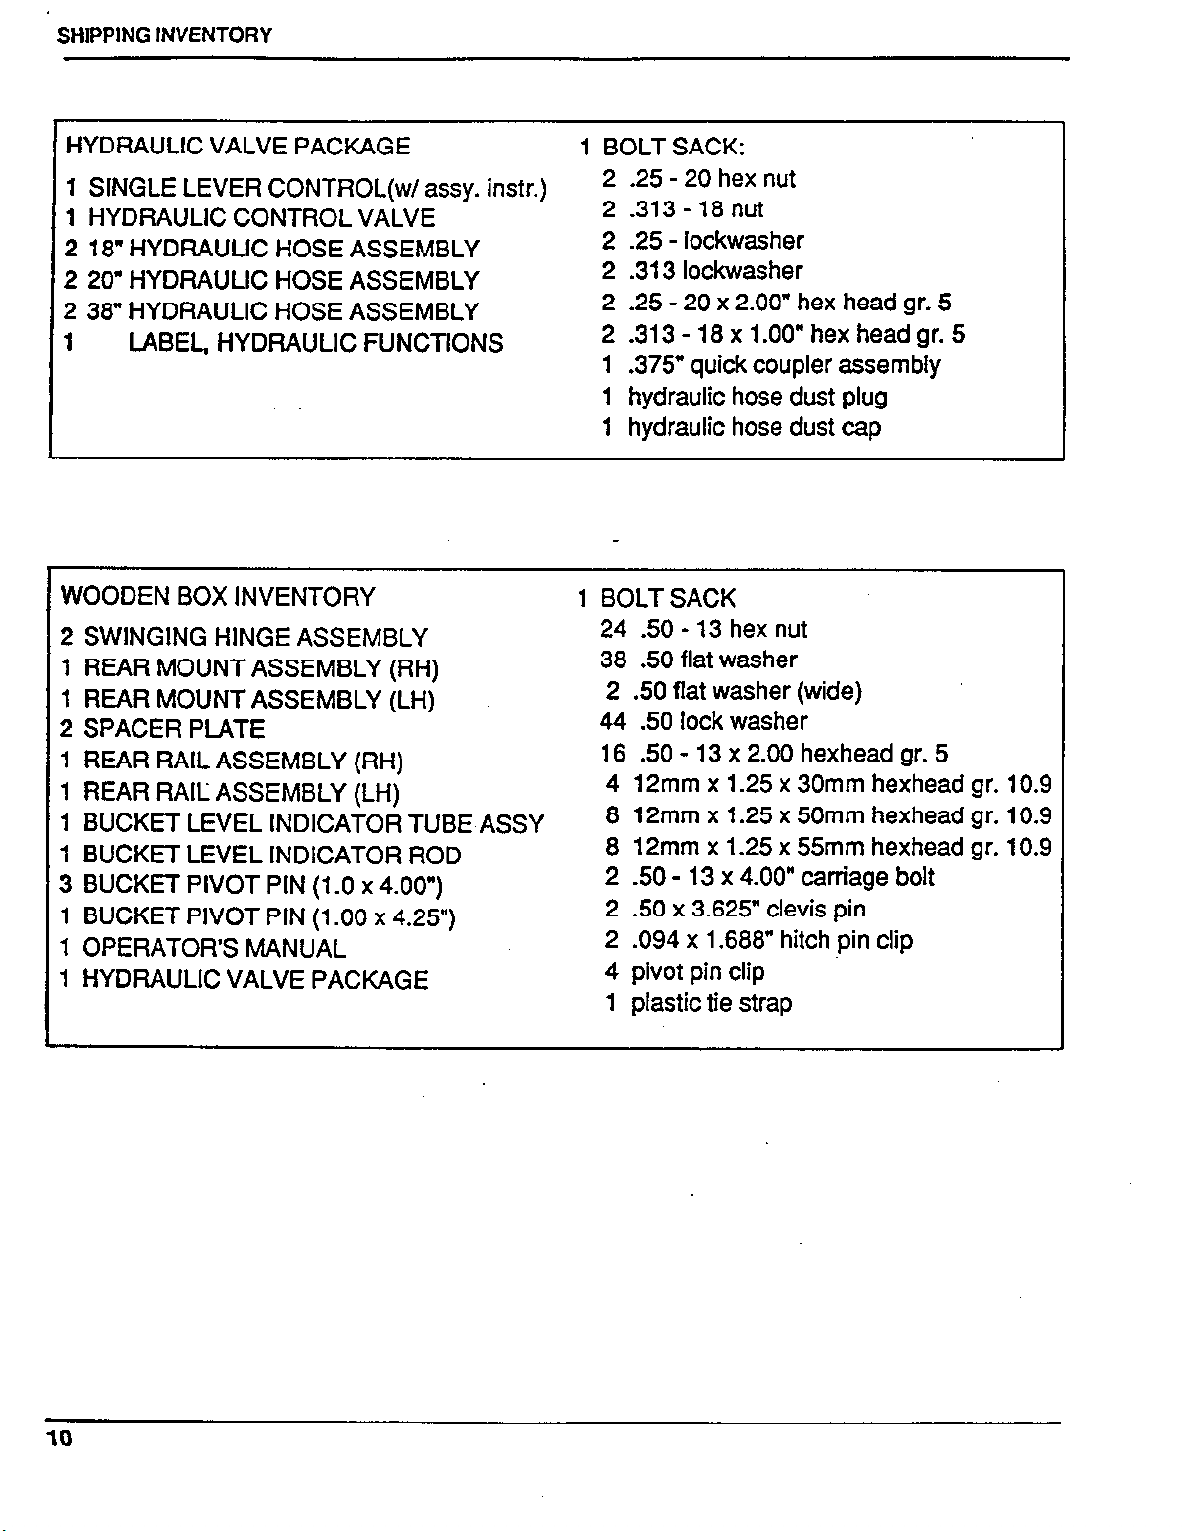
HYDRAULIC VALVE PACKAGE
1 SINGLE LEVER CONTROL(w/ instr.)
assy.
1 HYDRAULIC CONTROL VALVE
2 18” HYDRAULIC HOSE ASSEMBLY
2 20” HYDRAULIC HOSE ASSEMBLY
2 38” HYDRAULIC HOSE ASSEMBLY
1 LABEL, HYDRAULIC FUNCTIONS
WOODEN BOX INVENTORY
2 SWINGING HINGE ASSEMBLY
1 REAR MOUNT ASSEMBLY (RH)
1
REAR MOUNT ASSEMBLY (LH)
2 SPACER PLATE
1
REAR RAIL ASSEMBLY (RH)
1 REAR RAIL ASSEMBLY (LH)
1 BUCKET LEVEL INDICATOR TUBE
ASSY
1 BUCKET LEVEL INDICATOR ROD
3 BUCKET PIVOT PIN (1 .O x 4.00”)
1 BUCKET PIVOT PIN (1 .OO x 4.25”)
1 OPERATOR’S MANUAL
1 HYDRAULIC VALVE PACKAGE
1 BOLT SACK:
2 .25 - 20 hex nut
2 .313-18nut
2 .25 - lockwasher
2 .313 lockwasher
2 .25 - 20 x 2.00” hex head gr. 5
2 .313-18xl.OO”hexheadgr.5
1 .375” quick coupler assembly
1 hydraulic hose dust plug
1 hydraulic hose dust cap
1 BOLT SACK
24
.50 - 13 hex nut
38
.50 flat washer
2 .50 flat washer (wide)
44
.50 lock washer
16
.50 - 13 x 2.00 hexhead gr. 5
4 12mm x 1.25 x 30mm hexhead
8 12mm x 1.25 x 50mm hexhead
8 12mm x 1.25 x 55mm hexhead
2 50 -. 13 x 4.00” carriage bolt
2 .50 x 3.625” clevis pin
2 .094 x 1.688” hitch pin clip
4 pivot pin clip
.
1 plastic tie strap
gr. 10.9
gr. 10.9
gr. 10.9
Page 12
TRACTOR PREPARATION
TRACTOR PREPARATION
Rear Counterweight
DO NOT EXCEED THE RATING FOR
MAXIMUM GROSS VEHICLE WEIGHT.
REFER TO OWNER’S MANUAL
PROVIDED WITH TRACTOR.
The use of adequate counterweight for
maximum loader capacity is required for
proper stability.
PROPER. COUNTERWEIGHT AND
BALLAST FOR H6522 (A4):
FL6555 FRONT LOADER ONLY
Ag tires:
99 pounds (45 Kg) ballast in each rear tire.
75 pound (31.8 Kg) wheel weight on each rear
wheel.
Three point hitch mounted with rear weight
box containing 583 pounds (265 Kg) of sand.
TIRE TYPES
Agricultural (Recommended)
Turf
High Flotation
.
TIRE INFLATION:
AG TIRES
Front 30 psi
Rear 20 psi
TURF TIRES HIGH FLOAT
22 psi
20 psi
16 psi
28 psi
Rear tires must be maintained at equal
pressure within the recommended tire
inflation range. Unequal rear tire inflation can
prevent loader attachment from contacting
the ground across its full width.
Roll-Over Protection Structure (ROPS)
System
The tractor ROPS system must be in place
and used properly to ensure adequate
operator protection.
Tractor Hydraulic System
Turf or High float:
236 pounds (107 Kg) ballast in each rear tire.
Three point hitch mounted with rear weight
box containing 583 pounds (265 Kg) of sand.
FL6555 FRONT LOADER AND BH6575
BACKHOE
Ag tires
99 pounds (45 Kg) ballast in each rear tire.
75 pound (31.8 Kg) wheel weight on each rear
tire.
Turf or High Float:
170 Pounds (77 Kg) ballast in each’ rear tire.
Additional counteweight requirements ‘will
vary with loader attachments and equipment
applications.
t I
.
m Certain specific conditions
0
may not permit safe use of loader at loader
rating or may require more careful
restricted operation at the rated load.
Tractor operation in a loader application
significantly increases demands on the
tractor hydraulic system. Check the tractor
hydraulic system fluid level daily. Refer to
your tractor owner’s manual for instructions
regarding tractor hydraulic system
maintenance.
Follow recommendations in your Tractor
Owners Manual concerning Hydraulic fluid
and Filter change intervals.
Refer to tractor owners manual for hydraulic
fluid specifications.
t A
.
m The tractor/loader must
l
only be operated with all safety equipment
properly installed.
Front Counterweight
Use of front counterweight is not
recommended when tractor is being used in
a loader application.
Front counterweight adds unnecessary front
axle load in loader applications.
11
Page 13
LOADER SPECIFICATIONS
LOADER SPECIFICATIONS
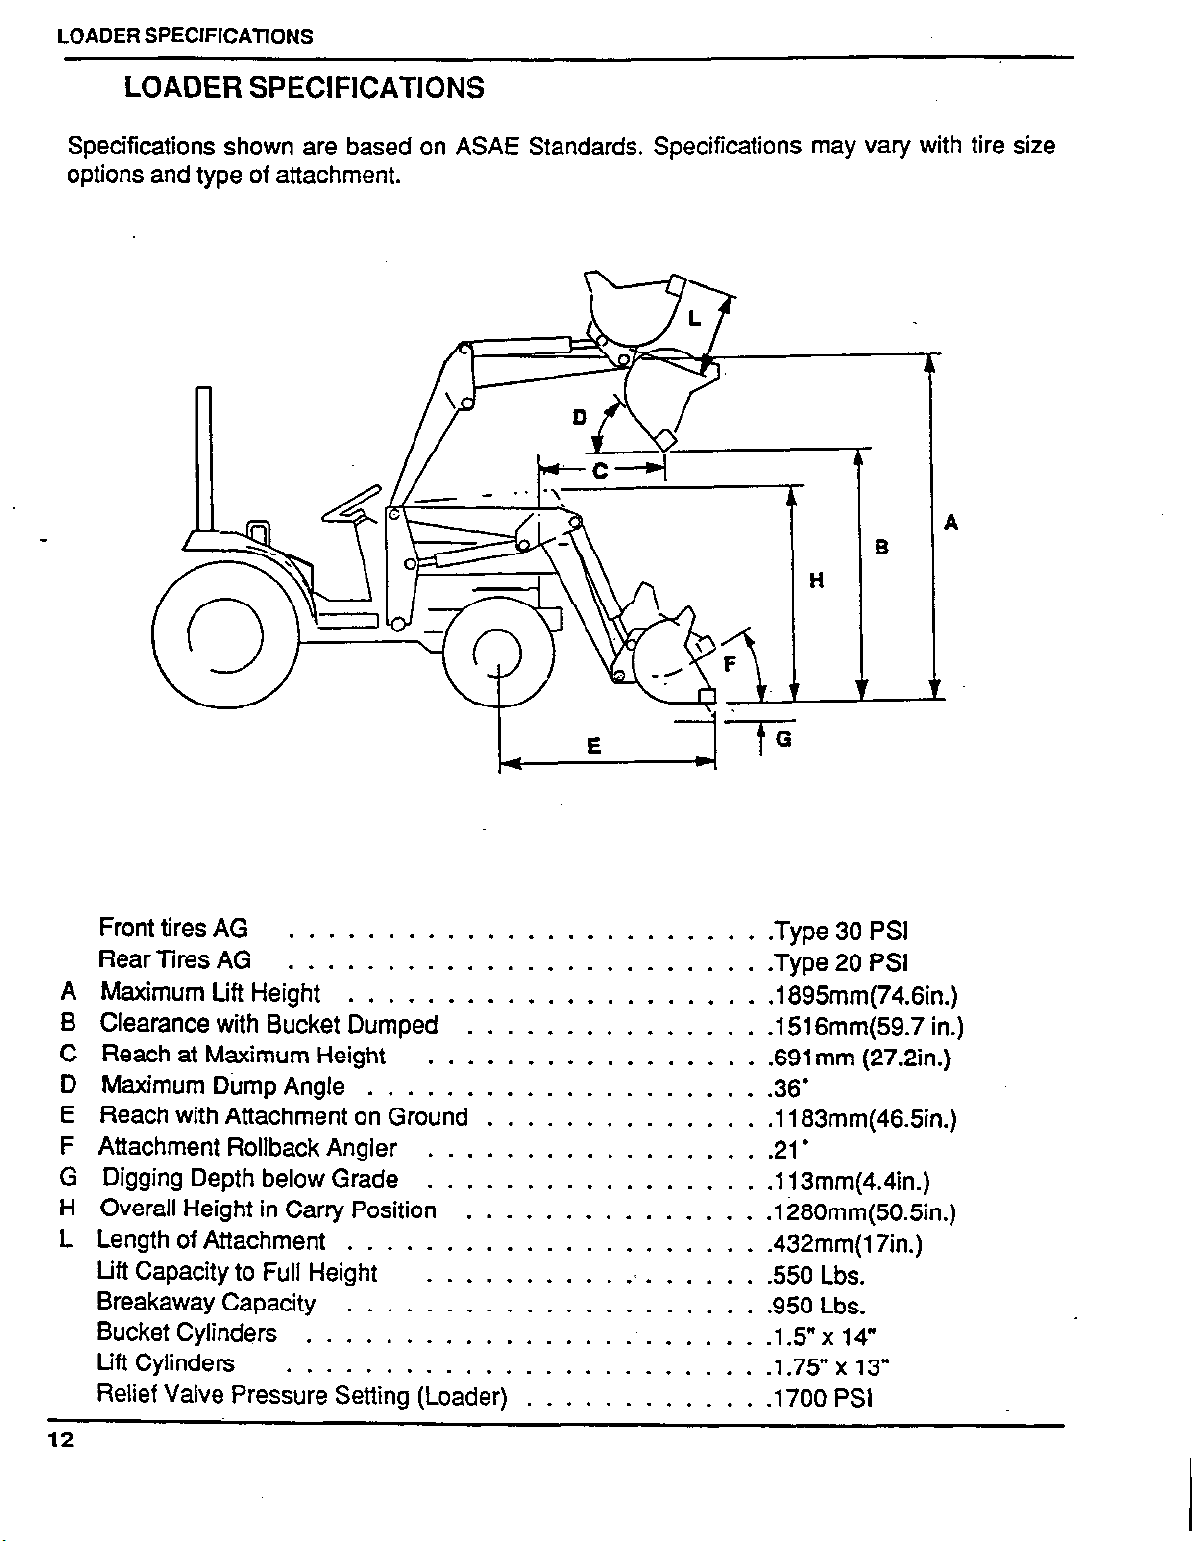
Specifications shown are based on ASAE Standards. Specifications may vary with tire size
options and type of attachment.
A
Front tires AG
Rear Tires AG
A
Maximum Lift Height
B
Clearance with Bucket Dumped
C
Reach at Maximum Height
D
Maximum Dump Angle
E
Reach with Attachment on Ground
F
Attachment Rollback Angler
G
Digging Depth below Grade
H
Overall Height in Carry Position
L
Length of Attachment
........................ .Type 30 PSI
........................ .Type 20 PSI
.....................
....................
.....................
Lift Capacity to Full Height
Breakaway Capacity
Bucket Cylinders
Lift Cylinders
........................ 175” x 13”
.....................
.......................
Relief Valve Pressure Setting (Loader)
12
.1895mm(74.6in.)
...............
.................
.1516mm(59.7 in.)
.691 mm (27.2in.)
.36’
..............
.................
.1183mm(46.5in.)
.21
.
................. .113mm(4.4in.)
............... .1280mm(50.5in.)
.432mm(l7in.)
..........
.’
......
.550 Lbs.
.950 Lbs.
-1.5” x 14”
............
.1700 PSI
Page 14
SET-UP INSTRUCTIONS
SET-UP INSTRUCTIONS
General
Read Set-up instruction completely prior to installing loader to familiarize yourself with all
mounting and hydraulic system installation procedures.
Ensure tractor ‘is prepared as described in Tractor Preparation Section.
The loader operates from the tractor hydraulic system.
Reference to LH or RH is as viewed from the operator’s seat.
A pipe thread sealant must be used on all pipe threads.
All hardware required for mounting is supplied.
All loader mount component hardware should be left loose until all mount components have
been installed.
Unless otherwise specified, refer to Torque Specification Table for torque values of hardware
required for assembly.
Layout and identify all components prior to installation.
13
Page 15
SET-UP INSTRUCTIONS
TORQUE SPECIFCATIONS
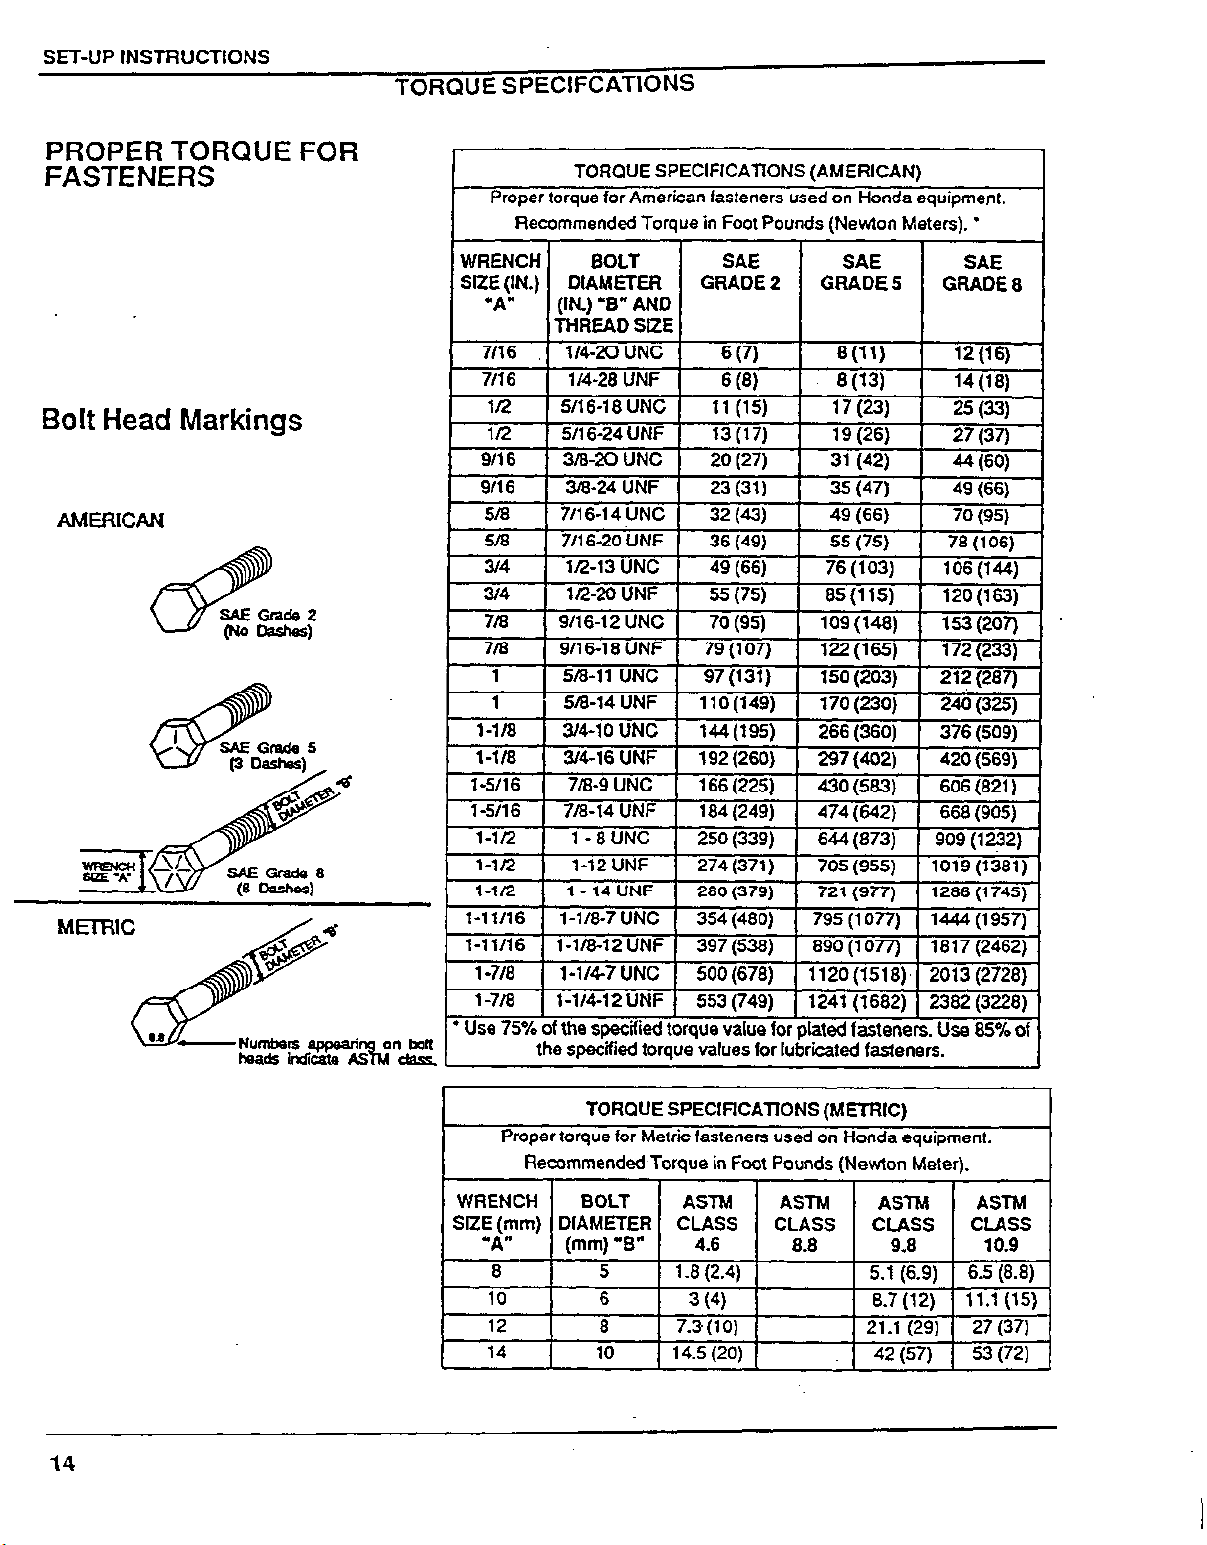
PROPER TORQUE FOR
FASTENERS
Bolt Head Markings
TORQUE SPECIFICATfONS (AMERICAN)
Proper torque for American fasteners used on Honda equipment.
Recommended Torque in Foot Pounds (Newton Meters). l
I
14
’ Use 75% of the specified torque value for plated fasteners. Use 85% of
the specified torque values for lubricated fasteners.
TORQUE SPECIFICATIONS (METRIC)
Proper torque for Metric fasteners used on Honda equipment.
Recommended Torque in Foot Pounds (Newton Meter).
WRENCH BOLT
SlZE (mm) DIAMETER CLASS
‘A” (mm) ‘B” 4.6 8.8 9.8 10.9
8 5 1.8 (2.4) 5.1 (6.9) 6.5 (8.8)
10 6 3 (4) 8.7 (12) 11.1 (15)
12 8 7.3(10) 21.1 (29) 27 (37)
14 10 14.5 (20) 42 1571 53 1721
ASTM
ASTM ASTM ASTM
CLASS
CLASS
CLASS
Page 16
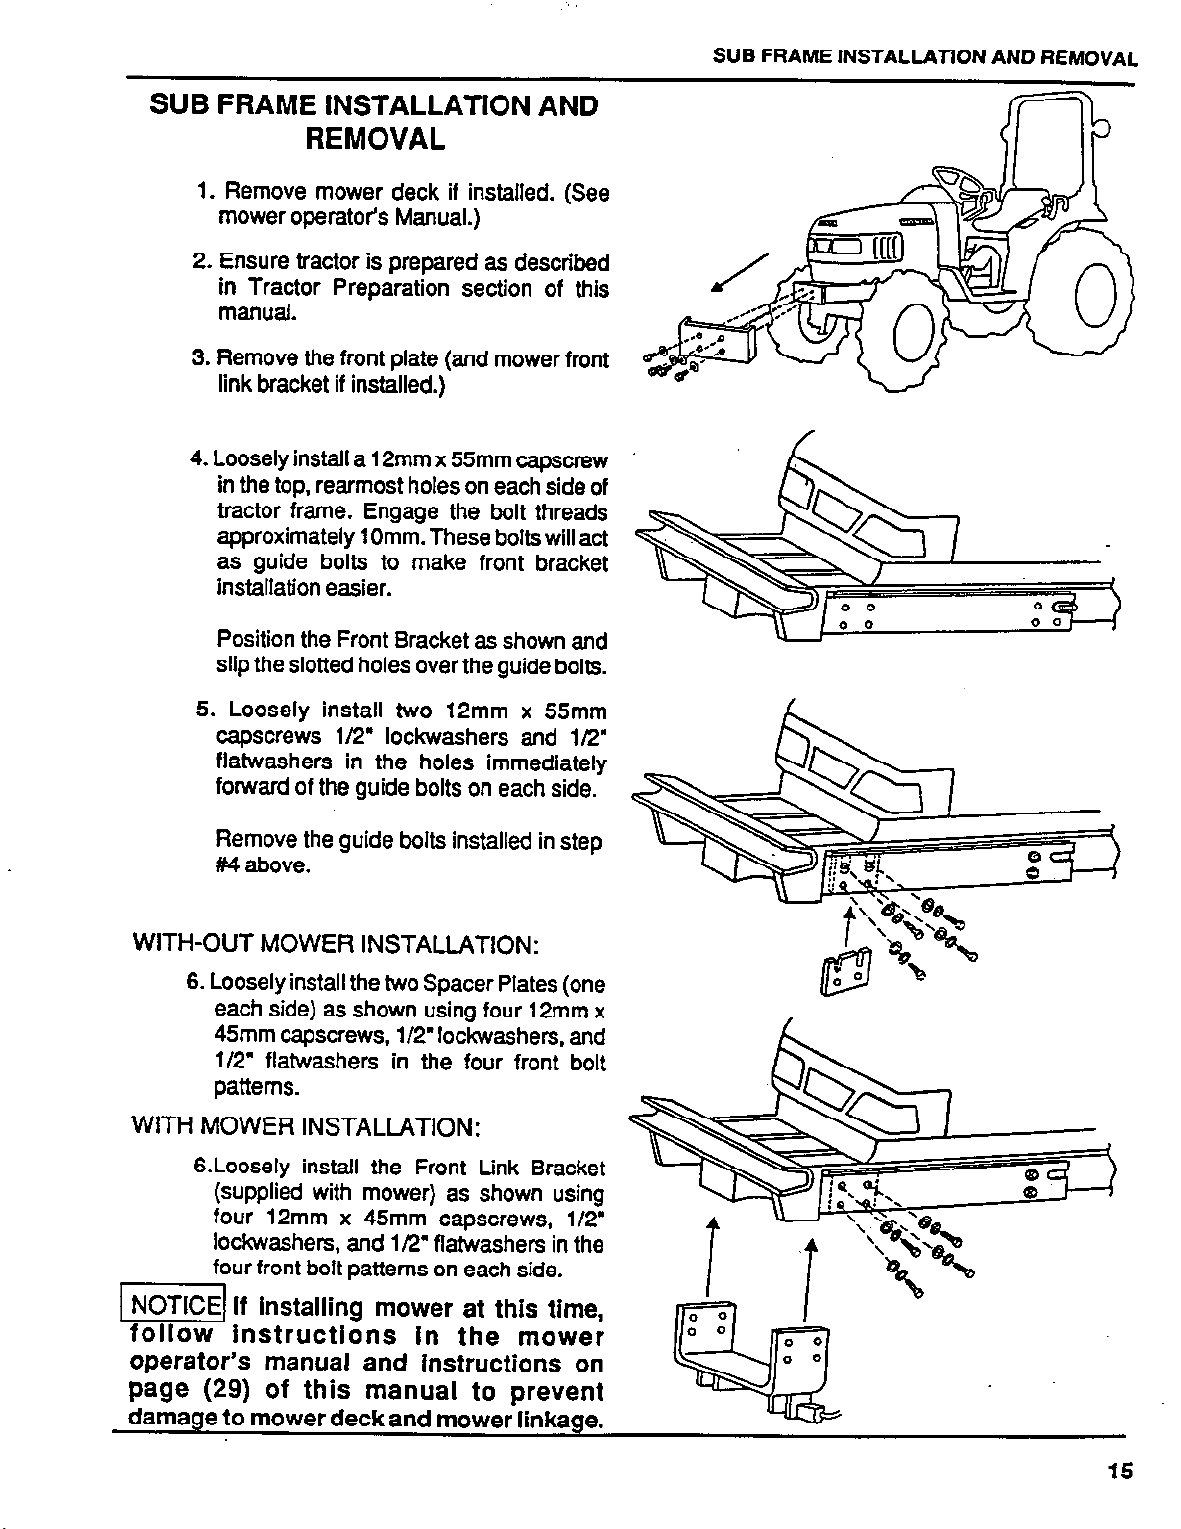
SUB FRAME INSTALLATION AND
REMOVAL
1. Remove mower deck if installed. (See
mower operator’s Manual.)
2. Ensure tractor is prepared as described
in Tractor Preparation section of this
manual.
3. Remove the front plate (and mower front
link bracket if installed.)
4. Loosely install a 12mm x 55mm capscrew
in the top, rearmost holes on each side of
tractor frame. Engage the bolt threads
approximately 1 Omm. These bolts will act
as guide bolts to make front bracket
installation easier.
SUB FRAME INSTALLATION AND REMOVAL
Position the Front Bracket as shown and
slip the slotted holes over the guide bolts.
5. Loosely install two 12mm x 55mm
capscrews l/2” lockwashers and l/2”
flatwashers in the holes immediately
forward of the guide bolts on each side.
Remove the guide bolts installed in step
##4 above.
WITH-OUT MOWER INSTALLATION:
6. Loosely install the two Spacer Plates (one
each side) as shown using four 12mm x
45mm capscrews, l/2” lo&washers, and
l/2” flatwashers in the four front bolt
patterns.
WITH MOWER INSTALLATION:
G.Loosely install the Front Link Bracket
(supplied with mower) as shown using
four 12mm x 45mm capscrews, l/2
lockwashers, and l/2” flatwashers in the
four front bolt patterns on each side.
NOTICE If Installing mower at this time,
follow Instructions in the mower
operator’s manual and instructions on
page (29) of this manual to prevent
damage to mower deck and mower linkage.
15
Page 17
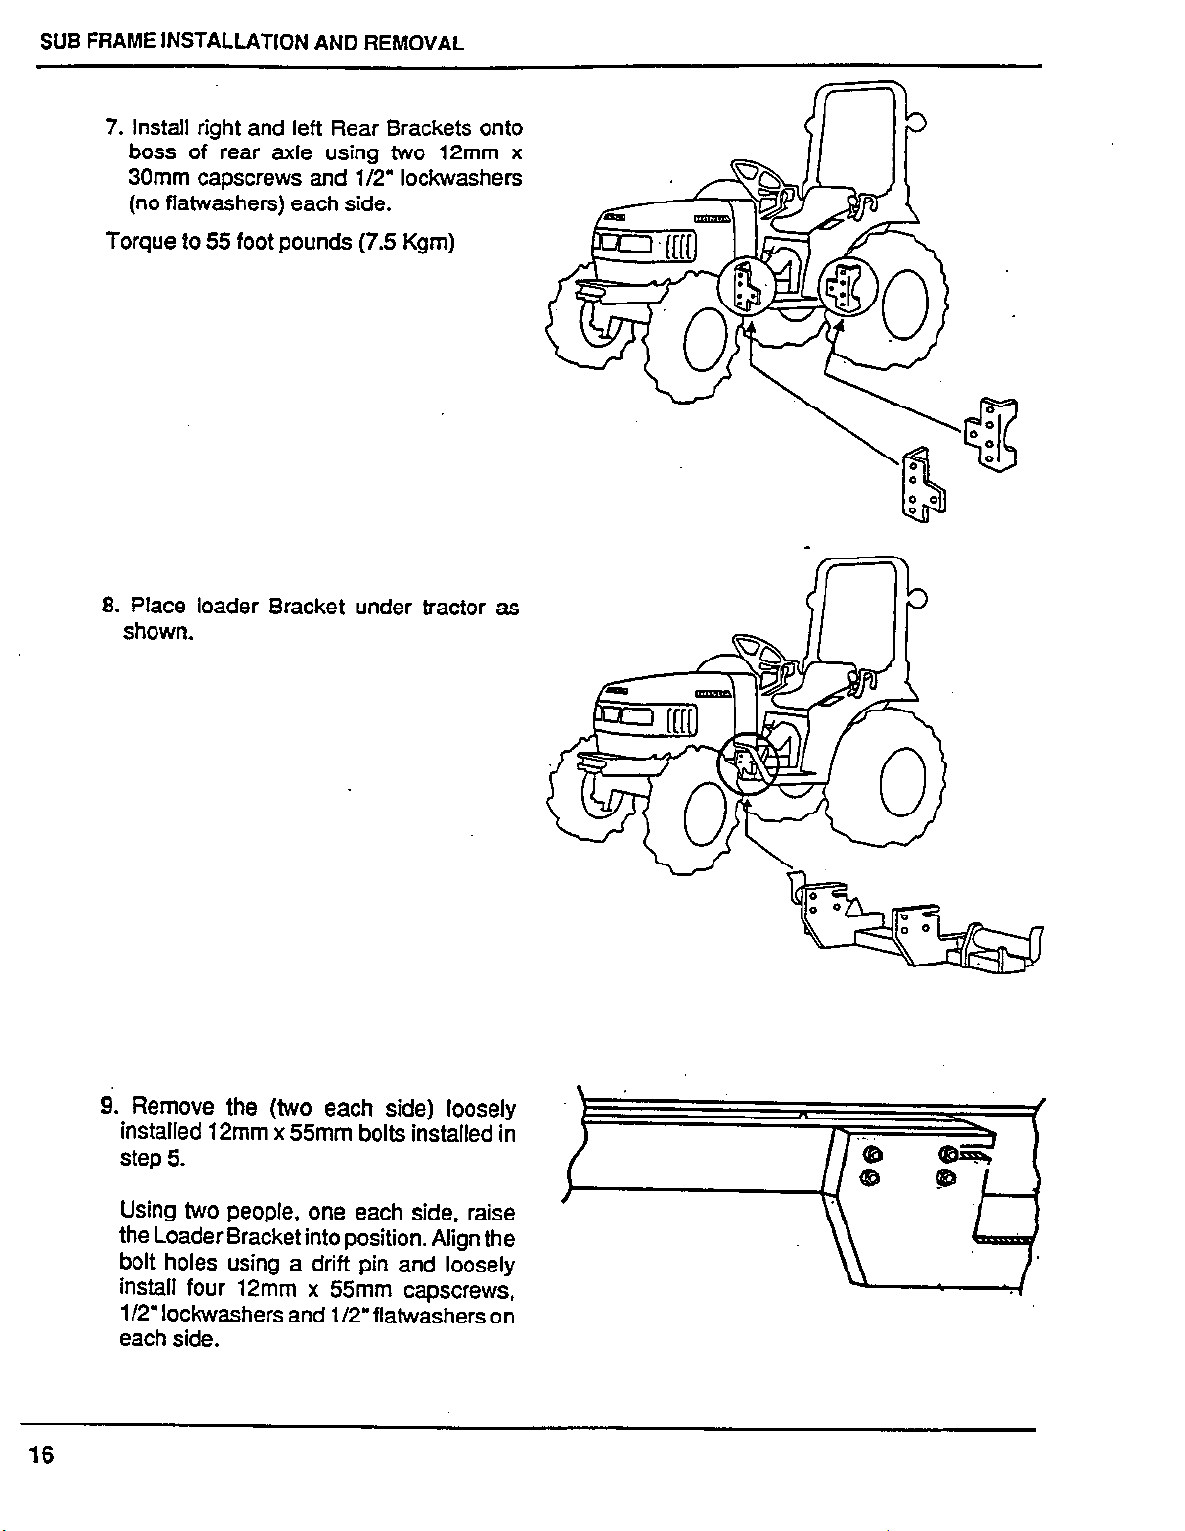
SUB FRAME INSTALLATION AND REMOVAL
7. Install right and left Rear Brackets onto
boss of rear axle using two 12mm x
30mm capscrews and l/2” lockwashers
(no flatwashers) each side.
Torque to 55 foot pounds (7.5 Kgm)
8. Place loader Bracket under tractor as
shown.
\o
0
0 0
0
cl
0
0
‘0
0
I
0
a
16
9. Remove the (two each side) loosely
installed 12mm x 55mm bolts installed in
step 5.
Using two people, one each side, raise
the Loader Bracket into position. Align the
bolt holes using a drift pin and loosely
install four 12mm x 55mm capscrews,
l/2” lo&washers and l/2” flatwashers on
each side.
Page 18
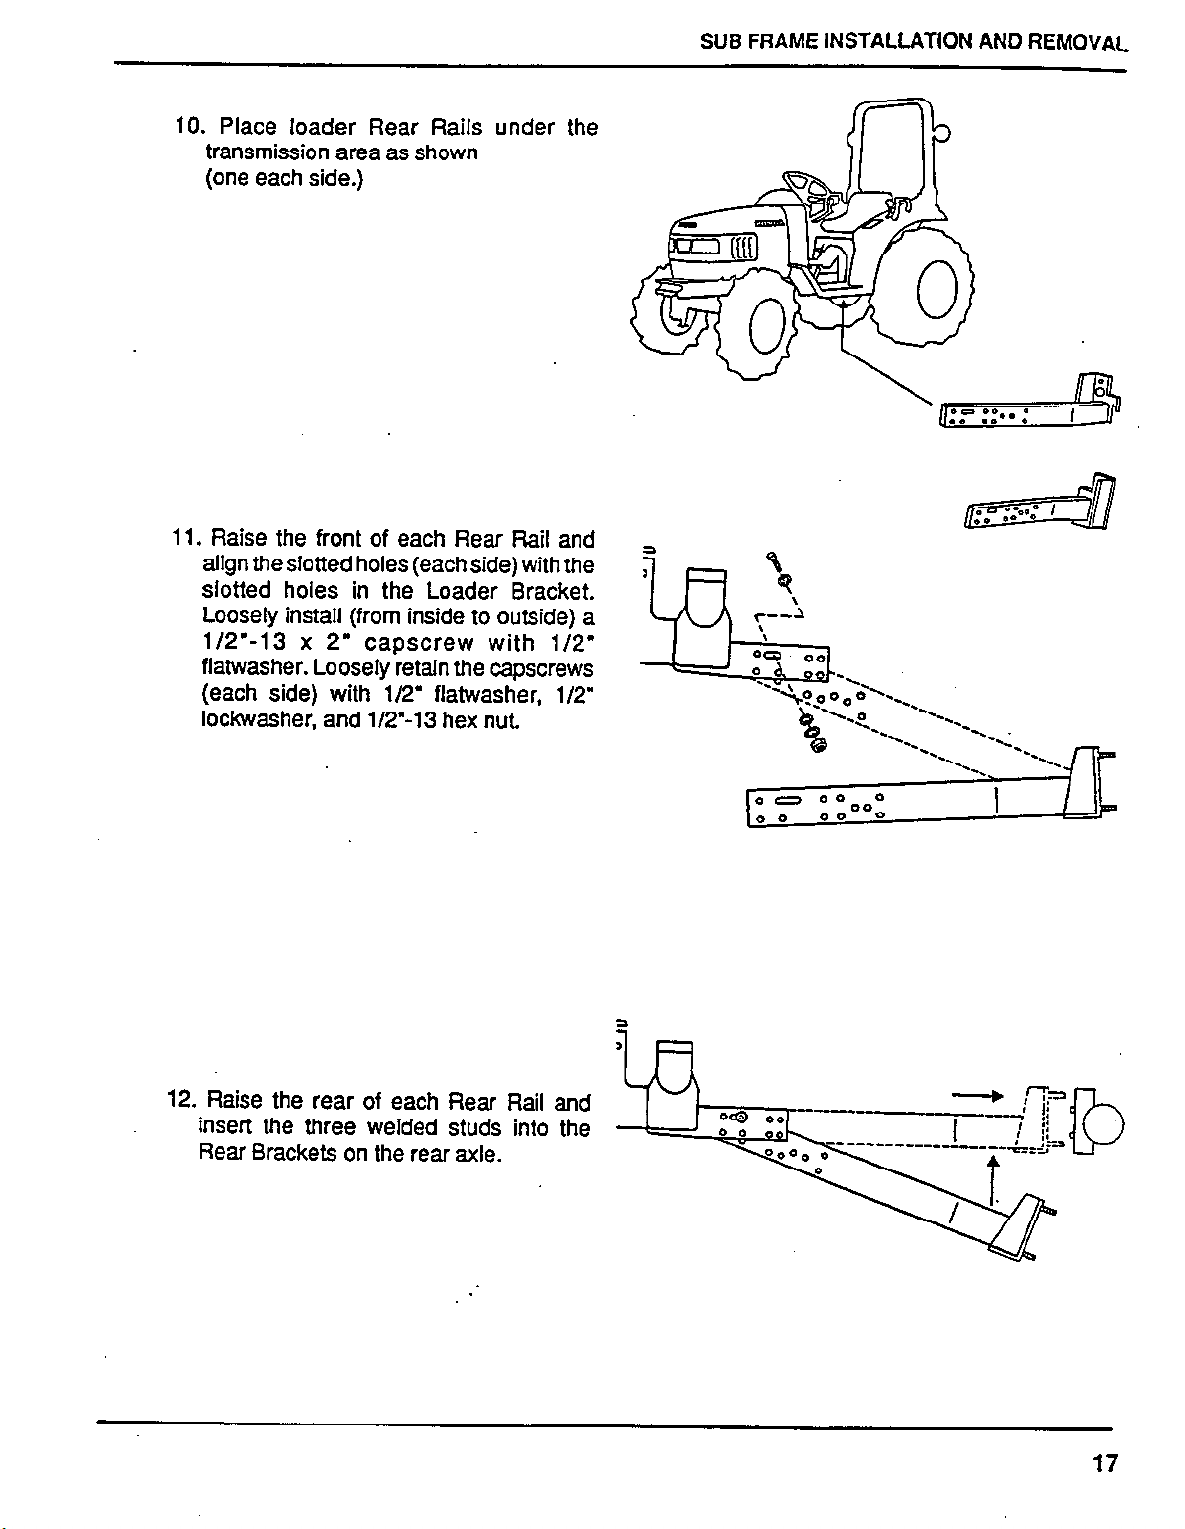
10. Place loader Rear Rails under the
transmission area as shown
(one each side.)
11. Raise the front of each Rear Rail and
align the slotted holes (each side) with the
slotted holes in the Loader Bracket.
Loosely install (from inside to outside) a
l/2.-13 x 2” capscrew with l/2’
flatwasher. Loosely retain the capscrews
(each side) with l/2” flatwasher, l/2”
lo&washer, and l/2”-13 hex nut.
SUB FRAME INSTALLATION AND REMOVAL
12. Raise the rear of each Rear Rail and
insert the three welded studs into the
Rear Brackets on the rear axle.
17
Page 19
/
SUB FRAME INSTALLATION AND REMOVAL
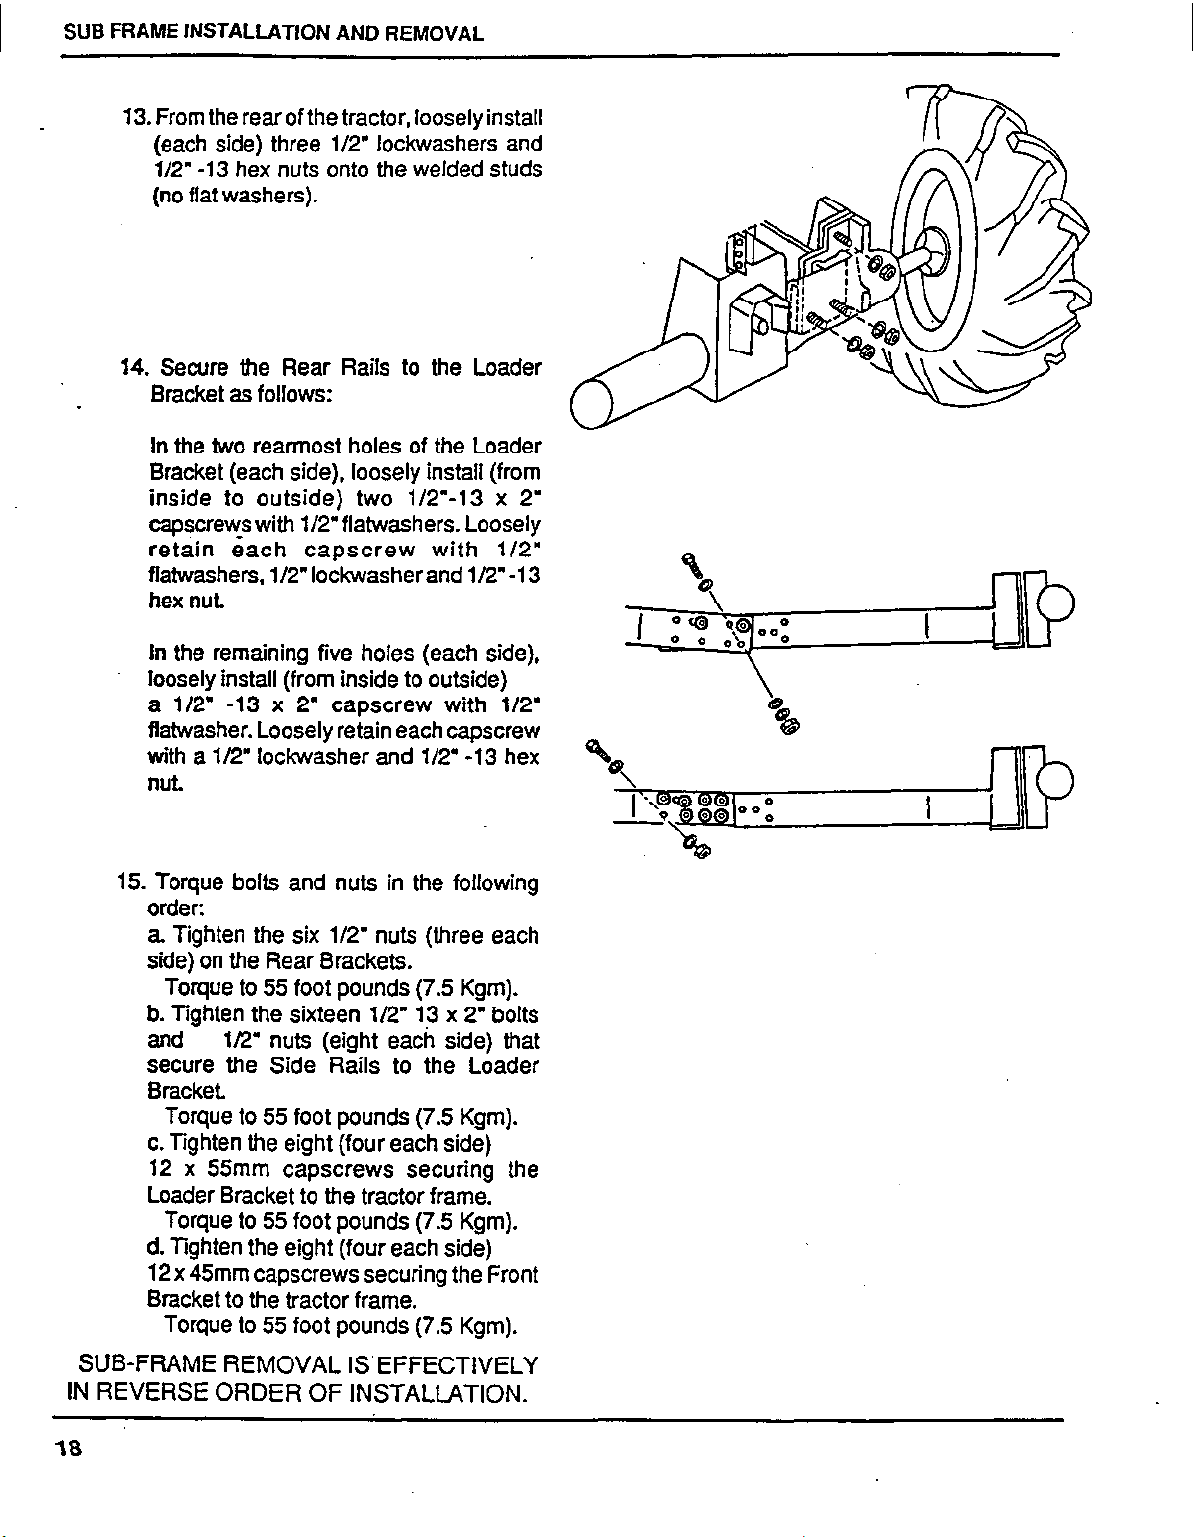
73. From the rear of the tractor, loosely install
(each side) three l/2” lo&washers and
V2” -13 hex nuts onto the welded studs
(no flat washers).
14. Secure the Rear Rails to the Loader
Bracket as follows:
In the two rearmost holes of the Loader
Bracket (each side), loosely install (from
inside to outside) two l/2”-13 x 2’
capscrews with l/2” flatwashers. Loosely
retain each capscrew with l/2”
ffatwashers, l/2” lockwasherand l/2”-13
hex nut.
In the remaining five holes (each side),
loosely install (from inside to outside)
a l/2” -13 x 2” capscrew with l/2’
flatwasher. Loosely retain each capscrew
with a l/2” lockwasher and l/2” -13 hex
nut.
15. Torque bolts and nuts in the following
order:
a. Tighten the six l/2” nuts (three each
side) on the Rear Brackets.
Torque to 55 foot pounds (7.5 Kgm).
b. Tighten the sixteen l/2” 13 x 2” bolts
and l/2” nuts (eight each side) that
secure the Side Rails to the Loader
Bracket.
Torque to 55 foot pounds (7.5 Kgm).
c. Tighten the eight (four each side)
12 x 55mm capscrews securing the
Loader Bracket to the tractor frame.
Torque to 55 foot pounds (7.5 Kgm).
d. Tighten the eight (four each side)
12 x 45mm capscrews securing the Front
Bracket to the tractor frame.
Torque to 55 foot pounds (7.5 Kgm).
SUB-FRAME REMOVAL IS’EFFECTIVELY
IN REVERSE ORDER OF INSTALLATION.
18
Page 20

SET-UP INSTRUCTIONS
SET-UP INSTRUCTIONS
‘DRAULIC VALVE PACKAGE
ORIFIt
\
LABEL
R
\
1. Install the single lever control on the
hydraulic valve assembly following
instructions included with valve.
2. Ensure the orifice plate is installed in the
hydraulic valve as illustrated;
3. Position the hydraulicvalve assembly onto
the valve stand and secure using two l/4”
-20 hex nuts.
4. Install the valve stand on the right side of
the loader sub frame. Secure with two
5/16” -18 X 1” capscrews, 5/16”
.lockwashers, and 5/l 6” -18 hex nuts.
19
Page 21

SET-UP INSTFWCllONS
5.
Connect the two 5/8”-38” hoses to the
loader hydraulic valve “IN” and “OUT”
ports as shown.
6.
Install a quick disconnect coupler (female
end) and dust plug onto the 38” hose
connected to the loader hydraulic valve
aJT port.
7.
Install a quick disconnect coupler (male
end) and dust plug onto the 38” hose
connected to the loader hydraulic valve
“IN” port.
8.
Attach two 18” hydraulic hoses and two
20” hydraulic hoses between loader
hydraulic valve and steel hydraulic tubes
as indicated.
Note: Two 20” hoses install between R/H ports
and two upper steel tubes.
Note: Installation of hydraulic hoses to steel
tubes will be easier if you:
a.
Loosen the retainers securing the steel
tubes to the loader arm.
b.
Install hydraulic hoses to steel tubes ’
beginning with bottom tuba and working
toward the top. Tighten the hoses to the
steel tubes as they are installed.
C.
Re-secure the steel tubes to the loader
arm using the retainers.
20
Page 22

LOADER ASSEMBLY INSTALLATION
1. Install hinge bolts, hinge pins and hinges
onto loader assembly.
2. Open hinges.
3. Using a suitable overhead hoist or
alternate safe method of lifting the loader
assembly, raise the unit and position it
into loader mounts.
4. Close sub frame hinges and secure by
torquing nuts to 75 foot pounds (102 N l m).
SET-UP INSTRUCTlONS
5. Check all pivot points to ensure retaining
hardware is in place.
6. Route the two 38” hoses on the “inside”
of the loader upright as shown and secure
with plastic tie strap. Ensure the hoses
are positioned to the rear of the muffler
exhaust port as shown.
PLASTIC TIE
7. Connect the two 38” hydraulic hoses to the
tractor hydraulic ports as illustrated.
21
Page 23

SET-UP INSTRUCTIONS .
I
Start-Up Procedure
Ensure tractor meets all requirements as
outlined in tractor preparation section of this
manual.
Check to ensure all labels are installed. Refer
to safety label page for label locations.
Check tractor hydraulic fluid level. Refer to
tractor operator’s manual for fluid
specifications.
Bucket and Lift Cylinders should be fully
retracted when checking fluid level.
Check all hydraulic connections to ensure
that they are adequately tightened.
Lubricate all pivot points that incorporate
grease fittings.
Start tractor and run engine at approximately
1,200 - 1,400 R.P.M. for initial cycling of
loader.
Operate all hydraulic cylinders to purge air
from loader hydraulic system.
Recheck hydraulic oil level with all hydraulic
cylinders fully retracted. Add recommended
oil as required to return hydraulic oil to proper
level as instructed in tractor owner’s manual.
Install loader bucket and bucket level
indicator in the second hole from the top.
NOTE: Longest bucket pin is used to attach
bucket level indicator.
Cycle Lift and Bucket Cylinders with bucket
empty several times to seat-in cylinder
components.
w Before using loader for the
19
- first time, cycle lift and bucket cylinders to
purge air from cylinders and hydraulic
system. Air In hydraulic system can cause
unexpected fall of loader boom, causing
Injury or damage to loader or tractor.
The tractor/loader should only be operated
with all safety equipment properly installed.
Operate the loader from the tractor seat only.
1 -
m Do not stand or walk under
a ralsed attachment. Accldental
movement of control lever or leak In
hydraulic system could cause loader
boom to drop, causing serious Injury. -
Make sure parked loader is on a hard level
surface with all safety devices engaged to
prevent loader from falling and being
damaged or injuring someone.
A -
m Before disconnecting
hydraulic llnes, relieve all hydraulic
pressure by operating hydraulic control
lever through all positions with engine off.
Escaping hydraulic oil under pressure can
have sufficient force to penetrate the skin,
causing serious personal Injury. Oil must
be surgically removed within a few hours
by a doctor familiar with this type of injury
or gangrene may result.
LONGEST BUCKET PIN
n
Inspect all hydraulic connections for evidence
of leaks.
Check hydraulic hose routings to ensure
adequate clearances exist between hoses
and adjacent components.
22
Page 24

SET-UP INSTRUCTIONS
Initial Lubrication
1-
m Do not perform any
service/maintenance Operations with
loader raised off ground.
Lower the loader to the ground and relieve
pressure in loader hydraulic lines prior to
performing any service/maintenance
operations on the tractor or loader by
operating hydraulic control lever through all
positions with engine off. Escaping fluid under
pressure can have sufficient force to
penetrate the skin, causing serious injury. Oil
must be surgically removed within a few hours
by a doctor familiar with this type of injury or
gangrene may result. Before applying
pressure to the system, be sure all
connections are tight and that lines, fittings
and hoses are not damaged. Fluid escaping
from avery small hole can be almost invisible.
Use a piece of cardboard or wood rather than
your hands to search for suspected leaks.
Check the tractor hydraulic system as
outlined in the tractor owner’s manual.
When checking hydraulic system oil level, the
loader should be on the ground and bucket
fully retracted. (All cylinders in retracted
position).
Grease all loader pivot points as indicated in
lubn’cation chart.
Inspect hydraulic hoses, connections, control
valve and cylinders for leakage.
If oil seepage past cylinder rod is evident,
tighten cylinder rod packings by turning
cylinder end cap l/4 turn clockwise. Do not
over-tighten end caps as this will reduce
service life of cylinder packings.
Tractor tire inflation should be checked as
listed in the Tractor Preparation section to
ensure tire inflation is to specifications.
Unequal rear tire inflation can result in bucket
not being level to the ground.
m A sudden line burst could
L -
cause the main frame to drop suddenly,
causing damage to the tractor or loader or
injury to personnel. Do not operate the
loader if the fittings are leaking or if the
hoses are damaged.
m
A -
Operate the loader from the
tractor seat only.
w Accidental movement of
A -
control lever or leak in hydraulic system
could cause main frame to drop, causing
severe injury. Do not stand or walk under
a raised attachment.
Front tires should be maintained at maximum
recommended inflation to maintain normal
tire profile with added weight of
loader/material.
23
Page 25

SET-UP INSTRUCTIONS
Pre-Delivery Checklist
After the machine has been completely assembled and lubricated, inspect it thoroughly to be
certain it is operating properly before delivering it to the customer. The following checklist is a
.reminder of points to inspect. Check off each item as it is found satisfactory or after proper
adjustment is made.
l Check to make sure loader is completely assembled according to assembly instructions.
l Check all bolts to make sure they are tightened to specified torque value.
- Inspect and if necessary, lubricate all lubrication points. Make sure all fittings are in place and
taking grease properly.
- Ins ect all hydraulic hoses, lines, and fittings to make sure they are installed properly and not
le ‘ng.
i&
- Make sure hydraulic hoses are properly routed and will not be damaged when the loader is
raised or lowered.
- Start tractor, raise and lower loader and operate bucket cylinders and make sure unit is
operating properly.
- Check tractor hydraulic fluid level. Add hydraulic fluid as required to fill full indicator on dipstick
Refer to Tractor Owner’s Manual for proper op to be used.
- Inflate tractor‘s front tires to maximum recommended pressure.
24
Page 26

OPERATION
OPERATION
Precautionary Notes
Do not lower the edge of the bucket too low
for loading. Keep the bottom of the bucket
level with the ground when loading.
1-j Do not use bucket for pushing
down material with bucket cylinders
partially extended. Damage to the
cylinders may result.
Do not tip bucket cutting edge down (fully
extend bucket cylinders) during
bacMilling/backgrading operation.
Operation with front tractor wheels off the
ground is not recommended.
Position vehicles to be loaded as near the pile
as possible and in such a direction as to
minimize the amount of tractor turning
required to dump.
Do not lowerthe loaderwith the tractor engine
shut off.
Don’t hurry the learning process or take the
unit for granted. Ease into it and become
familiar with your’new loader and tractor.
When lowering a heavy load, ease it
downward slowly. Never drop a loaded
attachment and ‘catch” hydraulically.
Stopping a load after it has gained downward
momentum places undue strain on the unit
and may cause unnecessary damage to the
loader or tractor or even worse, personal
injury.
m Escaping hydraulic oil under
1-
Dressure can have sufficient force to
aenetrate the skin causing serious
Dersonal injury. If injured by escaping
lydraulic oil, consult a physician
mmediately. Oil must be surgically
Pemoved within a few hours by a doctor
iamiliar with this type of injury or gangrene
nay result.
Before disconnecting
hydraulic lines, relieve .all hydraulic
pressure by operating hydraulic control
lever through all positions with engine off.
Keep the unit clean and perform regular
service. Observe safety instructions
whenever cleaning, servicing, or lubricating.
We urge you to follow this advice:
Read and understand this manual as well
as the Tractor Owner’s Manual.
Remember and observe the Safety
Precautions brought to your attention in this
manual, the tractor manual and on the
machinery itself.
Use good common sense in the everyday
operation of this unit.
recommendations can never be
all-inclusive. You are responsible for
watching out for, and avoiding, unsafe
conditions.
Never exceed the limits of a piece of
.machinery. If its ability to do a job safely is
in question - Don’t try it.
Safety
-A sudden line burst can
L -
cause the mainframe to drop suddenly,
causing damage to the tractor or loader or
injury to personnel. Do not operate the
loader if the fittings are leaking or if the
hoses are damaged.
BEFORE OPERATING, LUBRICATE ALL
MOVING
PARTS
(REFER TO
LUBRICATION SECTION).
Cold Weather Operation
To assure smooth operation in cold weather,
allow tractor to warm up. SLOWLY cycle the
loader and attachment several times to warm
the fluid in the hydraulic system. The loader
may operate erratically until the hydraulic fluid
has warmed to operating temperatures.
25
Page 27

OPERATION
CONTROLLED RATE of LOADER FUNCTIONS
‘By feathering (slightly moving) the control
lever, precise operational speeds can be
obtained. This action controls the position of
the valve spools in the control valve and
regulates flow of oil from/to cylinders.
It is important to utilize this operational
practice when lowerfng the main frame when
the bucket is loaded with material.
Scraping
FLOAT
UP
When scraping, the “Float” position should be
utilized to maintain the bucket firmly on the
ground and at the same time allow the bucket
to follow ground contours.
The bucket should be positioned level to the
ground during “Scraping” Operations.
BackfillinglBackgrading
When “Backfilling” or “Backgrading”, position
the bucket so it is level on the ground. Do not
dump material from bucket. Additional weight
of material in bucket will assist in
‘Backgrading” and increase loader efficiency
during “Backfilling”.
Page 28

LOADING
Drive straight ahead into pile with bucket
cutting edge level with the ground. In order to
prevent possibility of damaging tractor or
loader;
l Do not ram into pile at high speed.
l Do not attempt to turn tractor while loading.
As bucket begins to fill with material, gradually
roll the bucket back and raise the loader to
increase “fill” capacity. This procedure also
results in the material being removed in layers
from the top for maximum loading efficiency.
OPERATION
when the bucket is full, raise loader so that
the bucket is clear of material and slowly back
out of pile.
For maximum loading efficiency, minimize
angle of turn and distance between the
loading and unloading points.
27
Page 29

OPERATION
Transporting Material
Transport material to “Unloading Point” with
loader bucket as low as possible to prevent
spillage
and maintain
maximum
Tractor/Loader stability.
During transport the loader should not be in a
position that will impair operator’s vision.
Safety:
l Avoid any overhead wires or obstacles when
loader ls raised, to avoid damage or possible
death by electrocution.
l A loaded bucket should be transported in a low
position at slow ground speeds, especially if
the ground is irregular. Make turns slowly and
use the tractor brakes cautiously. A full bucket
in the raised position alters the center of gravity location of the unit and increases the possibility of mishaps.
.
l Do not lift or carry personnel on a loader or
attachment; a slip or fall could cause serious
injury.
l Operate at slow ground speeds, especially on
irregular ground to avoid tipping.
Unloading
As the tractor approaches the ‘Unloading
Point”, raise the loader to the height required
for clearance to “Dump” bucket.
Do not raise loader. higher than required for
=dumping” Clearance.
As “Dumping” clearance height increases, the
bucket position must be adjusted to maintain
a level bucket to prevent excessive spillage
of material from bucket.
28
Page 30

OPERATION
Loader Sub Frame Installed With MM60 Mower
You may install your MM60 mower deck with the FL6555 sub frame installed. The front loader
must be removed from the sub frame. If you also have a BH6575 Back Hoe, both the back hoe
and its sub frame must be removed.
pEE-]
You must use the following procedure to adjust the mower linkage to avoid damage to
the deck or linkage.
1. Put the hydraulic position control in the ‘DOWN” position.
2. Adjust the left lift rod as shown:
With three-point hitch installed:
without three-point hitch:
3. Follow the normal mower installation in mower operator’s manual up to the point of raising
the deck.
0.2in
LOADER
SUB FRAME
-yy-lf#
MOWER DECK STOP
4. Slowly move the hydraulic position control to the “UP” position to raise the deck. Immediately
lower the deck at the first indication of resistance.
5. Check the clearance between the deck stops and the front loader sub frame. Adjust the
clearance to 0.20in (5mm) by adjusting the left lift rod length (shortening the lift rod raises the
deck).
The fully raised position of the deck will be lower with the loader sub frame installed.
29
Page 31

LOADER REMOVAL AND
INSTALLATION
Loader Removal
Select a level place to park the loader.
Raise the loader off the ground and position
bucket cutting edge vertical to ground.
Lower loader to position bucket cutting edge
on the ground and- shut tractor off.
Place parking leg in ‘Park” position on the
boom and secure with pin.
LOADER REMOVAL AND INSTALLATION
Start tractor, raise loader and fully retract
bucket.
Lowerthe loader until the parking leg contacts
the ground.
Tip the bucket until the cutting edge just
contacts the ground.
Shut the tractor OFF, remove the hinge
assembly clamping capscrews and swing
hinges clear of the rear mount.
31
Page 32

LOADER REMOVAL AND INSTALLATION
Start the tractor and shift the loader control
valve into the “float” position.
Slowly retract the bucket cylinders until the
bottom of the bucket rests firmly on the
ground.
Note: During this procedure the loader should
raise off the rear mount. If necessary, extend
the lift cylinders as required to raise the loader
clear of the rear mount.
Back the tractor slowly until the loader front
crosstube is just clear of the Front Mount.
Observe the
hydraulic hoses
(valve/tubelines) to ensure they are not
caught or stretched during this operation
- Shift the loader control valve into the neutral
position.
Check to ensure the loader will clear the front
.tires. If additional clearance is required,
extend the lift cylinders.
Shut tractor OFF and disconnect the
hydraulic hose couplers. Secure the hydraulic
hoses to ensure they will be clear of the
tractor. Install dust caps and plugs.
Start the tractor and carefully back out of the
loader.
32
Page 33

Storage
LOADER REMOVAL AND INSTALLATION
End of Season:
If loader is to be dismounted from the tractor
during storage, make sure the parking area is
on hard, level ground. Cap all hydraulic hoses
to prevent contamination.
Store loader in a dry, sheltered area if
possible.
Thoroughly clean the loader of all
accumulated dirt and grease.
Completely lubricate the loader as specified
in “Lubrication” section of this manual.
Using an oil soaked cloth, lubricate all
hydraulic cylinder rods to protect them from
rust and corrosion.
Repaint any areas where paint is worn or
damaged.
Wear areas on bucket should be coated with
grease to prevent rust or corrosion.
Replace any Safety or Warning Labels that
are not readable due to wear or damage.
Replace any damaged or worn parts.
m To Prevent Accidents do
A -
not allow children to play on or around the
tractor or loader.
Remove sub frame if required for other
attachments.
See
sub frame
installation/removal section. .
Beginning of SeaSOn
Thoroughly clean the loader of all
accumulated dirt and grease.
If removed from tractor for storage, remount
loader per procedure in this manual.
Completely lubricate the loader per
“Lubrication” section of manual. Make sure all
fittings are taking grease properly.
Clean with solvent any exposed surfaces
which had been coated with grease: Wipe dry
with a clean cloth, then lubricate with an
oil-soaked cloth.
Tighten any bolts that have been loosened
and make sure all pins and retainers are in
place.
Start tractor and operate loader to make sure
it is operating property and all the hoses are
properly connected.
Check hydraulic fluid level in tractor and fill
as required. Use oil recommended in tractor
owner’s manual.
Make sure hydraulic hoses, lines and fittings
are in good shape and not leaking. Replace
or repair as required.
Review safety precautions and operation
sections of this manual.
33
Page 34

LOADER REMOVAL AND INSTALLATION
Loader Installation
Install sub frame if removed. See sub frame
installation section.
Carefully drive the tractor into the loader to a
position where the hydraulic hoses can be
connected to the tractor control valve.
Note: The tractor front mount should be
aligned with the loader front crosstube.
Shut the tractor OFF and connect the
hydraulic couplings to the tractor.
Start the tractor and drive ahead slowly to
position the loader front crosstube into the
tractor front mount.
Note: Activate the bucket cylinders and lift
cylinders as required to align the loader
crosstube/front mount and tractor front
mount.
Shift the loader control valve into the ‘Float”
position
With the loader assembly secure in the tractor
front mount, extend the bucket cylinders to
lower the loader assembly onto the rear
mount.
Shut the tractor OFF and secure the loader
assembly hinges.
Start the tractor, raise. the loader off the
ground and position bucket cutting edge
vertical to ground.
Lower loader to position bucket cutting edge
on ground and shut tractor off.
Remove the parking leg and place in storage
position.
Lubricate all loader pivot pins.
34
Page 35

LUBRICATION AND
MAINTENANCE
Do not perform any Service/Maintenance
operations with loader raised the off ground.
For additional access to tractor components
remove loader.
LUBRICATION AND MAINTENANCE
.
!
-Accidental movement of
control lever or leak in hydraulic system
could cause main frame to drop, causing
serious injury. Do not stand or walk under
a raised attachment.
Check the tractor hydraulic system as
outlined in the Tractor Owner’s Manual.
Lower the loader to the ground and relieve
pressure in loader hydraulic lines prior to
performing any service/maintenance
operations on the tractor or loader.
-1 When checking hydraulic system oil
level, the loader should be on the ground and
bucket fully retracted. (All cylinders in
retracted position).
A -
W Escaping fluid under pressure
can have sufficient force to penetrate the
skin, causing serious injury. Before
disconnecting lines, be sure to relieve all
Grease all loader pivot points daily (10 hours).
Inspect hydraulic hoses, connection, control
valve and cylinders for evidence of leakage.
_
pressure by operating control lever (1 If oil seepage past cylinder rod-is
through all -positions with engine off.
Before applying pressure to the system,
be sure all connections are tight and that
lines, pipes and hoses are not damaged.
evident, tighten cylinder rod packings by
turning cylinder end cap l/4 clockwise. Do not
over-tighten end caps as this will reduce
service life of cylinder packings.
Fluid escaping from a very small hole can
be almost invisible. Use a piece of
cardboard or wood rather than your hands
to search for suspected leaks.
Tractor tire inflation should be checked at
recommended intervals as listed in the tractor
owner’s manual to ensure tire inflation is to
specifications.
See a doctor at once if injured by escaping
fluid. Serious infection or reaction can
develop if correct medical treatment is not
administered immediately.
Referto “Lubrication and Maintenance Chart”
for quick reference to maintenance
operations.
1
!
-A sudden line burst could
cause the main frame to drop suddenly,
causing damage to the tractor or loader or
Unequal rear tire inflation can result in bucket
not being level to the ground.
Front tires should be maintained at maximum
recommended inflation to ,maintain normal
tire profile with added weight of
loader/material.
.
!
-The tractor/loader should
only be operated with all safety equipment
properly installed.
injury to personnel. Do not operate the
loader if the fittings are leaking or if the
hoses are damaged.
Operate the loader from the tractor seat only.
Page 36

LUBRICATION AND MAINTENANCE
ITEM
Hydraulic System Oil Level
SERVICE
Check
Hydraulic System Oil/Filter Replace
Tire Inflation
Loader Pivot Points
Loader Hydraulic Lines,
Check
Lubricate
Check for leaks/wear
Hoses, Connections
Lift and Bucket Cylinder Rod
Packings
Check fo; Seepage
Service as described under
Lubrication/Maintenance
NOTICE: Rod Packing Sets
should be reset after 10
Operations
Hours of operation.
See Cylinder Assembly
Maintenance Section.
Pivot Pin Clips
Subframe Hinge Clamping
Bolts
Loader Mount Hardware
Check - Replace if missing
Check - Retorque if
necessary
Check visually - Re-torque
INTERVAL
Daily/l0 Hours
As specified in Tractor
Owner’s Manual
WeeklyZOHours
Daily/l 0 Hours
Daily/l 0 Hours
Daily/l 0 Hours
Daily/l 0 Hours
Weekly/50Hours
Weekly/SO Hours
Every 200 Hours
36
Page 37

Locknut
SERVICE
Body Assembly
Rod Packing Set
\
:king Guide
Bushing Insert
SERVICE
Cylinder Disassembly
Refer to illustration for component
Lift and Bucket Cylinder
General
Lift and bucket cylinder ports should be
capped at all times when hydraulic hoses are
disconnected to prevent contamination.
It is recommended that all cylinder packings
be replaced during cylinder assembly. Order
seal repair kit to obtain all sealing
identification.
Drain all oil from cylinder end cap (turn
counterclockwise).
Install a plug in base end port of cylinders and
pop out rod packing set by applying air
pressure to the’ rod end port of cylinders.
Do not apply air pressure to base end port of
cylinder. As rod may extend causing injury.
components that should be replaced during Safety glasses should be worn when
hydraulic cylinder overhaul.
performing this operation.
37
Page 38

SERVICE,
Ensure hands and face are kept clear of end
of cylinder.
With rod packing set out of cylinder body,
remove the retaining wire located
approximately l-1/4” in from end of cylinder
body by pressing on one side to force the
retaining wire 90 out of the groove and pull
retaining wire out of cylinder body.
Pull cylinder rod out of cylinder body.
Secure the cylinder rod in a bench vise by the
end eye of the rod. Do not clamp on the
chromed finish section of the rod.
Remove piston assembly lock nut and pull
piston assembly from rod.
Remove piston seal and backups from piston.
Clean all parts for inspection.
inspection
inspect cylinder body for evidence.of scoring
and pitting. Replace cylinder body if
excessive pitting/scoring is evident.
Inspect cylinder rod for evidence of pitting or
plating deterioration through the section of the
rod that contacts the rod packing set.
Assemble piston seal and backups or piston
and install piston assembly on cylinder rod.
refer to illustration for reference to component
orientation.
Install Locknut and torque to 225 ft./lbs.
Coat piston assembly with clean hydraulic oil
and with the cylinder body supported in a
bench vise, carefully install cylinder rod in
cylinder body. Care must be taken to ensure
piston seal is not damaged during installation.
Install the retaining wire in the cylinder body.
Coat rod packing set components with clean
hydraulic oil and position in cylinder body.
Install cylinder end cap and tighten until rod
packing set components are snug. Do not
over-tighten as rod packing service life will be
reduced.
Rod packing sets should be reset by
tightening cylinder end cap l/4 turn after the
initial 10 hours of cylinder operation.
Install dust plugs in cylinder ports.
Inspect cylinder rod and body end eyes and
bushings for wear. The steel bushings should
fit snugly in the end eyes.
Inspect end eye grease fittings and replace if
damaged
Inspect cylinder packing guides and piston.
Replace any components that exhibit
excessive wear or damage.
Cylinder Assembly
Clean and dry all cylinder components
thoroughly.
Place cylinder end cap on cylinder rod
followed by rod packing set and retaining
wire.
Refer to illustration for reference to
component orientation and sequence.
38
Page 39

Lift and Bucket Cylinder Leakage Test
SERVICE
BASE END PORT
,
1
Piston Assembly
8
General
Safety glasses should be worn when
performing cylinder leakage test. -
ROD END PORT
RodPBdkingSe t
Test Procedure
Lower loader to the ground, shut tractor off
and disconnect cylinders as follows:
When performing cylinder leakage tests the
tractor engine should be operating at medium
R.P.M. to ensure the hydraulic system
reaches the relief valve setting.
During tests, the system relief valve
governing maximum pressure to the loader
cylinders will be ‘open” (system is at relief
valve setting).
l=IDo not maintain hydraulic
systemat relief valve setting pressure for
more than 20 second intervals to prevent
overheating hydraulic system.
The test procedures outlined enable the
cylinders to be checked for rod packing set
leakage (external leakage) and piston seal
leakage in both direction (internal leakage).
Lift Cylinder Test - Disconnect from Sub
frame (Rod End).
Bucket Cylinder Test - Disconnect from
bucket (rod end).
Support the cylinders to prevent excessive
strain on hydraulic hoses in a position that will
allow the cylinders to be completely
“extended”.
39
Page 40

SERVICE
Lift and Bucket Cylinder Leakage Test
Rod Packing Set Leakage Test
Start tractor and “retract” cylinders
completely.
Continue to hold control valve lever in position
to ‘retract cylinders” and check for evidence
of oil leakage past the rod packing set
(external leakage).
On cylinders that have been in service, rod
packing set leakage is usually indicated by
accumulation of dirt/oil at rod end of cylinder
body.
If oil leakage is evident, shut tractor off and
turn cylinder end cap l/4 turn clockwise to
tighten gland packing set seals.
Recheck for oil leakage and repeat tightening
procedure until oil leakage stops.
Piston Seal Assembly Leakage Test
With cylinders in the fully “retracted” position
and tractor shut off, disconnect the hydraulic
lines from the base end port of cylinders.
Route a hydraulic hose from the cylinder base
end ports to a container (to catch oil during
leakage test).
Start tractor and place loader control valve
lever in the position to ‘retract” cylinders and
“hold”.
Check for oil leakage from base end port of
cylinder.
A constant dripping or very slight flow of oil is
normal. If a steady flow of oil -is evident
excessive wear or damage of the piston seal
is indicated and the cylinder(s) should be
removed and disassembled for inspection
and repair.
1-1 Rod packing set seals should not be
over-tightened as this will reduce service life.
If leakage cannot be stopped, excessive wear
or damage or rod packing set component(s)
is indicated and the cylinder(s) should be
removed and disassembled for inspection
and repair.
Inspect cylinder rod for pitting, deterioration
or damage to the chrome finish. Any
excessive damage to the chrome finish
reduces the ability of the rod packing set to
seal properly.
If rod packing set tests are satisfactory,
proceed to piston seal assembly leakage test.
If piston seal leakage test in ‘retract” position
indicates piston seal is satisfactory, reinstall
hydraulic hoses and dully extend cylinders to
perform test in “extend” position.
With cylinder in the fully “extended” position
and tractor shut off connect hydraulic lines to
base port and disconnect the hydraulic lines
from the rod end port of cylinders. Route a
hydraulic hose from the cylinder rod end ports
to a container (to catch oil during leakage
tests).
Start tractor and place loader control valve
lever in the position to ‘extend” cylinders and
“hold”. .
Check for oil leakage from rod end port of
cylinders.
A constant dripping, or very slight flow of oil
is normal. If a steady flow of oil is evident
excessive wear or damage of the piston seal
is indicated and the cylinder(s) should be
removed and disassembled for inspection
and repair.
Page 41

Hydraulic Valve
SERVICE
41
Page 42

SERVICE
Hydraulic valve
Control Valve Removal
Priorto removing control valve, ensure loader
is on the ground and all hydraulic lines are
relieved of oil pressure.
Label and disconnect hydraulic lines from
control valve. Cap IN and RETURN lines to
prevent contamination of hydraulic system.
Remove control valve mounting capscrews.
Disassembly
Refer to control valve illustration for
component identification.
Remove quick disconnect couplings and
adaptor fittings.
Plug all ports and thoroughly clean external
areas of control valve.
Valve Spools
Prior to removal, mark valve spools to ensure
they can be identified for installation in the
same spool bores from which they were
removed.
.Lift Cylinder Spool (Float)
Remove the detent plugs, springs and balls
and remove the two detent body mounting
screws. Pull valve spool from valve body (pull
out from spring end of spool).
Remove the three valve spool ‘0’ rings from
the valve body and one from the detent body.
Care must be taken to ensure valve body
spool bores are not scratched during 0 Rjng
removal.
Thoroughly clean all parts.
Inspection
Remove single lever control components to
facilitate spool removal.
Relief Valve
Unscrew relief valve cap, followed by
adjustment screw. Unscrew relief valve body
and remove spring, cup, poppet, seat and
sealing washer.
Load Check Valve Service
The spring loaded check valve is located
adjacent to the bucket cylinder spool return
sprfng. Malfunctioning is most unlikely, but
contaminate can prevent free movement or
reseating.
Remove the check valve plug to reveal the
spring and poppet. Wash free of contaminate
and check for free movement of poppet with
valve body. Replace the poppet if damaged.
Reassemble in reverse order after valve body
is clean and drav.
,
Remove any nicks or burrs from valve
components and inspect for evidence of
excessive wear.
Inspect valve spools and valve body bores for
excessive wear, scratches or damage.
Imf If internal leakage with the valve
spool(s) in the spring centered position has
been experienced, valve body and/or valve
spool wear/damage is indicated. If this
condition exists the control valve assembly
must be replaced.
Inspect lift cylinder valve spool for excessive
wear in the detent area.
42
Page 43

SERVICE
Hydraulic Valve
If spool does not stay in “detent” position or
tends to be difficult to get into “detent”, “detent
spool” wear and/or weak detent springs are
indicated and suspected parts should be
replaced.
Inspect valve spool r&urn springs for
evidence of distortion/damage.
If valve spool(s) was not centering properly
and valve spool slides freely in valve body, a
weak or broken return spring is indicated.
Inspect relief valve spring for damage or
distortion.
Inspect relief valve poppet and seat for wear
or damage.
Assembly
It is recommended that all ‘0’ rings be
replaced during valve service.
Referto illustration for reference to assembly.
Thoroughly clean and dry all parts.
Carefully install the ‘0’ rings in the valve body
spool and detent body ‘0’ ring grooves.
Coat ‘0’ rings with clean hydraulic oil prior to
.installation.
Extreme care must be taken to ensure ‘0’
rings are not damaged during installation
Valve Spools
Assemble spool return springs on valve
spools if they were removed previously. .
Install end cap on detent body
Install detent balls, springs and plugs.
Install support, spring, spacer and end cap on
valve body/bucket cylinder spool.
Torque hardware to 2-3ftJlbs.
Relief Valve
Install sealing washer, seat, poppet, spring,
dup and body.
Screw in relief valve adjustment screw until
the spring just begins to compress and install
crushwasher, hex nut, second crushwasher
and cap.
Relief valve adjustment is made following
control valve installation as described under
“Relief Valve Adjustment”.
Control lever and hydraulic connections
Install single lever control linkage as
illustrated.
Install adaptor fittings and quick disconnect
couplers.
Inspect adaptor fitting ‘0’ rings and replace if
required.
Installation
Mount control valve on front loader valve
stand and reconnect hydraulic hoses to ports
from which they were removed.
Refer to hydraulic system schematic diagram
to check that hydraulic connections are
correct.
Install detent body on float spool.
Coat valve spools with clean hydraulic oil and
carefully install in valve body.
Extreme care must be taken during valve
spool installations to ensure ‘0’ rings are not
damaged.
“Float” valve spool is installed in valve body
adjacent to return port.
Relief valve setting should be adjusted
immediately following installation/start-up as
described under relief valve adjustment.
43
Page 44

SERVICE
Hydraulic Valve
Installation continued
Check for hydraulic leaks and ensure hose
routings do not result in hydraulic hoses
rubbing orcatching on adjacent tractor/loader
components.
Relief Valve Test/Adjustment
Safety glasses should be worn when
performing this adjustment.
Install a O-4000 PSI test gauge into the
unused loader control valve pressure port
(“IN”).
Start tractor and run engine at operating
speed to bring hydraulic fluid up to normal
operating temperature.
With engine at governed R.P.M., shift loader
control valve bucket cylinder spool to fully
retract bucket cylinders and hold in this
position to obtain hydraulic system relief
pressure.
Refer to “Loader Specifications” for relief
valve setting.
Re-torque locknut and reinstall relief valve
cap and crushwasher.
Recheck relief pressure.
Shut tractor OFF, remove test gauge and
reinstall port plug.
Start tractor and check for leaks.
4000 PSI
Test Gauge
In
I Ports
Observe pressure reading on test gauge.
NOTICE1 Do not maintain hydraulic
system at relief pressure for more than 10
second intervals to prevent overheating of
hydraulic system.
Adjust relief pressure to specification by
removing relief valve cap, loosening locknut
and turning adjustment screw:
‘IN” (clockwise) to increase relief pressure.
‘OUT” (counter-clockwise) to decrease relief
pressure.
Relief Valve Test
44
Page 45

TROUBLE SHOOTING
TROUBLE SHOOTING
This trouble shooting chart is provided for reference to possible loader operational problems.
Determine the “problem” that best describes the operational problem being experienced and
eliminate the “possible causes” as listed by following the “correction” procedures.
For further assistance contact your dealer.
PROBLEM
Lift and Bucket Cylinders
Inoperative.
POSSIBLE CAUSE
Low hydraulic fluid level
Hydraulic hoses connected
incorrectly.
Hydraulic hoses to/from
control valve “blocked”.
Loader control valve or
tractor main relief valve stuck
“open”.
Low system pressure
supplied from hydraulic
pump.
Control valve linkage
broken.
Quick disconnect coupler(s)
are not fully connected or
“Flow check”.
CORRECTION
Check and replenish
hydraulic fluid.
Check and correct hydraulic
hose connections.
Check for damaged (kinked)
hoses, etc.
Check system pressure.
Refer to “Hydraulic pump
capacity inadequate”
.Check system pressure.
Refer to “Hydraulic pump
capacity inadequate”.
Inspect. Repair as required.
Check coupler connections.
Replace coupler(s) if
necessary.
Lift and/or bucket cylinders
operate in wrong direction
relative to control valve lever
position.
Hydraulic hose or tubeline
blockage.
Cylinder piston assembly
defective (not sealing).
Control valve blockage.
Hydraulic hoses connected
incorrectly.
Check for evidence of
damage to hose or tube lines
that would block flow of oil
between cylinders and
control valve.
Check cylinders for internal
leakage as described in
service section under
cylinder leakage tests..
Inspect for blockage.
Disassemble if necessary.
Correct hydraulic hose
connections
45
Page 46

TROUBLE SHOOTING
PROBLEM
POSSIBLE CAUSE
Slow or erratic Lift. Low hydraulic fluid.level.
Cold hydraulic fluid.
Engine R.P.M. too slow
(Hydraulic pump R.P.M. too
slow).
Excessive weight in bucket.
Material weight exceeds
maximum specified loader
capacity.
Control valve linkage
binding/defective.
Aeration of hydraulic fluid.
CORRECTION
Check/replenish hydraulic
fluid
Allow hydraulic system to
warm up to operating
temperature.
Increase engine speed to
obtain satisfactory loader
operation.
Reduce material loads.
Check control valve linkage
and repair if worn/defective.
Refer to ‘Aeration of
hydraulic fluid”.
Quick disconnect coupler
restriction or coupler “flow
check”.
Hydraulic hose or tubeline
restriction
(hoses/tubeline kinked or
pinched).
Lift cylinder piston assembly
linkage.
Relief valve erratic or set
below specifications.
Control valve leaking
internally.
(Bypassing fluid within
valve).
Inadequate hydraulic pump
capacity.
Check coupler(s). R,epair or
replace.
Check hoses and tubelines
for evidence of restriction.
Check cylinders for leakage
described in service section
under cylinder leakage tests.
Check relief valve setting as
described under relief valve
test.
Replace control valve and
recheck operation.
Refer to ‘hydraulic pump
capacity inadequate”.
46
Page 47

TROUBLE SHOOTING
PROBLEM
Inadequate lifting capacity
Aeration of hydraulic fluid
(generally indicated by
foamy appearance of fluid).
POSSIBLE CAUSE
Engine RPM too SIOW
Excessive load - material
weight exceeds specified
loader capacity.
Relief valve setting below
specifications.
Lift cylinder piston assembly
leakage.
Control valve leaking
internally.
Hydraulic pump defective.
Lower hydraulic fluid level.
Air leaking into suction side
of hydraulic pump.
CORRECTlON
Increase engine RPM.
Reduce load.
Check relief valve setting as
described under relief valve
test.
Check cylinders for leakage
as described in service
section under cylinder
leakage tests.
Replace control valve and
recheck operation.
Refer to “hydraulic pump
capacity inadequate.”
Check and refill hydraulic
system to proper level.
Check for loose or defective
connections
between
reservoir and hydraulic
pump-
System relief valve squeals.
Hydraulic fluid foaming due
to improper hydraulic oil
usage.
Cold hydraulic fluid.
Excessive load in bucket.
Weight exceeds specified
loader capacity.
Relief valve setting below
specifications.
Hydraulic hose, tubeline or
quick disconnect coupler
restriction.
Refer to tractor owner’s
manual and replace
hydraulic oil
using
recommended hydraulic oil.
Allow hydraulic fluid to warm
up to operating temperature.
Reduce loads.
Check relief valve setting as
described under relief valve
test.
Check for evidence of
restriction in hydraulic oil
flow. Repair or replace
defective component(s).
47
Page 48

TROUBLE SHOOTING
PROBLEM
Loader drops with control
valve spool in %entered”
position (no external oil
leakage evident).
Note: A gradual drop over an
extended period is a normal
condition.
Control valve spool(s) will
not return (position) to
‘centered” position.
External hydraulic fluid
leakage.
POSSIBLE CAUSE
Cylinder piston assembly
leakage.
Control valve internal
.leakage. .
Control
lever/linkage
binding.
Control valve spool
centering spring broken.
Control valve spool binding
in valve body spool bore.
Loose hydraulic connection.
Defective hydraulic hose,
tubeline, adaptor fitting or
adaptor fitting ‘0’ ring.
CORRECTION
Check cylinders for leakage
as described under cylinder
leakage tests.
Replace control valve &
recheck.
Determine origin of binding
and repair.
Replace centering spring.
Refer to valve service
procedure.
Disassemble valve for
inspection and repair. Refer
to valve service procedure.
Tighten loose connection.
Check for origin of oil leak
and replace defective part.
Control valve ‘0’ rings
defective.
Control valve spool or body
damaged/or worn.
Cylinder rod packing set
leakage.
Replace defective ‘0’ rings.
Replace control valve.
Perform cylinder leakage
test for rod packing set as
described under cylinder
leakage tests.
48
Page 49

TROUBLE SHOOTING
PROBLEM
Hydraulic pump capacity
inadequate.
Lift cylinder rods bend when
lift cylinders extended.
POSSIBLE CAUSE
Cold hydraulic, fluid.
Engine RPM too slow.
Low hydraulic fluid supply.
Hydraulic hose restriction.
Hydraulic pump defective.
Excessive shock load on lift
cylinders during transport.
CORRECTION
Allow hydraulic fluid to warm
up to operating temperature.
Increase engine R.P.M.
Refer to tractor owner’s
manual for
service
recommendations.
Check for evidence of
restriction in hydraulic
hoses.
Refer to tractor owner’s
manual for recommended
service procedures. Replace
hydraulic pump if determined
to be defective.
Replace defective parts.
Review and observe proper
and safe operational
practices.
Bucket cylinder
when bucket
rods bend
cylinders
extended.
Bucket cutting edge wear is
‘uneven” - side to side.
Bucket cutting edge wear
rate is excessive (wear rate
is even across full width of
bucket on concrete).
Note: Extensive use of
bucket on concrete/asphalt
surfaces will accelerate wear
rate of bucket cutting edge.
Fork bucket tine(s) bend.
Back grading or dozing with
bucket cylinder extended.
Bucket is not level to ground.
Incorrect operation
practices.
Excessive down pressure
placed on bucket when being
used on hard abrasive
surfaces.
Bucket wear pads worn.
Excessive loading on
individual tine(s).
Replace defective parts.
Review and observe proper
and safe operational
practices.
Check rear tire inflation and
adjust pressures to level
bucket to ground.
Refer to operation -scraping
section for correct operating
procedures. Utilize float
position.
Replace wear pads.
Repair/replace defective
tines. Ensure full compliment
of tines are under load when
breaking out material.
49
Page 50

HYDRAULIC SYSTEM SCHEMATIC
1 - Bucket Cylinder Retract
2 - Bucket Cylinder Extend
3 - Lift Cylinder Extend
4 - Lift Cylinder Retract
HYDRAULIC SYSTEM
SCHEMATIC
Quick Disconnect Coupler
%
LH
I
Bucket Cylinders
Lift Cylinders
II r
RH
50
Tractor Hydraulic Pump
LH
L Relielf Valve 1
--
l-l -
Loader Control Valve
-J
r
Tractor Hydraulic System
Jr*-
RH
4321
Page 51

PARTS LIST
PARTS LIST
.
SINGLE LEVER CONTROL
REF. ..............
DESCRIPTION .........
.... ...... .KIT - lever, single control
r::
2 ......
3 .......
.HANDLE
..KNO B .....................
.
JAMNUT
...................
...................
4 . HANDLE ADAPTER
5 :::::::.R~DEND..
6 .......
7 ......
a
.......
9
.......
10 .......
11 .......
12 .......
13 .......
14 .......
.RODEND
..BOL T .....................
. SPACER
. CAP SCREW ’ : : : : : : : : : : : : : : :. : . 3
.BRACKET,Assy.
.CAPSCREW
-LOCKNUT
.STUD ..
.BOOT .....................
....
..................
................
..::: ..............
...........
:::I::::::::: 1
...............
..............
REQ’D
1
1
.
1
1
.2
.
: 2
1
-2
2
.l
1
51
Page 52

PARTS LIST
.-
HYDRAULIC VALVE ASSEMBLY
REF. DESCRIPTION
1
‘0’ RING
2
‘O’RING
3 GASKET
4
WASHER
........
........
........
........
5 CAPSCREW
6 COVER
7
SCREW
a
SPACER
.9
SPRING
10 SPRING
11 SPACER
......... 1
.........
.........
.........
.........
........
12 DETENTSPOOL
13 DETENTEND CAP
.....
......
....
...
14 STEELBALL ...... .
52
REQ’D
4
1
2
3
4
1
1
1
1
1
1
1
15 DETENT SPRING
16 DETENTPLUG..
.
17 LOAD CHECK PLUG
18 LOAD CHECK SPRING
.... 2
... .
.. 1
. 1
19 LOAD CHECK POPPET 1
20 STEELBALL
21 . BALLRETAINER
22 RELIEF SPRING
...... .
.... 1
..... 1
23 ADJUSTMENT SCREW 1
24 JAMNUT
25 RELIEFCAP
26 PLUG
27 ‘O’RING
.
34 SPOOL
35 ORIFICE
........
..... .l
........... 1
......... 1
......... 2
........ 1
1
Page 53

Page 54

PARTS LIST
BUCKET AND BOOM HYDRAULICS
REF. . . . . . . . DESCRIPTION . . . . . .
1
. . . . . . . .
2
. . . . . . . .
3 . . . . . . . .
4
. . . . . . . .
5 . . . . . . . .
. . . . . . . . .
CYLINDER ASSEMBLY, BUC& . : : : : : : 2.
CYLINDER ASSEMBLY, BOOM . . . . . . . . 2
HOSE ASSEMBLY,bucket cylinder,l/4 x 20 inch 2
HOSE ASSEMBLY, boom lower, l/4 x 38 inch
HOSE ASSEMBLY, boom raise, l/4 x 23 inch . 2
CONNECTOR, short, 906 - 18 flared x 9116 - 18
‘0’ ring boss (not shown) . . . . . . . . . . . . 6
a':~~~~~~~~
11 . . . . . . . .
12 . . . . . . . .
13 . . . . . . . . STRAP,tie
14 . . . . . . . .
54
O’ring,15/32idx5/64inch
TUBE ASSEMBLY, front . . . . . : . . . . . . 4
TUBE ASSEMBLY, rear . . . . . . . . . . . . 4
. . . . . . . . . . . . . . . . . . UAR
HOSE ASSEMBLY,bucket cylinder,l/4 x 15 inch 2
REQ’D
2
. . . . . . . . . . 8
Page 55

PARTS LIST
BUCKET CYLINDER
REF: DESCRIPTION . . . . . REQ’D
CYLINDER assy, bucket 2
1
BODY assly ,bucket cyl
2
FITTING, grease, . . . . 1
3
ROD assy,bucket cylinder 1
4
FITTING, grease, . . . . 1
5
NUT, hex lock,‘3/4 in NF
6’
END, piston . . . . . . . 1
7’
‘0’ RlNG,piston rod . . . 1
a*
RING, wear piston . . . . 2
. 1
1
9
SEAL, piston . . . . . . . 1
10
12
13
14’
15’
16’
17
ia
l indicates ordered as SEAL KlT only
PISTON, cylinder
: . . . 1
WIRE, retaining . . . . . 1
GUIDE, packing, male . . 1
GUIDE, packing, female . 1
V-SEAL, rubber . . . . . 1
V-SEAL, fiber . . . . . .2
WIPER, rod . . . . . . .1
NUT, cartridge . . . . . . 1
55
Page 56

PARTS LIST
BOOM CYLINDER
REF: DESCRIPTION . . . . . REQ’D
CYLINDER assy, bucket 2
1
BODY assly ,bucket cyl . 1
2
FITTING, grease, . . . . 1
3
ROD assy,bucket cylinder 1
4
FITTING, grease, . . . . 1
5 NUT, hex lock, 3/4 in NF 1
END, piston . . . . . . . 1
6’
7'
‘0’ RING,piston rod . . . 1
a-
RING, wear piston . . . . 2
56
SEAL, piston . . . . . . . 1
9
10 PISTON, cylinder . . . . 1
12 WIRE, retaining . . . . .l .
13 GUIDE, packing,male . .l
14' GUIDE, packing, female . 1
15’ V-SEAL, rubber . . . . . 1
16’ V-SEAL, fiber . . . . . .2
17 WIPER, rod . . . . . . . 1
la NUT, cartridge . . . . . . 1
l Indicates ordered as SEAL KIT only
Page 57

PARTS LIST
PARKING LEG
REF . . . . . . . DESCRIPTION . . . . . . . . . . . . . . . . .REQ’D
1
. . . . . . . . .
2
. . . . . . . . .
3
. . . . . . . . .
LEG parking . . . . . . . . . . . . . . . . . .l
PIN heading, l/2 x 3 inch, Grade 1
. . . . . .l
PIN hair . . . . . . . . . . . . . . . . . . . .2
BUCKET LEVEL INDICATOR
INDICATOR AlTACHMENT bucket level
7
. . . . . . . . .
a
. . . . . . . . .
TUBE ‘level indicator . . . . . . . . . . . . ‘. .l
ROD indicator . . . . . . . . . . . . . . . . .l
Page 58

Page 59

PARTS LIST
LOADER SUB-FRAME
REF . . . . . . . DESCRIPTION . . . . . . . . . . . . . . . . QTY
~ 1 . . . . . . . . .SPACER
2
. . . . . . . . .
3
. . . . . . . . .
FRONT BRi&E;’ : : : : : : : : : : : : : : 1
LOADER BRACKET . . . . . . . . . . . . . 1
4 . . . . . . . . .SlDEFiAlL(R)
5
. . . . . . . .
6
. . . . . . . .
7
. . . . . . . .
.SlDERAlL(L) . . . . . . . . . . . . . . . . . 1
.REAR BRACKET (R) . . . . . . . . . . . . . 1
.REAR BRACKET (L) . . . . . . . . . . . . . 1 .
. . . . . . . . . . . . . . . . 1
2
59
Page 60

PARTS LIST
LABELS
1
WHEN MOWER DECK IS INSTALLED WlTH
FRONT LOADER, LIFT LINKAGE MUST BE
READJUSTED TO PREVENT DAMAGE TO
THE LIFT MECHANISM.
REFER TO OPERATOR’S MANUAL FOR
ADJUSTMENT INSTRUCTlONS.
TRACTOR TIP-OVER CAN
CAUSE SERIOUS INJURY
I
Tractor loader attachments for
INFORMATION
handling large objects are available
from agricultural suppliers.
6
IMPROPER SERVICING CAN CAUSE
SERIOUS INJURY OR DEATH
kforo swvlclng of adiusfment
0
tower loo&r to the ground ond
shut off onaIm.
l
R.ti.w hydio& pc.uur. befor.
disconnecting oil tines.
8
SERIOUS INJURY OR
REF. ......
1 .......
2 .......
3 .......
.DESCRIPTION ................
.lABEL MOWER NOTICE
.LABEL HYDRAULIC OIL NOi&.
.lABEL TIP OVER WARNING ..........
4 ....... .lABEL LOADER OPERATION ........
5 .......
6 .......
7 .......
a .......
.LABEL AlTACHMENT INFORMATION
.LABEL SERVICE WARNING .........
.LABELHTA ................
LABEL LOAD WARNING ..........
: : : : : :
...
REQ’D
1
1
1
1
1
1
2
1
Page 61

WARRANTY SERVICE
WARRANTY SERVICE
OWNER SATISFACTION
Your satisfaction and good will are important to your dealer and to us. All Honda warranty
details are explained in the Distributor’s Limited Warranty. Normally any problems concerning
the product will be handled by your dealer’s service department.
that has not been handled to your satisfaction, we suggest you take the following action:
Discuss your problem with a member of the dealership management. Often complaints can
be quickly resolved at that level. If the problem has already been reviewed with the Service
Manager, contact the owner of the dealership or the General Manager.
If your problem still has not been resolved to your satisfaction, contact the Power Equipment
Customer Service Department of American Honda Motor Co., Inc.
American Honda Motor Co., Inc.
Power Equipment Customer Service Department
Duluth, Georgia 30136-9421
Telephone: (404) 497-6400
If you have a warranty problem
We will need the following information to assist you:
- Your name, address, and telephone number
- Product model and serial number
- Date of purchase
- Dealer name and address
- Nature of problem
After reviewing all the facts involved, you will be advised of what action can be taken. Please.
bear in mind that your problem will likely be resolved at the dealership, using the dealer’s
facilities, equipment, and personnel, so it is very important that your initial contact be with the
dealer.
Your purchase of a Honda product is greatly appreciated by both your dealer and American
Honda Motor Co., Inc. We want to assist you in every way possible to assure your satisfaction
with your purchase.
61
Page 62

Current customer service contact information:
United States, Puerto Rico, and U.S. Virgin Islands:
Honda Power Equipment dealership personnel are trained professionals. They should
be able to answer any question you may have. If you encounter a problem that your
dealer does not solve to your satisfaction, please discuss it with the dealership's
management. The Service Manager or General Manager can help. Almost all problems
are solved in this way.
If you are dissatisfied with the decision made by the dealership's management, contact
the Honda Power Equipment Customer Relations Office. You can write:
American Honda Motor Co., Inc.
Power Equipment Division
Customer Relations Office
4900 Marconi Drive
Alpharetta, GA 30005-8847
Or telephone: (770) 497-6400 M-F, 8:30 am - 5:00 pm EST
When you write or call, please provide the following information:
• Model and serial numbers
• Name of the dealer who sold the Honda power equipment to you
• Name and address of the dealer who services your equipment
• Date of purchase
• Your name, address, and telephone number
• A detailed description of the problem
Page 63

 Loading...