

Page 1
2000
-
06 ACCESSORIES & EQUIPMENT
2006 Honda Insight
2006 Honda Insight
2000-06 ACCESSORIES & EQUIPMENT Wipers/Washers - Insight
2000-06 ACCESSORIES & EQUIPMENT Wipers/Washers - Insight
Wipers/Washers - Insight
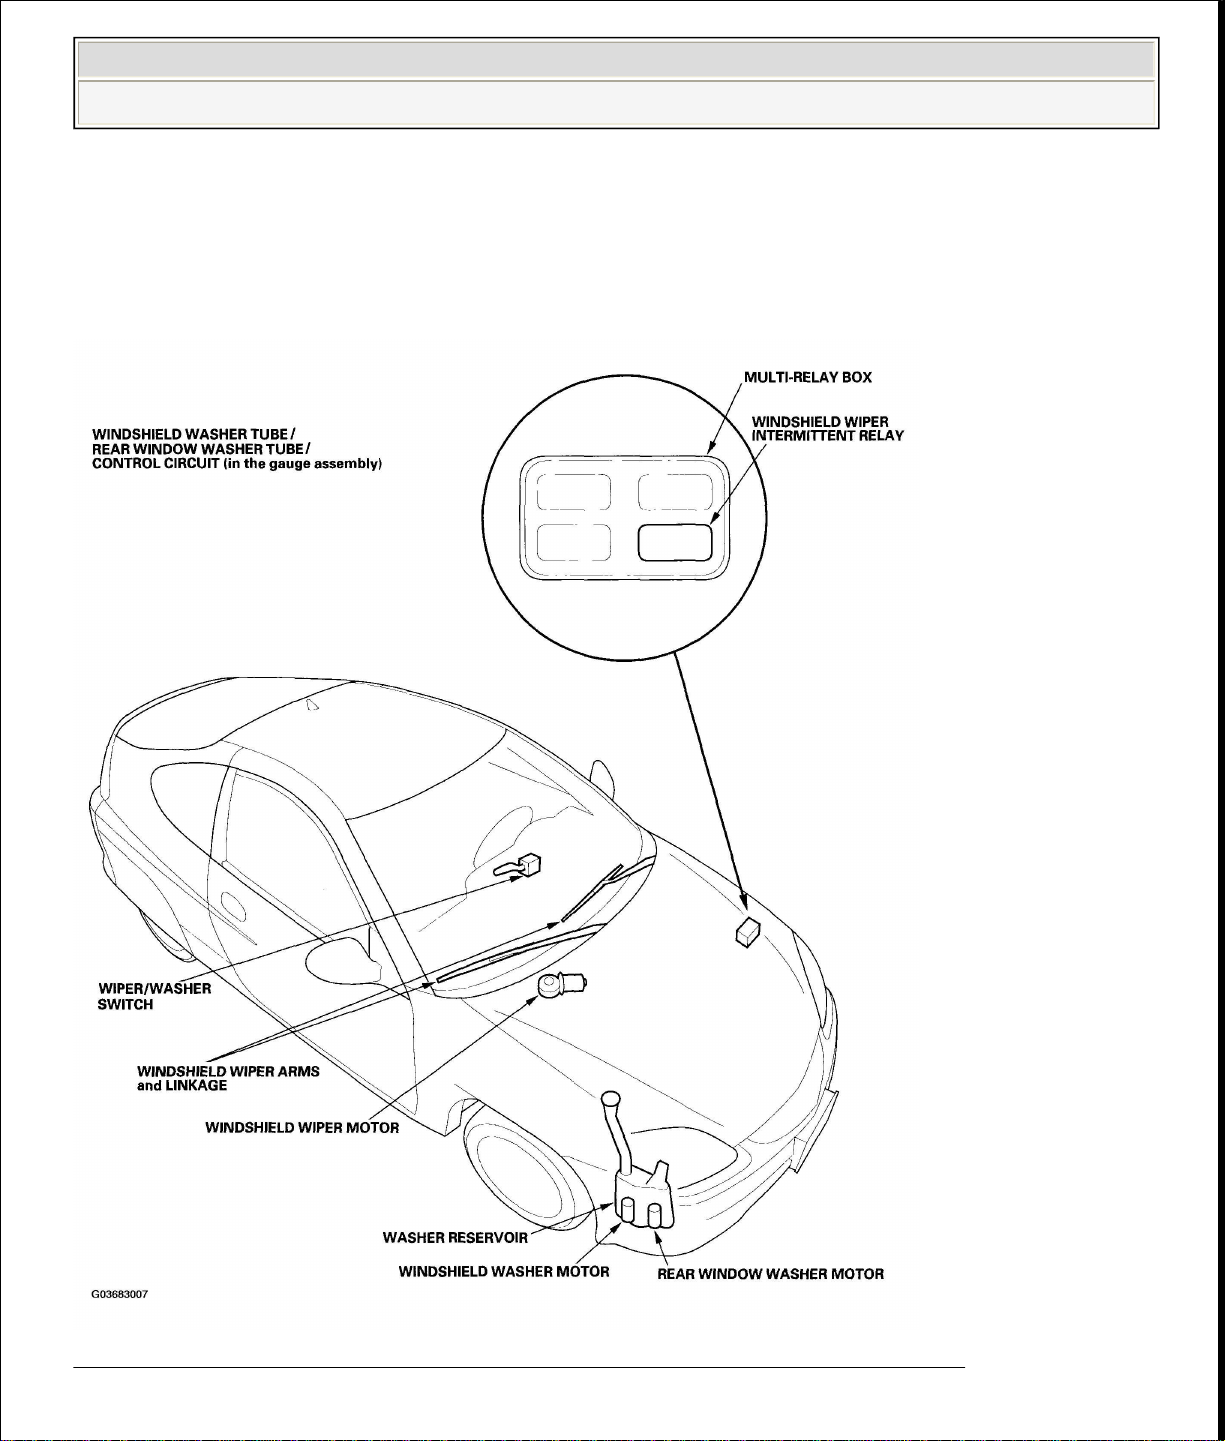
COMPONENT LOCATION INDEX
Fig. 1: Identifying Wipers/Washers Component Location (1 Of 2)
Courtesy of AMERICAN HONDA MOTOR CO., INC.
Page 2
2006 Honda Insight
2000-06 ACCESSORIES & EQUIPMENT Wipers/Washers - Insight
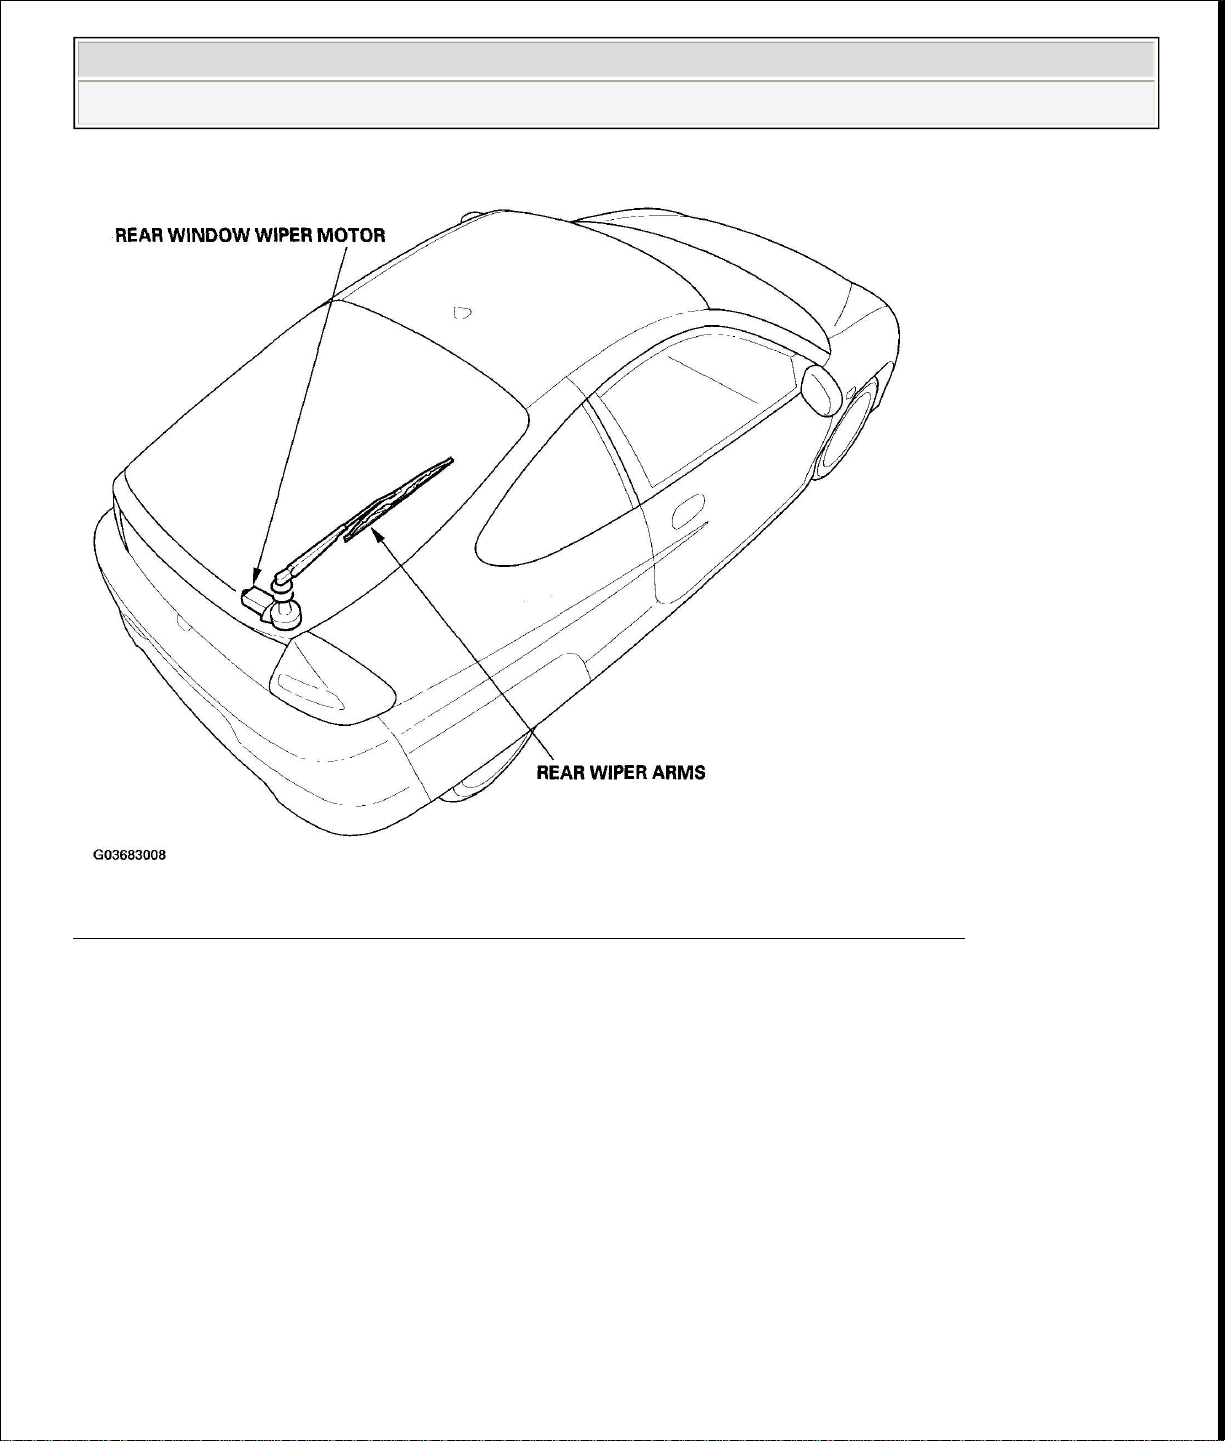
Fig. 2: Identifying Wipers/Washers Component Location (2 Of 2)
Courtesy of AMERICAN HONDA MOTOR CO., INC.
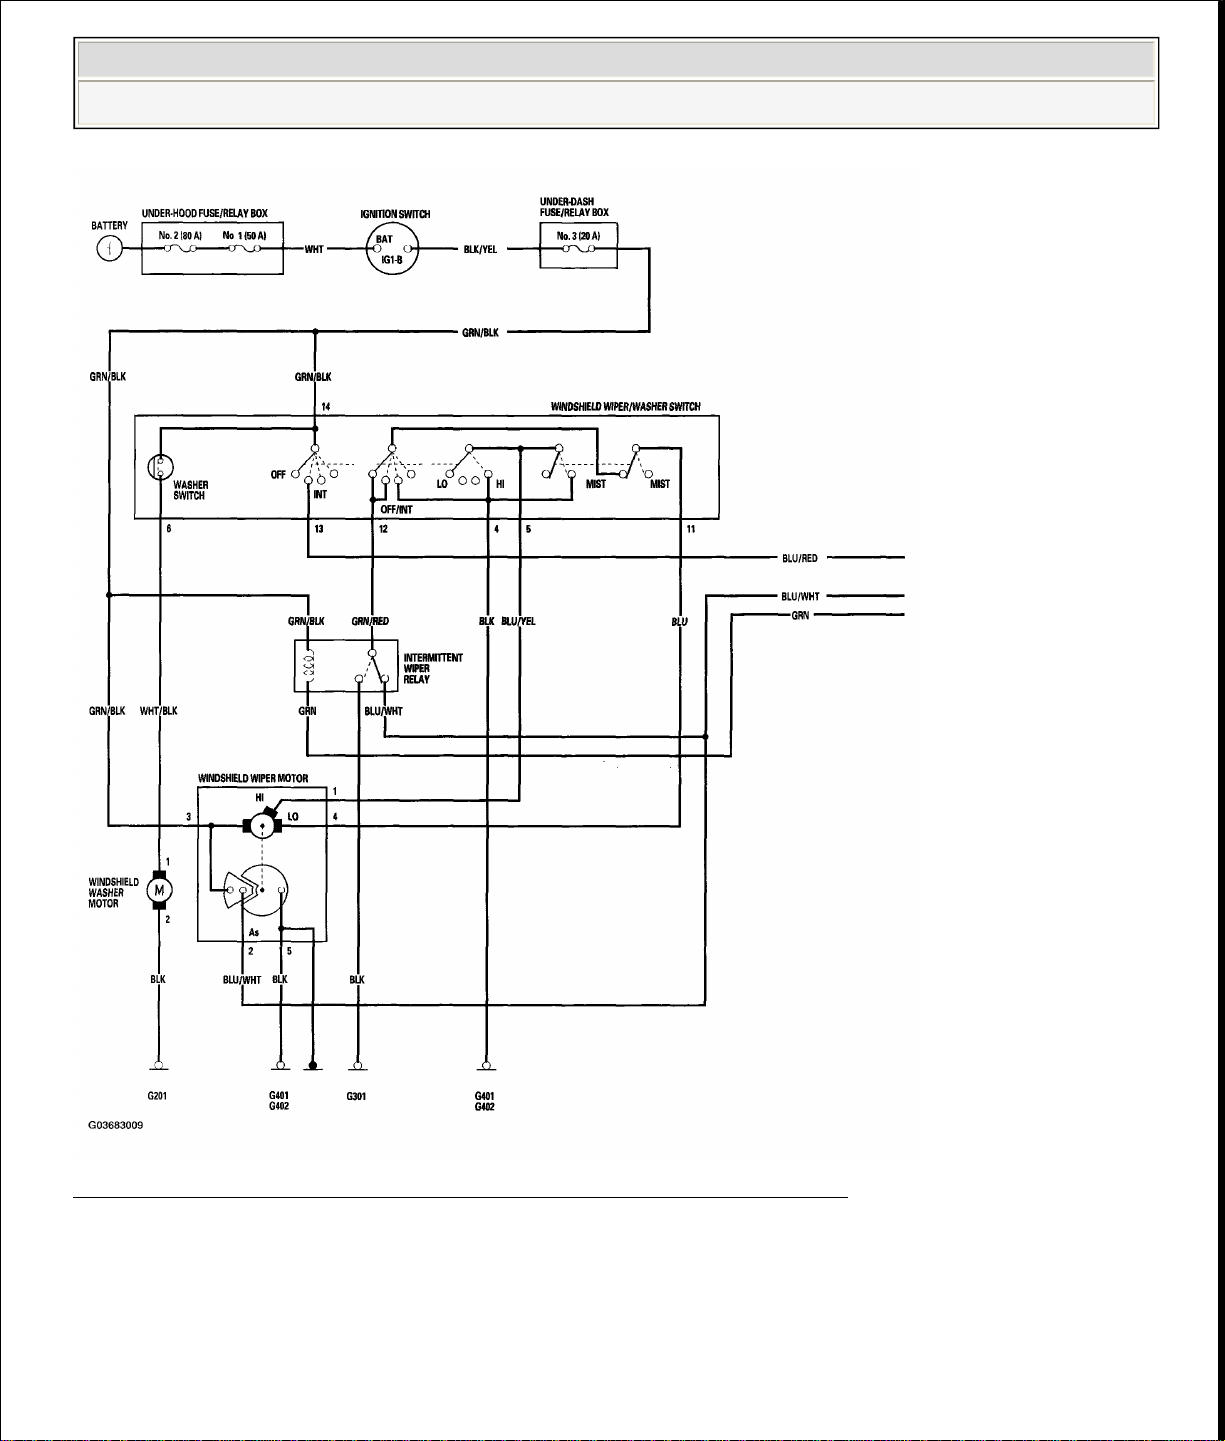
CIRCUIT DIAGRAM - WINDSHIELD
'00 MODEL
Page 3
2006 Honda Insight
2000-06 ACCESSORIES & EQUIPMENT Wipers/Washers - Insight
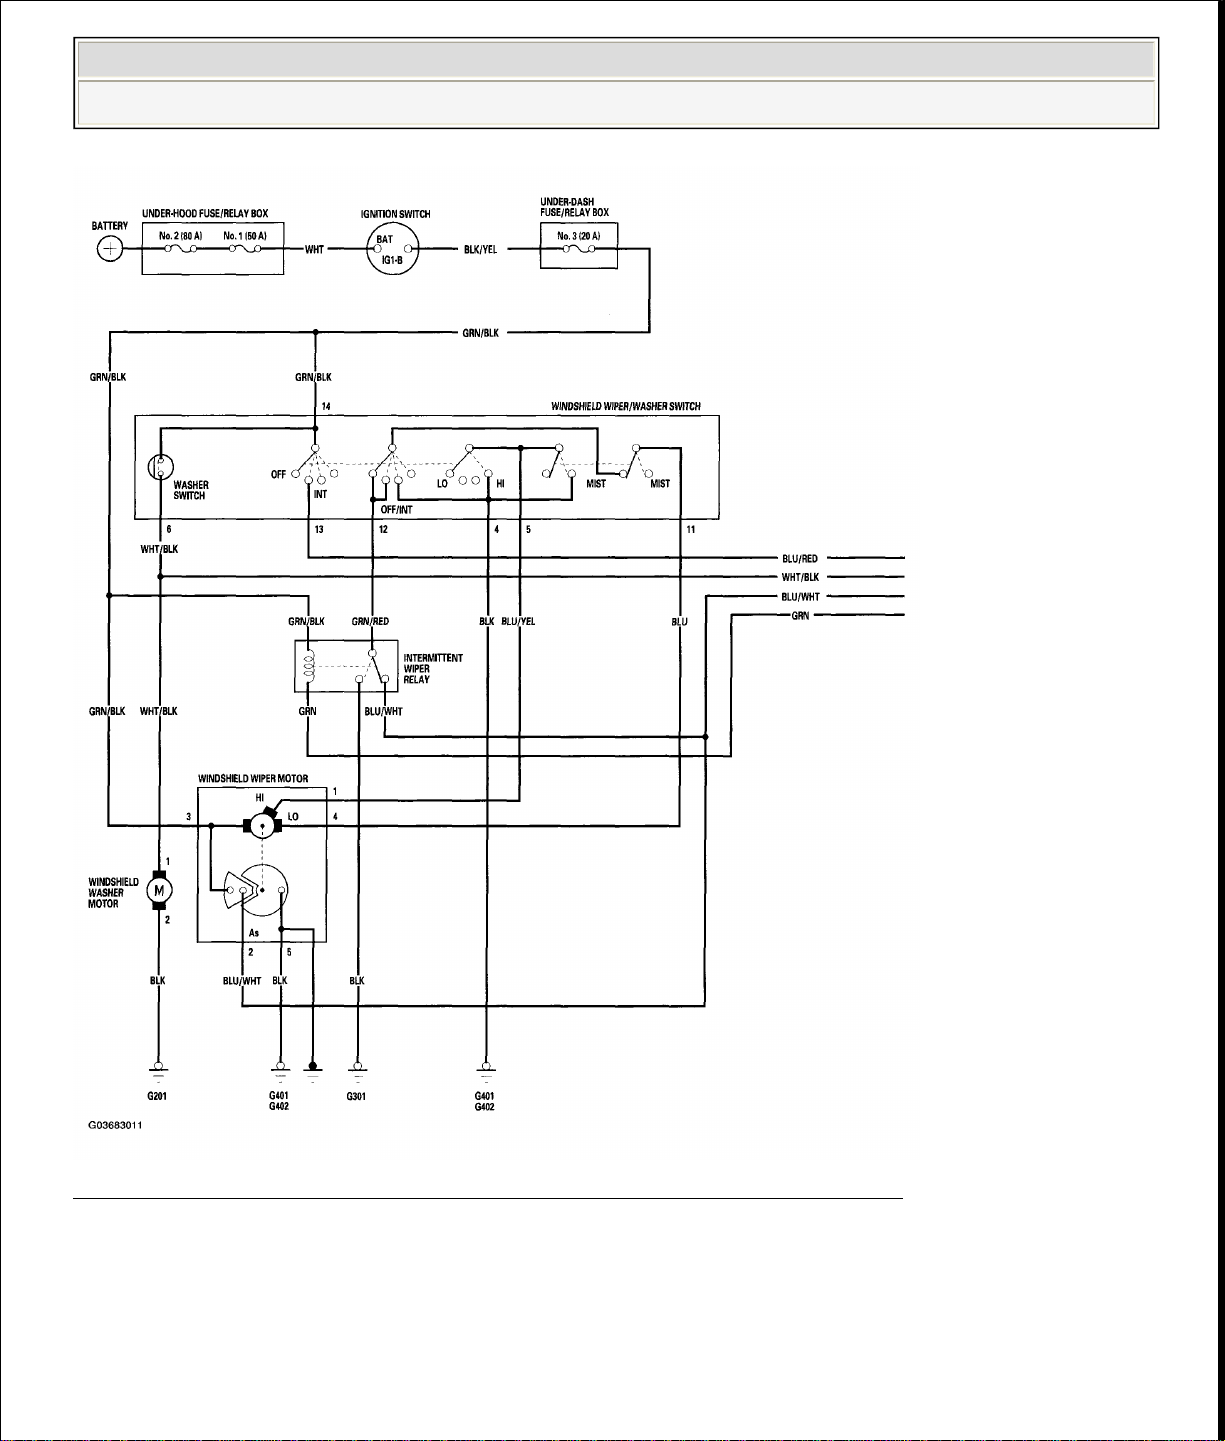
Fig. 3: Circuit Diagram - Windshield (00 Model) (1 Of 2)
Courtesy of AMERICAN HONDA MOTOR CO., INC.
Page 4
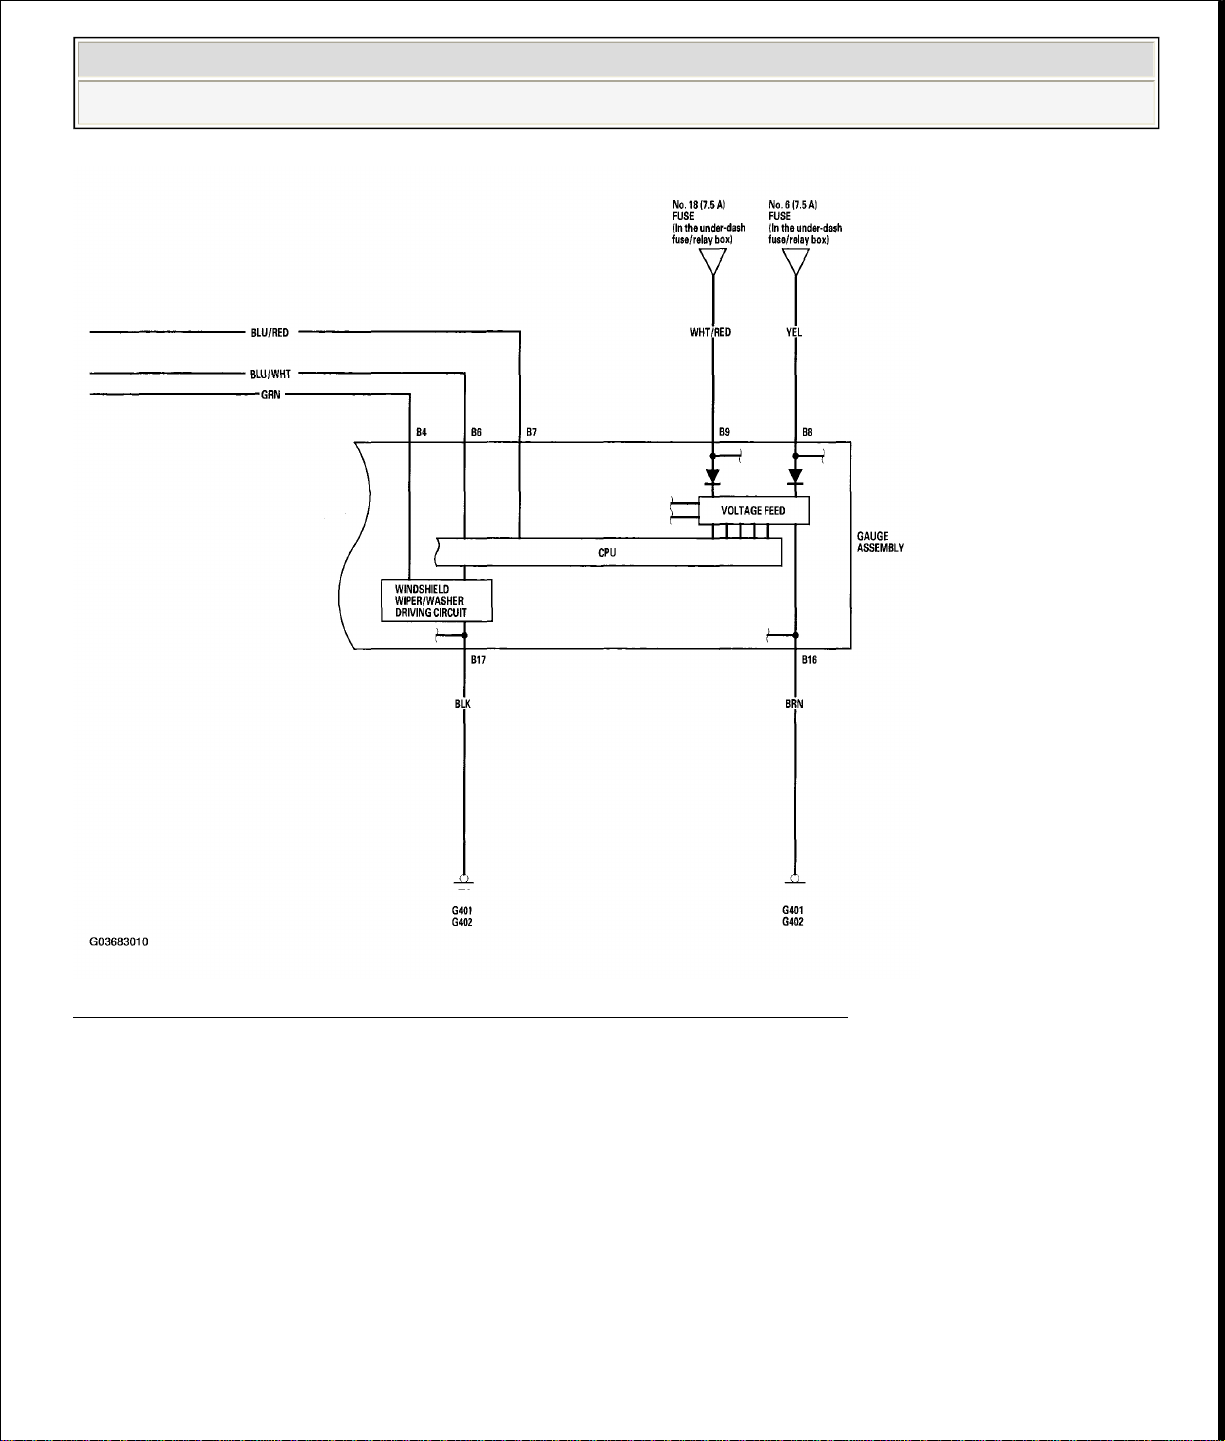
'01-06 MODELS
2006 Honda Insight
2000-06 ACCESSORIES & EQUIPMENT Wipers/Washers - Insight
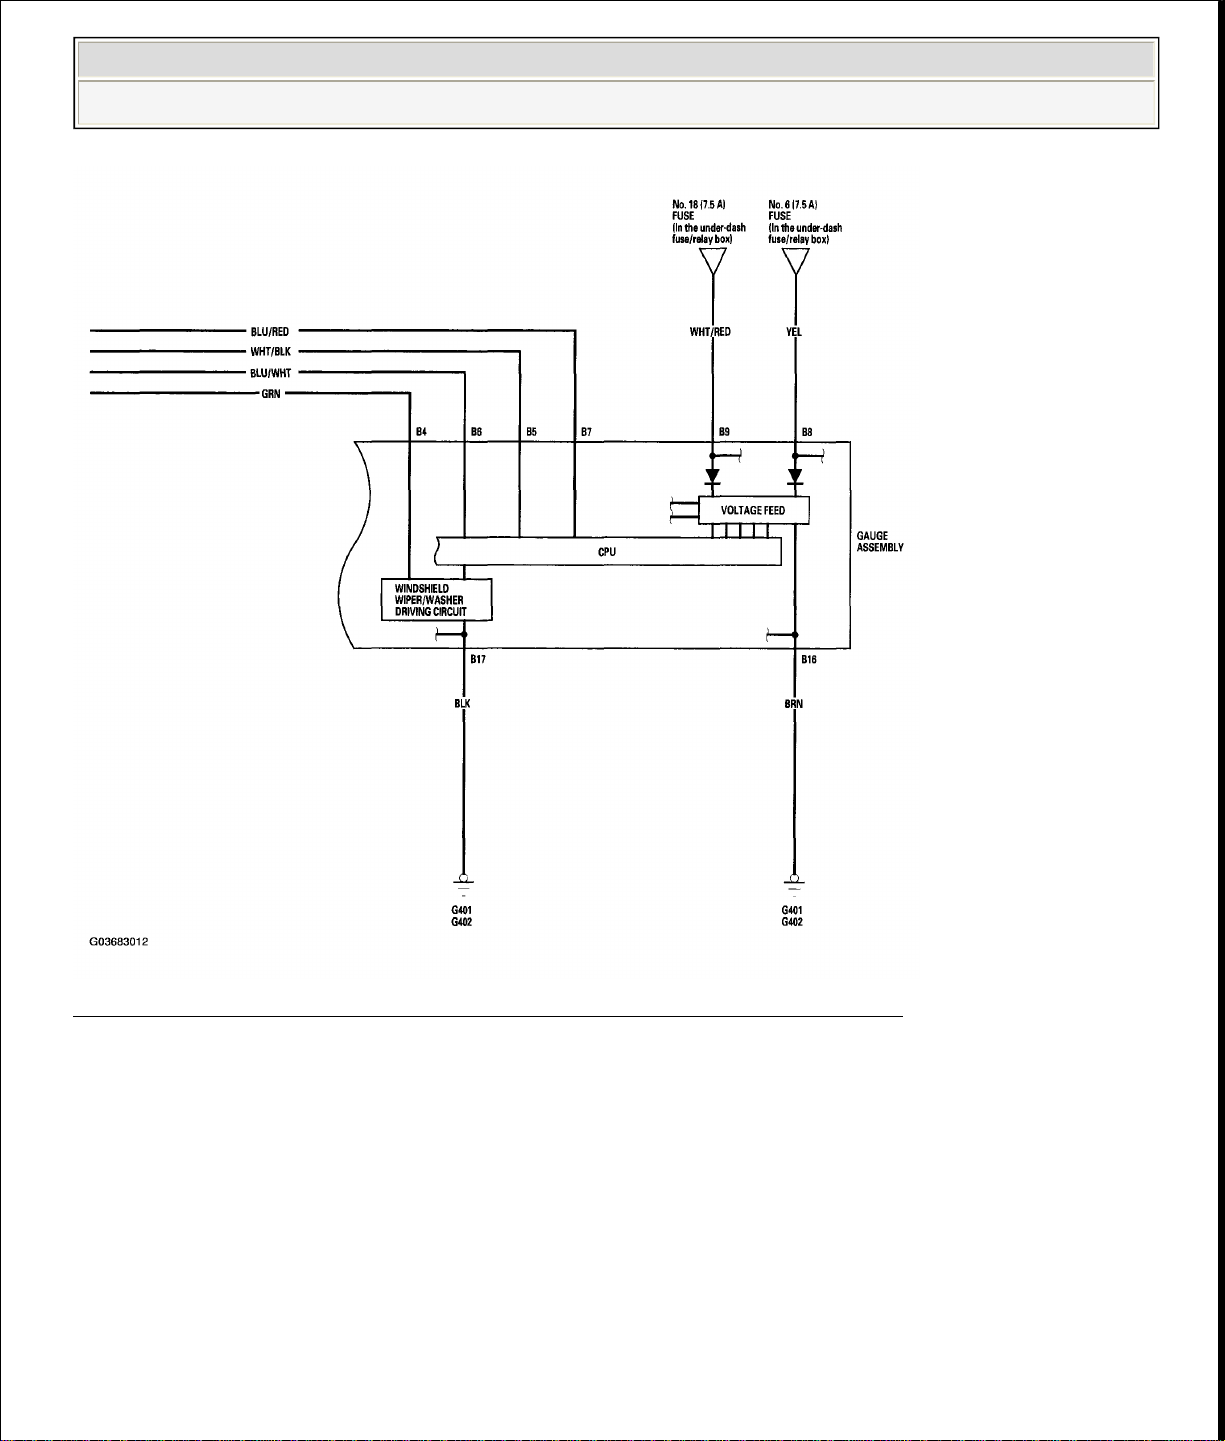
Fig. 4: Circuit Diagram - Windshield (00 Model) (2 Of 2)
Courtesy of AMERICAN HONDA MOTOR CO., INC.
Page 5
2006 Honda Insight
2000-06 ACCESSORIES & EQUIPMENT Wipers/Washers - Insight
Fig. 5: Circuit Diagram - Windshield (01-06 Models) (1 Of 2)
Courtesy of AMERICAN HONDA MOTOR CO., INC.
Page 6
CIRCUIT DIAGRAM
-
REAR WINDOW
2006 Honda Insight
2000-06 ACCESSORIES & EQUIPMENT Wipers/Washers - Insight
Fig. 6: Circuit Diagram - Windshield (01-06 Models) (2 Of 2)
Courtesy of AMERICAN HONDA MOTOR CO., INC.
Page 7
2006 Honda Insight
2000-06 ACCESSORIES & EQUIPMENT Wipers/Washers - Insight
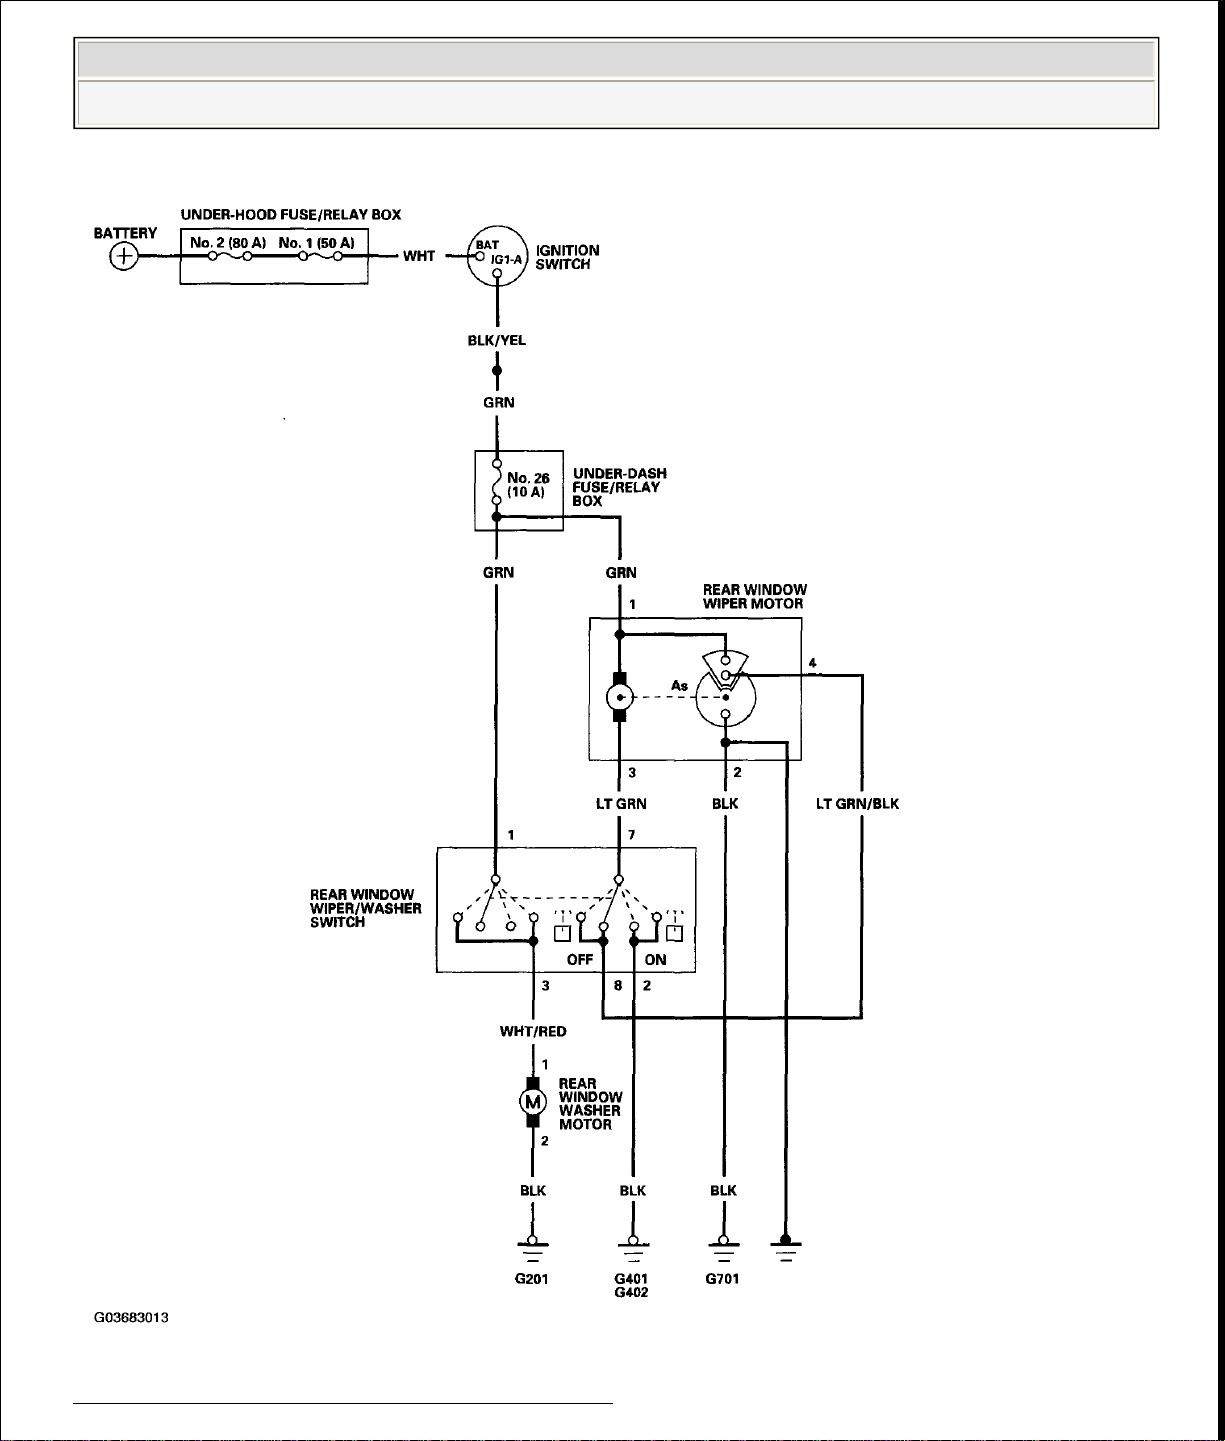
Fig. 7: Circuit Diagram - Rear Window
Courtesy of AMERICAN HONDA MOTOR CO., INC.
Page 8
WIPER/WASHER SWITCH TEST/REPLACEMENT
2006 Honda Insight
2000-06 ACCESSORIES & EQUIPMENT Wipers/Washers - Insight
1. Remove the steering column covers (see STEERING COLUMN
REMOVAL AND INSTALLATION ).
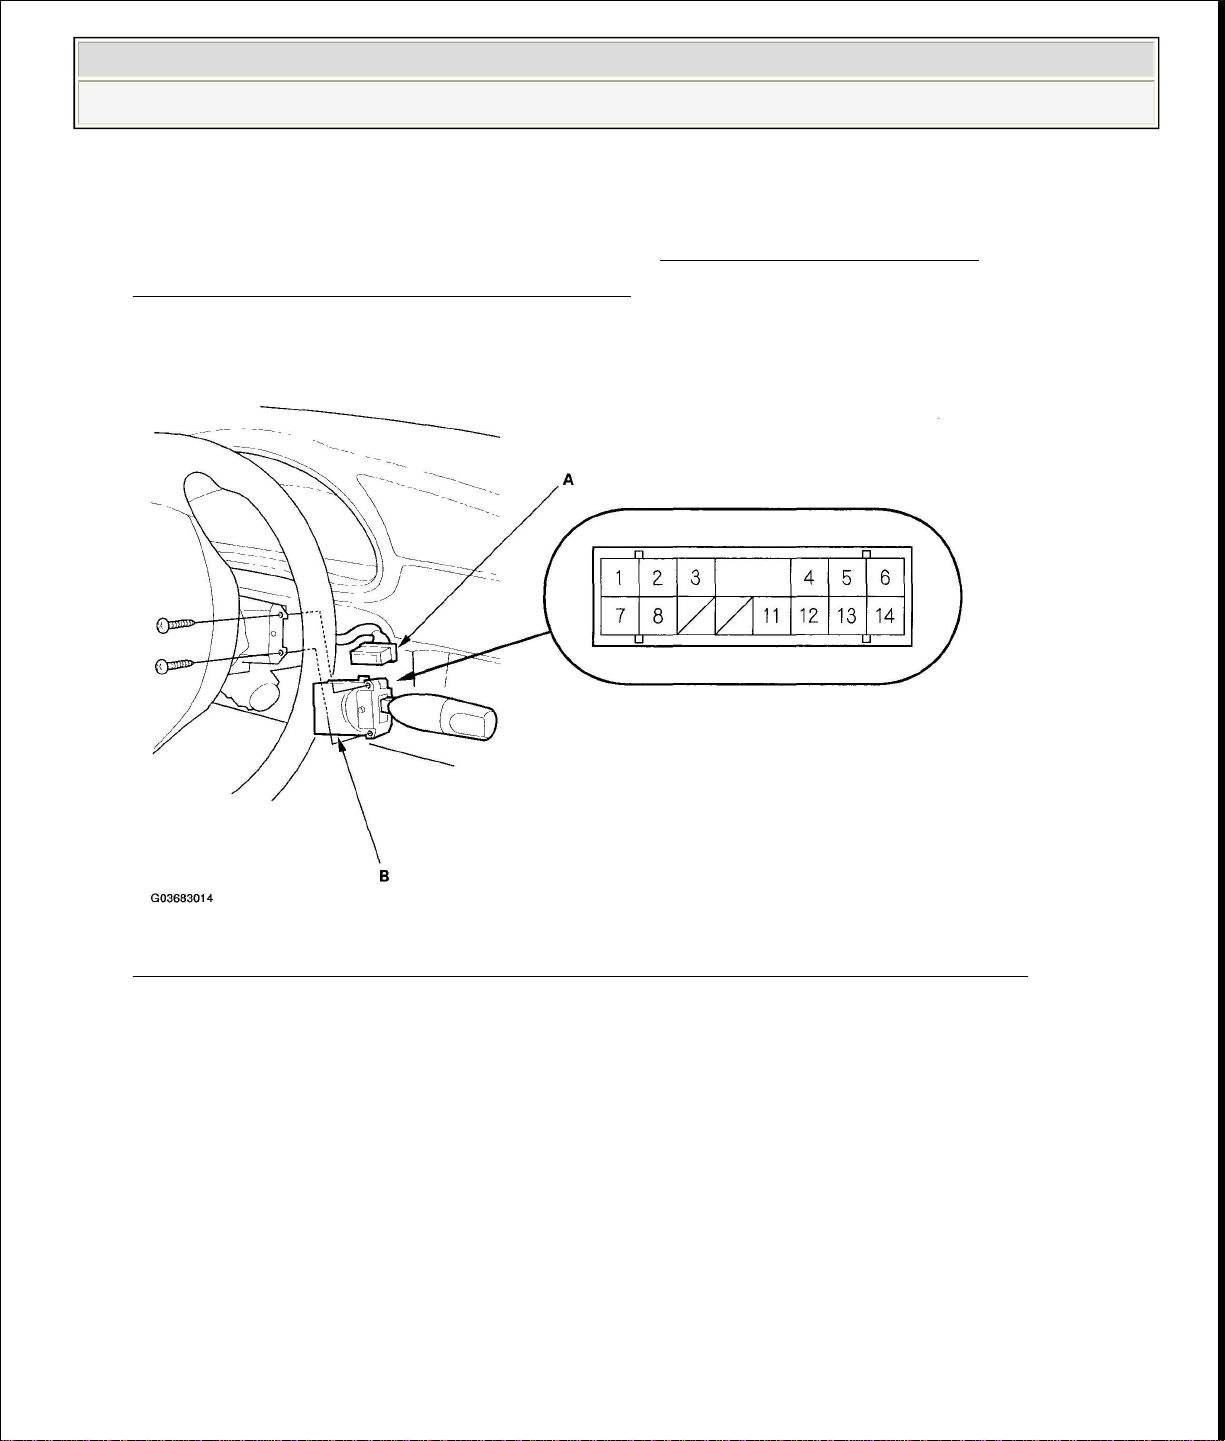
2. Disconnect the 14P connector (A) from the wiper/washer switch (B).
Fig. 8: Disconnecting 14P Connector From Wiper/Washer Switch
Courtesy of AMERICAN HONDA MOTOR CO., INC.
3. Remove the two screws, then pull out the switch.
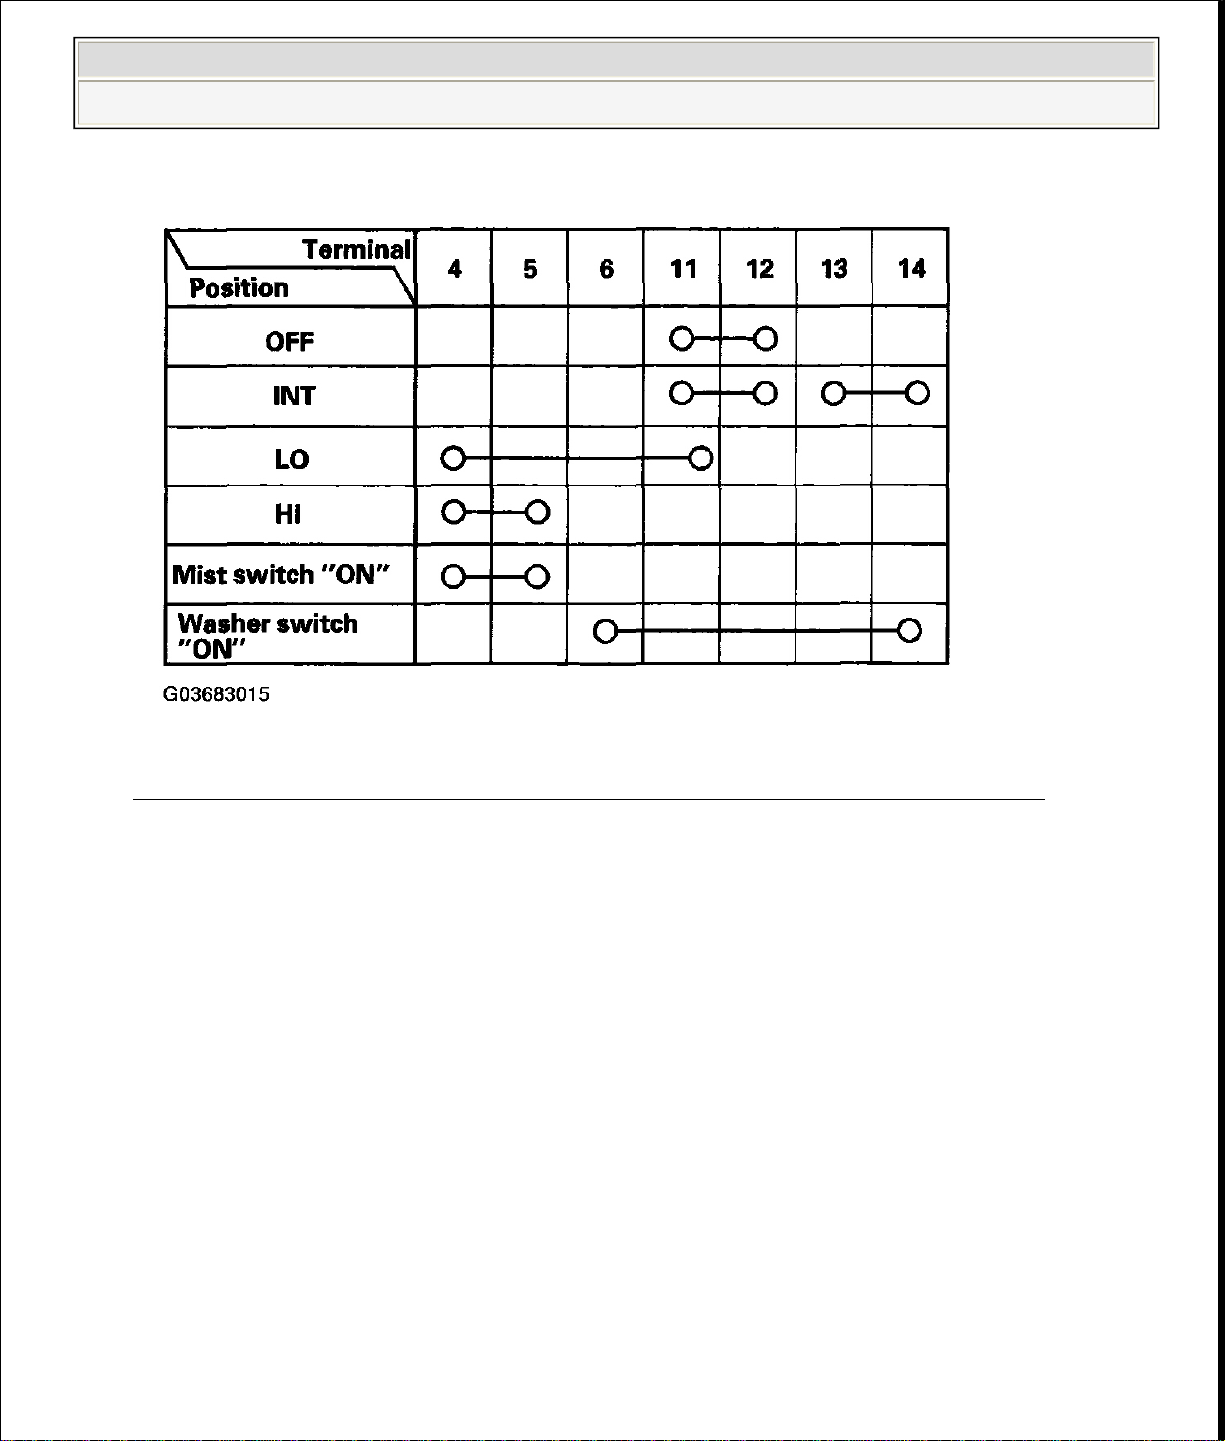
4. Check for continuity between the terminals in each switch position according
to the table. If the continuity is not as specified, replace the switch.
Windshield Wiper/Washer Switch:
Page 9
2006 Honda Insight
2000-06 ACCESSORIES & EQUIPMENT Wipers/Washers - Insight
Fig. 9: Windshield Wiper/Washer Switch Position Reference Table
Courtesy of AMERICAN HONDA MOTOR CO., INC.
Rear Window Wiper/Washer Switch:
Page 10

).
2006 Honda Insight
2000-06 ACCESSORIES & EQUIPMENT Wipers/Washers - Insight
Fig. 10: Rear Window Wiper/Washer Switch Position Reference Table
Courtesy of AMERICAN HONDA MOTOR CO., INC.
CONTROL CIRCUIT INPUT TEST
1. Remove the gauge assembly (see GAUGE ASSEMBLY REPLACEMENT
2. Disconnect the gauge assembly connector B (22P) from the gauge assembly.
Page 11

Fig. 11: Disconnecting Gauge Assembly Connector B (22P) From Gauge
If any test indicates a problem, find and correct the cause, then recheck the
Possible cause if result is
There should
Poor ground
(G401,G402)
An open in the wire
There should
Poor ground(G401,
G402)
An open in the wire
Blown No. 6 (7.5 A)
dash
2006 Honda Insight
2000-06 ACCESSORIES & EQUIPMENT Wipers/Washers - Insight
Assembly
Courtesy of AMERICAN HONDA MOTOR CO., INC.
3. Inspect the connector and socket terminals to be sure they are making good
contact.
If the terminals are bent, loose, or corroded, repair them as necessary, and
recheck the system.
If the terminals look OK, go to step 4.
4. Reconnect the connector, and make these input tests at the connector.
system.
If all the input tests prove OK, replace the printed circuit board in the
gauge assembly.
CONNECTOR INPUT TEST REFERENCE
Test:
Cavity Wire Test condition
Desired
result
Check for
voltage to
Under all
ground:
B16 BRN
conditions
be less than
1 V
Check for
voltage to
Under all
ground:
B17 BLK
conditions
be less than
1 V.
not obtained
Check for
B8 YEL
Ignition switch
voltage to
ground:
fuse in the under-
Page 12

There should
fuse/relay box
An open in the wire
There should
Blown No. 18(7.5 A)
dash
fuse/relay box
An open in the wire
There should
Blown No. 3 (20 A)
dash
fuse/relay box
Faulty intermittent
wiper relay
An open in the wire
There should
Blown No. 3 (20 A)
dash
fuse/relay box
Faulty wiper/washer
switch
An open in the wire
ON (II), wipers in
There should
Blown No. 3 (20 A)
dash
fuse/relay box
Faulty wiper/washer
switch
Faulty windshield
wiper motor
Faulty intermittent
wiper relay
An open in the wire
Blown No. 3 (20 A)
2006 Honda Insight
2000-06 ACCESSORIES & EQUIPMENT Wipers/Washers - Insight
B9 WHT/RED
B4 GRN
ON (II)
Under all
conditions
Ignition switch
ON (II)
be battery
voltage.
Check for
voltage to
ground:
be battery
voltage.
Check for
voltage to
ground:
be battery
fuse in the under-
fuse in the under-
(1)
B5
WHT/BLK
B6 BLU/WHT
Ignition switch
ON (II) and
washer switch ON
Ignition switch
parked position
voltage.
Check for
voltage to
ground:
be battery
voltage.
Check for
voltage to
ground:
be battery
voltage.
fuse in the under-
fuse in the under-
Check for
Page 13

2.
Disconnect the 5P connector (A) from the windshield wiper motor (B).
ON (II) and wiper
There should
dash
fuse/relay box
Faulty wiper/washer
switch
An open in the wire
2006 Honda Insight
2000-06 ACCESSORIES & EQUIPMENT Wipers/Washers - Insight
B7 BLU/RED
(1)
'01-06
WIPER MOTOR TEST
WINDSHIELD
1. Open the hood.
Ignition switch
switch at INT
voltage to
ground:
be battery
voltage.
fuse in the under-
Page 14

2006 Honda Insight
2000-06 ACCESSORIES & EQUIPMENT Wipers/Washers - Insight
Page 15

Fig. 12: Disconnecting 5P Connector From Windshield Wiper Motor
between the No. 3 (+) terminal and the No. 2 (ground) terminal. When the park
2.
Disconnect the 4P connector (A) from the rear window wiper motor (B).
2006 Honda Insight
2000-06 ACCESSORIES & EQUIPMENT Wipers/Washers - Insight
Courtesy of AMERICAN HONDA MOTOR CO., INC.
3. Test the motor by connecting battery power and ground according to the table.
If the motor does not run or fails to run smoothly, replace it.
Fig. 13: Battery Power And Ground Connection Reference Table
Courtesy of AMERICAN HONDA MOTOR CO., INC.
4. Connect the battery power to the No. 3 terminal, and ground to the No. 4 and
No. 5 terminals of the 5P connector. Then connect an analog voltmeter
switch contacts, the pointer should swing. If not, replace the motor.
REAR WINDOW
1. Open the hatch and remove the hatch trim panel (see TRIM
REMOVAL/INSTALLATION - HATCH AREA ).
Page 16

2006 Honda Insight
2000-06 ACCESSORIES & EQUIPMENT Wipers/Washers - Insight
Fig. 14: Disconnecting 4P Connector From Rear Window Wiper Motor
Page 17

Courtesy of AMERICAN HONDA MOTOR CO., INC.
between the No. 1 (+) terminal and the No. 4 (ground) terminal. When the park
2.
Disconnect the 2P connectors (A) from the washer motors (B).
2006 Honda Insight
2000-06 ACCESSORIES & EQUIPMENT Wipers/Washers - Insight
3. Test the motor by connecting battery power to terminal No. 1 and connect
terminal No. 3 to body ground. The rear wiper motor should run smoothly.
4. Connect the battery power to the No. 1 terminal, and ground to the No. 2 and
No. 3 terminals of the 4P connector. Then connect an analog voltmeter
switch contacts, the pointer should swing. If not, replace the motor.
WASHER MOTOR TEST
1. Remove the right front inner fender (see FRONT INNER FENDER
REPLACEMENT ).
Page 18

2006 Honda Insight
2000-06 ACCESSORIES & EQUIPMENT Wipers/Washers - Insight
Fig. 15: Disconnecting 2P Connectors From Washer Motors
Courtesy of AMERICAN HONDA MOTOR CO., INC.
Page 19

1.
Open the hood. Remove the nuts and the windshield wiper arms.
2006 Honda Insight
2000-06 ACCESSORIES & EQUIPMENT Wipers/Washers - Insight
3. Test the washer motor by connecting battery power to terminal No. 1 and
connect terminal No. 2 to body ground. The washer motor should operate. If
the washer motor does not operate, replace it.
WINDSHIELD WIPER MOTOR REPLACEMENT
Page 20

3.
Remove the bolts and wiper linkage assembly (A).
2006 Honda Insight
2000-06 ACCESSORIES & EQUIPMENT Wipers/Washers - Insight
Fig. 16: Removing Nuts And Windshield Wiper Arms With Specified
Torques
Courtesy of AMERICAN HONDA MOTOR CO., INC.
2. Remove the hood seal and cowl cover.
Page 21

4.
Scribe a line (A) across the link (B) and body to show the original adjustment.
2006 Honda Insight
2000-06 ACCESSORIES & EQUIPMENT Wipers/Washers - Insight
Fig. 17: Removing Bolts And Wiper Linkage Assembly With Specified
Torques
Courtesy of AMERICAN HONDA MOTOR CO., INC.
Page 22

2006 Honda Insight
2000-06 ACCESSORIES & EQUIPMENT Wipers/Washers - Insight
Fig. 18: Scribing Line Across Link And Body
Courtesy of AMERICAN HONDA MOTOR CO., INC.
Page 23

2006 Honda Insight
2000-06 ACCESSORIES & EQUIPMENT Wipers/Washers - Insight
5. Remove the nut and link (A) from the wiper motor (B).
Page 24

Fig. 19: Removing Nut And Link From Wiper Motor With Specified
wiper motor (B).
2006 Honda Insight
2000-06 ACCESSORIES & EQUIPMENT Wipers/Washers - Insight
Torques
Courtesy of AMERICAN HONDA MOTOR CO., INC.
6. Disconnect the 5P connector (A), then remove the four mounting nuts and
Page 25

2006 Honda Insight
2000-06 ACCESSORIES & EQUIPMENT Wipers/Washers - Insight
Fig. 20: Removing Four Mounting Nuts And Wiper Motor With Specified
Torques
Courtesy of AMERICAN HONDA MOTOR CO., INC.
Page 26

2006 Honda Insight
2000-06 ACCESSORIES & EQUIPMENT Wipers/Washers - Insight
7. Apply a multipurpose grease to the moving parts and install in the reverse
order of removal.
REAR WINDOW WIPER MOTOR REPLACEMENT
1. Remove the nut (A), the wiper arm (B) and the special nut (C).
Fig. 21: Removing Nut, Wiper Arm And Special Nut
Courtesy of AMERICAN HONDA MOTOR CO., INC.
Page 27

1.
Pull away the right front inner fender (see
2006 Honda Insight
2000-06 ACCESSORIES & EQUIPMENT Wipers/Washers - Insight
2. Open the hatch and remove the hatch trim panel (see TRIM
REMOVAL/INSTALLATION - HATCH AREA ).
3. Disconnect the 4P connector (A) from the motor (B).
Fig. 22: Disconnecting 4P Connector From Motor And Torque
Specifications
Courtesy of AMERICAN HONDA MOTOR CO., INC.
4. Remove the three mounting bolts, then remove the motor.
5. Install in the reverse order of removal.
WASHER MOTOR/WASHER RESERVOIR REPLACEMENT
FRONT INNER FENDER
Page 28

REPLACEMENT
4.
Remove the three mounting bolts and washer reservoir.
2006 Honda Insight
2000-06 ACCESSORIES & EQUIPMENT Wipers/Washers - Insight
).
2. Disconnect the 2P connectors (A) from the washer motors (B).
Fig. 23: Disconnecting 2P Connectors From Washer Motors
Courtesy of AMERICAN HONDA MOTOR CO., INC.
3. Disconnect the washer tubes (C) from the washer motors.
Page 29

2.
Remove the washer nozzles and clips, then remove the tubes.
2006 Honda Insight
2000-06 ACCESSORIES & EQUIPMENT Wipers/Washers - Insight
Fig. 24: Removing Reservoir Mounting Bolts And Washer With Specified
Torques
Courtesy of AMERICAN HONDA MOTOR CO., INC.
5. Install in the reverse order of removal.
WASHER TUBE REPLACEMENT
1. Remove the right front inner fender (see FRONT INNER FENDER
REPLACEMENT ).
Page 30

Install in the reverse order of removal. Take care not to pinch the washer tubes.
Check the washers operation.
2006 Honda Insight
2000-06 ACCESSORIES & EQUIPMENT Wipers/Washers - Insight
Fig. 25: Removing Washer Nozzles And Clips
Courtesy of AMERICAN HONDA MOTOR CO., INC.
3.
 Loading...