

Page 1
Kit No. 08E50-SLN-100
Security System User’s Information
© 2006 American Honda Motor Co., Inc. - All Rights Reserved. 1
FIT
Page 2
Contents
Introduction ..................................................... 3
Emergency Disarming
During Alarming ........................................ 4
During the Entry Delay Time ..................... 4
System Controls
Arming Mode (MANUAL AUTO) ...............
Arming Mode (AUTO MANUAL)...............
Valet (Auto Arming Mode only)
Placing the System in the Valet Mode ...... 7
In the Valet Mode ...................................... 8
Exit From the Valet Mode .......................... 9
Arming
Arming Methods ...................................... 10
Manual Arming (Remote Controlled) ...... 10
Auto Arming (Passive) ............................ 11
Please write the serial number of the remote control and the main unit below.
Keep this booklet as a record of your purchase.
Remote Control No.: Main Unit No.:
No.:
Alarm Mode
Alarm Triggered Mode ............................. 12
Disarming
Remote Controlled Disarming ................. 13
Panic
5
6
Activating the Panic Function ................. 14
Deactivating the Panic Function ............. 14
Tripped Sensor Warning and Indication
Tripped Sensor Warning ........................... 15
Tripped Sensor Indication (using both
the transmitter and ignition key) ............ 16
Tripped Sensor Indication (using only
the ignition key)...................................... 17
Glossary ........................................................ 18
Specifications................................................ 20
2 © 2006 American Honda Motor Co., Inc. - All Rights Reserved.
Page 3
Introduction
Congratulations on your purchase of this Honda Security System.
Your Honda Security System is the product of years of research
and development. It will give you many years of reliable
performance, protection, and convenience.
The system consists of two major components: a main unit and a
remote control transmitter.
The main unit is the “brain” of the system. The built-in
programmable microprocessor monitors your vehicle for optimal
protection while offering various options to tailor the system to the
preferences of different users.
The remote control allows you to turn the system on and off from
outside the vehicle while simultaneously locking and unlocking
the
doors. The transmitter can also be used to intentionally activate
the horn in case of an emergency.
To take full advantage of your Honda Security System, we
encourage you to read this manual thoroughly.
The Security System can be operated with the vehicle’s Keyless Entry System.
For operation of the keyless entry system, refer to the vehicle Owner’s Manual or User’s Information for the optional keyless entry system.
© 2006 American Honda Motor Co., Inc. - All Rights Reserved. 3
Due to the expertise required to properly install the Honda
Security System, we highly recommend that the installation
be performed by your Honda dealer. Proper wiring and
component placement are essential for optimum system
performance.
Page 4
Emergency Disarming
During Alarming
1
2
During the Entry Delay
Time
1
ON
OFF
ON
OFF
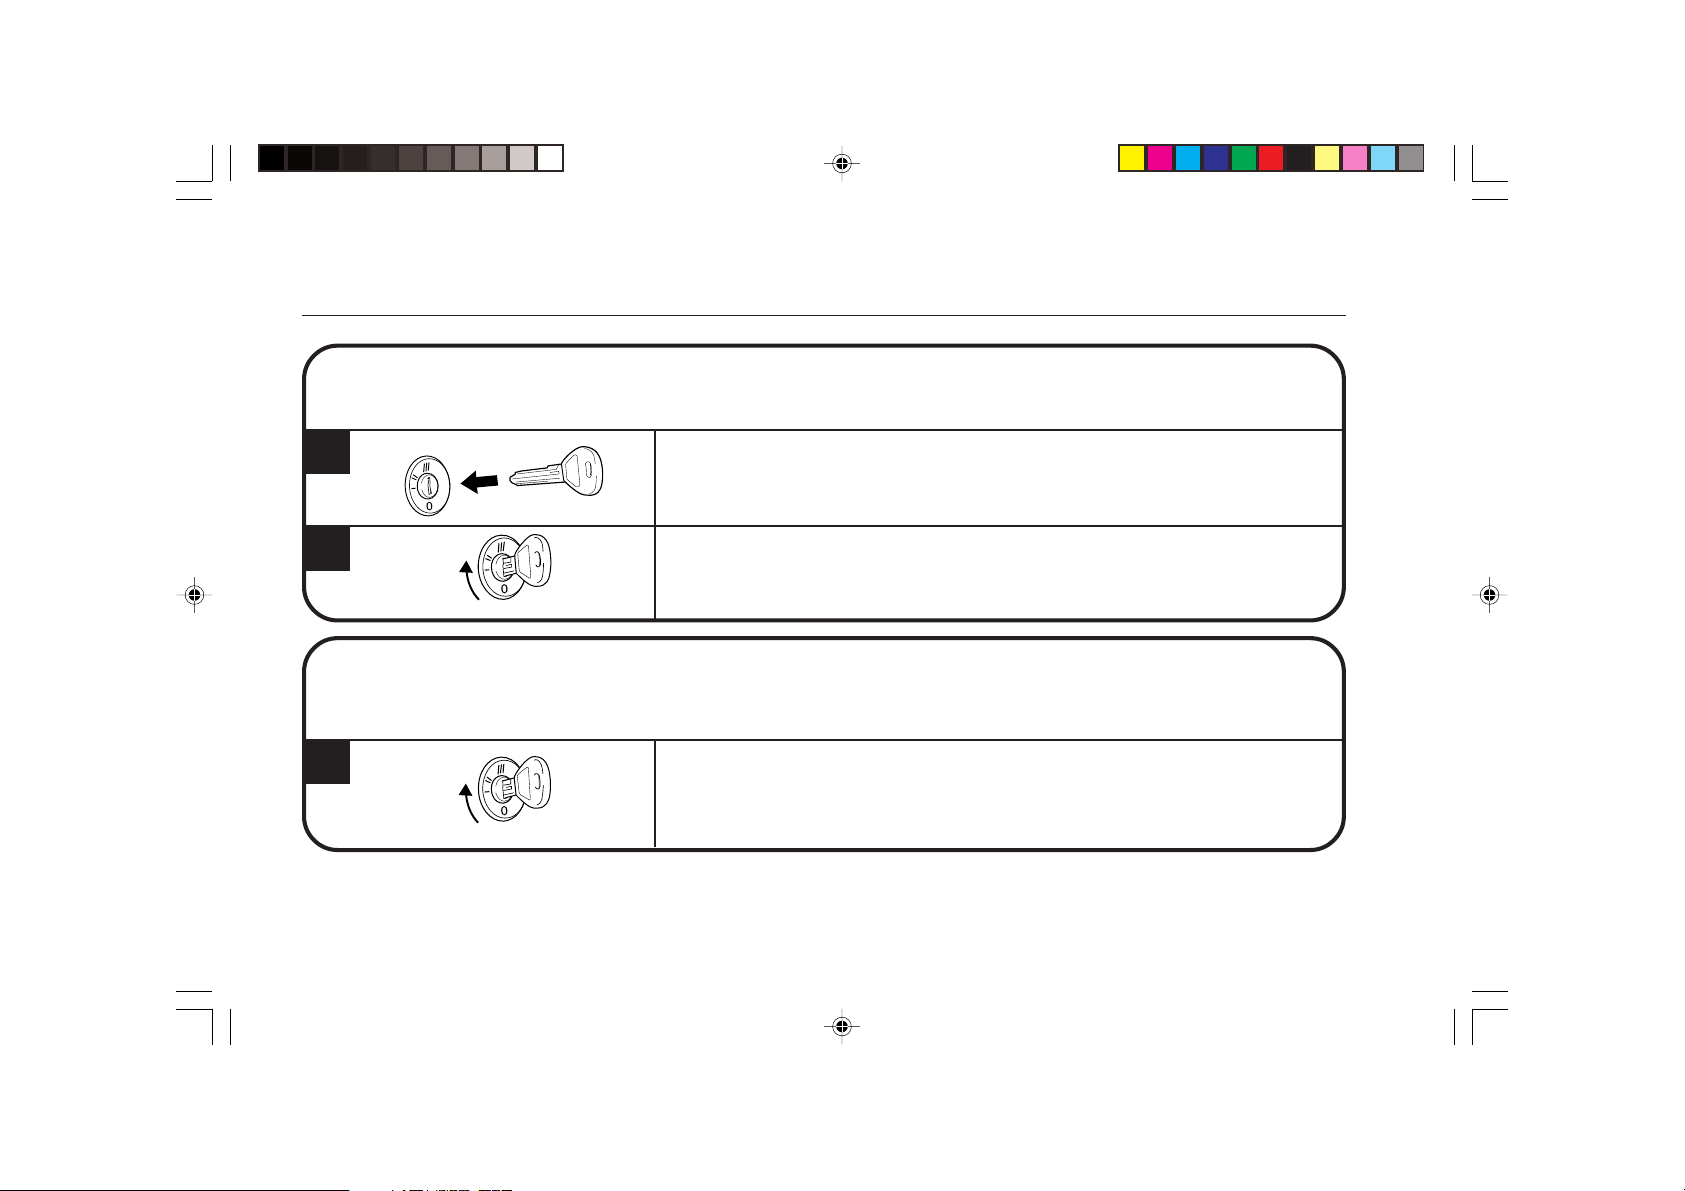
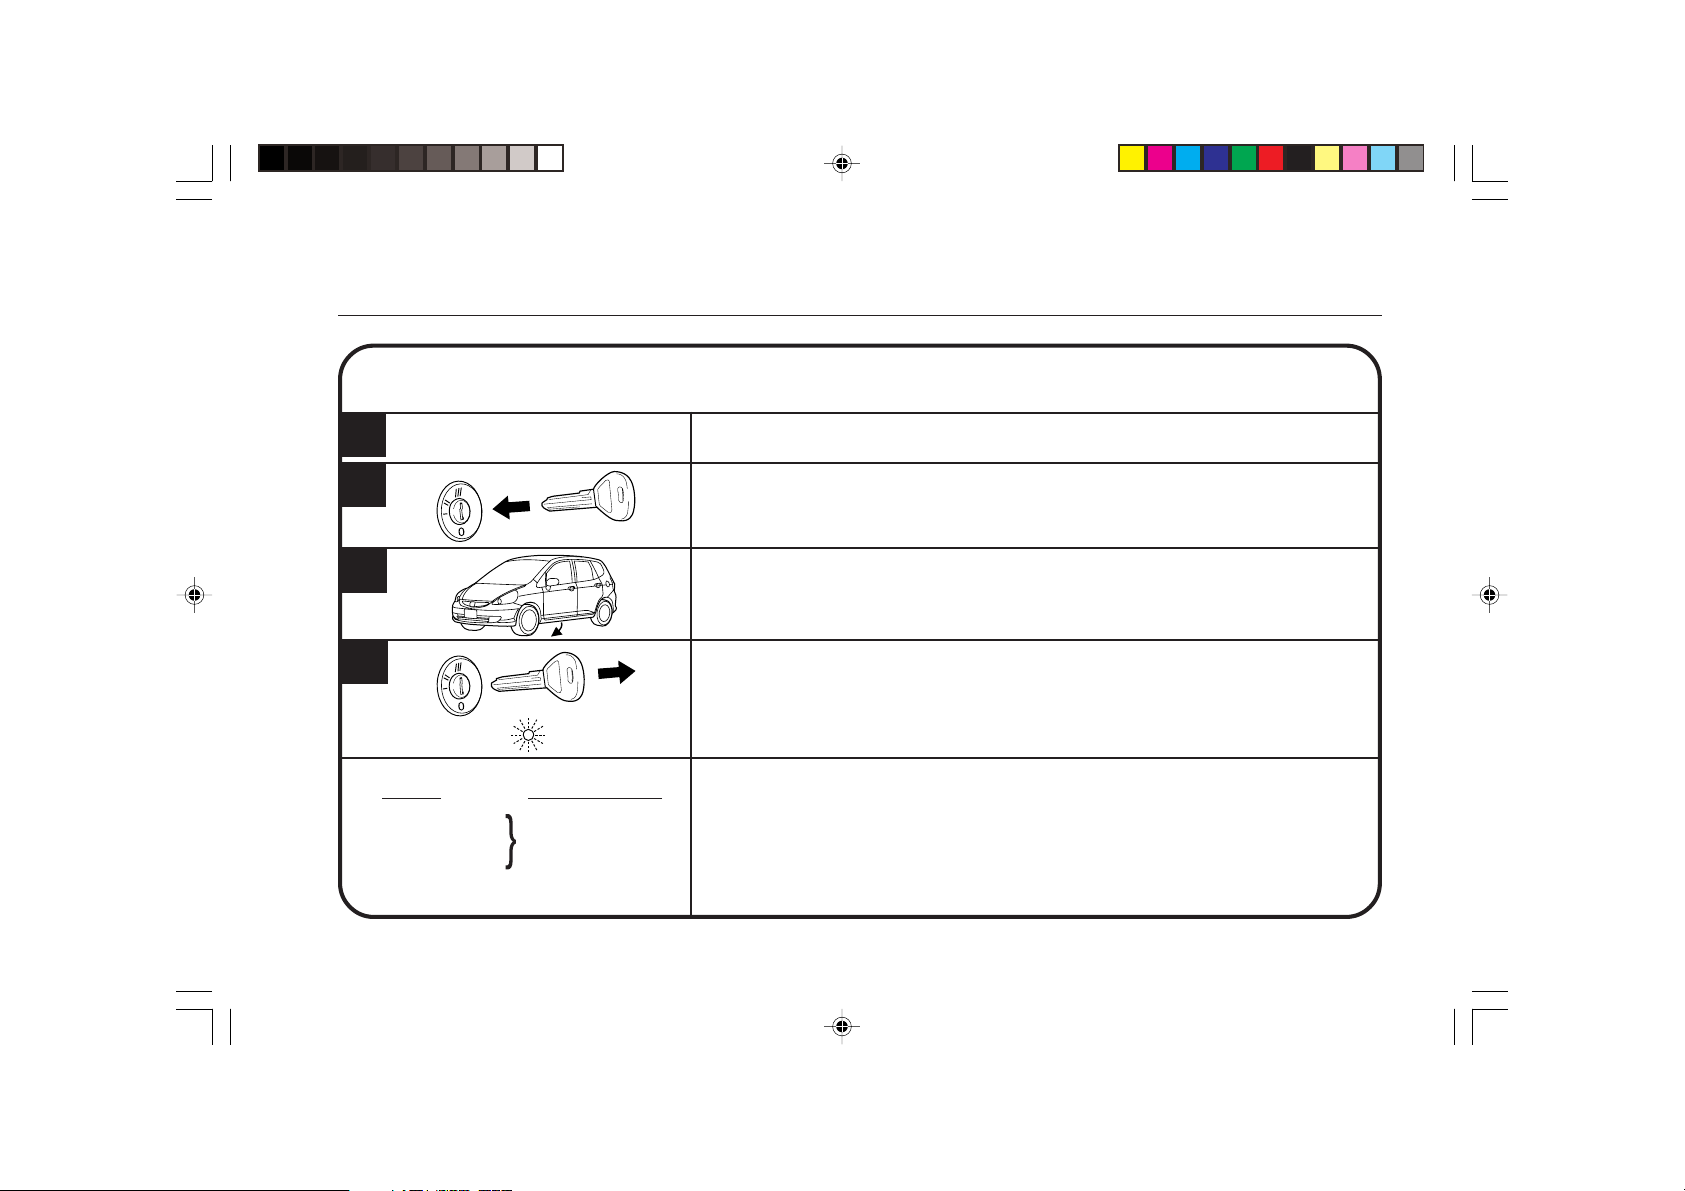
• The system can be disarmed using the Ignition key regardless of the method used to
arm the system.
• This method of disarming also serves as an emergency override if the remote control
transmitter cannot be used.
Enter the vehicle and insert the ignition key.
Turn the ignition key to the “ON” (II) position.
The security system will disarm when the ignition key is turned to the on position.
• When the system is being armed by the AUTO arming method, there is a 20 second
entry delay time after opening a door.
• If the system is armed by the remote control transmitter, the entry delay time is changed
to zero seconds, and the alarm is triggered immediately when a door is opened.
Insert the ignition key after opening the door.
Turn the ignition key to the “ON” (II) position. The security system will disarm when the
ignition key is turned to the on position.
4 © 2006 American Honda Motor Co., Inc. - All Rights Reserved.
Page 5
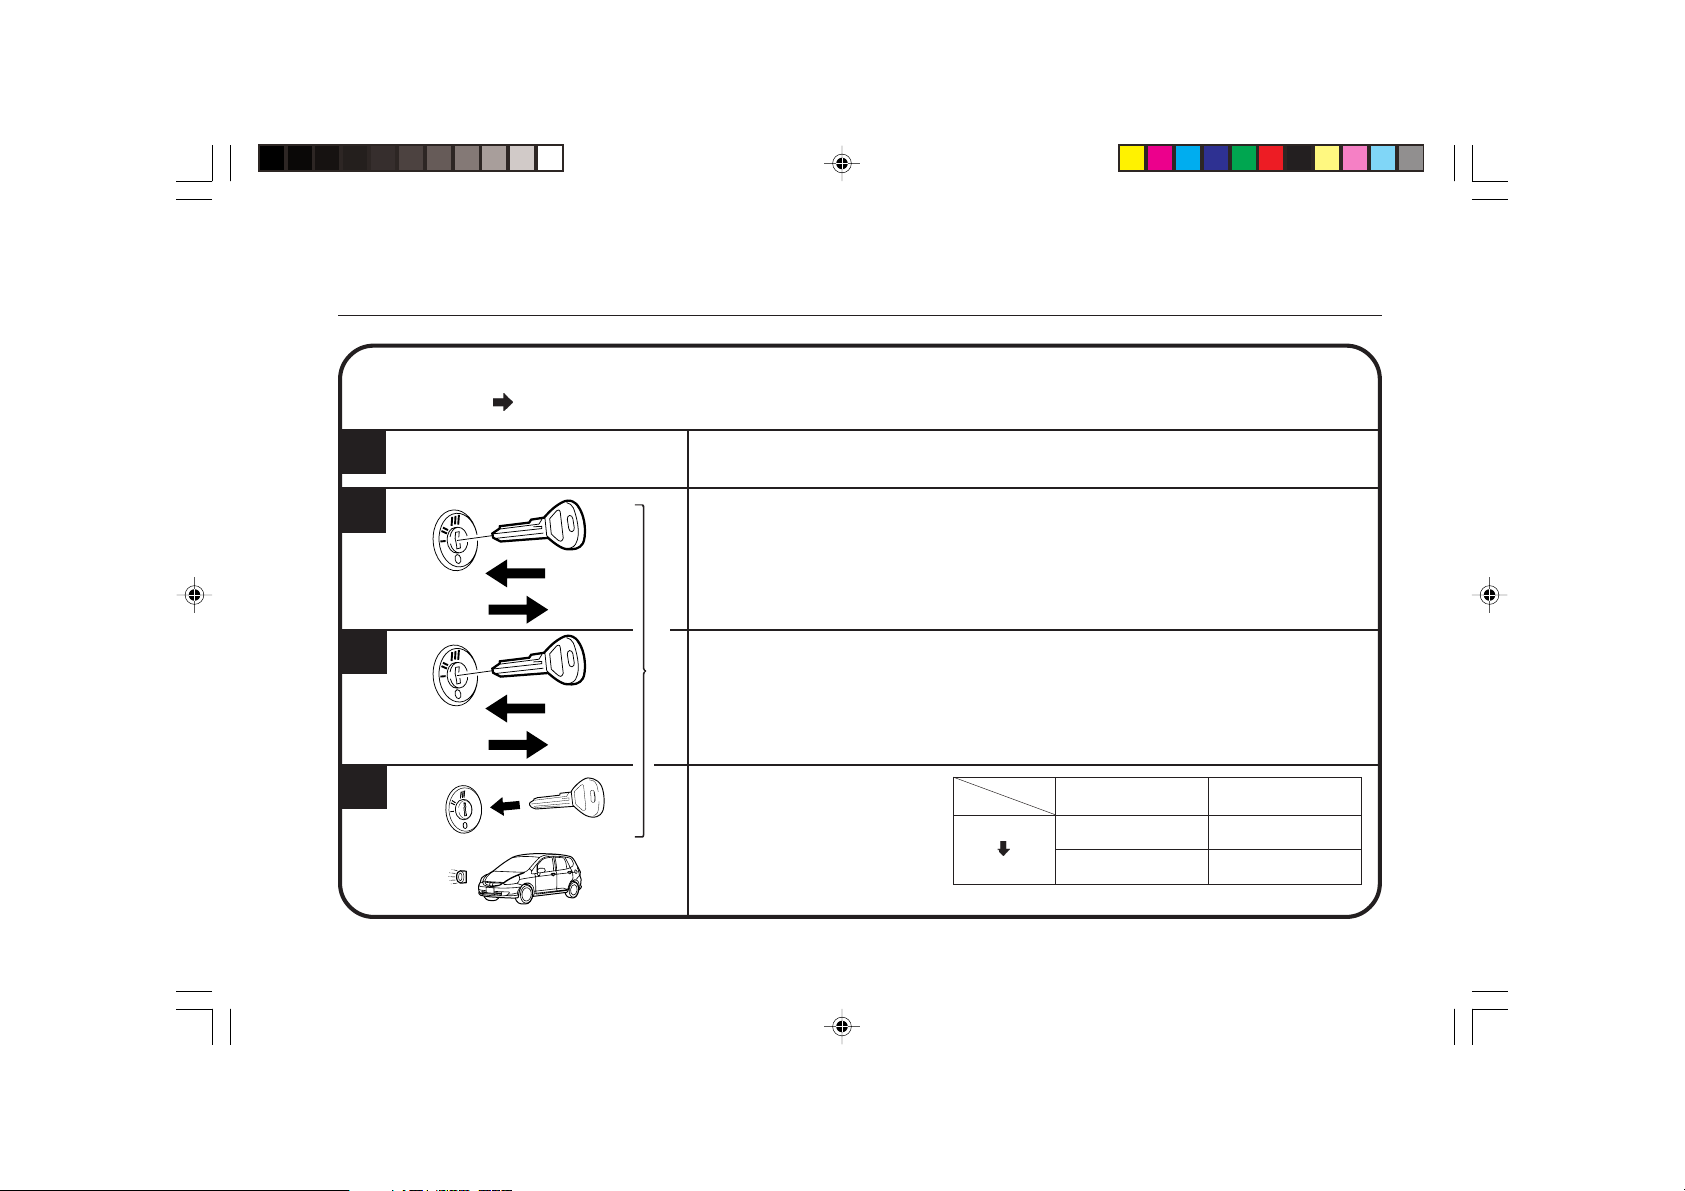
System Controls
Arming Mode
(MANUAL AUTO)
1
2
3
4
4713010M
4713010M
5N25010S
This section explains how to switch the arming mode from MANUAL to AUTO.
NOTE: Factory preset is MANUAL.
Disarm the security system.
Steps from 2 to 4 must be completed within 3 seconds.
Insert the ignition key, and remove the ignition key from the ignition switch.
(All the way out.)
Insert the ignition key, and remove the ignition key from the ignition switch.
(All the way out.)
within 3 seconds
Insert the ignition key.
You will observe the following.
• The system “beep” once.
MANUAL MODE
AUTO MODE
The switching procedure is
Completed Beep once
Not completed No beep
The result
© 2006 American Honda Motor Co., Inc. - All Rights Reserved. 5
Page 6
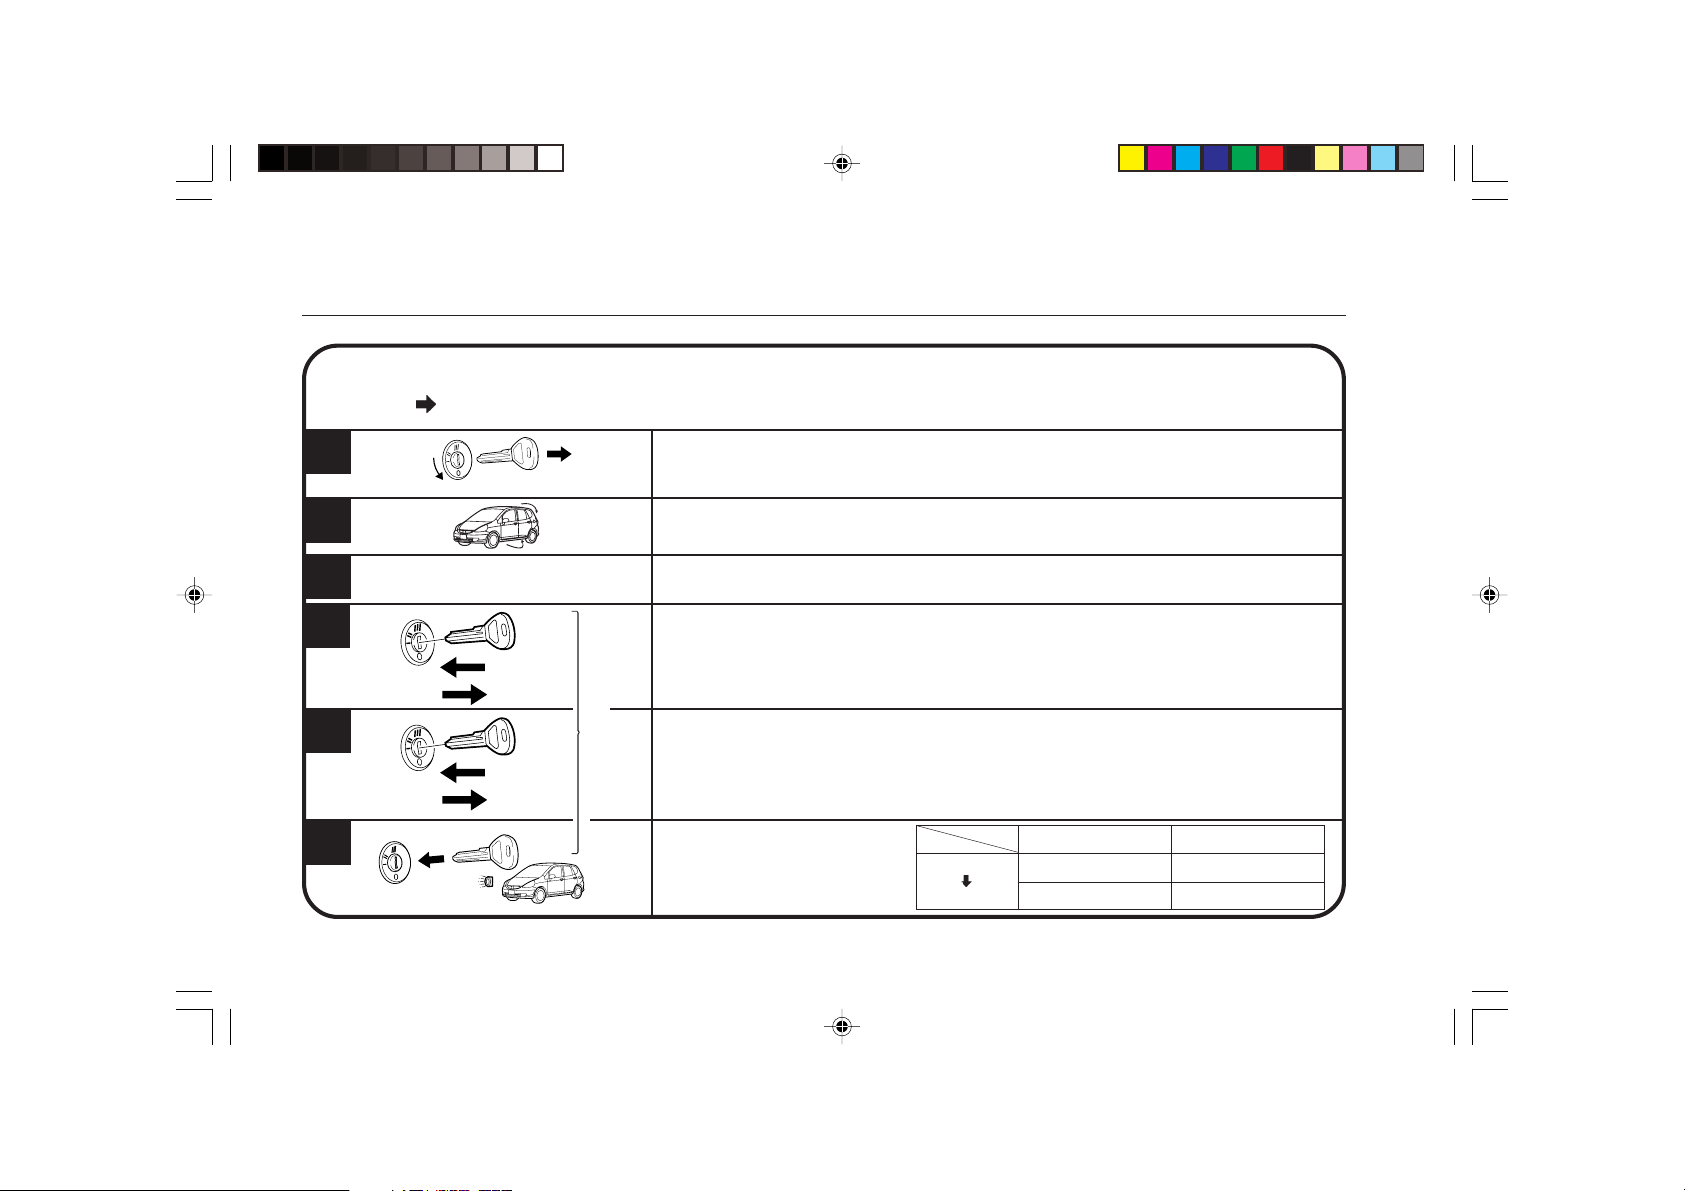
System Controls
Arming Mode
(AUTO MANUAL)
1
ON
OFF
2
3
4
4713010M
5
4713010M
6
5N25021S
5N25120S
This section explains how to switch the arming mode from AUTO to MANUAL.
Turn the ignition key to the OFF position.
Remove the key from the ignition switch.
Open a door and close it. (The EXIT delay starts.)
Steps from 4 to 6 must be completed within 3 seconds.
Insert the ignition key, and remove the ignition key from the ignition switch.
(All the way out.)
Insert the ignition key, and remove the ignition key from the ignition switch.
(All the way out.)
within 3 seconds
Insert the ignition key.
You will observe the following.
• The system “beeps” twice.
AUTO MODE
MANUAL MODE
The switching procedure is
Completed Beep twice
Not completed No beep
The result
6 © 2006 American Honda Motor Co., Inc. - All Rights Reserved.
Page 7
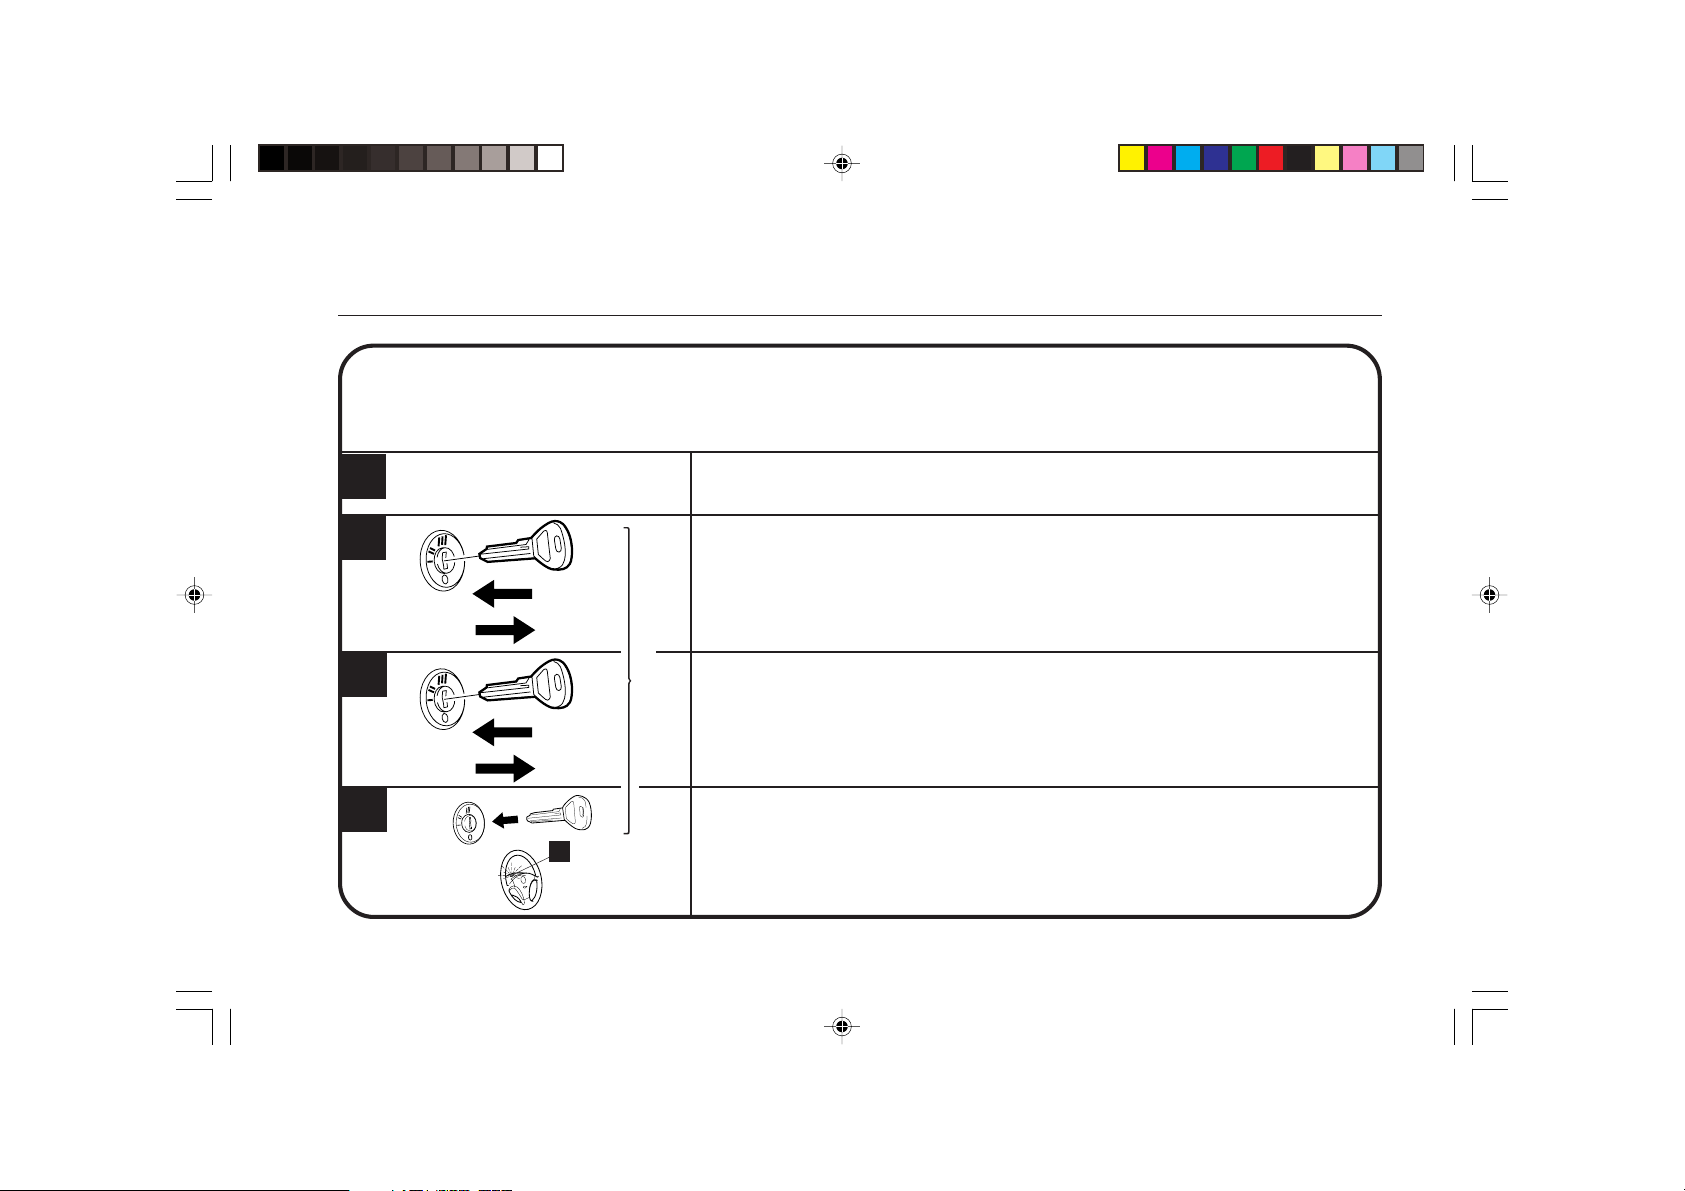
Valet (Auto Arming Mode only)
Placing the System in the Valet Mode
(Valet Mode cannot be used in the
Manual Arming Mode)
1
2
3
4
4713010M
4713010M
4
Status LED
within 3 seconds
Disarm the system.
Steps from 2 to 4 must be completed within 3 seconds.
Insert the ignition key, and remove the ignition key from the ignition switch.
(All the way out.)
Insert the ignition key, and remove the ignition key from the ignition switch.
(All the way out.)
Insert the ignition key.
The Status LED will flash once, indicating that the system is in the Valet mode.
When the security system is placed in the valet mode, it is
temporarily placed on “hold.” When in the valet mode, the system
cannot be armed, but panic mode is still functional. This is a
convenient feature if the car is to be washed, serviced, or valet
parked.
© 2006 American Honda Motor Co., Inc. - All Rights Reserved. 7
Page 8
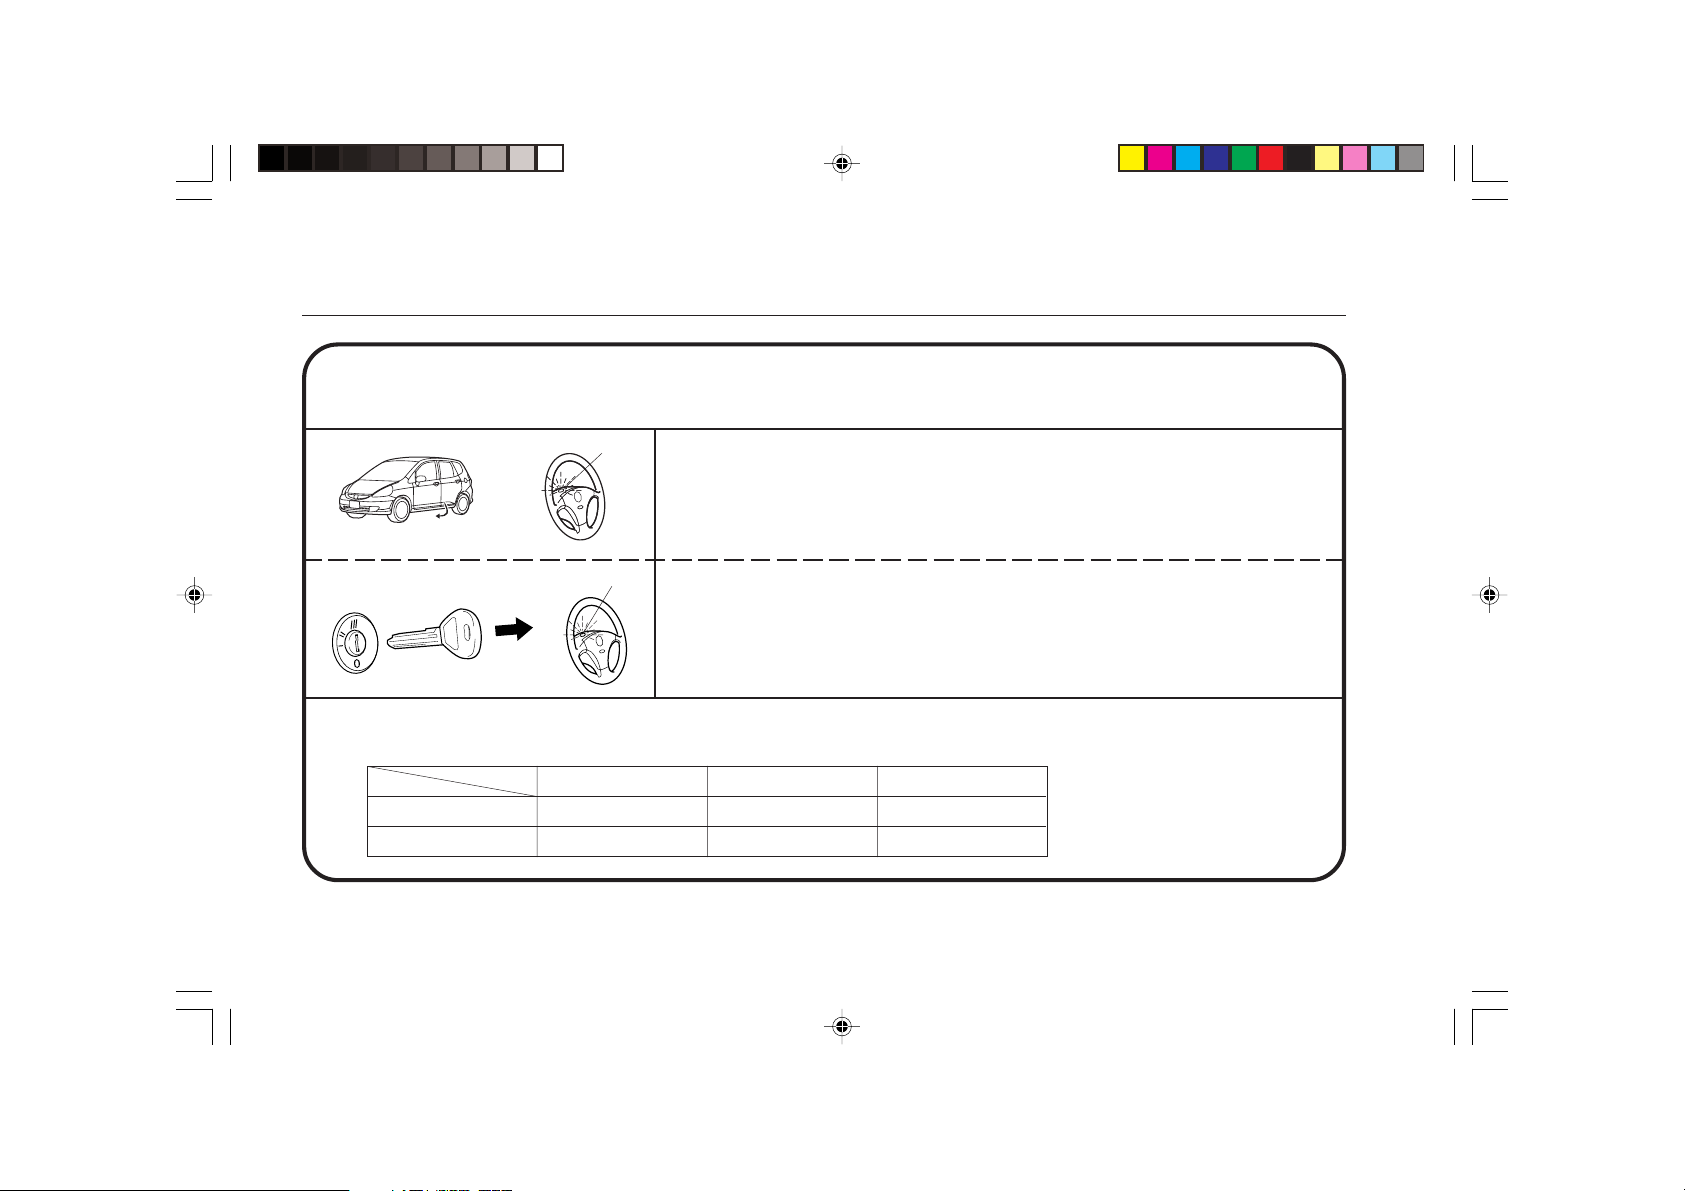
Valet (Auto Arming Mode only)
In the Valet Mode:
LED
5N25031S
LED
If you follow either procedure below, LED blinks once to show the system is in the Valet
mode.
Open one of the doors.
LED blinks once.
After turning the ignition switch to OFF, remove the ignition key.
LED blinks once.
Keyless/Security during the Valet Mode.
Lock/Unlock of Keyless
VALET MODE is ON Active Active Non-Active
VALET MODE is OFF Active Active Active
Panic of Keyless
Set/Unset of Security
8 © 2006 American Honda Motor Co., Inc. - All Rights Reserved.
Page 9
Exit from the Valet Mode
Valet (Auto Arming Mode only)
1
2
4713010M
3
4713010M
4
Status LED4
© 2006 American Honda Motor Co., Inc. - All Rights Reserved. 9
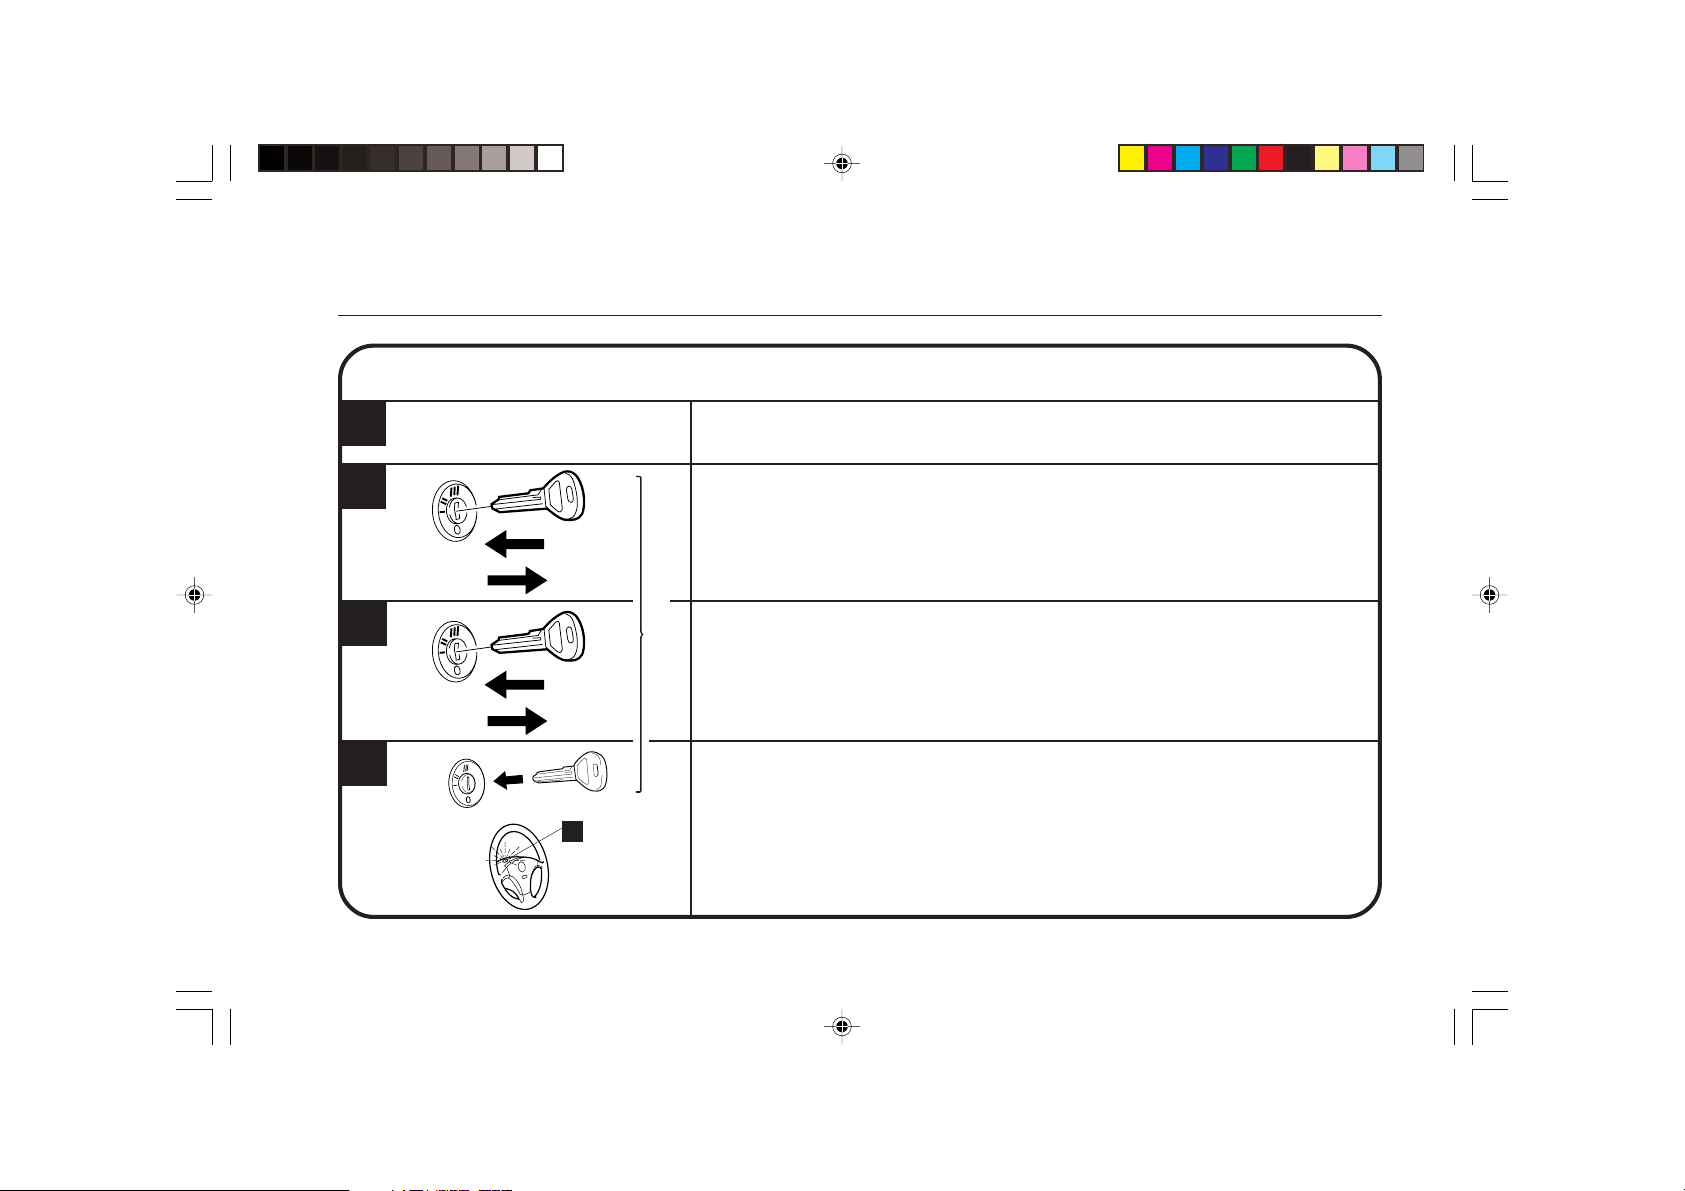
With the system in the Valet mode and the key out of the ignition switch.
Steps from 2 to 4 must be completed within 3 seconds.
Insert the ignition key, and remove the ignition key from the ignition switch.
(All the way out.)
Insert the ignition key, and remove the ignition key from the ignition switch.
(All the way out.)
within 3 seconds
Insert the ignition key.
The Status LED will flash twice, indicating that the system is out of the Valet mode.
The system is now in the Disarm mode.
Page 10
Arming
Arming Methods
Manual Arming
(Remote Controlled)
3
There are two possible ways to arm the system:
• MANUAL Arming (Remote Controlled).
• AUTO Arming (Passive)
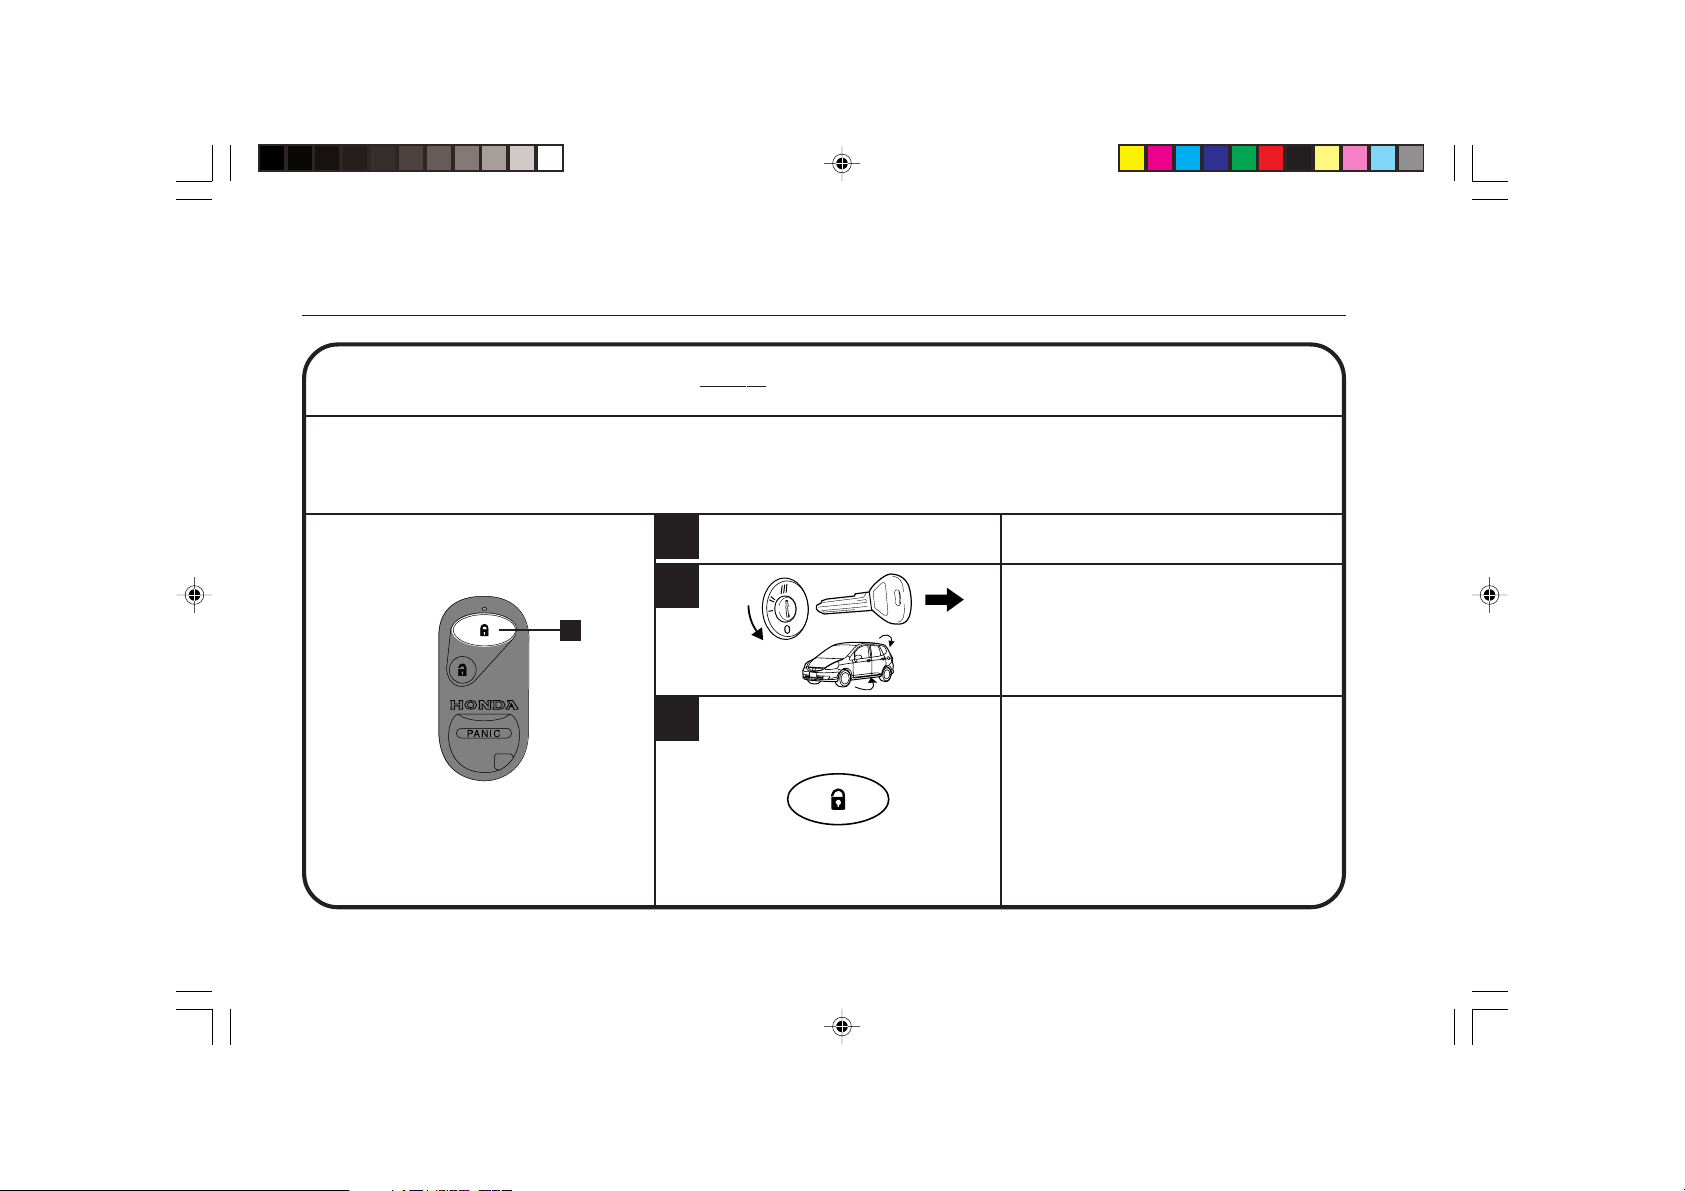
• When the main unit is set to “MANUAL,” the system is armed by using the remote
control transmitter. This is the factory setting.
• If a door or the tailgate is open, the system will not arm when the “LOCK” button is
pressed.
1
2
3
ON
OFF
5N25040S
The arming mode is set to “MANUAL.”
Turn the ignition key to the “OFF” (0)
position.
Remove the key from the ignition switch.
Exit the vehicle and close all the doors and
the tailgate.
Press the “LOCK” button on the remote control
transmitter.
You will observe the following.
• The remote control LED illuminates.
• The security system arms.
• The status LED flashes once per second.
• The parking lights flash once.
• The doors and the tailgate will lock.
If the “LOCK” button is pressed a second time
(within 5 seconds of the first push) the horn will
beep once to confirm the doors and the tailgate
are locked and the system is armed.
10 © 2006 American Honda Motor Co., Inc. - All Rights Reserved.
Page 11
Auto Arming (Passive)
(Arms the security system without
locking the doors.)
Arming
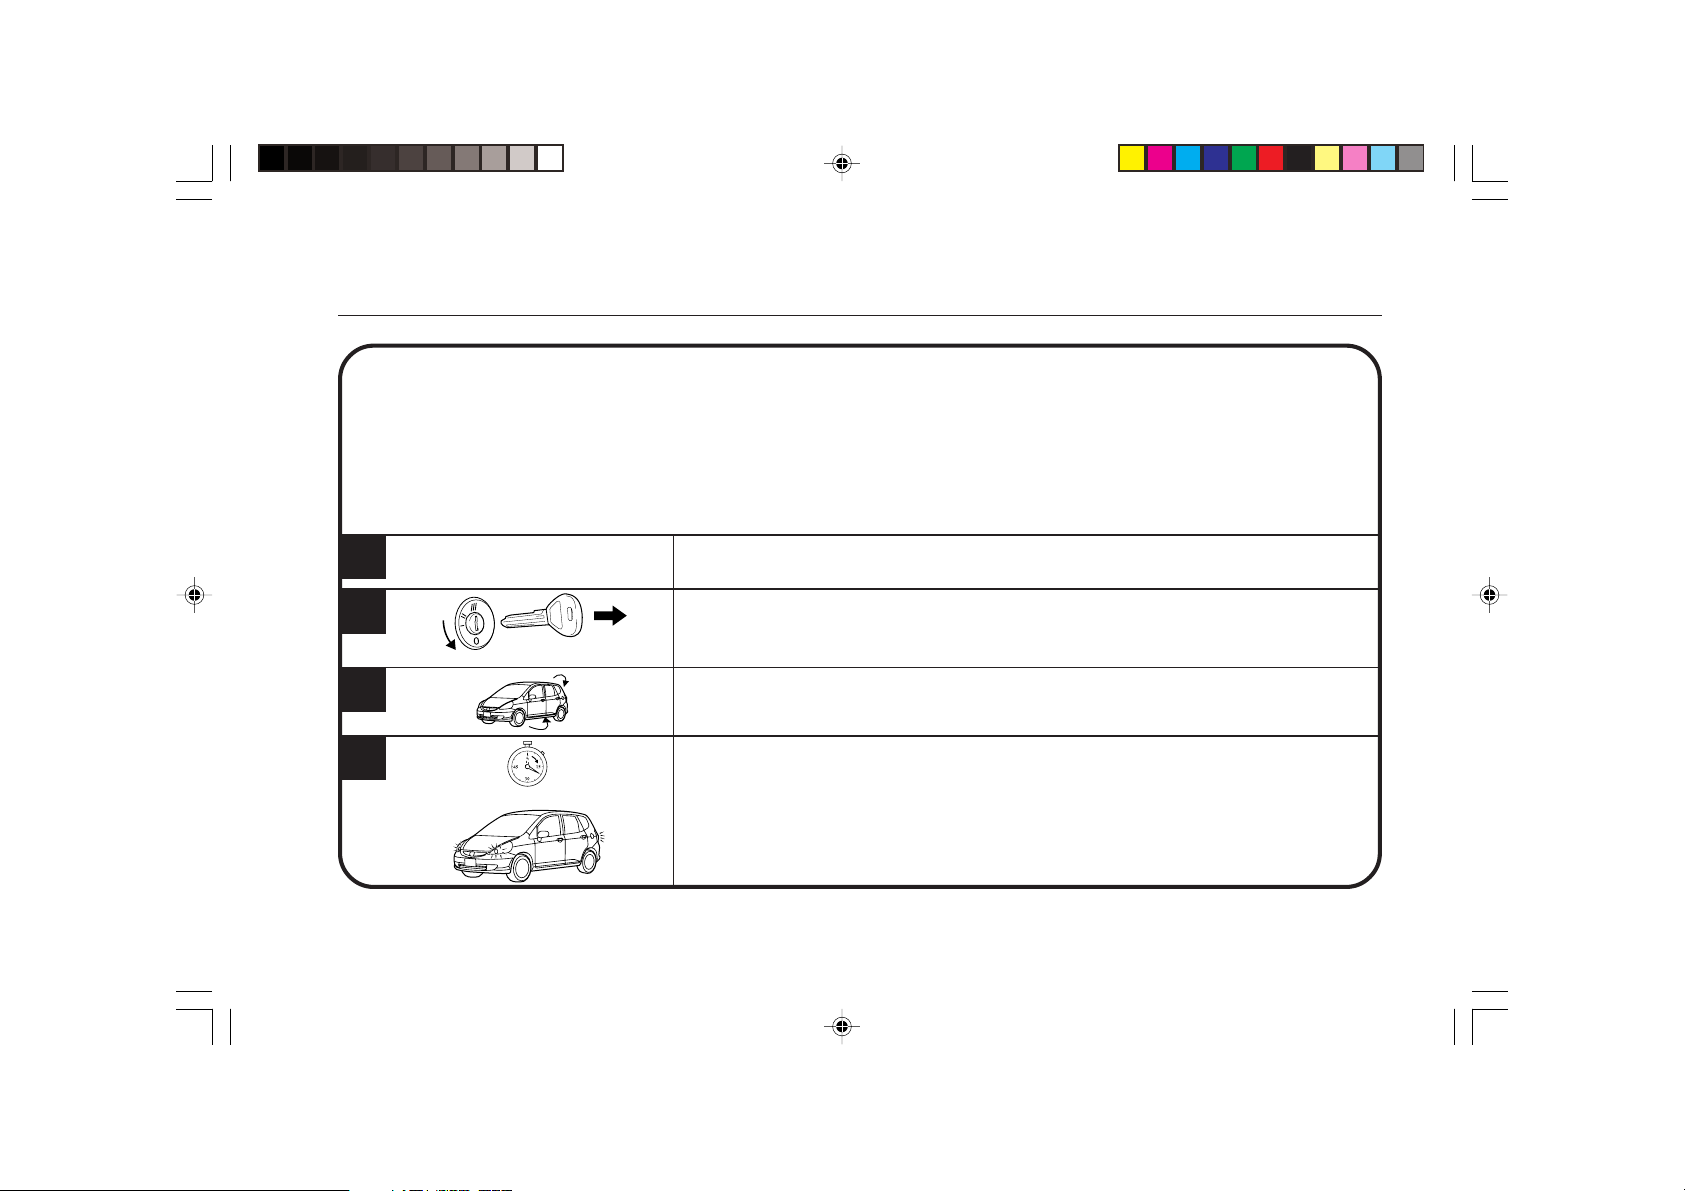
• When the main unit is set to “AUTO,” the system arms automatically 20 seconds after the
last door or the tailgate is closed*.
• If a door or the tailgate is opened during the 20 second exit delay time, the timer resets and
the 20 second exit delay time restarts after the last door or the tailgate is closed.
• If the ignition key is inserted into the ignition switch during the exit delay time, the system
will be disarmed.
• When the remote control transmitter is used to arm the system in the auto arming mode,
the 20 second entry and exit delay time is changed to zero seconds.
1
2
ON
OFF
3
5N25110S
4
20-sec exit delay time
5N25050S
© 2006 American Honda Motor Co., Inc. - All Rights Reserved. 11
The arming mode is set to “AUTO.”
Turn the ignition key to the OFF position.
Remove the key from the ignition switch.
Exit the vehicle and close all the doors and the tailgate.
The system arms automatically 20 seconds after the last door or the tailgate is closed and
the following will occur:
• The status LED flashes 4 times per second during the exit delay time, and once per
second after the system is armed.
• The parking lights flash once without a beep sound to confirm the system is armed.
• When the “LOCK” button on the remote control transmitter is pressed during the exit delay
time, the arming function of the remote control transmitter has priority.
*
The ignition key must be removed from the ignition switch before the system will arm.
Page 12
Alarm Mode
Alarm Triggered Mode
2
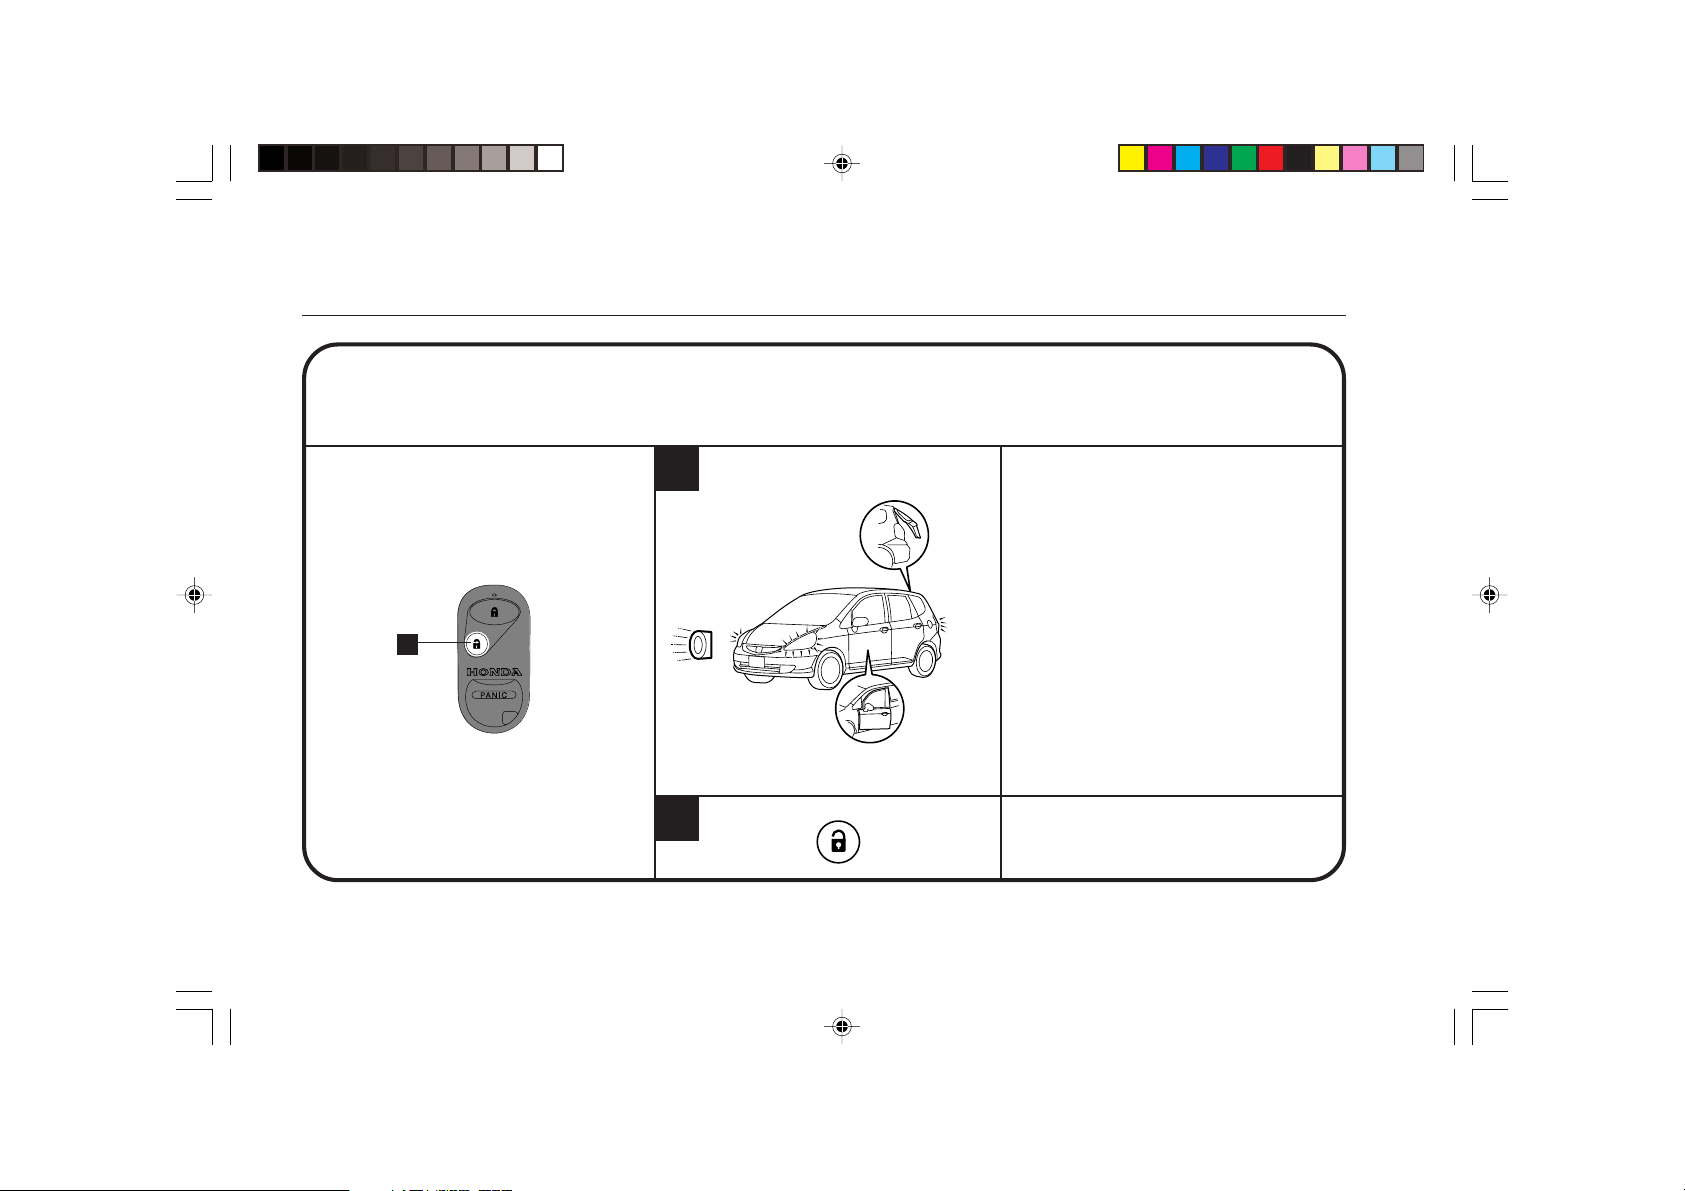
• After the system is armed, opening of any doors or the tailgate will trigger the alarm.
• If the door(s) or the tailgate is kept open, the alarm will continue to sound for 10
minutes.
• If the battery is disconnected in the alarm mode, any attempt to reconnect the battery
will send the alarm into the triggered mode.
1
5N25060S
2
When the alarm is triggered, you will
observe the following:
• The horn sounds once per 1.5
seconds for one alarm duration (horn
duration is 30 seconds).
• The parking and head lights flash
once per 1.5 seconds for one alarm
duration.
• The status LED flashes twice per
second for one alarm duration.
• After one alarm duration the system
automatically rearms.
NOTE: The entry delay time is functional
only when the Arming mode is
set to “AUTO” and the door is
open.
Pressing the “UNLOCK” button of the
remote will cancel the alarm.
12 © 2006 American Honda Motor Co., Inc. - All Rights Reserved.
Page 13
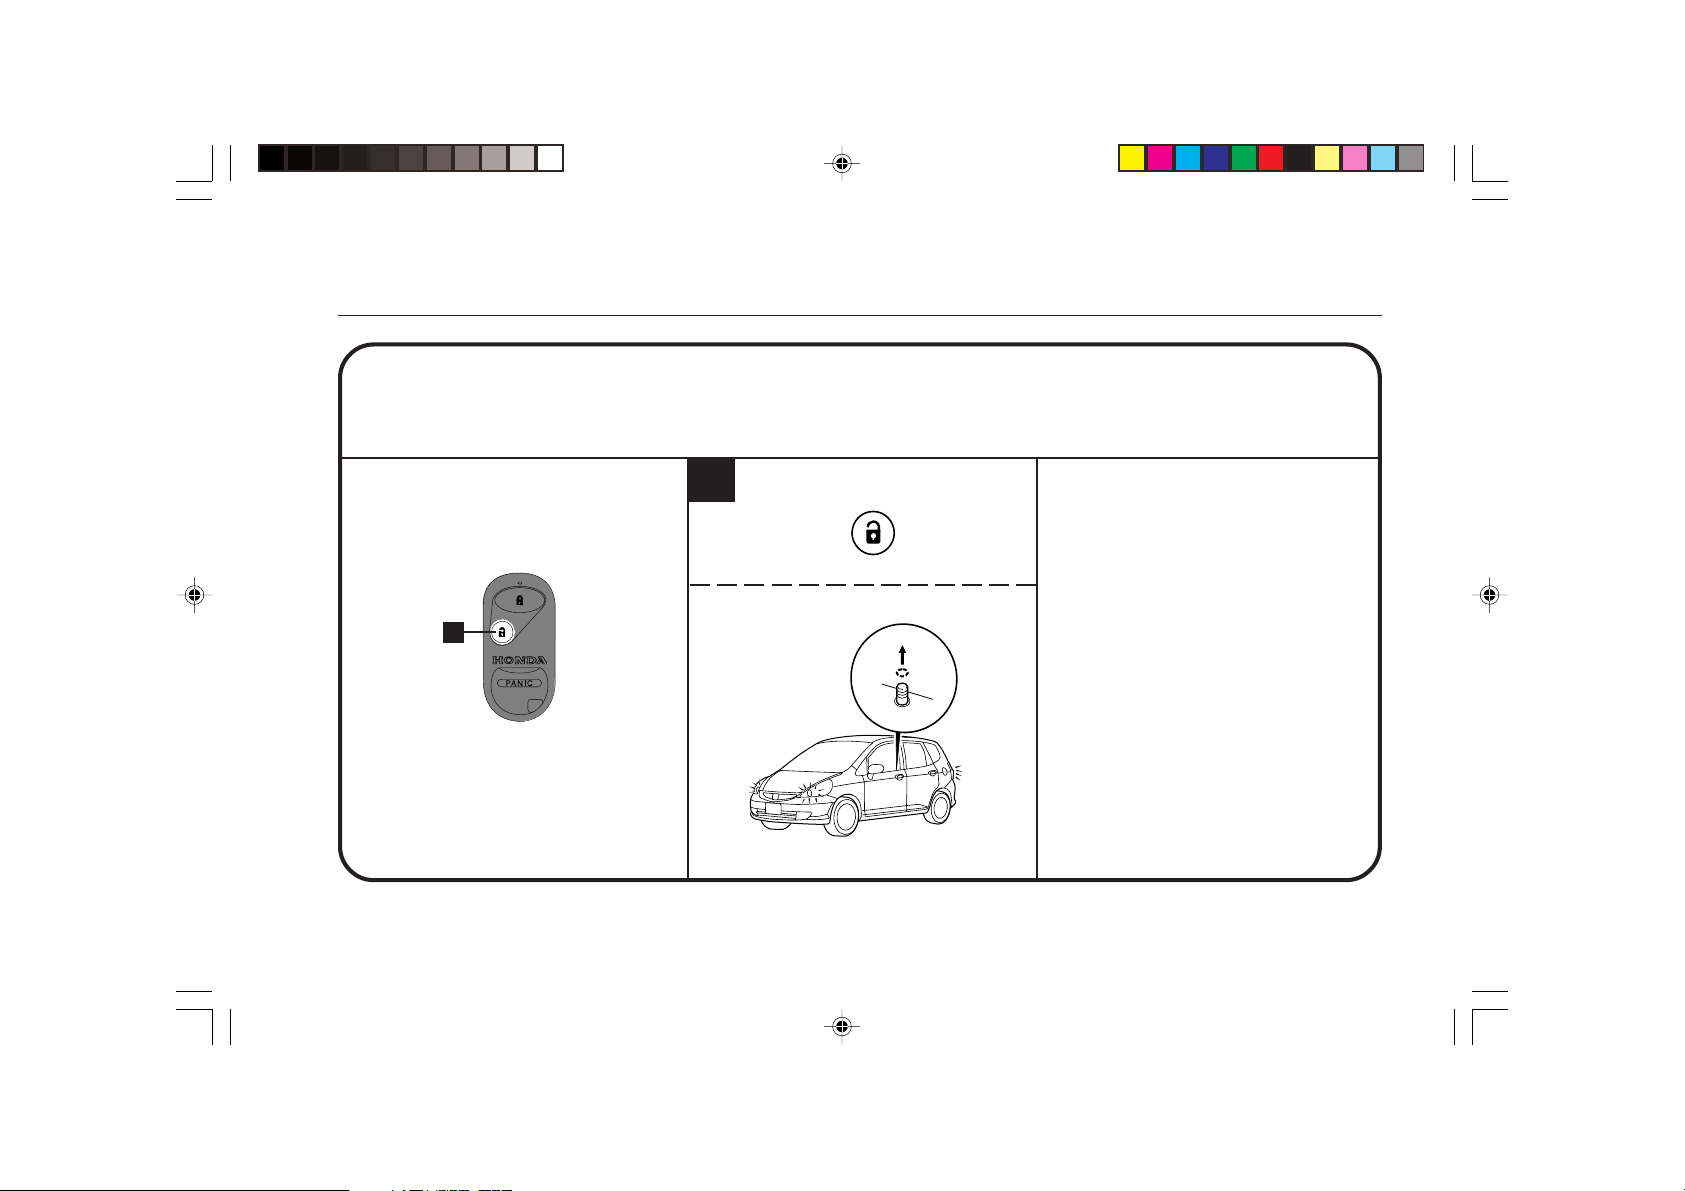
Disarming
Remote Controlled
Disarming
1
• Regardless of the method used to arm the system, the system can be disarmed using
the remote control transmitter.
1
5N25070S
Press the “UNLOCK” button once on the
remote control transmitter and the
following will occur.
The remote control LED illuminates.
• The security system disarms and the
parking lights flash twice.
• The doors unlock.
NOTE: After disarm the system will
rearm in 30 seconds if the doors
or the tailgate are not opened.
© 2006 American Honda Motor Co., Inc. - All Rights Reserved. 13
Page 14
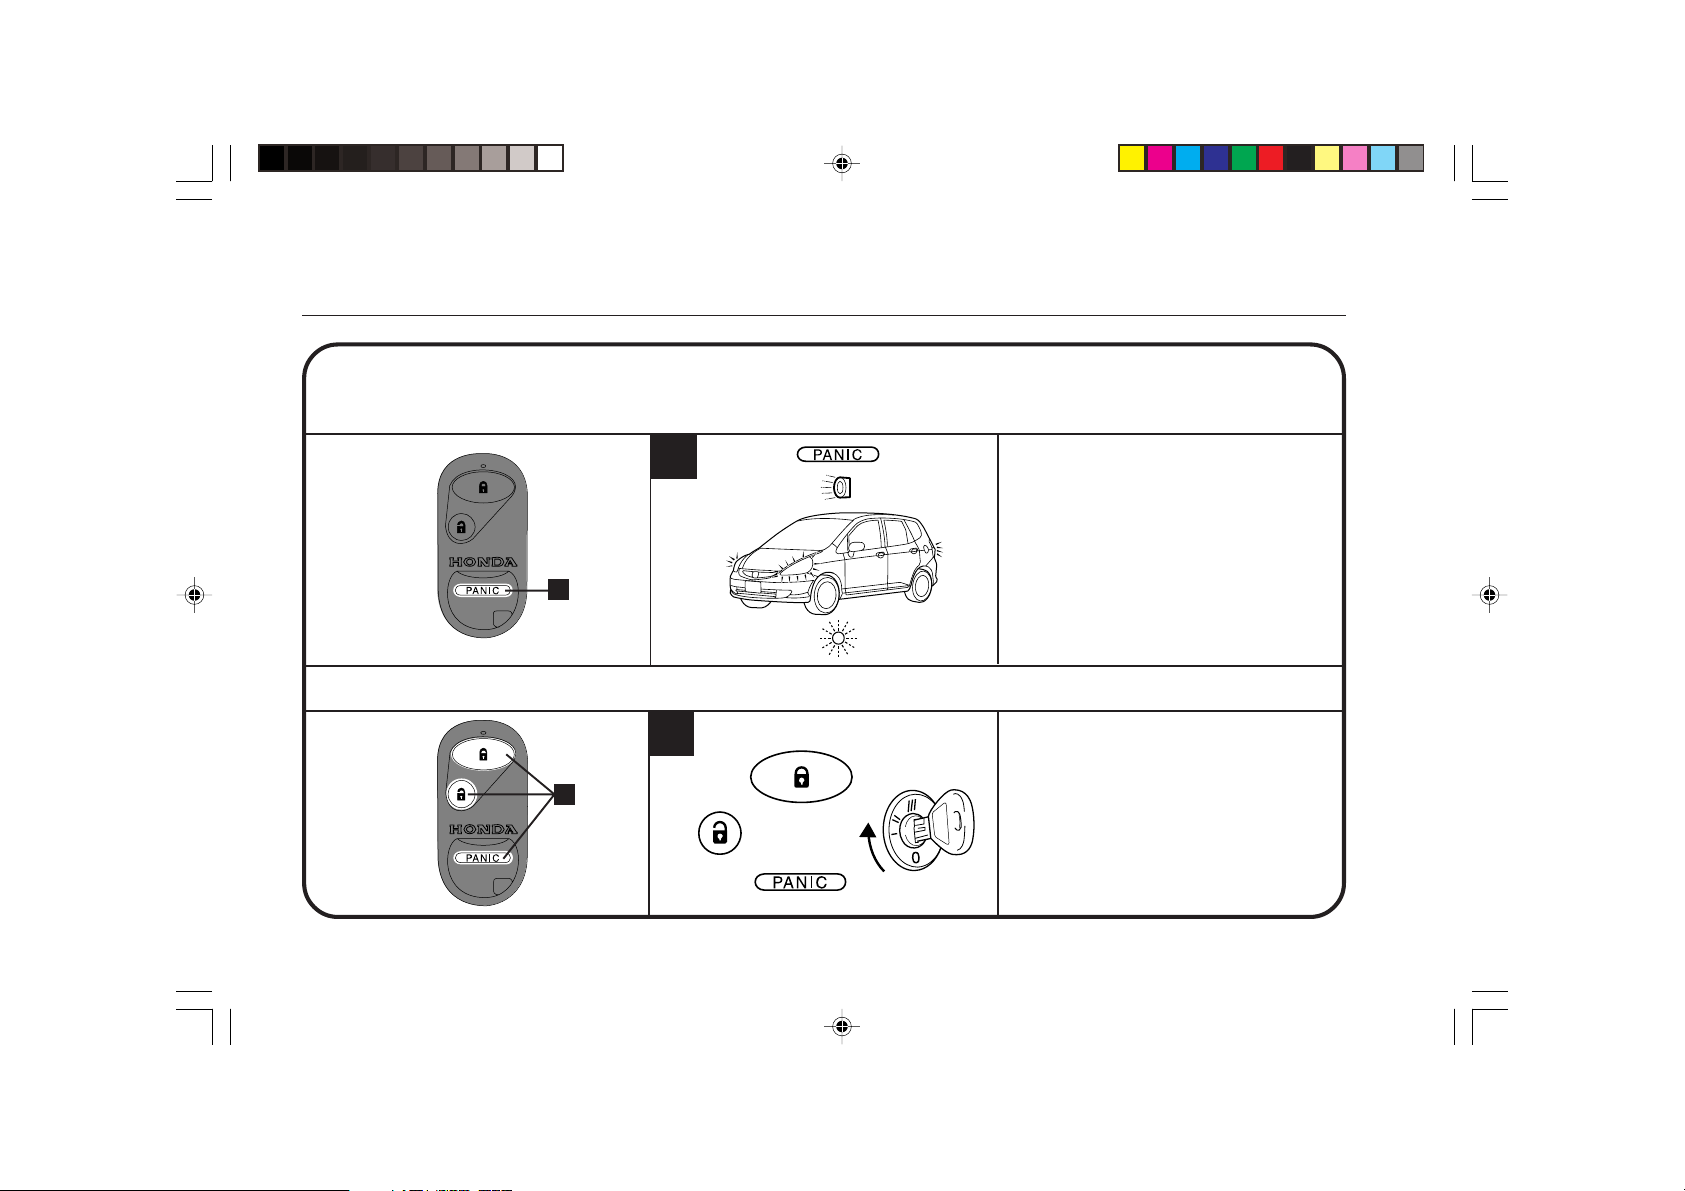
Panic
Activating the Panic Function
1
1111111111111111111111111111111
Deactivating the Panic Function
1
111111111111111111111111111111
• You can intentionally activate the horn and flash the head lights
and parking lights by the remote control transmitter.
• This is a convenient feature if you need to attract attention in
case of an emergency.
Press and hold the “PANIC” button for
more than 1 second. The following will
occur.
• The horn sounds once per 1.5
seconds for one alarm duration. (Horn
duration is 30 seconds.)
The parking and head lights flash once
per 1.5 seconds for one alarm
duration.
5N25080S
ON
or
OFF
• The status LED flashes twice per
second for one alarm duration.
To stop the horn sounding, and head
lights and parking lights flashing before
the alarm duration time is up, press the
“PANIC”, “LOCK” or “UNLOCK” button
momentarily, or turn the ignition key to
the “ON” (II) position.
14 © 2006 American Honda Motor Co., Inc. - All Rights Reserved.
Page 15
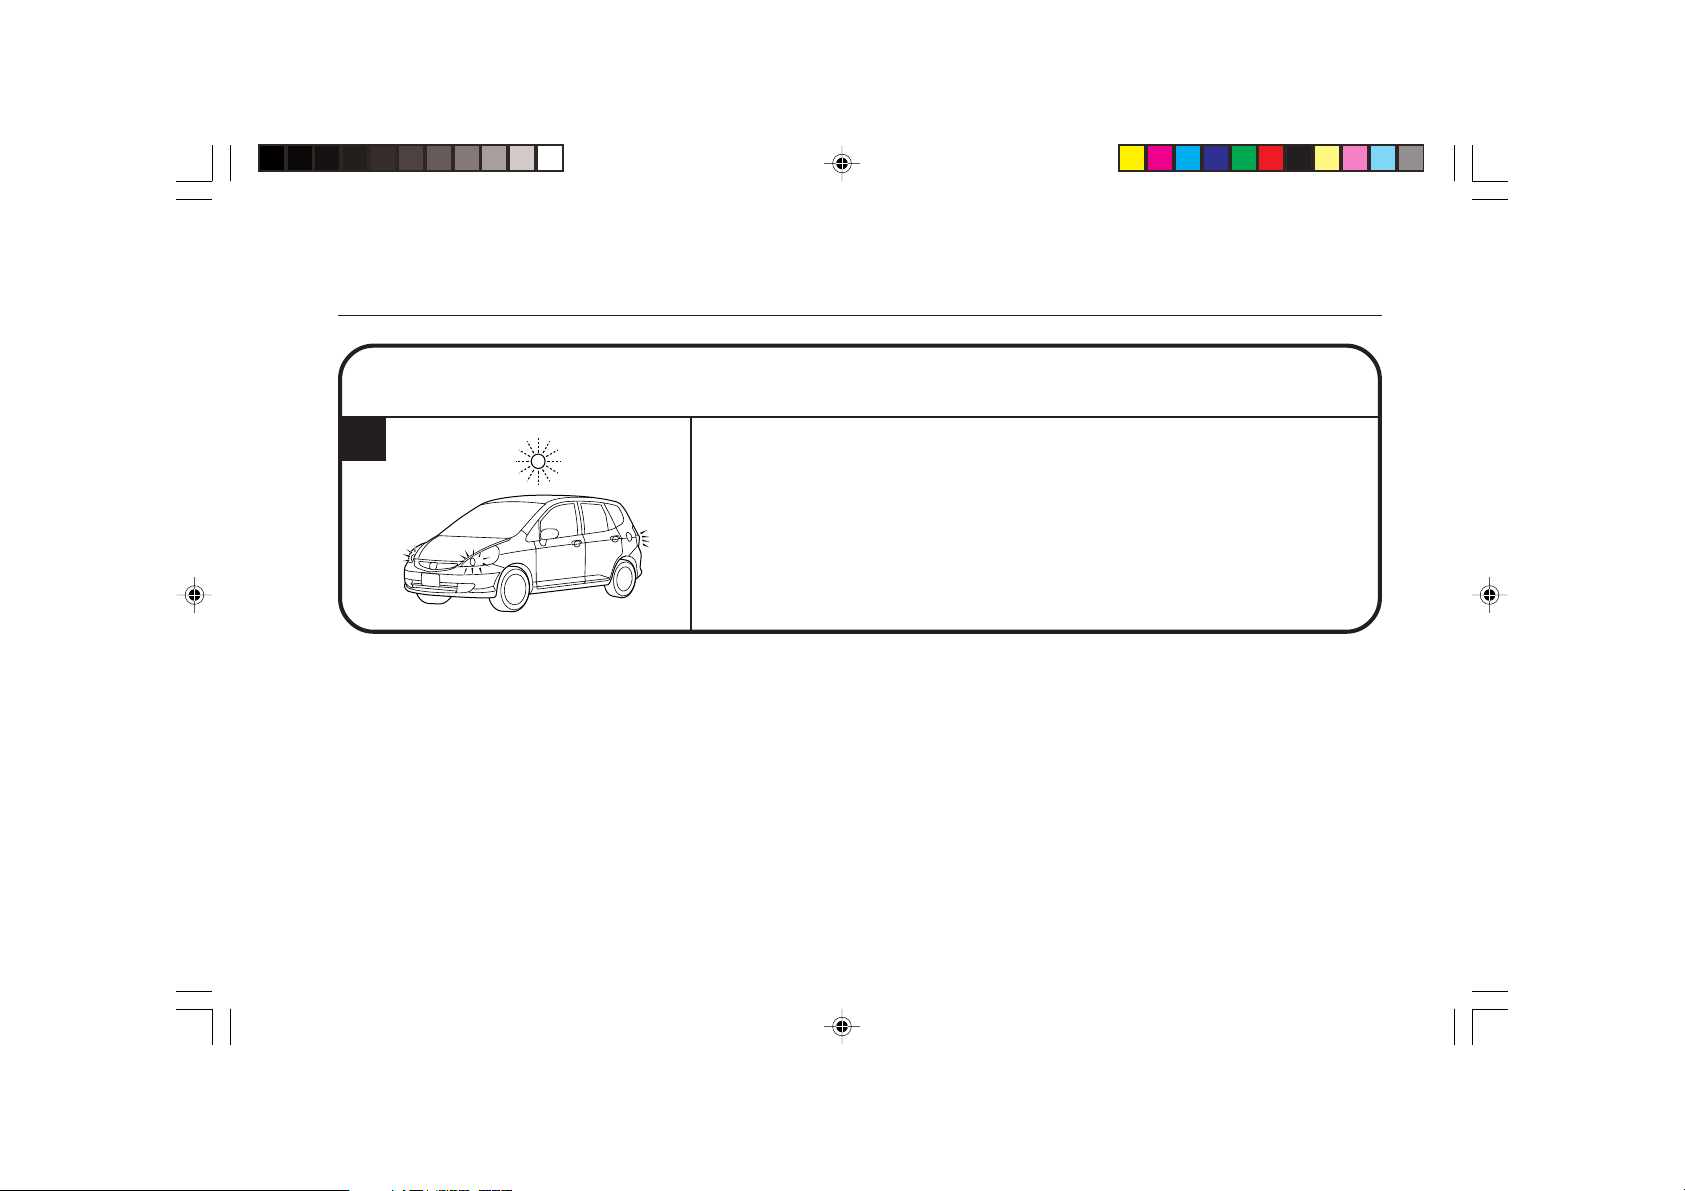
Tripped Sensor Warning and Indication
Tripped Sensor Warning
1
5N25090S
• The system will warn you that the security system has been tripped in your absence.
• If the system was tripped and auto rearmed you will observe the following:
The status LED flashes twice per second.
The parking lights flash 3 times when the system is disarmed.
© 2006 American Honda Motor Co., Inc. - All Rights Reserved. 15
Page 16
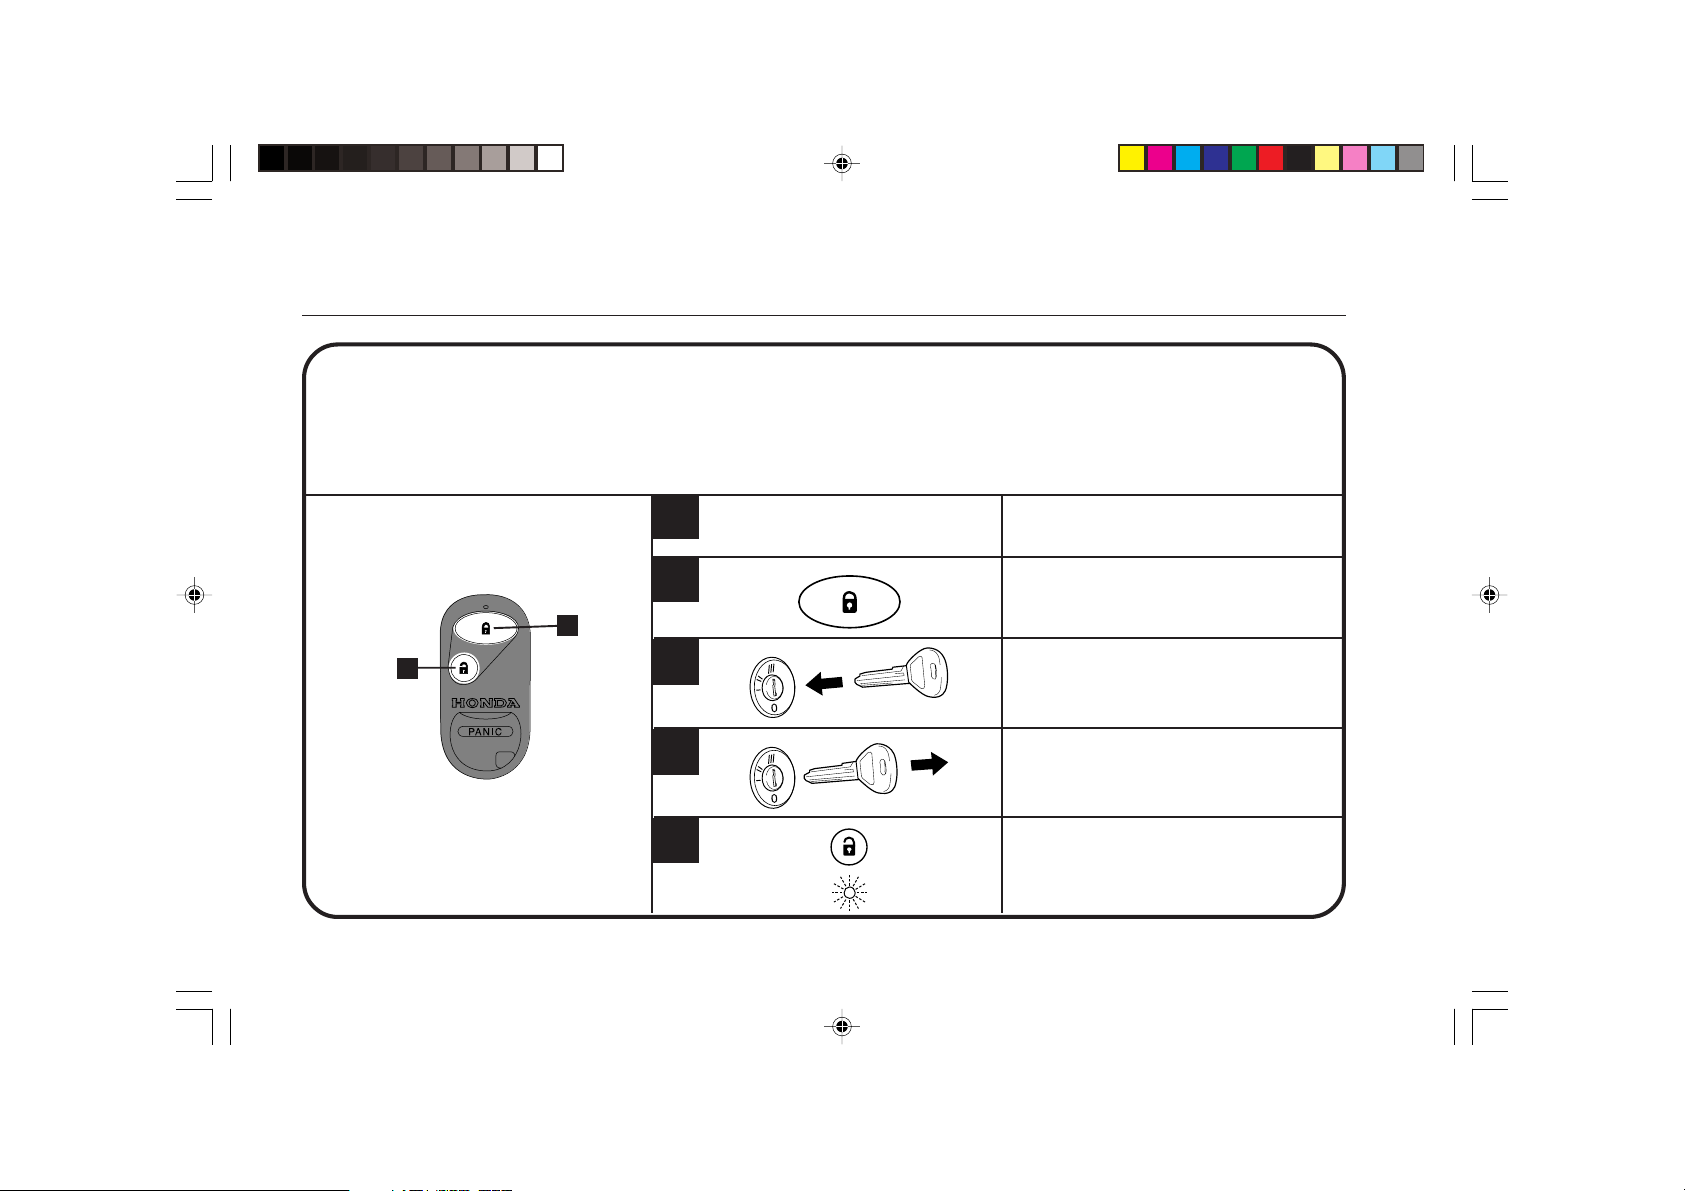
Tripped Sensor Warning and Indication
• After disarming the system, if the tripped sensor warning indicator appears, you can
Tripped Sensor Indication
(using both the transmitter
and ignition key)
identify which sensor has been tripped by observing the number of flashes as shown
below.
• As a diagnostic tool, the tripped sensor can be recalled from memory regardless of
whether the system had been armed.
• There are two possible ways to indicate:
• Method using both the transmitter and ignition key.
• Method using only the ignition key.
1
2
2
5
3
Disarm the security system.
All doors and the tailgate must be
closed.
Press the “LOCK” button on the remote
control transmitter.
Steps from 2 to 5 must be completed
within 6 seconds.
Insert the ignition key.
4
5
16 © 2006 American Honda Motor Co., Inc. - All Rights Reserved.
Remove the key from the ignition switch.
Press the “UNLOCK” button on the
remote control transmitter.
The status LED will flash according to
the sensors tripped.
(For indication examples, see next page.)
Page 17
Tripped Sensor Warning and Indication
Tripped Sensor Indication (using only the ignition key)
1
2
3
5N25100S
4
TRIPPED STATUS LED
SENSOR
Door (tailgate) 1
Ignition Key Switch
Ignition Switch
Battery Disconnected
© 2006 American Honda Motor Co., Inc. - All Rights Reserved. 17
NUMBER OF FLASHES
3
Disarm the security system.
Close the door.
Insert the ignition key.
Within 1 second after step 2, open the door.
Within 1 second after step 3, remove the key from the ignition switch.
The status LED will flash according to the sensors tripped.
Example 1:
If opening the door causes the alarm to be triggered, the Status LED will flash 1 time,
pause and repeat this sequence for 1 minute.
Example 2:
If the alarm is triggered twice, first by opening the door and then by inserting the ignition
key, the Status LED will flash once, pause, flash 3 times, pause and repeat this sequence
for 1 minute.
Page 18
Glossary
Description
ALARM DURATION
ARM
*
AUTOMATIC ARMING
MANUAL ARMING
DISARM
*
ENTRY DELAY TIME
*
EXIT DELAY TIME
*
Functional only in the Automatic Arming mode.
The amount of time the horn sounds when the alarm is tripped or the panic feature is
activated. The duration is 30 seconds.
To turn the security system’s protection on.
The optional mode in which the security system is armed automatically (passively) after
the trunk (tailgate) and all the doors are closed. The doors do not lock when the system is
armed.
The mode in which the system is armed and disarmed by the remote control transmitter.
This is the factory preset mode.
To turn the security system’s protection off.
The amount of time before the alarm is triggered after the door is opened.
When the system is set to the Automatic Arming mode, the amount of time before the
system arms after the trunk (tailgate) and all the doors are closed.
18 © 2006 American Honda Motor Co., Inc. - All Rights Reserved.
Page 19
Description
Glossary
EXTENDED EXIT ARMING
PANIC
SENSOR CANCELLATION
TRIPPED SENSOR INDICATION
TRIPPED SENSOR WARNING
*
VALET
*
Functional only in the Automatic Arming mode.
© 2006 American Honda Motor Co., Inc. - All Rights Reserved. 19
If a door or the trunk (tailgate) is opened during the exit delay time, the timer will reset itself
and will restart the count down procedure when that door or trunk is closed.
A mode in which the horn is intentionally activated.
Useful for attracting attention in case of an emergency.
A feature which cancels (ignores) a particular sensor which has caused the alarm to be
tripped consecutively for 10 minutes.
A feature which indicates, through the status LED, the sensor which tripped the alarm.
A diagnostic feature which recalls the tripped sensor from memory. This feature is not
disabled once the alarm is rearmed.
A feature which tells the owner that the alarm was tripped in his/her absence.
A mode in which the system cannot auto-arm. Useful when the car is being serviced, valet
parked, or washed. The remote control transmitter won’t arm or disarm the system in the
valet mode, but panic feature will work in the valet mode.
Page 20
Specifications
Main Unit
Design ................................................................................................... Microprocessor, all solid state
Operating Voltage ............................................................................... 13 V DC (9 V to 16 V allowable)
Current Consumption (Arming) ....................................................................................................2 mA
Operating Temperature ................................................................... -40°F to +176°F (-40°C to + 80°C)
Dimensions ...................................................... 84 mm x 65 mm x 28 mm (3-5/16" x 2-9/16" x 1-1/8")
Net Weight ................................................................................................................... 0.05 kg (1.8 oz)
NOTE: Due to continuous product improvement, specifications and
design are subject to change without notice.
20 © 2006 American Honda Motor Co., Inc. - All Rights Reserved.
Page 21
Note
© 2006 American Honda Motor Co., Inc. - All Rights Reserved. 21
Page 22
Note
22 © 2006 American Honda Motor Co., Inc. - All Rights Reserved.
Page 23
Note
© 2006 American Honda Motor Co., Inc. - All Rights Reserved. 23
Page 24

24 © 2006 American Honda Motor Co., Inc. - All Rights Reserved.Printed in Japan08E51-SLN-1000-81 © 2006 American Honda Motor Co., Inc. - All Rights Reserved.
 Loading...