

Page 1

2005 Honda Motor Co., Ltd.
This manual should be considered a permanent part of the motorcycle and should remain
with the motorcycle when it is resold.
This publication includes the latest production information available before printing. Honda
Motor Co., Ltd. reserves the right to make changes at any time without notice and without
incurring any obligation.
No part of this publication may be reproduced without written permission.
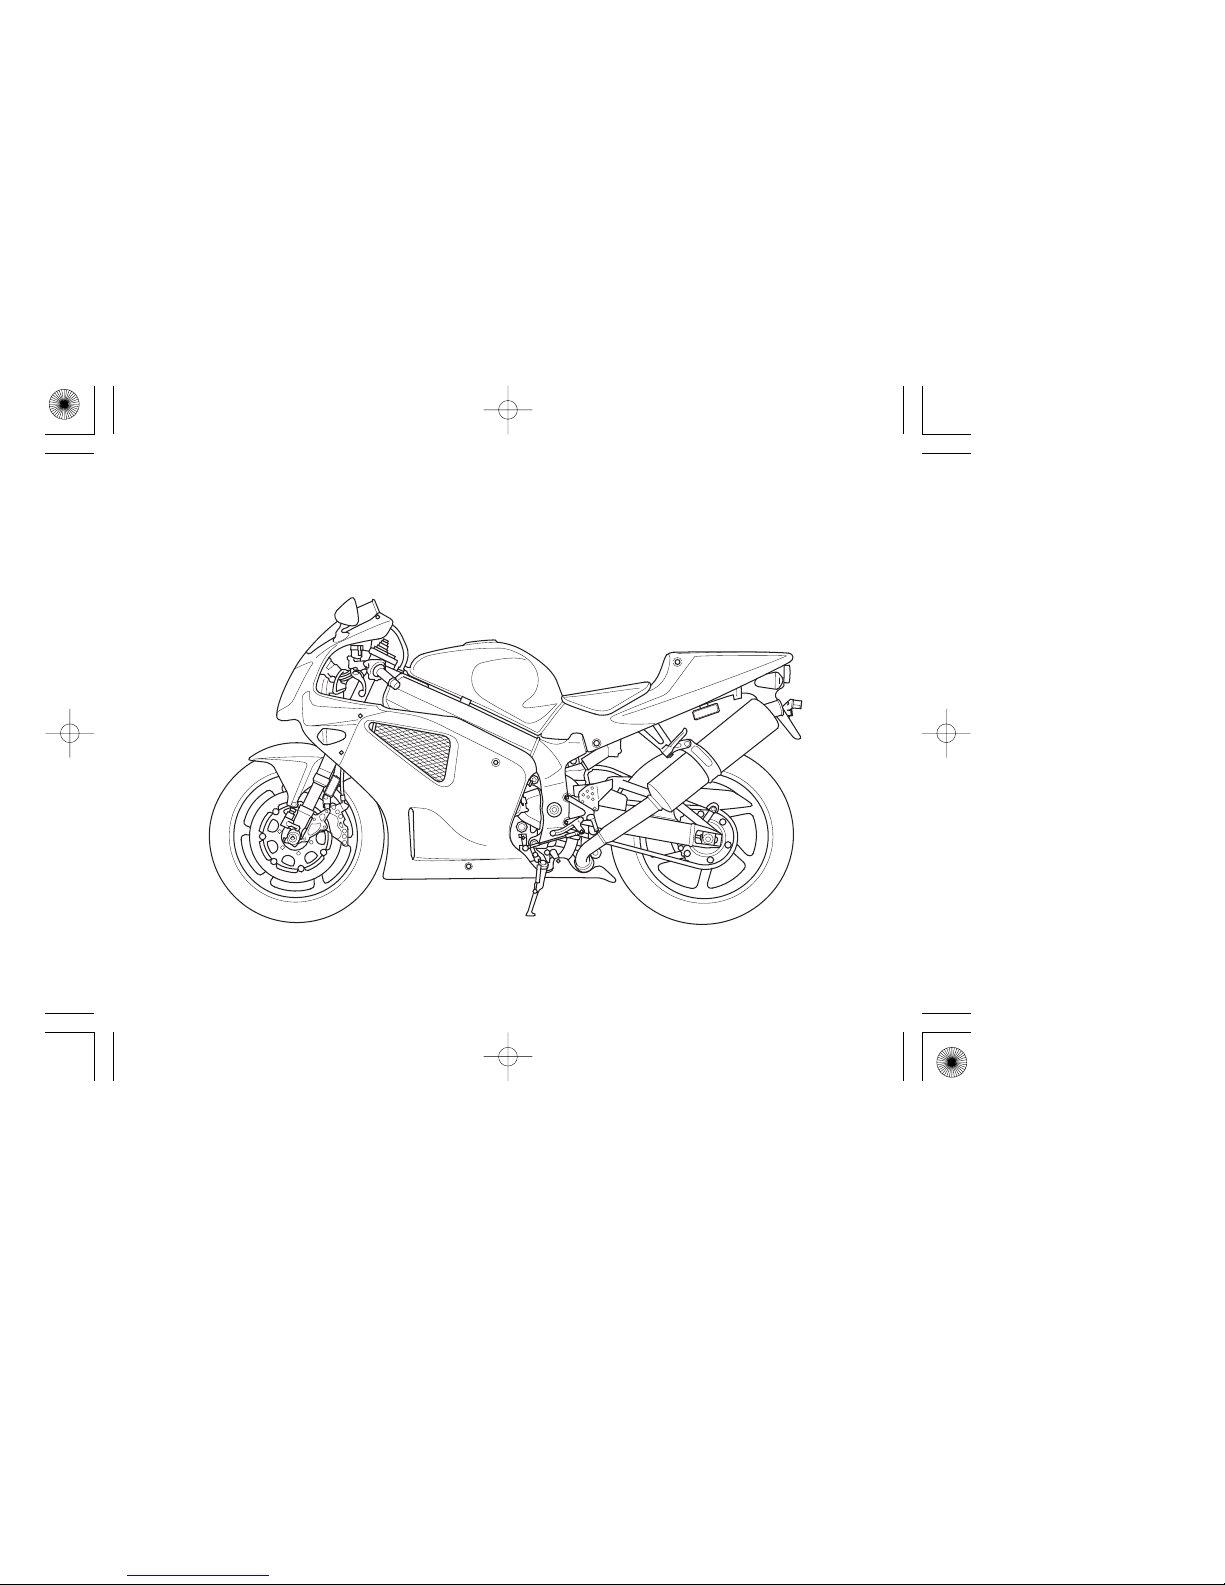
The vehicle pictured on the front cover may not match your vehicle.
05/11/15 12:10:25 31MCF660_001
Page 2
2006
Honda RC51
OWNER’S MANUAL
05/11/15 12:10:28 31MCF660_002
Page 3
−
Introduction
Introduction
Congratulations on choosing your Honda
motorcycle.
When you own a Honda, you’re part of a
worldwide family of satisfied customers
people who appreciate Honda’s
reputation for building quality into every
product.
Before riding, take time to get acquainted
with your motorcycle and how it works.
To protect your investment, we urge you
to take responsibility for keeping your
motorcycle well maintained. Scheduled
service is a must, of course. But it’s just as
important to observe the break-in
guidelines, and perform all pre-ride and
other periodic checks detailed in this
manual.
We also recommend that you read this
owner’s manual before you ride. It’s full
of facts, instructions, safety information,
and helpful tips. To make it easy to use,
the manual contains a detailed list of
topics at the beginning of each section,
and both an in-depth table of contents and
an index at the back of the book.
As you read this manual, you will find
information that is preceded by a
symbol. This information is
intended to help you avoid damage to your
Honda, other property, or the environment.
05/11/15 12:10:36 31MCF660_003
Page 4
Introduction
Introduction
WARNING:
Read the Warranties Booklet (page )
thoroughly so you understand the
coverages that protect your new Honda
and are aware of your rights and
responsibilities.
If you have any questions, or if you ever
need special service or repairs, remember
that your Honda dealer knows your
motorcycle best and is dedicated to your
complete satisfaction.
Please report any change of address or
ownership to your Honda dealer so we
will be able to contact you concerning
important production information.
You may also want to visit our website at
www.honda.com.
Happy riding!
California Proposition 65 Warning
This product contains or
emits chemicals known to the State of
California to cause cancer and birth
defects or other reproductive harm.
219
05/11/15 12:10:44 31MCF660_004
Page 5
A Few Words About Safety
Safety Messages
Safety Labels
Safety Messages
DANGER, WARNING, CAUTION
Your safety, and the safety of others, is very important. And operating this motorcycle safely
is an important responsibility.
To help you make informed decisions about safety, we have provided operating procedures
and other information on labels and in this manual. This information alerts you to potential
hazards that could hurt you or others.
Of course, it is not practical or possible to warn you about all hazards associated with
operating or maintaining a motorcycle. You must use your own good judgment.
You will find important safety information in a variety of forms, including:
–– on the motorcycle.
–– preceded by a safety alert symbol and one of three signal words:
or .
These signal words mean:
05/11/15 12:10:49 31MCF660_005
Page 6
You WILL be KILLED or SERIOUSLY HURT if you
don’t follow instructions.
You CAN be KILLED or SERIOUSLY HURT if you don’t
follow instructions.
You CAN be HURT if you don’t follow instructions.
A Few Words About Safety
Safety Messages
Safety Headings
Safety Section
Instructions
–– such as Important Safety Reminders or Important Safety Precautions.
–– such as Motorcycle Safety.
–– how to use this motorcycle correctly and safely.
This entire manual is filled with important safety information –– please read it carefully.
05/11/15 12:10:56 31MCF660_006
Page 7
Contents
Contents
..............................Motorcycle Safety .
....................Instruments & Controls .
................Basic Operation & Riding .
.....................................Before Riding .
1
9
29
39
These pages give an overview of the
contents of your owner’s manual. The first
page of each section lists the topics
covered in that section.
The importance of wearing a helmet
and other protective gear, how to make
sure you and your motorcycle are ready
to ride, and important information about
loading.
Important safety information you
should know, plus a look at the safetyrelated labels on your motorcycle.
The location and function of indicators,
gauges, and controls on your
motorcycle and operating instructions
for various controls and features.
How to start and stop the engine, shift
gears, and brake. Also, riding
precautions and important information
about riding with a passenger or cargo.
05/11/15 12:11:05 31MCF660_007
Page 8
Contents
Contents
........‘‘Reporting Safety Defects’’ .
Quick Reference
......................Servicing Your Honda .
......................................................Tips .
.......Taking Care of the Unexpected .
......................Technical Information .
.....................Consumer Information .
..............................Table of Contents .
....................................................Index .
57
159
165
195
215
224
226
230
Why your motorcycle needs regular
maintenance, what you need to know
before servicing your Honda, an owner
maintenance schedule, and instructions
for specific maintenance and
adjustment items.
How to store and transport your
motorcycle and how to be an
environmentally-responsible rider.
What to do if you have a flat tire, your
engine won’t start, etc.
ID numbers, technical specifications,
and other technical facts.
Information on warranties, emission
controls, how to get Honda service
manuals, and...
Sequential listing of topics in this
owner’s manual.
Handy facts about fuel, engine oil, tire
sizes, and air pressures.
05/11/15 12:11:19 31MCF660_008
Page 9

05/11/15 12:11:21 31MCF660_009
Page 10
1
Motorcycle Safety
Motorcycle Saf ety
This section presents some of the most
important information and
recommendations to help you ride your
motorcycle safely. Please take a few
moments to read these pages. This section
also includes information about the
location of safety labels on your
motorcycle.
.................Important Safety Information . 2
..................Accessories & Modifications . 5
...........................................Safety Labels . 7
05/11/15 12:11:26 31MCF660_010
Page 11
−
2
Important Safety Information
Motorcycle Saf ety
Always Wear a HelmetYour motorcycle can provide many years
of service and pleasure if you take
responsibility for your own safety and
understand the challenges you can meet
while riding.
There is much that you can do to protect
yourself when you ride. You’ll find many
helpful recommendations throughout this
manual. The following are a few that we
consider most important.
It’s a proven fact: helmets significantly
reduce the number and severity of head
injuries. So always wear an approved
motorcycle helmet and make sure your
passenger does the same. We also
recommend that you wear eye protection,
sturdy boots, gloves, and other protective
gear (page ).30
05/11/15 12:11:31 31MCF660_011
Page 12
3
Important Safety Information
Motorcycle Saf ety
Make Yourself Easy to See
Take Time to Learn & Practice
Ride Defensively
You and
Your Motorcycle: Riding Tips and
Practice Guide,
Some drivers do not see motorcycles
because they are not looking for them. To
make yourself more visible, wear bright
reflective clothing, position yourself so
other drivers can see you, signal before
turning or changing lanes, and use your
horn when it will help others notice you.
Always pay attention to other vehicles
around you, and do not assume that other
drivers see you. Be prepared to stop
quickly or make an evasive maneuver. For
other riding tips, see the booklet,
which came with your
new motorcycle (USA only).
Even if you have ridden other motorcycles,
take time to become familiar with how
this motorcycle works and handles.
Practice in a safe area until you build your
skills and get accustomed to the
motorcycle’s size and weight.
Because many accidents involve
inexperienced or untrained riders, we urge
all riders to take a certified course
approved by the Motorcycle Safety
Foundation (MSF). See page .
The most frequent motorcycle collision
happens when a car turns left in front of a
motorcycle. Another common situation is
a car moving suddenly into your lane.
32
05/11/15 12:11:37 31MCF660_012
Page 13
4
Important Safety Information
Motorcycle Saf ety
Keep Your Honda in Safe ConditionRide within Your Limits
Don’t Drink and Ride
It’s important to keep your motorcycle
properly maintained and in safe riding
condition. To help avoid problems, inspect
your motorcycle before every ride and
perform all recommended maintenance.
Never exceed load limits (page ), and
do not modify your motorcycle (page )
or install accessories that would make
your motorcycle unsafe (page ).
Pushing limits is another major cause of
motorcycle accidents. Never ride beyond
your personal abilities or faster than
conditions warrant. Remember that
alcohol, drugs, fatigue, and inattention can
significantly reduce your ability to make
good judgments and ride safely.
Alcohol and riding don’t mix. Even one
drink can reduce your ability to respond to
changing conditions, and your reaction
time gets worse with every additional
drink. So don’t drink and ride, and don’t
let your friends drink and ride either.
5
6
37
05/11/15 12:11:43 31MCF660_013
Page 14
Improper accessories or
modifications can cause a crash in
which you can be seriously hurt or
killed.
Follow all instructions in this
owner’s manual regarding
accessories and modifications.
5
Accessories
Accessories & Modifications
Motorcycle Saf ety
Modifying your motorcycle or using nonHonda accessories can make your
motorcycle unsafe. Before you consider
making any modifications or adding an
accessory, be sure to read the following
information.
We strongly recommend that you use only
genuine Honda accessories that have been
specifically designed and tested for your
motorcycle. Because Honda cannot test all
other accessories, you must be personally
responsible for proper selection,
installation, and use of non-Honda
accessories.
Check with your Honda dealer for
assistance and always follow these
guidelines:
Make sure the accessory does not
obscure any lights, reduce ground
clearance and lean angle, limit
suspension travel or steering travel, alter
your riding position, or interfere with
operating any controls. (cont’d)
05/11/15 12:11:50 31MCF660_014
Page 15
6
Modifications
Accessories & Modifications
Motorcycle Saf ety
Do not add any electrical equipment
that will exceed the motorcycle’s
electrical system capacity (page ).
A blown fuse can cause a loss of lights
or engine power (page ).
Do not pull a trailer or sidecar with your
motorcycle. This motorcycle was not
designed for these attachments, and
their use can seriously impair your
motorcycle’s handling.
We strongly advise you not to remove any
original equipment or modify your
motorcycle in any way that would change
its design or operation. Such changes
could seriously impair your motorcycle’s
handling, stability, and braking, making it
unsafe to ride.
Removing or modifying your lights,
exhaust system, emission control system,
or other equipment can also make your
motorcycle illegal.
203
187
05/11/15 12:11:58 31MCF660_015
Page 16
7
Motorcycle Saf ety
Safety Labels
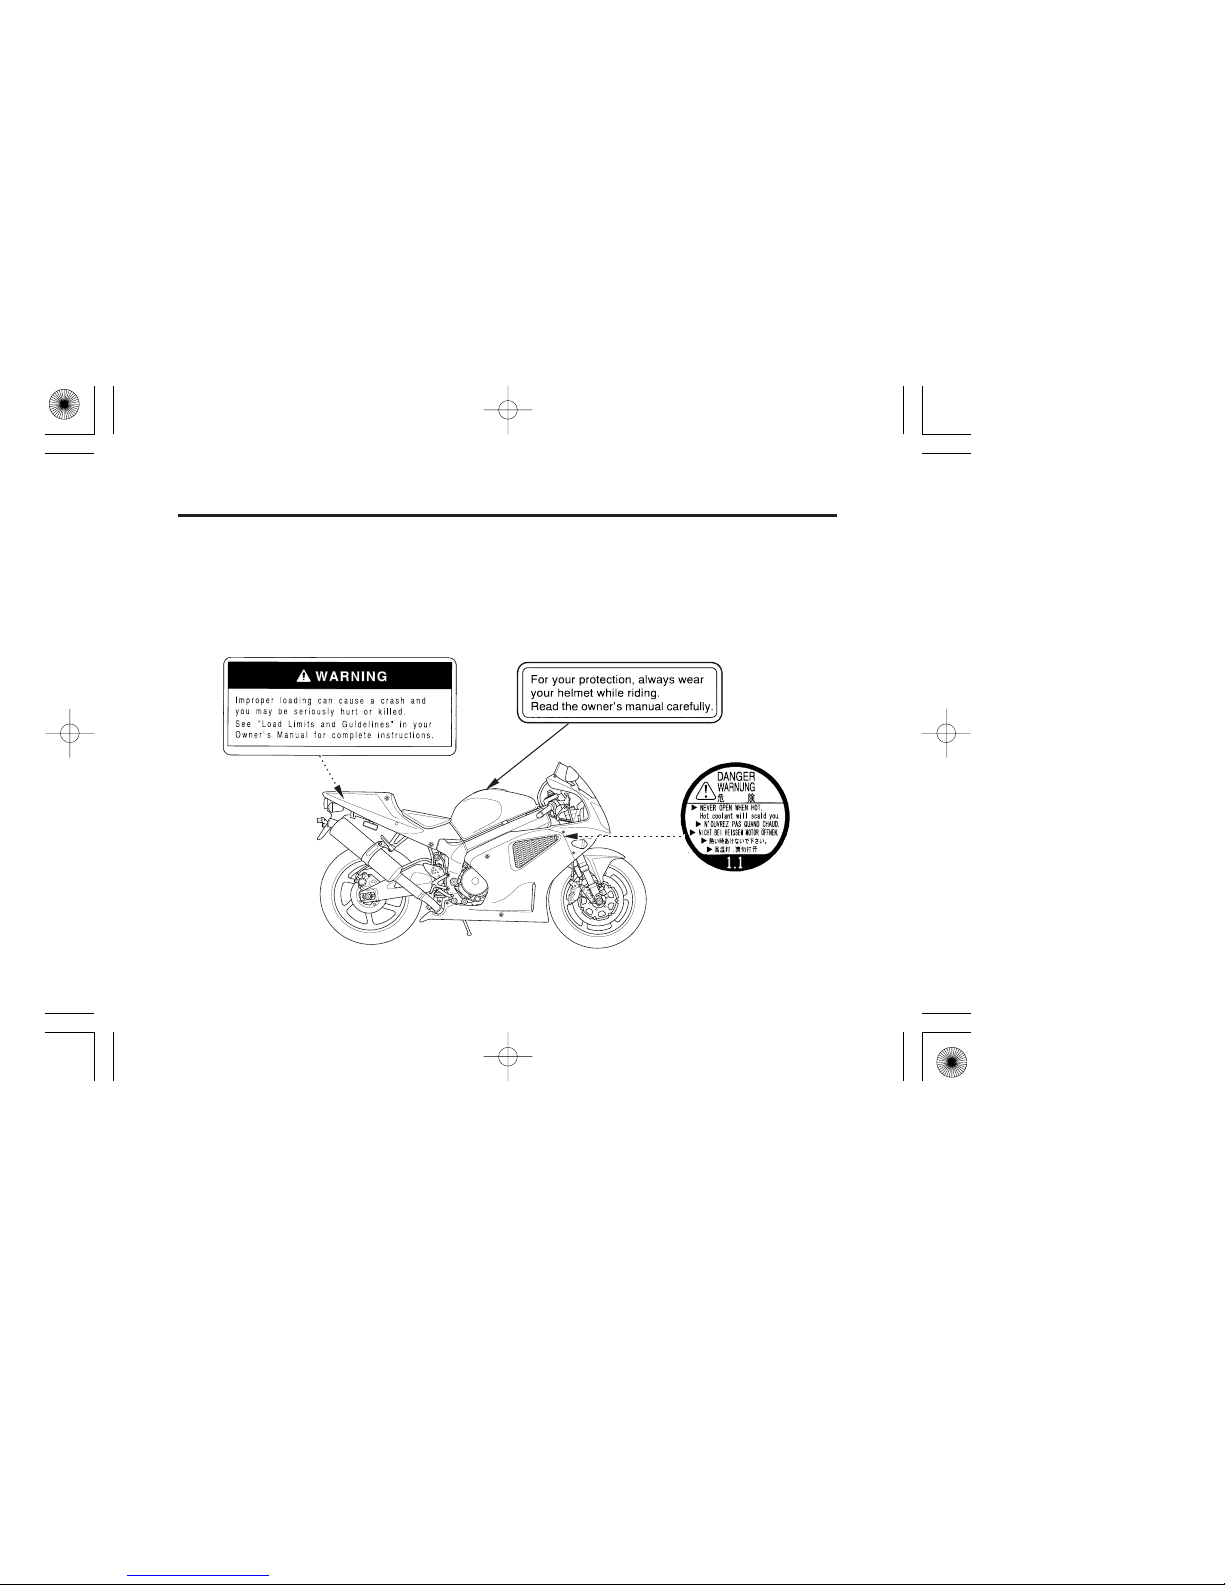
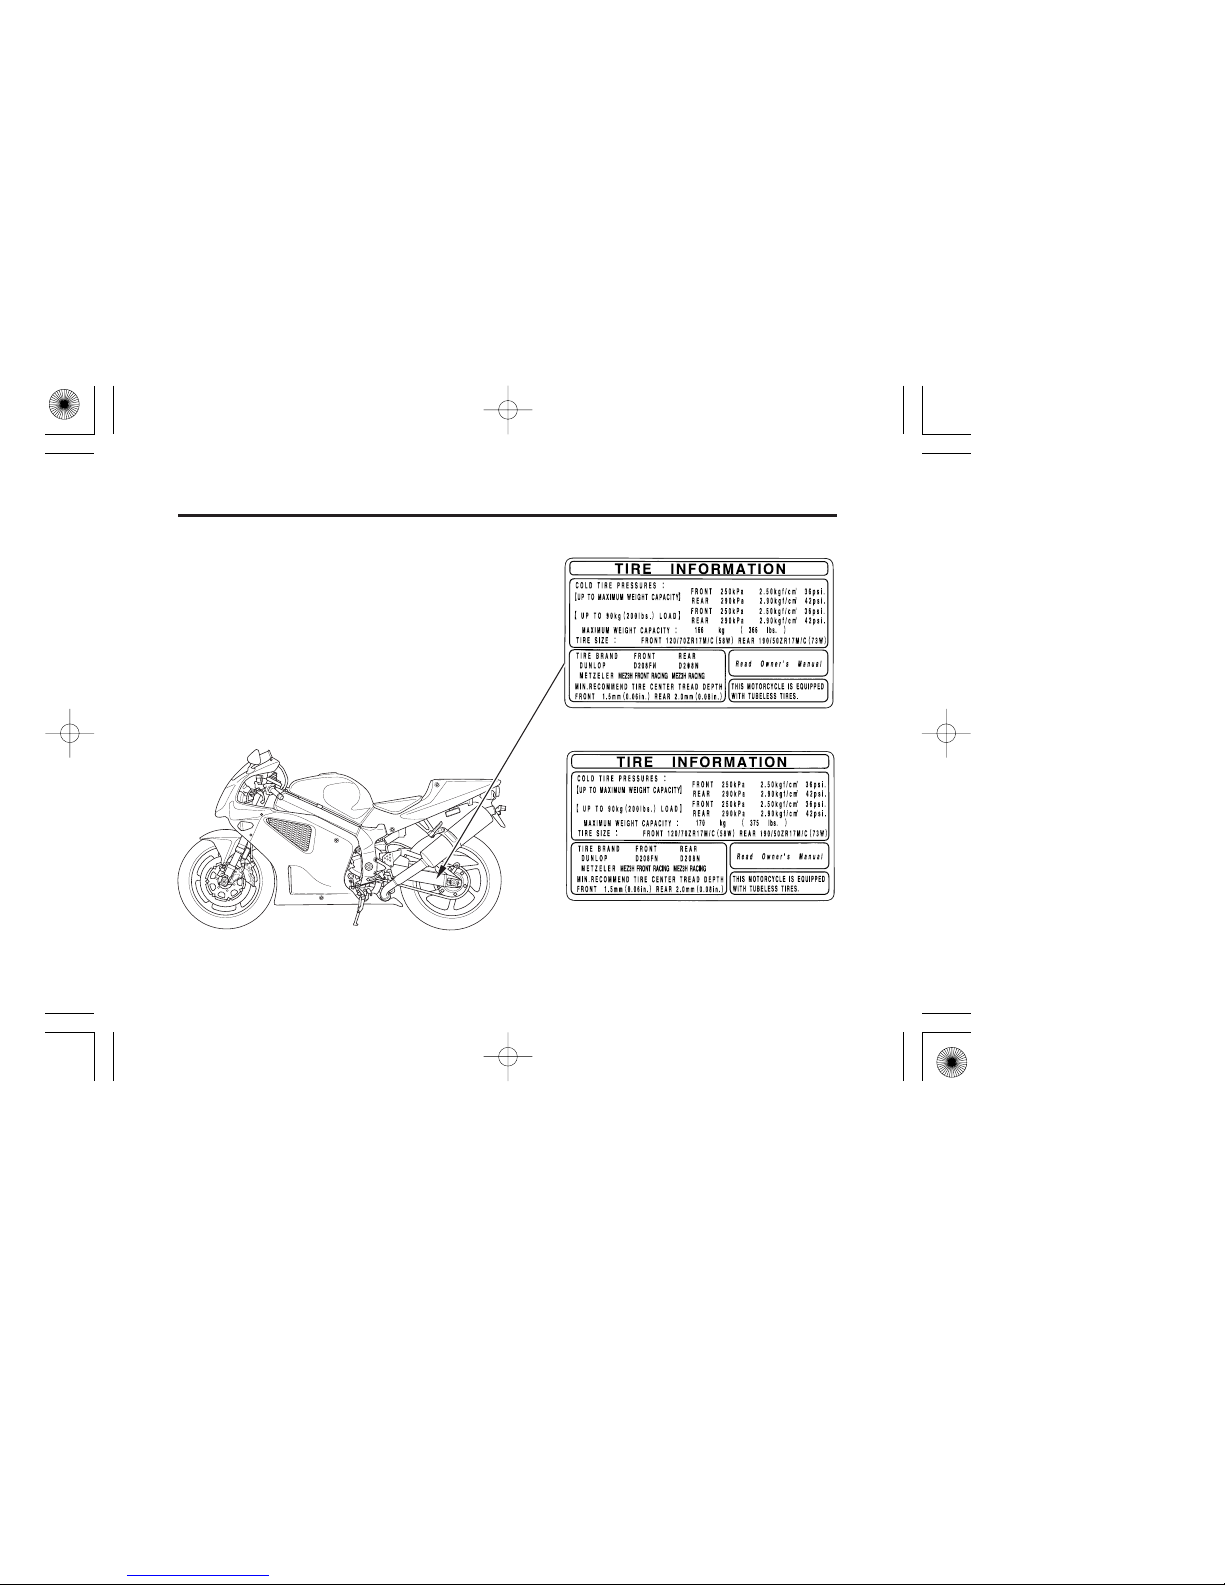
Safety labels on your motorcycle either warn you of potential hazards that could cause
serious injury or they provide important safety information. Read these labels carefully and
don’t remove them.
If a label comes off or becomes hard to read, contact your Honda dealer for a replacement.
05/11/15 12:12:09 31MCF660_016
Page 17
〈〉
〈〉
For USA
For CANADA
8
Safety Labels
Motorcycle Saf ety
05/11/15 12:12:29 31MCF660_017
Page 18
9
Instruments & Controls
Instruments & Controls
This section shows the location of all
gauges, indicators, and controls you would
normally use before or while riding your
motorcycle.
The items listed on this page are described
in this section. Instructions for other
components are presented in other sections
of this manual where they will be most
useful.
..........Operation Component Locations . 10
..............Gauges, Indicators & Displays . 13
......................Multi-function Display . 19
..............Coolant Temperature Meter . 20
......................................Speedometer . 22
...........................................Odometer . 22
...........................................Tripmeter . 22
..................Changing the Speed Unit . 23
Controls & Features
.......................................Choke Knob . 24
..................................Ignition Switch . 25
........................................Start Button . 26
...........................Engine Stop Switch . 26
................Headlight Dimmer Switch . 27
............................Turn Signal Switch . 27
.......................................Horn Button . 28
Multi-function Select and
......................................Reset Button . 28
05/11/15 12:12:35 31MCF660_018
Page 19
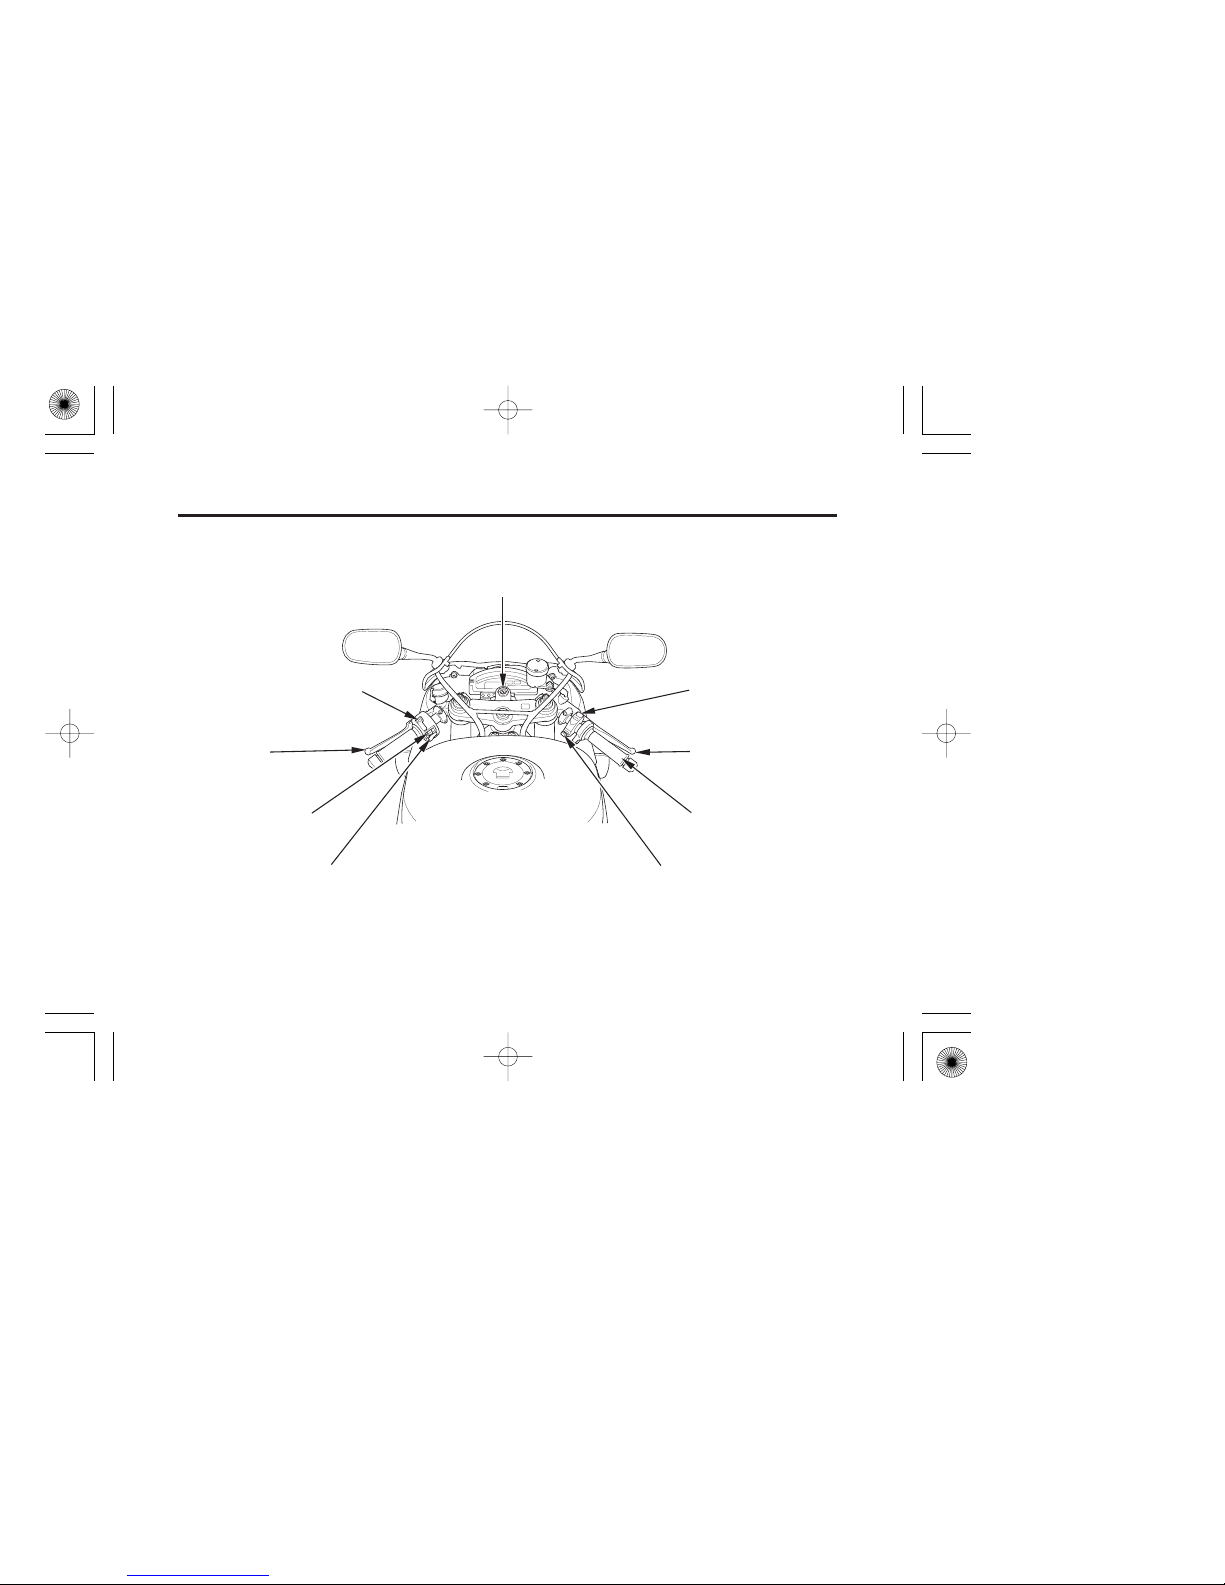
turn signal switch
clutch lever
start button
headlight dimmer switch
horn button
ignition switch
throttle grip
front brake lever
engine stop switch
10
Instruments & Controls
Operation Component Locations
05/11/15 12:12:40 31MCF660_019
Page 20
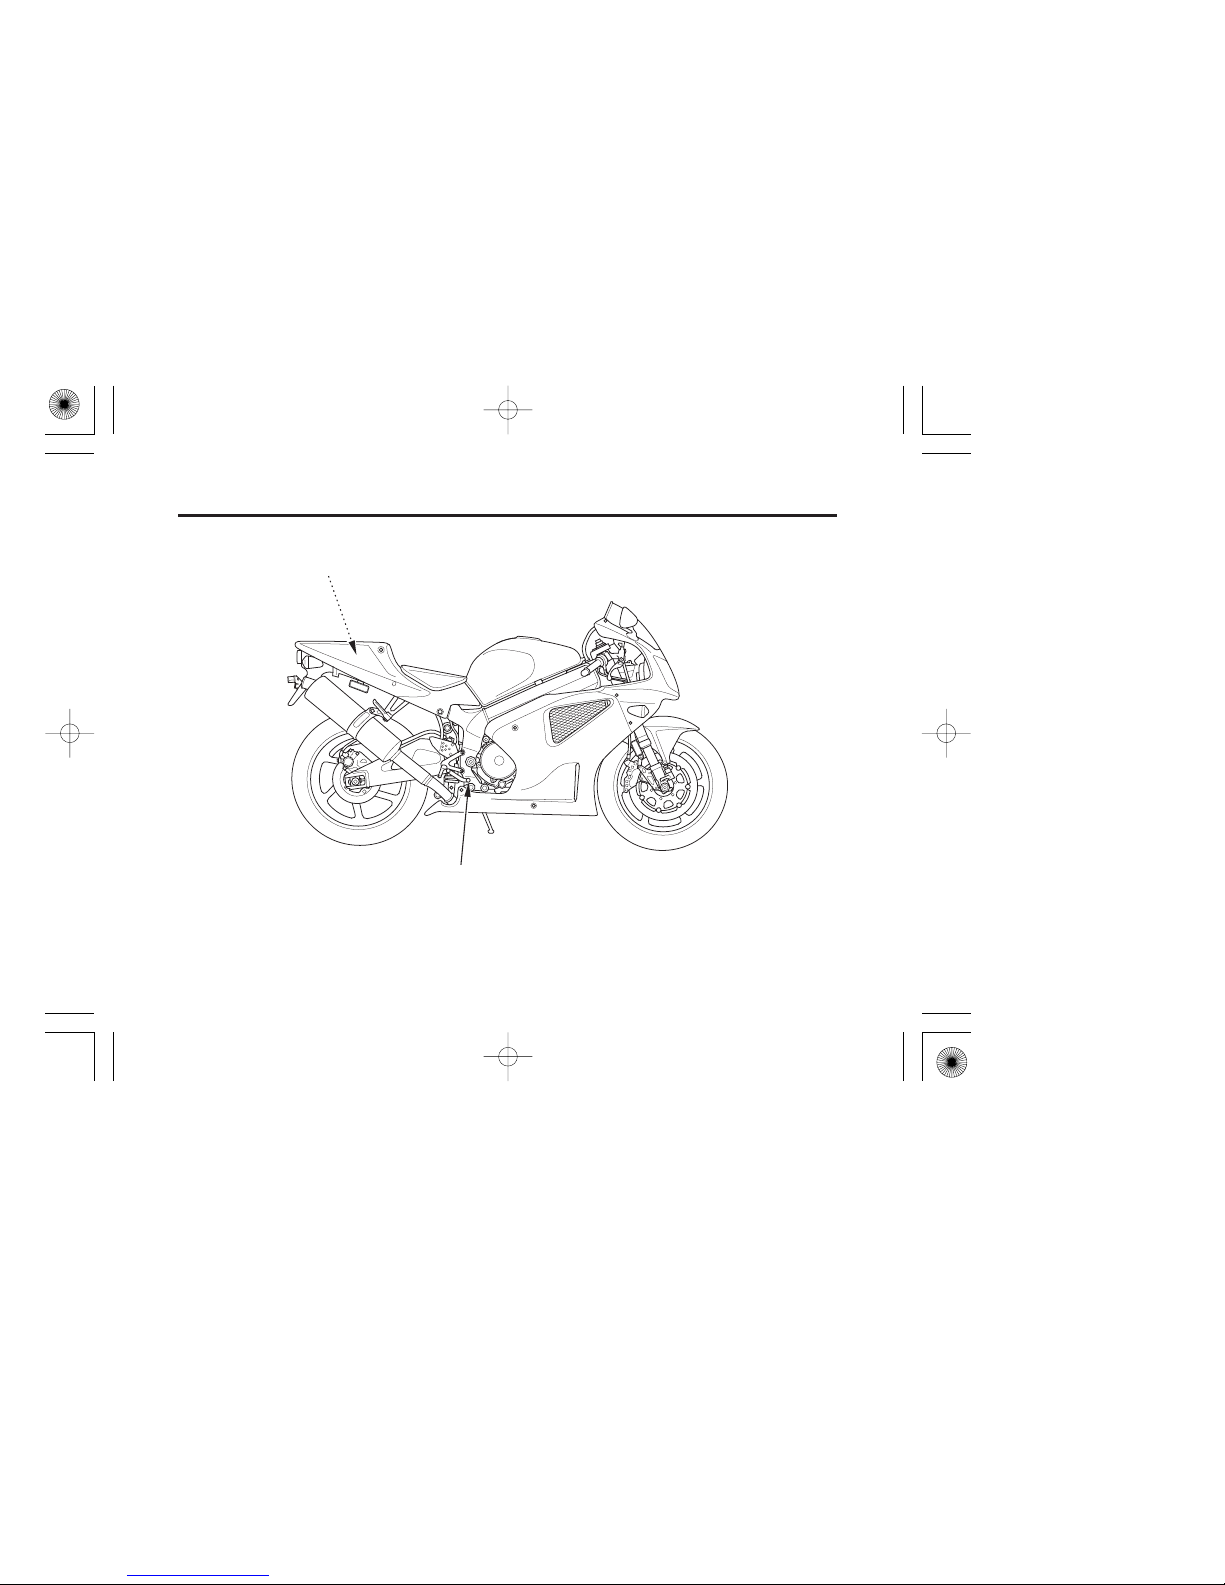
storage compartment for U-shaped lock
rear brake pedal
11
Instruments & Controls
Operation Component Locations
05/11/15 12:12:45 31MCF660_020
Page 21
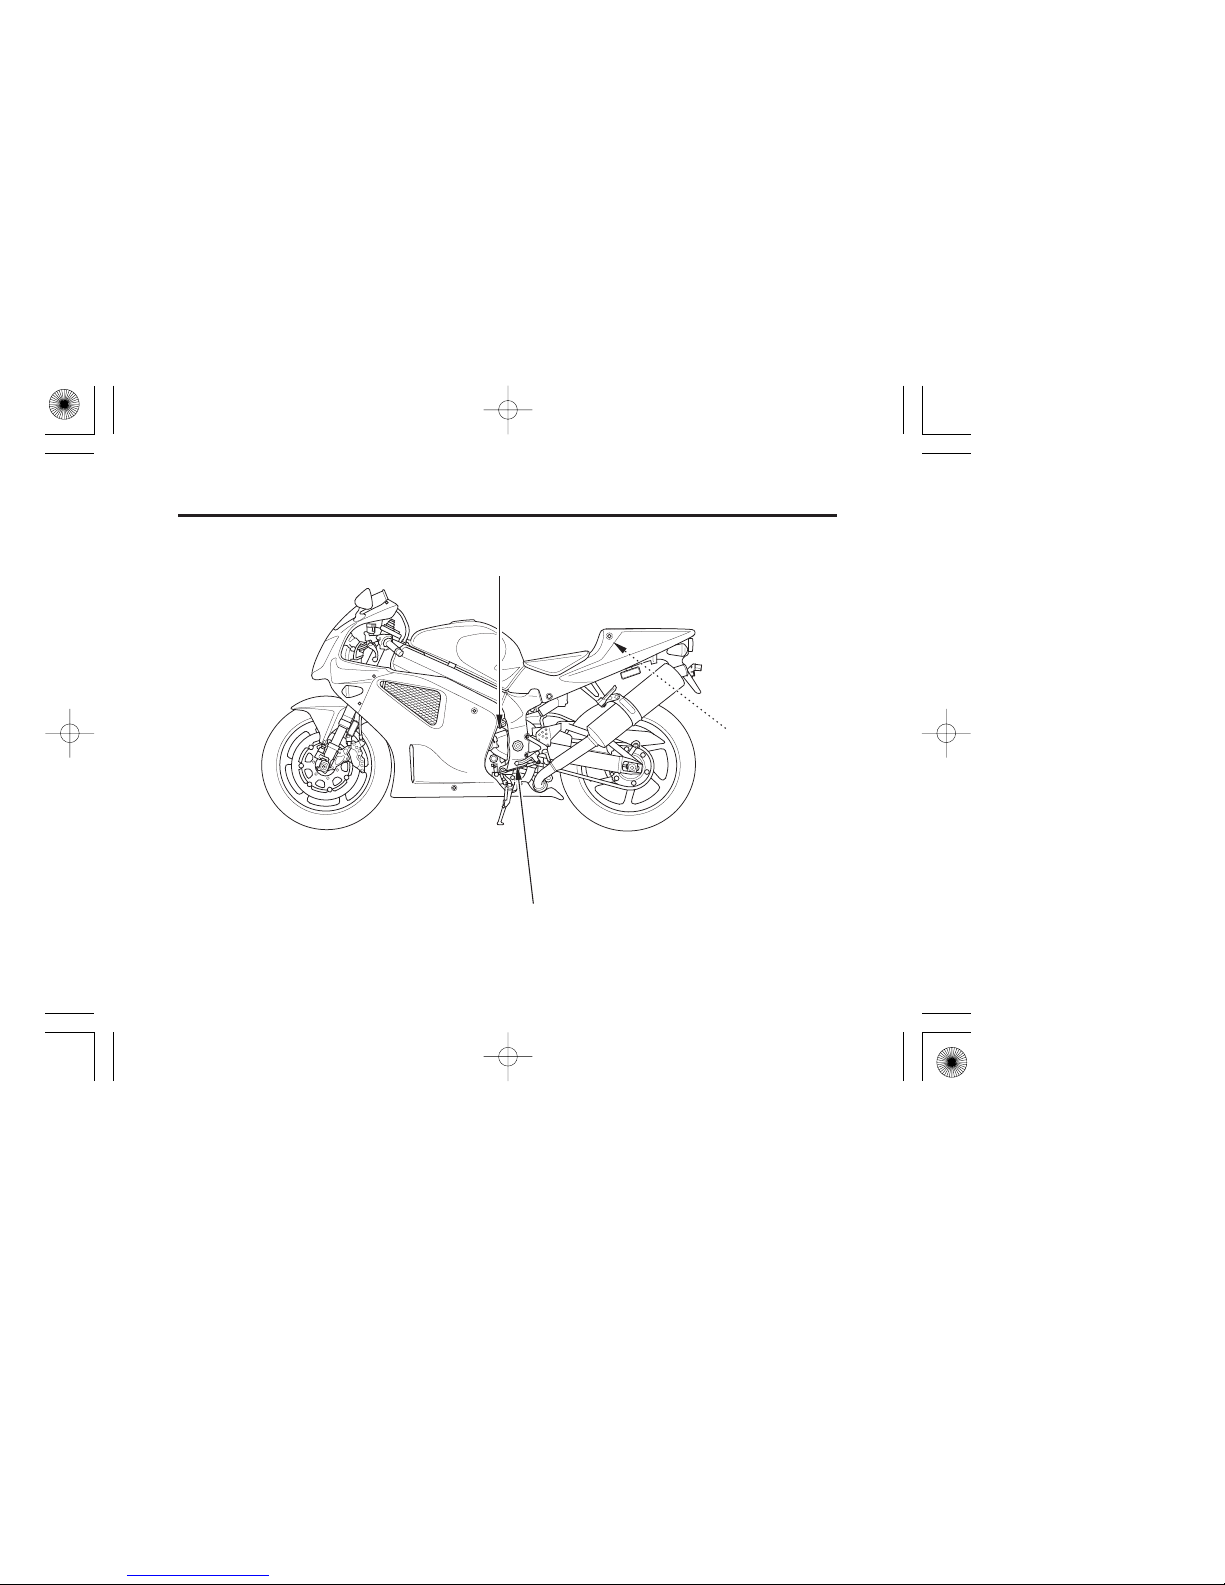
helmet holder
shift lever
choke knob
12
Instruments & Controls
Operation Component Locations
05/11/15 12:12:49 31MCF660_021
Page 22
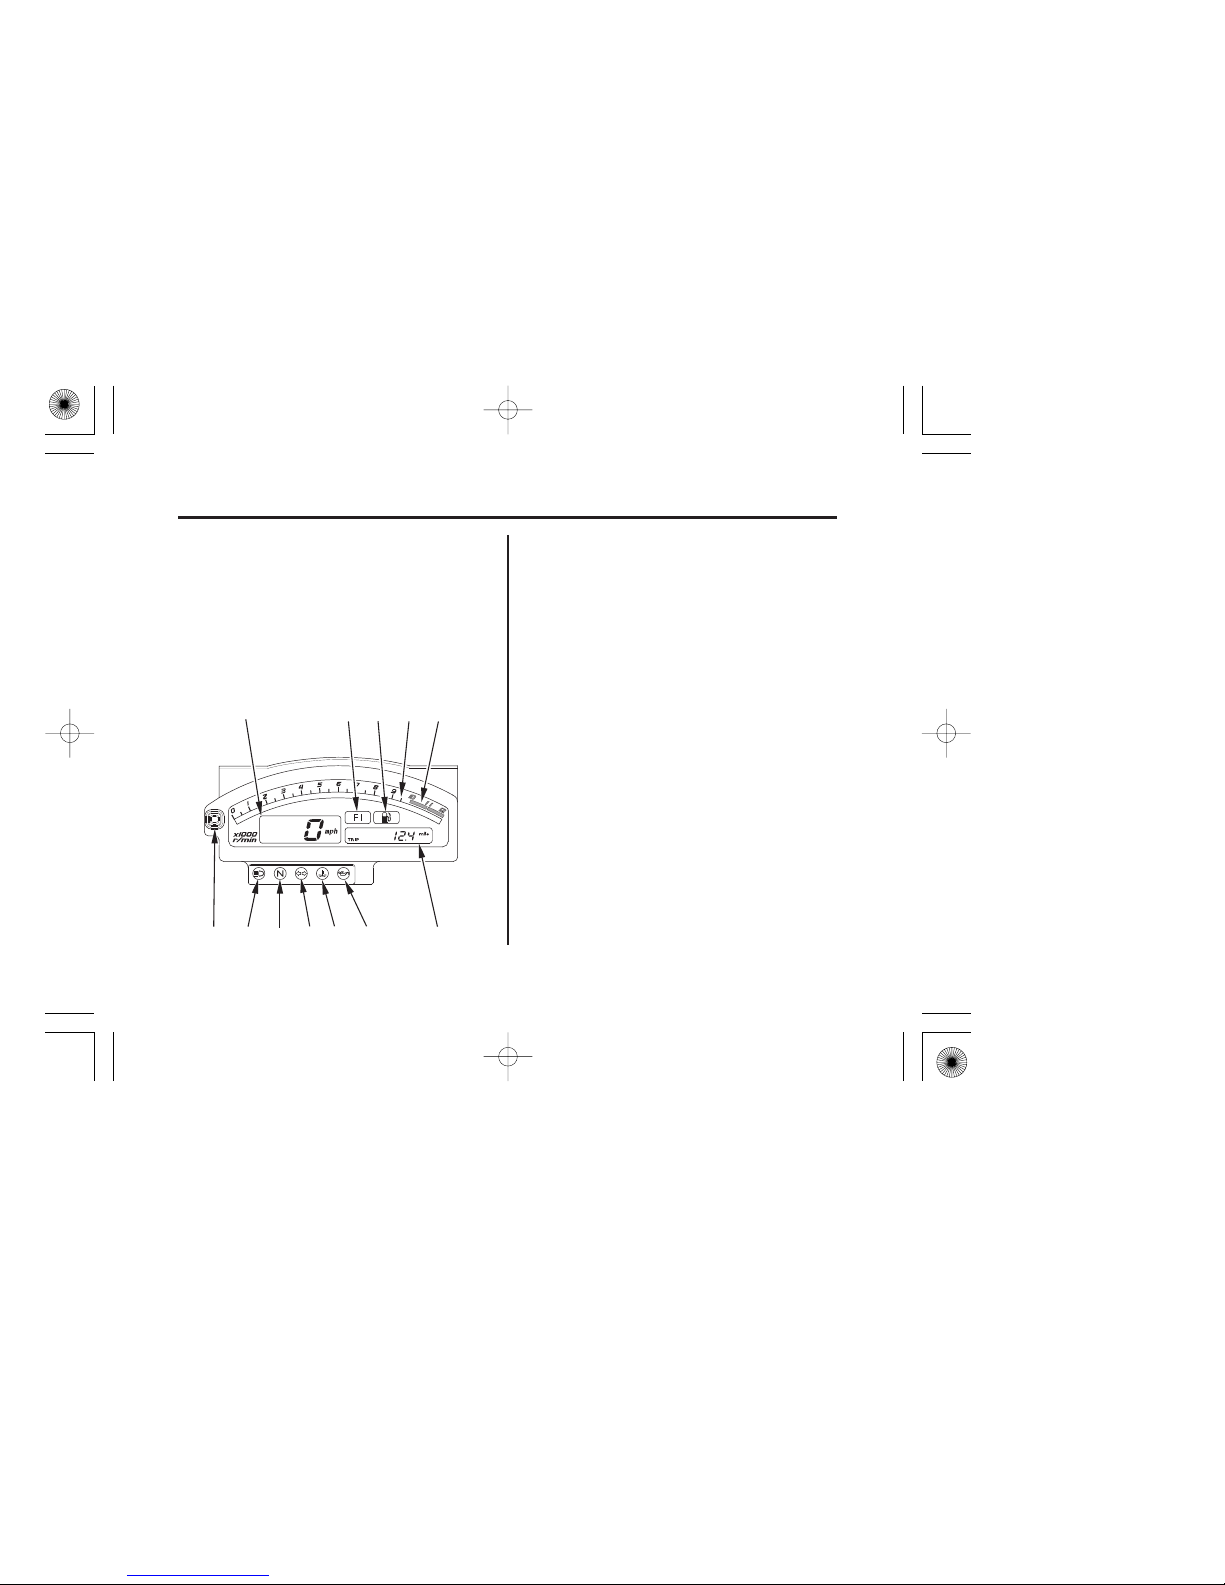
(1) (5)
(6)(7)(11)(12)
(3)
(4)
(2)
(9) (8)(10)
13
Instruments & Controls
Gauges, Indicators & Displays
The gauges, indicators and displays on
your motorcycle keep you informed, alert
you to possible problems, and make your
riding safer and more enjoyable. Refer to
the gauges, indicators and displays
frequently. Their functions are described
on the following pages.
(1) speedometer
(2) PGM-FI malfunction indicator lamp
(MIL)
(3) fuel indicator
(4) tachometer
(5) tachometer red zone
(6) multi-function display
(7) low oil pressure indicator
(8) coolant temperature indicator
(9) turn signal indicator
(10) neutral indicator
(11) high beam indicator
(12) multi-function select and reset button
05/11/15 12:12:56 31MCF660_022
Page 23
−
14
Instruments & Controls
Gauges, Indicators & Displays
Lamp
Check.
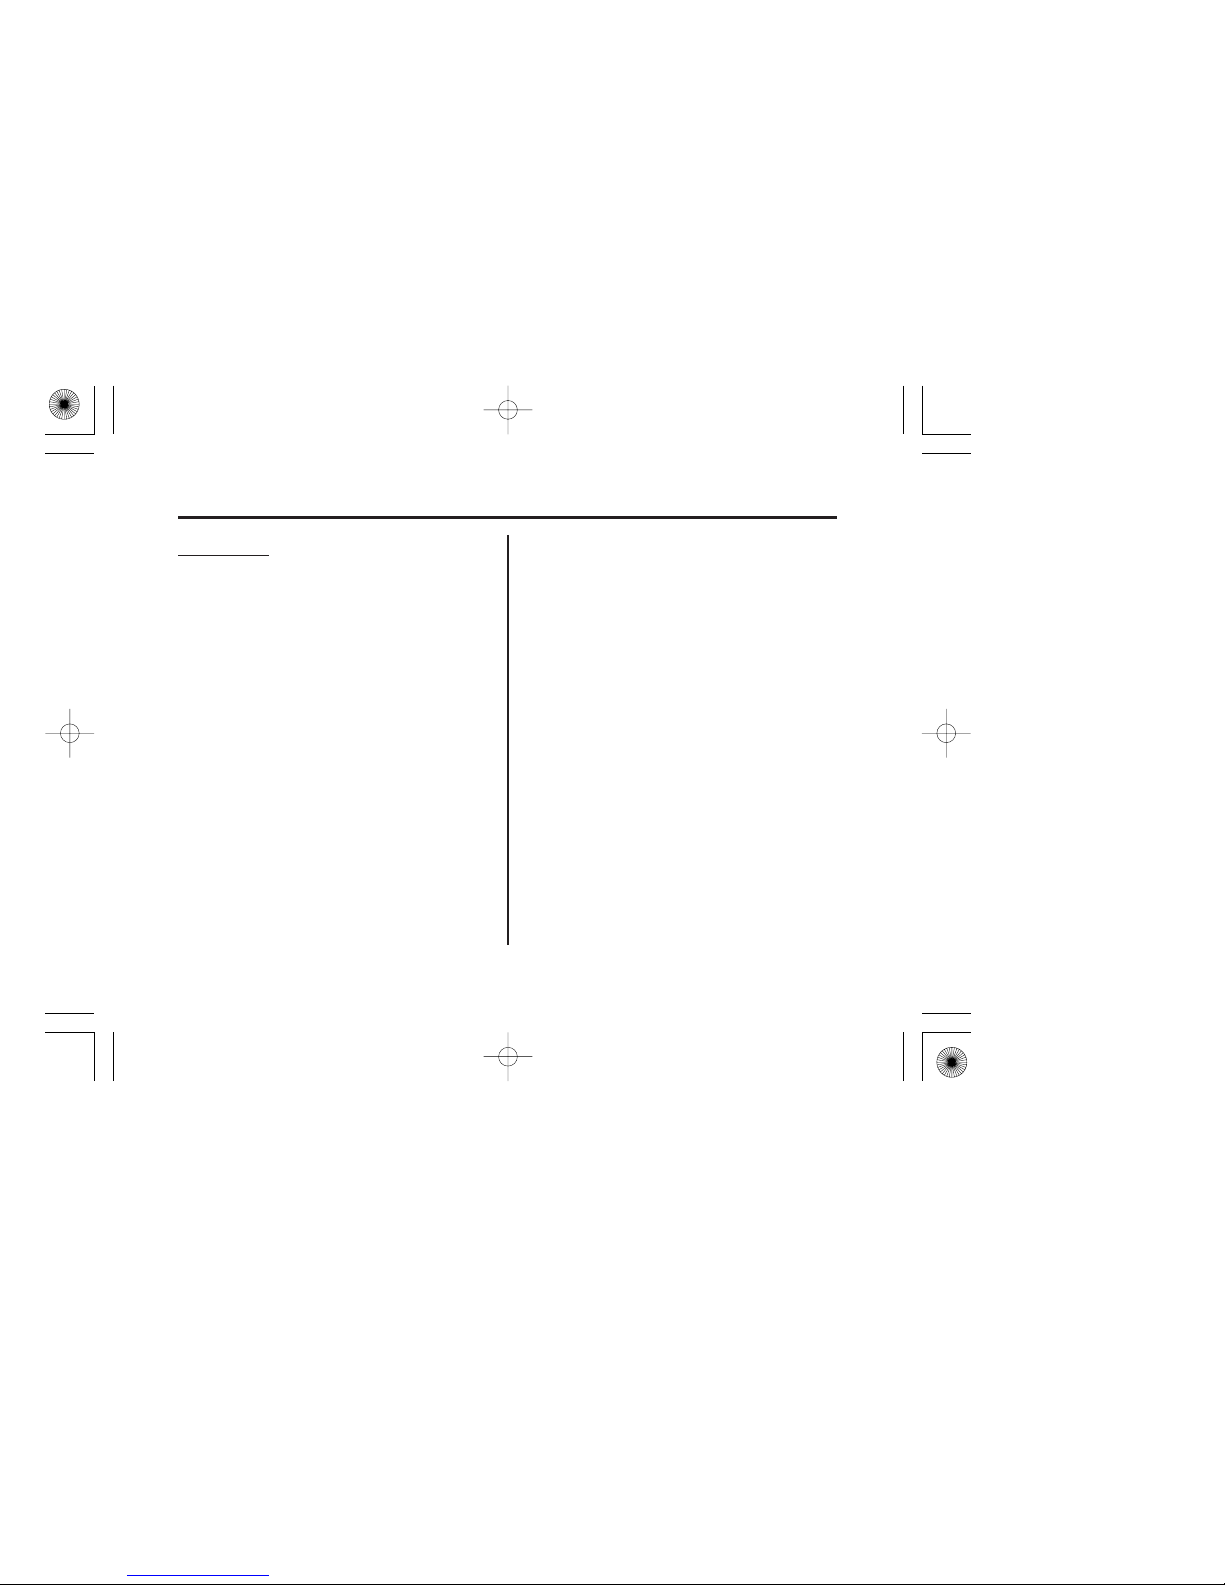
Lamp Check If one of these indicators does not come
on when it should, have your Honda dealer
check for problems.The PGM-FI malfunction indicator lamp
(MIL) lights for a few seconds and then
goes off when you turn the ignition switch
ON.
When applicable, the high beam and
neutral indicators come on when you turn
the ignition switch ON and remain on until
you select the low beam or shift out of
neutral.
These indicators are identified in the table
on pages with the words:
The low oil pressure indicator comes on
when you turn the ignition switch ON so
you can check that it is working. The
indicator remains on until after the engine
is started.
16 18
05/11/15 12:13:04 31MCF660_023
Page 24
−
(1)
(2)
(3)
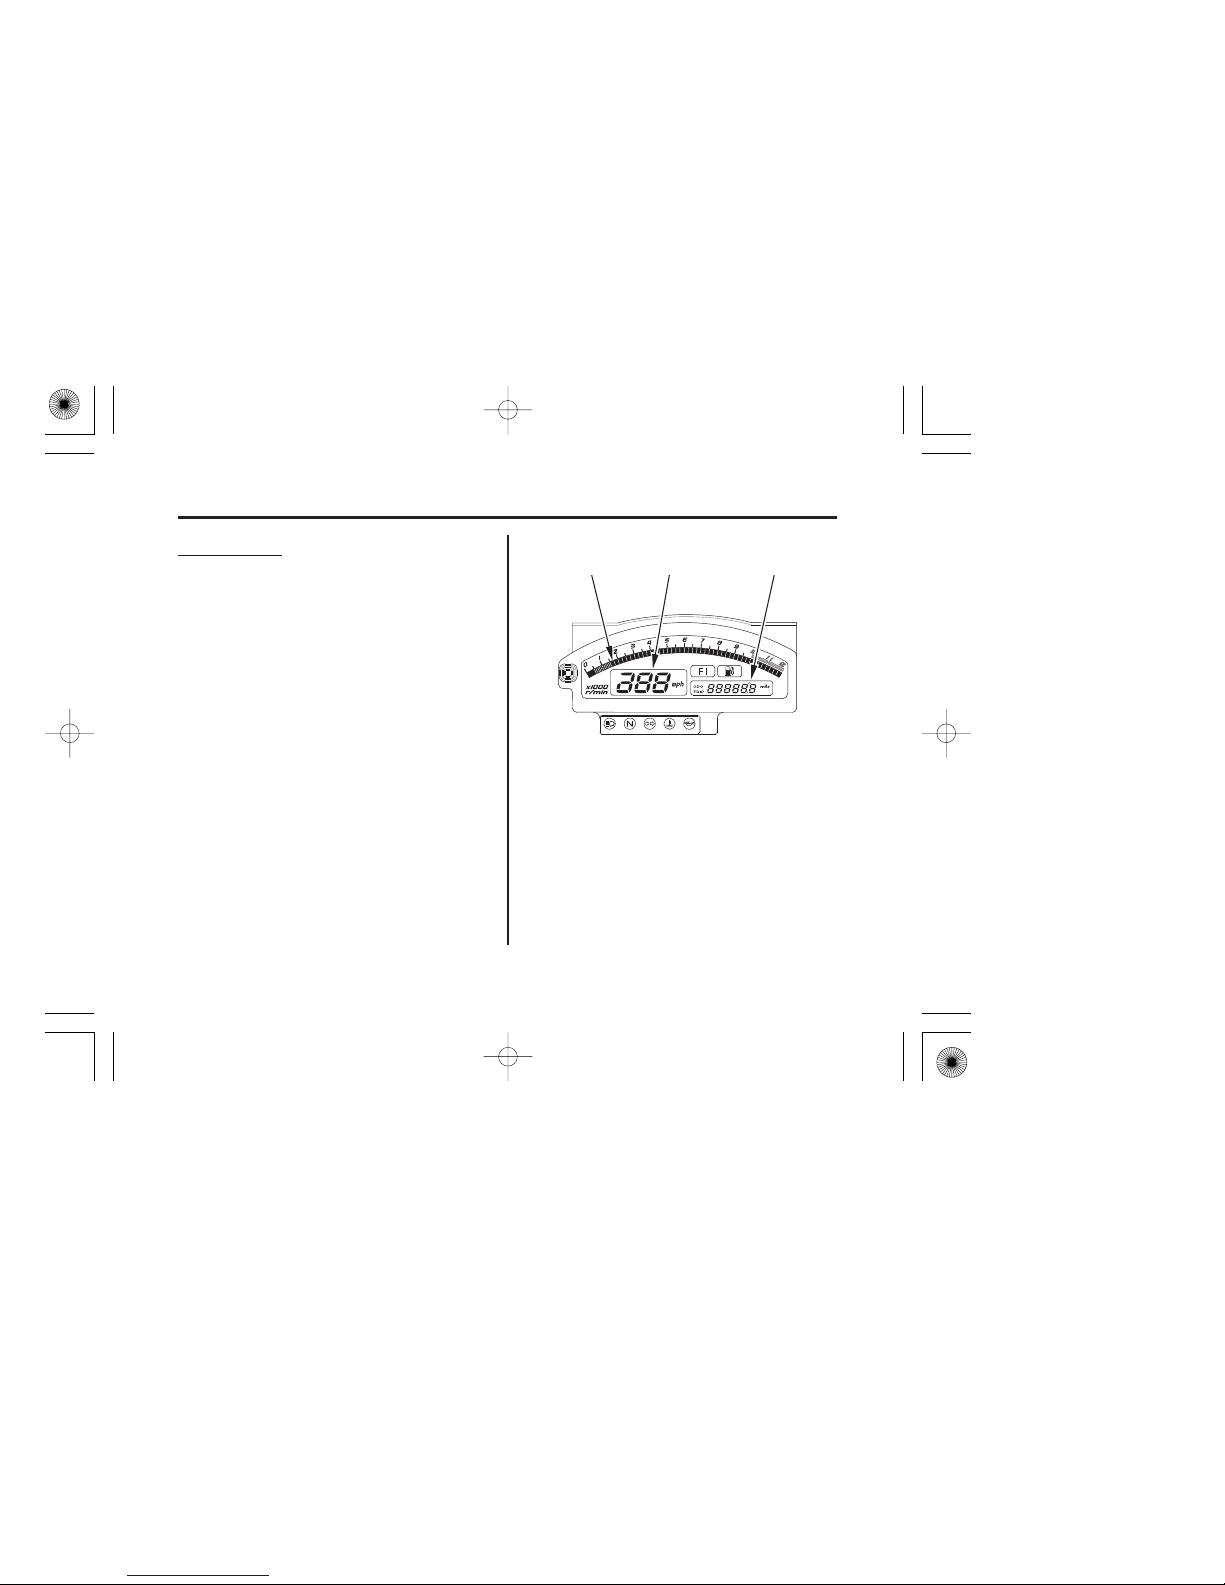
(1) tachometer
(2) speedometer
(3) multi-function display
15
Gauges, Indicators & Displays
Instruments & Controls
Display
Check.
Display Check
When the ignition switch is turned ON, the
display will temporarily show all the
modes and digital segments so you can
make sure the liquid crystal display is
functioning properly.
The displays are identified in the table on
pages with the words:
If any part of these displays does not come
on when it should, have your Honda dealer
check for problems.
16 17
05/11/15 12:13:11 31MCF660_024
Page 25

1.19 US gal (4.5 )
16
Gauges, Indicators & Displays
Instruments & Controls
Display Check.
Lamp Check.
Display Check.
speedometer
PGM-FI malfunction
indicator lamp (MIL)
(red)
Shows riding speed in miles or kilometers per hour
(page ).
When this indicator comes on while riding, fuel
reserved in the tank is about:
tachometer
Shows excessive engine rpm range (indicated
from the beginning of the tachometer red zone) in
which operation may damage the engine. Do not
let the tachometer rpm display enter the red zone.
tachometer red zone
1
2
3
4
5
Lights when there is any abnormality in the PGM-FI
(Programmed Fuel Injection) system. Should also
light for a few seconds and then go off when the
ignition switch is turned ON and the engine stop
switch is at RUN. If the indicator comes on at any
other time, reduce speed and take your motorcycle to
a Honda dealer as soon as possible.
fuel indicator (amber)
Shows engine speed in revolutions per minute (rpm).
22
05/11/15 12:13:22 31MCF660_025
Page 26
17
Gauges, Indicators & Displays
Instruments & Controls
Display Check.
Lamp Check
Lamp Check.
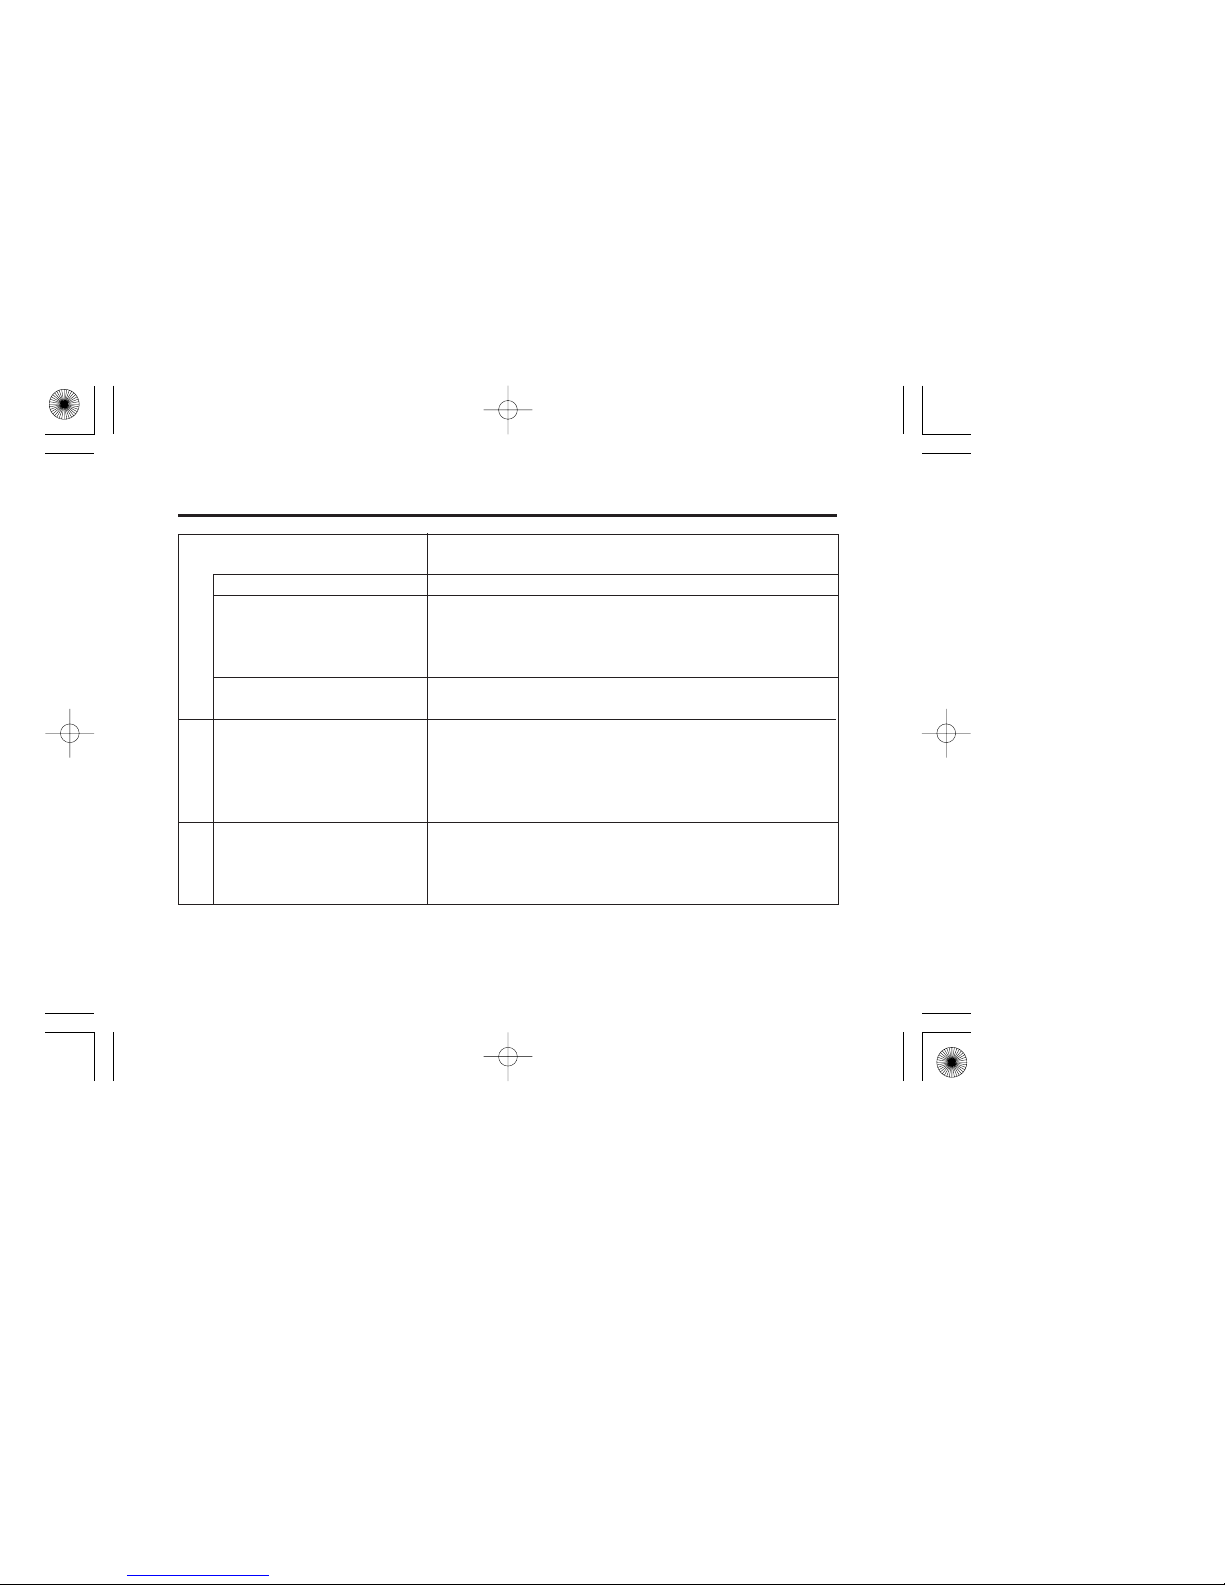
multi-function display
coolant temperature
meter
Shows coolant temperature (page ).
USA : Fahrenheit (°F), Canada : Centigrade (°C).
The display includes the following functions:
odometer Shows the total miles or kilometers ridden (page ).
tripmeter
low oil pressure
indicator (red)
Lights when engine oil pressure is low enough to
cause engine damage. If the low oil pressure
indicator lights during operation, pull safely to the
side of the road. See page for instructions and
cautions. .
Lights when the coolant is over the specified
temperature. If the indicator comes on, pull safely to
the side of the road. See page f or instructions
and cautions.
coolant temperature
indicator (red)
6
7
8
Shows the number of miles or kilometers ridden
since you last reset the meter. To zero (0) the
tripmeter, push and hold the multi-function select
and reset button (page ).
22
20
184
186
28
05/11/15 12:13:35 31MCF660_026
Page 27

18
Gauges, Indicators & Displays
Instruments & Controls
Lamp Check.
Lamp Check.
turn signal indicator
(amber)
Flashes when either turn signal operates.
neutral indicator (green) Lights when the transmission is in neutral.
high beam indicator
(blue)
Lights when the headlight is on high beam.
multi-function select and
reset button
Selects display of the odometer, tripmeter and
coolant temperature meter (page ).
9
10
11
12
28
05/11/15 12:13:44 31MCF660_027
Page 28
(1)
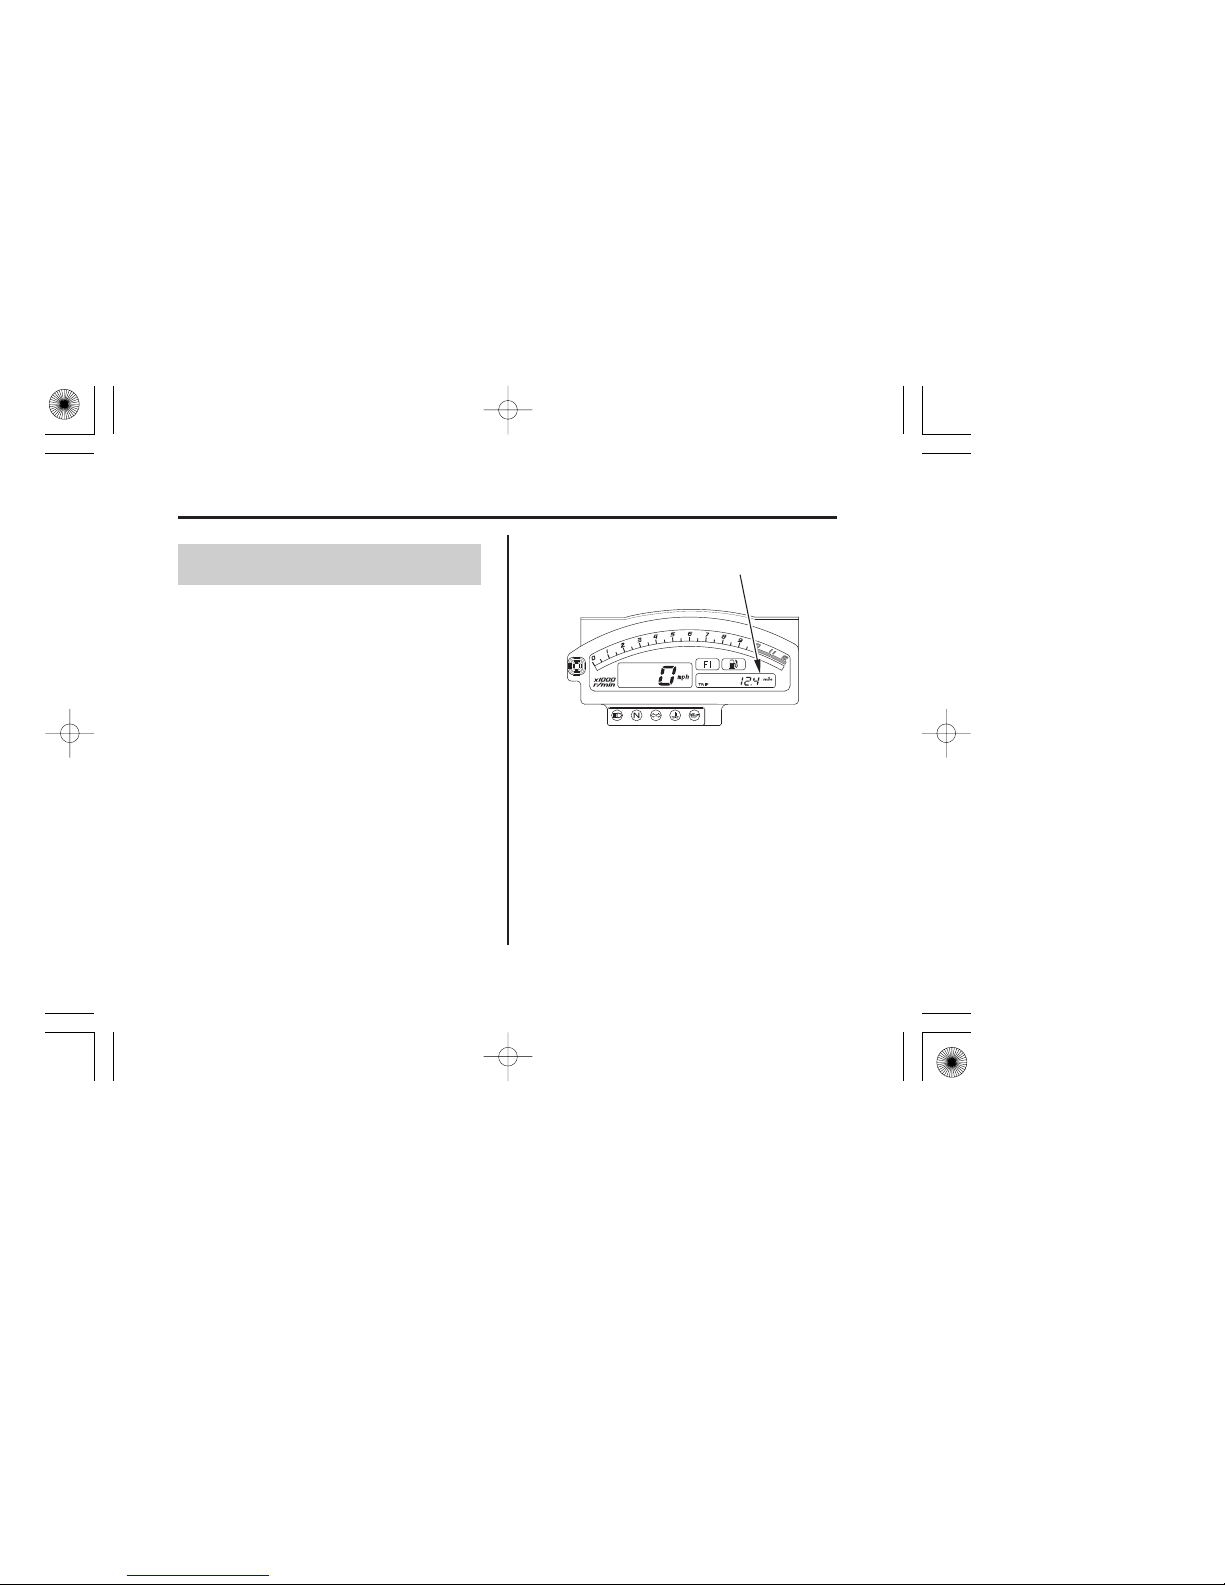
(1) multi-function display
19
Multi-function Display
Gauges, Indicators & Displays
Instruments & Controls
The multi-function display ( ) includes
the following functions:
The tripmeter will reset if the battery is
disconnected.
1
odometer
tripmeter
coolant temperature meter
05/11/15 12:13:50 31MCF660_028
Page 29
−
−
〈〉
〈〉
(1)
(1)
For Canada
For USA
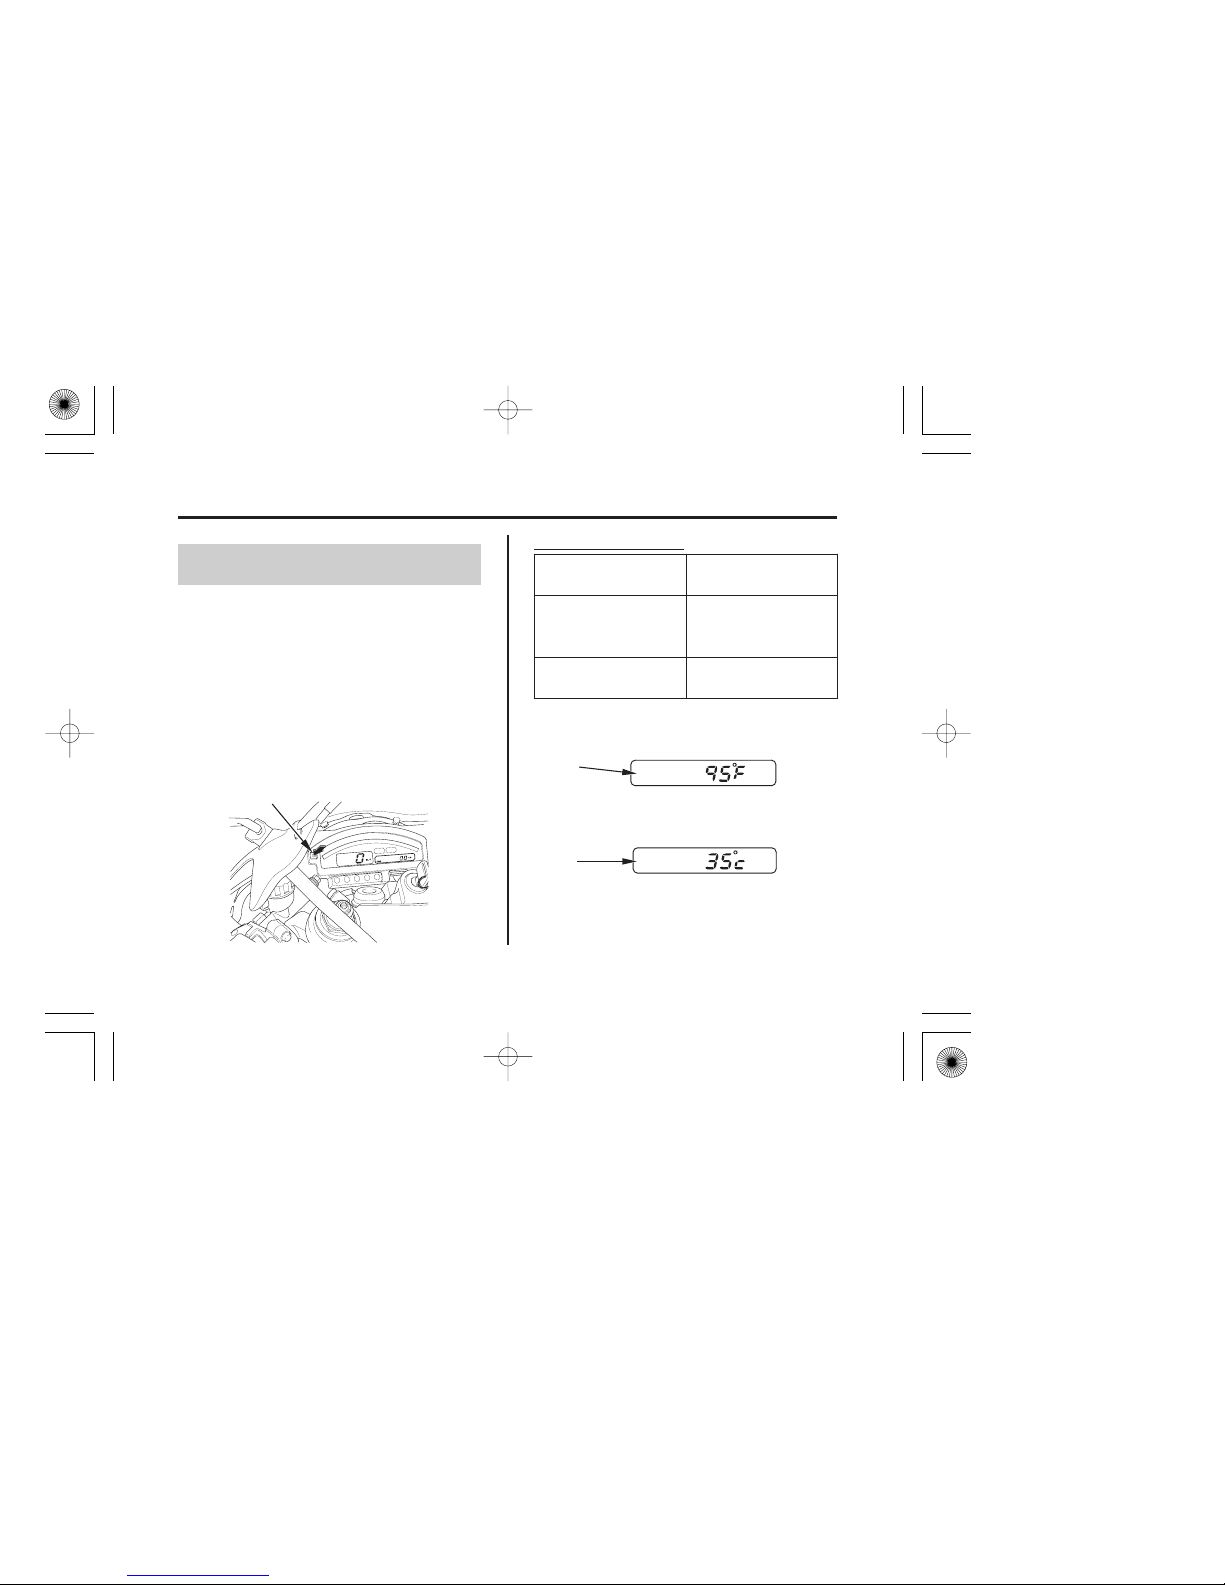
(1) coolant temperature meter
(2) multi-function select and reset button
(2)
20
Coolant Temperature Meter
Gauges, Indicators & Displays
Instruments & Controls
The coolant temperature meter ( ) shows
the coolant temperature digitally.
Temperature Display
USA : Fahrenheit (°F),
Canada : Centigrade (°C).
If the tripmeter is displayed, push the
multi-function select and reset button ( )
to display the coolant temperature.
1
2
Below
94°F (34°C)
Between
95°F 270°F
(35°C 132°C)
Above
270°F (132°C)
‘‘--’’ is displayed
Actual coolant
temperature is
displayed.
The display remains
‘‘270°F (132°C)’’
05/11/15 12:14:01 31MCF660_029
Page 30
−
〈〉
〈〉
For Canada
For USA
(3)
(3)
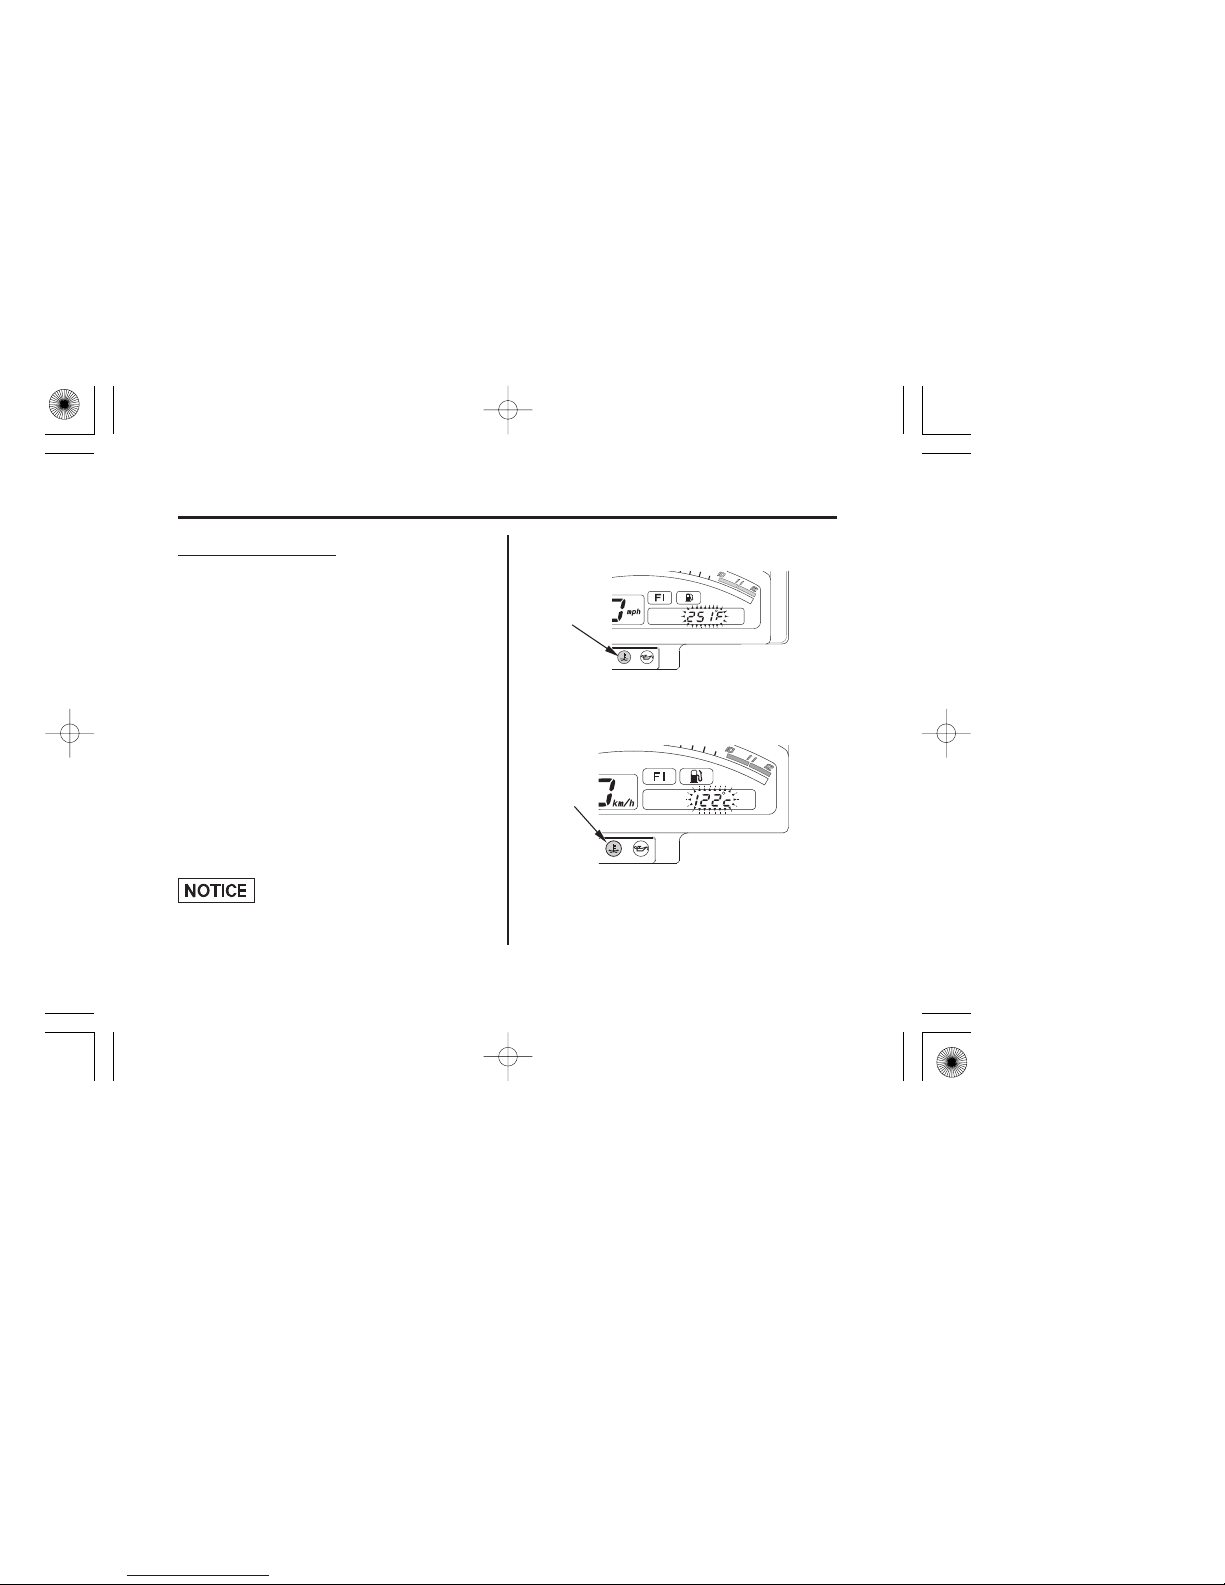
(3) coolant temperature indicator
21
Gauges, Indicators & Displays
Instruments & Controls
Continuing to ride with an overheated
engine can cause serious engine damage.
Overheating Message:
If the coolant temperature reaches 251°F
(122°C) while the odometer and tripmeter
display is selected, the display will
automatically switch to coolant
temperature.
When the coolant temperature reaches
251°F (122°C), the numbers in the
temperature display start flashing and the
coolant temperature indicator ( ) comes
on. If this occurs, stop the engine and
check the reserve tank coolant level. Read
pages and do not ride the
motorcycle until the problem has been
corrected.
100 103
3
05/11/15 12:14:08 31MCF660_030
Page 31
(3)
(2)
(1)
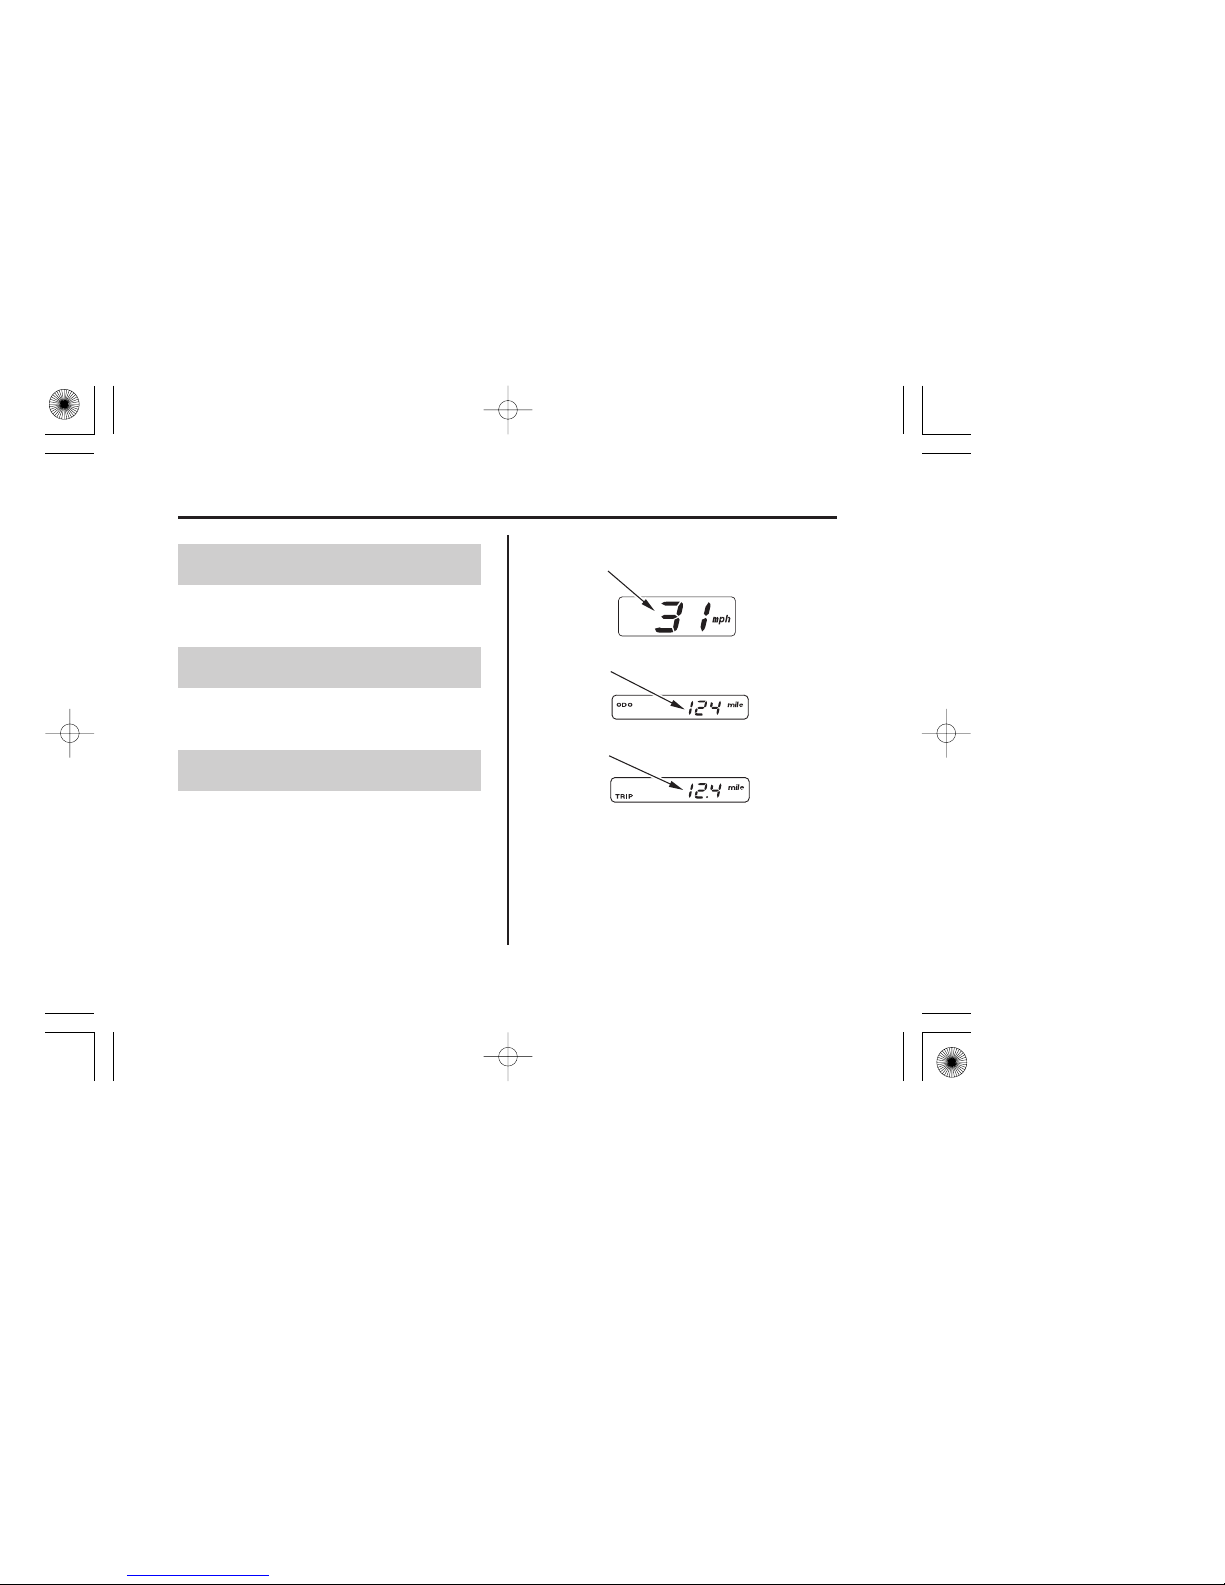
(1) speedometer
(2) odometer
(3) tripmeter
22
Speedometer
Odometer
Tripmeter
Gauges, Indicators & Displays
Instruments & Controls
The speedometer ( ) shows riding speed
in miles or kilometers per hour.
The odometer ( ) shows the total miles or
kilometers ridden.
The tripmeter ( ) shows number of miles
or kilometers ridden since you last reset
the meter.
2
1
3
05/11/15 12:14:18 31MCF660_031
Page 32
(4)
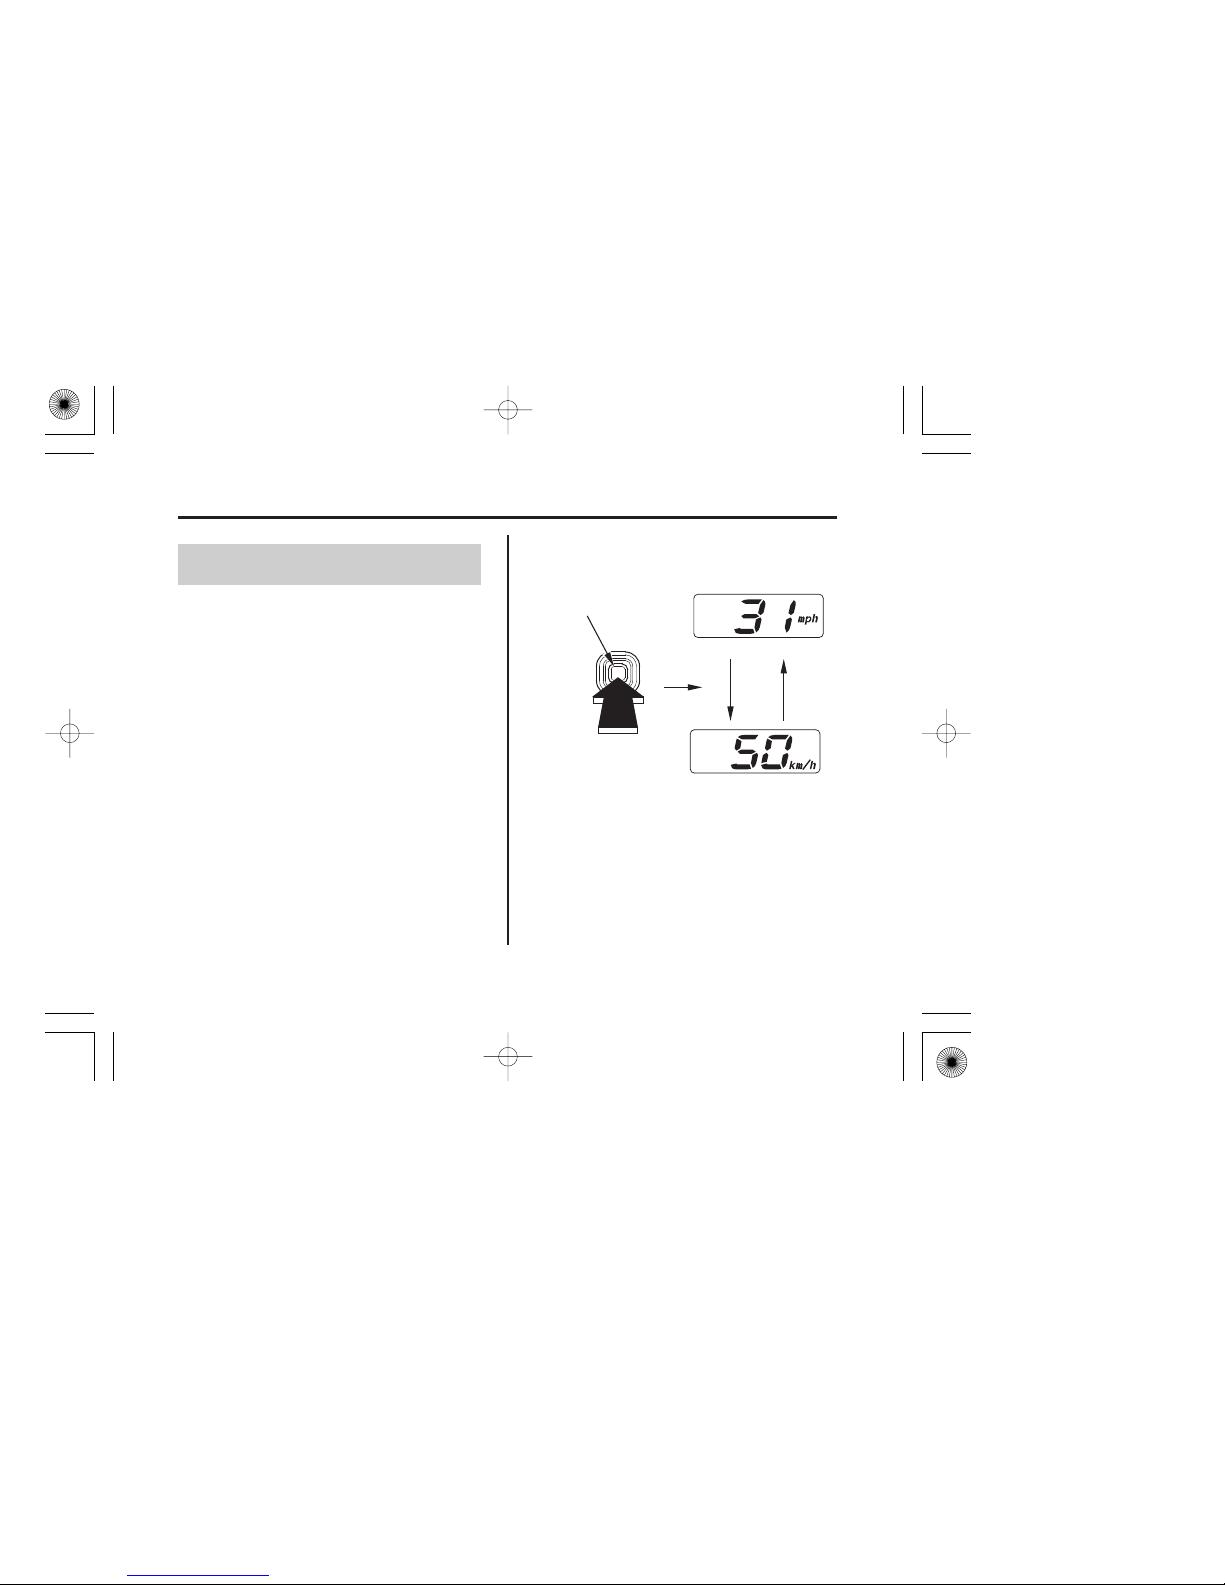
(4) multi-function select and
reset button
23
Changing the Speed Unit
Gauges, Indicators & Displays
Instruments & Controls
The speedometer displays both ‘‘mph’’
and ‘‘km/h.’’
Push and hold the multi-function select
and reset button ( ) to select ‘‘mph’’ or
‘‘km/h.’’
This function only operates while the
display is in the ‘‘ODO’’ mode (page ).
4
(USA Only)
28
05/11/15 12:14:25 31MCF660_032
Page 33
(1)
((AA))
(A) fully ON
(B) fully OFF
LEFT SIDE
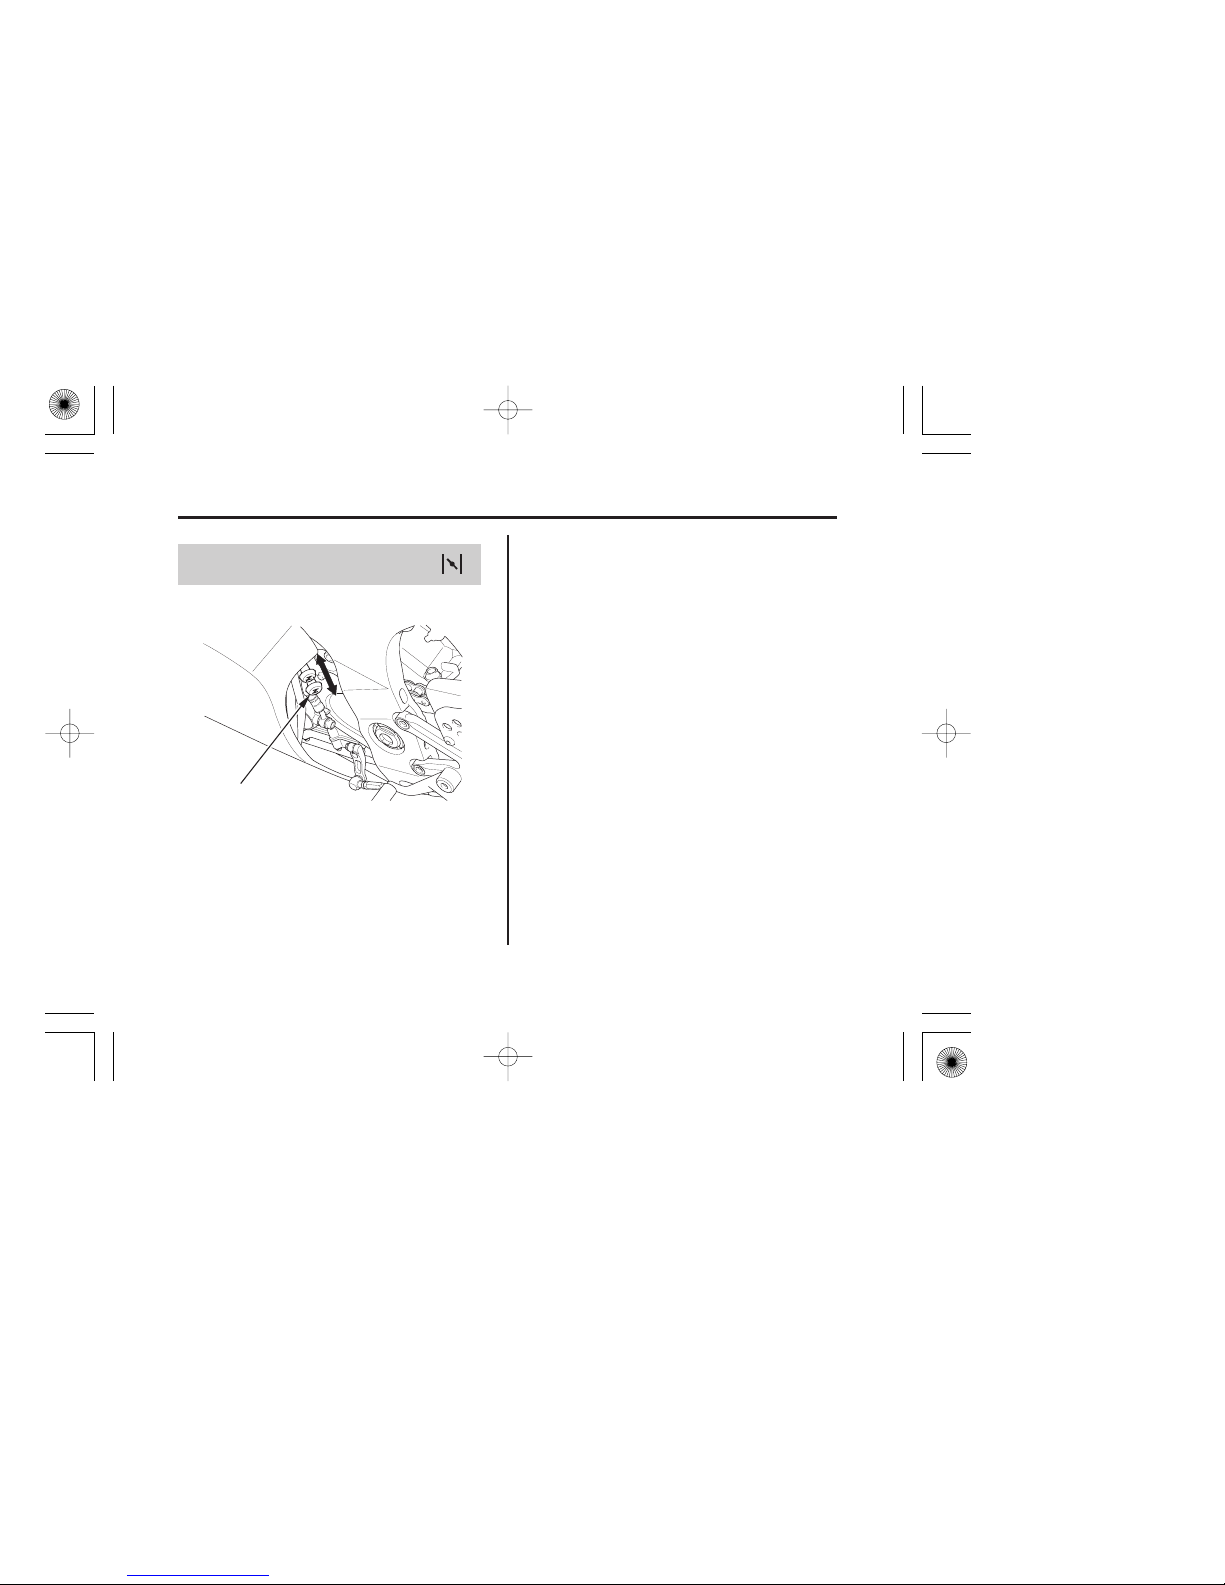
(1) choke knob
((BB))
24
Choke Knob
Controls & Features
Instruments & Controls
The choke knob may be used when
starting the engine. See page .42
05/11/15 12:14:32 31MCF660_033
Page 34
ON
OFF
Electrical circuits on.
No electrical
circuits function.
No electrical circuits
function. Locks the
steering head.
LOCK
(steering
lock)
(1)
FRONT
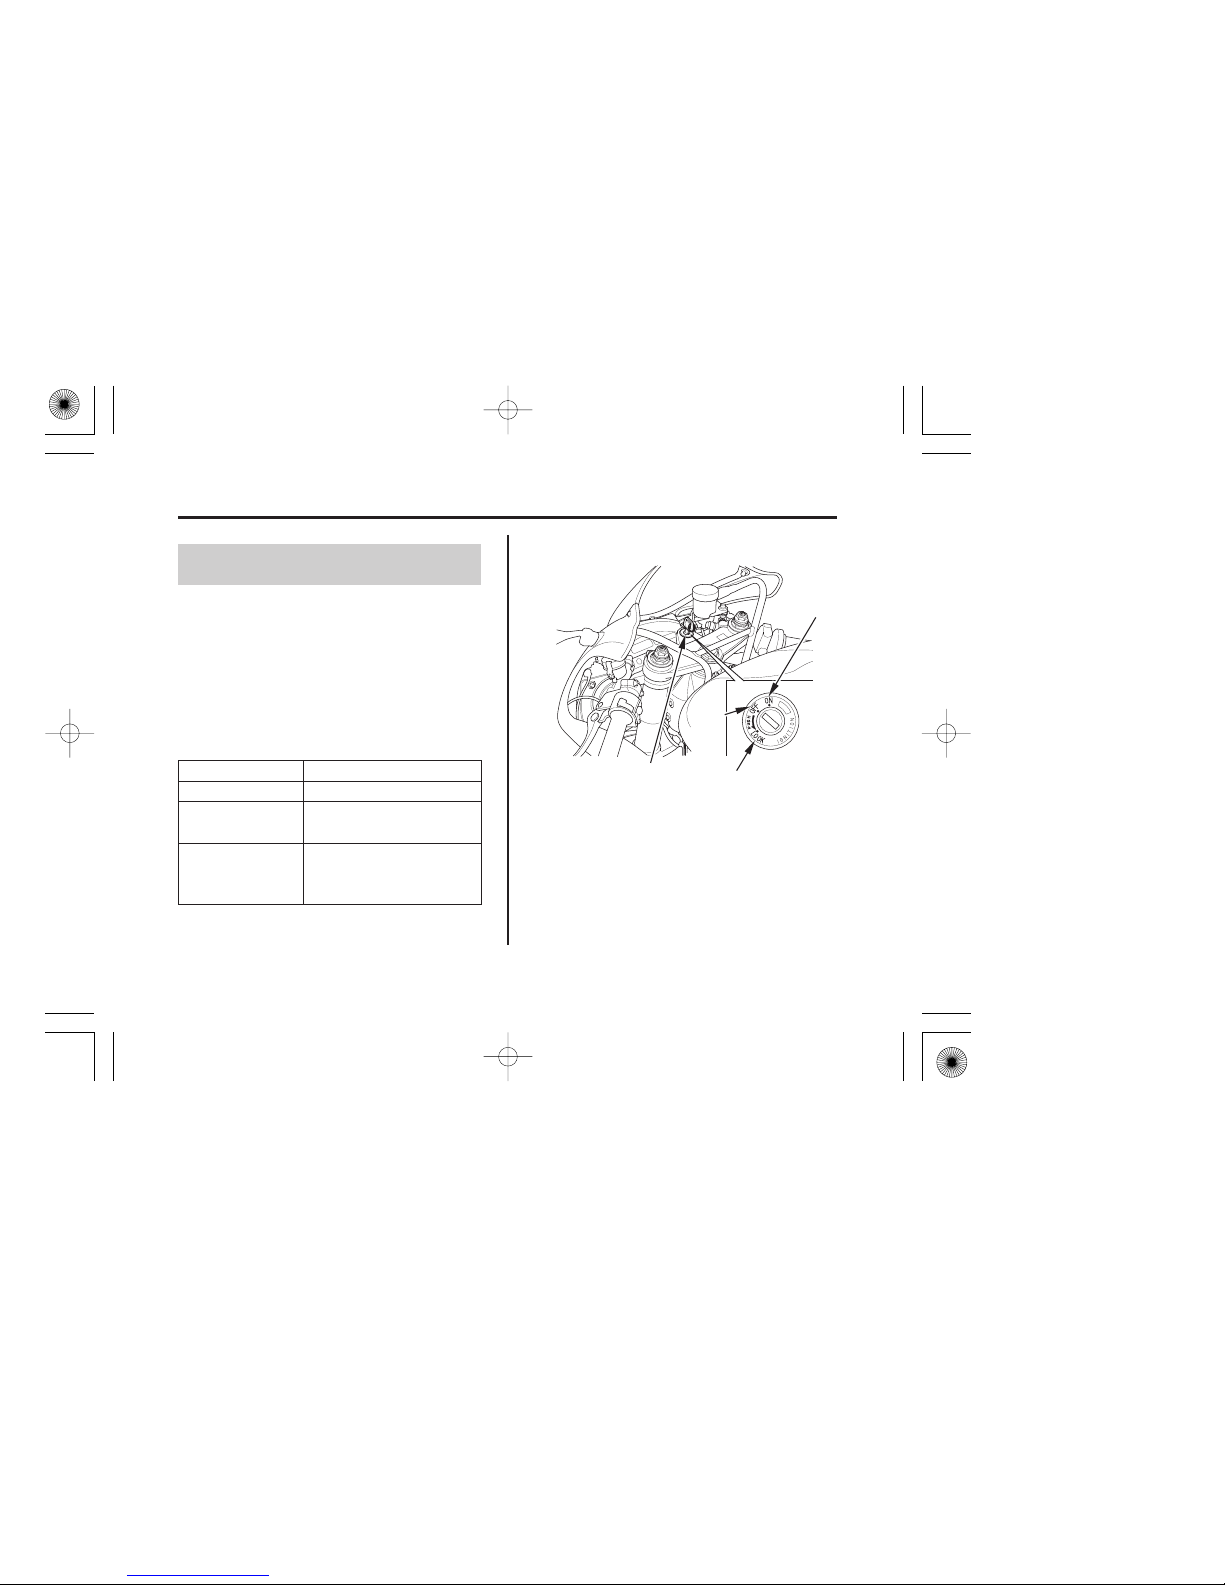
(1) ignition switch
LOCK
ON
OFF
Key Position Function
25
Ignition Switch
Controls & Features
Instruments & Controls
The ignition switch ( ) is used for starting
and stopping the engine (page ) and to
lock the steering for theft prevention (page
). Insert the key and turn it to the right
for the ON position. Push down on the key
andturnittothelefttotheLOCK
(steering lock) position.
To unlock the steering lock, insert the key
and turn it to the right to the OFF position.
1
41
51
05/11/15 12:14:43 31MCF660_034
Page 35
(1)
RIGHT HANDLEBAR
(2)
OFF
RUN
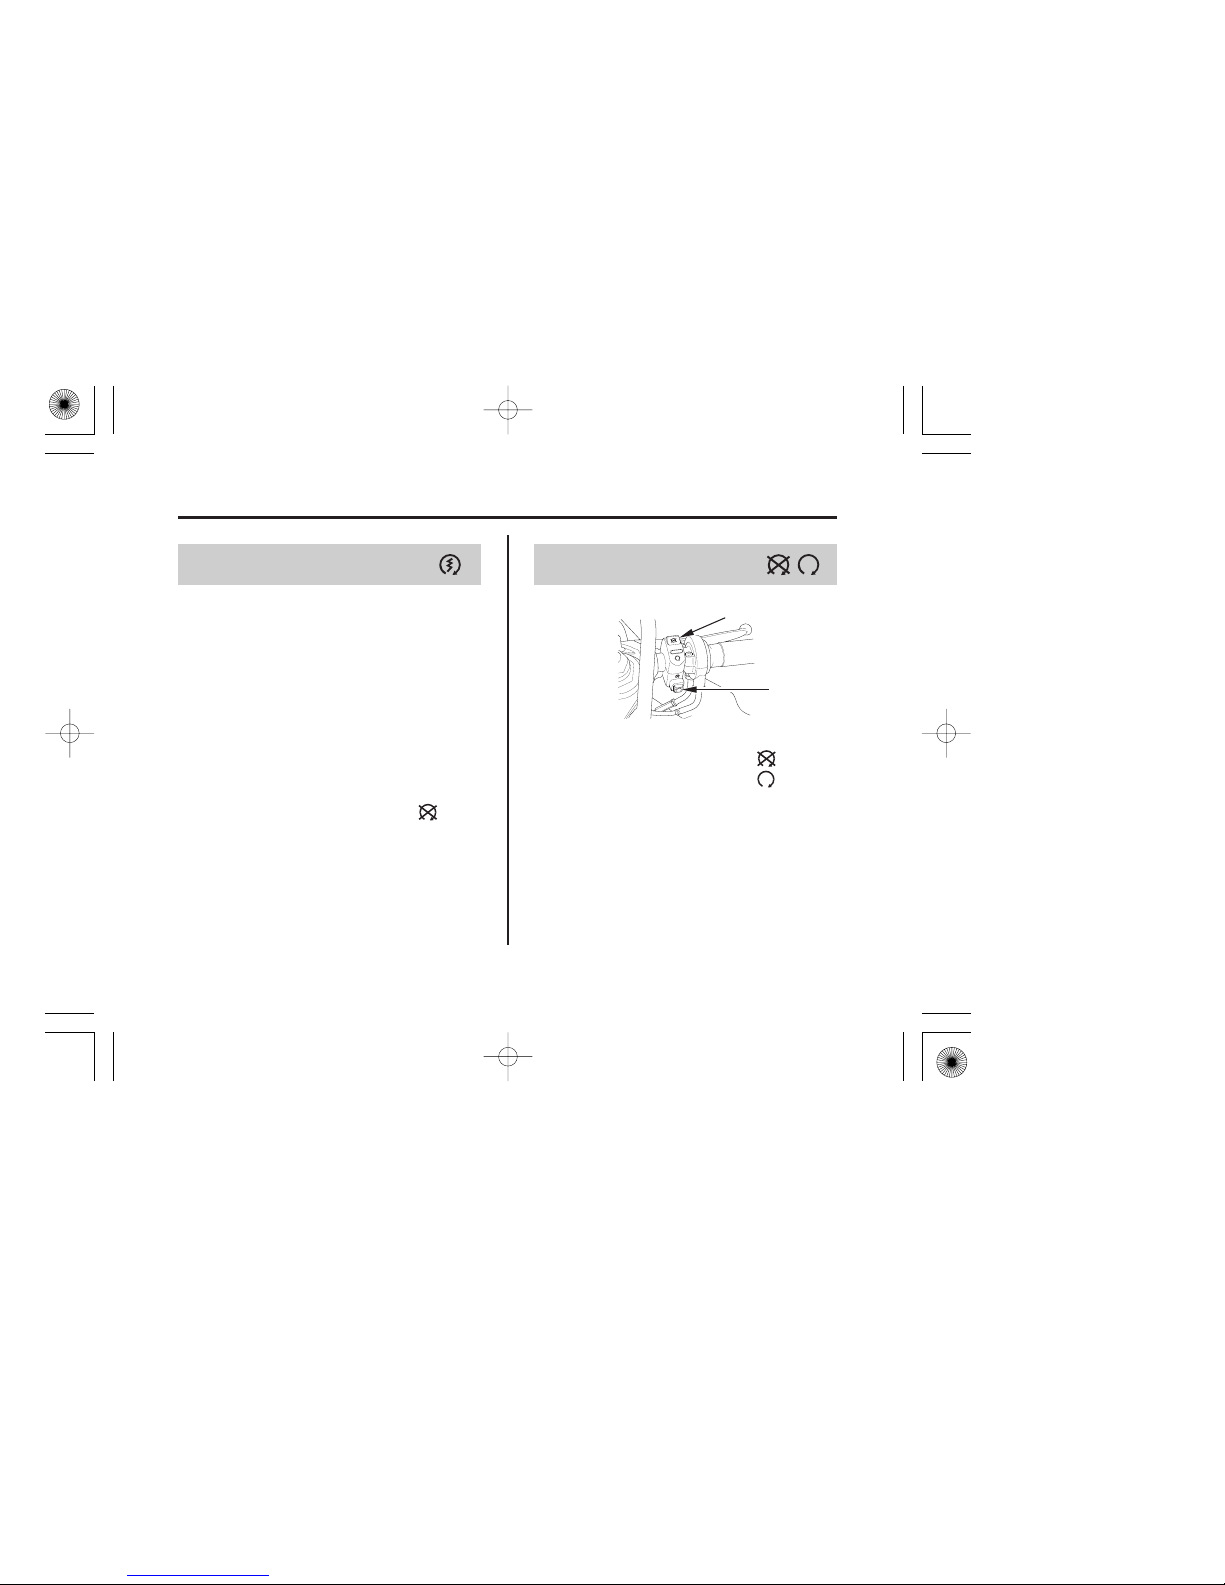
(1) start button
(2) engine stop switch
26
Start Button Engine Stop Switch
Controls & Features
Instruments & Controls
Starting Procedure,
When the start button is pushed, the starter
motor will crank the engine; the headlight
will automatically go out, but the taillight
will stay on.
The start button ( ) is used for starting the
engine. Pushing the button in starts the
engine. See page .
The engine stop switch ( ) is used to stop
the engine in an emergency. To operate,
push the switch to the OFF position. The
switch must be in the RUN position to
start the engine, and it should normally
remain in the RUN position even when the
engine is OFF.
The starter motor will not operate if the
engine stop switch is in the OFF ( )
position when the start button is pushed.
1
2
42
05/11/15 12:14:52 31MCF660_035
Page 36
(1)
(2)
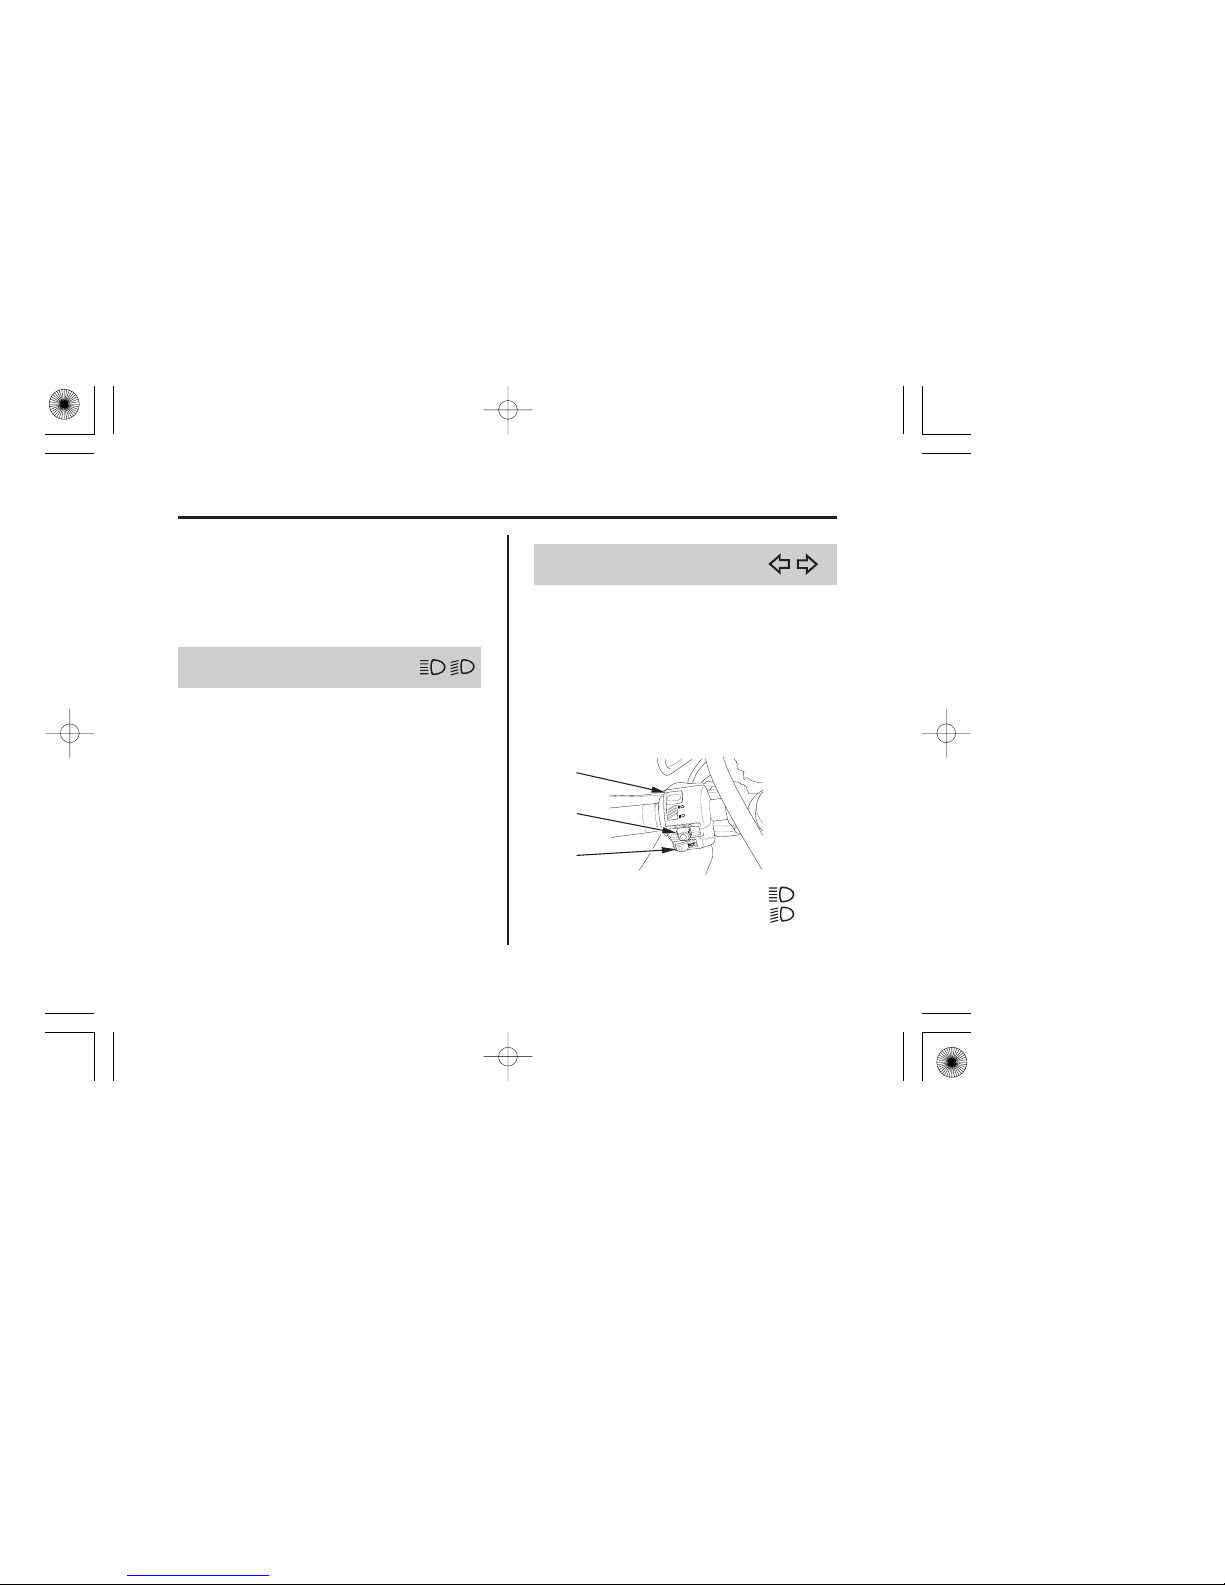
(1) headlight dimmer switch
(2) turn signal switch
(3) horn button
HI
LO
(3)
LEFT HANDLEBAR
27
Turn Signal Switch
Headlight Dimmer Switch
Controls & Features
Instruments & Controls
If your motorcycle is stopped with the
ignition switch ON and the engine stop
switch OFF, the headlight and taillight
will remain on, resulting in battery
discharge.
Theturnsignalswitch( )isusedtosignal
a turn or a lane change. To operate, move
the switch all the way in the proper
direction and release it. The appropriate
turn signal lights will start blinking. To
cancel the light, push the switch in.The headlight dimmer switch ( ) is used
to change between the high and low beams
of the headlight. To operate, turn the
switch to HI for high beam, LO for low
beam.
1
2
05/11/15 12:15:01 31MCF660_036
Page 37
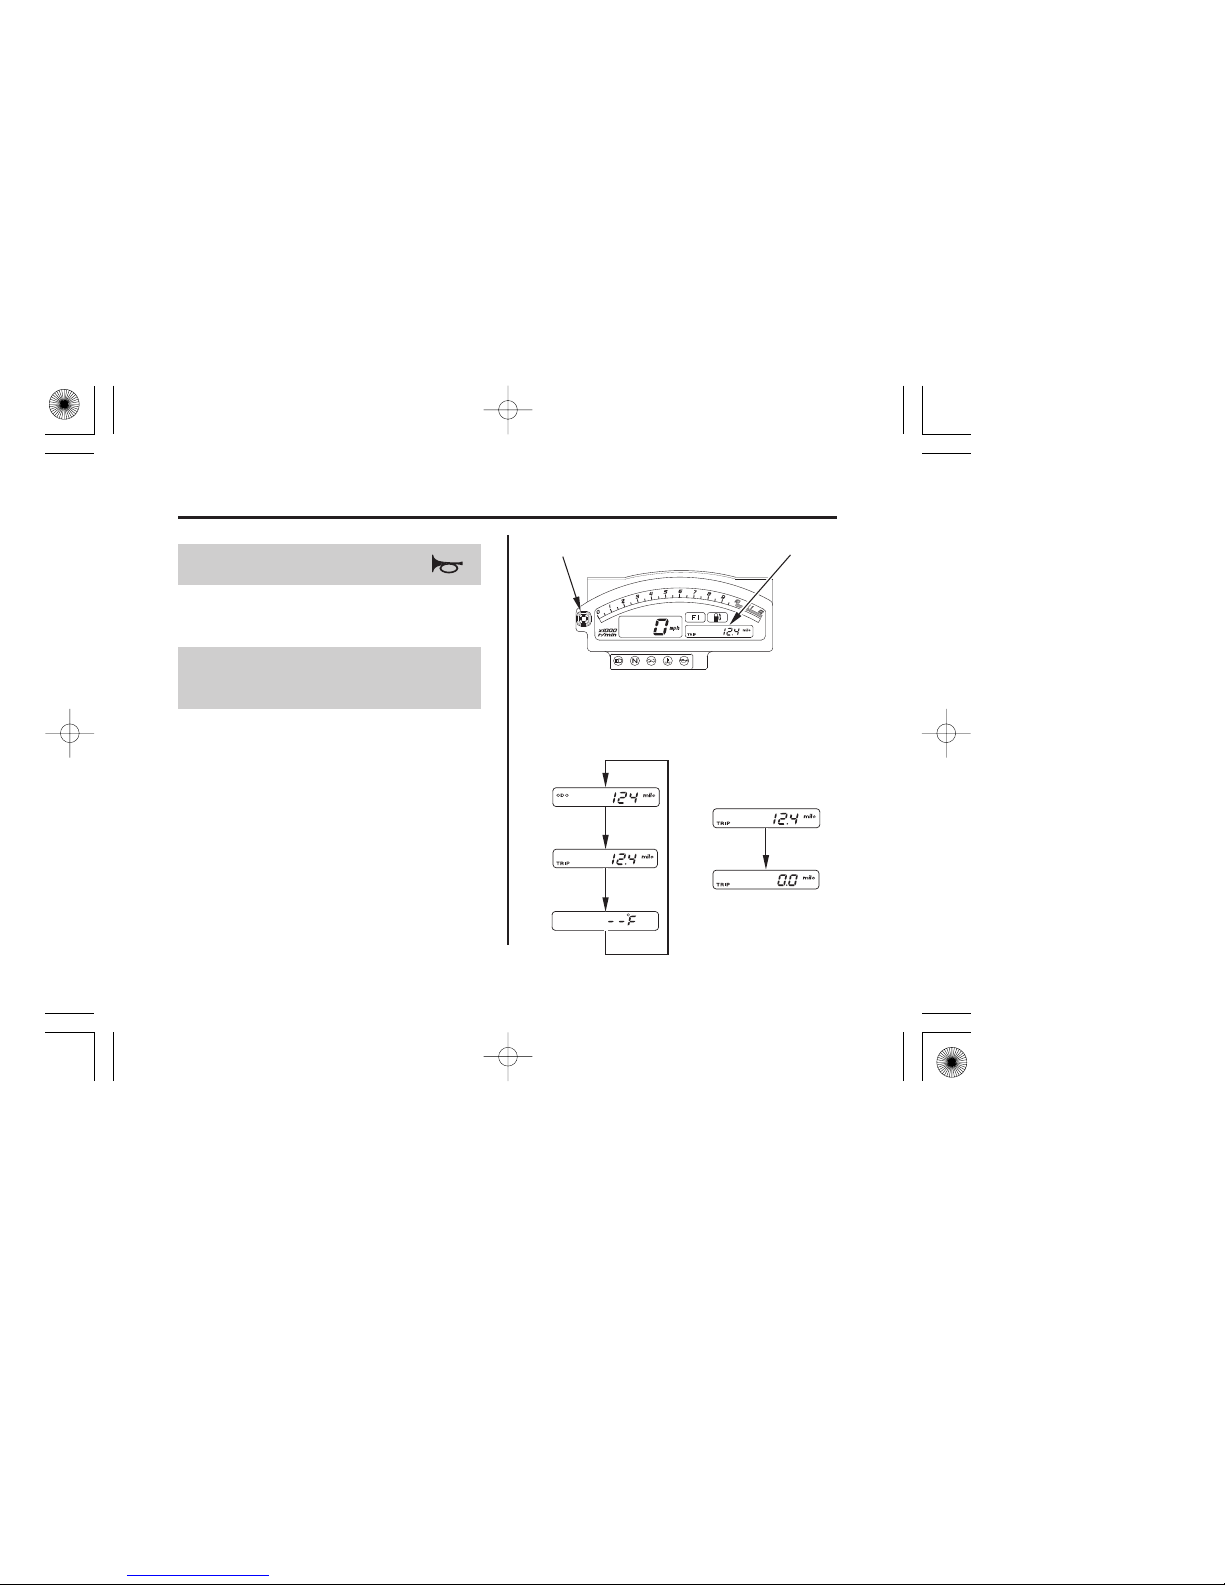
(2)
(1)
ODO
(1) multi-function display
(2) multi-function select and reset button
TRIP
TEMP
tripmeter
reset
28
Horn Button
Multi-function Select and
Reset Button
Controls & Features
Instruments & Controls
The horn is used to alert other motorists.
To operate, push the horn button ( ).
The display ( ) has three functions,
odometer, tripmeter and temperature meter.
Push the button ( ) to select the ‘‘ODO’’,
‘‘TRIP’’ or ‘‘TEMP’’ mode.
To reset the tripmeter, push and hold the
button with the display in the ‘‘TRIP’’
mode.
3
1
2
05/11/15 12:15:12 31MCF660_037
Page 38
29
Before Riding
Before Riding
Before each ride, you need to make sure
you and your Honda are both ready to ride.
To help get you prepared, this section
discusses how to evaluate your riding
readiness, what items you should check on
your motorcycle, and adjustments to make
for your comfort, convenience, or safety.
This section also includes important
information about loading.
For information about adjusting the
suspension on your Honda, see page .
.......................Are You Ready to Ride? . 30
.............................Protective Apparel . 30
...................................Rider Training . 32
.....Is Your Motorcycle Ready to Ride? . 33
............................Pre-ride Inspection . 33
.....................Load Limits & Guidelines . 36
..............................................Loading . 36
.......................................Load Limits . 37
...........................Loading Guidelines . 37
116
05/11/15 12:15:17 31MCF660_038
Page 39
30
Protective Apparel
Are You Ready to Ride?
Before Riding
Before you ride your motorcycle for the
first time, we urge you to:
Read this owner’s manual.
Make sure you understand all the safety
messages.
Know how to operate all the controls.
You feel well and are in good physical
and mental condition.
Before each ride, be sure:
Youarewearinganapproved
motorcycle helmet (with chin strap
tightened securely), eye protection, and
other protective clothing.
Make sure your passenger is ready to ride,
too, and is wearing proper gear including a
helmet.
You don’t have any alcohol or drugs in
your system.
If you must carry an extra helmet while
riding, use a commercially-available
elastic cord, strap, or net to secure the
helmet to the seat.
For your safety, we strongly recommend
that you always wear an approved
motorcycle helmet, eye protection, boots,
gloves, long pants, and a long-sleeved
shirt or jacket whenever you ride.
Although complete protection is not
possible, wearing proper gear can reduce
the chance of injury when you ride.
Following are suggestions to help you
choose the proper gear.
05/11/15 12:15:28 31MCF660_039
Page 40
Not wearing a helmet increases
the chance of serious injury or
death in a crash.
Be sure you and your passenger
always wear a helmet, eye
protection, and other protective
apparel when you ride.
31
Are You Ready to Ride?
Before Riding
(cont’d)
Helmets and Eye Protection
Your helmet is your most important piece
of riding gear because it off ers the best
protection against head injuries. A helmet
should fit your head comfortably and
securely. A bright-colored helmet and
reflective strips can make you more
noticeable in traffic.
An open-face helmet offers some
protection, but a full-face helmet offers
more. Regardless of the style, look for a
DOT (Department of Transportation)
sticker in any helmet you buy (USA only).
Always wear a face shield or goggles to
protect your eyes and help your vision.
Leather gloves to help protect your
hands.
Sturdy boots with non-slip soles to help
protect your feet and ankles.
In addition to a helmet and eye protection,
we also recommend:
Additional Riding Gear
05/11/15 12:15:36 31MCF660_040
Page 41
32
Rider Training
Are You Ready to Ride?
Before Riding
Riding Tips
A motorcycle riding suit or jacket for
comfort as well as protection.
Bright-colored and reflective clothing
can help make you more noticeable in
traffic. Avoid loose clothes that could
get caught on any part of your
motorcycle.
Developing your riding skills is an ongoing process. Even if you have ridden
other motorcycles, take time to become
familiar with how this motorcycle works
and handles. Practice riding the
motorcycle in a safe area to build your
skills. Do not ride in traffic until you get
accustomed to the motorcycle’s controls,
and feel comfortable with its size and
weight.
We urge all riders to take a certified
course approved by the Motorcycle Safety
Foundation (MSF). New riders should
start with the basic course, and even
experienced riders will find the advanced
course beneficial. For information about
the MSF training course nearest you, call
the national toll-free number: (800) 446-
9227.
Other riding tips can be found in the
booklet that came with your
motorcycle (USA only).
05/11/15 12:15:43 31MCF660_041
Page 42
Improperly maintaining this
motorcycle or failing to correct a
problem before riding can cause a
crash in which you can be
seriously hurt or killed.
Always perform a pre-ride
inspection before every ride and
correct any problems.
33
Pre-ride Inspection
Before Riding
Is Your Motorcycle Ready to Ride?
Tires
&
Wheels
Chain
Before each ride, it’s important to inspect
your motorcycle and make sure any
problem you find is corrected. A pre-ride
inspection is a must, not only for safety,
but because having a breakdown, or even
a flat tire, can be a major inconvenience.
Check the following items before you get
on the motorcycle:
Look at the tires. If a tire
appears low, use an air pressure
gauge to check its pressure. Also
look for signs of excessive wear
(page ) or damage to the
tires and wheels.
Check the condition of the chain.
Adjust slack and lubricate as
needed (page ).
133
140
05/11/15 12:15:51 31MCF660_042
Page 43
34
Is Your Motorcycle Ready to Ride?
Before Riding
Leaks,
Loose
Parts
Lights
Load Limits
Cargo
Adjustments
Walk around your
motorcycle and look for
anything that appears
unusual, such as a leak or
loose cable.
Make sure the headlight,
brakelight, taillight, and
turn signals are working
properly.
If you are carrying a passenger or cargo,
also check the following:
Make sure you do not
exceed the load limits
(page ).
Check that all cargo is
secure.
Adjust the suspension
(pages , )
according to your load.
37
117 121
05/11/15 12:16:02 31MCF660_043
Page 44
35
Is Your Motorcycle Ready to Ride?
Before Riding
Periodic MaintenanceThrottle
Brakes
Indicators
If you haven’t ridden the motorcycle in
over a week, you should also check other
items, such as the oil level and other fluids.
See (page ).
Periodic maintenance should also be done
at least once a month, no matter how often
you ride.
Remember, be sure to take care of any
problem you find, or have your Honda
dealer correct it before you ride.
Check these items after you get on the
motorcycle:
Rotate the throttle to check
it moves smoothly without
binding.
Pull the brake lever and
press on the brake pedal to
check that they operate
normally.
Turn the ignition on and
check for normal operation
of the indicators (page ).6413
05/11/15 12:16:11 31MCF660_044
Page 45
Overloading or improper loading
can cause a crash and you can be
seriously hurt or killed.
Follow all load limits and other
loading guidelines in this manual.
36
Loading
Load Limits & Guidelines
Before Riding
Your motorcycle has been designed to
carry you and one passenger. When you
carry a passenger, you may feel some
difference during acceleration and braking.
But so long as you keep your motorcycle
well-maintained, with good tires and
brakes, you can safely carry loads within
the given limits and guidelines.
However, exceeding the weight limit or
carrying an unbalanced load can seriously
impair your motorcycle’s handling,
braking, and stability. Non-Honda
accessories, improper modifications, and
poor maintenance can also reduce your
safety margin.
How much weight you put on your
motorcycle, and how you load it, are
important to your safety. Anytime you
ride with a passenger or cargo, you should
be aware of the following information.
05/11/15 12:16:18 31MCF660_045
Page 46
366 lbs (166 kg)
375 lbs (170 kg)
31 lbs (14 kg)
37
Loading GuidelinesLoad Limits
Load Limits & Guidelines
Before Riding
maximum weight capacity:
maximum cargo weight:
Your motorcycle is primarily intended for
transporting you and a passenger. You
may wish to secure a jacket or other small
items to the seat when you are not riding
with a passenger.
If you wish to carry more cargo, check
with your Honda dealer for advice, and be
sure to read the information regarding
accessories on page .
Following are the load limits for your
motorcycle:
includes the weight of the rider,
passenger, all cargo, and all accessories.
Improperly loading your motorcycle can
affect its stability and handling. Even if
your motorcycle is properly loaded, you
should ride at reduced speeds and never
exceed 80 mph (130 km/h) when carrying
cargo.
The weight of added accessories will
reduce the maximum cargo weight you
can carry.
(Canada only)
5
05/11/15 12:16:29 31MCF660_046
Page 47
38
Load Limits & Guidelines
Before Riding
Follow these guidelines whenever you
carry a passenger or cargo:
To prevent loose items from creating a
hazard, make sure that all cargo is tied
down securely before you ride.
Place cargo weight as low and close to
the center of your motorcycle as
possible.
Balance cargo weight evenly on both
sides.
Check that both tires are properly
inflated (page ).
If you change your normal load, you
may need to adjust the front suspension
(page ) and the rear suspension
(page ).
131
117
121
05/11/15 12:16:37 31MCF660_047
Page 48
39
Basic Operation & Riding
Basic Operation & Riding
This section gives basic riding instructions,
including how to start and stop your
engine, and how to use the throttle, clutch,
and brakes. It also provides important
information on riding with a passenger or
cargo.
To protect your new engine and enjoy
optimum performance and service life,
refer to Break-in Guidelines (page ).
........................Safe Riding Precautions . 40
............Starting & Stopping the Engine . 41
.........................................Preparation . 41
.............................Starting Procedure . 42
..................................Flooded Engine . 44
Bank Angle Sensor Ignition Cut-off
................................................System . 45
....................How to Stop the Engine . 46
........................................Shifting Gears . 47
..................................................Braking . 49
...................................................Parking . 51
.........Riding with a Passenger or Cargo . 55
206
05/11/15 12:16:43 31MCF660_048
Page 49
40
Safe Riding Precautions
Basic Operation & Riding
Motorcycle Saf ety
Bef ore Riding
Before riding your motorcycle for the first
time, please review the
section beginning on page 1, and the
section beginning on page
.
Even if you have ridden other motorcycles,
take time to become familiar with how
this motorcycle works and handles.
Practice in a safe area until you build your
skills and get accustomed to the
motorcycle’s size and weight.
29
05/11/15 12:16:48 31MCF660_049
Page 50
41
Preparation
Starting & Stopping the Engine
Basic Operation & Riding
Always follow the proper starting
procedure described below.
For your safety, avoid starting or operating
the engine in an enclosed area such as a
garage. Your motorcycle’s exhaust
contains poisonous carbon monoxide gas
which can collect rapidly in an enclosed
area and cause illness or death.
Your motorcycle can be started with the
transmission in gear by pulling in the
clutch lever before operating the starter.
Your motorcycle is equipped with a side
stand ignition cut-off system. If the side
stand is down––the engine cannot be
started unless the transmission is in neutral.
If the side stand is up––the engine can be
started in neutral, or in gear with the
clutch lever pulled in. After starting with
the side stand down, the engine will stop if
the transmission is put in gear before
raising the side stand.
Before starting, insert the key, turn the
ignition switch ON, and confirm the
following:
The transmission is in NEUTRAL
(neutral indicator light ON).
The engine stop switch is set to RUN.
The low oil pressure indicator is ON.
The PGM-FI malfunction indicator
lamp (MIL) is OFF.
05/11/15 12:16:57 31MCF660_050
Page 51
−−
(1)
(1) choke knob
((AA))
((BB))
LEFT SIDE
(A) fully ON
(B) fully OFF
42
Starting Procedure
Starting & Stopping the Engine
Basic Operation & Riding
High Air Temperature.
To restart a warm engine, follow the
procedure for
Normal Air Temperature
10° 35°C (50° 95°F)
The low oil pressure indicator should go
off a few seconds after the engine starts.
If the low oil pressure indicator lights
during operation, stop the engine
immediately and check the engine oil level.
05/11/15 12:17:04 31MCF660_051
Page 52
−
−
1,500 2,500 rpm
1,500 2,500 rpm
43
Starting & Stopping the Engine
Basic Operation & Riding
Normal Air
Temperature.
High Air Temperature
35°C (95°F) or above
Do not use the choke.
(cont’d)
Start the engine.
Pull the choke knob back all the way to
fully ON ( ), if the engine is cold.
Start the engine, leaving the throttle
closed.
Immediately after the engine starts,
operate the choke knob to keep fast idle
at:
About a quarter minute after the engine
starts, push the choke knob ( ) forward
allthewaytofullyOFF( ).
If idling is unstable, open the throttle
slightly.
The engine will not start if the throttle is
fully open (because the electronic control
module cuts off the fuel supply).
The radiator cooling fan may start to
rotate when the choke knob is pulled out
with the engine heated, but this is normal.
If this takes place, check that the choke
knob is returned completely.
When engine rpm begins to pick up,
operate the choke knob to keep fast idle
at:
Follow steps 1-2 under
Low Air Temperature
10°C (50°F) or below
B
1
1.
2.
3.
4.
5.
1.
2.
1.
2.
A
05/11/15 12:17:18 31MCF660_052
Page 53
−
44
Flooded Engine
Starting & Stopping the Engine
Basic Operation & Riding
Extended use of the choke may impair
piston and cylinder wall lubrication and
damage the engine.
If
Your Engine Quits or Won’t Start,
Continue warming up the engine until it
runs smoothly and responds to the
throttle when the choke knob is at fully
OFF ( ).
Snapping the throttle or fast idling for
more than about 5 minutes at normal air
temperature may cause exhaust pipe
discoloration.
If the engine fails to start after repeated
attempts, it may be flooded with excess
fuel. To clear a flooded engine:
Leave the engine stop switch set to
RUN.
Press the start button for 5 seconds.
Open the throttle fully.
Push the choke knob forward all the
waytofullyOFF.
Follow the normal starting procedure.
If the engine starts, then open the
throttle slightly if idling is unstable.
If the engine still won’t start, refer to
page
.
If the engine does not start, wait 10
seconds, then follow steps
again.
1.3.
4.
5.
2.
3.
B
6.
1
5
167
05/11/15 12:17:31 31MCF660_053
Page 54
45
Bank Angle Sensor Ignition
Cut-off System
Basic Operation & Riding
Starting & Stopping the Engine
Your motorcycle’s banking (lean angle)
sensor system is designed to automatically
stop the engine and fuel pump if the
motorcycle is overturned.
Before restarting the engine, you must
turn the ignition switch to the OFF
position and then back to ON. The engine
will not restart until you perform this
procedure.
05/11/15 12:17:36 31MCF660_054
Page 55
46
How to Stop the Engine
Starting & Stopping the Engine
Basic Operation & Riding
Normal Engine Stop
To stop the engine, shift into neutral and
turn the ignition switch OFF.
The engine stop switch should normally
remain in the RUN position even when the
engine is OFF.
If your motorcycle is stopped with the
engine stop switch OFF and the ignition
switch ON, the headlight and taillight
will remain on, resulting in battery
discharge.
Emergency Engine Stop
To stop the engine in an emergency, use
the engine stop switch. To operate, press
the switch to the OFF position.
05/11/15 12:17:44 31MCF660_055
Page 56
shifting pattern
47
Shifting Gears
Basic Operation & Riding
Learning when to shift gears comes with
experience. Keep the following tips in
mind:
Close the throttle and pull the clutch
lever in completely before shifting.
Improper shifting may damage the
engine, transmission, and drive train.
Learn to recognize the engagement
point as you release the clutch lever. It
is at this point the transmission of
power to the rear wheel resumes.
Upshift to a higher gear or reduce
throttle before engine rpm (speed) gets
too high. Learn the relationship between
engine sound and the normal shifting
points.
As a general rule, shift while moving in
a straight line.
Downshift to a lower gear before you
feel the engine laboring (lugging) at
low rpm.
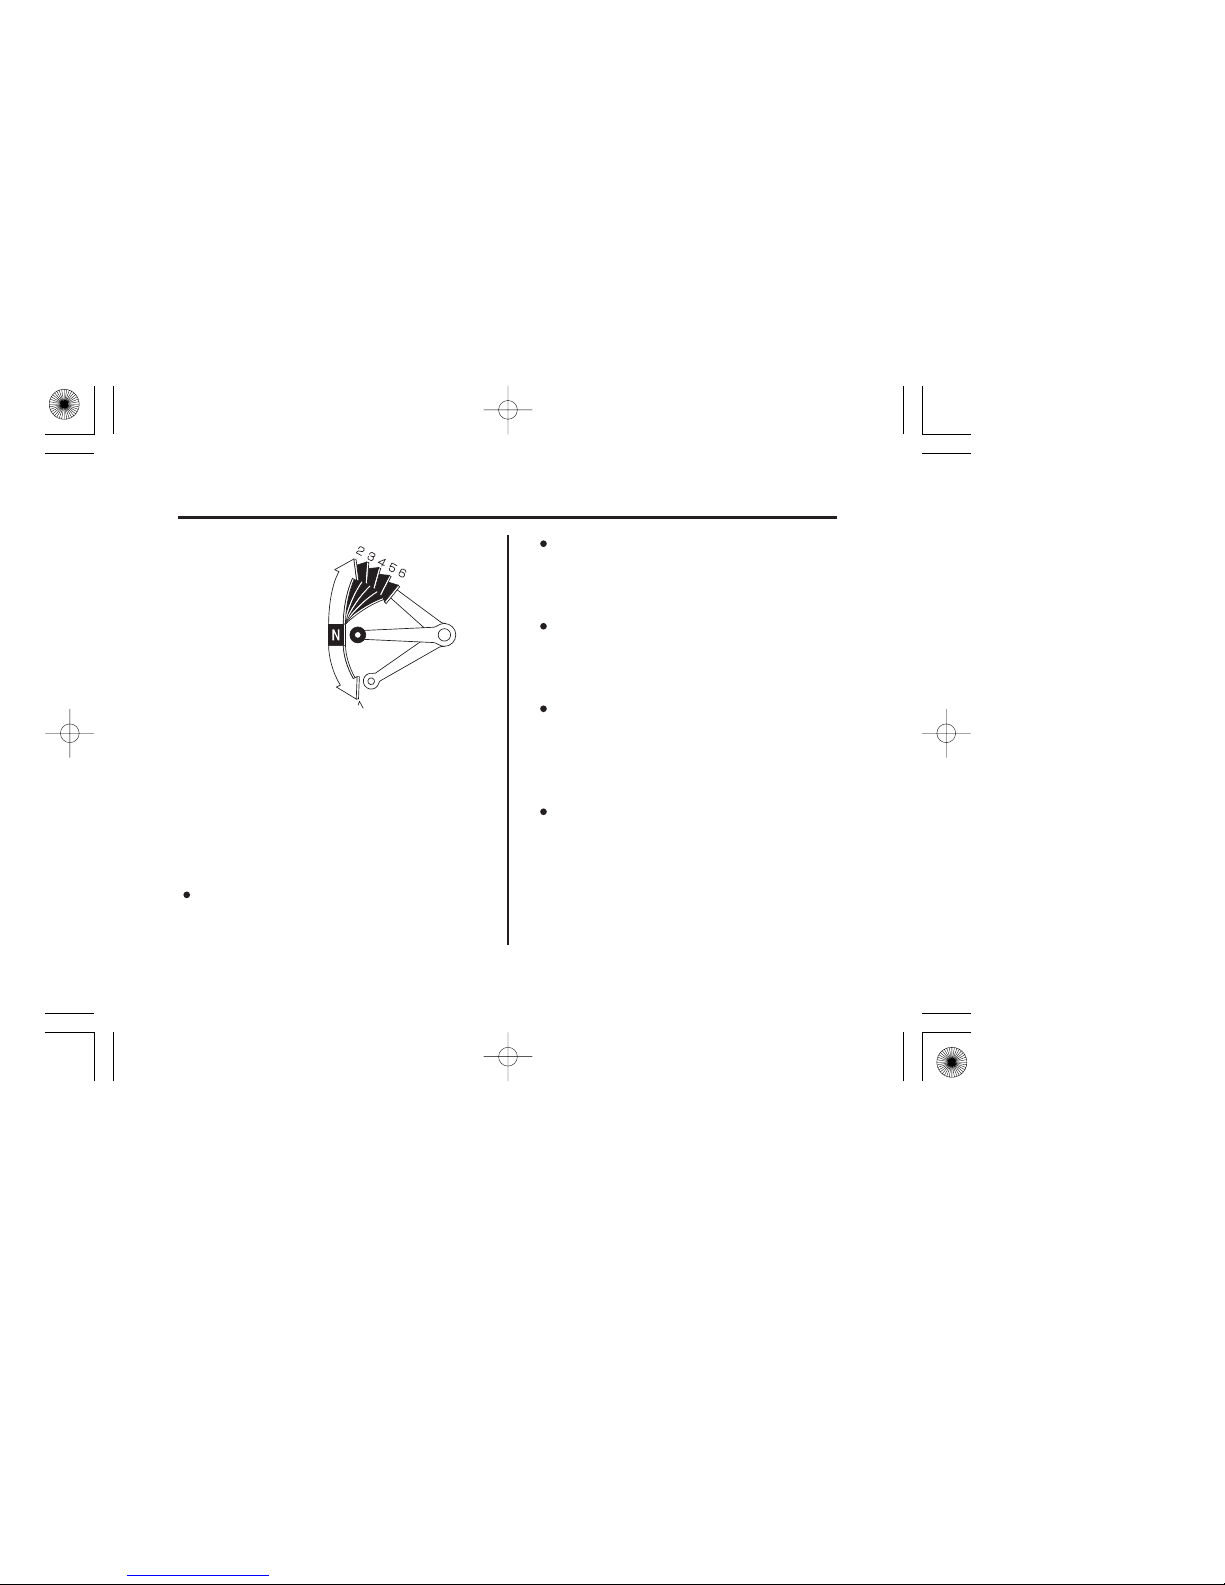
Your motorcycle has six forward gears in
a one-down, five-up shift pattern which is
coordinated with a hydraulically actuated
clutch system.
(cont’d)
05/11/15 12:17:54 31MCF660_056
Page 57
48
Shifting Gears
Basic Operation & Riding
Shif ting Up:
Shif ting Down:
Avoid downshifting to help slow your
motorcycle when engine rpm is near its
allowable maximum (near the
tachometer red zone). In this situation,
the rev limiter in the engine ignition
control module may not prevent
excessive engine speed which could
damage the engine.
To prevent transmission damage, do not
coast or tow the motorcycle for long
distances with the engine off.
Recommended Shift Points
Ride in the highest gear that lets the
engine run and accelerate smoothly. This
will give you good fuel economy and
effective emissions control. When
changing gears under normal conditions,
use these recommended shift points:
From 1st to 2nd:
From 2nd to 3rd:
From 3rd to 4th:
From 4th to 5th:
From 5th to 6th:
12 mph (20 km/h)
19 mph (30 km/h)
25 mph (40 km/h)
31 mph (50 km/h)
37 mph (60 km/h)
From 6th to 5th:
From 5th to 4th:
From 4th to 3rd:
28 mph (45 km/h)
22 mph (35 km/h)
16 mph (25 km/h)
Pull the clutch lever in when speed drops
below 9 mph (15 km/h), when engine
roughness is evident, or when engine
stalling is imminent; and shift down to 1st
gear for acceleration.
05/11/15 12:18:04 31MCF660_057
Page 58
49
Braking
Basic Operation & Riding
Your motorcycle is equipped with disc
braking systems which are hydraulically
activated. Depressing the brake pedal
applies the rear disc brake. Operating the
brake lever applies the two front disc
brakes.
As a general rule, the front braking system
provides about 70 percent of total stopping
power.
For full braking effectiveness, use both
the pedal and lever simultaneously.
Using both braking systems will stop
your motorcycle faster with greater
stability.
To slow or stop, apply the brake lever and
brake pedal smoothly, while downshifting
to match your speed.
Gradually increase braking as you feel the
brakes slowing your speed. The increase
in engine compression from downshifting
will help slow your motorcycle.
To prevent stalling the engine, pull the
clutch lever in before coming to a
complete stop. For support, put your left
foot down first, then your right foot when
you are through using the brake pedal.
Applying the brakes too hard may cause
the wheels to lock and slide, reducing
control of your motorcycle. If this happens,
release the brake controls, steer straight
ahead until you regain control, then
reapply the brakes more gently.
05/11/15 12:18:12 31MCF660_058
Page 59
50
Braking
Basic Operation & Riding
When possible, reduce your speed or
complete braking before entering a turn.
Avoid braking or closing the throttle
quickly while turning. Either action may
cause one or both wheels to slip and
reduce your control of your motorcycle.
Your ability to brake in a turn and to brake
hard in an emergency situation are
important riding skills. We suggest
attending a Motorcycle Safety Foundation
experienced rider training course
(page ) to retain these skills.
When riding in wet or rainy conditions, or
on loose surfaces, the ability to maneuver
and stop will be reduced. All of your
actions should be smooth under these
conditions. Rapid acceleration, braking or
turning may cause loss of control. For
your safety, exercise extreme caution
when braking, accelerating or turning.
Riding with your foot resting on the
brake pedal or your hand on the brake
lever may actuate the brakelight, giving
a false indication to other drivers. It
may also overheat the brakes, reducing
effectiveness.
When descending a long, steep grade,
use engine compression braking by
downshifting, with intermittent use of
both brakes. Continuous brake
application can overheat the brakes and
reduce their effectiveness.
32
05/11/15 12:18:18 31MCF660_059
Page 60
51
Parking
Basic Operation & Riding
Look for a level parking area. If you
can’t park on a paved surface, make
sure the ground surface is firm,
especially under the side stand.
If you must park on a hill, leave the
transmission in gear and position the
rear tire against the curb at a 45 degree
angle.
Use the side stand to support the
motorcycle while parked.
To lower the side stand, use your foot
to guide it down. Remember that
lowering the side stand with the
transmission in gear will stop the
engine, even if the clutch lever is
pulled in. That is a function of the
side stand ignition cut-off system.
If you have to park on a soft surface,
insert something solid under the side
stand for support.
Check that the side stand is down all
the way so that the side stand ignition
cut-off system (page ) is activated.
(cont’d)
Use the steering lock, which locks the
handlebar in place. Turn the handlebar
all the way to the left or right. Push in
on the ignition key ( ) and turn it to
LOCK. Remove the key.
(To unlock the steering lock, insert the
key and turn it to the right to the OFF
position.)
1.
2.
3.
41
1
05/11/15 12:18:28 31MCF660_060
Page 61
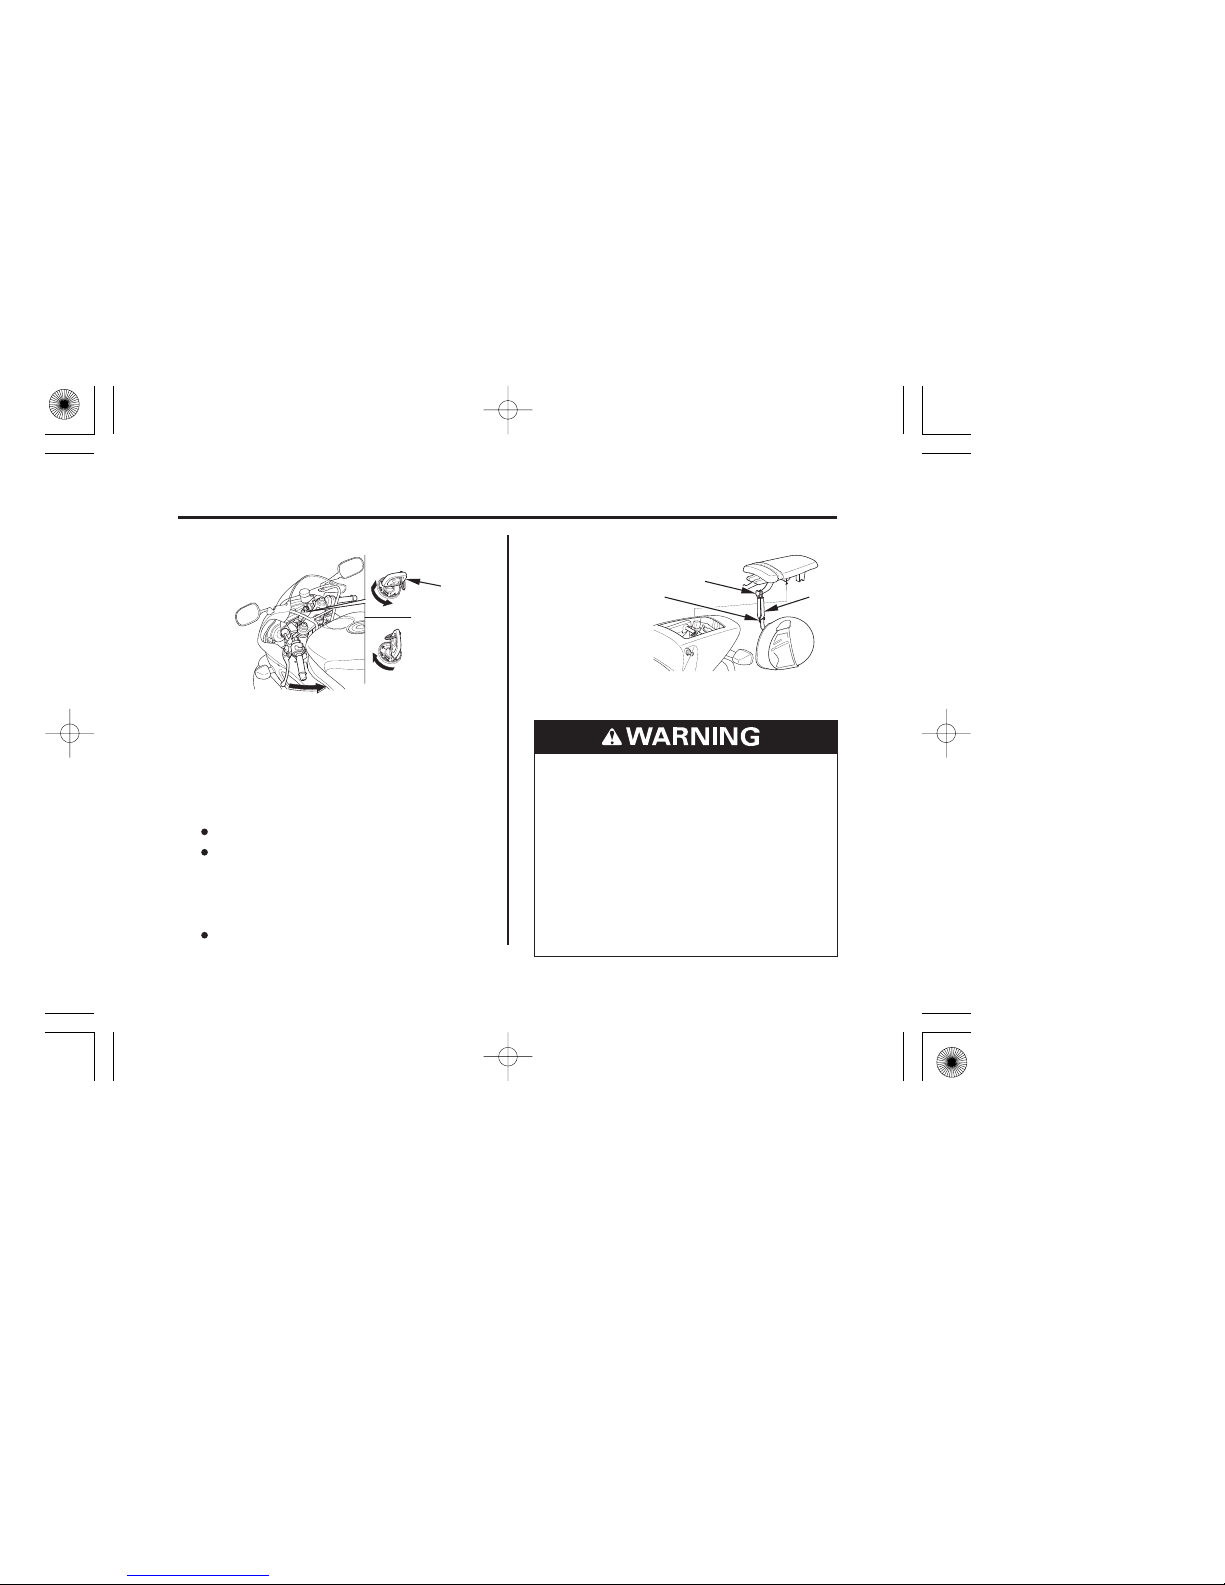
Riding with a helmet attached to
the holder can interfere with the
rear wheel or suspension and
could cause a crash in which you
can be seriously hurt or killed.
Use the helmet holder only while
parked. Do not ride with a helmet
secured by the holder.
(1) ignition key
(1)
FRONT
LEFT REAR
(3)
(2) helmet wire
(3) D-ring
(4) hook
(2)
(4)
(A)
(A) push in
(B)turntoLOCK
(C)turntoOFF
(C)
To lock
To unlock
(B)
52
Parking
Basic Operation & Riding
Use the helmet holder to secure your
helmet with your motorcycle:
Remove the rear seat (page ).
Route the helmet wire ( ) through
the helmet D-ring ( ) and hook the
loops of the helmet wire onto the rear
seat hook ( ).
Install the rear seat.
4.
79
4
3
2
05/11/15 12:18:37 31MCF660_061
Page 62
53
Theft-Prevention Tips
Parking
Basic Operation & Riding
Park your motorcycle in a locked
garage whenever possible. If a garage
isn’t available, park in a concealed area
or in a well-lit area with enough
pedestrian traffic to discourage a thief.
Always take the ignition key with you.
Always use the steering lock (page ),
even if you’re parking for just a minute
or two. A thief can easily push an
unlocked motorcycle to a waiting truck.
(cont’d)
In addition to the steering lock, use a
good quality anti-theft device made
specifically to lock a motorcycle to a
secure object.
If you decide to use an anti-theft device,
select one of good quality and be sure to
follow the manufacturer’s instructions.
51
05/11/15 12:18:44 31MCF660_062
Page 63
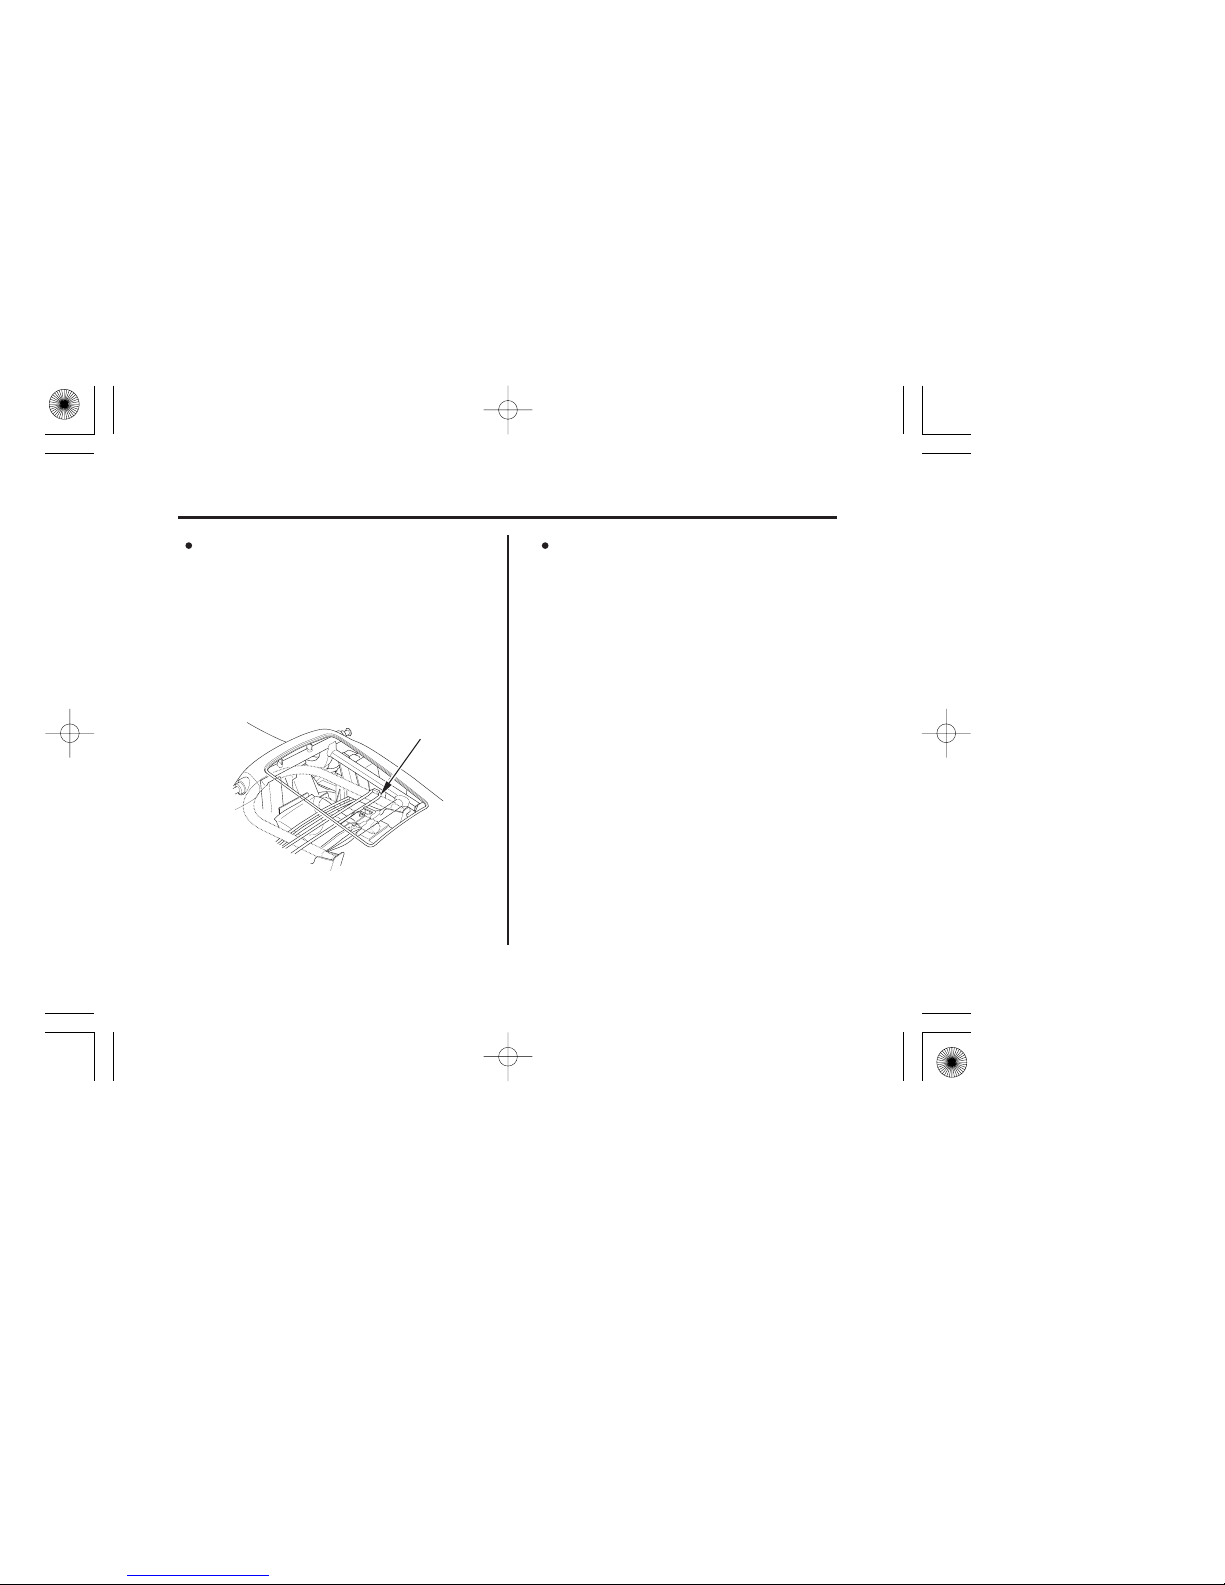
(1) rubber band
(1)
UNDER REAR SEAT
54
Parking
Basic Operation & Riding
Keep your owner’s manual, current
registration, and insurance information
with your motorcycle. This will make it
easier for the authorities to find you if
your motorcycle is stolen and recovered.
The rear fender has a storage
compartment to store a U-shaped lock
under the seat. After storing, use the
rubber band ( ) to securely fasten the
lock. Some U-shaped locks may not be
stored in the compartment due to their
size or design.
1
05/11/15 12:18:50 31MCF660_063
Page 64
55
Riding with a Passenger or Cargo
Basic Operation & Riding
Load Limits,
Loading
Guidelines,
Your motorcycle is a high-performance
sport model designed to carry you and one
passenger. Whenever you add a passenger
or cargo, you must be careful not to
exceed the total load limits for this vehicle
( page ). Make sure your
cargo is properly secured (
page ).
Also consider adjusting the suspension
(page ) for the extra load.
Be aware that carrying a passenger or
heavy cargo can affect acceleration,
braking, and handling.
Tell your passenger to hold the seat strap
or your waist, lean with you in the turns,
and keep their feet on the passenger
footpegs at all times, even when the
motorcycle is stopped at a traffic light.
Before riding with a passenger, make sure
your passenger is wearing the proper
protective apparel (page ). Also check
that your passenger is not wearing any
loose apparel that might get caught in the
drive chain.37
37
30
116
05/11/15 12:18:56 31MCF660_064
Page 65

56
Basic Operation & Riding
05/11/15 12:18:59 31MCF660_065
Page 66
57
Servicing Your Honda
Servicing Your Honda
Maintenance, replacement or repair of
the emission control devices and
systems may be performed by any
motorcycle repair establishment or
individual using parts that are
‘‘certified’’ to EPA standards.
Bef ore You Service Your Honda
To help keep your motorcycle in good
shape, this section includes a Maintenance
Schedule for required service, a list of
periodic checks you should perform at
least once a month, and step-by-step
instructions for specific maintenance tasks.
You’ll also find important safety
precautions, information on fuels and oils,
and tips for keeping your Honda looking
great.
For information about the exhaust
emission and noise emission requirements
of the U.S. Environmental Protection
Agency (EPA) and the California Air
Resources Board (CARB), see page .
For information about replacing fuses, see
page .
(cont’d)
USA only
...........The Importance of Maintenance . 60
...............................Maintenance Safety . 61
............Important Safety Precautions . 62
............................Periodic Maintenance . 64
..........................Maintenance Schedule . 66
..............................Maintenance Record . 71
210
187
05/11/15 12:19:06 31MCF660_066
Page 67
58
Servicing Your Honda
Servicing Your Honda
Service Preparations
Service Procedures
Electrical
Chassis
Engine
................................................Throttle . 105
......................................Clutch System . 107
................................Engine Idle Speed . 110
..........................................Spark Plugs . 112
...........................................Suspension . 116
..................................................Brakes . 125
.....................................................Tires . 131
............................................Side Stand . 138
..........................................Drive Chain . 139
..................................................Battery . 146
.................................Appearance Care . 151
.....Maintenance Component Locations . 73
..................................................Tool Kit . 76
.......................Owner’s Manual Storage . 77
.........................................Seat Removal . 78
..............................Rear Cowl Removal . 81
........................Lower Fairing Removal . 82
..........................Inner Fairing Removal . 84
.........................................Clip Removal . 85
...........................Raising the Fuel Tank . 86
........................................................Fuel . 87
................................Engine Oil & Filter . 90
.................................................Coolant . 100
.............................Crankcase Breather . 104
Fluids & Filters
05/11/15 12:19:16 31MCF660_067
Page 68
*
**
*
**
59
Servicing Your Honda
Servicing Your Honda
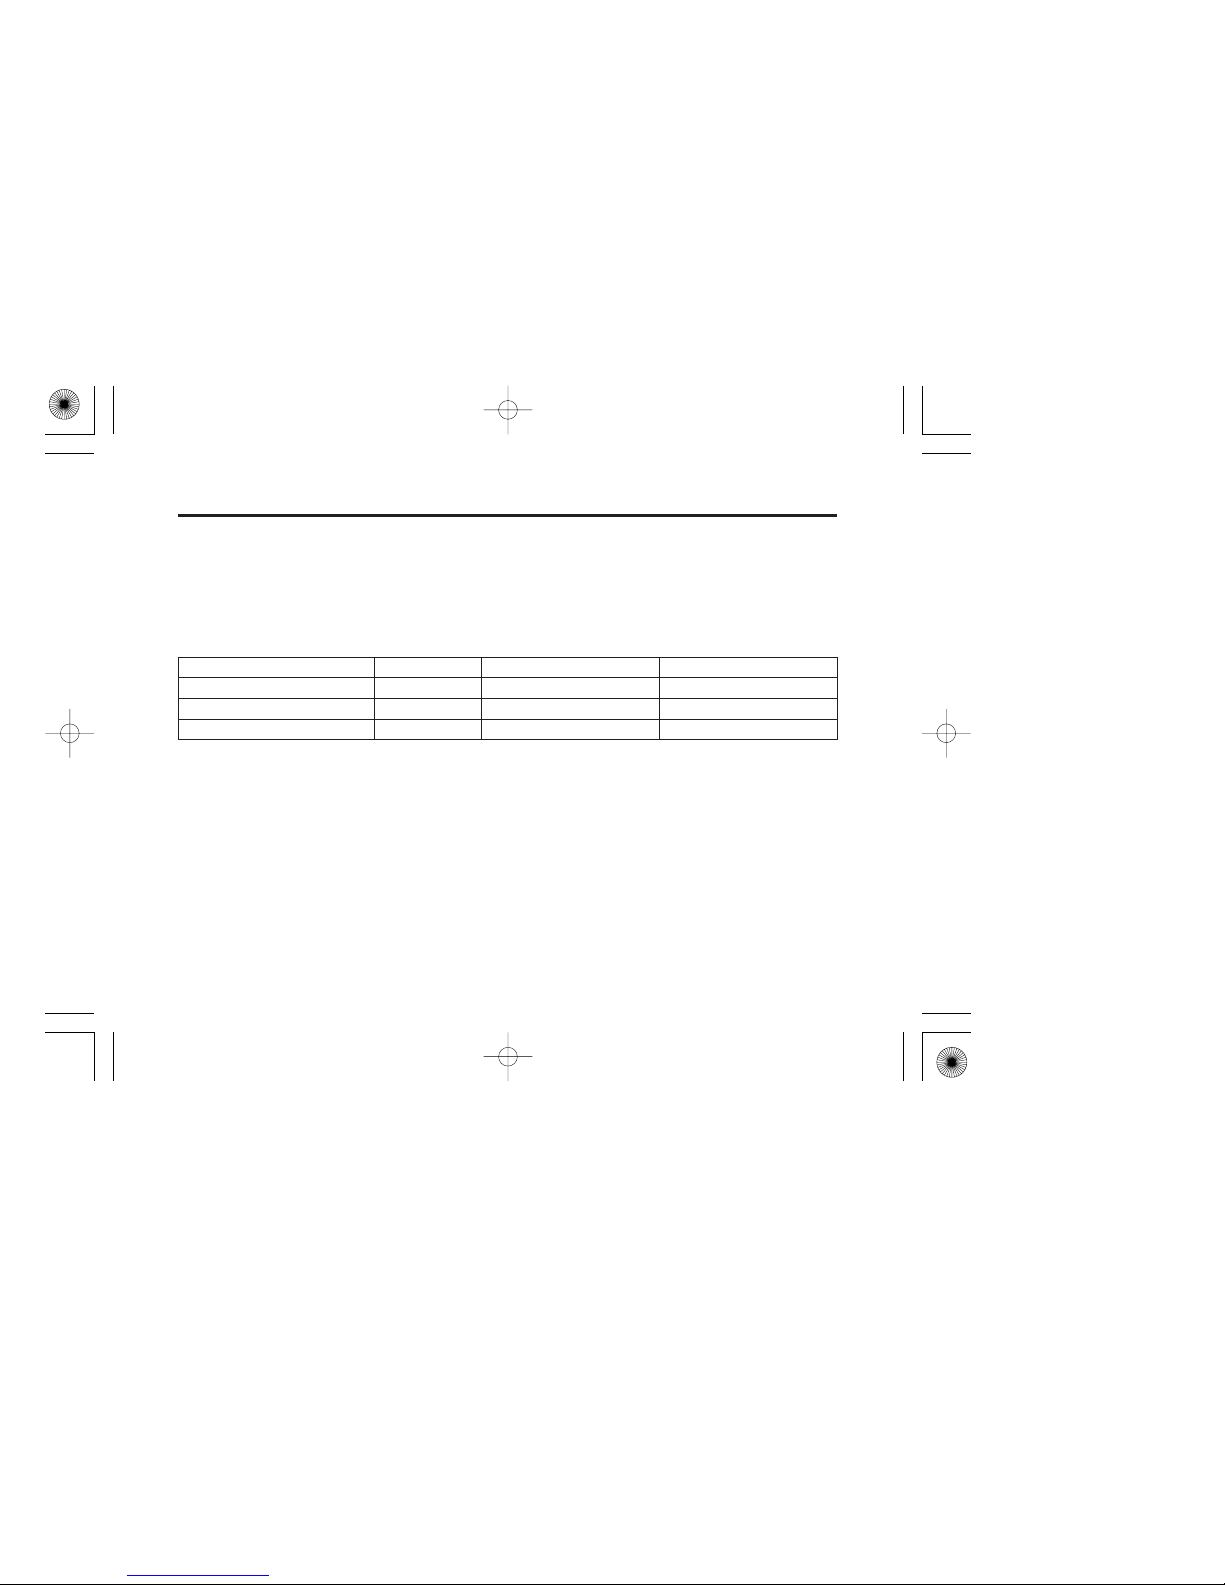
The following table summarizes the three types of inspections and servicing
recommendations for your motorcycle. Both the pre-ride inspection and the scheduled
maintenance at the recommended intervals are necessary to assure safe and dependable
performance. The periodic checks provide additional confidence in your motorcycle’s
performance.
more often if you ride frequently or long distances; or anytime you clean your motorcycle
unless you have the proper tools and service data and are mechanically qualified
Type of Inspection/Service
Maintenance Schedule
Periodic Maintenance
Pre-ride Inspection
Refer to page:
interval on schedule
monthly
before every ride
your Honda dealer
you
you
Who PerformsWhen Perf ormed
33
64
66
05/11/15 12:19:29 31MCF660_068
Page 69
Improperly maintaining this
motorcycle or failing to correct a
problem before you ride can
causeacrashinwhichyoucanbe
seriously hurt or killed.
Always follow the inspection and
maintenance recommendations
and schedules in this owner’s
manual.
60
The Importance of Maintenance
Servicing Your Honda
Keeping your motorcycle well-maintained
is absolutely essential to your safety. It’s
also a good way to protect your
investment, get maximum performance,
avoid breakdowns, and have more fun. A
properly maintained motorcycle will also
help to reduce air pollution.
Remember, proper maintenance is the
owner’s responsibility. Be sure to inspect
your motorcycle before each ride, perform
the periodic checks, and follow the
Maintenance Schedule in this section.
If your motorcycle overturns or is
involved in a crash, be sure your Honda
dealer inspects all major parts, even if you
areabletomakesomerepairs.
05/11/15 12:19:35 31MCF660_069
Page 70
Failure to properly follow
maintenance instructions and
precautions can cause you to be
seriously hurt or killed.
Always follow the procedures and
precautions in this owner’s
manual.
61
Maintenance Safety
Servicing Your Honda
This section includes instructions on how
to perform some important maintenance
tasks. If you have basic mechanical skills,
you can perform many of these tasks with
the tools provided with your motorcycle.
Other tasks that are more difficult and
require special tools are best performed by
professionals. Wheel removal should
normally be handled only by a Honda
technician or other qualified mechanic.
Instructions are included in this manual
only to assist in emergency service.
Some of the most important safety
precautions follow. However, we cannot
warn you of every conceivable hazard that
can arise in performing maintenance. Only
you can decide whether or not you should
perform a given task.
05/11/15 12:19:41 31MCF660_070
Page 71
62
Important Safety Precautions
Maintenance Safety
Servicing Your Honda
Carbon monoxide poisoning from
engine exhaust.
Burns from hot motorcycle parts.
Injury from moving parts.
Read the instructions before you begin,
and make sure you have the tools and
skills required.
To help prevent the motorcycle from
falling over, park it on a firm, level
surface, using the side stand or a
maintenance stand to provide support.
Make sure the engine is off before you
begin any maintenance or repairs. This
will help eliminate several potential
hazards:
Be sure there is
adequate ventilation whenever you
operate the engine.
Let
the engine and exhaust system cool
before touching.
Do not run
the engine unless instructed to do so.
To reduce the possibility of a fire or
explosion, be careful when working
around gasoline. Use only
non-flammable solvent, not gasoline, to
clean parts. Keep cigarettes, sparks, and
flames away from all fuel-related parts.
05/11/15 12:19:47 31MCF660_071
Page 72
63
Maintenance Safety
Servicing Your Honda
Remember that your Honda dealer knows
your motorcycle best and is fully equipped
to maintain and repair it. To ensure the
best quality and reliability, use only new
genuine Honda parts or their equivalents
for repair and replacement. If you have the
tools and skills required for additional
maintenance jobs, you can purchase an
official Honda Service Manual (page
).216
05/11/15 12:19:52 31MCF660_072
Page 73
64
Periodic Maintenance
Servicing Your Honda
In addition to the regularly scheduled
maintenance (page ) and daily pre-ride
inspection (page ), consider performing
the periodic checks on the following page
at least once a month, even if you haven’t
ridden your motorcycle, or as often as
once a week if you ride frequently or for
long distances. It’s a good idea to perform
this maintenance any time you clean your
motorcycle.
Check the odometer reading and perform
any scheduled maintenance checks that are
needed (page ). Remember, more
frequent checks may be needed for riding
in severe conditions.
66
33
66
05/11/15 12:19:57 31MCF660_073
Page 74
65
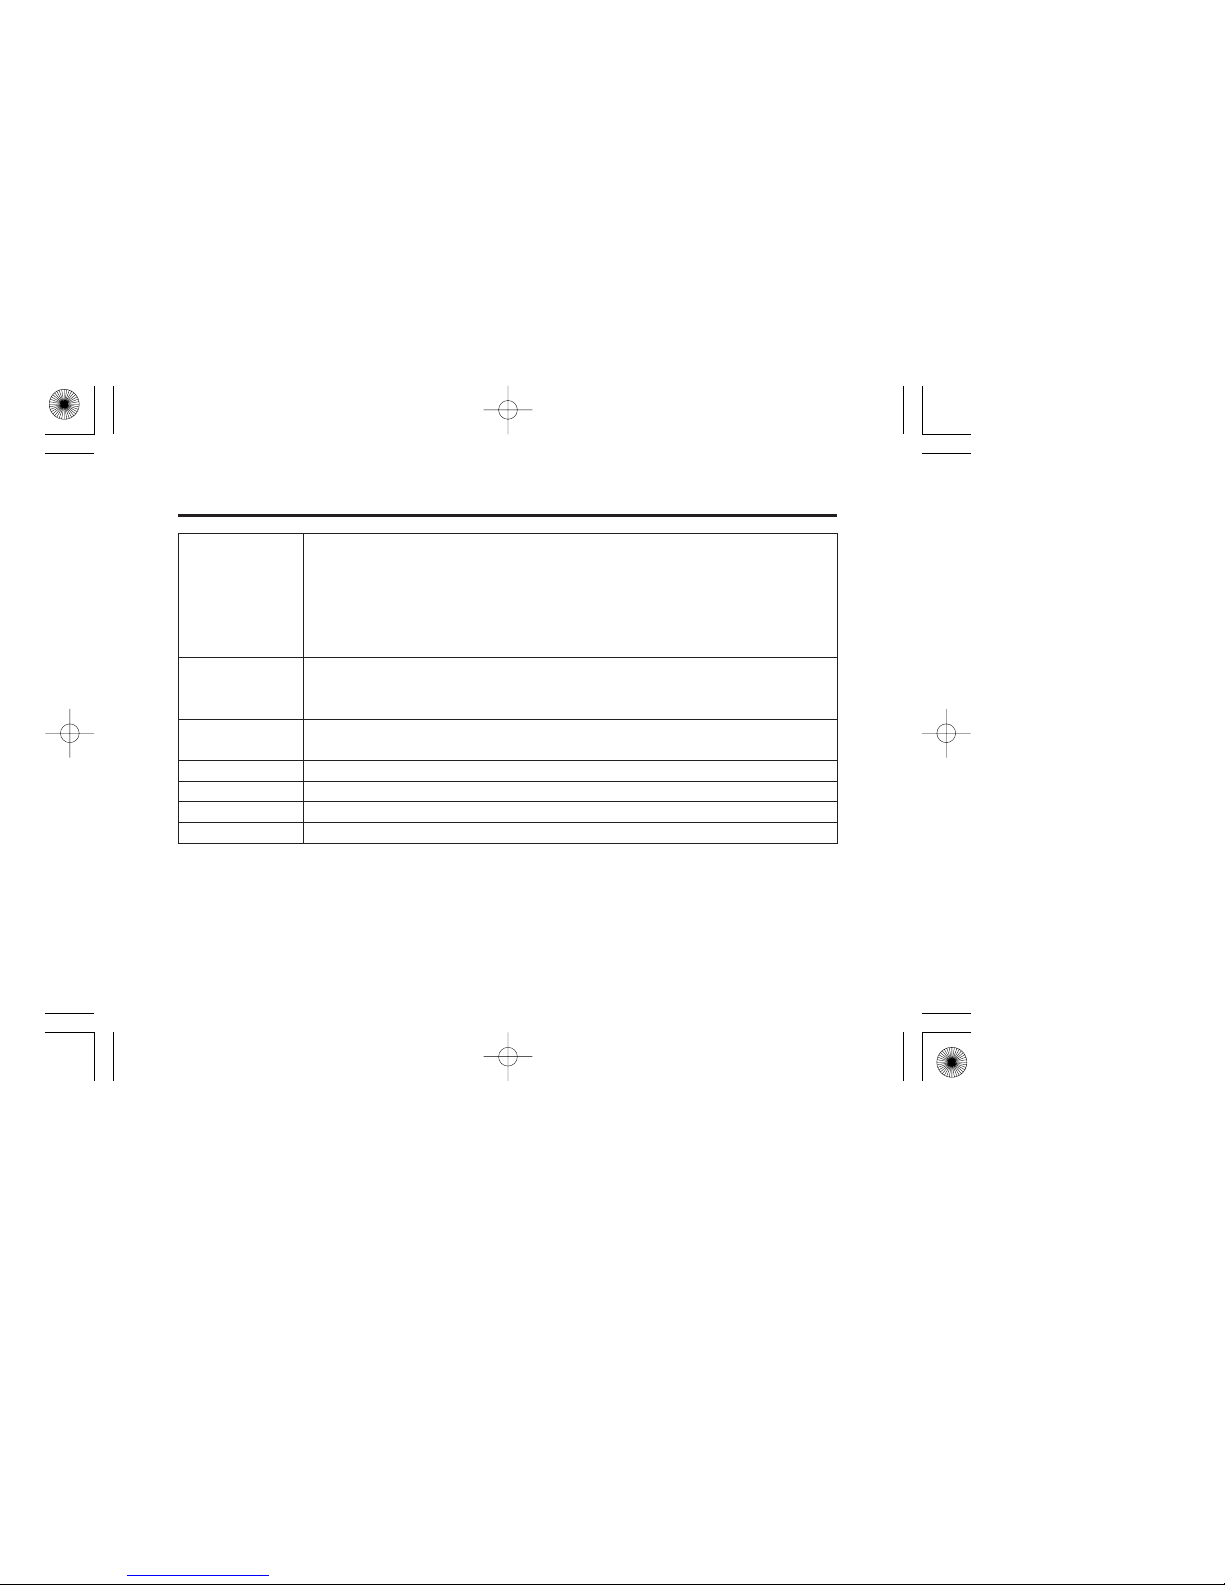
Periodic Maintenance
Servicing Your Honda
Fluids
Lights
Freeplay
Check the levels of the engine oil (page ), coolant (page ),
clutch fluid (page ) and brake fluid (page ). Add the correct
fluid as necessary, and investigate the cause of any low fluid level.
Check the freeplay of the throttle grip (page ).
Drive Chain
Fuses
Nuts & Bolts
Check condition, adjust slack, and lubricate as needed (page ).
Make sure you have a full supply of spare fuses.
Check the major fasteners and tighten as needed.
Check the air pressure with a gauge and add air if needed (page ).
Examine the tread for wear (page ).
Look closely for nails, embedded objects, cuts, and other types of
damage (page ). Roll your motorcycle so you can inspect the
entire surface.
Check the condition of the wheels.
Make sure the headlight, brakelight, taillight, and turn signals are
working properly.
Tires &
Wheels
131
133
133
94 101
108 127
105
140
05/11/15 12:20:09 31MCF660_074
Page 75
66
Servicing Your Honda
Maintenance Schedule
The required Maintenance Schedule that
follows specifies how often you should
have your motorcycle serviced, and what
things need attention. It is essential to have
your motorcycle serviced as scheduled to
maintain safe, dependable performance
and proper emission control.
Some items in the Maintenance Schedule
can be performed with basic mechanical
skills and hand tools. Procedures for these
items are provided in this manual. Other
items involve more extensive procedures
and may require special training, tools,
and equipment. We recommend that you
have your Honda dealer perform these
tasks unless you have advanced
mechanical skills and the required tools
and equipment. Procedures for such items
in this schedule are provided in an official
Honda Service Manual available for
purchase (page ).
The service intervals in this Maintenance
Schedule are based on average riding
conditions. Some items will need more
frequent service if you ride in unusually
wet or dusty areas or at full throttle.
Consult your Honda dealer for
recommendations applicable to your
individual needs and use.
216
05/11/15 12:20:16 31MCF660_075
Page 76
***
*
**
67
Maintenance Schedule
Servicing Your Honda
Should be serviced by your Honda
dealer, unless you have the proper tools
and service data and are mechanically
qualified. Refer to the official Honda
Service Manual (page ).
In the interest of safety, we recommend
these items be serviced only by your
Honda dealer.
If you do not feel capable of performing a
given task or need assistance, remember
that your Honda dealer knows your
motorcycle best and is fully equipped to
maintain and repair it. If you decide to do
your own maintenance, use only genuine
Honda parts or their equivalents for repair
or replacement to ensure the best quality
and reliability.
Perform the pre-ride inspection (page )
and owner maintenance (page ) at each
scheduled maintenance period.
Each item on the maintenance schedule
requires some mechanical knowledge.
Certain items (particularly those marked
and ) may require more technical
information and tools. Consult your
Honda dealer.
33
68
216
05/11/15 12:20:23 31MCF660_076
Page 77
68
Servicing Your Honda
Maintenance Schedule
Summary of Maintenance Schedule Notes
& Procedures:
At higher odometer readings, repeat at
the frequency interval established here.
Service more frequently if the
motorcycle is ridden in unusually wet or
dusty areas.
Maintenance Procedures:
I: inspect and clean, adjust, lubricate,
or replace, if necessary
C: clean
A: adjust
L: lubricate
R: replace
California type only.
Replace every 2 years, or at indicated
odometer interval, whichever comes
first. Replacement requires mechanical
skill. Refer to the off icial Honda
service manual.
Service more frequently if the
motorcycle is ridden often at full
throttle or in the rain.
NOTES:
1.
2.
3.
4.
5.
05/11/15 12:20:32 31MCF660_077
Page 78
×
×
−
−
−
−
−
−
−
−
*
*
*
*
*
*
*
*
*
*
1,000 mi
1,000 km
FUEL LINE
THROTTLE OPERATION
CHOKE OPERATION
AIR CLEANER
CRANKCASE BREATHER
SPARK PLUGS
VALVE CLEARANCE
ENGINE OIL
ENGINE OIL FILTER
ENGINE IDLE SPEED
RADIATOR COOLANT
COOLING SYSTEM
SECONDARY AIR SUPPLY
SYSTEM
EVAPORATIVE EMISSION
CONTROL SYSTEM
NOTE
2
3
4
5
4
6.4
C
I
12
19.2
I
C
I
I
20
32.0
C
I
Refer to
page
104
112
90
95
110
100
0.6
1.0
R
I
8
12.8
I
I
I
C
R
I
I
I
I
16
25.6
I
I
I
C
I
R
I
I
I
I
24
38.4
I
I
I
I
C
R
I
R
I
I
I
ODOMETER READING (Note 1)
ITEM
FREQUENCY
600 mi (1,000 km) or 1 month: RINITIAL=
REGULAR=
EMISSION RELATED ITEMS
EVERY 8,000 mi (12,800 km) or
12 months: R
EVERY 16,000 mi (25,600 km) I
EVERY 32,000 mi (51,200 km) R
69
Servicing Your Honda
Maintenance Schedule
Should be serviced by your Honda dealer, unless you have the proper tools and service data and are
mechanically qualified. Refer to the off icial Honda Service Manual (page ).216
05/11/15 12:20:44 31MCF660_078
Page 79
×
×
−
−
−
−
−
−
*
*
*
*
**
**
*
**
1,000 mi
1,000 km
0.6
1.0
I
I
I
4
6.4
I
I
I
8
12.8
I
I
I
I
I
I
I
I
I
I
I
I
12
19.2
R
I
R
16
25.6
I
I
I
I
I
I
I
I
I
I
I
I
20
32.0
I
I
I
24
38.4
R
I
I
I
I
I
R
I
I
I
I
I
NOTE
4
4
Refer to
page
139
126
129
125
107
108
138
DRIVE CHAIN
BRAKE FLUID
BRAKE PAD WEAR
BRAKE SYSTEM
BRAKELIGHT SWITCH
HEADLIGHT AIM
CLUTCH SYSTEM
CLUTCH FLUID
SIDE STAND
SUSPENSION
NUTS, BOLTS, FASTENERS
WHEELS/TIRES
STEERING HEAD
BEARINGS
ODOMETER READING (Note 1)
ITEM
FREQUENCY
NON-EMISSION RELATED ITEMS
EVERY 500 mi (800 km) I, L
70
Maintenance Schedule
Servicing Your Honda
Should be serviced by your Honda dealer, unless you have the proper tools and service data and are
mechanically qualified. Refer to the off icial Honda Service Manual (page ).
In the interest of safety, we recommend these items be serviced only by your Honda dealer.
216
05/11/15 12:20:58 31MCF660_079
Page 80
71
Maintenance Record
Servicing Your Honda
Miles (km) Odometer Date Performed By: Notes
Keeping an accurate maintenance record will help ensure that your motorcycle is properly
maintained. Retain detailed receipts to verify the maintenance was performed. If the
motorcycle is sold, these receipts should be transferred with the motorcycle to the new owner.
Make sure whoever performs the maintenance completes this record. All scheduled
maintenance, including the 600 mile (1,000 km) initial maintenance, is considered a normal
owner operating cost and will be charged for by your dealer. Use the space under Notes to
record anything you want to remind yourself about or mention to your dealer.
600 (1,000)
4,000 (6,400)
8,000 (12,800)
12,000 (19,200)
16,000 (25,600)
20,000 (32,000)
05/11/15 12:21:05 31MCF660_080
Page 81
72
Maintenance Record
Servicing Your Honda
Miles (km) Odometer Date NotesPerformed By:
24,000 (38,400)
28,000 (44,800)
32,000 (51,200)
36,000 (57,600)
40,000 (64,000)
44,000 (70,400)
48,000 (76,800)
52,000 (83,200)
56,000 (89,600)
60,000 (96,000)
64,000 (102,400)
68,000 (108,800)
05/11/15 12:21:13 31MCF660_081
Page 82
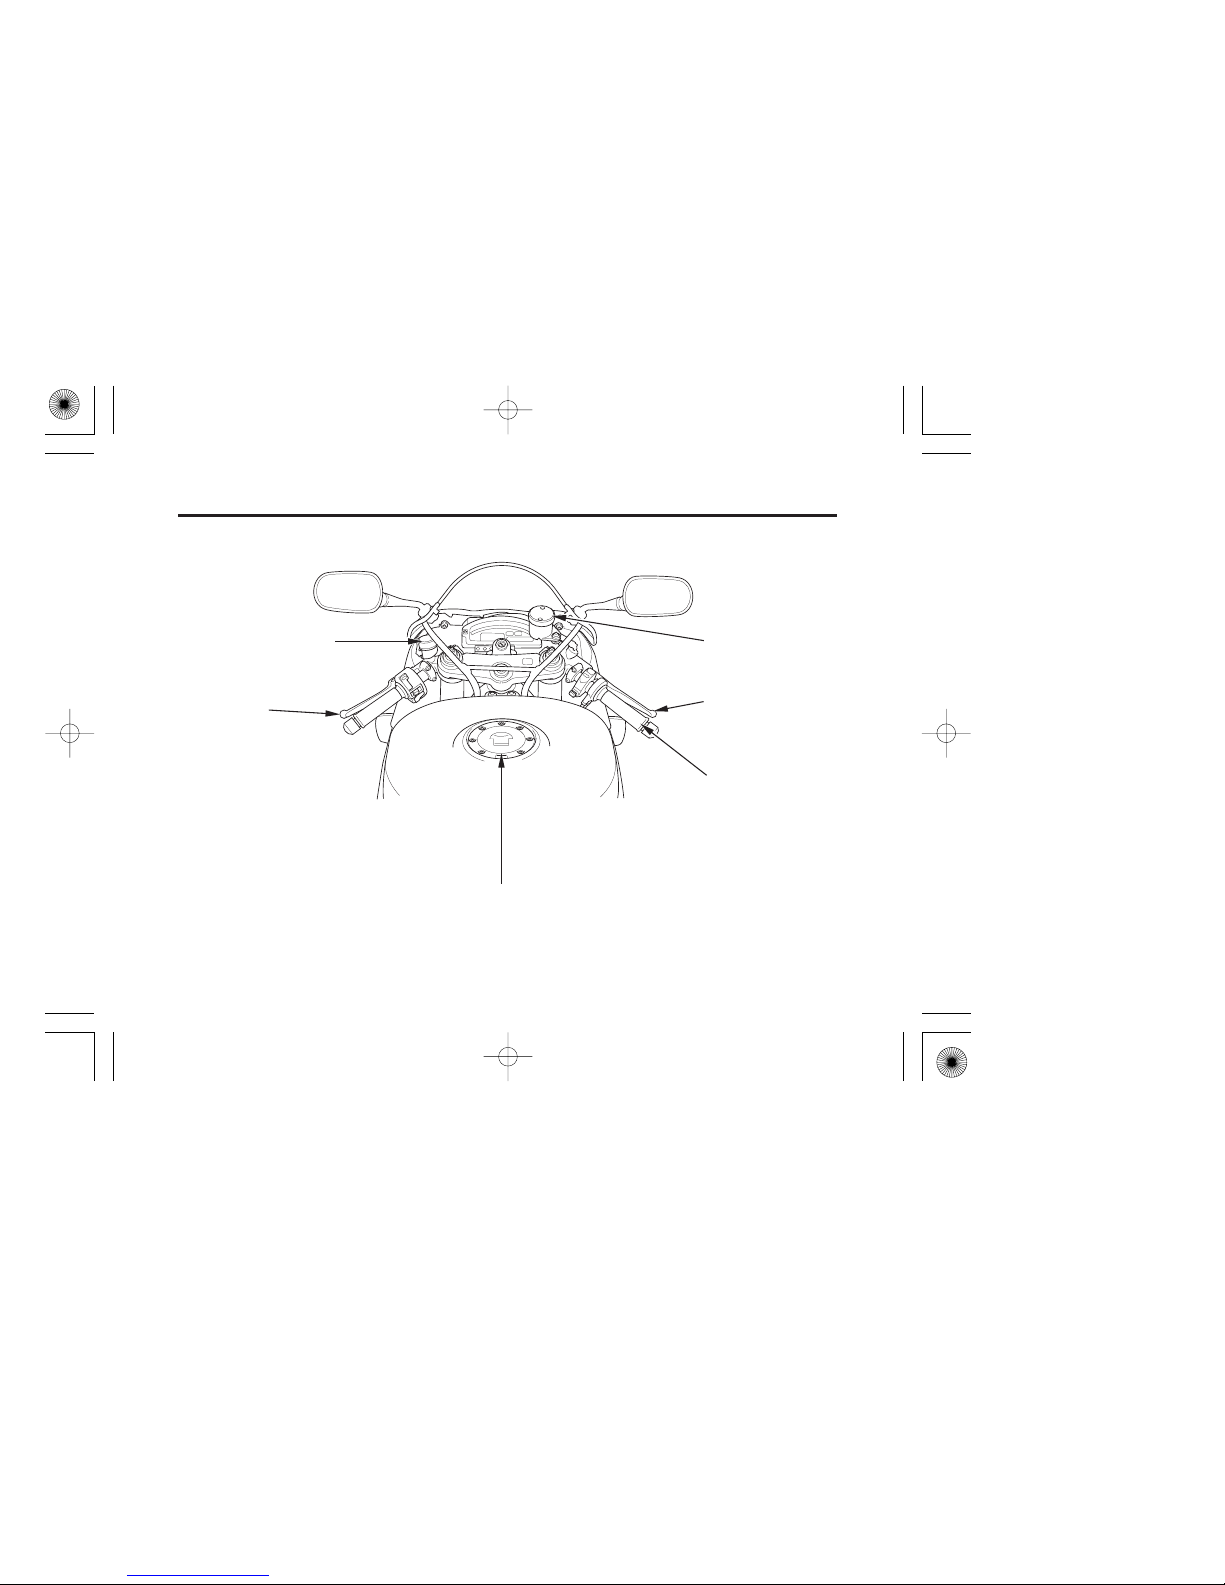
throttle grip
front brake fluid
reservoir
front brake lever
clutch fluid reservoir
clutch lever
fuel fill cap
73
Servicing Your Honda
Maintenance Component Locations
05/11/15 12:21:18 31MCF660_082
Page 83
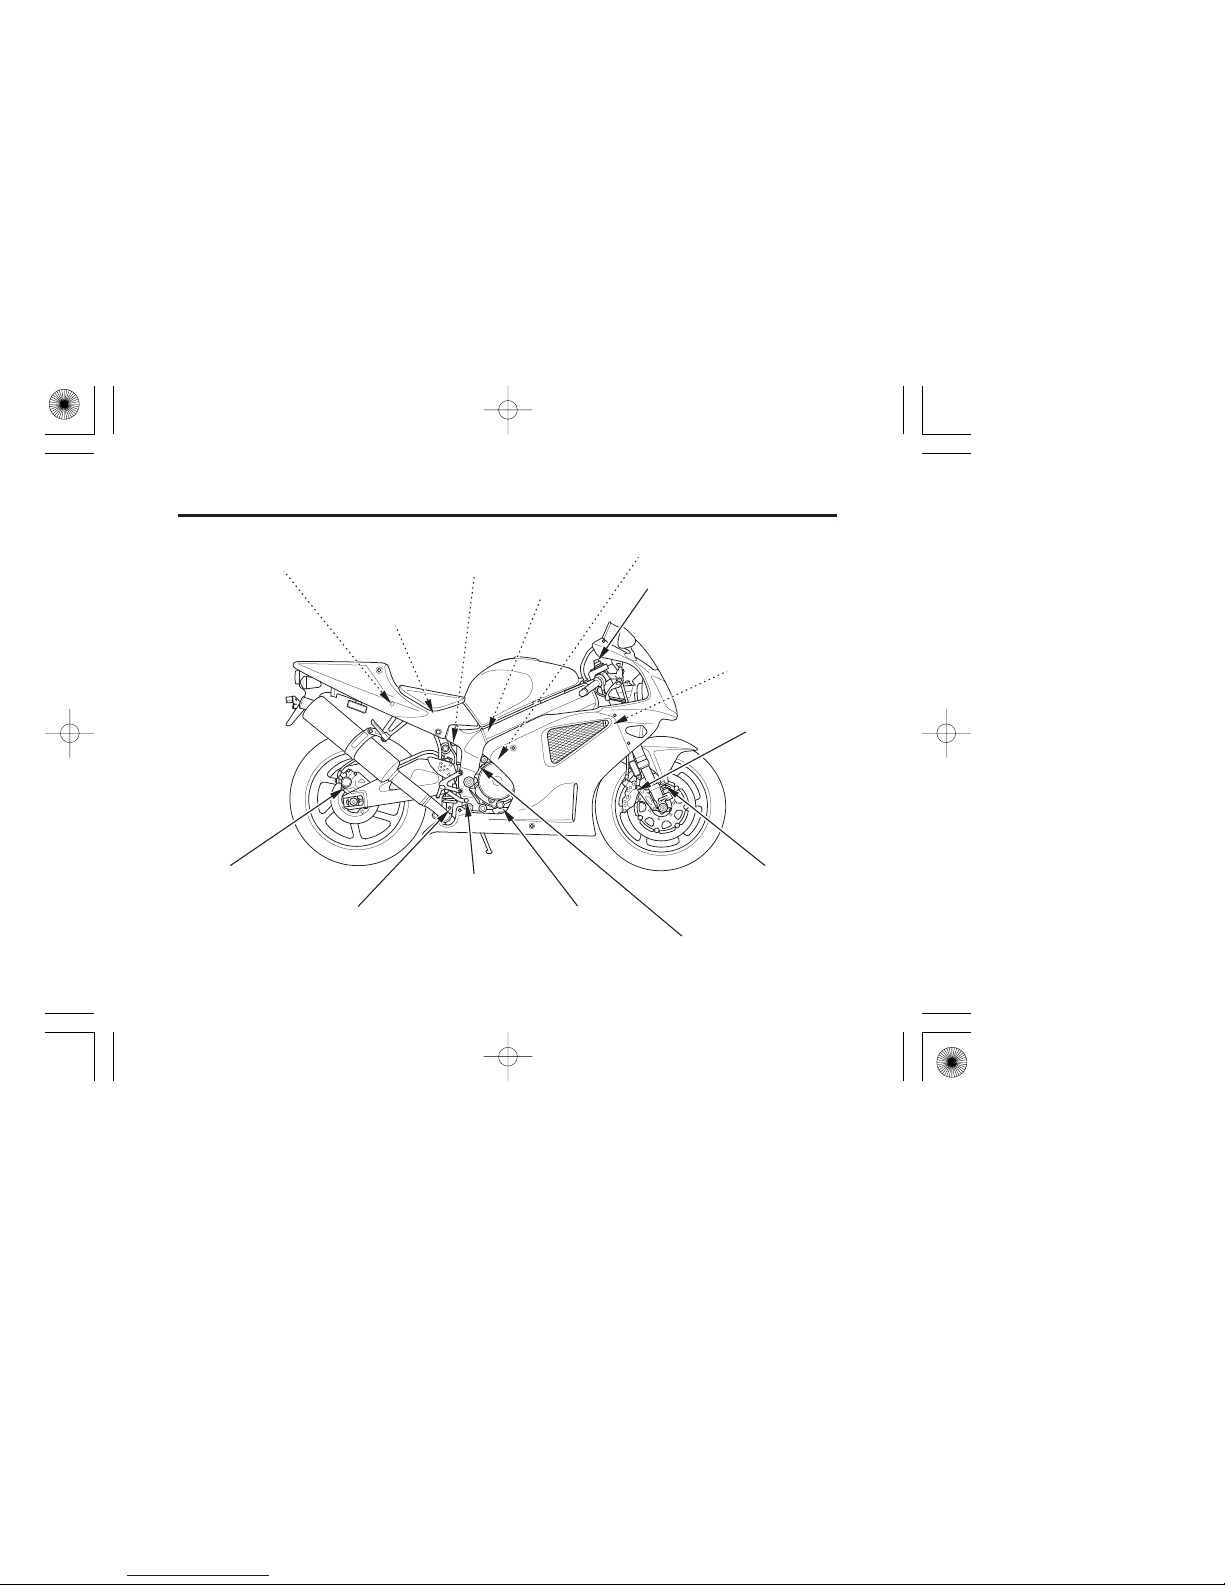
rear brake fluid
reservoir
rear brake
caliper
front brake
caliper
spark plug
spark plug
rear suspension rebound
damping adjuster
engine oil level
inspection window
rear brake pedal
battery
main fuse B
front suspension spring
pre-load adjuster
front suspension rebound
damping adjuster
engine idle speed
front suspension
compression
damping adjuster
rear suspension compression
damping adjuster
engine oil filler cap
74
Servicing Your Honda
Maintenance Component Locations
05/11/15 12:21:24 31MCF660_083
Page 84
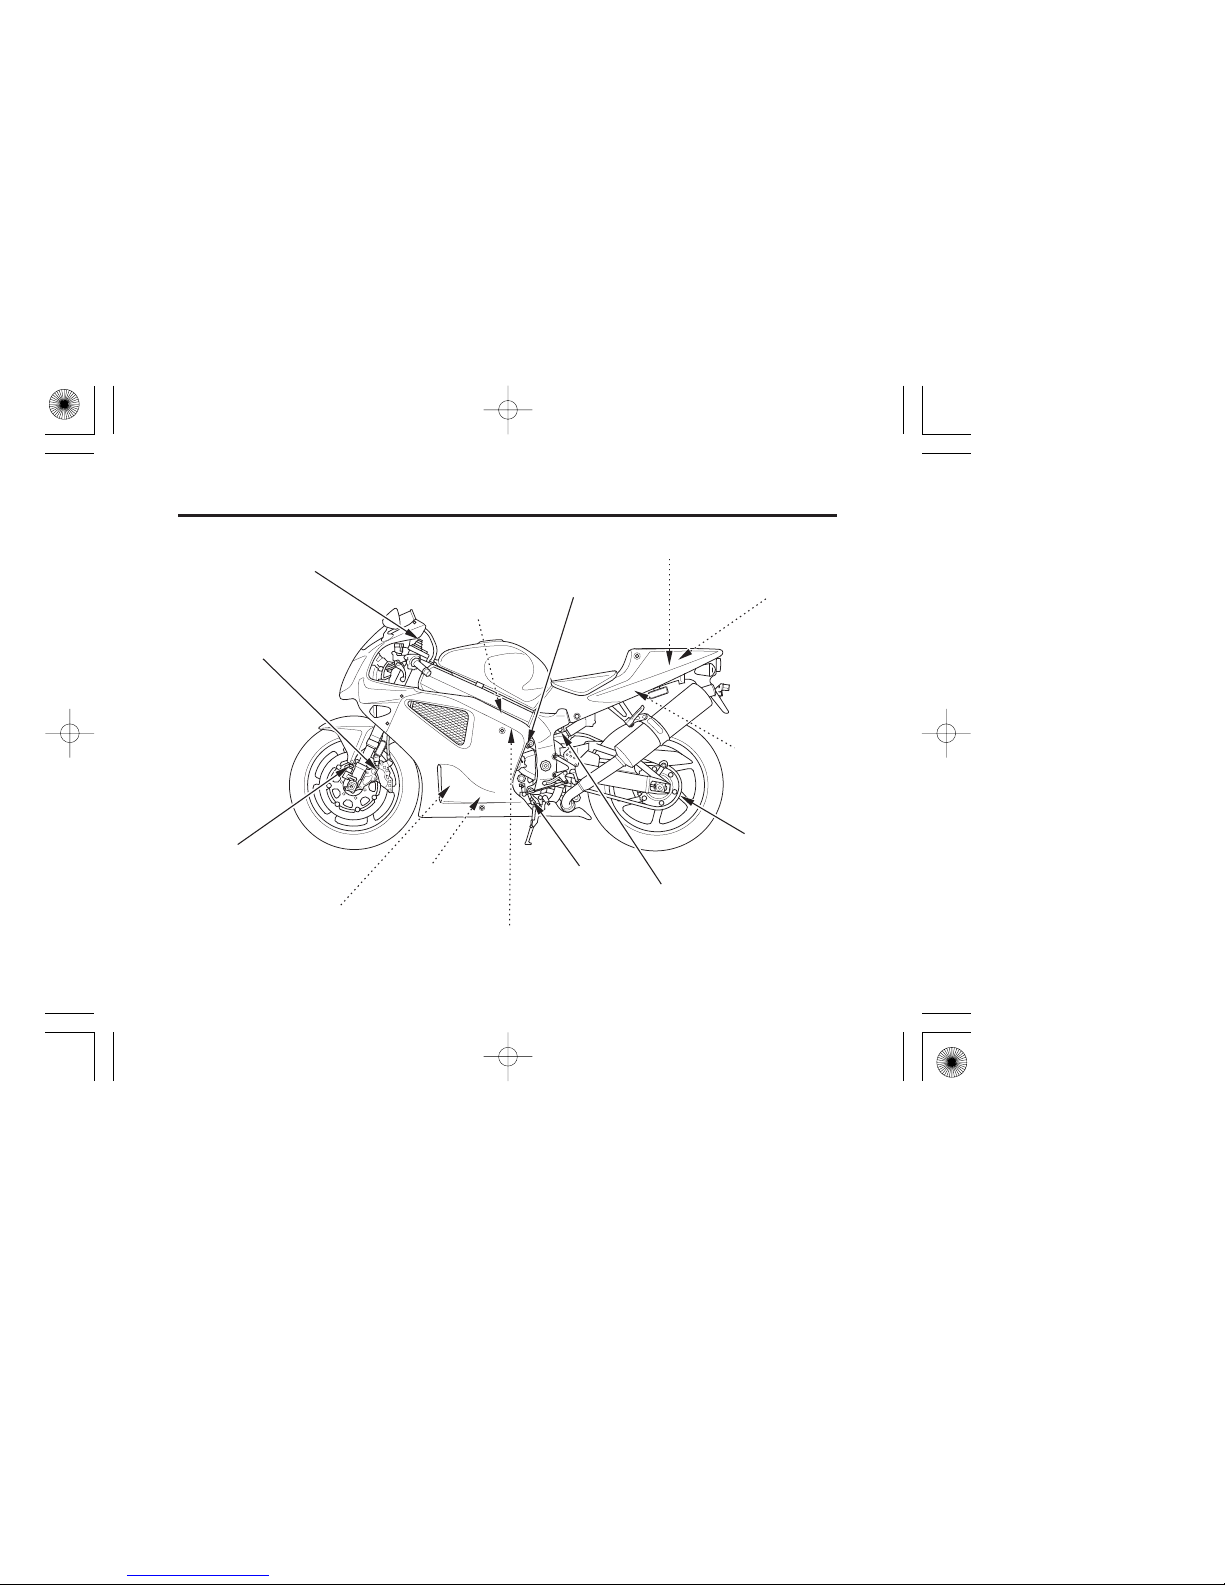
drive chain
main fuse A
tool kit
owner’s manual
fuse box
choke knob
front suspension spring pre-load adjuster
front suspension rebound damping adjuster
front brake caliper
rear suspension spring
pre-load adjuster
engine oil filter
front suspension
compression
damping adjuster
engine oil
drain bolt
coolant reserve tank
crankcase
breather tube
75
Servicing Your Honda
Maintenance Component Locations
05/11/15 12:21:30 31MCF660_084
Page 85
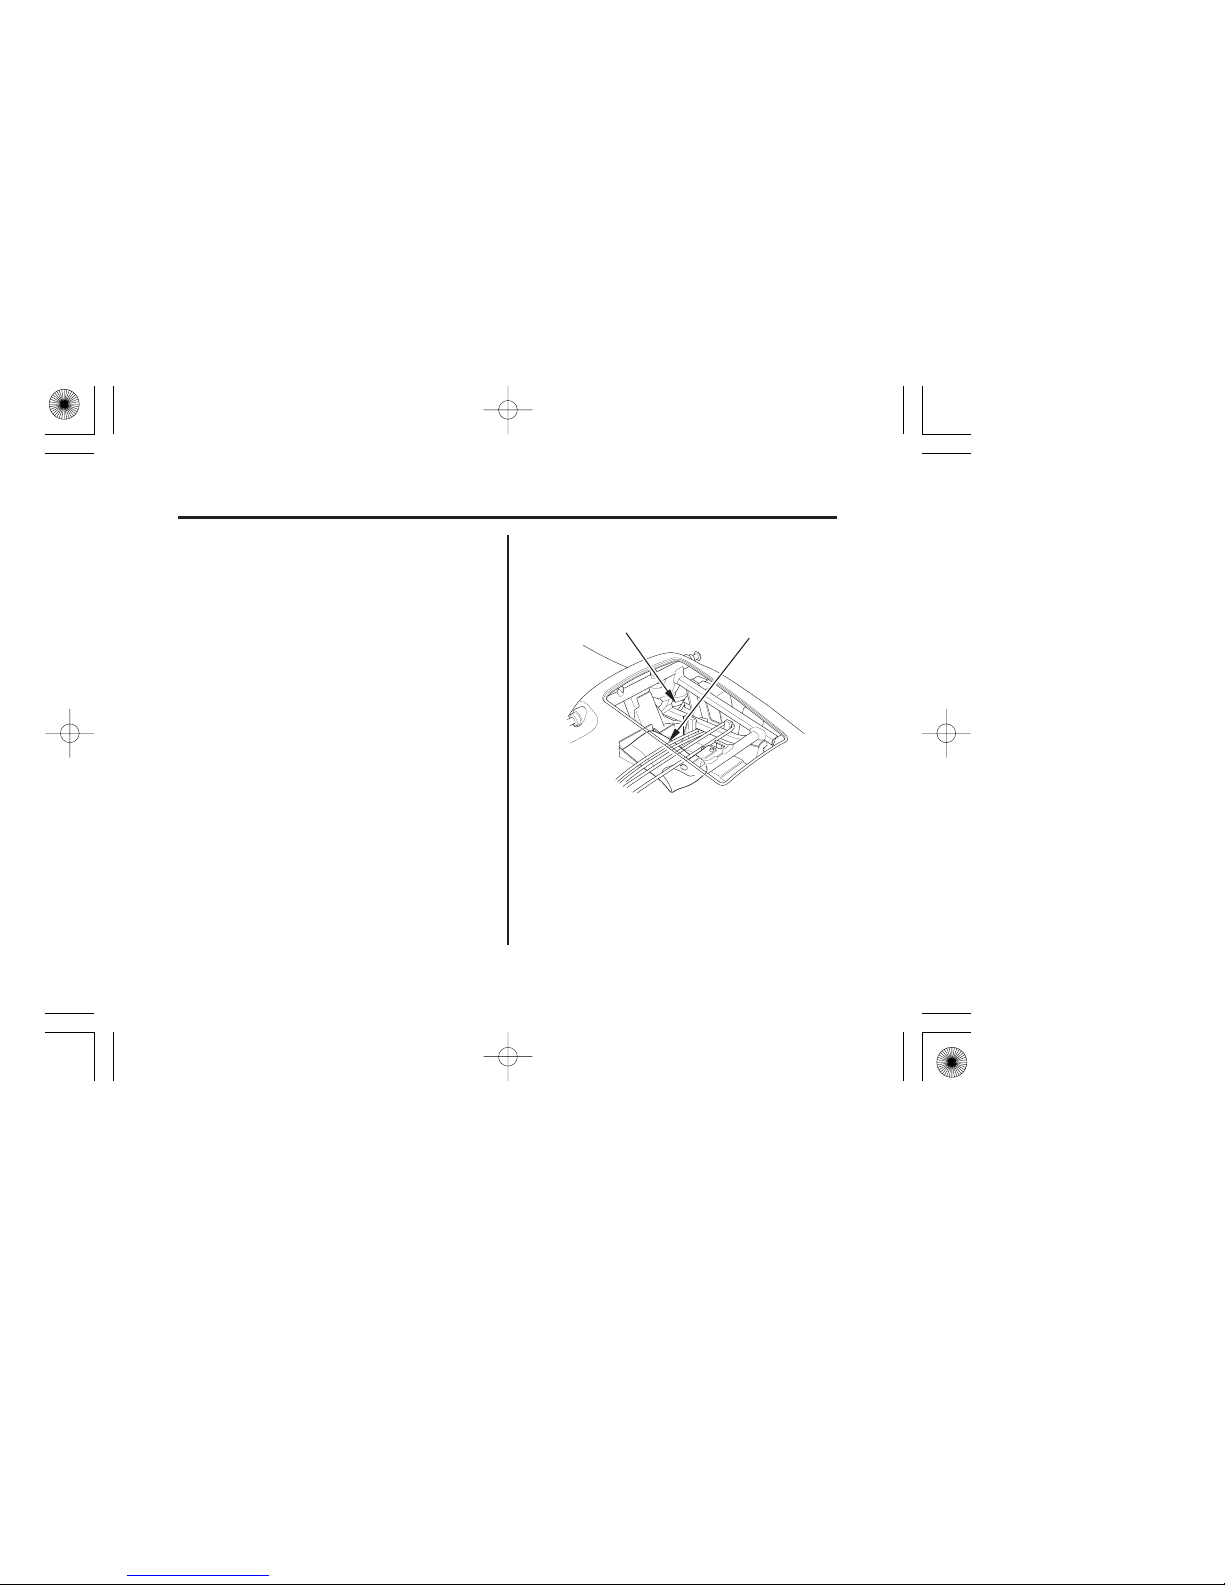
(1) tool kit
(2)
(1)
UNDER REAR SEAT
(2) storage compartment
76
Tool Kit
Servicing Your Honda
An optional, larger tool kit may be
available. Check with your Honda dealer’s
parts department.
The tool kit ( ) is stored in the storage
compartment ( ) under the rear seat (page
).179
2
05/11/15 12:21:36 31MCF660_085
Page 86
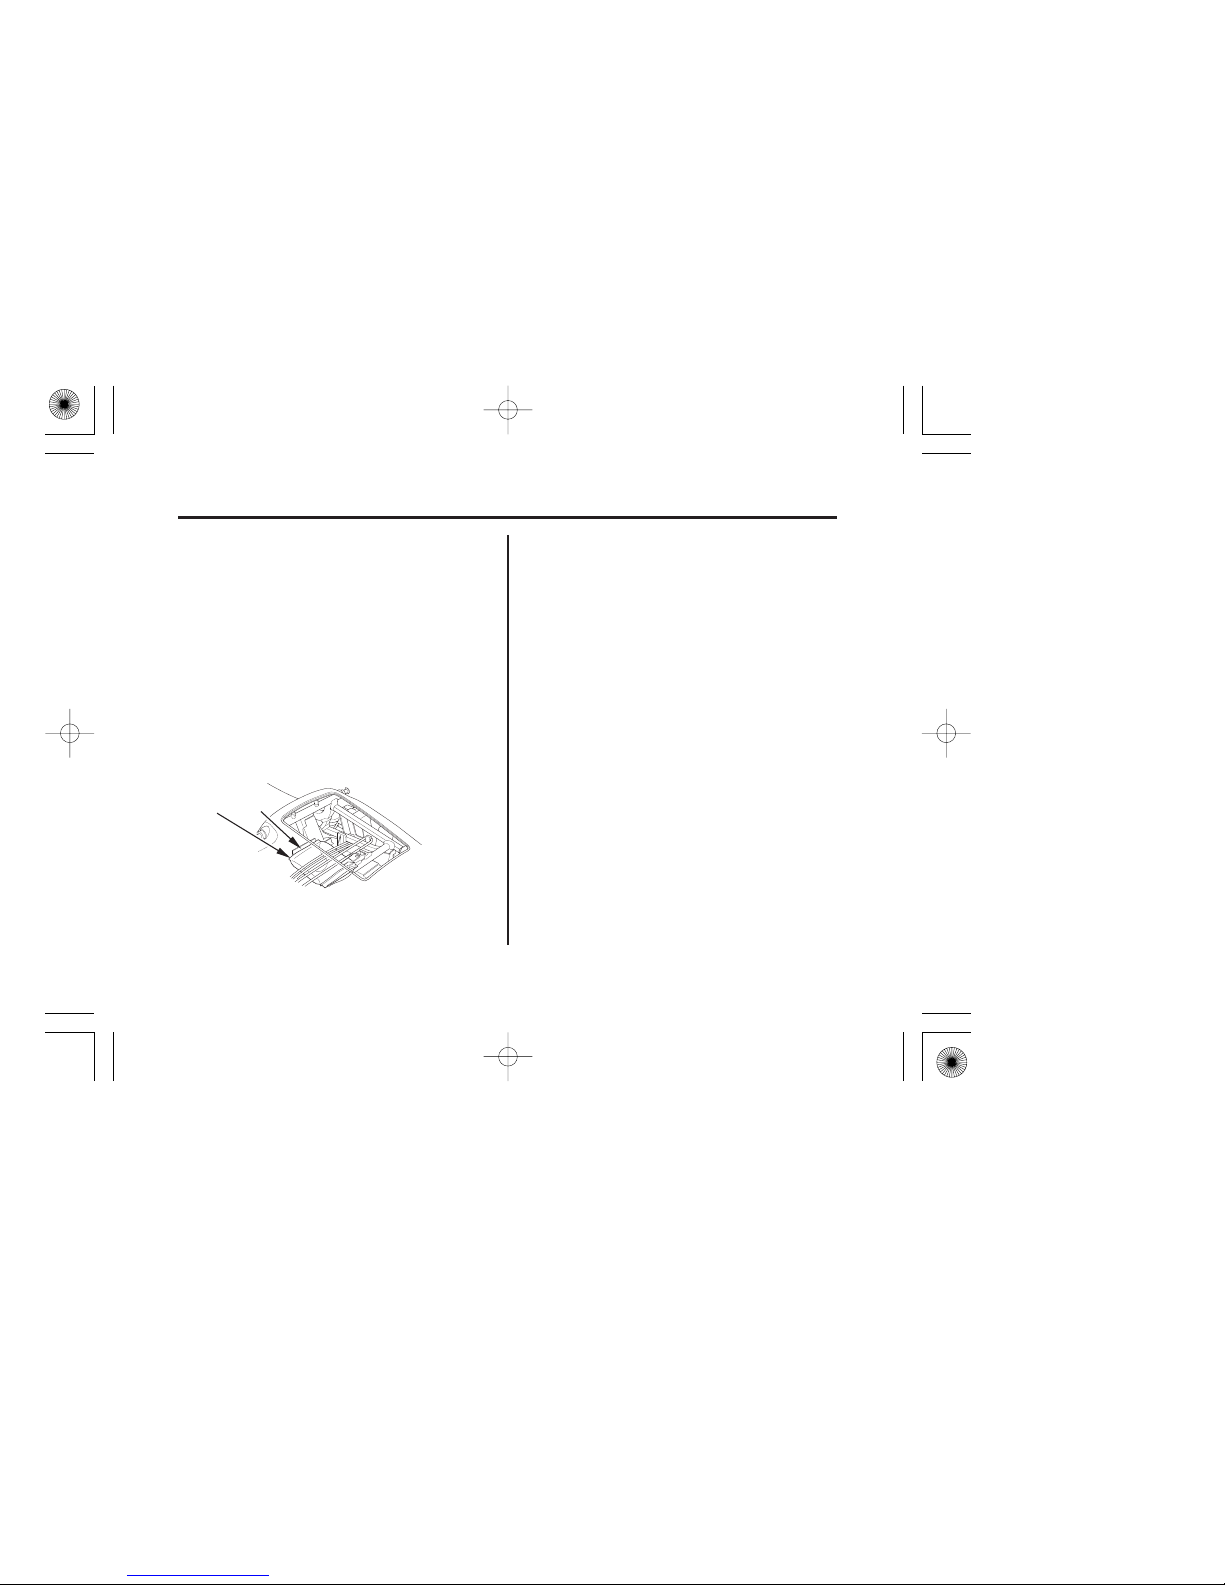
(1)
(2)
UNDER REAR SEAT
(1) plastic storage bag
(2) storage compartment
77
Servicing Your Honda
Owner’s Manual Storage
Be careful not to flood this area when
washing your motorcycle.
Your motorcycle provides storage for the
owner’s manual so you’ll have it with you
for easy reference. Store your owner’s
manual (and other documents) in the
plastic storage bag ( ) in the storage
compartment ( ) under the rear seat.
1
2
05/11/15 12:21:42 31MCF660_086
Page 87
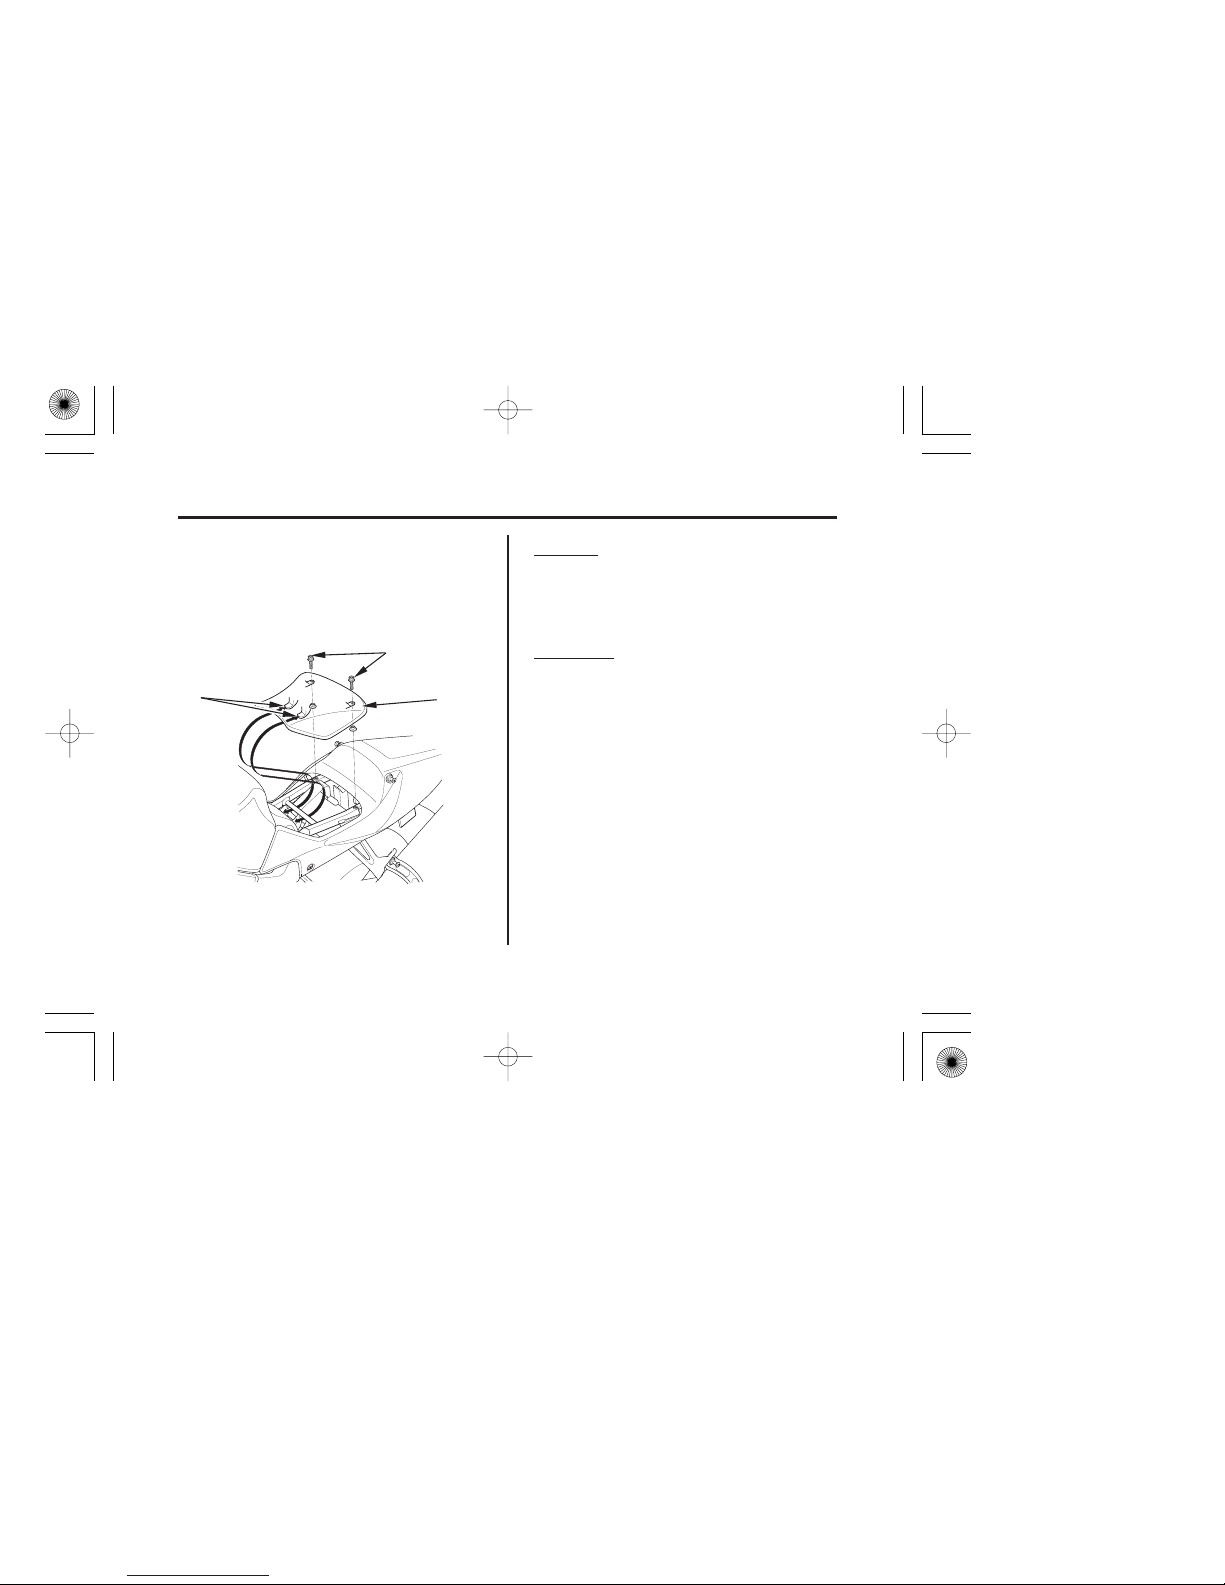
(1)
(3)
(2)
(2) mounting bolts
(1) front seat
(3) prongs
78
Seat Removal
Servicing Your Honda
Saf ety PrecautionsRefer to on page . Removal
Installation
The front seat must be removed for
battery and fuse maintenance, or to lift the
fuel tank.
Pull up the front seat ( ) end and
remove the seat mounting bolts ( ).
Pull the seat ( ) back and up.
Tighten the seat mounting bolts
securely.
Insert the prongs ( ) into the recess
under the frame.
1.
2.
2.
1.
2
62
3
1
1
05/11/15 12:21:53 31MCF660_087
Page 88
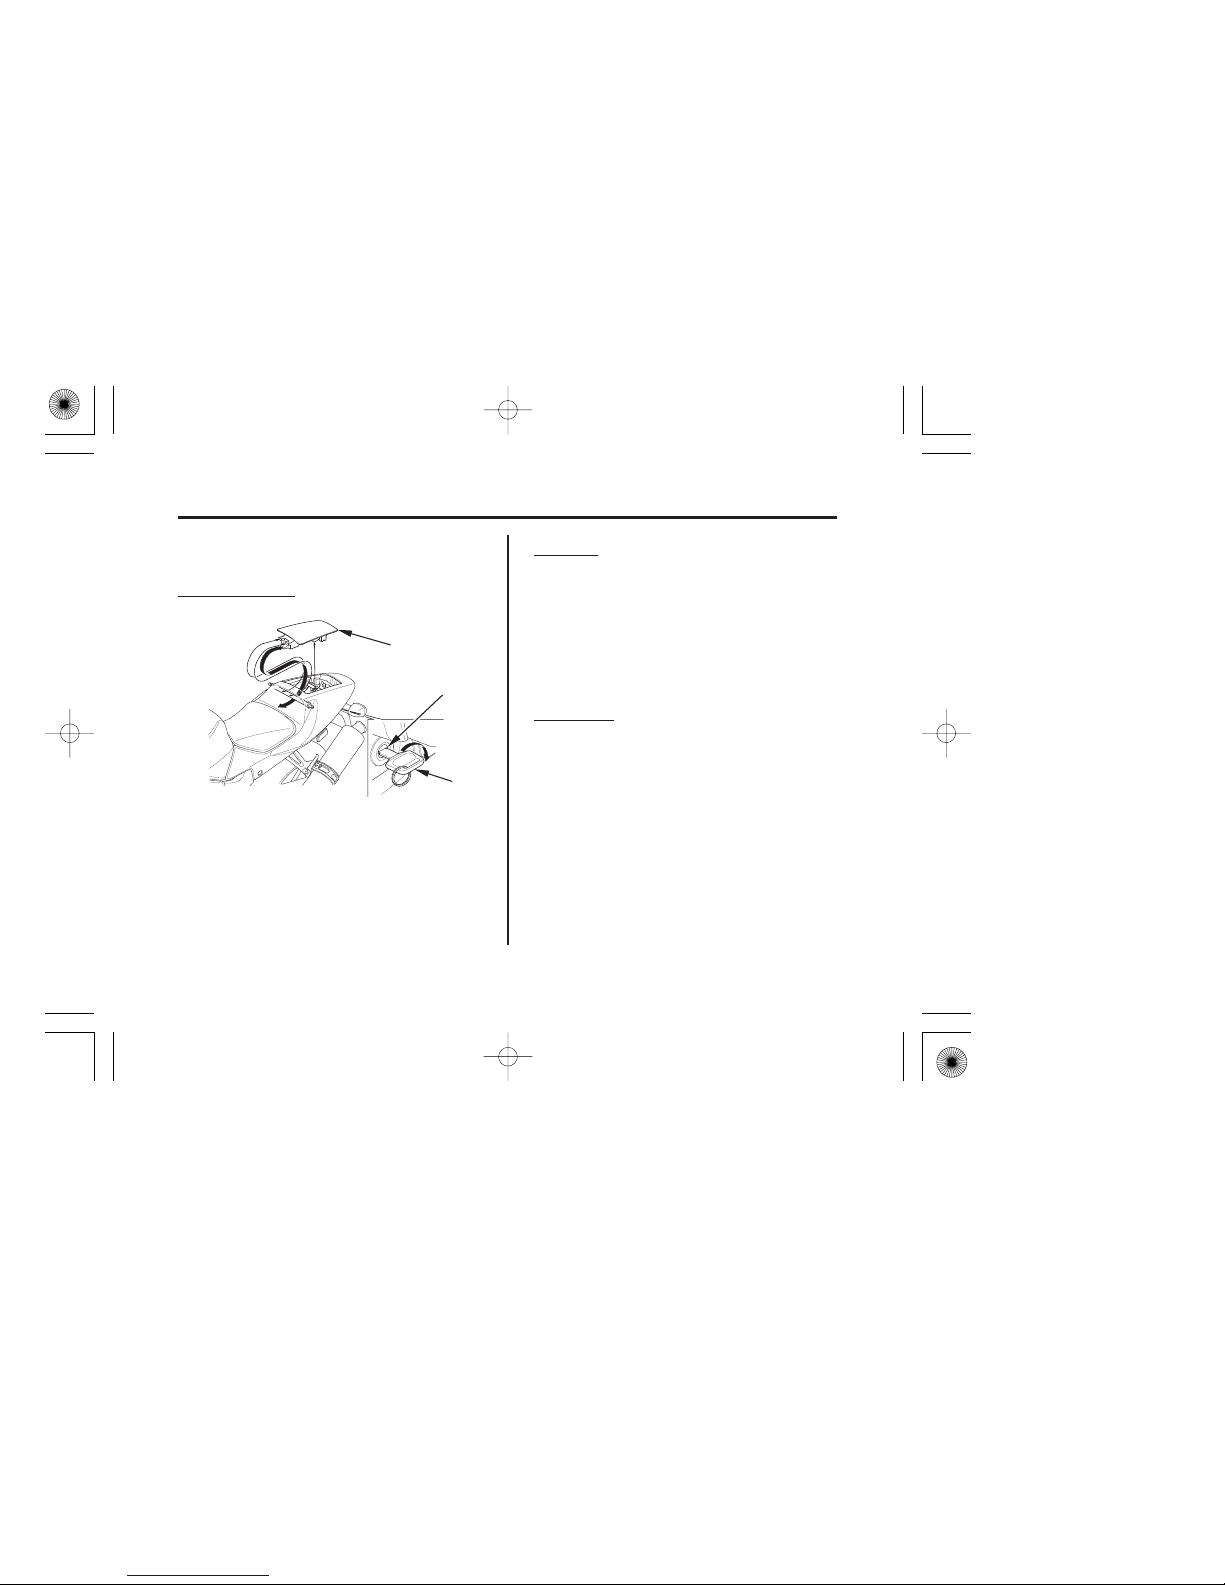
(3)
(1)
(2)
(2) seat lock(1) ignition key
(3) seat cowl panel
79
Seat Removal
Servicing Your Honda
Saf ety PrecautionsRefer to on page .
Seat Cowl Panel
Pull the seat cowl panel ( ) back and
up.
Turn it clockwise and pull up rear of the
seat cowl panel ( ).
Insert the ignition key ( ) into the seat
lock ( ).
Removal
Installation
Push forward and then down on the rear
of the seat cowl panel.
Be sure to securely lock the seat cowl
panel after reinstalling it.
1.
2.
3.
1.
62
1
2
3
3
05/11/15 12:22:04 31MCF660_088
Page 89
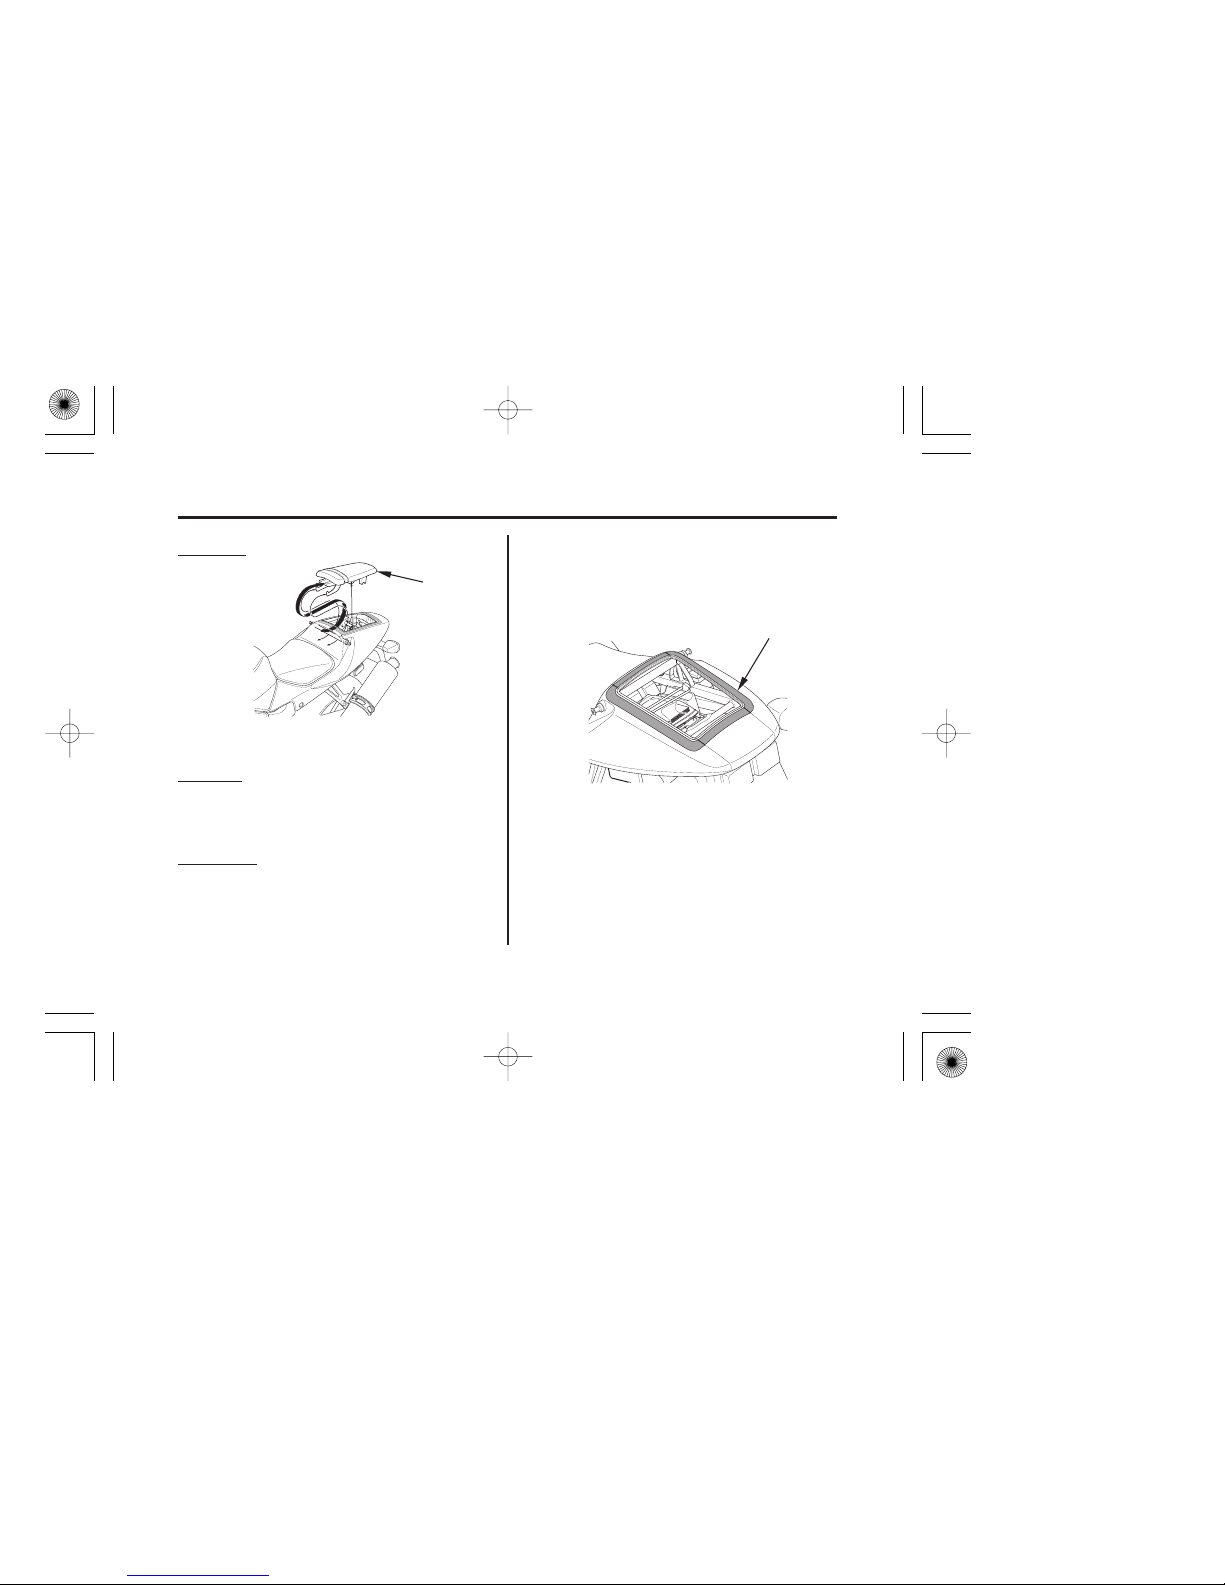
(5) seat cowl rubber
(5)
(4) rear seat
(4)
80
Seat Removal
Servicing Your Honda
To prevent scratches to the rear cowl,
attach the seat cowl rubber ( ) provided
before installing the rear seat.
Rear Seat
Be sure to securely lock the seat after
reinstalling it.
Removal
Installation
Push forward and then down on the rear
of the rear seat.
Remove the seat cowl panel (page )
when using the rear seat ( ).
5
1.
1.
79
4
05/11/15 12:22:14 31MCF660_089
Page 90
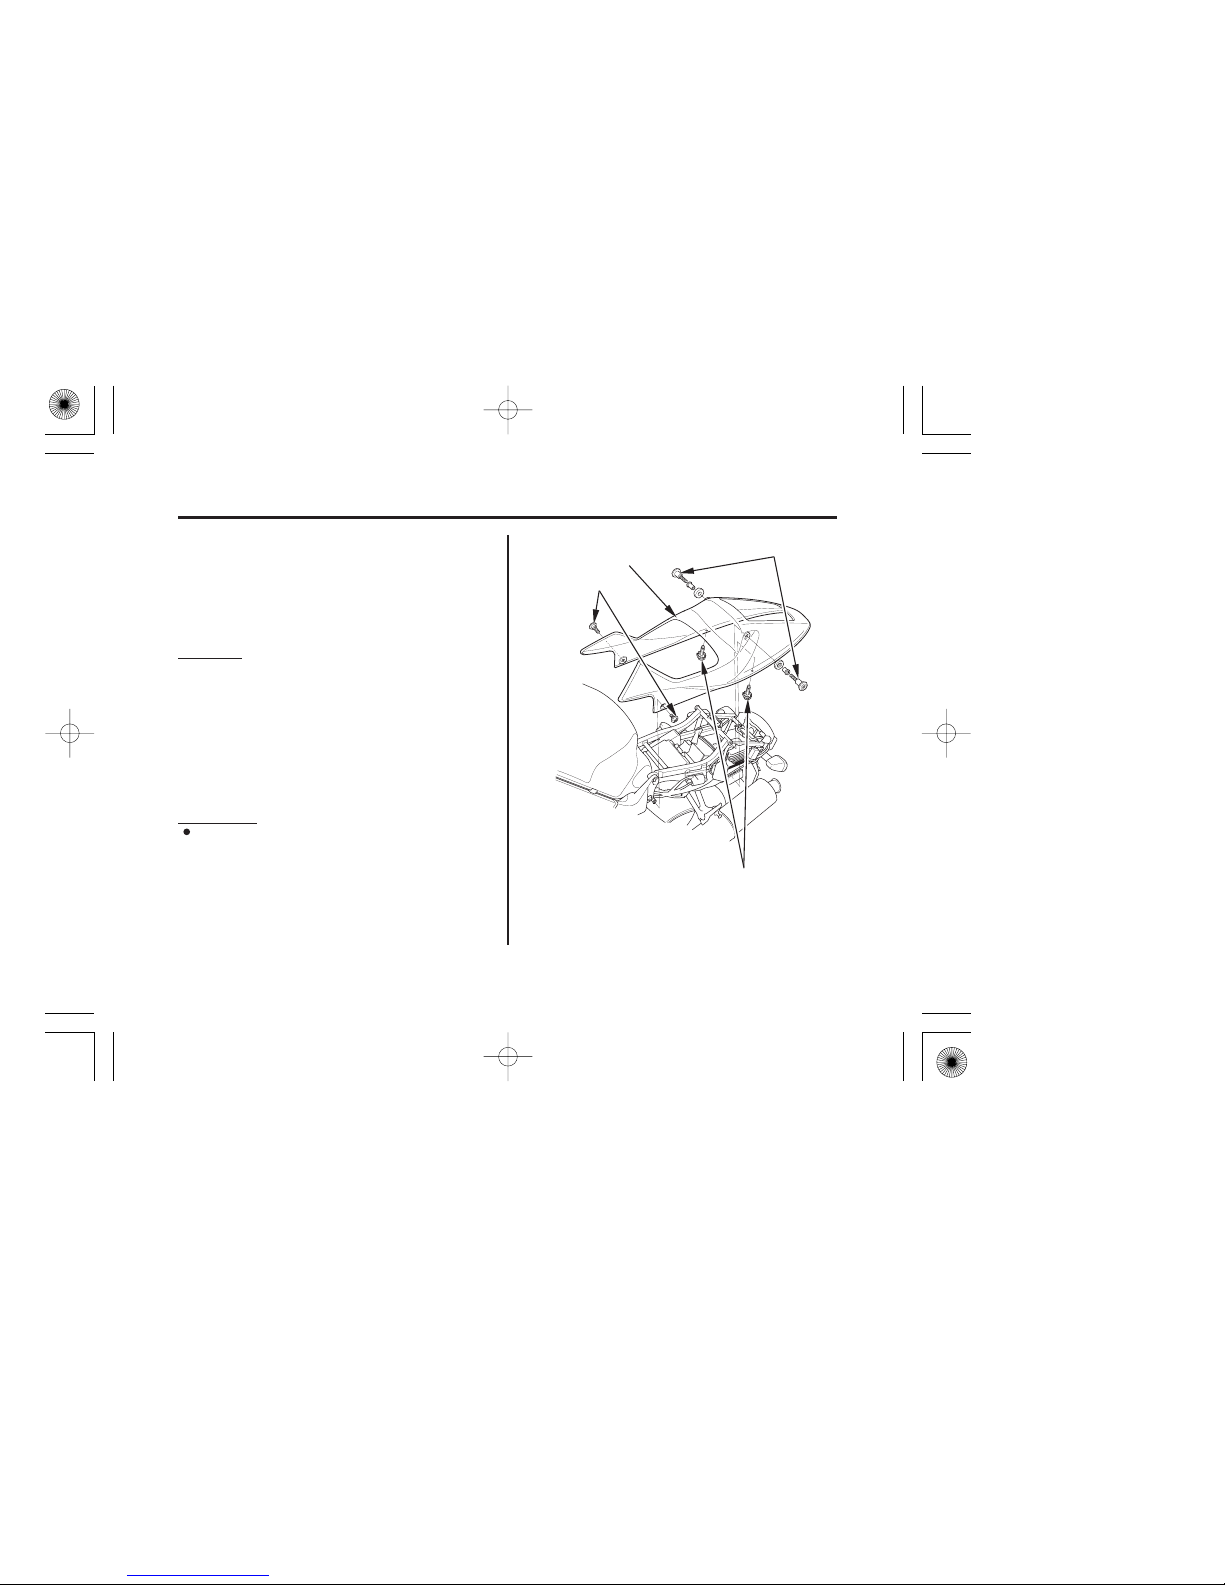
(2)
(1)
(4)
(3)
(1) clips
(2) bolts A
(3) bolts B
(4) rear cowl
81
Rear Cowl Removal
Servicing Your Honda
Saf ety PrecautionsRefer to on page .
Removal
The rear cowl must be removed for main
fuse maintenance.
Installation
Installation can be done in the reverse
order of removal.
Remove the front seat (page 78).
Remove the seat cowl panel (page 79).
Remove the clips ( ) (page ).
Remove the bolts A (2) and bolts B (3).
Slightly spread the front of the rear
cowl (4) and remove it.
1.
2.
3.
4.
5.
62
185
05/11/15 12:22:24 31MCF660_090
Page 91
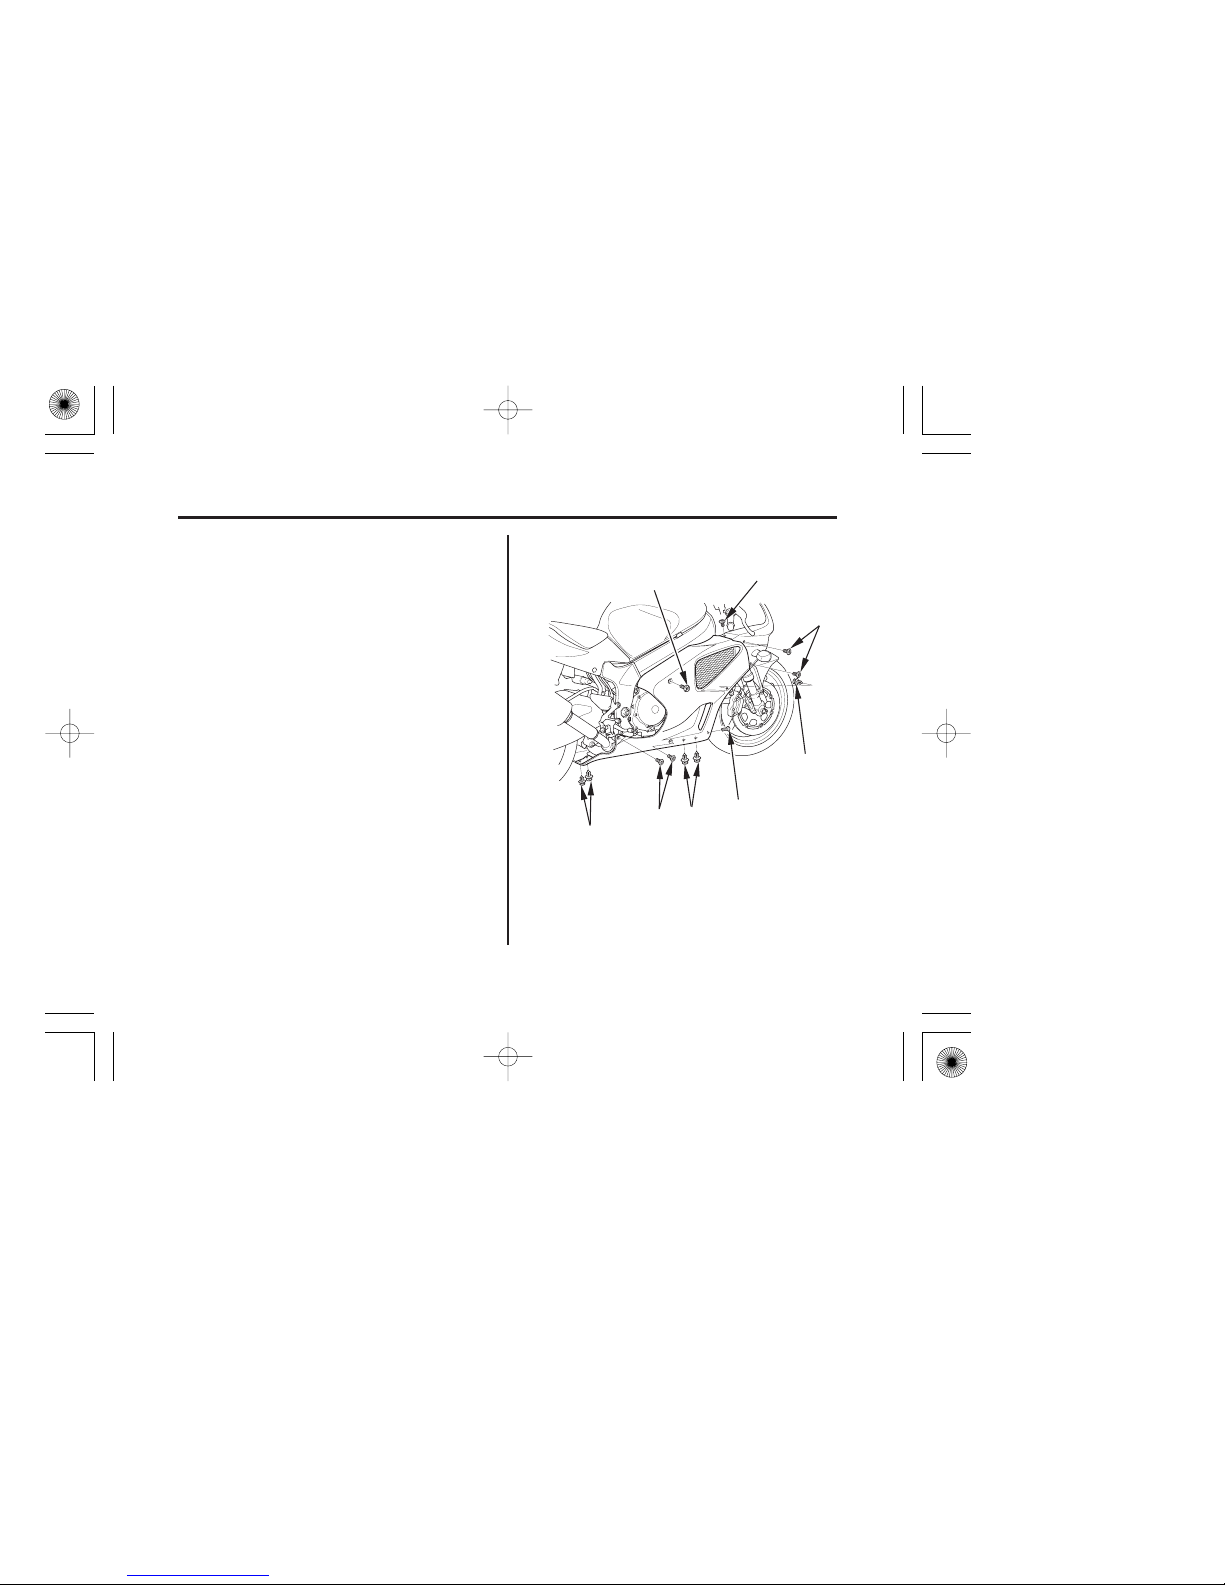
RIGHT SIDE
(1)
(2)
(2)
(3)
(2)
(3)
(4)
(5)
(4) bolts C
(5) bolts D
(1) bolt A
(2) clips
(3) bolts B
82
Lower Fairing Removal
Servicing Your Honda
Saf ety PrecautionsRefer to on page .
The lower fairing must be removed to
service the coolant reserve tank, engine oil,
fuses, or to remove the inner fairing.
62
05/11/15 12:22:32 31MCF660_091
Page 92
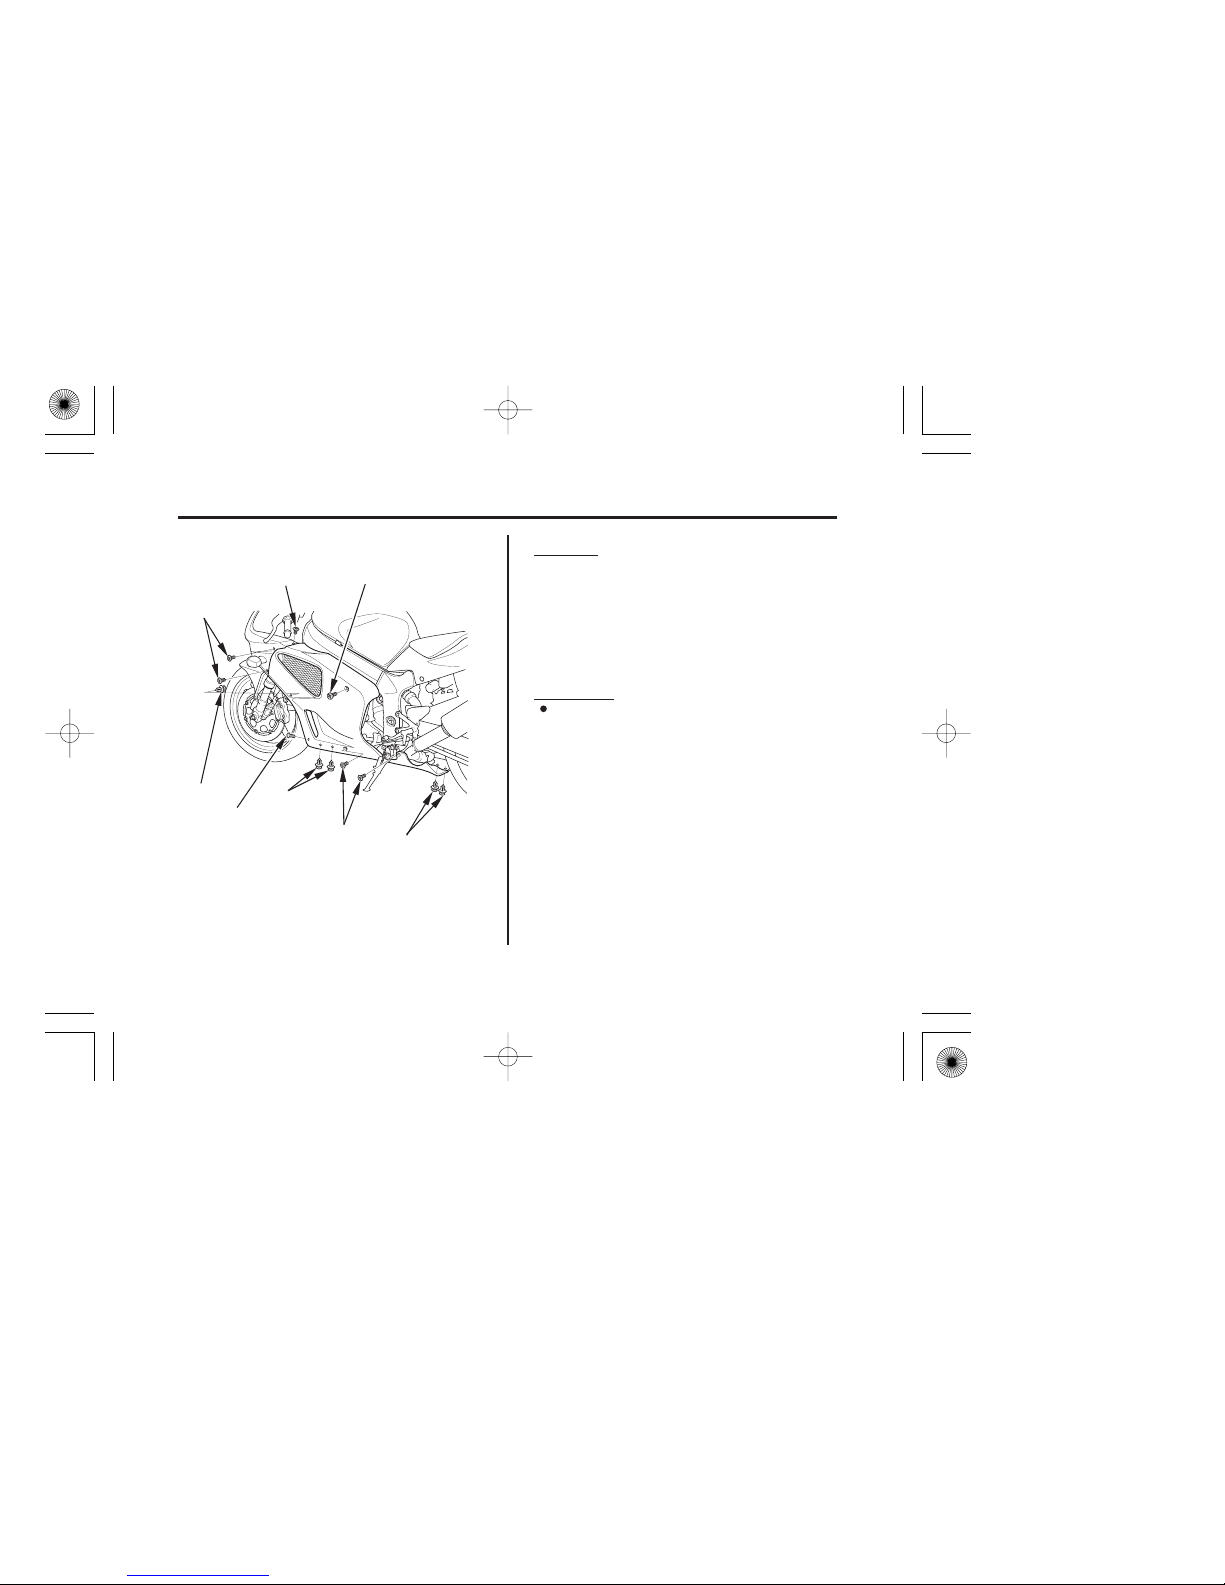
LEFT SIDE
(2)
(1)
(2)
(2)
(3)
(3)
(4)
(5)
(4) bolts C
(5) bolts D
(1) bolt A
(2) clips
(3) bolts B
83
Lower Fairing Removal
Servicing Your Honda
Removal
Installation can be done in the reverse
order of removal.
Installation
Remove the clips ( ).
Turn the bolt A ( ) 90°
counterclockwise.
Remove the bolts B ( ), bolts C ( )
and bolts D ( ).
1.
2.
3.
2
43
5
1
05/11/15 12:22:42 31MCF660_092
Page 93
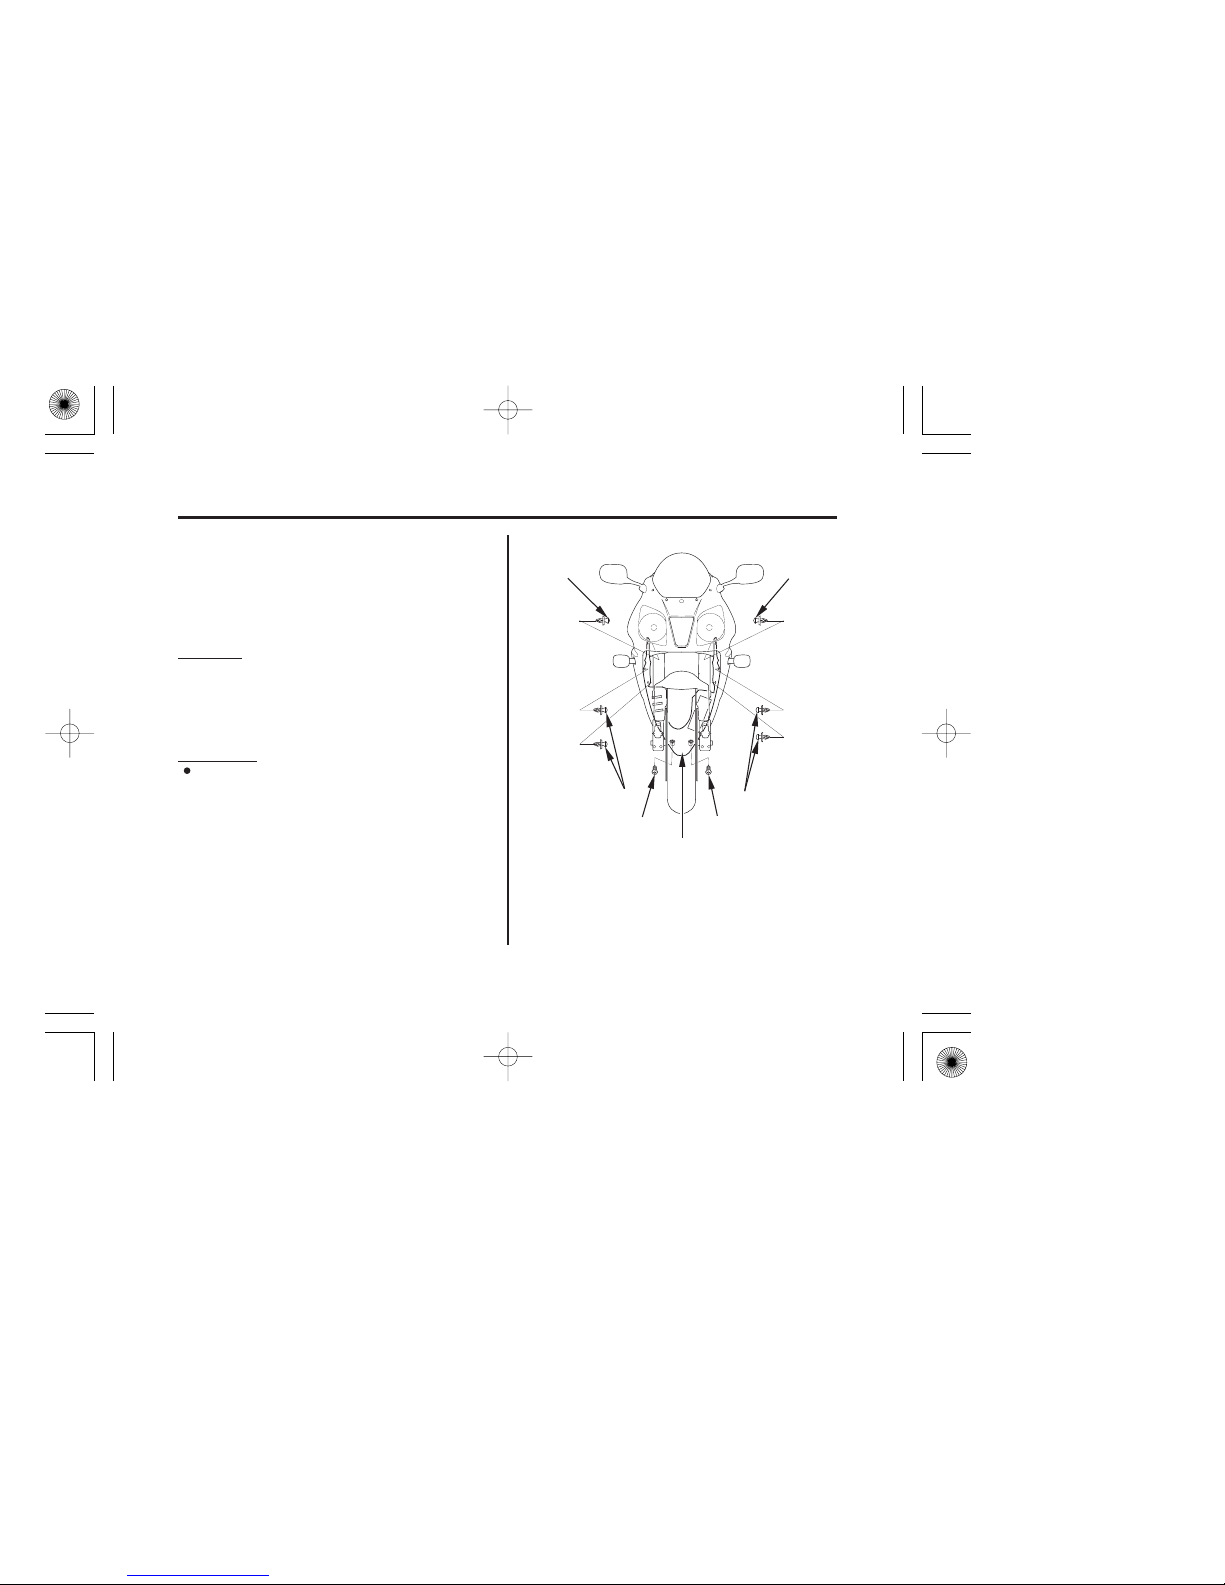
(1)
(2)
(1) bolts
(2) clips
(3) inner fairing
(2)
(2)
(1)
(2)
(3)
84
Inner Fairing Removal
Servicing Your Honda
Saf ety PrecautionsRefer to on page .
The inner fairing must be removed to
service the engine oil filter.
Removal
Installation
Installation can be done in the reverse
order of removal.
Remove the lower fairing (page 82).
Remove the bolts (1).
Remove the clips (2).
2.
1.
3.
62
05/11/15 12:22:52 31MCF660_093
Page 94
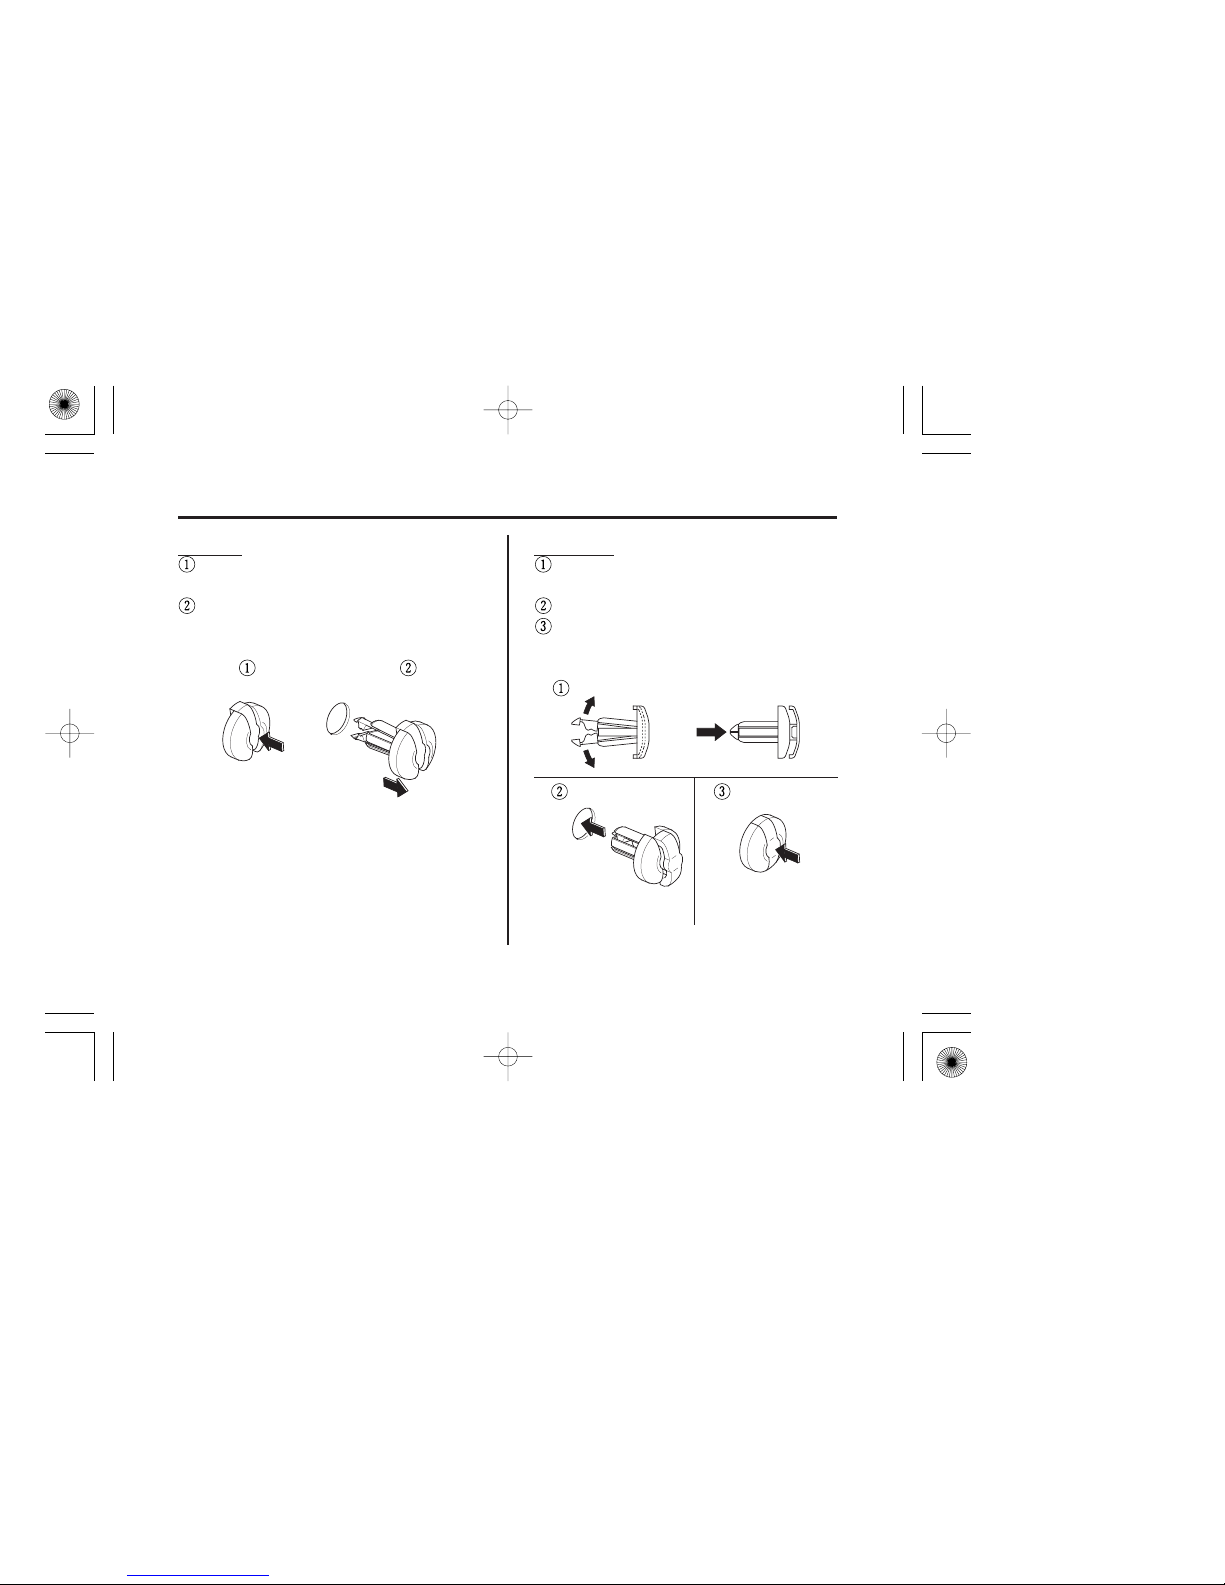
85
Clip Removal
Servicing Your Honda
Removal
Press down on the center pin to release
the lock.
Pull the clip out of the hole.
Installation
Slightly open the retaining pawls and
then push them out.
Insert the clip into the hole.
Lightly press down on the center pin to
lock the clip.
05/11/15 12:23:01 31MCF660_094
Page 95
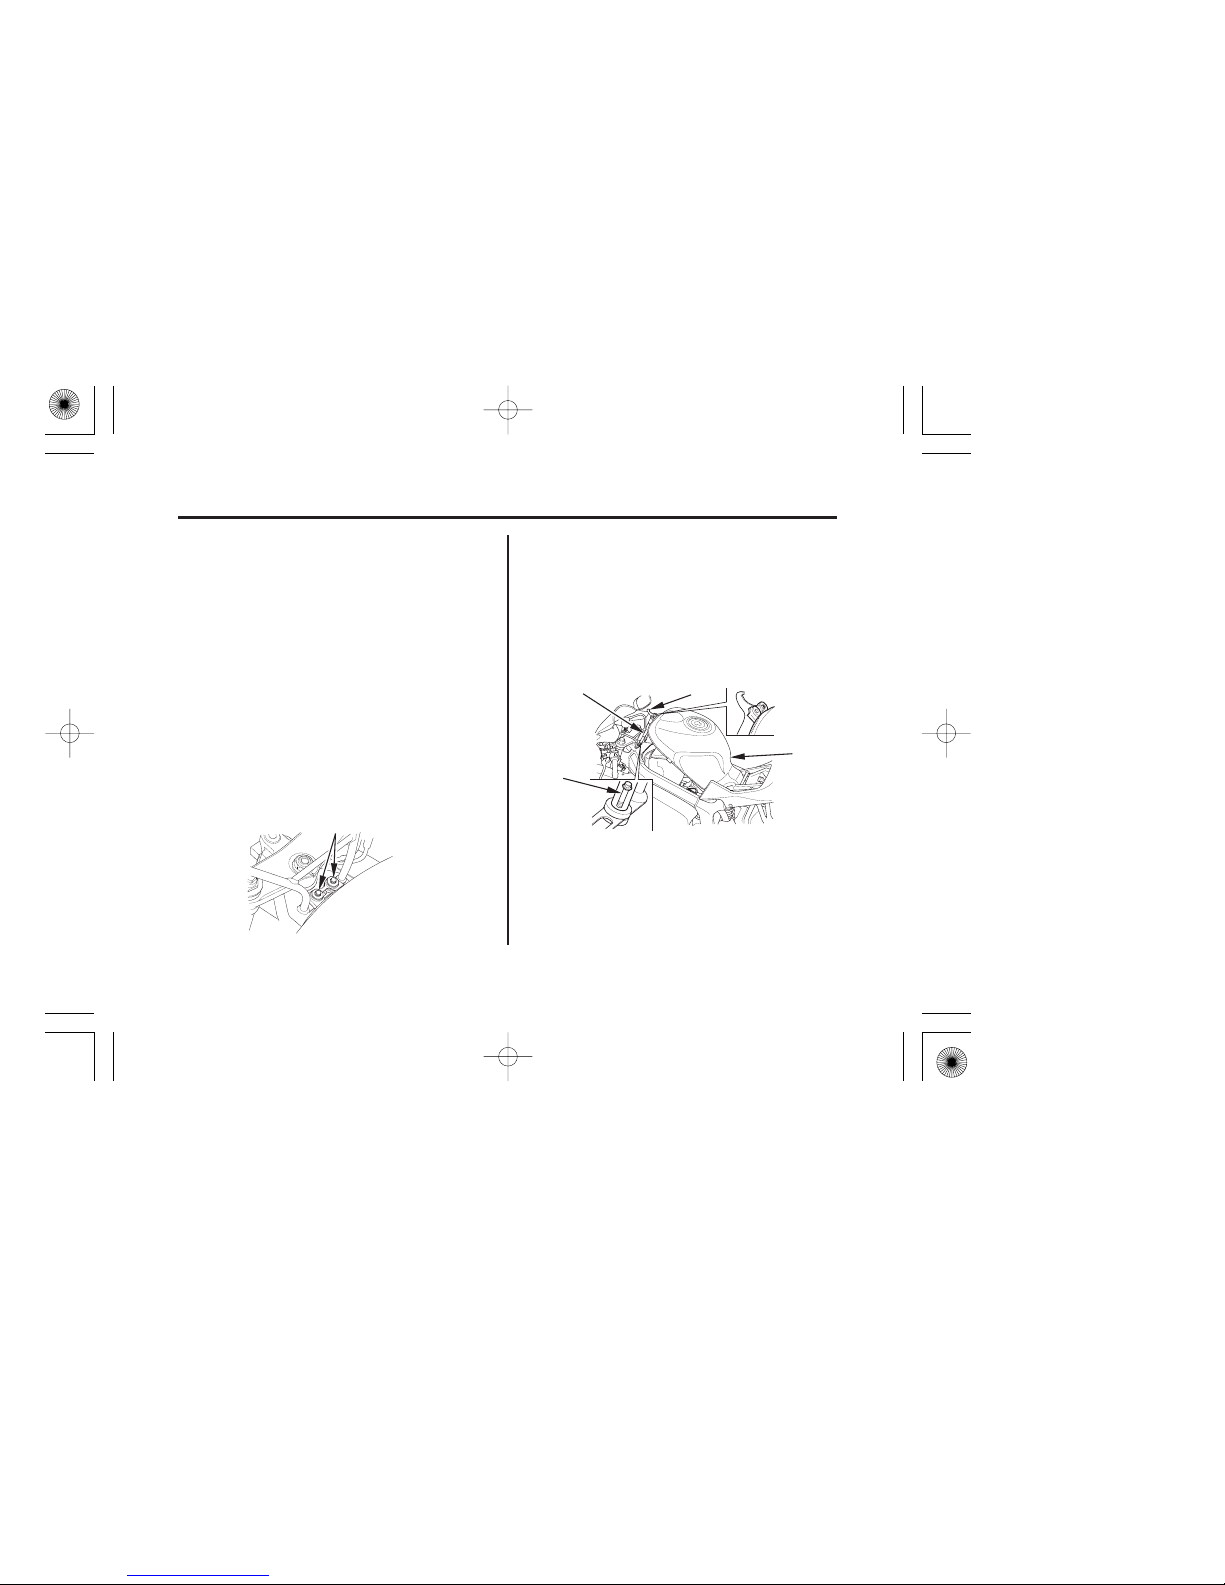
(1) bolts
(1)
LEFT SIDE
(1)
FRONT
(3)
(2)
(4)
(2) pin spanner
(3) extension bar
(4) fuel tank
86
Raising the Fuel Tank
Servicing Your Honda
Saf ety PrecautionsRefer to on page .
The fuel tank does not require draining for
this procedure.
Place the base of the extension bar over
the installed bolt and position the pin
spanner so that it supports the fuel tank.
The fuel tank must be raised to service the
rear cylinder spark plug.
Check that the fuel fill cap is closed.
Remove the front seat (page 78).
Remove the bolts (1) and washers.
Insert a pin spanner ( ) into an
extension bar ( ).
Raise the front of the fuel tank (4) and
temporarily install one of the removed
bolts in the frame body as shown.
Park your motorcycle on its side stand
on a firm, level surface with the
transmission in neutral and ignition
switch OFF.
1.
2.
3.
4.
5.62
6.
7.
3
2
05/11/15 12:23:13 31MCF660_095
Page 96
unleaded
91 (or higher)
type
pump octane
number
87
Fuel Recommendation
Fuel
Servicing Your Honda
Saf ety PrecautionsRefer to on page . Use of lower octane gasoline can cause
persistent ‘‘pinging’’ or ‘‘spark knock’’ (a
loud rapping noise) which, if severe, can
lead to engine damage. Light pinging
experienced while operating under a heavy
load, such as climbing a hill, is no cause
for concern.
If pinging or spark knock occurs at a
steady engine speed under normal load,
change brands of gasoline. If pinging or
spark knock persists, consult your Honda
dealer.
We recommend that you use unleaded fuel
because it produces fewer engine deposits
and extends the life of exhaust system
components.
Your engine is designed to use any
gasoline that has a pump octane number of
91 or higher. Gasoline pumps at service
stations normally display the pump octane
number. For information on the use of
oxygenated fuels, see page .62213
05/11/15 12:23:22 31MCF660_096
Page 97
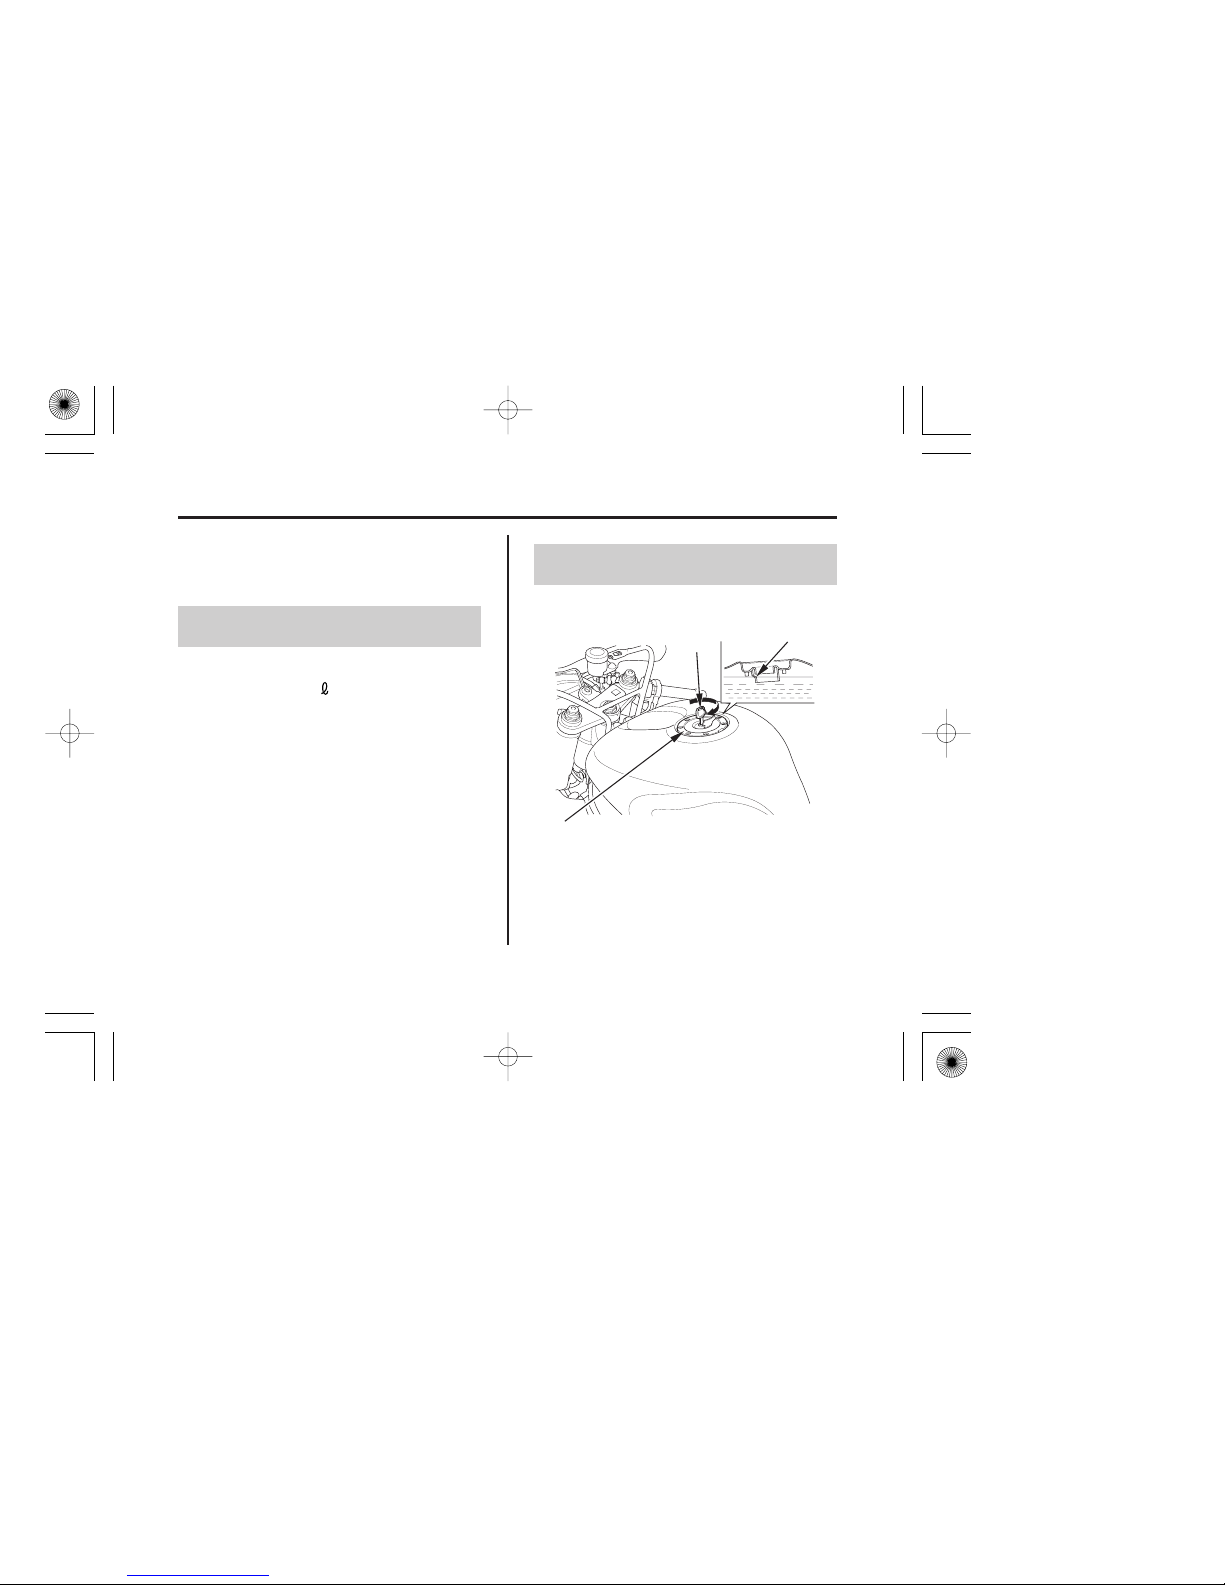
4.76 US gal (18.0 )
(3)
(2)
(1)
(1) ignition key
(2) fuel fill cap
(3) filler neck
88
Refueling Procedure
Fuel Capacity
Fuel
Servicing Your Honda
Saf ety Precautions
Never use stale or contaminated gasoline
or an oil/gasoline mixture. Avoid getting
dirt, dust, or water in the fuel tank.
Refer to on page .
Insert the ignition key ( ) in the fuel
fill cap ( ) and turn it clockwise.
Fuel tank capacity:
The tank should be refilled as soon as
possible when the fuel indicator comes on.
1.
62
1
2
05/11/15 12:23:33 31MCF660_097
Page 98
Gasoline is highly flammable and
explosive. You can be burned or
seriously injured when handling
fuel.
Stop the engine and keep heat,
sparks and flame away.
Handle fuel only outdoors.
Wipe up spills immediately.
89
Fuel
Servicing Your Honda
Open the cap.
Add fuel until the level reaches the
bottom of the filler neck ( ). Avoid
overfilling the tank. There should be no
fuel in the filler neck.
After refueling, push the fuel fill cap
closed until it snaps and locks.
Remove the ignition key from the cap.
2.
3.
35.
4.
05/11/15 12:23:41 31MCF660_098
Page 99
90
Engine Oil & Filter
Servicing Your Honda
Engine oil quality is a major factor that
affects both the performance and the
service life of the engine.
When running in very dusty conditions, oil
changes should be performed more
frequently than specified in the
maintenance schedule.
Using the proper oil (page ) and filter,
and regularly checking, adding, and
changing oil will help extend your
engine’s life. Even the best oil wears out.
Changing oil helps get rid of dirt and
deposits in the engine. Operating the
engine with old or dirty oil can damage
your engine. Running the engine with
insufficient oil can cause serious damage
to the engine and transmission.
Change the engine oil as specified in the
maintenance schedule on page .69
91
05/11/15 12:23:47 31MCF660_099
Page 100
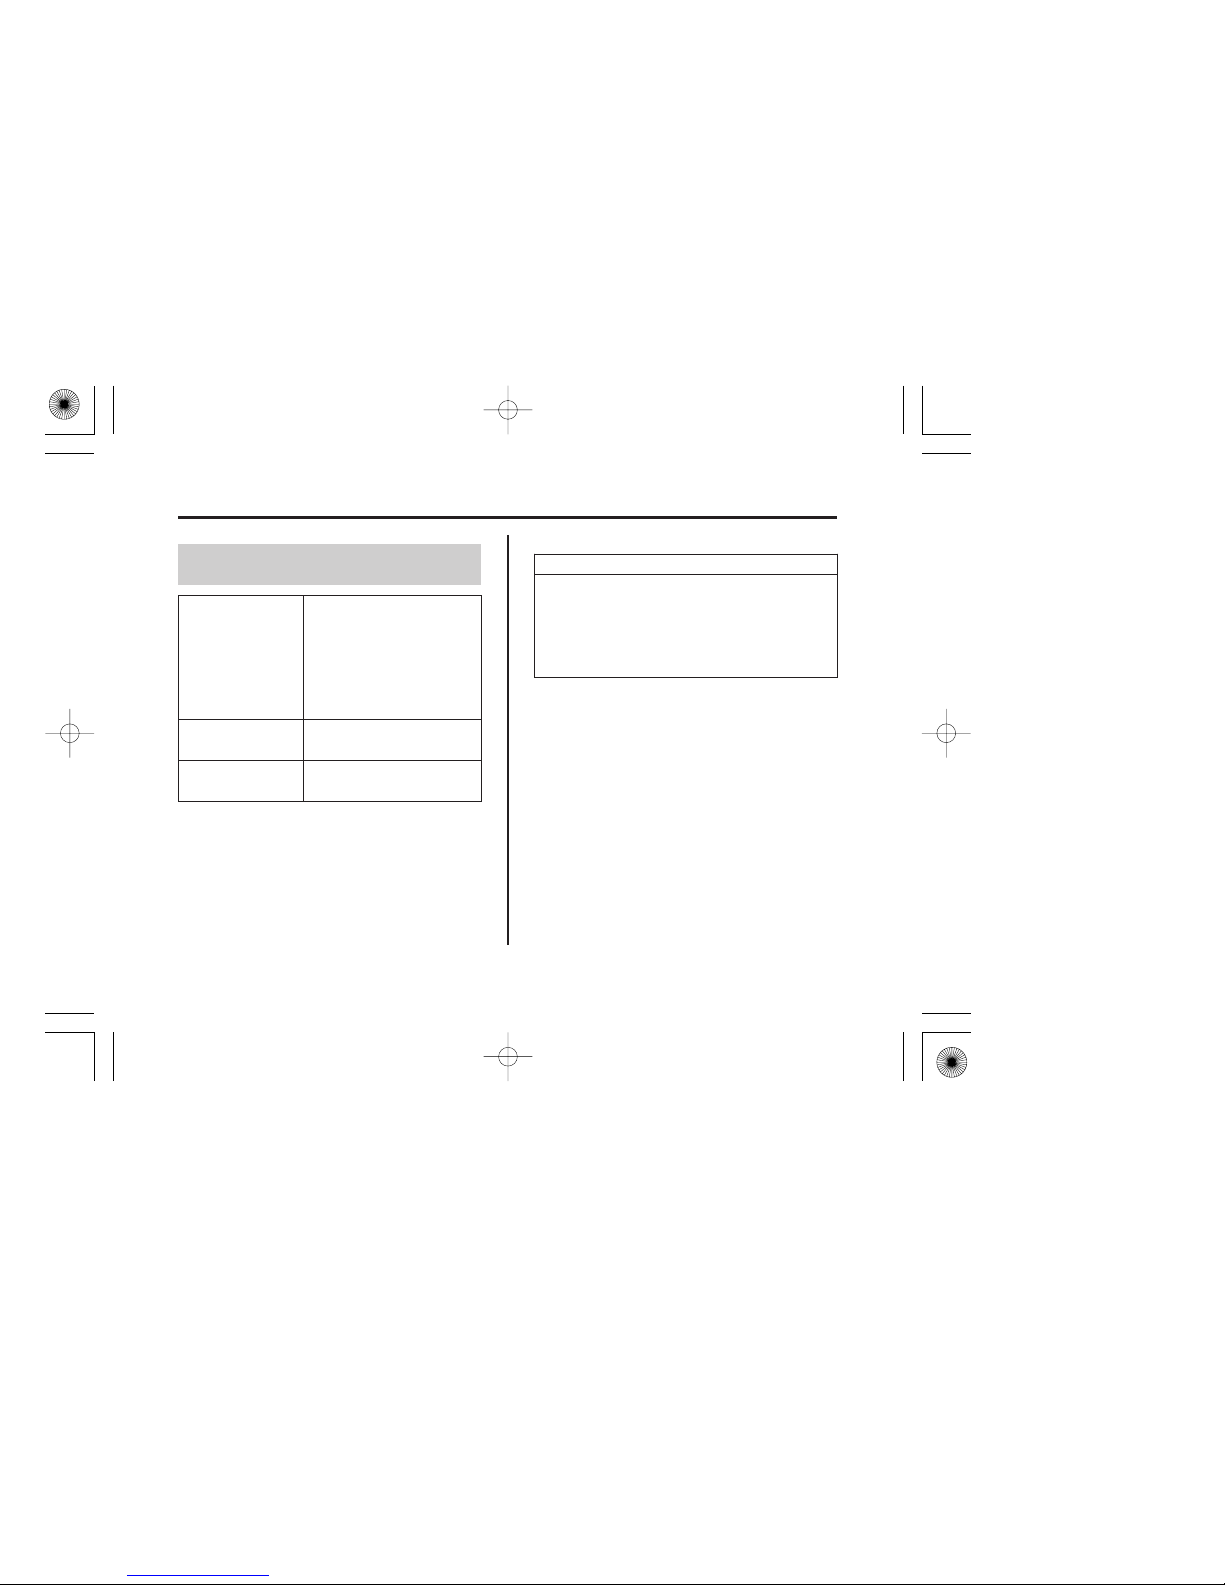
*
*
Pro Honda GN4 or HP4 (without
molybdenum additives) 4-stroke
oil (USA & Canada), or Honda
4-stroke oil (Canada only), or an
equivalent motorcycle oil.
MA
SAE 10W-40
SG or higher
except oils
labeled as energy
conserving on the
circular API
service label
API
classification
JASO T 903
standard
viscosity
(weight)
suggested oil
91
Oil Recommendation
Engine Oil & Filter
Servicing Your Honda
Suggested oils are equal in performance
to SJ oils that are not labeled as energy
conserving on the circular API service
label.
05/11/15 12:23:57 31MCF660_100
 Loading...