

Page 1

T E C H N O L O G Y
R E F E R E N C E
G U I D E
w w w . o w n e r s . h o n d a . c o m
2011 Honda O d y s s e y E X - L and EX-L R E S
31 T K 8B0 0 Technology Reference G u i d e
00 X 3 1-T K 8 - B0 0 0 ©2010 American Honda Motor Co., Inc. — All Rights Reserved Pr i n ted in U .S. A .
2011 ODYSSEY
EX-L and EX-L RES
Page 2
TEC H NO LOG Y R E FE R EN C E G U ID E
INSTRUMENT PANEL p.4
TheTechnology Reference Guide is designed to help you get
acquainted with your new Honda and provide basic
instructions on some of the technology items. This guide
covers the Odyssey EX-L and EX-L with Rear Entertainment
System trim levels.
This guide is not intended as a substitute for the Owner’s
Manual. For complete information on vehicle controls and
operation, please refer to the respective sections in the
Owner’s Manual.
Odyssey LX shown on cover
Auto Door Locks .....................................................................................................2
BLUETOOTH
®
HANDSFREELINK®p.10
AUDIO
p.13
REAR ENTERTAINMENT
SYSTEM p.16
EX-L RES shown
Bluetooth®Audio......................................................................................................14
Instrument Panel Indicators ...................................................................................4
Information Display ..................................................................................................6
Tire Pressure Monitoring System (TPMS)...........................................................7
Rearview Camera .....................................................................................................8
®
HomeLink
Bluetooth
®
iPod
.................................................................................................................9
®
HandsFreeLink®(HFL)........................................................................10
or USB Flash Memory................................................................................13
CD Library...............................................................................................................15
Rear Entertainment System (RES)......................................................................16
Cool Box..................................................................................................................18
Owner Link..............................................................................................................19
Safety Reminder ......................................................................................................20
Fuel Recommendation...........................................................................................20
Page 3
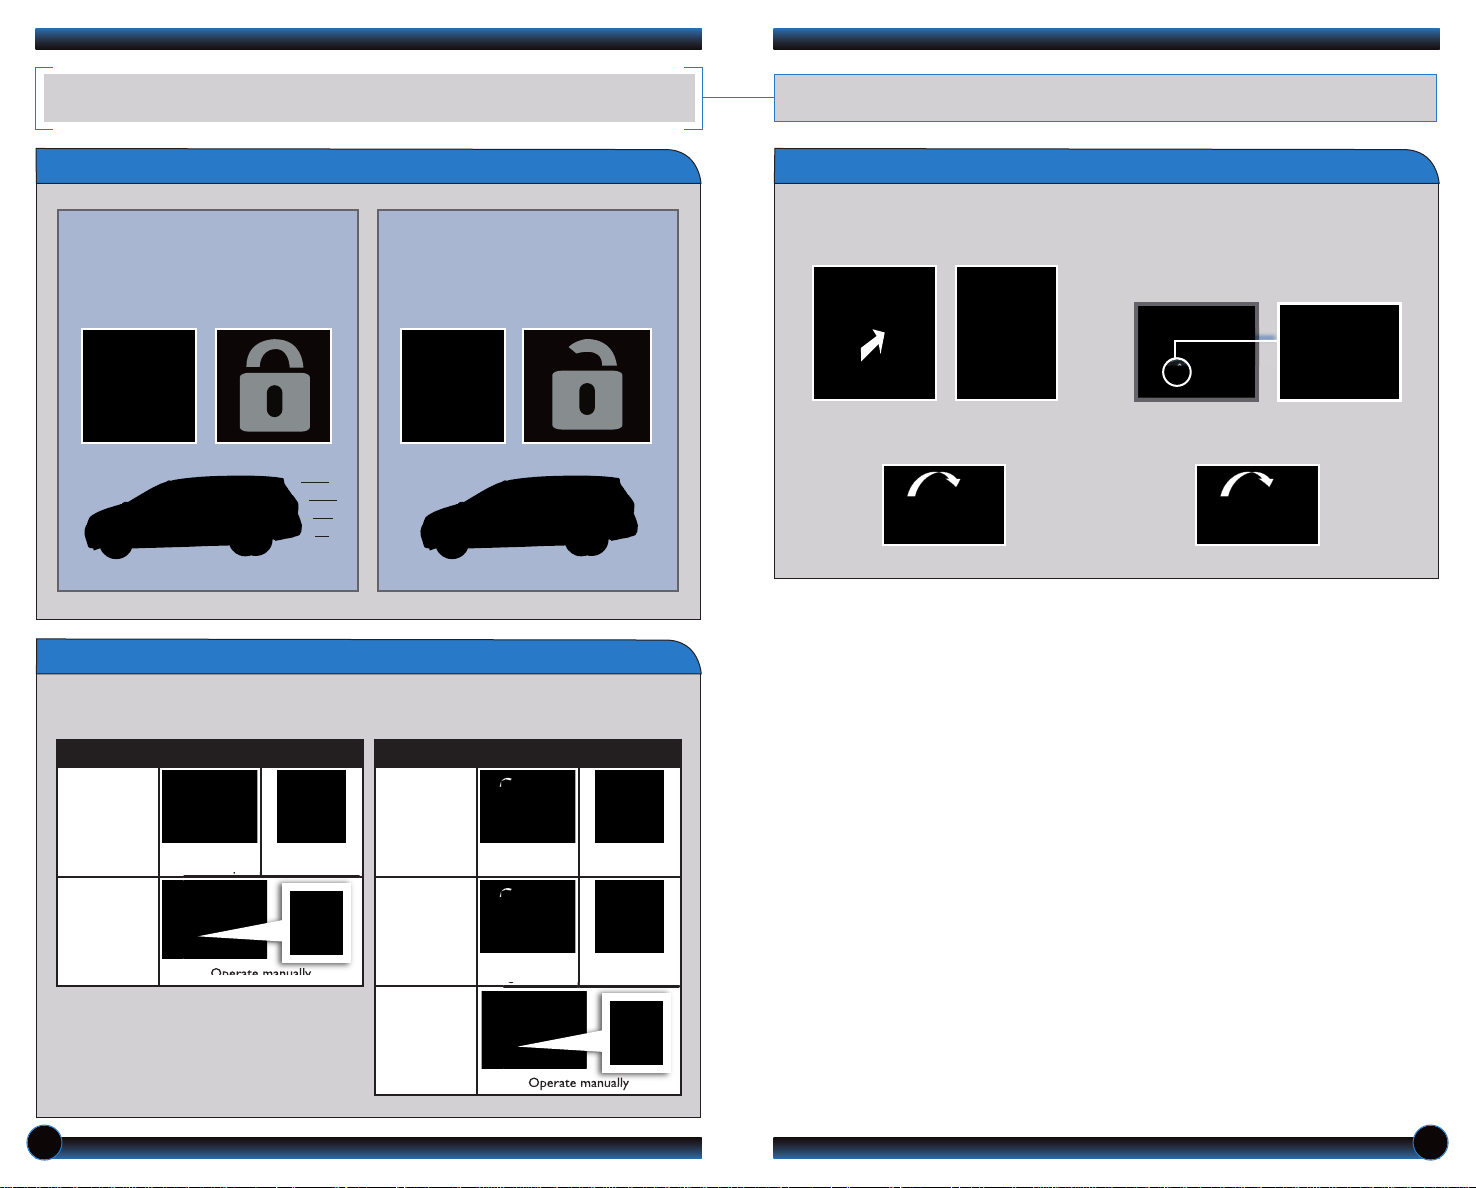
AU TO DOOR LOCKS
Program how and when the vehicle doors automatically lock and unlock.
Default Lock/Unlock Setting
Default Lock Setting
All doors and the tailgate are
preset to lock when your vehicle
reaches about 10 mph.
Default Unlock Setting
Only the driver’s door is preset to
unlock when you shift into Park (P).
Programmable Auto Door Lock/Unlock Settings
Below are the options you can choose. See Auto Door Locking/Unlocking in your
owner’s manual for instructions on programming these settings.
Programming the Auto Door Unlock Setting
To program all doors and the tailgate to unlock when you shift to Park:
1. Close the driver’s door. Shift into
Park.
2. Turn the ignition switch to ON (II). 4.Within 5 seconds, turn the ignition
3. Press and hold the unlock side of
the master lock switch for about
10 seconds. In that time, you will
hear three clicks.
switch to LOCK (0).
Auto Lock
Turn off
Auto Lock
AUTO DOOR LOCK
When you
reach 10 mph
Operate manually
When you shift
out of Park
Auto Unlock
Auto Unlock
(only driver’s
Auto Unlock
AUTO DOOR UNLOCK
(all doors)
door)
Turn off
When you turn
the ignition OFF
When you turn
the ignition OFF
Operate manually
When you shift
into Park
When you shift
into Park
2 3
Page 4

INSTRUMENT PANEL INDICATORS
PASSENGER
AIRBAG
OFF
Briefly appear with each engine start. Red and amber indicators are most critical.
Blue and green indicators are used for general information.
If an indicator remains on, there may be a problem;see your dealer
Charging system
Low brake fluid, brake system
Low oil pressure
SRS (supplemental restraint system)
Power tailgate
Power sliding door
DRL (daytime running lights)
(anti-lock brake system)
ABS
Malfunction lamp (check engine light)
VSA (vehicle stability assist)
TPMS
(tire pressure monitoring system)
Starter system
Condition Indicators
Action is needed by driver
Malfunction Indicators
Parking brake on:
Release
Door/Tailgate open:
Close door(s)/tailgate
Seat belt reminder:
Fasten seat belt(s)
Low fuel:
Refill
TM
Maintenance Minder
:
Make dealer appointment
On/Off Indicators
PASSENGER AIRBAG OFF
(located on center panel)
SIDE AIRBAG OFF
VSA OFF
CRUISE MAIN on
CRUISE CONTROL on
Low tire pressure:
Add air
Fuel economy on
Immobilizer
Flashes: improperly coded key;
use correct key
Headlights on
Turn signals/hazards on
High beams on
4 5
Page 5
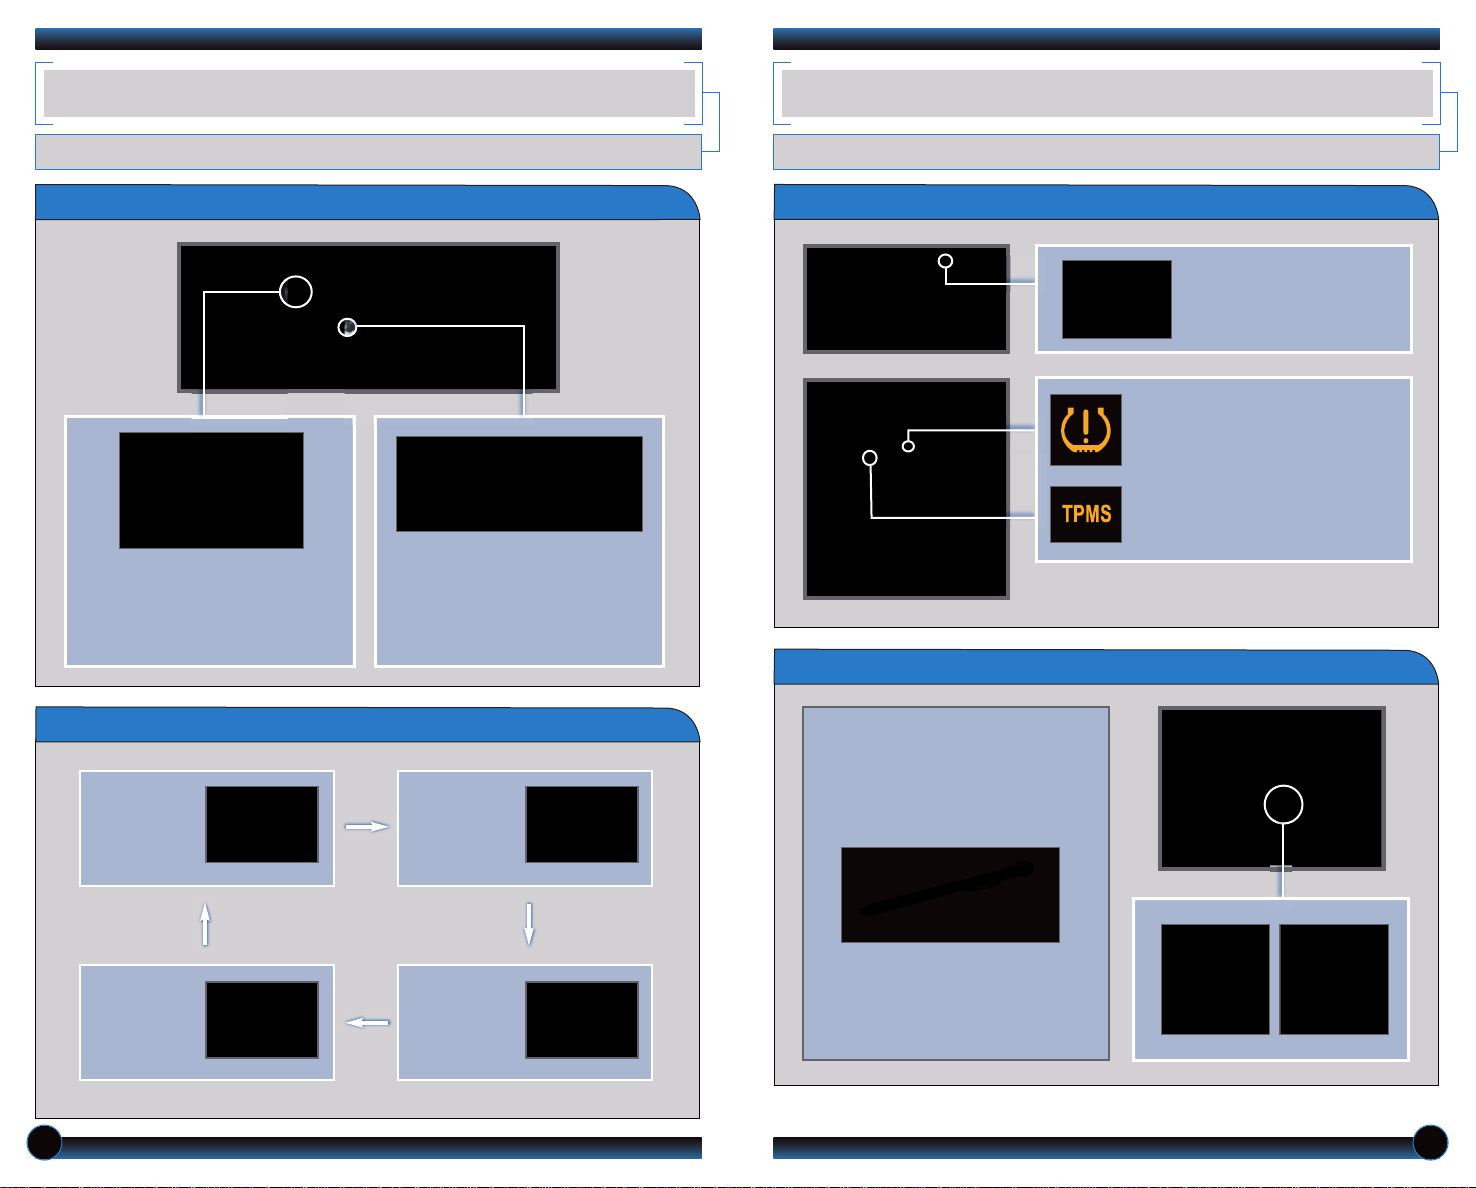
IN FOR MATION DIS PLAY
TIRE PRESSURE MONITORING SYSTEM (TPMS)
Consists of several displays that provide you with useful information.
Accessing the Information Display
When you start the engine, the
display shows your last active
selection from the previous drive
cycle.
To toggle between the different
displays, press and release the
select/reset knob repeatedly.
Information Displays
Odometer,
Outside
temperature
Fuel range,
Instant fuel
economy
Monitors the vehicle’s tire pressures.
How It Works
Each tire valve stem contains
a TPMS sensor.
When the tire pressure drops
significantly below recommended
levels, the low tire pressure
indicator comes on.
If the TPMS indicator appears, there
may be a problem with the system.
See your dealer.
What to Do
1. Visually inspect the tires for
damage.
2. Use a tire air pressure gauge to
check which tire(s) have low
pressure.
Oil life
Trip meter A/B,
Average fuel
economy
6
3. Inflate the tire(s), if necessary,
to the recommended pressures
listed on the label on the
driver’s doorjamb.
7
Page 6
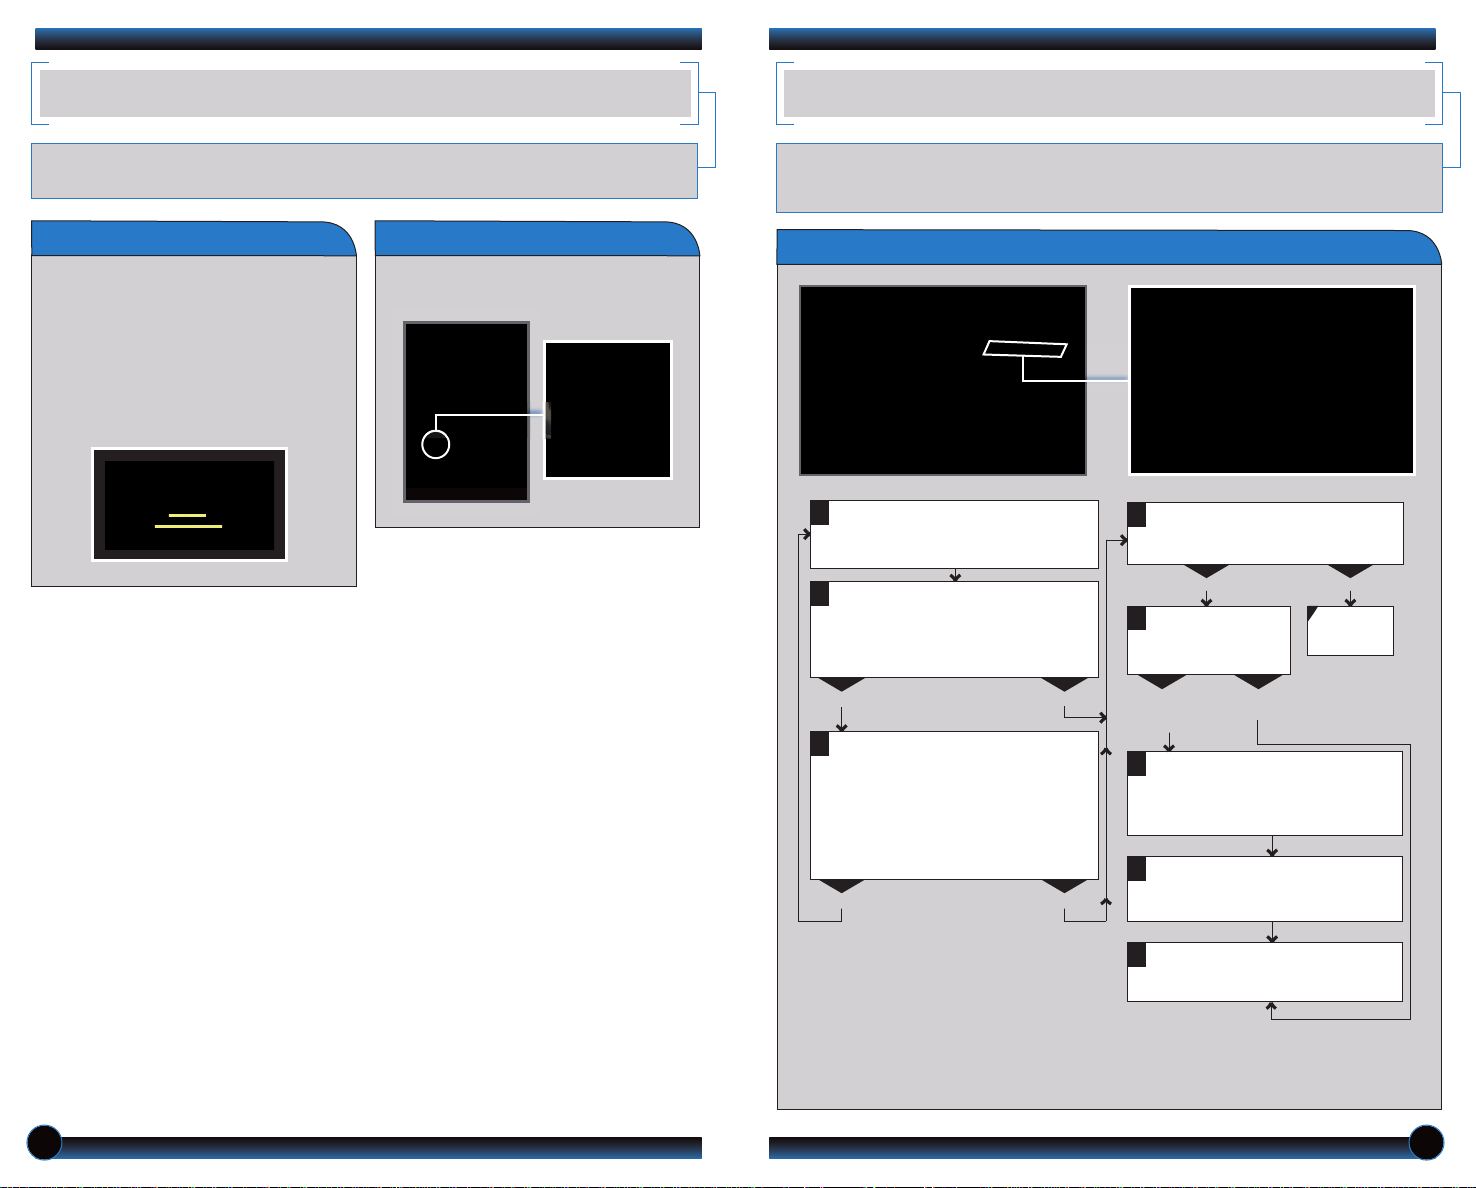
Press and hold the button on the
remote and the HomeLink button at
the same time. Then, while
continuing to hold the HomeLink
button, press and release the button
on the remote every 2 seconds.
Does the LED blink at a faster rate within 20
seconds?
Press and hold
the HomeLink
button again.
Training
complete
YESNO
HomeLink indicator
flashes for 2 seconds,
then remains on.
HomeLink LED
remains on.
YESNO
YESNO
Position the remote transmitter you
wish to link 1–3 inches from the
HomeLink button you want to program.
1
Press and hold the desired
HomeLink button and the button on
the remote transmitter.
Does the HomeLink indicator (LED) blink at a
faster rate after about 10 seconds?
2
a
The remote has a rolling code.
Press the “learn” button on the
remote-controlled device (e.g.,
garage door opener).
Press the programmed HomeLink
button again; the remote-controlled
device should operate.
Within 30 seconds, press and
hold the programmed HomeLink
button for 2 seconds.
a
Press and hold the programmed
HomeLink button for about a
second.
Does the device (garage door opener) work?
3
b
4
5
RE ARV IEW CAM ERA
HO MEL INK
®
For added convenience, the area behind your vehicle is displayed to help you navigate
while backing up.
How It Works
• When you shift into Reverse (R), a
real-time image of the area behind
Turning the Guide Lines On or Off
Press and hold the RETURN button
for about 3 seconds.
your vehicle is shown in the center
display.
• Yellow parking guide lines also appear
to help you judge distance.
• The rearview display turns off when
you shift out of Reverse.
The HomeLink Universal Transceiver can be programmed to operate up to three
remote-controlled devices around your home, such as garage doors,lighting, or home
security systems.
Training a Button
If you have any problems programming HomeLink, see the owner’s manual included
with the device you are trying to program, call HomeLink at (800) 355-3515, or
visit www.homelink.com.
98
Page 7
BLUETOOTH
®
HANDSFREELINK®(HFL)
Place and receive phone calls through your vehicle’s audio system. Visit
handsfreelink.honda.com to check if your phone is compatible.
Pairing Your Phone Making a Call
Pick-Up button: Go directly to the Phone screen,
or answer an incoming call.
Talk button: Use to call speed dial entries with
stored voice tags.
Back button: Cancel a selection.
Hang-Up button: End a call.
1. Press the Pick-Up button to
access the Phone screen.
2. The system asks you to pair
a phone. Select “Yes” and
“Continue.” Make sure your
phone is in discovery mode.
4. If the system does not find
your phone, select “Phone
Not Found.” HFL gives you a
four-digit code.
5. Search for a HandsFreeLink
device from your phone, and
connect to HFL.
1. Press the Pick-Up button to
go to the Phone screen.
2. Select Dial.
Receiving a Call
1. A notification is heard and
the incoming phone number
appears on the center
display screen.
3. Enter the phone number using
the selector knob, and select
the green Dial icon to call.
4. The call is connected and heard
through the vehicle speakers.
3. Press the Hang-Up button to
end or decline the call.
2. Press the Pick-Up button to
3. Select the number of the
location (1-6) to add the phone.
6. Enter the four-digit code on
your phone when prompted.
Select OK to complete.
accept the call.
10 11
Page 8
Phonebook
When your phone is paired, its entire phonebook is automatically imported to
the system.
1. Press the Pick-Up button
to go to the Phone screen.
3. Scroll the list to find the name
you want to call, and press
ENTER to begin the call.
IP OD®OR USB FLASH MEM ORY
Play audio files from your compatible iPod or USB flash drive through your vehicle’s
audio system.
Connecting Devices and Playing Audio Files
2. Select Phonebook.
4. The call is connected and heard
through the vehicle speakers.
Speed Dial
Speed dial entries and accompanying voice tags* can be stored for quick and
voice-activated dialing
1. Press the Pick-Up button
to go to the Phone screen.
3. Scroll through the list to find
the name you want to call, and
press ENTER to begin the call.
1. Open the glove box, and pull out
the USB adapter cable.
2. Connect the USB connector to your
iPod dock connector or flash drive.
3. Press USB/AUX to begin playing.
4. To change tracks, rotate the selector
knob or press the SKIP () or ()
.
button
2. Select Speed Dial.
* When a voice tag is stored for a speed dial entry, you can make a call using voice commands.
See your Owner’s Manual for instructions .
4. The call is connected and heard
through the vehicle speakers.
iPod is a registered trademark of Apple Computer, Inc., registered in the U.S. and other countr ies. iPod not inc luded.
12 13
Page 9
BLUETOOTH
®
AUDIO
CD LIBRAR Y
Play audio files from your compatible phone through your vehicle’s audio system. Visit
handsfreelink.honda.com to check if this feature is available on your phone.
Playing
1. Make sure your phone is on and
2. Press USB/AUX repeatedly until
Skipping
Bluetooth
paired to HandsFreeLink (See
HandsFreeLink).
“Bluetooth Audio” appears on the
screen.
Bluetooth
Audio Files
Audio Files
3. Press “play” on your phone; sound is
redirected to the audio system. Make
sure the volume on your phone is
adjusted.
Store up to 18 audio CDs in the system memory.
Recording an Audio CD
1. Insert an audio CD. 3. Select the location to store
2. The system asks if you want to
record the CD to memory.
Select Yes or No.
the CD.
4. The CD records. If available,
album information is displayed.
Using the CD Library
There are two ways to skip through audio files*:
• Press (
control panel.
) or () on the audio
• Press (+) or (-) on the steering
wheel.
*not suppor ted on all phones
1. Press the CD/CDL button. The last
album recorded begins playing.
To change tracks, press the
() or ()
SKIP
rotate the selector knob.
To change albums, press the
CATEGORY (+) or (-) button.
button, or
2. To view the CD library,press
the selector knob.
3. A list of recorded CDs
appears. Select the album and
track you want to hear.
1514
Page 10
RE AR ENTERTA INM ENT SYS TEM (RES)
Operating the RES from the Front
With the rear entertainment system and headphones,rear passengers can enjoy a
different entertainment source than the front seat occupants.
RES Front Panel Controls
Rear Entertainment System
Pull down the bottom edge of
the screen to open it.
1. Press the REAR POWER button.
Rear passengers will hear audio
through the headphones.
2. Press the REAR SOURCE button.
Select an entertainment source for
the rear passengers.
Operating the RES from the Rear
1.
Press the REAR POWER button on
the front audio panel. Open the
overhead screen.
3. Press the REAR SOURCE button again
to return to the front audio controls.
3.
Press the () () () () buttons
to navigate the menu options. Press
the ENTER button to select an option.
Pivot the earpieces to turn on or
off. Wireless headphones only
work in the rear seats.
Wired headphones may also be
used.
Extend the screen until it
locks into place.
2. Press the DVD/AUX, CD/CDL, XM,
or FM/AM button.
4. The rear control panel can be detached
and used as a remote control. Press
the release button to remove it.
1716
Page 11
CO OL BOX
OW NER LIN K
Store beverages in a conveniently located box to keep them cool.
How It Works
• Store up to four 20-ounce bottles or six 12-ounce cans.Keep already
cold drinks from becoming warm.
• Press the COOL BOX button to turn it on or off. A green indicator
light appears when the Cool Box is on.Cold air from the air
conditioning system flows into and circulates within the box.
Owner Link allows you to explore features and technologies specific to your vehicle,
schedule service appointments, obtain and update maintenance and service records,
manage your financial services account, and access other useful information. Register
at www.owners.honda.com to ensure that you continue to enjoy the experience of
owning a Honda.
Usage Tips
• The Cool Box is not a refrigerator or cooler. It does not cool down warm
drinks.
• Do not use ice.
• Do not store perishable items inside for an extended amount of time.
• Keep the box closed for best results.
• The box cannot be removed for cleaning.
• Because the air conditioning system is always on when the Cool Box is in use,
fuel economy may be slightly reduced.
• If the ignition switch is turned to LOCK (0), the box maintains its temperature
for one hour.
1918
Page 12
SA FET Y RE MIN DER
Your vehicle is equipped with airbags. Airbags do not replace seat belts; they add to
the protection offered by seat belts. Airbags can help protect you in some types of
collisions, but they do not provide protection in all collisions.
Always make sure you and your passengers wear seat belts, and that young children
are properly secured in a child seat or booster in the rear seat. Never place an infant
seat in the front passenger’s seat as the force of a deploying airbag can seriously
injure an infant.
FU EL RECOMME NDA TION
• Only use unleaded gasoline of 87 octane or higher.
• Some gasoline in North America contains MMT,a manganese-based fuel additive.
Prolonged and consistent use of gasoline containing MMT can deteriorate your
vehicle’s performance, fuel economy, and the emission control system. Always use
MMT-free gasoline if available. Failures caused by use of gasoline containing MMT
may not be covered under warranty.
• “TOPTIER Detergent Gasoline” meets a new gasoline standard jointly established
by leading automotive manufacturers to meet the needs of today's advanced
engines. In most cases, qualifying gasoline retailers will identify their gasoline as
having met “TOP TIER Detergent Gasoline” standards at the retail location. This
fuel is guaranteed to contain the proper level of detergent additives and be free of
metallic additives. This helps avoid build-up of deposits in your engine and
emission control system. Because the level of detergency and harmful metallic
additives (such as MMT) in gasoline vary in the market, Honda endorses the use
of “TOPTIER Detergent Gasoline” where available to help maintain the
performance and reliability of your vehicle. For more information, visit
www.toptiergas.com.
• For further important information on fuel and lubricants for your car and
information on gasoline that does not contain MMT, contact your dealer or visit
Owner Link at www.owners.honda.com.
2120
 Loading...