

Page 1
T E C H N O L O G Y
R E F E R E N C E
G U I D E
2011 ODYSSEY LX/EX
w w w . o w n e r s . h o n d a . c o m
31T K8 A00 20 11 Honda Od ys sey LX an d EX Te ch no lo gy Re fe re nc e Gui de
00X 31 -TK 8- Q00 0 ©20 10 A meri can Honda Motor Co. , In c. — A ll Rig hts Reserved Pri nt ed in U .S .A .
11 Odyssey TRG_LX EX:ATG_NEW STYLE 7/30/2010 7:45 AM Page 1
Page 2
INSTRUMENT PANEL p.4
CD LIBRARY
p.9
CD Library (EX only) ..............................................................................................9
Owner Link ..............................................................................................................10
Safety Reminder ......................................................................................................11
Fuel Recommendation...........................................................................................11
Auto Door Locks .....................................................................................................2
Instrument Panel Indicators ...................................................................................4
Information Display ..................................................................................................6
Tire Pressure Monitoring System (TPMS)...........................................................7
HomeLink
®
(EX only)..............................................................................................8
TEC H N OL OG Y RE F ER EN C E GU I DE
TheTechnology Reference Guide is designed to help you get
acquainted with your new Honda and provide basic
instructions on some of the technology items. This guide
covers the Odyssey LX and EX trim levels.
This guide is not intended as a substitute for the Owner’s
Manual.For complete information on vehicle controls and
operation,please refer to the respective sections in the
Owner’s Manual.
Odyssey LX shown on cover
EX shown
11 Odyssey TRG_LX EX:ATG_NEW STYLE 7/30/2010 7:45 AM Page 2
Page 3
AUTO DOOR L OCKS
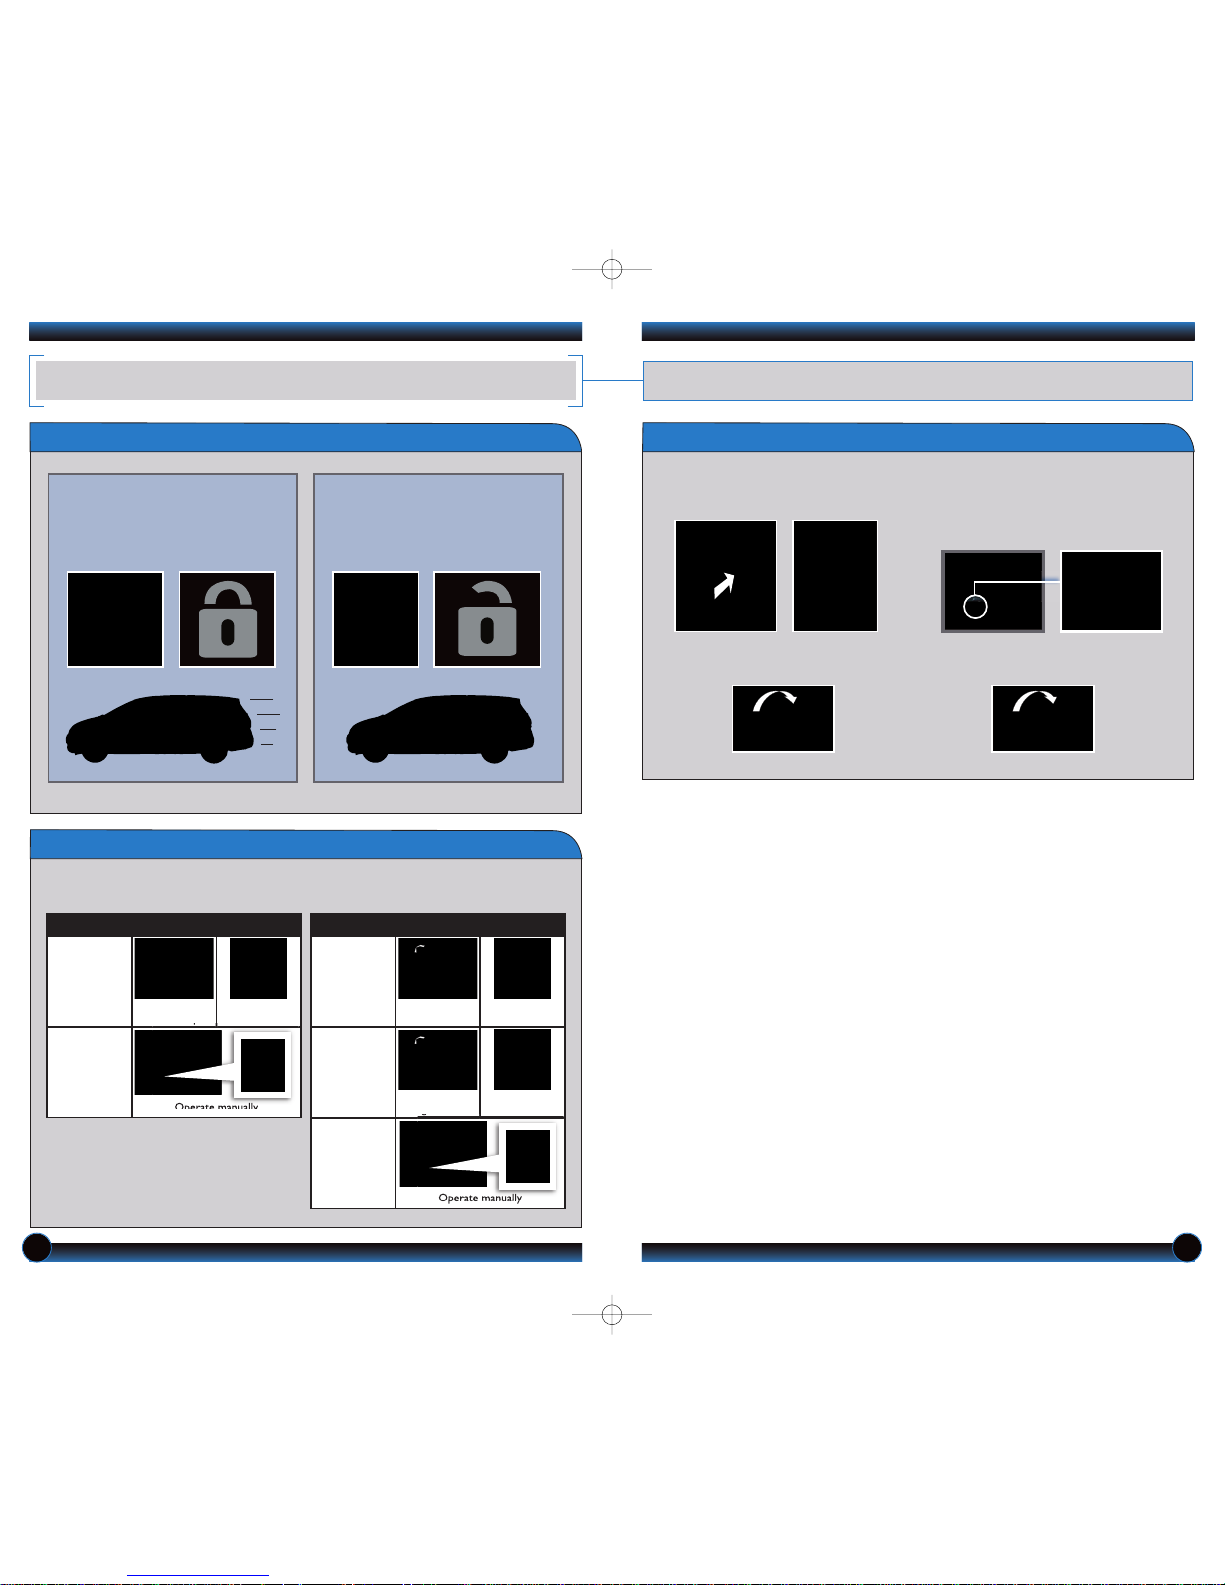
Program how and when the vehicle doors automatically lock and unlock.
Programmable Auto Door Lock/Unlock Settings
Below are the options you can choose. See Auto Door Locking/Unlocking in your
owner’s manual for instructions on programming these settings.
AUTO DOOR UNLOCK
Auto Unlock
(all doors)
When you turn
the ignition OFF
When you shift
into Park
Auto Unlock
(only driver’s
door)
When you turn
the ignition OFF
When you shift
into Park
Turn off
Auto Unlock
Operate manually
AUTO DOOR LOCK
Auto Lock
When you
reach 10 mph
When you shift
out of Park
Turn off
Auto Lock
Operate manually
Programming the Auto Door Unlock Setting
1. Close the driver’s door. Shift into
Park.
2. Turn the ignition switch to ON (II). 4.Within 5 seconds, turn the ignition
switch to LOCK (0).
3. Press and hold the unlock side of
the master lock switch for about
10 seconds. In that time, you will
hear three clicks.
To program all doors and the tailgate to unlock when you shift to Park:
Default Lock/Unlock Setting
Default Lock Setting
All doors and the tailgate are
preset to lock when your vehicle
reaches about 10 mph.
Default Unlock Setting
Only the driver’s door is preset to
unlock when you shift into Park (P).
AUTO DOOR L OCKS
Program how and when the vehicle doors automatically lock and unlock.
2 3
EX shown
11 Odyssey TRG_LX EX:ATG_NEW STYLE 7/30/2010 7:46 AM Page 3
Page 4
4 5
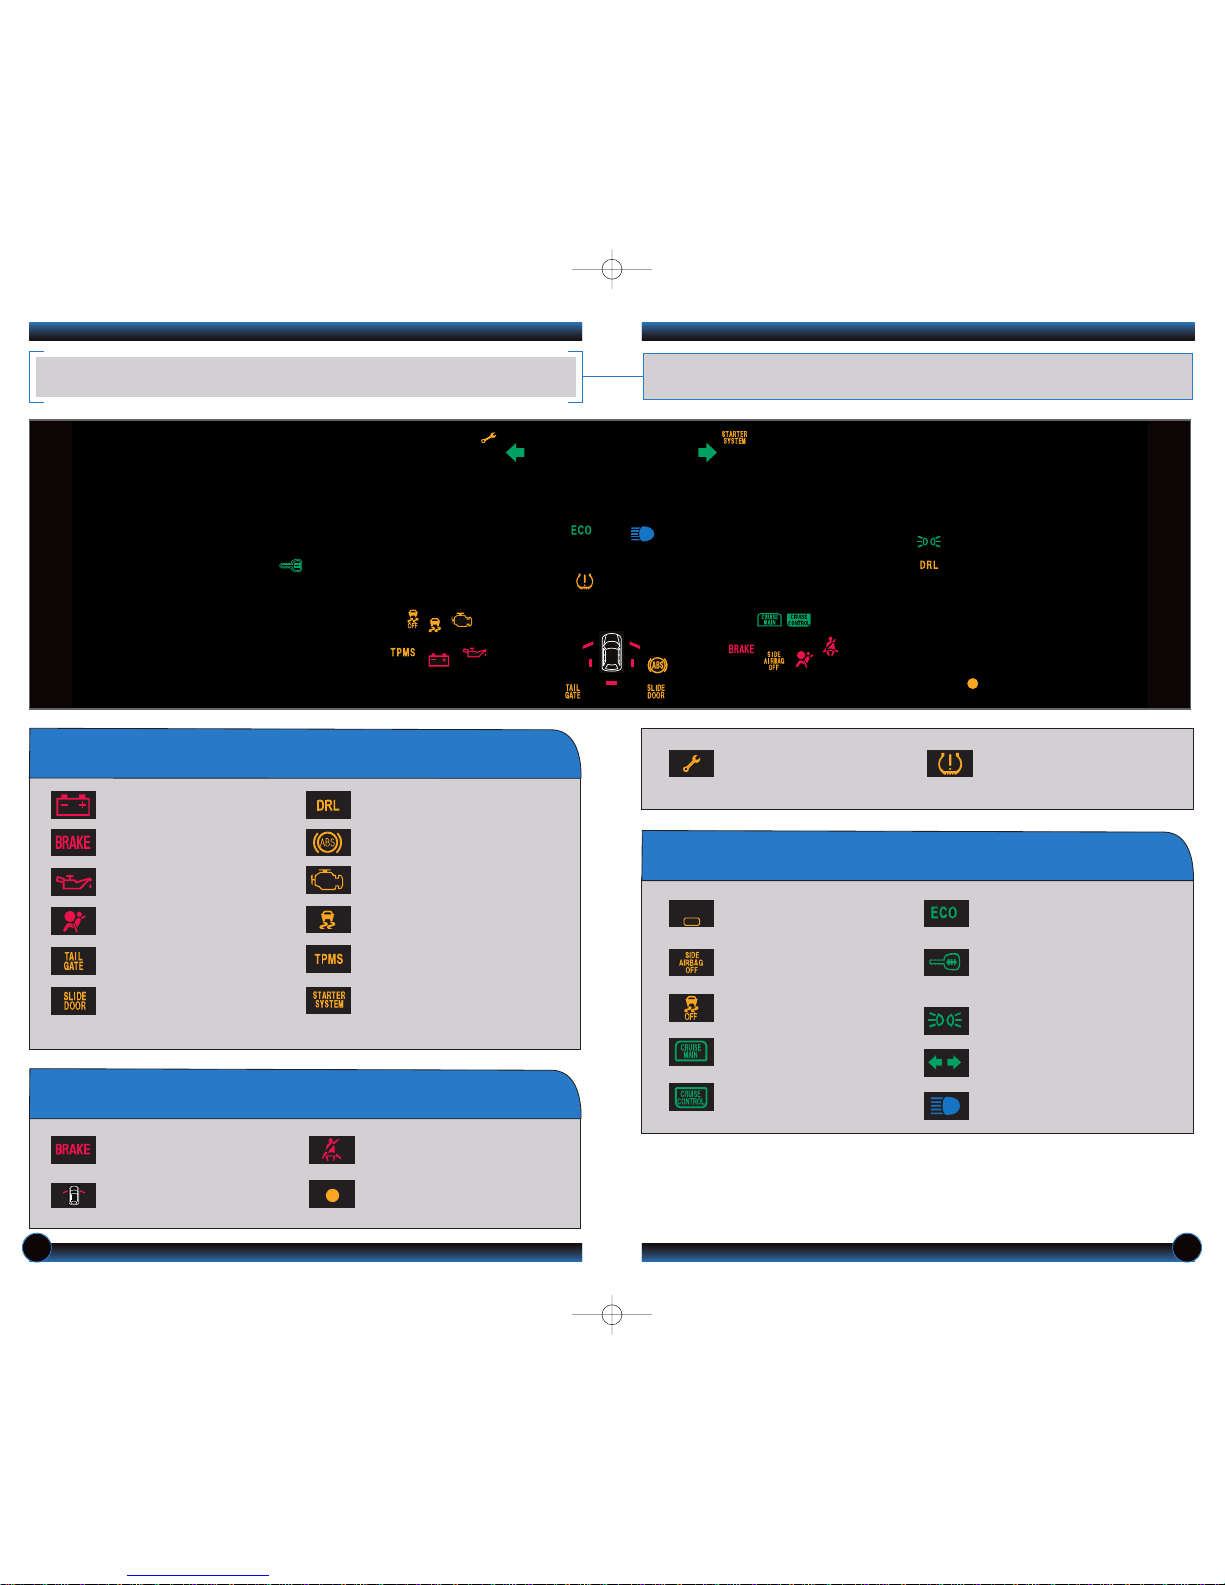
On/Off Indicators
PASSENGERAIRBAG OFF
(located on center panel)
SIDE AIRBAG OFF
CRUISE CONTROL on
VSA OFF
Headlights on
Turn signals/hazards on
High beams on
Maintenance Minder
TM
:
Make dealer appointment
Low tire pressure:
Add air
INSTRUMENT PANEL INDICATORS
Immobilizer
Flashes: improperly coded key;
use correct key
Briefly appear with each engine start. Red and amber indicators are most critical.
Blue and green indicators are used for general information.
CRUISE MAIN on
Fuel economy on
Malfunction Indicators
If an indicator remains on, there may be a problem;see your dealer
Condition Indicators
Action is needed by driver
Charging system
Low brake fluid, brake system
Low oil pressure
ABS
(anti-lock brake system)
Malfunction lamp (check engine light)
VSA (vehicle stability assist)
SRS (supplemental restraint system)
Power tailgate
Power sliding door*
TPMS
(tire pressure monitoring system)
DRL (daytime running lights)
Starter system
Parking brake on:
Release
Door/Tailgate open:
Close door(s)/tailgate
Low fuel:
Refill
Seat belt reminder:
Fasten seat belt(s)
*EX only
PASSENGER
AIRBAG
OFF
11 Odyssey TRG_LX EX:ATG_NEW STYLE 7/30/2010 7:46 AM Page 4
Page 5
Accessing the Information Display
Information Displays
INFORM ATION D ISPLAY
Consists of several displays that provide you with useful information.
To toggle between the different
displays, press and release the
select/reset knob repeatedly.
When you start the engine, the
display shows your last active
selection from the previous drive
cycle.
6
Odometer,
Outside
temperature*
Fuel range,
Instant fuel
economy
Oil life
7
Trip meter,
Average fuel
economy
What to Do
How It Works
TIRE PRESSURE MONITORING SYSTEM (TPMS)
Monitors the vehicle’s tire pressures.
Each tire valve stem contains
a TPMS sensor.
When the tire pressure drops
significantly below recommended
levels, the low tire pressure
indicator comes on.
If the TPMS indicator appears, there
may be a problem with the system.
See your dealer.
1. Visually inspect the tires for
damage.
2. Use a tire air pressure gauge to
check which tire(s) have low
pressure.
3. Inflate the tire(s), if necessary,
to the recommended pressures
listed on the label on the
driver’s doorjamb.
*EX only
11 Odyssey TRG_LX EX:ATG_NEW STYLE 7/30/2010 7:47 AM Page 5
Page 6
98
HOMELI N K
®
(EX O NLY)
The HomeLink Universal Transceiver can be programmed to operate up to three
remote-controlled devices around your home,such as garage doors, lighting, or home
security systems.
Press and hold the button on the
remote and the HomeLink button at
the same time. Then, while
continuing to hold the HomeLink
button, press and release the button
on the remote every 2 seconds.
Does the LED blink at a faster rate within 20
seconds?
Press and hold
the HomeLink
button again.
Training
complete
YESNO
HomeLink indicator
flashes for 2 seconds,
then remains on.
HomeLink LED
remains on.
YESNO
YESNO
Position the remote transmitter you
wish to link 1–3 inches from the
HomeLink button you want to program.
1
Press and hold the desired
HomeLink button and the button on
the remote transmitter.
Does the HomeLink indicator (LED) blink at a
faster rate after about 10 seconds?
2
a
The remote has a rolling code.
Press the “learn” button on the
remote-controlled device (e.g.,
garage door opener).
Press the programmed HomeLink
button again; the remote-controlled
device should operate.
Within 30 seconds, press and
hold the programmed HomeLink
button for 2 seconds.
a
Press and hold the programmed
HomeLink button for about a
second.
Does the device (garage door opener) work?
3
b
4
5
Training a Button
If you have any problems programming HomeLink, see the owner’s manual included
with the device you are trying to program, call HomeLink at (800) 355-3515, or
visit www.homelink.com.
CD L IBRARY
(EX O NLY)
Store up to 18 audio CDs in the system memory.
Recording an Audio CD
1. Insert an audio CD. 3. Choose the location to store
the CD.
2. The system asks if you want to
record the CD to memory.
Select Yes or No.
4. The CD records. If available,
album information is displayed.
Using the CD Library
2. To view the CD library, press
LIST on the selector knob.
3. A list of recorded CDs
appears. Select the album and
track you want to hear.
To change tracks, press the
SKIP
(
) or ()
button, or
rotate the selector knob.
To change albums, press the
CATEGORY (+) or (-) button.
1. Press the CDL button.The last album
recorded begins playing.
11 Odyssey TRG_LX EX:ATG_NEW STYLE 7/30/2010 7:47 AM Page 6
Page 7
1110
OWNER LINK
Owner Link allows you to explore features and technologies specific to your vehicle,
schedule service appointments, obtain and update maintenance and service records,
manage your financial services account, and access other useful information. Register
at www.owners.honda.com to ensure that you continue to enjoy the experience of
owning a Honda.
SAFETY REMIN D ER
Your vehicle is equipped with airbags. Airbags do not replace seat belts; they add to
the protection offered by seat belts. Airbags can help protect you in some types of
collisions, but they do not provide protection in all collisions.
Always make sure you and your passengers wear seat belts, and that young children
are properly secured in a child seat or booster in the rear seat. Never place an infant
seat in the front passenger’s seat as the force of a deploying airbag can seriously
injure an infant.
FUEL RECOMME N DATION
• Only use unleaded gasoline of 87 octane or higher.
• Some gasoline in North America contains MMT, a manganese-based fuel additive.
Prolonged and consistent use of gasoline containing MMT can deteriorate your
vehicle’s performance, fuel economy, and the emission control system. Always use
MMT-free gasoline if available. Failures caused by use of gasoline containing MMT
may not be covered under warranty.
• “TOPTIER Detergent Gasoline” meets a new gasoline standard jointly established
by leading automotive manufacturers to meet the needs of today's advanced
engines. In most cases, qualifying gasoline retailers will identify their gasoline as
having met “TOPTIER Detergent Gasoline” standards at the retail location. This
fuel is guaranteed to contain the proper level of detergent additives and be free of
metallic additives. This helps avoid build-up of deposits in your engine and
emission control system. Because the level of detergency and harmful metallic
additives (such as MMT) in gasoline vary in the market, Honda endorses the use
of “TOPTIER Detergent Gasoline” where available to help maintain the
performance and reliability of your vehicle. For more information, visit
www.toptiergas.com.
• For further important information on fuel and lubricants for your car and
information on gasoline that does not contain MMT,contact your dealer or visit
Owner Link at www.owners.honda.com.
11 Odyssey TRG_LX EX:ATG_NEW STYLE 7/30/2010 7:47 AM Page 7
 Loading...