

Page 1
INSTALLATION
INSTRUCTIONS
Accessory Application Publications No.
MP3 PLAYER
ATTACHMENT KIT
2008 RIDGELINE
AII 36661
Issue Date
MAY 2007
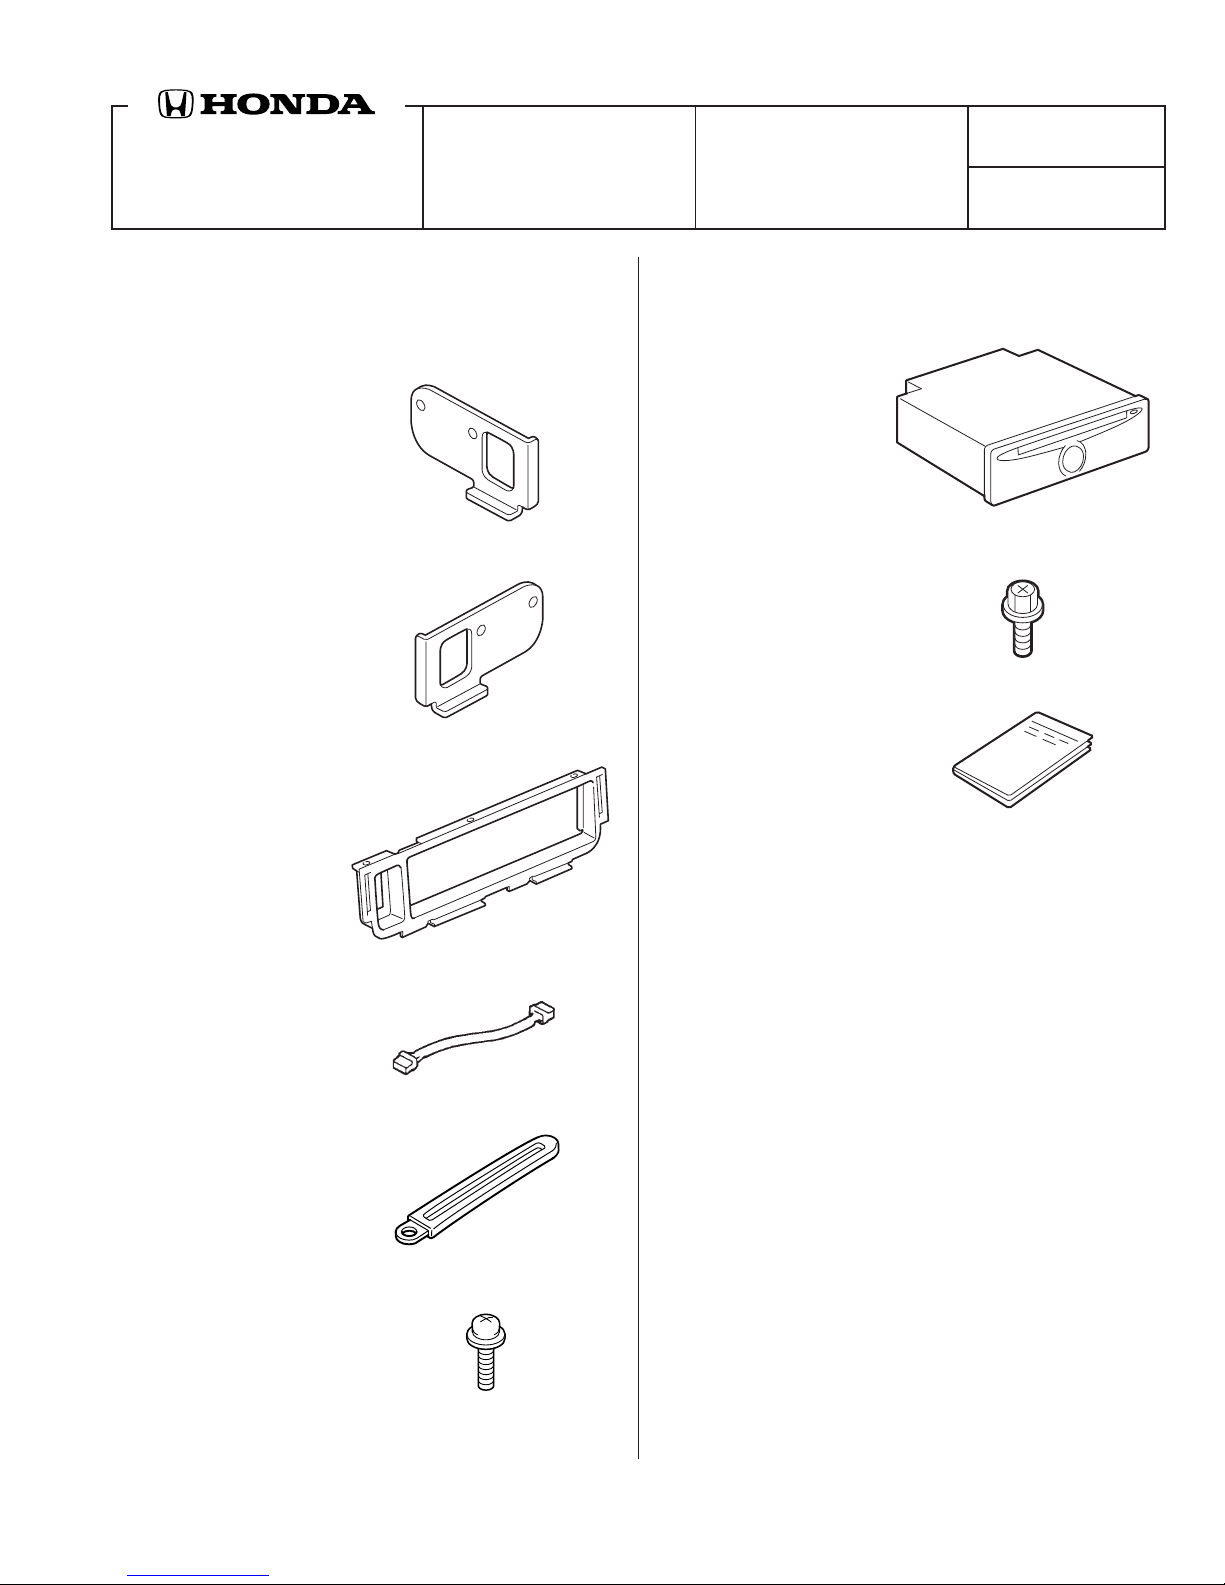
PARTS LIST
Attachment Kit:
P/N 08B06-SJC-100
Right player bracket
Left player bracket
Player panel
MP3 Player Kit (sold separately):
P/N 08A06-4E1-200
MP3 player
4 Washer-bolts, 5 x 8 mm
Owner’s Manual
Bus cable
Harness clip
Washer-screw, 4 x 8 mm
© 2007 American Honda Motor Co., Inc. - All Rights Reserved. AII 36661 (0705) 1 of 508B06-SJC-1000-91
Page 2
TOOL AND SUPPLIES REQUIRED
Phillips screwdriver
Flat-tip screwdriver
Shop towel
INSTALLATION
Customer Information: The information in this
installation instruction is intended for use only by
skilled technicians who have the proper tools,
equipment, and training to correctly and safely add
equipment to your vehicle. These procedures
should not be attempted by “do-it-yourselfers.”
1. Make sure you have the anti-theft code for the
radio, then write down the radio station presets.
2. Disconnect the negative cable from the battery.
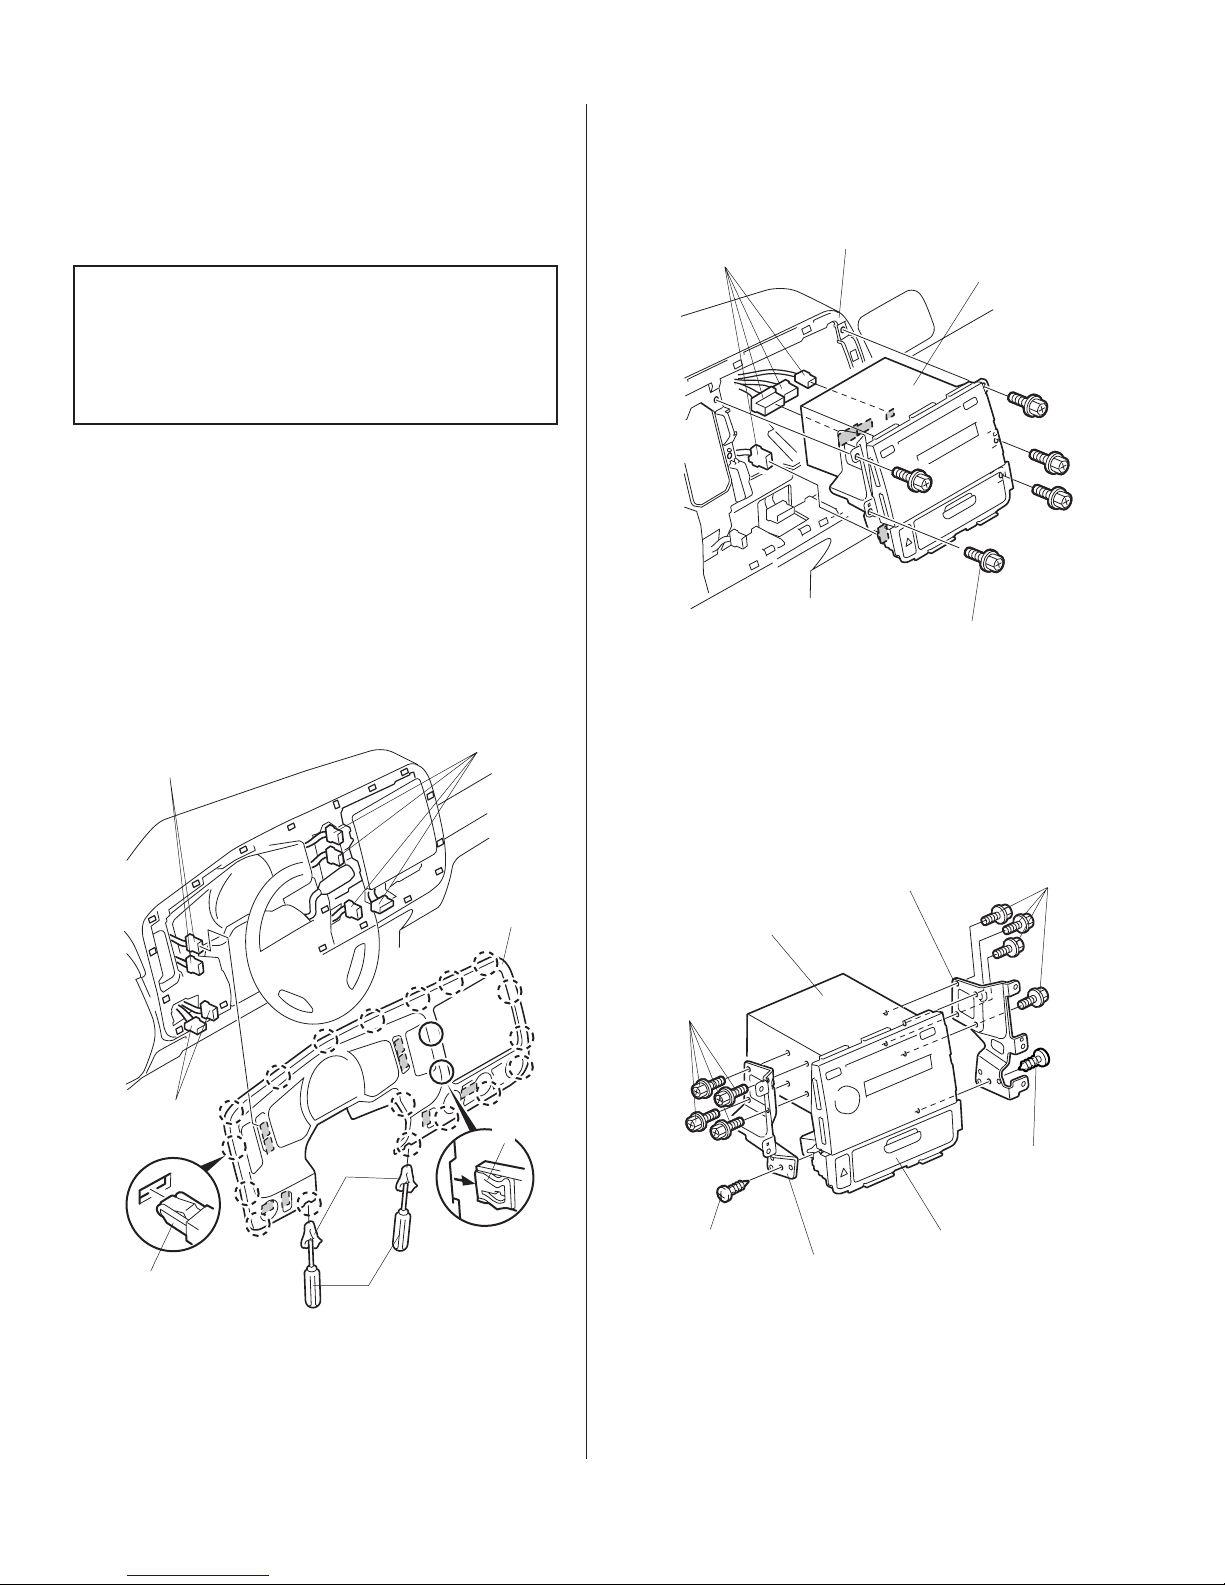
3. Insert a flat-tip screwdriver, wrapped with a shop
towel, into the groove of the meter panel to
release the two clips. Pull the meter panel out
toward you to release the 18 clips, and then
remove the meter panel by unplugging the vehicle
connectors.
VEHICLE
VEHICLE
CONNECTORS
CONNECTORS
4. Remove the audio unit (five bolts, pull the audio
unit out toward you, and unplug the vehicle
connectors).
VEHICLE
CONNECTORS
INSTRUMENT
PANEL
AUDIO
UNIT
5 BOLTS
(Reuse.)
4606030T
5. Remove the left and right vehicle brackets, and
the pocket from the audio unit by removing the
eight bolts and two self-tapping screws.
VEHICLE
CONNECTOR
18 CLIPS
SHOP
TOWEL
FLAT-TIP
SCREWDRIVER
(Insert into the groove.)
METER
PANEL
2
CLIPS
3915101T
AUDIO
UNIT
BOLTS
(Reuse.)
SELF-TAPPING
SCREW
(not reused)
RIGHT VEHICLE
BRACKET
LEFT VEHICLE
BRACKET
BOLTS
(Reuse.)
SELF-TAPPING
SCREW
(not reused)
POCKET
4701010T
2 of 5 AII 36661 (0705) © 2007 American Honda Motor Co., Inc. - All Rights Reserved.
Page 3
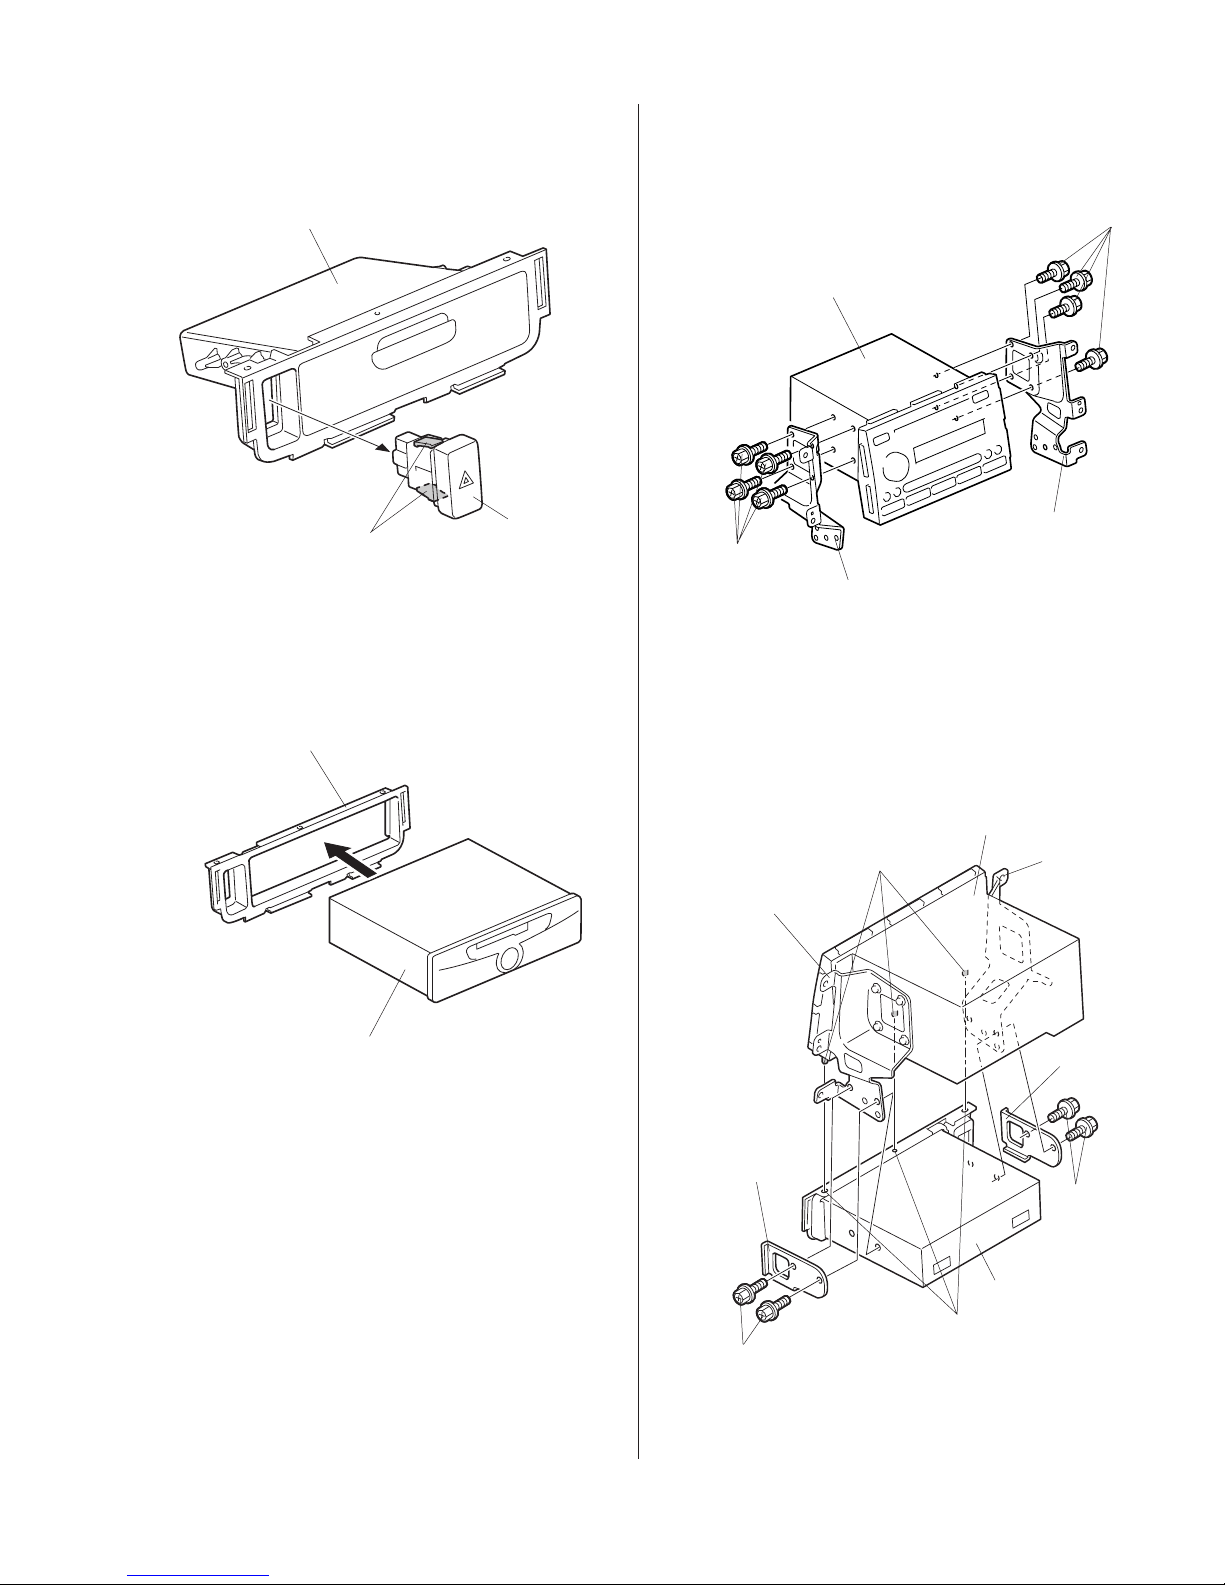
6. Remove the hazard switch from the pocket (two
4701050T
retaining tabs).
8. Reinstall the vehicle brackets to the audio unit
with the eight bolts removed in step 5.
POCKET
(not reused)
HAZARD
RETAINING
TABS
SWITCH
7. Insert the player into the new player panel.
PLAYER
PANEL
4701020T
BOLTS
(Reuse.)
AUDIO UNIT
RIGHT VEHICLE
BOLTS
(Reuse.)
LEFT VEHICLE
BRACKET
BRACKET
9. Insert the pins on the audio unit into the holes in
the player panel, and attach the audio unit to the
player. Position the left and right player brackets
on the vehicle brackets, and install the four
5 x 8 mm washer-bolts included with the player
kit.
PLAYER
4701041T
RIGHT VEHICLE
BRACKET
RIGHT
PLAYER
BRACKET
5 x 8 mm
WASHERBOLTS
(in the
Player Kit)
PINS
AUDIO UNIT
PLAYER
HOLES
LEFT
VEHICLE
BRACKET
LEFT
PLAYER
BRACKET
5 x 8 mm
WASHERBOLTS
(in the
Player Kit)
4701062T
© 2007 American Honda Motor Co., Inc. - All Rights Reserved. AII 36661 (0705) 3 of 5
Page 4
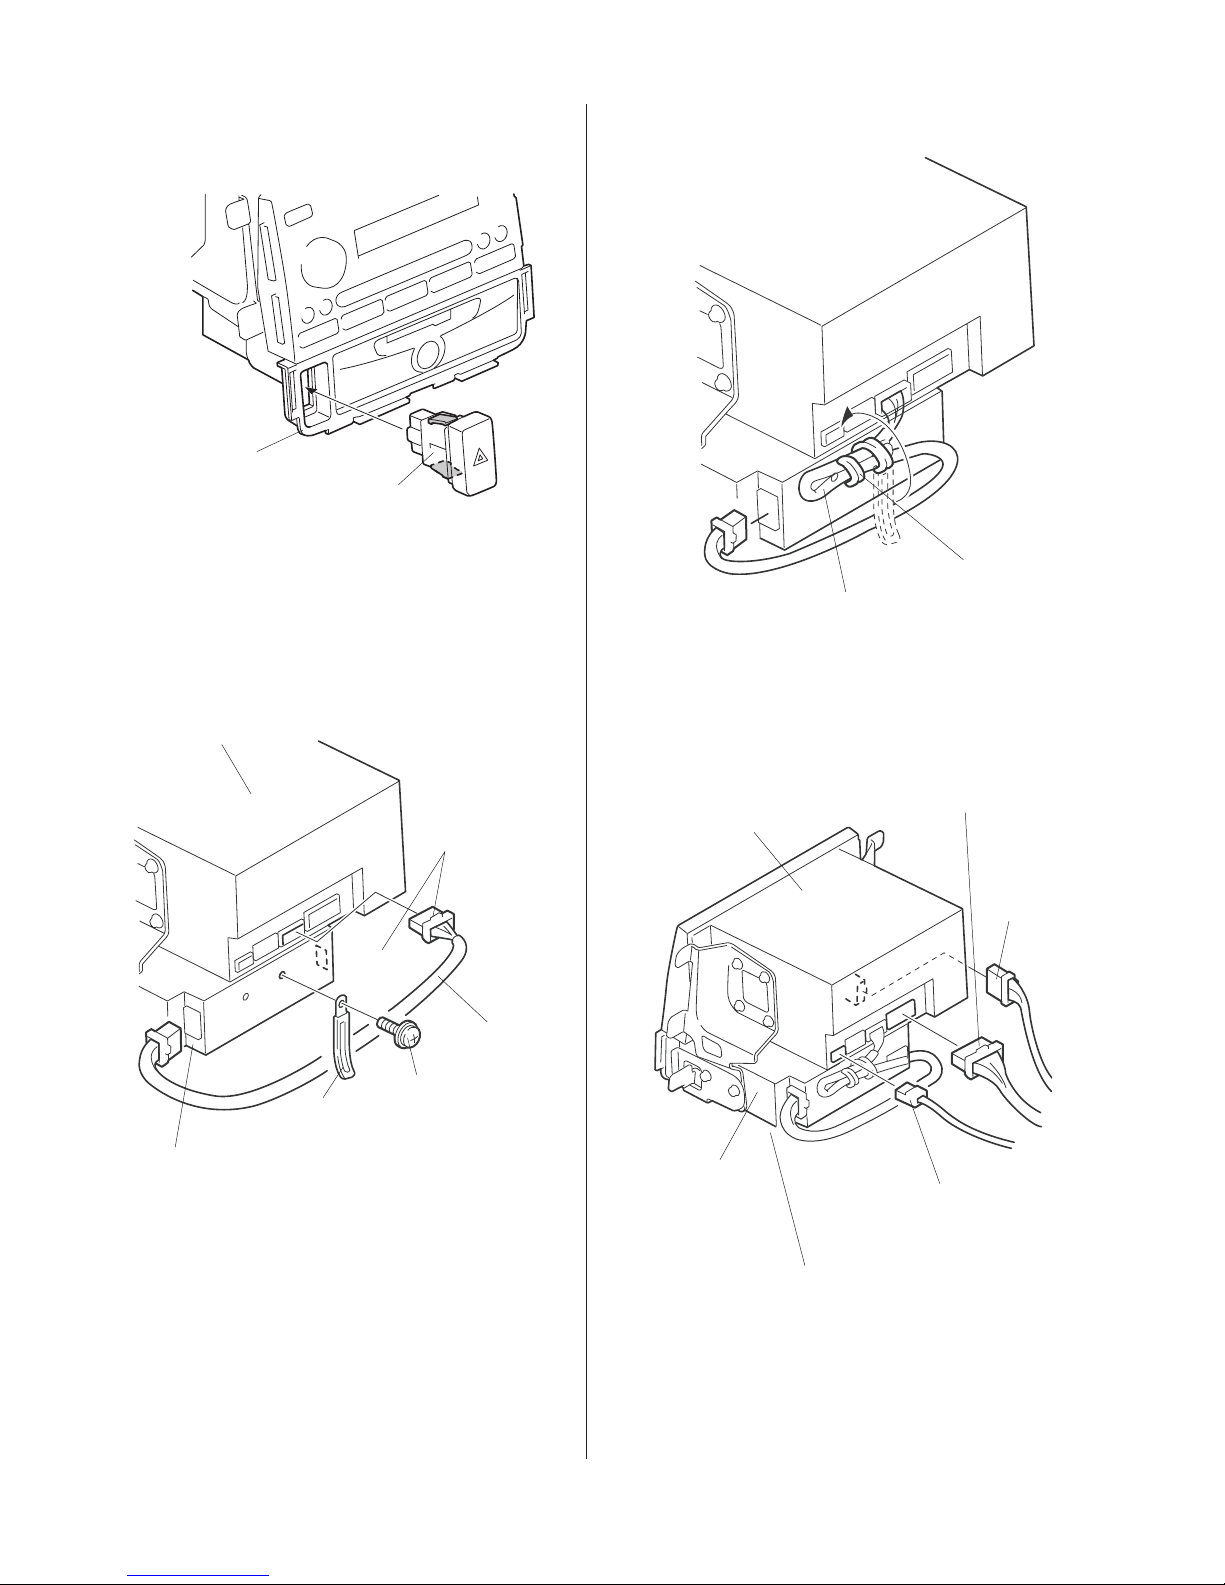
10. Install the hazard switch (removed in step 6) into
the player panel.
PLAYER
PANEL
HAZARD
SWITCH
4701031T
12. Secure the bus cable with the harness clip.
11. Plug the bus cable 14-pin connector into the audio
unit and into the player. Install the harness clip to
the rear of the player with the 4 x 8 mm washerscrew.
AUDIO
UNIT
14-PIN
CONNECTOR
BUS
CABLE
4 x 8 mm
HARNESS
CLIP
PLAYER
WASHERSCREW
HARNESS CLIP
BUS CABLE
13. Plug the vehicle connectors into the audio unit,
and into the player.
VEHICLE 20-PIN
AUDIO
UNIT
PLAYER
CONNECTOR
HAZARD
SWITCH
CONNECTOR
ANTENNA
CONNECTOR
VEHICLE 14-PIN
CONNECTOR or ACCESSORY
XM RADIO 14-PIN
CONNECTOR
(if equipped)
4 of 5 AII 36661 (0705) © 2007 American Honda Motor Co., Inc. - All Rights Reserved.
Page 5
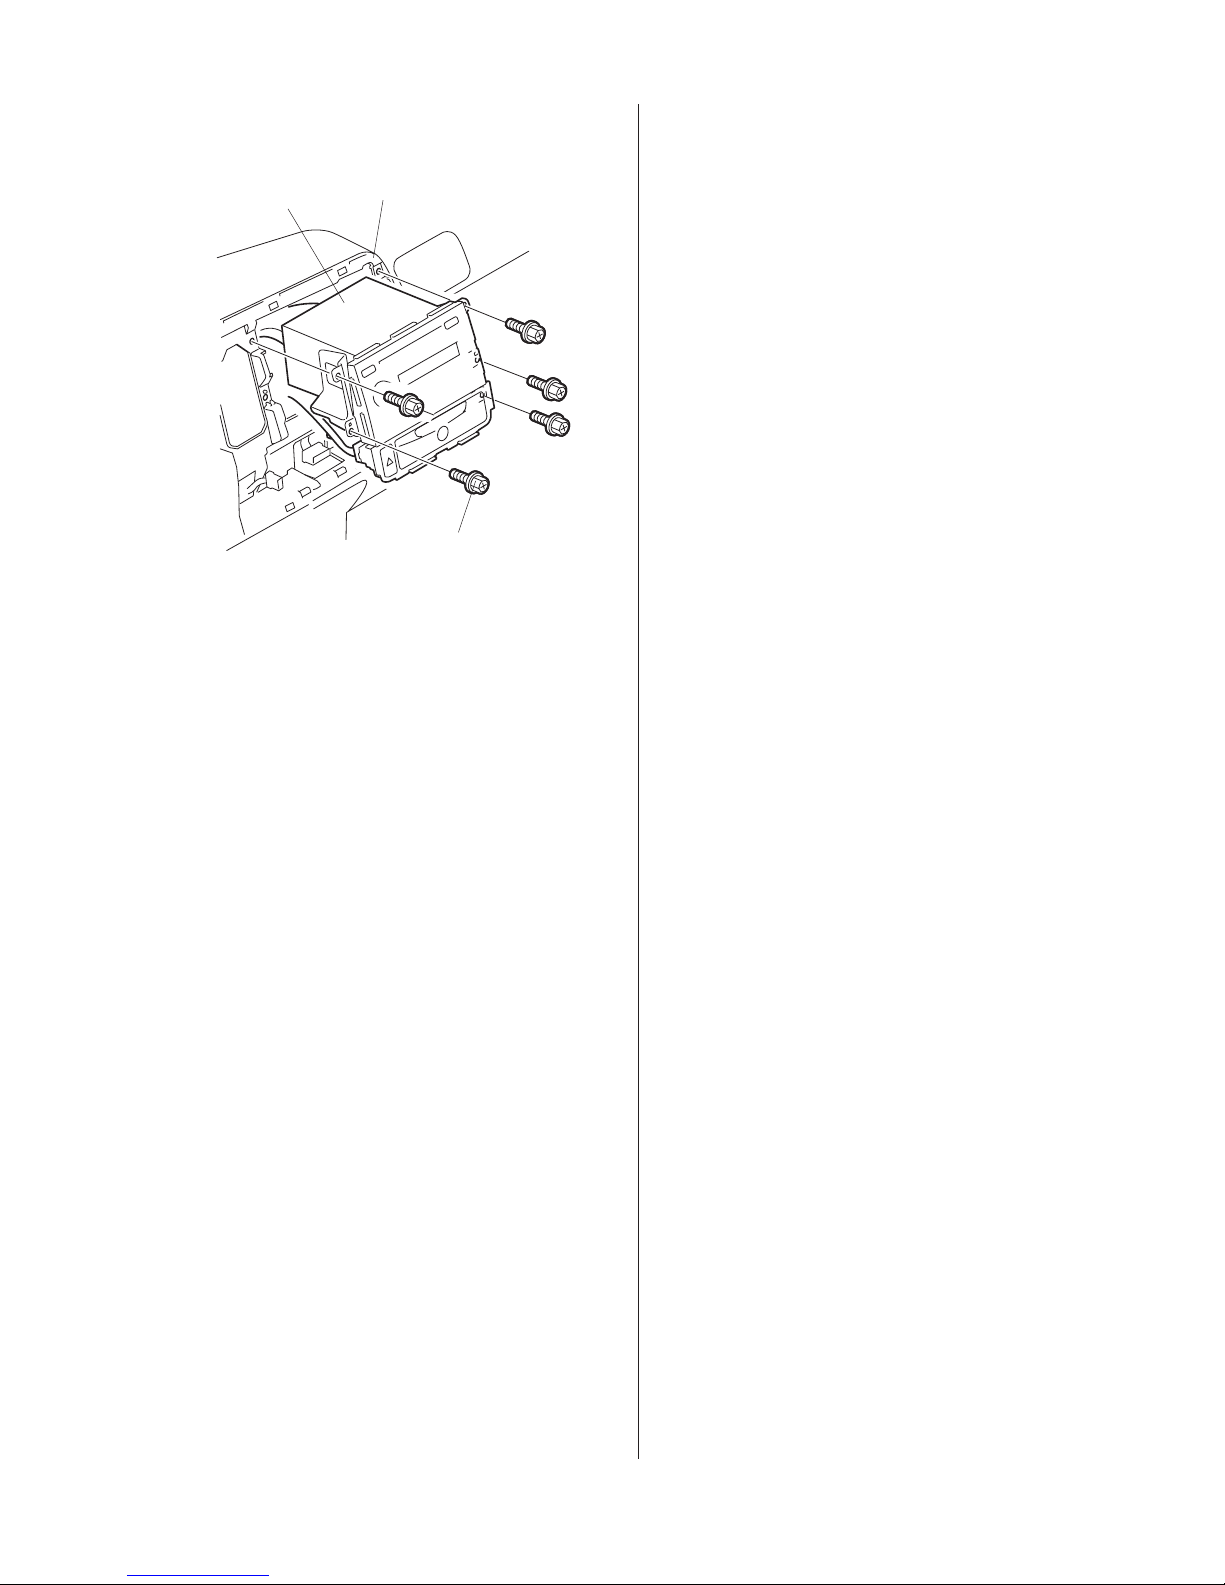
14. Reinstall the audio unit/player assembly.
AUDIO UNIT/
PLAYER ASSEMBLY
INSTRUMENT
PANEL
5 BOLTS
(Reuse.)
4701131T
15. Check that all wire harnesses are routed properly
and all connectors are plugged in.
16. Reconnect the negative cable to the battery.
17. Enter the customer’s radio anti-theft code, and
reset the radio station presets.
18. Set the clock.
19. Check the operation of the player according to
the owner’s manual.
20. Put the player owner’s manual in the glove box.
21. Reinstall all removed parts.
NOTE: Whenever the battery is disconnected, the
driver's window AUTO function is disabled.
22. Start the engine. Push down on the driver's
window switch until the window is fully open.
23. Pull up on the driver's window switch fully to close
the window completely, then hold the switch for
2 seconds or more.
24. Check the window AUTO function by opening and
closing the window with the driver's window
switch.
© 2007 American Honda Motor Co., Inc. - All Rights Reserved. AII 36661 (0705) 5 of 5
 Loading...