


INTRODUCTION
Thank you for purchasing a Honda engine. We want to help you to
get the best results from your new engine and to operate it safely.
This manual contains information on how to do that; please read it
carefully before operating the engine. If a problem should arise, or
if you have any questions about your engine, consult an
authorized Honda servicing dealer.
All information in this publication is based on the latest product
information available at the time of printing. Honda Motor Co., Ltd.
reserves the right to make changes at any time without notice and
without incurring any obligation. No part of this publication may
be reproduced without written permission.
This manual should be considered a permanent part of the engine
and should remain with the engine if resold.
Review the instructions provided with the equipment powered by
this engine for any additional information regarding engine
startup, shutdown, operation, adjustments or any special
maintenance instructions.
United States, Puerto Rico, and U.S. Virgin Islands:
We suggest you read the warranty policy to fully understand its
coverage and your responsibilities of ownership. The warranty
policy is a separate document that should have been given to you
by your dealer.
SAFETY MESSAGES
OWNER’S MANUAL
MANUEL DE L’UTILISATEUR
MANUAL DEL PROPIETARIO
GX120 · GX160
FOR RAMMER-TYPE COMPACTORS
The engine exhaust from this product
contains chemicals known to the State of
California to cause cancer, birth defects
or other reproductive harm.
ENGLISHFRANÇAISESPAÑOL
Your safety and the safety of others are very important. We have
provided important safety messages in this manual and on the
engine. Please read these messages carefully.
A safety message alerts you to potential hazards that could hurt
you or others. Each safety message is preceded by a safety alert
symbol and one of three words, DANGER, WARNING, or
CAUTION.
These signal words mean:
You WILL be KILLED or SERIOUSLY
HURT if you don’t follow instructions.
You CAN be KILLED or SERIOUSLY
HURT if you don’t follow instructions.
You CAN be HURT if you don’t follow
instructions.
Each message tells you what the hazard is, what can happen, and
what you can do to avoid or reduce injury.
DAMAGE PREVENTION MESSAGES
You will also see other important messages that are preceded by
the word NOTICE.
This word means:
Your engine or other property can be damaged if you
don’t follow instructions.
The purpose of these messages is to help prevent damage to your
engine, other property, or the environment.
CONTENTS
.......................INTRODUCTION .1
................SAFETY MESSAGES .1
..........SAFETY INFORMATION .2
.........................SAFETY LABEL .2
COMPONENT & CONTROL
................................LOCATION .2
BEFORE OPERATION
....................................CHECKS .3
..............................OPERATION .3
SAFE OPERATING
.....................PRECAUTIONS .3
THE IMPORTANCE OF
....................MAINTENANCE .5
MAINTENANCE
............................SCHEDULE .5
...........................REFUELING .6
...........................ENGINE OIL .6
............Recommended Oil .6
..................Oil Level Check .6
.........................Oil Change .7
........................AIR CLEANER .8
..........................Inspection .8
............................Cleaning .8
......STARTING THE ENGINE .3
......STOPPING THE ENGINE .4
.....SERVICING YOUR ENGINE .5
......MAINTENANCE SAFETY .5
.......SAFETY PRECAUTIONS .5
........................SPARK PLUG .8
....................AIR VENT TUBE .9
...........................IDLE SPEED .9
HELPFUL TIPS &
........................SUGGESTIONS .9
.....STORING YOUR ENGINE .9
................TRANSPORTING .10
TAKING CARE OF
....UNEXPECTED PROBLEMS .11
..TECHNICAL INFORMATION .11
.....Serial Number Location .11
Carburetor Modifications for
.....High Altitude Operation .12
Emission Control System
.........................Information .12
.....................Specifications .13
........Tuneup Specifications .13
Quick Reference
.........................Information .13
..................Wiring Diagram .13
.CONSUMER INFORMATION .14
Distributor/Dealer Locator
.........................Information .14
Customer Service
.........................Information .14
2006 Honda Motor Co., Ltd. All Rights Reserved
37Z4F801
00X37-Z4F-8010
−
GX120U1·GX160U1 (RAMMER)
ENGLISH
1

COMPONENT & CONTROL LOCATIONSAFETY INFORMATION
Understand the operation of all controls and learn how to stop
the engine quickly in case of emergency. Make sure the operator
receives adequate instruction before operating the equipment.
Do not allow children to operate the engine. Keep children and
pets away from the area of operation.
Your engine’s exhaust contains poisonous carbon monoxide.
Do not run the engine without adequate ventilation, and never
run the engine indoors.
The engine and exhaust become very hot during operation.
Keep the engine at least 1 meter (3 feet) away from buildings
and other equipment during operation. Keep flammable
materials away, and do not place anything on the engine while it
is running.
SAFETY LABEL
This label warns you of potential hazards that can cause serious
injury. Read it carefully.
If the label comes off or becomes hard to read, contact your Honda
dealer for replacement.
AIR VENT TUBE
AIR CLEANER
SPARK PLUG
MUFFLER
STARTER GRIP
OIL FILLER CAP/
DIPSTICK
Labels come with the engine.
Gasoline is highly flammable and explosive.
Turn engine off and let cool before refueling.
The engine emits toxic poisonous carbon
monoxide gas. Do not run in an enclosed area.
Read Owner’s Manual before operation.
For Canadian types only:
French label.
CHOKE LEVER
OIL DRAIN PLUG
RECOIL STARTER
ENGINE CONTROLS
ENGINE SWITCH
2
ENGLISH

BEFORE OPERATION CHECKS OPERATION
IS YOUR ENGINE READY TO GO?
For your safety, and to maximize the service life of your
equipment, it is very important to take a few moments before you
operate the engine to check its condition. Be sure to take care of
any problem you find, or have your servicing dealer correct it,
before you operate the engine.
Improperly maintaining this engine, or failure to
correct a problem before operation, can cause a
malfunction in which you can be seriously hurt or
killed.
Always perform a preoperation inspection before
each operation, and correct any problem.
Before beginning your preoperation checks, be sure the engine is
level and the engine switch is in the OFF position.
Always check the following items before you start the engine:
Check the General Condition of the Engine
1.
Look around and underneath the engine for signs of oil or
gasoline leaks.
2.
Remove any excessive dirt or debris, especially around the
muffler and recoil starter.
Look for signs of damage.
3.
SAFE OPERATING PRECAUTIONS
Before operating the engine for the first time, please review the
SAFETY INFORMATION
OPERATION CHECKS
section on page and the
2
.
BEFORE
Carbon monoxide gas is toxic. Breathing it can cause
unconsciousness and even kill you.
Avoid any areas or actions that expose you to carbon
monoxide.
Review the instructions provided with the equipment powered by
this engine for any safety precautions that should be observed
with engine startup, shutdown or operation.
STARTING THE ENGINE
1.
If the fuel tank is equipped with a valve, be sure the fuel valve
and fuel filler cap vent are in the OPEN or ON position before
attempting to start the engine. For specific instructions on fuel
valve and fuel filler cap vent operation, refer to the instructions
provided with the equipment powered by this engine.
2.
To start a cold engine, move the choke lever to the CLOSED
position.
CHOKE LEVER
Check that all shields and covers are in place, and all nuts, bolts,
4.
and screws are tightened.
Check the Engine
Check the fuel level. Starting with a full tank will help to
1.
eliminate or reduce operating interruptions for refueling.
Check the engine oil level (see page ). Running the engine
2.
6
with a low oil level can cause engine damage.
3.
Check the air filter element (see page ). A dirty air filter
8
element will restrict air flow to the carburetor, reducing engine
performance.
4.
Check the equipment powered by this engine.
Review the instructions provided with the equipment powered
by this engine for any precautions and procedures that should
be followed before engine startup.
CLOSED
CLOSED
OOPPEENN
To restart a warm engine, leave the choke lever in the OPEN
position.
Move the throttle lever to the MIN. position. The throttle lever is
3.
mounted on the equipment powered by this engine. Refer to the
instructions provided with that equipment for information about
your specific throttle control.
THROTTLE LEVER
(on the equipment)
MIN.
ENGLISH
3

4.
Turn the engine switch to the ON position.
ENGINE SWITCH
ON
Position the throttle lever for the desired engine speed. For
7.
engine speed recommendations, refer to the instructions
provided with the equipment powered by this engine.
MIN.
5.
Operate the starter.
Pull the starter grip lightly until you feel resistance, then pull
briskly in the direction of the arrow as shown below. Return the
starter grip gently.
STARTER GRIP
DDiirreeccttiioonn ttoo ppuullll
Do not allow the starter grip to snap back against the engine.
Return it gently to prevent damage to the starter.
6.
If the choke lever was moved to the CLOSED position to start the
engine, gradually move it to the OPEN position as the engine
warms up.
THROTTLE LEVER
(on the equipment)
MAX.
STOPPING THE ENGINE
To stop the engine in an emergency, simply turn the engine switch
to the OFF position. Under normal conditions, use the following
procedure.
Move the throttle lever to the MIN. position.
1.
THROTTLE LEVER
(on the equipment)
Turn the engine switch to the OFF position.
2.
ENGINE SWITCH
MIN.
CHOKE LEVER
OPEN
CLOSED
OOPPEENN
4
3.
If the fuel tank is equipped with a fuel valve or a fuel filler cap
with a vent, turn them to the CLOSED or OFF position.
ENGLISH
OFF

SERVICING YOUR ENGINE
THE IMPORTANCE OF MAINTENANCE
Good maintenance is essential for safe, economical and troublefree operation. It will also help reduce pollution.
Improper maintenance, or failure to correct a
problem before operation, can cause a malfunction in
which you can be seriously hurt or killed.
Always follow the inspection and maintenance
recommendations and schedules in this owner’s
manual.
To help you properly care for your engine, the following pages
include a maintenance schedule, routine inspection procedures,
and simple maintenance procedures using basic hand tools. Other
service tasks that are more difficult, or require special tools, are
best handled by professionals and are normally performed by a
Honda technician or other qualified mechanic.
The maintenance schedule applies to normal operating conditions.
If you operate your engine under severe conditions, such as
sustained high-load or high-temperature operation, or use in
unusually wet or dusty conditions, consult your servicing dealer
for recommendations applicable to your individual needs and use.
MAINTENANCE SCHEDULE
REGULAR SERVICE PERIOD (3)
Perform at every
indicated month or
operating hour interval,
whichever comes first.
ITEM
Engine oil
Air filter
Spark plug
Idle speed
Valve clearance
Combustion
chamber
Fuel tank &
filter
Fuel tube
Replace the paper air filter element only.
*
(1)
Service more frequently when used in dusty areas.
Check level
Change
Check
Clean
Replace
Check-adjust
Replace
Check-adjust
Check-adjust
Clean
Clean
Check
Each
Use
Every 3
First
Months
Month
or
or
50 Hrs
20 Hrs
(1)
After every 500 Hrs. (2)
Every 2 years
(Replace if necessary) (2)
Every 6
Months
or
100 Hrs
(2)
Every
Year
or
300 Hrs
*
(2)
(2)
Refer
to
Page
6
7
8
8
8
9
Shop
manual
Shop
manual
Shop
manual
Shop
manual
Maintenance, replacement, or repair of the emission control
devices and systems may be performed by any engine repair
establishment or individual, using parts that are ‘‘certified’’ to
EPA standards.
MAINTENANCE SAFETY
Some of the most important safety precautions follow. However,
we cannot warn you of every conceivable hazard that can arise in
performing maintenance. Only you can decide whether or not you
should perform a given task.
Failure to properly follow maintenance instructions
and precautions can cause you to be seriously hurt or
killed.
Always follow the procedures and precautions in this
owner’s manual.
SAFETY PRECAUTIONS
Make sure the engine is off before you begin any maintenance
or repairs. This will eliminate several potential hazards:
Carbon monoxide poisoning from engine exhaust.
−
Be sure there is adequate ventilation whenever you operate
the engine.
Burns from hot parts.
−
Let the engine and exhaust system cool before touching.
Injury from moving parts.
−
Do not run the engine unless instructed to do so.
Read the instructions before you begin, and make sure you have
the tools and skills required.
To reduce the possibility of fire or explosion, be careful when
working around gasoline. Use only a nonflammable solvent, not
gasoline, to clean parts. Keep cigarettes, sparks and flames
away from all fuel related parts.
Remember that an authorized Honda servicing dealer knows your
engine best and is fully equipped to maintain and repair it.
To ensure the best quality and reliability, use only new genuine
Honda parts or their equivalents for repair and replacement.
(2)
These items should be serviced by your servicing dealer,
unless you have the proper tools and are mechanically
proficient. Refer to Honda shop manual for service procedures.
(3)
For commercial use, log hours of operation to determine
proper maintenance intervals.
Failure to follow this maintenance schedule could result in nonwarrantable failures.
ENGLISH
5

REFUELING
ENGINE OIL
Recommended Fuel
Unleaded gasoline
U. S.
Except U. S.
Pump octane rating 86 or higher
Research octane rating 91 or higher
Pump octane rating 86 or higher
This engine is certified to operate on unleaded gasoline with a
pump octane rating of 86 or higher (a research octane rating of 91
or higher).
Refuel in a well-ventilated area with the engine stopped. If the
engine has been running, allow it to cool first. Never refuel the
engine inside a building where gasoline fumes may reach flames
or sparks.
You may use regular unleaded gasoline containing no more than
10% Ethanol (E10) or 5% Methanol by volume. In addition,
Methanol must contain cosolvents and corrosion inhibitors. Use of
fuels with content of Ethanol or Methanol greater than shown
above may cause starting and/or performance problems. It may
also damage metal, rubber, and plastic parts of the fuel system.
Engine damage or performance problems that result from using a
fuel with percentages of Ethanol or Methanol greater than shown
above are not covered under warranty.
Gasoline is highly flammable and explosive, and you
can be burned or seriously injured when refueling.
Stop engine and keep heat, sparks, and flame away.
Refuel only outdoors.
Wipe up spills immediately.
Oil is a major factor affecting performance and service life. Use
4-stroke automotive detergent oil.
Recommended Oil
SAE Viscosity Grades
Use 4-stroke motor oil that
meets or exceeds the
requirements for API service
classification SJ or later (or
equivalent). Always check the
API service label on the oil
container to be sure it includes
the letters SJ or later (or
AMBIENT TEMPERATURE
equivalent).
SAE 10W-30 is recommended for general use. Other viscosities
shown in the chart may be used when the average temperature in
your area is within the indicated range.
Oil Level Check
Check the engine oil level with the engine stopped and in a level
position.
1.
Remove the oil filler cap/dipstick and wipe it clean.
2.
Insert the oil filler cap/dipstick into the oil filler neck as shown,
but do not screw it in, then remove it to check the oil level.
3.
If the oil level is near or below the lower limit mark on the
dipstick, fill with the recommended oil to the upper limit mark
(bottom edge of the oil fill hole). Do not overfill.
Fuel can damage paint and some types of plastic. Be careful not to
spill fuel when filling your fuel tank. Damage caused by spilled
fuel is not covered under the
Distributor’s Limited Warranty.
Never use stale or contaminated gasoline or oil/gasoline mixture.
Avoid getting dirt or water in the fuel tank.
Refuel carefully to avoid spilling fuel.
Keep gasoline away from appliance pilot lights, barbecues,
electric appliances, power tools, etc.
Spilled fuel is not only a fire hazard, it causes environmental
damage. Wipe up spills immediately.
4.
Reinstall the oil filler cap/dipstick.
OIL FILLER CAP/DIPSTICK
UPPER LIMIT
OIL FILL HOLE
(bottom edge)
LOWER LIMIT
Running the engine with a low oil level can cause engine damage.
6
ENGLISH

Oil Change
Drain the used oil when the engine is warm. Warm oil drains
quickly and completely.
1.
Place a suitable container below the engine to catch the used oil,
then remove the oil filler cap/dipstick, drain plug and washer.
2.
Allow the used oil to drain completely, then reinstall the drain
plug and new washer, and tighten the drain plug securely.
Please dispose of used motor oil in a manner that is compatible
with the environment. We suggest you take used oil in a sealed
container to your local recycling center or service station for
reclamation. Do not throw it in the trash, pour it on the ground,
or down a drain.
With the engine in a level position, fill to the upper limit mark
3.
(bottom edge of the oil fill hole) on the dipstick with the
recommended oil (see page ).
6
Running the engine with a low oil level can cause engine
damage.
Install the oil filler cap/dipstick and tighten securely.
4.
OIL FILLER CAP/DIPSTICK
WASHER
UPPER LIMIT
DRAIN PLUG
ENGLISH
7

AIR CLEANER
SPARK PLUG
A dirty air cleaner will restrict air flow to the carburetor, reducing
engine performance. If you operate the engine in very dusty areas,
clean the air filter more often than specified in the MAINTENANCE
SCHEDULE.
Operating the engine without an air filter, or with a damaged air
filter, will allow dirt to enter the engine, causing rapid engine wear.
This type of damage is not covered by the
Distributor’s Limited
Warranty.
Inspection
1.
Release the retaining clip, and remove the air cleaner cover.
2.
Remove and inspect the air filter elements. If the air filter
element is dirty, clean the air filter elements as described below.
Replace damaged filter elements. Always replace the paper air
filter element at the scheduled interval (see page ).
3.
Place the foam air filter element over the paper element, and
5
reinstall the assembled air filter elements. Insert the open end of
the air filter elements into the case as shown, so the closed end
is toward the air cleaner cover.
4.
Hook the bottom edge of the air cleaner cover onto the case,
then secure the cover with the retaining clip.
RETAINING CLIP
PAPER FILTER ELEMENT
CLOSED END
FOAM FILTER ELEMENT
INCORRECT
AIR CLEANER CASE
OPEN END
CORRECT
Recommended Spark Plugs:
BPR4ES (NGK)
W14EPR-U (DENSO)
The recommended spark plug has the correct heat range for
normal engine operating temperatures.
An incorrect spark plug can cause engine damage.
For good performance, the spark plug must be properly gapped
and free of deposits.
1.
Disconnect the spark plug cap,
SPARK PLUG WRENCH
and remove any dirt from
around the spark plug area.
2.
Remove the spark plug with a
13/16-inch spark plug wrench.
Inspect the spark plug.
3.
Replace it if damaged or
badly fouled, if the sealing
washer is in poor condition,
or if the electrode is worn.
Measure the spark plug
4.
electrode gap with a wiretype feeler gauge. Correct the
gap, if necessary, by carefully
SIDE ELECTRODE
0.70 0.80 mm
−
(0.028 0.031 in)
−
bending the side electrode.
The gap should be:
0.70 0.80 mm (0.028 0.031 in)
−−
Install the spark plug carefully,
5.
SEALING
WASHER
by hand, to avoid crossthreading.
6.
After the spark plug is seated, tighten with a 13/16-inch spark
plug wrench to compress the sealing washer.
When installing a new spark plug, tighten 1/2 turn after the spark
7.
plug seats to compress the washer.
AIR CLEANER COVER
PLATE
HOLE
Cleaning
1.
Clean the air filter elements if they are to be reused.
Paper air filter element: Tap the filter element several times on a
hard surface to remove dirt, or blow compressed air [not
exceeding 207 kPa (2.1 kgf/cm
, 30 psi)] through the filter
element from the inside. Never try to brush off dirt; brushing will
force dirt into the fibers.
Foam air filter element: Clean in warm soapy water, rinse, and
allow to dry thoroughly. Or clean in non-flammable solvent and
allow to dry. Dip the filter element in clean engine oil, then
squeeze out all excess oil. The engine will smoke when started if
too much oil is left in the foam.
2.
Wipe dirt from the inside of the air cleaner case and cover, using
a moist rag. Be careful to prevent dirt from entering the air duct
that leads to the carburetor.
8
When reinstalling the original spark plug, tighten 1/8 1/4 turn
8.
after the spark plug seats to compress the washer.
A loose spark plug can overheat and damage the engine.
Overtightening the spark plug can damage the threads in the
cylinder head.
9.
Attach the spark plug cap to the spark plug.
ENGLISH
−

AIR VENT TUBE
HELPFUL TIPS & SUGGESTIONS
Inspection
Check that the air vent tube is
secured by the tube retainers
without collapsing or kinking.
IDLE SPEED
Adjustment
1.
Start the engine outdoors,
andallowittowarmupto
operating temperature.
2.
With the engine idling, turn
the throttle stop screw to
obtain the standard idle
speed.
Standard idle speed:
1,500 150 rpm
±
RETAINERS
AIR VENT TUBE
THROTTLE STOP SCREW
STORING YOUR ENGINE
Storage Preparation
Proper storage preparation is essential for keeping your engine
trouble-free and looking good. The following steps will help to
keep rust and corrosion from impairing your engine’s function and
appearance, and will make the engine easier to start when you use
it again.
Cleaning
If the engine has been running, allow it to cool for at least half an
hour before cleaning. Clean all exterior surfaces, touch up any
damaged paint, and coat other areas that may rust with a light film
of oil.
Using a garden hose or pressure washing equipment can force
water into the air cleaner or muffler opening. Water in the air
cleaner will soak the air filter, and water that passes through the
air filter or muffler can enter the cylinder, causing damage.
Fuel
Gasoline will oxidize and deteriorate in storage. Deteriorated
gasoline will cause hard starting, and it leaves gum deposits that
clog the fuel system. If the gasoline in your engine deteriorates
during storage, you may need to have the carburetor, and other
fuel system components, serviced or replaced.
The length of time that gasoline can be left in your fuel tank and
carburetor without causing functional problems will vary with
such factors as gasoline blend, your storage temperatures, and
whether the fuel tank is partially or completely filled. The air in a
partially filled fuel tank promotes fuel deterioration. Very warm
storage temperatures accelerate fuel deterioration. Fuel problems
may occur within a few months, or even less if the gasoline was
not fresh when you filled the fuel tank.
Fuel system damage or engine performance problems resulting
from neglected storage preparation are not covered under the
Distributor’s Limited Warranty
.
You can extend fuel storage life by adding a gasoline stabilizer
that is formulated for that purpose, or you can avoid fuel
deterioration problems by draining the fuel tank and carburetor.
Adding a Gasoline Stabilizer to Extend Fuel Storage Life
When adding a gasoline stabilizer, fill the fuel tank with fresh
gasoline. If only partially filled, air in the tank will promote fuel
deterioration during storage. If you keep a container of gasoline
for refueling, be sure that it contains only fresh gasoline.
1.
Add gasoline stabilizer following the manufacturer’s instructions.
2.
After adding a gasoline stabilizer, run the engine outdoors for 10
minutes to be sure that treated gasoline has replaced the
untreated gasoline in the carburetor.
3.
Stop the engine.
ENGLISH
9

Gasoline is highly flammable and explosive, and you
can be burned or seriously injured when handling
fuel.
Stop engine and keep heat, sparks, and flame away.
Handle fuel only outdoors.
Wipe up spills immediately.
Drain the fuel tank, following the instructions of the equipment
1.
manufacturer.
Place an approved gasoline container below the carburetor, and
2.
use a funnel to avoid spilling fuel. Loosen or remove the
carburetor drain bolt and washer.
CARBURETOR
WASHER
DRAIN BOLT
After all fuel has drained into the container, install the drain bolt
3.
and washer and tighten the drain bolt.
Engine Oil
Change the engine oil (see page ).
1.
Remove the spark plug (see page ).
2.
Pour a tablespoon 5 10 cm
3.
−−
7
8
(5 10 cc) of clean engine oil into
the cylinder.
Pull the starter rope several times to distribute the oil in the
4.
cylinder.
Reinstall the spark plug.
5.
Pull the starter rope slowly until resistance is felt and the notch
6.
on the starter pulley aligns with the hole at the top of the recoil
starter cover. This will close the valves so moisture cannot enter
the engine cylinder. Return the starter rope gently.
Storage PrecautionsDraining the Fuel Tank and Carburetor
If your engine will be stored with gasoline in the fuel tank and
carburetor, it is important to reduce the hazard of gasoline vapor
ignition. Select a well-ventilated storage area away from any
appliance that operates with a flame, such as a furnace, water
heater, or clothes dryer. Also avoid any area with a sparkproducing electric motor, or where power tools are operated.
If possible, avoid storage areas with high humidity, because that
promotes rust and corrosion.
Keep the engine level in storage. Tilting can cause fuel or oil
leakage.
Unless all fuel has been drained from the fuel tank, leave the fuel
valve and fuel filler cap vent in the CLOSED or OFF position to
reduce the possibility of fuel leakage.
With the engine and exhaust system cool, cover the engine to
keep out dust. A hot engine and exhaust system can ignite or melt
some materials. Do not use sheet plastic as a dust cover. A
nonporous cover will trap moisture around the engine, promoting
rust and corrosion.
Removal from Storage
Check your engine as described in the
CHECKS
section of this manual (see page ).
BEFORE OPERATION
3
If the fuel was drained during storage preparation, fill the tank with
fresh gasoline. If you keep a container of gasoline for refueling, be
sure it contains only fresh gasoline. Gasoline oxidizes and
deteriorates over time, causing hard starting.
If the cylinder was coated with oil during storage preparation, the
engine will smoke briefly at startup. This is normal.
TRANSPORTING
If the engine has been running, allow it to cool for at least 15
minutes before storing or loading on the transport vehicle. A hot
engine and muffler can burn you and can ignite some materials.
If the fuel tank is equipped with a fuel valve and/or a fuel filler cap
vent valve, turn them to the CLOSED or OFF position.
You can rest the equipment on its side if the fuel tank is equipped
with a fuel valve and a fuel filler cap vent, and both are in the
CLOSED or OFF position. Position the equipment so the carburetor
is facing up, as shown.
INCORRECT
FRONT
10
Align notch on pulley with hole at top of cover.
ENGLISH
INCORRECT
LEFT
REAR (Operator’s side)
INCORRECT
CORRECT
RIGHT
CARBURETOR
As viewed from the above

TAKING CARE OF UNEXPECTED PROBLEMS TECHNICAL INFORMATION
ENGINE WILL
NOT START
1.
Check control
positions.
2.
Check fuel.
3.
Remove and
inspect spark
plug.
4.
Take engine to
an authorized
Honda
servicing
dealer, or refer
to shop
manual.
Possible Cause Correction
Fuel valve and/
Turn valve(s) ON.
or fuel filler cap
vent valve OFF.
Choke open.
Move lever to
CLOSED position
unless the engine
is warm.
Engine switch
OFF.
Out of fuel.
Bad fuel; engine
stored without
treating or
draining
Turn engine switch
to ON position.
Refuel (p. 6).
Drain fuel tank and
carburetor (p. 10).
Refuel with fresh
gasoline(p. 6).
gasoline, or
refueled with
bad gasoline.
Spark plug faulty,
fouled, or
Gap or replace
spark plug (p. 8).
improperly
gapped.
Spark plug wet
with fuel
(flooded engine).
Dry and reinstall
spark plug. Start
engine with
throttle lever in
MAX. position.
Fuel filter
restricted,
carburetor
Replace or repair
faulty components
as necessary.
malfunction,
ignition
malfunction,
valves stuck, etc.
Serial Number Location
Record the engine serial
number, type and purchase
date in the space below. You
will need this information when
ordering parts and when
making technical or warranty
inquiries.
SERIAL NUMBER &
ENGINE TYPE LOCATION
Engine serial number: __ __ __ __ __ __ __ __ __ __ __
−
Engine type: ___ ___ ___ ___
Date Purchased: ______ / ______ / ______
ENGINE LACKS
POWER
1.
Check air filter.
2.
Check fuel.
3.
Take engine to
an authorized
Honda
servicing
dealer, or refer
to shop
manual.
Possible Cause Correction
Filter element(s)
restricted.
Clean or replace
filter element(s)
(p. 8).
Bad fuel; engine
stored without
treating or
draining
Drain fuel tank and
carburetor (p. 10).
Refuel with fresh
gasoline (p. 6).
gasoline, or
refueled with
bad gasoline.
Fuel filter
restricted,
carburetor
Replace or repair
faulty components
as necessary.
malfunction,
ignition
malfunction,
valves stuck, etc.
ENGLISH
11

Oxygenated Fuels
Emission Control System Information
Some conventional gasolines are being blended with alcohol or an
ether compound. These gasolines are collectively referred to as
oxygenated fuels. To meet clean air standards, some areas of the
United States and Canada use oxygenated fuels to help reduce
emissions.
If you use oxygenated fuel, be sure it is unleaded and meets the
minimum octane rating requirements.
Before using an oxygenated fuel, try to confirm the fuel’s contents.
Some states/provinces require this information to be posted on
the pump.
The following are the EPA approved percentages of oxygenates:
ETHANOL
(ethyl or grain alcohol) 10% by volume
You may use gasoline containing up to 10%
ethanol by volume. Gasoline containing
ethanol may be marketed under the name
Gasohol.
MTBE
(methyl tertiary butyl ether) 15% by volume
You may use gasoline containing up to 15%
MTBE by volume.
METHANOL
(methyl or wood alcohol) 5% by volume
You may use gasoline containing up to 5%
methanol by volume as long as it also
contains cosolvents and corrosion inhibitors
to protect the fuel system. Gasoline
containing more than 5% methanol by
volume may cause starting and/or
performance problems. It may also damage
metal, rubber, and plastic parts of your fuel
system.
Source of Emissions
The combustion process produces carbon monoxide, oxides of
nitrogen, and hydrocarbons. Control of hydrocarbons and oxides
of nitrogen is very important because, under certain conditions,
they react to form photochemical smog when subjected to
sunlight. Carbon monoxide does not react in the same way, but it
is toxic.
Honda utilizes lean carburetor settings and other systems to
reduce the emissions of carbon monoxide, oxides of nitrogen, and
hydrocarbons.
The U.S. Clean Air Acts and Environment Canada
EPA and Canadian regulations require all manufacturers to furnish
written instructions describing the operation and maintenance of
emission control systems.
The following instructions and procedures must be followed in
order to keep the emissions from your Honda engine within the
emission standards.
Tampering and Altering
Tampering with or altering the emission control system may
increase emissions beyond the legal limit. Among those acts that
constitute tampering are:
Removal or alteration of any part of the intake, fuel, or exhaust
systems.
Altering or defeating the governor linkage or speed-adjusting
mechanism to cause the engine to operate outside its design
parameters.
Problems That May Affect Emissions
If you are aware of any of the following symptoms, have your
engine inspected and repaired by your servicing dealer.
If you notice any undesirable operating symptoms, try another
service station or switch to another brand of gasoline.
Fuel system damage or performance problems resulting from the
use of an oxygenated fuel containing more than the percentages
of oxygenates mentioned above are not covered under the
Distributor’s Limited Warranty
.
Hard starting or stalling after starting.
Rough idle.
Misfiring or backfiring under load.
Afterburning (backfiring).
Black exhaust smoke or high fuel consumption.
Replacement Parts
The emission control systems on your Honda engine were
designed, built, and certified to conform with EPA and Canadian
emission regulations. We recommend the use of genuine Honda
parts whenever you have maintenance done. These originaldesign replacement parts are manufactured to the same standards
as the original parts, so you can be confident of their performance.
The use of replacement parts that are not of the original design
and quality may impair the effectiveness of your emission control
system.
A manufacturer of an aftermarket part assumes the responsibility
that the part will not adversely affect emission performance. The
manufacturer or rebuilder of the part must certify that use of the
part will not result in a failure of the engine to comply with
emission regulations.
Maintenance
Follow the maintenance schedule on page . Remember that this
5
schedule is based on the assumption that your machine will be
used for its designed purpose. Sustained high-load or hightemperature operation, or use in unusually wet or dusty conditions,
will require more frequent service.
12
ENGLISH

Specifications
Quick Reference Information
GX120 (Standard type: KR type)
Length Width
××
Height
Dry weight
Engine type
4-stroke, overhead valve, single cylinder
Displacement
[Bore Stroke]
×
Max. output
Max. torque
Engine oil capacity
Fuel consumption
2.9 kW (4.0 PS, 4.0 bhp) at 3,600 rpm
7.4 N·m (0.75 kgf·m, 5.4 lbf·ft) at
0.40
310 g/kWh (230 g/PSh, 0.51 lb/hph)
Cooling system
Ignition system
PTO shaft rotation
GX160
(Standard type: AR type)
Length Width
××
Height
Dry weight
Engine type
4-stroke, overhead valve, single cylinder
Displacement
[Bore Stroke]
×
Max. output
Max. torque
Engine oil capacity
Fuel consumption
4.0 kW (5.5 PS, 5.5 bhp) at 3,600 rpm
10.8 N·m (1.1 kgf·m, 8.0 lbf·ft) at
0.37
310 g/kWh (230 g/PSh, 0.51 lb/hph)
Cooling system
Ignition system
PTO shaft rotation
313 331 321 mm
××
(12.3 13.0 12.6 in)
××
16.5 kg (36.4 lbs)
118 cm
××
[6042mm(2.41.7in)]
(7.2 cu-in)
2,500 rpm
(0.42 US qt , 0.35 Imp qt)
Forced air
Transistorized magneto
Counterclockwise
319 342 333 mm
××
(12.6 13.5 13.1 in)
××
18.6 kg (41.0 lbs)
163 cm
××
[6845mm(2.71.8in)]
(9.9 cu-in)
2,500 rpm
(0.39 US qt , 0.33 Imp qt)
Forced air
Transistorized magneto
Counterclockwise
Fuel
Engine oil
Unleaded gasoline (Refer to page 6)
U.S.
Except
U.S.
Pump octane rating 86 or higher
Research octane rating 91 or higher
Pump octane rating 86 or higher
SAE 10W-30, API SJ or later, for general use.
Refer to page 6.
Spark plug
BPR4ES (NGK)
W14EPR-U (DENSO)
Maintenance
Before each use:
Check engine oil level. Refer to page 6.
Check air filter. Refer to page 8.
Check all bolts and nuts.
First 20 hours:
Change engine oil. Refer to page 7.
Subsequent:
Refer to the maintenance schedule on page 5.
Wiring Diagram
Wiring diagram may vary according to the type.
OFF
ON
Tuneup Specifications
GX120/160
ITEM SPECIFICATION MAINTENANCE
Spark plug gap
Idle speed
Valve clearance
(cold)
0.70 0.80 mm
−
(0.028 0.031 in)
−
1,500 150 rpm
±
IN:
0.15 0.02 mm
EX:
±
0.20 0.02 mm
±
Refer to page: 8
Refer to page: 9
See your
authorized
Honda dealer
Other
No other adjustments needed.
specifications
(1) SPARK PLUG
(2) IGNITION COIL
(3) ENGINE SWITCH
BI Black
ENGLISH
13
CONSUMER INFORMATION
Distributor/Dealer Locator Information
United States, Puerto Rico, and U.S. Virgin Islands:
Call (800) 426-7701
or visit our website: www.honda-engines.com
Canada:
Call (888) 9HONDA9
or visit our website: www.honda.ca
For European Area:
visit our website: http://www.honda-engines-eu.com
Customer Service Information
Servicing dealership personnel are trained professionals. They
should be able to answer any question you may have. If you
encounter a problem that your dealer does not solve to your
satisfaction, please discuss it with the dealership’s management.
The Service Manager, General Manager, or Owner can help.
Almost all problems are solved in this way.
United States, Puerto Rico, and U.S. Virgin Islands:
If you are dissatisfied with the decision made by the dealership’s
management, contact the Honda Regional Engine Distributor for
your area.
Canada:
Honda Canada, Inc.
715 Milner Avenue
Toronto, ON
M1B 2K8
Telephone: (888) 9HONDA9
Toll free
(888) 946-6329
English:
French:
Facsimile:
(416) 299-3400
(416) 287-4776
(877) 939-0909
(416) 287-4776
Local Toronto dialing area
Local Toronto dialing area
Toll free
Local Toronto dialing area
Australia:
Honda Australia Motorcycle and Power Equipment Pty. Ltd.
1954 1956 Hume Highway Campbellfield Victoria 3061
−
Telephone:
Facsimile:
(03) 9270 1111
(03) 9270 1133
For European Area:
Honda Europe NV.
European Engine Center
http://www.honda-engines-eu.com
All Other Areas:
Please contact the Honda distributor in your area for assistance.
If you are still dissatisfied after speaking with the Regional Engine
Distributor, you may contact the Honda’s Office as shown.
All Other Areas:
If you are dissatisfied with the decision made by the dealership’s
management, contact the Honda’s Office as shown.
《》
Honda’s Office
When you write or call, please provide this information:
Equipment manufacturer’s name and model number that the
engine is mounted on
Engine model, serial number, and type (see page )
11
Name of dealer who sold the engine to you
Name, address, and contact person of the dealer who services
your engine
Date of purchase
Your name, address and telephone number
A detailed description of the problem
United States, Puerto Rico, and U.S. Virgin Islands:
American Honda Motor Co., Inc.
Power Equipment Division
Customer Relations Office
4900 Marconi Drive
Alpharetta, GA 30005-8847
Or telephone: (770) 497-6400, 8:30 am - 6:00 pm EST
14
ENGLISH


INTRODUCTION
Nous vous remercions d’avoir porté votre choix sur un moteur Honda.
Nous désirons vous aider à faire le meilleur usage de votre nouveau
moteur et à l’utiliser en sécurité. Vous trouverez dans ce manuel des
informations sur la manière d’y parvenir; veuillez le lire attentivement
avant d’utiliser le moteur. En cas de problème ou pour toute question sur
le moteur, consultez un concessionnaire Honda agréé.
Toutes les informations de cette publication sont basées sur les dernières
informations sur le produit disponibles au moment de l’impression. Honda
Motor Co., Ltd. se réserve le droit d’apporter des modifications à tout
moment sans avertissement et sans obligation de sa part. Aucune partie
de ce document ne peut être reproduite sans autorisation écrite.
Ce manuel doit être considéré comme faisant partie du moteur et
l’accompagner en cas de revente.
Pour de plus amples informations sur le démarrage, l’arrêt, l’utilisation et
les réglages du moteur ou pour des instructions sur tout entretien spécial,
consultez les instructions accompagnant l’équipement commandé par ce
moteur.
Etats-Unis, Puerto Rico et Iles vierges américaines:
Nous vous conseillons de lire le bulletin de garantie afin de bien
comprendre l’étendue de la garantie et vos responsabilités de propriété. Le
bulletin de garantie est un document séparé que vous avez dû en principe
recevoir de votre concessionnaire.
MESSAGES DE SECURITE
Votre sécurité et celle des autres sont très importantes. Vous trouverez des
messages de sécurité importants dans ce manuel et sur le moteur. Veuillez
les lire attentivement.
MANUEL DE L’UTILISATEUR
GX120 · GX160
POUR LES COMPACTEURS DE TYPE DAMEUSE
FRANÇAIS
L’échappement du moteur contient des
substances chimiques déclarées
responsables de cancers, de malformations
congénitales ou d’autres anomalies de la
reproduction par l’Etat de Californie.
SOMMAIRE
Les messages de sécurité vous avertissent de risques potentiels de
blessures pour vous et les autres. Chaque message de sécurité est précédé
d’un symbole de mise en garde et de l’une des trois mentions DANGER,
ATTENTION ou PRECAUTION.
Ces mots-indicateurs signifient:
Vous SEREZ MORTELLEMENT ou
GRIEVEMENT BLESSE si vous ne suivez
pas ces instructions.
Vous POUVEZ être MORTELLEMENT ou
GRIEVEMENT BLESSE si vous ne suivez
pas ces instructions.
Vous POUVEZ être BLESSE si vous ne
suivez pas ces instructions.
Chaque message vous indique quel est le danger, ce qui peut arriver et ce
que vous pouvez faire pour éviter ou réduire les blessures.
MESSAGES DE PREVENTION DES DOMMAGES
D’autres messages importants sont précédés du mot AVIS.
Cette mention signifie:
Votre moteur ou d’autres biens peuvent être endommagés si
vous ne suivez pas ces instructions.
L’objet de ces messages est de vous aider à ne pas causer de dommages
au moteur, à d’autres biens ou à l’environnement.
..............................INTRODUCTION .1
.............MESSAGES DE SECURITE .1
..............ETIQUETTE DE SECURITE .2
EMPLACEMENT DES PIECES ET
.................................COMMANDES .2
CONTROLES AVANT
................................L’UTILISATION .3
...................................UTILISATION .3
CONSIGNES DE SECURITE
............................D’UTILISATION .3
........DEMARRAGE DU MOTEUR .3
...................ARRET DU MOTEUR .4
...............ENTRETIEN DU MOTEUR .5
L’IMPORTANCE DE
...............................L’ENTRETIEN .5
............SECURITE D’ENTRETIEN .5
........CONSIGNES DE SECURITE .5
...............PLEIN DE CARBURANT .6
...........................HUILE MOTEUR .6
................Huile recommandée .6
..........Renouvellement d’huile .7
................................FILTRE A AIR .8
....................................Contrôle .8
.................................Nettoyage .8
........................................BOUGIE .8
.....INFORMATIONS DE SECURITE .2
CONSEILS ET SUGGESTIONS
.............................................UTILES .9
EN CAS DE PROBLEME
Emplacement des numéros de
............................................série .11
Modifications du carburateur
pour une utilisation à haute
........................................altitude .12
Informations sur le système
......PROGRAMME D’ENTRETIEN .5
Caractéristiques de mise au
............................................point .13
Informations de référence
.........................................rapide .13
.Vérification du niveau d’huile .6
INFORMATION DU
Informations sur le localisateur
de distributeurs/
Informations d’entretien pour le
...........................................client .14
..TUYAU DE MISE A L’AIR LIBRE .9
..................REGIME DE RALENTI .9
............REMISAGE DU MOTEUR .9
..............................TRANSPORT .10
...................................INATTENDU .11
...INFORMATIONS TECHNIQUES .11
...............................antipollution .12
.........................Caractéristiques .13
...................Schéma de câblage .13
........................CONSOMMATEUR .14
.......................concessionnaires .14
FRANÇAIS
1

EMPLACEMENT DES PIECES ET COMMANDESINFORMATIONS DE SECURITE
Comprenez bien le fonctionnement de toutes les commandes et
apprenez comment arrêter le moteur rapidement en cas d’urgence.
Veillez à ce que l’opérateur reçoive des instructions adéquates avant
l’utilisation de l’équipement.
Ne pas autoriser des enfants à utiliser le moteur. Eloigner les enfants et
les animaux de la zone d’utilisation.
Les gaz d’échappement du moteur contiennent du monoxyde de
carbone toxique. Ne pas faire tourner le moteur sans une aération
adéquate et ne jamais l’utiliser à l’intérieur.
Le moteur et les gaz d’échappement deviennent très chauds pendant le
fonctionnement. Garder le moteur à au moins 1 mètre des bâtiments et
des autres équipements pendant l’utilisation. Ne pas approcher de
matières inflammables et ne rien placer sur le moteur pendant son
fonctionnement.
ETIQUETTE DE SECURITE
Cette étiquette met en garde contre les risques potentiels de blessures
graves. La lire attentivement.
Si l’étiquette se décolle ou devient illisible, s’adresser au concessionnaire
Honda pour son remplacement.
FILTRE A AIR
TUYAU D’AERATEUR D’AIR
BOUGIE D’ALLUMAGE
SILENCIEUX
POIGNEE DE
DEMARREUR
BOUCHON DE
REMPLISSAGE/
JAUGE A HUILE
Des étiquettes sont collées sur le moteur.
L’essence est très inflammable et explosive. Arrêter
le moteur et le laisser refroidir avant de faire le plein
d’essence.
Le moteur dégage du monoxyde de carbone qui est
un gaz toxique. Ne jamais le faire fonctionner dans
un endroit clos.
Lire le manuel de l’utilisateur avant l’utilisation.
Pour les types pour le Canada
seulement:
Etiquette en français.
LEVIER DE STARTER
DEMARREUR A LANCEUR
COMMANDES DUMOTEUR
CONTACTEUR D’ARRET MOTEUR
BOUCHON DE
VIDANGE D’HUILE
2
FRANÇAIS

CONTROLES AVANT L’UTILISATION UTILISATION
LE MOTEUR EST-IL PRET A FONCTIONNER?
Pour la sécurité et la longévité de l’équipement, il est important de
consacrer quelques instants à vérifier l’état du moteur avant l’utilisation.
Corriger tout problème constaté ou confier cette opération au
concessionnaire avant l’utilisation.
Un entretien incorrect de ce moteur ou l’absence de
correction d’un problème avant l’utilisation peut provoquer
un une anomalie susceptible d’entraîner des blessures
graves ou mortelles.
Toujours effectuer les contrôles avant l’utilisation avant
chaque utilisation et corriger tout problème.
Avant de commencer les contrôles avant l’utilisation, s’assurer que le
moteur est à l’horizontale et que l’interrupteur du moteur se trouve sur la
position ARRET.
Toujours vérifier les points suivants avant de mettre le moteur en marche:
Vérifier l’état général du moteur
1.
Vérifier s’il n’y a pas de traces de fuites d’huile ou d’essence autour ou
sous le moteur.
CONSIGNES DE SECURITE D’UTILISATION
Avant d’utiliser le moteur pour la première fois, lire la section
INFORMATIONS DE SECURITE
AVANT L’UTILISATION
.
àlapage etlasection
2
CONTROLES
Le monoxyde de carbone est un gaz toxique. Il risque de
provoquer des évanouissements et d’être mortel.
Eviter tout endroit et toute activité exposant au monoxyde
de carbone.
Pour les consignes de sécurité à observer au démarrage, lors de l’arrêt du
moteur et pendant l’utilisation, consulter les instructions accompagnant
l’équipement commandé par ce moteur.
DEMARRAGE DU MOTEUR
Si le réservoir de carburant est doté d’un robinet de carburant, s’assurer
1.
que celui-ci et l’orifice de mise à l’air libre du bouchon de remplissage
de carburant se trouvent sur la position OUVERT ou ACTIVE avant de
tenter de mettre le moteur en marche. Pour des instructions particulières
sur l’utilisation du robinet de carburant et de l’orifice de mise à l’air libre
du bouchon de remplissage de carburant, consulter les instructions
accompagnant l’équipement commandé par ce moteur.
2.
Enlever toute saleté ou débris excessifs, tout particulièrement autour du
silencieux et du lanceur.
3.
Vérifier s’il n’y a pas de signes de dommages.
4.
S’assurer que tous les protecteurs et couvercles sont en place et que
tous les écrous, boulons et vis sont serrés.
Vérifier le moteur
1.
Vérifier le niveau de carburant. En démarrant avec un réservoir de
carburant plein, on évitera ou réduira les interruptions de service pour
faire le plein.
Vérifier le niveau d’huile du moteur (voir page ). L’utilisation du
2.
6
moteur avec un niveau d’huile insuffisant peut provoquer des
dommages au moteur.
Vérifier l’élément de filtre à air (voir page ). Un élément de filtre à air
3.
8
sale limite le passage d’air vers le carburateur, ce qui diminue les
performances du moteur.
Vérifier l’équipement commandé par ce moteur.
4.
Pour les précautions et procédures à observer avant le démarrage du
moteur, consulter les instructions accompagnant l’équipement
commandé par ce moteur.
Pour mettre en marche un moteur froid, placer le levier de starter sur la
2.
position FERME.
LEVIER DE STARTER
FERME
FERME
OOUUVVEERRTT
Pour remettre en marche un moteur chaud, laisser le levier de starter sur
la position OUVERT.
Placer le levier de commande des gaz sur la position MIN. Le levier des
3.
gaz se trouve monté sur l’équipement commandé par ce moteur. Pour
les informations pour votre commande à distance, consulter les
instructions accompagnant cet équipement.
LEVIER DES GAZ
(sur l’équipement)
MINI
FRANÇAIS
3

Placer l’interrupteur du moteur sur la position MARCHE.
4.
CONTACTEUR D’ARRET MOTEUR
MMAARRCCHHEE
Placer le levier des gaz sur la position correspondant au régime moteur
7.
désiré. Pour les recommandations de régime moteur, consulter les
instructions accompagnant l’équipement commandé par ce moteur.
MINI
Actionner le démarreur.
5.
Tirer doucement la poignée de lancement jusqu’à ce que l’on ressente
une résistance, puis la tirer d’un coup sec dans le sens de la flèche
comme sur la figure ci-dessous. Ramener doucement la poignée de
lancement en arrière.
POIGNEE DE DEMARREUR
DDiirreeccttiioonn ddee ttrraaccttiioonn
Ne pas laisser la poignée de lancement revenir d’elle-même contre le
moteur. Accompagner doucement son mouvement de retour pour ne
pas risquer d’endommager le lanceur.
Si l’on a placé le levier de starter sur la position FERME pour mettre le
6.
moteur en marche, le ramener progressivement sur la position OUVERT
à mesure que le moteur chauffe.
LEVIER DES GAZ
(sur l’équipement)
MAXI
ARRET DU MOTEUR
Pour arrêter le moteur en cas d’urgence, placer simplement l’interrupteur
du moteur sur la position ARRET. Dans des conditions normales, procéder
comme il est indiqué ci-dessous.
Placer le levier de commande des gaz sur la position MIN.
1.
LEVIER DES GAZ
(sur l’équipement)
Placer l’interrupteur du moteur sur la position ARRET.
2.
CONTACTEUR D’ARRET MOTEUR
MINI
LEVIER DE STARTER
AARRRREETT
OUVERT
Si le réservoir de carburant est doté d’un robinet de carburant ou d’un
3.
FERME
OUVERT
4
bouchon de remplissage de carburant avec mise à l’air libre, les placer
sur la position FERME ou DESACTIVE.
FRANÇAIS

ENTRETIEN DU MOTEUR
L’IMPORTANCE DE L’ENTRETIEN
Un bon entretien est essentiel pour un fonctionnement sûr, économique et
sans problème. Il contribue également à réduire la pollution.
Ne pas oublier que c’est le concessionnaire Honda agréé qui connaît le
mieux le moteur et qu’il est parfaitement outillé pour son entretien et sa
réparation.
Pour la meilleure qualité et fiabilité, n’utiliser que des pièces Honda
d’origine neuves ou leur équivalent pour la réparation et le remplacement.
PROGRAMME D’ENTRETIEN
Un entretien incorrect ou l’absence de correction d’un
problème avant l’utilisation peut provoquer une anomalie
susceptible d’entraîner des blessures graves ou mortelles.
Toujours observer les recommandations et programmes de
contrôle et d’entretien figurant dans ce manuel.
Pour permettre d’entretenir correctement le moteur, on trouvera aux pages
suivantes un programme d’entretien, des procédures de contrôle de
routine et des procédures d’entretien simples pouvant être effectuées avec
des outils à main de base. D’autres opérations d’entretien plus difficiles ou
demandant des outils spéciaux seront mieux exécutées par des
professionnels et devront normalement être confiées à un technicien
Honda ou à un autre mécanicien qualifié.
Le programme d’entretien s’applique à des conditions d’utilisation
normales. Si l’on utilise le moteur dans des conditions sévères telles qu’un
fonctionnement prolongé sous une charge élevée ou par haute
température, ou dans des conditions anormalement humides ou
poussiéreuses, demander au concessionnaire des recommandations pour
des besoins et un usage particuliers.
L’entretien, le remplacement ou la réparation des dispositifs et systèmes
antipollution peuvent être exécutés par toute entreprise ou technicien de
réparation de moteurs utilisant des pièces ‘‘certifiées’’ aux normes EPA.
SECURITE D’ENTRETIEN
Certaines des consignes de sécurité les plus importantes sont indiquées cidessous. Il ne nous est toutefois pas possible de vous avertir de tous les
dangers imaginables que vous pouvez courir en exécutant l’entretien.
Vous êtes seul juge de décider si vous devez ou non effectuer un travail
donné.
FREQUENCE D’ENTRETIEN
PERIODIQUE (3)
A effectuer après le nombre de
mois ou d’heures d’utilisation
indiqué en retenant l’intervalle
le plus court des deux.
DESCRIPTION
Huile moteur
Filtre à air
Bougie
Régime de ralenti
Jeu aux soupapes
Chambre de
combustion
Réservoir de
carburantetfiltreà
carburant
Tuyau de
carburant
Ne remplacer que l’élément filtrant en papier.
*
En cas d’utilisation dans des endroits poussiéreux, augmenter la
(1)
Vérifier le niveau
Renouveler
Vérifier
Nettoyer
Remplacer
Vérifier-régler
Remplacer
Vérifier-régler
Vérifier-régler
Nettoyer
Nettoyer
Vérifier
Chaque
utilisation
mois
ou
20 h
Après toutes les 500 h (2)
Tous les 2 ans
(Remplacer si nécessaire) (2)
3mois
ou
50 h
(1)
6mois
ou
100 h
(2)
ans
ou
300 h
Tous les
Tous les
Tous les
Premier
fréquence d’entretien.
Confier l’entretien de ces points au concessionnaire à moins que l’on
(2)
ne dispose des outils appropriés et ne soit mécaniquement compétent.
Pour les procédures d’entretien, voir le manuel d’atelier Honda.
Voir
page
6
7
8
8
*
8
9
(2)
Manuel
(2)
d’atelier
Manuel
d’atelier
Manuel
d’atelier
Manuel
d’atelier
En n’observant pas correctement les instructions et
précautions d’entretien, on s’expose à de graves blessures
ou à un danger de mort.
Toujours observer les procédures et précautions de ce
manuel.
CONSIGNES DE SECURITE
Avant de commencer un entretien ou une réparation, s’assurer que le
moteur est arrêté. Ceci éliminera plusieurs risques potentiels:
Empoisonnement par le monoxyde de carbone de l’échappement du
−
moteur.
Avant d’utiliser le moteur, s’assurer que l’aération est suffisante.
Brûlures par des pièces chaudes.
−
Attendre que le moteur et le système d’échappement se soient
refroidis avant de les toucher.
Blessures par des pièces mobiles.
−
Ne faire tourner le moteur que si cela est indiqué dans les instructions.
Lire les instructions avant de commencer et s’assurer que l’on dispose
de l’outillage et des compétences nécessaires pour effectuer le travail en
sécurité.
Pour diminuer les risques d’incendie ou d’explosion, être prudent
lorsqu’on travaille à proximité de l’essence. Pour le nettoyage des pièces,
utiliser uniquement un solvant ininflammable et non de l’essence. Ne
pas approcher de cigarettes, étincelles ou flammes des pièces du
système d’alimentation en carburant.
Pour une utilisation commerciale, consigner le nombre d’heures de
(3)
service afin de déterminer la périodicité d’entretien appropriée.
L’inobservation de ce programme d’entretien peut entraîner des
problèmes non couverts par la garantie.
FRANÇAIS
5

PLEIN DE CARBURANT
HUILE MOTEUR
Carburant recommandé
Etats-Unis
Sauf Etats-Unis
Indice d’octane pompe d’au moins 86
Indice d’octane recherche d’au moins 91
Indice d’octane pompe d’au moins 86
Ce moteur est certifié pour fonctionner sur de l’essence sans plomb ayant
un indice d’octane pompe d’au moins 86 (ou un indice d’octane recherche
d’au moins 91).
Refaire le plein dans un endroit bien aéré avec le moteur arrêté. Si le
moteur vient de tourner, le laisser d’abord se refroidir. Ne jamais faire le
plein à l’intérieur d’un bâtiment où des vapeurs d’essence pourraient
atteindre des flammes ou des étincelles.
On peut utiliser une essence sans plomb ordinaire ne contenant pas plus
de 10% d’éthanol (E10) ou de 5% de méthanol en volume. Le méthanol doit
contenir des cosolvants et des inhibiteurs de corrosion. L’utilisation de
carburants ayant une teneur en éthanol ou méthanol supérieure à celle
indiquée ci-dessus peut occasionner des problèmes de démarrage et/ou
performances. Elle peut également endommager les pièces métalliques,
en caoutchouc et en plastique du système d’alimentation en carburant. Les
dommages au moteur ou problèmes de performance résultant de
l’utilisation d’un carburant avec des pourcentages d’éthanol ou méthanol
supérieurs à ceux qui sont indiqués ci-dessus ne sont pas couverts par la
garantie.
L’essence est très inflammable et explosive et l’on peut se
brûler ou se blesser grièvement en faisant le plein.
Arrêter le moteur et ne pas autoriser de sources de chaleur,
étincelles ou flammes à proximité.
Ne faire le plein qu’à l’extérieur.
Essuyer immédiatement tout carburant renversé.
L’huile est un facteur déterminant pour la performance et la durée de
service. Utiliser une huile automobile 4 temps détergente.Essence sans plomb
Huile recommandée
Grades de viscosité
Utiliser une huile moteur 4 temps
répondant ou dépassant les
prescriptions pour la classification
service API SJ ou ultérieure (ou
équivalente). Toujours vérifier
l’étiquette de service API sur le
bidon d’huile pour s’assurer qu’elle
porte bien la mention SJ ou
TEMPÉRATURE AMBIANTE
ultérieure (ou équivalente).
Une huile SAE 10W-30 est recommandée pour l’utilisation générale. Les
autres viscosités indiquées dans le tableau peuvent être utilisées lorsque la
température moyenne du lieu d’utilisation se trouve dans la plage indiquée.
Vérification du niveau d’huile
Vérifier le niveau d’huile du moteur avec le moteur arrêté et à l’horizontale.
Retirer la jauge/bouchon de remplissage d’huile et l’essuyer.
1.
Introduire la jauge/bouchon de remplissage d’huile dans le goulot de
2.
remplissage d’huile comme sur la figure, sans la visser, puis la retirer
pour vérifier le niveau d’huile.
Si le niveau d’huile est proche ou au-dessous du repère de limite
3.
minimum sur la jauge, faire l’appoint d’huile recommandée jusqu’au
repère de limite maximum (bord inférieur de l’orifice de remplissage
d’huile). Ne pas trop remplir.
Le carburant peut endommager la peinture et certains types de plastiques.
Veiller à ne pas renverser de carburant lorsqu’on remplit le réservoir. Les
dommages causés par du carburant renversé ne sont pas couverts par la
Garantie limitée du distributeur.
Ne jamais utiliser de l’essence ou un mélange d’huile/essence viciés ou
contaminés. Empêcher la pénétration de saleté ou eau dans le réservoir de
carburant.
Faire le plein avec précaution pour éviter de renverser du carburant.
Garder l’essence loin des veilleuses des appareils, barbecues, appareils
électriques, outils électriques, etc.
Le carburant renversé ne fait pas seulement courir des risques d’incendie;
il est également nuisible pour l’environnement. Essuyer immédiatement
tout carburant renversé.
Remettre la jauge/bouchon de remplissage d’huile en place.
4.
BOUCHON DE REMPLISSAGE/
JAUGE A HUILE
LIMITE SUPERIEURE
ORIFICE DE REMPLISSAGE D’HUILE
(bord inférieur)
LIMITE INFERIEURE
L’utilisation du moteur avec un niveau d’huile insuffisant peut provoquer
des dommages au moteur.
6
FRANÇAIS

Renouvellement d’huile
Vidanger l’huile usée alors que le moteur est chaud. La vidange s’effectue
plus rapidement et plus complètement lorsque l’huile est chaude.
Placer un récipient approprié sous le moteur pour recueillir l’huile usée,
1.
puis retirer la jauge/bouchon de remplissage d’huile, le bouchon de
vidange d’huile et la rondelle.
Vidanger complètement l’huile usée, puis remettre le bouchon de
2.
vidange d’huile en place avec une rondelle neuve et le serrer à fond.
Jeter l’huile moteur usée d’une manière compatible avec
l’environnement. Nous conseillons de la porter dans un récipient fermé
au centre de traitement local ou à une station service pour qu’elle soit
traitée. Ne pas la jeter aux ordures ni la déverser dans la terre ou dans
un égout.
Avec le moteur à l’horizontale, verser l’huile recommandée jusqu’au
3.
repère de limite maximum (bord inférieur de l’orifice de remplissage
d’huile) de la jauge (voir page ).
6
L’utilisation du moteur avec un niveau d’huile insuffisant peut
provoquer des dommages au moteur.
Reposer la jauge/bouchon de remplissage d’huile et la serrer à fond.
4.
BOUCHON DE REMPLISSAGE/
JAUGE A HUILE
RONDELLE
LIMITE SUPERIEURE
BOUCHON DE VIDANGE
FRANÇAIS
7

BOUGIEFILTRE A AIR
Un filtre à air sale restreint le passage d’air vers le carburateur et réduit
ainsi les performances du moteur. Si l’on utilise le moteur dans des
endroits très poussiéreux, nettoyer le filtre à air plus souvent qu’il n’est
indiqué dans le PROGRAMME D’ENTRETIEN.
Si l’on utilise le moteur sans filtre à air ou avec un filtre à air endommagé,
des saletés pénétreront dans le moteur qui s’usera alors rapidement. Ce
type de dommage n’est pas couvert par la
Garantie limitée du distributeur.
Contrôle
Libérer le clip de maintien et retirer le couvercle du filtre à air.
1.
Déposer et contrôler les éléments de filtre à air. Si les éléments de filtre
2.
à air sont sales, les nettoyer comme il est indiqué ci-dessous. Remplacer
les éléments filtrants endommagés. Toujours remplacer l’élément
filtrant en papier aux intervalles prévus dans le programme d’entretien
(voir page ).
Placer l’élément filtrant en mousse sur l’élément en papier, puis reposer
3.
5
les éléments de filtre à air assemblés. Introduire l’extrémité ouverte des
éléments de filtre à air dans le boîtier comme sur la figure de façon
qu’elle soit tournée vers le couvercle de filtre à air.
Accrocher le bord inférieur du couvercle de filtre à air sur le boîtier, puis
4.
fixer le couvercle avec le clip de maintien.
CLIP DE MAINTIEN
ELEMENT FILTRANT EN PAPIER
EXTREMITEE
FERMEE
BOITIER DE FILTRE A AIR
Bougies recommandées:
BPR4ES (NGK)
W14EPR-U (DENSO)
La bougie recommandée possède l’indice thermique correct pour des
températures normales de fonctionnement du moteur.
Une bougie incorrecte peut provoquer des dommages au moteur.
Pour que les performances soient bonnes, la bougie doit avoir un
écartement des électrodes correct et ne pas être encrassée.
Déconnecter le capuchon de
1.
CLE A BOUGIE
bougie et nettoyer toute saleté
autour de la bougie.
Déposer la bougie avec une clé à
2.
bougie de 13/16 pouce.
Contrôler la bougie. La remplacer
3.
si elle est endommagée ou très
encrassée, si sa rondelle
d’étanchéité est en mauvais état
ou si son électrode est usée.
Mesurer l’écartement des
4.
ELECTRODE LATERALE
électrodes avec un calibre
d’épaisseur à fils. Si nécessaire,
0,70 0,80 mm
−
le corriger en pliant l’électrode
latérale.
L’écartement des électrodes doit
être de:
−
0,70 0,80 mm
RONDELLE
D’ETANCHEITE
ELEMENT FILTRANT EN
MOUSSE
EXTREMITE OUVERTE
COUVERCLEDEFILTREAAIR
INCORRECT
PLAQUE
CORRECT
ORIFICE
Nettoyage
Nettoyer les éléments du filtre à air s’ils doivent être réutilisés.
1.
Elément filtrant en papier: Tapoter doucement l’élément filtrant à
plusieurs reprises sur une surface dure pour en détacher la saleté ou
appliquer un jet d’air comprimé [207 kPa (2,1 kgf/cm
) maximum] à
travers l’élément filtrant depuis l’intérieur. Ne jamais essayer de faire
partir la saleté avec une brosse; ceci ne ferait qu’enfoncer la saleté dans
les fibres.
Elément filtrant en mousse: Nettoyer l’élément filtrant dans de l’eau
savonneuse chaude, le rincer et le laisser sécher complètement. On
pourra également le nettoyer dans un solvant ininflammable, puis le
laisser sécher. Tremper l’élément filtrant dans de l’huile moteur propre,
puis en exprimer toute huile en excès. S’il reste trop d’huile dans la
mousse, le moteur fumera au démarrage.
Reposer la bougie avec précaution à
5.
la main pour éviter de foirer son
filetage.
Lorsque la bougie a touché son siège, continuer à la serrer avec une clé
6.
à bougie de 13/16 pouce pour comprimer la rondelle d’étanchéité.
Si la bougie est neuve, la serrer de 1/2 tour après qu’elle a touché son
7.
siège pour comprimer la rondelle.
Si elle a déjà été utilisée, la serrer de 1/8 à 1/4 de tour après qu’elle a
8.
touché son siège pour comprimer la rondelle.
Une bougie insuffisamment serrée peut surchauffer et endommager le
moteur. Un serrage excessif de la bougie peut endommager le filetage
dans la culasse.
Fixer le capuchon de bougie sur la bougie.
9.
Essuyer la saleté à l’intérieur du boîtier et du couvercle de filtre à air à
2.
l’aide d’un chiffon humide. Veiller à ce que la saleté ne pénètre pas dans
le conduit d’air menant au carburateur.
8
FRANÇAIS

TUYAU DE MISE A L’AIR LIBRE
CONSEILS ET SUGGESTIONS UTILES
Contrôle
S’assurer que le tuyau de mise à
l’air libre est fixé par les pièces de
maintien de tuyau sans
affaissement ni torsion.
REGIMEDERALENTI
Réglage
Mettrelemoteurenmarcheà
1.
l’extérieur et l’échauffer jusqu’à
la température de
fonctionnement.
Avec le moteur au ralenti, tourner
2.
la vis butée de ralenti pour
obtenir le régime de ralenti
standard.
PIECES DE MAINTIEN
TUYAU D’AERATEUR D’AIR
VIS D’ARRET DES GAZ
REMISAGE DU MOTEUR
Préparation au remisage
Une préparation au remisage appropriée est essentielle pour maintenir le
moteur en bon état de fonctionnement et lui conserver son bel aspect. Les
opérations suivantes contribueront à empêcher que la rouille et la
corrosion n’affectent le fonctionnement et l’aspect du moteur et à faciliter
le démarrage du moteur lors de sa remise en service.
Nettoyage
Si le moteur vient de tourner, le laisser se refroidir pendant au moins une
demi-heure avant le nettoyage. Nettoyer toutes les surfaces extérieures,
faire les retouches de peinture nécessaires et enduire toutes les parties
susceptibles de rouiller d’une légère couche d’huile.
L’utilisation d’un tuyau d’arrosage ou d’un dispositif de lavage sous
pression peut faire pénétrer de l’eau dans le filtre à air ou dans l’ouverture
du silencieux. L’eau dans le filtre à air imbibe alors l’élément filtrant, et
l’eau qui traverse l’élément filtrant ou le silencieux peut pénétrer dans le
cylindre et causer des dommages.
Carburant
L’essence s’oxyde et se dégrade lors du remisage. Une essence dégradée
rend le démarrage difficile et laisse des dépôts de gomme susceptibles de
boucher le système d’alimentation en carburant. Si l’essence dans le
moteur se dégrade pendant le remisage, une intervention sur le
carburateur et d’autres pièces du système d’alimentation en carburant ou
leur remplacement peut être nécessaire.
Régime de ralenti standard:
±
1.500 150 min
(tr/mn)
La durée pendant laquelle on peut laisser l’essence dans le réservoir de
carburant et le carburateur sans causer de problèmes fonctionnels dépend
de facteurs tels que la composition de l’essence ou les températures de
remisage ainsi que du degré de remplissage, partiel ou complet, du
réservoir. L’air dans un réservoir de carburant partiellement rempli
favorise la dégradation du carburant. De très fortes températures de
remisage accélèrent la dégradation du carburant. Des problèmes de
carburant peuvent survenir après quelques mois ou même plus
rapidement si l’essence n’était pas fraîche lorsqu’on a fait le plein.
Les dommages du système d’alimentation en carburant ou les problèmes
de performances du moteur qui résultent d’une mauvaise préparation au
remisage ne sont pas couverts par la
On peut prolonger la durée de vie du carburant lors du remisage en
ajoutant un stabilisateur d’essence spécialement formulé à cet effet ou l’on
peut éviter les problèmes de dégradation du carburant en vidangeant le
réservoir de carburant et le carburateur.
Ajout d’un stabilisateur d’essence pour prolonger la durée de stockage
du carburant
Lorsqu’on ajoute un stabilisateur d’essence, remplir le réservoir de
carburant avec de l’essence fraîche. Si le réservoir n’est que partiellement
rempli, l’air à l’intérieur favorise la dégradation du carburant pendant le
remisage. Si l’on garde un bidon d’essence pour le ravitaillement, veiller à
ce qu’il ne contienne que de l’essence fraîche.
Garantie limitée du distributeur
.
Ajouter le stabilisateur d’essence en suivant les instructions du fabricant.
1.
Après avoir ajouté le stabilisateur d’essence, faire tourner le moteur à
2.
l’extérieur pendant 10 minutes pour être sûr que l’essence traitée a
remplacé l’essence non traitée dans le carburateur.
Arrêter le moteur.
3.
FRANÇAIS
9

L’essence est très inflammable et explosive et l’on peut se
brûler ou se blesser grièvement en la manipulant.
Arrêter le moteur et ne pas autoriser de sources de
chaleur, étincelles ou flammes à proximité.
Ne manipuler le carburant qu’à l’extérieur.
Essuyer immédiatement tout carburant renversé.
Vidanger le réservoir de carburant en suivant les instructions du
1.
fabricant de l’équipement.
Placer un récipient d’essence agréé sous le carburateur et utiliser un
2.
entonnoir pour ne pas renverser de carburant. Desserrer ou déposer le
boulon de vidange du carburateur et la rondelle.
CARBURATEUR
RONDELLE
BOULON DE VIDANGE
Précautions de remisageVidange du réservoir de carburant et du carburateur
Si l’on remise le moteur avec de l’essence dans le réservoir de carburant et
le carburateur, il est important de réduire les risques d’inflammation des
vapeurs d’essence. Choisir une zone de remisage bien aérée loin de tout
appareil à flamme tel que fourneau, chauffe-eau ou séchoir à linge. Eviter
également un endroit où un moteur électrique produisant des étincelles ou
des outils électriques sont utilisés.
Eviter dans la mesure du possible des zones de remisage très humides car
ceci favorise la rouille et la corrosion.
Garder le moteur à l’horizontale lors du remisage. Une inclinaison peut
provoquer des fuites de carburant ou d’huile.
Sauf si le carburant a été vidangé du réservoir de carburant, laisser le
robinet de carburant et l’orifice de mise à l’air libre du bouchon de
remplissage de carburant sur la position FERME ou DESACTIVE pour
réduire les risques de fuites de carburant.
Alors que le moteur et le système d’échappement sont froids, couvrir le
moteur pour le protéger contre la poussière. Un moteur ou un système
d’échappement chaud peut enflammer ou faire fondre certaines matières.
Ne pas utiliser une feuille en plastique pour la protection contre la
poussière. Une bâche non poreuse emprisonne l’humidité autour du
moteur et favorise la rouille et la corrosion.
Fin du remisage
Vérifier le moteur comme il est indiqué à la section
L’UTILISATION
de ce manuel (voir page ).
3
CONTROLES AVANT
3.
Après avoir vidangé tout le carburant dans le récipient, reposer le
boulon de vidange et la rondelle, puis serrer le boulon de vidange.
Huile moteur
1.
Renouveler l’huile moteur (voir page ).
2.
Déposer la bougie (voir page ).
Verser une cuillère à soupe (5 10 cm
3.
7
8
−
) d’huile moteur propre dans le
cylindre.
Tirer la corde de lancement à plusieurs reprises pour distribuer l’huile
4.
dans le cylindre.
Reposer la bougie.
5.
Tirer la corde de lancement lentement jusqu’à ce qu’une résistance soit
6.
ressentie et que le cran de la poulie de lanceur vienne en regard de
l’orifice en haut du couvercle de lanceur. Ceci ferme les soupapes pour
empêcher l’humidité de pénétrer dans le cylindre du moteur. Ramener
doucement la corde de lancement en arrière.
Aligner le cran de la poulie sur l’orifice au-dessus du couvercle.
Si le carburant a été vidangé lors de la préparation au remisage, remplir le
réservoir avec de l’essence fraîche. Si l’on garde un bidon d’essence pour
le ravitaillement, veiller à ce qu’il ne contienne que de l’essence fraîche.
L’essence s’oxyde et se dégrade avec le temps, ce qui rend le démarrage
difficile.
Si le cylindre a été enduit d’huile lors de la préparation au remisage, le
moteur fume brièvement au démarrage. Ceci est normal.
TRANSPORT
Si le moteur vient de tourner, le laisser se refroidir pendant au moins 15
minutes avant de le remiser ou de le charger sur le véhicule de transport.
Un moteur ou un silencieux chaud peut provoquer des brûlures et
enflammer certaines matières.
Si le réservoir de carburant est doté d’un robinet de carburant et/ou d’une
soupape de mise à l’air libre du bouchon de remplissage de carburant, les
placer sur la position FERME ou DESACTIVE.
On peut placer l’équipement sur son côté si le réservoir de carburant est
doté d’un robinet de carburant et d’un orifice de mise à l’air libre du
bouchon de remplissage de carburant et si tous deux se trouvent sur la
position FERME ou DESACTIVE. Positionner l’équipement de façon que le
carburateur soit tourné vers le haut comme sur la figure.
AVANT INCORRECT
10
FRANÇAIS
GAUCHE INCORRECT
ARRIERE (côté de l’opérateur)
INCORRECT
DROITE CORRECT
CARBURATEUR
Vu depuis le haut
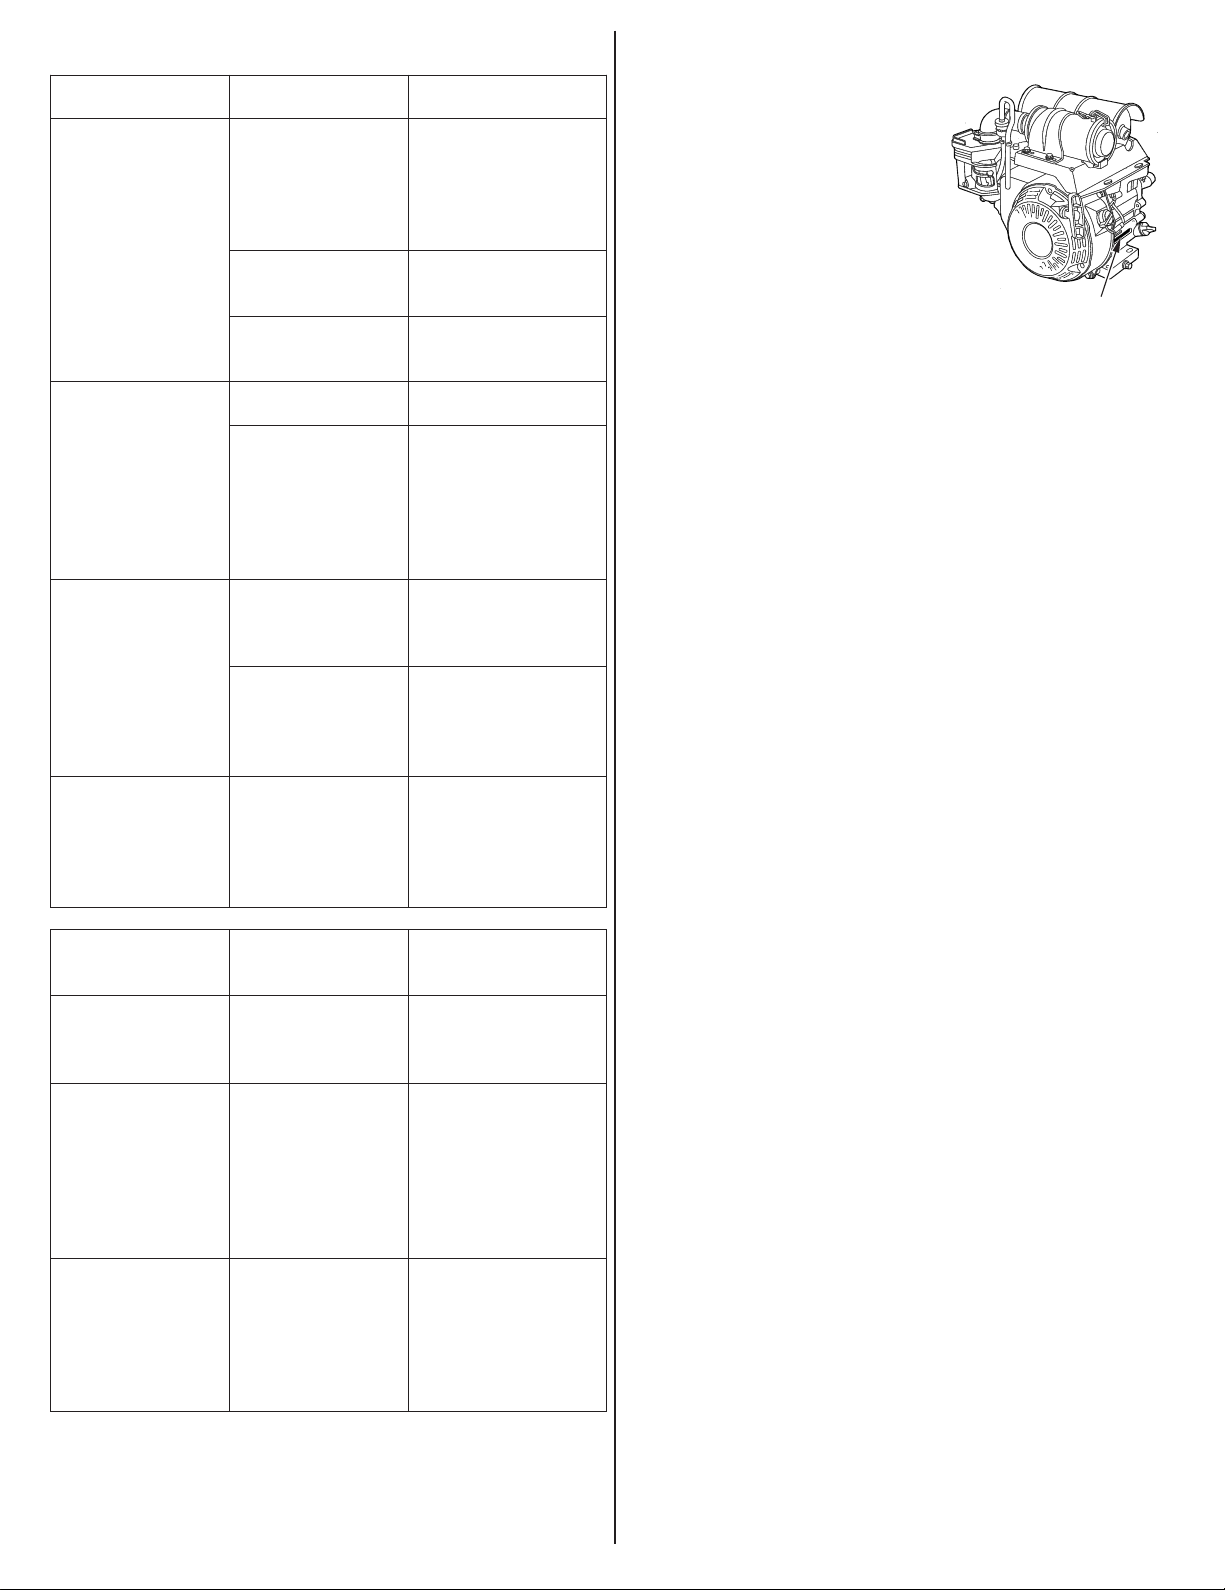
EN CAS DE PROBLEME INATTENDU INFORMATIONS TECHNIQUES
LE MOTEUR NE
DEMARRE PAS
Vérifier les
1.
positions des
commandes.
Vérifier le
2.
carburant.
Retirer la bougie
3.
et la contrôler.
Porter le moteur
4.
chez un
concessionnaire
Honda agréé ou
consulter le
manuel d’atelier.
Cause possible Remède
Robinet de carburant
et/ou soupape de
Placer le ou les robinets
sur MARCHE.
mise à l’air libre du
bouchon de
remplissage de
carburant sur ARRET.
Starter ouvert.
Placer le levier sur la
position FERME si le
moteur n’est pas chaud.
Interrupteur du
moteur sur ARRET.
Placer l’interrupteur du
moteur sur la position
MARCHE.
Carburant épuisé.
Faire le plein de
carburant (p. 6).
Mauvais carburant;
moteur remisé sans
traitement ou
vidange préalable de
l’essence ou plein
Vidanger le réservoir de
carburantetle
carburateur (p. 10).
Faire le plein avec de
l’essence fraîche (p. 6).
effectué avec une
mauvaise essence.
Bougie défectueuse,
encrassée ou ayant
un écartement des
électrodes incorrect.
Bougie mouillée de
carburant (moteur
noyé).
Régler l’écartement des
électrodes ou
remplacer la bougie
(p. 8).
Sécher et reposer la
bougie. Mettre le
moteur en marche avec
le levier des gaz sur la
position MAX.
Filtre à carburant
obstrué, anomalie du
carburateur,
Remplacer ou réparer
les pièces défectueuses
si nécessaire.
anomalie d’allumage,
soupapes grippées,
etc.
Emplacement des numéros de série
Noter le numéro de série du moteur,
le type et la date d’achat dans
l’espace ci-dessous. Cette
information est nécessaire pour la
commande de pièces et les
demandes de renseignements
techniques ou de garantie.
EMPLACEMENT DU
NUMERO DE SERIE ET DU
TYPE DU MOTEUR
Numéro de série du moteur: __ __ __ __ __ __ __ __ __ __ __
−
Type de moteur: ___ ___ ___ ___
Date d’achat: ______ / ______ / ______
LE MOTEUR
MANQUE DE
PUISSANCE
Vérifier le filtre à
1.
air.
Vérifier le
2.
carburant.
Porter le moteur
3.
chez un
concessionnaire
Honda agréé ou
consulter le
manuel d’atelier.
Cause possible Remède
Elément(s) filtrant
(s) colmaté(s).
Nettoyer ou
remplacer le ou les
éléments filtrants
(p. 8).
Mauvais carburant;
moteur remisé
sans traitement ou
vidange préalable
de l’essence ou
plein effectué avec
Vidanger le réservoir
de carburant et le
carburateur (p. 10).
Faire le plein avec de
l’essence fraîche
(p. 6).
une mauvaise
essence.
Filtre à carburant
obstrué, anomalie
du carburateur,
anomalie
Remplacer ou réparer
les pièces
défectueuses si
nécessaire.
d’allumage,
soupapes grippées,
etc.
FRANÇAIS
11

Carburants oxygénés
Informations sur le système antipollution
Certaines essences conventionnelles sont mélangées à de l’alcool ou un
composé d’éther. Elles sont collectivement appelées carburants oxygénés.
Des carburants oxygénés sont utilisés dans certaines parties des EtatsUnis et du Canada pour réduire les rejets gazeux et satisfaire ainsi aux
normes sur la pollution atmosphérique.
Si l’on utilise un carburant oxygéné, s’assurer qu’il est sans plomb et
possède l’indice d’octane minimum spécifié.
Avant d’utiliser un carburant oxygéné, essayer d’en connaître la
composition. Dans certains états/provinces, celle-ci est indiquée sur la
pompe à essence.
Les pourcentages de composants oxygénés autorisés par l’EPA sont les
suivants:
ETHANOL
(alcool éthylique ou alcool de grain) 10 % en
volume
On peut utiliser une essence contenant jusqu’à 10
% d’éthanol en volume. Les essences à l’éthanol
sont parfois commercialisées sous le nom d’alcoessence.
MTBE
(éther méthyl-tertiobutylique) 15 % en volume
On peut utiliser une essence contenant jusqu’à 15
% de MTBE en volume.
METHANOL
(alcool méthylique ou alcool de bois) 5 % en
volume
On peut utiliser une essence contenant jusqu’à 5 %
de méthanol en volume à la condition qu’elle
contienne également des cosolvants et des
inhibiteurs de corrosion pour protéger le système
d’alimentation en carburant. Une essence
contenant plus de 5 % de méthanol en volume
peut provoquer des problèmes de démarrage et/
ou de performances. Elle peut également
endommager les pièces métalliques, en
caoutchouc et en plastique du système
d’alimentation en carburant.
Si l’on constate des symptômes de fonctionnement indésirables, essayer
une autre station-service ou changer de marque d’essence.
Les dommages du système d’alimentation en carburant ou les problèmes
de performances résultant de l’utilisation d’un carburant oxygéné avec des
pourcentages de composants oxygénés supérieurs à ceux ci-dessus ne
sont pas couverts par la
garantie limitée du distributeur
.
Source des émissions polluantes
La combustion du carburant s’accompagne d’un rejet de monoxyde de
carbone, d’oxydes d’azote et d’hydrocarbures. Il est très important de
contrôler les hydrocarbures et les oxydes d’azote car, dans certaines
conditions, ils réagissent à la lumière du soleil pour former un brouillard
photochimique. Le monoxyde de carbone ne réagit pas de la même
manière, mais il est toxique.
Honda utilise des réglages pauvres du carburateur et d’autres systèmes
pour réduire les rejets de monoxyde de carbone, d’oxydes d’azote et
d’hydrocarbures.
Les Clean Air Act des Etats-Unis et Environnement Canada
La réglementation de l’EPA (agence de protection de l’environnement) et
du Canada exige de tous les fabricants qu’ils fournissent des instructions
écrites décrivant le fonctionnement et l’entretien des systèmes
antipollution.
Les instructions et procédures suivantes doivent être respectées afin de
maintenir les émissions polluantes du moteur Honda dans les limites
autorisées.
Modification non autorisée et altération
La modification non autorisée ou l’altération du système antipollution peut
entraîner une augmentation des émissions polluantes au-delà de la limite
légale. Les actions suivantes constituent notamment des modifications
non autorisées:
Retrait ou altération d’une pièce quelconque des systèmes d’admission,
d’alimentation en carburant ou d’échappement.
Altération ou neutralisation de la tringlerie du régulateur de régime ou
du mécanisme de réglage de régime ayant pour effet de faire
fonctionner le moteur en dehors de ses paramètres de conception.
Problèmes pouvant avoir une incidence sur les émissions polluantes
Si l’on constante l’un des symptômes suivants, faire contrôler et réparer le
moteur par le concessionnaire.
Démarrage difficile ou calage après le démarrage.
Ralenti irrégulier.
Ratés d’allumage ou retours de flammes en charge.
Postcombustion (retours de flamme).
Fumée d’échappement noire ou consommation de carburant excessive.
Pièces de rechange
Les systèmes antipollution du moteur Honda ont été conçus, fabriqués et
homologués conformément à la réglementation sur la pollution de l’EPA
(agence de protection de l’environnement) et du Canada. Nous
recommandons d’utiliser des pièces Honda d’origine lors de tout entretien.
Ces pièces de rechange ont la conception d’origine et sont fabriquées en
appliquant les mêmes normes que les pièces initiales, ce qui garantit la
fiabilité de leurs performances. L’utilisation de pièces de rechange n’ayant
pas la conception et la qualité d’origine peut nuire à l’efficacité du système
antipollution.
12
Le fabricant d’une pièce du marché des pièces de rechange assume la
responsabilité que cette pièce n’affectera pas la performance antipollution.
Le fabricant ou le reconstructeur de la pièce doit certifier que l’utilisation
de cette pièce n’empêchera pas le moteur de se conformer à la
réglementation sur la pollution.
Entretien
Observer le programme d’entretien de la page . Ne pas oublier que ce
5
programme présuppose que la machine sera utilisée pour l’application
pour laquelle elle est prévue. Une utilisation prolongée sous une charge
élevée ou par haute température, ou dans des conditions anormalement
humides ou poussiéreuses demande un entretien plus fréquent.
FRANÇAIS

Caractéristiques Informations de référence rapide
GX120
(Type standard: Type KR)
Longueur Largeur
××
Hauteur
Poids à sec
Type de moteur
Cylindrée
[Alésage course]
×
Puissance maxi
Couple maxi
Contenance en huile
moteur
Consommation de
carburant
Système de
refroidissement
Système d’allumage
Rotation de l’arbre de
prisedeforce
GX160
(Type standard: Type AR)
Longueur Largeur
××
Hauteur
Poids à sec
Type de moteur
Cylindrée
[Alésage course]
×
Puissance maxi
Couple maxi
Contenance en huile
moteur
Consommation de
carburant
Système de
refroidissement
Système d’allumage
Rotation de l’arbre de
prisedeforce
××
313 331 321 mm
16,5 kg
4 temps, soupape en tête, cylindre unique
118 cm
×
[60 42 mm]
2,9 kW (4,0 PS) à 3.600 min
7,4 N·m (0,75 kgf·m) à 2.500 min
(tr/mn)
(tr/mn)
0,40
310 g/kWh (230 g/PSh)
Air forcé
Transistor magnétique
Sens inverse des aiguilles d’un montre
××
319 342 333 mm
18,6 kg
4 temps, soupape en tête, cylindre unique
163 cm
×
[68 45 mm]
4,0 kW (5,5 PS) à 3.600 min
(tr/mn)
10,8 N·m (1,1 kgf·m) à 2.500 min (tr/mn)
0,37
310 g/kWh (230 g/PSh)
Air forcé
Transistor magnétique
Sens inverse des aiguilles d’un montre
Carburant
Huile moteur
Essence sans plomb (Voir page 6)
Etats-Unis
Sauf
Etats-Unis
Indice d’octane pompe d’au moins 86
Indice d’octane recherche d’au moins 91
Indice d’octane pompe d’au moins 86
SAE 10W-30, API SJ ou ultérieure, pour l’utilisation générale.
Voir page 6.
Bougie
BPR4ES (NGK)
W14EPR-U (DENSO)
Entretien
Avant chaque utilisation:
Vérifier le niveau d’huile moteur. Voir page 6.
Vérifier le filtre à air. Voir page 8.
Vérifier tous les boulons et écrous.
Premières 20 h:
Renouveler l’huile moteur. Voir page 7.
Après:
Voir le programme d’entretien à la page 5.
Schéma de câblage
Le schéma de câblage peut être différent selon les types.
FERME
MARCHE
(1) BOUGIE D’ALLUMAGE
(2) BOBINE D’ALLUMAGE
(3) CONTACTEUR D’ARRET MOTEUR
Caractéristiques de mise au point
CARACTERISTIQUESDESCRIPTION ENTRETIEN
−
Ecartement des
0,70 0,80 mm
électrodes
±
Régime de ralenti
Jeu aux soupapes
(à froid)
1.500 150 min
0,15 0,02 mm
ADM :
0,20 0,02 mm
ECH :
Autres
caractéristiques
GX120/160
Voir page: 8
(tr/mn)
±
±
Voir page: 9
Consulter le
concessionnaire
Honda agréé
Aucun autre réglage nécessaire.
BI Noir
FRANÇAIS
13

INFORMATION DU CONSOMMATEUR
Informations de localisation des distributeurs/concessionnaires
Etats-Unis, Puerto Rico et Iles vierges américaines:
Appelez le (800) 426-7701
ou rendez-vous sur notre site Web: www.honda-engines.com
Canada:
Appelez le (888) 9HONDA9
ou rendez-vous sur notre site Web: www.honda.ca
Pour la zone européenne:
rendez-vous sur notre site Web: http://www.honda-engines-eu.com
Informations d’entretien pour le client
Le personnel des concessionnaires compte des professionnels qualifiés. Il
devrait pouvoir répondre à toutes vos questions. Si le concessionnaire ne
résout pas votre problème de manière satisfaisante, adressez-vous à la
direction du concessionnaire. Le responsable du service après-vente, le
directeur général ou le propriétaire pourra vous aider. Presque tous les
problèmes se résolvent de cette manière.
Etats-Unis, Puerto Rico et Iles vierges américaines:
Si vous n’êtes pas satisfait de la décision prise par la direction du
concessionnaire, adressez-vous au distributeur régional de moteurs Honda
de votre région.
Canada:
Honda Canada, Inc.
715 Milner Avenue
Toronto, ON
M1B 2K8
Téléphone: (888) 9HONDA9
Sans frais
(888) 946-6329
Anglais:
Français:
Télécopieur:
(416) 299-3400
(416) 287-4776
(877) 939-0909
(416) 287-4776
Appels locaux de la région de Toronto
Appels locaux de la région de Toronto
Sans frais
Appels locaux de la région de Toronto
Australie:
Honda Australia Motorcycle and Power Equipment Pty. Ltd.
1954 1956 Hume Highway Campbellfield Victoria 3061
−
Téléphone:
Télécopieur:
(03) 9270 1111
(03) 9270 1133
Pour la zone européenne:
Honda Europe NV.
European Engine Center
http://www.honda-engines-eu.com
Toutes les autres zones:
S’adresser au distributeur Honda local pour toute assistance.
Si vous n’êtes toujours pas satisfait après avoir parlé au distributeur
régional de moteurs, vous pourrez vous adresser au bureau Honda indiqué.
Toutes les autres zones:
Si vous n’êtes pas satisfait de la décision prise par la direction du
concessionnaire, adressez-vous au bureau Honda indiqué.
《》
Bureau Honda
Lorsque vous écrivez ou appelez, veuillez fournir les informations
suivantes:
Nom du fabricant et numéro de modèle de l’équipement sur lequel est
monté le moteur
Modèle, numéro de série et type du moteur (voir page )
11
Nom du concessionnaire vous ayant vendu le moteur
Nom, adresse et personne à contacter du concessionnaire assurant le
service après-vente de votre moteur
Date d’achat
Vos nom, adresse et numéro de téléphone
Description détaillée du problème
Etats-Unis, Puerto Rico et Iles vierges américaines:
American Honda Motor Co., Inc.
Power Equipment Division
Customer Relations Office
4900 Marconi Drive
Alpharetta, GA 30005-8847
Ou téléphoner au: (770) 497-6400, 8 h 30 - 20 h 00 HNE
14
FRANÇAIS

INTRODUCCIÓN
Muchas gracias por la adquisición de un motor Honda. Nos gustaría
ayudarle a obtener los mejores resultados con su nuevo motor y a
operarlo con seguridad. Este manual contiene información para ello; léalo
detenidamente antes de poner en funcionamiento el motor. En caso de
encontrarse con algún problema, o si tiene alguna pregunta sobre su
motor, consulte a un concesionario de servicio Honda autorizado.
Toda la información de esta publicación se basa en la información más
reciente disponible en el momento de la impresión. Honda Motor Co., Ltd.
se reserva el derecho a efectuar cambios en cualquier momento sin previo
aviso y sin incurrir en ningún tipo de obligación. No se permite la
reproducción de ninguna parte de esta publicación sin permiso por escrito.
Este manual debe considerarse como una parte permanente del motor y
debe permanecer con el motor en caso de reventa.
Revise las instrucciones suministradas con el equipo que funcionará con
este motor para encontrar información adicional sobre la puesta en
marcha del motor, parada, operación, ajustes, o instrucciones especiales
para el mantenimiento.
Estados Unidos, Puerto Rico, e Islas Vírgenes Estadounidenses:
Le aconsejamos que lea el contrato de garantía para que comprenda su
alcance y sus responsabilidades de propiedad. El contrato de garantía es
un documento independiente que le habrá entregado su concesionario.
MENSAJES DE SEGURIDAD
Su seguridad y la seguridad de los demás son muy importantes. Hemos
incluido mensajes de seguridad importantes en este manual y en el motor.
Lea detenidamente estos mensajes.
Un mensaje de seguridad le avisa sobre los peligros potenciales que
podrían causarle lesiones a usted y a los demás. Cada mensaje de
seguridad viene precedido por un símbolo de alerta de seguridad y una
de las tres palabras, PELIGRO, ADVERTENCIA o PRECAUCION.
Estas palabras de indicación significan:
Correrá el peligro de MUERTE o de
HERIDAS GRAVES si no sigue las
instrucciones.
Podrá correr el peligro de MUERTE o de
HERIDAS GRAVES si no sigue las
instrucciones.
Podrá correr el peligro de HERIDAS si no
sigue las instrucciones.
Cada mensaje le explica en qué consiste el peligro, lo que puede suceder, y
lo que usted debe hacer para evitar las heridas o para reducirlas.
MENSAJES PARA PREVENCIÓN DE DAÑOS
Encontrará también otros mensajes importantes que vienen precedidos
por la palabra AVISO.
Esta palabra significa:
Pueden producirse daños en el motor o en la propiedad de
terceras personas si no sigue las instrucciones.
El propósito de estos mensajes es el de ayudar a evitar daños en el motor,
en la propiedad de terceras personas, o en medio ambiente.
MANUAL DEL PROPIETARIO
GX120 · GX160
PARA COMPACTADORES DEL TIPO DE APISONADORA
Los gases de escape de este producto
contienen agentes químicos que, según el
Estado de California, causan cáncer, defectos
de nacimiento u otros efectos perjudiciales
CONTENIDO
..............................INTRODUCCIÓN .1
..........MENSAJES DE SEGURIDAD .1
............ETIQUETA DE SEGURIDAD .2
SITUACIONES DE LOS
COMPROBACIONES PREVIAS A
...............................LA OPERACIÓN .3
.....................................OPERACIÓN .3
PRECAUCIONES DE SEGURIDAD
.........DURANTE LA OPERACIÓN .3
...........ARRANQUE DEL MOTOR .3
.................PARADA DEL MOTOR .4
...............SERVICIO DE SU MOTOR .5
LA IMPORTANCIA DEL
.......................MANTENIMIENTO .5
SEGURIDAD DEL
.......................MANTENIMIENTO .5
PRECAUCIONES DE
.................................SEGURIDAD .5
PROGRAMA DE
.......................MANTENIMIENTO .5
........................PARA REPOSTAR .6
.....................ACEITE DE MOTOR .6
................Aceite recomendado .6
Comprobación del nivel de
.........................................aceite .6
....................Cambio del aceite .7
...........................FILTRO DE AIRE .8
................................Inspección .8
...................................Limpieza .8
reproductivos.
TUBO DE VENTILACIÓN DE
....INFORMACIÓN DE SEGURIDAD .2
SUGERENCIAS Y
...COMPONENTES Y CONTROLES .2
CUIDADOS PARA PROBLEMAS
Modificaciones del carburador
Información del sistema de
control de las emisiones de
Información de referencia
INFORMACIÓN DEL
Información para encontrar
Información de servicio de
ESPAÑOL
...........................................BUJÍA .8
..............................................AIRE .9
............VELOCIDAD DE RALENTÍ .9
....OBSERVACIONES DE UTILIDAD .9
.......ALMACENAJE DEL MOTOR .9
............................TRANSPORTE .10
..............................INESPERADOS .11
.............INFORMACIÓN TÉCNICA .11
..Situación del número de serie .11
....para funcionar a gran altitud .12
........................................escape .12
........................Especificaciones .13
.......Especificaciones de reglaje .13
.........................................rápida .13
..........Diagrama de conexiones .13
..............................CONSUMIDOR .14
..distribuidores/concesionarios .14
.......................................clientes .14
ESPAÑOL
1

INFORMACIÓN DE SEGURIDAD
Comprenda el funcionamiento de todos los controles y aprenda a parar
con rapidez el motor en un caso de emergencia. Asegúrese de que el
operador haya recibido una instrucción adecuada antes de operar el
equipo.
No permita que los niños operen el motor. Mantenga a los niños y
animales apartados del lugar de operación.
Los gases de escape del motor contienen monóxido de carbono que es
venenoso. No ponga en marcha el motor si no hay una ventilación
adecuada, y no ponga nunca en marcha el motor en un lugar cerrado.
El motor y el sistema de escape se calientan mucho durante la operación.
Mantenga el motor por lo menos a 1 metro de distancia de edificios y de
otros equipos durante la operación. Mantenga apartados los materiales
inflamables, y no ponga nada sobre el motor mientras esté en marcha.
ETIQUETA DE SEGURIDAD
Esta etiqueta le avisa sobre peligros potenciales que pueden ocasionar
heridas graves. Léala detenidamente.
Si la etiqueta se despega o si resulta difícil de leer, solicite su reemplazo a
su concesionario Honda.
SITUACIONES DE LOS COMPONENTES Y
CONTROLES
BUJÍA
FILTRO DE AIRE
TUBO DE VENTILACION
SILENCIADOR
EMPUÑADURA DEL
MOTOR DE ARRANQUE
TAPA DEL ORIFICIO
DE LLENADO DE
ACEITE/VARILLA
INDICADORA DE
NIVEL
El motor se sirve con las etiquetas.
La gasolina es muy inflamable y explosiva. Pare el
motor y espere a que se enfríe antes de repostar.
El motor emite gas monóxido de carbono que es
tóxico y venenoso. No lo tenga en marcha en un
lugar cerrado.
Lea el Manual del propietario antes de la operación.
Sólo para los tipos para
Canadá:
Etiqueta en francés.
ARRANCADOR DE RETROCESO
CONTROLES DEL MOTOR
PALANCA DEL ESTRANGULADOR
TAPÓN DE DRENAJE
DE ACEITE
INTERRUPTOR DEL MOTOR
2
ESPAÑOL

COMPROBACIONES PREVIAS A LA OPERACIÓN OPERACIÓN
¿ESTÁ PREPARADO EL MOTOR PARA FUNCIONAR? PRECAUCIONES DE SEGURIDAD DURANTE LA OPERACIÓN
Por su propia seguridad, y para maximizar la vida de servicio de su equipo,
es muy importante emplear un poco de tiempo para comprobar el estado
del motor antes de ponerlo en funcionamiento. Antes de poner en marcha
el motor, deberá asegurarse de haber solucionado cualquier problema
encontrado, o de solicitar a su concesionario de servicio que lo solucione.
El mantenimiento inadecuado de este motor, o la falta de
reparación de un problema antes de la operación, pueden
ser causa de un mal funcionamiento en el que pueda correr
el peligro de heridas graves o de muerte.
Efectúe siempre la inspección previa a la operación antes de
cada operación, y solucione los problemas encontrados.
Antes de comenzar las comprobaciones previas a la operación, asegúrese
de que el motor esté nivelado y que el interruptor del motor esté en la
posición OFF.
Compruebe siempre los elementos siguientes antes de poner en marcha el
motor:
Comprobación del estado general del motor
Mire en torno al motor y debajo del mismo para ver si hay indicios de
1.
fugas de aceite o de gasolina.
Extraiga el polvo o la suciedad excesiva, especialmente en torno al
2.
silenciador y al arrancador de retroceso.
Busque si hay indicios de daños.
3.
Antes de poner en marcha el motor por primera vez, revise la sección
INFORMACIÓN DE SEGURIDAD
PREVIAS A LA OPERACIÓN
.
en la página y
2
COMPROBACIONES
El gas de monóxido de carbono es tóxico. Su inhalación
puede causar la pérdida del sentido y provocar incluso la
muerte.
Evite los lugares o las acciones que le puedan exponer al
monóxido de carbono.
Revise las instrucciones proporcionadas con el equipo que deba funcionar
con este motor para ver si hay precauciones de seguridad que deban
observarse para poner en marcha, parar, y operar el motor.
ARRANQUE DEL MOTOR
Si el depósito de combustible está equipado con una válvula, asegúrese
1.
de que la válvula de combustible y el dispositivo de ventilación de la
tapa de relleno de combustible estén en la posición OPEN u ON antes de
intentar poner en marcha el motor. Para ver las instrucciones específicas
sobre la operación de la válvula de combustible y del dispositivo de
ventilación de la tapa de relleno de combustible, consulte las
instrucciones que se sirven con el equipo operado con este motor.
Para arrancar el motor cuando está frío, mueva la palanca del
2.
estrangulador a la posición CLOSED.
PALANCA DEL ESTRANGULADOR
Compruebe que todos los protectores y cubiertas estén en su ligar, y
4.
que todas las tuercas, pernos, y tornillos estén apretados.
Comprobación del motor
Compruebe el nivel de combustible. Si comienza el trabajo con el
1.
depósito lleno, le ayudará a eliminar o reducir las interrupciones de la
operación para repostar.
Compruebe el nivel del aceite de motor (vea la página ). El motor
2.
6
puede dañarse si se utiliza con un nivel bajo de aceite.
Compruebe el elemento del filtro de aire (vea la página ). Un
3.
8
elemento del filtro de aire sucio restringirá el flujo de aire al carburador,
reduciendo el rendimiento del motor.
Compruebe el equipo que deba funcionar con este motor.
4.
Revise las instrucciones proporcionadas con el equipo que deba
funcionar con este motor para ver si hay precauciones y
procedimientos que deban seguirse antes de poner en marcha el
motor.
CERRADO
CERRADO
AABBRRIIRR
Para arrancar el motor cuando está caliente, deje la palanca del
estrangulador en la posición OPEN.
Mueva la palanca del acelerador a la posición MIN. La palanca del
3.
acelerador está montada en el equipo operado con este motor. Consulte
el manual de instrucciones suministrado con este equipo para ver la
información sobre el control del acelerador específico.
PALANCA DEL ACELERADOR
(en el equipo)
MÍN.
ESPAÑOL
3

Gire el interruptor del motor a la posición ON.
4.
INTERRUPTOR DEL MOTOR
CONEXIÓN
Ajuste la palanca del acelerador a la velocidad deseada del motor. Para
7.
ver las recomendaciones de la velocidad del motor, consulte el manual
de instrucciones suministrado con el equipo que deba funcionar con
este motor.
MÍN.
Opere el arrancador.
5.
Tire ligeramente de la empuñadura del arrancador hasta notar
resistencia, y entonces tire con fuerza en la dirección de la flecha como
se muestra abajo. Deje que la empuñadura del arrancador retorne con
suavidad.
EMPUÑADURA DEL MOTOR DE ARRANQUE
DDiirreecccciióónn ddee ttiirroo
No permita que la empuñadura del arrancador retroceda con fuerza
contra el motor. Haga que retorne con suavidad para evitar daños en el
arrancador.
Si se ha movido la palanca del estrangulador a la posición CLOSED para
6.
arrancar el motor, muévala gradualmente a la posición OPEN a medida
que se va calentando el motor.
PALANCA DEL ACELERADOR
(en el equipo)
MÁX.
PARADA DEL MOTOR
Para parar el motor en un caso de emergencia, simplemente gire el
interruptor del motor a la posición OFF. En situaciones normales, emplee
el procedimiento siguiente.
Mueva la palanca del acelerador a la posición MIN.
1.
PALANCA DEL ACELERADOR
(en el equipo)
Gire el interruptor del motor a la posición OFF.
2.
INTERRUPTOR DEL MOTOR
MÍN.
PALANCA DEL ESTRANGULADOR
DESCONEXIÓN
ABRIR
Si el depósito de combustible está equipado con una válvula de
3.
CERRADO
ABRIR
4
combustible o con una tapa de relleno de combustible con ventilación,
gírela a la posición CLOSED u OFF.
ESPAÑOL

SERVICIO DE SU MOTOR
LA IMPORTANCIA DEL MANTENIMIENTO
El buen mantenimiento es esencial para conseguir una operación segura,
económica y exenta de problemas. Ayudará también a reducir la
contaminación.
El mantenimiento inadecuado, o la falta de reparación de un
problema antes de la operación, pueden ser causa de un
mal funcionamiento en el que pueda correr el peligro de
heridas graves o de muerte.
Siga siempre las recomendaciones de inspección y
mantenimiento y los programas de este manual del
propietario.
Para ayudarle a cuidar adecuadamente el motor, las páginas siguientes
incluyen un programa de mantenimiento, procedimientos de inspección
rutinarios, y simple procedimientos de mantenimiento empleando
herramientas manuales básicas. Las otras tareas de servicio que son más
difíciles, o que requieren herramientas especiales, es mejor que sean
realizadas por profesionales y normalmente las lleva a cabo un mecánico
de Honda u otro mecánico cualificado.
El programa de mantenimiento se aplica a las condiciones normales de
operación. Si opera el motor en condiciones severas, tales como con una
carga grande continuamente o a altas temperaturas, o si lo utiliza en
condiciones con mucha humedad o polvo, consulte a su concesionario de
servicio para que le diga las recomendaciones aplicables a sus
necesidades y aplicaciones individuales.
El mantenimiento, reemplazo o reparación de los dispositivos y sistemas
de control de las emisiones de escape pueden efectuarse en cualquier
establecimiento de reparaciones de motores o por cualquier individuo,
empleando partes que estén ‘‘homologadas’’ según las normas EPA.
SEGURIDAD DEL MANTENIMIENTO
A continuación se mencionan algunas de las precauciones de seguridad
más importantes. No obstante, no podemos avisarle sobre todos los
peligros concebibles que pueden surgir al realizar el mantenimiento. Sólo
usted será quien pueda decidir si debe o no llevar a cabo una tarea dada.
Lea las instrucciones antes de empezar, y asegúrese de disponer de las
herramientas y conocimientos necesarios.
Para reducir la posibilidad de incendio o explosión, tenga cuidado
cuando trabaje cerca de gasolina. Emplee sólo solventes ininflamables,
y no emplee gasolina, para limpiar las partes. Mantenga apartados los
cigarrillos, las chispas y el fuego de las partes relacionadas con el
combustible.
Recuerde que su concesionario de servicio autorizado Honda es quien
mejor conoce su motor y que está completamente equipado para su
mantenimiento y reparación.
Para asegurar la mejor calidad y fiabilidad, emplee sólo partes nuevas
genuinas de Honda o sus equivalentes para las reparaciones y reemplazos.
PROGRAMA DE MANTENIMIENTO
Consulte
Cada
Cada 6
mes
o
20
horas
Cada 3
meses
o
50
horas
(1)
Cada 2 años
meses
o
100
horas
la
año
página
o
300
horas
6
7
8
8
*
8
9
(2)
Manual
(2)
de taller
Manual
de taller
(2)
Manual
de taller
Manual
de taller
PERÍODO DE SERVICIO REGULAR (3) Primer
Efectúelo a cada intervalo
indicado de meses o de
horas de funcionamiento, lo
que primero acontezca.
ELEMENTO
Aceite de motor
Filtro de aire
Bujía
Velocidad de
ralentí
Holgura de
válvulas
Cámara de
combustión
Depósito y filtro
de combustible
Tubo de
combustible
Reemplace sólo el elemento de papel del filtro de aire.
*
Efectúe el servicio con más frecuencia cuando lo utilice en zonas
(1)
Comprobar el nivel
Cambiar
Comprobar
Limpiar
Reemplazar
Comprobar-ajustar
Reemplazar
Comprobar-ajustar
Comprobar-ajustar
Limpiar
Limpiar
Comprobar
Cada
utilización
Después de cada 500 horas (2)
(Reemplazar si es necesario) (2)
polvorientas.
Si no sigue correctamente las instrucciones y precauciones
para el mantenimiento, correrá el peligro de graves heridas
odemuerte.
Siga siempre con cuidado los procedimientos y
precauciones de este manual del propietario.
PRECAUCIONES DE SEGURIDAD
Asegúrese de que el motor esté desconectado antes de comenzar
cualquier trabajo de mantenimiento o de reparación. De este modo
eliminará muchos peligros potenciales:
Envenenamiento por monóxido de carbono de los gases de escape
−
del motor.
Asegúrese de que haya una ventilación adecuada siempre que tenga
el motor en marcha.
Quemaduras en las partes calientes.
−
Espere a que se enfríen el motor y el sistema de escape antes de
tocarlos.
Daños debidos a las partes en movimiento.
−
No ponga en marcha el motor a menos que se lo indiquen las
instrucciones.
El servicio de estas partes deberá realizarlo su concesionario de
(2)
servicio, a menos que usted disponga de las herramientas adecuadas
y posea suficientes conocimientos mecánicos. Consulte el manual de
taller Honda para ver los procedimientos de servicio.
Para aplicaciones comerciales, registre las horas de funcionamiento
(3)
para determinar los intervalos apropiados para el mantenimiento.
Si no sigue este programa de mantenimiento pueden producirse fallas que
no entran en la garantía.
ESPAÑOL
5

PARA REPOSTAR
ACEITE DE MOTOR
Combustible recomendado
EE.UU.
Excepto EE.UU.
Valor de octanos de bomba de 86 o más alto
Valor de octanos de investigación de 91 o más alto
Valor de octanos de bomba de 86 o más alto
Este motor está homologado para funcionar con gasolina sin plomo con
un valor de octanos de bomba de 86 o más alto (un valor de octanos de
investigación de 91 o más alto).
Llene el depósito en un lugar bien ventilado con el motor parado. Si el
motor ha estado funcionando, espere primero a que se enfríe. No reposte
nunca el motor dentro de un edificio donde los gases de la gasolina
pudieran llegar a fuegos o chispas.
Podrá emplear gasolina normal sin plomo con un contenido máximo del
10% de etanol (E10) o del 5% de metanol por volumen. Adicionalmente, el
metanol debe contener cosolventes e inhibidores contra la corrosión. El
empleo de combustible con un contenido de etanol o de metanol mayor
que el indicado arriba puede ocasionar problemas en el arranque y/o en el
funcionamiento. También puede causar daños en las partes metálicas, de
goma, y de plástico del sistema de combustible. Los daños del motor o los
problemas de funcionamiento debidos al empleo de un combustible con
porcentajes de etanol o metanol mayores que los indicados arriba no están
cubiertos por la garantía.
El aceite es un factor muy importante que afecta el rendimiento y la vida
de servicio. Emplee aceite detergente para automóviles de 4 tiempos.Gasolina sin plomo
Aceite recomendado
Grados de viscosidad SAE
Emplee aceite de motor de 4
tiempos que satisfaga o exceda los
requisitos para la clasificación de
servicio API de SJ o posterior (o
equivalente). Compruebe siempre
la etiqueta de servicio API del
recipiente de aceite para asegurarse
que incluye las letras SJ o posterior
TEMPERATURA AMBIENTAL
(o equivalente).
Se recomienda el SAE 10W-30 para aplicaciones generales. Las otras
viscosidades mostradas en la gráfica pueden utilizarse cuando la
temperatura media de su zona está dentro del margen indicado.
Comprobación del nivel de aceite
Compruebe el nivel del aceite de motor con el motor parado y en una
posición nivelada.
Extraiga la tapa de relleno/varilla de medición del nivel de aceite y
1.
frótela para limpiarla.
La gasolina es muy inflamable y explosiva, y correrá el peligro
de quemaduras o de heridas graves al repostar.
Pare el motor y mantenga apartados el calor, las chispas, y
el fuego.
Reposte sólo al aire libre.
Frote inmediatamente el líquido derramado.
El combustible puede dañar la pintura y ciertos tipos de plástico. Tenga
cuidado para que no se derrame combustible mientras llena el depósito de
combustible. Lo daños causados por el combustible derramado no están
cubiertos por la
garantía limitada del distribuidor.
No emplee nunca gasolina pasada o sucia ni mezcla de aceite/gasolina.
Evite la entrada de suciedad o agua en el depósito de combustible.
Reposte con cuidado para que no se derrame combustible.
Mantenga la gasolina apartada de las luces piloto de los aparatos,
barbacoas, aparatos eléctricos, herramientas eléctricas, etc.
El combustible derramado no sólo le hará correr el peligro de incendio,
sino que además causa daños en el medio ambiente. Frote
inmediatamente el líquido derramado.
Inserte la tapa de relleno/varilla de medición del nivel de aceite en el
2.
cuello de relleno como se muestra, pero no la enrosque, y luego
extráigala para comprobar el nivel de aceite.
Si el nivel de aceite está cerca o por debajo de la marca del límite
3.
inferior de la varilla de medición del nivel de aceite, llene aceite del
recomendado hasta la marca del límite superior (parte inferior del
orificio de relleno de aceite). No llene excesivamente.
Vuelva a instalar la tapa de relleno/varilla de medición del nivel de aceite.
4.
TAPA DEL ORIFICIO DE LLENADO DE ACEITE/
VARILLA INDICADORA DE NIVEL
LÍMITE SUPERIOR
ORIFICIO DE RELLENO DE ACEITE
(borde inferior)
LÍMITE INFERIOR
El motor puede dañarse si se utiliza con un nivel bajo de aceite.
6
ESPAÑOL

Cambio del aceite
Drene el aceite usado cuando el motor esté caliente. El aceite caliente se
drena con más rapidez y por completo.
Ponga un recipiente adecuado debajo del motor para recibir el aceite
1.
usado, y extraiga entonces la tapa de relleno/varilla de medición del
nivel de aceite, el tapón de drenaje y la arandela.
Deje que el aceite usado se drene por completo, y vuelva a instalar
2.
entonces el tapón de drenaje y una arandela nueva, y apriete con
seguridad el tapón de drenaje.
Tire el aceite de motor usado de manera que sea compatible con el
medio ambiente. Le aconsejamos que lleve el aceite usado en un
recipiente cerrado al centro de reciclaje de su localidad o a una
gasolinera para que se encarguen de su eliminación. No lo tire a la
basura, no lo derrame a la tierra, ni tampoco por una cloaca.
Con el motor en una posición nivelada, llene aceite del recomendado
3.
hasta la marca del límite superior (parte inferior del orificio de relleno de
aceite) (vea la página ).
6
El motor puede dañarse si se utiliza con un nivel bajo de aceite.
Instale la tapa de relleno/varilla de medición del nivel de aceite y
4.
apriétela con seguridad.
TAPA DEL ORIFICIO DE LLENADO DE ACEITE/
VARILLA INDICADORA DE NIVEL
ARANDELA
LÍMITE SUPERIOR
TAPON DE DRENAJE
ESPAÑOL
7

BUJÍAFILTRO DE AIRE
Un filtro de aire sucio restringirá el flujo de aire al carburador, reduciendo
el rendimiento del motor. Si utiliza el motor en lugares muy polvorientos,
limpie el filtro de aire con mayor frecuencia que la que se especifica en el
PROGRAMA DE MANTENIMIENTO.
Si se pone en funcionamiento el motor sin el filtro de aire, o con un filtro
de aire dañado, la suciedad se introducirá en el motor, ocasionando su
rápido desgaste. Este tipo de daños no está cubierto por la
garantía
limitada del distribuidor.
Inspección
Libere el retenedor de sujeción, y extraiga la cubierta del filtro de aire.
1.
Extraiga e inspeccione los elementos del filtro de aire. Si el elemento del
2.
filtro de aire está sucio, limpie los elementos del filtro de aire como se
describe a continuación. Reemplace los elementos del filtro si están
dañados. Reemplace siempre el elemento de papel del filtro de aire a los
intervalos programados (vea la página ).
Ponga el elemento de espuma del filtro de aire sobre el elemento de
3.
5
papel, y vuelva a instalar los elementos del filtro de aire montados.
Inserte el extremo abierto de los elementos del filtro de aire en la caja
como se muestra, de modo que el extremo cerrado quede hacia la
cubierta del filtro de aire.
Enganche el borde inferior de la cubierta del filtro de aire en la caja, y
4.
luego fije la cubierta con el retenedor de sujeción.
RETENEDOR DE SUJECIÓN
ELEMENTO DE PAPEL DEL FILTRO
EXTREMO CERRADO
CAJA DEL FILTRO DE AIRE
Bujías recomendadas:
BPR4ES (NGK)
W14EPR-U (DENSO)
La bujía recomendada tiene el margen térmico correcto para las
temperaturas normales de operación del motor.
Una bujía incorrecta puede causar daños en el motor.
Para obtener un buen rendimiento, el huelgo de los electrodos de al bujía
deberá ser correcto y no deberá haber carbonilla acumulada.
Desconectelatapadelabujía,y
1.
LLAVE DE BUJÍAS
saque la suciedad que pudiera
haber en torno al área de la bujía.
Extraiga la bujía con una llave
2.
para bujías de 13/16 pulgadas.
Inspeccione la bujía. Reemplácela
3.
si está dañada o muy sucia, si la
arandela de sellado está en mal
estado, o si el electrodo está
gastado.
Mida el huelgo del electrodo de la
4.
ELECTRODO LATERAL
bujía con un calibre de espesores
del tipo de alambre. Corrija el
0,70 0,80 mm
−
huelgo, si es necesario, doblando
con cuidado el electrodo lateral.
El huelgo deberá ser:
−
0,70 0,80 mm
Instale con cuidado la bujía, con la
5.
ARANDELA DE
SELLADO
mano, para evitar que se dañen las
roscas.
ELEMENTO DE ESPUMA
DEL FILTRO
TAPA DEL FILTRO DE AIRE
INCORRECTO
PLATO
EXTREMO ABIERTO
CORRECTO
ORIFICIO
Limpieza
Limpie los elementos del filtro de aire si debe volver a utilizarlos.
1.
Elemento de papel del filtro de aire: Golpee varias veces el elemento del
filtro contra una superficie dura para sacar la suciedad, o sople aire
comprimido [sin exceder 207 kPa, (2,1 kgf/cm
)] por el elemento del filtro
desde el interior. No trate nunca de cepillar la suciedad; el cepillo
forzaría la suciedad al interior de las fibras.
Elemento de espuma del filtro de aire: Límpielo en agua tibia con jabón,
aclárelo y espere a que se seque por completo. También podrá limpiarlo
en solvente ininflamable y dejarlo secar. Sumerja el elemento del filtro
en aceite de motor limpio, y luego exprima todo el aceite excesivo. Si se
deja demasiado aceite en la espuma, el motor producirá humo cuando
se arranque.
Frote la suciedad desde el interior de la cubierta del filtro de aire y la
2.
cubierta, empleando un paño humedecido. Tenga cuidado para evitar
que la suciedad se introduzca en el conducto de aire que va al
carburador.
8
Después de haberse asentado la bujía, apriétela con una llave de bujías
6.
de 13/16 pulgadas para comprimir la arandela de sellado.
Cuando instale una bujía nueva, apriétela 1/2 de vuelta después de
7.
haberse asentado la bujía para comprimir la arandela.
Cuando vuelva a instalar la bujía original, apriétela 1/8 1/4 de vuelta
8.
−
después de haberse asentado la bujía para comprimir la arandela.
Una bujía floja puede causar sobrecalentamiento y daños en el motor. El
apriete excesivo de la bujía puede dañar las roscas de la culata de
cilindros.
Instale la tapa de la bujía en la bujía.
9.
ESPAÑOL

TUBO DE VENTILACIÓN DE AIRE
SUGERENCIAS Y OBSERVACIONES DE UTILIDAD
Inspección
Compruebe que el tubo de
ventilación de aire esté fijado con
los retenedores del tubo y no esté
desprendido ni retorcido.
VELOCIDAD DE RALENTÍ
Ajuste
Arranque el motor al aire libre, y
1.
deje que se caliente hasta
alcanzar la temperatura de
funcionamiento.
Con el motor en marcha al ralentí,
2.
gire el tornillo de tope de la
mariposa de gases para obtener
la velocidad de ralentí estándar.
RETENEDORES
TUBO DE VENTILACION
TORNILLO DE TOPE DEL
ACELERADOR
ALMACENAJE DEL MOTOR
Preparativos para el almacenaje
Los preparativos adecuados para el almacenaje son esenciales para
mantener el motor exento de problemas y con buena apariencia exterior.
Los pasos siguientes ayudarán a evitar que la oxidación y la corrosión
afecten el funcionamiento y el aspecto exterior del motor, y facilitarán el
arranque del motor cuando lo vuelva a utilizar.
Limpieza
Si el motor ha estado en marcha, espere a que se enfríe por lo menos
media hora antes de efectuar la limpieza. Limpie todas las superficies
exteriores, retoque cualquier parte dañada con pintura, y revista las otras
partes que puedan oxidarse con una capa fina de aceite.
Si se emplea una manguera de jardín o un equipo de lavado a presión, el
agua puede forzarse al interior del filtro de aire o a la abertura del
silenciador. Al agua dentro del filtro de aire mojará el filtro de aire, y el
agua que pasa por el filtro de aire o el silenciador puede introducirse en el
cilindro, y ocasionar daños.
Combustible
La gasolina se oxida y deteriora durante el almacenaje. La gasolina
deteriorada dificulta el arranque, y deja acumulaciones de suciedad que
obstruyen el sistema de combustible. Si se deteriora la gasolina del motor
durante el almacenaje, es posible que tenga que solicitar el servicio o el
reemplazo del carburador y de otros componentes del sistema de
combustible.
Velocidad de ralentí estándar:
±
1.500 150 min
(rpm)
El tiempo que puede dejarse la gasolina en el depósito de combustible y
en el carburador sin que cause problemas funcionales variará de acuerdo
con factores tales como la mezcla de la gasolina, la temperatura de
almacenaje, y de si el depósito está parcialmente o completamente lleno.
El aire de un depósito de combustible parcialmente lleno acelera el
deterioro. Las temperaturas de almacenaje muy altas acelerarán también
el deterioro del combustible. Los problemas con el combustible suelen
ocurrir después de pocos meses, o incluso menos si la gasolina no era
nueva cuando se llenó el depósito de combustible.
Los daños del sistema de combustible o los problemas de rendimiento del
motor debidos a unos preparativos inadecuados para el almacenaje no
están cubiertos por la
garantía limitada del distribuidor
.
Podrá extender la vida de servicio durante el almacenaje del combustible
añadiendo un estabilizador de gasolina que esté formulado para este
propósito, o podrá evitar los problemas del deterioro del combustible
drenando el depósito de combustible y el carburador.
Adición de un estabilizador de gasolina para extender la duración de
almacenaje del combustible
Cuando añada un estabilizador de gasolina, llene el depósito de
combustible con gasolina nueva. Si sólo lo llena parcialmente, el aire que
quede en el depósito acelerará el deterioro durante el almacenaje. Si
conserva un recipiente de gasolina para repostar, asegúrese de que sólo
contenga gasolina nueva.
Añada el estabilizador de gasolina siguiendo las instrucciones del
1.
fabricante.
Después de añadir un estabilizador de gasolina, deje en marcha el motor
2.
al aire libre durante 10 minutos para asegurarse de que la gasolina
tratada ha reemplazado a la gasolina que no está tratada en el
carburador.
Pare el motor.
3.
ESPAÑOL
9

La gasolina es muy inflamable y explosiva, y correrá el
peligro de quemaduras o de heridas graves al manipular el
combustible.
Pare el motor y mantenga apartados el calor, las chispas,
y el fuego.
Manipule el combustible sólo en exteriores.
Frote inmediatamente el líquido derramado.
1.
Drene el depósito de combustible siguiendo las instrucciones del
fabricante del equipo.
2.
Ponga un recipiente de gasolina homologado debajo del carburador, y
emplee un embudo para evitar el derrame de combustible. Afloje o
extraiga el perno de drenaje y la arandela del carburador.
CARBURADOR
ARANDELA
PERNO DE DRENAJE
3.
Después de haber drenado todo el combustible en el recipiente, instale
el perno de drenaje y la arandela y apriete el perno de drenaje.
Aceite de motor
1.
Cambie el aceite de motor (vea la página ).
2.
Extraiga la bujía (vea la página ).
Introduzca una cucharada de 5 10 cm
3.
8
−
7
de aceite de motor limpio en el
cilindro.
Precauciones para el almacenajeDrenaje del depósito de combustible y del carburador
Si el motor debe almacenarse con gasolina en el depósito de combustible
y en el carburador, es importante reducir el peligro de que se enciendan
los gases de la gasolina. Seleccione un lugar de almacenaje bien ventilado
apartado de todos los aparatos que funcionen con fuego, como puedan ser
los hornos, calentadores de agua, o secadoras para la ropa. Evite también
los lugares con motores eléctricos que produzcan chispas, o donde se
utilicen herramientas eléctricas.
Si es posible, evite los lugares de almacenaje con mucha humedad,
porque aceleran la oxidación y la corrosión.
Mantenga el motor nivelado durante el almacenaje. La inclinación podría
ocasionar fugas de combustible o de aceite.
A menos que se haya drenado todo el combustible del depósito de
combustible, deje la válvula de combustible y el dispositivo de ventilación
de la tapa de relleno de combustible en la posición CLOSED u OFF para
reducir la posibilidad de fugas de combustible.
Cuando el motor y el sistema de escape estén fríos, cubra el motor para
protegerlo contra el polvo. Si el motor y el sistema de escape están
calientes pueden hacer que se enciendan o derritan algunos materiales.
No emplee un trozo de plástico como cubierta contra el polvo. Una
cubierta que no sea porosa no dejará escapar la humedad en torno al
motor, acelerando la oxidación y la corrosión.
Salida del almacenaje
Compruebe el motor como se describe en la sección de
COMPROBACIONES PREVIAS A LA OPERACIÓN
página ).
3
de este manual (vea la
Si se había drenado el combustible durante los preparativos para el
almacenaje, llene el depósito con gasolina nueva. Si conserva un
recipiente de gasolina para repostar, asegúrese de que sólo contenga
gasolina nueva. La gasolina se oxida y deteriora con el tiempo,
dificultando el arranque.
Si se había revestido el cilindro con aceite durante los preparativos para el
almacenaje, el motor produce un poco de humo al principio. Esto es
normal.
TRANSPORTE
Si el motor ha estado en marcha, espere como mínimo 15 minutos a que
se enfríe antes de guardarlo o cargarlo en el vehículo de transporte. Si el
motor y el silenciador están calientes pueden causarle quemaduras y
hacer que se enciendan algunos materiales.
Tire varias veces de la cuerda del arrancador para que el aceite se
4.
distribuya por el cilindro.
Vuelva a instalar la bujía.
5.
Tire lentamente de la cuerda del arrancador hasta notar resistencia y
6.
hasta que la muesca de la polea del arrancador se alinee con el orificio
de la parte superior de la cubierta del arrancador de retroceso. De este
modo se cerrarán las válvulas para que no pueda introducirse suciedad
en el cilindro del motor. Deje que la cuerda del arrancador retorne con
suavidad.
Alinee la muesca de la polea con el orificio de la parte superior de la cubierta.
10
Si el depósito de combustible está equipado con una válvula de
combustible y/o una válvula de ventilación de la tapa de relleno de
combustible, gírelas a la posición CLOSED u OFF.
Podrá apoyar el equipo sobre su costado si el depósito de combustible
está equipado con una válvula de combustible y un dispositivo de
ventilación de la tapa de relleno de combustible, y están los dos en la
posición CLOSED u OFF. Ponga el equipo de modo que el carburador
quede arriba, como se muestra.
DELANTE INCORRECTO
IZQUIERDA INCORRECTO
DETRÁS (Lado del operador) INCORRECTO
ESPAÑOL
DERECHA CORRECTO
CARBURADOR
Mirando desde arriba

CUIDADOS PARA PROBLEMAS INESPERADOS INFORMACIÓN TÉCNICA
NO ARRANCA EL
MOTOR
Compruebe las
1.
posiciones de los
controles.
Compruebe el
2.
combustible.
Extraiga e
3.
inspeccione la
bujía.
Lleve el motor a
4.
un concesionario
de servicio
autorizado Honda,
o consulte el
manual de taller.
Causa posible Corrección
Válvula de
combustible y/o
válvula de
ventilación de la
tapa de relleno de
combustible en la
posición OFF.
Estrangulador
abierto.
Interruptor del
motor en OFF.
No hay combustible.
Combustible
inadecuado; motor
guardado sin tratar o
drenar la gasolina, o
llenado con gasolina
inadecuada.
Bujía defectuosa,
sucia, o con un
huelgo incorrecto.
Bujía mojada de
combustible
(motor anegado).
Filtro de combustible
restringido, mal
funcionamiento del
carburador, mal
funcionamiento del
encendido, válvulas
agarrotadas, etc.
Gire la(s) válvula(s) a la
posición ON.
Mueva la palanca a la
posición CLOSED a
menos que el motor
esté caliente.
Gire el interruptor del
motor a la posición ON.
Reposte (p. 6).
Drene el depósito de
combustible y el
carburador (p. 10).
Reposte con gasolina
nueva (p. 6).
Ajuste el huelgo o
reemplace la bujía
(p. 8).
Sequeyvuelvaa
instalar la bujía. Ponga
en marcha el motor con
la palanca del
acelerador en la
posición MAX.
Reemplace o repare los
componentes
defectuosos como sea
necesario.
Situación del número de serie
Anote el número de serie del motor,
el tipo y la fecha de adquisición en
el espacio siguiente. Necesitará esta
información cuando realice pedidos
de partes y consultas técnicas o
sobre la garantía.
SITUACIÓN DEL NÚMERO DE
SERIE Y DEL TIPO DE MOTOR
Número de serie del motor: __ __ __ __ __ __ __ __ __ __ __
Tipo de motor: ___ ___ ___ ___
Fecha de adquisición: ______ / ______ / ______
−
LE FALTA POTENCIA
AL MOTOR
Compruebe el
1.
filtro de aire.
Compruebe el
2.
combustible.
Lleve el motor a
3.
un concesionario
de servicio
autorizado Honda,
o consulte el
manual de taller.
Causa posible Corrección
Elemento(s) del filtro
restringido(s).
Combustible
inadecuado; motor
guardado sin tratar o
drenar la gasolina, o
llenado con gasolina
inadecuada.
Filtro de combustible
restringido, mal
funcionamiento del
carburador, mal
funcionamiento del
encendido, válvulas
agarrotadas, etc.
Limpie o reemplace
el (los) elemento(s)
delfiltro(p.8).
Drene el depósito de
combustible y el
carburador (p. 10).
Reposte con gasolina
nueva (p. 6).
Reemplace o repare
los componentes
defectuosos como
sea necesario.
ESPAÑOL
11

Combustibles oxigenados
Información del sistema de control de las emisiones de escape
Algunas gasolinas convencionales se mezclan con alcohol o con un
compuesto de éter. Estas gasolinas se agrupan con la denominación de
combustibles oxigenados. Para cumplir las normas de aire limpio, algunas
zonas de los Estados Unidos y de Canadá emplean combustibles
oxigenados para ayudar a reducir las emisiones de escape.
Si usted emplea un combustible oxigenado, asegúrese de que no contenga
plomo y que satisfaga los requisitos mínimos de octanaje.
Antes de emplear un combustible oxigenado, trate de confirmar el
contenido del combustible. Algunos estados/provincias estipulan que esta
información debe mostrarse en la bomba.
A continuación se mencionan los porcentajes de oxigenación
homologados por EPA:
ETANOL
(etilo o alcohol de grano) 10 % por volumen
Podrá emplear gasolina con un contenido de
etanol de hasta el 10 % por volumen. La gasolina
que contiene etanol puede estar comercializada
con el nombre de Gasohol.
MTBE
(metilo o éter butílico terciario) 15 % por volumen
Podrá emplear gasolina con un contenido de
MTBE de hasta el 15 % por volumen.
METANOL
(metilo o alcohol de madera) 5 % por volumen
Podrá emplear gasolina con un contenido de
metanol de hasta el 5 % por volumen siempre y
cuando contenga cosolventes e inhibidores contra
la corrosión para proteger el sistema de
combustible. La gasolina que contenga más del
5 % de metanol por volumen puede causar
problemas en el arranque y/o el rendimiento.
También puede causar daños en las partes
metálicas, de goma, y de plástico del sistema de
combustible.
Origen de las emisiones de escape
El proceso de combustión produce monóxido de carbono, óxidos de
nitrógeno, e hidrocarburos. El control de los hidrocarburos y de los óxidos
de nitrógeno es muy importante porque, bajo ciertas condiciones,
reaccionan para formar humo fotoquímico cuando se exponen a la luz
solar. El monóxido de carbono no reacciona del mismo modo, pero es
tóxico.
Honda emplea ajustes del carburador de mezcla pobre y otros sistemas
para reducir las emisiones de monóxido de carbono, de óxidos de
nitrógeno, y de hidrocarburos.
Actas sobre el aire limpio de EE.UU. y sobre el medio ambiente de
Canadá
Las regulaciones de EPA y Canadá estipulan que todos los fabricantes
deben proporcionar instrucciones escritas que describan la operación y el
mantenimiento de los sistemas de control de las emisiones de escape.
Deberán seguirse las instrucciones y procedimientos siguientes para
mantener las emisiones de escape del motor Honda dentro de lo
estipulado por las normas sobre las emisiones de escape.
Manipulación indebida y alteraciones
La manipulación indebida o las alteraciones del sistema de control de las
emisiones de escape pueden incrementar las emisiones hasta sobrepasar
el límite legal. Entre los actos que constituyen manipulación indebida se
encuentran:
Extracción o alternación de cualquier parte de los sistemas de admisión,
combustible, o escape.
Alternación o supresión de la articulación del regulador o del
mecanismo de ajuste de la velocidad para que el motor funcione fuera
de sus parámetros de diseño.
Problemas que pueden afectar las emisiones de escape
Si percibe alguno de los síntomas siguientes, solicite a su distribuidor de
servicio que inspeccione y repare el motor.
Si nota algún síntoma anormal en el funcionamiento, pruebe otra
gasolinera o cambie a otra marca de gasolina.
Los daños en el sistema de combustible o los problemas de rendimiento
debidos al empleo de combustible oxigenado con mayor contenido que
los porcentajes de oxigenación arriba mencionados, no quedarán
cubiertos por la
garantía limitada del distribuidor
.
12
Cuesta arrancar o se cala después de arrancar.
Ralentí irregular.
Fallos de encendido o detonaciones bajo carga.
Combustión retardada (detonaciones).
Humo negro de escape o alto consumo de combustible.
Repuestos
Los sistemas de control de las emisiones de escape de su motor Honda
han sido diseñados, fabricados y certificados para conformar las
regulaciones de las emisiones de escape estipuladas por EPA y Canadá.
Recomendamos el empleo de repuestos genuinos de Honda cuando se
haga el mantenimiento. Estos repuestos de diseño original están
fabricados con las mismas normas que las partes originales, por lo que
podrá confiar en su rendimiento. El empleo de repuestos que no son de
diseño y calidad originales puede degradar la efectividad de su sistema de
control de las emisiones de escape.
Los fabricantes del mercado de repuestos asumen la responsabilidad de
que el repuesto no afectará adversamente el rendimiento de las emisiones
de escape. El fabricante o el remodelador del repuesto deberá certificar
que el empleo del repuesto no ocasionará fallas del motor para que éste
pueda cumplir las regulaciones sobre las emisiones de escape.
Mantenimiento
Siga el programa de mantenimiento de la página . Recuerde que este
5
programa se basa en la suposición de que su máquina se utiliza para su
propósito original. El funcionamiento continuado con grandes cargas o
altas temperaturas, o la utilización en condiciones de mucha humedad o
polvo, requerirá que se realice el servicio con más frecuencia.
ESPAÑOL

Especificaciones Información de referencia rápida
GX120
(Tipo estándar: Tipo KR)
Longitud Anchura
××
Altura
Peso en seco
Tipo de motor
4 tiempos, válvulas en cabeza, monocilíndrico
Cilindrada
[Calibre carrera]
Potencia máx.
Torsión máx.
×
2,9 kW (4,0 PS) a 3.600 min
7,4 N·m (0,75 kgf·m) a 2.500 min
Capacidad de aceite de
motor
Consumo de combustible
Sistemadeenfriamiento
Sistema de encendido
Rotación del eje de la
toma de fuerza
GX160
(Tipo estándar: Tipo AR)
Longitud Anchura
××
Altura
Peso en seco
Tipo de motor
4 tiempos, válvulas en cabeza, monocilíndrico
Cilindrada
[Calibre carrera]
Potencia máx.
Torsión máx.
×
4,0 kW (5,5 PS) a 3.600 min
10,8 N·m (1,1 kgf·m) a 2.500 min
Capacidad de aceite de
motor
Consumo de combustible
Sistemadeenfriamiento
Sistema de encendido
Rotación del eje de la
toma de fuerza
Especificaciones de reglaje
GX120/160
ELEMENTO MANTENIMIENTOESPECIFICACIONES
Huelgo de bujía
Velocidad de ralentí
Holgura de válvulas
(en frío)
Otras
−
0,70 0,80 mm
±
1.500 150 min
ADMISIÓN:
ESCAPE:
0,15 0,02 mm
0,20 0,02 mm
No se requiere ningún otro ajuste.
especificaciones
××
313 331 321 mm
16,5 kg
118 cm
×
[60 42 mm]
0,40
310 g/kWh (230 g/PSh)
Aire forzado
Magneto transistorizado
Hacia la izquierda
××
319 342 333 mm
18,6 kg
163 cm
×
[68 45 mm]
0,37
310 g/kWh (230 g/PSh)
Aire forzado
Magneto transistorizado
Hacia la izquierda
Consulte la
página: 8
(rpm)
Consulte la
página: 9
±
±
Consulte a su
concesionario
Honda autorizado
(rpm)
(rpm)
(rpm)
(rpm)
Combustible
Aceite de motor
Gasolina sin plomo (Consulte la página 6)
EE.UU.
Excepto
EE.UU.
Valor de octanos de bomba de 86 o más alto
Valor de octanos de investigación de 91 o más alto
Valor de octanos de bomba de 86 o más alto
SAE 10W-30, API SJ o posterior, para aplicaciones generales.
Consulte la página 6.
Bujía
BPR4ES (NGK)
W14EPR-U (DENSO)
Mantenimiento
Antes de cada utilización:
Compruebe el nivel de aceite de motor. Consulte
la página 6.
Compruebe el filtro de aire. Consulte la
página 8.
Comprobación de todos los pernos y tuercas.
Primeras 20 horas:
Cambie el aceite de motor. Consulte la página 7.
Subsecuentemente:
Consulte el programa de mantenimiento de la
página 5.
Diagrama de conexiones
El diagrama de conexiones puede variar según el tipo.
DESCONEXIÓN
CONEXIÓN
(1) BUJÍA
(2) BOBINA DE ENCENDIDO
(3) INTERRUPTOR DEL MOTOR
BI Negro
ESPAÑOL
13
INFORMACIÓN DEL CONSUMIDOR
Información para encontrar distribuidores/concesionarios
Estados Unidos, Puerto Rico, e Islas Vírgenes Estadounidenses:
Llame al (800) 426-7701
o visite nuestro sitio en la Web: www.honda-engines.com
Canadá:
Llame al (888) 9HONDA9
o visite nuestro sitio en la Web: www.honda.ca
Para la zona de Europa:
visite nuestro sitio en la Web: http://www.honda-engines-eu.com
Información de servicio de clientes
El personal de los concesionarios de servicio son profesionales entrenados.
Ellos podrán contestar a cualquier pregunta que usted les haga. Si se
encuentra con un problema que su concesionario no puede resolver para
dejarle satisfecho, comuníqueselo al jefe del concesionario. El jefe de
servicio, el director general, o el propietario podrán ayudarle. Casi todos
los problemas se resuelven de este modo.
Estados Unidos, Puerto Rico, e Islas Vírgenes Estadounidenses:
Si no queda satisfecho con la decisión tomada por los jefes del
concesionario, póngase en contacto con el distribuidor regional de
motores Honda de su localidad.
Canadá:
Honda Canada, Inc.
715 Milner Avenue
Toronto, ON
M1B 2K8
Teléfono: (888) 9HONDA9
Llamada sin cargo
(888) 946-6329
Inglés:
Francés:
Facsímil:
(416) 299-3400
(416) 287-4776
(877) 939-0909
(416) 287-4776
Área de marcación local de Toronto
Área de marcación local de Toronto
Llamada sin cargo
Área de marcación local de Toronto
Australia:
Honda Australia Motorcycle and Power Equipment Pty. Ltd.
1954 1956 Hume Highway Campbellfield Victoria 3061
−
Teléfono:
Facsímil:
(03) 9270 1111
(03) 9270 1133
Para la zona de Europa:
Honda Europe NV.
European Engine Center
http://www.honda-engines-eu.com
Todas las otras zonas:
Póngase en contacto con el distribuidor Honda de su zona para que le
ayude.
Si todavía no está satisfecho después de hablar con el distribuidor de
motor regional, podrá ponerse en contacto con la Oficina de Honda como
se muestra.
Todas las otras zonas:
Si no queda satisfecho con la decisión tomada por los jefes del
concesionario, póngase en contacto con la Oficina de Honda como se
muestra.
《》
Oficinas Honda
Cuando escriba o llame, tenga la amabilidad de incluir la información
siguiente:
Nombre del fabricante y número de modelo del equipo al que se ha
montado el motor
Modelo, número de serie, y tipo del motor (vea la página )
11
Nombre del concesionario que le vendió el motor
Nombre, dirección, y persona de contacto del concesionario que realiza
el servicio de su motor
Fecha de adquisición
Su nombre, dirección y número de teléfono
Una descripción detallada del problema
Estados Unidos, Puerto Rico, e Islas Vírgenes Estadounidenses:
American Honda Motor Co., Inc.
Power Equipment Division
Customer Relations Office
4900 Marconi Drive
Alpharetta, GA 30005-8847
O llamar por teléfono: (770) 497-6400, 8:30 am - 6:00 pm EST
14
ESPAÑOL
 Loading...