

Page 1

Page 2
WARRANTY
SERVICE
Your satisfaction and
warranty
this
your
been
details
booklet. Normally, any problems concerning the product
dealer's
handled
service
to your satisfaction,
goodwill
are
explained
dpeartment
are
important to your dealer and to us.
in the Distributor's Limited Warranty at the back of
will
be
If
you have a warranty problem that has not
we
suggest you take the following action:
Discuss your problem with a member of dealership management. Often
complaints
reviewed with the
quickly resolved at that level.
Sewice
Manager, contact the owner of the dealership or the
If
the problem
has
already been
can
be
General Manager.
If
your problem still has not been resolved to your satisfaction, contact the
of
Customer Relations Department
-CAN
PYlKgR
4475
DlY"E,
EQlIIFNEhW
RN&R
GEORGlA
CtJmW
(404) 497-6400
We
will
need the following information
-
Your name, address. and telephone number
-Product model
-
Date
of purchase
-
Dealer name and address
-
Nature of the problem
and
serial
number
American Honda Motor
EORDA
SERVICE
MorOR
DIVISION
GRFEn
PARE(krAp
30136
DZPWET
in
CO,.
order to
INC..
..
assist
.
_._
you:
Co.,
Inc.:
All
Honda
handled by
After reviewing
taken.
Please
dealership, using the dealer's facilities, equipment, and personnel,
important
Your purchase of
all
the facts involved, you
bear
in mind that your problem
that
your initial contact
a
Honda product
will
be
advised
will
likely be resolved
be
with
the dealer.
is
greatly appreciated by both your dealer and
of
what
action can
at
the
so
it
is
very
be
American Honda Motor Company. We want to assist you in every way possible to
assure your complete satisfaction with your purchase.
..
Page 3

ASSElldBLY
1.
Assemble the link pins to the A-frame
halves using
%"jam
nuts, lock washers
and hex nuts.
2.
Join the frame halves together with the
spacing plate. Secure the plate at the front
.holes only with the hex bolts, lock washers
-
and hex nuts. Finger
3.
Assemble the frame angles to the A-frame
as
shown. Install the hex bolts, plain
tighten the bolts.
washers, lock washers and hex nuts:
-
finger
4.
Install the struts
A
angles. Finger
tighten.
first
at the rear
-
frame, and then at the
-
tighten the bolts.
rear
of
of
the frame
the
WASHER
LOCK WASHER
HEX. BOLT,
Yz
x
1
3h
HEX. BOLT,
'12
x
1
3h
HEX. NUT
NOTE The frame
most common cutting position
cutting angle
is
shown assembled for the
(goo).
is
determined by where the
struts are attached to the frame angles.
5.
Assemble a spring shank at positions
and 2-where frame angles attach to
-
frame-with existing hardware.
A
Assemble the remaining spring
shown.
Use
(thick) washers between
shanks
the springs and frame angles.*
6.
Align the springs and tighten
and
spring bolts securely.
all
frame
The
1
as
'h x 1
PLAIN WASHER
LOCK WASHER
HEX. BOLT,
PLAIN WASHER
LOCK WASHER
3h
HEX. NUT
POSITION
Yz
x
1
3h
HEX. NUT
>A
FRAME
ANGLES
1
h
Page 4
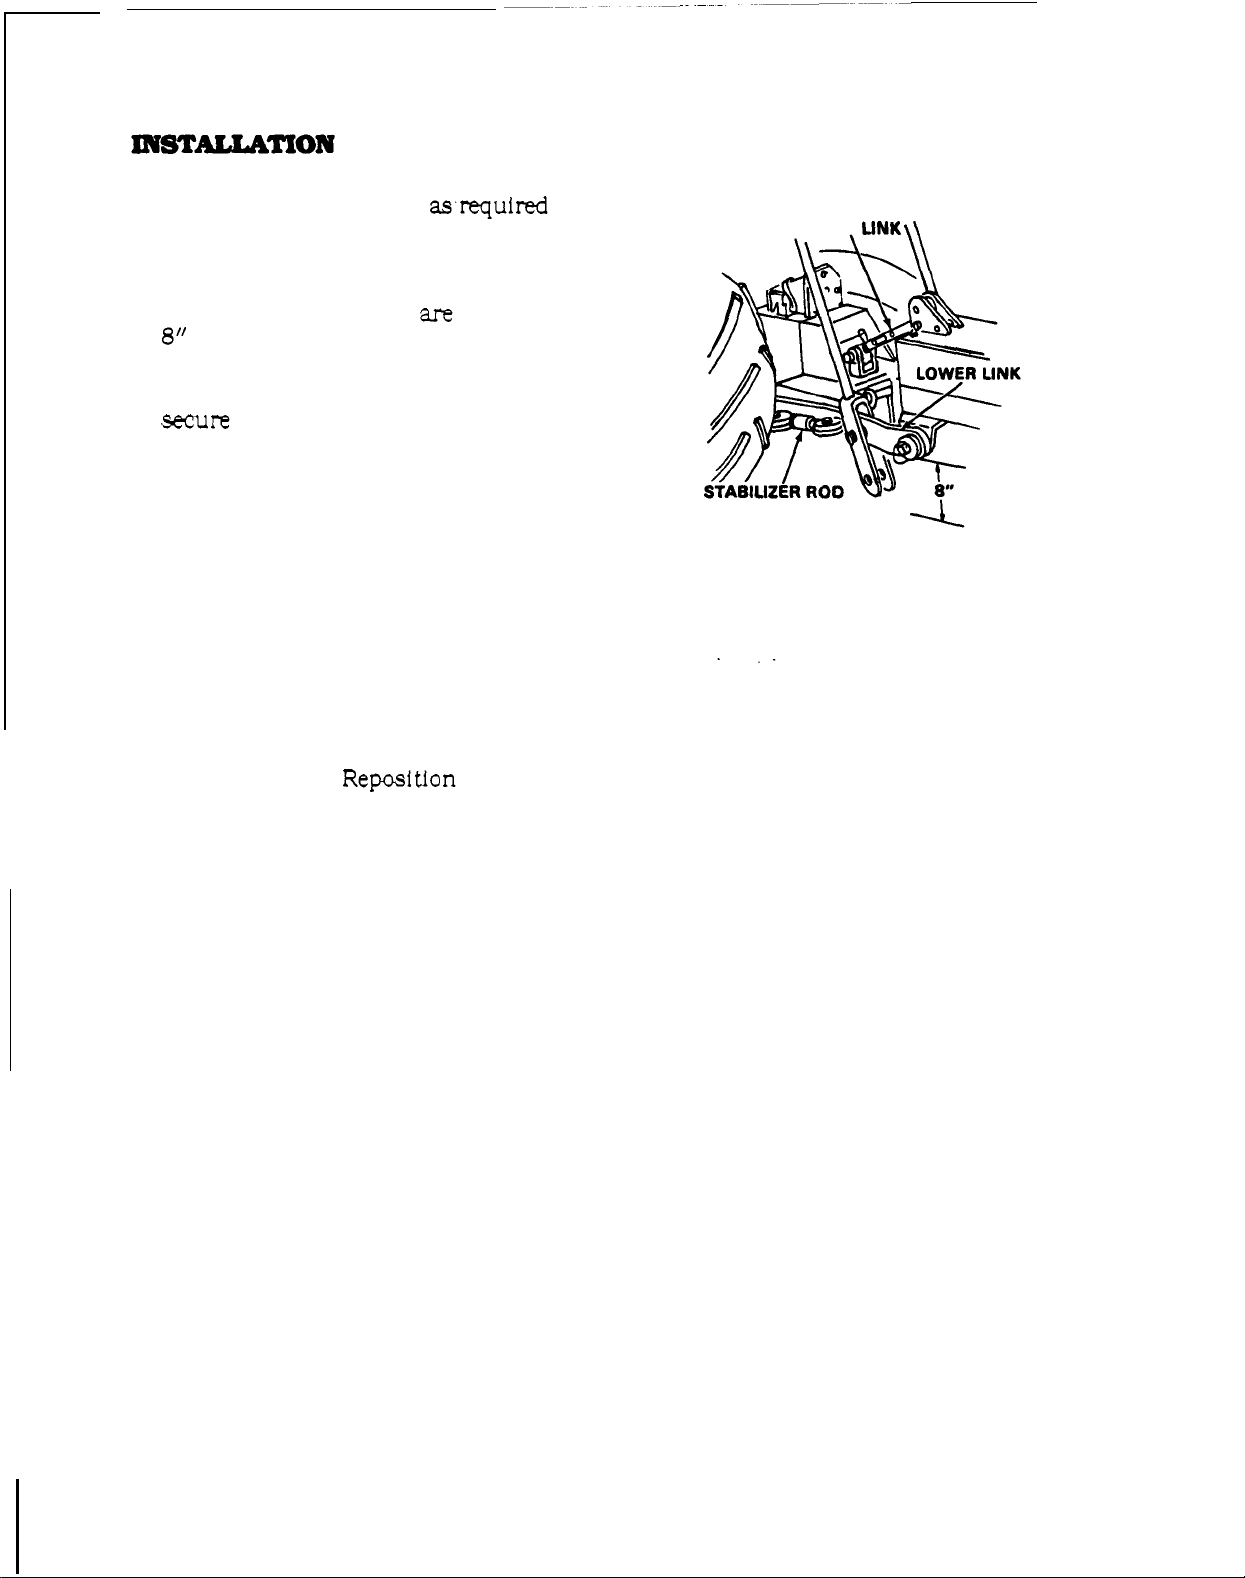
1.
Adjust the tractor wheels asmquired to
provide maximum plant foliage
clearance.
UPPER
LINK
\\
With the hitch lowered, adjust the lower
links
until
the link
8"
from
the ground.
2.
Attach the cultivator to the lower
secure
3.
Connect the upper link
and the
with
with
lower
hitch
spring pins.
and
balls
are
approximately
links
and
rod
to the hitch
hole in the A-Frame: secure
spring pins.
OPERATXON
Adjust the cultivator angle and shank placement according to the type and row
spacing of the crop:
Reposition the
struts
to change the angle: remove the left
right front shanks for wider crops.
and
When necessary. adjust the upper link to make the front or
shallower
or
deeper.
rear
shanks dig
Page 5

11
15
AMERICAN HONDA
SPRING SHANK CULTIVATOR
Page 6

HOXVA
CODE
#
3755782
 Loading...