

Page 1

T E C H N O L O G Y
R E F E R E N C E
G U I D E
o w n e r s . h o n d a . c o m
2013 H on da C iv ic Seda n wi th Na vi ga tion
31 TR 3B 10 T ec hn ology R ef eren ce G uide
00 X3 1- TR 3-B1 00 ©201 2 America n Honda Motor Co., Inc. — All Rights Re served P ri nt ed in U .S .A.
2013 Civic Sedan
with Navigation
Page 2
TE C HNO LOG Y R EFE REN CE GUI DE
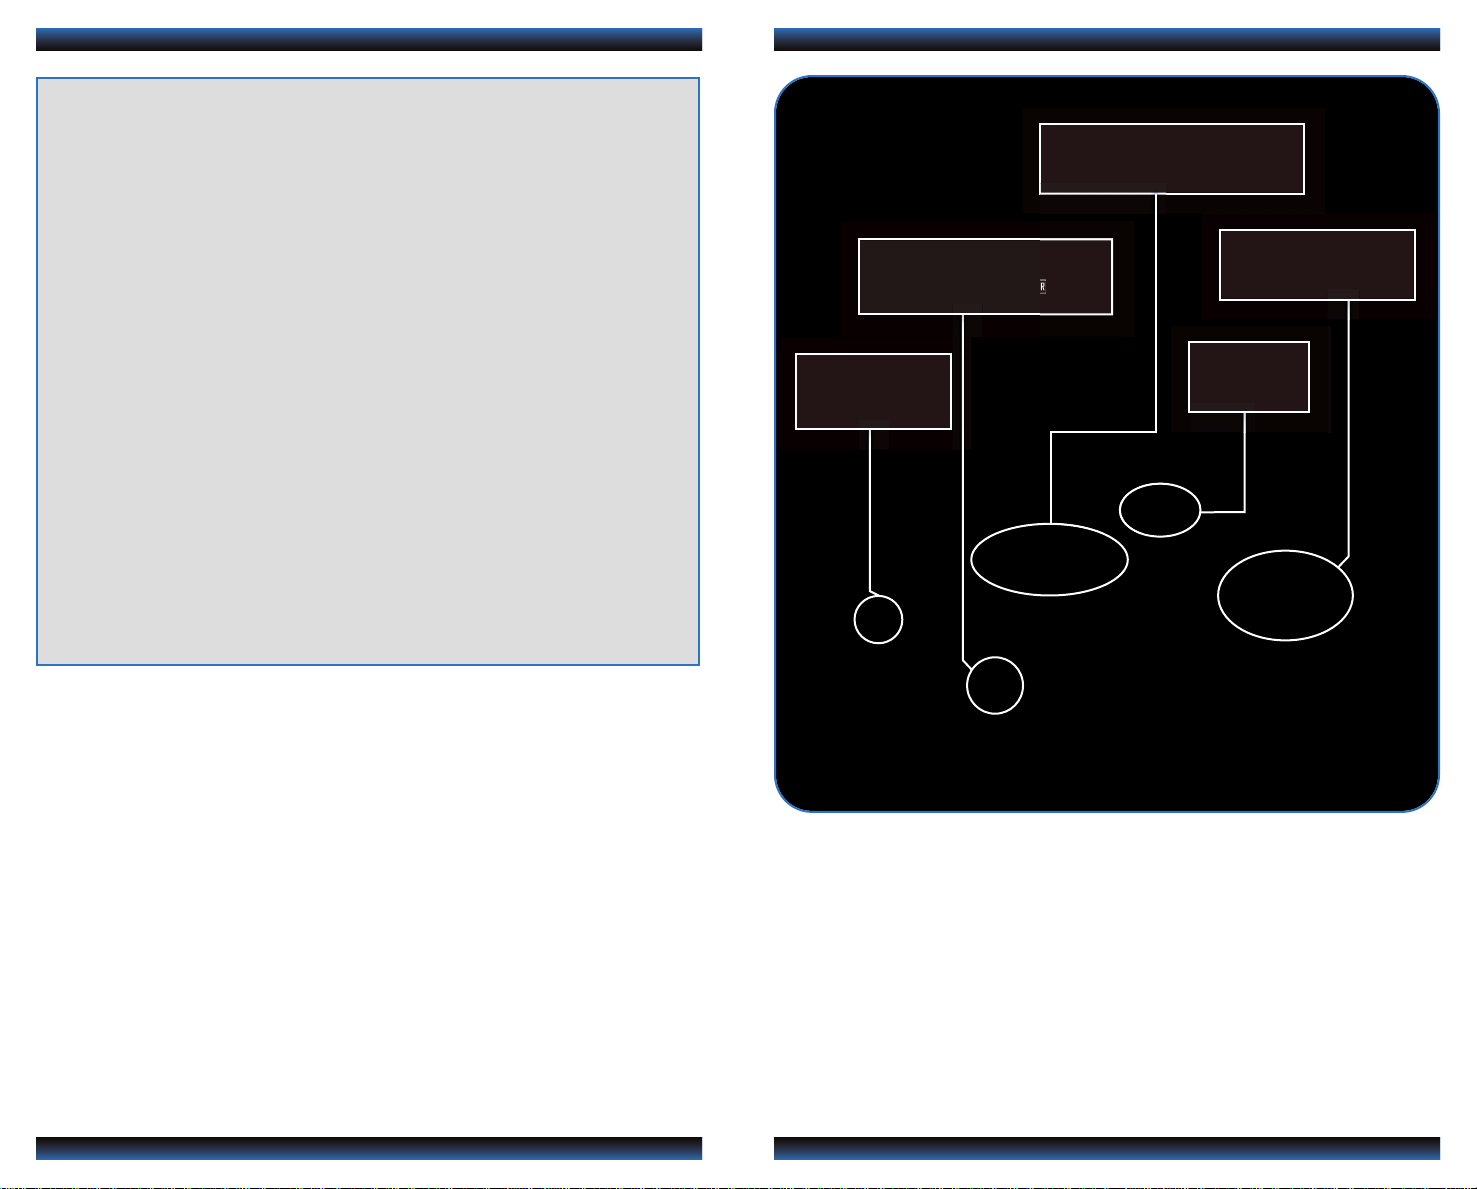
The Technology Reference Guide is designed to help you get
acquainted with your new Honda and provide basic
instructions on some of its technology and convenience
INSTRUMENT PANEL p.4
BLUETOOTH
HANDSFREELINK®p.20
®
p.20
NAVIGATION p.16
features. This guide covers the Civic Sedan with Navigation.
This guide is not intended to be a substitute for the
Owner’s Manual. For more detailed information on vehicle
controls and operation, please refer to the respective
sections in the Owner’s Manual or Navigation Manual.
Auto Door Locks .....................................................................................................2
Instrument Panel Indicators ...................................................................................4
Eco Assist
Tire Pre ssure Monitoring System (TPMS)...........................................................7
Intelligent Multi-Information Display (i-MID).....................................................8
One-Touch Turn Signal...........................................................................................10
Auto Headlights with Wiper Integration*.........................................................10
Multi-View Rear Camera ......................................................................................11
Voice Recognition...................................................................................................12
TM
*..............................................................................................................6
ECO
i-MID p.8
ASSISTTMp.6
Navigation.................................................................................................................16
Bluetooth
SMS Text Messaging................................................................................................24
iPod
Bluetooth
Pandora
Owner Link..............................................................................................................29
Safety Reminder......................................................................................................29
Fuel Recommendation...........................................................................................30
®
HandsFreeLink®(HFL)........................................................................20
®
or USB Flash Drive .....................................................................................26
®
Audio......................................................................................................27
®
...................................................................................................................28
* if equipped
Page 3
AUTO DOOR LOCKS
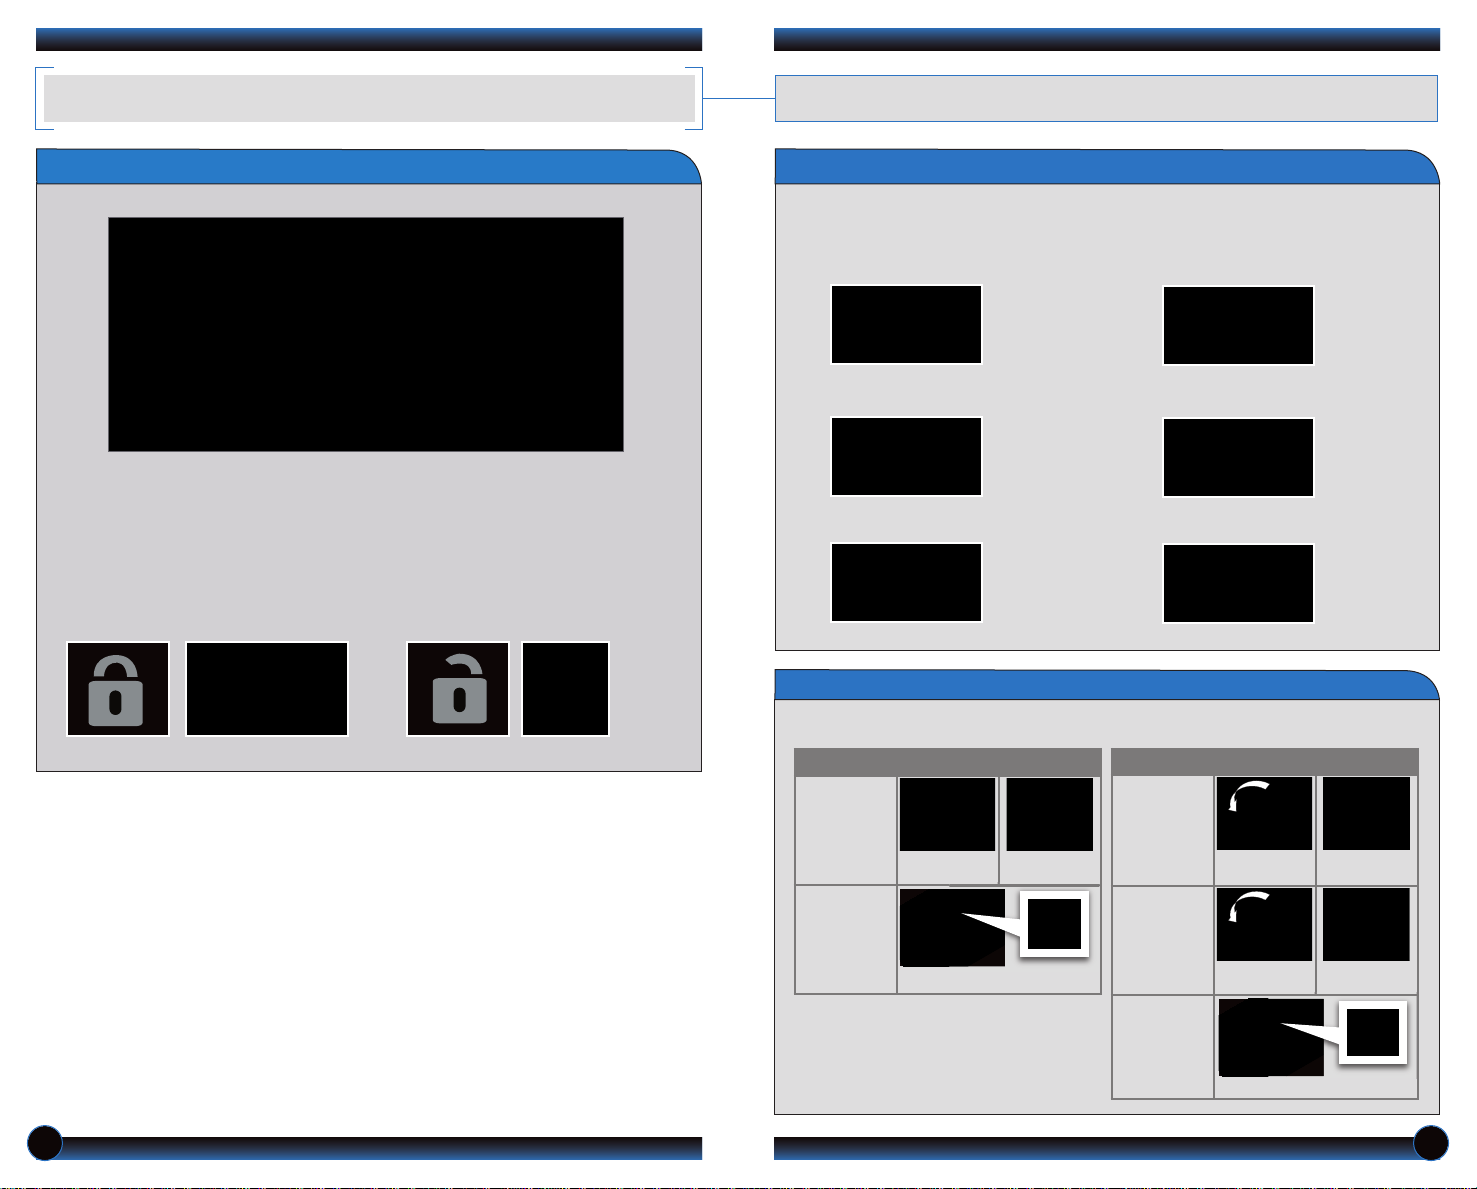
Program how and when the vehicle doors automatically lock and unlock.
Door Locks
D e f a u l t Lo c k S e t t i n g
The doors are preset to lock when
your vehicle reaches about 10 mph.
D e f a u l t Un l o c k S e t t in g
Only the driver’s door is preset to
unlock when you:
• Shift into Park (P) for automatic
transmission vehicles.
• Turn the ignition switch to LOCK (0)
for manual transmission vehicles.
Programming the Auto Door Unlock Setting
Press the (+/-) buttons on the steering wheel to scroll through the menu options.
Press SOURCE to select an option. See page 8–9 for more information on the i-MID
and its controls.
1. Press MENU.
2. Select Customize Settings.
3. Select Door Setup.
4 . Select Auto Door Unlock.
5. Select All Doors with Shift to P.
6. Press MENU to exit.
Programmable Auto Door Lock/Unlock Settings
Below are the options you can choose. See Auto Door Locking/Unlocking in your Owner’s
Manual for instructions on programming these settings.
AUTO DOOR LOCK
AUTO DOOR UNLOCK
Auto Lock
When you
reach 10 mph
Turn off
Auto Lock
Operate manually
*IGN OFF for manual transmission vehicles
When you shift
out of Park*
Auto Unlock
(all doors)
Auto Unlock
(only driver’s
door)
Turn off
Auto Unlock
When you turn
the ignition OFF
When you turn
the ignition OFF
Operate manually
When you shift
out of Park*
When you shift
out of Park*
2 3
Page 4
PASSENGER
AIRBAG
OFF
INSTRUMENT PANEL INDICATORS
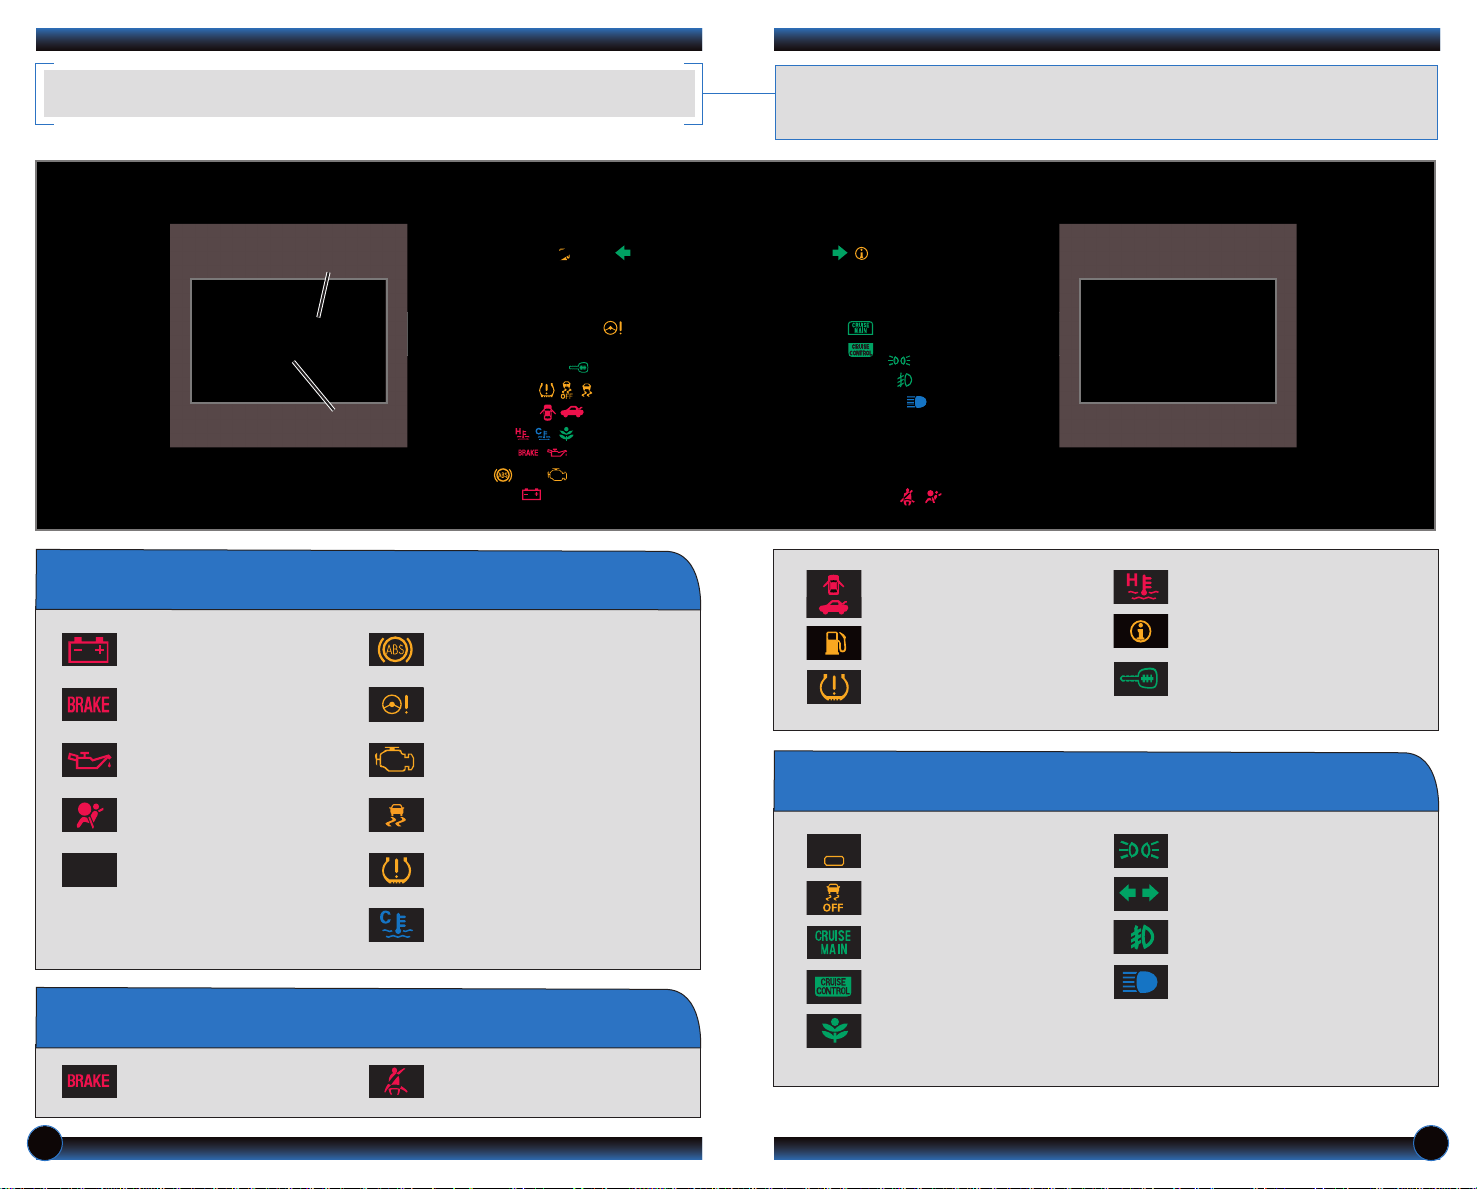
Briefly appear with each engine start. Red and amber indicators are most critical.
Blue and green indicators are used for general information. See your Owner’s
Manual for more information.
Si only
i-VTEC indicator
REV indicators
Malfunction Indicators
If an indicator remains on, there may be a problem; see your dealer
Charging system
Low brake fluid, Brake system
Low oil pressure
Transmission (blinking)
D
(automatic transmission)
ABS (anti-lock brake system)
EPS (electric power steering)
Malfunction indicator lamp
(check engine light)
®
VSA
(vehicle stability assist)SRS (supplemental restraint system)
TPMS (blinks and stays on)
(tire pressure monitoring system)
Low temperature
Door/Trunk open:
Close door(s) / trunk
Low fuel:
Refill
Low tire pressure:
Add air
On/Off Indicators
PASSENGER AIRBAG OFF
(next to i-MID)
VSA OFF
CRUISE MAIN on
Si only
High temperature:
Drive slowly or pull over
Message indicator:
i-MID
See i-MID
Immobilizer (blinks):
Use other vehicle key
Exterior lights on
Turn signals/hazards on
Fog lights* on
*
CRUISE CONTROL on
High beams on
Condition Indicators
Action is needed by driver
Parking brake on:
Release
4 5
Seat belt reminder:
Fasten seat belt(s)
ECON* on
* if equipped
*
Page 5
ECO ASSISTTM(
mph
mph
mph
if equ ipp ed
)
TIRE PRESSURE MONITORING SYSTEM (TPMS)
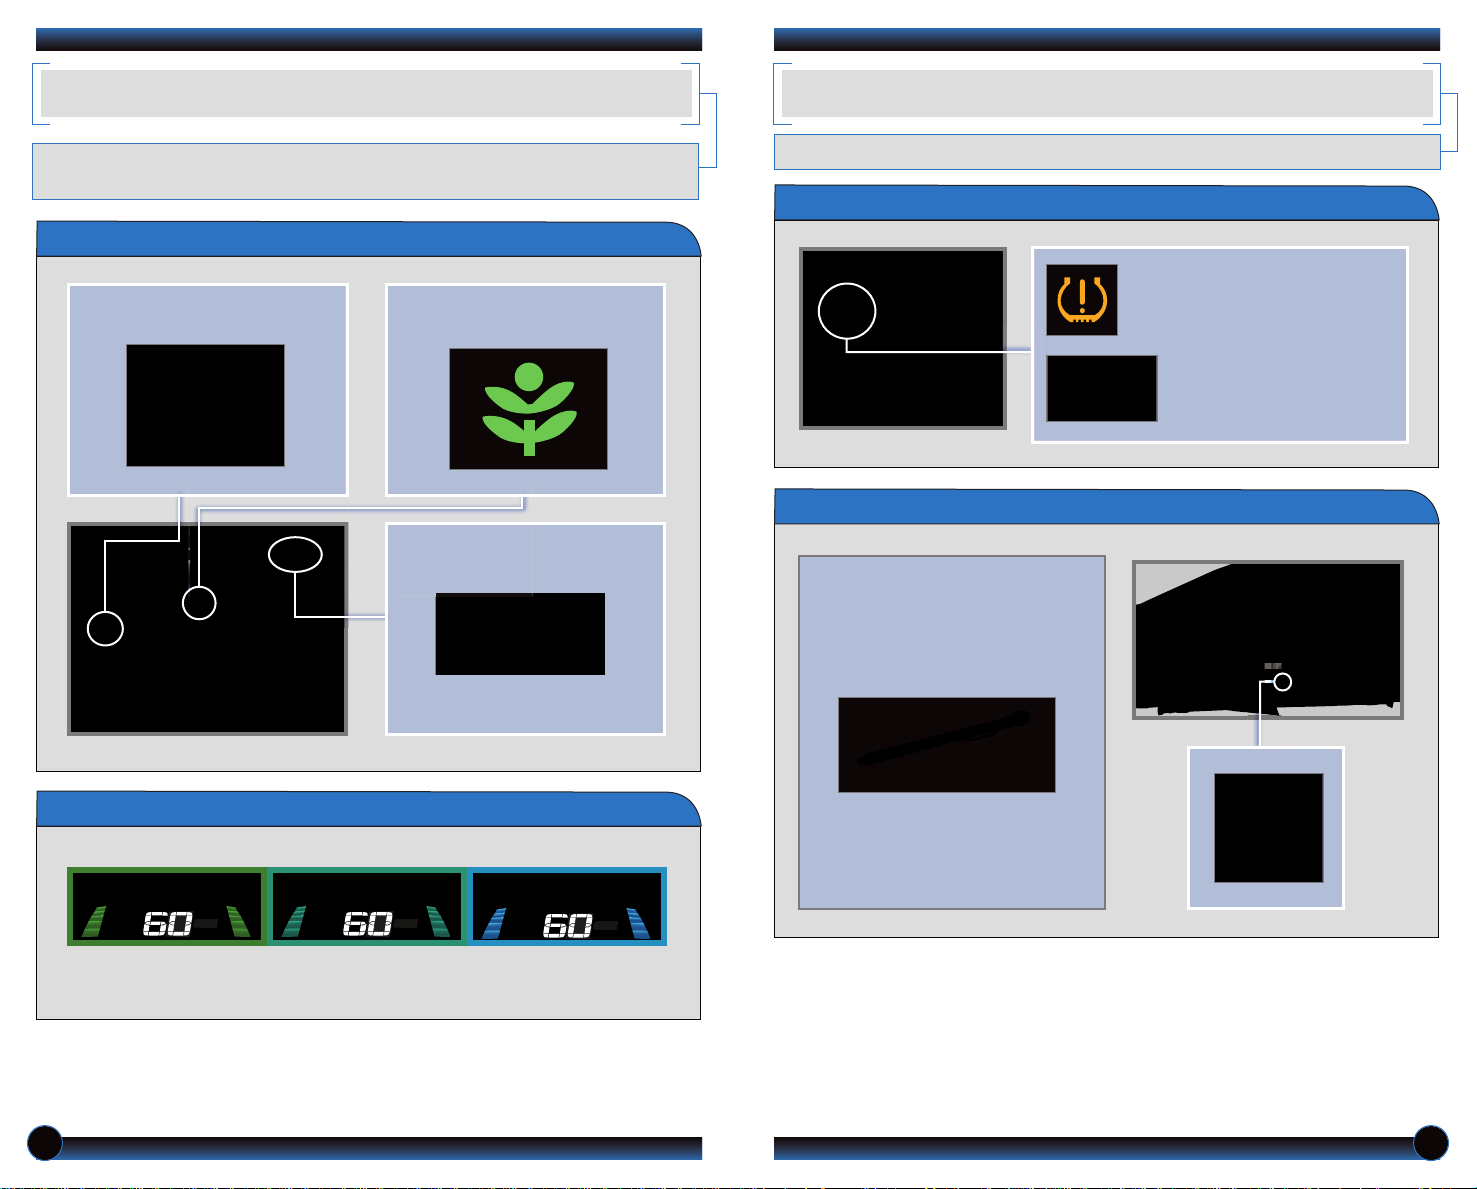
When turned on, performance of the vehicle’s engine, transmission, cruise control, and
air conditioning system are adjusted to achieve maximum fuel efficiency.
Turning ECON Mode On/Off
1. Press ECON.
2. The ECON mode indicator
comes on.
3. Check the i-MID for the
system status.
4. Press ECON again to turn the
system off.
Monitors the vehicle’s tire pressures.
How It Works
When the tire pressure drops
significantly below recommended
levels, the low tire pressure
indicator comes on.
If a message also appears on
the i_MID there may be a
problem with the system. See
your dealer.
What to Do
1. Visually inspect the tires for
damage.
2. Use a tire air pressure gauge to
check which tire(s) have low
pressure.
Ambient Meter
Indicates instant fuel efficiency using color-coded bars.
High fuel efficiency Moderate fuel efficiency Low fuel efficiency
This feature can be turned off in the Customize Settings Menu. See your Owner’s
Manual for more information.
3. Inflate the tire(s), if necessary,
to the recommended pressures
listed on the label on the
driver’s doorjamb.
6 7
Page 6
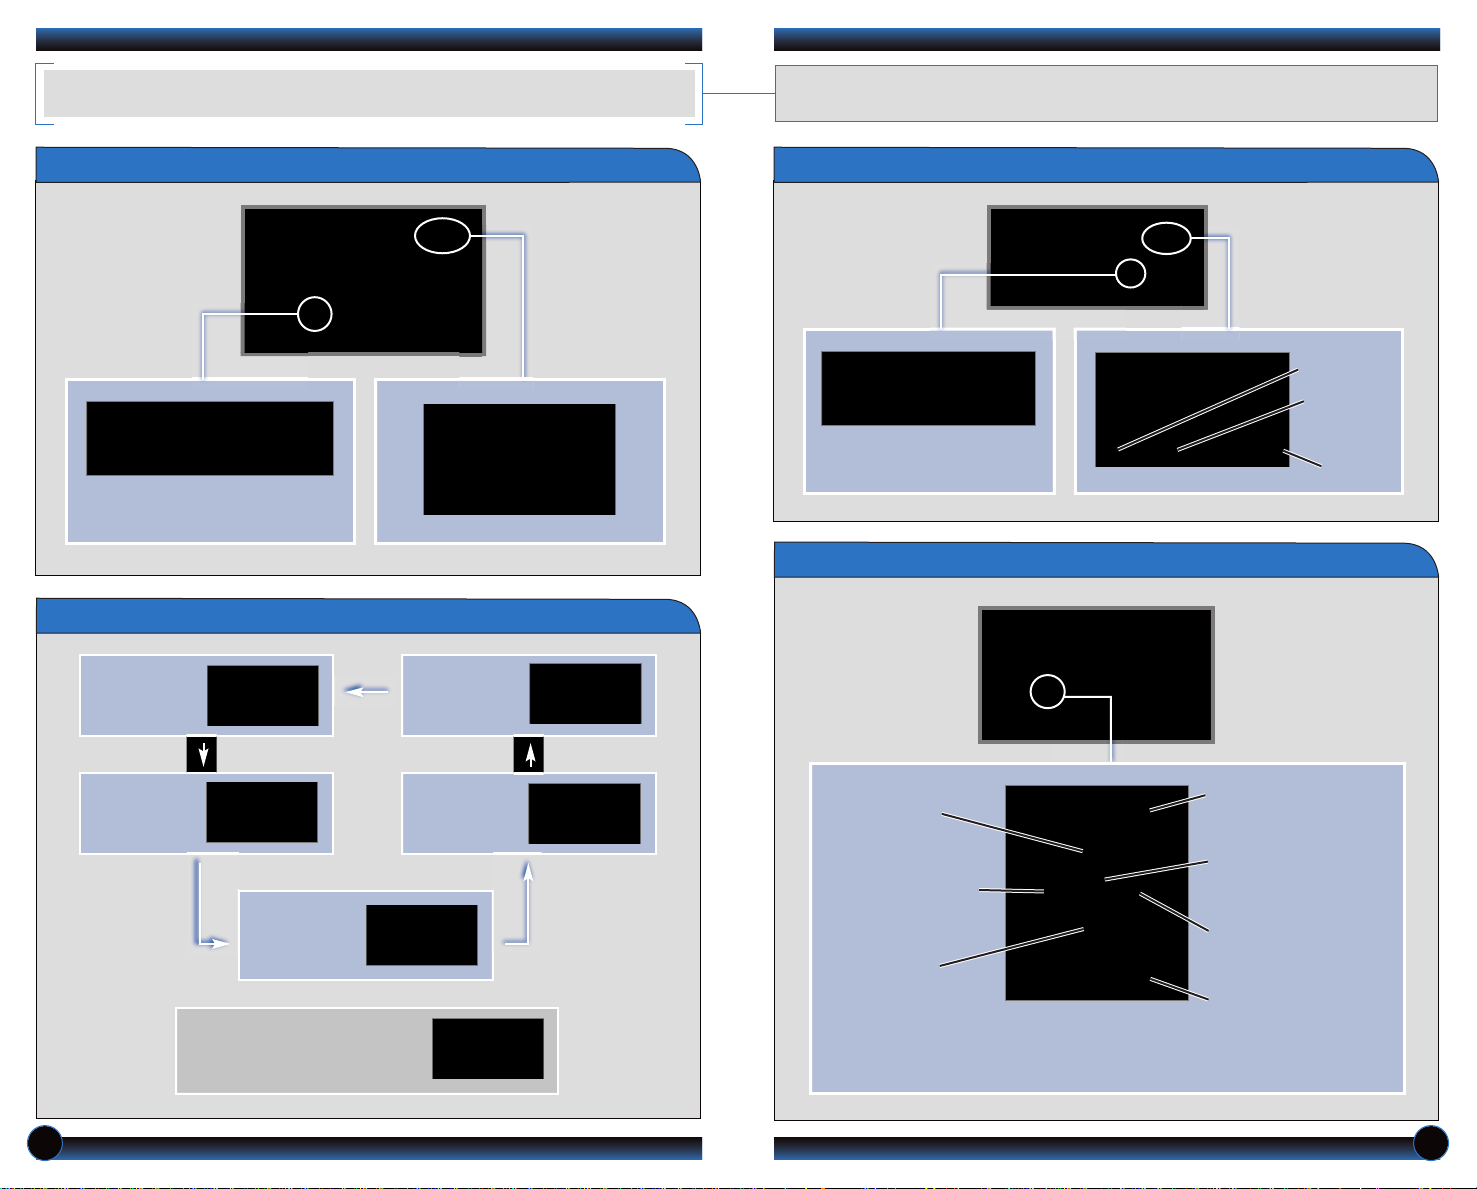
INTELLIGENT MULTI-INFORMATION DISPLAY (i-MID)
Consists of several displays that provide you with useful information.
Accessing the i-MID
Press the INFO button to change
main displays.
Main Displays
Main display Power
monitor
(Civic Si only)
Sub-displays
Press the SEL/RESET button
to change sub-displays.
Steering Wheel Controls
Outside
temperature
Odometer
Trip A
Trip B
Clock
Clock
(or wallpaper)
Audio display
(or Phone
display during
call)
A warning or indicator message
may appear as necessary. Press
the INFO button to clear it.
Trip
computer
(+) Button:
Press to scroll
upward.
(t) Button:
Press to go back to
the previous display.
(-) Button:
Press to scroll
downward.
Display/Information
Button:
Change main displays.
SOURCE Button:
Press to enter your
selection.
(u) Button:
Press to go to the next
display.
MENU Button:
Press to go to “Vehicle
Menu” for customization
and other settings.
8 9
Page 7
ONE-TOUCH TURN SIGNAL
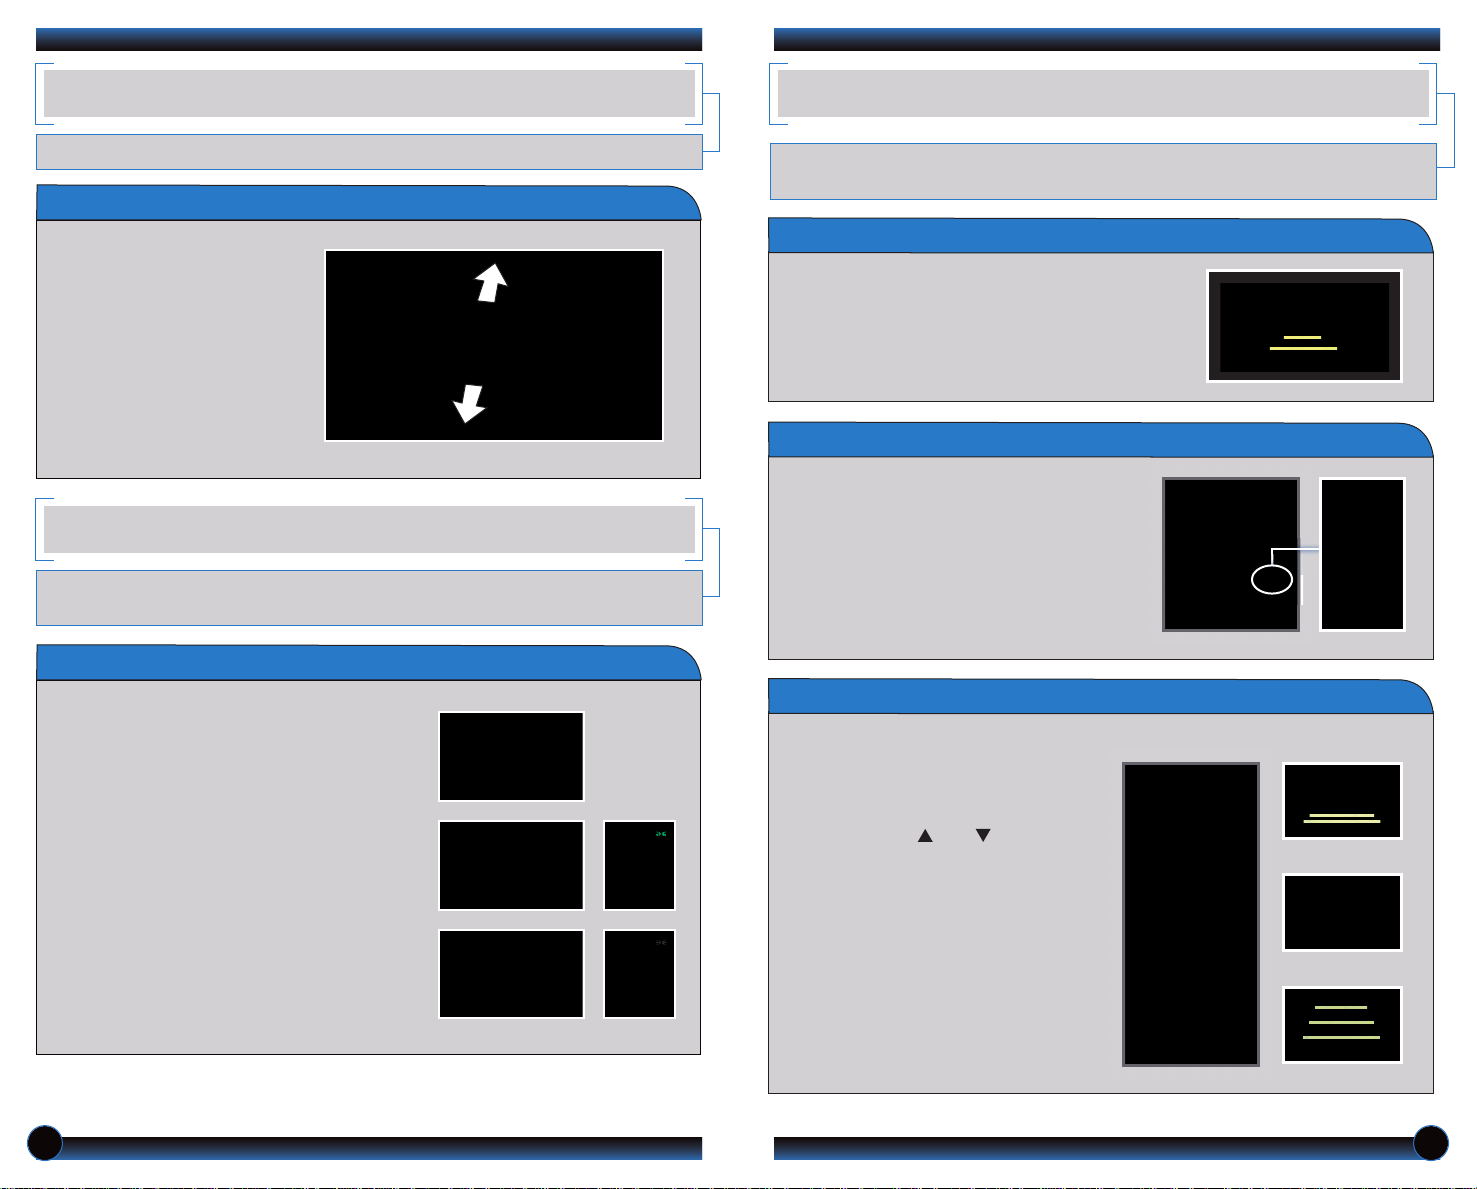
Parking Guide Lines
How It Works
• When you shift into Reverse (R), a real-time image
of the area behind your vehicle is shown in the
navigation display.
• The rearview display turns off when you shift out of
Reverse.
Switching Views
There are three rearview modes: wide
(default view), normal, and top down.
• Select the corresponding icon to change
views.
•
Press ZOOM (
) or ( ) to adjust the
screen brightness.
Wide (default)
Normal
Top down
• Yellow parking guide lines also appear to help
you judge distance. They can be turned on or
off.
• Press and hold CANCEL until the guide
lines turn on or off. They remain off until you
turn them on again.
MULTI-VIEW REAR CAMERA
Use this quick and convenient method to signal a lane change.
How It Works
• Lightly push the turn signal
lever up or down for a threeblink sequence.
• For a continuous signal, push
the lever up or down until it
locks into place.
AUTO HEADLIGHTS WITH WIPER INTEGRATION (
For your convenience, your vehicle’s headlights automatically turn on when you activate
the windshield wipers.
if equipped
How It Works
• Make sure your headlights are in the AUTO
position.
• Turn on your windshield wipers. The headlights
also turn on.
For added convenience, the area behind your vehicle is displayed to help you navigate
while backing up.
)
• When you turn off the windshield wipers, the
headlights turn off shortly after.
10 11
Page 8
VOICE RECOGNITION
Key Functions by Voice Command
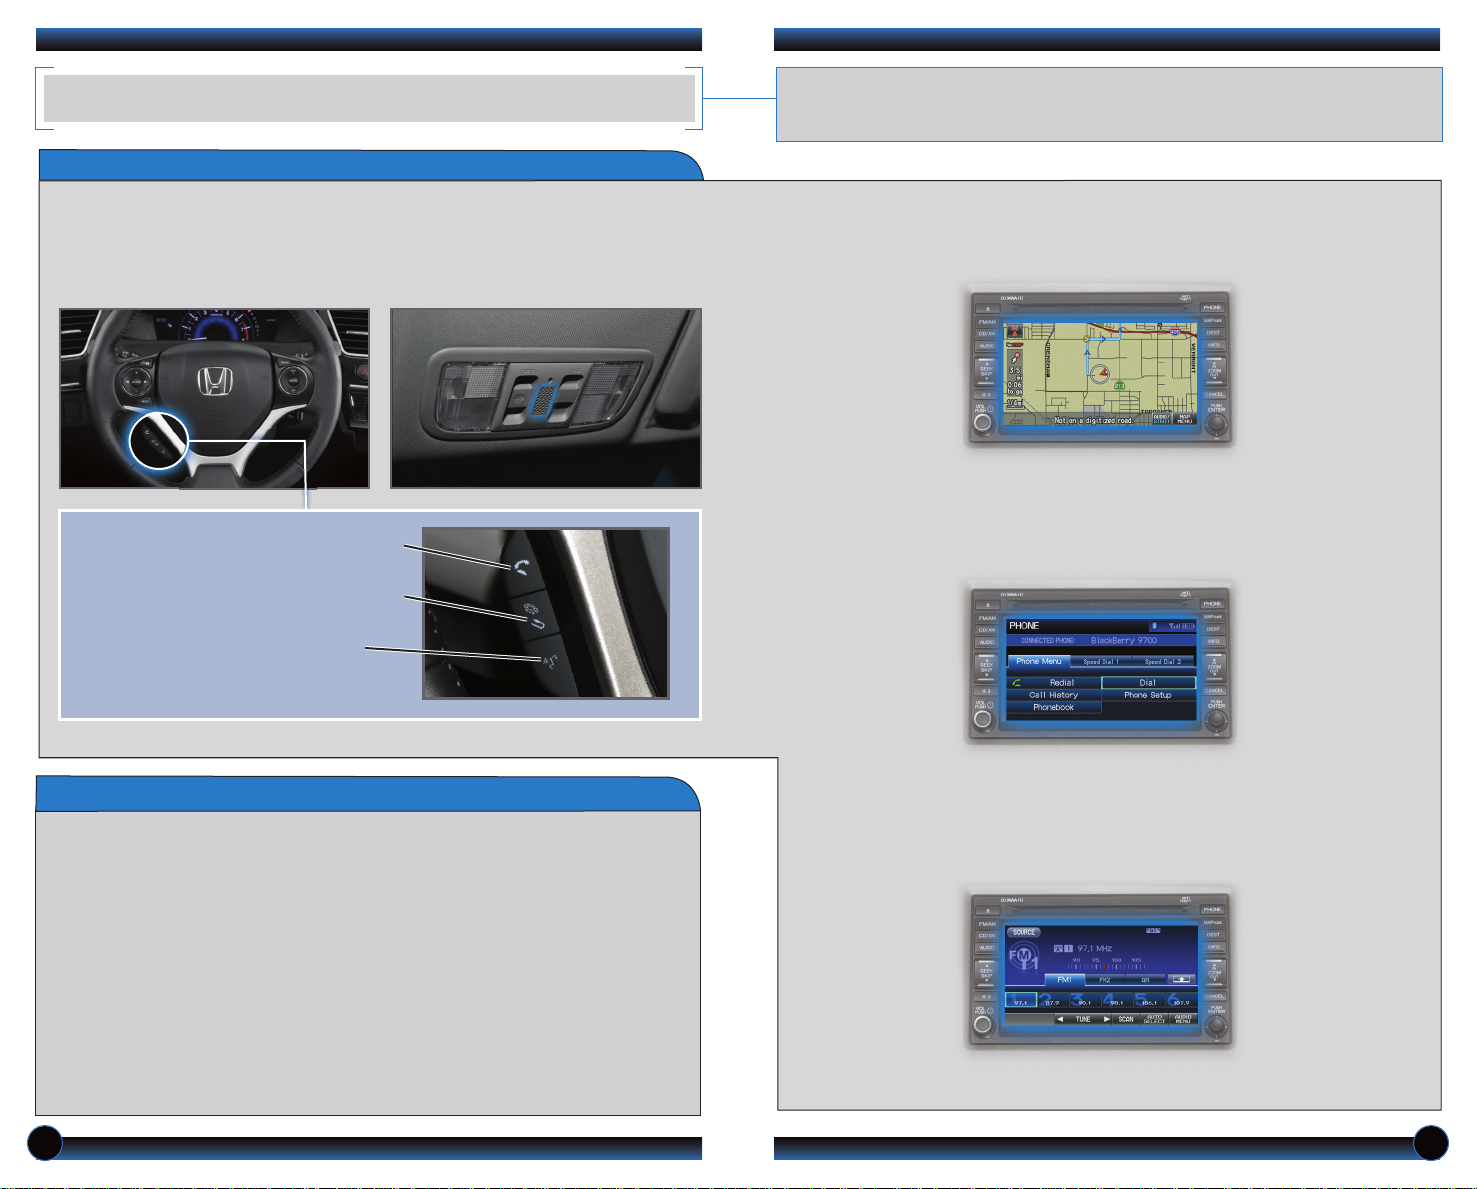
Control different systems with the steering wheel buttons and the ceiling
microphone.
To reduce the potential for driver distraction, certain manual and touch
screen functions may be inoperable or grayed out while the vehicle is
moving. Voice commands are always available.
To keep your eyes on the road and hands on the wheel, use voice commands for
hands-free calling, navigation, and audio. For a full list of commands, say “Display
Information” and “Voice Info.”
N A V I G A T I O N p. 16
Pick-Up button: Answer an incoming call,
or go directly to the Phone screen.
Hang-Up/Back button: End a call, decline
an incoming call, or cancel a selection.
Talk button: Give navigation, HFL, or
audio commands.
Voice Command Tips
• Press and release the Talk button, wait for a beep, then say a command.
• All available voice commands are highlighted in blue when you press the Talk
button.
• For a list of available commands, press and release the Talk button and say
“Help” at any time.
• Speak in a clear, natural voice.
• Reduce all background noise.
• Adjust the dashboard and side vents away from the microphone in the ceiling.
• Close the windows.
• The system also uses a touchscreen display. You can select options or icons by
touching them on the screen. This is limited while the vehicle is moving.
B L U E T O O T H
®
H A N D S F R E E L I N K
A U D I O
p. 15
®
p. 20
12 13
Page 9
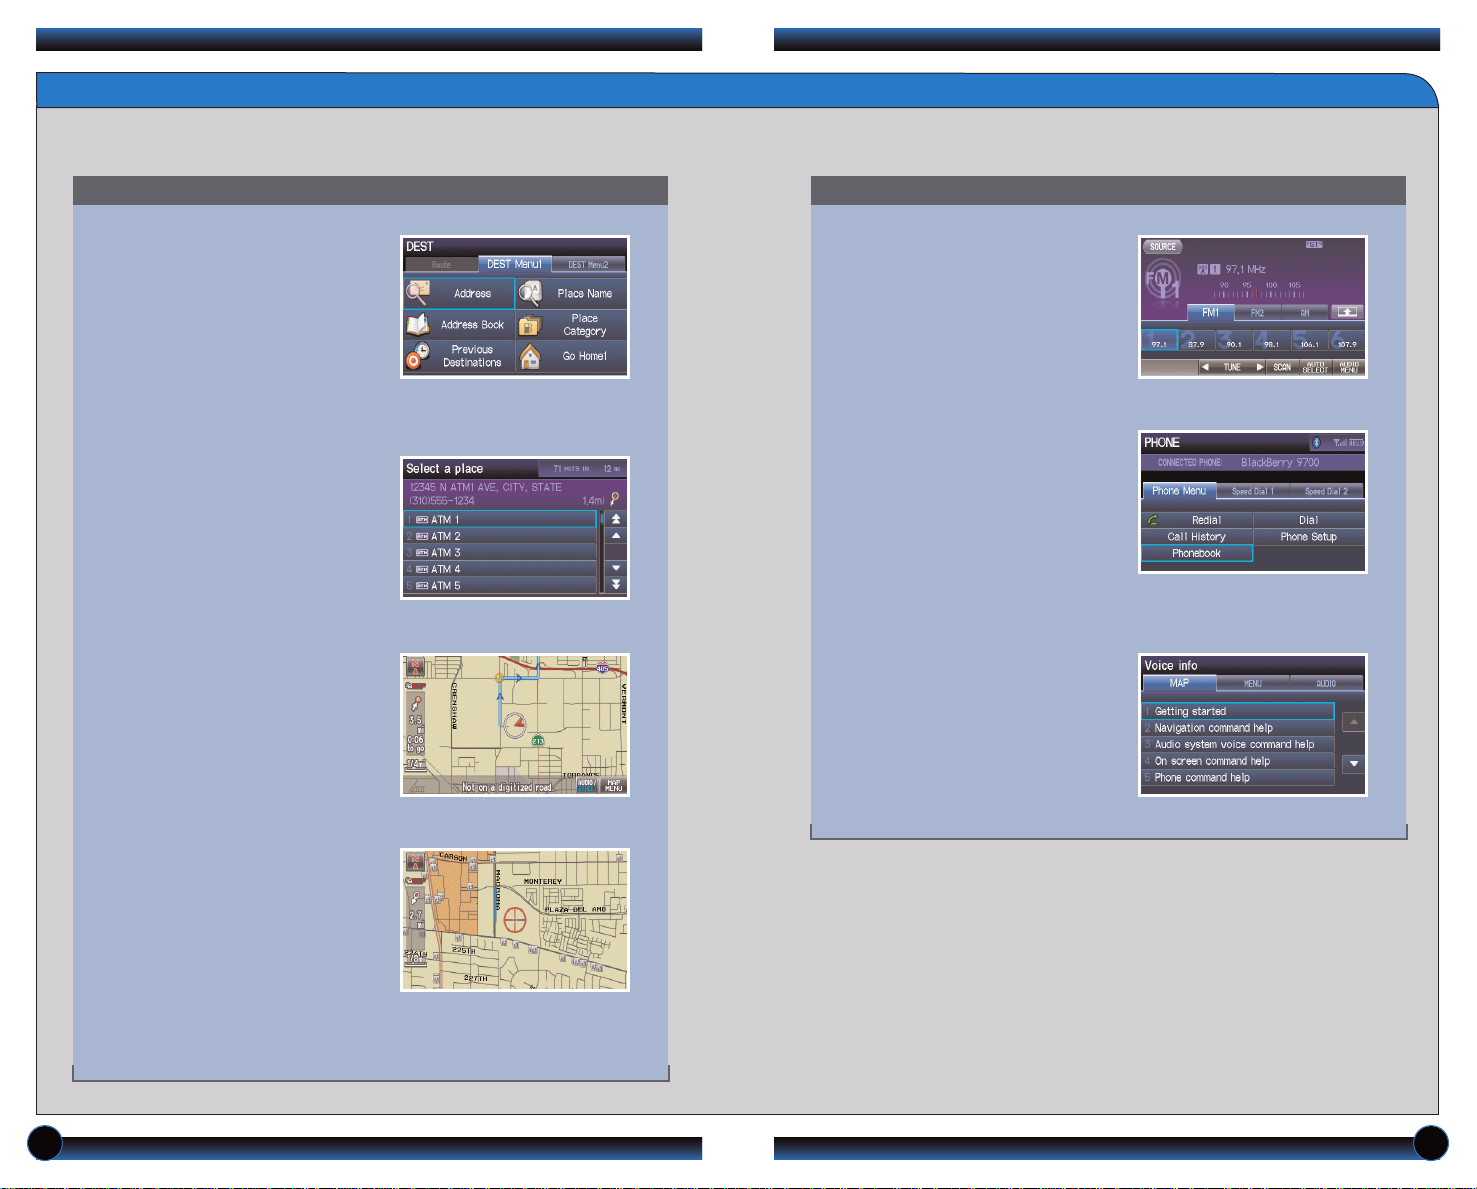
Commonly Used Voice Commands
Here are some examples of commonly used voice commands. Try some of these
to familiarize yourself with the voice command system.
Press and release the Talk button before you say a command.
G e n e r a l C o m m a n d s
(Accepted on most screens to change displays)
• Display map
• Display menu
• Display information
• Display audio
• What time is it?
• Next/previous
• Left/right
• Up/down
F i n d P l a ce C o m m a n d s
(Accepted on Map screen)
• Find nearest:
- ATM - Honda dealer
- gas station - airport
- Mexican - hospital
restaurant - bank
- post office
N a v i g a t i on C o m m a n d s
(Accepted on Map screen)
• How long/far to the destination?
• Display destination map
• Display entire route
(to change pages)
(to change tabs)
(to scroll lists up to three pages)
Press and release the Talk button before you say a command.
A u d i o C o m m a n d s
(Accepted on most screens)
• Radio on
• Radio # FM/AM
• Radio preset 1/2/3/4/5/6
• DISC/USB/iPod play
• DISC/USB/iPod skip forward/back
• Auxiliary (AUX) play
P h o n e C o mm a n d s
(Accepted on Phone screen)
• Dial
• Speed Dial 1 (or 2)
• Redial
• Phonebook
• Phone setup
(Accepted on any screen)
• Dial by number
• Dial by voice tag
H e l p C o m ma n d s
(Accepted on most screens)
• Help (list of available commands
for current screen)
• Voice info - from
INFO screen (list of all
available commands by category)
D i s p l a y Co m m a n d s
(Accepted on Map screen)
• Display/Hide:
- ATM
- gas station
- restaurant
- post office
• Display north up/heading up
• Zoom in/out
• Go home
• Display current location
14 15
Page 10
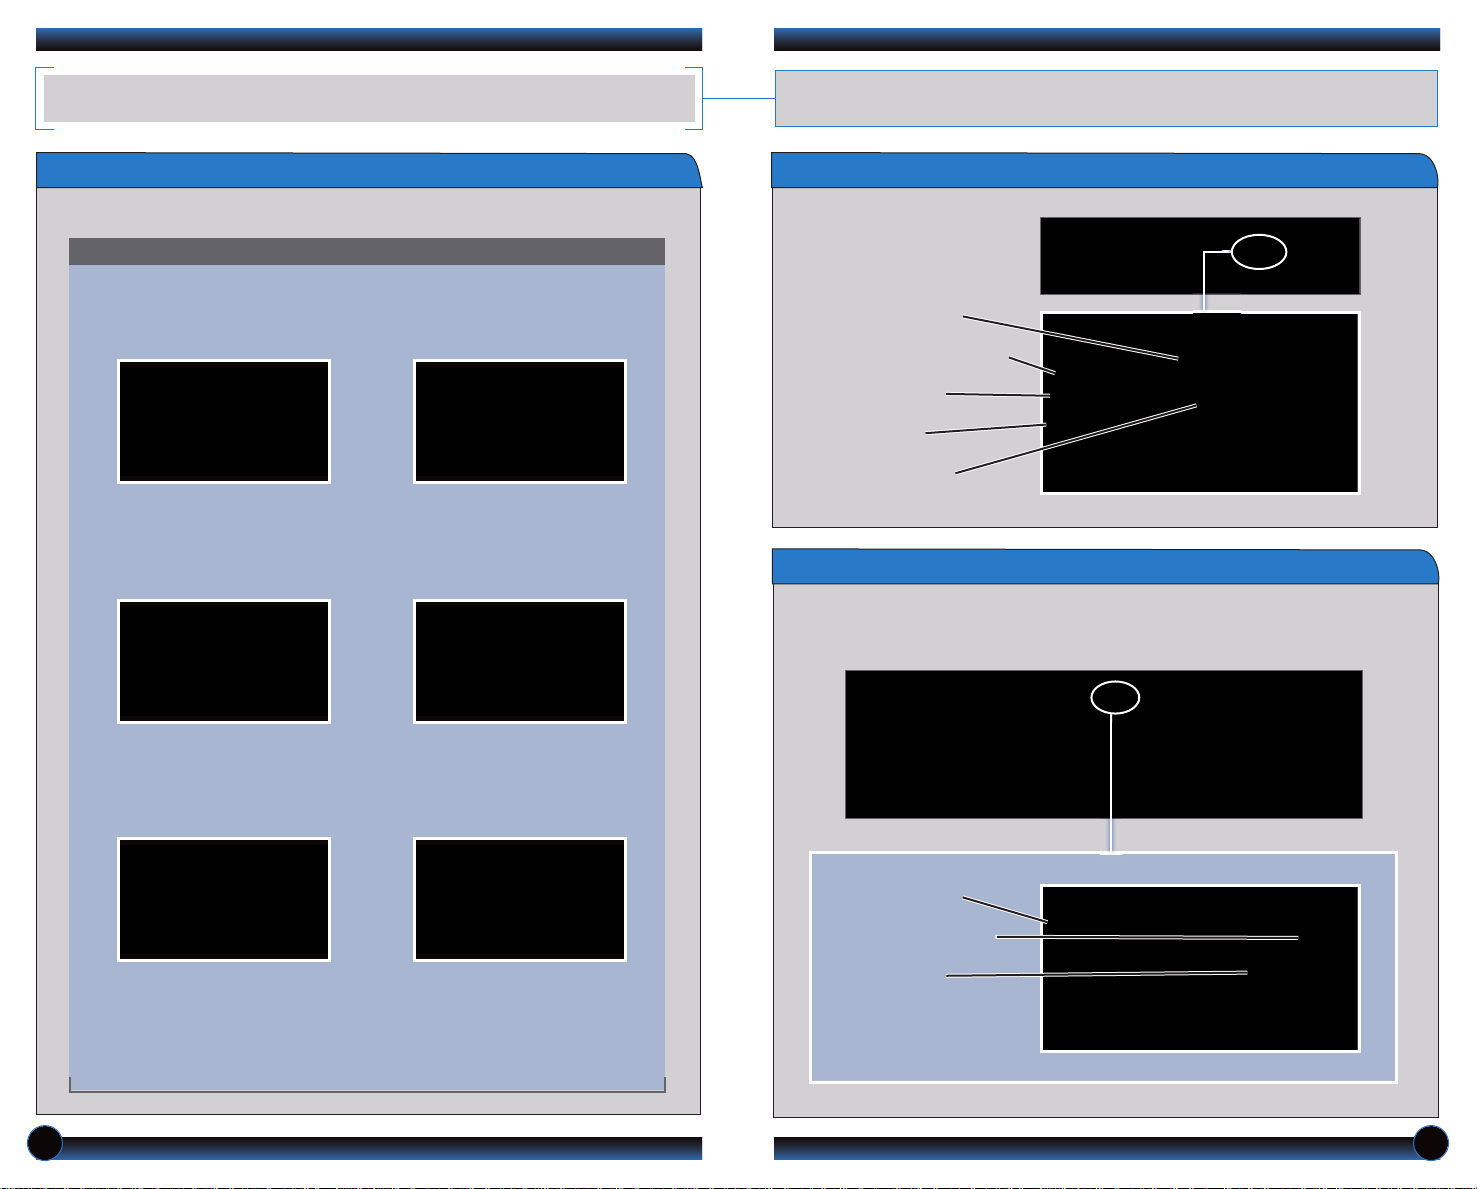
NAVIGATION
Real-time navigation system uses GPS and a map database to show your current
location and help guide you to a desired destination.
Entering a Destination Using Voice Commands
Set a destination using a street address. For other destination options, see your
Navigation Manual.
Press and release the Talk button before you say a command.
1. Say“Display menu.”
Say “Address.”
2. Say “Street,” then say the street
name on the next screen. Do
not include the direction (N, S,
E, W) or type (St., Ave., Blvd.,
etc.).
4. Say the entire street address
number. For example, “1-2-3-
4.” If necessary, say “OK” to
proceed.
5. If the street address is in more
than one city, a list of city names
appears. Say the number next to
the city you want to select.
Map Screen Legend
Calculated route
Direction of destination
Distance to go
Time to go
Current vehicle
location
Turn-by-Turn Directions
Shows a more detailed view of the next maneuvers during route guidance on the
multi-information display. See your Owner’s Manual for instructions on how to
turn this feature on or off.
3. A list of street names appears.
Say the number next to the
street you want to select.
6. The system displays the
“Calculate route to” screen. Say
“Set as destination” to set the
route.
Distance to next
maneuver
Upcoming maneuver
Current route
Note: If menu options are grayed out, they are only available using
voice commands. It is recommended that you enter your destination
before driving or when the vehicle is stopped.
16 17
Page 11
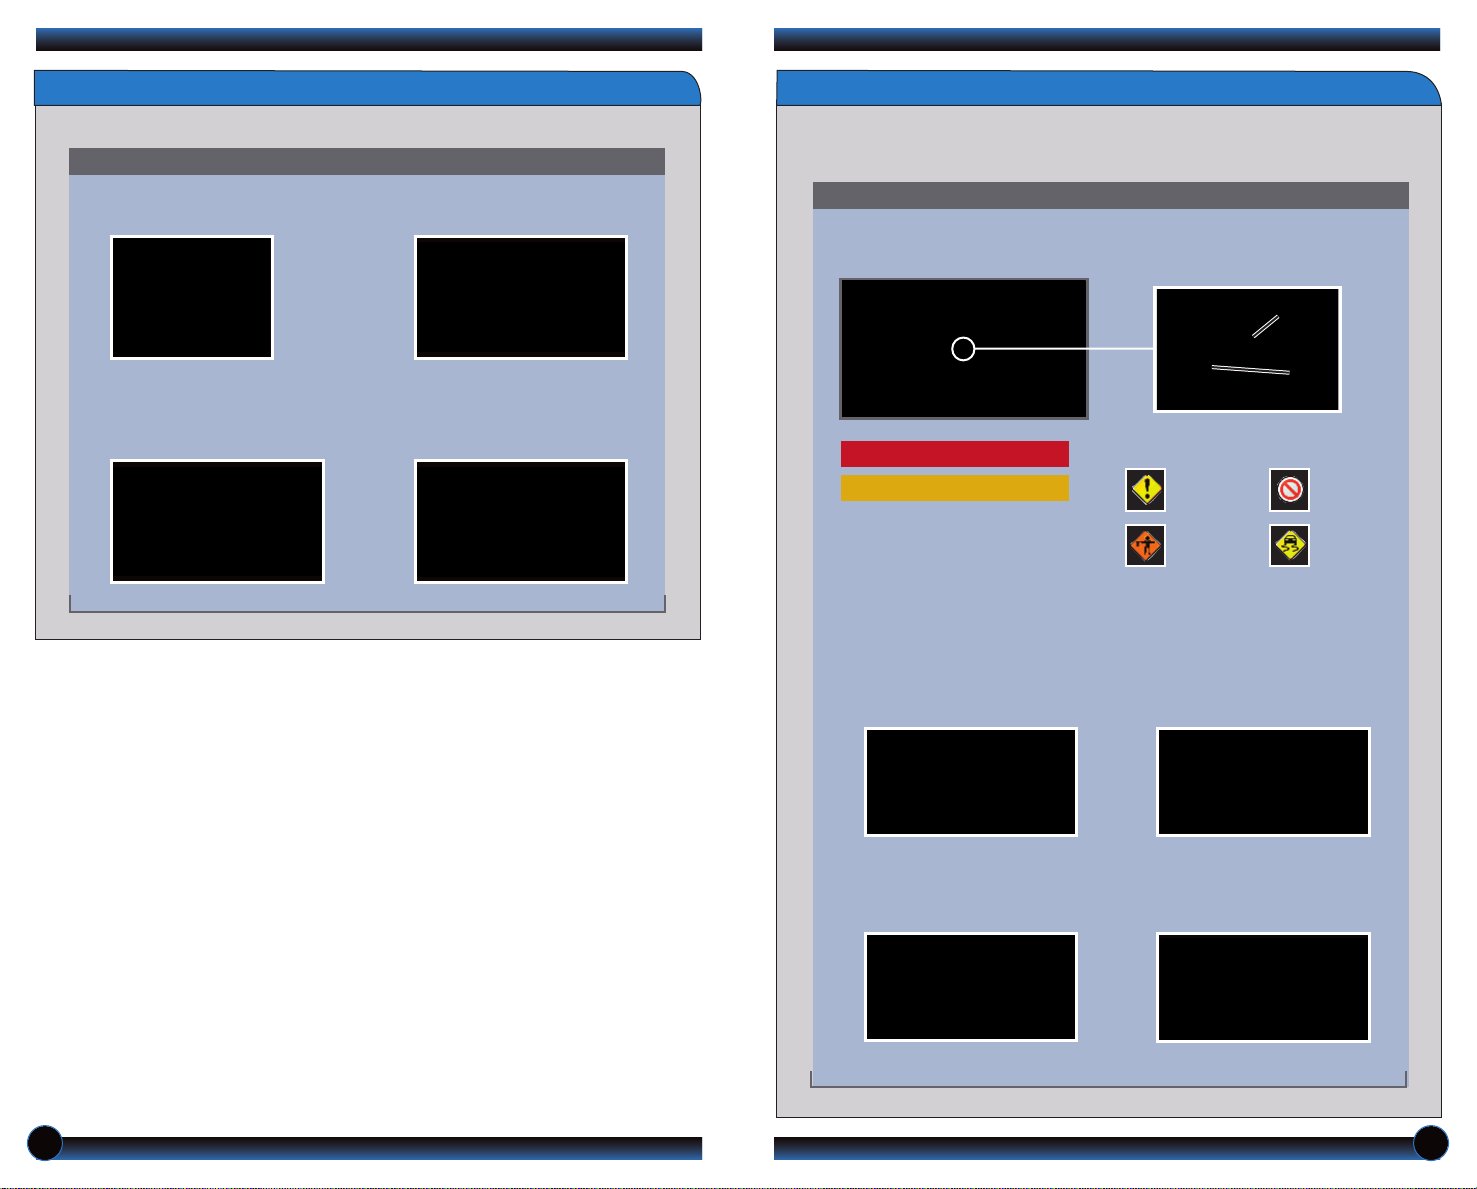
Use the audio selector knob to make and enter selections.
3. HFL begins dialing the number.1. With the message open, pr
ess
the selector knob to enter the
Text Message menu.
2. Select Call.
Use the audio selector knob to make and enter selections.
Replying to Text Messages
Calling the Sender
3. Select one of the six available
reply messages.
1. With the message open, pr
ess
the selector knob to enter the
Text Message menu.
4. Select Y
es to send the message.2. Select Reply.
Using the “Find Nearest” Command
Find a nearby point of interest, such as a gas station, movie theater, restaurant, etc.
Press and release the Talk button before you say a command.
1. From the map screen, say “Find
nearest ATM.”
2. A list of the nearest ATMs in
your area is displayed by
shortest distance to destination.
3. Say the number next to the
destination you want to select.
4. The system displays the
“Calculate route to” screen.
Say “Set as destination” to set
the route.
FM Traffic
Provides continuously updated information, including traffic speed, incidents, and
construction in major metro areas. Works in cities where a clear FM traffic signal
is available.
Press and release the Talk button before you say a command.
Displaying Traffic Information
Say “Display traffic” to view highway flow data.
Incident
Incident
icon
icon
Traffic
Traffic
Flow
Flow
data
data
Heavy traffic
Traffic Icons:
Moderate traffic
Note: Traffic flow and incident icons are
only displayed on map scales of 5 miles
(8 km) or less.
Incident
Construction
Road closed
Weather
Traffic Rerouting
When a destination is already set, you can create a detour to avoid traffic
incidents or congestion.
1. Say “Display traffic list” to view
a list of incidents on your
route.
2. Say the number of the incident
you want to avoid. When the
incident appears, say “Traffic
detail.”
3. Say “Avoid,” and the incident
list returns.
4. Say “Reroute” to set the new
route.
18 19
Page 12
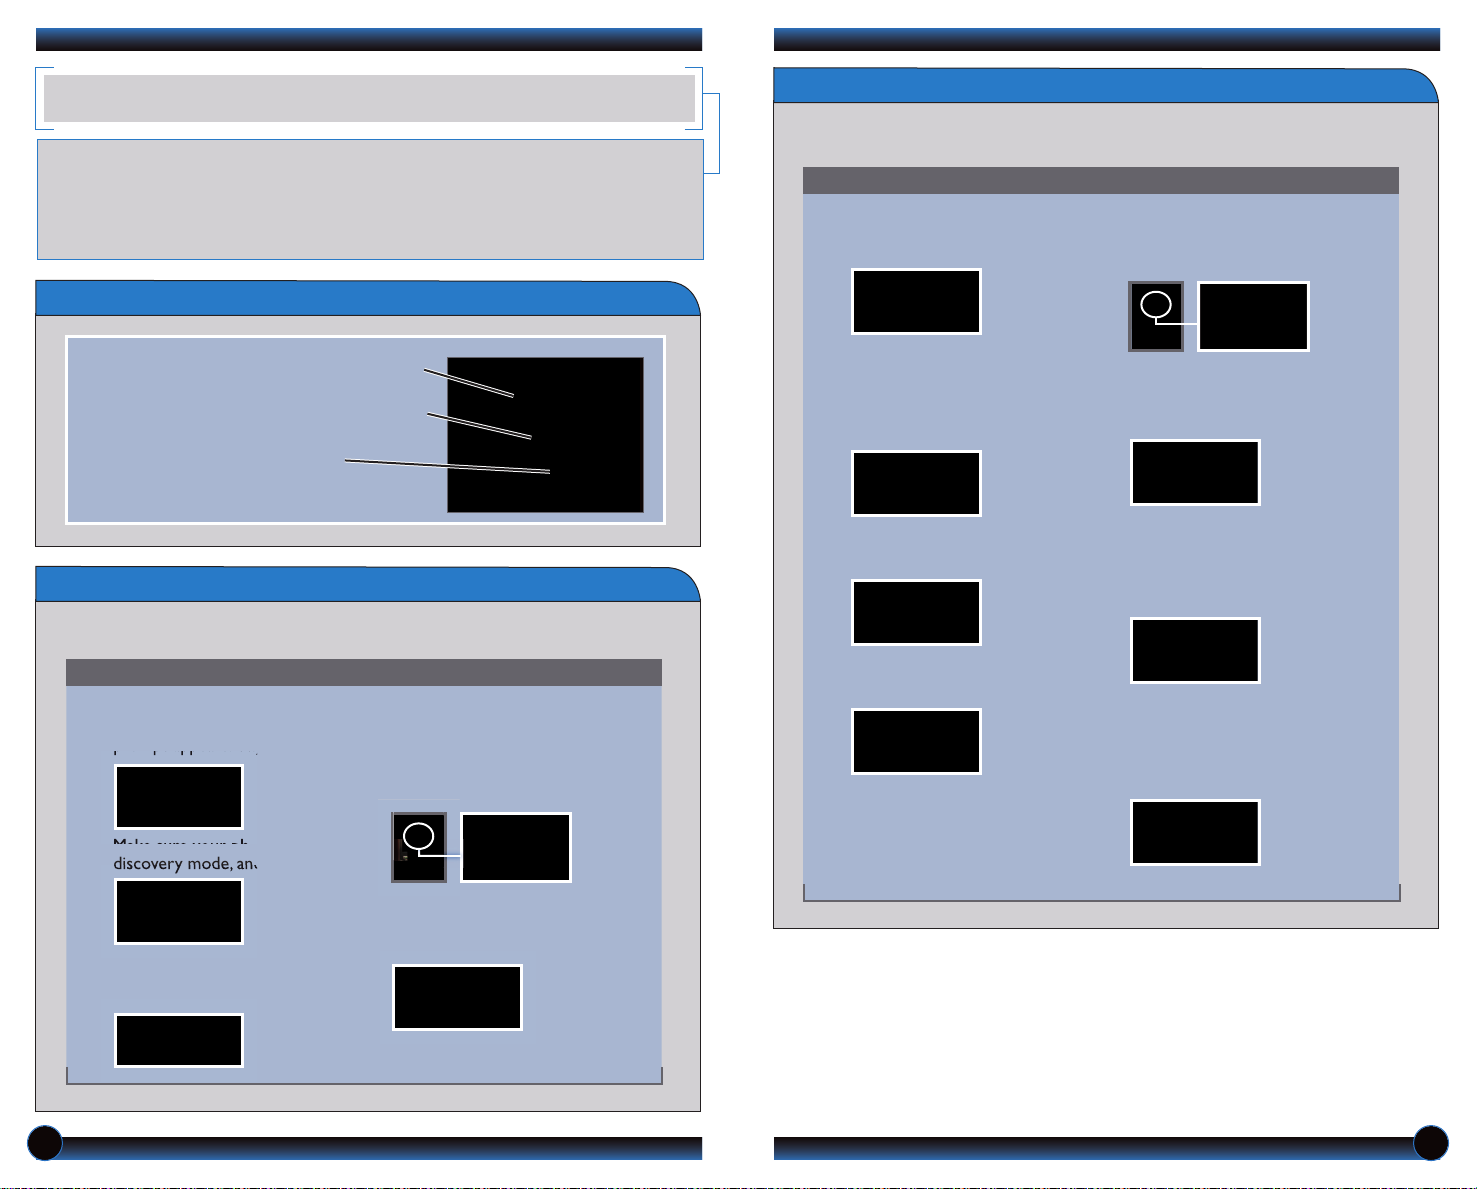
BLUETOOTH
1. Press the Pick-Up button to
go to the Phone screen.
If a prompt appears asking to
connect to a phone, say “No.”
5. Make sure your phone is in
discovery mode, and say “OK.”
6. HFL searches for your phone. Say
the number next to the phone
when it appears on the list.
7. HFL gives you a four-digit code.
Enter it on your phone when
prompted. The phone is now
paired.
If your phone does not appear:
Say “Find Anot her Pho ne” and
search for HandsFreeLink from
your phone. Connect to HFL.
2. Say “Phone setup.”
3. Say “Add a new phone.”
4. Say “Search.”
Place and receive phone calls through your vehicle’s audio system. Visit
handsfreelink.honda.com to check if your phone is compatible.
To reduce the potential for driver distraction, certain manual and touch
screen functions may be inoperable or grayed out while the vehicle is
moving. Voice commands are always available.
®
HANDSFREELINK® (HFL)
How to Use HFL
Pick-Up button: Answer an incoming call, or
go directly to the Phone screen.
Hang-Up/Back button: End a call, decline an
incoming call, or cancel a selection.
Talk button: Give HFL commands.
Pairing Your Phone (continued)
Use this pairing method when a phone has already been paired to the system, or
when you want to pair an additional phone.
Press and release the Talk button before you say a command.
Pairing Your Phone
Use this pairing method when no phone has ever been paired to the system. You
can pair your compatible phone only when the vehicle is stopped.
Press and release the Talk button before you say a command.
1. Press the Pick-Up button to
go to the Phone screen. A
prompt appears. Say “Yes.”
2. Make sure your phone is in
discovery mode, and say “OK.”
3. HFL searches for your phone. Say
the number next to the phone
when it appears on the list.
If your phone does not appear:
Say “Find Another Phone” and
search for a HandsFreeLink
device from your phone.
Connect to HFL.
4. HFL gives you a four-digit code.
Enter it on your phone when
prompted. The phone is now paired.
20 21
Page 13
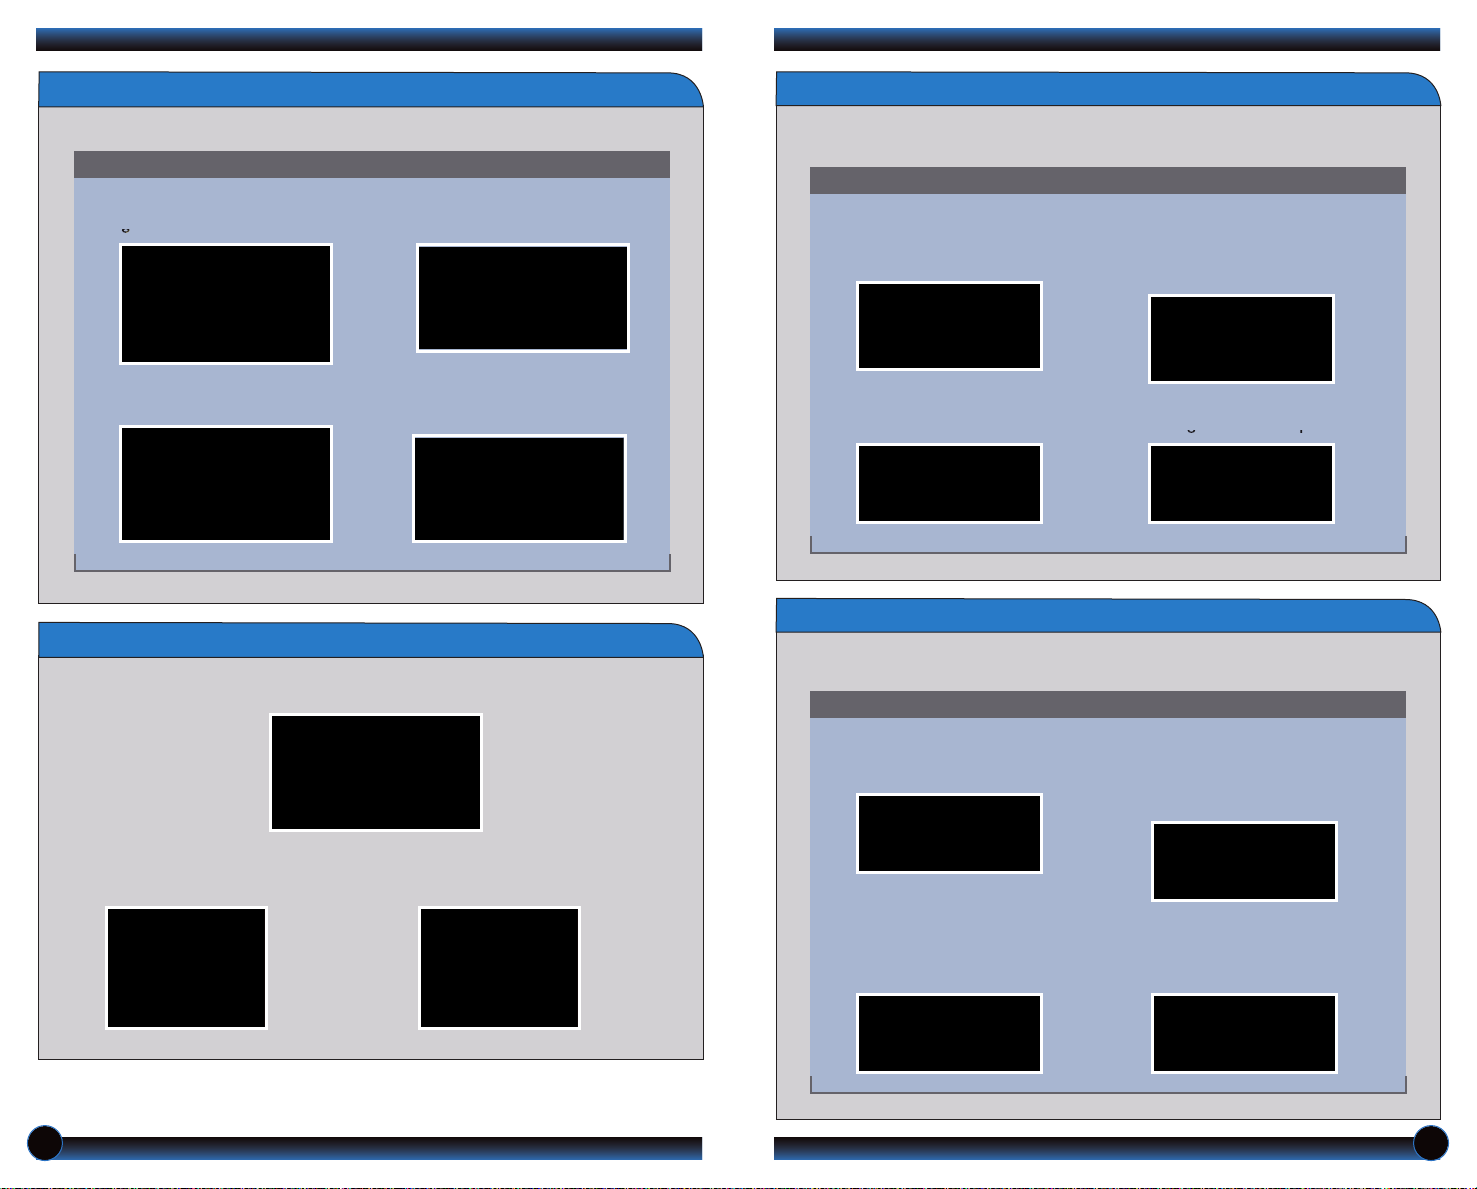
Dialing a Number
Using the Phonebook
Enter a 10-digit phone number to call.
Press and release the Talk button before you say a command.
1. Pr
ess the Pick-Up button to
go to the Phone screen.
2. Say “Dial.”
3. Say the entire phone number,
4. The call is connected and heard
Receiving a Call
A notification is heard and the following screen appears:
then say “Dial” to call.
through the vehicle speakers.
When your phone is paired, its entire phonebook is automatically imported to
the system.
Press and release the Talk button before you say a command.
1. Press the Pick-Up button
to go to the Phone screen.
2. Say “Phonebook.”
3. Scroll through the list to find
the name and number you want
to call. Say “Dial,” or press the
Pick-Up button to call.
4. The call is connected and heard
through the vehicle speakers.
Using Speed Dial
Store up to 15 numbers for quick calling. See your Navigation Manual for
instructions on storing voice tags.
Press and release the Talk button before you say a command.
Press the Pick-Up button to
accept the call.
Press the Hang-Up button to
end or decline the call.
1. Press the Pick-Up button
to go to the Phone screen.
2. Say “Speed Dial 1” (or “Speed
Dial 2”) and the number next
to the entry. For example,
“One.” Say “Call,” or press the
Pick-Up button to call.
If an entry has a stored voice tag,
say “Dial by voice tag,” followed
by the voice tag name and “Dial”
from any screen.
3. The call is connected and heard
through the vehicle speakers.
22 23
Page 14
SMS TEXT MESSAGING
Receive and send text messages from your paired and linked compatible phone. Visit
handsfreelink.honda.com to see if this feature is compatible on your phone. Standard
message rates apply. This feature is limited while the vehicle is moving.
Receiving Text Messages
Press and release the Talk button before you say a command.
Replying to Text Messages
Press and release the Talk button before you say a command.
1. With the message open, say
“Reply.”
3. Say “Send” to send the
message.
1. A notification appears on the
navigation screen when you
receive a text message.
Displaying Messages
Press and release the Talk button before you say a command.
1. Press the Pick-Up button to go
to the Phone screen.
2. Say “Text Message.” The 20
most recent text messages
from your phone are displayed.
2. Say “Read” to open the
message. The message is
displayed, and the system reads
it aloud.
3. Say the number next to the
message you want. The message
is displayed, and the system
reads it aloud.
2. Say the corresponding
number of one of the six
available reply messages.
Calling the Sender
Press and release the Talk button before you say a command.
“Call.”
4. A notification appears after
the message is sent.
2. HFL begins dialing the number.1. With the message open, say
24 25
Page 15
iPod®OR USB FLASH DRIVE
BLUETOOTH
®
AUDIO
Play audio files from your compatible iPod or USB flash drive through your vehicle’s
audio system.
Connecting Devices and Playing Audio
1. Pull out the USB adapter cable from
the center console.
Connect the USB adapter cable to
your iPod dock connector or flash
drive.
2. Press SOURCE or CD/XM until
iPod or USB mode appears. Audio
begins to play.
3. Press
tracks.
(9) (:)
or
(t) (u)
to change
Play stored or streaming audio files from your compatible phone through your
vehicle’s audio system. Visit handsfreelink.honda.com to check if this feature is
available on your phone.
Playing
1. Make sure your phone is on and
2. Press SOURCE or CD/XM until
3. From your phone, open the desired
Bluetooth
paired to Bluetooth® HandsFreeLink
(see page 20).
Bluetooth Audio mode appears.
audio player or app and begin playing.
Sound is redirected to the audio
system. Make sure the volume on your
phone is properly adjusted.
Audio
®
4. Press
tracks.
(9) (:)
or
(t) (u)
to change
Notes:
• You may need to enable additional Bluetooth settings on your phone for
Note: Connect your device only when your vehicle is stopped.
iPod is a registered trademark of Apple Computer, Inc., registered in the U.S . and other countries. iPod not included.
playback.
• Remote audio controls and the play/pause function may not be supported
on all phones.
• Operate your phone only when your vehicle is stopped.
26 27
Page 16
PANDORA
®
OWNER LINK
Play and operate Pandora streaming radio from your iPhone®through your vehicle’s
audio system. Standard data rates apply.
Playing Pandora
1. Pull out the USB adapter cable from
the center console.
Connect the USB adapter cable to
your iPod dock connector or flash
drive.
2. Open Pandora from your phone.
Press SOURCE or CD/XM until
Pandora mode appears and
streaming begins.
3. From the audio screen, select items
such as Station List, Like/Dislike, and
Pause/Resume.*
4. Press
(:)
or
to change tracks.
(u)
Owner Link allows you to explore features and technologies specific to your vehicle,
obtain and update maintenance and service records, and access other useful
information. Register at owners.honda.com to ensure that you continue to enjoy the
experience of owning a Honda. For added convenience, Owner Link can also be
accessed on a mobile device.
SAFETY REMINDER
Your vehicle is equipped with airbags. Airbags do not replace seat belts; they add to
the protection offered by seat belts. Airbags can help protect you in some types of
collisions, but they do not provide protection in all collisions.
Notes:
• If Pandora is not selected from your phone, iPod music is played.
• Press the Home button on your iPhone to switch from Pandora to iPod. To
play Pandora again, you must reopen the app from your phone.
• If you cannot operate Pandora through the audio system, it may be streaming
through Bluetooth
selected. If Pandora still does not operate, you may have to reconnect the
cable.
• Connect your phone only when your vehicle is stopped.
®
Audio. Make sure Pandora mode on your audio system is
iPhone is a registered trademark of Apple Computer, Inc., registered in the U.S. and other countries.
*Menu fucntions not available on all phones.
28
Always make sure you and your passengers wear seat belts, and that young children
are properly secured in a child seat or booster in the rear seat. Never place an
infant seat in the front passenger’s seat as the force of a deploying airbag can
seriously injure an infant.
29
Page 17
FUEL RECOMMENDATION
• Only use unleaded gasoline of 87 octane or higher. For Civic Si models, unleaded
gasoline of 91 octane or higher is required. For Civic Natural Gas models,
compressed natural gas (CNG) is required.
• Some gasoline in North America contains MMT, a manganese-based fuel additive.
Prolonged and consistent use of gasoline containing MMT can deteriorate your
vehicle’s performance, fuel economy, and the emission control system. Always use
MMT-free gasoline if available. Failures caused by use of gasoline containing MMT
may not be covered under warranty.
• “TOP TIER Detergent Gasoline” meets a new gasoline standard jointly established
by leading automotive manufacturers to meet the needs of today’s advanced
engines. In most cases, qualifying gasoline retailers will identify their gasoline as
having met “TOP TIER Detergent Gasoline” standards at the retail location. This
fuel is guaranteed to contain the proper level of detergent additives and be free of
metallic additives. This helps avoid build-up of deposits in your engine and
emission control system. Because the level of detergency and harmful metallic
additives (such as MMT) in gasoline vary in the market, Honda endorses the use
of “TOP TIER Detergent Gasoline” where available to help maintain the
performance and reliability of your vehicle. For more information, visit
www.toptiergas.com.
• For further important information on fuel and lubricants for your car and
information on gasoline that does not contain MMT, contact your dealer or visit
Owner Link at owners.honda.com.
30
31
 Loading...