

Page 1

1993 Accord Sedan Online Reference Owner's Manual
Information Provided by:
Use these links (and links throughout this manual) to navigate through this reference.
For a printed owner's manual, click on authorized manuals or go to www.helminc.com.
Owner's Identification Form
Features & Safety ................................................................................................................................ 2
What you should know before driving your car.
Starting & Driving............................................................................................................................. 92
What gas to use, how to change gears, etc.
Maintenance .......................................................................................................................................110
The Required Maintenance Schedule and some items you can service.
Emergency Service .......................................................................................................................... 148
Changing a flat, jump starting, towing.
Specifications ................................................................................................................................... 158
Dimensions, weights and capacities.
Consumer Information .................................................................................................................... 160
Reporting Safety Detects, warranty service, vehicle identification numbers, etc.
Index ................................................................................................................................................ 169
Gas Station Information
Contents
Page 2

Introduction
Information Provided by:
This manual contains important information about the safe
operation and maintenance of your car.
We urge you to read it carefully, become familiar with the controls it
describes, and follow its recommendations, to help make your
driving trouble-free and enjoyable.
Statements or labels on the product preceded by the following
words are of special significance:
indicates severe personal injury or death will result if
instructions are not followed.
indicates a strong possibility of severe personal
injury or death if instructions are not followed.
means hazards or unsafe practices which could
cause minor personal injury or product or property
damage.
NOTE: gives helpful information.
Break-in Period
During the first 600 miles (1,000 km) of driving, avoid full throttle
starts and cruising for extended periods at a constant speed.
NOTE:
This break-in procedure also applies to exchanged or overhauled
engines.
During and after the break-in period, drive the car at moderate
speeds until the engine is fully warmed up.
During the first 200 miles (300 km), try to avoid severe braking.
Brake misuse during this period will reduce future braking efficiency,
Remember, your Honda Automobile dealer knows your car best,
and should be consulted for service assistance and advice.
Page 3

Keys and Locks
Information Provided by:
Keys
Your car is supplied with a master
VALET KEY MASTER KEY
key that fits the ignition and all locks,
and a valet key that fits the ignition
and doors but not the trunk, trunk
remote release, rear seat trunk
access or glove box.
The valet key is provided for times
when you must leave the key with a
parking attendant or repair person,
but still want to keep valuables
safely locked-up.
Write down the numbers stamped on both keys and keep the
information in your wallet or purse in case you ever need to have
duplicates made. Both the master and valet keys are double-edged,
so you can insert them in the locks with either side up.
Door Locks
You can lock the doors by pushing the plunger down.
The doors must be unlocked before you can open them. The
passenger doors can be locked when open, and will stay locked
when you close them; the driver's door cannot be locked when
open unless you hold the door handle open. The front doors can be
locked and unlocked from the outside with the key.
Unlock
Unlock
LockLock
(cont'd)
Page 4

Keys and Locks (cont'd)
Information Provided by:
Power Door Locks
(US: LX/EX/SE/Anniversary Edition, Canada: EX/EX-R/SE)
All doors can be simultaneously locked and unlocked by operating
the master door lock switch located on each front door.
Unlock
Lock
In addition, the passenger doors will lock automatically when the
plunger on the driver's door is pushed down, or when the driver's
door is locked from the outside with the key.
Lock
Unlock
Lock
Page 5

Trunk
Information Provided by:
The trunk can be opened by pulling up the lever at the left side of
the driver's seat.
To open the trunk lid from the outside, put the master key in the
lock and turn clockwise. The trunk lid opener lever is lockable with
the master key.
Pull up
Open
Lock
MASTER KEY
Keep the trunk lid closed while driving to keep poisonous carbon
monoxide exhaust fumes out of the interior; prolonged exposure
can cause unconsciousness that may lead to death.
Child Proof Door Locks
The child proof door locks are designed to prevent accidental opening of the rear doors. To activate
LOCK TAB
the locks, push down the lock tabs
located on each rear door, then
close the doors. When the rear
doors are locked in this way, they
can only be opened from the
outside.
Lock
Page 6

Seats
Information Provided by:
Front Seat
Adjust the seat position by pulling up on the adjustment lever under
the front edge of the seat cushion, and sliding the seat to the
desired position. Then release the lever and make sure the seat is
locked in position by moving it back and forth.
Pull up
Pull up
The angle of the seat-back can be changed by pulling up on the lever
at the outside edge of the seat and leaning forward or back. Release
the lever and let the seat lock into place when it reaches the desired
angle.
Seat belts are most effective when the driver and passenger are
sitting up straight and well back in each seat.
Do not adjust the driver's seat while the car is moving; the seat
could move suddenly, causing loss of vehicle control.
To reduce the risk of sliding under the seat belts in a collision,
adjust the seat-backs to an upright position and sit well back in
the seat.
Page 7

Front Seat Head Restraints
Information Provided by:
The head restraints are designed to help reduce injuries due to
whiplash. They are located at the top of each seat-back and have
several height positions. They can be adjusted by pulling up to the
recommended position. To lower them, slide the button next to the
restraint's height bar, while pushing the restraint down.
Adjust so the top of the restraint is approximately level with the
tops of your ears.
If a head restraint must be removed (for cleaning, fabric repair, etc.)
pull the restraint up to its highest position, then slide the button
while pulling the restraint out.
To reinstall, reverse the above procedure.
Slide
Do not drive the car with head restraints removed.
Do not try to adjust head restraints while driving.
(cont'd)
Page 8

Seats (cont'd)
Information Provided by:
Driver's Lumbar Support
(US: EX/SE, Canada: EX-R/SE)
Support of the lower back can be
adjusted by turning the knob on the
driver's armrest to give more or less
support.
Do not try to adjust lumbar support
while driving. Make the adjustment
while sitting in your normal driving
position before driving away.
Driver's Seat Center Armrest
(US: LX/EX/SE/Anniversary Edition,
Canada: EX/EX-R/SE)
The angle of the driver's armrest on
the driver's seat adjusts to five
positions. To lower the armrest,
push the button on the driver's side
of the armrest and lower the
armrest.
Push
Do not try to adjust the armrest
while driving. Make the adjustment
before driving away.
Rear Seat Armrest
(US: LX/EX/SE/Anniversary Edition,
Canada: EX/EX-R/SE)
The rear seat armrest is located at
the center of the rear seat-back and
can be used by pulling the tab out.
Pull out
Page 9

Trunk Access from Rear Seat
Information Provided by:
The rear seat-back can be released by turning the lock on the rear
shelf with the master key and pulling down the top of the seat-back.
This allows you access to the trunk and makes it possible to carry
long objects inside the car.
The rear seat-back can also be released from inside the trunk by
pulling the release.
Open
Pull
MASTER
KEY
RELEASE
Passengers or pets must not sit on the folded portion of the rear
seat.
Make sure any luggage or cargo within the trunk, or extending
through the rear seat trunk access is secured.
Make sure the seat-back latches engage securely when the
seat-back is returned to its normal position.
Weight limits shown on the label located on the driver's door
jamb must be observed. The total weight of passengers and
cargo must not exceed the total weight limit on the label.
Do not store any items on the shelf behind the rear seat; they
may become dangerous projectiles in a collision.
Store any luggage or cargo in the trunk. If you are carrying more
items than will fit in the trunk, use the floor space between the
front and rear seats.
Make sure both rear shoulder belts are positioned in front of the
rear seat-backs whenever the seat-backs are in their upright
position.
When closing the rear seat trunk access, push the seat-back firmly
into place, then pull on the top of the seat-back to make sure it is
secure.
Page 10

Your Occupant Protection System
Information Provided by:
Your Accord is equipped with seat belts and other features that
work together to protect you and your passengers during a crash.
Seat belts are the most important part of your occupant protection
system. When worn properly, seat belts can reduce the chance of
serious injury or death in a crash.
For added protection during a severe frontal collision, all Accords
have a Supplemental Restraint System (SRS) with a driver's airbag.
The SE model also has a passenger's airbag.
Two indicator lights are also part of your safety system. One
reminds you to make sure you and your passengers wear your seat
belts. The other alerts you to a possible problem with your
supplemental restraint system (see page 22 ).
The seats, head restraints, and door locks also play a role in
occupant safety. For example, reclining your seat-back can
decrease the effectiveness of your seat belt. Head restraints can
help protect your neck and head, especially during rear-end impacts.
Door locks help keep your doors from being accidentally opened
during a crash.
To get the maximum protection from your occupant protection
system, check the following before you drive away:
Everyone in the car is wearing a seat belt properly (see page 13 ).
Infants and small children are properly secured in child safety
seats (see page 27 ).
All doors are closed and locked (see page 25 ).
Seat-backs are upright and head restraints are properly adjusted
(see page 24 ).
There are no loose items that could be thrown around and hurt
someone during a crash or sudden stop (see page 25 ).
By following these guidelines, you can reduce injuries to yourself
and your passengers in many crash situations. Remember, however,
that no safety system can prevent all injuries or deaths that can
occur in severe crashes.
Page 11

The Seat Belt System and How It Works
Information Provided by:
Why Wear Seat Belts
Wearing seat belts, and wearing them properly, is fundamental to
your safety and the safety of your passengers.
During a crash or emergency stop, seat belts can help keep you
from being thrown against the inside of the car, against other
occupants, or out of the car.
Of course, seat belts cannot completely protect you in every crash.
But, in most cases, seat belts reduce your chance of serious injury,
and can even save your life. That is why many states and all
Canadian provinces require you to wear seat belts.
Not wearing a seat belt increases the chance of being killed or
seriously hurt in a crash.
Be sure you and your passengers always wear seat belts and wear
them properly.
Important Safety Reminders
Seat belts are designed for adults and larger children. All infants and
small children must be properly restrained in child safety seats (see
page 27 ).
A pregnant woman needs to wear a seat belt to protect herself and
her unborn child (see page 18 ).
Two people should never use the same seat belt. If they do, they
could be very seriously injured in a crash.
Do not place the shoulder portion of a lap/shoulder belt under your
arm or behind your back. This could increase the chance of serious
injuries in a crash.
Do not put shoulder belt pads or other accessories on seat belts.
They can reduce the effectiveness of the belts and increase the
chance of injury.
(cont'd)
Page 12

The Seat Belt System and How It Works (cont'd)
Information Provided by:
Seat Belt System Components
Your Accord has seat belts in all five seating positions. The front
seats and the outside positions of the rear seat have lap/shoulder
belts. The center position of the rear seat has a lap belt.
Your seat belt system also includes a light on the instrument panel
to remind you to fasten your seat belt, and to make sure your
passengers fasten theirs. This light comes on when you turn on the
ignition if you have not fastened your seat belt. A beeper also
sounds for several seconds (see page 39 ).
The following pages cover more about the seat belt components
and how they work.
Lap/Shoulder Belt
This style of seat belt has a single belt that goes over your shoulder,
across your chest, and across your hips.
Each lap/shoulder belt has an emergency locking retractor. In normal
driving, the retractor lets you move freely in your seat while it
keeps some tension on the belt. During a collision or sudden stop,
the retractor automatically locks the belt to help restrain your body.
ADJUSTER
SHOULDER
PORTION
LATCH
PLATE
BUCKLE
LAP PORTION
UPPER
SEAT BELT
ANCHOR
Page 13

Lap Belt
Information Provided by:
The lap belt has one manually-adjusted belt that fits across the hips.
It is similar to safety belts used in airplanes.
BELT END
LATCH PLATE
BUCKLE
Wearing Seat Belts Properly
You can increase the effectiveness of your seat belts if you take a
little time to read the following pages and make sure you know how
to wear seat belts properly.
Not wearing a seat belt properly increases the chance of serious
injury or death in a crash.
Be sure you and your passengers always wear seat belts and wear
them properly.
(cont'd)
Page 14

The Seat Belt System and How It Works (cont'd)
Information Provided by:
Wearing a Lap/Shoulder Belt
Before putting on
forward or backward to a good driving or riding position and the
back of your seat is upright (see page 24 ).
1. Pull the latch plate across your body and insert it into the buckle.
Tug on the belt to make sure the latch is securely locked.
2. Check that the belt is not twisted.
3. Position the lap portion of the belt as low as possible across your
hips, not across your stomach. This lets your strong pelvic bones
take the force of a crash.
a
front seat belt, be sure your seat is adjusted
Page 15

4. Pull up on the shoulder part of the belt to remove any slack. Make
Information Provided by:
sure the belt goes over your collarbone and across your chest.
5. If the belt crosses your neck, you need to adjust the belt anchor
height or your seating position.
Front seats: Adjust the belt anchor by squeezing the two
buttons and sliding the anchor downward (it has
four positions).
Rear seat: Move toward the center of the seat until the belt
fits over your collarbone.
RELEASE BUTTON
RELEASE BUTTON
(cont'd)
Page 16

The Seat Belt System and How It Works (cont'd)
Information Provided by:
To unlatch the seat belt, push the red PRESS button on the buckle.
Guide the belt across your body to the door pillar. If the belt doesn't
retract easily, pull it out and check for twists or kinks.
Wearing the Lap Belt
1. Pull the latch plate across your hips and insert it into the buckle
marked CENTER.
If the belt is too short, hold the latch plate at a right angle and pull
to extend the belt. Insert the latch plate into the buckle.
Page 17

2. Position the belt as low as possible across your hips and pelvic
Information Provided by:
bones, not across your stomach. Pull the loose end of the belt to
adjust for a snug but comfortable fit.
To unlatch the belt, push the red PRESS button on the buckle.
(cont'd)
Page 18

The Seat Belt System and How It Works (cont'd)
Information Provided by:
Advice For Pregnant Women
Protecting the mother is the best way to protect her unborn child.
Therefore, a pregnant woman should wear a properly-positioned
seat belt whenever she drives or rides in a car.
If possible, use a lap/shoulder seat belt, remembering to keep the lap
portion as low as possible (see page 14). Each time you have a
check-up, ask your doctor if its okay for you to drive and how you
should position a lap/shoulder seat belt.
Seat Belt Maintenance
For safety, you should check the condition of your seat belts
regularly.
Pull out each belt fully and look for frays, cuts, burns, and wear.
Check that the latches work smoothly and the lap/shoulder belts
retract easily. Any belt not in good condition or not working
properly should be replaced.
If a seat belt is worn during a crash, have your dealer replace the
belt and check the anchors for damage.
If your seat belts get dirty, you can use a soft brush with a mixture
of mild soap and warm water to clean them. Do not use bleach, dye,
or cleaning solvents. They can weaken the belt material. Let the
belts air-dry before you use the car.
Dirt build-up in the metal loops of the seat belt anchors can cause
the belts to retract slowly. Wipe the inside of the loops with a clean
cloth dampened in isopropyl alcohol.
Page 19

Supplemental Restraint System
Information Provided by:
All Accords are equipped with a Supplemental Restraint System
(SRS) to help protect your head and chest during a severe frontal
collision. This system does not replace your seat belt. It supplements, or
adds to, the protection offered by your seat belt.
The system on the SE model also includes a front passenger's airbag.
Not wearing a seat belt increases the chance of serious injury or
death in a crash, even if you have an airbag.
Be sure you and your passengers always wear seat belts and wear
them properly.
PASSENGER'S
AIRBAG
RIGHT SENSOR
LEFT SENSOR
S R S
DRIVER'S
AIRBAG
SRS CONTROL UNIT
The main components in your SRS are:
An airbag in the steering wheel for the driver.
(On SE model)
An airbag in the dashboard for the front passenger.
A diagnostic system that, when the ignition is ON (II), continually
monitors the sensors, control unit, airbag activator, and all related
wiring.
An indicator light to warn you of a possible problem with the
system.
Emergency power backup in case your car's electrical system is
disconnected in a crash.
(cont'd)
Page 20

Supplemental Restraint System (cont'd)
Information Provided by:
Important Safety Reminders
FRONTAL COLLISION RANGE
Even with an airbag, you need to wear a seat belt. The reasons are:
Airbags only inflate in severe frontal collisions. They offer no
protection in rear impacts, side impacts, rollovers, or moderate
frontal collisions.
An airbag inflates and deflates very quickly. It cannot protect you
during any additional impacts that can occur during a crash.
A seat belt helps keep you in the proper position when an airbag
inflates. An airbag opens with considerable force and can hurt you
if you are not in the proper position.
Page 21

How the Driver's Airbag Works
Information Provided by:
If you ever have a severe frontal collision, your airbag will instantly
inflate to help protect your head and chest.
When the airbag inflates, you may hear a fairly loud noise and you
might see smoke and powder. This is normal; it is caused by the
inflation of the airbag.
To do its job, the airbag inflates with considerable force. So, while it
can reduce serious injuries and even save your life, the airbag might
cause some facial or other abrasions.
After the bag completely inflates, it immediately starts deflating so
it won't interfere with your visibility, ability to steer, or ability to
operate other controls.
The airbag is stored in the center of the steering wheel. For safety,
do not attach any items to the steering wheel. They could interfere
with the proper operation of the airbag. Or, if the airbag inflates,
they could be propelled inside the car and hurt someone.
(cont'd)
Page 22

Supplemental Restraint System (cont'd)
Information Provided by:
How the Passenger's Airbag Works (SE)
If you ever have a severe frontal collision, the passenger's airbag will
inflate at the same time as the driver's airbag.
This airbag is quite large and inflates with considerable force. It can
seriously hurt an adult who is not in the proper position and wearing
the seat belt properly. The bag's force could also hurt a small child
who is not properly restrained in a child seat.
Because of the airbag, we strongly recommend that you do not put
an infant seat in the front passenger's seat. If the airbag inflates, it
can dislodge the infant seat and seriously injure the infant.
S R S
The purpose of the SRS light on your instrument panel is to alert
you of a potential problem with your supplemental restraint system.
Have the system checked if:
The light does not come on when you turn the ignition ON (II).
The light stays on after the engine starts.
The light comes on or flashes while you are driving.
How the SRS Indicator Light Works
Page 23

System Service
Information Provided by:
Your supplemental restraint system is virtually maintenance-free.
There are no parts you can safely service.
You must have the system serviced by an authorized Honda dealer:
If your airbag ever inflates. The bag must be replaced. Do not try
to remove or discard the airbag by yourself. This must be done by
a Honda dealer.
If the SRS indicator light alerts you of a problem. Have the
supplemental restraint system checked as soon as possible.
Otherwise, your airbag might not inflate when you need it.
When the car is ten years old. Have the dealer inspect the
system. The production date is on the left rear door jamb for your
convenience.
System Service Precautions
Do not modify your steering wheel or any other part of the
supplemental restraint system. Modifications could make the
system ineffective.
Do not tamper with the system components or wiring. This could
cause the airbag to inflate inadvertently, possibly injuring someone
very seriously.
Tell anyone who works on your car that you have a supplemental
restraint system. Failure to follow the procedures and precautions in
the official Honda service manual could result in personal injury or
damage to the system.
Scrapping an entire car that has an uninflated airbag can be
dangerous. Get assistance from a Honda dealer if your car must be
scrapped.
If you sell your car, please be sure to tell the new owner that the car
has a supplemental restraint system. Alert them to the information
and precautions in this part of the owner's manual.
Page 24

Additional Safety Information
Information Provided by:
Your seat belts and airbag are obviously important parts of your
occupant protection system.
In addition, you should know that sitting upright, adjusting the head
restraints to the proper positions, locking the doors, and stowing
things properly can increase your safety and possibly even save
your life.
Seat-back Position
The seat-backs should be in an upright position for you and your
passengers to get the most protection from the seat belts.
If you recline a seat-back, you will reduce the protective capability
of your seat belt. The farther a seat-back is reclined, the greater the
risk that you will slide under the belt in a severe crash and be very
seriously injured.
For information on how to adjust the seat-back, see page 6.
Head Restraint Position
Head restraints can help protect you from whiplash and other
injuries. For the best protection, the top of the head restraint should
be even with the top of your ears, or as high as possible. For
instructions on how to adjust the head restraints, see page 7.
Page 25

Door Locks
Information Provided by:
It is not safe to leave your car doors unlocked. A passenger,
especially a child, could open a door and accidentally fall out. Also,
there is a greater chance of being thrown out of the car during a
crash when the doors are not locked.
Storing Cargo Safely
Before you drive, make sure you first securely store or tie down any
items that could be thrown around the car and hurt someone, or
interfere with your ability to operate the controls.
Do not put any items on top of the rear shelf. They can block your
view and they could be thrown about the car in a crash.
Be sure to keep compartment doors closed when the car is moving.
If a front passenger hits the door of an open glove box, for example,
he could injure his knees.
(cont'd)
Page 26

Additional Safety Information (cont'd)
Information Provided by:
Driving With Pets
Loose pets can be a hazard while you are driving. An unrestrained
pet can interfere with your ability to drive the car. In a crash or
sudden stop, loose pets or cages can be thrown around inside the
car and hurt you or your passengers. It is also for their safety that
pets should be properly restrained in your car.
The recommended way to restrain a medium-sized or larger dog is
with a special traveling harness. This harness can be secured to the
rear seat with a seat belt. Travel harnesses are available at pet
stores.
A small dog, cat, or other small animal will be safest in a pet carrier
with rigid sides. Choose a style that allows you to secure it to the
car's seat by routing a seat belt through the carrier's handle.
For further information, contact your veterinarian or local animal
protection society.
Page 27

Child Safety
Information Provided by:
Children depend on adults to protect them. To help make sure we
do, every state and Canadian province has laws requiring infants
and young children to be properly restrained whenever they ride in a
car.
An infant or child who is not properly restrained can be killed or
seriously injured in a crash.
Be sure any child too small for seat belts is properly secured in a
child restraint.
Where Should Children Sit?
According to accident statistics, children of all sizes and ages are
safer when they are properly restrained in the rear seat rather than
the front seat.
We recommend that, whenever possible, you secure your child's
infant or toddler seat in the center position of the rear seat with the
lap belt.
For cars with passenger airbags, we strongly recommend that you
do not put an infant seat in the front passenger seat. If the airbag
inflates, it can hit the seat with great force. The infant seat can be
dislodged and the baby seriously injured.
We also recommend that any child who is too large to use an infant
or toddler seat ride in one of the outside positions of the rear seat.
The child should then wear the lap/shoulder belt properly for
protection.
(cont'd)
Page 28

Child Safety (cont'd)
Information Provided by:
Important Safety Reminders
Never hold a baby or child on your lap when riding in a car. If you are
wearing your seat belt, the violent forces created during a crash will
tear the child from your arms. The child could be seriously hurt or
killed.
If you are holding a child and not wearing a seat belt in a crash, you
could crush the child against the inside of the car.
Never put your seat belt over yourself and a child. During a crash,
the belt could press deep into the child, causing serious internal
injuries.
Two children should never use the same seat belt. If they do, they
could be very seriously injured in a crash.
If you are driving with small children in the car, you should use the
childproof door locks to prevent them from opening the rear doors
(see page 5 ).
General Guidelines for Restraining Children Under 40 Pounds
(18kg)
Use an approved child seat. The seat must meet Federal Motor Vehicle
Safety Standard 213 (FMVSS-213) or Canadian Motor Vehicle
Safety Standards. Look for the manufacturer's statement of
compliance on the box and seat.
Use a seat of the right size. Make sure the seat fits your child. Check
the seat's instructions and labels for height and weight limits.
Secure the child seat to the car. All approved child seats are designed
to be secured in the car seat by the lap belt or the lap belt portion of
a lap/shoulder belt. A child whose seat is not properly secured to
the car can be endangered in a crash.
To properly route a seat belt through a child seat, follow the seat
maker's instructions. If you use a lap/shoulder belt, be sure you
install a locking clip on the belt (see page 32 ).
Secure the child in the child seat. Make sure the infant or child is firmly
secured to the child seat. Use the straps provided, and carefully
follow the manufacturer's instructions.
Page 29

Restraining an Infant Who Weighs Less Than 20 Pounds (9 kg)
Information Provided by:
An infant up to about 20 pounds (9 kg) must be restrained in an
infant seat or a convertible seat designed for a baby. Because
infants must ride in a reclining position, be sure the infant seat
always faces the REAR of the car as shown.
We recommend that, whenever possible, you put the infant seat in
the center position of the rear seat and secure it to the car with the
lap belt.
If you decide to put an infant seat in any other seating position, you
must use a locking clip with the car's lap/shoulder belt (see page
32 ).
Special Precaution for SE models
We strongly recommend that you do not put an infant seat in the
front passenger's seat.
In a severe frontal collision, the inflating airbag can hit the infant
seat with considerable force.
The infant seat can be dislodged, causing serious injury to the infant.
(cont'd)
Page 30

Child Safety (cont'd)
Information Provided by:
Restraining a Child Who Weighs Between 20 and 40 Pounds
(9 — 18 kg)
Toddler seats are designed for children who weigh between 20 and
40 pounds (9 — 18 kg). The preferred place to put a toddler seat is
the center position of the rear seat. Use the car's lap belt to secure
the seat to the car.
If you decide to put a toddler seat in any other seating position, you
must use a locking clip with the lap/shoulder belt (see page 32 ).
Page 31
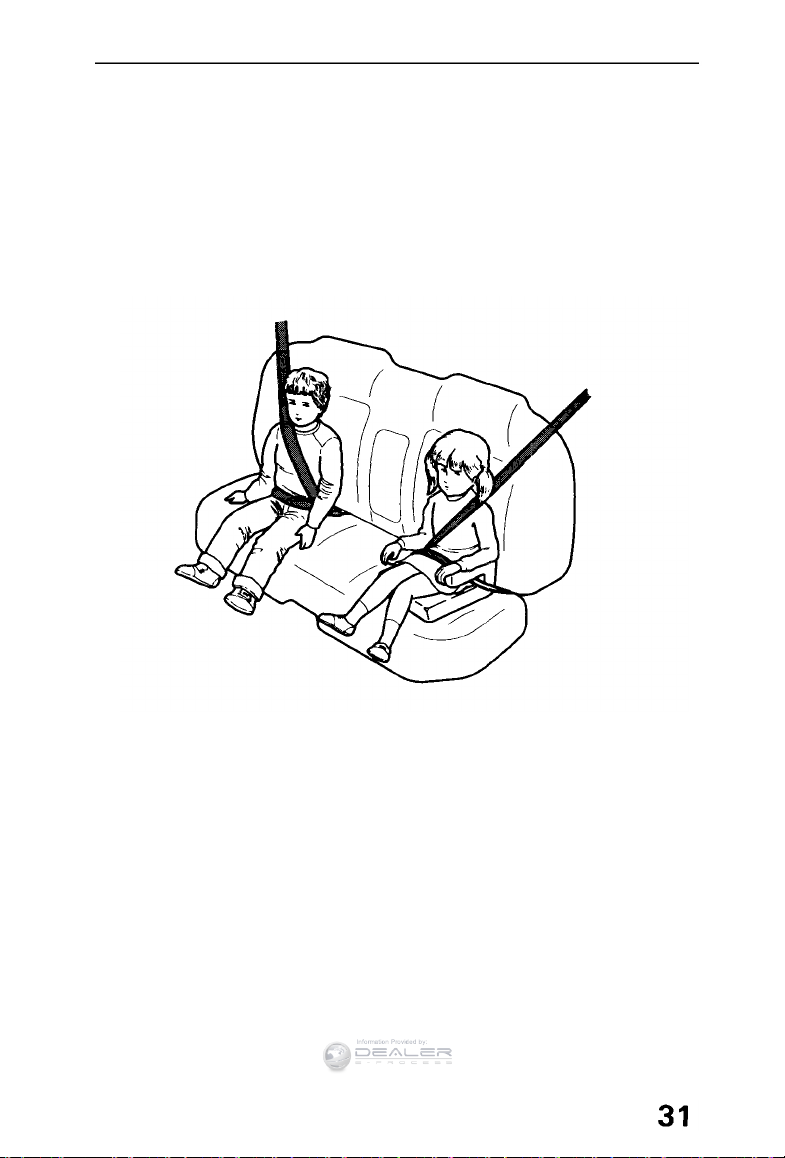
Restraining a Child Who Weighs Over 40 Pounds (18 kg)
Information Provided by:
We recommend that, whenever possible, a child who has outgrown
a toddler seat ride in one of the outside positions of the rear seat
and use a lap/shoulder belt.
Put the lap/shoulder belt on your child and check its fit. The
shoulder belt should fit over the collarbone and across the chest.
The lap belt should sit low on your child's hips, not across the
stomach.
If the shoulder belt crosses the neck, have your child move toward
the center of the rear seat until the belt fits properly. If the belt still
crosses the child's neck, you should use a booster seat.
Several styles of booster seats are available. We recommend a
design that allows the child to use the car's lap/shoulder belt.
Whatever style is used, follow the booster seat manufacturer's
instructions.
(cont'd)
Page 32
Child Safety (cont'd)
Information Provided by:
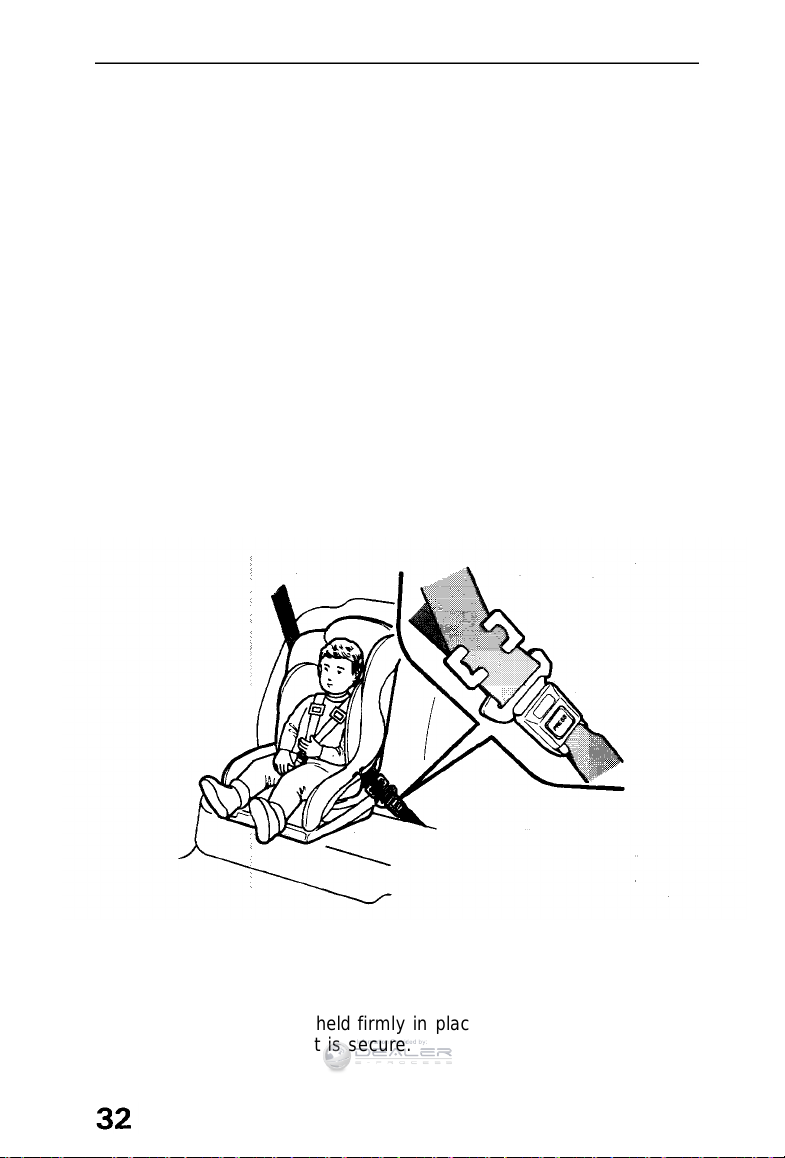
Using a Seat Belt Locking Clip
Always use a seat belt locking clip when you secure a child seat to
your car with a lap/shoulder seat belt. This helps prevent a child
seat from shifting position or overturning.
A locking clip is usually included with the child seat. If you need a
clip, contact the seat's manufacturer or a store that sells child
restraints.
To install a locking clip, do the following:
1. Place the child restraint in the desired position. Route the lap/
shoulder belt through the restraint according to the seat
manufacturer's instructions.
2. Insert the latch plate into the buckle. Pull on the shoulder part of
the belt to make sure there is no slack in the lap portion.
3. Tightly grasp the belt near the latch plate. Pinch both parts of the
belt together so they won't slip through the latch plate. Unbuckle
the seat belt.
4. Install the locking clip as shown. Position the clip as close as
possible to the latch plate.
5. Insert the latch plate into the buckle. Push and pull on the child
seat to verify that it is held firmly in place. If it is not, repeat these
steps until the restraint is secure.
Page 33
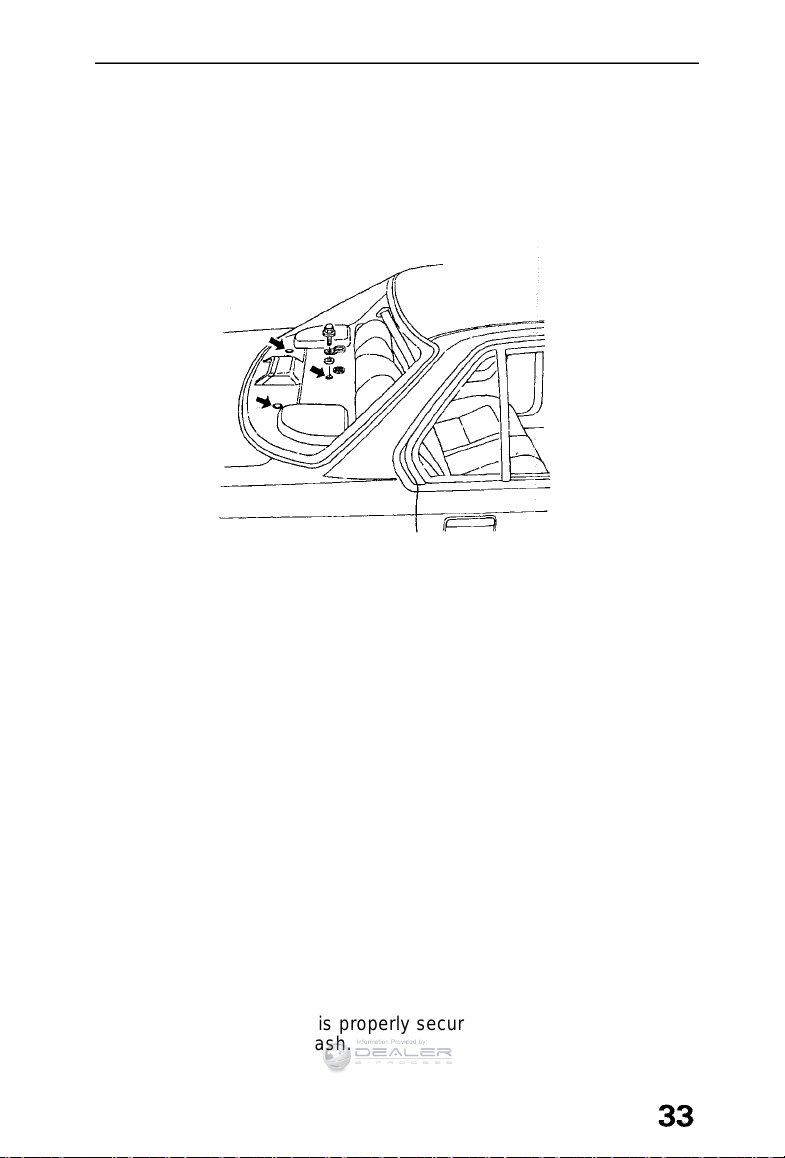
Using Child Restraints With Tethers
Information Provided by:
Your Honda has three attachment points for tether-style child seats.
Remove the plug cover from the attachment points shown in the
illustration, then install the tether hardware that came with the child
seat. Tighten the bolt to:
22 N.m(2.2 kg-m , 16 Ib-ft)
If you are not sure how to install the bracket, have it installed by
your Honda dealer.
If you need an anchor plate and mounting hardware, you can obtain
them by writing to:
American Honda Motor Co., Inc.
Consumer Affairs
1919 Torrance Blvd.
Torrance, CA 90501-2746
Canadian Cars
The anchor plate and mounting hardware for a top tether are
supplied with the car. When installing, make sure the toothed
washer is on the bottom of the bolt.
The supplied anchor plate is designed only for mounting a child
restraint. Do not use it for any other purpose.
Storing a Child Seat
When you are not using an infant seat or other child restraint, either
remove it or make sure it is properly secured so it cannot be thrown
around the car during a crash.
Page 34
Anti-lock Brake System (ABS)
Information Provided by:
Anti-lock Brakes
(US: EX/SE/Anniversary Edition, Canada: EX-RISE)
Your car has an Anti-lock Brake System (ABS). This system helps
you to maintain stopping and steering control. It does this by helping
to prevent the wheels from locking up and skidding.
The ABS is always "ON". It requires no special effort or driving
technique. You will feel a pulsation in the brake pedal when the ABS
activates.
Activation varies with the amount of traction your tires have. On
dry pavement, you will need to press on the brake pedal very hard
before you feel the pedal pulsation that means the ABS has
activated.
However, you may feel the ABS activate immediately if you are
trying to stop on snow or ice.
Under all conditions, the ABS is helping to prevent the wheels from
locking so you can retain steering control. You should continue to
press on the brake pedal with the same force.
You may feel a slight movement of the brake pedal just after you
start the engine. This is the ABS working.
The ABS is self-checking. If
anything goes wrong, the ABS
indicator on the instrument panel
comes on (see page 41 ). This
means the Anti-lock function of the
braking system has shut down. The
brakes still work like a conventional
system providing normal stopping ability. You should have the
dealer inspect your car as soon as possible.
A B S
The ABS works by comparing the speed of the wheels. When
replacing tires, use the same size originally supplied with the car.
Tire size and construction can affect wheel speed and may cause
the system to work inconsistently.
A car with an ABS may require a longer distance to stop on loose or
uneven surfaces than an equivalent car without ABS. The ABS
cannot make up for road conditions or bad judgment. It is still your
responsibility to drive at reasonable speeds for weather and traffic
conditions, and to leave a margin of safety.
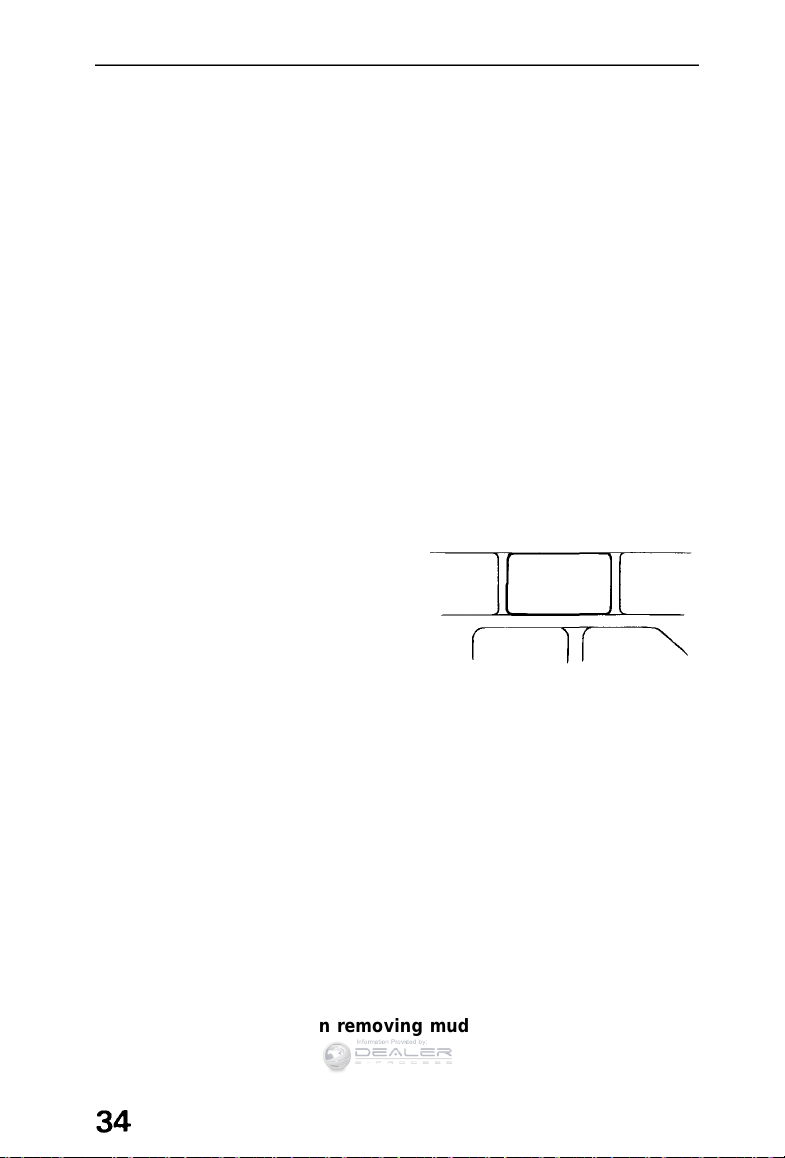
CAUTION:
Be careful not to damage the wiring or the speed sensors at the
back of each wheel when removing mud or snow from the wheel
housings.
Page 35
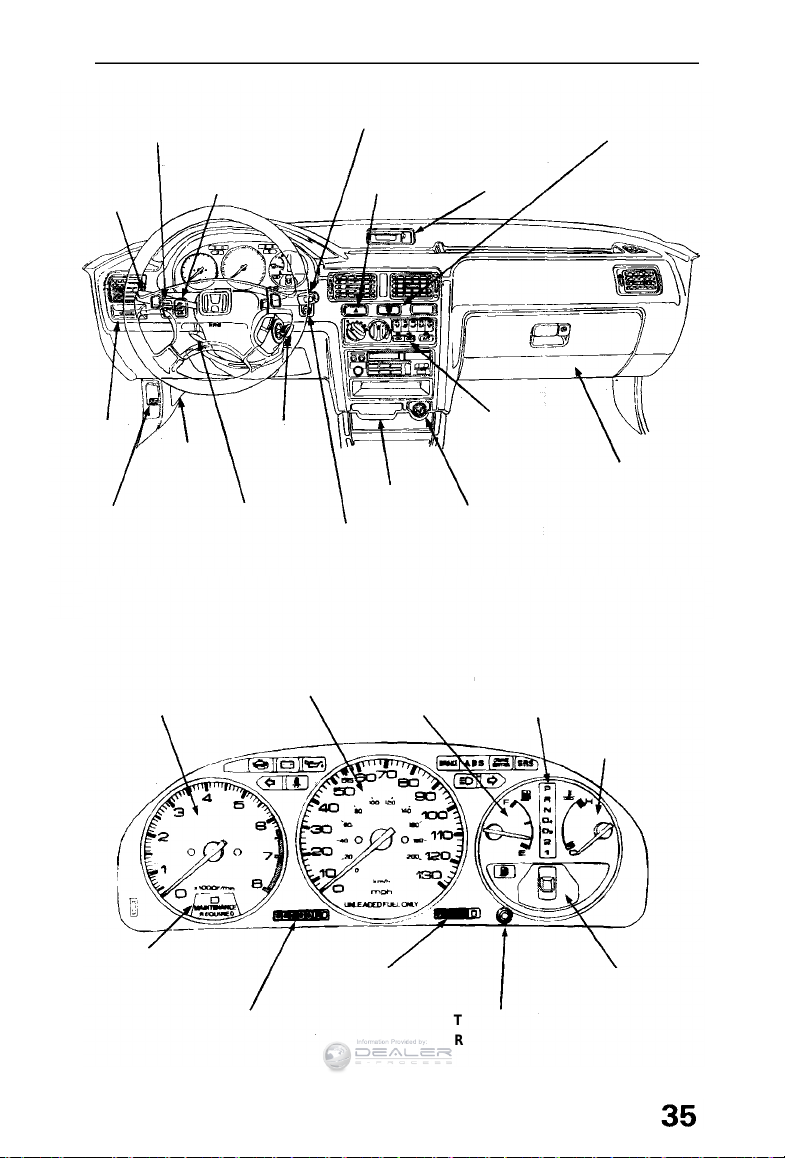
Instrument Panel
Information Provided by:
CRUISE CONTROL
MASTER SWITCH
(Except US: DX)
MOONROOF SWITCH
LIGHT
SWITCH
COIN
BOX
HOOD
RELEASE
HANDLE
(US: EX/SE,
Canada: EX-R/SE)
FUSE
BOX
TILT STEERING
ADJUSTMENT
LEVER
US Car Shown:
TACHOMETER
WIPER/WASHER
SWITCH
IGNITION
SWITCH
PANEL
BRIGHTNESS
CONTROL
KNOB
SPEEDOMETER
HAZARD
WARNING
SWITCH
ASHTRAY
FUEL
GAUGE
DIGITAL
CLOCK
HEATING/
COOLING
CONTROL
PANEL
CIGARETTE
LIGHTER
SHIFT LEVER
POSITION
INDICATOR
(Automatic
Trans. only)
REAR
WINDOW
DEFOGGER
SWITCH
GLOVE BOX
COOLANT
TEMPERATURE
GAUGE
MAINTENANCE
INDICATOR
ODOMETER
TRIP METER
SAFETY
INDICATOR
LIGHTSTRIP METER
RESET BUTTON
Page 36
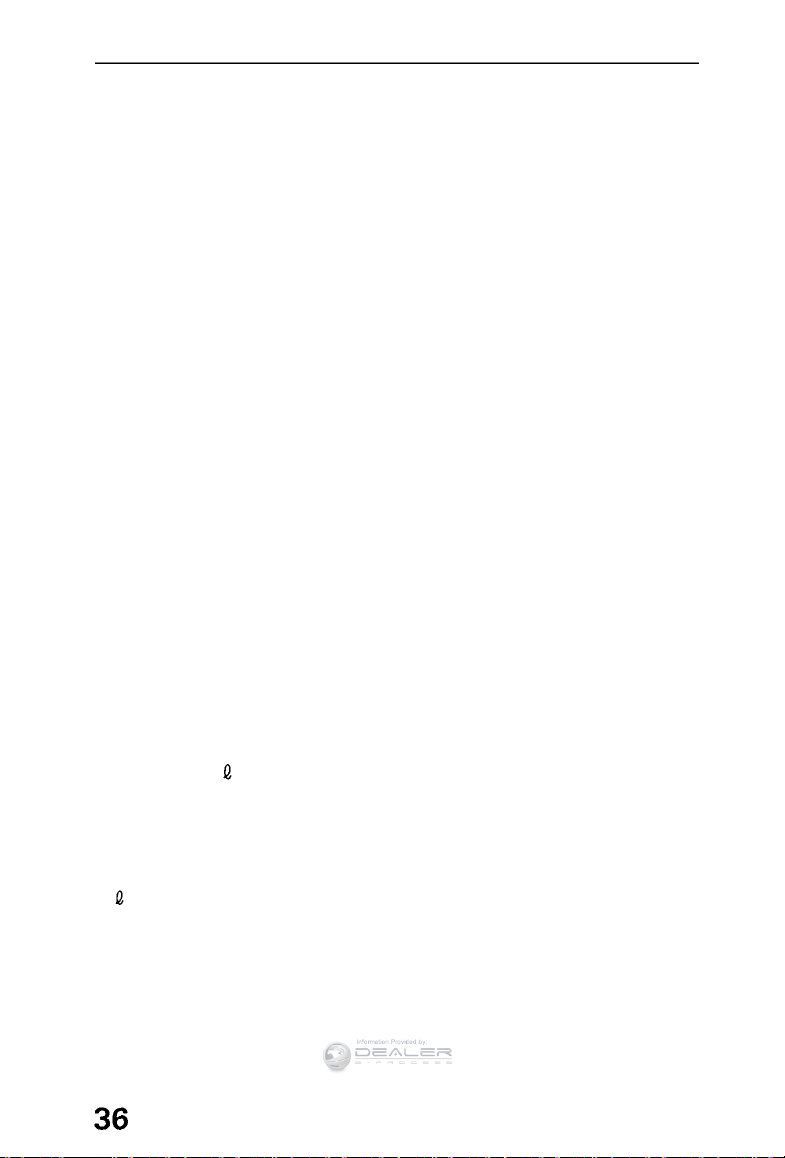
Gauges
Information Provided by:
Speedometer
US Cars:
The speed is indicated in miles per hour (outer scale) and kilometers
per hour (inner scale).
Canada Cars:
The speed is indicated in kilometers per hour (outer scale) and miles
per hour (inner scale).
Odometer
The numbers on the odometer indicate miles (US Cars) or
kilometers (Canadian Cars).
The odometer registers total distance traveled, and serves as your
guide for determining when periodic maintenance is due.
US Cars:
Federal law makes it illegal to alter the odometer of any motor
vehicle with the intent to change the number of miles indicated.
Trip Meter
The numbers on the trip meter indicate miles (US Cars) or
kilometers (Canadian Cars).
The trip meter can be returned to zero by pushing in the reset
button. Use it for checking fuel consumption or distance traveled
per trip.
Tachometer
The tachometer indicates engine speed in revolutions per minute.
The beginning of the RED ZONE indicates the maximum allowable
engine R.P.M. Do not run the engine with the tachometer indicator
needle in the RED ZONE.
Fuel Gauge
FUEL TANK CAPACITY:
Approx. 64.5 (17.04 US gal, 14.19 Imp gal)
As a convenience, the gauge continues to show the same fuel level
as when the ignition was last on. After refueling, the gauge will
slowly change to the new fuel level when the ignition is switched on.
When the needle first indicates E (empty), you have a usable
reserve left in the tank of about:
4 (1.1 US gal, 0.9 Imp gal)
Page 37
Coolant Temperature Gauge
Information Provided by:
Do not remove the radiator cap when the engine is hot. The
coolant is under pressure and may blow out and scald you.
This gauge shows the temperature of the engine coolant. During
normal operation, the needle should stay in the middle of the white
range. Under severe driving conditions, such as hot weather or
driving uphill for a long period, the needle may rise toward the upper
section of the white range.
If the needle reaches the red line at "H" (Hot), pull safely off the
road and stop the engine.
Wait until the engine is cool and check the coolant level in the
reserve tank on the passenger side of the radiator under the hood.
(See pages 122 — 123.)
Page 38
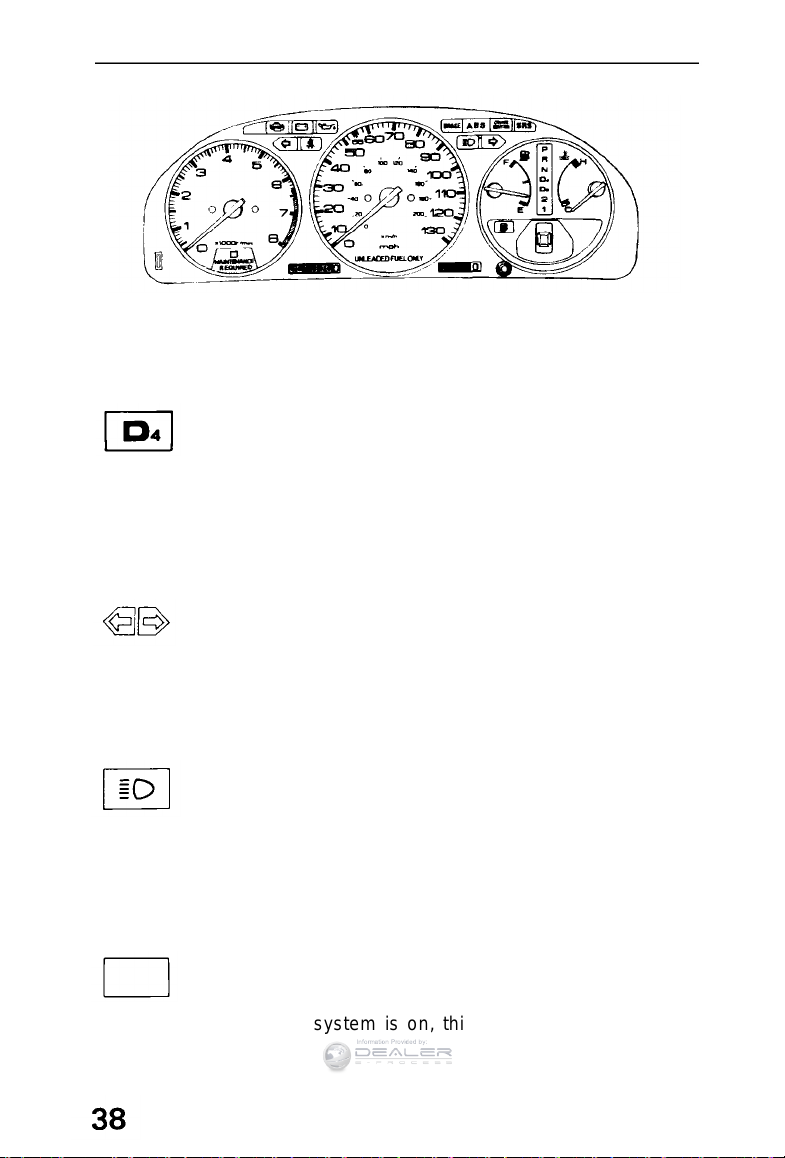
Warning and Indicator Lights
Information Provided by:
US Car
Shown:
Shift Lever Position Indicator (Automatic Transmission only)
A lighted indicator between the fuel and coolant temperature
gauges shows which gear you have selected.
D4 Indicator Light (Automatic Transmission only)
The D4 indicator light in the instrument panel also serves a second
function. If the light flashes while driving (in any gear range) it
indicates a possible malfunction in the transmission; avoid rapid
acceleration and have the transmission checked by an authorized
Honda dealer as soon as possible.
Turn Signal and Hazard Warning Indicators
When the turn signal lever is pushed for left or right turns, the
appropriate green indicator arrow on the instrument panel will blink
along with the signal. Pushing the hazard warning switch will make
all turn signals and both arrows blink (see page 49 ).
High Beam Indicator
This blue indicator light will go on whenever the high beams are
switched on (see page 49 ).
(Canada Cars)
It will also go on with a reduced brightness when the Daytime
Running Lights (DRL) are on (see page 51 ).
CRUISE
CONTROL
Cruise Control Indicator (Except US: DX)
When the cruise control system is on, this indicator light is on (see
pages 52 and 53 ).
Page 39
Seat Belt Reminder Light
Information Provided by:
The seat belt reminder light comes on if the driver's seat belt is not
fastened, when the ignition switch is turned on. It stays on until the
driver fastens his seat belt. (See page 12 )
Charging System Light
The charging system light comes on when there is a problem with
the electrical charging system or when the ignition switch is turned
on with the engine not running. If the light comes on while driving,
get off the road, stop the car and turn off the ignition. Then check
the alternator belt for proper tension.
To check the belt tension, push with about 98 N (22 Ib) of force on
the middle of the belt as shown. The belt should deflect about:
10 — 12 mm (0.4 — 0.5 in)
If the engine has been running, some engine components may
be hot enough to burn you.
Keep hands away from the radiator fan. The fan may start
automatically without warning and run for up to 15 minutes,
even after the engine is turned off.
NOTE:
If necessary, have the charging system checked by an authorized
Honda dealer.
(cont'd)
Page 40
Warning and Indicator Lights (cont'd)
Information Provided by:
US
Malfunction Indicator Lamp
Canada
Check Engine Light
This light comes on for a couple of seconds each time the ignition is
turned on. It will also come on, and remain on, if there is a
malfunction in the emission control system. If the light comes on
while driving, avoid driving at high speed, and have the system
checked by a Honda dealer as soon as possible.
Low Oil Pressure Light
A severe fluctuation in engine oil pressure will cause this light to
flash on and off. You should pull safely off the road and stop the car.
When the engine has cooled down, check the oil level, and add oil if
necessary.
The low oil pressure light will come on, and remain on, if there is
insufficient oil pressure or when the ignition switch is turned on
with the engine not running. If the light should come on while driving,
get the car off the road as soon as you can, turn the engine off and
check the engine oil level (see page 117).
Even if the oil level is correct, the engine should be checked by a
Honda dealer before the car is driven again.
NOTE:
The low oil pressure light will only light as a result of low oil pressure.
It is not directly an oil level indicator.
CAUTION:
Running the engine while the low oil pressure light is on constantly
may cause immediate and severe engine damage.
Page 41
Canada
Information Provided by:
US
BRAKE
Check this light every time you start the car.
With the parking brake set, this light should go on when the ignition
switch is turned to II or III. With the parking brake released, the light
should go on for a few seconds when the ignition switch is turned
to III. If the light goes on at any other time, it means the brake fluid
level in the master cylinder reservoir is too low; add fluid (see page
126) and have your dealer check for leaks immediately.
Low Fuel Indicator
If this indicator glows, it means you should refuel, because the tank
contains less than:
8.0 (2.11 US gal, 1.76 Imp gal)
Parking Brake and Brake System Light
A
B S
The ABS indicator will come on, and remain on, if there is a
malfunction in the ABS or when the ignition switch is turned on
with the engine not running. If the light comes on while driving, stop
the car at a safe place and shut off the engine. If the light does not
go out or lights again while driving, have the system checked by an
authorized Honda dealer as soon as possible.
NOTE:
The light does not indicate a failure of the normal brake system.
The light only indicates a malfunction in the ABS. In such a case,
the ABS is automatically shut down but normal braking capability
continues.
After jump-starting the car, there is a possibility that the ABS
indicator may come on due to insufficient battery voltage. After
the battery is sufficiently recharged and the engine is turned off
and restarted, the ABS indicator should indicate that the ABS is
OK, by coming on for a few seconds each time the engine is
started. If the indicator remains on after recharging, have it
checked by a Honda dealer.
Anti-lock Brake System (ABS) Indicator
(US: EX/SE/Anniversary Edition, Canada: EX-R/SE)
(cont'd)
Page 42
Warning and Indicator Lights (cont'd)
Information Provided by:
S R S
When the key is turned to the II position, the SRS indicator will
come on for about six seconds, to show normal system operation,
and then turn off.
See Supplemental Restraint System section on page 19-23.
D R L
This indicator light comes on when the ignition switch is ON
(position II), the headlight switch OFF, and the parking brake set.
This indicates that the "Daytime Running Lights" are off. The
indicator light goes off when the parking brake is released. If the
parking brake is reapplied without switching the ignition off, the
indicator light will remain off. See page 51.
If the light does not go off when the parking brake is released with
the ignition ON, or if it comes on while driving, it indicates a burntout high-beam bulb.
Have the bulb checked and replaced by your Honda dealer.
Supplemental Restraint System Indicator
"Daytime Running Lights" Indicator
(Canada Cars)
Page 43
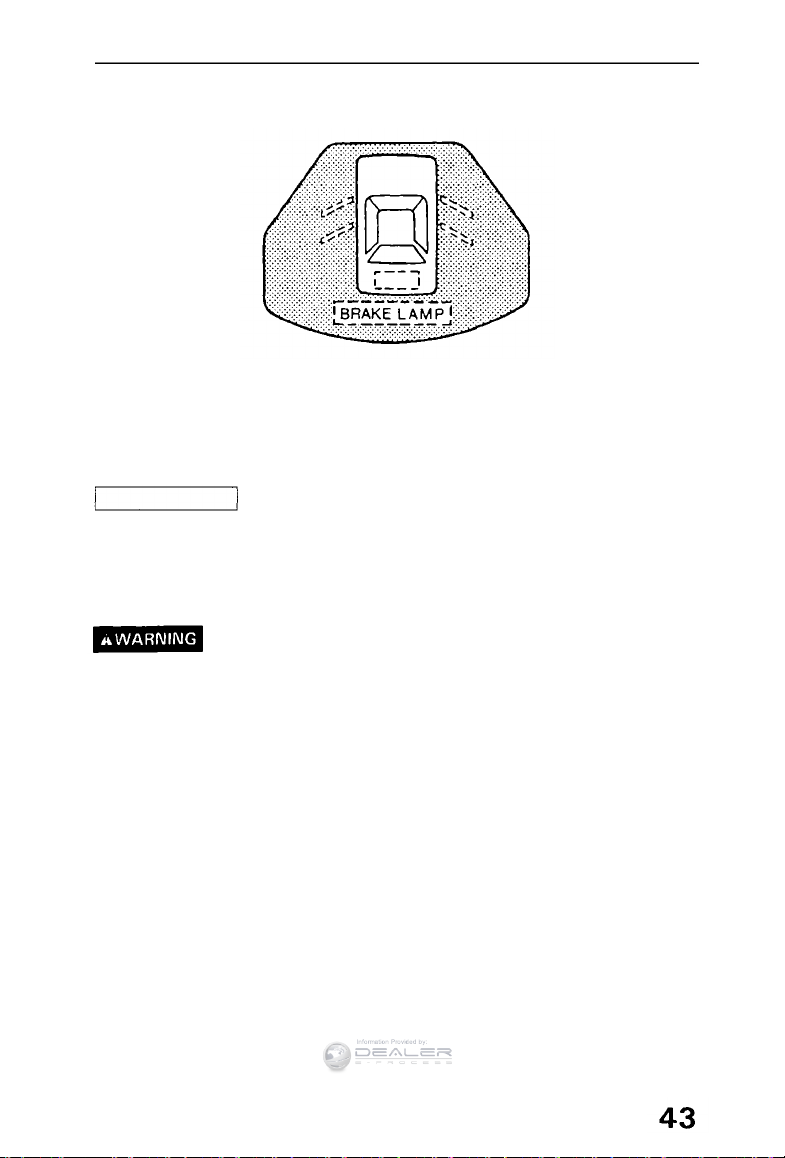
Safety Indicator Lights :
Information Provided by:
Door and Trunk Lid Warning Lights
If a door or the trunk lid is open when the ignition is switched on,
the appropriate indicator will light, and stay lit, until the door or
trunk lid is closed.
BRAKE LAMP
Brake Lamp Warning Light
If a brake light does not work, the BRAKE LAMP indicator will
go on when you push the brake pedal with the ignition on; the
indicator will stay on until you have the lamp repaired or replaced.
Have the brake lights checked as soon as possible.
It is hazardous to drive your car with a problem in either the brake
electrical or hydraulic system; have your dealer check both
systems if you suspect brake trouble.
Checking the Safety Indicator Lights
The door, trunk lid and brake lamp warning lights should come on for
about two seconds when the ignition switch is turned on. If they
don't, have the system checked by a Honda dealer.
Page 44
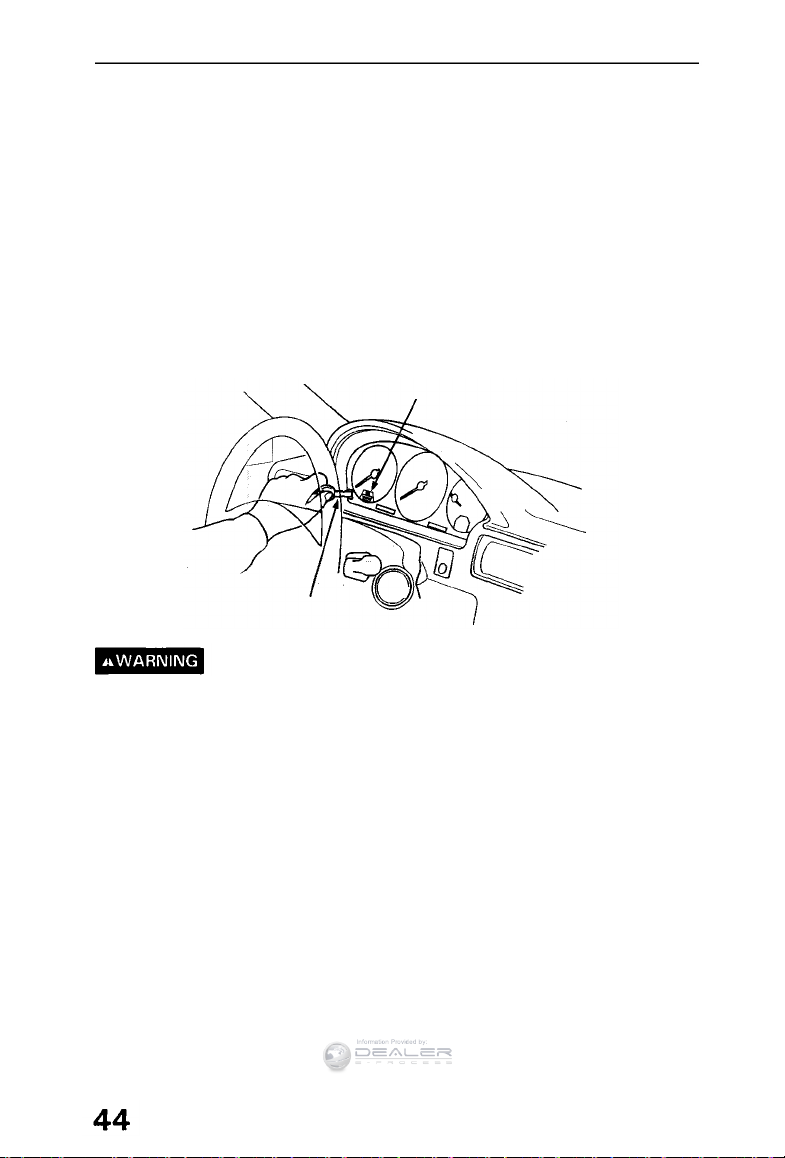
Maintenance Indicator
Information Provided by:
When the total mileage of your car approaches the specified
maintenance interval for engine oil change, oil filter change or other
required service, the indicator will change from green to yellow. The
indicator will change to red if it is not reset before you reach the
mileage interval. The indicator marked MAINTENANCE REQUIRED is
to be used as a reminder that there are items in addition to the
engine oil and filter that require service each 7,500 miles (12,000
km). See the maintenance schedule on page 112. After the
maintenance is done, be sure to reset the switch below the
tachometer by inserting the ignition key in the slot. The color of the
indicator will change to green and repeat its cycle.
INDICATOR
KEY
Do not reset the maintenance indicator while driving; your hand
may impair steering which can result in an accident.
Page 45
Tilt Steering
Information Provided by:
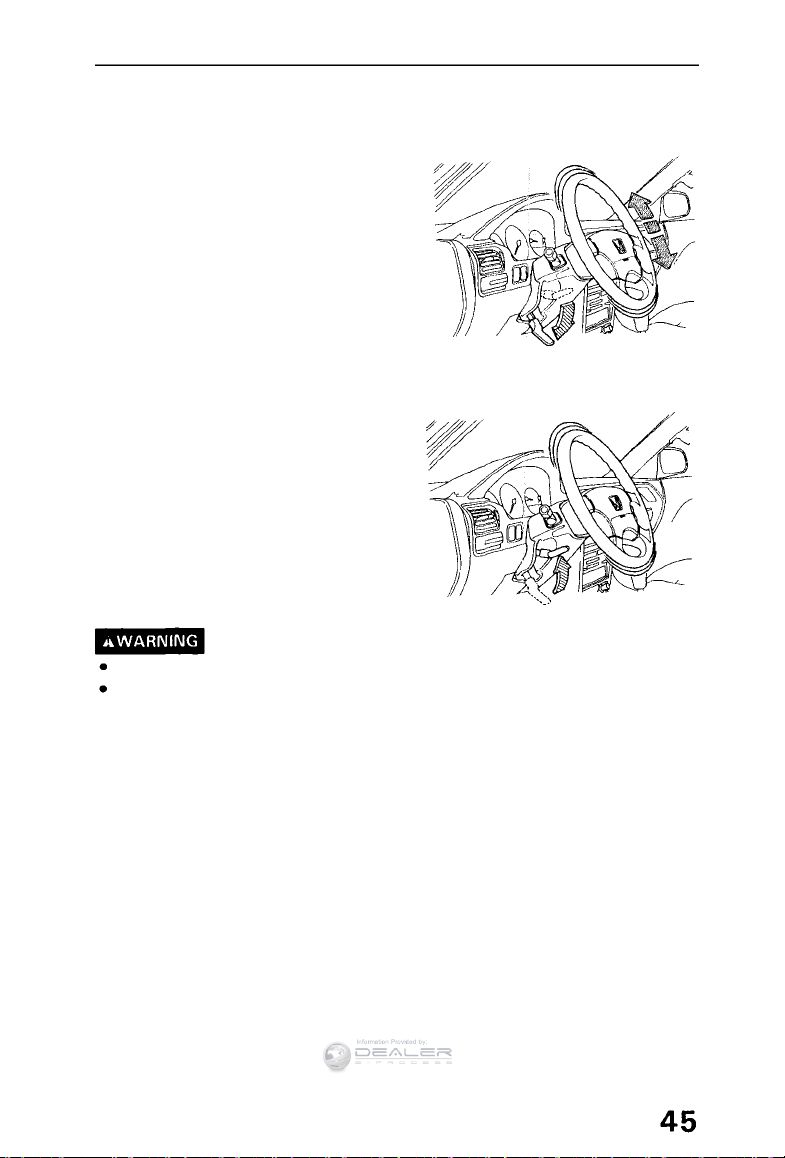
The steering wheel position can be adjusted to suit the driver
preference.
1. Push the lever located under the
dash, on the left side of the
steering column, all the way down
and hold it while adjusting the
steering wheel to the desired
position.
Push down
2. Hold the steering wheel in the
desired position and pull the lever
all the way up to lock it in place.
Pull up
Do not adjust the steering wheel position while driving.
After adjusting the steering wheel position, make sure it is
securely locked in place by "rocking" it up and down slightly.
Page 46
Windshield Wipers/Washer/Defogger
Information Provided by:
Windshield Wipers
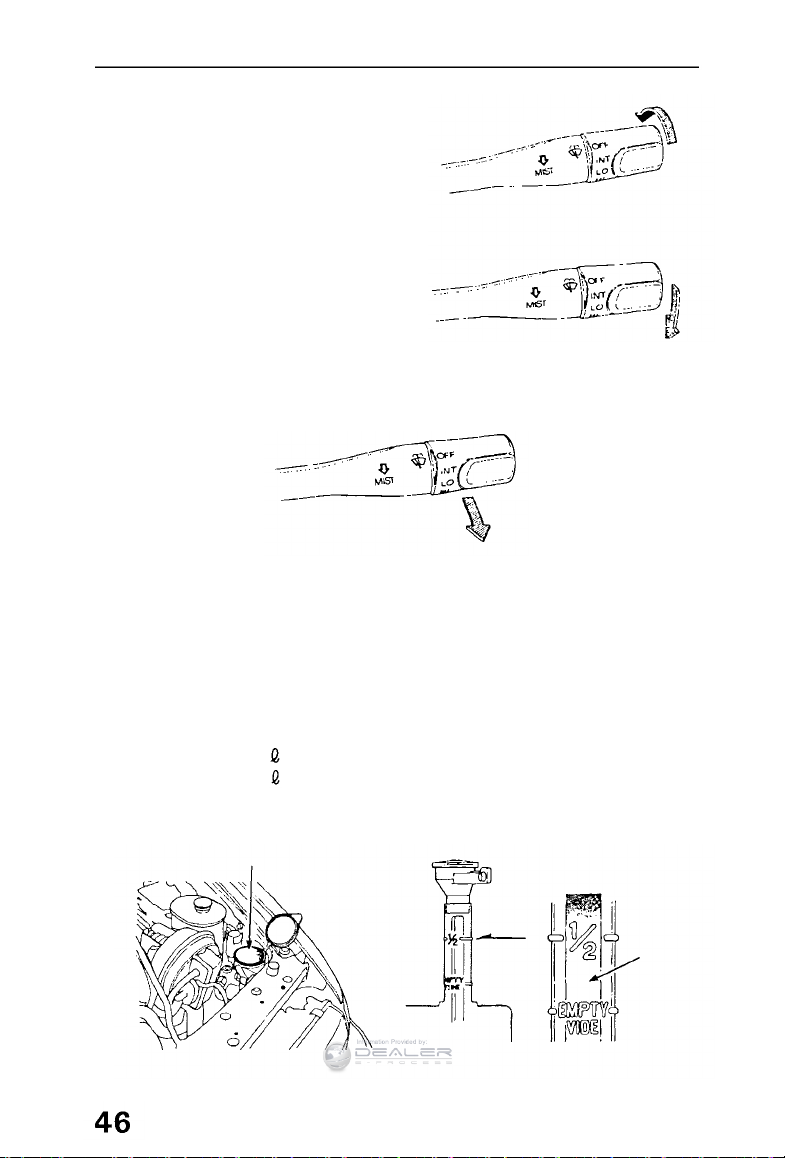
Switch the wipers to INT for inter-
mittent operation, LO for low speed
operation, and HI for high speed
operation.
In fog or very light rain, push the
lever down to the MIST position for
temporary high speed operation of
the wipers. The wipers will return
to the rest position and the motor
will shut off as soon as you release
the lever.
Washer
Pull the wiper switch lever toward you to turn on the washer.
Pull
(Except US: DX)
The windshield wipers will sweep when the washer is operated.
Check the washer fluid regularly, especially during bad weather, or
whenever the washer has been in frequent use. The float in the
neck of the reservoir indicates the fluid level.
Push down
WINDSHIELD WASHER
RESERVOIR CAPACITY:
US Cars: 2.5 (2.6 US qt, 2.2 Imp qt)
Canada Cars: 4.5 (4.8 US qt, 4.0 Imp qt)
Use a good quality commercial washer fluid for all-weather cleaning.
WASHER FLUID RESERVOIR
FLOAT
Page 47
CAUTION:
Information Provided by:
Do not use radiator antifreeze in the windshield washer; it will
damage the paint.
Do not use a vinegar/water combination in the windshield
washer; it will damage the pump.
Prolonged operation of the washer without fluid may damage
the pump.
In freezing weather, warm the windshield with the defrosters
before using the washer. This will help prevent icing which could
seriously impair visibility.
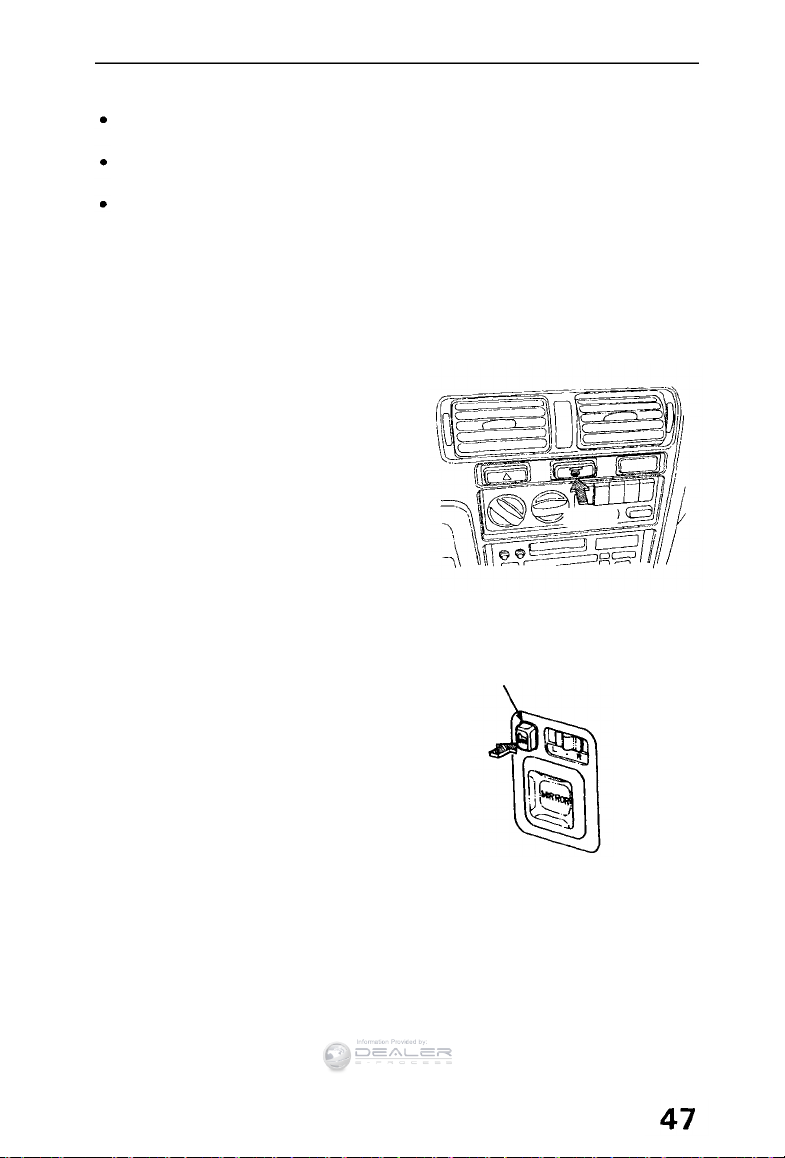
Rear Window Defogger
Push the switch to turn the defogger on or off. The indicator will
light when the defogger is on.
The defogger will turn off automatically 25 minutes after it is turned on.
CAUTION:
When cleaning the inside of the
Push
rear window, be careful not to
damage the printed heater wires
on the rear window. Wipe the
window horizontally along the
wires, not up and down.
Door Mirror Defoggers
DOOR MIRROR
DEFOGGER SWITCH
(Canada: SE)
Push the switch to defog or defrost
the door mirrors. The indicator light
will come on and remain lit until it is
pushed again to turn them off.
Page 48
Mirrors
Information Provided by:
Rearview Mirrors
Keep the inside and outside mirrors clean and adjusted for best
visibility.
Be sure to adjust mirror angles before you start driving.
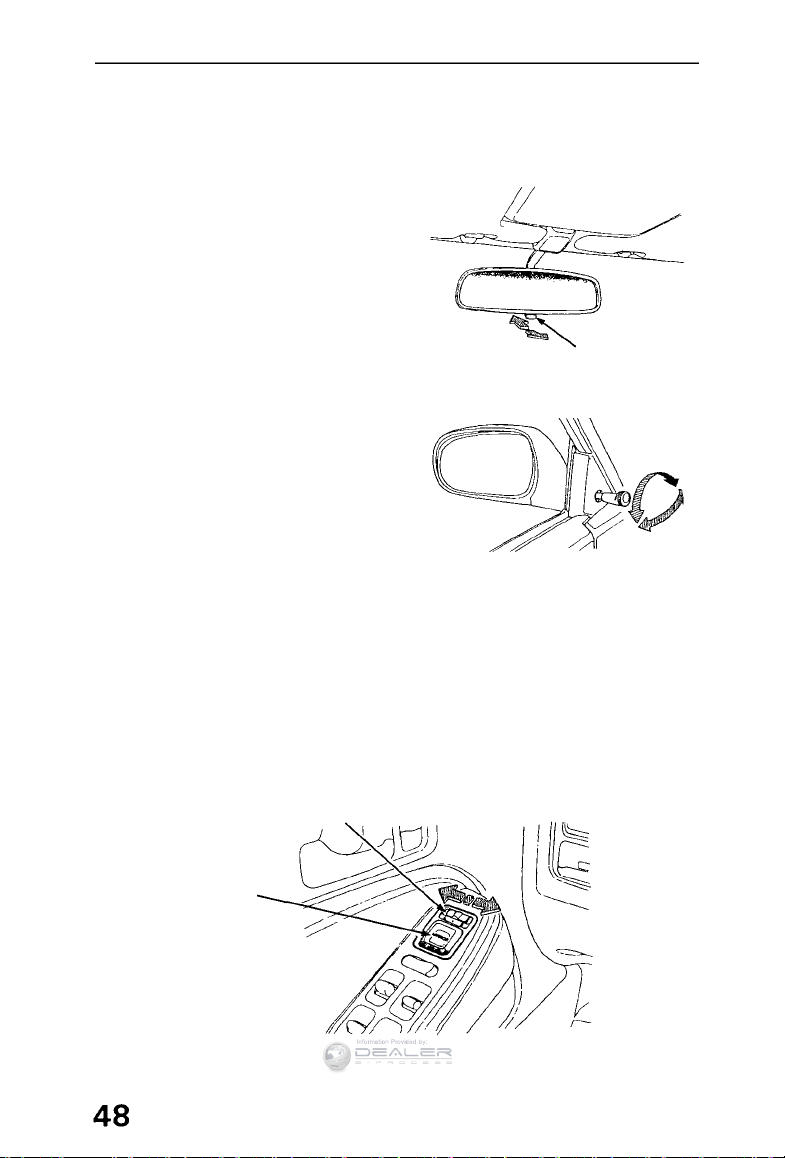
The inside mirror has day and night
positions. The night position reduces glare from the headlights of
vehicles behind you. Flip the small
tab on the bottom of the mirror
forward or backward to select day
or night position.
DAY/NIGHT
ADJUSTMENT
TAB
Manual Mirrors
(US: DX, Canada: LX)
The outside mirrors can be adjusted
by moving the knob located on each
door (driver's side only for US cars).
Power Mirrors
(US: LX/EX/SE/Anniversary Edition, Canada: EX/EX R/SE)
With the ignition switch in the "II" position, move the main switch
to L (for driver's side) or R (for passenger's side), then use the
adjustment switch to adjust the outside mirrors to the correct angle.
After the mirrors have been adjusted, return the main switch to the
center (off) position.
NOTE:
Be sure to adjust mirror angles before you start driving.
MAIN SWITCH
ADJUSTMEM
SWITCH
Page 49
Lights
Information Provided by:
Turn Signals
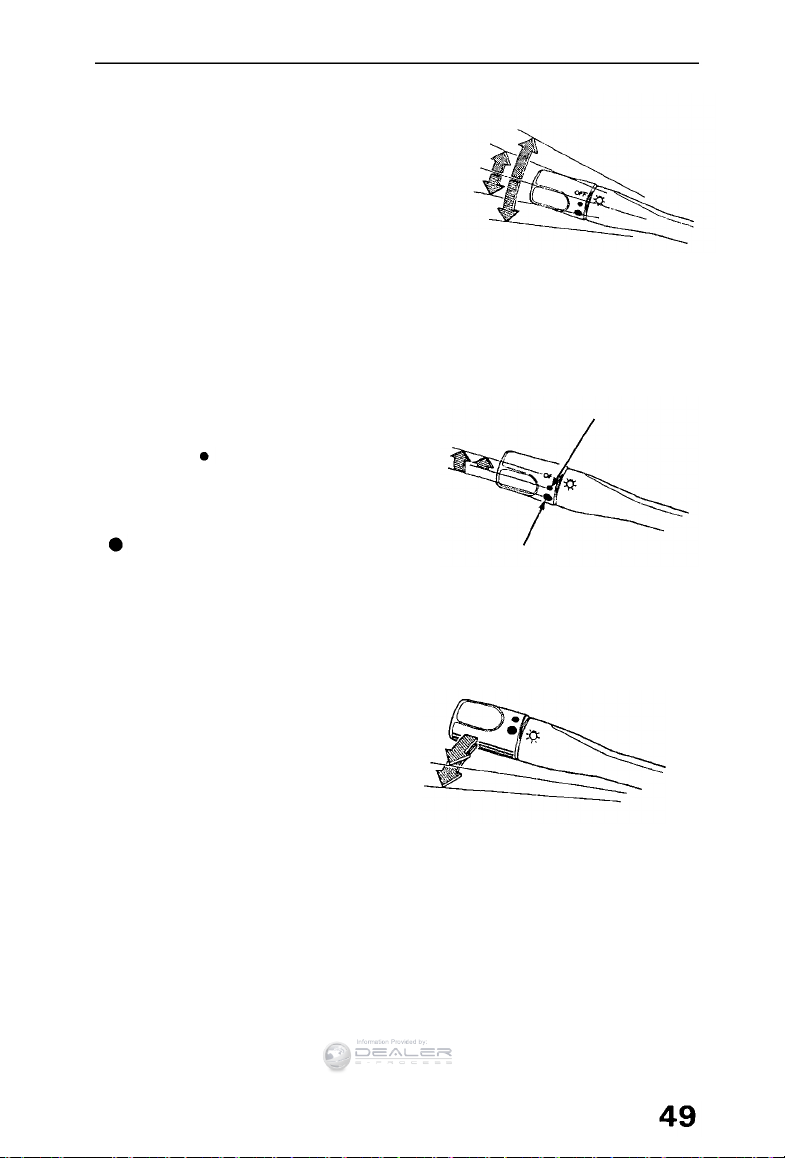
Push the turn signal lever down to
RIGHT TURN
signal a left turn, and up for a right
turn. The indicator and appropriate
signal lights will blink. The lever will
FIRST
STOP
return automatically to its original
position when the steering wheel is
returned to straight ahead.
LEFT TURN
For lane changing, you can signal by
pushing the lever part way up or down (to the first stop) and holding
it there; the lever will return to its original position when you release
it. If either turn signal indicator lights up but does not blink, blinks
faster than usual or does not light up at all, check for a burned out
bulb or fuse.
Headlights
Turn the light switch to the first
Turn
FIRST POSITION
position ( ) for taillights, side
marker lights, position lights, license
plate lights, and instrument panel
lights. Turn to the second position
( ) to add the headlights.
SECOND POSITION
If the driver's door is opened when the light switch is turned to
either "on" position, a chime will sound to remind you to turn off
your lights.
High Beam/Low Beam Switch
The headlights may be switched
between low beam and high beam
by pulling the turn signal lever
toward you. The blue high beam
indicator light will be on when the
high beam is on.
Pull and release
Headlight Flasher
To flash the headlights, pull lightly on the turn signal lever and
release.
(cont'd)
Page 50
Lights (cont'd)
Information Provided by:
Hazard Warning System
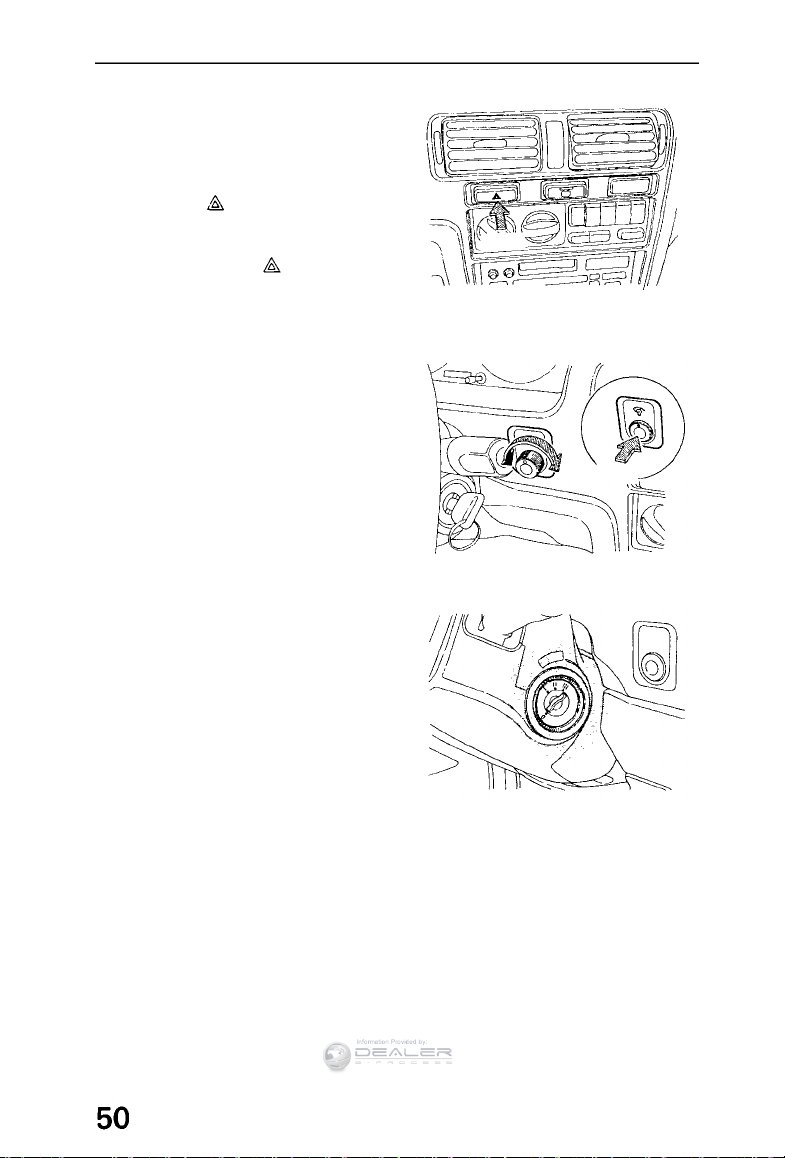
This system should be used only
when your car is stopped under
emergency or hazardous conditions.
To activate, push the hazard warning switch ( ). The front and rear
turn signals will blink simultaneously
and both indicator lights will flash.
Push the switch ( ) again to turn
the system off.
Panel Brightness Control
When the light switch is in either of
the two "on" positions, the intensity of the instrument lights can be
adjusted. Push the panel brightness
control knob so it pops out, then
turn the knob to adjust the
brightness.
Ignition Switch Light
(US: LX/EX/SE/Anniversary Edition,
Canada: EX/EX-R/SE)
This light will illuminate the switch
for several seconds after the driver's
door is closed.
Push
Push
Page 51
Interior Light
Information Provided by:
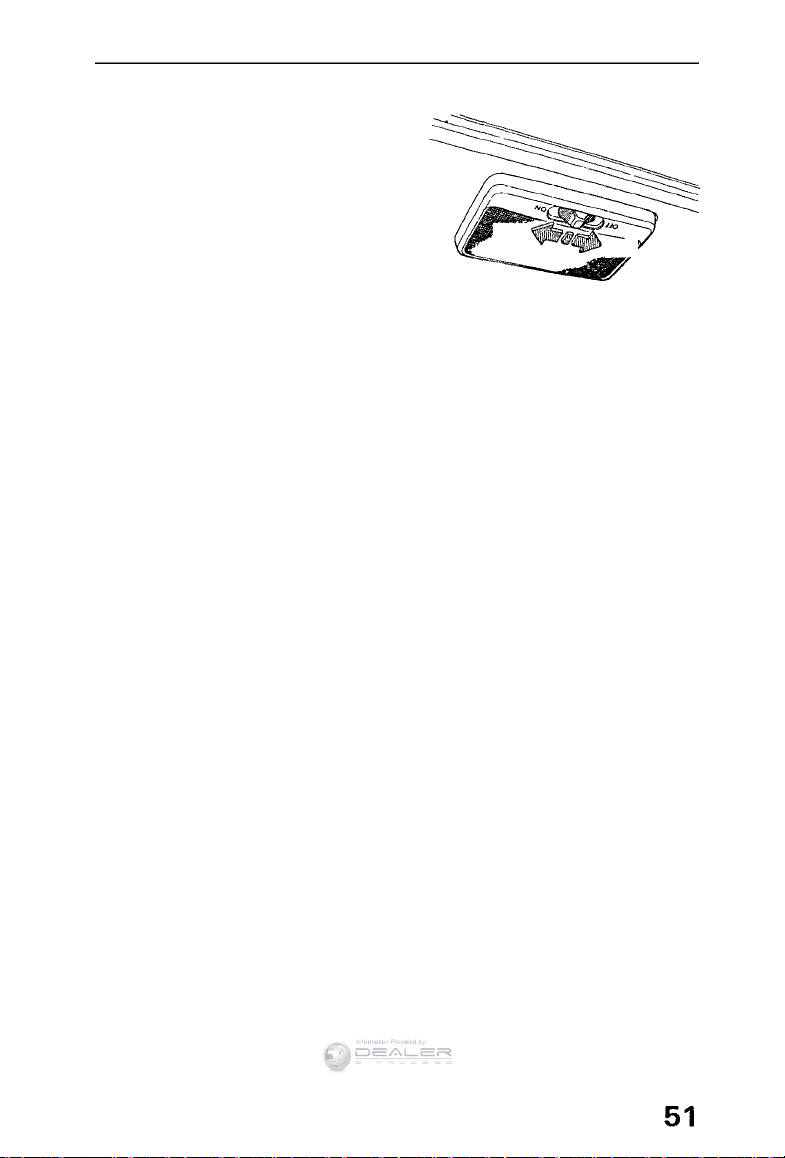
The interior light has a three position switch. The light is off all the
time in the OFF position. In the mid-
dle position, it goes on only when a
door is opened. In the ON position, it
is on all the time.
ON
OFF
Daytime Running Lights (Canada Cars)
With the ignition ON (position II) and the headlight switch OFF, the
high beam headlights will come on at one-half power when the
parking brake is released. This type of lighting is called "Daytime
Running Lights" or DRL. The DRL turns off when you turn the
ignition switch off.
If the parking brake is reapplied without switching the ignition off,
the "Daytime Running Lights" will remain on.
Page 52
Cruise Control (Except US: DX)
Information Provided by:
Cruise Control
Cruise control allows you maintain a set speed above 25 mph (40
km/h) without keeping your foot on the accelerator pedal. It is not
recommended for conditions such as city driving, winding roads,
slippery roads, heavy rain, or bad weather. You should have full
control of the car under those conditions.
Improper use of the cruise control can lead to a crash.
Use the cruise control only when traveling on open highways in
good weather.
CAUTION:
The cruise control, as it operates, moves the accelerator pedal.
You can damage your car's accelerator mechanism by resting your
foot under the pedal and blocking the movement.
To Set the Cruise Control:
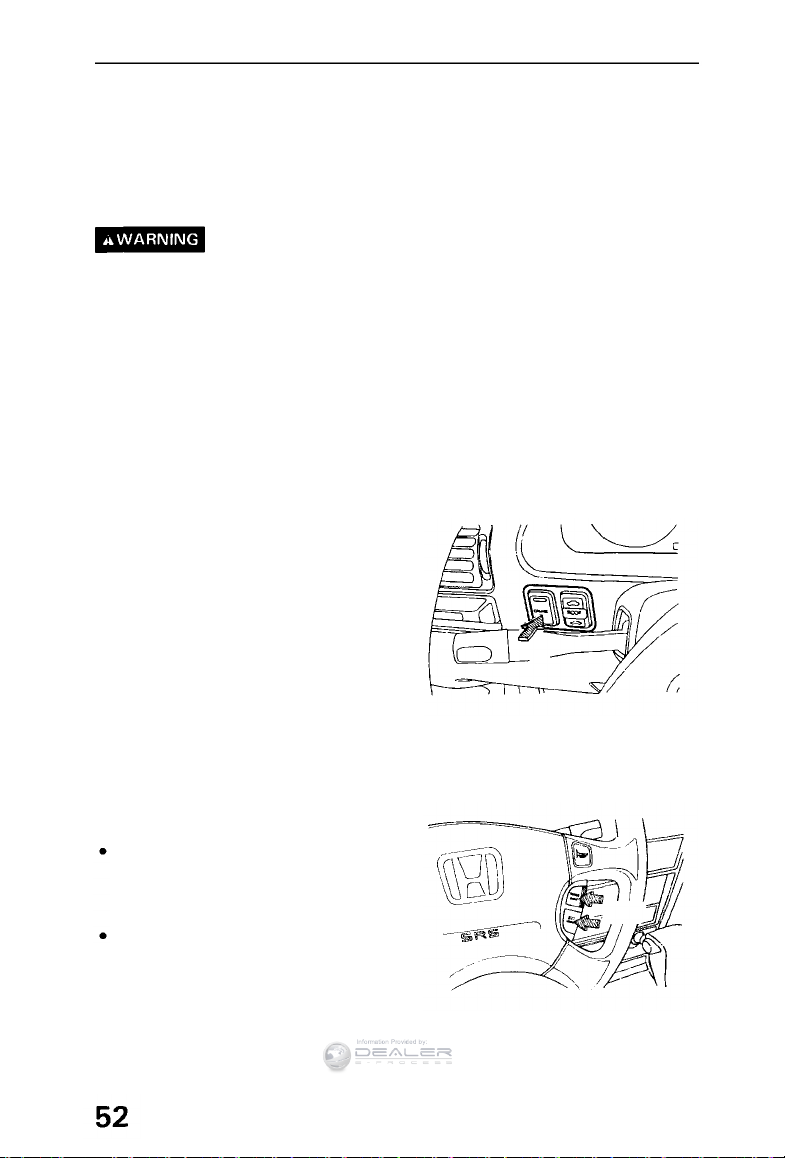
Push in the Cruise Control master
switch to the left of the steering
column. The indicator in the switch
will light.
Accelerate to the desired cruising
speed above 25 mph (40 km/h).
Press and hold the SET/decel button
on the steering wheel until the
CRUISE CONTROL light on the
instrument panel comes on.
This shows the system is now
activated.
The set speed may vary slightly,
particularly on hills.
Push
Changing the Set Speed
To increase the set cruising speed:
Press and hold the RESUME/accel
button. The car will accelerate
slowly. Release the button when
the desired speed is reached.
Push on the accelerator pedal.
Accelerate to the desired cruising
speed and press the SET/decel
button.
Push
Page 53

To decrease the set cruising speed:
Information Provided by:
Press and hold the SET/decel button. The car will decelerate.
Release the button when the desired speed is reached.
Tap the brake or clutch pedal lightly with your foot. The CRUISE
CONTROL light on the instrument panel will go out. When the car
slows to the desired speed, press the SET/decel button. The car
will then maintain the desired speed.
Even with the cruise control turned on, you can still use the
accelerator pedal to speed up for passing. After completing the pass,
take your foot off the accelerator pedal. The car will return to the
set cruising speed.
Resting you foot on the brake or clutch pedal will cause the cruise
control to cancel.
To Cancel the Cruise Control:
Any of these actions cause the cruise control to cancel.
Tap the brake or clutch pedal.
Press the SET/decel and RESUME/accel buttons at the same time.
Press the Cruise Control Master Switch.
When you tap the brake or clutch pedal, or press the SET and
RESUME buttons at the same time, the CRUISE CONTROL light on
the instrument panel will go out and the car will begin to slow down.
You can use the accelerator pedal in the normal way.
If you use the brake or clutch pedal to cancel cruise control, the
system retains the previously-set cruising speed. To return to that
speed, accelerate to above 25 mph (40 km/h) and press the
RESUME/accel button until the CRUISE CONTROL light comes on.
The car will accelerate to the same cruising speed as before.
If you cancel the CRUISE CONTROL by pressing the SET and
RESUME buttons at the same time, the previously-set cruising
speed is erased. To use the cruise control, accelerate to the desired
cruising speed and press the SET/decel button.
Pressing the Cruise Control Master Switch turns the system
completely off and erases the previous cruising speed from memory.
To use the system again, see page 52.
Page 54
Hood and Parking Brake
Information Provided by:
Hood
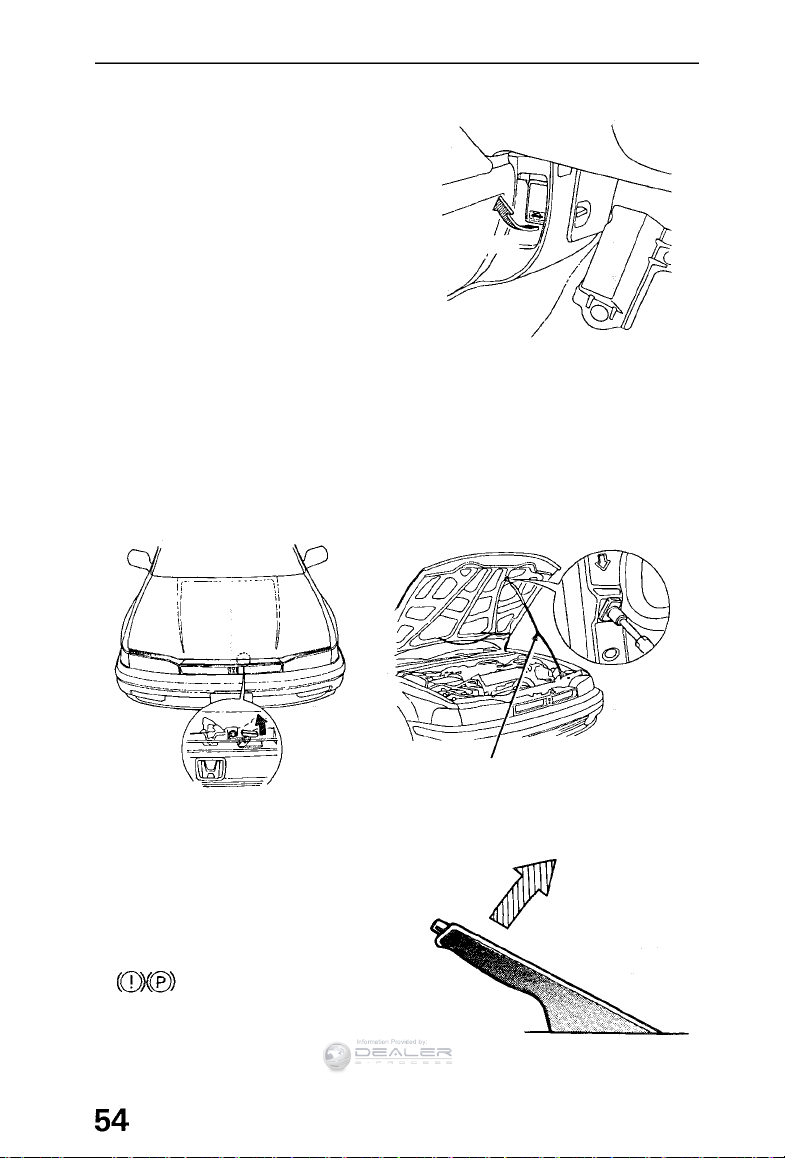
To open the hood, pull back on the
handle located under the dash on
the driver's side.
Pull to release
The hood latch is spring-loaded, so the hood will pop up slightly.
Release the safety catch under the front center of the hood by
pushing the rubber-tipped handle up.
Lift the hood and prop it open with the support rod.
To close, take the support rod down, place it back in its holder,
lower the hood until it is approximately one foot from the closed
position, then let it drop. Be sure the hood is securely latched before
driving away.
Parking Brake
To apply the parking brake, pull
up on the lever. To release it, pull
up slightly, push the button, and
lower the lever; when fully
released, the BRAKE (US cars), or
(Canadian cars)
indicator will go out.
SUPPORT
ROD
Pull up
Page 55
Power Windows
Information Provided by:
(US: LX/EX/SE/Anniversary Edition,
Canada: EX/EX-R/SE)
The power windows can be oper-
ated only when the ignition switch
is in the "II" position.
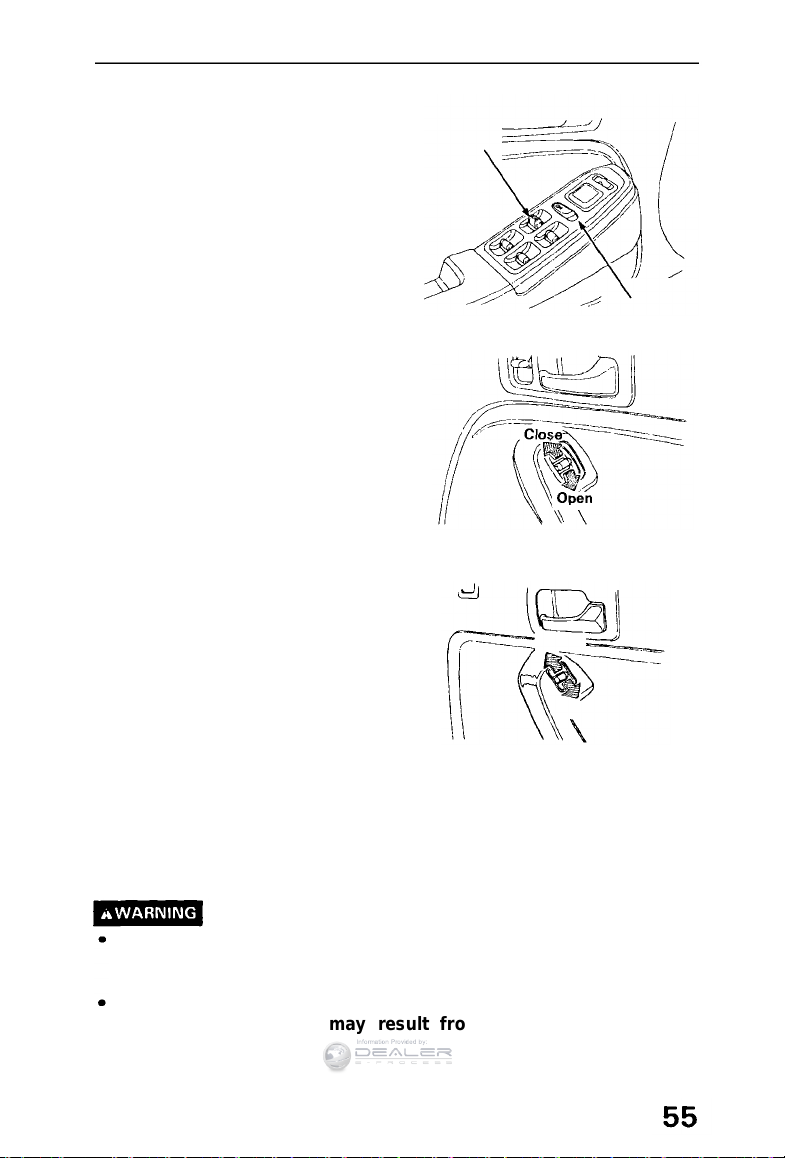
The operation of the windows is
controlled by the main switch
located in the master control panel
on the armrest of the driver's door.
When the main switch is off, only
the driver's door window can be
opened and closed.
When the main switch is on, all door
windows can be opened and closed
by the driver, using the appropriate
switch in the master control panel,
and the passenger windows can be
opened and closed by the passengers, using the switch located on
each passenger door.
When opening or closing a window,
push and hold either the "up" or
"down" side of the switch until the
window reaches the desired position, then release.
NOTE:
The driver's window can be opened
fully, without the driver having to
hold the switch down, simply by
pushing the switch past the first
"stop."
DRIVER'S
WINDOW
SWITCH
MAIN
SWITCH
FRONT PASSENGER'S WINDOW
Close
Open
REAR PASSENGER'S WINDOW
Power Window Key-off Operation
The power windows can still be operated for about 10 minutes
after the ignition is turned from the "II" to the "I" or "0" position as
long as neither front door has been opened.
Be sure, before closing any window, that all hands, arms and
other obstructions are clear of the window frame and glass;
severe personal injury could result.
Always keep the main switch in the off position when children
are in the car; injury may result from unintentional window
operation.
Page 56
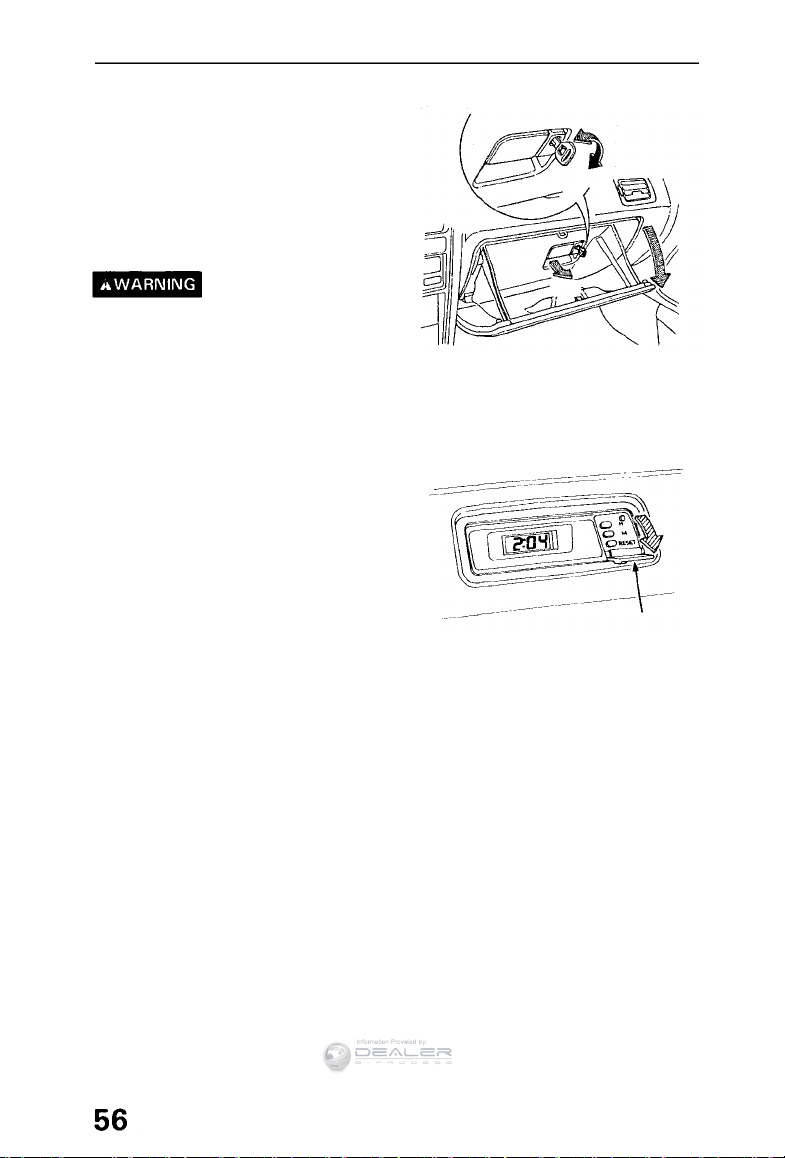
Glove Box and Clock
Information Provided by:
Glove Box
Open by pulling the handle. Close
Open
with a firm push. The glove box
door can be locked by using the
master key.
Lock
The glove box light will go on when
the glove box door is opened and
the headlights are on.
Pull
Do not drive the car with the glove
box door open; it could cause injury
in an accident.
Digital Clock
The time is displayed continuously when the ignition is switched to
II or III. At all other times, push in on the lid to display the time.
To adjust the time:
1. Lower the lid.
2. To set the minutes, push and hold
the M button until the numbers
advance to the desired minute or
minutes.
3. To set the hour, push and hold
the H button until the hour
LID
advances to the desired hour.
4. The RESET button allows you to synchronize your clock to the
closest hour. If the time on the clock is before the half hour,
pressing the RESET button will return the time to the previous
hour. If the time is beyond the half hour, the RESET button will
change the time to the next hour.
NOTE:
Be careful not to push the H, M or RESET buttons accidentally.
Pushing any of them will change the clock's time setting.
Page 57
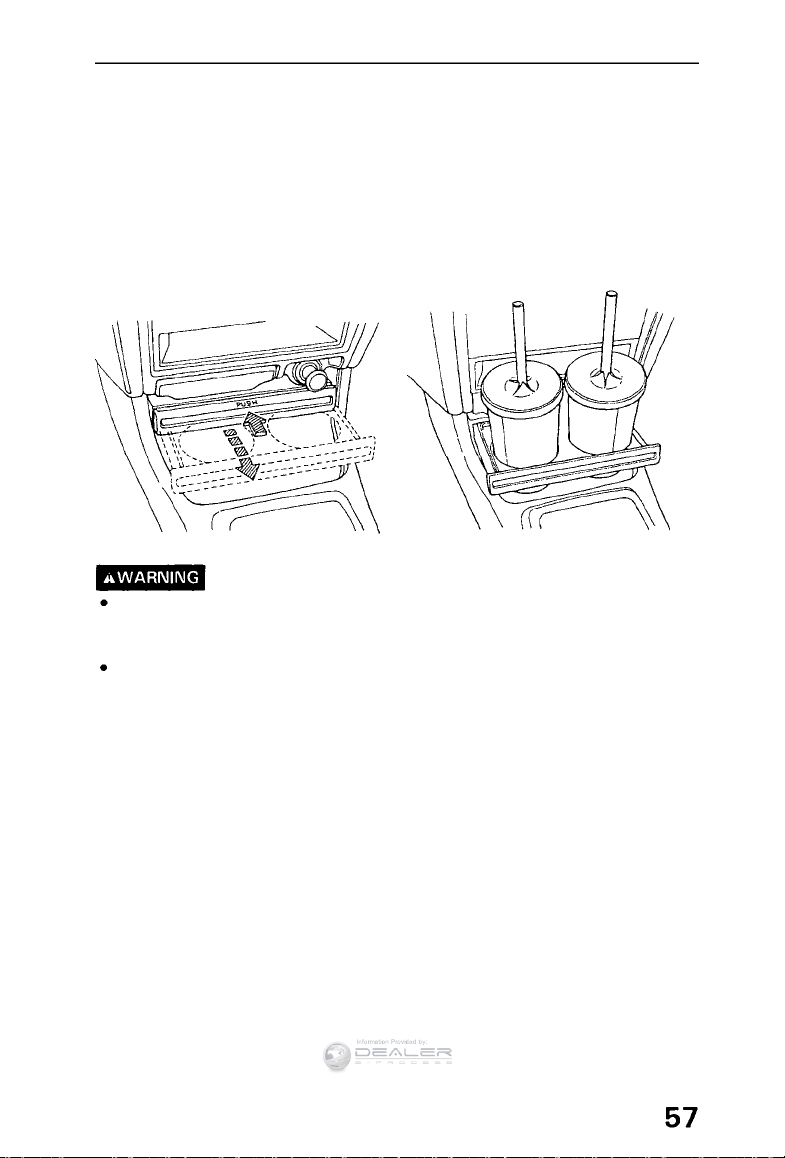
Beverage Holder
Information Provided by:
(US: LX/EX/SE/Anniversary Edition, Canada: EX/EX-R/SE)
Your car is equipped with a beverage holder for use while the car is
stopped. Drinking while driving or driving with a beverage in the
holder may be hazardous.
Open the holder by pushing it.
NOTE:
Use only lidded cups or containers that fit snugly in the beverage
holder.
Spilling even a small amount while driving, especially if the liquid
is hot, may distract the driver's attention from the road and
could result in a serious collision.
Alcohol and driving don't mix. For your safety, and the safety of
others, please do not drink and drive.
Page 58
Cigarette Lighter and Ashtrays
Information Provided by:
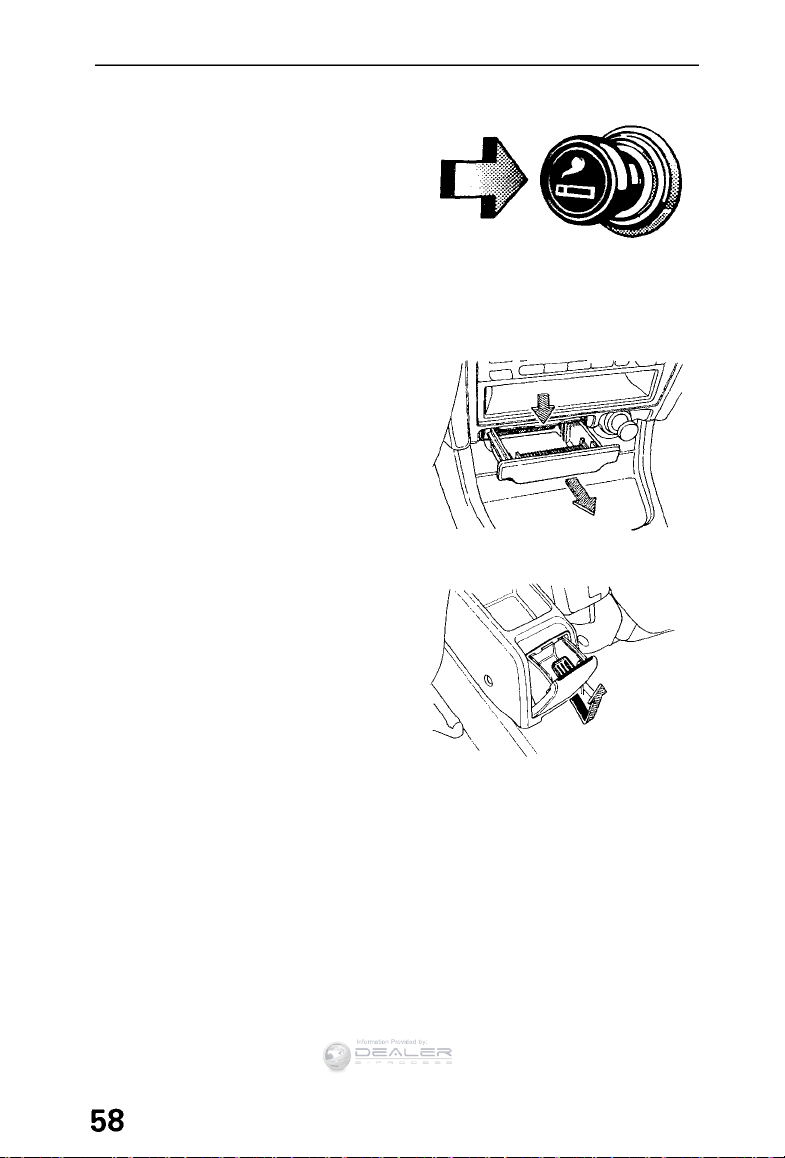
Cigarette Lighter
Push in the lighter to heat up. It will
automatically release when the
element is hot. DO NOT hold it in
while it is heating up, it may
overheat and damage the lighter and
the heating element.
NOTE:
The cigarette lighter will operate
with the key in the "I" or "II"
position.
Front Ashtray
Open the ashtray by pulling its bottom edge toward you.
To remove it, pull it out further
while pushing down on the spring-
loaded plate inside.
Rear Ashtray
The rear ashtray is located at the
rear of the center console. It is
opened by pulling out the top edge.
To remove it, open the ashtray and
release its bottom edge by pulling up,
then out. To install, reverse the
removal procedure.
Push
To remove, pull up and out.
CAUTION:
Do not use the ashtrays as trash containers; use them only for
extinguished cigarettes. Putting lit cigarettes or matches in an
ashtray with other combustible materials may cause a fire.
Page 59
Heating and Cooling
Information Provided by:
The vents, heater and air conditioning are combined in one system;
adjusting four basic controls to different settings can provide a full
range of interior temperatures for safe and comfortable driving.
(Air conditioning is optional on US: DX, Canada: LX.)
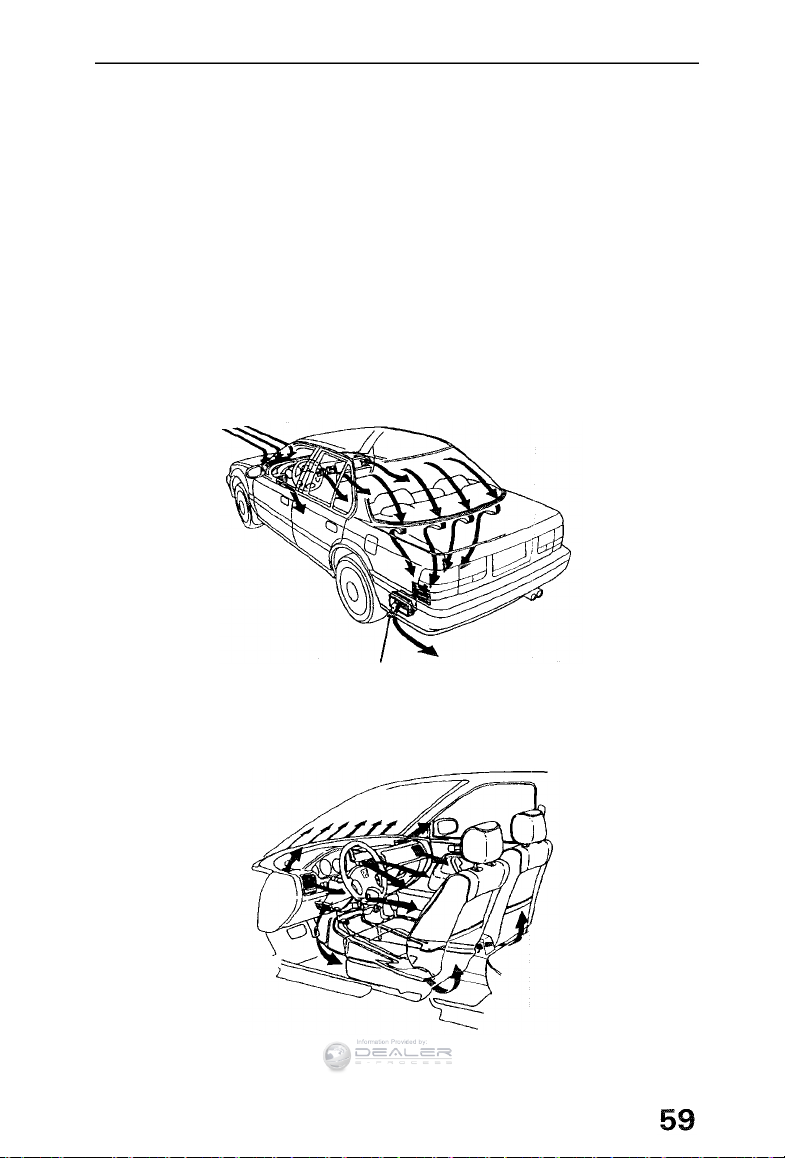
Ventilation
The flow-through ventilation system can provide fresh air to the
interior when the car is moving or stopped, even with the windows
closed.
NOTE:
For proper air flow, the flow-through vents must not be covered.
Keep the air inlet at the base of the windshield free of leaves or
other debris.
AIR INLET
AIR OUTLET
You can adjust the controls to direct cool or warm outside air
throughout the car for defogging windows, heating, or cooling by
turning on the fan.
(cont'd)
Page 60
Heating and Cooling (cont'd)
Information Provided by:
Dash Vents
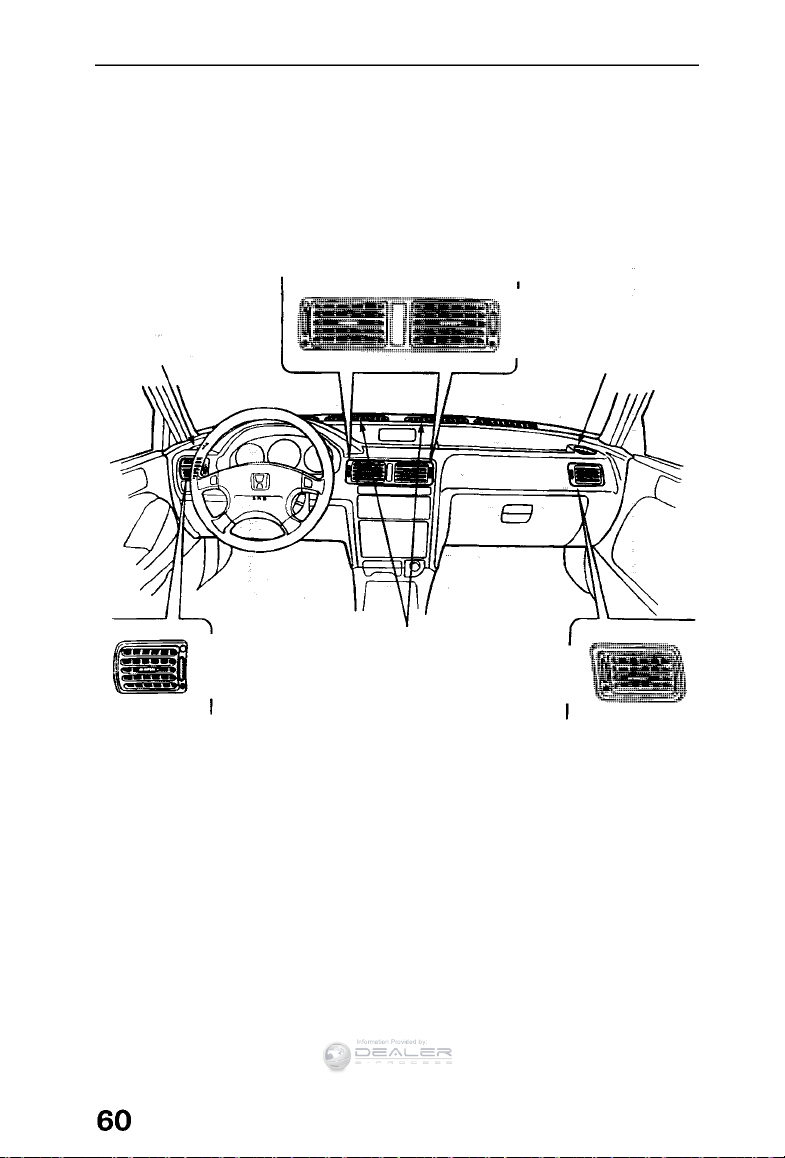
The corner vents can be used for flow-through ventilation, or during
the heating and air conditioning operation.
The corner and center vents can be tilted up or down, and their
louvers turned right or left, to change the direction of air flow.
The amount of air flow from the corner and center vents can be
regulated by the control located beside each vent.
CENTER VENTS
Open
SIDE
DEFROSTER
VENT
HALF
Close
SIDE
DEFROSTER
VENT
DASH
CORNER
VENT
Open
HALF
Close
WINDSHIELD
DEFROSTER
VENT
Open
HALF
Close
DASH
CORNER
VENT
Page 61
What the Controls Do
Information Provided by:
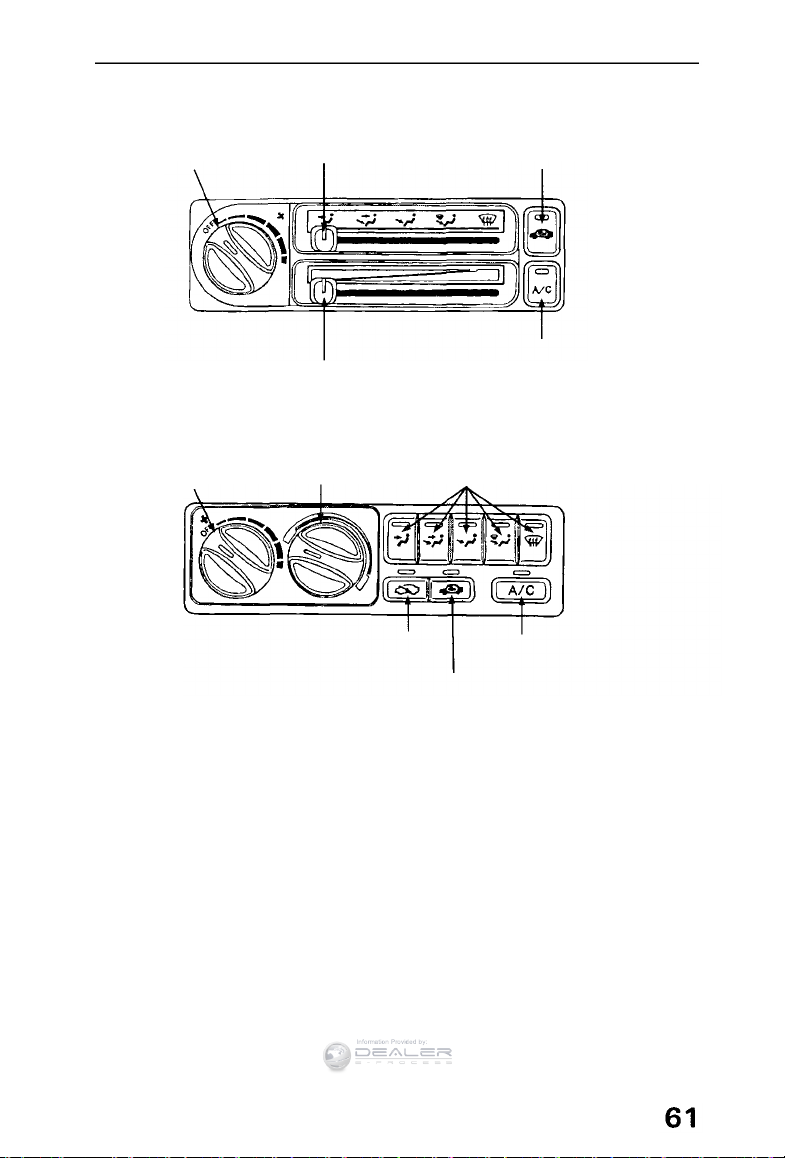
(US: DX, Canada: LX)
FAN SWITCH
FUNCTION LEVER
TEMPERATURE LEVER
RECIRCULATION/FRESH AIR
BUTTON AND INDICATOR LIGHT
AIR CONDITIONING SWITCH
AND INDICATOR LIGHT
(optional)
(US: LX/EX/SE/Anniversary Edition, Canada: EX/EX-R/SE)
FAN SWITCH
TEMPERATURE
CONTROL DIAL
FRESH AIR BUTTON
FUNCTION BUTTONS AND
INDICATOR LIGHTS
AIR CONDITIONING SWITCH
RECIRCULATION BUTTON
Fan Switch
Turning the switch clockwise will increase the fan speed, and the
fan will circulate warm, cool, or outside air, depending on where the
temperature lever/control dial and function lever/buttons are set.
Whenever the fan is switched on, air flows from the dash corner
vents regardless of function lever/button position.
Function Lever/Buttons
Slide the lever (US: DX, Canada: LX) or push the appropriate button
(US: LX/EX/SE/Anniversary Edition, Canada: EX/EX-R/SE) to direct
air to and from the heater, defroster and vents.
There is an indicator light in each function button that comes on
when the button is pushed.
(cont'd)
Page 62
Heating and Cooling (cont'd)
Information Provided by:
Temperature Lever/Control Dial
Slide the lever from left to right or turn the dial clockwise to make
air warmer when the appropriate function is selected.
Air Conditioning Switch (opitonal on US: DX, Canada: LX)
With the fan on, push the A/C switch to operate the air conditioning.
The indicator light will come on.
Push the switch again to turn the air conditioning off.
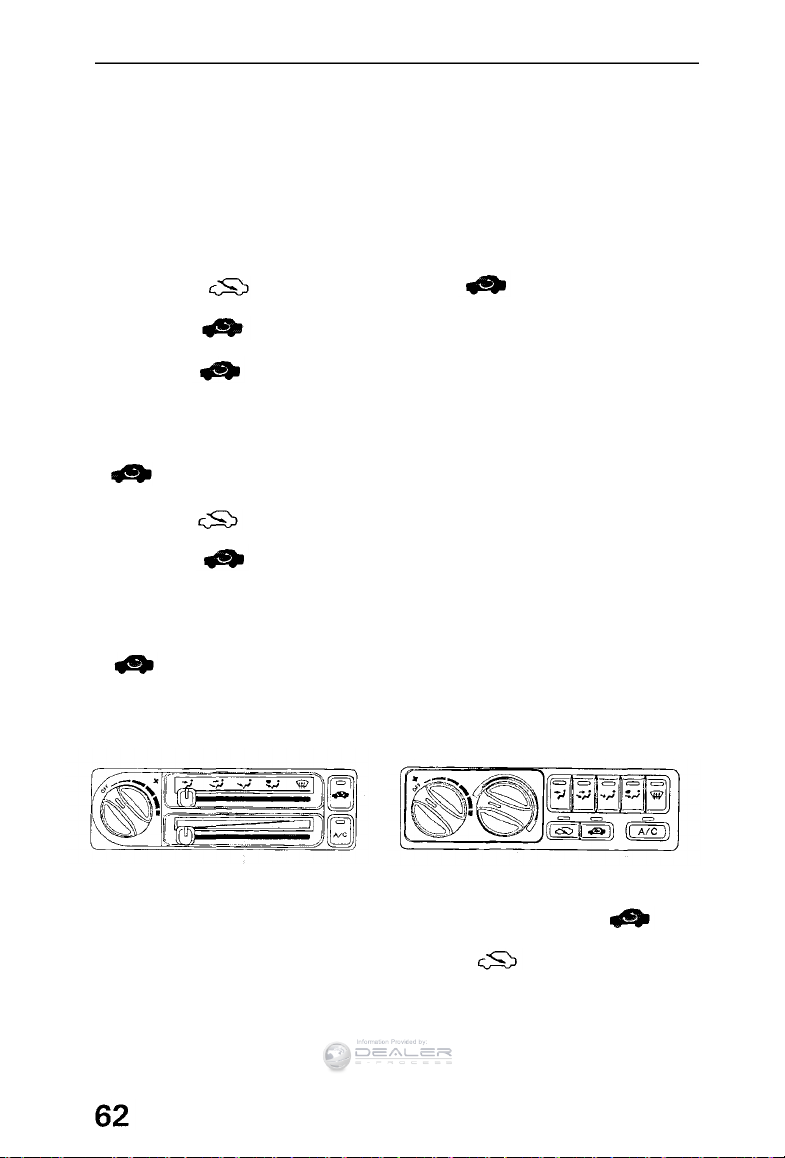
Fresh Air ( ) and Recirculation (
) Buttons
(US: DX, Canada: LX)
When the button's indicator light is out, outside air will be
allowed to circulate inside the car.
When the button is pushed in and the indicator light comes
on, outside air is shut off and the air inside the car is recirculated.
If the heater or air conditioning is on and you want to warm up or
cool down the interior more quickly, or keep smoke or dust out of
the car without losing the heat or cool function, simply push the
button.
(US: LX/EX/SE/Anniversary Edition, Canada: EX/EX-R/SE)
When the button is pushed, the indicator light will go on and
outside air will be allowed to circulate inside the car.
When the button is pushed, the indicator light comes on,
outside air is shut off and the air inside the car is recirculated.
If the heater or air conditioning is on and you want to warm up or
cool down the interior more quickly, or keep smoke or dust out of
the car without losing the heat or cool function, simply push the
button.
(US: DX, Canada: LX)
(US: LX/EX/SE/
Anniversary Edition,
Canada: EX/EX-R/SE)
NOTE:
The windows may become fogged if the system is in the setting for an extended period of time with the air conditioning off. As
soon as the interior is warmed, switch to setting.
Page 63
How to Use the Controls
Information Provided by:
To Ventilate
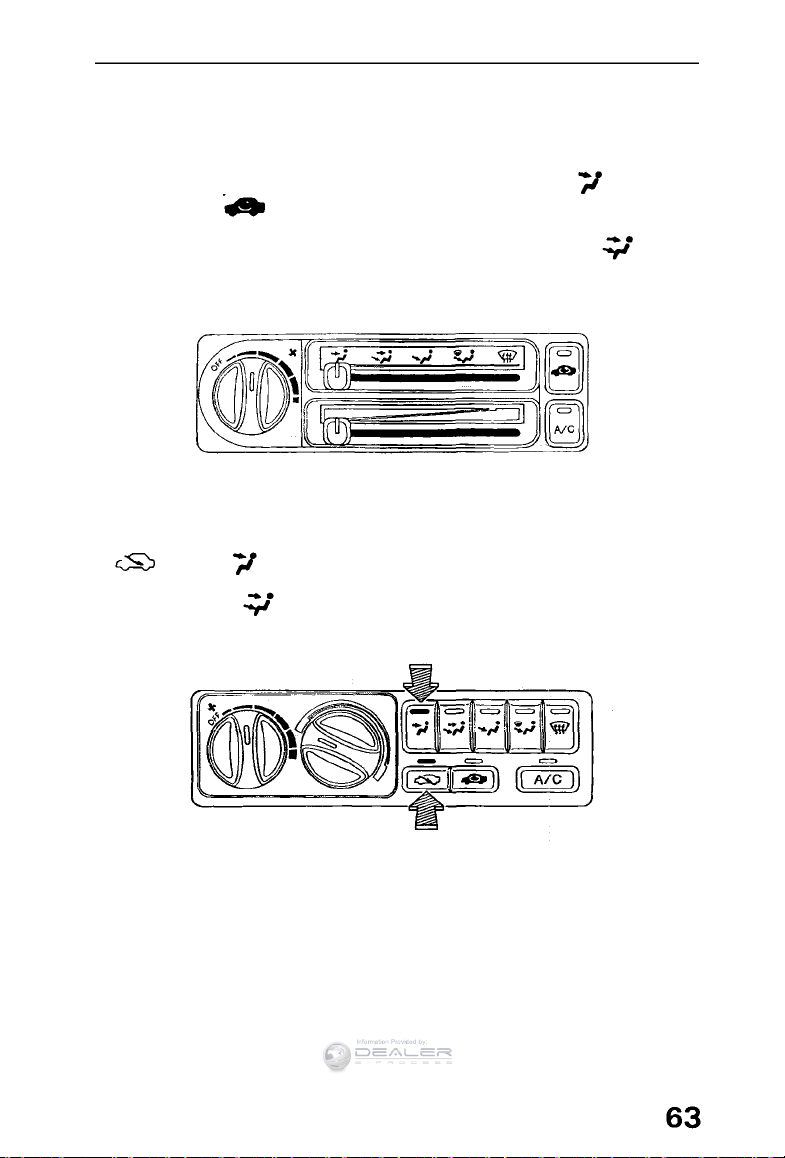
(US: DX, Canada: LX)
Move the temperature lever to the left, select the position
and push the button off.
Switch the fan on and outside air will flow through the corner and
center vents. To change air distribution, switch to the posi-
tion and outside air will also flow from the heater ducts at the floor
level.
(US: LX/EX/SE/Anniversary Edition, Canada: EX/EX-R/SE)
Turn the temperature control dial counterclockwise, and push the
and buttons. Switch the fan on and outside air will
flow through the corner and center vents. To change air distribution,
switch to the position and outside air will also flow from
the heater ducts at the floor level.
(cont'd)
Page 64
Heating and Cooling (cont'd)
Information Provided by:
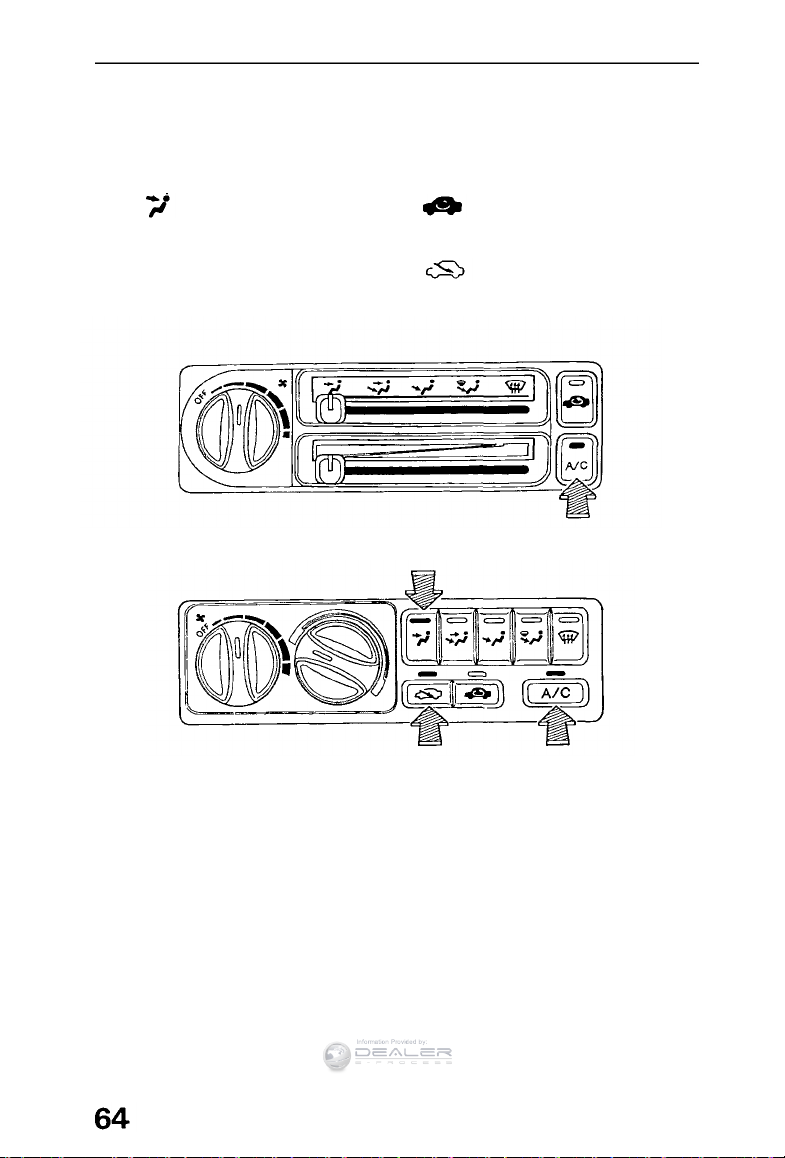
To Cool with A/C (optional on US: DX, Canada: LX)
To cool the car down quickly, start the engine, turn the fan to high,
push the A/C switch and open the windows briefly. Then close the
windows, slide the temperature lever all the way to the left or turn
the temperature control dial counterclockwise all the way, select
the position and push the button on, so inside air
will recirculate to the air conditioning for maximum cooling.
When the interior has cooled sufficiently, switch the fan to the
desired speed, then change to the setting to direct fresh
(outside) air to the air conditioning.
(US: DX, Canada: LX)
(US: LX/EX/SE/Anniversary Edition, Canada: EX/EX-R/SE)
When using the air conditioning in heavy traffic, or while driving up
long hills, watch the coolant temperature gauge: if the needle moves
near the "H" end of the scale, turn the air conditioning off by
pushing the A/C switch; leave it off until the needle goes back into
the middle of the scale.
Page 65
To Heat
Information Provided by:
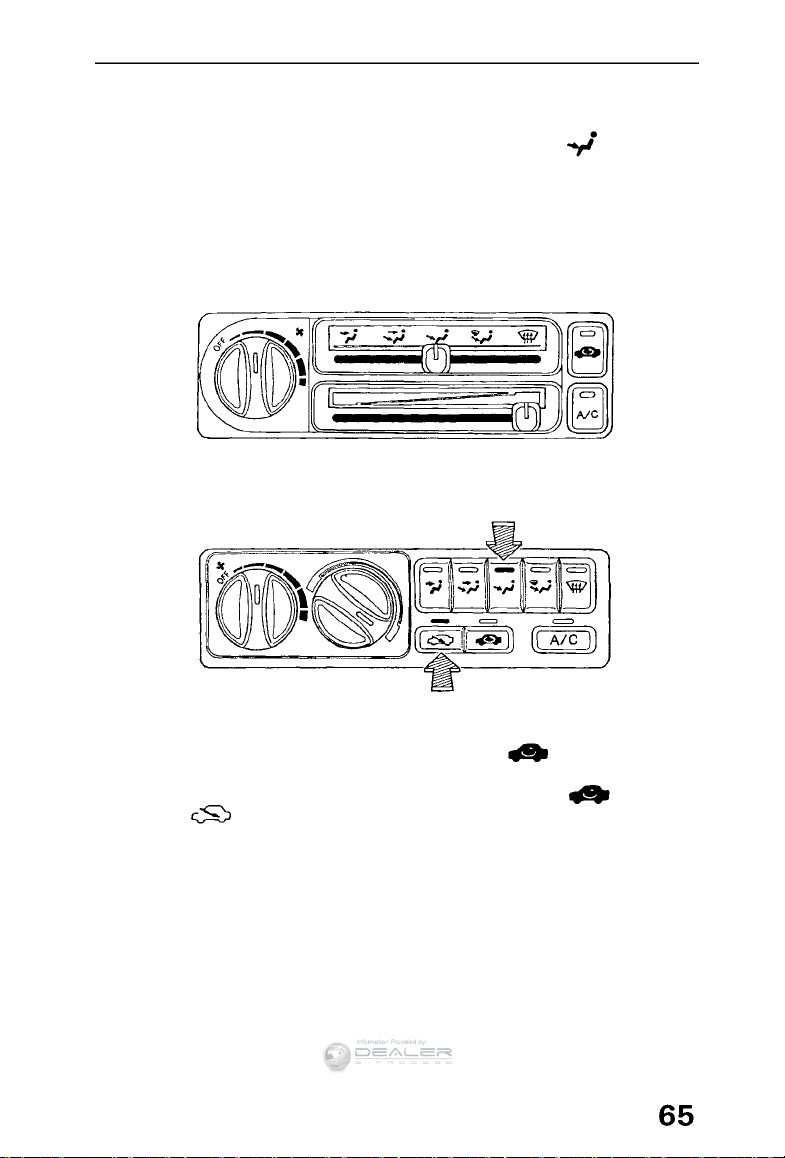
Switch the fan on, slide the temperature lever to the right or turn
the temperature control dial clockwise, select the position,
and warmed air will begin flowing from the floor outlets.
(US: LX/EX/SE/Anniversary Edition, Canada: EX/EX-R/SE)
A small amount of warmed air will also flow from the windshield
defroster vent.
(US: DX, Canada: LX)
(US: LX/EX/SE/Anniversary Edition, Canada: EX/EX-R/SE)
To warm up the interior quickly, push the
inside air will be recirculated to the heater.
If the windows begin to fog while heating in the
switch to to allow outside air to enter.
button so the
setting,
(cont'd)
Page 66
Heating and Cooling (cont'd)
Information Provided by:
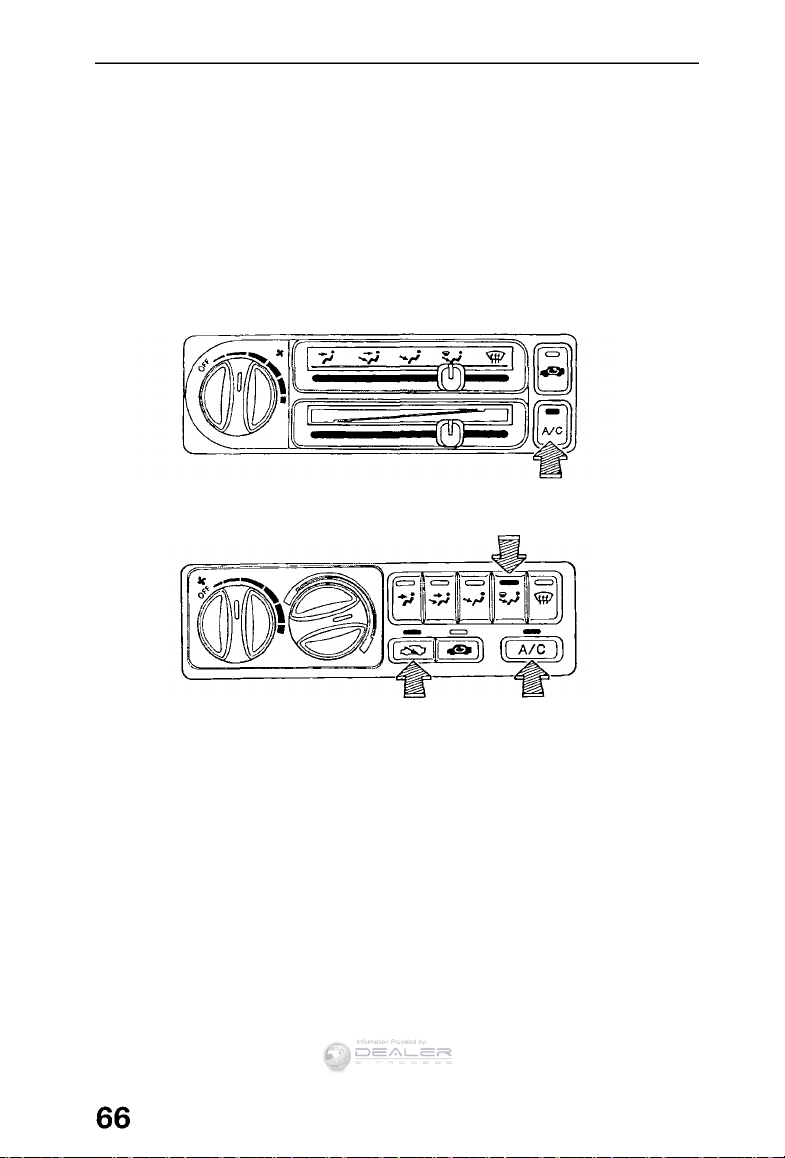
To Dehumidify with A/C (optional on US: DX, Canada: LX)
Because air conditioning dehumidifies as it works, you can use it in
cool or cold weather to help defog the windows. Just switch the
fan on, push the A/C switch on, select the desired function and
adjust the temperature lever/control dial to a comfortable setting.
NOTE:
This setting is desirable for most operating conditions in ambient
temperatures above approximately 32°F (0°C).
(US: DX, Canada: LX)
(US: LX/EX/SE/Anniversary Edition, Canada: EX/EX-R/SE)
Page 67
To Defrost
Information Provided by:
To defrost or defog the windshield and door windows, slide the
temperature lever to the right or turn the temperature control dial
clockwise, select the function, and switch the fan on.
If there is actual frost on the windows, first select the position.
If the windows are fogged, select the setting. Warmed air
will then flow from the windshield and side defroster vents.
(US: DX, Canada: LX)
(US: LX/EX/SE/Anniversary Edition, Canada: EX/EX-R/SE)
(cont'd)
Page 68
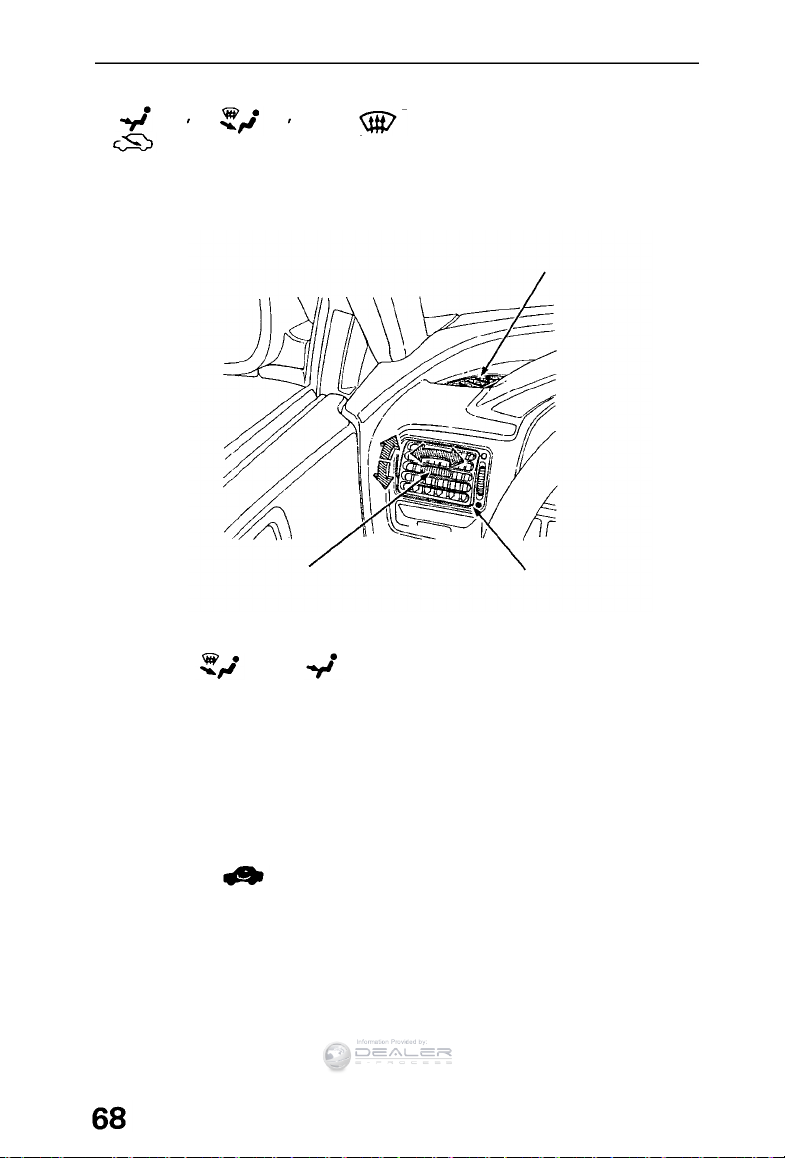
Heating and Cooling (cont'd)
Information Provided by:
For extra door window defrosting or defogging, select either the
or function, switch to the
setting, and turn the fan on.
Air will flow to the side door windows from the vents at each end
of the dash when the vertical fins of the dash corner vents are
pointed toward the windows, and the horizontal fins are moved
upward.
SIDE WINDOW
DEFROSTER
VERTICAL FIN
ADJUSTMENT CONTROL
DASH CORNER
VENT
After the windows are sufficiently defrosted, you may wish to
select the or mode for more comfort. Sliding the
temperature lever to the left or turning the temperature control dial
counterclockwise will reduce the temperature of the air exiting the
dash corner vents without appreciably affecting the heat to your leg
and foot area. Continue to adjust the temperature and fan speed to
find the most comfortable setting.
To Turn Everything OFF
Slide the temperature lever to the left or turn the temperature
control dial counterclockwise all the way, turn the fan switch off
and push the button on.
NOTE:
This setting should only be used in cold weather for the first few
minutes of driving to prevent cold air from blowing into the cabin.
Under normal operating conditions, the fan should always be kept
ON to prevent the accumulation of stale air in the system.
Page 69
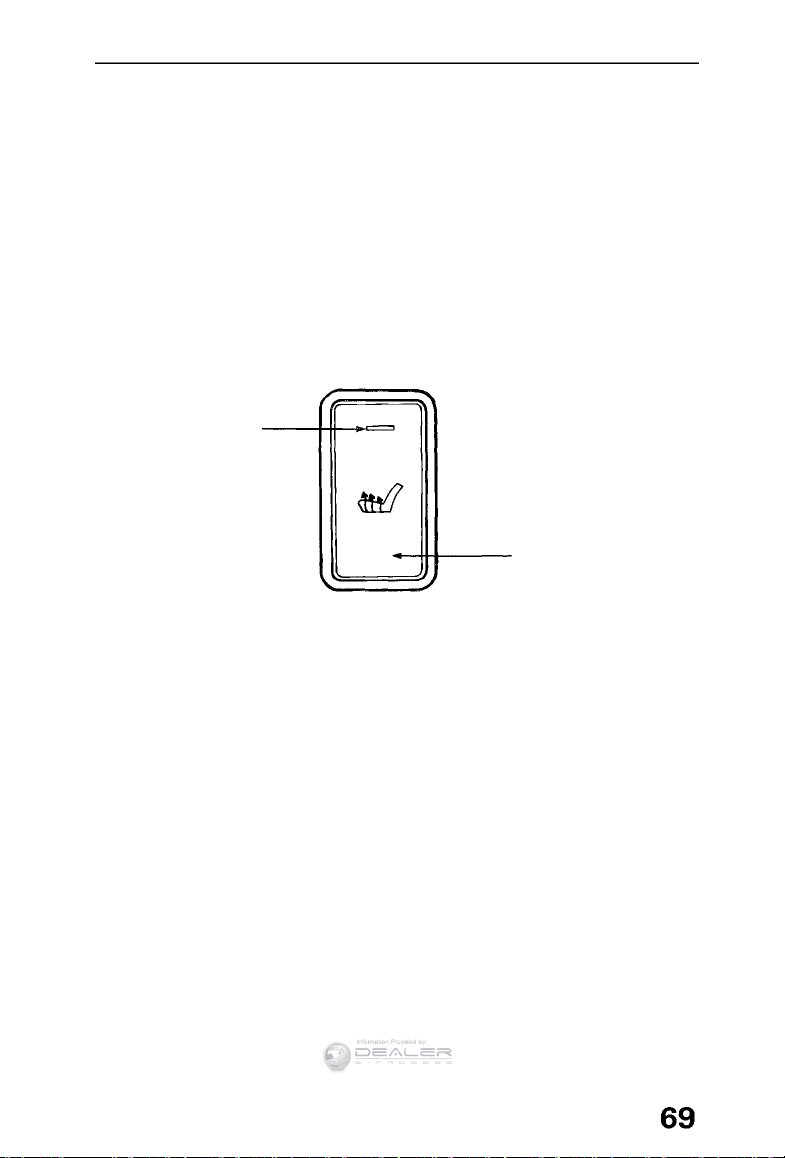
Seat Heater (Canada: SE)
Information Provided by:
Both front seats in your car are equipped with seat heaters. The
ignition must be in the II (ON) position when using the seat heaters.
Push the seat heater switch, the light in the switch will come on and
remain on while the heaters are working.
To turn the system off, push the switch, the light in the indicator
should go off.
CAUTION:
As the unit draws considerable current, it should not be used
when idling for an extended period of time. Doing so can cause a
weak battery, resulting in hard starting.
INDICATOR LIGHT
SEAT HEATER SWITCH
Page 70
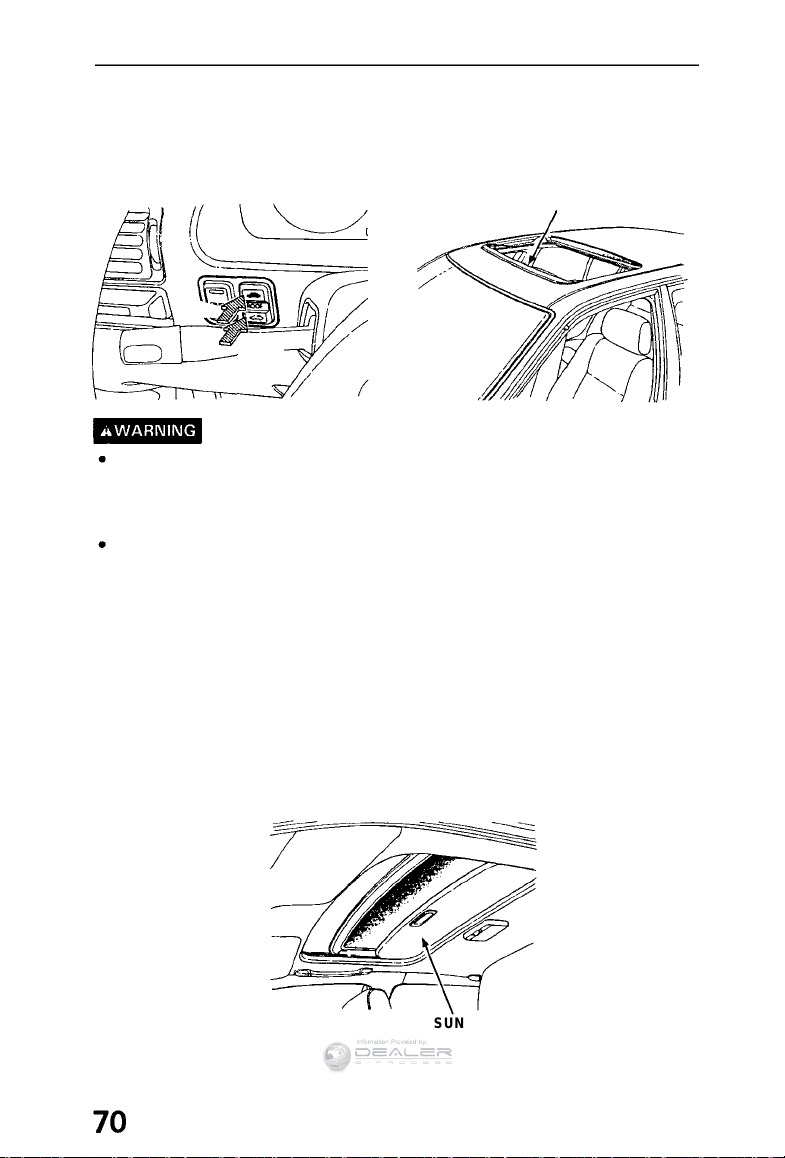
Moonroof (US: EX/SE, Canada: EX-R/SE)
Information Provided by:
To open or close the moonroof, push and hold the switch. Release
the switch when the moonroof reaches the desired position.
Do not hold the switch on after the moonroof has fully opened or
closed, or you may damage the moonroof motor.
Close
Open
Do not allow any part of your body to extend through the
moonroof while the vehicle is in motion. In the event of a
collision or sudden application of the brakes, severe personal
injury could result.
To avoid the possibility of injury while closing the moonroof,
never allow any part of your body to extend through the
opening.
CAUTION:
Operating the moonroof in severe cold or when it is covered with
snow or ice may cause damage to the moonroof.
POP-UP WIND
DEFLECTOR
Sunshade
As well as the moonroof, there is a sliding sunshade which you can
adjust to let in light with the roof closed, or to block out light
entirely. The sunshade automatically opens as you open the
moonroof.
SUNSHADE
Page 71
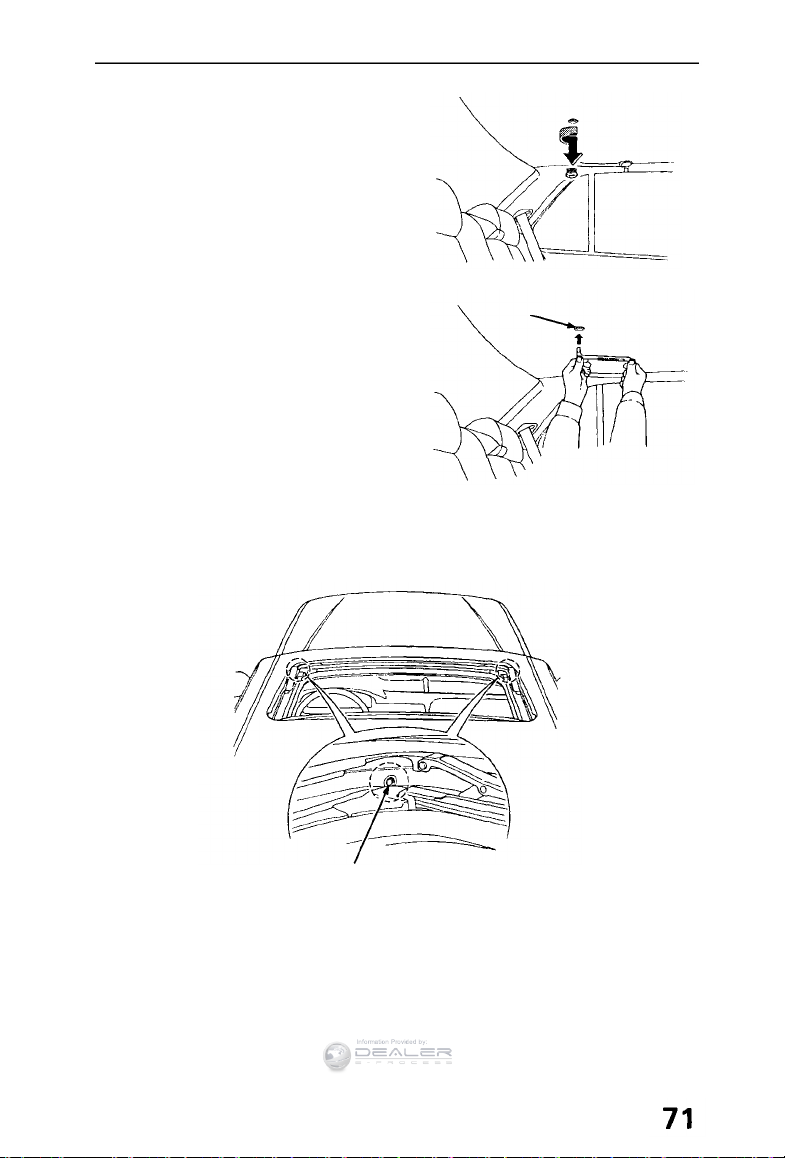
If the Moonroof Won't Close
Information Provided by:
Remove
plug
The moonroof can be closed
manually, if the control switch will
not close it.
1. Remove the round plug near the
rear center of the headliner.
2. Insert the moonroof wrench
(from the tool kit) into the socket.
3.Turn the wrench until the
moonroof seats in the closed
position.
SOCKET
4. Replace the plug.
Maintenance
Periodically pour a little water down the drain holes to make sure
they are not plugged. If they are free, water should drop on the
ground behind each front wheel.
DRAIN HOLE
CAUTION:
Do not put weight on the moonroof or force it open or closed, you
may damage the mechanism.
Page 72
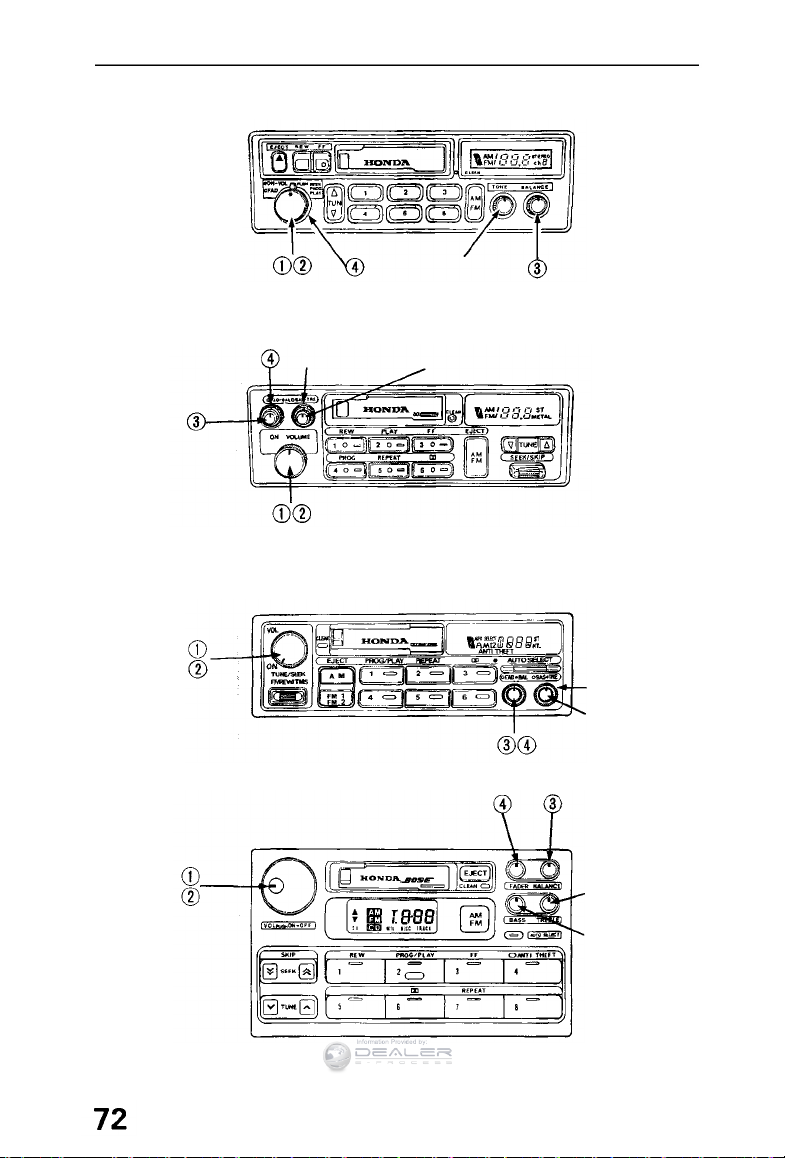
Stereo Sound System
Information Provided by:
(Canada: LX)
(US: LX/Anniversary Edition,
Canada:EX)
Bass Control
(US: EX,
Canada: EX-R)
Tone Control
Treble Control
Treble Control
Bass Control
(SE)
Treble Control
Bass Control
Page 73
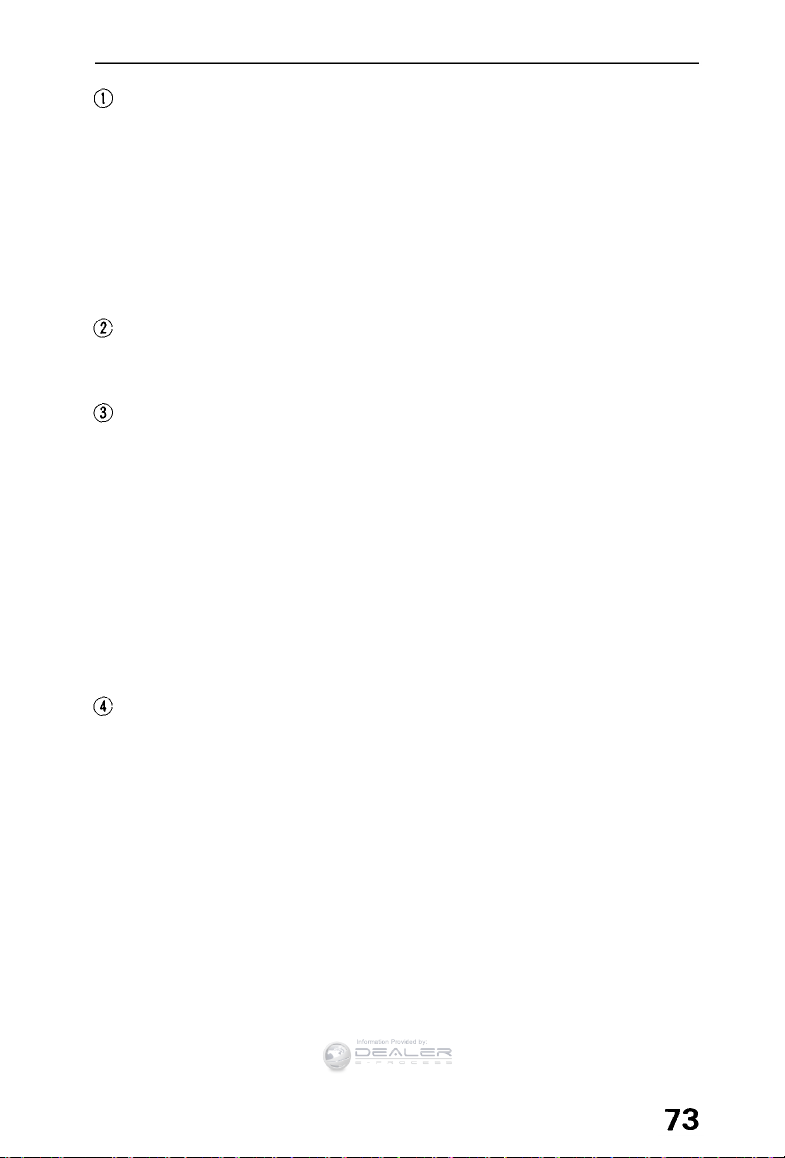
ON/OFF Switch
Information Provided by:
Turn the switch clockwise to turn the unit on; turn it counterclockwise to turn the unit off.
(SE)
Push the switch to turn the unit on; push it again to turn the unit off.
NOTE:
The antenna will rise or retract automatically when the unit is
turned on or off. It will also retract automatically if the ignition is
switched off.
Volume Control
Turn the ON/OFF switch clockwise to increase volume and counterclockwise to decrease volume.
Balance Control
Balances sound between left and right speakers.
(Except Canada: LX)
To use the control, push on the knob to get it to pop out, adjust the
balance to your liking and push the knob back in when you are done.
NOTE:
(Except Canada: LX)
When the headlights are on, the radio panel illumination is on, even if
the radio is turned off.
The panel lighting can be turned off by first pushing the Balance
Control knob to its out position and then pulling it out slightly
further.
Fader Control
Balances sound between front and rear speakers.
(Except Canada: LX)
To use the control, push on the knob to get it to pop out, adjust the
sound to your liking and push the knob back in when you are done.
(cont'd)
Page 74
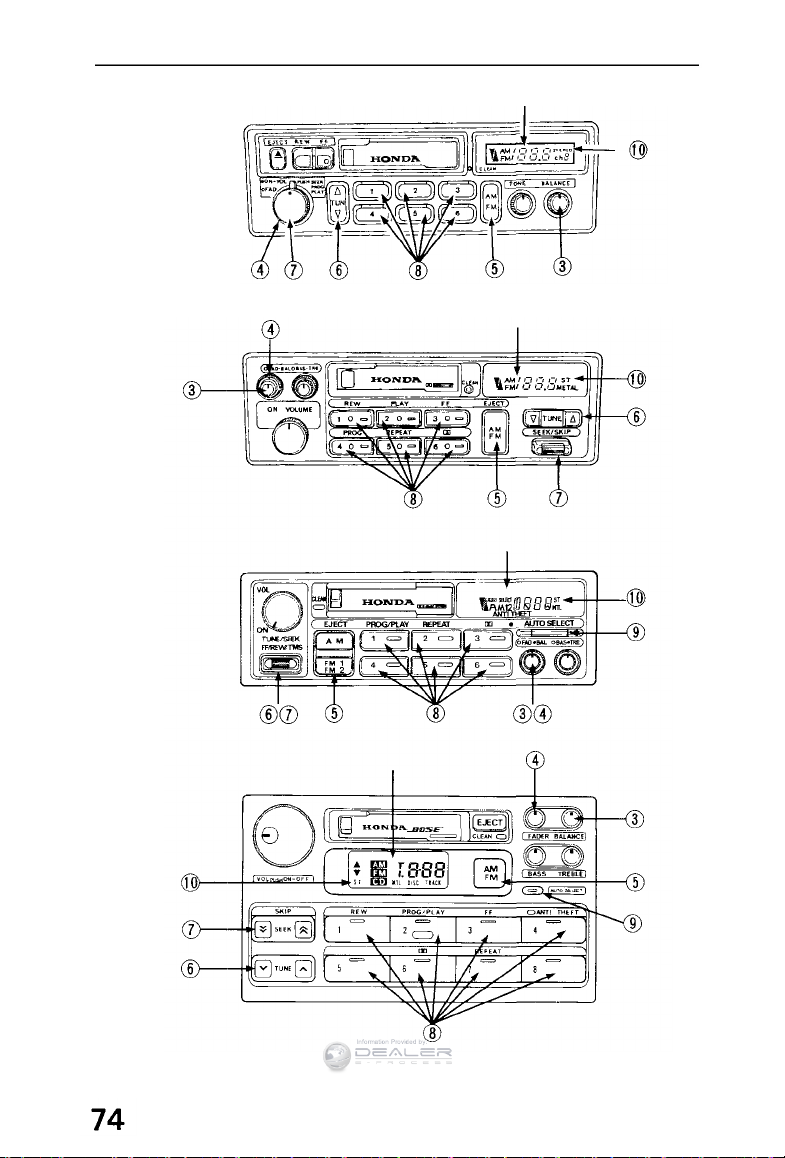
Stereo Sound System (cont'd)
Information Provided by:
Radio Operation
(Canada: LX)
(US: LX/Anniversary Edition,
Canada:EX)
(US: EX,
Canada: EX-R)
Frequency Display
Frequency Display
Frequency Display
(SE
Frequency Display
)
Page 75
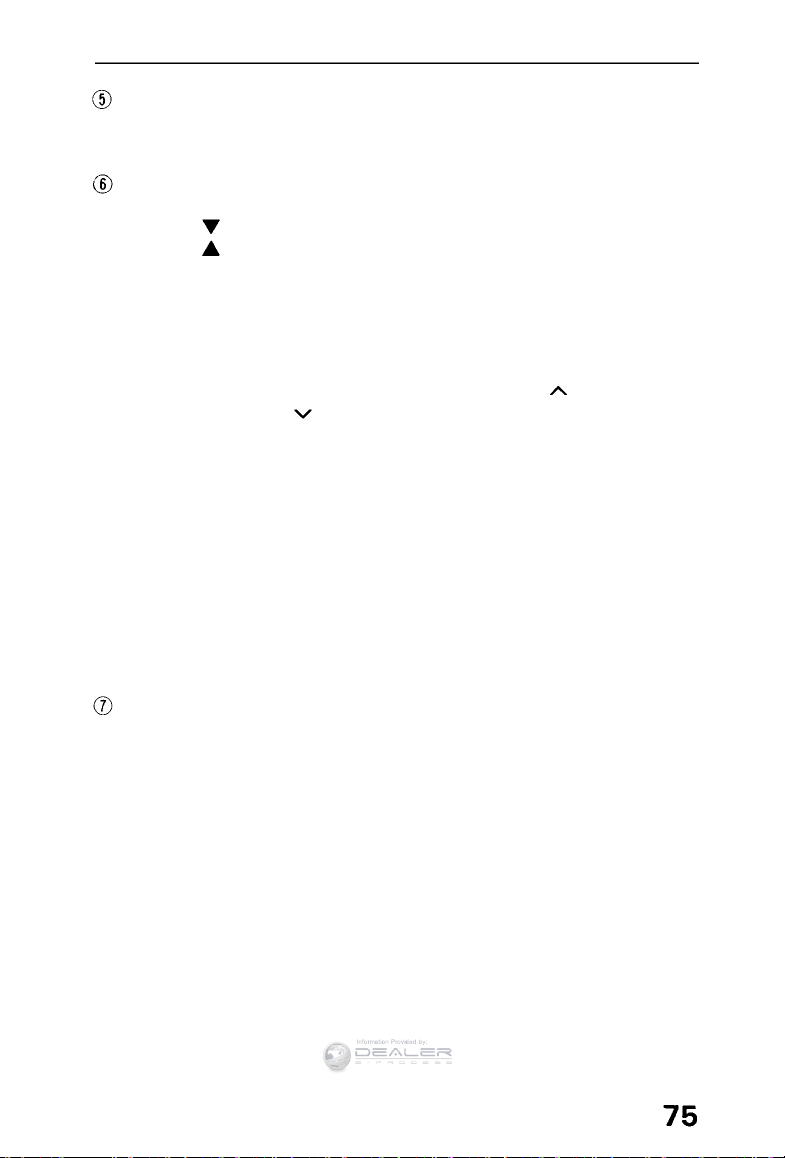
AM/FM Band Selector
Information Provided by:
Push to select AM or FM band. The corresponding band indicator
will light.
Manual Tunin
g
(US: LX/Anniversary Edition, Canada: LX/EX)
Push the button to tune to a lower frequency station.
Push the button to tune to a higher frequency station.
(US: EX, Canada: EX-R)
Push the TUNE/SEEK switch up to change to a higher frequency,
and down to change to a lower frequency.
To change the frequency up or down a single increment, push and
release the TUNE/SEEK switch.
(SE)
Use the TUNE bar to change frequencies. Push to tune to a
higher frequency, and to tune to a lower frequency.
NOTE:
(US: LX/Anniversary Edition, Canada: LX/EX)
If you hold either button for more than half a second, the tuning
frequency will count up or down rapidly.
(US: EX, Canada: EX-R)
To go to a frequency that is farther away, push the switch and hold
it. You will hear a beep and the frequency display will begin to count
rapidly.
(SE)
The frequency will continue changing for as long as you push on the
bar.
Seek Tuning
(Canada: LX)
Each time you push this button, the tuner will automatically seek
the next higher frequency station.
(US: LX/Anniversary Edition, Canada: EX)
Each time you push this button up or down, the tuner will
automatically seek the next higher or lower frequency station.
(US: EX, Canada: EX-R)
Depending on which way you push the TUNE/SEEK switch, the
system searches up or down from the current frequency. Push the
switch until you hear a beep, then release it. The system searches
until it finds a station with a strong signal, then stops.
(cont'd)
Page 76
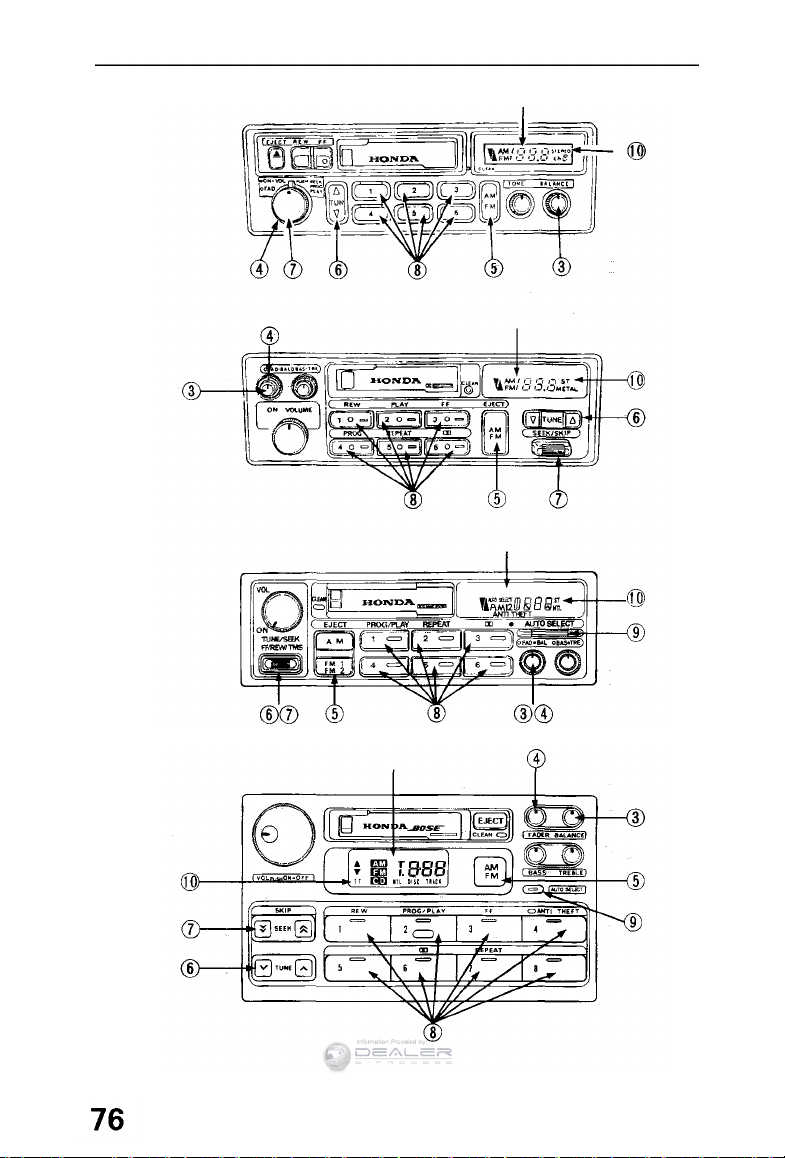
Stereo Sound System (cont'd)
Information Provided by:
(Canada: LX)
Frequency Display
(US: LX/Anniversary Edition,
Canada: EX)
(US:EX,
Canada: EX-R)
(SE)
Frequency Display
Frequency Display
Frequency Display
Page 77
(SE)
Information Provided by:
When you push the SEEK bar, the radio scans the selected band and
stops on the next station with a strong signal. Push to scan
higher frequencies, and to scan lower frequencies.
Preset Station Selection
1.Make sure the Band Selector is on the band you want ... AM or
FM. Then, find the station you want by Manual Tuning or Seek
Tuning.
2. Press and hold one of the Preset Buttons.
3. In a few seconds, a beep will sound and the light in the button will
come on. The station is now preset in the memory. You may
preset 1 AM and 1 FM station per button, (total, 6 of each on US:
LX/Anniversary Edition, Canada: LX/EX, and 8 of each on SE).
(US: EX, Canada: EX-R)
Each button will store one frequency on the AM band, and two on
the FM band by pushing the FM1, and FM2 switch. You can store
a total of 6 stations on AM and 12 on FM.
4. You can tune to a preset station by pushing its corresponding
preset button.
NOTE:
(US: EX/SE, Canada: EX-R/SE)
The Auto Select Button must be off before the Preset Station
Selection can be used.
Auto Select Button (US: EX/SE, Canada: EX-R/SE)
If you are visiting a new broadcast area, you can quickly enter into
memory the stronger stations in that area by simply pushing the
Auto Select Button. The radio will then automatically scan both the
AM and FM bands and temporarily memorize up to 6 stations (8
stations on SE) in each. With the Auto Select Button on, these
stations can then be tuned by pushing the preset buttons. Manuallypreset stations remain memorized for use when you return to your
normal broadcast area, but are only selectable with the Auto Select
Button off.
Stereo Indicator
This lights up when a FM broadcast in stereo is being received. It will
flash when the signal strength diminishes. If it flashes, good stereo
reception cannot be expected. Stereo reception is available only for
FM stereo broadcasts, not for AM stereo broadcasts.
(cont'd)
Page 78
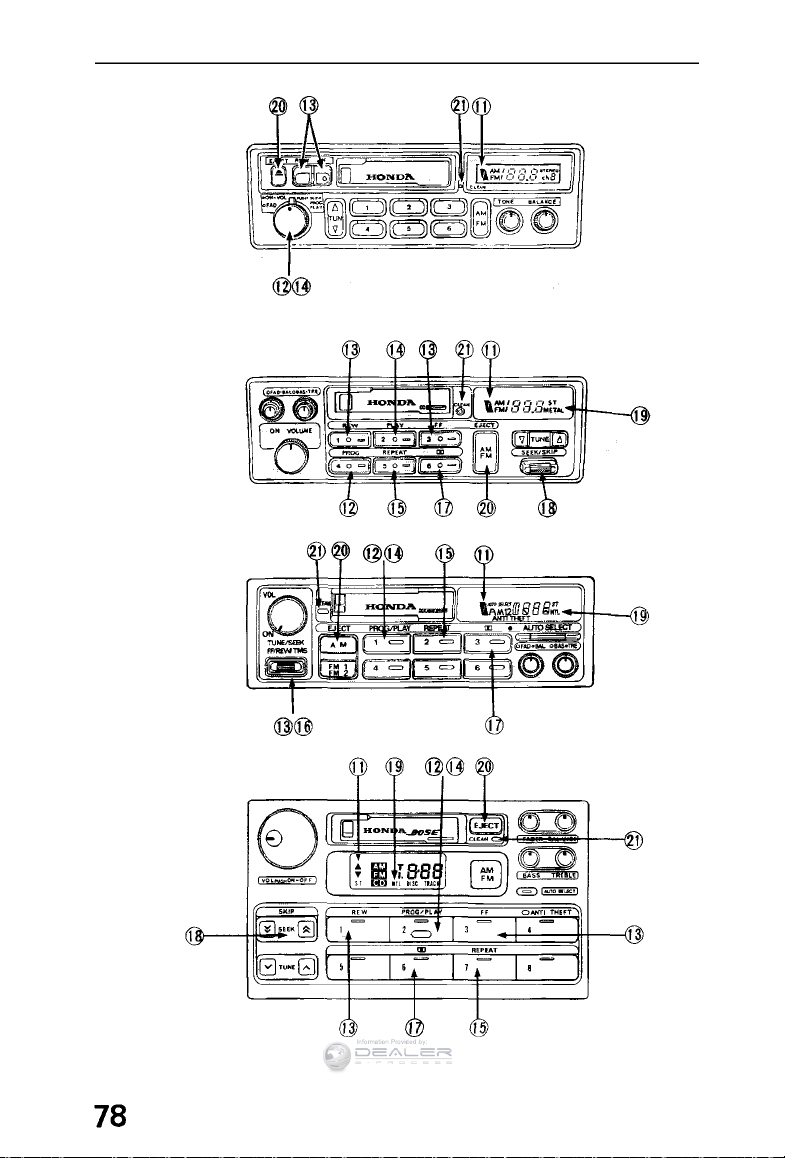
Stereo Sound System (cont'd)
Information Provided by:
Tape Operation
(Canada: LX)
(US: LX/Anniversary Edition,
Canada: EX)
(US:
EX,
Canada: EX-R)
(SE)
Page 79
Tape Direction Indicator
Information Provided by:
Load the cassette into the slot with the tape opening to the right.
The ( ) will light when the upper side is playing. The ( ) will light
when the bottom side is playing.
Program Selector (PROG)
Push to change the direction of tape play.
Auto Reverse Feature: The tape direction automatically reverses
when the end of the tape is reached in play or FF mode and plays
the other side.
Fast Forward/Rewind (FF/REW)
Note which Tape Direction Indicator is lighted, then push the
appropriate button to rapidly wind the tape in the same direction
(FF) or in the opposite direction (REW).
(US: EX, Canada: EX-R)
To rewind the tape, push the FF/REW/TMS button down then
release it. You will see REW in the display. To fast forward the tape,
push the button up then release it. You will see FF displayed. To
stop rewind or fast forward, press the PROG/PLAY button or push
the FF/REW/TMS switch again.
Play (PLAY)
Push the PLAY button to resume tape play and stop rewind or fast
forward operation.
(On US: LX/EX/SE/Anniversary Edition, Canada: EX/EX-R/SE, the
indicator will light.)
Repeat Button (REPEAT)
(US: LX/EX/SE/Anniversary Edition, Canada: EX/EX-R/SE)
Push the REPEAT button (indicator on) to return to the beginning of
a song or section of programming and repeat its play. Push the
button again (indicator off) to cancel the repeat function and resume
normal play.
(cont'd)
Page 80
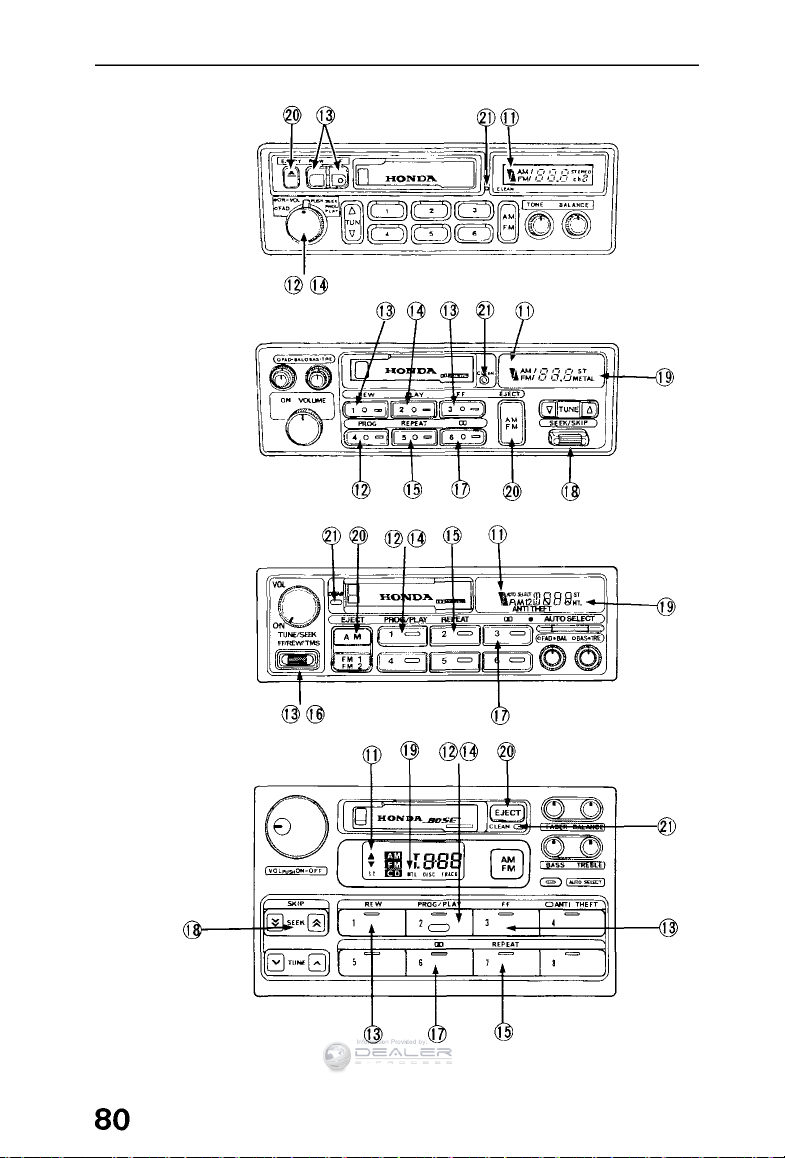
Stereo Sound System (cont'd)
Information Provided by:
(Canada: LX)
(US: LX/Anniversary Edition,
Canada:EX)
(US:EX,
Canada: EX-R)
(SE)
Page 81

TMS function (US: EX, Canada: EX-R)
Information Provided by:
The TMS function lets you skip to the beginning of a song or other
passage. The tape skips forward or backward, depending on which
direction you push the FF/REW/TMS switch.
Activate TMS by pushing the FF/REW/TMS button and holding it
until you hear a beep. If you push the button down, you will see
REW blinking in the display as the tape rewinds. If you push the
button up, you will see FF blinking in the display as the tape fast
forwards. When the system senses a silent period on the tape, it
goes back to PLAY mode.
NOTE:
(US: LX/EX/SE/Anniversary Edition, Canada: EX/EX-R/SE)
The REPEAT and TMS functions use silent periods on the tape to
find the end of a selection. These features may not work
satisfactorily on tapes that have almost no gap between songs, a
high noise level between songs, or silent periods in the middle of
songs.
Dolby® Noise Reduction ( )
(US: LX/Anniversary Edition, Canada: EX)
Push when playing tapes recorded in Dolby NR (the Dolby NR
indicator will light). Push again when playing tapes not recorded in
Dolby NR. Use of the wrong setting will affect high frequency
response.
(US: EX/SE, Canada: EX-R/SE)
Dolby noise reduction turns on when you insert a cassette. If the
tape is not recorded with Dolby "B" noise reduction, turn it off by
pressing the button.
NOTE:
The Dolby NR circuit will not operate during radio reception.
Dolby noise reduction manufactured under license from Dolby
Laboratories Licensing Corporation.
"DOLBY" and the double-D symbol are trademarks of Dolby
Laboratories Licensing Corporation.
(cont'd)
Page 82
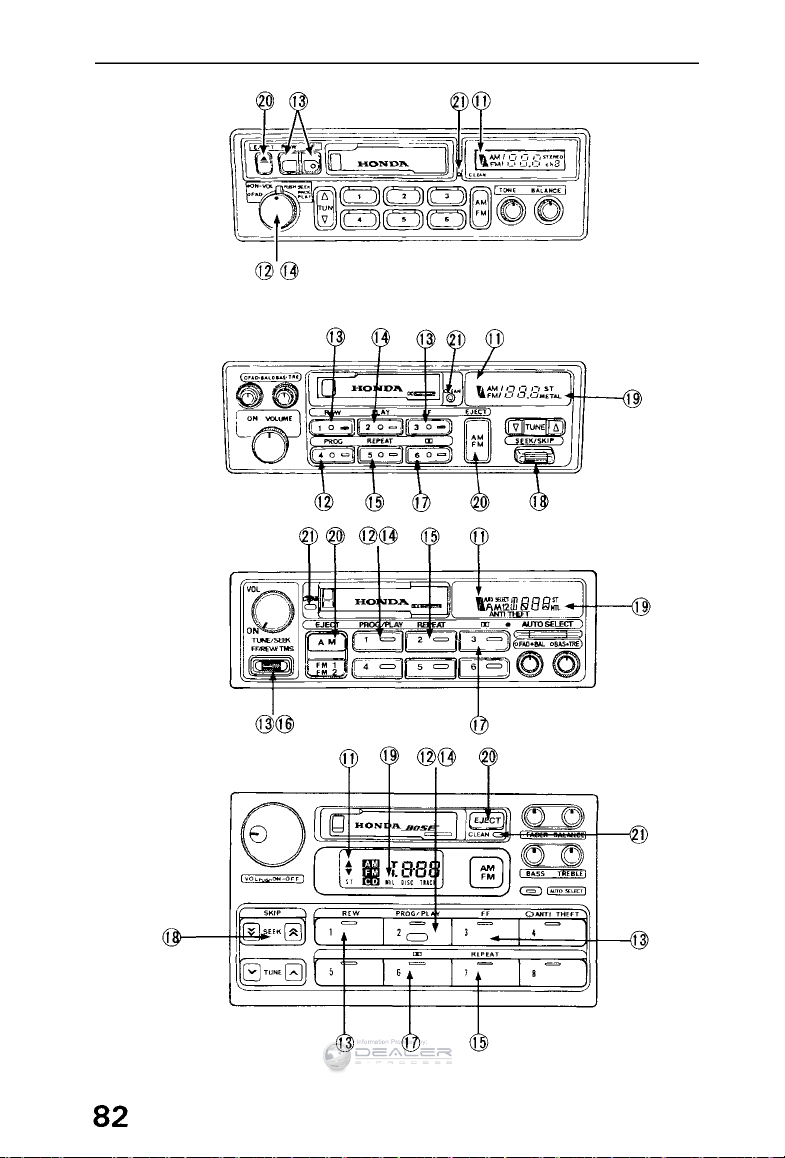
Stereo Sound System (cont'd)
Information Provided by:
(Canada: LX)
(US: LX/Anniversary Edition,
Canada: EX)
(US: EX,
Canada: EX-R)
(SE)
Page 83
Skip Function
Information Provided by:
(US: LX/Anniversary Edition, Canada: EX)
The circuit senses silent passages between songs or programs on a
tape. Push upward to automatically advance to the beginning of the
next song, or downward to return to the beginning of the song just
played.
(SE)
SKIP function lets you skip over a song or other passage. Press
to SKIP backward, and to SKIP forward. The light in the
REW or FF button will flash as the system advances the tape. When
it senses a silent period, the system goes back to PLAY.
NOTE:
Tapes that contain short silent passages between songs, a high level
of noise between songs, or silent passages within a song may not be
suitable for this function.
Metal Indicator (METAL/MTL) (Except Canada: LX)
Most metal or CrO2 cassettes are coded with slots on their back
edge. If such a cassette is inserted, the player will detect the slots
and automatically switch to the proper equalization for full
enjoyment of metal/Cr02 tapes. The indicator light will go on when
coded cassettes are played.
Eject (EJECT)
Push this button to stop and eject the tape.
Ignition Key-OFF Eject: The cassette being played will be automatically ejected when the ignition or the unit is turned off.
NOTE:
When one side of the tape ends, "Auto-Reverse" will automatically
begin playing the other side, therefore, you must push the eject
button to stop or remove the tape.
(cont'd)
Page 84
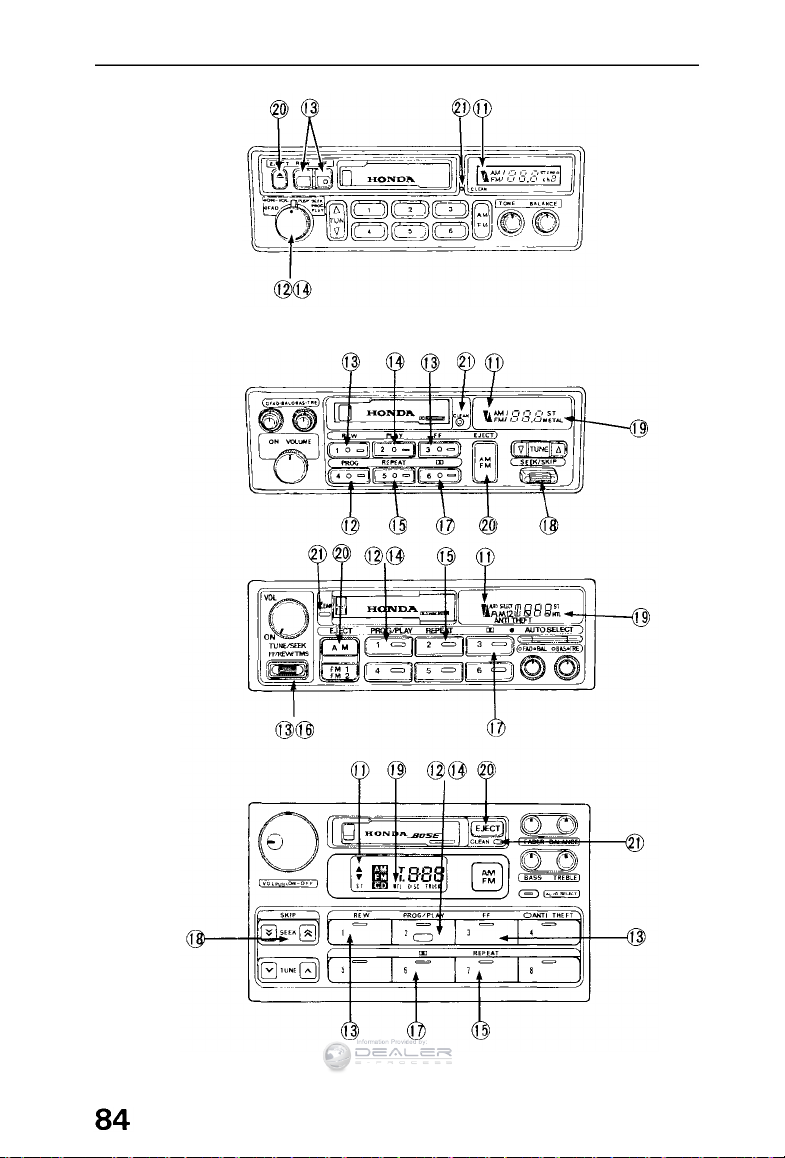
Stereo Sound System (cont'd)
Information Provided by:
(Canada:LX)
(US: LX/Anniversary Edition,
Canada:EX)
(US:
EX,
Canada: EX-R)
(SE)
Page 85

CLEAN Indicator Light
Information Provided by:
(US: SE, Canada: LX/SE)
After 50 hours of cassette tape play, the CLEAN indicator light will
come on as a reminder to clean the tape heads. If the light comes on
and the tape heads were not cleaned at the recommended 30 hours
of usage (see maintenance section on the next page), they should be
cleaned immediately. To reset, push the indicator with a pointed
instrument such as a ball-point pen until the light goes off (about 5
seconds).
(US: LX/EX/Anniversary Edition, Canada: EX/EX-R)
After 30 hours of cassette tape play, the CLEAN indicator light will
come on as a reminder to clean the tape heads. If the light comes on
and the tape heads were not cleaned at the recommended 30 hours
of usage (see maintenance section on the next page), they should be
cleaned immediately. To reset, push the indicator with a pointed
instrument such as a ball-point pen until the light goes off (about 3
seconds).
Defective Tape Eject
The tape player includes a protection mechanism to automatically
eject defective tapes (warped housing, loose label, faulty tape
movement) immediately upon insertion. If a tape malfunctions while
in play, the tape direction will change back and forth and then eject
the cassette. Tapes ejected before play should be considered faulty
and discarded; tapes ejected during play may only be unevenly
wound and could be re-usable if fully rewound, manually, outside the
player.
NOTE:
The tape player may repeat cycle through the loading and unloading
motion several times in an effort to eject a faulty tape. During this
process the tape will either eject fully or rise to the loading level and
have to be pulled out manually. In either case, discard the tape; reuse may damage the tape player.
(cont'd)
Page 86

Stereo Sound System (cont'd)
Information Provided by:
Maintenance
The head in the cassette tape player can pick up dirt or tape
deposits each time a cassette is played. The result is low or
"muddy" sound from one or both channels, as if the treble tone
control were turned all the way down. To prevent this, you should
periodically clean the head with a commercially available cleaning
cassette.
As preventive maintenance, clean the head about every 30 hours of
use. If you wait until the head becomes very dirty (noticeably poor
sound), it may not be possible to remove all deposits with a simple
cleaning cassette.
The use of 120 minute tapes is not recommended.
CAUTION:
Storing cassettes out of their cases, or touching the magnetic
tape with your fingers will increase the amount of dirt that gets to
the tape head. Using low-quality "off-brand" tape will increase the
amount of tape deposits that get on the head. Both of these
practices may eventually lead to damage of the head and playing
mechanism.
Page 87
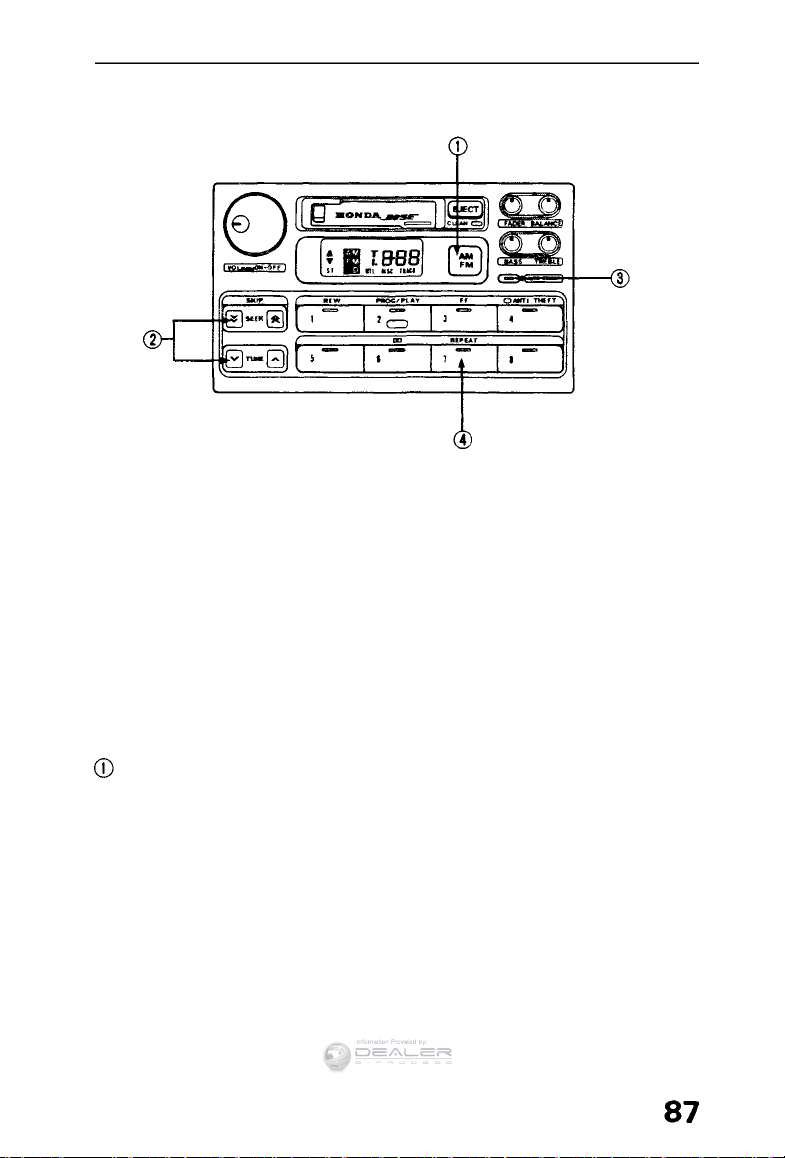
Operating the CD Changer
Information Provided by:
(Optional for SE)
A trunk-mounted Compact Disc changer is available for your car. It
holds up to six discs, providing several hours of continuous
programming. You operate the CD changer with the same buttons,
used for the radio and cassette player.
Load the desired CD's in the magazine and bad the magazine in the
changer according to the instructions that came with the unit.
To operate the CD changer, the ignition key must be in the
ACCESSORY (I) or ON (II) position.
If you are listening to a cassette tape, eject it before playing a CD.
AM/FM Button
Press the AM/FM button until "CD" appears on the display. Once in
the CD mode, the system will start to play the first track of the first
disc in the magazine.
When that disc ends, the next disc in the magazine is loaded and
played.
After disc 6 has completed, the system will return to disc 1. To
make your own disc selection, push one of the first six preset
buttons. Your selection will appear in the display and start playing.
(cont'd)
Page 88
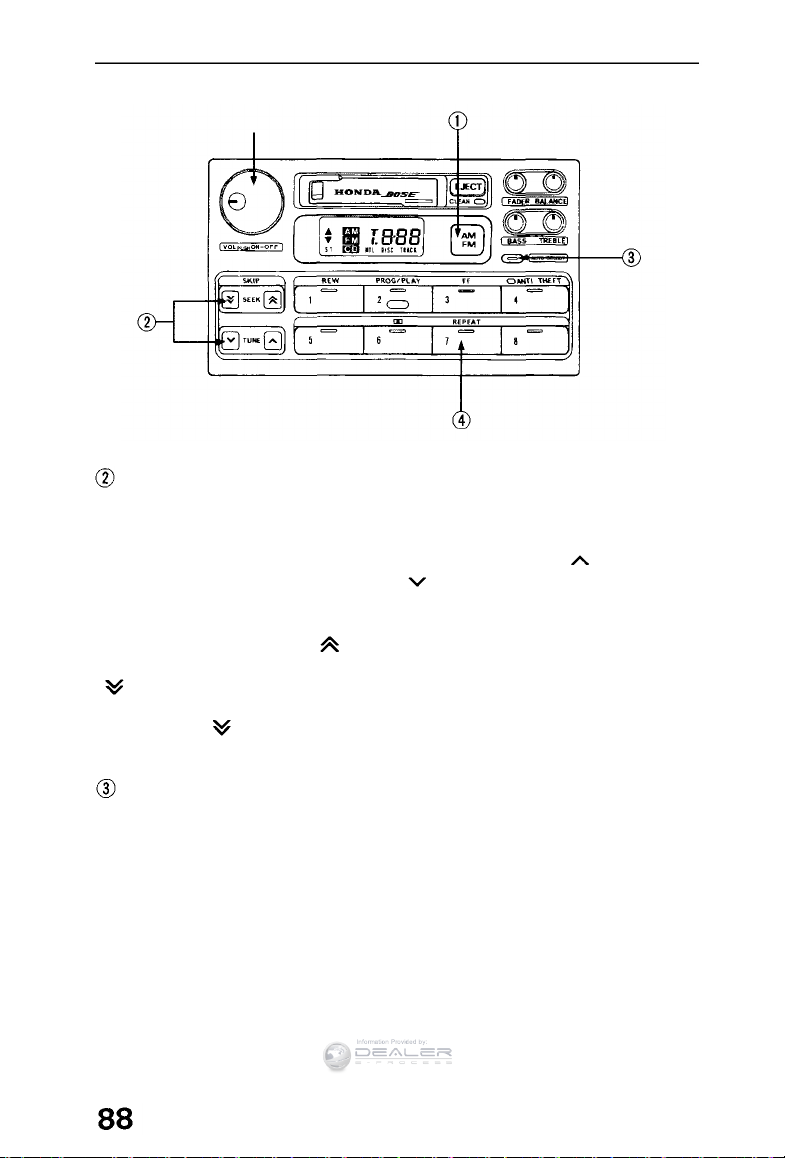
Stereo Sound System (cont'd)
Information Provided by:
ON-OFF/VOL KNOB
SEEK/TUNE Bar
You can use the SEEK bar or TUNE bar while a disc is playing to
select passages and change tracks.
To move rapidly within a track, press and hold the side of the
TUNE bar to move forward or the side to move backward. This
continues until you release the bar.
Each time you press the side of the SEEK bar, the system skips
forward to the beginning of the next track on that CD. Press the
side to skip backward to the beginning of the current track.
If you press again, the system skips backward to the beginning
of the previous track.
Auto Select Button
You can get the CD player to randomly select tracks by pressing the
AUTO SELECT button. The indicator in the button lights as a
reminder. With this active, the system selects and plays the tracks
randomly, rather than sequentially, on each disc. When the system
has played all the tracks on that disc, it loads the next disc and
starts to play it randomly. The system continues to select and play
tracks randomly on each of the six discs until you press the AUTO
SELECT button again.
Page 89
Repeat Button (REPEAT)
Information Provided by:
If you push the REPEAT button, the system will continuously play
the track you are listening to. The light in the button stays on as a
reminder.
— If you change modes to radio or tape while a CD is playing, then
change back to CD mode, the same disc and track will play.
— If you turn off the system while a CD is playing, either with the
ON-OFF/VOL knob or by turning off the ignition, the system will
begin at the same disc and track when you turn it back on.
— If you try to select an empty slot in the magazine, the system will
select and play the first track of the next disc in the magazine.
To return to the radio function, press the AM/FM button.
(cont'd)
Page 90
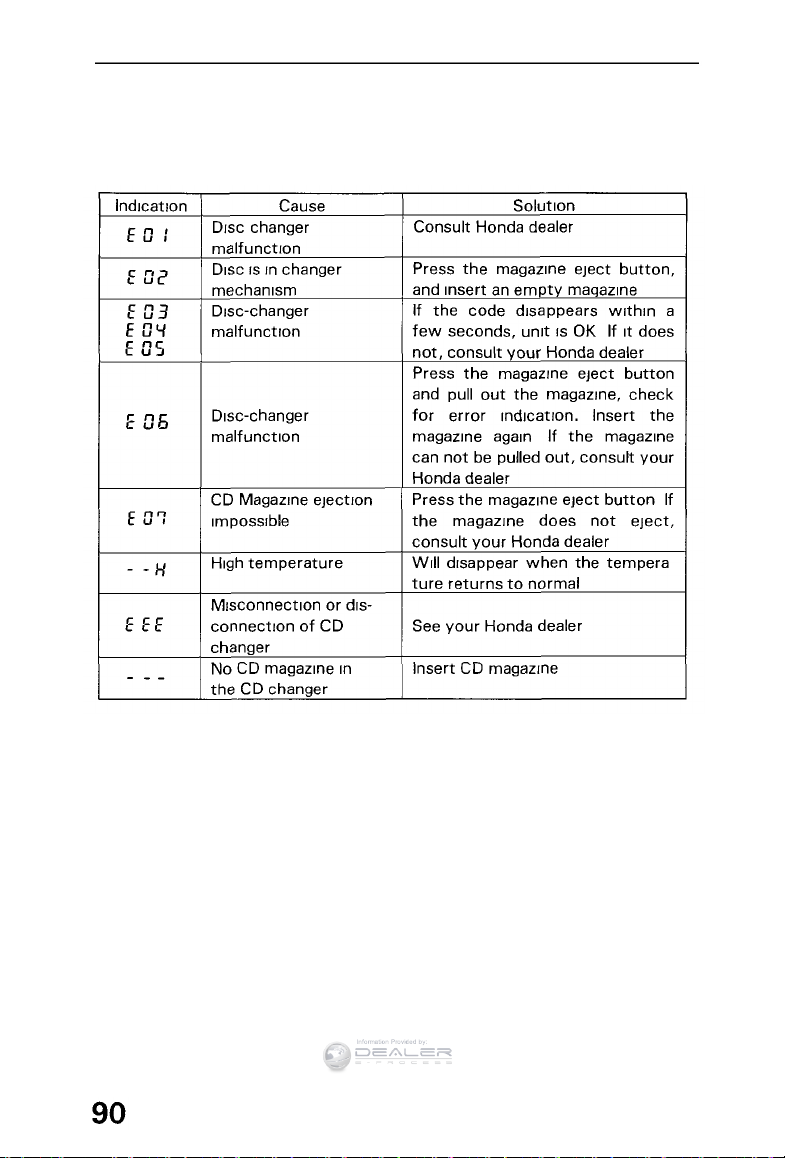
Stereo Sound System (cont'd)
Information Provided by:
CD Error Indications
If
you see an error indication on the display, find the cause in the
chart to the right. If you cannot clear the error indication, take the
car to your Honda dealer.
Page 91

Entering the Security Code for the Anti-theft Radio
Information Provided by:
(US: EX, Canada: EX-R/SE)
The Honda anti-theft radio will not operate if the radio is stolen.
Even if the radio is electrically reconnected, it will be inoperable
unless
a
five-digit security code is entered.
The code for your radio is printed on each of the two cards that
came with your radio. Keep these cards in a secure place away from
the car. The radio cannot be reprogrammed without the code.
Enter the five-digit code using the preset station selector buttons.
The radio must be on and the word "Code" must be in the display.
When entering the five-digit code, be sure to complete the
number sequence even if an error was made. For instance if the
code number is 43215 and 42 was mistakenly entered for the first
two numbers instead of 43, continue entering 215. A beep will
sound after five digits are entered.
The word "Code" will appear in the display.
Re-enter the correct code number sequence. The word "Code"
will no longer appear, and the radio should resume normal
operation.
If the correct code is not entered in three successive tries, the
radio will not accept entry at this time. You must wait one hour
with the radio ON to re-enter the correct code.
If the voltage supply is interrupted and reconnected, the word
"Code" will appear in the radio's display and the radio will not work.
When your car requires electrical repairs, the code number must be
re-entered for radio operation.
Page 92

Gasoline
Information Provided by:
Gasoline
Your Honda operates most effectively on unleaded gasoline with a
pump octane number of 86 or higher. Use of a lower octane gasoline
can cause a persistent, heavy metallic rapping noise in the engine
that can lead to mechanical damage.
We recommend gasolines containing detergent additives that help
prevent fuel system and engine deposits.
Using gasoline containing lead will damage your car's emission
controls. This contributes to air pollution and can void certain parts
of your warranty.
Oxygenated Fuels
Some conventional gasolines are being blended with alcohol or an
ether compound. These gasolines are collectively referred to as
oxygenated fuels. To meet clean air standards, some areas of the
United States and Canada use oxygenated fuels to help reduce
emissions.
If you use an oxygenated fuel, be sure it is unleaded and meets the
minimum octane rating requirement.
Before using an oxygenated fuel, try to confirm the fuel's contents.
Some states/provinces require this information to be posted on the
pump.
The following are the EPA — approved percentages of oxygenates:
ETHANOL (ethyl or grain alcohol)
You may use gasoline containing up to 10% ethanol by volume.
Gasoline containing ethanol may be marketed under the name
"Gasohol."
MTBE (Methyl Tertiary Butyl Ether)
You may use gasoline containing up to 15% MTBE by volume.
Page 93

METHANOL (methyl or wood alcohol)
Information Provided by:
You may use gasoline containing up to 5% methanol by volume as
long as it also contains cosolvents and corrosion inhibitors to
protect the fuel system.
Gasoline containing more than 5% methanol by volume may cause
starting and/or performance problems. It may also damage metal,
rubber, and plastic parts of your fuel system.
If you notice any undesirable operating symptoms, try another
service station or switch to another brand of gasoline.
Fuel system damage or performance problems resulting from the
use of an oxygenated fuel containing more than the percentages of
oxygenates given above are not covered under warranty.
Operation In Foreign Countries
In order to comply with U.S. and Canada Federal Emissions
Regulations, you must use unleaded fuels of the recommended
octane rating. These fuels may not be available in other countries. If
you intend taking your car outside the U.S. or Canada, write to
Honda (stating the year and model of your car) at the address shown
for information regarding modifications you may need to have done.
U.S. Owners: American Honda Motor Co., Inc.
Consumer Affairs
1919 Torrance Blvd.
Torrance, CA 90501-2746
Canadian Owners: Honda Canada Inc.
715 Milner Ave.
Scarborough, Ontario M1B-2K8
(cont'd)
Page 94
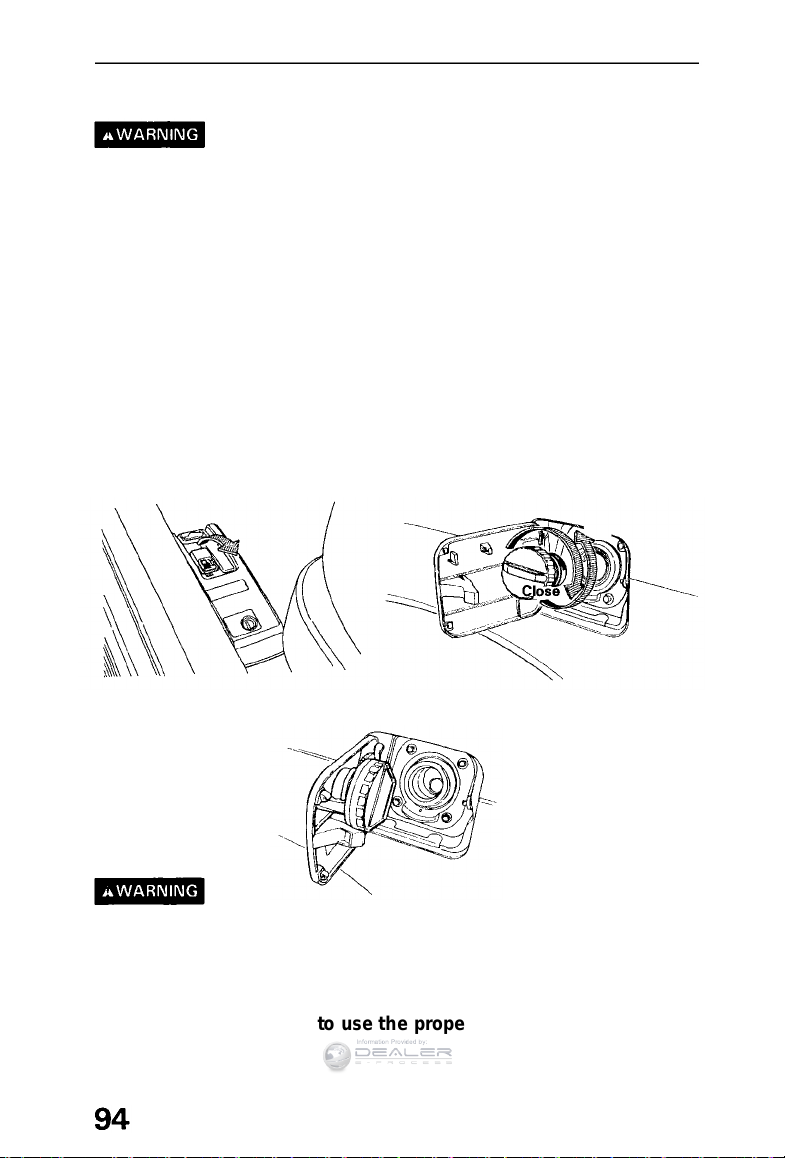
Gasoline (cont'd)
Information Provided by:
Fuel Fill Door and Cap
Gasoline is extremely flammable and is explosive under certain
conditions. Perform this operation in a well-ventilated area with
the engine stopped. Do not smoke or allow open flames or sparks
in the area or where gasoline is stored.
The fuel fill door is opened by pulling up on the lever at the left side
of the driver's seat.
The door will lock automatically when closed; push it until it clicks.
CAUTION:
You may hear a hiss when you open the fuel fill cap. This sound is
residual pressure escaping from the fuel tank. Open the cap slowly
and remove the cap after the hissing stops. Fuel spray may cause
injury. Do not overfill the tank; fill only until the gas pump clicks off
automatically and never top off.
NOTE:
The fuel fill cap is a screw-in ratchetting type. Tighten the cap
clockwise until ratchetting clicks are heard.
Open
The removed fuel fill cap can be placed on the inside of the door.
Fuel vapor is extremely hazardous under certain conditions.
Always stop the engine before refueling, and never refuel near
sparks or open flames.
CAUTION:
If you replace the cap, use only a genuine Honda replacement part
or its equivalent. Failure to use the proper part could cause serious
fuel system problems.
Page 95
How to Improve Your fuel Mileage:
Information Provided by:
Drive at a smooth, steady pace to avoid unnecessary deceleration
and stops — accelerating back to speed uses more fuel.
Plan trips to avoid rush hour traffic if possible.
Make sure the parking brake is completely released.
Consolidate trips whenever possible.
Keep vehicle weight to a minimum by removing unnecessary
items from the luggage area.
Whenever possible, use fresh air from the dash vents to keep
cool when driving; open windows, or use of the air conditioning
both affect fuel economy.
(Air conditioning is optional on US: DX, Canada: LX.)
Keep the tires adjusted to the recommended pressure.
Tire Pressure(measured cold):
Front/Rear:
US: DX/LX, Canada: LX/EX 200 kPa (29 psi)
US: EX/SE/Anniversary Edition, Canada: EX-R/SE
220 kPa (32 psi)
Condition of Your Car
You can only get maximum fuel economy if your car is in top
running condition. Have all required maintenance done at the proper
intervals. Check tire pressures and tire wear frequently. If tire wear
is uneven, have the alignment checked by your Honda dealer.
Proper alignment saves gasoline and prolongs tire life.
Page 96
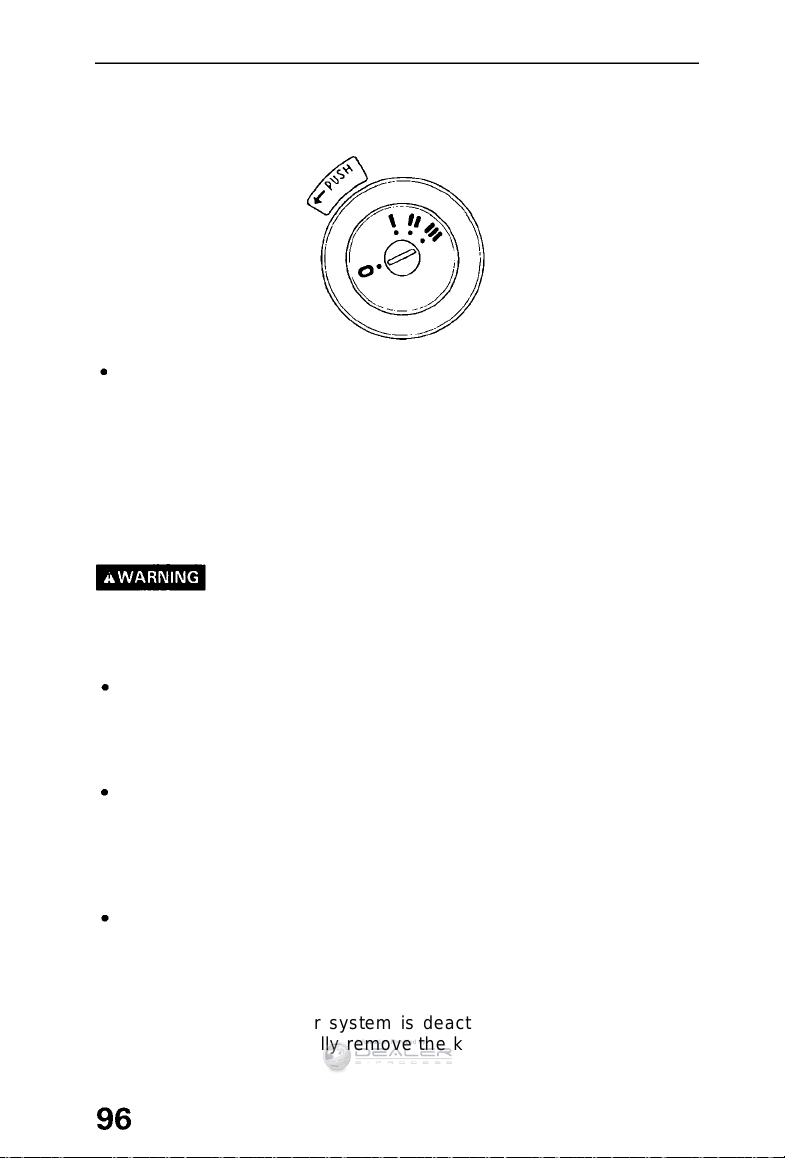
Ignition Switch
Information Provided by:
The combined ignition switch/anti-theft lock is located on the right
side of the steering column and has four positions:
0-LOCK position: The key can be removed or inserted in this
position. To remove the key, push it in at position I, then turn it to
0 and pull it out. When the key is removed, the steering column
will lock.
NOTE:
On cars equipped with automatic transmissions, the transmission
must be in Park before pushing and turning the key to the 0-LOCK
position.
Never turn the ignition switch to the lock position or remove the
key while the car is in motion; the steering wheel can lock causing
a loss of directional control, and an accident could result.
I-ACCESSORY position: In this position, the accessory circuit is
on, but the ignition circuit is off.
If the key is difficult to turn from the 0 to the I position, turn the
steering wheel slightly to relieve pressure on the lock.
II-ON position: This is the normal running position.
Canada Cars:
The "Daytime Running Lights" will come on in this position (see
page 51 ).
III-START position: The starter will engage when the key is
turned to this position.
To remind you to remove the ignition key when leaving your car, a
beeper will sound if the key is still in the ignition when you open the
driver's door. The beeper system is deactivated when you turn the
ignition to 0 (Lock) and fully remove the key.
Page 97
Starting the Engine
Information Provided by:
Before Starting
When starting in cold weather, keep all unnecessary electrical
circuits off (lights, defogger, etc.) for the best battery output.
Manual Transmission:
1. Apply the parking brake.
2. Push the clutch pedal all the way in (see NOTE below).
3. Shift the transmission to neutral.
NOTE:
On cars equipped with manual transmissions, the engine will not
crank unless the clutch pedal is fully depressed.
Automatic Transmission:
1. Make sure the shift lever is in Park (P).
2. Apply the parking brake and the foot brake.
Starting the Engine
During the following starting procedures, do not crank the engine
for more than 15 seconds at a time. If the engine won't start, wait
10 seconds before going to the next step.
1. With your foot off the accelerator, start the engine by turning the
key to the III position.
2. If the engine won't start within 15 seconds or starts but fails to
continue to run, push the accelerator pedal halfway, and hold it
there while cranking the engine. If the engine starts, release the
accelerator gradually.
3. If it doesn't start within 15 seconds, push the accelerator pedal
down to the floor and hold it there while cranking. If the engine
starts, release the accelerator gradually. If it doesn't start, repeat
step 2.
Cold Weather at High Altitude Starting
1. When starting in cold weather at high altitude (above 8,000 feet),
push the accelerator pedal about halfway and hold it there while
cranking the engine. If the engine starts, release the accelerator
gradually.
2. If it doesn't start within 15 seconds, push the accelerator pedal
down to the floor and hold it there while cranking. If the engine
starts, release the accelerator gradually. If it doesn't start, repeat
step 1.
NOTE:
If the outside temperature is below freezing, or if your car has not
been driven for several days, warm up the engine for a few minutes
before driving.
Page 98
Safety Items
Information Provided by:
Before driving away, check that:
The doors are closed properly.
The mirrors are properly adjusted, and the windows clean.
The driver and passengers are wearing properly adjusted seat
belts.
The front seat head restraints are properly adjusted.
The warning and indicator lights are operating properly.
The brake pedal feels normal.
All luggage and cargo is secured.
Nothing is interfering with the driver's feet or blocking vision to
the rear.
While driving remember to:
Always drive defensively; expect the unexpected.
Reduce your speed during night hours and bad weather.
Follow at a safe distance; don't tailgate.
Get off the highway when you are tired; stop and take a rest.
When stopping for repairs:
Park the car well off the road.
Turn on the hazard warning flasher.
Use flares or other warning devices to warn other motorists.
After parking your car:
Apply the parking brake and shift to first gear if your car is
equipped with manual transmission, or PARK on automatic
transmission equipped cars.
Make sure the moonroof and windows are closed and the doors
are locked.
(The moonroof is standard for US: EX/SE, Canada: EX-R/SE.)
If parked on a hill:
1. Turn the front wheels away from the curb if facing uphill.
2. Turn the front wheels toward the curb if facing downhill.
Never leave children unattended in a parked car.
Take your keys.
Page 99
Engine Exhaust Gas Warning
Information Provided by:
A properly maintained car is your best protection against exhaust
gas entering the passenger compartment.
The exhaust system should be thoroughly inspected by a competent mechanic whenever:
The car is raised for oil change.
You notice a change in the sound of the exhaust.
The exhaust system or the rear or underside of the car is
damaged.
Avoid breathing exhaust gases. They contain carbon monoxide,
which is a colorless, odorless gas that can cause loss of consciousness and eventual death. If you suspect that exhaust gas
is entering the passenger compartment, have the cause determined and corrected as soon as possible. If you must drive
under these conditions, drive only with all windows fully open.
Do not drive with the trunk lid open. An open trunk lid may draw
exhaust gases into the passenger compartment. If you must
drive with the trunk lid open, drive only with all the windows
wide open.
Do not run the engine in confined areas, such as garages, any
longer than necessary to move the car in or out.
If you must sit in a parked car with the engine running for more
than a short time, adjust the heating/ventilation system as
follows:
1. (US: DX, Canada: LX)
Slide the function lever to and push the button off.
(US: LX/EX/SE/Anniversary Edition, Canada: EX/EX-R/SE)
Select the and positions.
2.Set the temperature lever/control dial for best comfort.
3.Turn the fan to the highest speed.
NOTE:
To insure proper operation of the car's ventilation system, keep the
front air inlet clear of snow, mud, leaves, or other obstructions.
Page 100
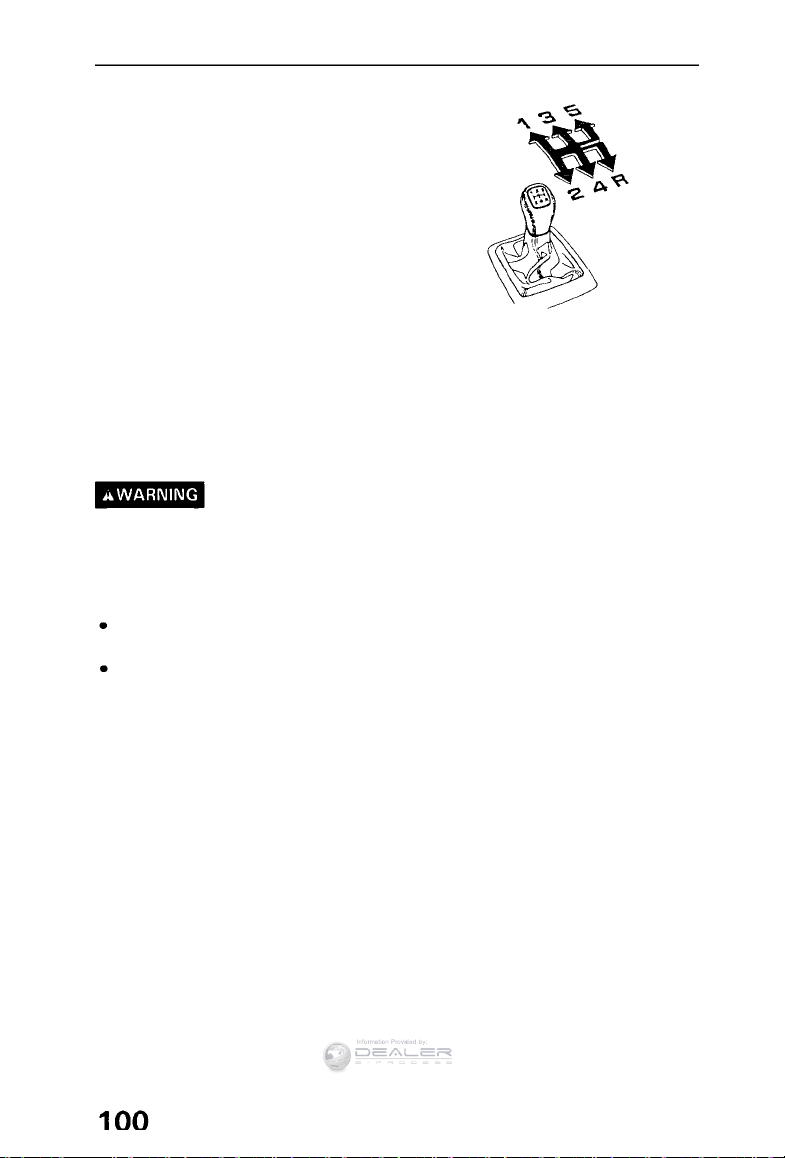
Shifting the 5-Speed Manual Transmission
Information Provided by:
The fully synchronized manual
transmission is very easy to shift
up or down. When you slow down
for traffic, steep hills, or corners,
shift to a lower gear before the
engine starts to labor. When de-
scending steep grades, select a
lower gear to help maintain a safe
speed and to prevent the brakes
from overheating.
When shifting, depress the clutch
pedal fully, shift gears and then release the clutch gradually. Do not
speed-shift; allow time for the gears to synchronize.
To prevent grinding the gears when shifting into reverse, hold the
clutch pedal depressed briefly before shifting, or shift the lever into
one of the forward gears before selecting reverse.
A safety lockout prevents accidental shifting straight from 5th to
Reverse.
Avoid rapid acceleration or sudden deceleration when either or
both driving wheels are on a slippery surface. Decreased traction
could cause loss of directional control.
CAUTION:
Do not drive with your foot on the clutch pedal as this will cause
premature wear of clutch components.
Do not shift into reverse while the car is moving.
 Loading...