

HONDA 08B21-SJC-102 User Manual
INSTALLATION
www.collegehillshonda.com
INSTRUCTIONS
Accessory Application Publications No.
REAR CAMERA
ATTACHMENT
(EX-L WITH NAVI)
2006-2008 RIDGELINE
AII 36587
Issue Date
MAY 2007
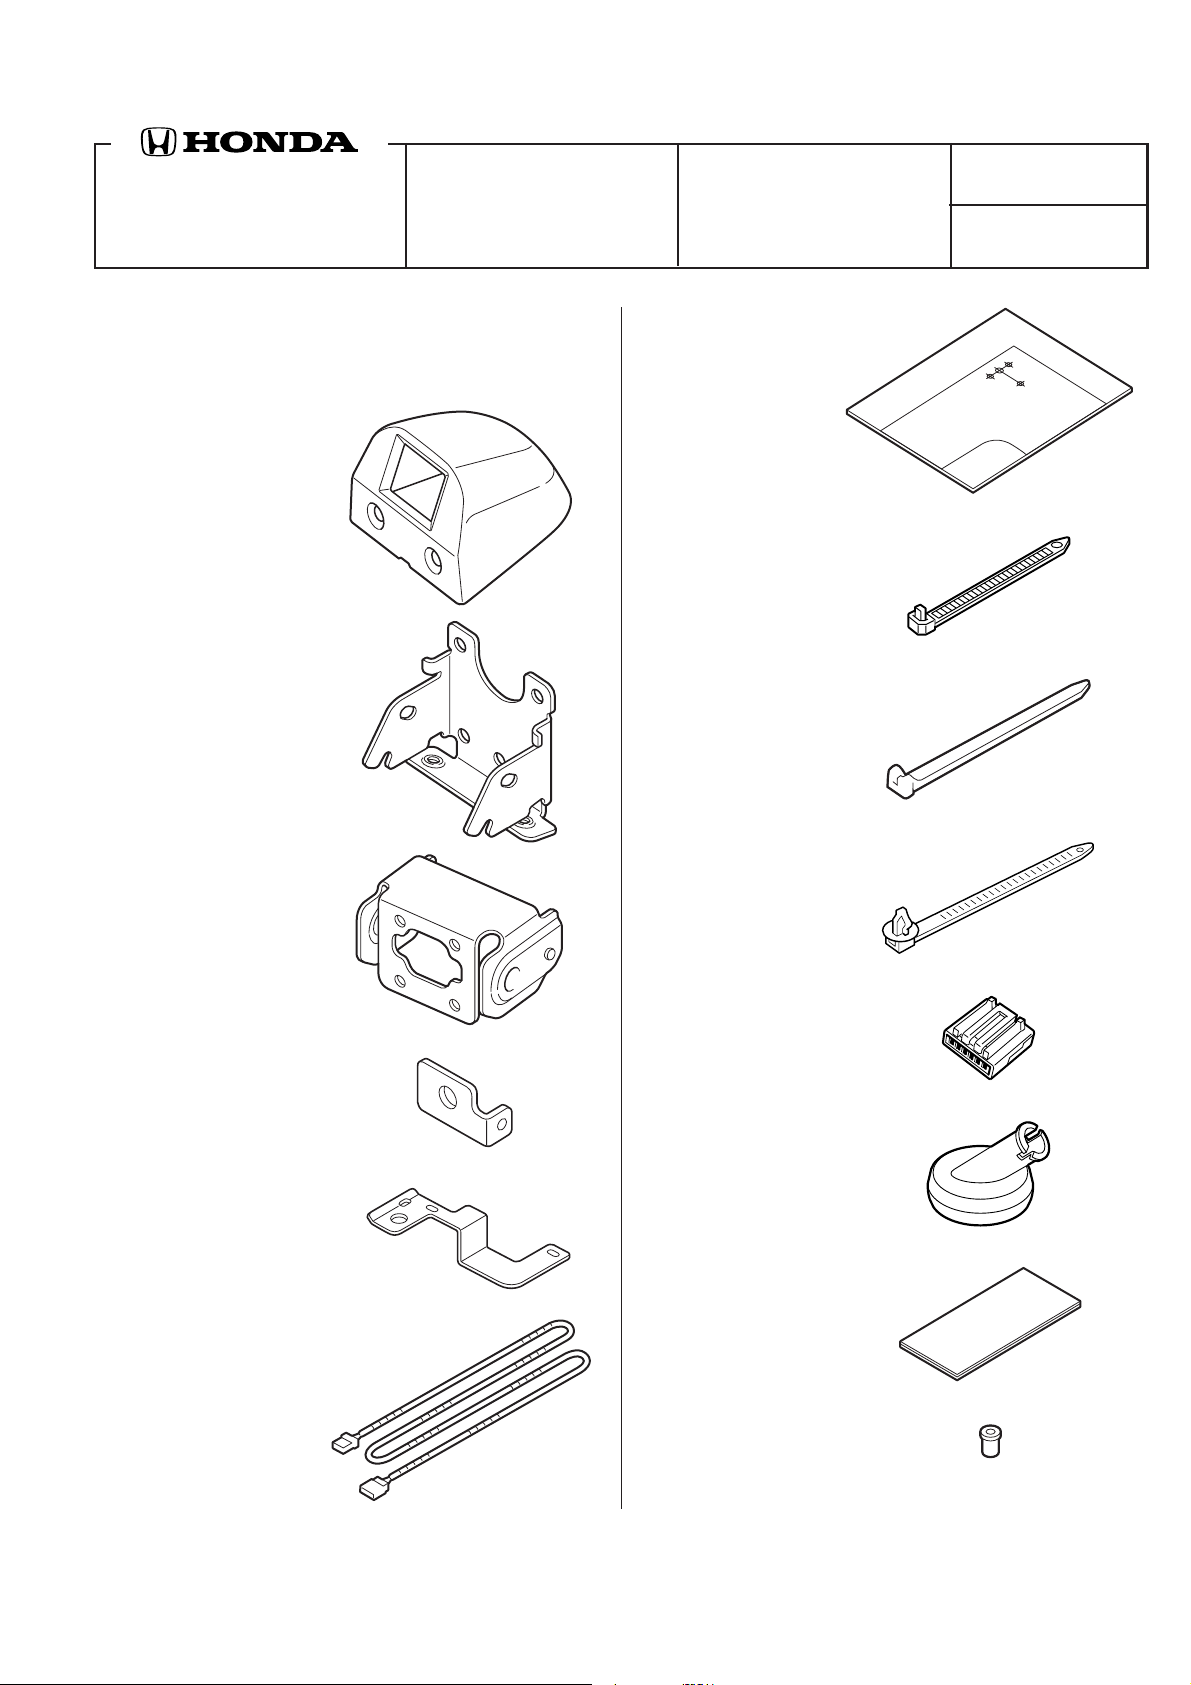
PARTS LIST
Attachment Kit
P/N: 08B21-SJC-102
Rear camera trim
Rear camera bracket
Rear camera subbracket
Template
19 Wire ties
10 Small wire ties
6 Wire ties with clip
6-Pin connector
Harness clamp bracket A
Grommet
Harness clamp bracket B
2 Clear adhesive tapes
Rear camera subharness
3 Blind nuts
© 2007 American Honda Motor Co., Inc. - All Rights Reserved. AII 36587 (0705) 1 of 17
08B21-SJC-1010-91

2 EPT sealers
K
www.collegehillshonda.com
4 Cushion tapes
2 Socket bolts, 4 x 10 mm
3 Washer screws, 4 x 12 mm
2 Washer screws, 4 x 6 mm
7 Clips
TOOLS AND SUPPLIES REQUIRED
Phillips screwdriver
Flat-tip screwdriver
10 mm Combination wrench
Ratchet
10, 12 mm and 14 mm Socket
Torque wrench
File
Isopropyl alcohol
Shop towel
Tape measure
Drill
3 mm, 8 mm, and 10 mm Drill bits
Utility knife
T40, and T50 Torx bit
KTC trim tool
Scissors
Tape
Electrical tape
Wire
3 mm Hex wrench
Round grommet
6 Oval grommets
Accessory user’s information manual
Rear Camera Kit (sold separately)
P/N: 08A57-SJC-100
Rear camera
Illustration of the Rear Camera Installed on the
Vehicle
NAVI CONTROL UNIT
REAR CAMERA
SUBHARNESS
6-PIN CONNECTOR
GROMMET
REAR
CAMERA
4712100
INST ALLATION
Customer Information: The information in this
installation instruction is intended for use only by
skilled technicians who have the proper tools,
equipment, and training to correctly and safely add
equipment to your vehicle. These procedures
should not be attempted by “do-it-yourselfers.”
1. Make sure you have the anti-theft code for the
radio, then write down radio station presets.
2. Disconnect the negative cable from the battery.
2 of 17 AII 36587 (0705) © 2007 American Honda Motor Co., Inc. - All Rights Reserved.
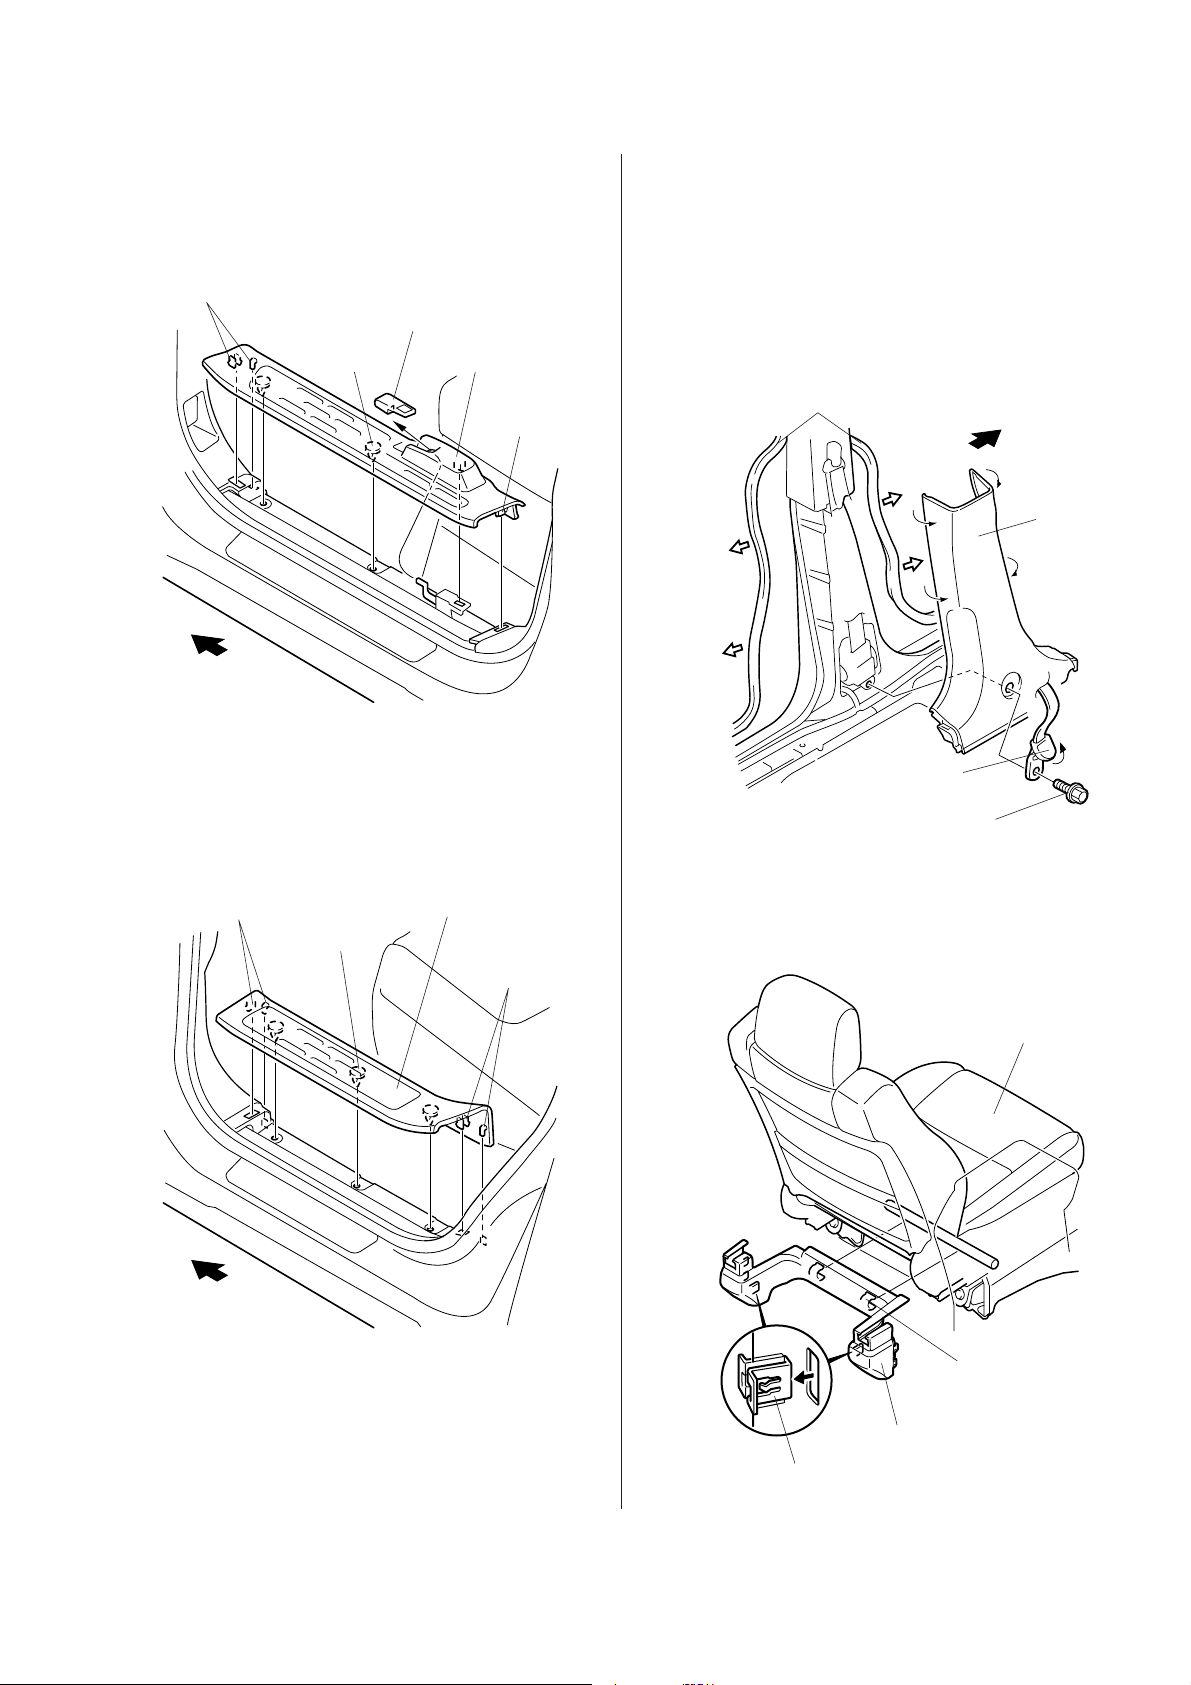
3. Remove the fuel fill door release handle. Remove
T
T
4713010K
T
www.collegehillshonda.com
the left front door sill trim (three clips and three
retaining tabs).
RET AINING
TABS
FRONT
FUEL FILL DOOR
RELEASE HANDLE
3 CLIPS
LEFT FRONT
DOOR SILL TRIM
RETAINING
TAB
3916041
5. Pull away the weatherstrip from the B-pillar lower
trim panel. Remove the left seat belt lower anchor
bolt cover and remove the lower anchor bolt.
Remove the left B-pillar lower trim panel by
pulling out toward you as shown.
• Seat belt anchor bolt torque:
30 to 35 N·m (22 to 25 lbs)
WEATHERSTRIP
(Pull away.)
FRONT
LEFT
B-PILLAR
LOWER
TRIM
PANEL
4. Remove the left rear door sill trim (three clips and
four retaining tabs).
RETAINIG
TABS
3 CLIPS
FRONT
LEFT REAR
DOOR SILL TRIM
RETAINIG
TABS
4212450
LOWER ANCHOR
BOLT COVER
LEFT SEAT BELT
LOWER ANCHOR BOLT
4212330
6. Remove the driver’s seat frame rear cover (two
clips and two hooks).
DRIVER’S SEAT
© 2007 American Honda Motor Co., Inc. - All Rights Reserved. AII 36587 (0705) 3 of 17
2 HOOKS
DRIVER’S SEAT
FRAME REAR COVER
2 CLIPS

7. Lift up the rear seats, and remove the rear seat
T
T
T
T
www.collegehillshonda.com
under covers;
9. Remove the rear seat belt anchor bolt and eight
seat anchor bolts.
• Remove the right rear seat under cover (four
clips).
• Remove the left rear seat under cover (five
clips).
LEFT REAR
SEAT CUSHION
RIGHT REAR
SEAT CUSHION
RIGHT REAR
SEAT UNDER
COVER
LEFT REAR
9 CLIPS
SEAT UNDER
COVER
8. Remove the rear seat bracket covers;
4212342
• Seat belt anchor bolt torque:
30 to 35 N·m (22 to 25 lbs)
8 SEAT
ANCHOR
BOLTS
REAR SEAT
BELT ANCHOR
BOLT
4212362
10. Remove the cap from the rear trim panel cover
(four retaining tabs for each cover), and remove
the rear seat.
• Remove the left and right rear seat bracket
covers (two clips for each cover).
• Remove the center seat bracket cover (two
clips and nine retaining tabs).
LEFT REAR
SEAT BRACKET
COVER
CLIPS
9 RETAINING
TABS
CENTER SEAT
BRACKET
COVER
2 CLIPS
RIGHT REAR
SEAT BRACKET
COVER
CLIPS
4212460
4 RETAINING
TABS
REAR SEAT
CAP
4 RETAINING
TABS
CAP
4212371
4 of 17 AII 36587 (0705) © 2007 American Honda Motor Co., Inc. - All Rights Reserved.

11. Remove the rear trim panel cover (eight clips and
K
3924012H
K
T
www.collegehillshonda.com
two retaining tabs).
2 RETAINING
TABS
REAR TRIM
PANEL COVER
14. Remove the left rear lower anchor bolt cover, and
remove the left rear seat belt lower anchor bolt.
• Seat belt anchor bolt torque:
30 to 35 N·m (22 to 25 lbs)
CLIP
6 CLIPS
CLIPS
4212381
12. Remove the left rear seat belt upper anchor bolt
cover (four retaining tabs), and remove the left
rear seat belt upper anchor bolt.
• Seat belt anchor bolt torque:
30 to 35 N·m (22 to 25 lbs)
CLIP
LEFT REAR SEAT
BELT UPPER
ANCHOR BOLT
4 RETAINING
TABS
2 CLIPS
LEFT REAR
LOWER
ANCHOR
BOLT COVER
LEFT REAR
SEAT BELT
LOWER
ANCHOR
BOLT
LEFT REAR
PILLAR
LOWER TRIM
4715611
15. Remove upper clip, then pull the left rear pillar
lower trim out toward you to release two clips.
16. Remove the left rear taillight (two bolts, two clips
and vehicle connector). Remove the right taillight
the same way .
LEFT SIDE RIGHT SIDE
VEHICLE
CONNECTOR
LEFT REAR
SEA T BEL T
ANCHOR BOLT
COVER
2 TABS
LEFT REAR PILLAR
UPPER TRIM
CLIP
4715601
2 CLIPS
VEHICLE
CONNECTOR
BOLTS
13. Remove the left rear pillar upper trim.
• With side airbag; pull the clip, and remove the
left rear pillar trim by releasing the one clip.
• Without side airbag; remove the left rear pillar
trim by releasing the two clips.
LEFT
TAILLIGHT
© 2007 American Honda Motor Co., Inc. - All Rights Reserved. AII 36587 (0705) 5 of 17
VEHICLE
CONNECTOR
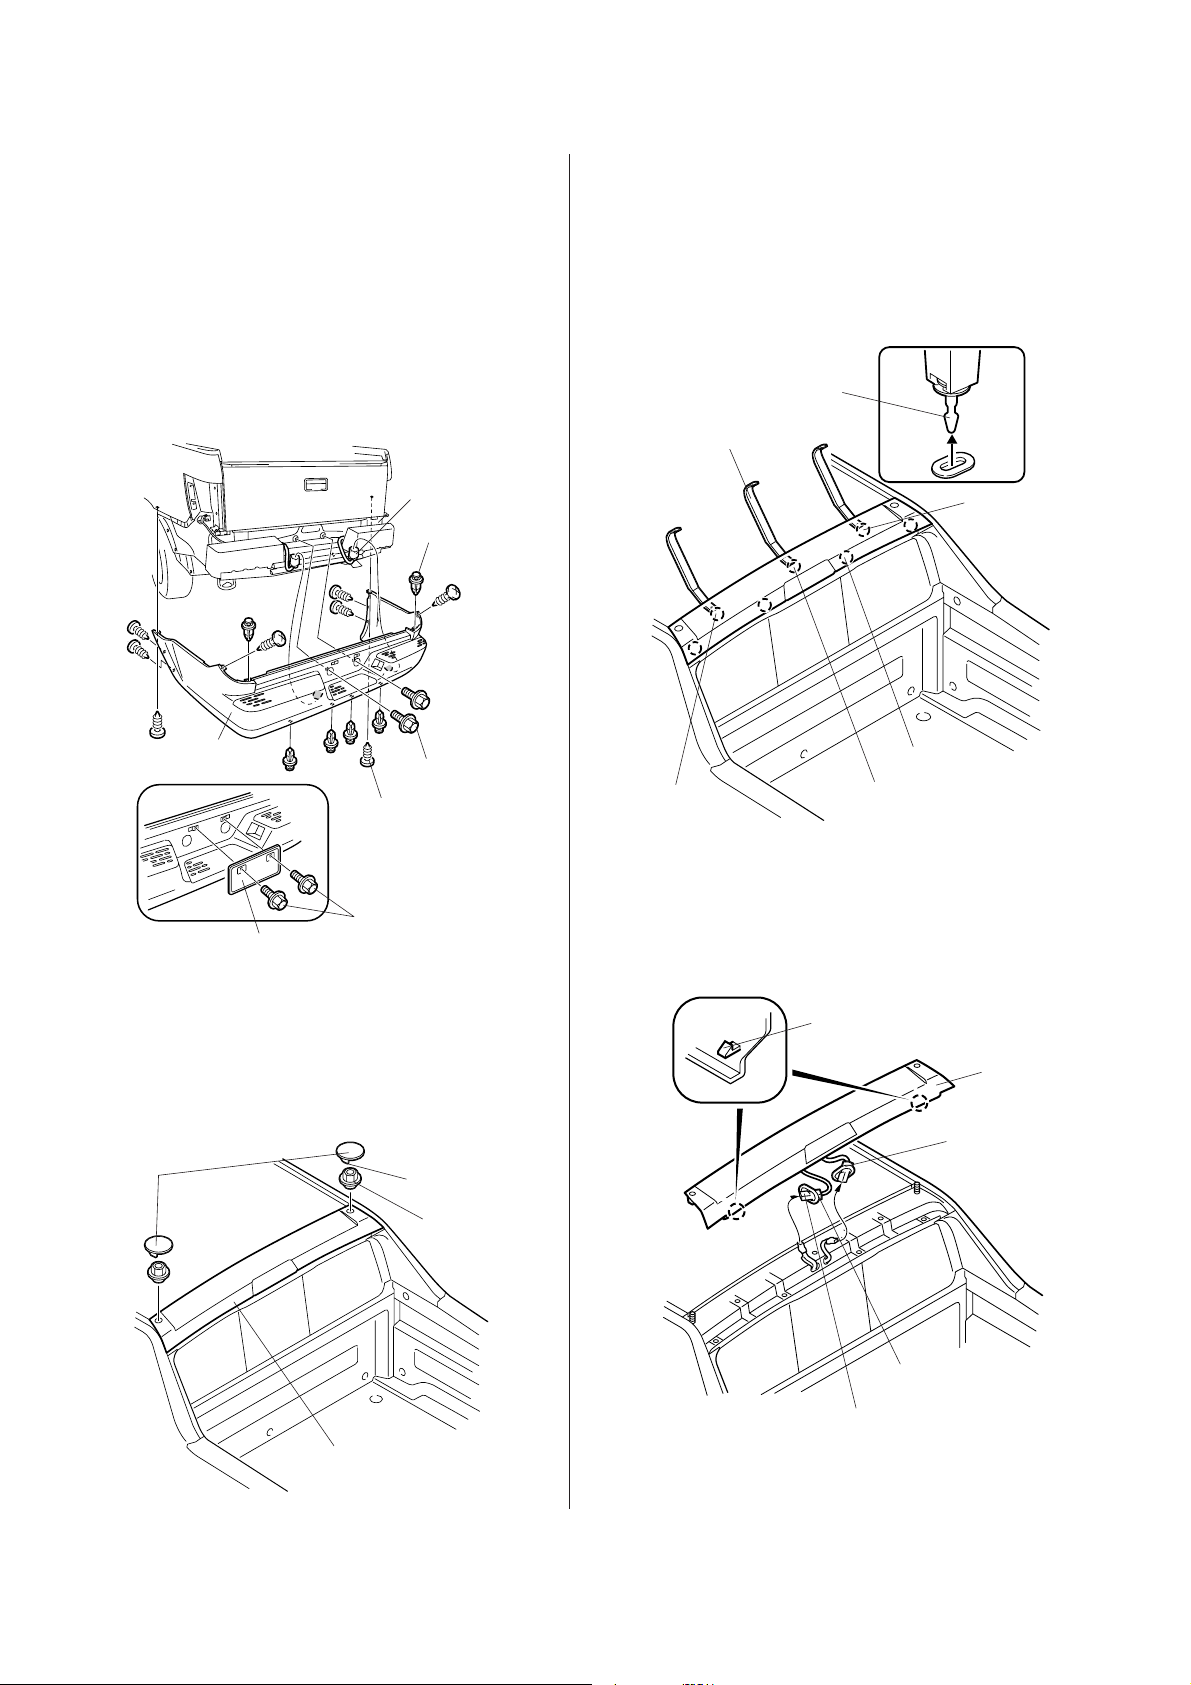
17. Remove the rear bumper:
H
H
H
H
www.collegehillshonda.com
• Remove the license plate (two bolts).
• Remove two bolts, six self-tapping screws and
six clips from the rear bumper.
• Pull the rear bumper toward you. Unplug the
two vehicle connectors, and remove the rear
bumper.
• Using a KTC trim tool, carefully pry up the
front of the trim to release the three front clips.
Start with the left clip and work towards the
right clip.
• Gently left the front of the trim to release the
four rear clips.
• Set the rear bumper on the blanket.
2 VEHICLE
CONNECTORS
6 CLIPS
REAR
BUMPER
LICENSE PLATE
2 BOLTS
8 SELFTAPPING
SCREWS
BOLTS
3003063
7 CLIPS
KTC TRIM TOOL
RIGHT CLIP
(Finish here.)
4 CLIPS
LEFT CLIP
(Start here.)
CENTER CLIP
(Second.)
4D19062
• Remove the antenna grommet from the roof,
unplug the vehicle connector, and remove the
rear roof trim.
18. Remove the rear roof trim:
2 HOOKS
• Remove the roof trim nut covers (two retaining
tabs for each cover).
REAR
ROOF TRIM
• Remove the two nuts.
ROOF TRIM
NUT COVER
2 RETAINING
TABS
2 NUTS
2 VEHICLE
CONNECTORS
REAR ROOF TRIM
4D19051
6 of 17 AII 36587 (0705) © 2007 American Honda Motor Co., Inc. - All Rights Reserved.
HIGH-MOUNT
BRAKE LIGHT
GROMMET
ANTENNA
GROMMET
4804024
 Loading...