

Page 1
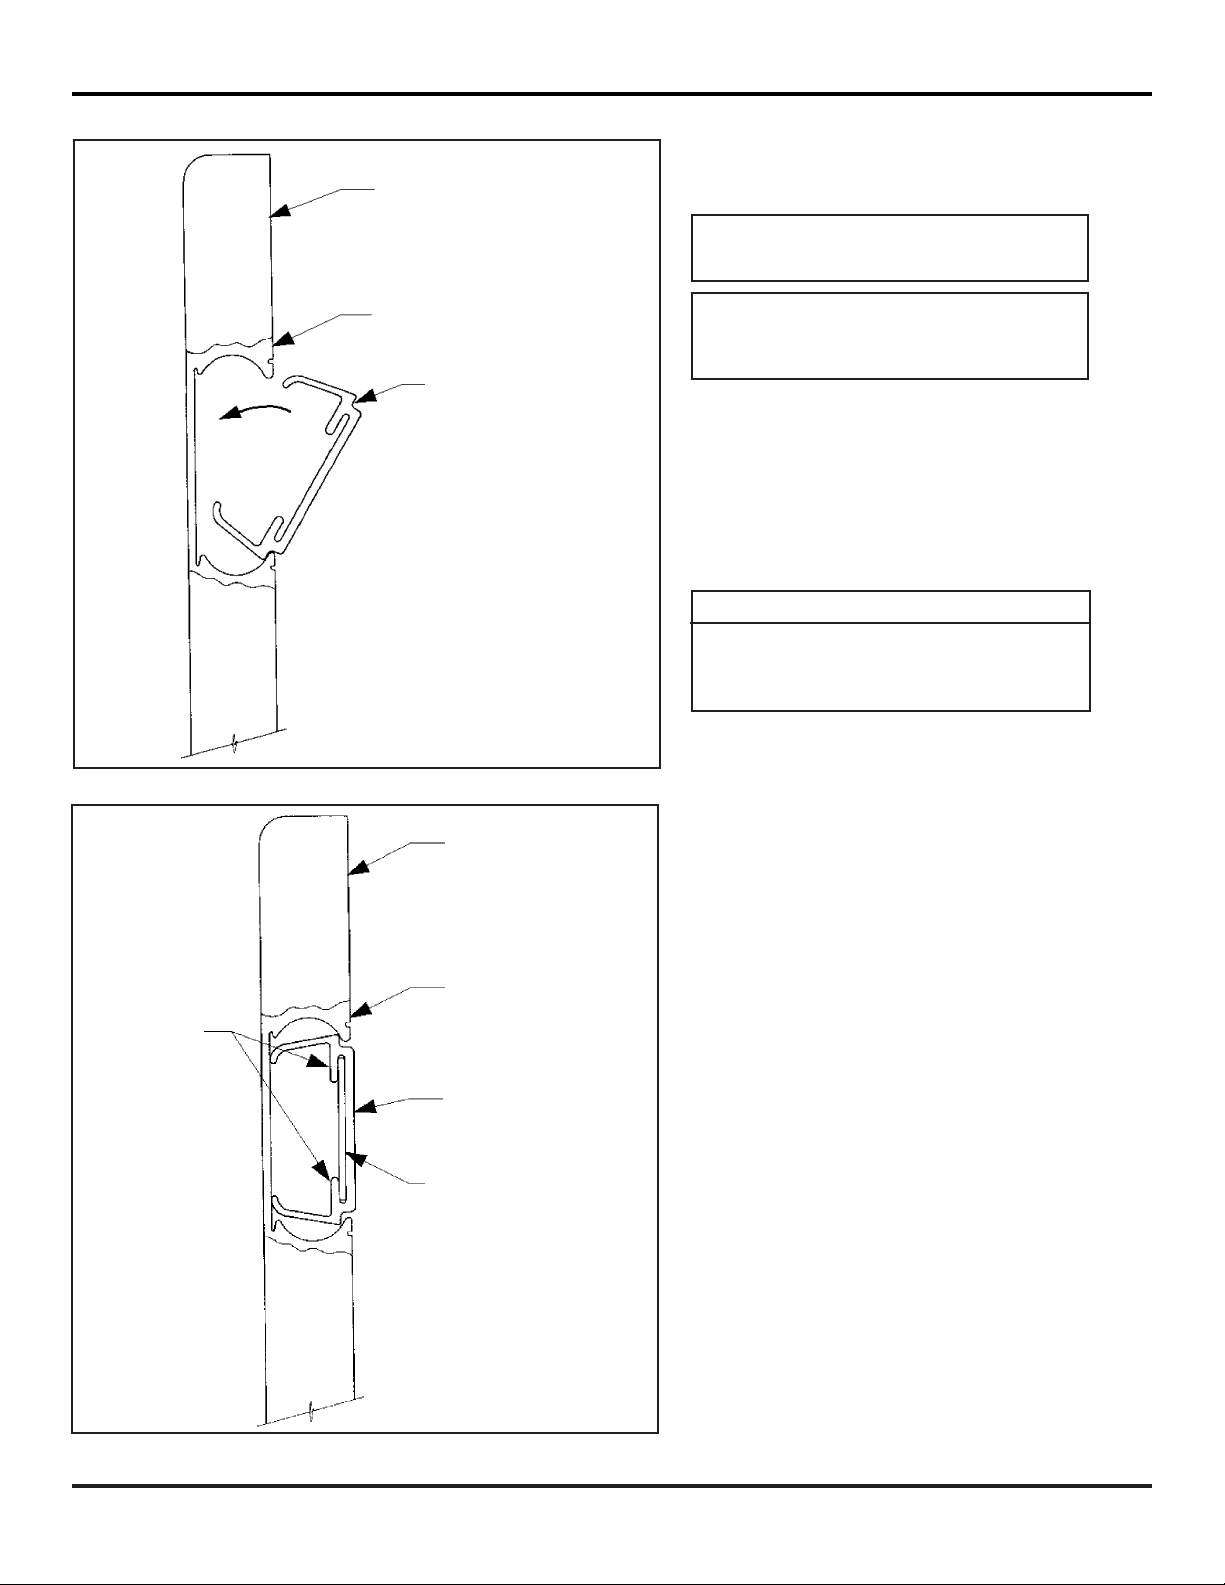
600 SERIES LATERAL AND SHELF FILE LABEL HOLDER
42-2303B
(2/95)
Installation:
1. Refer to Illustration 1. Place bottom lip
of label holder onto bottom edge of
drawer pull.
2. Refer to Illustration 1. While applying
downward pressure to top of label holder, push inward until label holder snaps
into place.
3. Slide label holder either to the left or
right side of drawer pull.
4. Refer to Illustration 2. Insert label into
label holder by sliding label into label
holder grooves.
Tools required for assembly:
None
Read all instructions and review illustrations before installing.
This assembly includes:
Label holder
Label
Drawer front
Drawer pull
Label holder
Drawer front
Drawer pull
Label holder
Label
NOTE
To allow access to the drawer pull, the label
holder must be positioned to either side of
drawer pull.
Grooves
Illustration 1
Illustration 2
INSTALLATION INSTRUCTIONS
Page 2
REQUIRED ADJUSTMENTS
Tools required for file adjustment:
1
⁄4" Drive socket wrench 24" long level
1
⁄4" Drive extension Straight blade screwdriver (optional)
1
⁄4" Six point socket with 1⁄4" drive
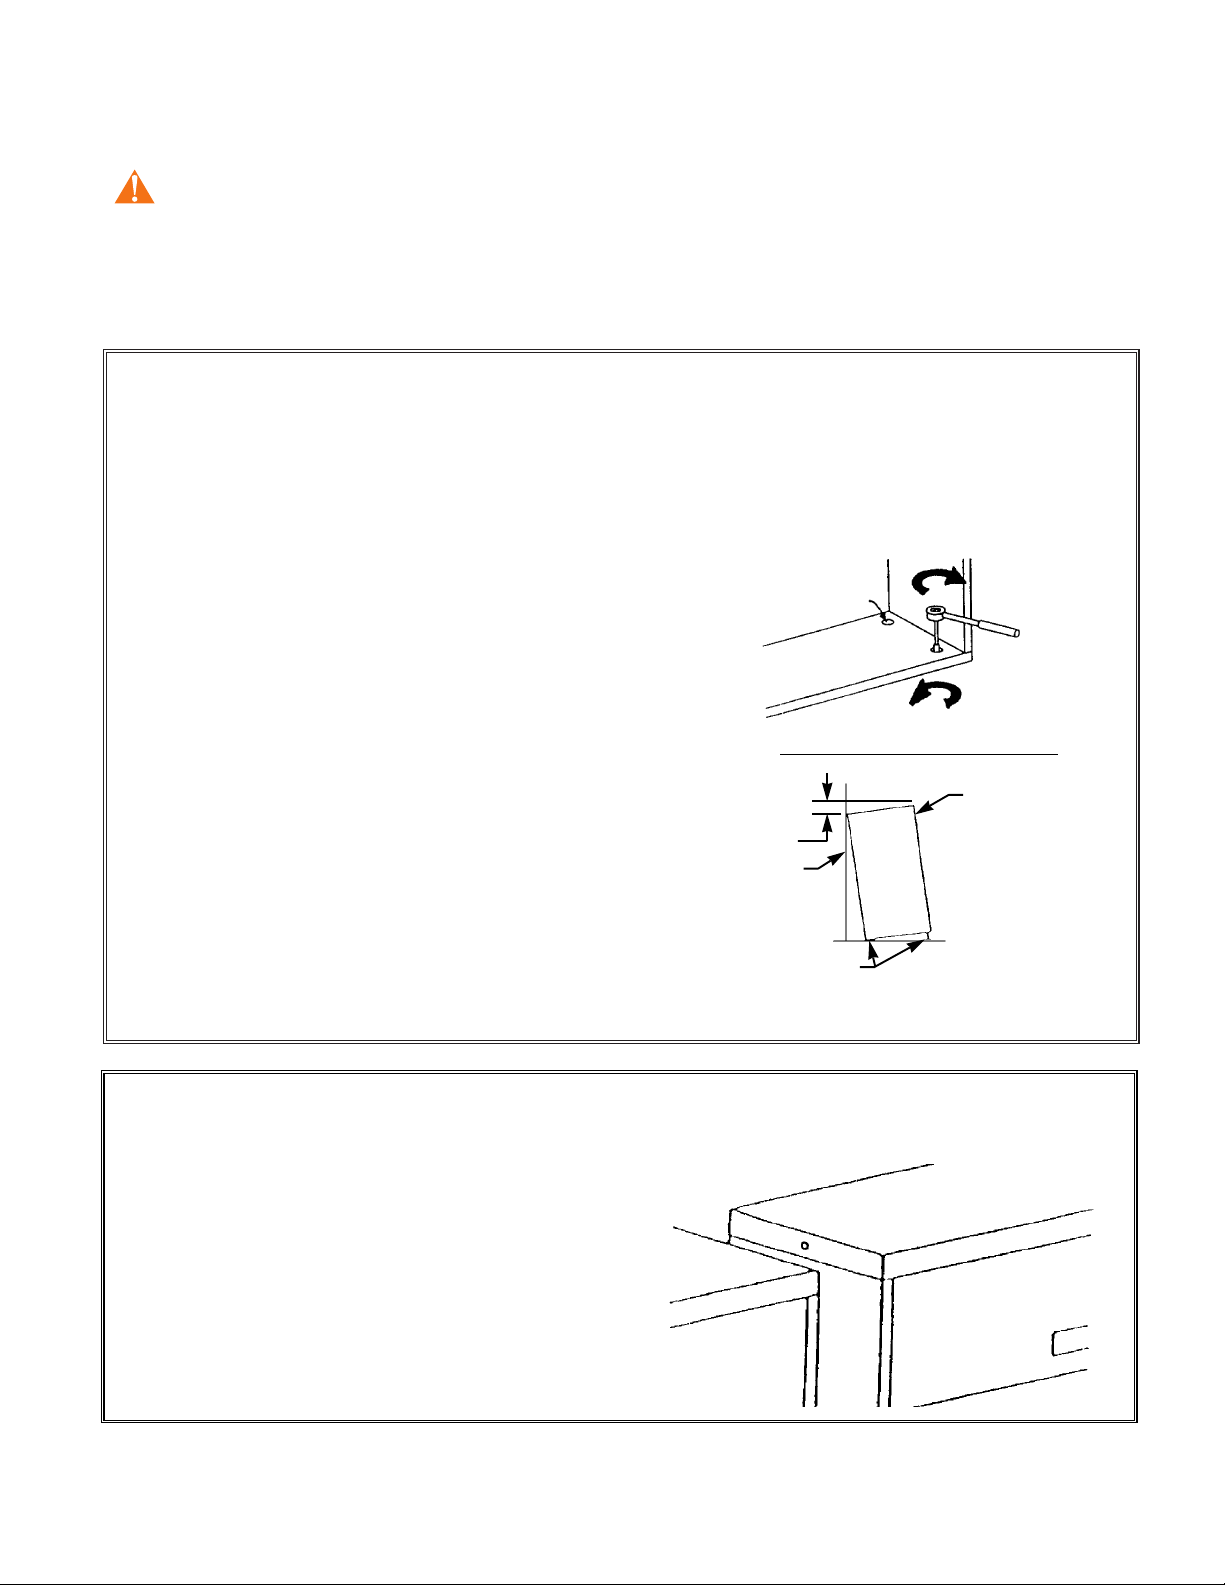
Adjustable glides are provided in the base of each cabinet.
Glide adjustment is critical for cabinet stability and
proper operation of lock, interlock, doors, and shelves.
1. Be sure cabinet is empty.
2. Position cabinet into desired location.
3. To access glides, align slots in bottom drawer/shelf with
holes in base. Use the socket wrench, extension, and 1⁄4"
socket (or the straight blade screwdriver) to adjust glides.
4. Turn glides clockwise to raise cabinet. Turn counterclockwise to lower cabinet.
5. On carpeted floors, extend all four glides until the weight
of the cabinet is supported by the glides (not by the cabinet bottom).
6. Level cabinet side-to-side.
7. On carpet, adjust glides so the front of the cabinet is
1
⁄4" higher than the rear. On uncarpeted floors, the
front should be 1⁄8" higher than the rear.
8. Check cabinet for proper operation. Drawers and doors
should open and close smoothly and be evenly aligned
with the frame.
I
NSTALLATION AND USE MANUAL FOR LATERAL FILES
Please return this manual to the orange storage pocket in the bottom drawer.
42-2306J
SIDE 1 OF 4 (6/99)
AN IMPROPERLY INSTALLED FILE CABINET CAN BECOME UNSTABLE OR TIP OVER, CAUSING SERIOUS INJURY.
FOLLOW ALL INSTRUCTIONS IN THIS MANUAL FOR CORRECT INSTALLATION, USE, AND MAINTENANCE.
These files are for storing and filing non-combustible materials that do not require special protection. Do not use this
cabinet to store combustible or hazardous materials.
WEAR SAFETY GLASSES WHEN USING TOOLS
INSTALLATION AND ANCHORING
To increase stability and avoid tip over, cabinets should be bolted together or anchored to a wall whenever
possible.
1. Adjust all cabinets. Refer to Required Adjustments
Section.
2. Fully extend top drawer.
3. Remove knockout.
4. Use the hardware provided in the key packet to bolt cabinets together.
5. Use wall anchoring devices when securing a cabinet to a
wall. Be sure to use the right devices for the type of wall
you have.
WARNING
Front of cabinet
1
⁄8" to 1⁄4"
Adjustable glides
Quantity dependent on model:
4 - One at each corner, or
2 - One at each front corner
Wall
Clockwise to raise
Access holes
Counterclockwise to lower
Bottom drawer/shelf not shown for clarity
Page 3
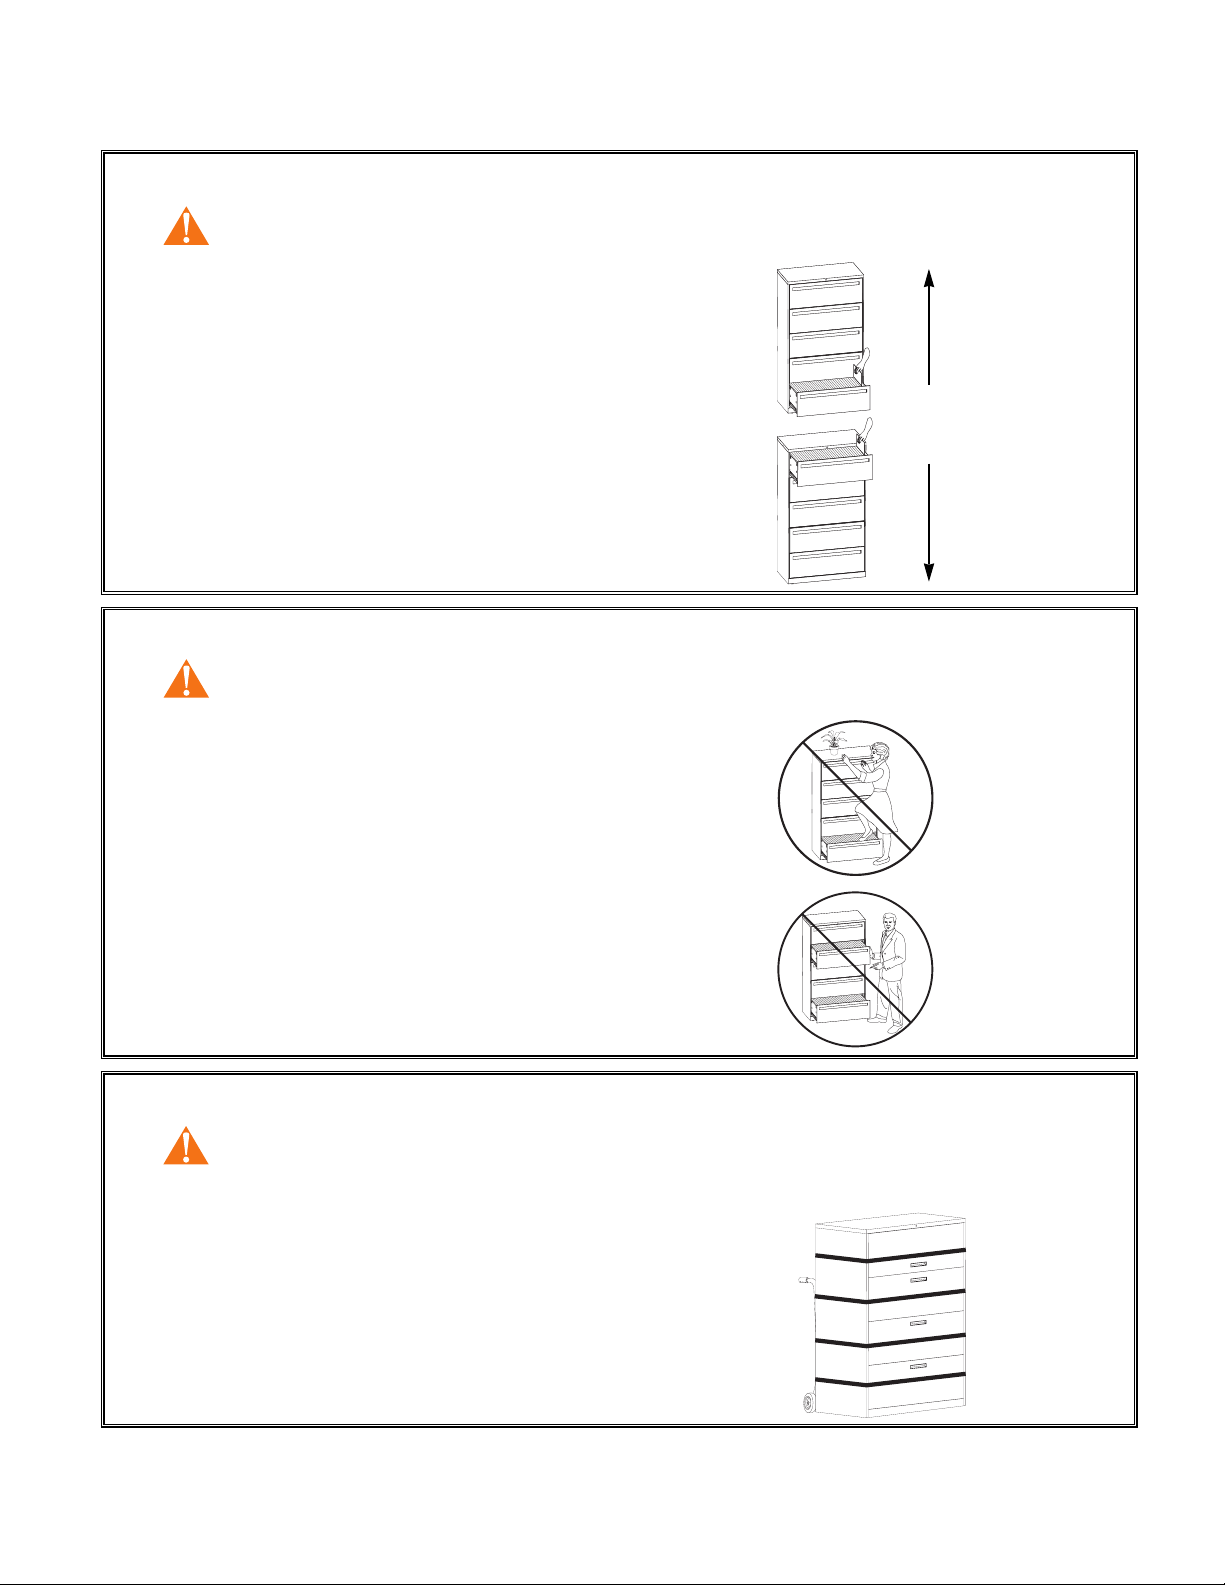
LOADING AND UNLOADING
Loading:
1. Check cabinet for proper adjustment and stability.
2. Load bottom drawer first to increase stability.
3. Distribute contents and weight evenly among remaining
drawers.
4.
Check to see if cabinet is stable after loading is complete (on carpeted surfaces, settling may occur). If
necessary, empty cabinet completely, then readjust
glides.
Unloading:
1. Remove contents from top drawer first.
2. Remove contents from bottom drawer last.
42-2306J
SIDE 2 OF 4 (6/99)
An improperly loaded or unloaded file cabinet can become unstable or tip
over, causing serious injury.
OPERATING
• Do not stand or lean on an open drawer.
• Do not put materials on an open drawer. Use posting shelf
or table to sort or collate.
• If this cabinet ever seems unstable, do not use it.
Have
it checked for proper leveling and loading. Have any problems corrected immediately.
• This cabinet has an interlock to inhibit opening more
than one drawer at a time. Do not try to defeat this interlock.
• These files are for storing and filing non-combustible materials that do not require special protection. Do not use this
cabinet to store combustible or hazardous materials.
If misused, this file cabinet can become unstable or tip over, causing serious
injury. To help prevent accidents, follow the instructions below.
RELOCATING
Before moving cabinet:
1. Unload contents. (Unload from the top. See loading and
unloading above.)
2. Secure the unit:
• Close and lock the cabinet.
• Use furniture straps and appropriate moving
equipment.
3. After positioning cabinet in new location, follow instructions for adjusting and installing.
If not properly secured when moving, this file cabinet can become unstable
or tip over, causing serious injury.
WARNING
WARNING
WARNING
Unload
Load
Page 4
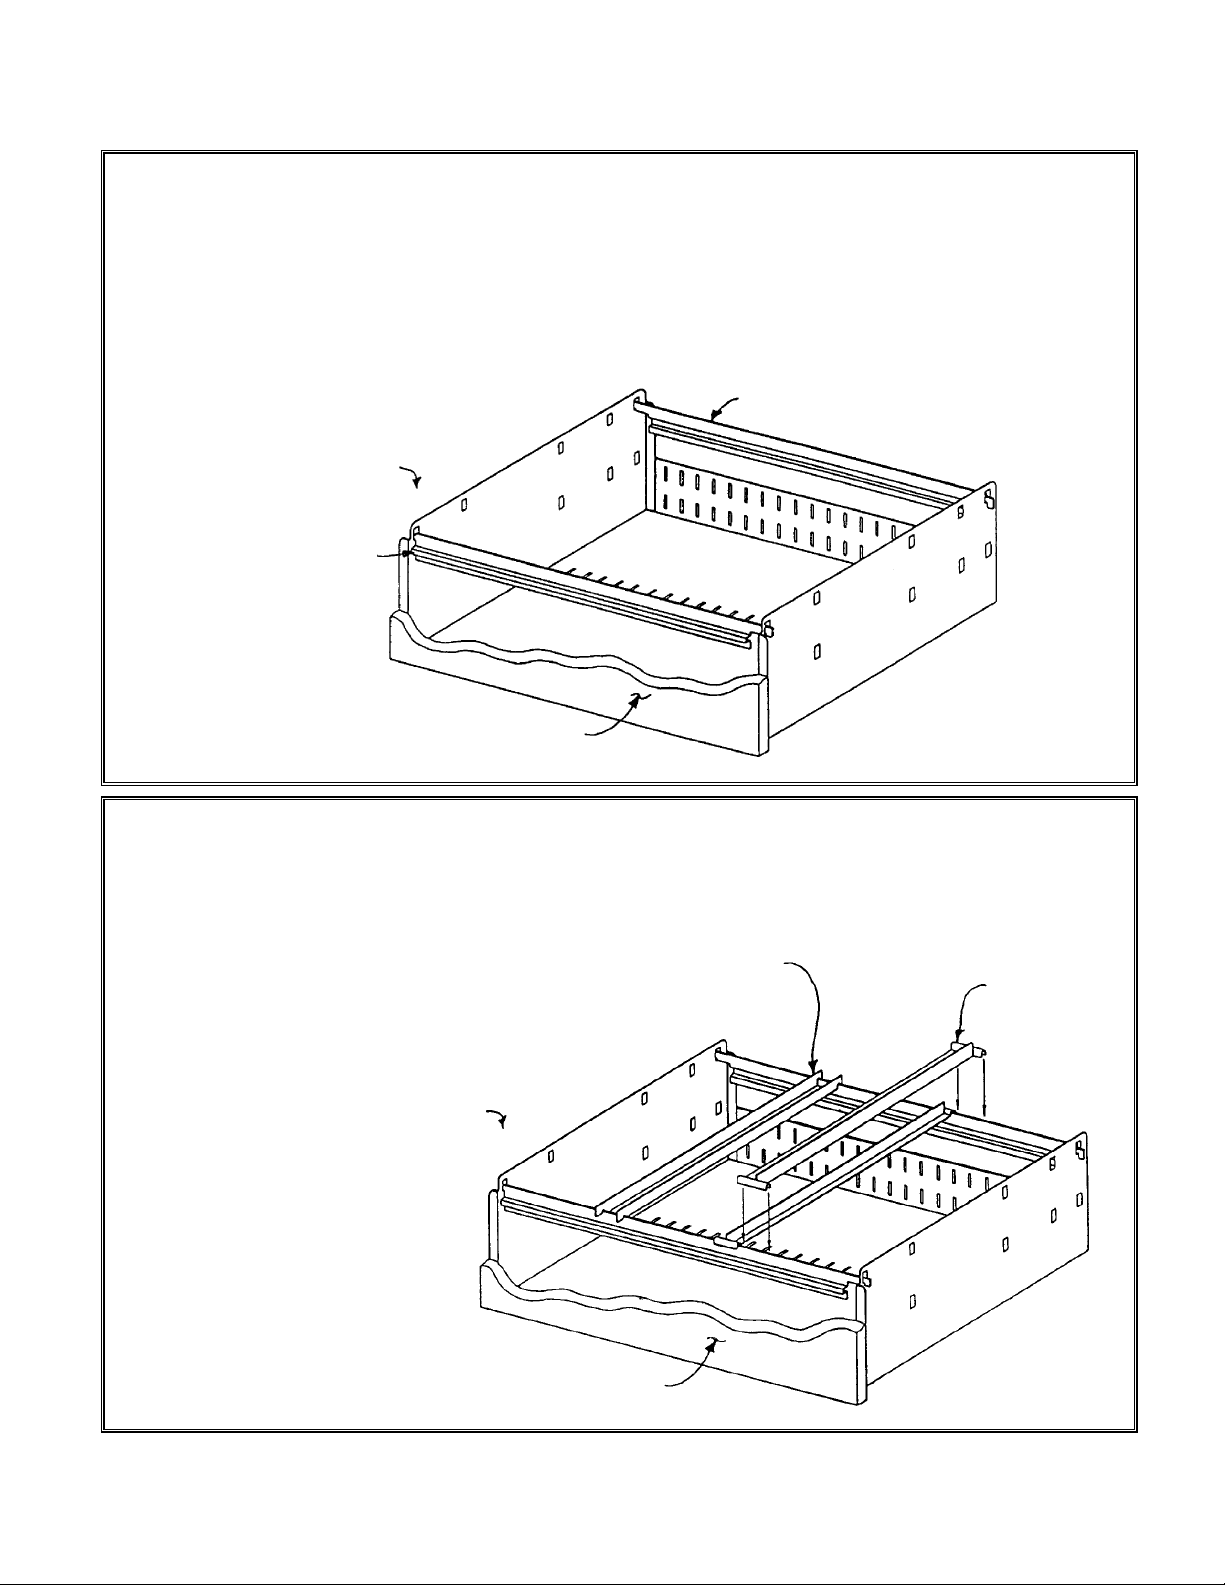
HANGING FOLDER FRAMES
There are two hanging folder frames per drawer.
Recommended filing positions are as follows:
Positions 1 & 3 - Letter filing (side-to-side in front)
Positions 2 & 4 - Letter filing (side-to-side in rear)
Positions 1 & 4 - Legal filing (side-to-side)
Positions 1 & 5 - Data printout filing (side-to-side)
(14
7
⁄8"w x 81⁄2"h paper)
Positions 1 & 5 - Front-to-rear filing
OPTIONAL FRONT-TO-BACK FILING
1. Hanging folder frames must be in Positions 1 & 5 as shown.
2. Position hanging file racks on front and rear hanging folder
frames for each bank of file folders. Side of drawer/shelf
should be used for outermost side of folders.
42-2306J
SIDE 3 0F 4 (6/99)
Ribs must face away
from filing system
Hanging folder frames
5
4
3
2
1
Front of drawer/shelf
Position number
Double rail hanging
file rack
Single rail
hanging file rack
5
4
3
2
1
Front of drawer/shelf
Position number
Page 5
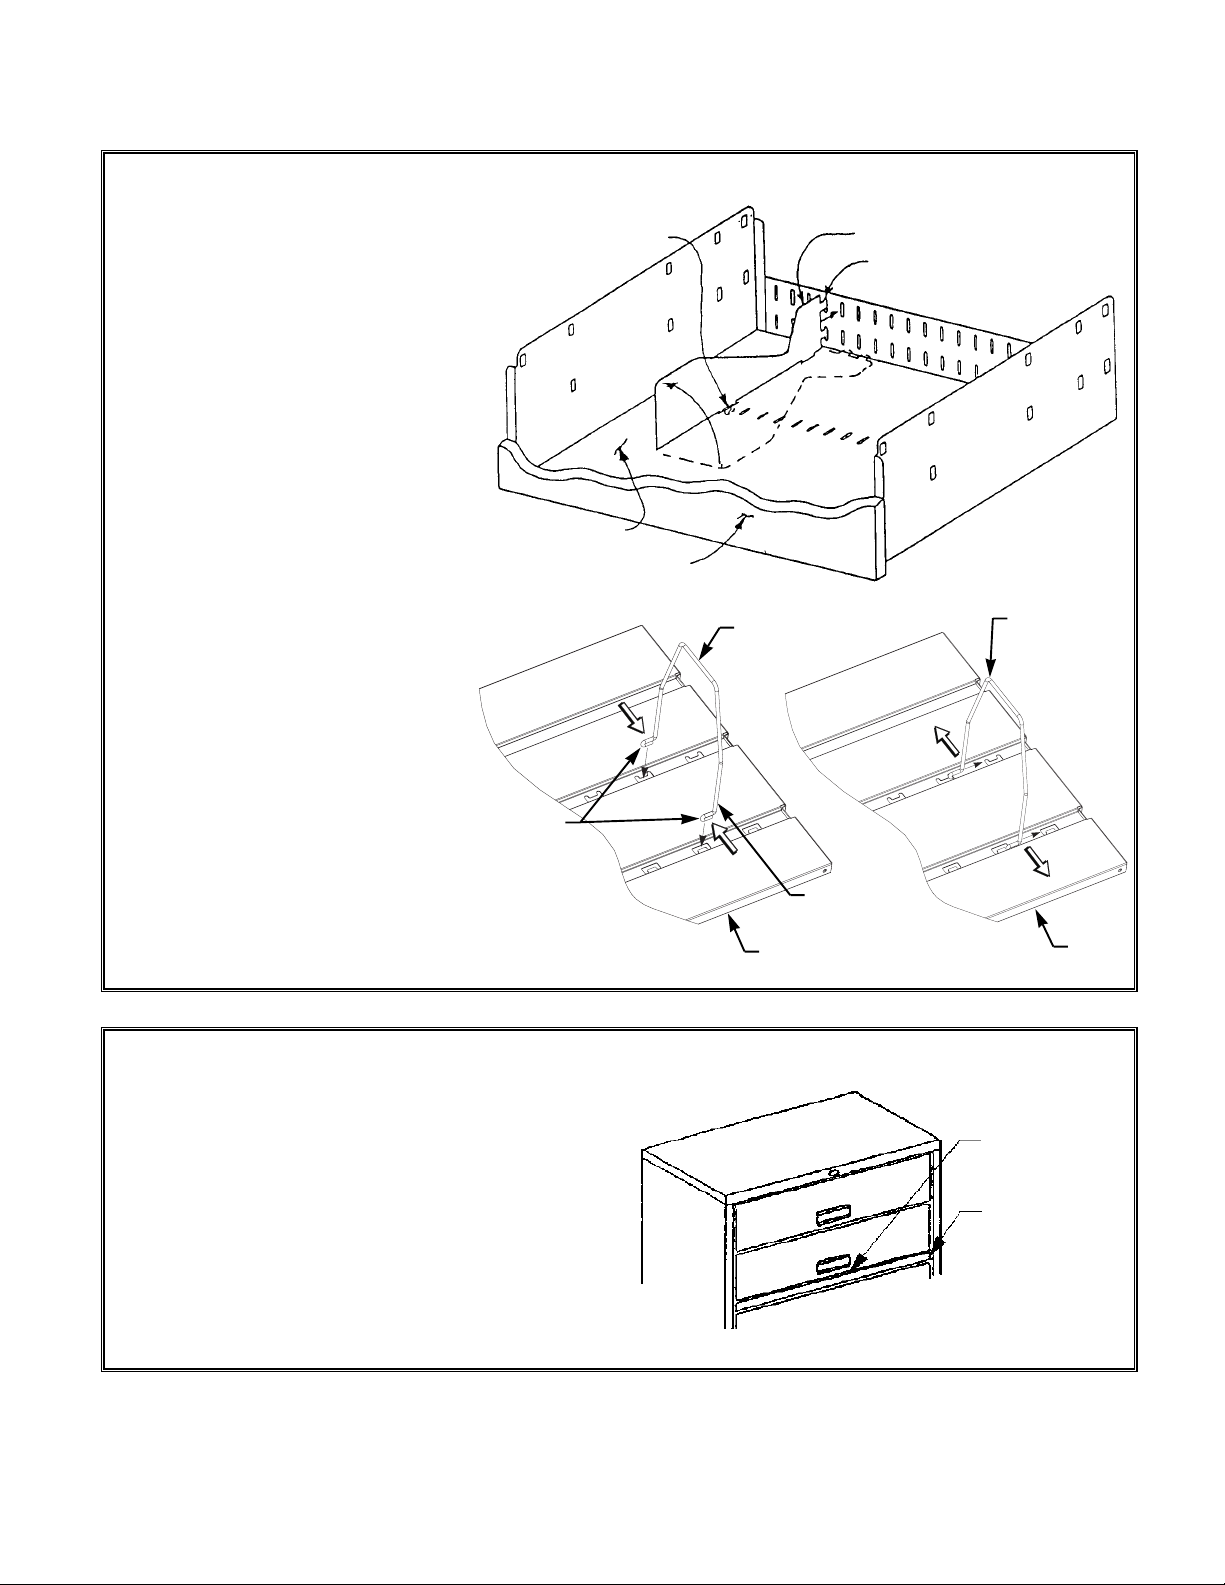
OPTIONAL DIVIDERS
Plate Divider:
1. With lower tab pointing down and rear
tabs pointing toward rear of drawer, lay
divider flat on bottom of drawer.
2. Insert lower tab into the desired slot on
the bottom of drawer and pivot top of
divider upward.
3. Align rear tabs with slots on rear of
drawer.
4. Push divider toward rear of drawer until
rear tabs lock into slots.
5. Reverse procedure to remove divider.
Wire Divider (Binder Storage Only):
1. Squeeze sides of divider and align bot-
tom ends (U-shaped flanges) of divider
with cut outs in shelf.
2. Insert U-shaped flanges into cut-outs
in shelf.
3. Slide divider toward side wall of cabi-
net, inserting edge of shelf cut-outs
into divider U-shaped flanges.
4. Release tension on sides of divider to
lock divider in place.
5. Reverse procedure to remove divider.
42-2306J
SIDE 4 OF 4 (6/99)
OPTIONAL POSTING SHELF
1. Close cabinet.
2. Push in and quickly release center of posting shelf.
Pushing on either end of posting shelf can cause shelf to
bind in cabinet.
3. Pull out on posting shelf to fully extend.
Bottom of drawer
Front of drawer/shelf
Push in and
release center of
posting shelf
Posting shelf
Divider
Rear tab
Lower tab
Divider
Squeeze
sides together
Shelf
Shelf
Slide divider
rearward and
release to lock
U-shaped
flange
 Loading...