

Homvilla LED Alarm Clock User Guide

HOMVILLA®
LED Alarm Clock
User Guide
Please Read It Carefully Before Use
Service Email
support@homvillalife.com
Video Guide
English
Deutsche
Española
Française
Italiana
For one-on-one guidance,
please contact us by mail or
directly on Amazon (find your
order and contact us, or search
for HOMVILLA on Amazon)

English Version……..……………….………………………………………..……….1-11
Deutsche Version……..……………….……………………………..………....…12-23
Versión Española…………………………………………………..……..…………24-34
Version Française…………………………………………………………………....35-45
Versione Italiana……………………………………….……………………….……46-56
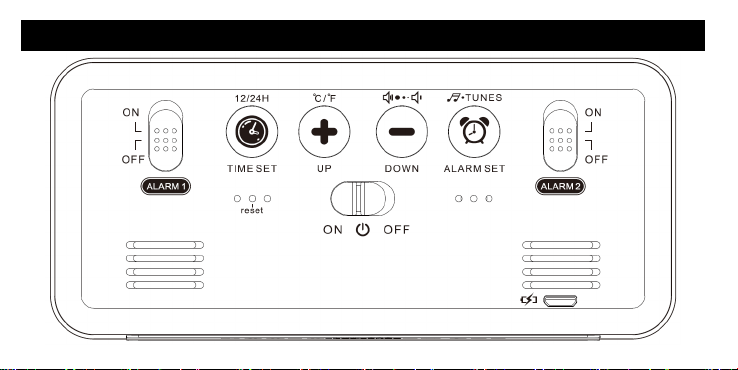
BUTTON LAYOUT
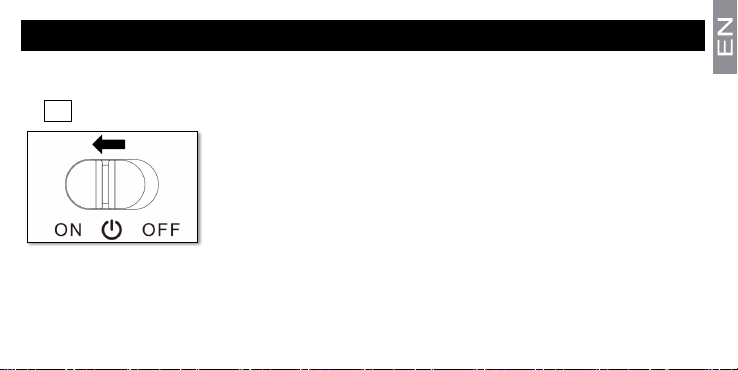
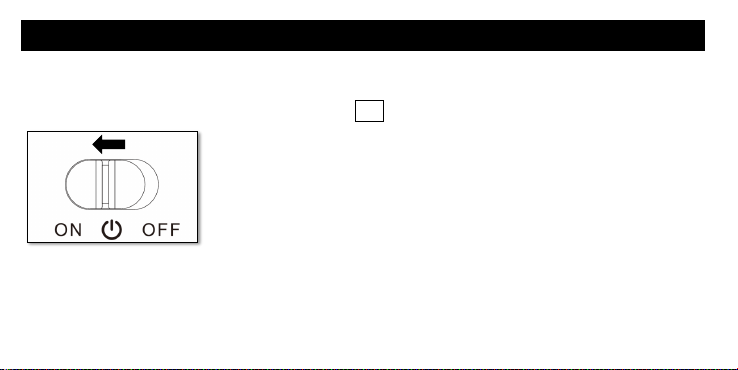
Power On
The alarm clock has 2 modes of use: USB powered mode and no power connection
mode. Regardless of which mode you use, you will first need to turn the alarm switch
to ON.
USB powered mode
1. Use the included power cord to connect the alarm clock to the adapter (5V/1A or
5V/2A).
2. In this mode, the alarm clock screen will remain on.
No power connection mode
1. You can also use this alarm clock without power connection, but please fully charge
the alarm clock before use this mode.
2. Disconnect the power cord.
3. In this mode, the alarm screen will automatically turn off after 6 seconds of light,
and then enter the energy-saving state. Press any button and it will light up again for
6 seconds.
4. This alarm clock has voice-activated function. You can also light up the screen by
making a sound.
Note: Remove the protective film on the surface of the alarm clock screen before use.
Note: The voice-activated function can only be used when the power supply is NOT connected.

Set the Time
1. Press and hold the “TIME SET” button for 3 seconds, the “hour” digits will flash.
Press the “
2. Press the “TIME SET” button to confirm “hour” setting and enter “minute” setting,
the “minute” digits will flash. Press the “
3. Press the “TIME SET” button again to confirm “minute” setting and complete time
setting.
Note: When setting the time, pay attention to whether the time format is 12-hour or 24-hour.
When the time format is 12-hour, the alarm clock will display AM or PM. You can short press the
“
TIME SET” button to switch the time format.
+” or “-” button to adjust “hour”.
+” or “-” button to adjust “minute”.
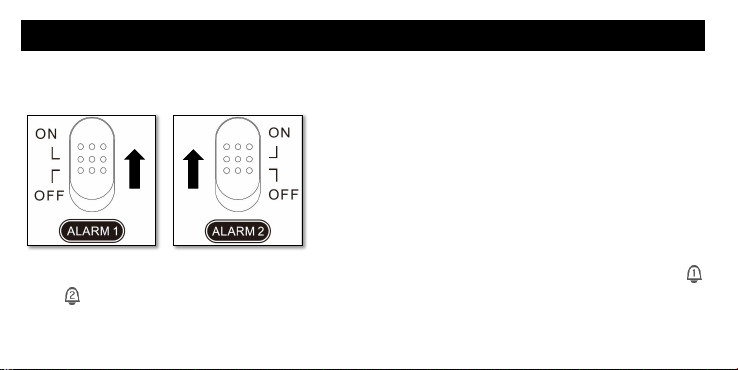
Set the Alarms
Before setting the alarms, make sure that the alarm switches on the back of the alarm
clock are all turned on. Otherwise, the alarms you set will not be activated.
When the alarm switches are turned on, the screen will display the alarm icons
and .
1. Press and hold the “ALARM SET” button for 3 seconds, it enters alarm #1 setting.

The “hour” digits will flash. Press the “+” or “-” button to adjust “hour”.
2. Press the “ALARM SET” button to confirm “hour” setting and enter “minute”
setting, the “minute” digits will flash. Press the “
3. Press the “ALARM SET” button again to confirm “minute” setting and enter alarm
#1 ringtone setting. Press the “
4. Press the “ALARM SET” button again to complete alarm #1 setting and enter alarm
#2 setting.
5. Repeat the above steps to complete the alarm #2 setting.
Note: If you are using 12-hour time format, you need to pay special attention to whether the
alarm time you set is correct (AM or PM).
N
ote: If you set the same alarm time for the 2 sets of alarms and keep 2 sets of alarms on, alarm
#2 will take precedence.
+” or “-” button to select an alarm ringtone.
+” or “-” button to adjust “minute”.

Set the Alarm Volume
In time display mode, press the “-” button repeatedly to switch among 3 levels of
volume. When switching to the volume you want to set, you can either wait for the
music playback to finish and automatically completing the volume setting, or you can
confirm the volume setting by pressing other button manually.
Alarm Switch
There are 2 alarm switches on the back of the alarm clock, which can independently
control 2 sets of alarms.
1. Turn the alarm switch to ON, the alarm #1 or alarm #2 will be turned on, and the
alarm icon or will be displayed on the screen.
2. Turn the alarm switch to OFF to turn off the alarm.

3. When the alarm goes off, press any button on the back of the alarm clock to stop
the alarm, and the alarm will go off tomorrow. If there is no operation, the alarm will
keep ringing for 2 minutes and then stop, and the alarm will go off tomorrow.
4. If you need to turn off the alarm completely (i.e., the alarm will not go off in the
future), you need to turn the alarm switch to OFF.
5. If you need to pause the alarm and let it go off again after 5 minutes, please refer
to the next chapter “Snooze Function”.
Snooze Function
When the alarm goes off, touch the “SNOOZE/LIGHT” button to pause the alarm and
enter snooze mode. The alarm icon will keep flashing and the alarm will goes off again
after 5 minutes. Snooze mode has no limit on the number of times. When the alarm
goes off again, you can still press the “SNOOZE/LIGHT” button to enter snooze mode.

You can press any button on the back of the alarm clock to exit snooze mode and
stop the alarm.
Adjust Screen Brightness
Manual adjustment
Touch the “SNOOZE/LIGHT” button to adjust the screen brightness. There are 4
levels of brightness.
Automatic adjustment
If you use USB powered mode, the alarm clock will automatically adjust the screen
brightness at different times. It automatically adjust to high brightness from 7:0019:00, adjust to medium brightness from 19:00-0:00, and adjust to low brightness
from 0:00-7:00. During this time, you can still manually adjust the screen brightness
by touching the “SNOOZE/LIGHT” button.

Note: If you have manually adjusted the screen brightness, the automatic screen brightness
adjustment function will be disabled. To use this feature again, you need to reset the alarm clock.
Switch Temperature Unit and Time Format
In time display mode, press the “+” button to switch the temperature unit between
degrees Celsius and Fahrenheit.
In time display mode, press the “TIME SET” button to switch the time format
between 12-hour and 24-hour.
Note: In order to ensure the accuracy of the temperature, please leave the alarm clock for more
than 30 minutes after opening the package.

Low Battery Alert
When the alarm clock displays the low battery icon , the screen flickers
abnormally or the screen does not display, please use the included USB power cord
to connect the alarm clock to the adapter to charge it in time. Please only use 5V/1A
or 5V/2A adapter/ power bank/ USB power supply port. Using a higher wattage
power source may cause damage to the alarm clock’s batteries or electronic
components.
Daily Maintenance
Do not use the alarm clock in hot and humid environments. Keep the alarm clock dry
and use soft tissue or cloth to clean the alarm clock.
In the case of crash, abnormal display, inability to operate buttons, etc., press the
reset button to restore the alarm clock to factory settings.

This alarm clock is used as a reference for healthy life and cannot be used as a
professional measuring instrument.
If you do not use this alarm clock for a long time, please charge it every 3 months.
For one-on-one guidance, please contact us at support@homvillalife.com or
directly on Amazon (find your order and contact us, or search for HOMVILLA on
Amazon)
Einschalten
Der Wecker hat 2 Nutzungsmodi: USB-betriebener Modus und kein
Stromverbindungsmodus. Unabhängig davon, welchen Modus Sie verwenden,
müssen Sie zuerst den Alarmschalter auf ON stellen.
USB-betriebener Modus
1. Verwenden Sie das mitgelieferte Netzkabel, um den Wecker mit dem Adapter
(5V/1A oder 5V/2A) zu verbinden.

2. In diesem Modus bleibt der Wecker-Bildschirm eingeschaltet.
Kein Stromverbindungsmodus
1. Sie können diesen Wecker auch ohne Stromanschluss verwenden, aber laden Sie
den Wecker bitte vollständig auf, bevor Sie diesen Modus verwenden.
2. Trennen Sie das Netzkabel.
3. In diesem Modus schaltet sich der Alarmbildschirm nach 6 Sekunden Licht
automatisch aus und wechselt dann in den Energiesparmodus. Drücken Sie eine
beliebige Taste und sie leuchtet erneut für 6 Sekunden auf.
4. Dieser Wecker hat eine sprachaktivierte Funktion. Sie können den Bildschirm auch
beleuchten, indem Sie einen Ton erzeugen.
Hinweis: Entfernen Sie vor dem Gebrauch die Schutzfolie auf der Oberfläche des
Weckerbildschirms.
H
inweis: Die sprachaktivierte Funktion kann nur verwendet werden, wenn die Stromversorgung

NICHT angeschlossen ist.
Stellen Sie die Uhrzeit ein
1. Halten Sie die „TIME SET“-Taste 3 Sekunden lang gedrückt, die „Stunden“-Ziffern
blinken. Drücken Sie die Taste „
2. Drücken Sie die „TIME SET“-Taste, um die „Stunden“-Einstellung zu bestätigen und
die „Minuten“-Einstellung einzugeben, die „Minuten“-Ziffern blinken. Drücken Sie
die Taste „
3. Drücken Sie die „TIME SET“-Taste erneut, um die „Minuten“-Einstellung zu
bestätigen und die Zeiteinstellung abzuschließen.
Hinweis: Achten Sie beim Einstellen der Uhrzeit darauf, ob das Zeitformat 12 Stunden oder 24
Stunden ist. Wenn das Zeitformat 12 Stunden ist, zeigt der Wecker AM oder PM an. Sie können
kurz die Taste „
+“ oder „-“, um die „Minute“ einzustellen.
TIME SET“ drücken, um das Zeitformat umzuschalten.
+“ oder „-“, um die „Stunde“ einzustellen.
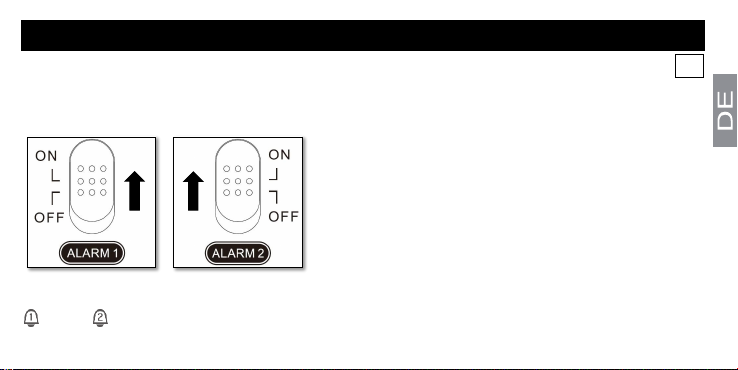
Stellen Sie die Alarme ein
Vergewissern Sie sich vor dem Einstellen des Weckers, dass alle Alarmschalter ON
der Rückseite des Weckers eingeschaltet sind. Andernfalls werden die von Ihnen
eingestellten Alarme nicht aktiviert.
Wenn die Alarmschalter eingeschaltet sind, zeigt der Bildschirm die Alarmsymbole
und .
 Loading...