

Homewerks 7148-01-AX User Manual
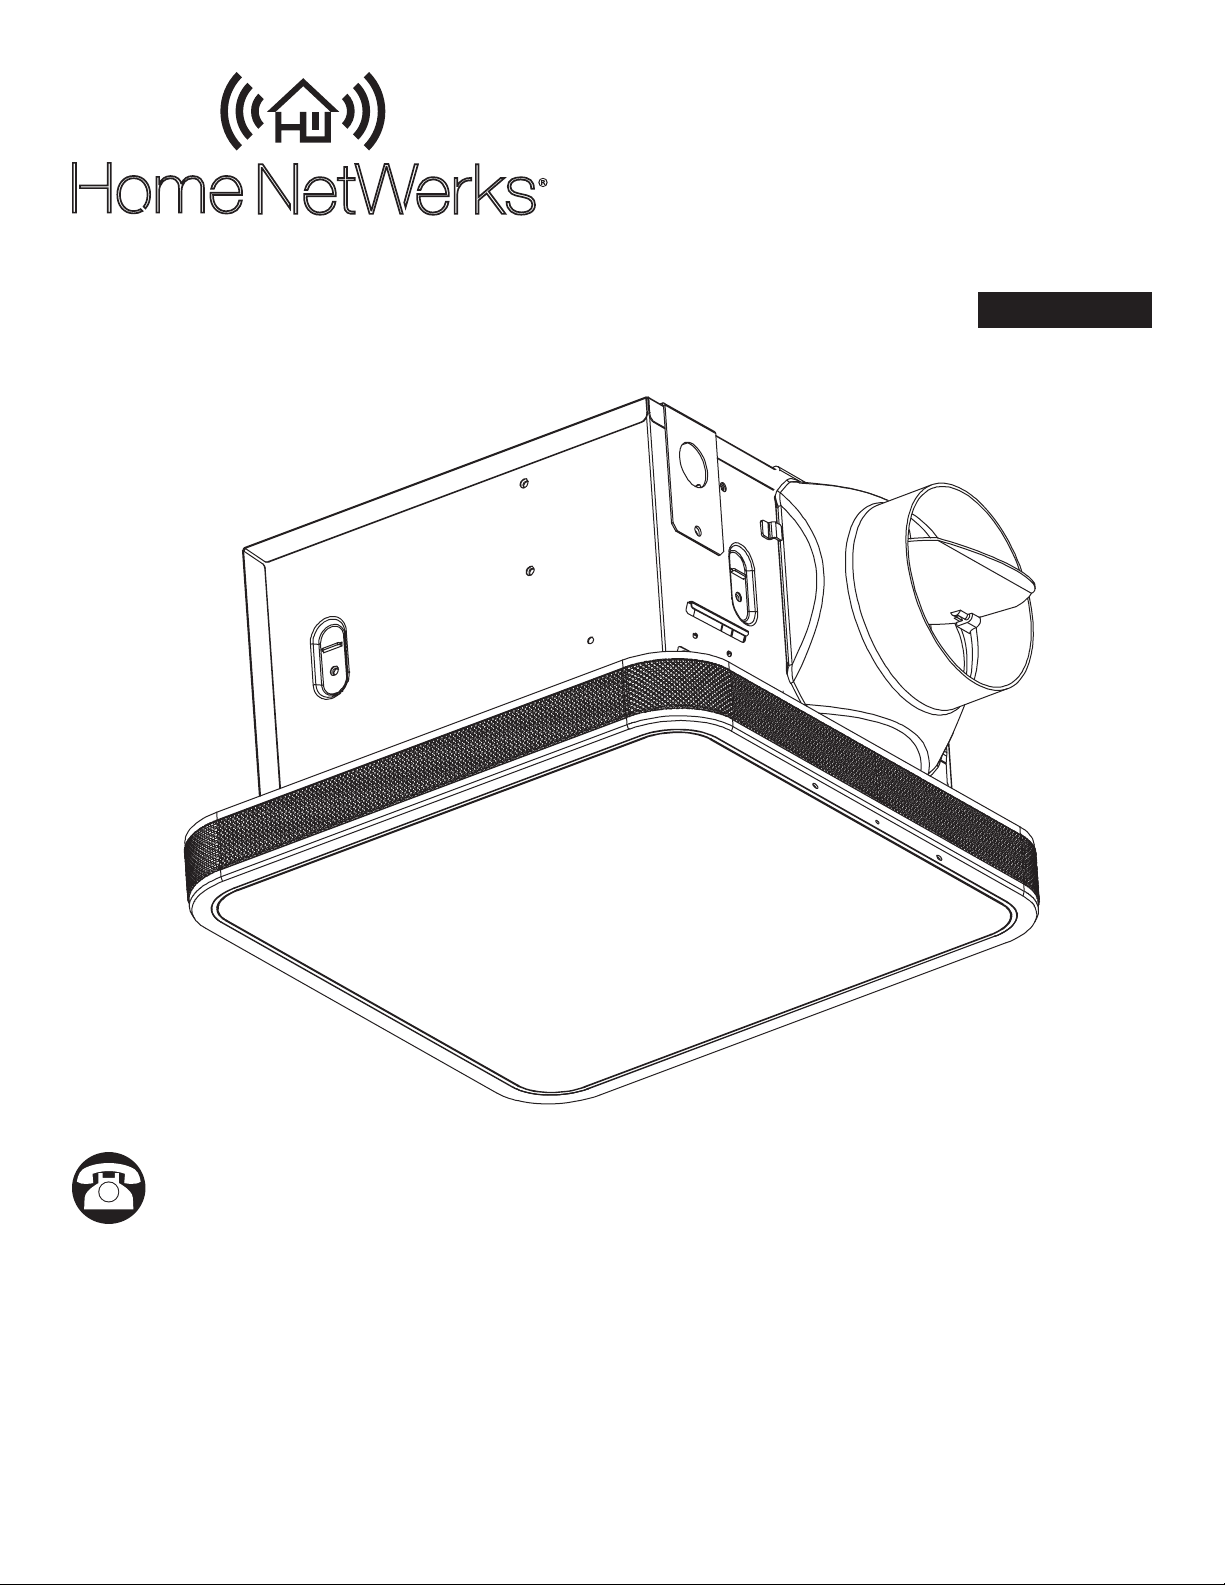
SMARTVENT
BATHROOM VENTILATION FAN
WITH ALEXA BUILT-IN, LED LIGHT,
Home
SIMPLE SOLUTIONS FOR A SMARTER HOME
NetWerks
AND BLUETOOTH® SPEAKERS
MODEL #7148-01-AX
Español p. 16
Questions, problems, missing parts? Before returning to your retailer, call our customer service department
at 1-877-319-3757, 7:30 a.m. - 4:30 p.m., CST, Monday - Friday.
READ AND SAVE THESE INSTRUCTIONS
Amazon, Alexa and all related logos are trademarks of Amazon.com, Inc. or its afliates.
The Bluetooth word mark and logos are owned by Bluetooth SIG, Inc. Other third-party brands and names are the property of their respective owners.
Home NetWerks, Homewerks, Homewerks Worldwide, the Homewerks house design, and all related logos are trademarks owned by
Homewerks Worldwide, LLC
U.S. Pat. No. 9,398,357
Homewerks.com
08/10/2020
TABLE OF CONTENTS
Product Specications ........................................................................................................................ 2
FCC Compliance ................................................................................................................................2
Package Contents ..............................................................................................................................3
Hardware Included .............................................................................................................................3
Safety Information ..............................................................................................................................4
Preparation ......................................................................................................................................... 4
Installation Instructions ....................................................................................................................... 6
Wall Switch Operation ........................................................................................................................8
Setting Up and Pairing Your Alexa Bath Fan to the Home NetWerks Connect App .......................... 9
Operating the Bath Fan Using Alexa Commands ...............................................................................9
Connecting your BLUETOOTH® Device to the Speaker ..................................................................10
Additional Functions .........................................................................................................................10
Care and Cleaning............................................................................................................................ 11
Troubleshooting ................................................................................................................................12
Warranty ...........................................................................................................................................14
PRODUCT SPECIFICATIONS
Airow: 110 CFM LED light power consumption: 18W
120V, 60Hz LED light brightness: 800 lumens
Duct diameter: 4 in. LED light color (CCT): 2200K Warm White / 3000K
Sound output: 1.5 Sones
Soft White / 4000K Cool White / 5000K Daylight
Total power consumption: 50W Night light color (CCT): 2200K Warm White
Fan power consumption: 28W Weight: 12.8 lbs.
Exhaust fan speed: 920 RPM
FCC COMPLIANCE
NOTICE: This equipment has been tested and found to comply with the
limits for a Class B digital device, pursuant to part 15 of the FCC Rules.
These limits are designed to provide reasonable protection against
harmful interference in a residential installation.
This equipment generates, uses, and can radiate radio frequency energy
and, if not installed and used in accordance with the instructions, may
cause harmful interference to radio communications. However, there is
no guarantee that interference will not occur in a particular installation.
If this equipment does cause harmful interference to radio or television
reception, which can be determined by turning the equipment off and on,
the user is encouraged to try to correct the interference by one or more
of the following measures:
– Reorient or relocate the receiving antenna.
– Increase the separation between the equipment and receiver.
– Connect the equipment into an outlet on a circuit different from that
to which the receiver is connected.
– Consult the dealer or an experienced radio/TV technician for help.
Changes or modications made to this equipment not expressly approved
by the party responsible for compliance could void the user's authority
to operate the equipment.
Federal Communication Commission (FCC) Radiation Exposure Statement:
When using the product, maintain a distance of 20cm from the body to
ensure compliance with RF exposure requirements.
This device complies with part 15 of the FCC rules. Operation is subject to
the following two conditions:
(1) this device may not cause harmful interference, and
(2) this device must accept any interference received, including interfer-
ence that may cause undesired operation.
NOTE: The manufacturer is not responsible for any radio or TV interfer-
ence caused by unauthorized modications or changes to this equipment.
Such modications or changes could void the user’s authority to operate
the equipment.
FCC ID:2AW5J-7148-01-AX
2
Homewerks.com

PACKAGE CONTENTS
A
B
C
D
E
F
G
PART DESCRIPTION QTY PART DESCRIPTION QTY
Fan Housing with BLUETOOTH
A
B
Grille with Amazon Alexa
Speakers
and LED Light
®
1
1
D Suspension Bracket 1
E Suspension Bracket 1
F 4 in. Duct Adapter 1
G Wall Switch 1
C Suspension Bracket 1
HARDWARE CONTENTS (not actual size)
AA BB
Wood Screw
M4 x 30
Machine Screw
M4 x 10
Qty. 9 Qty. 4
Homewerks.com
3

SAFETY INFORMATION
Please read and understand this entire manual before attempting to assemble, operate or install
the product.
• Always disconnect the power supply prior to servicing
the fan, motor or junction box.
• Follow all local building, safety and electrical codes
as well as NEC (National Electrical Code) and OSHA
(Occupational Safety and Health Act).
• Electric Service supply must be 120 volts, 60 hertz.
• This product must properly connect to the grounding
conductor of the supply circuit.
• Do not bend or kink the power wires.
• Do not use this fan with any solid state control device,
such as a remote control, dimmer switch, or certain
timers. Mechanical timers are not solid state devices.
• Do not install in a ceiling with insulation greater than
R40.
• Duct work should be installed in a straight line with
minimal bends.
• Duct work size must be the same size as the discharge
and should not be reduced. Reducing the duct size
may increase fan noise.
CAUTION
• For general ventilating use only. Do not use to
exhaust hazardous or explosive materials and
vapors.
• Not for use in cooking areas.
• To reduce the risk of injury to persons, install
the fan at least 7 feet (2.1 m) above the oor.
WARNING: To reduce the risk of re, electric shock,
or injury to persons, observe the following:
1. Use this unit in the manner intended by the manufacturer. If you have any questions, please call customer
service.
2. Before servicing or cleaning unit, switch power off at
service panel and lock the service disconnecting means
to prevent power from being switched on accidentally.
When the service disconnecting means cannot be
locked, securely fasten a prominent warning device,
such as a tag, to the service panel.
3. Installation work and electrical wiring must be done by
a qualied person(s) in accordance with all applicable
codes and standards, including re-rated construction.
4. Sufcient air is needed for proper combustion and
exhausting of gases through the ue (chimney) of fuel
burning equipment to prevent backdrafting. Follow the
heating equipment manufacturer´s guideline and safety
standards such as those published by the National Fire
Protection Association (NFPA), and the American Society
for Heating, Refrigeration and Air Conditioning Engineers
(ASHRAE) and local code authorities.
5. When cutting or drilling into the wall or ceiling, do not
damage electrical wiring and other hidden utilities.
6. Ducted fans must always be vented to the outdoors.
7. If this unit is to be installed over a tub or shower, it must
be marked as appropriate for the application and be
connected to a GFCI (Ground Fault Circuit Interrupter) –
protected branch circuit.
8. This ventilation fan is intended to be installed at least
3.28 ft. (1 m) from the showerhead when installing over
a bathtub or shower. Installation within a shower stall
is not recommended for this unit, unless the 3.28 ft.
(1 m) distance can be met.
CAUTION: Installation of this unit requires the power to be OFF until installation is complete. If you encounter issues
with the unit not powering up, please review the troubleshooting section of the instruction manual. If you require additional
assistance, please call 1-877-319-3757, 7:30 a.m. - 4:30 p.m., CST, Monday - Friday. DO NOT RETURN TO STORE.
PREPARATION
Before beginning assembly of product, make sure all parts are present. Compare parts with package contents list and
hardware contents. If any part is missing or damaged, do not attempt to assemble the product. Contact customer service
for replacement parts at 1-877-319-3757, 7:30 a.m. - 4:30 p.m., CST, Monday - Friday.
Tools Required for Assembly (not included): Hammer, Flathead Screwdriver, Wire Connectors, Nails, Duct Tape, Phillips
Screwdriver, Electrical Tape, and Utility Knife or Drywall Saw.
Helpful Tools (not included): Electric Drill, Drill Bits
IMPORTANT: 2.4 GHz Wi-Fi connection and Amazon Alexa account are required for full functionality.
4
Homewerks.com
PREPARATION (Continued)
WARNING: RISK OF ELECTRIC SHOCK! Ensure the electricity to the wires you are working on
is shut off. Either remove the fuse or turn off the circuit breaker before removing the existing
bath fan or installing the new one.
Before removing your current ventilation fan, verify the wall switch box has the required wires necessary
for this installation. These wires are power (black) and neutral (white), as shown in the wiring diagram
below. If you do not see both of these wires, consult a licensed electrician.
Check area above installation location to be sure that wiring can run to the planned location and that
duct work can be run and the area is sufcient for proper ventilation.
Inspect duct work and wiring before proceeding with installation.
Before installation, provide inspection and future maintenance access at a location that will not interfere
with installation work.
You may need the help of a second person to install this fan; one person on the attic side and one on
the room side.
Installation may vary depending on how the previous bath fan was installed. Supplies necessary for
the installation of your bath fan are not all included; however, most are available at your local
home improvement or hardware store.
DIMENSIONS
Ceiling
Opening (L)
Ceiling
Opening (W)
Ceiling
Opening (H)
Housing
Dimension (L)
Housing
Dimension (W)
Dimension (H)
9-1/4 in. 9-1/4 in. 5-29/32 in. 9 in. 9 in. 5-25/32 in.
IMPORTANT: ATTIC ACCESS IS REQUIRED FOR PROPER INSTALLATION.
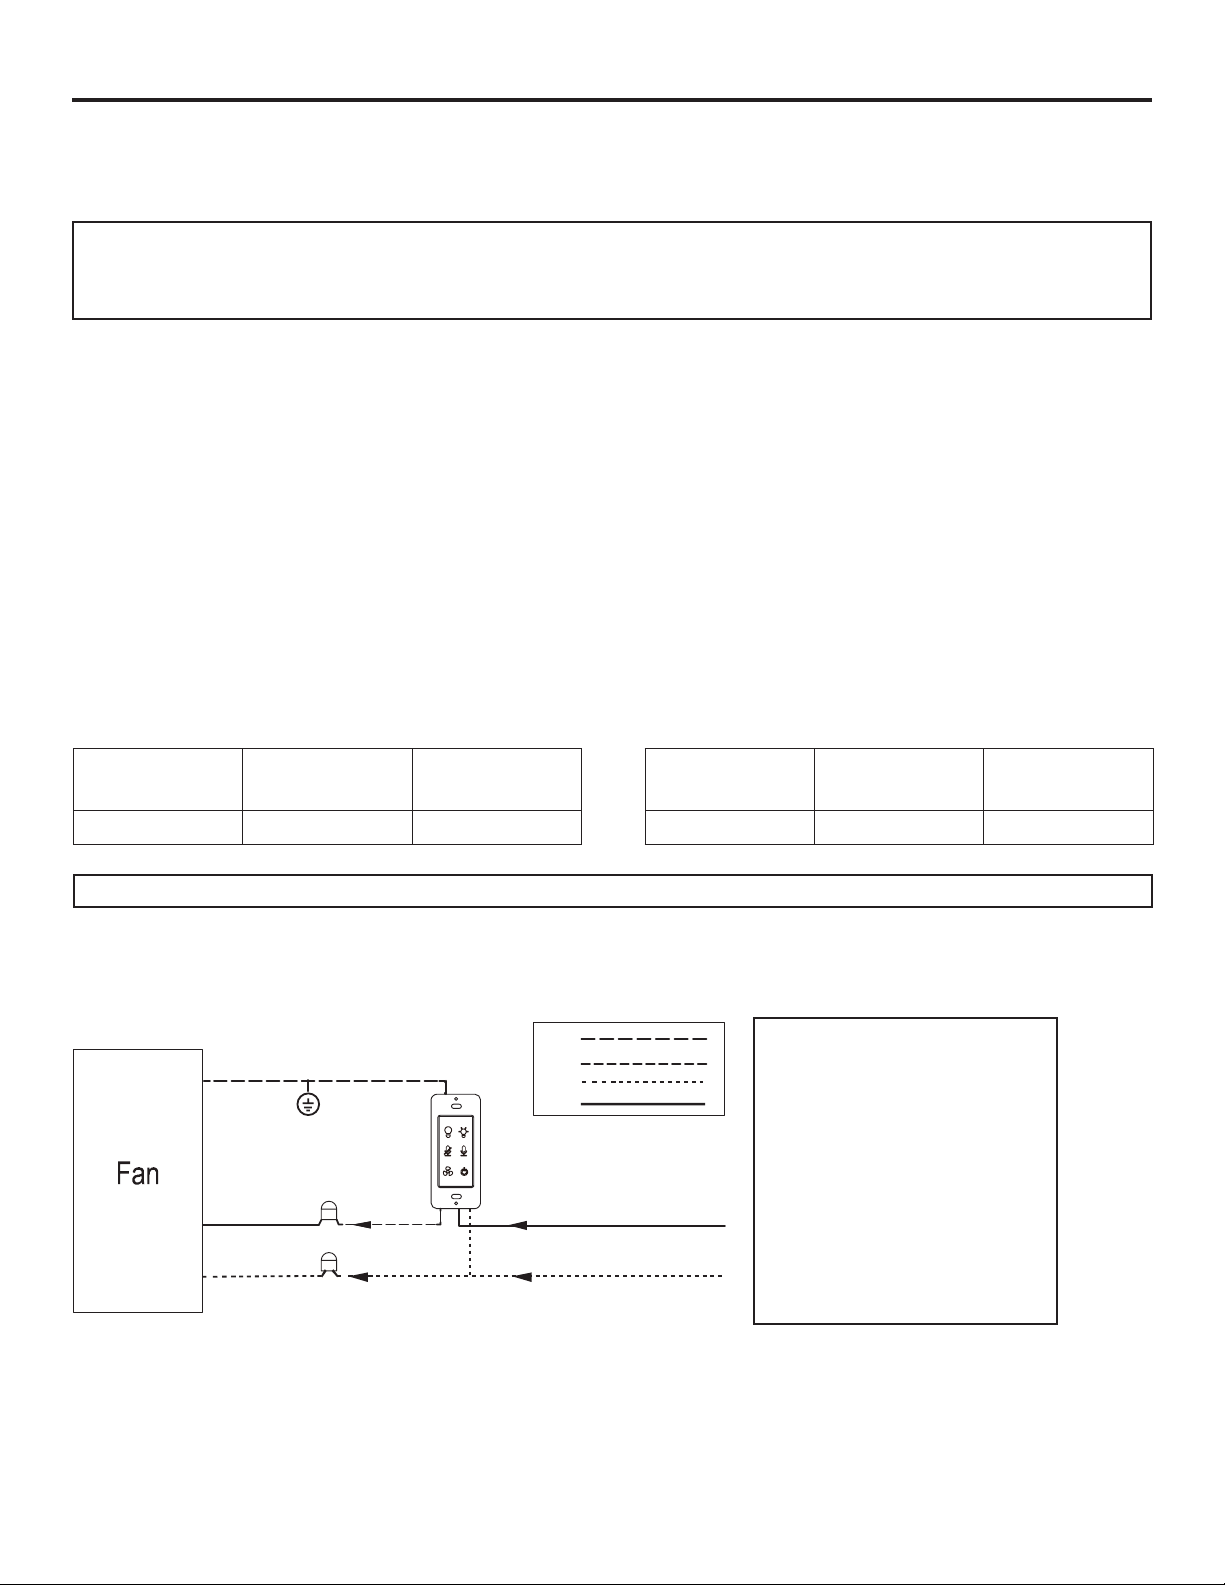
WIRING
All wiring must be connected for full functionality. Do not use metal wall plate with switch.
ATTENTION:
The switch included with this ventilation
fan requires a neutral wire connection.
If a neutral line is not present, one must
be run by a qualied electrician.
NOTE: This switch is intended to only
operate independently with this bath
fan, connections to other electrical
xtures is prohibited and could cause
electrical issues.
If you require assistance, please call
1-877-319-3757 before attempting this
switch installation.
ground/green
fan/black
fan neutral/white
Green
Red
White
Black
switch/red switch/black
AC 120V/60Hz
house neutral/white
Housing
Homewerks.com
5
INSTALLATION INSTRUCTIONS
BEFORE INSTALLATION
WARNING: RISK OF ELECTRIC SHOCK! Ensure the electricity
to the wires you are working on is shut off. Either remove the
fuse or turn off the circuit breaker before removing the existing
bath fan or installing the new one.
1. Remove existing fan.
If you are not replacing an existing fan, skip to step 4.
2. Measure the opening to ensure it is large enough to
accommodate the 9 in. x 9 in. dimensions of the new
fan housing (A).
3. If this fan is not replacing an old fan, be sure to cut a
9-1/4 in. x 9-1/4 in. opening for the fan housing (A).
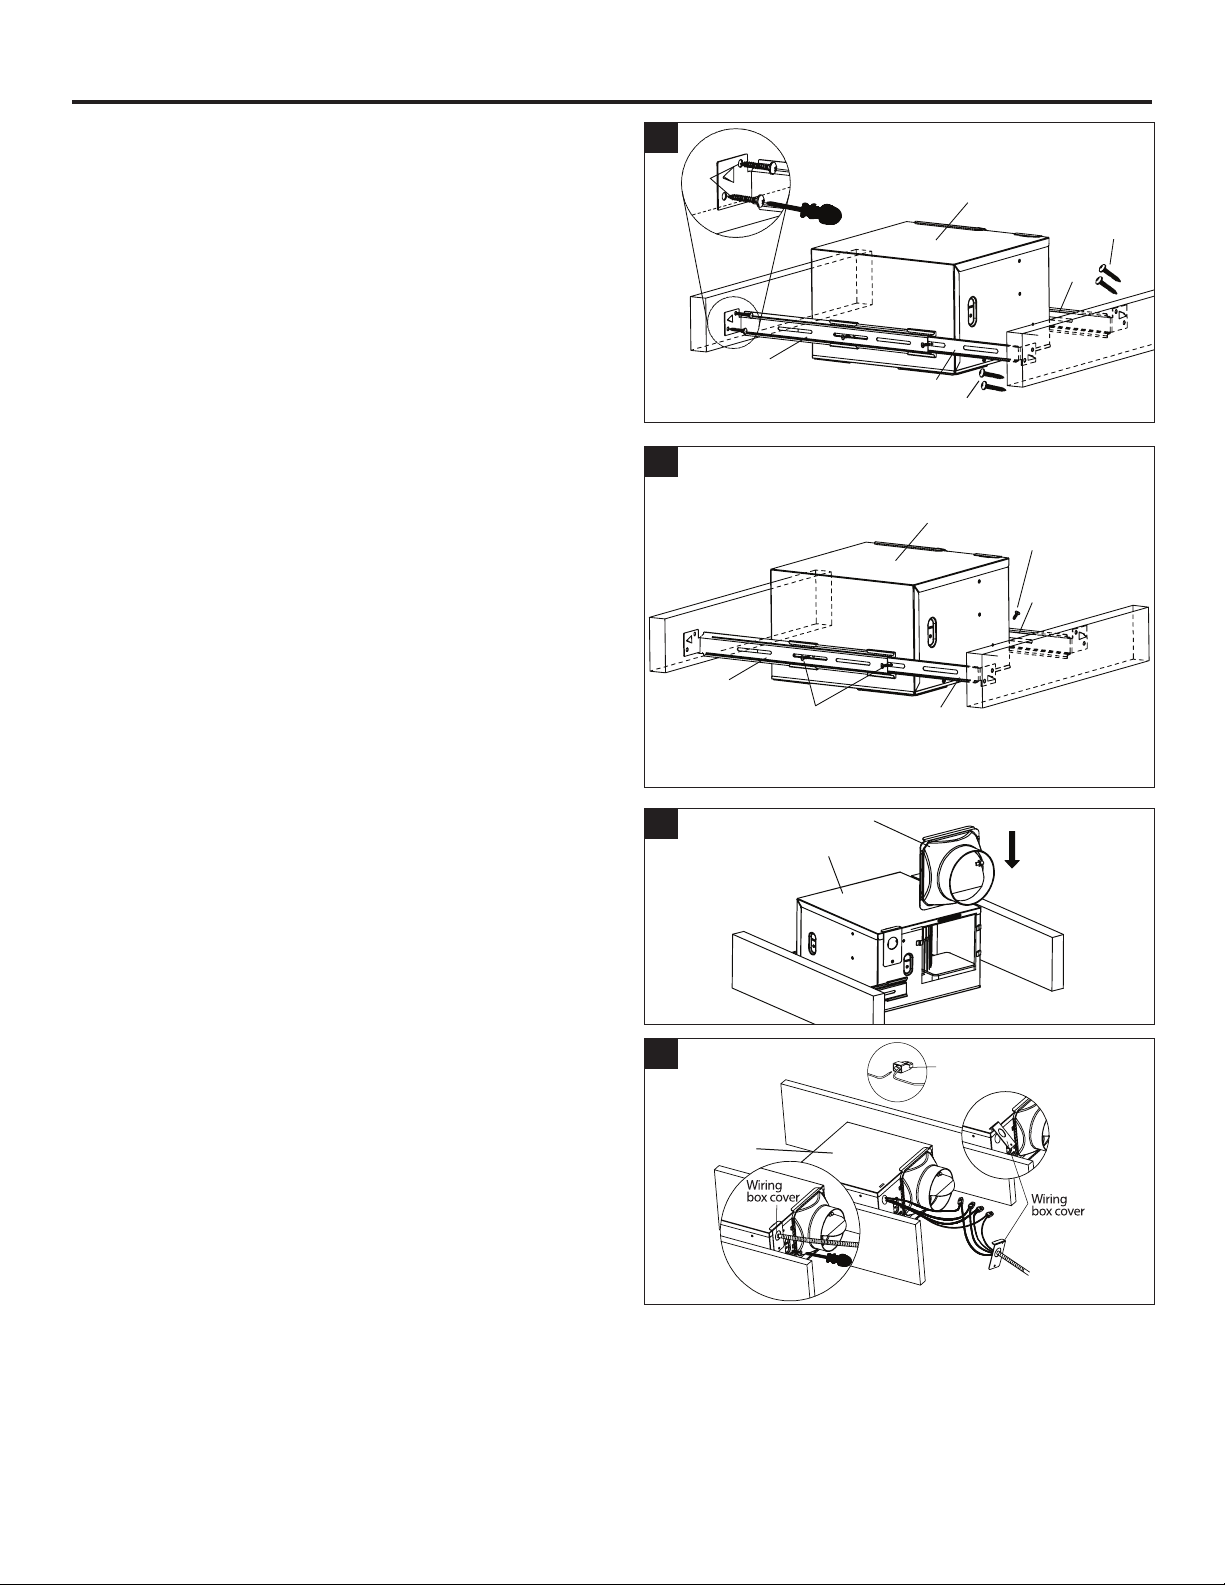
1
2
3
4. Insert suspension bracket (C) into the tabs on the fan
housing (A) on the side with the duct opening. Insert
suspension bracket (D) into the tabs on the opposite side of
the fan housing (A) and then slide suspension bracket (E)
into suspension bracket (D).
9-1/4"
9-1/4"
4
C
A
E
6
Homewerks.com
D
INSTALLATION INSTRUCTIONS (Continued)
A
5. Position the fan housing (A) so the bottom edge of the fan
housing (A) is ush with the ceiling board. Do not the ush
mount the fan housing (A) to the joist.
Attach the end of each of the suspension brackets (C, D, E)
to the ceiling joists using wood screws (AA).
6. Secure the suspension brackets (C, D, E) to the fan housing (A)
using machine screws (BB).
5
AA
A
AA
C
D
E
AA
6
BB
C
D
E
7. Slide the duct connector (F) into the tabs on the fan housing (A)
until the duct connector (F) snaps rmly into place over the
opening in the fan housing (A).
NOTE: Remove the protective tape on the duct adapter (F) ap.
8. Install the wall switch according to the wiring diagram on page 5.
Remove the wiring box cover from the fan housing (A). Pull the
house wires through the hole in the wiring box cover. Using the
quick connectors, connect the house wiring to the wall switch (G)
and fan housing (A). 14 AWG is the smallest conductor that
should be used for branch circuit wiring. Please refer to the
wiring diagram on page 5 to ensure proper wire connections are
made. Carefully push the wire connections into the wiring box and
reattach the wiring box cover.
NOTE: Do not use metal wall plate with the wall switch (G), as it
may cause interference with the fan operation.
CAUTION: The switch included with this ventilation fan requires
a neutral wire connection. If a neutral line is not present, one
must be run by a qualied electrician. If you require assistance,
please call 1-877-319-3757 before attempting switch installation.
CAUTION: This switch is intended to only operate with this
bath fan. Connections to other electrical xtures are prohibited
and could cause electrical issues.
7
8
F
A
Quick
connector
A
Homewerks.com
7
INSTALLATION INSTRUCTIONS (Continued)
9. Connect a 4 in. circular duct to the fan housing (A), securing
it with duct tape or a clamp. Vent the duct to the outside.
10. Join the connectors from the fan housing (A) to the grille (B).
The grille (B) must be connected BEFORE turning on power
to the fan.
11. Attach the grille (B) by pinching the mounting springs and
inserting them into the narrow rectangular slots in the fan
housing (A).
Turn on the power source. Test the unit.
10
11
9
A
A
4-hole
5-hole
A
3-hole
B
WALL SWITCH OPERATION
Button Action
• Short press to turn light ON/OFF
• Long press for 8 seconds to initiate the switch
pairing process
• Short press to adjust brightness
• Short press to mute Alexa microphone ON/OFF
• Long press for 5 seconds to activate
BLUETOOTH® pairing
• Short press to activate Alexa
• Long press for 5 seconds to start or restart the WiFi
pairing process
• Short press to turn on fan
• Long press for 8 seconds to activate a factory reset
• Short press to turn light and fan ON/OFF together
• Long press for 3 seconds to power ON/OFF
Mounting
springs
Slots in fan
housing
B
CAUTION: If you long press the ( ) button on the LED wall switch, you will need to repeat the setup process.
8
Homewerks.com

SETTING UP AND PAIRING YOUR ALEXA BATH FAN TO THE HOME NETWERKS CONNECT APP
1. Connect your phone or smart device to a steady 2.4 GHz WiFi connection that can be accessed where your bath fan
will be installed.
2. Download the Home NetWerks Connect app from your smart device compatible app store. If you don’t have
an Amazon Alexa account, download the Amazon Alexa app from the app store and choose “Create a
new account”.
3. If using IOS, open the Amazon Alexa app and log in to your Amazon Alexa account with your User ID and Password,
then click “Sign In”. IMPORTANT: If using Android, this step is not needed.
4. Turn on the bath fan at the LED wall switch by pressing the ( ) button for at least 3 seconds, until you hear a click.
The bath fan grille will light up.
5. The bath fan speaker will say “Now in set-up mode”. If you do not hear "Now in set-up mode", long press the (
button on the LED wall switch for 5 seconds to enter set-up mode.
6. Open the Home NetWerks Connect app on your smart device and follow the instructions provided in the app.
7. In the Home NetWerks Connect app, select “Add device” and then “Next.”
8. Click “Indicator is Blinking” and the app will search for the bath fan. Once the app has discovered the bath fan,
identied as 7148_01_AX_####, click “Set up this device”.
9. Set up WiFi for the bath fan by entering the password for the same 2.4 GHz WiFi signal your smart device is connected to
and click “Next”. The app will then connect the bath fan to WiFi. Once the bath fan is connected to WiFi, click “Next”.
10. The Home NetWerks Connect app will now search for and install the latest version of the rmware. Please be patient while
the rmware is updated to provide you with the best experience.
11. A list of available names will appear in the app and 7148_01_AX_#### will be selected as the default setting. Click
"Next" in the upper right corner of the app screen to proceed to the next step.
12. Now the Home NetWerks Connect app will need you to log in to your Amazon Alexa account. Click “Sign in with
Amazon”, then enter the User ID and Password for your Amazon account, and click “Sign In”. If using Android, select
"Keep signed in".
13. After logging in to Amazon, choose your preferred language.
14. When the next Amazon Alexa screen says “Alexa is ready”, click “Next” and then “Next” again.
15. In order to pair the bath fan to the Home NetWerks Connect app, you will need to create a User ID and Password for
the app. Click “Log in” and then click “Sign Up” at the bottom of the page. Enter a User ID & Password, using at least 8
characters with one number and one letter included, and sign in.
16. The screen will say your device is not paired. Click "Pair Device".
17. After pairing the bath fan to the app, the commands in this step will activate the special skills needed to control additional
functions of the bath fan. “Linkplay Smart Home” and “Home NetWerks Smart Fan” skills will be added to your Amazon
Alexa account. Click “Connect” on the next screen. Connect the Linkplay Smart Home and Home NetWerks Smart Fan
skills by clicking "Link". To nish the process, click “Done”.
You have successfully completed the set-up process and your Home NetWerks SmartVent fan is ready for use. You can now
speak your commands or questions to Alexa, control the fan via the Home NetWerks Connect app, or use the included wall switch!
)
OPERATING THE BATH FAN USING ALEXA COMMANDS
Once the initial set-up process is complete, the name of the bath fan will automatically be updated from
7148_01_AX_#### to BATHROOM. The following commands can be used with Alexa in your bath fan:
- Alexa, turn on BATHROOM light.
- Alexa, turn off BATHROOM light.
- Alexa, dim BATHROOM light.
- Alexa, brighten BATHROOM light.
- Alexa, change BATHROOM light to daylight.
- Alexa, change BATHROOM light to cool white.
- Alexa, change BATHROOM light to soft white.
IMPORTANT: If you rename the bath fan from BATHROOM to a custom name, your Alexa commands will need to be
directed to the new name. For example, if you renamed the fan as BATH, your command would be “Alexa, turn on the BATH
light” or “Alexa, turn off the BATH fan”.
Homewerks.com
- Alexa, change BATHROOM light to warm white.
- Alexa, turn on BATHROOM night light.
- Alexa, turn off BATHROOM night light.
- Alexa, turn on BATHROOM fan.
- Alexa, turn off BATHROOM fan.
- Alexa, ask smartfan to run for “x” minutes on BATHROOM.
9
 Loading...