

Page 1
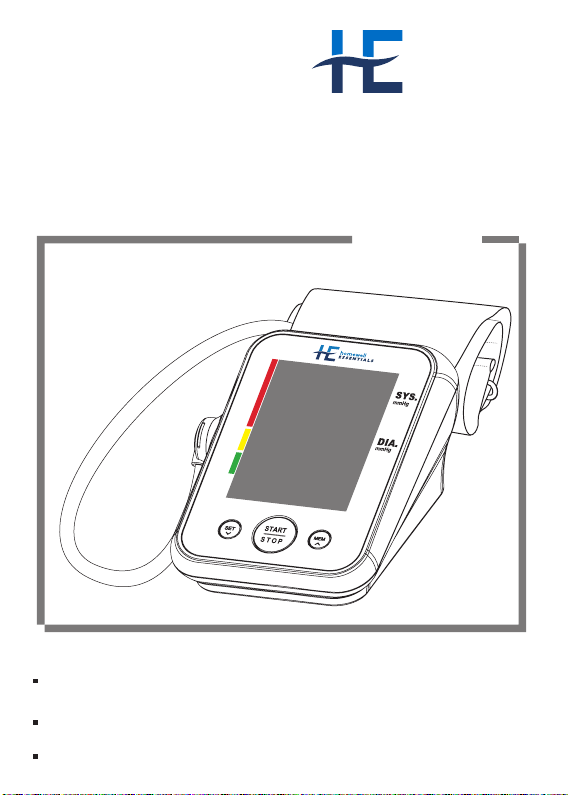
User Manual
TMB-995
homewell
E S SENTIAL S
Blood Pressure Monitor
HWEBPM
Arm Type
PUL.
/min.
Thank you very much for selecting Homewell Essentials Blood Pressure
Monitor HWEBPM.
To use the monitor correctly and safely, please read the manual thoroughly.
Please keep well this manual in order to reference in future.
Page 2
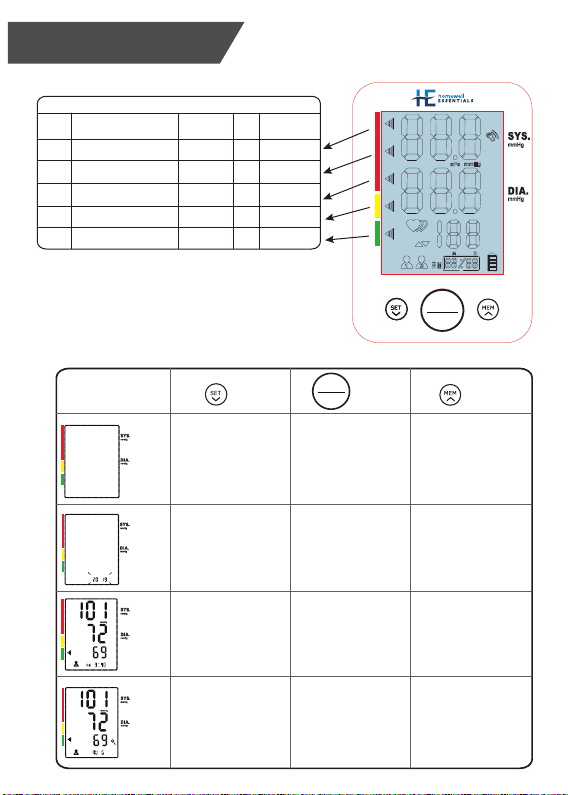
QUICK REFERENCE
This chart reflects blood pressure categories defined by American Heart Association.
Blood Pressure CategoryBacklight
on BPM
Hypertensive Crisis
Red
(Consult your doctor immediately)
Red
(Hypertension) Stage 2
Red
(Hypertension) Stage 1
Yellow
Green
High Blood Pressure
High Blood Pressure
Prehypertension
Normal
Systolic
mmHg (upper#)
Higher than 180
140 or higher
130-139
120-129
less than 120
and/or
or
or
and less than 80
and
Button instuctions
Screen
Mode
PUL.
/min.
Setting
Mode
PUL.
/min.
Off
Button
Quick press: switch
between user 1 and
user 2.
Long press: enter
setting mode.
Quick press: confirm
the setting.
Diastolic
mmHg (lower#)
Higher than 120
90 or higher
80-89
less than 80
START
STOP
Quick press: enter
working mode and
start measuring
blood pressure.
Quick press: turn
off blood pressure
monitor.
Button
PUL.
/min.
START
STOP
Button
Quick press: enter
memory mode.
Quick press: change
the setting
Working
Mode
PUL.
/min.
Memory
Mode
PUL.
/min.
/ /
Quick press: show
the previous record.
Long press: delete
the latest record.
Quick press: turn
off blood pressure
monitor.
Quick press: turn
off blood pressure
monitor.
Quick press: show
the next record.
Long press: delete
all the records.
Page 3

CATALOGUE
Table of Contents
INTRODUCTION...................................................................................................................2
General Description
Indications for Use
Contraindications
Measurement Principle
Safety Information
LCD Display Signal
Monitor Components
List
BEFORE YOU START...........................................................................................................9
The Choice of Power Supply
Installing and Replacing the Batteries
Setting Date, Time and Measurement Unit
Select the User
MEASUREMENT.................................................................................................................13
Tie the Cuff
Start the Measurement
DATA MANAGEMENT..........................................................................................................15
Recall the Records
Delete the Records
INFORMATION FOR USER................................................................................................18
Tips for measurement
Maintenances
ABOUT BLOOD PRESSURE..............................................................................................20
What are systolic pressure and diastolic pressure?
What is the standard blood pressure classification?
Irregular heartbeat detector
Why does my blood pressure fluctuate throughout the day?
Why do I get a different blood pressure at home compared to the hospital?
Is the result the same if measuring on the right arm?
TROUBLESHOOTING........................................................................................................22
SPECIFICATIONS...............................................................................................................23
AUTHORIZED COMPONENT ............................................................................................24
CONTACT INFORMATION..................................................................................................24
FCC STATEMENT................................................................................................................24
COMPLIED STANDARDS LIST...........................................................................................25
EMC GUIDANCE.................................................................................................................26
LIMITIED WARRANTY.........................................................................................................31
1
Page 4

INTRODUCTION
General Description
Thank you for selecting Homewell Essentials Blood Pressure Monitor
(HWEBPM). The monitor features blood pressure measurement, pulse
rate measurement and the result recording. The design provides you
with two years of reliable service.
Readings taken by the HWEBPM are equivalent to those obtained by
a trained observer using the cuff and stethoscope auscultation method.
This manual contains important safety and care information, and provides
step by step instructions for using the product.
Read the manual thoroughly before using the product.
Features:
80*60mm Digital LCD display
Maximum 60 records per each user
Measuring during inflation technology
Indications for Use
The Homewell Essentials Blood Pressure Monitor is digital monitors intended
for use in measuring blood pressure and heartbeat rate with arm circumference
ranging from 22cm to 42cm(about 8¾˝-16½˝). It is intended for adult indoor use
only.
Contraindications
1.The device should not be used by any person who may be suspected of,
or is pregnant .
2.The device is not suitable for use on patients with implanted,electrical
devices,such as cardiac pacemakers, defibrillators.
2
Page 5
INTRODUCTION
Measurement Principle
This product uses the Oscillometric Measuring Method to detect blood
pressure.Before every measurement, the unit establishes a “zero point”
equivalent to the atmospheric pressure. Then it starts inflating the cuff.
Meanwhile, the unit detects pressure oscillation generated by beat-to-beat
pulsatile, which is used to deter- mine the systolic pressure and diastolic
pressure as well as pulse rate.
Safety Information
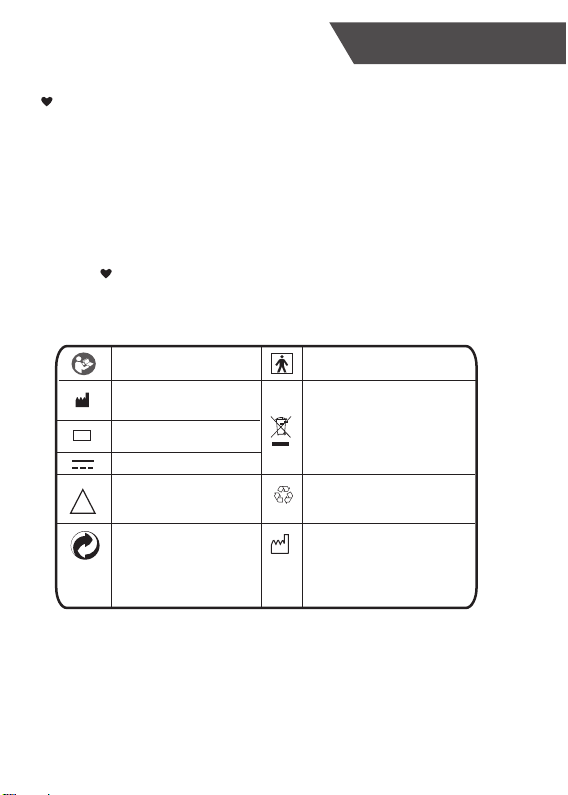
The signs below might be in the user manual, labeling or other components.
They are the requirement of standard and using.
Symbol for “THE OPERATION
GUIDE MUST BE READ”
Symbol for “MANUFACTURER”
Symbol for “SERIAL NUMBER”
SN
Symbol for “DIRECT CURRENT”
Caution: These notes must
be observed to prevent any
!
damage to the device.
The Green Dot is the license
symbol of a European
network of industry-funded
systems for recycling the
packaging materials of
consumer goods.
Symbol for “TYPE BF APPLIED
PARTS”
Symbol for “ENVIRONMENT
PROTECTION - Electrical waste
products should not be disposed of
with household waste. Please recycle
where facilities exist. Check with your
local authority or retailer for recycling
advice”
Symbol for “RECYCLE”
Symbol for “MANUFACTURE
DATE”
3
Page 6

INTRODUCTION
CAUTION
* This device is intended for adult use in homes only.
* The device is not suitable for use on neonatal patients, pregnant women, patients with
implanted, electronical devices, patients with pre-eclampsia, premature ventricular beats, atrial
fibrillation, peripheral, arterial disease and patients undergoing intravascular therapy or
arterio-venous shunt or people who received a mastectomy. Please consult your doctor prior
to using the unit if you suffer from illnesses.
* The device is not suitable for measuring the blood pressure of children. Ask your doctor
before using it on older children.
* The device is not intended for patient transport outside a healthcare facility.
* The device is not intended for public use.
* This device is intended for no-invasive measuring and monitoring of arterial blood pressure.
It is not intended for use on extremities other than the arm or for functions other than obtaining
a blood pressure measurement.
* Do not confuse self-monitoring with self-diagnosis. This unit allows you to monitor your blood
pressure.Do not begin or end medical treatment without asking a physician for treatment
advice.
* If you are taking medication,consult your physician to determine the most appropriate time to
measure your blood pressure. Never change a prescribed medication without consulting your
physician.
* Do not take any therapeutic measures on the basis of a self measurement. Never alter the
dose of a medicine prescribed by a doctor. Consult your doctor if you have any question about
your blood pressure.
* When the device is used to measure patients who have common arrhythmias such as atrial
or ventricular premature beats or atrial fibrillation, the best result may occur with deviation.
Please consult your physician about the result.
* Don't kink the connection tube during use, otherwise, the cuff pressure may continuously
increase which can prevent blood flow and result in harmful injury to the PATIENT.
* When using this device, please pay attention to the following situation which may interrupt
blood flow and influence blood circulation of the patient, thus cause harmful injury to the
patient: connection tubing kinking too frequent and consecutive multiple measurements; the
application of the cuff and its pressurization on any arm where intravascular access or
therapy, or an arterio-venous (A-V) shunt, is present; inflating the cuff on the side of a
mastectomy.
* Warning: Do not apply the cuff over a wound;otherwise it can cause further injury.
*Do not inflate the cuff on the same limb which other monitoring ME equipment is applied
around simultaneously, because this could cause temporary loss of function of those
simultaneously-used monitoring ME equipment.
*On the rare occasion of a fault causing the cuff to remain fully inflated during measurement,
open the cuff immediately. Prolonged high pressure (cuff pressure > 300mmHg or constant
pressure > 15mmHg for more than 3 minutes) applied to the arm may lead to an ecchymosis.
*Please check that operation of the device does not result in prolonged impairment of patient
blood circulation.
* When measurement, please avoid compression or restriction of the connection tubing.
* The device cannot be used with HF surgical equipment at the same time.
4
Page 7

INTRODUCTION
CAUTION
* The ACCOMPANYING DOCUMENT shall disclose that the SPHYGMOMANOMETER was
clinically investigated according to the requirements of ISO 81060-2:2013.
* To verify the calibration of the AUTOMATED SPHYGMOMANOMETER, please contact the
manufacturer.
* This device is contraindicated for any female who may be suspected of, or is pregnant.
Besides providing inaccurate readings, the effects of this device on the fetus are unknown.
* Too frequent and consecutive measurements could cause disturbances in blood circulation
and injuries.
* This unit is not suitable for continuous monitoring during medical emergencies or
operations.Otherwise, the patient’s arm and fingers will become anaesthetic, swollen and
even purple due to a lack of blood.
* When not in use, store the device in a dry room and protect it against extreme moisture,
heat, lint, dust and direct sunlight. Never place any heavy objects on the storage case.
* This device may be used only for the purpose described in this booklet. The manufacturer
cannot be held liable for damage caused by incorrect application.
*This device comprises sensitive components and must be treated with caution. Observe the
storage and operating conditions described in this booklet.
* The maximum temperature that the applied part can be achieved is 42.8°C while the
environmental temperature is 40°C.
* The equipment is not AP/APG equipment and not suitable for use in the presence of a
flammable anesthetic mixture with air of with oxygen or nitrous oxide.
* Warning: No servicing/maintenance while the ME equipment is in use.
* The patient is an intended operator.
* The patient can measure, and charge power under normal circumstances and maintain the
device and its accessories according to the user manual.
* To avoid measurement errors, please avoid the condition of strong electromagnetic field
radiated interference signal or electrical fast transient/burst signal.
* The blood pressure monitor, and the cuff are suitable for use within the patient
environment. If you are allergic to polyester, nylon or plastic, please don't use this device.
* During use, the patient will be in contact with the cuff. The materials of the cuff have been
tested and found to comply with requirements of ISO 10993-5:2009 and ISO 10993-10:2010.
It will not cause any potential sensation or irritation reaction.
* Adaptor is specified as a part of ME EQUIPMENT.
* If you experience discomfort during a measurement, such as pain in the arm or other
complaints, press any button to release the air immediately from the cuff. Loosen the cuff
and remove it from your arm.
* If the cuff pressure reaches 40 kPa (300 mmHg), the unit will automatically deflate. Should
the cuff not deflate when pressure reaches 40 kPa (300 mmHg), detach the cuff from the arm
and press any button to stop inflation.
* Before use, make sure the device functions safely and is in proper working condition.
Check the device, do not use the device if it is damaged in any way. The continuous use of a
damaged unit may cause injury, improper results, or serious danger.
* Do not wash the cuff in a washing machine or dishwasher!
5
Page 8

INTRODUCTION
CAUTION
* The service life of the cuff may vary by the frequency of washing, skin condition, and
storage state. The typical service life is 10000 times.
* It is recommended that the performance should be checked every 2 years and after
maintenance and repair, by retesting at least the requirements in limits of the error of the cuff
pressure indication and air leakage (testing at least at 50mmHg and 200mmHg).
* Please dispose of ACCESSORIES, detachable parts, and the ME EQUIPMENT according
to the local guidelines.
* Manufacturer will make available on request circuit diagrams, component part lists,
descriptions, calibration instructions,etc., to assist to service personnel in parts repair.
* The plug/adapter plug pins insulate the device from the main supply. Do not position the
device in a position where it is difficult to disconnect from the supply mains to safely
terminate operation of ME equipment.
* The operator shall not touch output of batteries /adapter and the patient simultaneously.
* Cleaning :Dust environment may affect the performance of the unit. Please use the soft
cloth to clean the whole unit before and after use. Don’t use any abrasive or volatile
cleaners.
* The device doesn’t need to be calibrated within two years of reliable service.
* If you have any problems with this device, such as setting up, maintaining or using, please
contact the SERVICE PERSONNEL of Huntkey USA Inc..Don’t open or repair the device by
yourself in the event of malfunctions. The device must only be serviced, repaired and opened
by individuals at authorized sales/service centers.
* Please report to Huntkey USA Inc. if any unexpected operation or events occur.
* Keep the unit out of reach of infants, young children or pets to avoid inhalation or
swallowing of small parts. It is dangerous or even fatal.
* Be careful to strangulation due to cables and hoses, particularly due to excessive length.
* At least 30 min required for ME equipment to warm from the minimum storage temperature
between uses until it is ready for intended use. At least 30 min required for ME equipment to
cool from the maximum storage temperature between uses until it is ready for intended use.
* This equipment needs to be installed and put into service in accordance with the
information provided in the ACCOMPANYING DOCUMENTS;
* Wireless communications equipment such as wireless home network devices, mobile
phones, cordless telephones and their base stations, walkie-talkies can affect this equipment
and should be kept at least a distance d away from the equipment. The distance d is
calculated by the MANUFACTURER from the 80MHz to 5.8 GHz column of Table 4 and
Table 9 of IEC 60601-1-2:2014, as appropriate.
* Please use ACCESSORIES and detachable parts specified/ authorised by MANUFACTURE. Otherwise, it may cause damage to the unit or danger to the user/patients.
* There is no luer lock connectors are used in the construction of tubing, there is a possibility
that they might be inadvertently connected to intravascular fluid systems, allowing air to be
pumped into a blood vessel.
* Please use the device under the environment which is provided in the user manual.
Otherwise, the performance and lifetime of the device will be impacted and reduced.
6
Page 9
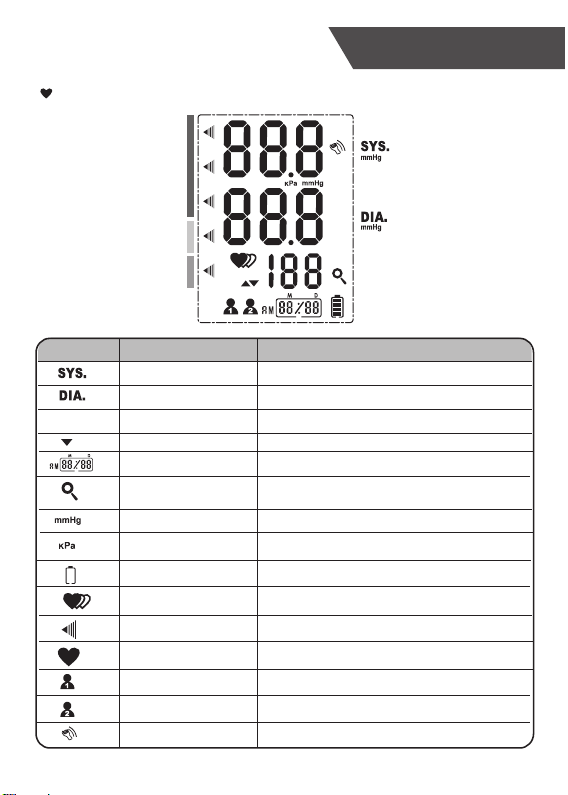
LCD Display Signal
PUL.
/min.
INTRODUCTION
SYMBOL DESCRIPTION
Systolic blood pressure High pressure result
PUL.
/min.
Diastolic blood pressure
Pulse Pulse/minute
Deflating CUFF air is exhausting of deflating
Current Time
Memory
mmHg
kPa
Battery Indicator
Irregular heartbeat
Grade
Heartbeat Heartbeat dectetion during measurement
User 1
User 2
Shocking reminder Shocking will result in inaccurate
EXPLANATION
Low pressure result
Time(year:month:day:hour:minute)
If “MEM” shows, the displayed measurement
values is from the memory.
Measurement Unit of the blood pressure
Measurement Unit of the blood pressure
Indicate the current battery
Irregular heartbeat
The grade of the blood pressure
Start measurement and transmit the results for User 1
Start measurement and transmit the results for User 2
7
Page 10
INTRODUCTION
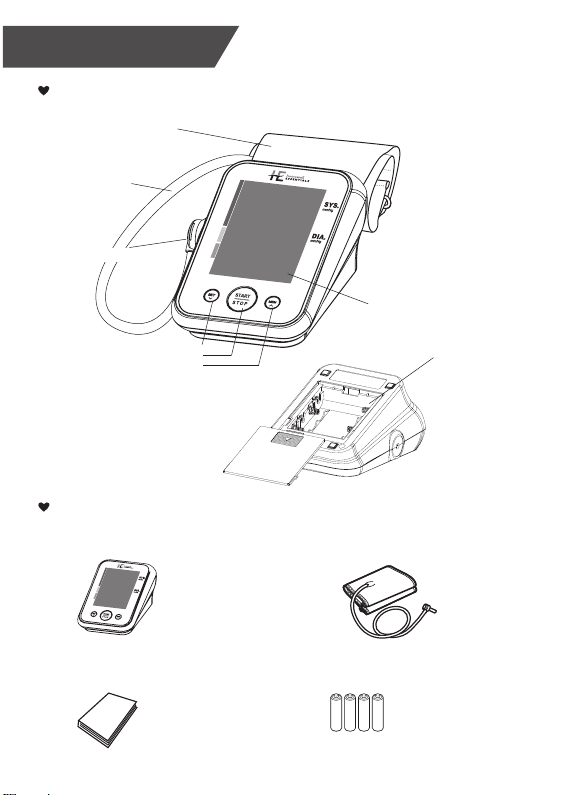
Monitor Components
CUFF
AIR HOSE
AIR CONNECTOR PLUG
SET/DOWN BUTTON
START/STOP BUTTON
MEM/UP BUTTON
Component list of
pressure measuring system:
1 Cuff
2 Air pipe
3 PCBA
4 Pump
5 Valve
START
STOP
PUL.
/min.
List
1. Blood Pressure Monitor
(HWEBPM)
PUL.
/min.
3. User manual 4. 4*AA batteries
2. Cuff ( 22~42cm)/ (9-17 inch)
(Type BF applied part)
8
LCD DISPLAY
BATTERY COMPARTMENT
Page 11
BEFORE YOU START
The Choice of Power Supply
1. Battery powered mode:
6VDC 4*AA batteries
2. AC adaptor powered mode:
6V 1A (Not included)
(Please use the AC adaptor which
authorized by the manufacturer!)
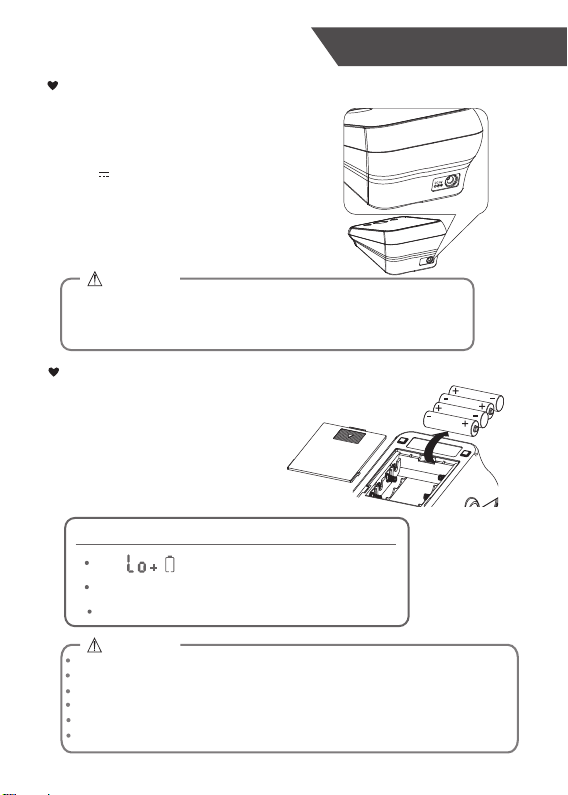
Right picture is the hole in for power
adaptor.
CAUTION
In order to get the best effect and protect your monitor,please use the
the right batteries and special power adapter which complies with local
safety standard.
Installing and Replacing the Batteries
1.Slide off the battery cover.
2.Install the batteries by matching
the correct polarity, as shown.
3.Replace the cover.
Replace the batteries whenever the below happens
The shows
The display dims
The display does not light up
CAUTION
Do not use new and used batteries together.
Do not use different types of batteries together.
Do not dispose the batteries in fire. Batteries may explode or leak.
Remove batteries if the device is not likely to be used for some time.
Worn batteries are harmful to the environment. Do not dispose with daily garbage.
Remove the old batteries from the device following your local recycling guidelines.
9
Page 12
BEFORE YOU START
Setting Date, Time and Measurement Unit
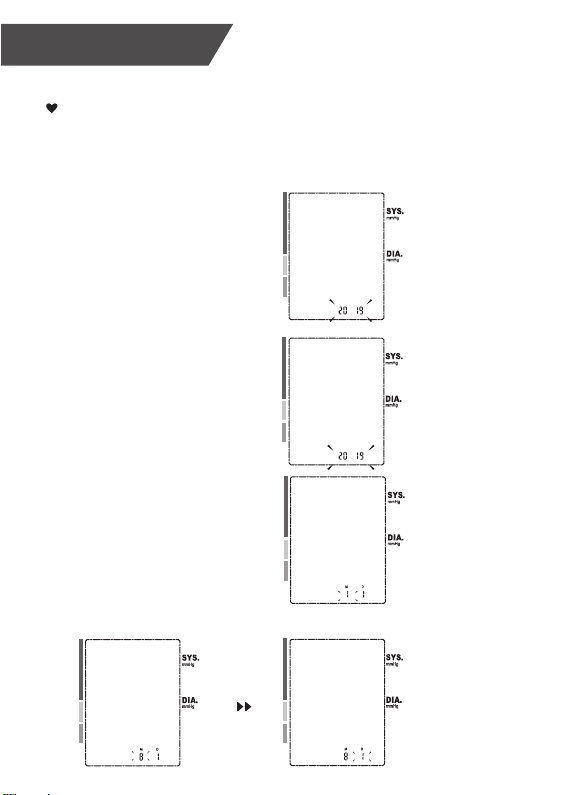
It is important to set the clock before using your blood pressure
monitor, so that a time stamp can be assigned to each record that is
stored in the memory. (year: 2019—2059 time:12 H)
1.When the monitor is
off, hold pressing “
SET ” button for 3
seconds to enter the
mode for year setting.
2.Press the “ MEM ”
button to change the
[YEAR].
3.When you get the right
year, press “ SET ”
button to set down and
turn to next step.
4.Repeat step 2 and 3 to set the [MONTH] and [DAY].
PUL.
/min.
PUL.
/min.
PUL.
/min.
10
PUL.
/min.
PUL.
/min.
Page 13
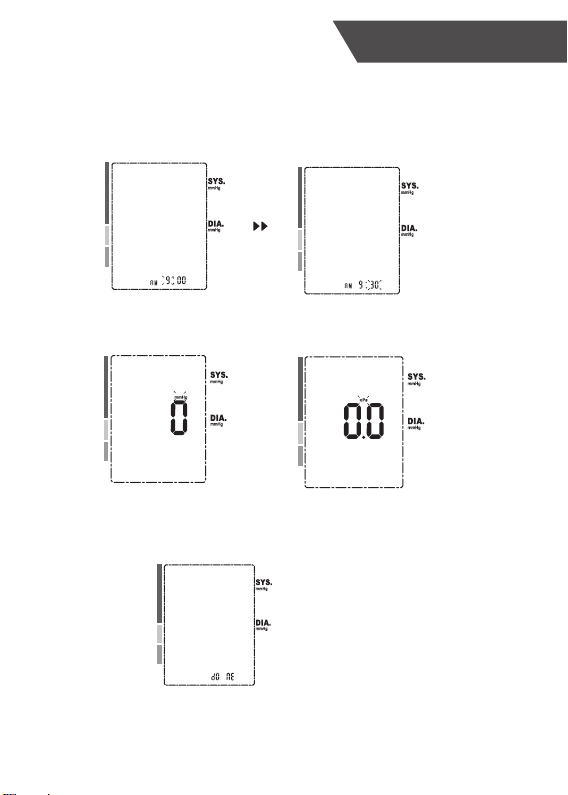
5.Repeat step 2 and 3 to set the [HOUR] and [MINUTE].
BEFORE YOU START
PUL.
/min.
PUL.
/min.
6.Repeat step 2 and 3 to set the [UNIT] .
PUL.
/min.
PUL.
/min.
7.After the [UNIT] is set, the LCD will display “ donE ” then turn
off.
PUL.
/min.
11
Page 14
BEFORE YOU START
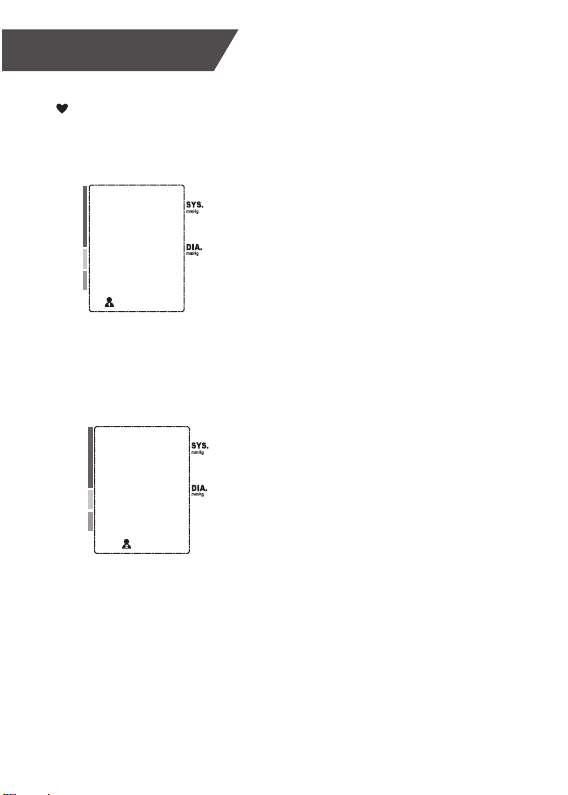
Select the User
1.When the monitor is off , press the “ SET ” button shortly
to enter user setting mode.
PUL.
/min.
2.Then press “ SET ” button again, select the user ID between user 1
and user 2 .
PUL.
/min.
3. After selecting the suitable user ID, press “ START/STOP ” button to
save the setteing you have done then the device will turn off.
12
Page 15
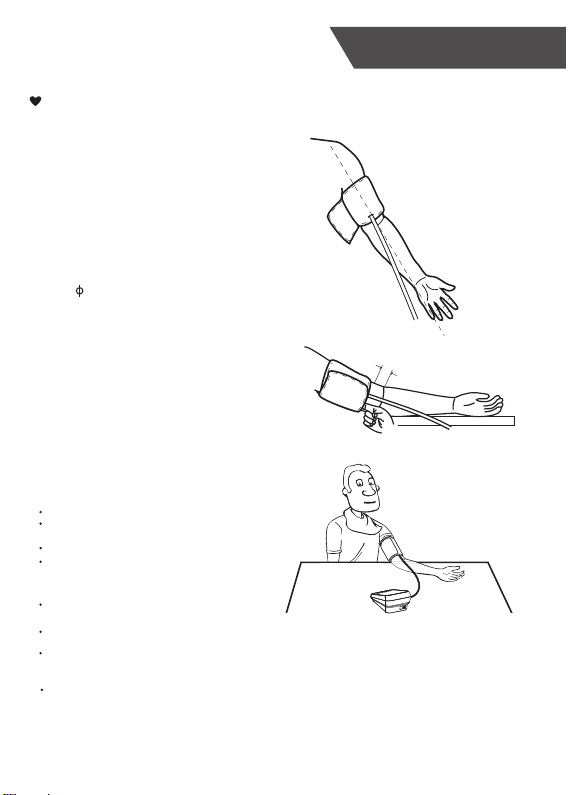
Tie the Cuff
1.
Remove all jewelry, such as watches and
bracelets from your left arm.
Note: If your doctor has diagnosed you with
poor circulation in your left arm, use your
right arm.
2.
Roll or push up your sleeve to expose the
skin. Make sure your sleeve is not too tight.
Hold your arm with your palm facing up and tie
3.
the cuff on your upper arm, then position the
tube off-center toward the inner side of arm in
line with the little finger. Or position the artery
mark over the main artery (on the inside of
your arm). Note: Locate the main artery by
pressing with 1 finger approximately 1/2 inch
above the bend of your elbow on the inside of
your left arm. Identify where the pulse can be
felt the strongest. This is your main artery.
4.
The cuff should be snug but not too tight. You
should be able to insert one finger between
the cuff and your arm.
5.
Sit comfortably with your tested arm resting
on a flat surface. Place your elbow on a table
so that the cuff is at the same level as your
heart. Turn your palm upwards. Sit upright in
a chair, and take 5-6 deep breaths.
6.
Helpful tips for Patients, especially for Patients
with Hypertension:
Rest for 5 minutes before first measurement.
Wait at least 3 minutes between measurements.
This allows your blood circulation to recover.
Take the measurement in a silent room.
The patient must relax as much as possible
and do not move and talk during the
measurement procedure.
The cuff should maintain at the same level
as the right atrium of the heart.
Please sit comfortably. Do not cross your legs
and keep your feet flat on the ground.
Keep your back against the backrest of the
chair.
For a meaningful comparison, try to measure
under similar conditions. For example, take daily
measurements at approximately the same time,
on the same arm, or as directed by a physician.
MEASUREMENT
½”
13
Page 16
MEASUREMENT
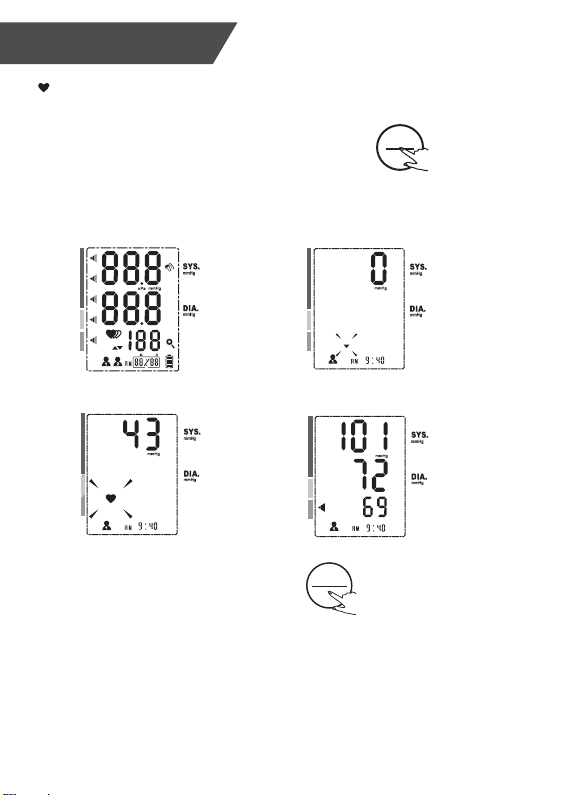
Start the Measurement
1.When the monitor is off, press the
“START/STOP” button to turn on the
monitor, and it will finish the whole
measurement,save and transmit the
measurement data for the desired user.
(Take User 1 for example.)
LCD display
START
STOP
Adjust the zero
PUL.
/min.
Inflating and measuring.
PUL.
/min.
2.Press “START/STOP” button to
power off, otherwise it will turn
off within 1 minute.
Display and save the results.
START
STOP
Tips:
A.You can press “START/STOP” button at any time to stop measuring
during the process of measurement.
B.Maximum 60 records are both for USER 1 and USER 2.
C.If the measurement result is out of the measurement range (SYS:
60mmHg to 230mmHg; or DIA: 40mmHg to 130mmHg;or Pulse: 40-199
pulse/minute), the LCD will display “out”.
14
PUL.
/min.
PUL.
/min.
Page 17
DATA MANAGEMENT
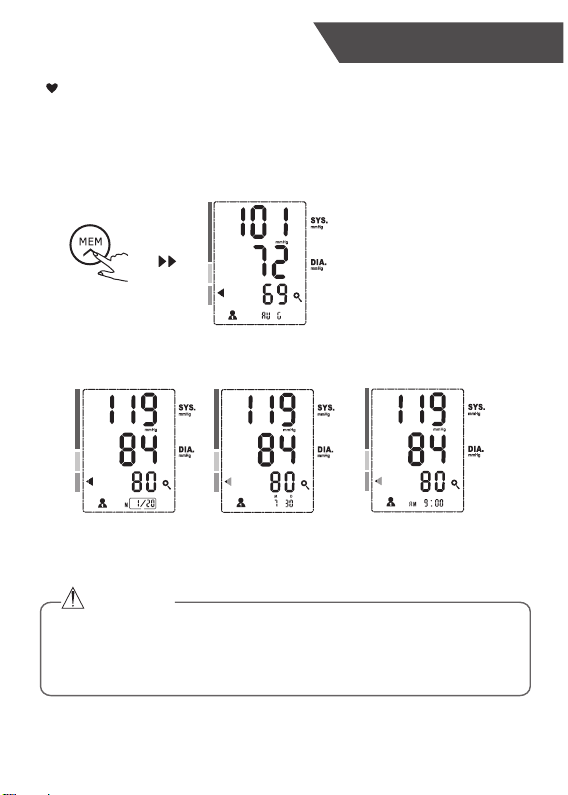
Recall the Records
1.When the monitor is off, please press “MEM” button to show the average
value of the latest three records.If the records are less than 3 groups, it will
display the latest record instead. Displays different colors at different levels
when the monitor is under the memory recall mode.
(Take user 1 for example.)
PUL.
/min.
2. Press the “MEM” or “SET” button to rotate the records.
The order of the record, date and time will be displayed alternatively.
PUL.
/min.
The current is
the No. 1.Twenty
PUL.
/min.
The corresponding
date is July 30th.
PUL.
/min.
The corresponding
time is A.M.9:00.
records in total.
CAUTION
The most recent record (1) is shown first. Each new measurement is
assigned to the first (1) record. All other records are pushed back one digit
(e.g., 2 becomes 3, and so on), and the last record (60) is dropped from the
list.
15
Page 18
DATA MANAGEMENT
Delete the Records
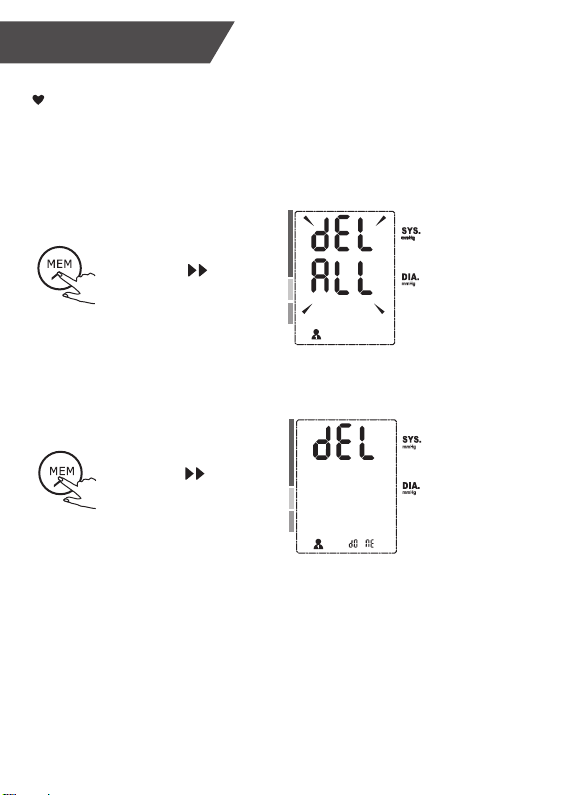
If you did not get the correct measurement, you can delete all
results of the selected user by following steps below .
1.Hold pressing “MEM” button for 3 seconds when the monitor is in the
memory recall mode. The LCD will display “Use ID + dEL ALL”.
PUL.
/min.
2.Press “MEM” button to confirm deleting, the LCD will display “Use ID +
dEL donE” and the monitor will turn off.
PUL.
/min.
16
Page 19
DATA MANAGEMENT
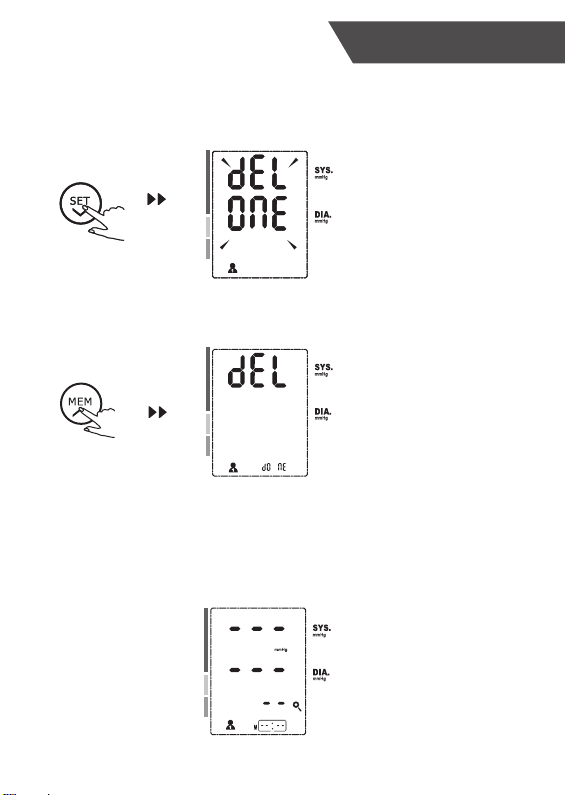
3.Hold pressing “SET” button for 3 seconds when the monitor is in the memory
recall mode (excluding the LCD displays AVG). The LCD will blink “Use ID +
dEL ONE”.
PUL.
/min.
4.Press “MEM” button to confirm deleting selected record, the LCD will
display “Use ID + dEL donE” and the monitor will turn off.
PUL.
/min.
5.If you don’t want to delete the records, press the “START/STOP” button,
it will turn off and quit the deletion. Or when it is in the deleting memory
mode, it will turn off and quit the deletion if there is no operation in one
minute.
6. If there is no record, the LCD will display as below :
PUL.
/min.
17
Page 20
INFORMATION FOR USER
Tips for Measurement
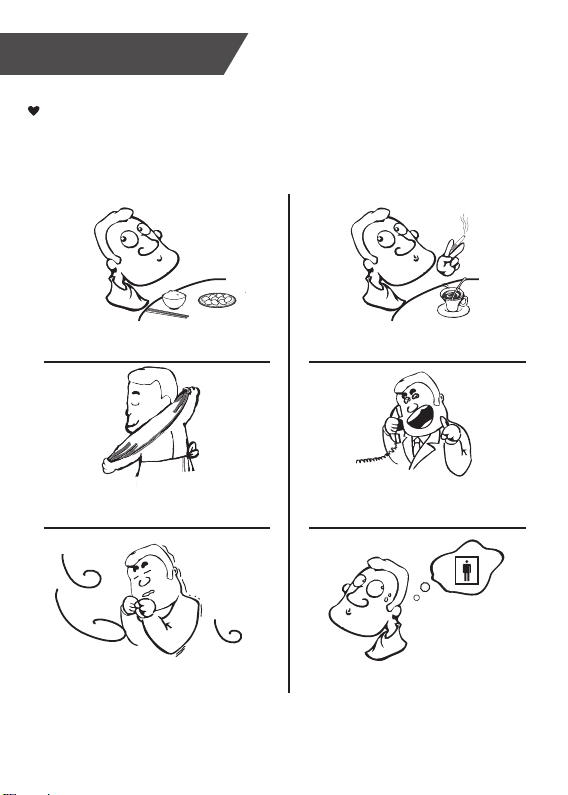
Measurements may be inaccurate if taken in the following
circumstances.
Wait at least 1 hour after
dinner or drinking
Wait at least 20 minutes
after taking a bath
Do not take measurement
in a cold environment
18
Do not take immediate measurement
after tea, coffee or smoking
Do not take measurement when
talking or moving your fingers
Do not take measurement when
you want to discharge urine
Page 21
INFORMATION FOR USER
Maintenance
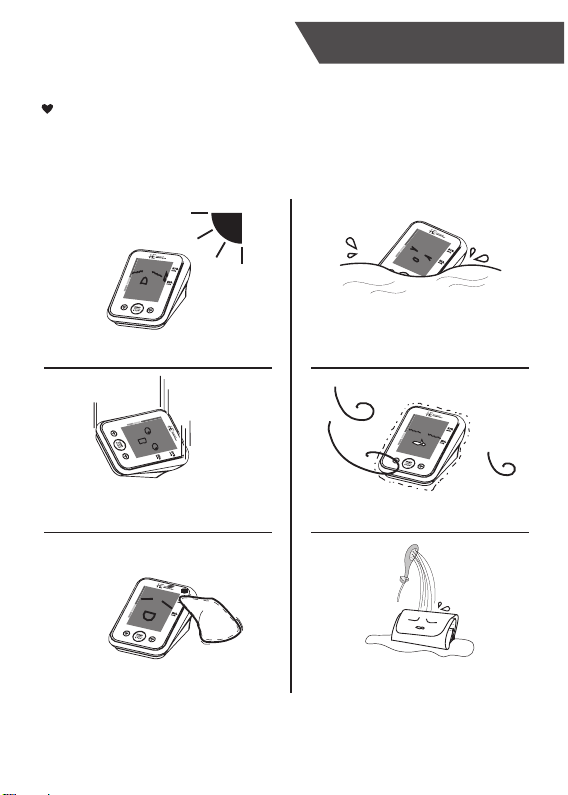
In order to get the best performance, please follow the instructions
below.
PUL.
/min.
PUL.
/min.
Put in a dry place and
avoid the sunshine
PUL.
/min.
Avoid intense shaking
and collisions
PUL.
/min.
Use wet cloths to remove dirt
Avoid touching water,
clean it with a dry cloth in case.
PUL.
/min.
Avoid dusty and unstable
temperature environment
Avoid washing the cuff
19
Page 22
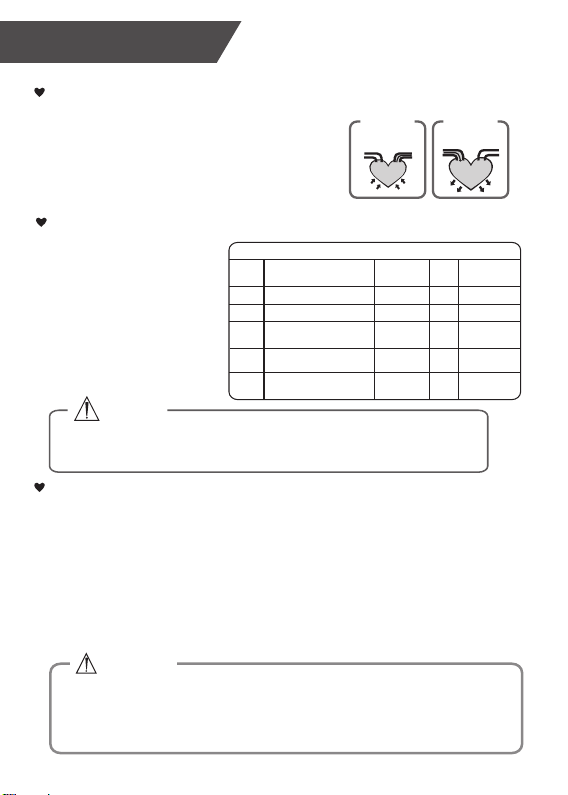
ABOUT BLOOD PRESSURE
What are systolic pressure and diastolic pressure?
When ventricles contract and pump blood out
of the heart, the blood pressure reaches its
maximum value in the cycle, which is called
systolic pressure. When the ventricles relax,
the blood pressure reaches its minimum value
in the cycle, which is called diastolic pressure.
Systolic
blood discharging
artery
press
Diastolic
blood entering
vein
What is the standard blood pressure classification?
The chart on the right is the
standard blood pressure
classification published by
American Heart Association
(AHA).
CAUTION
Please consult a physician if your measuring result falls outside the
range. Please note that only a physician can tell whether your blood
pressure value has reached a dangerous point.
This chart reflects blood pressure categories defined by American Heart Association.
Backlight
Blood Pressure Category
on BPM
Green
Yellow
Red
Red
Red
Normal
Prehypertension
High Blood Pressure
(Hypertension) Stage 1
High Blood Pressure
(Hypertension) Stage 2
Hypertensive Crisis
(Consult your doctor immediately)
Systolic
mmHg (upper#)
less than 120
120-129
130-139
140 or higher
Higher than 180
and
and less than 80
or
or
and/or
Irregular Heartbeat Detector
An irregular heartbeat is detected when a heartbeat rhythm varies while the
device is measuring systolic pressure and diastolic pressure. During each
measurement, blood pressure monitor will keep a record of all the pulse
intervals and calculate the average value of them. If there are two or more
pulse intervals, the difference between each interval and the average is
more than the average value of ±25%, or there are four or more pulse
intervals, the difference between each interval and the average is more than
the average value of ±15%, then the irregular heartbeat symbol will appear
on the display with the measurement result.
CAUTION
The appearance of the IHB icon indicates that a pulse irregularity consistent with an
irregular heartbeat was detected during measurement. Usually this is NOT a cause for
concern. However, if the symbol appears often, we recommend you seek medical
advice. Please note that the device does not replace a cardiac examination, but serves
to detect pulse irregularities at an early stage.
20
relax
Diastolic
mmHg (lower#)
less than 80
80-89
90 or higher
Higher than 120
Page 23
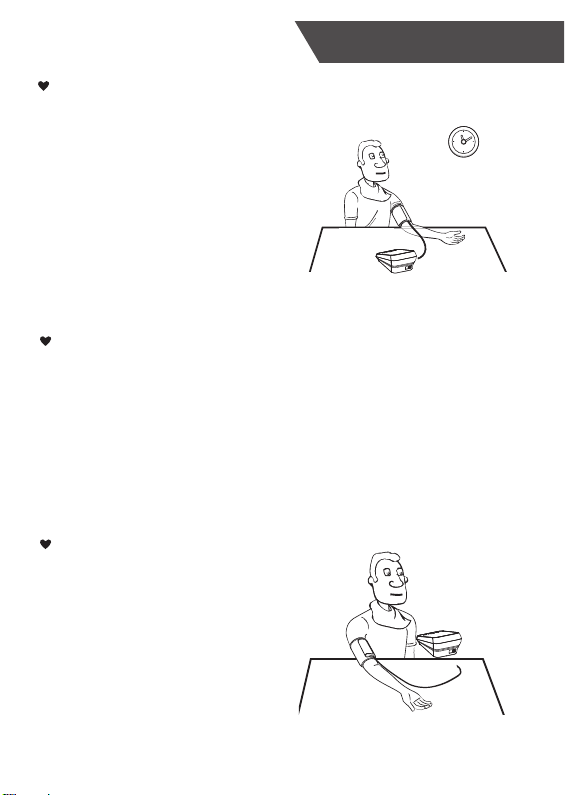
Why does my blood pressure
fluctuate throughout the day?
1. Individual blood pressure varies
multiple times everyday. It is also
affected by the way you tie your
cuff and your measurement position,
so please take the measurement
under the same conditions.
2.
If the person takes medicine, the
pressure will vary more.
3. Wait at least 3 minutes for another
measurement.
Why do I get a different
blood pressure at home
compared to the hospital?
The blood pressure is different even
throughout the day due to weather,
emotion, exercise etc, Also, there is
the “white coat” effect, which means
blood pressure usually increases in
clinical settings.
Is the result the same
if measuring on the
right arm?
It is ok for both arms, but there will be
some different results for different
people. We suggest you measure
the same arm every time.
ABOUT BLOOD PRESSURE
What you need to pay attention
to when you measure your blood
pressure at home:
If the cuff is tied properly.
If the cuff is too tight or too loose.
If the cuff is tied on the upper arm.
If you feel anxious.
Taking 2-3 deep breaths before
beginning will be better for
measuring.
Advice: Relax yourself for 4-5
minutes until you calm down.
21
Page 24
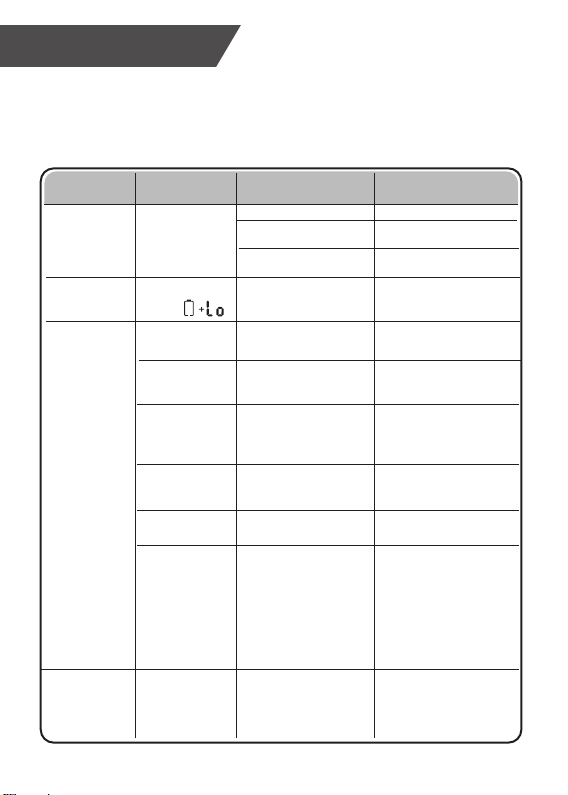
TROUBLESHOOTING
This section includes a list of error messages and frequently asked
questions for problems you may encounter with your blood pressure
monitor. If the products not operating as you think it should, check
here before arranging for servicing.
22
PROBLEM
No power
Low
batteries
Error
message
Warning
message
SYMPTOM
Display
will not light up.
Display is dim or
shows
E 1 shows
E 3 shows
E10 or E11
shows
E20 shows
E21 shows
EExx,shows on
the display.
“out ” shows
CHECK THIS
Batteries are exhausted.
Batteries are inserted
incorrectly.
AC adaptor is inserted
incorrectly.
Batteries are low.
The cuff is not secure or
very tight.
The pressure of the
cuff is excess.
The monitor detected
motion,talking or the
pluse is too poor
while measuring.
The measurement
process does not detect
the pulse signal.
The treatment of the
measurement failed.
A calibration error
occurred.
Out of measurement
range
REMEDY
Replace with new batteries
Insert the batteries
correctly
Insert the AC adaptor
tightly
Replace with new batteries
Refasten the cuff and then
measure again.
Relax for a
moment and then
measure again.
Movement can affect the
measurement.Relax for a
moment and then
measure again.
Loosen the clothing on the
arm and then measure
again
Relax for a moment and
then measure again.
Retake the measurement.
If the problem persists,
contact the retailer or our
customer service
department for further
assistance.Refer to the
warranty for contact
information and return
instructions.
Relax for a moment.
Refasten the cuff and then
measure again. If the
problem persists, contact
your physician.
Page 25
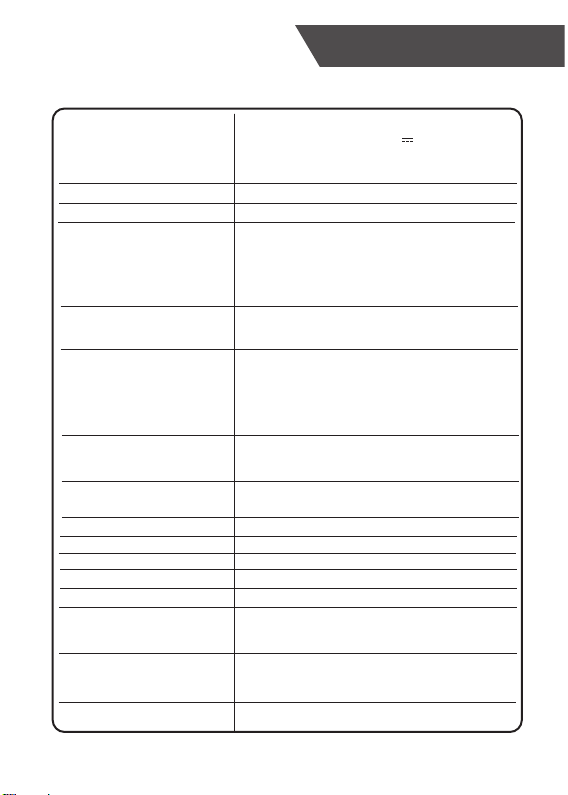
SPECIFICATIONS
Battery powered mode:
Power supply
Display mode
Measurement mode
Measurement range
Accuracy
Normal working condition
Storage & transportation
condition
Measurement perimeter
of the upper arm
Net Weight
External dimensions
Attachment
Mode of operation
Degree of protection
Protection against
ingress of water
Device Classification
Software Version
WARNING: No modification of this equipment is allowed.
AC adaptor powered mode:
(Please only use the recommended AC
adaptor model).
Digital LCD V.A.60mm*80mm(3.15”*2.36”)
Oscillographic testing mode
Rated cuff pressure:
0mmHg~299mmHg(0kPa ~ 39.9kPa)
Measurement pressure:
SYS: 60mmHg~230mmHg (8.0kPa~30.7kPa)
DIA: 40mmHg~130mmHg (5.3kPa~17.3kPa)
Pulse value: (40-199)beat/minute
Pressure:
5°C-40°Cwithin±3mmHg(0.4kPa)
Pulse value: ±5%
A temperature range of: +5°C to +40°C
A relative humidity range of 15% to 90%,
non-condensing, but not requiring a water vapour
partial pressure greater than 50 hPa
An atmospheric pressure range of:
700 hPa to 1060 hPa
Temperature: -20°C to +60°C
A relative humidity range of ≤ 93%, non-condensing,
at a water vapour pressure up to 50hPa
About 22cm~42cm
Approx.263g(Excluding the batteries)
Approx.102mm*143mm*73mm
4×AA batteries,user manual
Continuous operation
Type BF applied part
IP21 It means the device could protected against
solid foreign objects of 12.5mm and greater, and
protect against vertically falling water drops.
Battery Powered Mode:
Internally Powered ME Equipment
AC Adaptor Powered Mode: Class II ME Equipment
A01
6VDC 4×AA batteries
6V 1A (Not included)
23
Page 26
AUTHORIZED COMPONENT
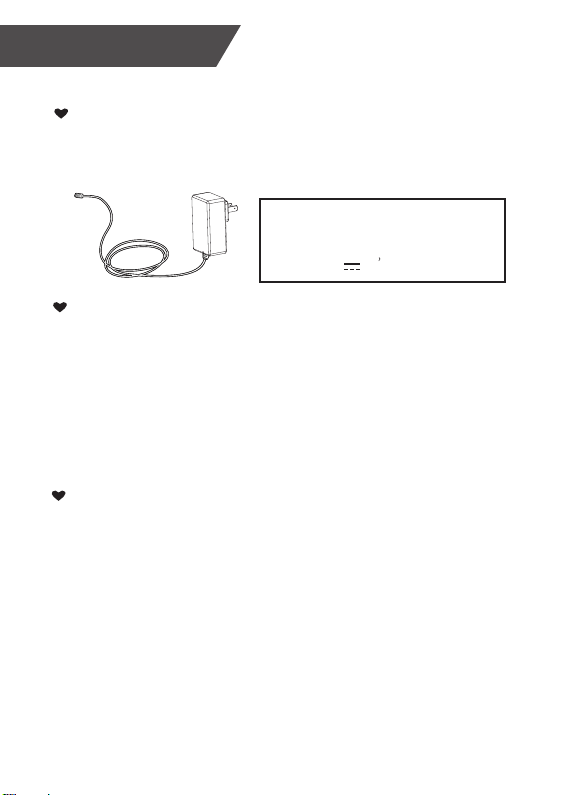
Authorized Component
1. Please use the Homewell Essentials
authorized adapter (Not included).
Adaptor
Type:
BLJ06L060100P-U
100-240V 50-60Hz,0.2Amax
Input:
6V 1000mA
Output:
Contact Information
Please call 1-805-383-0003 Monday through Friday,
8:30 AM to 4:30PM PST.
735 West Ventura Blvd., Suite B
Camarillo, CA 93010
Homewell Essentials™ is a trademark of Huntkey USA,Inc.
Distributed by Huntkey USA, LLC.
735 West Ventura Blvd., Suite B
Camarillo, CA 93010
FCC Statement
This equipment has been tested and found to comply with the limits for a Class
B digital device, pursuant to Part 15 of the FCC Rules. These limits are
designed to provide reasonable protection against harmful interference in a
residential installation. This equipment generates, uses and can radiate radio
frequency energy and, if not installed and used in accordance with the
instructions, may cause harmful interference to radio communications.
However, there is no guarantee that interference will not occur in a particular
installation. If this equipment does cause harmful interference to radio or
television reception, which can be determined by turning the equipment off and
on, the user is encouraged to try to correct the interference by one or more of
the following measures:
—Reorient or relocate the receiving antenna.
—Increase the separation between the equipment and receiver.
—Connect the equipment into an outlet on a circuit different from that to which
the receiver is connected.
—Consult the dealer or an experienced radio/TV technician for help.
24
Page 27

Complied Standards List
Risk management
Labeling
User manual
General Requirements
for Safety
Electromagnetic
compatibility
Performance
requirements
Clinical investigation
Usability
Software life-cycle
processes
Bio-compatibility
EN ISO 14971:2012 / ISO 14971:2007 Medical devices Application of risk management to medical devices
EN ISO 15223-1:2016 / ISO 15223-1:2016 Medical devices.
Symbols to be used with medical device labels, labelling and
information to be supplied. Part 1 : General requirements
EN 1041:2008+A1:2013 Information supplied by the manufacturer
of medical devices
EN 60601-1:2006+A1:2013/ IEC 60601-1:2005+A1:2012 Medical
electrical equipment - Part 1: General requirements for basic safety
and essential performance
EN 60601-1-11:2015/ IEC 60601-1-11:2015 Medical electrical
equipment - Part 1-11: General requirements for basic safety and
essential performance - Collateral standard: Requirements for
medical electrical equipment and medical electrical systems used
in the home healthcare environment
EN 60601-1-2:2015/ IEC 60601-1-2:2014 Medical electrical
equipment - Part 1-2: General requirements for basic safety and
essential performance - Collateral standard: Electromagnetic
disturbances - Requirements and tests
EN ISO 81060-1:2012 Non-invasive sphygmomanometers - Part 1:
Requirements and test methods for non-automated measurement
type
EN 1060-3:1997+A2:2009 Non-invasive sphygmomanometers Part 3: Supplementary requirements for electro-mechanical blood
pressure measuring systems
IEC 80601-2-30:2009+A1:2013 Medical electrical equipmentPart 2-30: Particular requirements for the basic safety and essential
performance of automated non-invasive sphygmomanometers
EN 1060-4:2004 Non-invasive sphygmomanometers - Part 4: Test
procedures to determine the overall system accuracy of automated
non-invasive sphygmomanometers
ISO 81060-2:2013 Non-invasive sphygmomanometers - Part 2:
Clinical validation of automated measurement type
EN 60601-1-6:2010+A1:2015/IEC 60601-1-6:2010+A1:2013 Medical
electrical equipment - Part 1-6: General requirements for basic safety
and essential performance - Collateral standard: Usability
IEC 62366-1:2015 Medical devices - Part 1: Application of usability
engineering to medical devices
EN 62304:2006/AC: 2008 / IEC 62304: 2006+A1:2015 Medical
device software - Software life-cycle processes
ISO 10993-1:2009 Biological evaluation of medical devices- Part 1:
Evaluation and testing within a risk management process
ISO 10993-5:2009 Biological evaluation of medical devices - Part 5:
Tests for in vitro cytotoxicity
ISO 10993-10:2010 Biological evaluation of medical devices Part 10: Tests for irritation and skin sensitization
COMPLIED STANDARDS LIST
25
Page 28
EMC GUIDANCE
EMC Guidance
1)This product needs special precautions regarding EMC and needs to be
installed and put into service according to the EMC information provided,
and this unit can be affected by portable and mobile RF communications
equipment.
2)* Do not use a mobile phone or other devices that emit electromagnetic
fields, near the unit. This may result in incorrect operation of the unit.
3)Caution: This unit has been thoroughly tested and inspected to assure
proper performance and operation!
4)* Caution: This machine should not be used adjacent to or stacked with
other equipment and that if adjacent or stacked use is necessary, this
machine should be observed to verify normal operation in the configuration in
which it will be used.
Table 1
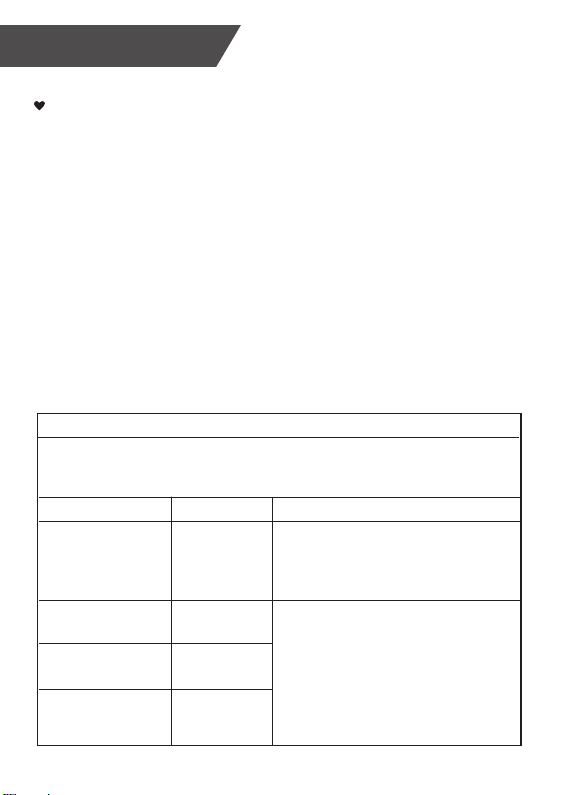
Guidance and manufacturer’s declaration – electromagnetic emissions
The device is intended for use in the electromagnet ic environment specified below. The cu stomer or the
user of the device should assure that it is used in such an environment.
Emissions test Electromagnetic environment - guidance
RF emissions
CISPR 11
RF emissions
CISPR 11
Harmonic emissions
IEC 61000-3-2
Voltage fluctuations/
flicker emissions
IEC 61000-3-3
Compliance
Group 1
Class B
Class A
Complies
The device uses RF energy only for its internal
function. Therefore, its RF emissions are very low
and are not likely to cause any interference in nearby
electronic equipment.
The device is suitable for use in all establishments,
other than domestic and those directly connected to
the public low-voltage power supply network that
supplies buildings used for domestic purposes.
26
Page 29

EMC GUIDANCE
Table 2
Guidance and manufacturer’s declaration – electromagnetic immunity
The device is intended for use in the electromagnetic environment specified below. The customer or the
user of the device should assure that it is used in such an environment.
Immunity test
Electrostatic
discharge (ESD)
IEC 61000-4-2
Electrical fast
transient/burst
IEC 61000-4-4
Surge
IEC61000-4-5
Voltage dips,
short interruptions
and voltage
variations on
power supply
input lines
IEC 61000-4-11
Power frequency
(50Hz/60Hz)
magnetic field
IEC 61000-4-8
NOTE UT is the a.c. mains voltage prior to application of the test level.
IEC 60601 test level
±8 kV contact
±15 kV air
power supply lines:
±2 kV
input/output lines:
±1 kV
line(s) to line(s): ±1 kV
line(s) to earth: ±2 kV
100 kHz repetition
frequency
0%UT; 0.5 cycle
At 0°, 45°, 90°, 135°,
180°,225°,270° and 315°
0%U
T ; 1 cycle
and
T ; 25/30 cycles
70%U
Single phase: at 0°
T ; 300 cycle
0% U
30 A/m
50Hz/60Hz
Compliance level
±8 kV contact
±15 kV air
power supply lines:
±2 kV
line(s) to line(s): ±1 kV
100 kHz repetition
frequency
0% U
T ; 0.5 cycle
At 0°, 45°, 90°, 135°,
180°,225°,270° and
315°
T ; 1 cycle
0% U
and
T ; 25/30 cycles
70% U
Single phase: at 0°
T ;300 cy cle
0% U
30 A/m
50Hz/60Hz
Electromagnetic
environment - guidance
Floors should be wood, concrete
or ceramic tile. If floors are
covered with synthetic material,
the relative humidity should be at
least 30%.
Mains power quality should be
that of a typical commercial or
hospital environment.
Mains power quality should be
that of a typical commercial or
hospital environment.
Mains power quality should be
that of a typical commercial or
hospital environment.
Power frequency magnetic fields
should be at levels characteristic
of a typical location in a typical
commercial or hospital
environment.
27
Page 30
EMC GUIDANCE
Table 3
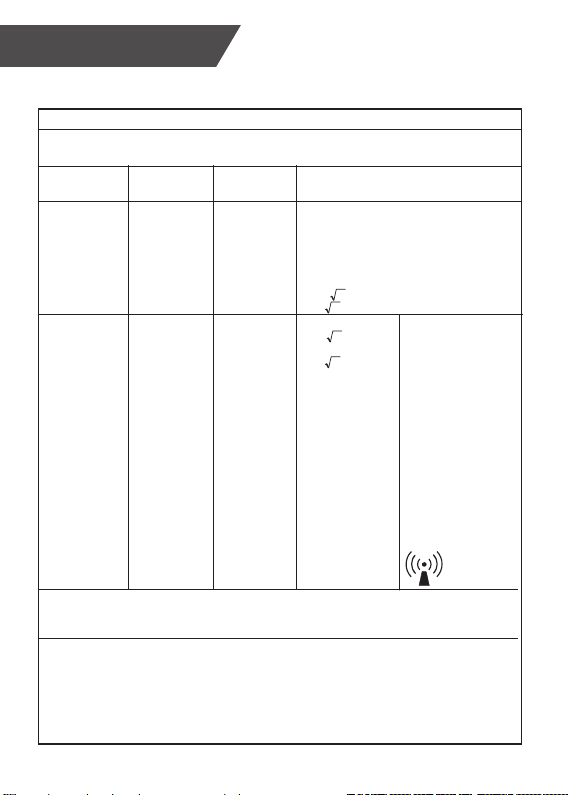
Guidance and manufacturer’s declaration – electromagnetic immunity
The device is intended for use in the electromagnetic environment specified below. The customer or the
user of the device should assure that it is used in such an environment.
Immunity test
Conducted RF
IEC 61000-4-6
Radiated RF
IEC 61000-4-3
NOTE 1 At 80 MHz and 800 MHz, the higher frequency range applies.
NOTE 2 These guidelines may not apply in all situations. Electromagnetic propagation is affected by
absorption and reflection from structures, objects and people.
a
Field strengths from fixed transmitters, such as base stations for radio (cellular / cordless)
telephones and land mobile radios, amateur radio, AM and FM radio broadcast and TV broadcast
cannot be predicted theoretically with accuracy. To assess the electromagnetic environment due to
fixed RF transmitters, an electromagnetic site survey should be considered. If the measured field
strength in the location in which the device is used exceeds the applicable RF compliance level
above, the device should be observed to verify normal operation. If abnormal performance is
observed, additional measures may be necessary, such
b
Over the frequency range 150 kHz to 80 MHz, field strengths should be less than 3V/m.
IEC 60601
Test level
150 kHz to
80 MHz:
3 Vrms
6Vrms (in ISM
and amateur
radio bands)
80% Am at 1kHz
10V/m, 80% Am
at 1kHz
Compliance
level
150 kHz to
80 MHz:
3 Vrms
6Vrms (in ISM
and amateur
radio bands)
80% Am at 1kHz
10V/m, 80% Am
at 1kHz
Electromagnetic environment - guidance
Portable and mobile RF communications
equipment should be used no closer to any part
of the device, including cables, than the
recommended separation distance calculated
from the equation appropriate for the frequency
of the transmitter.
Recommended separation distances:
d=0.35 ;
P
d=1.2
P
80 MHz to 800 MHz:
d=1.2
P
800 MHz to 2.7 GHz:
d=2.3
P
as re-orienting or relocating the device.
where, P is the maximum
output power rating of the
transmitter in watts (W)
according to the
transmitter manufacturer,
d is the recommended
separation distance in
meters (m). Field
strengths from fixed RF
transmitters, as
determined by an
electromagnetic site
a
survey, should be less
than the compliance level
in each frequency range.
Interference may occur in
the vicinity of equipment
marked with the following
symbol:
28
b
Page 31
EMC GUIDANCE
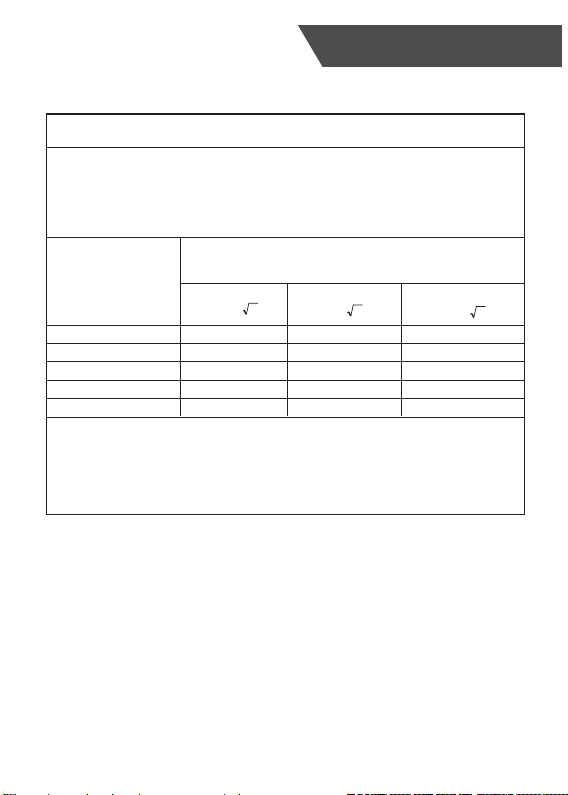
Table 4
Recommended separation distances between portable and mobile RF communications
equipment and the device.
The device is intended for use in an electromagnetic environment in which radiated RF disturbances are
controlled. The customer or the user of the device can help prevent electromagnetic interference by
maintaining a minimum distance between portable and mobile RF communications equipment
(transmittters) and the device as recommended below, according to the maximum output power of the
communications equipment.
Rated maximum output
power of transmitter
(W)
0.01
0.1
1
10
100
For transmitters rated at a maximum output power not listed above, the recommended separation
distance d in metres (m) can be estimated using the equation applicable to the frequency of the
transmitter, where P is the maximum output power rating of the transmitter in watts (W) according to the
transmitter manufacturer.
NOTE 1 At 80 MHz and 800 MHz, the separation distance for the higher frequency range applies.
NOTE 2 These guidelines may not apply in all situations. Electromagnetic propagation is affected by
absorption and reflection from structures, objects and people.
Separation distance according to frequency of transmitter (m)
150 kHz to 80 MHz 80 MHz to 800 MHz 800 MHz to 2.7 GHz
=d
3.5
P
0.12 0.12
0.38
1.2
3.8
12
=d 1.2
0.38
1.2
3.8
12
P
2.3=d
0.23
0.73
2.3
7.3
23
P
29
Page 32
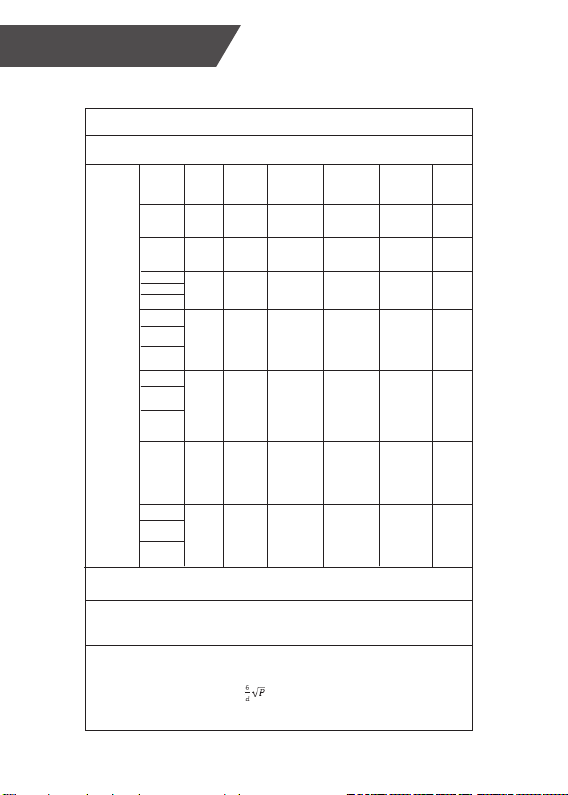
EMC GUIDANCE
Table 5
The device is intended for use in the electromagnetic environment specified below. The customer or the
user of the device, should assure that it is used in such an environment.
Radiated RF
IEC61000-4-3
(Test
specifications
for
ENCLOSURE
PORT
IMMUNITY to
RF wireless
communications
equipment)
NOTE If necessary to achieve the IMMUNITY TEST LEVEL, the distance between the transmitting antenna
and the ME EQUIPMENT or ME SYSTEM may be reduced to 1 m. The 1 m test distance is permitted by
IEC 61000-4-3.
a) For some services, only the uplink frequencies are included.
b) The carrier shall be modulated using a 50% duty cycle square wave signal.
c) As an alternative to FM modulation, 50% pulse modulation at 18 Hz may be used because while it does
not represent actual modulation, it would be worst case.
The MANUFACTURER should consider reducing the minimum separation distance, based on RISK
MANAGEMENT, and using higher IMMUNITY TEST LEVELS that are appropriate for the reduced
minimum separation distance. Minimum separation distances for higher IMMUNITY TEST LEVELS shall be
calculated using the following equation:
E=
Where P is the maximum power in W, d is the minimum separation distance in m, and E is the IMMUNITY
TEST LEVEL in V/m.
Guidance and manufacturer’s declaration - electromagnetic immunity
Test
Band a)
Frequency
(MHz)
385
450 430-470
710 704-787
745
780
810
870
930
1720
1845
1970
5240
5500
5785
Service a) Modulation b) Modulation b)
(MHz)
380-390 TETRA
800-960
17001990
2570
51005800
400
GMRS 460,
FRS 460
LTE Band
13,
17
GSM
800/900,
TETRA 800,
iDEN 820,
CDMA 850,
LTE Band 5
GSM 1800;
CDMA 1900;
GSM 1900;
DECT;
LTE Band 1,
3,
4,25; UMTS
Bluetooth,
WLAN,
802.11
b/g/n, RFID
2450, LTE
Band 7
WLAN
802.11
a/n
Pulse
modulation b)
18Hz
FM c) ± 5kHz
deviation 1kHz
sine
Pulse
modulation b)
217Hz
Pulse
modulation b)
18Hz
Pulse
modulation b)
217Hz
Pulse
modulation b)
217 Hz
Pulse
modulation b)
217 Hz
(W)
1.8
2 0.3 28
0.2 0.3 9
2
2
2
0.2
Distance (m)
0.3 27
0.3 28
0.3 28
0.3 282450 2400-
0.3 9
IMMUNITY
TEST
LEVEL
(V/m)
30
Page 33

LIMITED WARRANTY
2 Year Limited Warranty
Homewell Essentials products (“Homewell Essentials”) warrants to you, the original
purchaser of this new product, that the product shall be free of defects in the original
manufacture of the material or workmanship for a period of two (2) year from the original
date of your purchase of the product (“Warranty Period”). This product must be purchased
from an authorized dealer and packaged with this warranty statement. This warranty does
not cover refurbished product.
What does this Warranty Cover?
During the Warranty Period, if the original manufacture of the material or workmanship of
the product is determined to be defective by an authorized dealer, Huntkey USA Inc. will
(at its sole option): (1) repair the product with new or rebuilt parts; or (2) replace the product
at no charge with new or rebuilt comparable products or parts. Products and parts replaced
under this warranty become the property of Huntkey USA Inc. and are not returned to you.
If service of products or parts are required after the Warranty Period expires, you must pay
all labor and parts charges. This warranty lasts as long as you own your product during the
Warranty Period. Warranty coverage terminates if you sell or otherwise transfer the product.
How to Obtain Warranty Service?
Please call 1-805-383-0003 Monday through Friday, 8:30AM to 4:30PM PST. You will be
provided with a Return Merchandise Authorization (RMA) number and return instructions.
Send product to:
Huntkey USA, Inc.
735 W Ventura Blvd., Suite B
Camarillo, CA 93010
Please include the RMA number prominently displayed on the shipping box and include
your name, phone number and address with the product inside the box.
Where is the Warranty Valid?
This warranty is valid only to the original purchaser of the product in North America
(United States, Canada and Mexico).
WHAT DOES THE WARRANTY NOT COVER?
This warranty does not cover:
31
Page 34

• Cosmetic damage
• Damage due to force majeure, such as lightning strikes, fire, flood, etc..
• Accident
• Misuse
• Abuse
• Negligence
• Commercial use
• Modification of any part of the product
• Damage due to incorrect operation or maintenance
• Connection to an incorrect voltage supply
• Attempted repair by anyone other than a facility authorized by Homewell Essentials to
service the product
• Products sold as is or with all faults
• Consumables, such as batteries
• Products where the factory applied serial number has been altered or removed
REPAIR REPLACEMENT AS PROVIDED UNDER THIS WARRANTY IS YOUR
EXCLUSIVE REMEDY. HOMEWELL ESSENTIALS SHALL NOT BE LIABLE FOR
ANY INCIDENTAL OR CONSEQUENTIAL DAMAGES FOR THE BREACH OF ANY
EXPRESS OR IMPLIED WARRANTY ON THIS PRODUCT, INCLUDING, BUT NOT
LIMITED TO LOST DATA, LOSS OF USE OF YOUR PRODUCT, LOST BUSINESS
OR LOST PROFITS. HOMEWELL ESSENTIALS PRODUCTS MAKES NO OTHER
EXPRESS WARRANTIES WITH RESPECT TO THE PRODUCT, ALL EXPRESS AND
IMPLIED WARRANTIES FOR THE PRODUCT, INCLUDING, BUT NOT LIMITED TO,
ANY IMPLIED WARRANTIES OF AND CONDITIONS OF MERCHANTABILITY AND
FITNESS FOR A PARTICULAR PURPOSE, ARE LIMITED IN DURATION TO THE
WARRANTY PERIOD SET FORTH ABOVE AND NO WARRANTIES, WHETHER
EXPRESS OR IMPLIED, WILL APPLY AFTER THE WARRANTY PERIOD. SOME
STATES, PROVINCES AND JURISDICTIONS DO NOT ALLOW LIMITATIONS ON
HOW LONG AN IMPLIED WARRANTY LASTS, SO THE ABOVE LIMITATION MAY NOT
APPLY TO YOU. THIS WARRANTY GIVES YOU SPECIFIC LEGAL RIGHTS, AND YOU
MAY ALSO HAVE OTHER RIGHTS, WHICH VARY FROM STATE TO STATE OR
PROVINCE TO PROVINCE.
Contact Homewell Essentials:
For customer service please call 1-805-383-0003
Homewell Essentials™ is a trademark of Huntkey USA, Inc.
Distributed by Huntkey USA, LLC.
735 W Ventura Blvd Suite B, Camarillo CA 93010
32
Page 35

homewell
E S SENTI ALS
Distributed by: Huntkey USA, Inc
Address: 735 West Ventura Blvd., Suite B
Camarillo, CA 93010
Made in China
Page 36

Manufactured for & Distributed by: Huntkey USA Inc.
735 West Ventura Blvd., Suite B
Camarillo, CA 93010
 Loading...