

Page 1
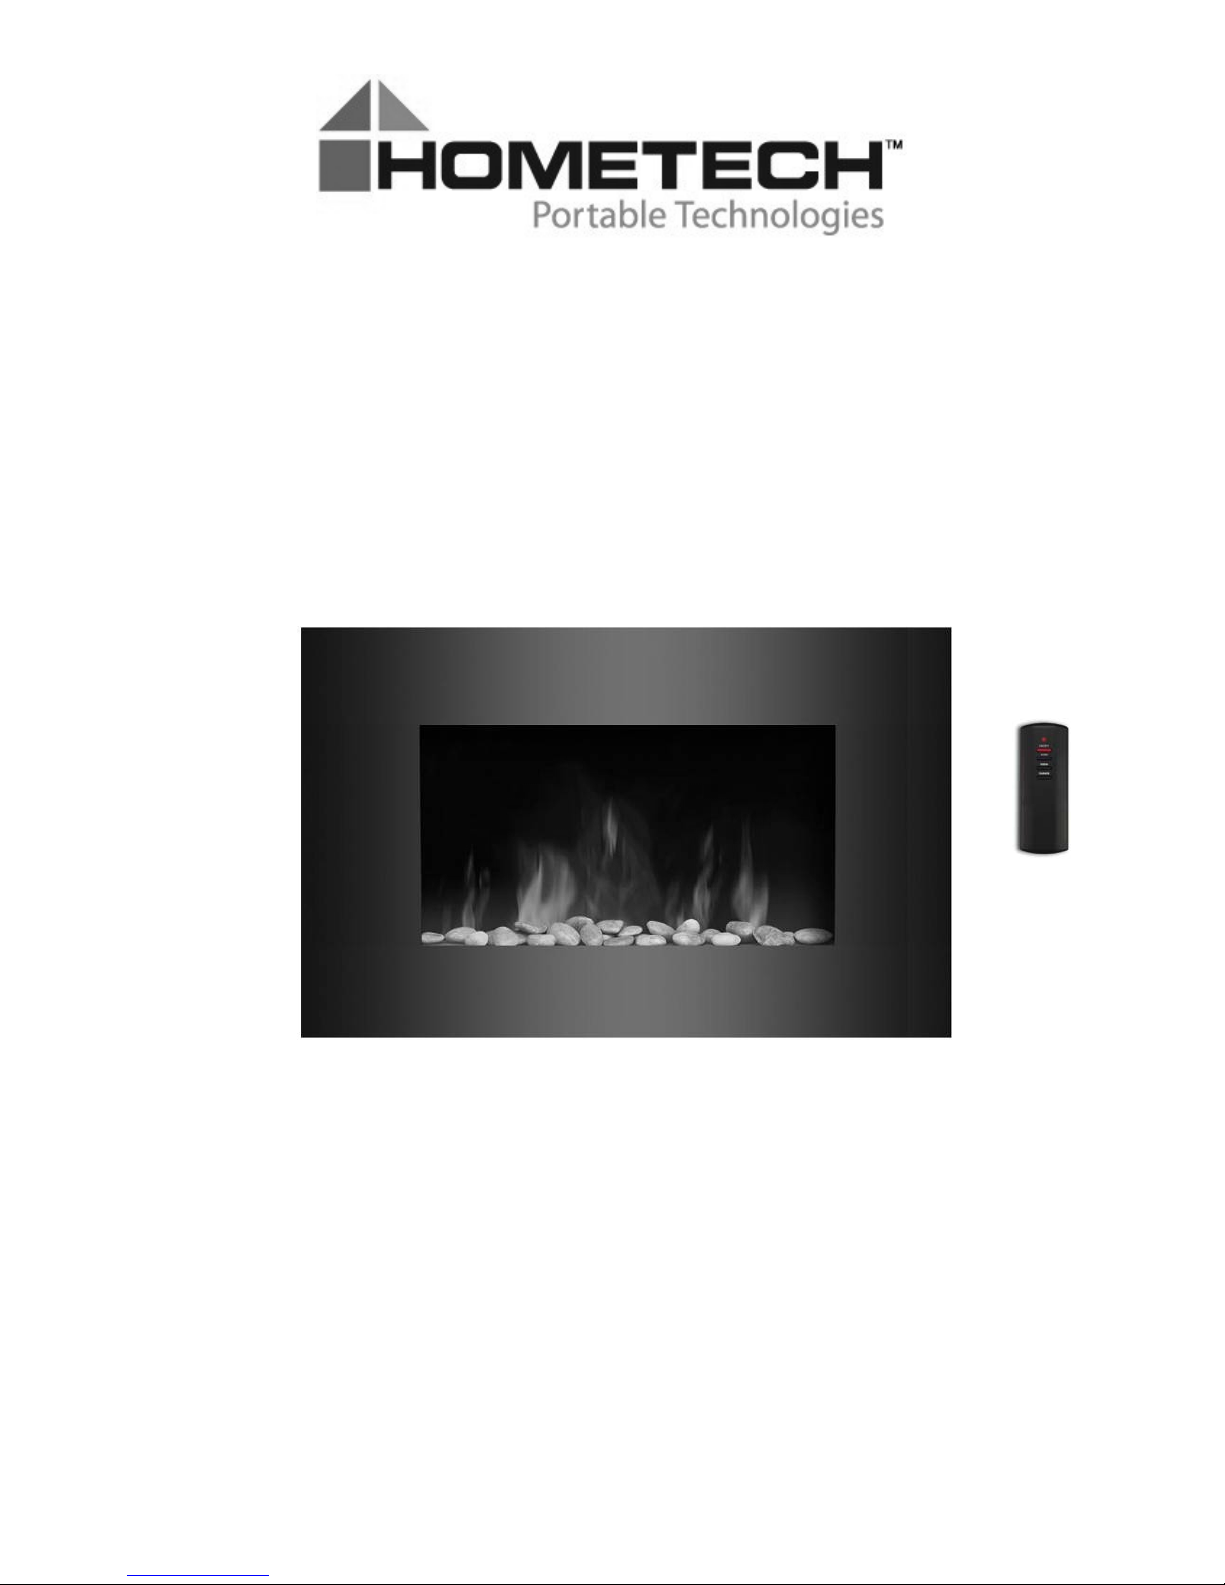
ELECTRIC FIREPLACE
with Remote Control
Model: EF423 / EF430 / EF431 / EF450 / EF451
INSTALLATION AND USER INSTRUCTION GUIDE
Please read all instructions carefully
and retain for future reference
Page 2

IMPORTANT SAFETY INSTRUCTIONS
Important Safety Instructions:
When using this electrical appliance, basic precautions should be followed to reduce the risk of fire,
electric shock, and injury to person, including the following:
1. This heater must be used on an AC supply only and the voltage marked on the heater must
correspond to the supply voltage.
2. Do not switch the appliance on until it properly installed as described in this manual.
3. The heater must not be located immediately below a socket outlet.
4. Keep furniture, curtains and other flammable material at least 1 meter away from the appliance.
5. Do not leave the appliance unattended during use.
6. Do not leave the appliance unattended whilst connected to the mains supply.
7. Keep out of reach of children and do not allow them to operate this appliance.
8. This appliance is intended for household use and should not be used for industrial purposes.
9. From time to time, check the cord for damage. Never use the appliance if the cord or any part of
the appliance shows signs of damage.
10. Do not operate this appliance with a damaged plug or cord, after a malfunction or after being
dropped or damaged in any way.
11. Repairs to electrical appliances should only be performed by a qualified electrician.
12. Improper repairs may place the user at serious risk.
13. Do not run the mains cable under carpets, rugs etc.
14. Do not allow the mains cable to hang over sharp edges or come into contact with hot surfaces.
15. Do not cover or obstruct the heater in any way.
16. Overheating will result if it is accidentally covered.
17. Never immerse the product in water or any other liquids.
18. Do not use this heater in the immediate surroundings of a bath, a shower or a swimming pool.
19. Do not use the appliance outdoors.
20. Do not use if you have wet hands.
21. Never use the appliance on or near hot surfaces.
22. Before cleaning the appliance, ensure it is unplugged from the power and that it is completely
cooled.
23. Do not clean the appliance with abrasive chemicals.
24. Never use accessories that are not recommended or supplied by the manufacturer. It could cause
danger to the user or damage to the appliance.
25. The only user replacement parts are the bulbs. There are no other user replacement parts. All
other servicing should be referred to a qualified engineer.
26. This appliance is not intended for use by persons (including children) with reduced physical,
sensory or mental capabilities, or lack of experience and knowledge unless they have been given
supervision or instruction concerning use of the appliance by a person responsible for their
safety.
27. Children should be supervised to ensure that they do not play with the appliance.
28. Do not lift the appliance by the front panel.
29. Do not use this heater with a programm er, timer or any other device that s witches the heater on
automatically, since a fire risk exists if the heater is covered or positioned incorrectly.
CAUTION: TO PREVENT ELECTRIC SHOCK, MATCH WIDE BLADE OF PLUG TO WIDE SLOT,
FULLY INSERT.
SAVE THESE INSTRUCTIONS
Page 3

GETTING TO KNOW YOUR HEATER
INSTALLATION
Getting started
1. Remove the appliance from the box.
2. Remove any packaging from the product.
3. Place the packaging inside the box and either store or dispose of safely.
Contents of carton
1. Electric Fireplace
2. Wall fixing bracket
3. Fixing screws and wall plugs
4. Remote control
5. Instruction manual
6. 1 bag of decorative pebbles (If your Fireplac e is with “log fuel effect”, no pebbles are included)
Helpful advice before fitting
1. Please retain all packaging until you have checked and counted all the parts and the contents of
the fixing pack against the parts list.
2. The fixing pack contains small items which should be kept away from young children
3. We suggest that you open the fixing pack and place all the contents into a container, therefore
reducing the risk of losing any small pieces
1. Do not connect the appliance until properly fixed to the wall and the instructions is read fully
2. The minimum distances must be observed
3. For installation of the appliance, care must be taken not to damage concealed cables
4. Please be careful while drilling the ho les.
5. This appliance is designed to be permanently fixed to a wall at a minimum height of 300mm.The
wall bracket must be fitted horizontally and the cable routed to the bottom right of the heater
6. A height of 600mm from bottom of heater to floor is recommended for optimum viewing of fuel
bed. Keep top of heater at least 1 meter away from ceiling or other object for optimum heat
ventilation. (For recommend fixing dimensions, see Fig. 1 of the diagram that corresponds to your
Fireplace model number)
7. For optimum viewing, mark the top four screws fixing positions on wall in accordance with the
recommend fixing dimensions (see Fig.2). D rill holes with a six dri ll bit.(for EF450/EF451)
For optimum viewing, mark the top five screws fixing positions on wall in accordance with the
recommend fixing dimensions (see Fig.2). Drill holes with a six dri ll b i t. (for EF423/EF430/EF431)
8. Fix the wall bracket using that the plug and screws provided
9. Carefully lift the heater up ensuring that the top rear ledge of heater engages the wall bracket
(see Fig.2 in circle) and is sitting centrally
10. Gently bring the heater level with the w all
11. Mark the bottom holes position (see Fig.3), remove the heater ensuring that the bottom fixing
bracket is rotated up
12. Drill and fit wall plug
13. Refit the heater to the wall fixing bracket and rotate the bottom fixing bracket down again and use
the screw provided to permanently fix the heater in place
14. Unpack the pebbles from the bag and place them along the light unit in the desired position.
(Disregard this instruction if your Firep lace is with “log fuel ef f ec t” )
15. Place the front panel over the front of the fire aligning the slots in the brackets at each side of the
panel with the lugs on the sides of the fire (see Fig. 4). Again two people will be required for this
operation
Page 4
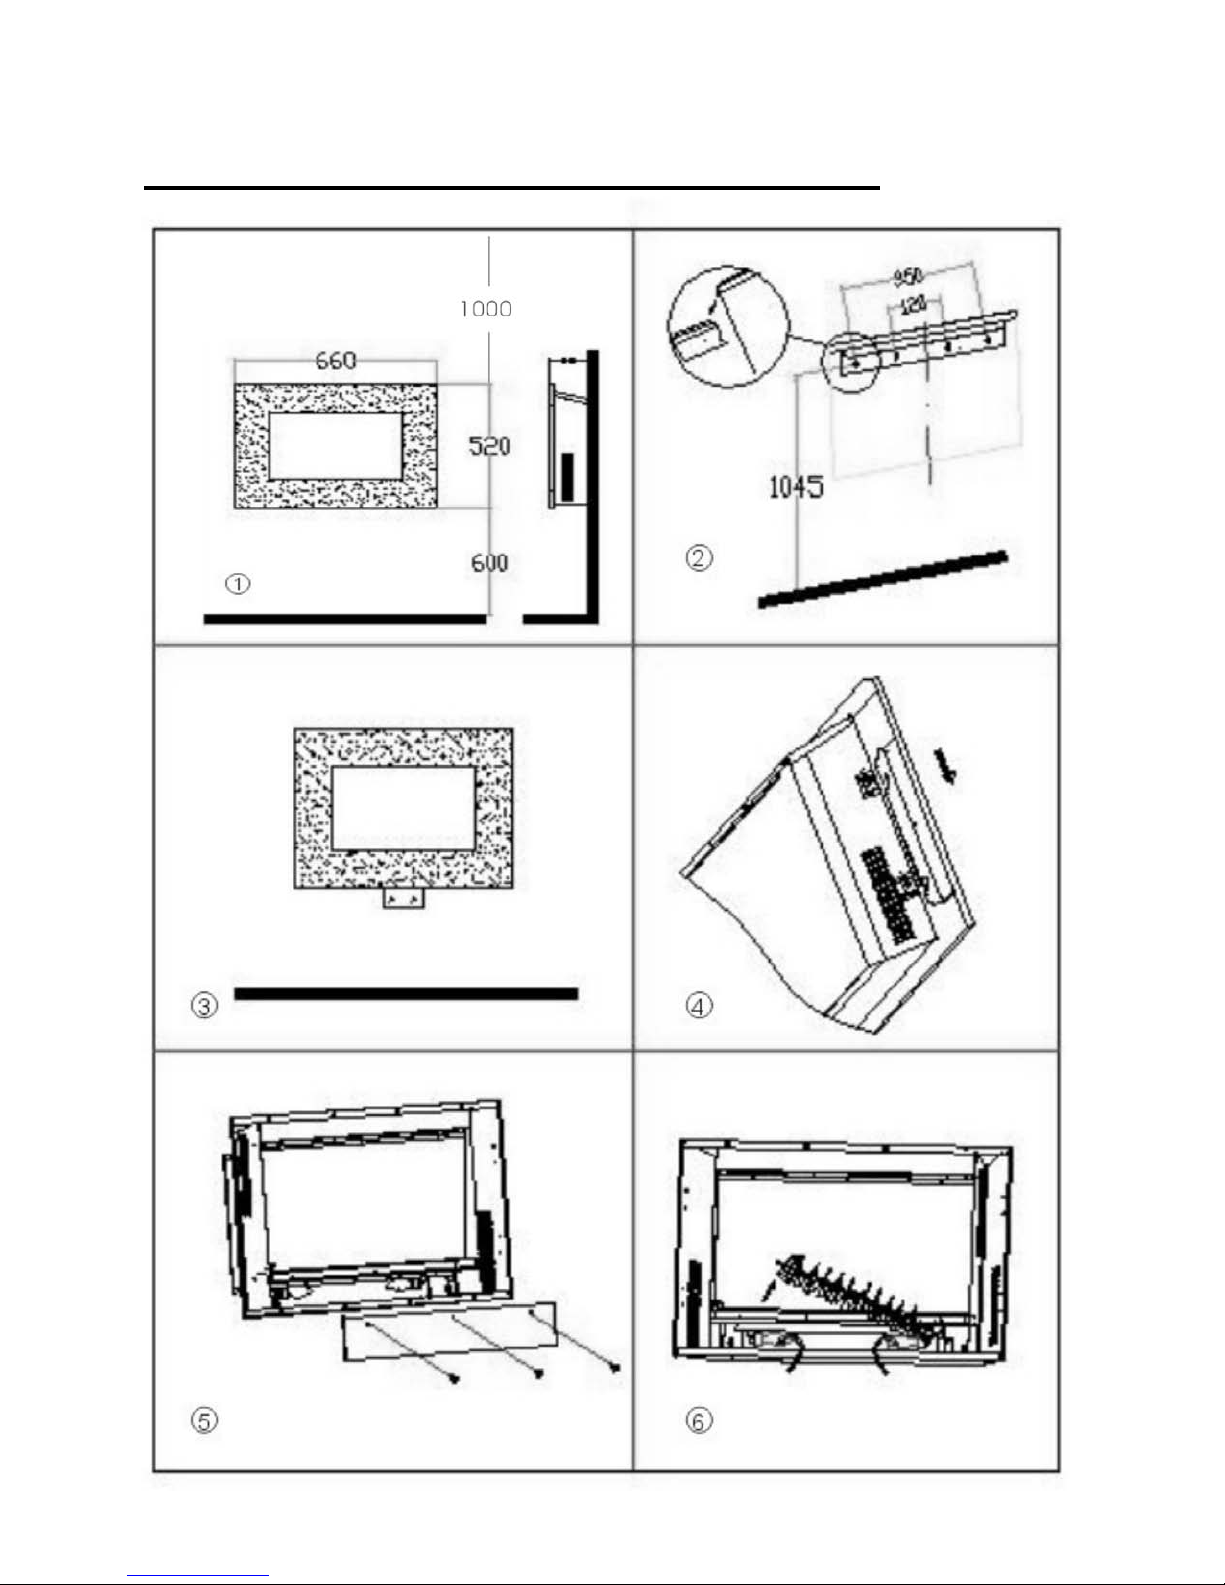
DIAGRAM FOR M ODEL: EF450 / EF451
Page 5
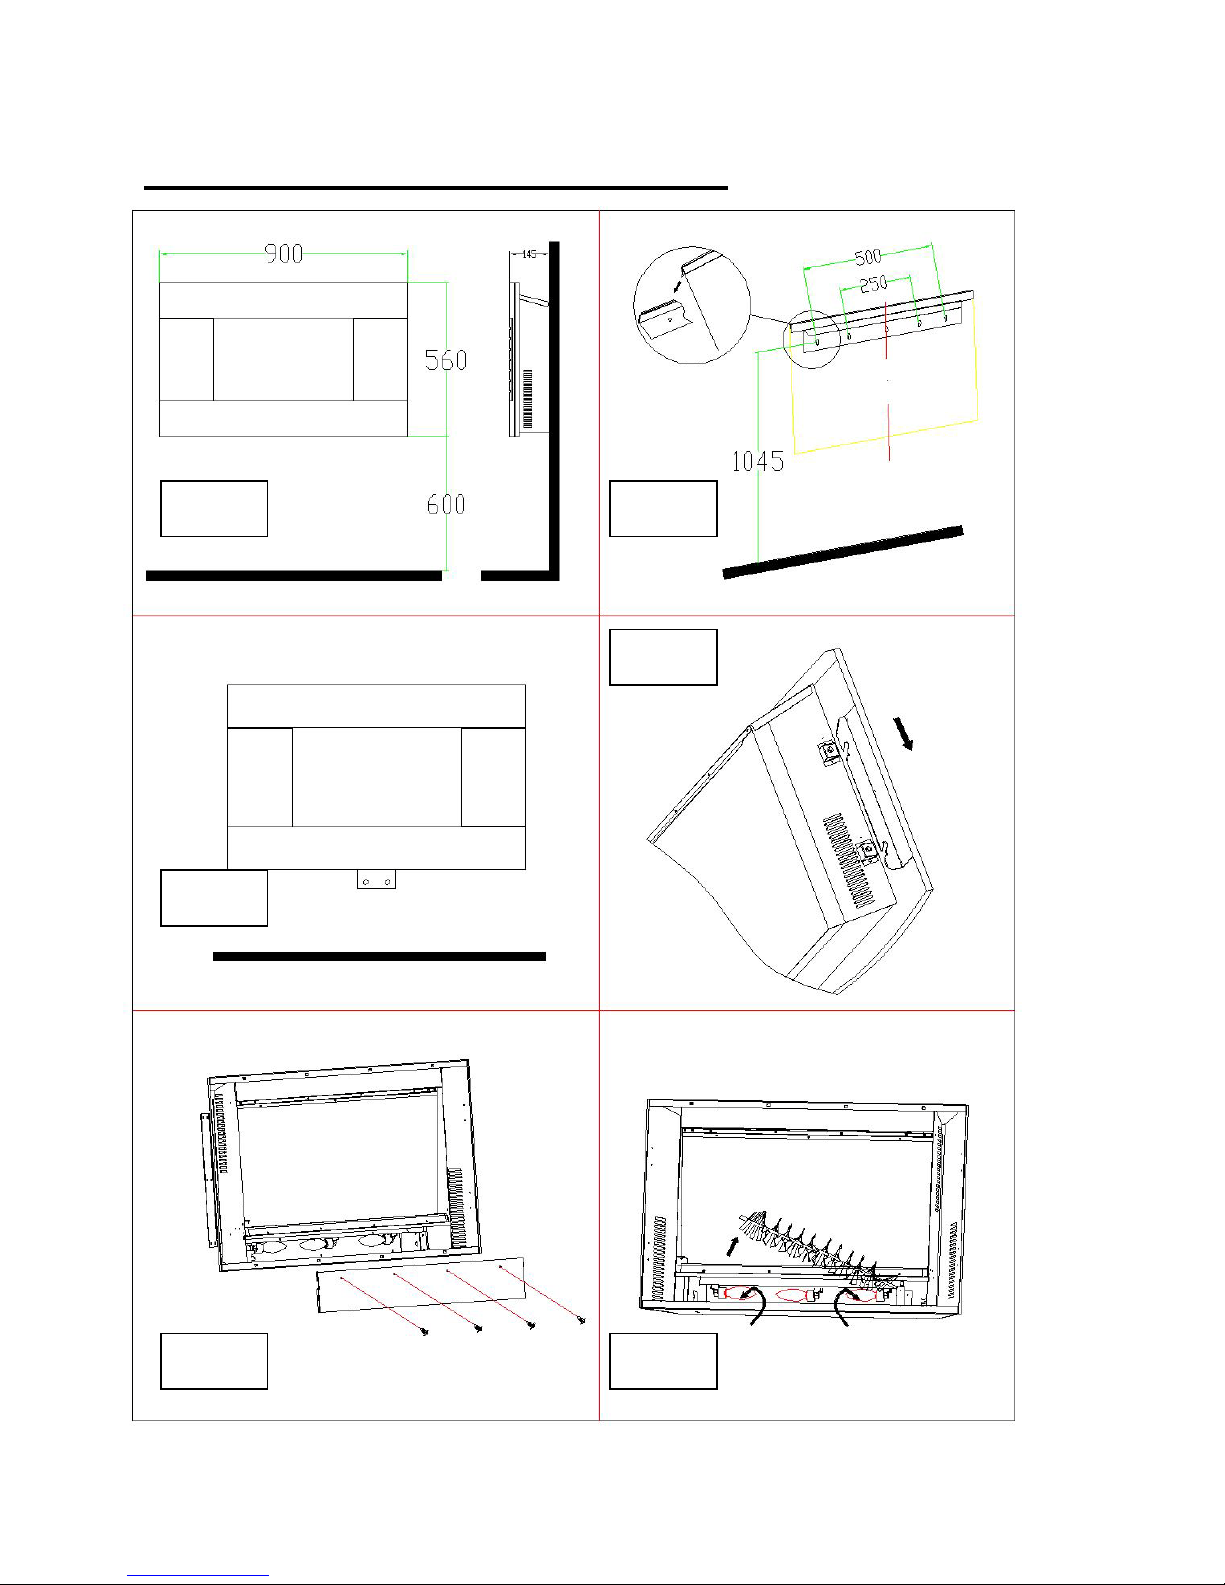
DIAGRAM FOR M ODEL: EF423
Fig.1
Fig.2
Fig.3
Fig.4
Fig.5
Fig.6
Page 6

DIAGRAM FOR M ODEL: EF430 / EF431
Page 7

Symptom
Solution
No operation/ no fan.
Check for safety cut-off operation.
No fire effect light.
Check the bulb by replacement.
OPERATING INSTRUCTIONS
SAFETY FEATURES
Instructions for Use
• The appliance can be operated either by the switches located on the top right hand side of the fire
or by supplied remote control.
Manual Operation
• The switches located at the top right hand side of the fire. The standby switch must be first switch
on.
• Press once the button
appear to indicate that the function is ON. Press the button
the dimmer mode.
• Press once the button
setting.
• Press once the button
setting.
to turn on the appliance and fire effect. A red indicator light will
for 3 seconds this will operate
for the low heat settings (750W); press twice to switch off the heat
for the high heat settings (1500W); press twice to switch off the heat
Remote Operation
• The standby switch located at the top right hand side of the fire must be first switch on.
• It takes some time for the receiver to respond to the transmitter. Do not PRESS the buttons more
than once within two seconds for correct operation.
• Press once the button
effect.
• Press once the button
setting.
• Press once the button
setting.
on the remote control this turns ON/OFF the appliance and fire
for the low heat settings (750W); press twice to switch off the heat
for the high heat settings (1500W); press twice to switch off the heat
• Press the button
Safety Cut-Off
• This appliance is fitted with a safety cut-off which will operate if the fire overheats (eg. due to
blocked air vents). For safety reasons, the fireplace will NOT automatically reset.
• To reset the appliance, disconnect the appliance from the mains supply for at least 15 minutes.
Reconnect the supply to the mains and switch on the appliance.
to operate the dimmer mode.
TROUBLESHOOTING
Page 8

CLEANING
Warning: Always disconnect from the power supply before cleaning heater.
• For general cleaning use a soft clean duster-never use abrasive cleaners. The glass viewing
screen should be cleaned carefully with a soft cloth. DO NOT use proprietary glass cleaners.
REPLACING THE LAMP
Warning: Always disconnect from the power supply before removing bulb.
Warning: The bulbs reach high temperatures during operation. Allow the bulbs to
cool down after switching off the appliance before changing lamps.
Note: Two people will be required for this process.
1. It is recommended that the fire is carefully removed from the wall and laid on its back in order to
replace the lamp.
2. Gently slide the front panel towards the top of the fire and remove. Store the panel safely out of
the way whilst the bulb is replaced so that it does not get damaged.
3. At the bottom of fireplace, there is a lamp cover fixed by:
• EF450 / EF451: THREE Philip's head screws
• EF423: FOUR Philip's head screws
• EF430 / EF431: EIGHT Philip's head screws
Remove the screws and lift off the lamp cover (see Fig. 5 of the diagram that corresponds to your
Fireplace model number)
4. For access to the bottom bulbs, carefully slide the flexible rotisserie to one side ensuring that the
rubber grommet is not lost (see Fig. 6)
5. Remove the defective bulb by unscrewing it.
6. Replace with a 40W E12 SES Clear Candle bulb, rotating it. Take care not to over-tighten the
bulb.
7. Refit the rotisserie making sure that the rubber grommet is carefully pushed into the slotted hole
on the axial bracket.
8. Lift the fire back onto the wall and replace the front panel b y lift ing onto the lugs either side of the
fireplace.
TECHNICAL SPECIFICATIONS
Supply: 110V-120V~ 60Hz
Rated power: 1500W
Lighting: 40W E12 SES Clear Candle bulb
Page 9

FOYER ÉLECTRIQUE
avec télécommand e
Modèle: EF423 / E F430 / EF431 / EF450 / EF451
GUIDE D’INSTALLATION ET D’UTILISATION
Veuillez lire attentivement ces instructions et
les conserver pour référence ultérieure
Page 10

INSTRUCTIONS DE SÉCURITÉ IMPORTANTES
Instructions de sécurité importantes
Lorsque vous utilisez cet appareil électrique, vous devez prendre des précautions de base pour réduire le
risque d'incendie, de choc électrique, et de blessure sur une personne, y compris celles qui suivent :
1. Cet appareil de chauffage doit être uniquement utilisé sur une alimentation c.a. et la tension
indiquée sur l’appareil doit correspondre à la tension du secteur.
2. Ne pas allumer l’appareil tant qu’il n’est pas correctement installé selon les instructions du manuel.
3. L’appareil ne doit pas être situé juste en-dessous d’une prise de courant.
4. Tenir les meubles, les rideaux, et autres matériaux inflammables à un 1 mètre minimum de
l’appareil.
5. Ne pas laisser l’appareil sans surveillance lorsqu’il est en marche.
6. Ne pas laisser l’appareil sans surveillance lorsqu’il est branché au secteur.
7. Tenir hors de portée des enfants et ne pas les laisser manipuler cet appareil.
8. Cet appareil est dest iné à une utilisa tion en intérieur uniquement et n’ est pas destiné à u n usage
industriel.
9. Vérifiez de temps en tem ps le cordon d ’alim entation p our vo ir s’il n’est pas endo mm agé. Ne jam ais
utiliser l’appareil si le cordon ou toute autre partie de l’appareil montre des signes de détérioration.
10. Ne pas mettre l’appareil en marche si le cordon ou la prise est endommagé, après un
disfonctionnement ou après avoir été trempé ou endommagé de quelque façon que ce soit.
11. Les réparations des appareils électriques doivent être uniquement effectuées par un électricien
qualifié.
12. De mauvaises réparations pourraient mettre en péril l’utilisateur.
13. Ne pas placer le câble électrique sous des tapis, des moquettes etc.
14. Ne pas laisser le c âble électrique suspendu sur des bords tranchants ou entrer en con tact avec
des surfaces chaudes.
15. Ne pas couvrir ou obstruer le foyer électrique.
16. Une surchauffe peut survenir si l’appareil est accidentellement couvert.
17. Ne jamais immerger le produit dans l’eau ou tout autre liquide.
18. Ne pas utiliser ce foyer à proximité d’une salle de bain, d’une douche ou d’une piscine.
19. Ne pas utiliser l’appareil à l’extérieur.
20. Ne pas utiliser si vous avez les mains humides.
21. Ne pas utiliser l’appareil sur ou près de surfaces chaudes.
22. Avant de nettoyer l’appareil, assurez-vous qu’il est débranché et qu’il ait complètement refroidi.
23. Ne pas nettoyer l’appareil avec des produits chimiques abrasifs.
24. Ne jamais utiliser d’accessoires qui ne sont pas recommandés par le fabricant. Cela pourrait mettre
en péril l’utilisateur et endommager l’appareil.
25. Le seul remplacem ent que l’utilisateur peut effectuer est les am poules. I l n'y a aucun autre élément
à remplacer. Tout autre problème technique doit être présenté à l'ingénieur qualifié.
26. Cet appareil ne doit pas être utilisé par des personnes (y com pris les enfants) dont les capacités
physiques, sensorielles ou mentales sont réduites, ou dépourvues de l’expérience ou de
connaissances requises, à moins que ces personnes ne soient supervisées ou formées à
l'utilisation de l'appareil par un tiers, responsable de leur sécurité.
27. Il convient de surveiller les enfants afin de s’assurer qu’ils ne jouent pas avec l’appareil.
28. Ne pas soulever l’appareil par le panneau frontal.
29. Ne pas utiliser cet appareil avec un dispositif de programmation, une minuterie ou tout autre
système qui mettrait l’appareil en marche automatiquement, car un risque d’incendie pourrait
survenir si l’appareil est recouvert ou placé incorrectement.
AVERTISSEMENT: POUR PRÉVENIR LES CHOCS ÉLECTRIQUES: FAITES
CORRESPONDRE LA GRANDE LAME DE LA FICHE À LA GRANDE FENTE DE LA PRISE
ET INSÉREZ COMPLÈTEMENT.
CONSERVEZ CES INSTRUCTIONS
Page 11

Pour commencer
APPRENEZ À CONNAÎTRE VOTRE APPAREIL
INSTALLATION
1. Sortez l’appareil de la boîte.
2. Retirez tous les matériaux d’emballage du produit.
3. Placez l’emballage dans la boîte et rangez-la ou jetez-la de façon appropriée.
Contenu de la boîte
1. Foyer électrique
2. Support mural
3. Vis de fixation et pièces d’ancrage murales
4. Télécommande
5. Manuel d’instructions
6. Sac de galets décoratifs (si votre fo yer est doté de l’ef fet de flamme avec bûches, les galets ne
sont pas compris)
Conseils importants avant l’ins tallation
1. Veuillez conserver l’em ballage jusqu’à ce que vous a yez vérifié et compté tous les éléments de
fixation en les comparant à la liste.
2. Le sac de pièces de fixat ion contient de petits objets qui doivent être tenus hors de portée des
jeunes enfants.
3. Nous vous suggérons d’ouvrir le paquet de fixations et de les placer dans un récipient, vous
réduirez ainsi le risque de perdre les petites pièces.
1. Ne pas brancher l’apparei l tant q u’il n’es t pas correc tem ent fixé au m ur et que vous n’a vez pas l u
toutes les instructions.
2. Veuillez respecter les distances minimales d’installation.
3. Lors de l’installation de l ’appareil, vous devez faire attention à ne pas e ndommager les câbles
cachés.
4. Soyez prudent lorsque vous percez les trous.
5. Cet appareil est des tin é à ê tre fixé en permanence à u n mur à une hauteur m inim um de 300 mm.
Les fixations murales doi vent être installées horizont alement et le câble doit être pas sé dans le
coin inférieur droit de l’appareil.
6. Une distance de 600 m m entre le plancher et le bas de l’appar e il es t r ec om mandée pour une vue
optimale de l’image du foyer (pour les recommandations des dimensions de fixation, veuillez
consulter l’illustration qui correspond à votre modèle aux pages suivantes).
7. Pour une meilleure vue, marquez les quatre vis du haut pour f ixer les positions au mur selon les
recommandations de dimensions de fixation – voir l’illustration 2. Percez les trous avec une
mèche no.6. (modèles EF450 / EF451)
Pour une meilleure v ue, marquez les cinq vis du haut pour fixer les positions au m ur selon les
recommandations de dimensions de fixation – voir l’illustration 2. Percez les trous avec une
mèche no.6. (modèles EF450 / EF451)
8. Fixez le support mural avec les ancrages et les vis fournies.
9. Soulevez le foyer avec pr é c aution en vous assurant que son r eb ord s upérieur arrière s’encle nche
dans la patte du support (voir l’illustration 2, dans le cercle) et qu’il est bien fixé au centre.
10. Placez le foyer à niveau avec le mur.
11. Marquez la position des tr o us du bas ( voir l’i llustr ation 3), retir ez le fo yer en v ous as surant q ue la
partie inférieure du support est vers le haut.
12. Percez le mur et fixez les ancrages.
13. Replacez le foyer sur le suppor t, faites pivoter la parti e inférieure du sup port vers le bas et fix ez
le foyer en place à l’aide de la vis fournie.
14. Déballez les galets du sac et placez-les le long de la lumière dans la position désirée (ne
s’applique pas aux modèles de foyer avec effet de flamme et bûches)
15. Placez le panneau avant devant le panneau à effet de flamme, en alignant les fentes dans le
support de chaque côté du panneau avec les ergots sur les côtés du pannea u de flamme (voir
l’illustration 4). Deux personnes sont nécessaires pour cette installation.
Page 12

DIAGRAMME POUR LES MODÈLES: EF450 ET EF451
Page 13

DIAGRAMME POUR LE MODÈLE: EF423
Fig.1
Fig.2
Fig.3
Fig.4
Fig.5
Fig.6
Page 14

DIAGRAMME POUR LES MODÈLES: EF430 ET EF431
Page 15

INSTRUCTIONS D’UTILISATION
Instructions pour l’utilisation
• L’appareil peut être mis en marche soit par les bou tons situés sur le côté sup érieur droit du foyer
électrique, ou par la télécommande.
Mise en marche manuelle
• Utilisez les boutons situés sur le côté supérieur droit du foyer. Le bouton veille doit d’abord être
allumé.
• Appuyez une fois sur l e bouton
rouge apparaîtra pour vous indiquer que l’appareil est en marche. Appuyez sur le bouton
durant 3 secondes pour enclencher le mode gradateur.
• Appuyez une fois sur le bouton
pressez deux fois pour éteindre cette option.
• Appuyez une fois sur le bouton
pressez deux fois pour éteindre cette option.
Mise en marche par télécommande
• Le bouton de veille situé sur le côté supérieur droit du foyer doit d’abord être éteint.
• Il peut se passer un certain temps avant que le récepteur ne réponde au transmetteur. Ne pas
appuyer sur les boutons plus d’une fois durant deux secondes pour que la fonction s’effectue
correctement.
• Appuyez une fois sur le bouton
l’effet de flamme.
• Appuyez une fois sur le bouton
pressez deux fois pour éteindre cette option.
• Appuyez une fois sur le bouton
pressez deux fois pour éteindre cette option.
pour allumer l’apparei l et la fonc tion de chauf fage. Une lum ière
pour enclencher le chauffage à faible puissance (750 W);
pour enclencher le chauffage à forte puissance (1500 W),
sur la télécommande pour allumer ou éteindre l’appareil et
pour enclencher le chauffage à faible puissance (750 W);
pour enclencher le chauffage à forte puissance (1500 W),
• Appuyez sur le bouton
CARACTÉRISTIQUES DE SÉCURITÉ
Coupe-circuit thermique
• Cet appareil est doté qu’un système de sécurité qui s’enclenche si le foyer surchauffe (ex : si les
ventilations d’air sont bloquées). Pour des raisons de sécurité, le foyer ne se remettra PAS
automatiquement en marche.
• Pour remettre l’apparei l en marche, débranchez l’appareil du r éseau électrique durant au m oins 15
minutes. Reconnectez le câble à la prise et allumez l’appareil.
pour utiliser le mode gradateur.
Page 16

Problème
Solution
Le foyer ne fonctionne pas/ aucune
Vérifiez si le coupe-circuit thermique a
La lumière pour l’effet de flamme ne
Vérifiez l’ampoule en la remplaçant.
DÉPANNAGE
ventilation
été enclenché.
s’allume pas.
NETTOYAGE
Avertissement: Débranchez toujours le foyer de l’alimentation électrique avant le
nettoyage.
• Pour le nettoyage général, utilisez toujours un plumeau d’époussetage doux; n’utilisez jamais de
nettoyants abrasifs. L’écran de vue de la flamme doit être nettoyé avec précaution, à l’aide d’un
linge doux. N’UTILISEZ PAS de nettoyant tout usage pour vitres.
REMPLACEMENT DE L’AMPOULE
Avertissement : Débranchez toujours l’appareil avant de changer l’ampoule.
Avertissement : Les ampoules atteignent des températures très élevées lors de l'utilisation.
Laissez les ampoules re f r oi dir apr ès avoir éteint l’appareil pour les remplacer.
Note : Deux personnes sont nécessaires pour cette opération.
1. Il est recommandé de retirer le foyer du mur avec précaution et de le poser sur le dos pour
remplacer la lampe.
2. Faites doucement glisser le pan neau avant vers le h aut et retirez-le. Place z le pan neau en lieu sûr
pendant que vous remplacez l’ampoule, afin qu'il ne soit pas endommagé.
3. En bas du foyer se trouve un écran protecteur de lampe fixé par les fixations suivantes :
• Modèles EF450 / EF451 : TROIS vis Philips
• Modèle EF423 : QUATRE vis P hi li ps
• Modèles EF430 / EF431 : HUIT vis Philips
Retirez les vis et soulevez le couvercle de protection de l’ampoule (consultez la figure no.5 de
l’illustration correspondant à votre modèle de foyer).
4. Pour accéder aux ampoules du bas, glissez doucement la tige amovible sur le côté en vous
assurant que la rondelle en caoutchouc ne se perde pas – voir l’il lustr at ion 6.
5. Retirez l’ampoule défectueuse en la dévissant.
6. Remplacez-la par une ampoule candélabre claire 40W E12 SES, en la faisant pivoter. Faites
attention à ne pas trop serrer l’ampoule.
7. Refixez la tige en vous assurant que la rondelle en caoutchouc est bien poussée dans le trou sur la
patte axiale.
8. Soulevez le foyer pour le r emettre au mur et r emplacez le panneau avant en le souleva nt par les
poignées de chaque côté.
CARACTÉRISTIQUES TECHNIQUES
Tension : 110-120V~ 60Hz
Puissance nominale : 750-1500W
Éclairage : ampoule candélabre claire 40W E12 SES
 Loading...