

Page 1
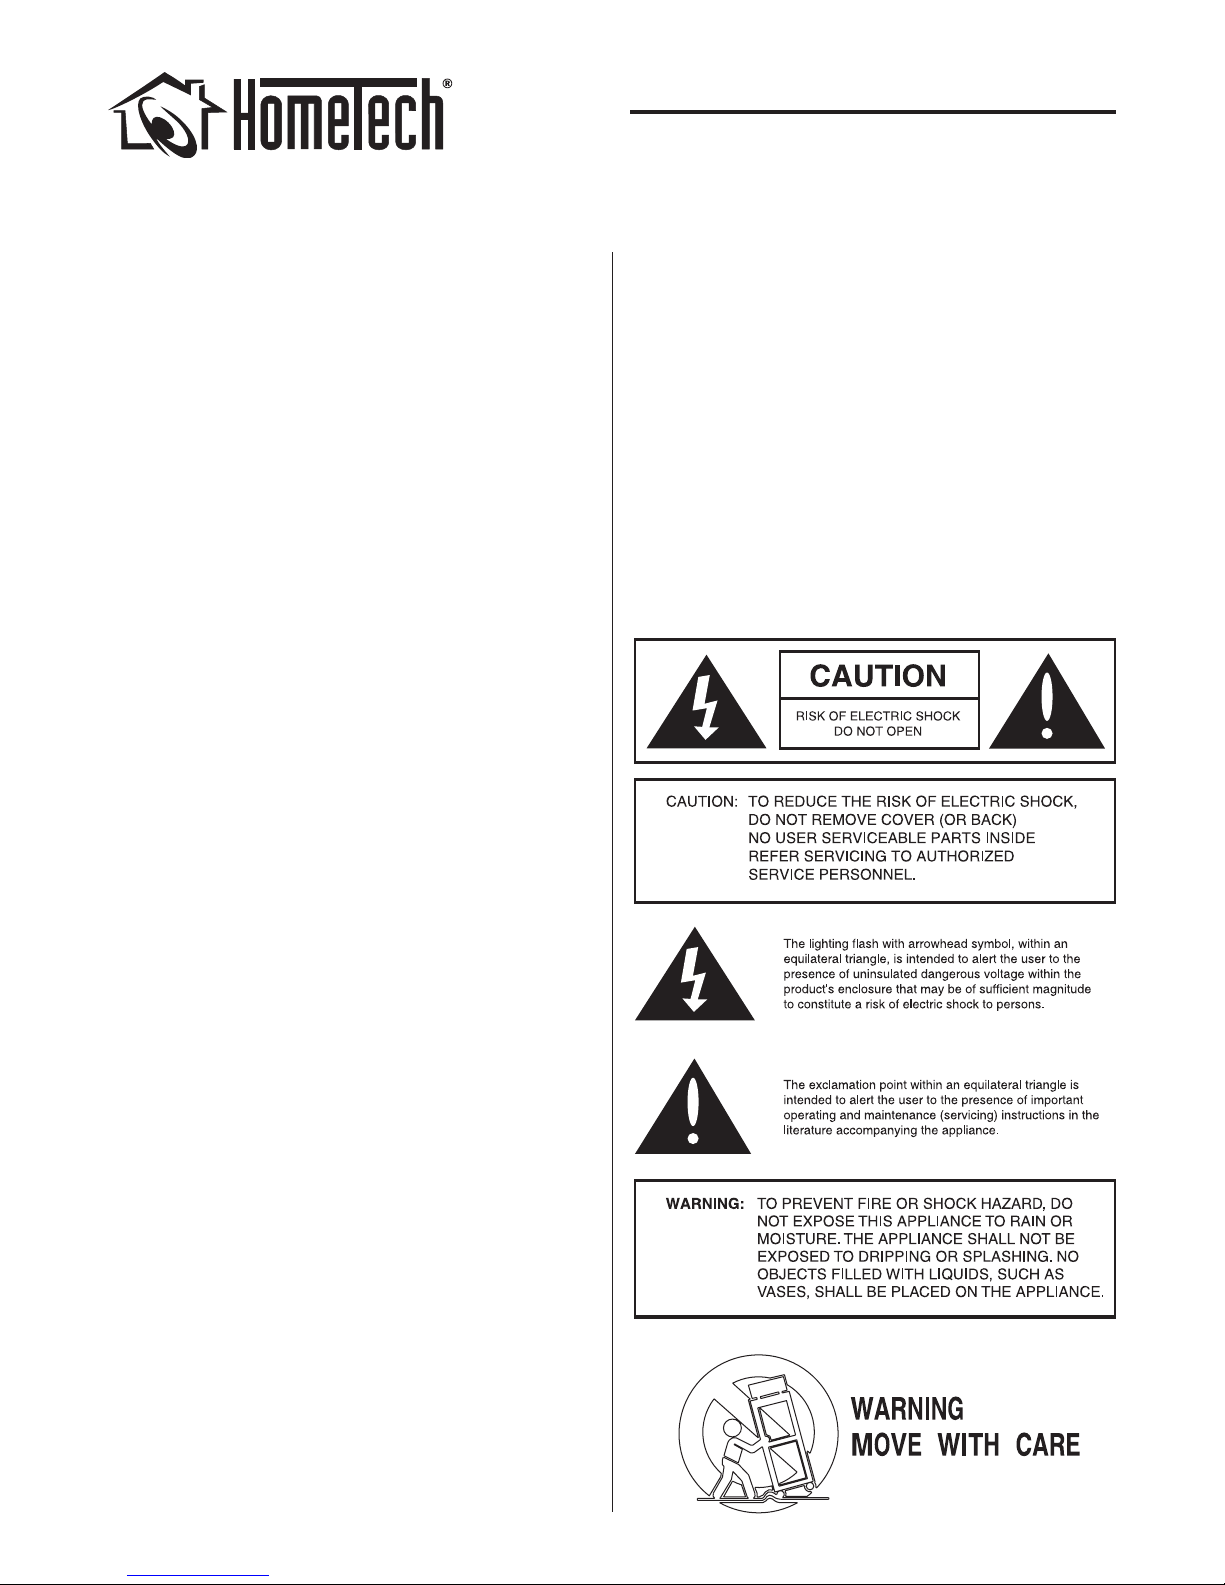
IMPORTANT SAFETY INSTRUCTIONS
When using your HomeTech CA308, basic safety precautions should
always be followed to reduce the risk of fire, electric shock and injury to
persons, including the following:
1. Read and retain instructions: All the safety and operating instructions
should be read before the amplifier is operated, and retained for
future reference.
2. Heed warnings: Adhere to all warnings and precautions listed on the
amplifier and in the operating instructions.
3. Follow instructions: Follow all operating instructions.
4. Water and moisture: The appliance should never be used next to water.
5. Carts and stands: The appliance should be used only with a cart or
stand that is recommended by the manufacturer. An appliance and
cart combination should be moved with care.
6. Caution: To prevent electric shock, do not use the CA308 (polarized)
plug with an extension cord, receptacle, or other outlets unless the
blades can be fully inserted to prevent blade exposure.
7. Ventilation: The appliance should be situated so that its location
does not interfere with its proper ventilation.
8. Heat: The appliance should be situated away from heat sources such
as radiators, stoves, or other appliances (including amplifiers) that
produce heat.
9. Power sources: The appliance should be connected to a power
supply only of the type described in the instructions or as marked on
the appliance.
10. Grounding or polarization: Grounding or polarization are precautions
that should be taken so that these attributes are not defeated.
11. Power cord protection: Power supply cords should be routed so that
they will not be walked on or pinched by items placed on or against
them.
12. Cleaning: To clean your HomeTech CA308, use a soft brush, “canned
air,” or wipe the exterior surfaces with a damp cloth. Never use any
cleaners or solvents.
13. Non-use periods: The power cord of the appliance should be
unplugged from the outlet when left unused for a long period of time.
14. Object entry: Care should be taken so that objects do not fall through
the opening of the enclosure.
15. Warning: The appliance shall not be exposed to dripping or
splashing. Objects filled with liquids, such as vases, shall not
be placed on the appliance.
16. Damage requiring service: The appliance should be serviced by a
qualified service personnel when:
A. The power supply cord or the plug has been damaged.
B. Objects have fallen, or liquid has been spilled into the appliance.
C. The appliance has been exposed to rain.
D. The appliance does not appear to operate normally or exhibits a
marked change in performance.
E. The appliance has been dropped or the enclosure damaged.
17. Servicing: Any service or repair required must be performed by
qualified, factory-authorized personnel. The user should not attempt
to service the amplifier themselves.
18.
Power requirement: Do not connect the HomeTech CA308 to the
accessory outlet of another component. A minimum 15 amp (20
amp preferred) grounded wall outlet is required.
Warning: The power (mains) plug serves as the amplifier’s
disconnect device:
• The disconnect device shall remain readily operable during
operation.
• To ensure that the disconnect device (power plug) is easily
accessible, the user shall not place the amplifier in a confined
area during operation.
19. Storms: To prevent damage to components, unplug all electronic
equipment during thunderstorms.
20. Power Interruptions: If the electrical service is subject to frequent
sags, spikes, and brownouts, a power conditioner designed for use
with high-fidelity equipment should be employed to protect the
HomeTech CA308.
INSTRUCTION MANUAL
CA308 SINGLE SOURCE/4-ZONE
POWER AMPLIFIER
1
Page 2
INTRODUCTION
Thank you for purchasing the HomeTech CA308 Single Source/4-Zone
amplifier. The CA308 is a versatile amplifier that takes a single audio source
(such as a receiver’s tape outputs, a CD player, a satellite radio tuner or a
multi-zone receiver’s ‘Zone 2 ‘ outputs) and distributes an amplified stereo
signal to up to 4 separate zones. (Each zone receives the same signal.)
The amplifier’s front panel has ON/OFF and volume controls for each
zone as well as a series of LEDs that indicate the zone’s current volume
level. In addition to being controlled from its front panel, the CA308’s
rear-panel keypad connections allow individual zones to be controlled by
optional CA308 keypads wall-mounted in each zone. Keypad IR inputs
allow the CA308 to be controlled by an optional CA308 remote control.
Source Components
The CA308 can be used with just about any audio component that supplies
a line-level stereo audio signal. Typical sources can include:
• Surround-sound receivers and processors (via tape record outputs)
• Stereo receivers (via tape record outputs)
• Multi-zone receivers (via 2nd-zone stereo line outputs)
• Stereo source components such as CD players, satellite and terrestrial
radio tuners, MP3 players, cassette decks, etc. (via stereo line outputs)
• DVD players (via analog stereo outputs)
• Stereo preamplifiers (via stereo line outputs)
Using Additional Amplifiers
The CA308’s buffered Line Output connections make it easy to connect
multiple amplifiers. Within the limits of available mains power, any
number of additional HomeTech CA308 amplifiers may be daisy-chained
for larger installations.
INSTALLATION
Box Contents
Your HomeTech CA308 box should contain the following items:
(1) HomeTech CA308 amplifier
(4) Removable 4-pin screw speaker connectors (connected to amplifier)
(4) Removable 5-pin screw keypad connectors (connected to amplifier)
(1) IEC Power cable
(1) RCA Audio cable
(1) Speaker zone label sheet
(1) Small screwdriver (for use with removable screw connectors)
Unpacking
Save the carton and polystyrene inserts for future safe transport in case
the amplifier is moved or requires shipping for repair.
Before proceeding with installation, locate the serial number on the rear
panel of the unit and note it here for future reference:
S/N:_________________________________________
INSTRUCTION MANUAL
CA308 SINGLE SOURCE/4-ZONE
POWER AMPLIFIER
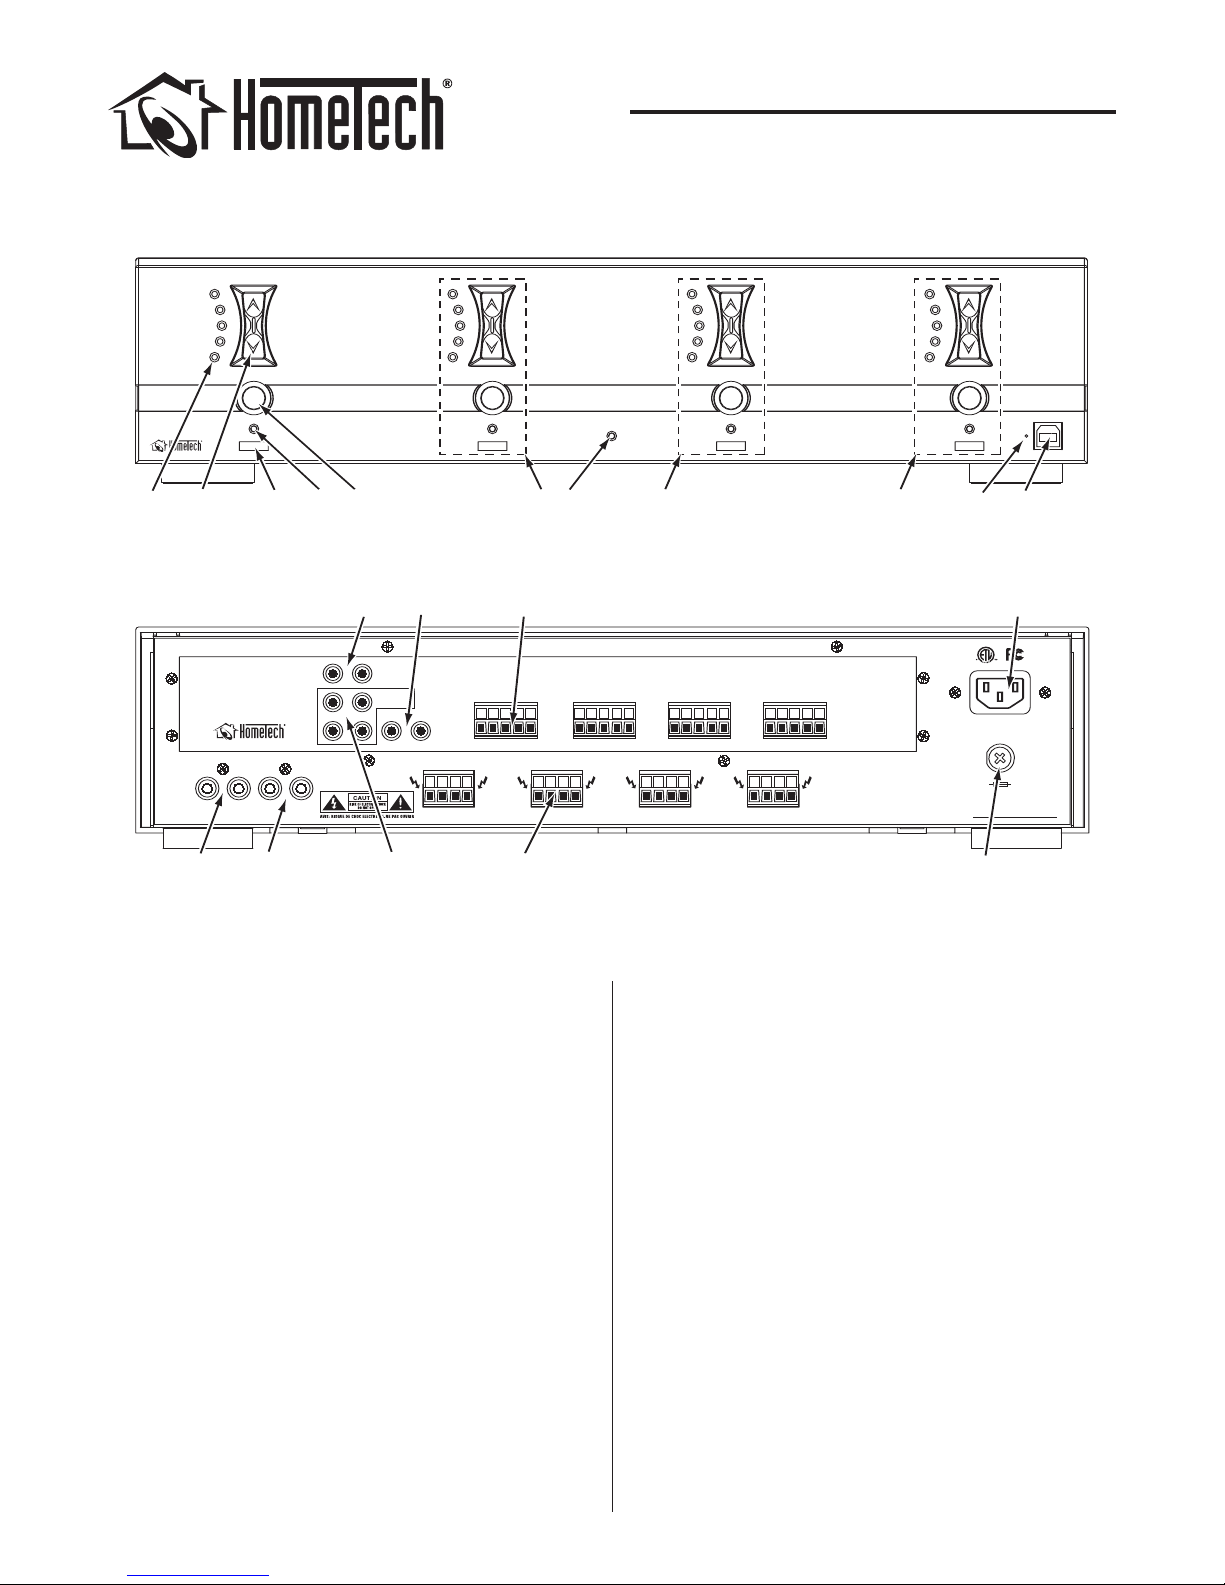
LRLR
Input Output
47kΩ
Caution: For continued protection against fire hazard use only
same type and rating fuses. Disconnect power supply before
changing fuse. Do not expose this unit to rain or moisture.
No user servicable parts inside. See operating manual before using.
F5A~250V
120~60Hz
600VA
Model: HT CA308 Amp
S/N:
Common
IR Out
Control Link
IR Link
A.C. ON
CA308
USB
Zone 4 Zone 3 Zone 2 Zone 1
+ L – – R + + L – – R + + L – – R + + L – – R +
Zone 4
STATUSGND GNDIR
DATA
12V STATUSGND GNDIR
DATA
12V STATUSGND GNDIR
DATA
12V STATUSGND GNDIR
DATA
12V
Zone 3 Zone 2 Zone 1
12 34
5
76 1110
1. Zone 1 Volume LEDs
2. Zone 1 Volume Control Buttons
3. Indentation for Zone 1 Label
4. Zone 1 Status LED
5. Zone 1 On/Off Button
6. Zone 2 Controls & Indicators
7. AC On LED
8. Zone 3 Controls & Indicators
9. Zone 4 Controls & Indicators
12
14
13 15 18
16 17 19
20
12. Left & Right Line-Level Audio Inputs
13. Left & Right Buffered Audio Outputs
14. IR Link Connections (2)
15. Common IR Outputs (4)
16. Control Link Connections (2)
17. Zone Keypad Connections (4)
(shown with removeable connectors in place)
18. Zone Speaker Connectors (4)
(shown with removeable connectors in place)
19. IEC Power Cord Connection
20. AC Fuse
FRONT PANEL
REAR PANEL
8 9
10. Pin-Hole Switch
11. USB Port
2
Page 3

Placement
Place the HomeTech CA308 on a level surface, in an upright position, out
of direct sunlight and away from windows through which rain may enter.
NOTE: The amplifier must always rest on its four feet to allow the builtin cooling fan to operate properly or it may sustain damage.
Situate the amplifier away from heat sources such as hot air ducts
or radiators.
CAUTION: The HomeTech CA308 requires four inches of clearance
above and on all sides.
• Never place any object on or against the amplifier.
• Never operate the amplifier on a carpeted surface as this will compromise ventilation.
• When the amplifier is installed in any cabinet, the front or back must
be open during operation. Alternately, install fans in the cabinet to
assure continuous ventilation.
Thermal Shutdown Protection
If the amplifier’s built-in cooling fan fails, or if the amplifier’s cooling
vents are blocked, the amplifier may exceed its safe operating temperature. If the amplifier overheats it will self-protect, and the following will
occur:
• The audio output to all connected zones will shut off.
• All the Zone Volume LEDs on the amplifier’s front panel will extinguish.
• The Zone Status LEDs will turn red and will repeatedly flash ON in
sequence, from Zone 1 through Zone 4.
Once a safe temperature is reached, the Zone Status LEDs will all
continually illuminate red, indicating that all zones are OFF.
IMPORTANT: Before turning any of the zones back ON, correct the
problem that caused the over-temperature condition. (Volume set
too high, etc.) If the fan has failed, contact our Tech Support
Department for assistance.
Power Connection (page 2 — #19)
The HomeTech CA308 uses an 18-gauge IEC-standard 120-volt grounded
power cable (provided). Due to the power requirement of this amplifier,
it is not advised that this cable be replaced with another of unknown
quality. Connect the power cable to a 15 or 20 amp grounded wall outlet.
Note: NEVER attempt to operate the amplifier from the accessory
outlet of another component.
Source Connections (page 2 — #12, #13)
To avoid noise interference, if the source component is located more than
20 feet from the amplifier HomeTech recommends that you convert the
source signal to a balanced line using optional 3rd-party components.
Always use quality high-fidelity interconnect cables.
Note: Always check local building codes before installing wire in walls
or ceilings.
• Connect the source component (receiver tape outputs, CD player, satellite radio tuner, etc.) to the Left & Right Line-Level Audio Inputs (#12).
• Connect additional CA308 amplifiers to the Left & Right Buffered
Audio Outputs (#13).
Note: To avoid noise interference, do not run source connections
parallel to high-voltage (AC) wiring. If the source connections must
cross high-voltage wiring, to minimize noise ensure that they cross at
right-angles.
Speaker Connections (page 2 — #18)
Always turn off power and unplug the amplifier before making
source signal or speaker connections.
To assure optimum sound reproduction, use high-quality speaker wire
such as HomeTech HTC100 16-gauge 4-conductor wire. Small gauge or
inferior quality wire will degrade imaging, diminish bass reproduction,
and add a generally congested quality to music.
Note: Always check local building codes before installing wire in walls
or ceilings.
1. Run speaker wire from each speaker to the amplifier location. We
recommend that you mark each wire’s positive (‘+’) and negative (‘–’)
leads, its channel (Left or Right) and which speaker pair it is from so
that you can connect them to the proper terminals.
2. Strip ¼” – ½” of insulation from each speaker lead. Twist the strands or
tin the exposed wire with solder to ensure that there are no stray strands.
(Touching wires can cause a short-circuit that can damage the amplifier.)
3. The HomeTech CA308 has a removable 4-pin
screw connector for each zone. Insert the
exposed portions of the speaker wires into
the holes in the terminals. Make sure to
insert the ‘+’ and ‘–’ leads into the correct
holes. (See illustration, right.)
4. Use the included screwdriver to tighten the
screws and secure the wires in the connector.
5. Press the 4-pin screw connectors into the
corresponding speaker connector on the
amplifier until they lock into place.
• The 4-pin connectors will only fit one way on
the amplifier.
Always provide sufficient slack
in wires to avoid tension.
Always contain any excess
wire to prevent tripping
hazards.
IR Connections (page 2 — #14, #15)
The Common IR outputs (#15) allow the connection of IR emitters that
can relay control commands to the system source component(s) from IR
receivers built-into CA308 zone control keypads. The IR Link connections
(#14) distribute these IR commands between any number of CA308
amplifiers when multiple amplifers are daisy-chained together in larger
installations. This allows control of the system source component from
any zone. Connectors are mono 3.5mm mini jacks.
Zone Keypad Connections (page 2 — #17)
Removable 5-pin screw connectors receive control signals from the
CA308 keypads. Each zone has its own keypad input, and each keypad
controls only the zone it’s connected to (except for “All ON” and “All OFF”
commands). See the CA308 Keypad Instruction Manual for wiring details.
Control Links (page 2 — #16)
When using two or more CA308 amplifiers in a system, use a 3.5mm
mono mini cable to connect these jacks together. This will link the microprocessor control signals between the amplifiers, allowing an “All ON” or
“All OFF” command from any keypad or remote to control all of the
CA308s in the system.
Zone ON/OFF Button (page 2 — #5)
Pressing a zone’s ON/OFF button toggles that zone ON and OFF. If the
zone is so enabled (see page 4), holding-down the button for at least 5
seconds while the zone is OFF turns all zones ON (“All ON”); holding-down
the button for at least 5 seconds while the zone is ON turns all zones OFF
(“All OFF”).
Note: Every time you turn a zone ON its volume will automatically
ramp-up to the Turn-On Volume you set for it (see Setting Zone Turn-On
Volume, below).
3
INSTRUCTION MANUAL
CA308 SINGLE SOURCE/4-ZONE
POWER AMPLIFIER
Page 4

Zone Volume Control Buttons (page 2 — #2)
Raises and lowers the zone’s volume. Holding-down the buttons smoothly
raises and lowers the volume.
Zone Volume LEDs (page 2 — #1)
The green LEDs indicate the zone’s relative volume.
Zone Status LED (page 2 — #4)
This multi-color LED indicates the following:
• LED is RED: The zone is OFF.
• LED is GREEN: The zone is ON.
• LED is YELLOW (flashing): IR control signals are being received at the
zone’s rear-panel keypad connection.
AC ON LED (page 2 — #7)
This red LED indicates that the AC power line cord is plugged-into a live AC
outlet. If the main AC line fuse (page 2 — #20) opens, this LED goes out.
USB Port (page 2 — #11)
Allows future updates of the amplifier’s firmware.
Pinhole Switch (page 2 — #10)
Allows you to access Advanced Features (set individual Maximum Volume
and Turn-On Volume levels for each zone and include or exclude any zone
from “All OFF/All ON” operation). See below.
Note: The CA308 will retain the Advanced Feature memory settings if
the amplifier’s AC power is interrupted by a power failure, etc.
ADVANCED FEATURES
Setting Maximum Volume (Max Vol):
You can set a maximum volume for each zone. This can prevent speakers
from being played louder than they can safely handle.
1. Using a straightened paper clip or jeweler’s screwdriver, press and
hold the Pinhole Switch for at least 3 seconds.
• All of the Zone Volume LEDs will flash and each set will show that
zone’s current Max Vol setting. (The factory setting for each zone is
maximum.)
• Each zone’s volume level will ramp-up to its Max Vol setting.
Note: The factory default Max Vol setting for all zones is MAXIMUM
(all the way up). However, to prevent possible speaker damage, the
first time you set a zone’s Maximum Volume, each zone’s volume will
ramp-up to less than its Max Vol setting.
2. Use the front-panel or keypad volume controls to set each zone’s
Max Vol level.
3. When finished, press the Pinhole Switch once to exit the Max Vol mode.
• The volume levels will be set in memory, the LEDs will stop flashing
and each zone will return to the listening condition it was in prior to
entering the Max Vol setting mode.
• If a zone’s prior listening condition was a higher volume than the new
Max Vol for that zone, the zone’s volume will be reduced to the new
Max Vol setting.
Note: If the Max Volume for a zone is set extremely low, the lowest one
or two Zone Volume LEDs for that zone will always remain ON when the
zone is active, even when the zone’s volume is turned all the way down.
Setting Zone Turn-On Volume:
You can set a turn-on volume for each zone. Some zones may require a
louder turn-on level due to the room’s size or background noise level.
IMPORTANT: The factory default Turn-On volume setting for all zones
is 0 (all the way down). The Zone Status LED (see above) will turn
green to indicate that the zone is ON.
1. Using a straightened paper clip or jeweler's screwdriver, press the
Pinhole Switch once.
• All of the Zone Volume LEDs will flash and each set will show that
zone’s current Turn-On Volume setting
• Each zone’s volume level will ramp-up to its Turn-On Volume setting.
2. Use the front-panel or keypad volume controls to set each zone’s
Turn-On Volume level.
3. When finished, press the Pinhole Switch once to exit the Turn-On
Volume mode.
• The volume levels will be set in memory, the LEDs will stop flashing
and each zone will return to the listening condition it was in prior to
entering the Turn-On Volume setting mode.
Including or excluding a zone from “All ON” operation:
You can include or exclude any zone from being turned on by an “All ON”
command sent by any keypad or remote in the system. This can be useful
for an outside zone or nursery that you don’t want to turn on by mistake.
The factory default is for all zones to be included in “All ON” operation.
1. Using a straightened paper clip or jeweler's screwdriver, press the
Pinhole Switch once.
2. Press the Zone ON/OFF button on the front panel (or the Zone OFF button
on a keypad or the OFF button on the remote) for the zone.
• The zone’s Zone Status LED will glow red when it is excluded from
“All ON” operation
• The zone’s Zone Status LED will glow green when it is included in
“All ON” operation.
• If you’re using the CA308 remote through a keypad to include or
exclude a zone from “All ON” operation, use the OFF button to toggle
between include and exclude.
Note: An “All OFF” command affects all zones.
Restoring Factory Settings
To restore the factory-set Maximum Volume, Turn-On Volume and
”All ON” settings, disconnect the amplifier’s AC power cord
(page 2 — #19). Using a straightened paper clip or jeweler’s screwdriver,
press and hold the Pinhole Switch and re-connect the AC power cord
while continuing to hold the Pinhole Switch. Release the switch after the
cord has been re-connected.
SPECIFICATIONS
Number of Channels: 8 (four stereo pairs)
Output Power (Stereo): 30 Watts per channel (stereo) @ 8 ohms
Frequency Response: 20Hz – 20kHz, ±1dB
Total Harmonic Distortion: 0.05% (1kHz); 0.1% (20Hz – 20kHz)
Input Sensitivity: 730mV
Input Impedance: 90k ohms
Signal to Noise Ratio: –95dB
Maximum Source Input Voltage: 3.5 VAC RMS
Loop Output Impedance (Buffered ): 100 ohms
Power Consumption: 600 Watts, maximum; 20 Watts (standby)
AC Fuse: 5A (F5A ~ 250V)
Dimensions (W x H x D): 1611/
16” x 3
15
/
16” x 14¾”
(424mm x 100mm x 375mm)
Shipping Weight: 25 lbs (11.4 kg)
INSTRUCTION MANUAL
CA308 SINGLE SOURCE/4-ZONE
POWER AMPLIFIER
4
Page 5

INSTALLATION EXAMPLE
The following illustration shows a typical system that can be assembled using multiple HomeTech CA308 amplifiers, optional CA308 Keypads and other
HomeTech products (sold separately).
5
INSTRUCTION MANUAL
CA308 SINGLE SOURCE/4-ZONE
POWER AMPLIFIER
Zone 4 Zone 3 Zone 2 Zone 1
LRLR
Input Output
47kΩ
+ L – – R + + L – – R + + L – – R + + L – – R +
Caution: For continued protection against fire hazard use only
same type and rating fuses. Disconnect power supply before
changing fuse. Do not expose this unit to rain or moisture.
No user servicable parts inside. See operating manual before using.
F5A~250V
120~60Hz
600VA
Model: HT CA308 Amp
S/N:
Zone 4
Common
IR Out
Control Link
IR Link
STATUSGND GNDIR
DATA
12V STATUSGND GNDIR
DATA
12V STATUSGND GNDIR
DATA
12V STATUSGND GNDIR
DATA
12V
Zone 3 Zone 2 Zone 1
Zone 4 Zone 3 Zone 2 Zone 1
LRLR
Input Output
47kΩ
+ L – – R + + L – – R + + L – – R + + L – – R +
Caution: For continued protection against fire hazard use only
same type and rating fuses. Disconnect power supply before
changing fuse. Do not expose this unit to rain or moisture.
No user servicable parts inside. See operating manual before using.
F5A~250V
120~60Hz
600VA
Model: HT CA308 Amp
S/N:
Common
IR Out
Control Link
IR Link
Audio Source
(Receiver Tape Record Outputs)
Zone 4 Zone 3 Zone 2 Zone 1
STATUSGND GNDIR
DATA
12V STATUSGND GNDIR
DATA
12V STATUSGND GNDIR
DATA
12V STATUSGND GNDIR
DATA
12V
Speakers
CA308
Keypad
Controller
(Master
Bedroom)
ZONE 8
ZONE 8
ZONE 8
(Living Room)
iPort IW-1
Docking
System
ZONE 4
ZONE 4
ZONE 4
Speakers
CA308
Keypad
Controller
ZONE 3
ZONE 3
ZONE 3
Speakers
CA308
Keypad
Controller
ZONE 2
ZONE 2
ZONE 2
Speakers
Speakers
CA308
Keypad
Controller
CA308
Keypad
Controller
IR Emitter
ZONE 7
ZONE 7
ZONE 7
Speakers
CA308
Keypad
Controller
ZONE 6
ZONE 6
ZONE 6
Speakers
CA308
Keypad
Controller
ZONE 5
ZONE 5
ZONE 5
Speakers
CA308
Keypad
Controller
CA308 Amplifier #1
CA308 Amplifier #2
ON
OFF
ON
OFF
ON
OFF
ON
OFF
ON
OFF
ON
OFF
From
CD Player
From
Cassette Deck
From
DVD Player
From
iPort/iPod
iPort
Wallplate
CAT-5
Wire
(Dining Room)(Kitchen)(Family Room)
ON
OFF
(Kid’s
Bedroom)
(Office)(Guest Room)
Page 6

TECHNICAL ASSISTANCE
For answers to installation questions or an installation walk-through, please call our Technical Assistance Department on any business day at: (888) HT INSTALL
(888-484-6782), from 7am to 5pm, Pacific Time.
OBTAINING SERVICE
If this product should need repair or service, contact your Authorized HomeTech Dealer for help or use the following procedure:
1. Prior to calling, note the product’s model number, serial number, purchase date, and the name and address of the dealer where you purchased the
product.
2. Contact our Technical Assistance Department at the above number and describe the problem the unit is experiencing. If applicable, they will issue
a Return Authorization Number.
IMPORTANT: Do not return the unit to HomeTech without first obtaining a Return Authorization Number!
3. If you’re directed to return the unit to HomeTech for repair, pack the unit in its original shipping carton. If needed, you can obtain replacement
packaging from us for a small charge. Note: it is best if you place the box into an additional outer “overcarton” before shipment to minimize a chance
of theft in shipment. Please include a copy of the original bill of sale inside the package.
4. Contact United Parcel Service, Federal Express, or RPS to arrange prepaid (not collect) shipping. Do not use the U.S. Postal Service.
IMPORTANT: Freight collect shipments will be refused.
5. Write the Return Authorization Number on the outside of the shipping carton. For warranty work, please include a copy of the original bill of sale
inside the package.
6. Ship the packaged unit to:
Returns Department
HomeTech
212 Avenida Fabricante
San Clemente, CA 92672-7531
WARRANTY COVERAGE (USA ONLY)
If
within three (3) years
from the date shown on the bill of sale the product fails due to a defect in workmanship or material, HomeTech will, at its option
and at no charge, repair or replace the components of the product which prove to be defective.
For this warranty to be effective, the bill of sale must show that the product was purchased from an “Authorized HomeTech Dealer” and must list the
price paid. This warranty shall apply exclusively to the original purchaser and shall not apply to products purchased for industrial or commercial use.
Furthermore, this warranty shall not apply if:
1. Damage to the product was caused by accident, abuse or misuse;
2. The product was opened, modified, or repaired by unauthorized personnel; or
3. The product was not used as outlined in the instruction manual.
EXCLUSIONS AND LIMITATIONS
The warranty set forth above is in lieu of all other warranties, express or implied, of merchantability, fitness for a particular purpose, or otherwise.
The warranty is limited to HomeTech products registered herein and specifically excludes any damage to loudspeakers and other allied or associated
equipment which may result for any reason from use with this product. HomeTech shall, in no event, be liable for incidental or consequential damages
arising from any breach of this warranty or otherwise. This warranty gives you specific legal rights, and you may have other rights which vary from state
to state.
INSTRUCTION MANUAL
CA308 SINGLE SOURCE/4-ZONE
POWER AMPLIFIER
©2005 HomeTech. All rights reserved. HomeTech and iPort are trademarks or registered trademarks of Dana Innovations.
iPod is a trademark of Apple Computer, Inc.
HomeTech • 212 Avenida Fabricante • San Clemente, CA 92672-7531 USA
www.hometechaudio.com
33-3804 12/05
6
 Loading...