

Page 1
Home Microscope
Instruction Manual for
MI-4100STD – Home Microscope
MI-4100DXL – Home 1000x Microscope
1.800.860.6272
www.homesciencetools.com
Copyright 2012 by Home Training Tools, Ltd.
All rights reserved.
Page 2
Welcome to an exciting world of
discovery with your new Home Microscope!
This manual will give you a familiarity with the
different features on your microscope, how to
use them, and how to preserve your investment
by proper maintenance and care.
These instructions are for two different
models with fluorescent lighting – MI-4100STD
and MI-4100DXL. Pages 2-4 will cover the basic
features and functions of the MI-4100STD
model, most of which are common to both
microscopes.
The small microscope icon indicates a
feature that is upgraded on the Home 1000x
(MI-4100DXL) microscope. Learn about these
upgraded features on pages 4-6.
Cleaning
The best optical quality is compromised by
dirty lenses. Use a dustcover and clean the
lenses regularly to greatly enhance your
microscope use.
To clean lens surfaces, remove dust with a
soft brush or a can of compressed air. Then
moisten a piece of lens paper (our item MIPAPER) with some lens cleaning solution (MILENSCLN). Gently clean the eyepiece, objective
lens exterior surface, and condenser using a
circular motion. Repeat with a second paper
moistened with solution if necessary. Repeat
once again with a piece of dry lens paper until
the lens is clean and dry. Do not spray lens
cleaner directly on the lens.
Table of Contents
General Microscope Care .................................... 2
Unpacking ......................................................... 2
Cleaning ........................................................... 2
Features & Definitions .......................................... 2
Microscope Diagram ......................................... 2
Description of Components .............................. 3
Installing a Mechanical Stage ........................... 3
Operating Procedure ............................................ 4
Features for MI-4100DXL ..................................... 4
1.25 Abbe Condenser ....................................... 4
Iris Diaphragm .................................................. 5
100x Oil Immersion Objective .......................... 5
Mechanical Stage ............................................. 5
Filters ................................................................ 6
Maintenance ......................................................... 6
Adjusting the Stage Stop .................................. 6
Changing the Bulb ............................................ 6
Adjusting Tension ............................................. 6
Troubleshooting ................................................ 7
Specifications ....................................................... 8
Warranty ............................................................... 8
Features & Definitions
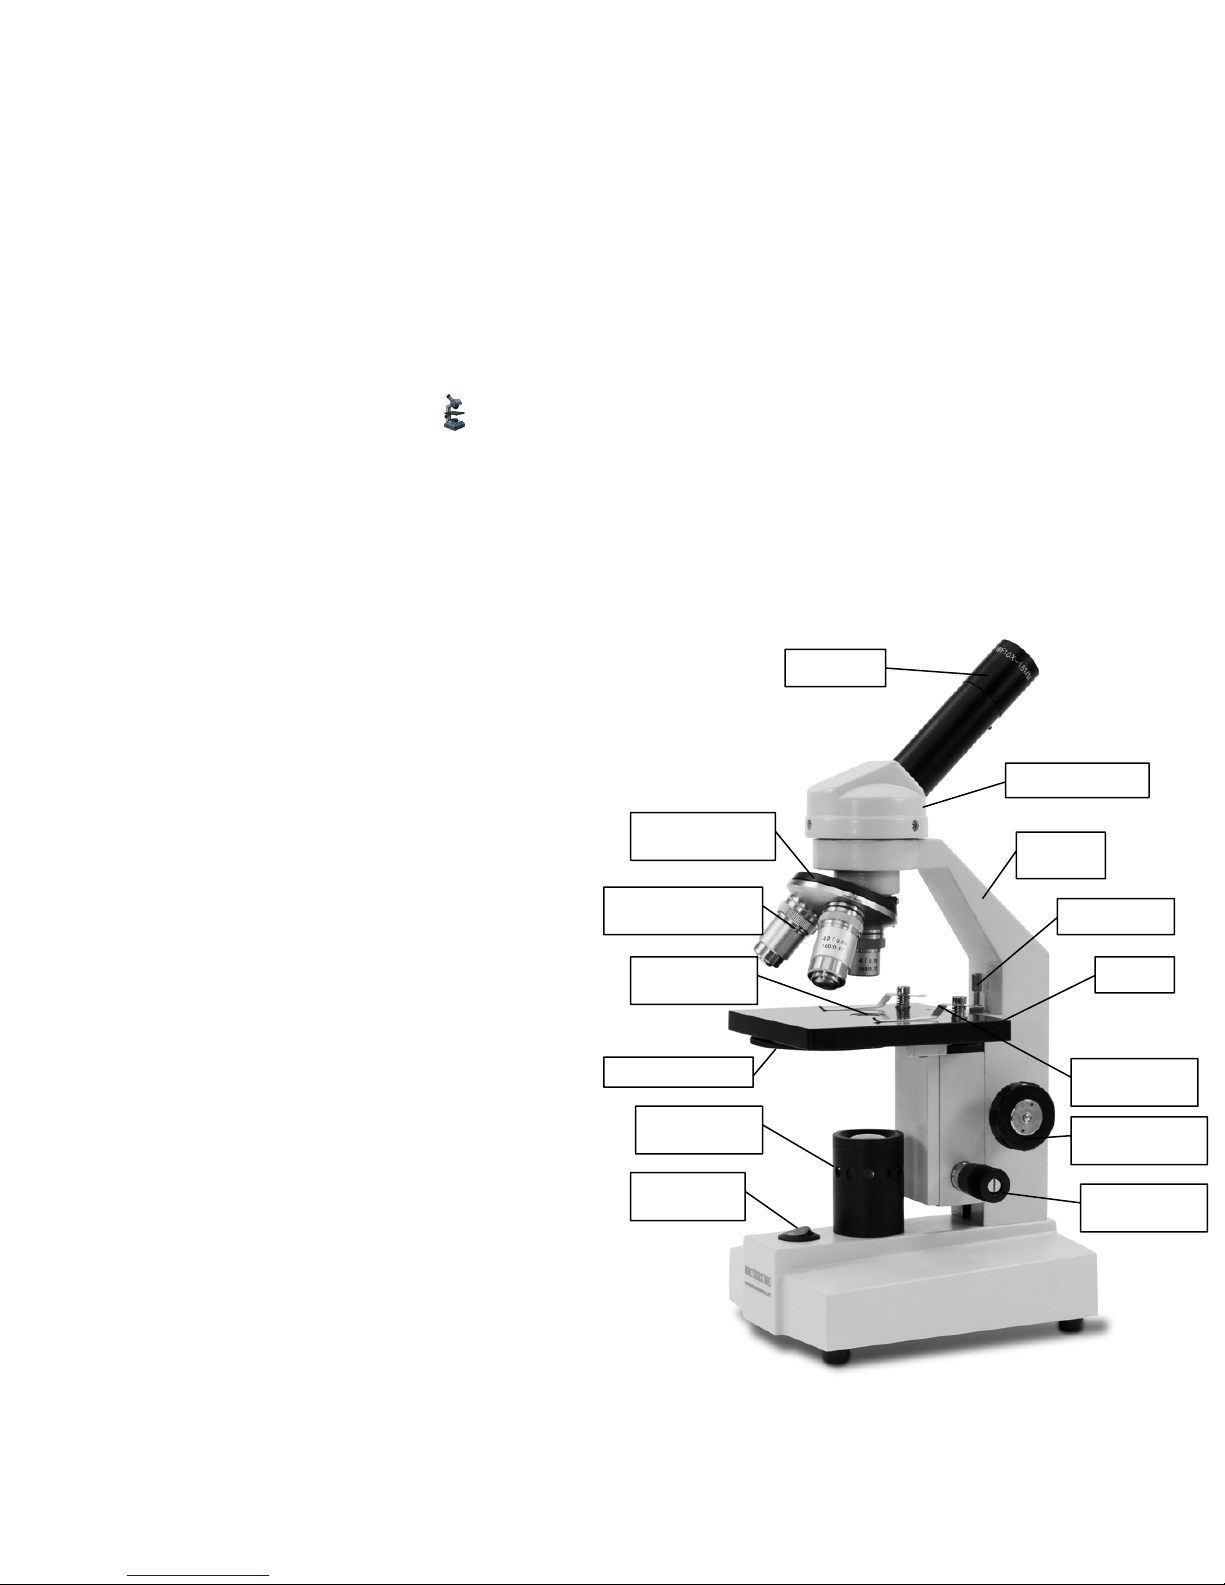
Microscope Diagram
1. Eyepiece
4. Nosepiece
5. Objective Lenses
9. Condenser
10. Disc Diaphragm
2. Rotating Head
3. Arm
7. Stage Stop
6. Stage
8. Stage Clips
General Microscope Care
Unpacking
The Home microscopes are shipped in a
two-part Styrofoam case. Keep this case for
storage, transport, and shipping. It is perfect
packing material should you ever need to send
your microscope in for repairs covered by the
warranty.
When handling your microscope, always
pick it up by the arm. Avoid touching the lens
surfaces on the eyepiece or objective lenses, as
fingerprints will decrease image quality.
© Home Training Tools Ltd. 2012 Page 2 of 8 Visit www.homesciencetools.com
13. Illuminator
On/Off Switch
11. Coarse Focus
12. Fine Focus
Page 3

Description of Components
1. Eyepiece: This is the part of the microscope
you look through. It is inclined at a 45º angle
for comfortable viewing. It contains a lens
that magnifies 10x.
2. Rotating head: The head rotates 360º so
that multiple users can look in the eyepiece
comfortably without moving the microscope
itself.
3. Arm: The arm not only supports the head
and nosepiece but it is also the best
“handle” for picking up and moving the
microscope.
4. Nosepiece: This is also called the “objective
turret.” It holds the objective lenses and
rotates 360º. Change magnification by
turning it until the lens you want to use
“clicks” into place.
5. Objective Lenses: These are the lenses
closest to the specimen. The standard
objectives are 4x, 10x, and 40x, which
multiply with the 10x eyepiece lens to
provide magnification levels of 40x, 100x,
and 400x. The 4100DXL model also
includes a 100x objective for 1000x
magnification. The shortest lens has the
lowest magnification level, while the longest
has the highest. The objectives have the
following characteristics:
• They are DIN – they meet an
international standard of optical
quality.
• They are achromatic – they help
prevent color distortion.
• They are parcentered – if you center
your slide using one objective, it will
still be centered when you move to
another objective.
• They are parfocal – if you focus your
specimen using one objective, it will
stay coarsely focused when you
move to another objective (you will
still have to adjust the fine focus).
• The 40x and 100x objectives are
retractable – the tip containing the
lens is spring-loaded to prevent
damage to the objective or slide.
• The 100x objective is oil immersion
– This is described on page 5.
6. Stage: The stage is the platform that
supports the specimen slide below the
objective lenses. It moves up and down
when you turn the focus knobs, allowing you
to control the distance between the slide and
the lens. The MI-4100DXL model has an
integrated mechanical stage that allows for
precision adjustment of the specimen slide.
7. Stage stop: This is a screw with a lock nut
located between the stage and the arm of
the microscope. It prevents the stage from
coming too far up and grinding against the
objective lenses. It is also called a “safety
rack stop,” and is pre-adjusted by the
manufacturer. Instructions for readjusting it
manually are on page 6.
8. Stage clips: The stage clips hold the
microscope slide in place. Pressing on the
end closest to the arm of the scope will lift
up the other end allowing you to place your
slide underneath. There is a single stage clip
on the MI-4100DXL model that is easily
adjusted with a lever.
9. Condenser: The MI-4100STD
condenser is fixed and the MI-4100DXL
condenser has spiral focusing.
10. Diaphragm: The diaphragm controls the
amount of light coming through the
specimen in order to provide optimum
resolution for the objective lens. The MI4100STD has a rotating disc diaphragm
under the stage with various-sized holes.
The MI-4100DXL has an adjustable iris
diaphragm.
11. Coarse focus: The large coarse focus knob
is used to raise or lower the stage until the
image is in focus. The focus mechanism
uses a slip clutch to prevent damage to the
gears.
12. Fine focus: The smaller fine focus knob
allows more precise image resolving after
the image has been brought into focus with
the coarse focus knob.
13. Illuminator: The illuminator provides
necessary light underneath the stage. It
contains a cool, bright, 5-watt fluorescent
bulb. Instructions for changing the bulb are
on page 6.
© Home Training Tools Ltd. 2012 Page 3 of 8 Visit www.homesciencetools.com
Page 4
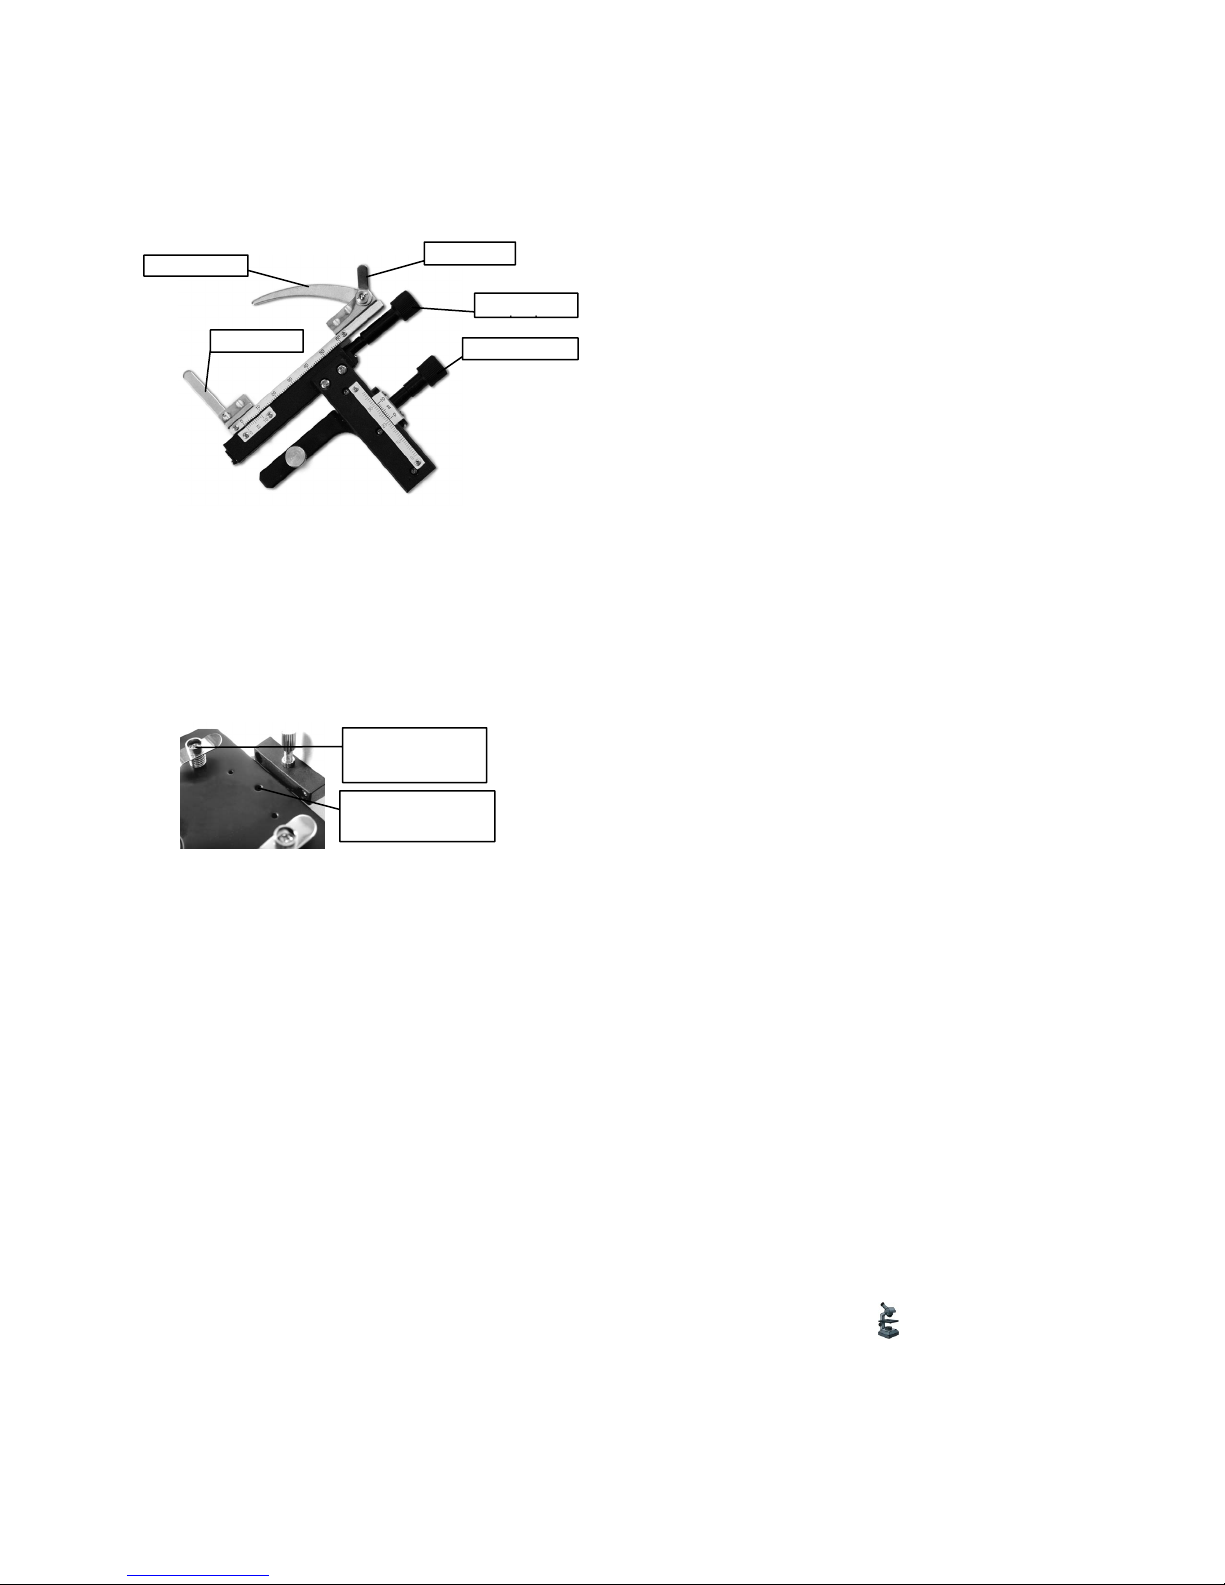
Installing a Mechanical Stage
The MI-4100STD model comes pre-drilled
for the addition of an optional mechanical stage
(our item MI-MESTAGE). This added feature
gives precise slide control for optimal viewing.
Slide clamp
Fixed side
To install the mechanical stage follow these
steps:
1. Remove the stage clips with a Phillips #2
screwdriver. The clips are screwed in tightly,
so be careful not to strip the screw heads.
2. The mechanical stage attaches to the three
holes that are located between the stage
clips. The two pins on the bottom of the
Remove stage clip
with this screw
Slide lever
Right/Left
Front/Back
2. Flip the switch to turn on your microscope's
light source and then turn the disc
diaphragm to the largest hole (number 5),
which allows the greatest amount of light
through. On MI-4100DXL, open the iris
diaphragm to the fully open position.
3. Rotate the nosepiece to the lowest-power
(4x) objective. You will hear a click when it is
properly in place. Always start with the
lowest power: it is easiest to scan a slide at
a low setting, as you have a larger field of
view.
4. Turn the coarse focus knob to move the
stage down (away) from the objective lens
as far as possible.
5. Set a microscope slide (coverslip facing up)
in place under the stage clips. A prepared
slide works best the first time. (If you do not
have a prepared slide, place a strand of
colored yarn or thread on a blank slide and
place a coverslip over it.) Move the slide
until the specimen is under the objective
lens.
6. Adjust the larger coarse focus knob until the
specimen is in focus. Slowly move the slide
to center the specimen under the lens,
nudging it with your fingers if necessary.
Holes for adding
mechanical stage
mechanical stage fit into the smaller holes
on each side of the threaded hole in the
center. Align the pins with these holes and
seat the mechanical stage firmly against the
microscope stage.
3. Secure the mechanical stage to the
microscope stage by tightening the center
set screw securely into the center (threaded)
hole.
Operating Procedure
Now that you have an overview of how to
use each component on your microscope, follow
this step-by-step procedure to help you get
started using it.
1. Set the microscope on a tabletop or other
flat sturdy surface where you will have
plenty of room to work. Plug the power cord
into an outlet, making sure that the excess
cord is out of the way so no one can trip
over it or pull it off of the table.
7. Adjust the small fine focus knob until the
specimen is clearly in focus. Then adjust the
diaphragm to get the best lighting. Start with
the most light and gradually decrease until
the specimen image has clear, sharp
contrast.
8. Scan the slide (right to left and top to
bottom) at low power to get an overview of
the specimen (nudge the slide very slowly
with your fingers). Then center the part of
the specimen you want to view at higher
power.
9. Rotate the nosepiece to the 10x for 100x
magnification. Refocus using the fine focus
knob and view your specimen carefully.
Adjust the diaphragm until the image has the
best contrast. Repeat with the 40x objective
for 400x magnification.
Features for MI-4100DXL
As indicated by the symbol, this model
is upgraded from the MI-4100STD. This section
describes each feature and how it is used.
© Home Training Tools Ltd. 2012 Page 4 of 8 Visit www.homesciencetools.com
Page 5
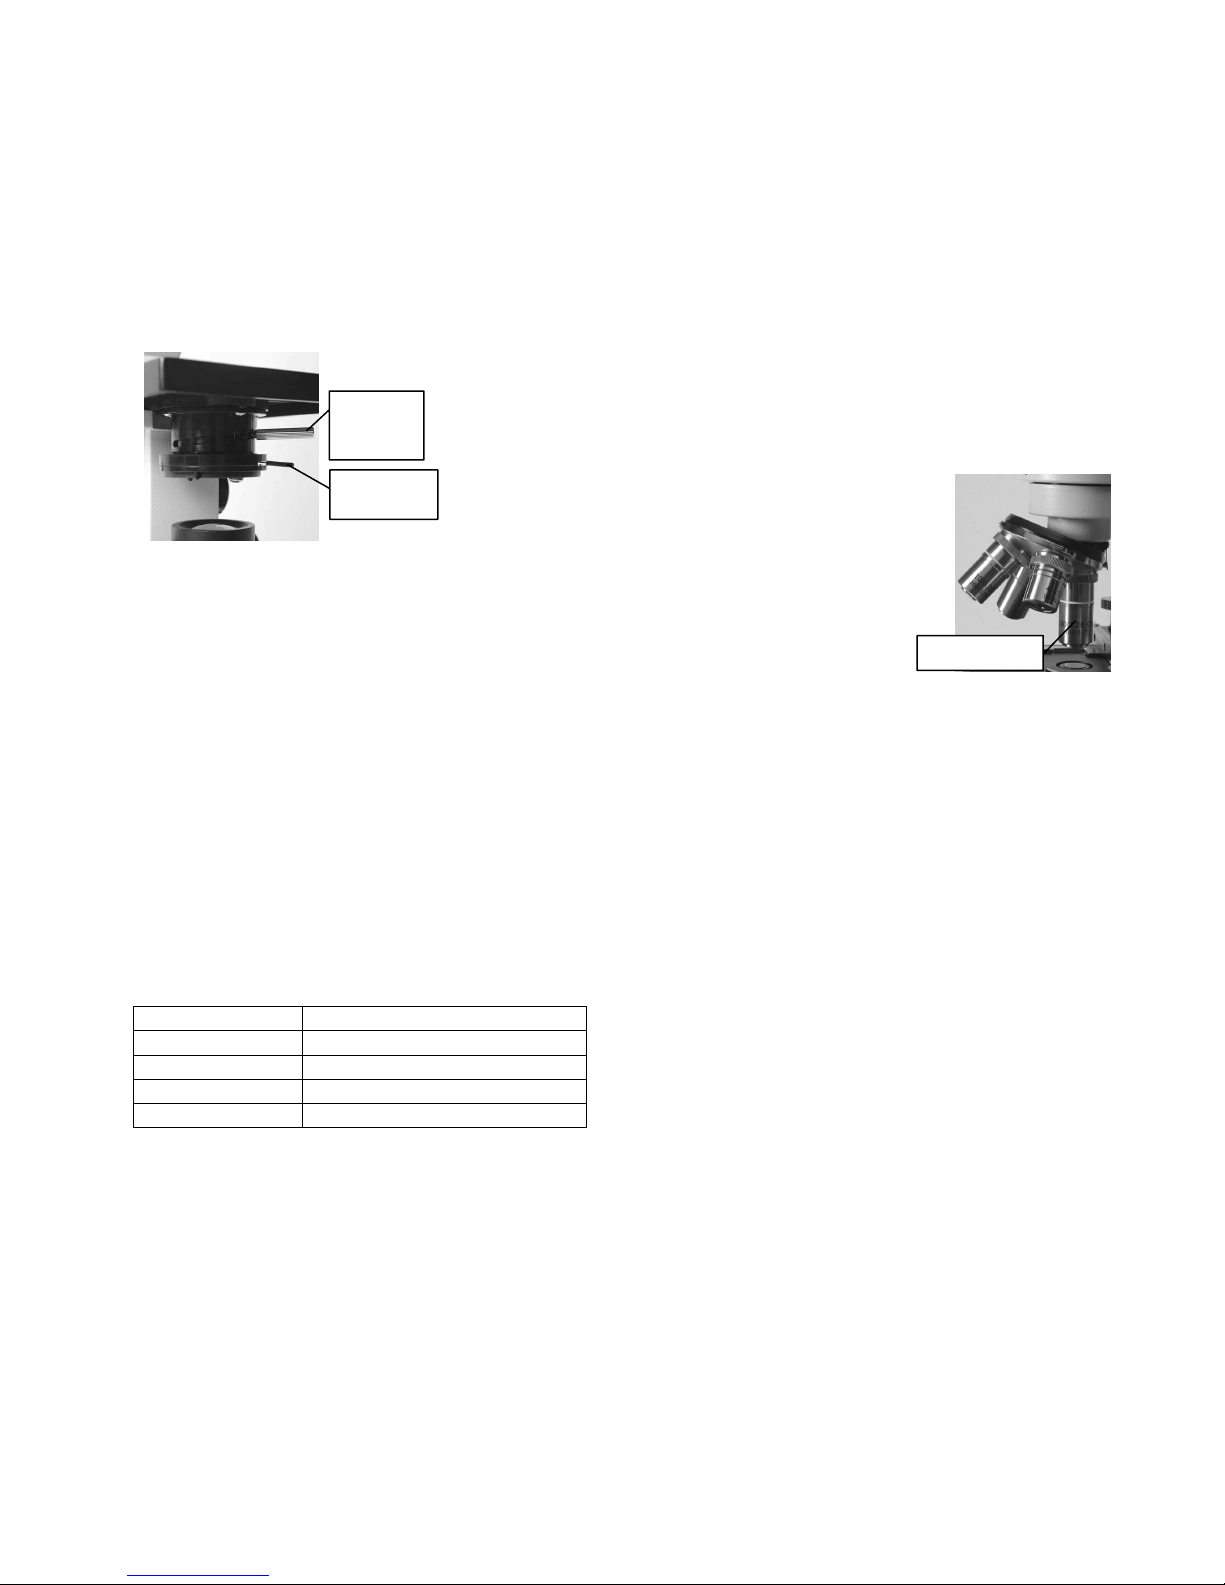
1.25 Abbe Condenser
Unlike the fixed condenser on the MI4100STD model, this condenser on the
4100DXL models is movable. Rotate it using the
upper lever under the stage. Moving it clockwise
will lower it; counter-clockwise will raise it. In
most cases it can be left all the way up, though it
may need adjustment when you use a 100x
objective lens to achieve a clear image.
Abbe
Condenser
Lever
Iris Diaphragm
Lever
Iris Diaphragm
On the MI-4100DXL model, the iris
diaphragm replaces the disc diaphragm. It
provides greater control of the amount of light
coming through the specimen and optics, thus
giving you more precise resolution and contrast
for each specimen. The diaphragm adjusts very
easily with a sliding control lever instead of a
rotating disk. This lever is the lower lever under
the stage.
Begin looking at any specimen with the iris
diaphragm all the way open (clockwise is open,
counter-clockwise is closed). After focusing,
reduce the light by moving the lower lever until
the specimen is in sharp, clear contrast. As with
the disc diaphragm, you will need less light on
lower power and more light on higher power.
The following table gives suggested opening
sizes for each power level:
Objective Diaphragm Opening
4x From fully closed to 1/8 open
10x 1/8 to 1/4 open
40x 1/4 to 1/2 open
100x 1/2 to 3/4 open
100x Oil Immersion Objective
The MI-4100DXL model has an additional
100x objective that provides 1000x
magnification. At this magnification it is
important to reduce light diffraction to enhance
the image quality. This is done by using
immersion oil according to the following steps:
1. Lower the stage using the coarse focus
knob.
2. Raise the Abbe Condenser to the highest
position by turning its lever counter-
clockwise. Open the iris diaphragm by
turning its lever clockwise.
3. Place one drop of high quality immersion oil
(our item MI-IMMOIL) on top of the
coverslip. (In some cases, it may be
beneficial to place a drop of oil between the
condenser and the slide also, but this is
usually not necessary for a good image.)
4. Move the 100x objective lens into position,
and then slowly move the stage up until the
lens makes contact with the oil.
5. Continue focusing with the coarse knob until
the color or blurred outline of the specimen
appears. Finish focusing with
the fine focus knob.
6. Adjust the condenser and
diaphragm until you see the
specimen in clear, sharp
contrast.
7. When you are done,
clean all the oil off the
lenses and slides using
100x Objective
lens paper and lens cleaning solution
(instructions are on page 2 of this manual).
Mechanical Stage
The MI-4100DXL model has a mechanical
stage built-in, a component that allows precise
movement of the slide on the stage while
maintaining relatively good focus. It is ideal for
scanning specimens. The mechanical stage has
three operating components: the slide clamp
arm, the “x” or right/left adjustment knob and the
“y” or front/back adjustment knob.
1. Move the small lever on top of the stage to
open the curved slide clamp arm.
2. Carefully place the slide squarely against
the fixed side and back edge of the
mechanical stage. Make sure the slide lies
flat on the microscope stage.
3. Gently release the small lever allowing the
slide clamp arm to securely hold the
specimen slide in place.
4. Move the specimen under the objective lens
by turning the adjustment knobs. The
front/back adjustment knob is at the top. It
allows precise movement to the front and
back of the stage. The right/left adjustment
knob is at the bottom, towards the base of
the microscope. It allows precise movement
to the right and left of the stage. Turn these
adjustment knobs without putting any
© Home Training Tools Ltd. 2012 Page 5 of 8 Visit www.homesciencetools.com
Page 6
pressure on the stage. This will allow you to
scan a slide while maintaining fairly good
focus.
Filters
The MI-4100DXL model comes with a blue
filter that can be placed in
the filter holder located
below the iris diaphragm.
The filter absorbs some of
the light from the
illuminator and makes the
light slightly blue. In some
cases this may enhance the image of your
specimen, though generally it is not necessary.
Use the following procedure to insert the filter:
1.
Locate the tiny filter holder knob underneath
the iris diaphragm. Use this to swing the
filter holder out from under the diaphragm.
2.
Place the filter in the holder and swing back
into place.
3.
Adjust focus and diaphragm normally.
Maintenance
Adjusting the Stage Stop
The stage stop is set at the factory to insure
that the stage cannot come up far enough to hit
the objective lenses. In normal circumstances
you will not have to adjust this. However, if it
falls out of adjustment or you are using a thinner
slide that cannot be focused, follow these steps:
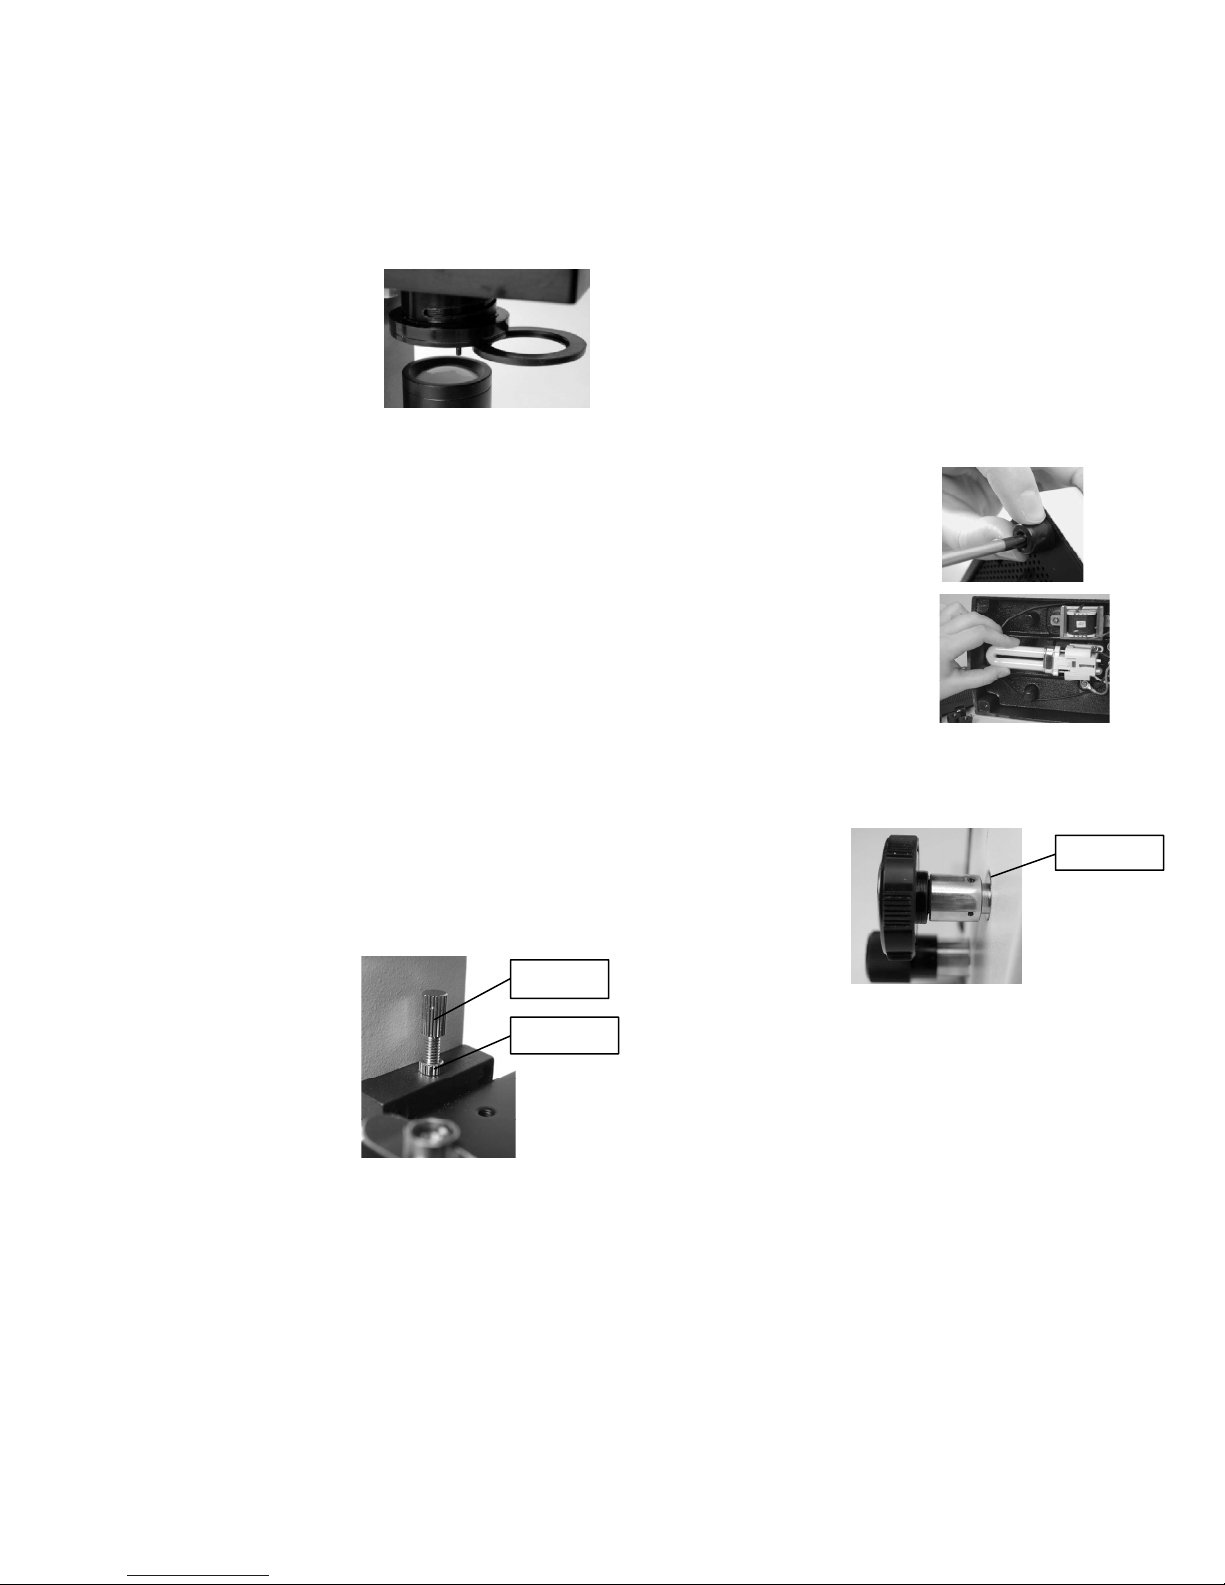
1.
Loosen the round
knurled locking
nut by turning it
counter-clockwise.
You may need to
use needle-nose
pliers for this.
2.
Loosen the stop
screw.
3.
Focus on a standard slide until you obtain a
sharp image.
4.
Tighten the stop screw by turning it
clockwise until it stops, and then turn it back
half a turn.
Stop screw
Locking nut
Changing the Bulb
Your microscope bulb should last for
years—approximately 8,000 hours. When it
burns out, follow these steps for replacing it:
1.
Obtain the correct 5-watt fluorescent
replacement bulb (our item MI-BULB4. Note:
some other 5-watt fluorescent bulbs may be
too big).
2.
Unplug your microscope from the power
supply and allow it to cool before replacing
the bulb.
3.
Carefully lay the microscope on its side.
4.
Using a screwdriver,
remove the screw from the
center of each rubber foot.
5.
Remove the perforated
metal plate and gently pull
the bulb straight out from
the socket.
6.
Replace with a new bulb,
then put the perforated
metal plate back in place
and replace the rubber feet.
Adjusting Tension
Coarse focus tension is pre-adjusted by the
manufacturer, but if
it falls out of
adjustment, the
stage will drift down
under its own weight
and the image will
move out of focus.
The tension adjustment collar is located
between the microscope arm and the coarse
focus knob on the right side (when the stage is
facing you). To adjust the tension, follow these
steps.
1.
To tighten tension, turn the collar clockwise
(you can get a better grip by putting a wide
rubber band around the collar).
2.
Tighten only enough to keep the stage from
drifting downward.
Tension collar
5.
Lock into position by tightening the locking
nut.
6.
Note: The higher the stop screw is, the
higher the stage will rise.
© Home Training Tools Ltd. 2012 Page 6 of 8 Visit www.homesciencetools.com
Page 7

Troubleshooting
c
s
s
v
If you experience difficulty with your microscope, try these troubleshooting techniques:
Problem Possible Reason and Solution
Light fails to
operate
1. The AC power cord is not connected. Connect the cord to an outlet.
2. The bulb is burned out. Replace the bulb. (See “Changing the Bulb,” p. 6.)
3. The power source outlet is inoperative. Have a qualified electrician repair the outlet.
4. The incorrect bulb is installed. Replace with the correct bulb.
Light flickers
No image
Unable to
focus slide
Poor
resolution,
image not
sharp
1. The bulb is not properly inserted into the socket. Properly insert the bulb.
2. The bulb is about to burn out. Replace the bulb.
3. The connection at the AC outlet is loose. Have a qualified electrician repair the outlet.
Note: The fluorescent bulb typically flickers for 10 to 15 seconds when first turned on.
This is normal.
1. The nosepiece is not indexed properly. Move revolving nosepiece until the objective
lens clicks into position.
2. The light is too bright. Adjust the diaphragm.
1. The slide coverslip is too thick. Use 0.17 mm thi
2. The stage drops under its own weight. Adjust tension of coarse focus knob. (See
“Adjusting Tension,” p. 6.)
3. The slide is upside down. Place the slide on the stage with the coverslip facing up.
4. The stage stop is not set at the proper position. Adjust the stage stop. (See
“Adjusting the Stage Stop,” p. 6.)
1. The condenser, objective, or eyepiece lenses are dirty. Clean the len
“Cleaning,” p. 2.)
2. There is too much light. Adjust the diaphragm.
k (No. 1) coverslip.
es. (See
Spots in field
Uneven
illumination of
field
© Home Training Tools Ltd. 2012 Page 7 of 8 Visit www.homesciencetools.com
1. The condenser, objective, or eyepiece lenses are dirty. Clean the len
“Cleaning,” p. 2.)
2. The specimen slide is dirty. Clean the slide.
1. The nosepiece is not indexed properly. Move revol
lens clicks into position.
2. The diaphragm is not properly indexed. Adjust the diaphragm to the proper level.
es. (See
ing nosepiece until the objective
Page 8

Specifications
k
Eyepiece
Widefield 10x with 18 mm exit pupil and fully coated optics.
Head
Nosepiece
Objectives
Focusing
Focus Rack
Stage
Mechanical
Stage
Condenser
Diaphragm
Illuminator
Monocular, 45° inclined head rotates 360°.
3-hole or 4-hole nosepiece is ball-bearing mounted with positive click stops.
All objectives are DIN achromatic, parfocalled, parcentered, and fully coated.
• 4x, 0.10 N.A., red ring, 4.5 mm field of view, 40x magnification
• 10x, 0.25 N.A., yellow ring, 1.8 mm field of view, 100x magnification
• 40xR, 0.65 N.A., blue ring, 0.45 mm field of view, 400x magnification, retractable
• 100xR, 1.25 N.A., white ring, 0.18 mm field of view, 1000x magnification, retractable, oil
immersion (model MI-4100DXL only)
Separate low position coarse and fine focusing controls with slip clutch, and tension
adjustment.
All metal rac
-and-pinion focusing with adjustable stage stop.
Acid and chemical resistant 110 x 120 mm metal stage with stage clips and predrilled for an
optional mechanical stage.
Top-position x-y controls provide precise 60 mm movement on the x-axis and 20 mm
movement on the y-axis (Model MI-4100DXL only).
Fixed 0.65 N.A. condenser on model MI-4100STD. Adjustable N.A.1.25 Abbe condenser on
model MI-4100DXL.
Calibrated 5-hole disc diaphragm on model MI-4100STD. Iris diaphragm with 2 mm to 30 mm
diameter opening on model MI-4100DXL.
5-watt fluorescent illuminator with grounded 110 volt cord.
Warranty
Home Science Tools warrants this microscope to be free from defects in material and workmanship under normal use
and service for the life of the instrument. This warranty does not cover light bulbs, batteries, or damage due to
misuse, abuse, alterations, or accident. Warranty does not cover lenses that have become inoperable due to
excessive dirtiness as a result of misuse or lack of normal maintenance. Any cameras and software supplied with this
microscope are under warranty for one year from the date of purchase.
You will need to return your microscope freight prepaid for warranty service to Home Science Tools, or the repair
facility we designate. We will repair or replace your microscope at no charge and return it freight prepaid to you.
Please call 1-800-860-6272 to arrange warranty service before returning this instrument.
Please note that warranties apply only to the original purchaser and are not transferable.
© Home Training Tools Ltd. 2012 Page 8 of 8 Visit www.homesciencetools.com
 Loading...