

Homeright Super Finish Max C800971 Instruction Manual
PLEASE READ AND SAVE THIS INSTRUCTION MANUAL ENGLISH • FRANÇAIS • ESPAÑOL
PAINT SPRAYER
PULVÉRISATEUR DE PEINTURE
Pulverizador de Pintura
WARNING
TO REDUCE THE RISK OF INJURY, USER MUST READ
AND UNDERSTAND INSTRUCTION MANUAL.
FOR HOUSEHOLD USE ONLY. KEEP CHILDREN AWAY
FROM WORKING AREA.
ADVERTENCIA
PARA DISMINUIR LOS RIESGOS DE LESIONES,
EL USUARIO DEBE LEER Y ENTENDER EL MANUAL
DE INSTRUCCIONES. SÓLO PARA USO DOMÉSTICO.
MANTENGA A LOS NIÑOS LEJOS DEL ÁREA
DE TRABAJO.
For Customer Service Call: 1-800-264-5442
or 763-780-5115, 7:30 a.m. to 4:30 p.m. CST.
Made in Taiwan
Para comunicarse con el departamento de servicio al
cliente, llame al: 1-800-264-5442 ó 763-780-5115, de
7:30 a. m. a 4:30 p. m. (hora del Centro de EE.UU.).
Hecho en Taiwán
AVERTISSEMENT
POUR RÉDUIRE LES RISQUES DE BLESSURE,
L’UTILISATEUR DOIT LIRE ET COMPRENDRE LE
MANUEL D’INSTRUCTION. DESTINÉ À UN USAGE
DOMESTIQUE SEULEMENT. TENEZ LES ENFANTS
ÉLOIGNÉS DE L’AIRE DE TRAVAIL.
Pour le service à la clientèle, appelez au :
1-800-264-5442 ou (763) 780-5115,
de 7:30 h à 16.5 h, heure normale du Centre.
Fabriqué en Taïwan

2
SUPER FINISH MAX® SPRAYER (C800971) ENGLISH
IMPORTANT SAFEGUARDS ....................................................................................................................................................................................2
•
Warnings .....................................................................................................................................................................................................3
PROP 65 Warning .............................................................................................................................................................................................3
Hazard: Explosion or Fire .................................................................................................................................................................................3
Hazard: Hazardous Vapors ...............................................................................................................................................................................3
Extension Cords ................................................................................................................................................................................................3
Storage .............................................................................................................................................................................................................3
FAST START QUICK REFERENCE GUIDE ................................................................................................................................................................4
HOW TO USE ..........................................................................................................................................................................................................5
Thinning Materials ............................................................................................................................................................................................6
Practice First ....................................................................................................................................................................................................6
Surface Prep .....................................................................................................................................................................................................6
Adjusting the Spray Pattern .............................................................................................................................................................................7
Spraying Instructions........................................................................................................................................................................................7
CLEAN UP & MAINTENANCE .................................................................................................................................................................................8
Step One: Clean Up Instructions .......................................................................................................................................................................8
Step Two: Clean Up Instructions for the Spray Tip ..........................................................................................................................................8
Maintenance .....................................................................................................................................................................................................8
TROUBLESHOOTING...............................................................................................................................................................................................9
PARTS LIST ................................................................................................................................................................................................... 30-31
TWO-YEAR LIMITED ............................................................................................................................................................................................32
TABLE OF CONTENTS
IMPORTANT SAFEGUARDS
HomeRight will not be responsible for losses or damage resulting from use of this product in any manner not specifically stated in this manual.
User assumes all risks associated with such non-specific use.
Before using this product, user must evaluate it and determine if it is suitable for intended application.
User assumes all risks and liability associated with such use.
READ AND FOLLOW ALL SAFEGUARDS.
Like other power tools, the Super Finish Max
®
sprayer is safe when properly used but can be dangerous if misused. It is the responsibility of the user
to read and understand all instructions, IMPORTANT SAFEGUARDS, and safety precautions before operating the unit and also to use the unit properly.
Failure to do so may result in personal injury or loss of life and product damage.
Do not try to repair (or disassemble) the unit yourself. Repairs should be performed by a qualified shop familiar with this unit or returned to
HomeRight
®
. See warranty. This unit is to be used with authorized parts only. When using parts that do not comply with the specifications and safety
devices of the manufacturer, theuser assumes all risks and liabilities.

3
SUPER FINISH MAX® SPRAYER (C800971) ENGLISH
IMPORTANT SAFEGUARDS
1. HAZARD: Solvent and paint fumes can explode or ignite, causing
property damage and severe injury. Avoid all low ignition sources such
as static electricity, sparks, and open flames.
2. HAZARD: Paints, solvents, insecticides, and other materials may be
harmful if inhaled, causing severe nausea, fainting, orpoisoning.
3. HAZARD: Do not hold cord at plug connections to support cord.
Failure to observe may result in electrical shock.
PROP 65 WARNING
• WARNING:
This product can expose you to chemicals including Antimony
Trioxide, which is known to the State of California to cause cancer,
and Lead and Nickel, which are known to the State of California
to cause birth defects or other reproductive harm. For more
information go to www.P65Warnings.ca.gov.
HAZARD: EXPLOSION OR FIRE
Paint, stain, and solvent fumes can explode or ignite, causing property
damage and/or severe injury.
∙ Keep area well ventilated. Exhaust and introduce fresh air to keep
fumes from accumulating in work area.
∙ Do not spray in areas where there are ignition sources, static
electricity, sparks, pilot lights, heaters, hot objects, cigarettes, or
open flames.
∙ Have fire extinguishing equipment present and in good workingorder.
∙ Follow safety instructions and IMPORTANT SAFEGUARDS of material
manufacturers.
HAZARD: HAZARDOUS VAPORS
Paint, stain and solvents, insecticides, varnishes, and other materials
may be harmful if inhaled, causing severe nausea, fainting, or poisoning.
∙ Use a mask or respirator when spraying when there is a chance of
inhaling vapors.
∙ Use protective eyewear.
EXTENSION CORDS
Make sure your extension cord is UL/ETL/CSA listed and is in
goodcondition. When using an extension cord, be sure to use one heavy
enough for the current - for lengths less than 18 feet, usea No. 18 AWG.
or heavier; for lengths more than 18 feet, useNo. 16 AWG. If in doubt,
use a heavier gauge. Anundersized cord will cause a drop in line voltage
resulting in loss of power andoverheating.
STORAGE
Make sure unit is clean and dry before storing. Store in a dry location.
To prevent damage, the electrical cord should not be crimped during
storage
.
∙ DO NOT aim sprayer at yourself or anyone else; in the event of injury,
seek expert medical advice immediately.
∙ DO NOT cover the nozzle with any part of your body. High velocity jet
can cause accidental injuries.
∙ DO NOT leave your sprayer uncleaned or allow paint to dry in the
sprayer. An uncleaned sprayer will not work the next time it’s used
and you could void the warranty.
∙ DO NOT spray textured materials containing asbestos fibers.
∙ DO NOT spray any textured materials containing particles or fibers
such as metallic paints or fire retardant paints.
∙ DO NOT spray flammable liquid.
∙ DO NOT use the sprayer outside when it’s raining.
∙ DO NOT use sprayer below garage floor or grade level.
∙ DO NOT disassemble the sprayer without reading directions.
∙ DO NOT allow any part of the body to come into contact with
the fluid stream.
∙ DO plug the cord or extension cord only into grounded power supply.
∙ DO keep the sprayer out of the reach of children.
∙ ALWAYS place the sprayer upright (do not place the sprayer upside
down or on its side) to prevent liquid from entering internal wiring and
causing electric shock.
∙ ALWAYS wear mask, goggles, and ear and eye protection while
operating the sprayer.
∙ When you stop spraying, ALWAYS unplug the cord to prevent
unintended operation.
∙ To prevent electrical shock, NEVER immerse the sprayer into water or
other liquids.
∙ NEVER leave sprayer unattended.
∙ NEVER leave sprayer plugged in while cleaning.
SERVICING A DOUBLE-INSULATED PRODUCT
In a double-insulated product, two systems of insulation are provided
instead of grounding. No grounding means are provided on a double
insulated product, nor should a means of grounding be added to the
product. Servicing of a double-insulated product requires extreme care
and knowledge of the system and should only be done by qualified
service personnel.
Replacement parts for a double-insulated product must be identical to
those parts in theproduct.
WARNINGS CAUTION
4
SUPER FINISH MAX® SPRAYER (C800971) ENGLISH
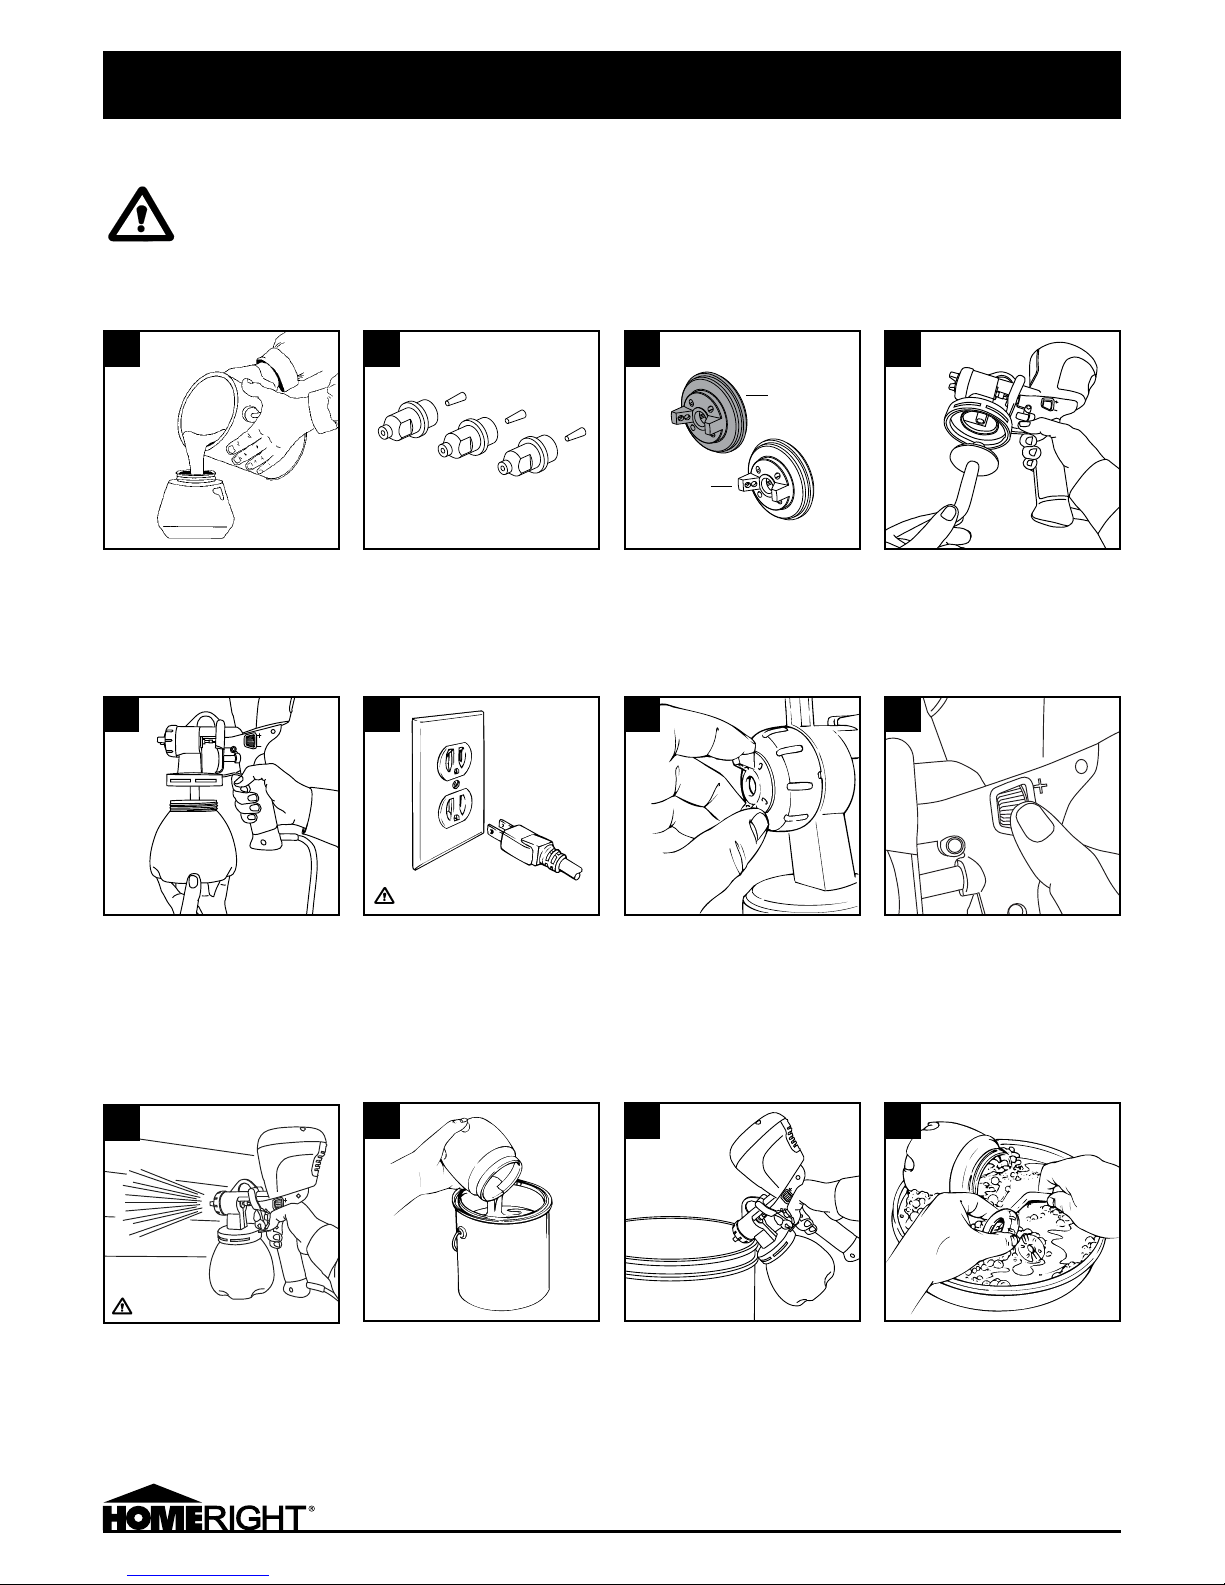
FAST START QUICK REFERENCE GUIDE
Cleaning Instructions
Spraying Instructions
This is only a quick reference.
Read the entire instruction manual prior to using the product.
SKIN INJECTION HAZARD RISK OF EXPLOSION OR FIRE HAZARDOUS VAPORS
Read all warnings and safety instructions in the owner’s manual before use.
6. Plug sprayer into outlet. 7. Adjust spray pattern to horizontal,
vertical, or cone. (See page 7.)
8. (–) Turn counter clockwise for
less flow and finer spray pattern.
(+) Turn clockwise for more flow
and larger spray pattern.
9. Spray surface, keeping sprayer
level. Use a sweeping and
overlapping motion.
5. Attach container to sprayer.
6 7 8
9
HAZARDOUS VAPORS
1. Thin material as necessary.
(Seepage 5.) Remove and fill
container with material. Use a
filter to strain material if it is old.
2. Determine size of tip and needle
you will need by referring to
chart on page 5.
3. Select the proper Air Cap.
Black: Fine spray pattern.
Yellow: Wide spray pattern
4. Insert the pick-up tube into the
cylinder housing. See Page 6,
Figure B to determine orientation
of pick-up tube.
Black
Yell o w
1 2 3 4
5
1. Unplug sprayer, remove
container, and empty contents.
2. Fill sprayer with cleaning
solution, plug in sprayer, and
operate trigger until solution
comes through nozzle. Do not
submerge in liquid.
3. Remove parts. Clean and dry
thoroughly according to Step
Two of the Clean Up instructions.
(See page 8.)
1 2 3
See manual for grounding
instructions
5
SUPER FINISH MAX® SPRAYER (C800971) ENGLISH
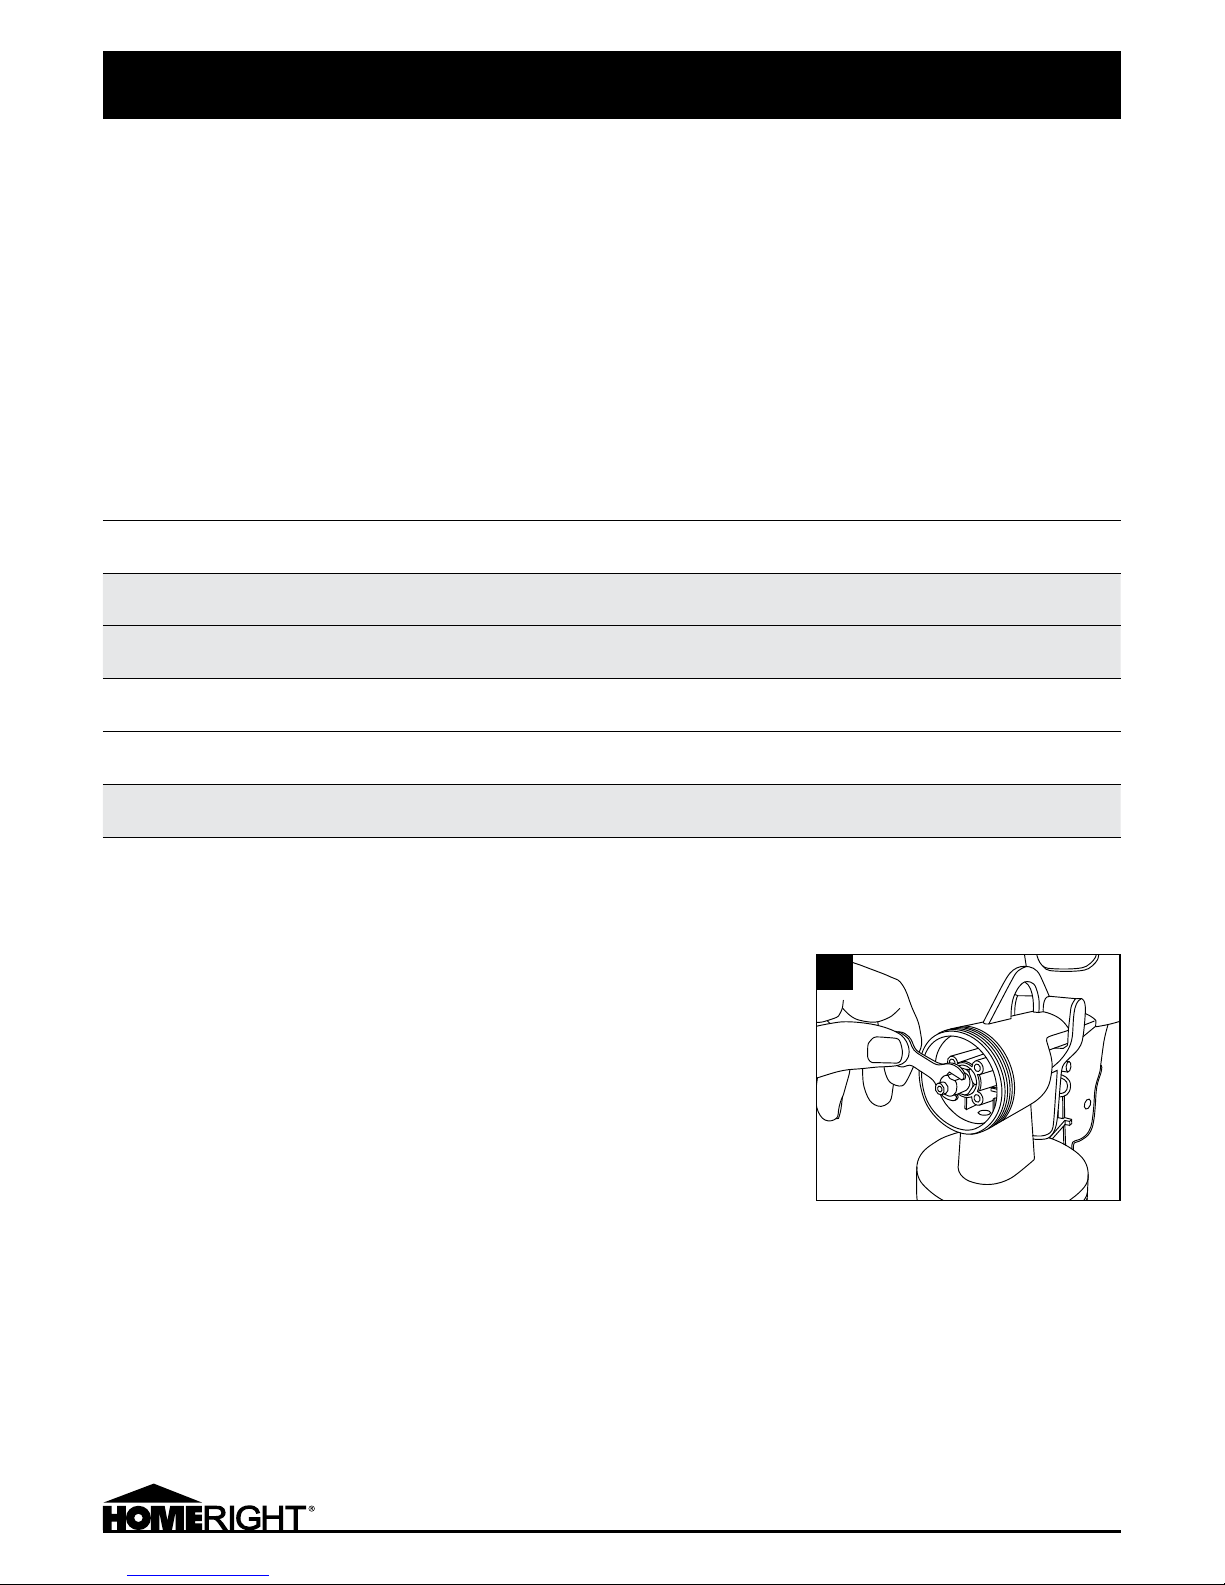
Use the included wrench to loosen the tip and
nozzle. Replace with desired tip and nozzle
and snug with wrench.
HOW TO USE
THINNING MATERIALS
In order for your sprayer to operate properly it is important to make sure the stain or
paint is thin enough to be sprayed. Thinning should be followed per the stain or paint
manufacturer’s guidelines. Because materials differ from brand to brand, this guide can
offer only general information. Always follow the coverage rate recommended by the
manufacturer regardless of the thinning required. Because there is a variance in viscosity
between paint and stain brands, it might be necessary to thin 5 to 15 percent to achieve
optimum spray pattern.
NOTES:
∙ Be sure pick-up tube is inserted tightly into the intake port.
∙ Thin material according to the procedure outlined above.
∙ Before each use, check the Brass Fluid Nozzle and Brass Fluid Needle for dried paint.
Keep Brass Fluid Needle clean.
∙ Always thoroughly clean the sprayer after each use.
(See CLEAN UP AND MAINTENANCE, page 8.)
∙ Turn control knob counterclockwise for less flow — see Page 6 Step 7 for more detail.
∙ Strain old paint or stain before using.
∙ Slowly stir paint or stain. To prevent air bubbles, do not shake stain or paint.
The Super Finish Max allows you the ultimate control for your spray pattern. With this unit you can change the spray tip set to adjust the flow of
material. You can also select a fine or wide air cap nozzle that also controls the flow of material for the sprayer. Dial in the actual spray pattern by
adjusting the flow control knob on the unit either + or – to your desired width. This allows you to use this sprayer for small detailed craft projects,
furniture or large fences and decks.
The sprayer comes with a 1.5 mm, 2.0 mm and 4.0 mm spray tip set. The spray tip sets are changeable with the wrench tool, simply turn the tip
counterclockwise to loosen the tip. Then use the other end of the tool to loosen the tip. Place the desired pin on the needle and then tighten or snug
with included wrench tool. Then place the matching (tips and pins are color coded) spray tip on and tighten with the tool. The sprayer comes with the
2.0 mm spray tip set installed and fine air cap.
Yellow Air Cap Nozzle = Wide spray pattern and is used for high production projects like large decks and fences.
Black Air Cap Nozzle = Fine spray pattern and is used for furniture, cabinets and anything requiring a fine finish.
Spray Tip
Set Size
Spray Tip
Set Color
Recommended Material**
Spray
Outcome
Project
Type
Air Cap
Nozzle
1.0 mm Orange Sealers and varnish
1-4" Spray pattern/
fine finish
Furniture and
woodworking projects
Black
1.5 mm* Blue Stains and polyurethane
1-6" Spray pattern/
fine finish
Furniture and
woodworking projects
Black
2.0 mm* Green
Latex paint, chalk type paint,
milk type paint
1-6" Spray pattern/
fine finish
Furniture and
cabinets
Black
2.5 mm Yellow
Latex paint, chalk type paint,
milk type paint
6-7" Spray pattern/
fine finish to medium finish
Furniture and
cabinets
Black
3.5 mm Black Primer and latex paint
8-10" Spray pattern/
medium finish
Walls, ceilings, decks
and fences
Yellow
4.0 mm* Red Primer and latex paint
10-12" Spray pattern/
medium finish
Walls, ceilings, decks
and fences
Yellow
*Included with Super Finish Max unit.
**Water and oil based materials can be used in the Super Finish Max.
A

6
SUPER FINISH MAX® SPRAYER (C800971) ENGLISH
HOW TO USE (CONTINUED)
PRACTICE FIRST
Practice spraying water on newspaper or cardboard. This will give you the feel of the sprayer and
familiarize you with its features. Follow the instructions for adjusting to the proper spraypattern.
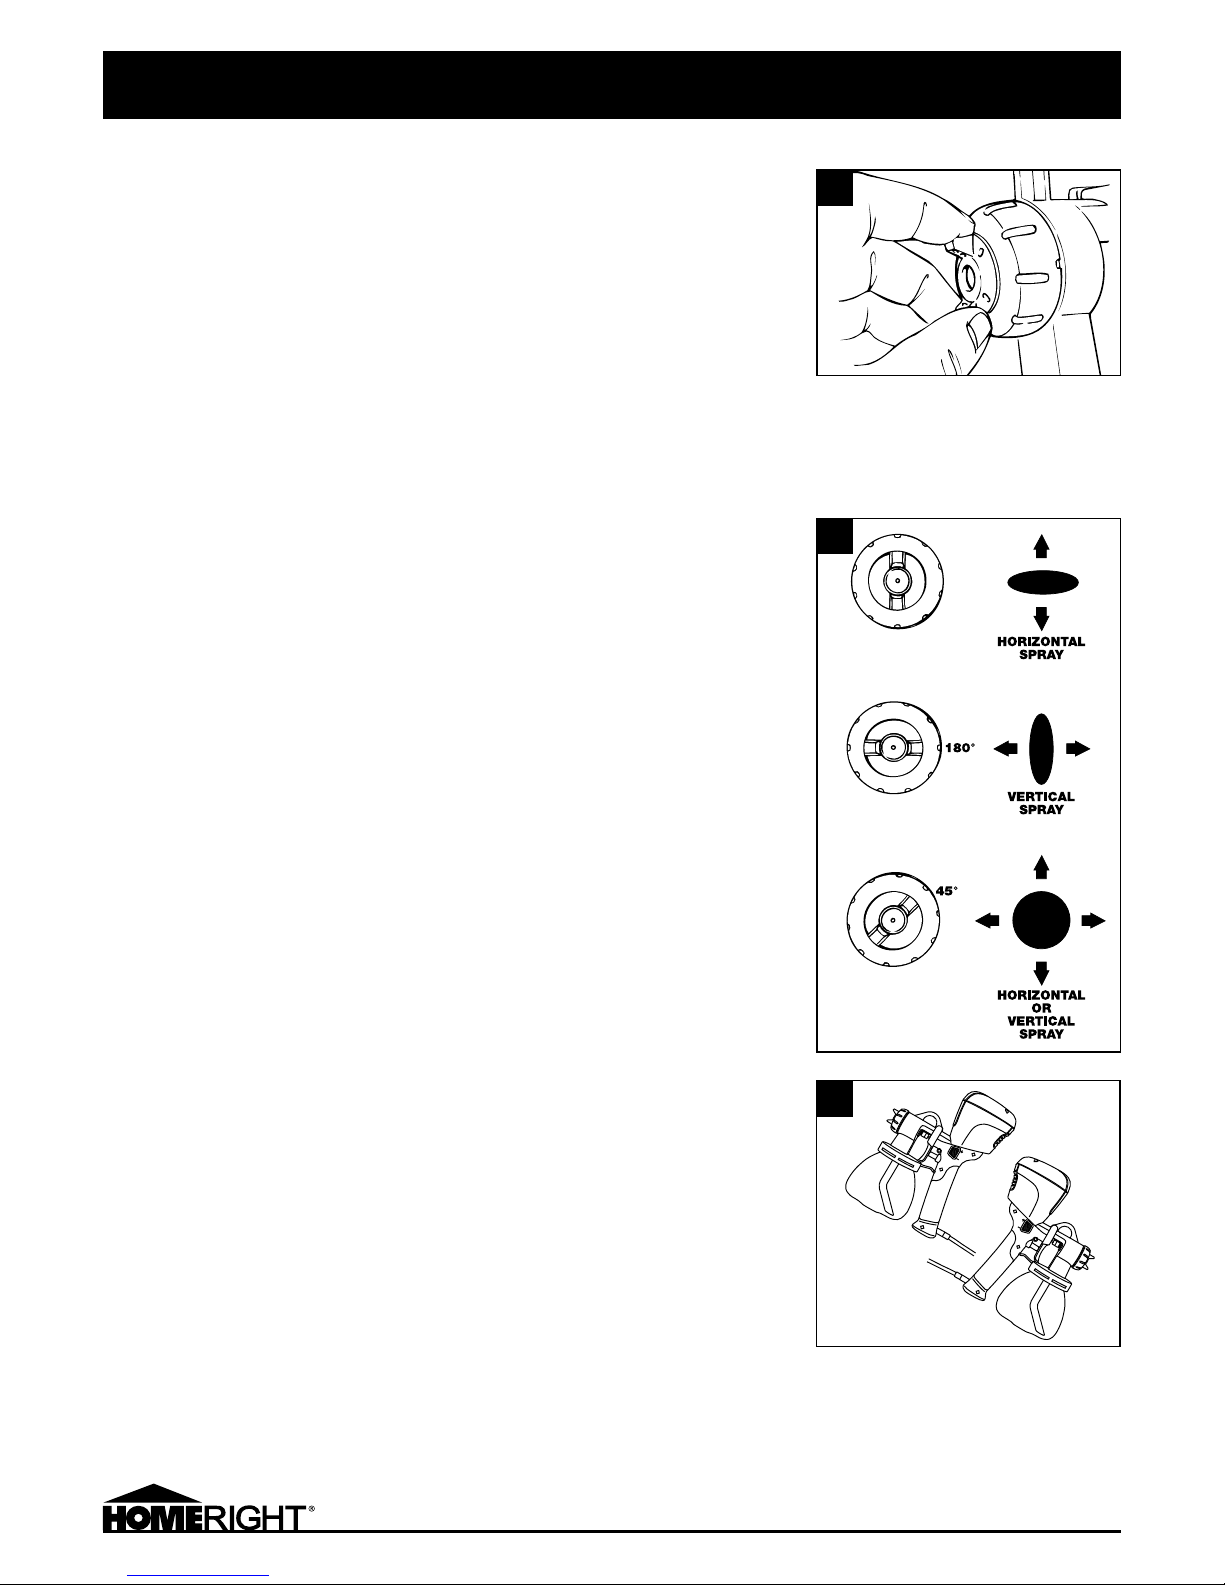
1. Make sure the spray tip is screwed on tightly. Familiarize yourself with the spray cap: Turn its
wings to adjust to a horizontal, vertical, or cone spray pattern. (See Figure A.)
2. Remove the container from the spray gun by turning it counterclockwise.
3. Firmly insert the pick-up tube. (See Figure B.) Place the pick-up tube with its angle pointing
forward if you’ll be spraying mostly in the downward direction, and place it facing backward
if you’ll be spraying mostly in an upward direction. This tube placement can be adjusted/
changed at any time during your project.
4. Fill the container with water and re-fasten it.
5. Plug in the sprayer.
6. Engage the trigger and wait a few seconds for the unit to start spraying the water.
7. Turn the volume control knob fully toward the + to get maximum flow. Then, turn it to – and
notice how the spray pattern changes in width and intensity. Adjust this knob until you get the
desired spray pattern. (See Figure C.)
NOTE: The best distance for spraying is 10 to 12 inches (see Figure D) from the surface you’re
spraying. Too far away may result in overspray (and wasted liquid), and too close may cause
liquid build-up (runs).
8. Keep a stiff wrist. Do not bend your wrist at the beginning or the end of the stroke.
(See Figure E.) Do not stop the motion of the unit while spraying. The path of the sprayer must
pass beyond the area being sprayed, and the switch must be triggered on and off as the
sprayer passes into and out of the spraying area. (See Figure F.)
NOTE: Stopping the motion of the sprayer or swinging into a new stroke pattern while spray is
being delivered will result in heavy spray build-up at the edges of the stroke.
SURFACE PREP
Thoroughly clean all objects and surfaces to be sprayed, before spraying material on them.
You may want to mask or cover areas not intended to be sprayed.
SMALL PROJECTS
This sprayer uses airflow to transfer liquid to the work piece. It is recommended that for
small projects, the user first tests the sprayer without adding liquid to the cup. The airflow may
cause small pieces to move or fall during operation. Use caution and good judgement before
spraying liquid.
A
C
12 inches
Correct Incorrect
Start Trigger Release End
F
E
D
B
7
SUPER FINISH MAX® SPRAYER (C800971) ENGLISH
ADJUSTING THE SPRAY PATTERN
By turning the wings of the tip, the Finish Max Super Fine Finish Sprayer sprays in one of three
patterns: horizontal, vertical, or cone. (See Figure D.) DO NOT engage the trigger while turning the
tip, and be sure not to spray toward you, as this could cause injury. (See Figure C & D)
SPRAYING INSTRUCTIONS
Caution: Do not twist electrical cord. Make sure heavy objects are not placed on it. Keep electrical
cord away from heat and sharp objects. To avoid a tripping hazard, make sure cord is not in a
heavy traffic area. Do not use the cord if it is damaged.
Use appropriate breathing protection, eye protection, gloves and clothing.
1. Make sure the container is empty and dry.
2. Pour paint or stain into the container.
3. Be sure the pick-up tube is inserted tightly in the intake port and the tube’s angle
is as you want it. (Figure E.)
4. Affix the container to the sprayer by turning the container counterclockwise.
5. Refer back to “Practice First” on page 6 and do this process again, this time to adjust the
flow rate not to the water you used to practice but to the material now in the container.
If, after making adjustments, you still are not satisfied with the spray pattern, refer to
TROUBLESHOOTING on page 9.
6. Hold the sprayer 10 to 12 inches from the surface to be painted. While the angled pick-up tube
permits you to spray in an upward or downward direction, try to tilt the sprayer as little as
possible. Do not tip more than 45 degrees when motor is switched off.
7. Overlap each stroke by about 1/3 of the spray pattern.
NOTE: If you stop spraying for 30 minutes or longer: Before continuing, retest the spray pattern
by spraying on newspaper or cardboard. If you are unable to adjust the spray pattern properly,
it is possible the stain or paint material has started to dry. If this happens, clean the sprayer.
See CLEAN UP INSTRUCTIONS.
NOTE: If the spray pattern still is not correct, you may need to thoroughly clean the spray tip and
pick-up tube. To keep the unit spraying properly, you should expect to clean it after dispensing
five to nine gallons of paint or stain. After cleaning, reassemble the parts.
HOW TO USE (CONTINUED)
C
DD
E
Two air cap choices
- Black: Fine spray pattern.
- Yellow: Wide spray pattern
8
SUPER FINISH MAX® SPRAYER (C800971) ENGLISH
NOTE: For easier and faster cleaning, consider purchasing the Rapid Clean Kit (C900042.M)
STEP ONE: CLEAN UP INSTRUCTIONS
NOTE: Proper clean up is essential to keep your sprayer in optimum working condition.
Driedby-products act like glue and will cause moving parts to stick. Failure to properly clean your
paint sprayer will damage the unit. Taking the time to clean your sprayer immediately after use
will help your sprayer last longer and work correctly. If you are finished with the project or are not
going to use the sprayer within the day, you must follow these instructions for proper clean up.
Never store the sprayer longer than 30 minutes without cleaning.
1. Unplug sprayer from electrical outlet and pull trigger on spray gun so material inside unit flows
back into the container.
2. Empty any remaining (stain or paint) material from the container.
3. Fill container approximately 1/2 full with appropriate cleaning solution. For latex, use
warm soapy water; for oil-based, use a cleaning solution recommended by the material
manufacturer.
4. Plug sprayer into an electrical outlet.
5. Press the switch of the sprayer until the cleaning solution passes through the spray nozzle for
several seconds. (See Figure A.)
6. Remove container and properly discard the cleaning solution.
7. Unplug the sprayer from the electrical outlet.
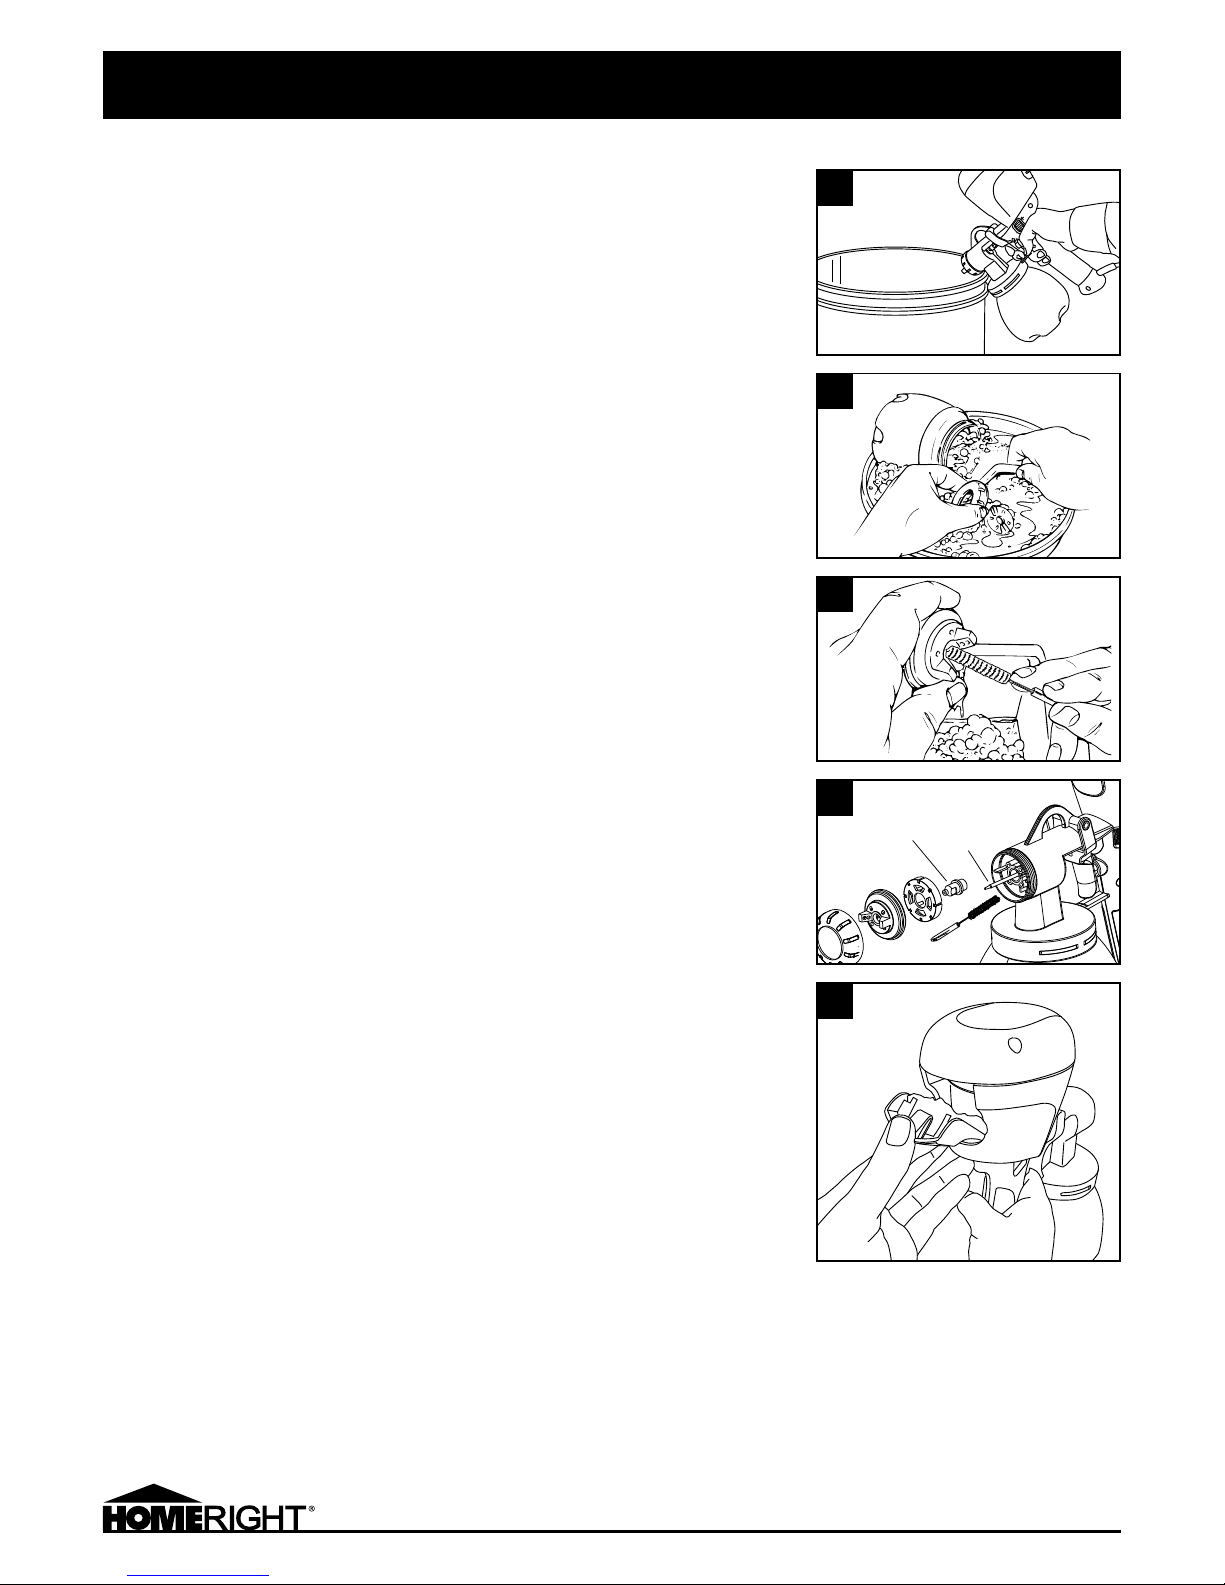
STEP TWO: CLEAN UP INSTRUCTIONS FOR THE SPRAY TIP
Use the brush (included) to complete the following steps.
1. Unplug sprayer from electrical outlet and pull trigger on spray gun so material inside unit flows
back into the container.
2. Unscrew the container and discard any remaining cleaning solution.
3. Remove the pick-up tube from the sprayer and clean it with warm, soapy water.*
(See Figure B.)
4. Unscrew the air cap ring, remove the winged spray cap and the inner spacer.
Clean all three with warm, soapy water.* (See Figure C.)
5. Clean the sealing ring found between the container and the housing with warm,
soapy water*.
6. Clean the Brass Fluid Nozzle housing and the unit with warm, soapy water.* Remove
the Brass Fluid Nozzle by unscrewing and clean around the brass needle with the brush
provided. (See Figure D.)
7. Let the components dry thoroughly and reassemble the unit.
8. Store the unit.
* If you’ve been using oil-based liquids, clean these parts with the liquid that the manufacturer recommends
(Example: mineral spirits).
MAINTENANCE
Air filters should be inspected periodically. If it is excessively dirty, follow these steps
to remove and replace: (Figure F.)
1. Keeping the sprayer upright at all times.
2. Replace filters (P/N C900088.M) and reinstall lid.
SERVICING A DOUBLE-INSULATED PRODUCT
In a double-insulated product, two systems of insulation are provided instead of grounding. No
grounding means is provided on a double insulated product, nor should a means of grounding
be added to the product. Servicing of a double-insulated product requires extreme care and
knowledge of the system and should only be done by qualified service personnel. Replacement
parts for a double-insulated product must be identical to those parts in theproduct.
CLEAN UP & MAINTENANCE
A
B
F
C
Brass
Fluid
Nozzle
Brass
Fluid
Needle
D

9
SUPER FINISH MAX® SPRAYER (C800971) ENGLISH
9
ENGLISH
TROUBLESHOOTING
PROBLEM CAUSE REMEDY
Sags or runs A. Too much paint.
B. Gun moving to slowly.
C. Paint too thin.
D. Gun held at incorrect angle or too close to painting
surface.
E. Spray overlaps too much.
A. Turn paint control knob counterclockwise.
B. Move gun faster.
C. Add unthinned paint to achieve correct time through
viscosity test cup.
D. Hold gun at right angle to the painting surface at a
distance of 10-12 inches.
E. Overlap spray by approximately 1/3 width of spray
pattern.
Dry spray A. Insufficient paint coming from the spray gun.
B. Gun held too far from surface.
C. Overspray from a preceding section when gun
is not held at right angle to painting surface.
D. Spray patterns not well overlapped.
A. Turn paint control knob clockwise.
B. Hold gun at a distance of 10-12 inches or closer for small
objects.
C. Hold gun at right angle to the painting surface.
D. Overlap spray by approximately 1/3 width of spray
pattern.
Striped or uneven coverage A. Gun tilted or not held at right angle to painting surface.
B. Dirt or burrs on air-cap or paint tip cause heavy top and
bottom pattern
C. Spray patterns not well overlapped.
A. Hold the gun at right angles to painting surface.
B. Clean or replace air-cap or paint tip.
C. Overlap spray by approximately 1/3 width of spray
pattern.
Spitting or spraying lumps A. Solid particles in paint
B. Loose paint tube.
A. Strain paint.
B. Ensure paint tube is firmly pushed into place.
Weak or no spray A. Low volume of paint from container due to blocked air
passageway in spray gun body.
B. Paint not thin enough.
C. Lid washer missing/dirty
A. Clean passageway.
B. Add the appropriate amount of solvent to the paint. Add
only a small amount of solvent to the paint at one time.
C. Replace/clean lid washer
Top-or bottom-heavy pattern or
heavy right or left side pattern
A. Air cap holes partially blocked.
B. Obstruction on paint tip or dirt on air cap seat
or paint tip seat.
A. Determine if obstruction is on air cap or paint tip by
making a test pattern, rotating air cap half turn, and
spraying another test pattern. If defect is inverted,
obstruction is on air cap.
B. Clean air cap with non-metallic instrument. If obstruction
is on paint tip, check for fine burring which can be
removed with 600 wet or dry sandpaper. For dried paint
inside, open and wash.
Fluttering spray A. Lack of paint.
B. Blocked paint passages.
C. Damaged paint nozzle or needle.
A. Refill container.
B. Clean.
C. Clean needle set or replace if necessary.
Paint leaking from guide nut A. Loose guide nut.
B. Worn guide washer.
A. Tighten guide nut.
B. Replace guide washer.
Paint leaking from front
of gun.
Needle not seated properly due to:
A. Worn or damaged paint nozzle.
B. Dirt or dried paint in nozzle.
C. Guide washer too tight preventing needle
from seating.
D. Broken spring.
E. Scored or damaged needle.
F. Leaking from container
A. Replace nozzle.
B. Clean nozzle.
C. Loosen guide washer.
D. Replace spring.
E. Replace needle.
F. Place petroleum jelly on top of the container where it
contacts the seal.

10
SUPER FINISH MAX® SPRAYER (C800971) ENGLISH
 Loading...