

Homeright STEAMMACHINE Instruction Manual
SteamMachine
Instruction Manual
WARNING
TO REDUCE THE RISK OF INJURY,
USER MUST READ INSTRUCTION MANUAL.
FOR HOUSEHOLD USE ONLY.
KEEP CHILDREN AWAY
FROM WORK AREA.
Customer Service
1-800-264-5442 or 763-780-5115,
8 a.m. to 5 p.m. CST.
English (page 1)
Français (page 15)
Español (página 29)
Contents
Important Safeguards 2
Quick Start Quick Reference Guide 4
Filling the Water Tank 5
Steam Gun Operation 6
Assembling and Attaching Accessories 7
Cleaning and Storage 10
Troubleshooting 12
Parts List 13
Made in China
SteamMachine
Register Online Today
To Activate Your Two-Year Warranty
Go online at www.homeright.com or scan the QR Code to the left. See back page for warranty details.
English
www.homeright.com
2
Safeguards and Warnings
Read and Follow All Safeguards
The SteamMachine is safe when properly used but can
be dangerous if misused. It is the responsibility of the
user to read and understand all instructions, IMPORTANT
SAFEGUARDS, and safety precautions before operating
the unit and to use the unit properly. Failure to do so may
result in product damage, personal injury or loss of life.
DO NOT try to repair (or disassemble) the unit yourself.
Repairs should be performed by a qualified technician
familiar with this unit or returned to HomeRight™ (see
warranty). This unit is to be used with authorized parts
only. The user assumes all risks and liabilities when
operating the unit with parts that do not comply with
the manufacturers specifications.
Warnings
• DO NOT operate the unit without water in the tank.
• DO NOT overfill the water tank. The unit can hold a
maximum of 40 oz. of water. Over filling the water tank
may cause damage to the machine and injury to the
operator.
• DO NOT fill the water tank with any fluid other than
water. Other cleaning agents could damage unit or
cause injury. Distilled or de-mineralized water is HIGHLY
RECOMMENDED in order to minimize build-up of
mineral deposits.
• DO NOT run the unit for more than 1 hour at a time.
• DO NOT allow machine to run unattended at any time.
• DO NOT direct steam at people, animals or electrical
devices.
• DO NOT touch main nozzle or attempt to connect
attachments while unit is in use.
• DO NOT attempt to use the steam plate included
with this unit as a cleaning devise. The steam plate is
designed for wallpaper removal only.
• DO NOT touch bottom of brush head or attempt
to attach a cleaning pad while unit is in use.
• DO NOT turn the machine over or tilt more than 45°
when it is switched on or if it is still producing steam.
• DO NOT operate with a damaged cord, if the power
cord is damaged it should be repaired by a qualified
electrician.
• DO NOT pull or carry the SteamMachine by its cord.
• DO NOT unplug by pulling on cord. Always grasp the
plug, not the cord.
• DO NOT expose machine to freezing temperatures.
• NEVER operate without the safety cap screwed tightly in
place.
• NEVER unscrew or attempt to remove the tank/pressure
safety cap while the unit is in use.
• NEVER use this machine to clean electronic devices.
• NEVER leave brush in one spot on any surface for more
than a few seconds – prolonged exposure to heat and
moisture may damage surfaces.
• ALWAYS unplug unit when not in use.
• ALWAYS turn unit off before unplugging from outlets.
• ALWAYS turn unit off and unplug power cord before
filling water tank.
• ALWAYS allow 10 minutes for the unit to cool before
removing the tank cap to refill the unit.
• ALWAYS allow the unit to completely cool (at least
20 minutes) before storing.
Caution
If there is a lot of steam emission from the fill cap, please
switch off and unplug the unit at once. The SteamMachine
should be checked and repaired by service agent.
Hazard
HOT STEAM AND PARTS.
May cause injury, including skin burns
or property damage. Temperatures
exceed 212˚ F (100˚ C).
FIRE.
May cause severe injury and/or
property damage.
ELECTRICAL SHOCK.
May cause severe injury.

www.homeright.com
English
3
Safeguards and Warnings
Cleaning Fabrics:
A number of materials and fabrics are NOT suitable to be
cleaned by steam:
DO NOT use on leather, wax polished furniture or floors,
synthetic fabrics, velvet, Dralon® or other delicate, steam
sensitive materials.
When steaming any surface for the first time, it is
recommended that you consult the manufacture’s
guidelines for cleaning.
Cleaning Glass/Mirrors:
Thermal shock can also shatter glass. Do not apply steam
to glass surfaces that are cooler than 32°F.
Electrical Connections
• DO use a three-pronged extension cord that is at least
18 gauge.
• DO only plug the cord or extension cord into a threepronged grounded power supply.
• To prevent electrical shock, NEVER immerse the
SteamMachine into water or other liquids
Prop 65 Warning
Handling the coated electrical wires of this product
exposes you to lead, a chemical known to the State of
California to cause birth defects or other reproductive
harm. Wash hands after use.
Grounding Instructions
The product must be grounded. In the event of an
electrical short circuit, grounding reduces the risk of
electrical shock by providing an escape wire for the
electric current. This product is equipped with a cord
having a grounding wire with an appropriate grounding
plug. The plug must be plugged into an appropriate
outlet that is properly installed and grounded in
accordance with all local codes and ordinances.
Warning
DANGER - Improper use of the grounding plug can result
in a risk of electric shock.
If repair or replacement of the cord or plug is necessary,
do not connect the grounding wire to either flat blade
terminal. The grounding wire has green insulation, with or
without yellow stripes. Check with a qualified electrician
or serviceman if the grounding instructions are not
completely understood, or if in doubt as to whether the
product is properly grounded. Do not modify the plug
provided; if it will not fit the outlet, have the proper outlet
installed by a qualified electrician. This product is for use
on a nominal 120 volt circuit and has a grounding plug that
looks like the plug illustrated in Figure A.
Make sure the product is connected to an outlet having
the same configuration as the plug. A temporary adaptor,
which looks like the adaptor illustrated in Figure B, may
be used to connect the plug to a two-pole receptacle
as shown in Figure B if a properly grounded outlet is not
available. The temporary adaptor should only be used until
a properly grounded outlet (Figure A) can be installed by
a qualified electrician. The green colored rigid ear plug or
the like extending from the adaptor must be connected to
a permanent ground such as a properly grounded outlet
box cover. Whenever the adaptor is used, it must be held
in place by a metal screw.
Extension Cords
Use only a three-pronged extension cord that has a threeblade grounding plug and a three-slot receptacle that will
accept the plug on the product. Make sure your extension
cord is UL/ETL/CSA listed and is in good condition. When
using an extension cord, be sure to use one heavy enough
for the current. For lengths less than 18 feet, use a No. 18
AWG or heavier; for lengths more than 18 feet but less
than 25 feet, use No. 16 AWG; for lengths more than 25
feet, use No. 14 AWG or heavier. If in doubt, use a heavier
gauge. An undersized cord will cause a drop in line voltage
resulting in loss of power and overheating which can
damage the unit or extension cord.
Storage
Make sure unit is clean and dry before storing. Store in a
dry location. To prevent damage, the electrical cord should
not be crimped during storage.
Grounded
Outlet
Grounded
Outlet Box
Adapter
Tab and
Grounding
Screw
A B

English
www.homeright.com
4
Quick Start Reference Guide
This is only a quick reference. Read the entire instruction manual prior to using the product.
Read all warnings and safety instructions in the instruction manual before use.
1 2 3
Fill the tank using the funnel and measuring cup
provided. The tank holds up to 40 oz. /1200ml of
water. DO NOT overfill the water tank or damage
to the product may occur.
Unscrew the safety cap by turning counter
clockwise.
Once full replace the safety cap by turning
clockwise, fasten tightly.
Red
Red
Orange
8
4 5 6
7
Attach the necessary cleaning adaptor and
accessory to the steam gun nozzle.
Plug the machine into the outlet and press the
ON/OFF button to ON.
Allow approximately 8 minutes for the machine
to build up steam pressure.
The Red power light and Orange steam light,
indicating that the machine is building steam,
should both illuminate.
8
Once the orange steam pressure light turns off,
the machine is ready to use.
www.homeright.com
English
5
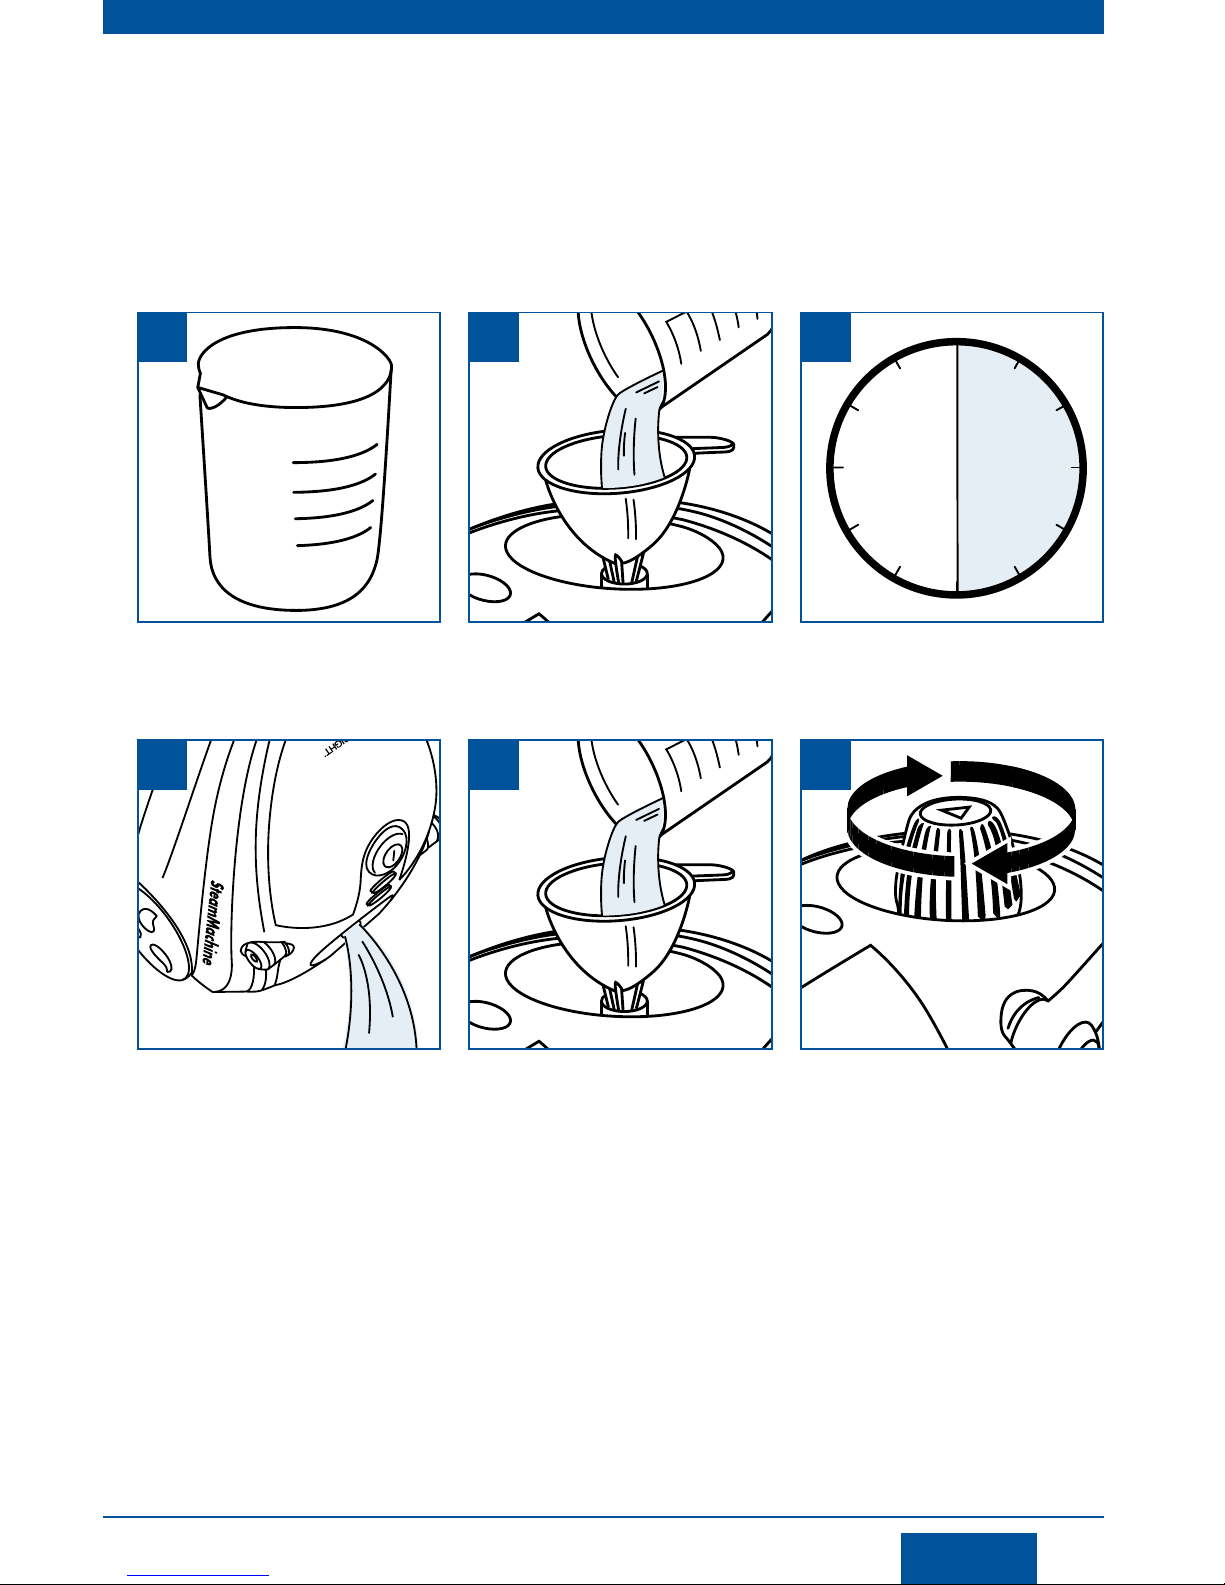
Filling the Water Tank
Refilling the Water Tank
Water Usage and Steam Time Guidelines
NEVER fill the tank while the machine is plugged in.
If the unit has been in use, ALWAYS follow these safety precautions before removing the water tank safety cap:
• Switch the unit to the OFF position and unplug the unit. Allow at least 10 minutes for the unit to cool.
• Release all the steam in the unit by pressing the steam nozzle flow trigger (the red safety switch must be in
the ON position).
WARNING: Failure to follow these precautions may result in burns from escaping steam
when the water tank safety cap is removed.
NOTE: Cap will not unscrew until unit is cool.
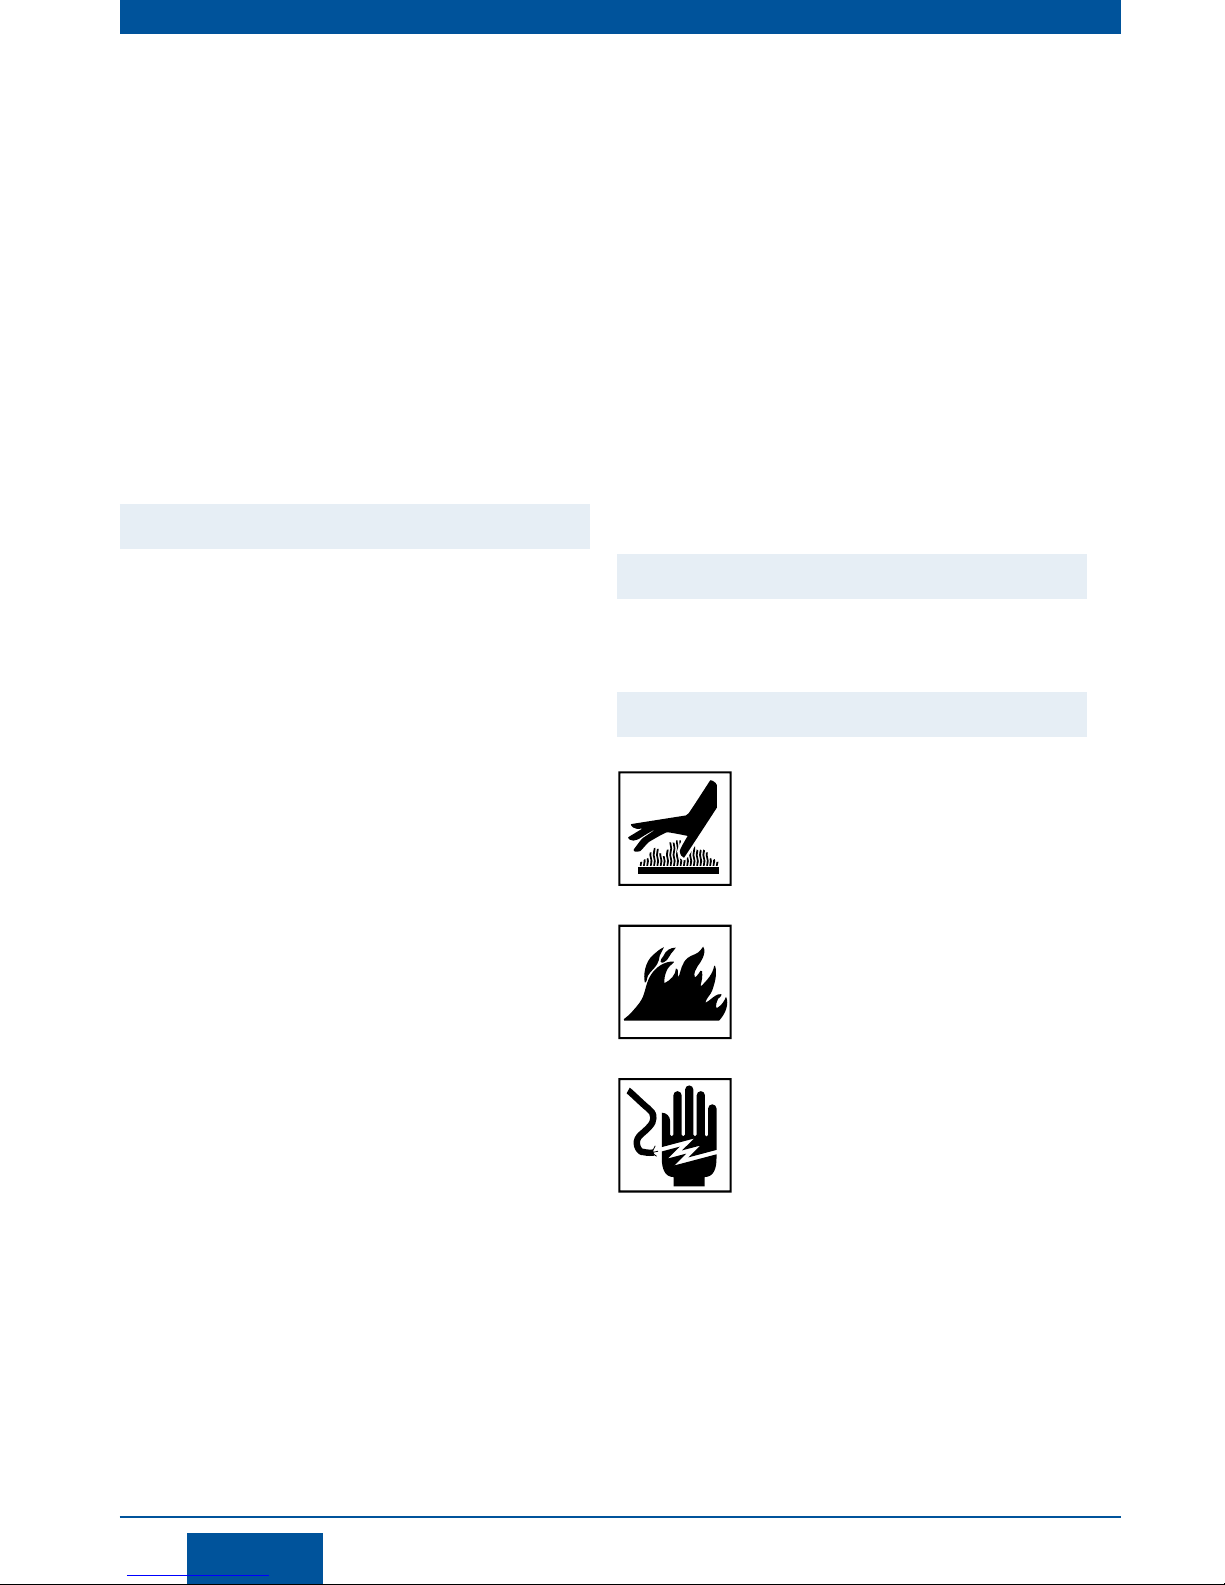
1 2 3
Fill the tank using the funnel and measuring cup
provided. The tank holds up to 40 oz. /1200ml
of water DO NOT overfill the water tank.
Unscrew the safety cap. Fasten the safety cap tightly into place.
Amount of Water Duration of Steam
13 oz. / 400ml Approximately 15 min.
26 oz. / 800ml Approximately 30 min.
40 oz. / 1200ml Approximately 45 min.
English
www.homeright.com
6
Steam Gun Operation
Rebuilding Steam Pressure While in Use
ON
TRIGGER
A
ON
TRIGGER
OFF/LOCK
TRIGGER
B
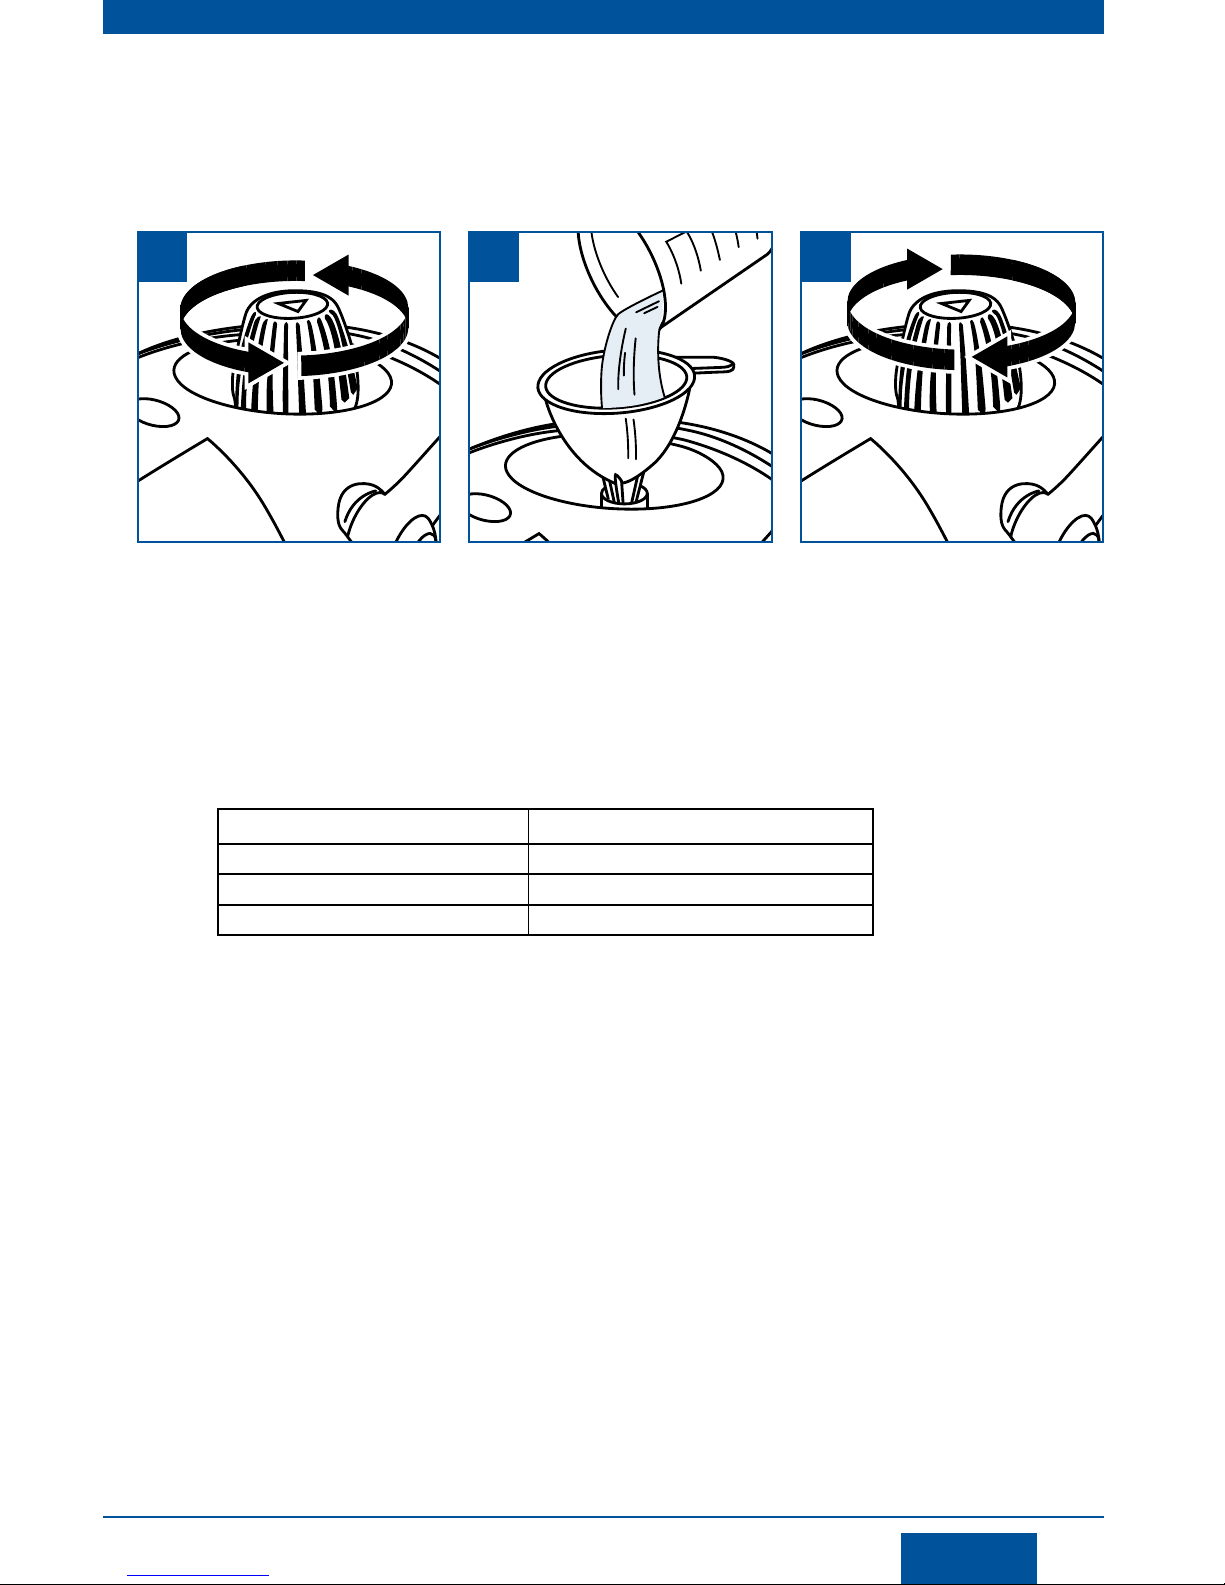
1 2 3
For continuous steam generation:
(A) Press the red safety switch to the ON
position. Hold down the steam trigger.
The steam output is controlled through the
steam gun. The gun has both a steam trigger
and red safety switch.
For intermittent steam generation press the red
safety switch to the ON position. Pull the trigger
to release steam.
(B) While holding down the trigger, press the
safety switch to LOCK. The trigger is now
locked into continuous steam mode.
To unlock from continuous steam mode, press
the red safety switch to the ON position.
WARNING:
Burns can occur from hot water or steam.
DO NOT touch the steam nozzle or attempt to
connect accessories while unit is in use.
NEVER direct the steam at a person, pet or
electrical device.
OFF
LOCK
ON
OFF
LOCK
ON
2
Red
Orange
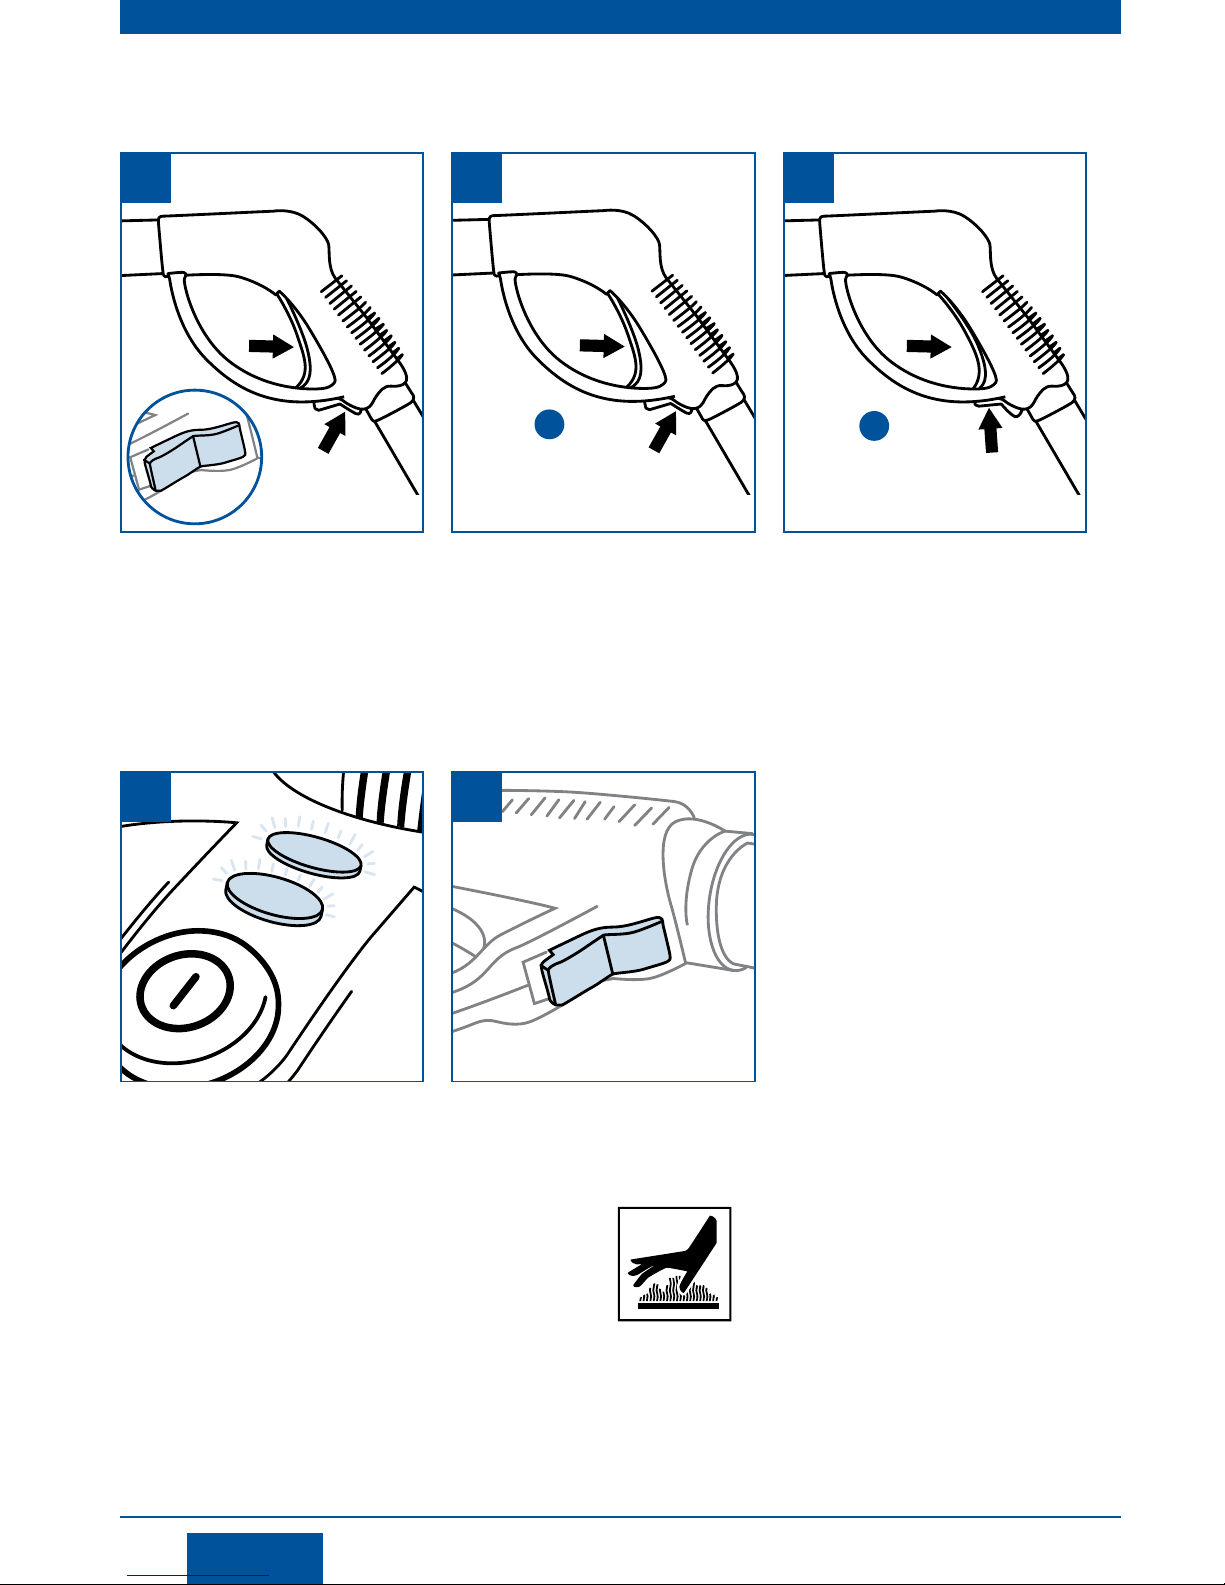
If the orange steam light comes on during use, it
indicates the machine needs to re-build pressure
in the tank.
Make sure the trigger on the steam gun is in
the open position and the switch is in the OFF
position. It should take approximately 40 seconds
to re-build pressure.
1
HAZARD:
HOT STEAM AND PARTS.
May cause injury, including skin burns
or property damage. Temperatures
exceed 212˚ F (100˚ C).

www.homeright.com
English
7
Assembling and Attaching Accessories
Steam Plate Assembly
NOTE: The steam plate MUST BE assembled before use.
Attaching the Steam Plate to the Steam Gun
Wallpaper Removal
Hold steam plate flat against wallpaper for 20 -30 seconds.
Remove steam plate and scrape steamed section of wallpaper.
Note: For best results it may be helpful to score wallpaper before steaming.
2
Slide the adaptor over the nozzle, aligning the
oval hole with the lock/release button on the
nozzle. Push the button to allow the attachment
to slide into place.
1
The Steam Plate adaptor will attach to either
the steam gun nozzle or extension wand.
Adapter
Diffuser
Disfusing
Slot
Bottom of Plate
1 2
Insert adaptor into opening on the topside of the
plate. Oval shaped opening should face up on
adapter.
Turn steam plate over. Connect diffuser to
adpater. Make certain steam disfusing slot is
facing down toward plate. Firmly attach with
screws.
English
www.homeright.com
8
Assembling and Attaching Accessories
Cleaning with the Attachments
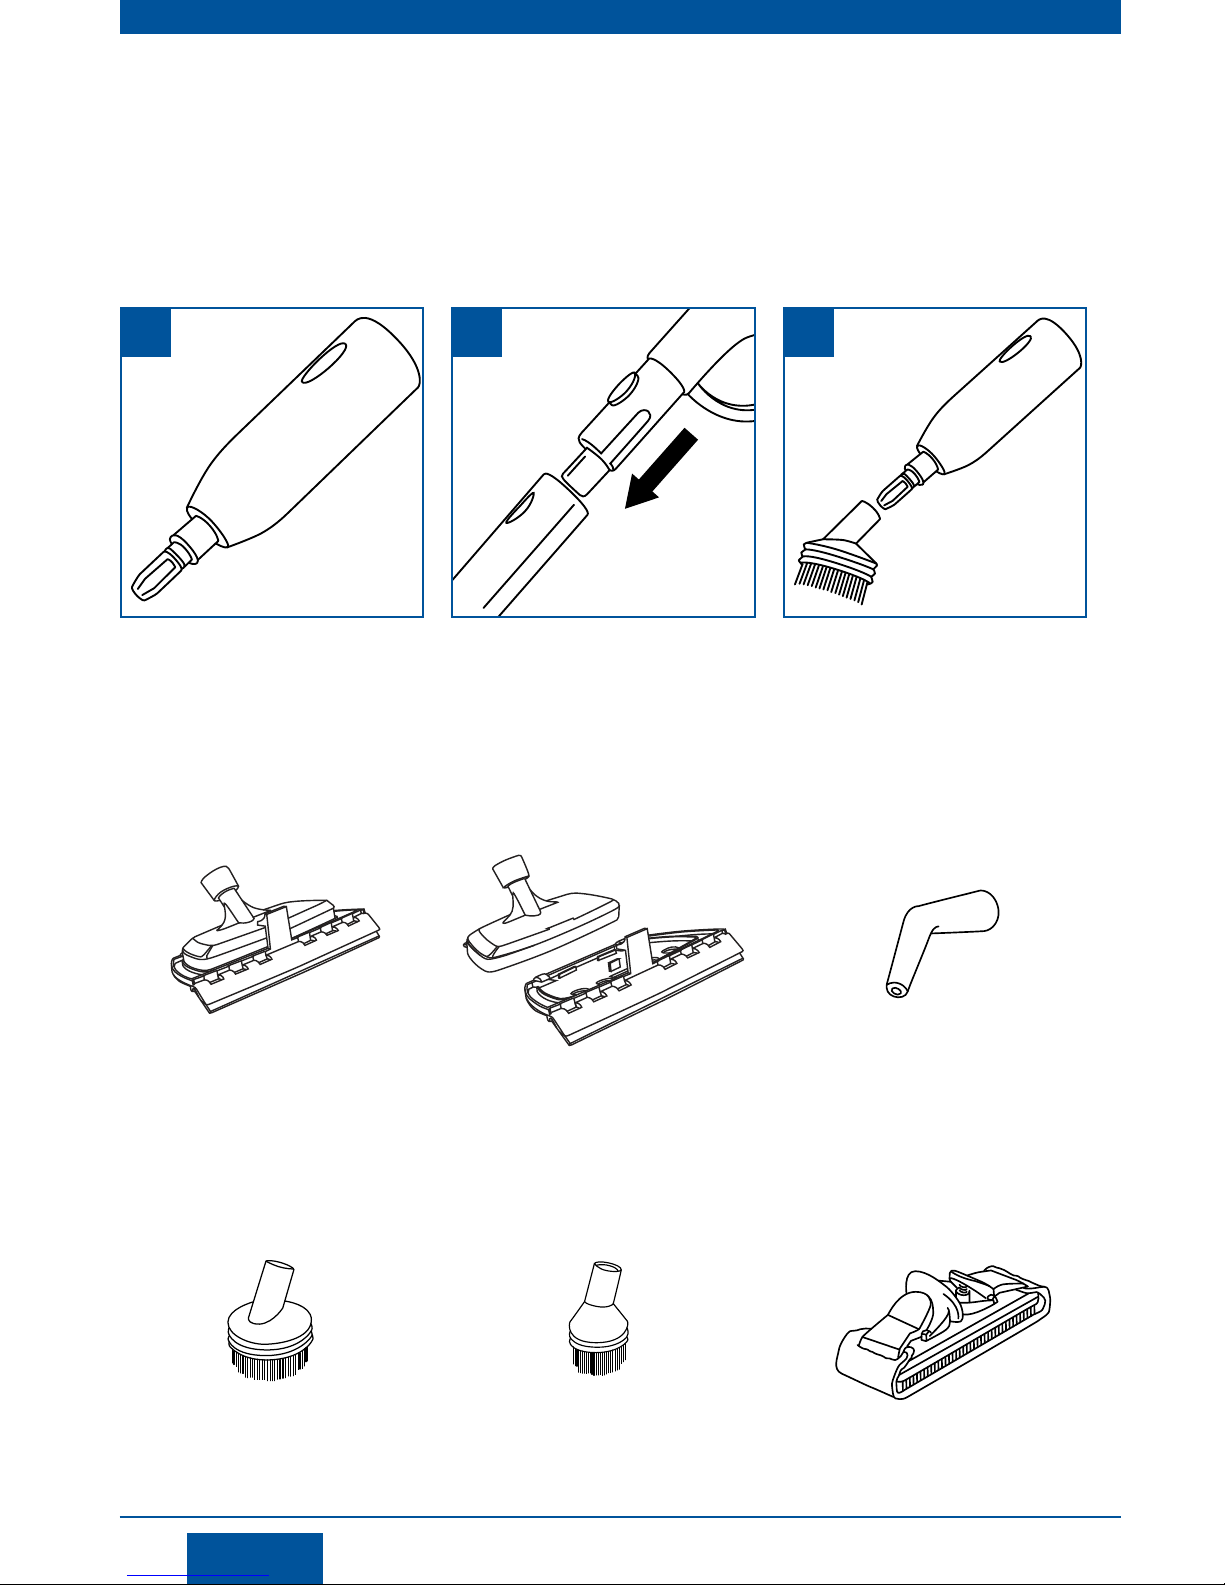
Attaching the Squeegee, Jet Nozzle and Utility Brushes to the
Steam Nozzle
NOTE: The straight adaptor is used to attach all accessories to the steam gun with the exception of the Large Brush.
ALWAYS attach accessories before turning the unit on.
2
Slide the straight adaptor over the steam
gun nozzle, align the oval hole with the lock/
release button and push the button to allow the
attachment to slide into place.
3
Slide the accessory onto the straight adaptor.
1
Use the straight adaptor to attach accessories
to the steam gun nozzle.
Squeegee Fabric Steamer
Brass Brush
Jet Nozzle
Large Cleaning BrushNylon Brush
The squeegee is an excellent tool for cleaning
bathroom shower doors and walls, fireplace
doors and windows. Do not use on glass when
temperature is below 32˚ F (0˚ C). Glass may
crack in cold temperatures.
Remove the rubber lip and use for garment
steaming and for killing dust mites in matresses.
The jet nozzle can be used to disinfect
bathroom and kitchen fixtures and hard
to reach places.
The brass brush can be used to remove grease
and grime found on grills and ovens.
The nylon brush can be used in hard to reach
areas around sink and bathroom faucets.
The large cleaning brush and cleaning cloth can
be used to clean marble and granite countertops
and ceramic tile, vinyl and linoleum floors.
www.homeright.com
English
9
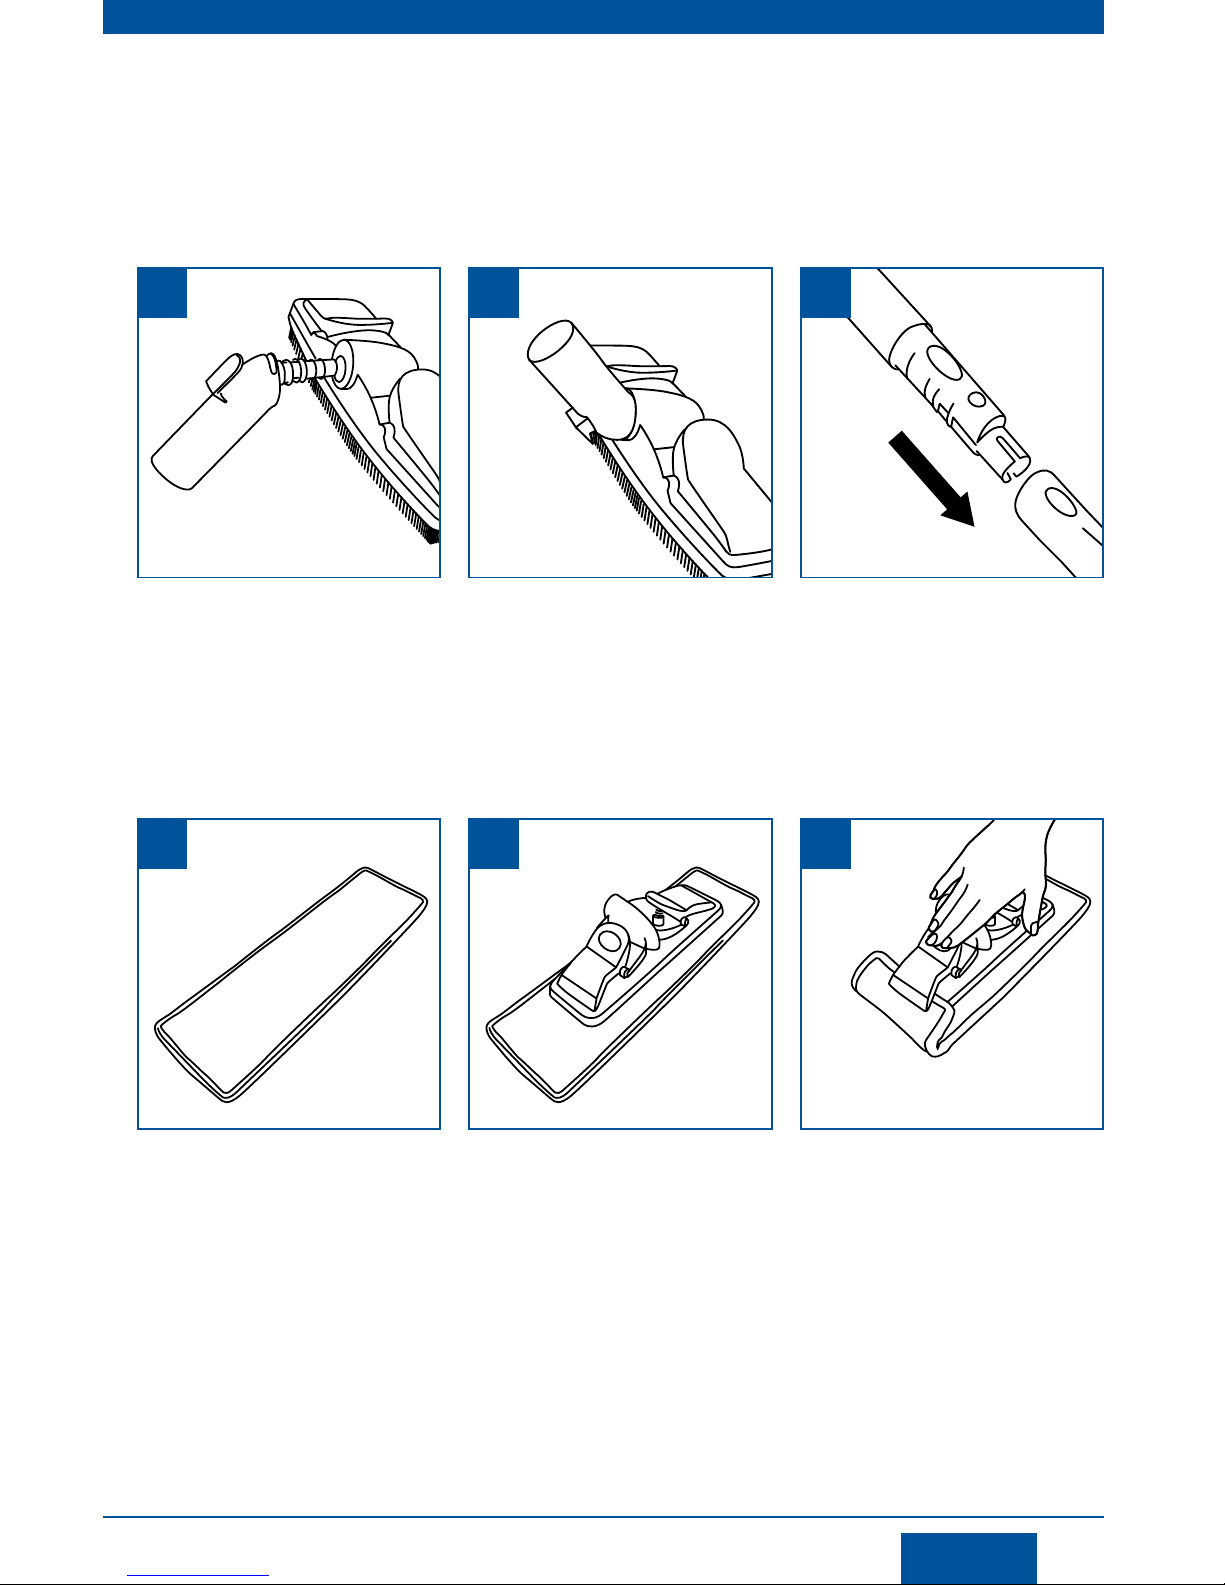
Assembling and Attaching Accessories
Attaching Large Brush, Angled Adaptor, Extension Wands
and Cleaning Cloth
ALWAYS attach accessories before turning the unit on.
Cleaning Cloth
Never remove the cleaning cloth while the machine is in operation or warm to the touch.
The Large Brush and Cleaning Cloth are
perfect for use on these hard floor surfaces:
• Stained Concrete
• Linoleum
• Marble
• Granite
• Ceramic Tile
• Vinyl
WARNING: Do not use on unsealed hard wood, laminate
flooring or unglazed ceramic surfaces. Surfaces that are not
properly sealed may be warped or damaged by exposure to
heat and moisture. Always test a small area before beginning.
2
2
3
3
Rotate the adaptor 90° to set into place.
Align the Brush adaptor with the end of the
Extension Wand so that the oval hole on the
adaptor aligns with the lock/release button on
the Wand.
Place the large Brush over the cleaning cloth.
Press down on the lock/release button. While
continuing to hold button down, slide Brush
Head adaptor onto Extension Wand. Press firmly
until button snaps into hole.
Press down on a clip on the bush and fold the
end of the cloth beneath the clip. Release the
clip to fasten the cloth into place. Repeat for the
opposite side.
1
1
Slide the angled adaptor into the Large Brush
receptacle. The adaptor must be angled down.
Lay one cleaning cloth on a flat surface.

English
www.homeright.com
10
Cleaning and Storage
ON
TRIGGER
OFF/LOCK
20
SteamMachine
1
4
2
5
3
6
Release all remaining steam from tank by
pressing the steam nozzle flow trigger (the Red
safety switch must be in the ON position).
Drain any remaining water from the tank.
NEVER store the unit with water in the tank.
Set the ON/OFF switch to off and unplug the
power cord from the electrical outlet.
Lock the steam nozzle flow trigger into the
off position and remove all accessories from
the trigger.
Allow the unit to completely cool
(at least 20 minutes).
Wipe the unit with a cloth and store in a cool,
dry location.
OFF
LOCK
ON
OFF
LOCK
ON
www.homeright.com
English
11
Mineral Build-Up
30
1
4
2
5
3
6
Use the funnel to pour the solution into the
water tank.
Rinse water tank with fresh water and repeat
steps 1 though 5 until vinegar odor dissipates.
Use a measuring cup to mix 8 oz. of vinegar an
8 oz of water.
Drain the water-vinegar solution from the tank.
Allow to stand for 30 minutes.
Replace the water tank safety cap and store in
a cool, dry location.
If your municipal water supply contains high mineral content it is HIGHLY RECOMMENDED to use distilled or de-mineralized
water when using your SteamMachine. If you are unable to use distilled water it is recommended to employ the following
cleaning procedure prior to storing the unit.
WARNING: NEVER clean the water tank while the unit is plugged into an outlet.

English
www.homeright.com
12
Troubleshooting
PROBLEM CAUSE REMEDY
1. Unit fails to heat up.
Red Power light DOES
NOT illuminate when
ON/OFF switch is set
to ON.
A. Unit is not plugged in.
B. Loose electrical connection.
C. Unit is damaged or in need of repair.
A. Check wall outlet.
B. Discontinue use and call Customer Service.
C. Call Customer Service.
2. Unit fails to heat up.
Red Power light DOES
illuminate when ON/
OFF switch is on.
A. Water tank is empty.
B. Mineral build-up in unit.
C. Unit is damaged or in need of repair.
A. Refer to Filling Water Tank procedure on Page 5.
B. Refer to Mineral Build-up section on page 11 for
cleaning procedure.
C. Call customer service.
3. Steam output is weak
or intermittent
A. Water level in tank is running low.
B. Steam hose may be kinked.
C. Mineral build-up in unit.
A. Refer to Filling Water Tank procedure on Page 5.
B. Remove kinks from steam hose.
C. Refer to Mineral Build-up section on page 11 for
cleaning procedure.
4. Excessive amounts of
water in steam
NOTE:
The SteamMachine produces a
great deal of steam. The steam
may condense as water or water
droplets in the steam hose and
tools and nozzle, which are then
expelled when used after a period
of cooling. This is normal and not a
cause for concern.
A. Water condensation in steam hose.
B. Water tank has been over filled.
C. Unit has not heated to full operating temperature.
A. Point nozzle towards sink, and shake while pressing
steam trigger.
B. Filling the water tank with more than 40 oz/ 1200 ml
of water interferes with steam production resulting in
water condensation. Turn unit off, let it cool and drain
some water out of tank.
C. Wait until Orange steam pressure indication light has
turned off.
5. Accessories do not stay
firmly connected to
main nozzle
A. Accessories are not properly installed. A. Refer to accessory installation on pages 7-9.
6. Floor surfaces appear
to have streaks after
cleaning
A. Cleaning pad is dirty.
B. Hard water residue on the floor.
A. Replace the cleaning pad with a clean one.
B. Switch to distilled or de-mineralized water.
www.homeright.com
English
13
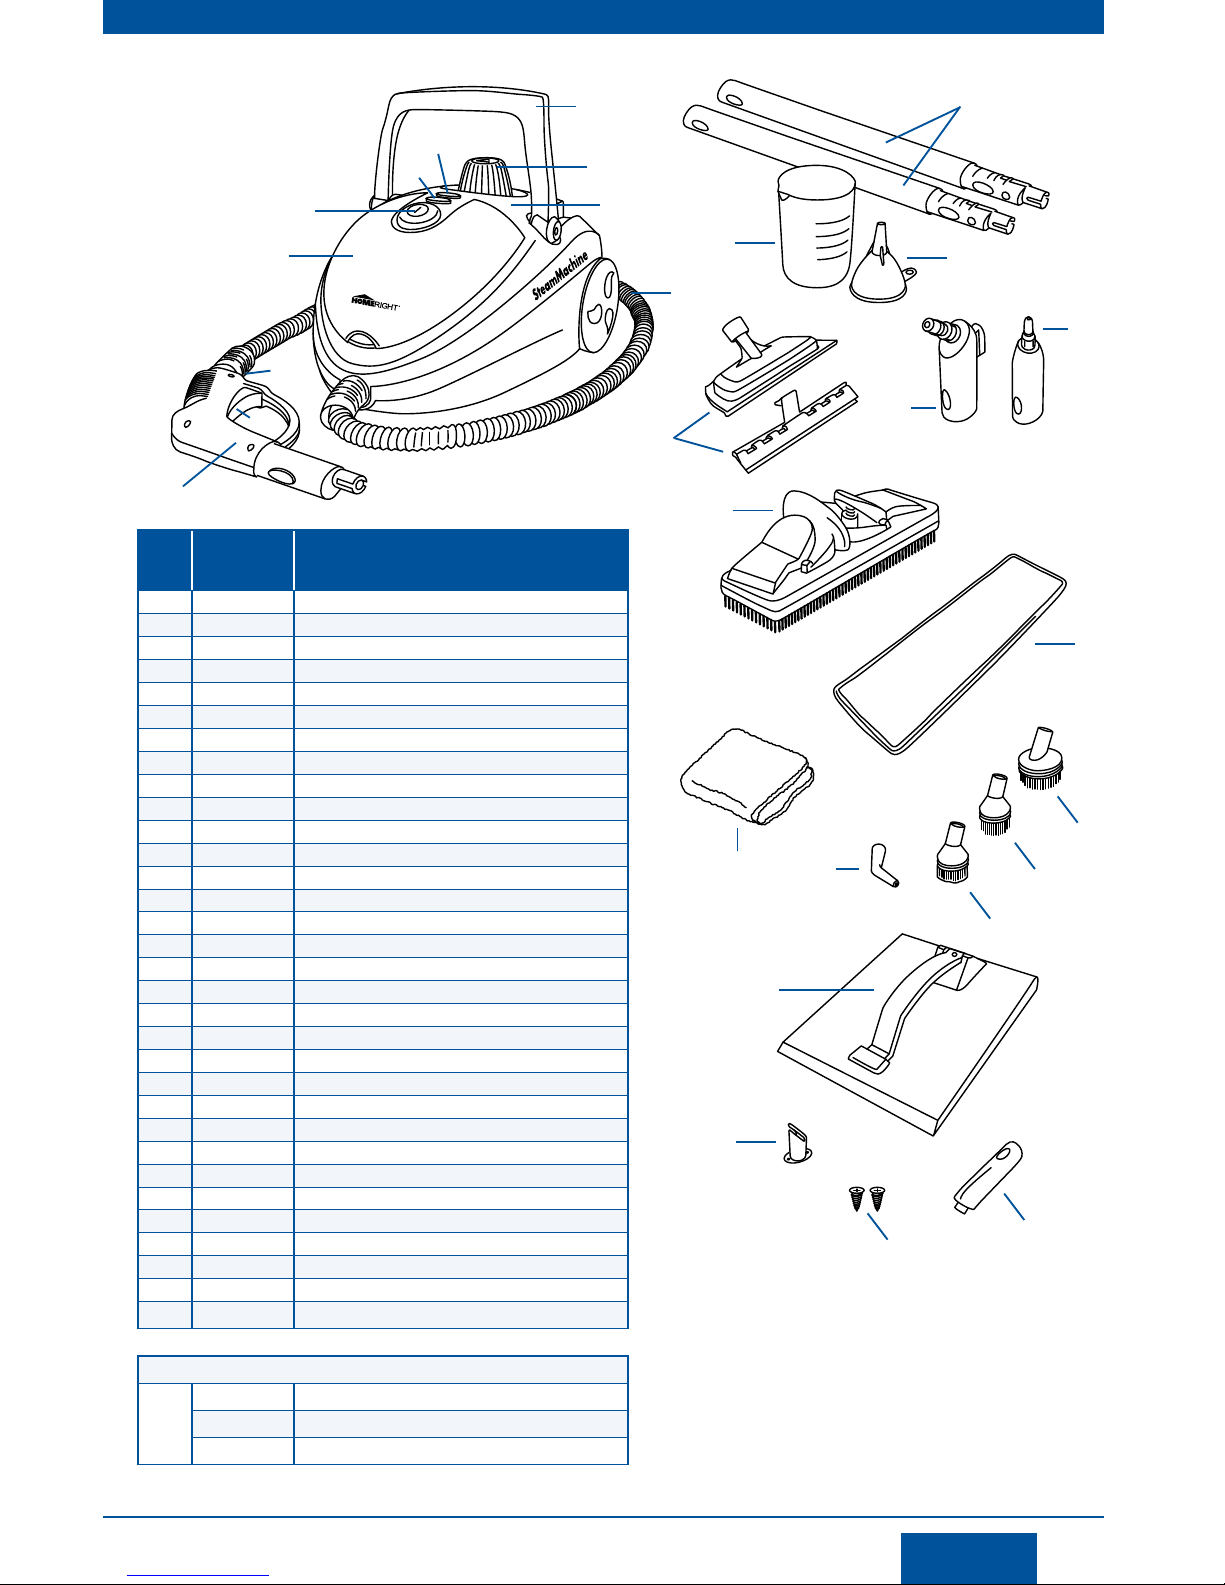
Parts List
HomeRight
1661 94th Lane N.E.
Minneapolis, Minnesota 55449-4324
Phone: 763-780-5115 • 1-800-264-5442
8:00 a.m. to 5:00 p.m. CST.
If you cannot obtain parts and accessories at your local retail
dealer, call or visit homeright.com
Item
Customer
Service
Part No. Description
1 — Steam Gun
1a — Steam Flow Trigger
1b — Steam Lock Switch
2 — Accessory storage area (internal)
3 — ON/OFF Button
4 — Red Operating Light
5 — Orange Steam Generation Light
6 — Carrying Handle
7 — Water Tank Cap
8 — Water Tank (internal)
9 — Steam Hose
10 C817558 Measuring Cup
11 C817557 Funnel
12 C817552 Extension Wands (2)
13 C817522 Squeegee and Fabric Steamer
14 C817520 Angled Adaptor for Large Brush
15 C817519 Straight Adaptor
16 C817523 Large Cleaning Brush
17 C800937.M Microfiber Pad for Large Cleaning Brush
18 — Microfiber Cleaning Towel
18a C800944.M Microfiber Cleaning Towel – 3 Pack
19 C817524 Jet Nozzle
20 — Small Brass Utility Brush
20a C800945.M Small Brass Utility Brush – 5 Pack
21 — Small Nylon Utility Brush
21a C800947.M Small Nylon Utility Brush – 5 Pack
22 — Large Nylon Utility Brush
22a C800948.M Large Nylon Utility Brush – 5 Pack
23 C800893 Wallpaper Steam Plate Assembled
23a — Diffuser for Steam Plate
23b — Screws for Steam Plate Diffuser (2)
23c — Attachment Adaptor for Steam Plate
ADDITIONAL ACCESSORIES
Not
Shown
C817755 Fabric Bonnet for Fabric Steamer – 1 Pack
C800938.M Chenille Mop Pad – 1 Pack
C800946.M Large Brass Brush – 5 Pack
1b
1
2
6
9
10
11
13
14
15
17
18
19
23c
23b
22
20
21
16
23a
23
12
8
7
3
4
5
1a

 Loading...