

Homeright PaintStick EZ-Twist Instruction Manual
®
PaintStick® EZ-Twist
Instruction Manual
WARNING: FOR HOUSEHOLD USE ONLY. To reduce the risk of injury, it is the responsibility of the user to read and
understand all instructions before using the PaintStick EZ-Twist. For Customer Service in Canada or US, call: 763-780-5115
or 1-800-264-5442, 7:30 am to 4:30 pm CST.
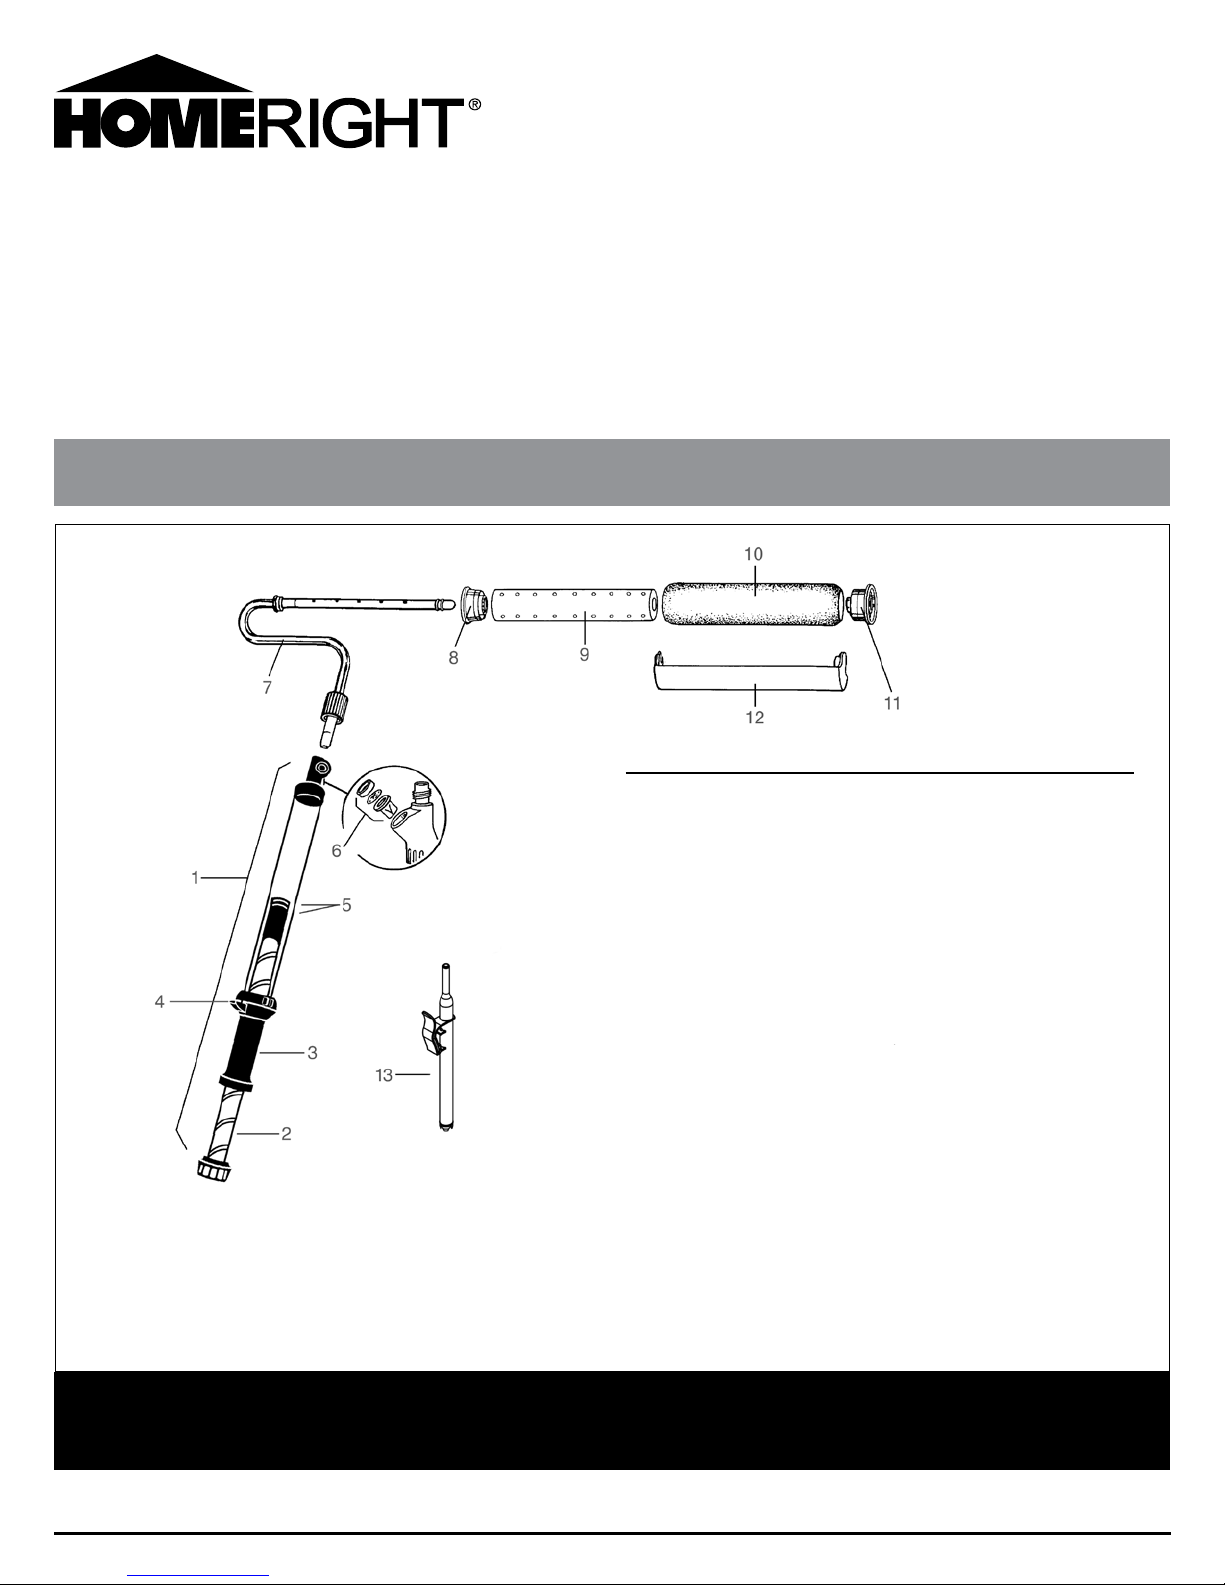
PaintStick EZ-Twist Parts List
PARTS LIST
Item Part No. Description
1 C806020 PaintStick EZ-Twist Handle Assembly
2 — Inner Tube
3 — Handle
4 — Toggle
5 C816853 Quad Rings (2-required)
6 C805291 Valve Kit for Fill Port
7 C805316 Frame
8 C817295 Inner End Cap and Seal, Black*
9 C805277 Spacer*
10 C817300 Roller Cover-9", 3/8" nap
11 C806122 Outer End Cap with Push Cap
12 C805187 Spatter Shield
13 C817430 Fill Tube
— C820488 Instruction Manual (Not Shown)
— C800798 Tune-up Kit*
(Sold Separately)
— C816894 Petroleum Packet (Not Shown)
NOTE: Use only PaintStick or PaintStick EZ-Twist perforated roller covers.
The PaintStick or PaintStick EZ-Twist will not operate with a normal (non-perforated) roller cover.
*Call 1-800-264-5442 to order the C800798 Tune-up Kit for your PaintStick EZ-Twist.
Register Online Today
To Activate Your Two-Year Warranty
Go online at www.homeright.com. See back page for warranty details.
1
ENGLISH • FRANÇAIS • ESPAÑOLPaintStick EZ-Twist
PaintStick EZ-Twist Instructions
Tips for Painting with the PaintStick EZ-Twist
•
Inspect roller cover for lint before painting. If needed wash before using.
•
When using the PaintStick EZ-Twist for the first paint application, it will take most of the paint in the
PaintStick EZ-Twist tube to saturate the roller cover.
•
Keep roller moving while pushing inner handle in to prevent dripping.
•
Stop pushing inner handle in if the roller starts to skid or slide.
•
When painting in tight areas partially fill PaintStick EZ-Twist. This reduces overall length
of P aintStick EZ-Twis t.
•
When leaving PaintStick EZ-Twist unattended for a longer period of time wrap roller cover in a
plastic bag.
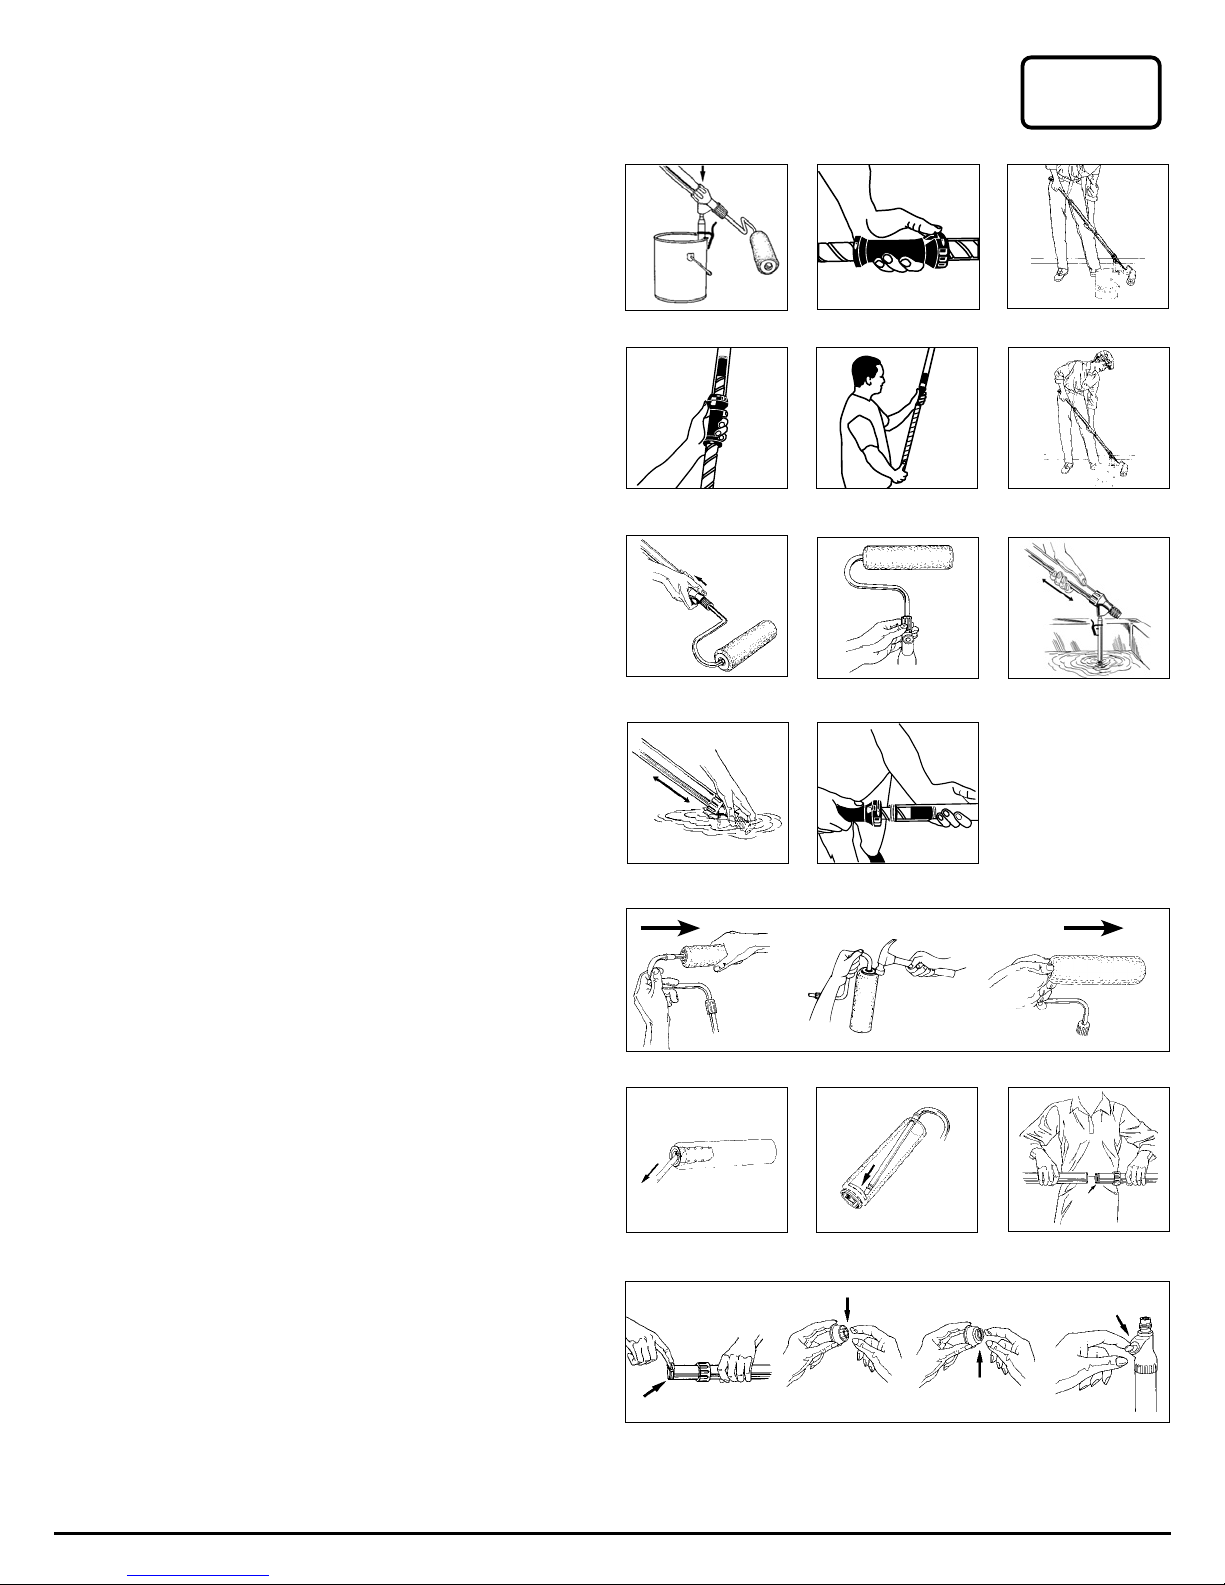
Painting with the PaintStick EZ-Twist
1. Hold the PaintStick EZ-Twist at a 45° angle and place the fill port over the fill tube (figure A). Firmly
push down until it bottoms on the fill tube. DO NOT KEEP PaintStick EZ-Twist ON FILL TUBE FOR
LONGER THAN 1 MINUTE AT A TIME.
Note: Make sure the fill tube is opposite from where you are standing when filling
to properly seat the valve. If inner handle is difficult to pull out, hold the
black knob and twist inner handle, then pull.
2. Use your thumb to move the toggle switch into the up position. (figure B).
3. While continuing to push the PaintStick EZ-Twist securely onto fill tube with one hand, pull inner
handle back with the other hand to draw paint into handle. When the handle is full of paint, lift
PaintStick EZ-Twist slowly off fill tube while holding fill tube securely to ensure it remains in can.
(figure C).
• NOTE: If inner tube does not release from outer tube, flip toggle switch to the down position and turn
the inner tube counterclockwise to release the inner tube from the outer tube.
4. To begin applying paint, put the toggle switch in the down position. (figure D).
5. Operate the PaintStick EZ-Twist by twisting the inner tube clockwise to feed paint to the roller cover.
(figure E).
• NOTE: To use the PaintStick without the EZ-Twist feature, put the toggle switch in the up position and
push in the inner tube to feed paint to the roller cover.
• NOTE: You may also hold the clear tube and rotate the inner tube by grasping anywhere along the
outer tube.
2 YEAR
WARRANTY
GAR ANTÍ A DE 2 AÑOS
A
B
D E F
G
H
C
I
Cleaning and Disassembling
Note: If painting with an oil based paint use manufacturer's recommended
cleaning solvent instead of warm water.
1. Return paint to container by placing PaintStick EZ-Twist on fill tube and pushing in inner handle until
stick is empty (figure F).
2. Remove paint from roller assembly by holding finger over fill port and pulling
inner handle back. Then return paint back to container (figure G).
3. Remove roller frame by unscrewing nut on end of roller frame (figure H).
4. Insert paint fill tube into PaintStick EZ-Twist fill port. Place in warm water and flush fill
tube by pulling inner handle back and pushing forward several times. Remove fill tube from PaintStick
EZ-Twist (figure I).
5. Place PaintStick EZ-Twist into clean warm water and flush fill port by plugging end of
PaintStick EZ-Twist with finger and pulling inner handle back and pushing forward several times. –
For best performance, also clean fill tube (figure J).
6a. Grasp clear tube firmly and twist handle counterclockwise to unscrew. Remove inner tube from clear
outer tube. (figure K).
• NOTE: If there is paint on the inner tube, remove it with a damp rag.
6b. To reassemble, hold the tube securely and turn the handle clockwise until secure.
• NOTE: Make sure quad rings do not get pinched or roll during assembly.
7. Remove roller from frame. Pull frame out from inner end cap until a snap is heard, or lightly tap
outside rim of end cap with hammer. Use extreme caution - do not hit metal ring on frame.
Optional Method–Use thumbs to pop off roller cover (figure L).
8. Remove inner end cap from roller cover by inserting the frame at an angle into the inner end cap
about 1". Pull gently towards you to remove cap (figure M).
9. Remove outer end cap from roller cover by inserting the frame inside the roller cover at a slightly
cocked angle. Then gently push to snap off the outer end cap with the frame. Optional method –
Remove outer end cap from roller cover using your fingers. (figure N).
Storing the PaintStick EZ-Twist
Separate inner and outer handles by quickly pulling apart (figure O).
After cleaning roller assembly components lubricate inner handle quad rings, outer end cap
fingers, and inner end cap seal with petroleum jelly. Put a small amount of petroleum jelly into the
fill port (Figure P).
J K
L
NM O
P
2
ENGLISHPaintStick EZ-Twist
®
PaintStick® EZ-Twist
Manuel d’instruction
AVERTISSEMENT : POUR USAGE DOMESTIQUE SEULEMENT. Pour réduire les risques de blessure, Il est de la
responsabilité de l’utilisateur de lire et comprendre toutes les instructions avant d'utiliser le PaintStick EZ-Twist.
Pour le service à la clientèle au Canada ou aux États-Unis, appelez le : (763) 780-5115 ou (800) 264-5442 de 7:30 h à 4:30 h,
heure normale du Centre.
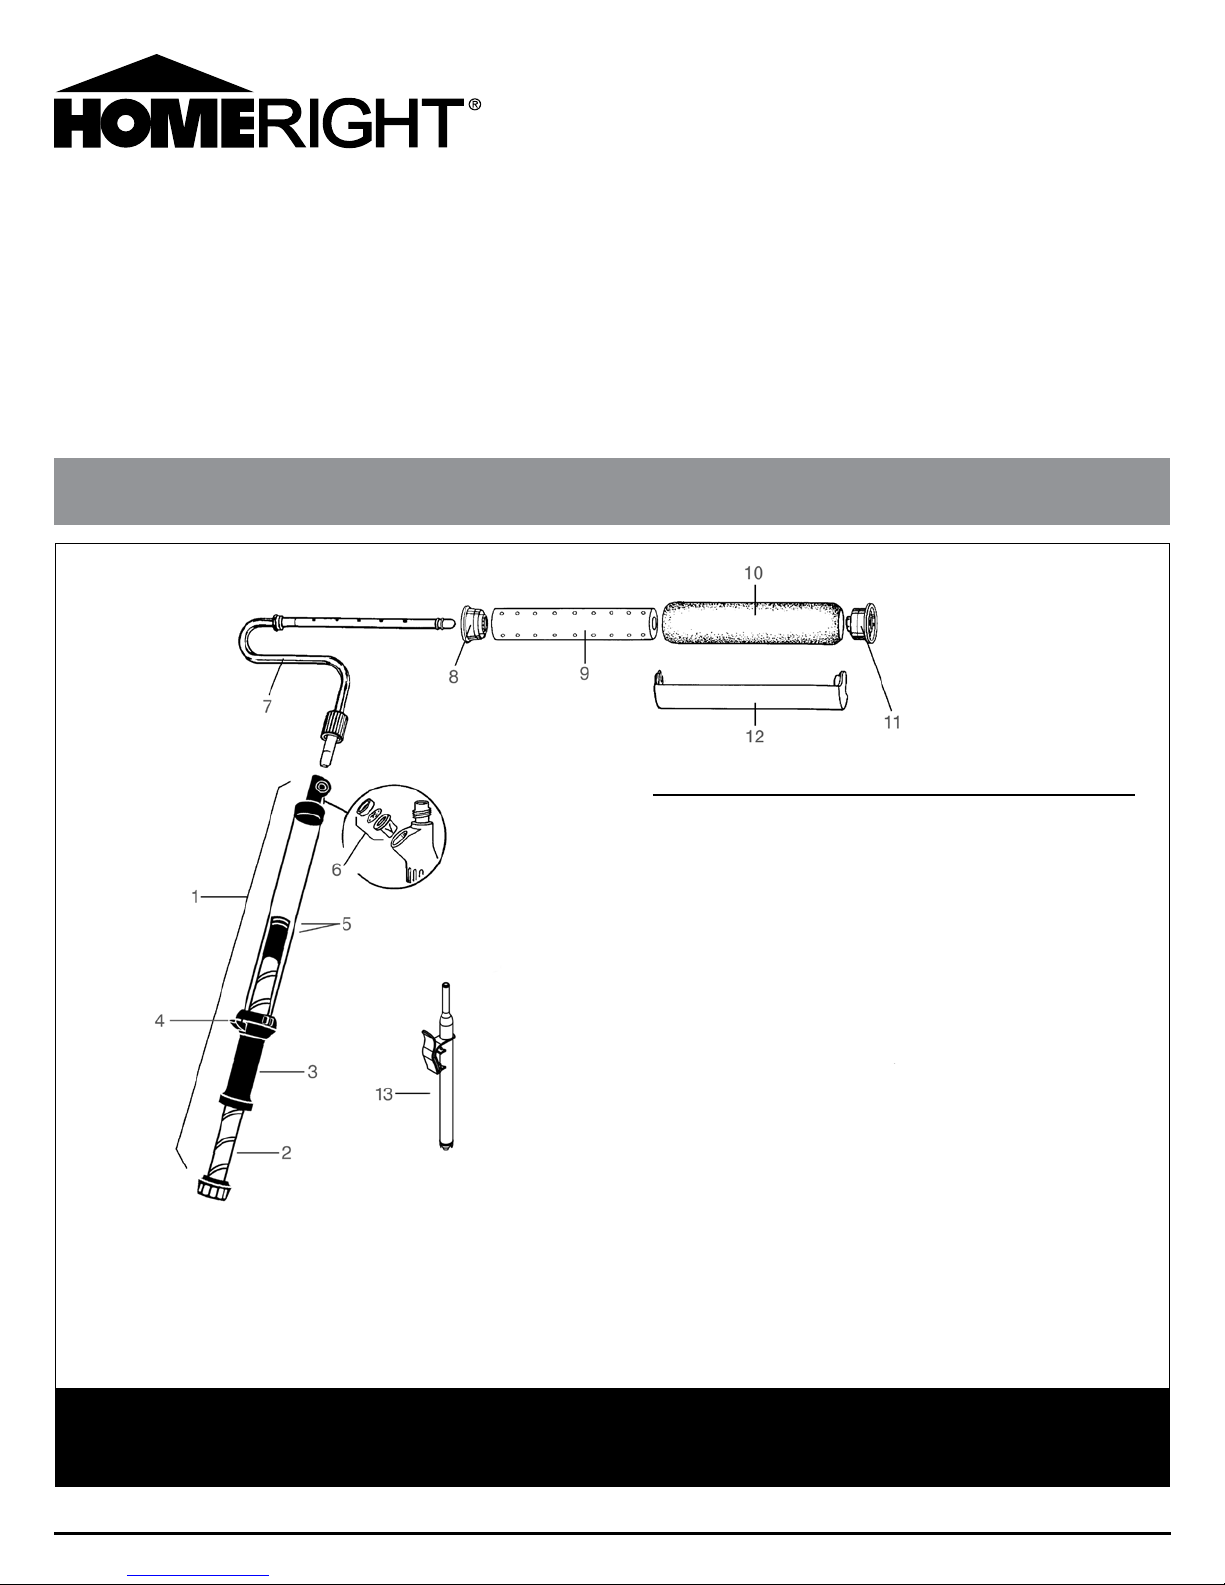
Liste de pièces PaintStick EZ-Twist
LISTE DE PIÈCES
o
Article N
référence
1 C806020 Manche à peindre PaintStick EZ-Twist
2 — Tube interne
3 — Poignée
4 — Bouton à bascule
5 C816853 Joints toriques* (2 requis)
6 C805291 Valve et orifice de remplissage
7 C805316 Armature
8 C817295 Bouchon interne et joint*
9 C805277 Cylindre d’écartement*
10 C817300 Manchon de 23 cm, fibres de 1 cm
11 C806122 Extrémité du bouchon extérieur avec
12 C80 5187 Écran antiéclaboussures
13 C817430 Tube de remplissage
— C820488 Manuel de l’utilisateur (non illustré)
— C800798 Ensemble de remise à neuf* (Vendu séparément)
— C816894 Paquet de vaseline (non illustré)
de Description
bouchon poussoir
REMARQUE : Utilisez uniquement les manchons perforés PaintStick ou PaintStick EZ-Twist.
Le PaintStick et le PaintStick EZ-Twist ne fonctionneront pas avec un manchon normal (non perforé).
*Appelez le 1 800 264-5442 pour commander votre ensemble de remise à neuf PaintStick EZ-Twist C800798.
Enregistrez en ligne aujourd’hui
Pour lancer votre garantie de deux ans
Rendez-vous en ligne au www.homeright.com. Voir au verso pour des détails de garantie.
3
FRANÇAISPaintStick EZ-Twist
 Loading...