

Homeright FINISH MAX PRO Instruction Manual

ACABADO FINO
PULVERIZADOR
FINISH MAX PRO
®
ADVERTENCIA PARA DISMINUIR LOS RIESGOS DE LESIONES,
EL USUARIO DEBE LEER Y ENTENDER EL MANUAL DE INSTRUCCIONES.
SÓLO PARA USO DOMÉSTICO.
MANTENGA A LOS NIÑOS LEJOS DEL ÁREA DE TRABAJO.
Para comunicarse con el departamento de servicio al cliente,
llame al: 1-800-264-5442 ó 763-780-5115, de 8:00 a. m. a 5:00 p. m.
(hora del Centro de EE.UU.).
Hecho en Taiwán
FINISH MAX PRO
®
FINE FINISH SPRAYER
WARNING TO REDUCE THE RISK OF INJURY,
USER MUST READ AND UNDERSTAND INSTRUCTION MANUAL.
FOR HOUSEHOLD USE ONLY.
KEEP CHILDREN AWAY FROM WORKING AREA.
For Customer Service Call:
1-800-264-5442 or 763-780-5115,
8 a.m. to 5 p.m. CST.
Made in Taiwan
PLEASE READ AND SAVE THIS INSTRUCTION MANUAL
FINITION FINE
PULVÉRISATEUR
FINISH MAX PRO
®
AVERTISSEMENT POUR RÉDUIRE LES RISQUES DE BLESSURE,
L’UTILISATEUR DOIT LIRE ET COMPRENDRE LE MANUEL
D’INSTRUCTION.
DESTINÉ À UN USAGE DOMESTIQUE SEULEMENT.
TENEZ LES ENFANTS ÉLOIGNÉS DE L’AIRE DE TRAVAIL.
Pour le service à la clientèle, appelez au : 1-800-264-5442 ou
(763) 780-5115, de 8h00 à 17h00, heure normale du Centre.
Fabriqué en Taïwan
Register Online Today
To Activate Your Two-Year Warranty
Go online at www.homeright.com or scan the QR Code to the left. See back page for warranty details.
2
FINISH MAX PRO FINE FINISH SPRAYER (C800850) ENGLISH
IMPORTANT SAFEGUARDS ......................................................................................................................................................................................2
Warnings ......................................................................................................................................................................................................2
PROP 65 Warning ..............................................................................................................................................................................................3
Hazard: Explosion or Fire ...................................................................................................................................................................................3
Hazard: Hazardous Vapors .................................................................................................................................................................................3
Extension Cords .................................................................................................................................................................................................3
Storage ..............................................................................................................................................................................................................3
PARTS LIST ............................................................................................................................................................................................................4
FAST START QUICK REFERENCE GUIDE ...................................................................................................................................................................5
HOW TO USE ..........................................................................................................................................................................................................6
Practice First ..........................................................................................................................................................................................................6
Surface Prep ......................................................................................................................................................................................................6
Thinning Materials .............................................................................................................................................................................................7
Adjusting the Spray Pattern ...............................................................................................................................................................................8
Spraying Instructions .........................................................................................................................................................................................8
Air Blowing Nozzle .............................................................................................................................................................................................8
CLEAN UP & MAINTENANCE ....................................................................................................................................................................................9
TROUBLESHOOTING ..............................................................................................................................................................................................10
TWO-YEAR LIMITED WARRANTY ...........................................................................................................................................................................32
TABLE OF CONTENTS
IMPORTANT SAFEGUARDS
READ AND FOLLOW ALL SAFEGUARDS.
Like other power tools, the Fine Finish Sprayer is safe when properly used
but can be dangerous if misused. It is the responsibility of the user to read
and understand all instructions, IMPORTANT SAFEGUARDS, and safety
precautions before operating the unit and also to use the unit properly. Failure
to do so may result in personal injury or loss of life and product damage.
Do not try to repair (or disassemble) the unit yourself. Repairs should be
performed by a qualified shop familiar with this unit or returned to HomeRight.
See warranty. This unit is to be used with authorized parts only. When using
parts that do not comply with the specifications and safety devices of the
manufacturer, theuser assumes all risks and liabilities.
• DO NOT aim sprayer at yourself or anyone else; in the event of injury,
seek expert medical advice immediately.
• DO NOT cover the nozzle with any part of your body. High velocity jet can
cause accidental injuries.
• DO NOT leave your sprayer uncleaned or allow paint to dry in the pump.
An uncleaned sprayer will not work the next time it’s used and you could
void the warranty.
• DO NOT spray textured materials containing asbestos fibers.
• DO NOT spray any textured materials containing particles or fibers such
as metallic paints or fire retardant paints.
• DO NOT spray flammable liquid.
• DO NOT use the sprayer outside when it’s raining.
• DO NOT use sprayer below garage floor or grade level.
• DO NOT disassemble the sprayer without reading instructions.
• DO NOT allow any part of the body to come into contact with
the fluid stream.
• DO plug the cord or extension cord only into grounded power supply.
• DO keep the sprayer out of the reach of children.
• ALWAYS place the sprayer upright (do not place the sprayer upside down
or on its side) to prevent liquid from entering internal wiring and causing
electric shock.
• ALWAYS wear mask, goggles, and ear and eye protection while
operating the sprayer.
• When you stop spraying, ALWAYS unplug the cord to prevent unintended
operation.
• To prevent electrical shock, NEVER immerse the sprayer into water or
other liquids.
• NEVER leave sprayer unattended.
• NEVER leave sprayer plugged in while cleaning.
WARNINGS
3
FINISH MAX PRO FINE FINISH SPRAYER (C800850) ENGLISH
IMPORTANT SAFEGUARDS (CONTINUED)
HAZARD: HAZARDOUS VAPORS
Paint, stain and solvents, insecticides, varnishes, and other materials may
be harmful if inhaled, causing severe nausea, fainting, or poisoning.
• Use a mask or respirator when spraying when there is a chance of
inhaling vapors.
• Use protective eyewear.
EXTENSION CORDS
Make sure your extension cord is UL/ETL/CSA listed and is in good
condition. When using an extension cord, be sure to use one heavy enough
for the current - for lengths less than 18 feet, usea No. 18 AWG. or
heavier; for lengths of 18 - 25 ft, useNo. 16 AWG. For lengths greater than
25 ft, use No. 14 AWG. If in doubt, use a heavier gauge. Anundersized cord
will cause a drop in line voltage resulting in loss of power andoverheating
and possible damage.
STORAGE
Make sure unit is clean and dry before storing. Store in a dry location. To
prevent damage, the electrical cord should not be crimped during storage.
1. HAZARD: Solvent and paint fumes can explode or ignite, causing
property damage and severe injury. Avoid all low ignition sources such
as static electricity, sparks, and open flames.
2. HAZARD: Paints, solvents, insecticides, and other materials may be
harmful if inhaled, causing severe nausea, fainting, orpoisoning.
3. HAZARD: Do not hold cord at plug connections to support cord. Failure
to observe may result in electrical shock.
PROP 65 WARNING
Handling the coated electrical wires of this product exposes you to lead, a
chemical known to the State of California to cause birth defects or other
reproductive harm. Wash hands after use.
HAZARD: EXPLOSION OR FIRE
Paint, stain and solvent fumes can explode or ignite, causing property
damage and/or severe injury.
Do not use materials with a flash point below 70°F (21°C). Flashpoint is the
temperature that a fluid can produce enough vapors to ignite.
Plastic can cause static sparks. Never use plastic to enclose the spray
area. Do not use plastic drop cloths when spraying flammable materials.
• Keep area well ventilated. Exhaust and introduce fresh air to keep fumes
from accumulating in work area.
• Do not spray in areas where there are ignition sources, static electricity,
sparks, pilot lights, heaters, hot objects, cigarettes, oropen flames.
• Have fire extinguishing equipment present and in good workingorder.
• Follow safety instructions and IMPORTANT SAFEGUARDS of material
manufacturers.
WARNINGS
CAUTION
SERVICING A DOUBLE-INSULATED PRODUCT
In a double-insulated product, two systems of insulation are provided
instead of grounding. No grounding means is provided on a double
insulated product, nor should a means of grounding be added to the
product. Servicing of a double-insulated product requires extreme care
and knowledge of the system and should only be done by qualified service
personnel. Replacement parts for a double-insulated product must be
identical to those parts in theproduct.
4
FINISH MAX PRO FINE FINISH SPRAYER (C800850) ENGLISH
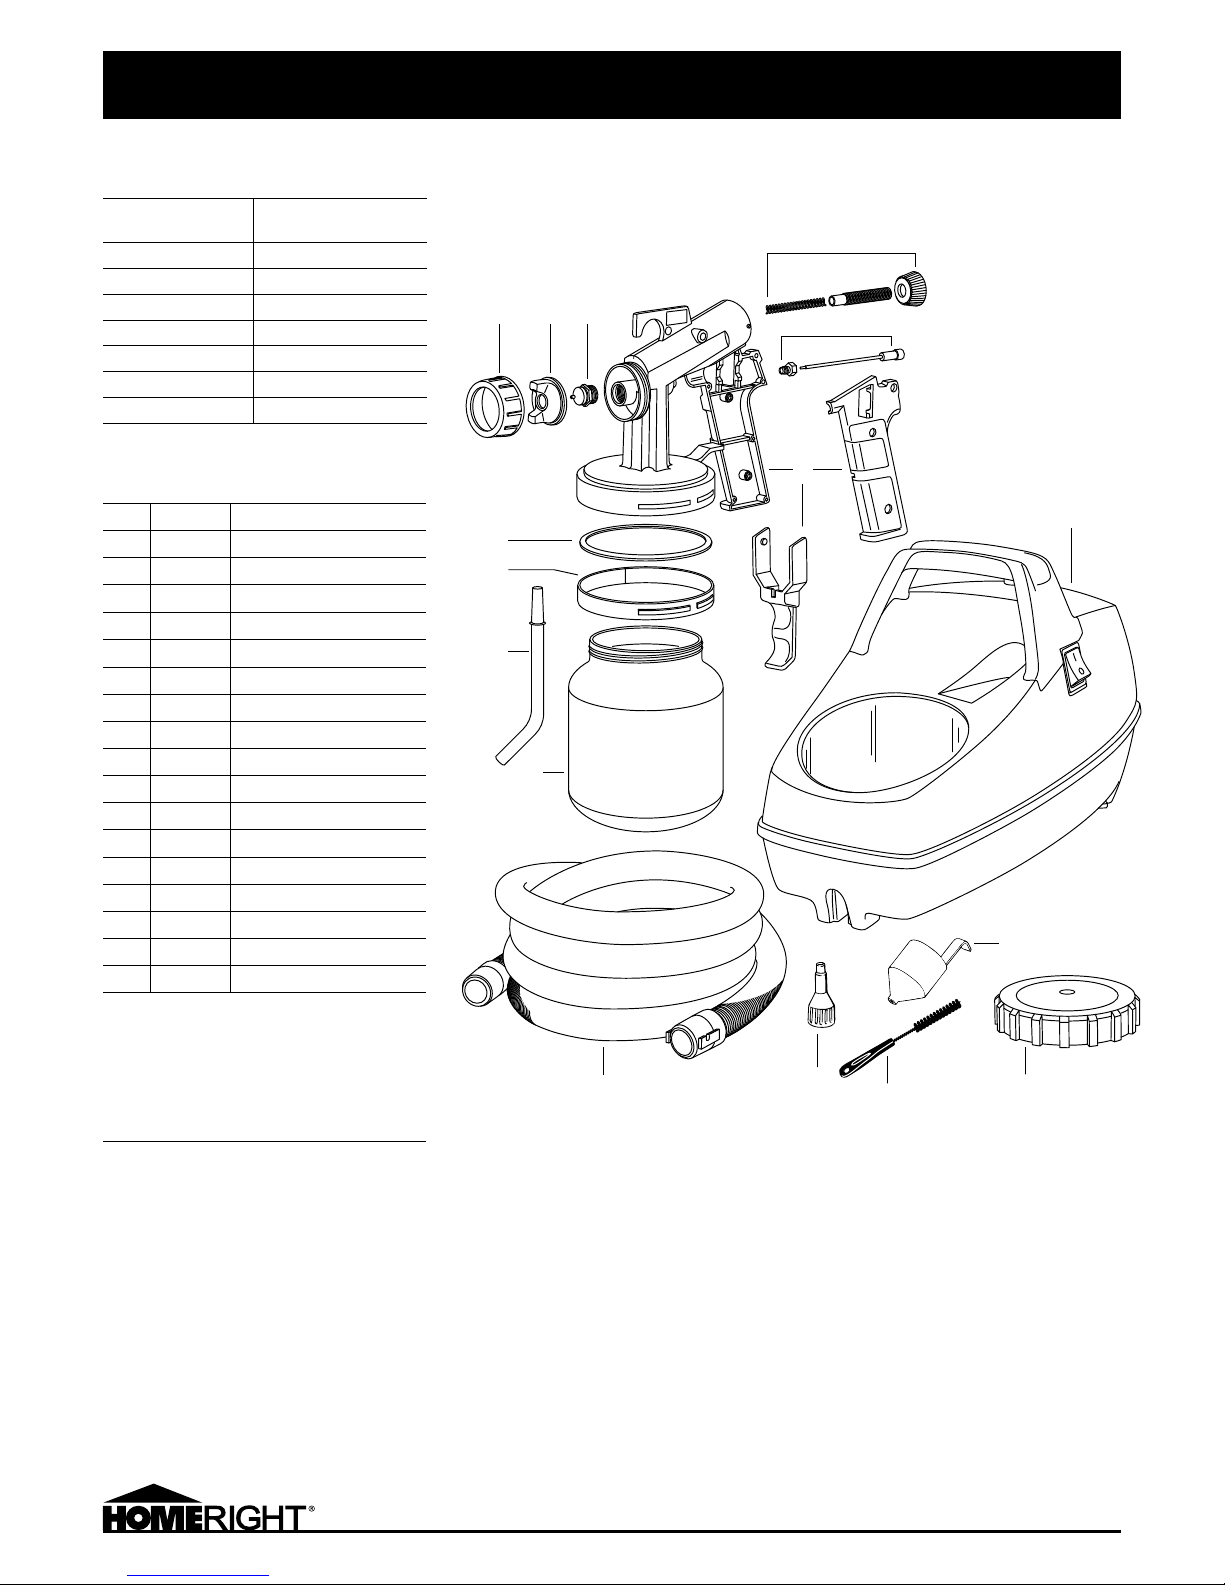
PARTS LIST
SPECIFICATIONS
Paint Compatibility Water or oil-based paints
and stains
Voltage 120V, 60 HZ
Watts 1000
Amps 10 amps
Air Supply 10.9 cfm
Container Capacity 0.8L ( 28 oz)
Weight 9.0 lbs ( 4.1 Kg)
Motor Speed 32,000 RPM
PARTS LIST
Item Part No. Description
1. C817821 Air Nut
2. C817824 Air Cap
3. C817866
Brass Fluid Nozzle, 2 mm Ø
4. C817867 Paint Control Adjusting Screw
5. C817737 Needle Assembly, 90 mm l
6. C817488 Gun Assembly
7. C817562 Turbine
8. C817561 Lid for Container
9. C817344 Viscosity Cup
10. C816545 Cleaning Brush
11. C817341 Air Blow Nozzle
12. C817513 Air Hose, 15 ft., Black
13. C817563 Container - Black
C817564 Container - Gray (not Shown)
14. C817823 Pick Up Tube
15. C817992 Blue Threaded Insert
16. C817822 Paint Cup Gasket
If you cannot obtain parts and accessories
at your local retail dealer, then call or
email: info@homeright.com
HomeRight, 1661 94th Lane N.E., Minneapolis,
Minnesota 55449-4324, Phone 763-780-5115
or 1-800-264-5442, 8:00 a.m. to 5:00 p.m. CST.
www.homeright.com
5
16
15
14
13
6
1 2 3
7
4
12
10
8
11
9
5
FINISH MAX PRO FINE FINISH SPRAYER (C800850) ENGLISH
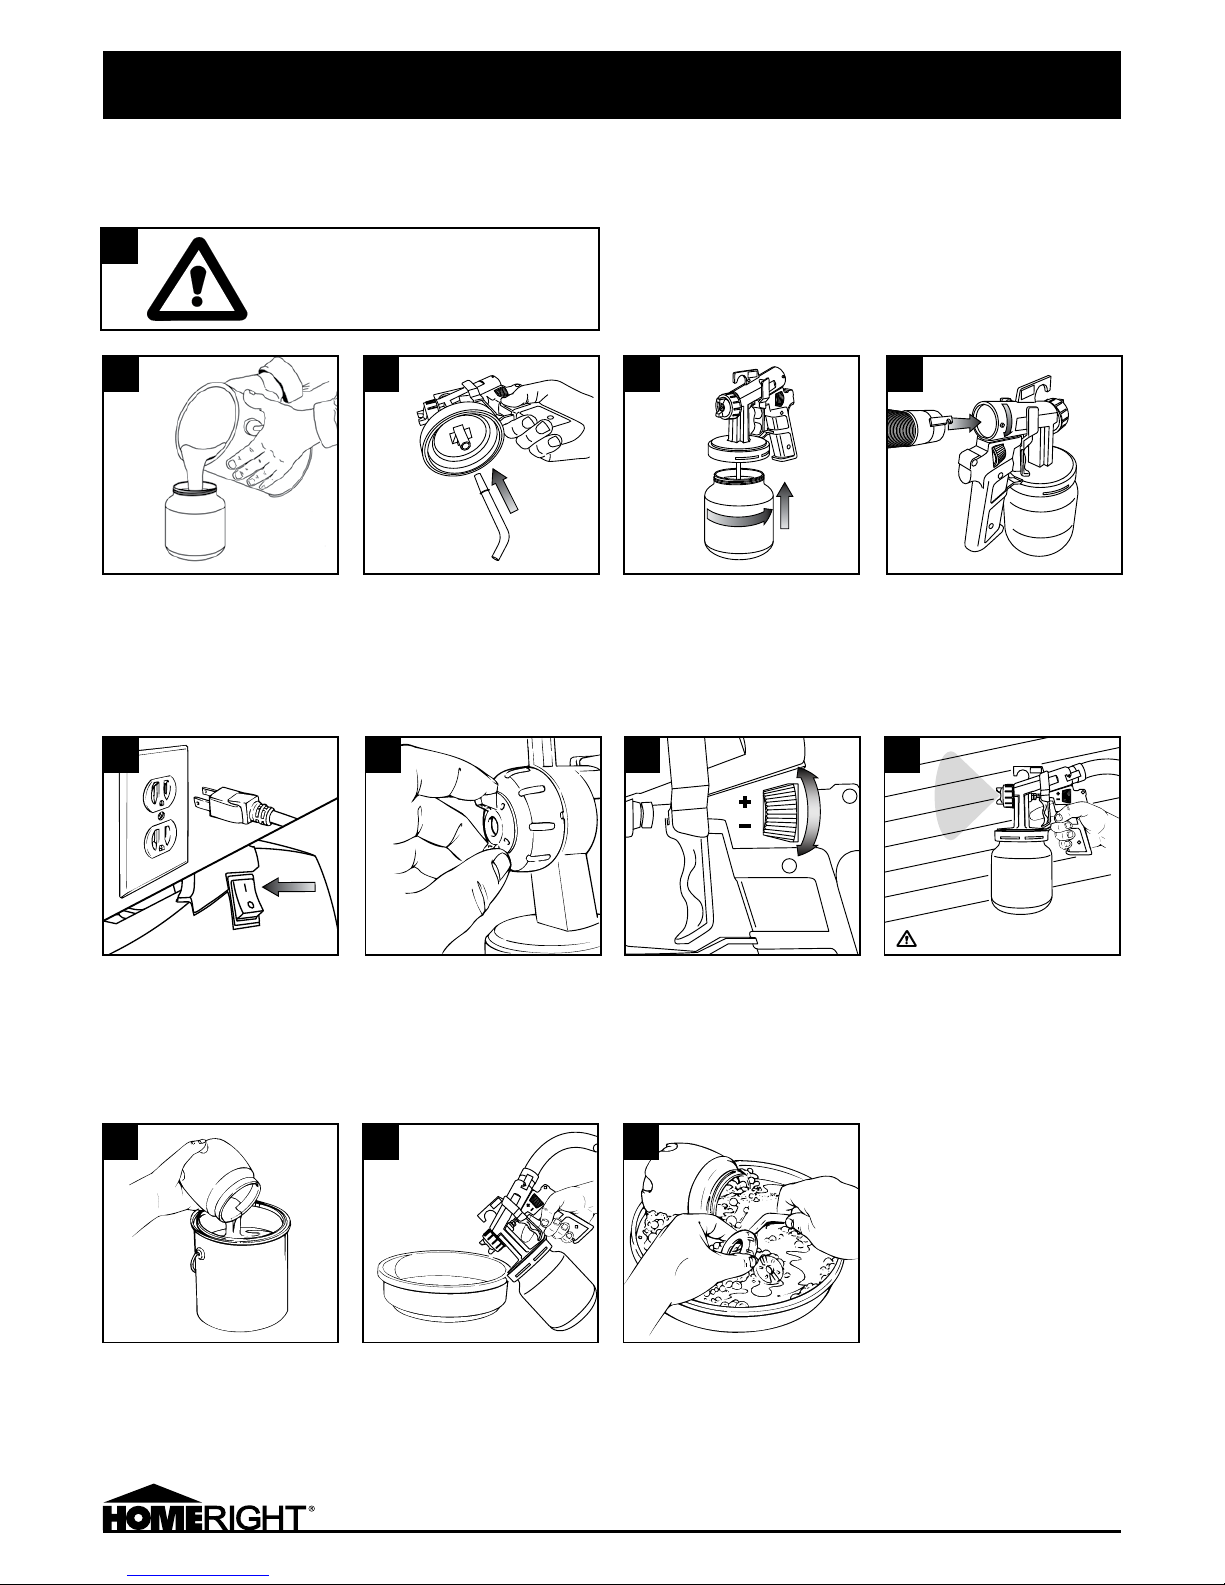
FAST START QUICK REFERENCE GUIDE
Cleaning Instructions
This is only a quick reference. Read the entire instruction manual prior to using the product.
1. Unplug sprayer, remove container,
and empty contents.
2. Fill sprayer container with cleaning
solution, plug in, turn on and
operate trigger until solution
comes through nozzle.
3. Remove parts. Clean and dry
thoroughly according to Step Two
of the Clean Up instructions. See
page 9.
1 2 3
Spraying Instructions
7 8
2
1
3 4
1. Read all warnings and safety
instructions in the user’s manual
before use.
2. Thin material as necessary.
(Seepage 7.) Remove and fill
container with material. Use a filter
to strain material if it is old.
3. Insert the pick-up tube into the
cylinder housing. See Page 6,
Figure B to determine orientation
of pick-up tube.
7. Adjust spray pattern to horizontal or
vertical. (See page 8.)
4. Attach container to sprayer.
8. Set the flow to maximum by
turning the volume control knob
fully clockwise.
6
6. Plug sprayer into outlet.
Turn sprayer On.
9
9. Spray surface, keeping sprayer
level. Use a sweeping and
overlapping motion.
HAZARDOUS VAPORS
5
5. Insert air hose with locking tabs
into rear of spray gun, turn until
tabs lock into place. Insert other
end of air hose into turbine.
RISK OF EXPLOSION OR FIRE
HAZARDOUS VAPORS
6
FINISH MAX PRO FINE FINISH SPRAYER (C800850) ENGLISH
PRACTICE FIRST
Practice spraying water on newspaper or cardboard. This will give you the feel of the sprayer and
familiarize you with its features. Follow the instructions for adjusting to the proper spraypattern.
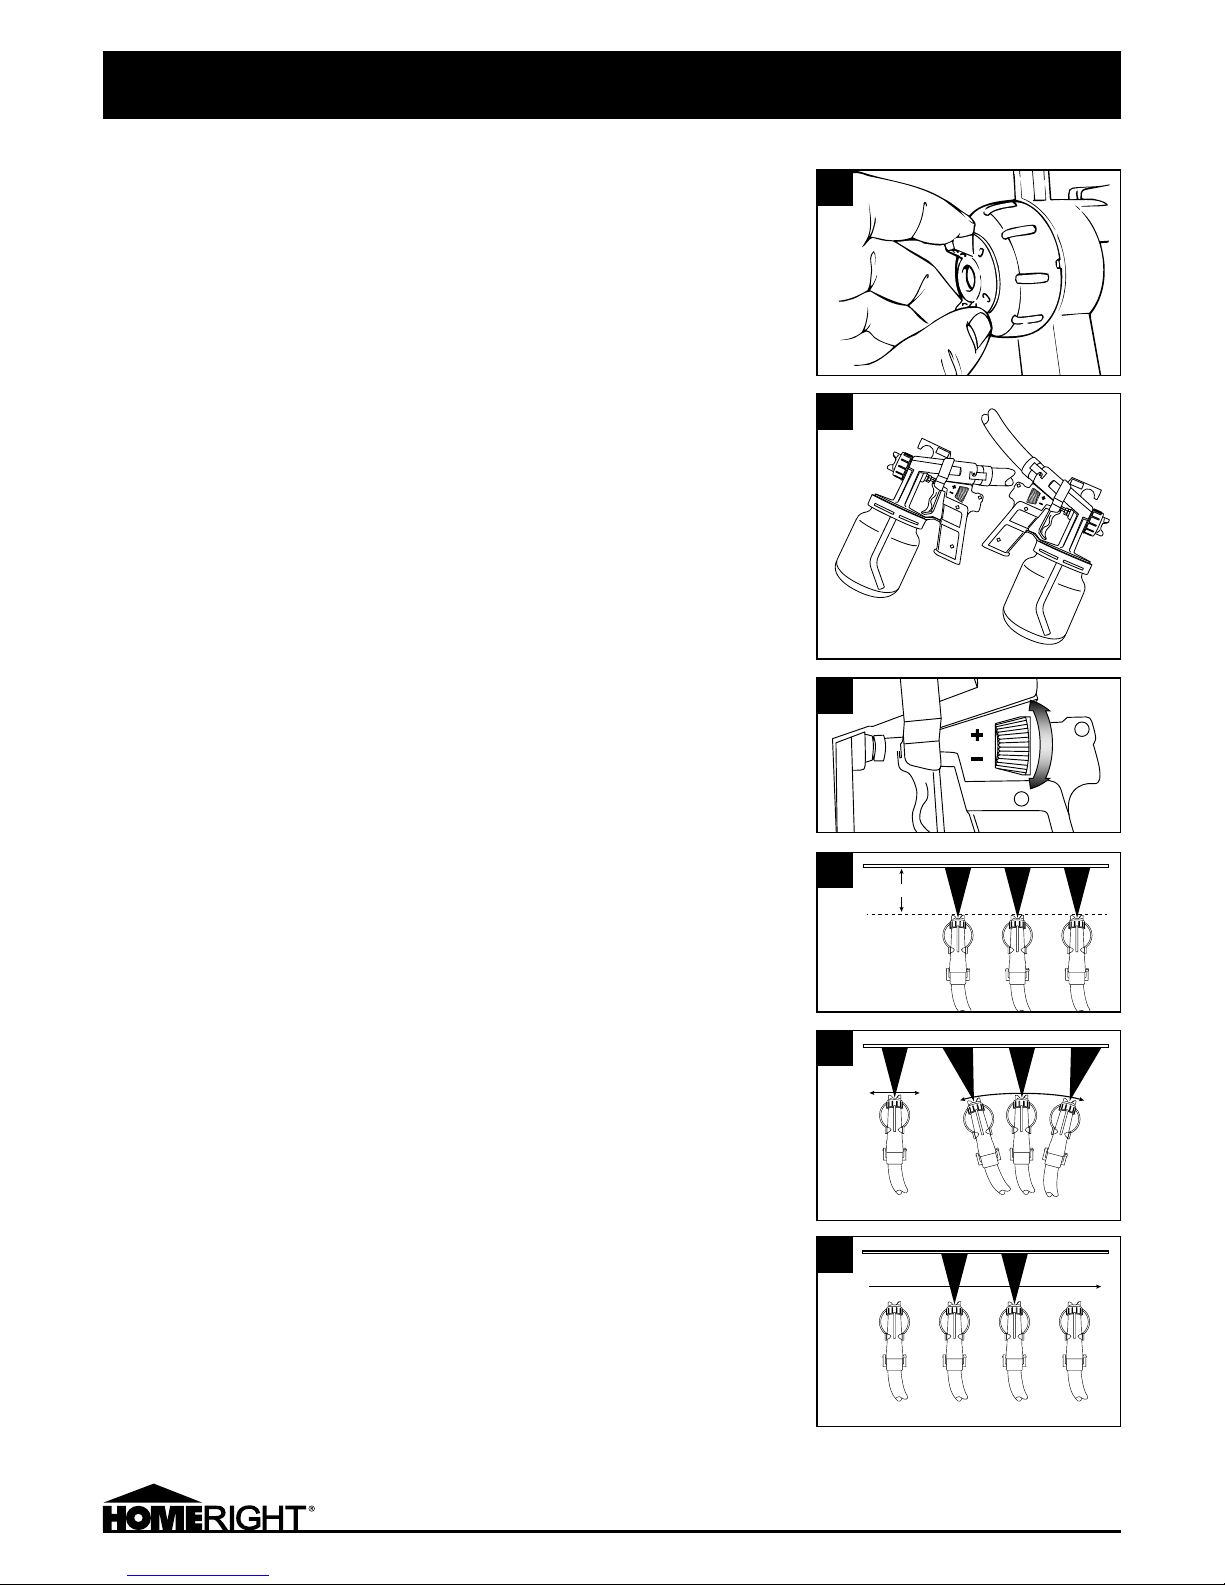
1. Make sure the spray tip is screwed on tightly. Familiarize yourself with the spray cap: Turn its wings
to adjust to a horizontal or vertical spray pattern. (See Figure A.)
2. Remove the container from the spray gun by turning it counterclockwise.
3. Firmly insert the pick-up tube. (See Figure B.) Place the pick-up tube with its angle pointing forward
if you’ll be spraying mostly in the downward direction, and place it facing backward if you’ll be
spraying mostly in an upward direction. This tube placement can be adjusted/changed at any time
during your project.
4. Fill the container with water and re-fasten it.
5. Plug in the sprayer and turn on.
6. Engage the trigger and wait a few seconds for the unit to start spraying the water.
7. Turn the volume control knob fully clockwise to get maximum flow. Then, turn it counterclockwise
and notice how the spray pattern changes in width and intensity. Adjust this knob until you get a
good spray pattern. (See Figure C.)
NOTE: The best distance for spraying is 4 to 10 inches from the surface you’re spraying. Too far
away may result in overspray (and wasted liquid), and too close may cause liquid build-up (runs)
(see Figure D).
8. Keep a stiff wrist. Do not arch your wrist at the beginning or end of the stroke. (See Figure E.)
Do not stop the motion of the unit while spraying. The path of the sprayer must pass beyond the
area being sprayed, and the switch must be triggered on and off as the sprayer passes into and out
of the spraying area. (See Figure F.)
NOTE: Stopping the motion of the sprayer or swinging into a new stroke pattern while spray is
being delivered will result in heavy spray build-up at the edges of the stroke.
SURFACE PREP
Thoroughly clean all objects and surfaces to be sprayed before spraying material on them. You may
want to mask or cover areas not intended to be sprayed.
SMALL PROJECTS
This sprayer uses airflow to transfer liquid to the work piece. It is recommended that for small projects,
the user first tests the sprayer without adding liquid to the cup. The airflow may cause small pieces to
move or fall during operation. Use caution and good judgement before spraying liquid.
HOW TO USE
A
B
C
4-10 inches
Correct Incorrect
Start Trigger Release End
F
E
D
7
FINISH MAX PRO FINE FINISH SPRAYER (C800850) ENGLISH
THINNING MATERIALS
In order for your sprayer to operate properly it is important to make sure the stain or paint is
thin enough to be sprayed. Materials can differ from brand to brand, this guide can offer only
general information. Follow paint or stain manufacturer’s guideline for thinning. The final guide
to correctly thinned stain or paint is achieving the proper spray pattern as shown in Figure A.
Always follow the coverage rate recommended by the manufacturer regardless of the thinning
required. Because there is a variance in viscosity between paint and stain brands, it might be
necessary to thin 5 to 15 percent to achieve optimum spray pattern.
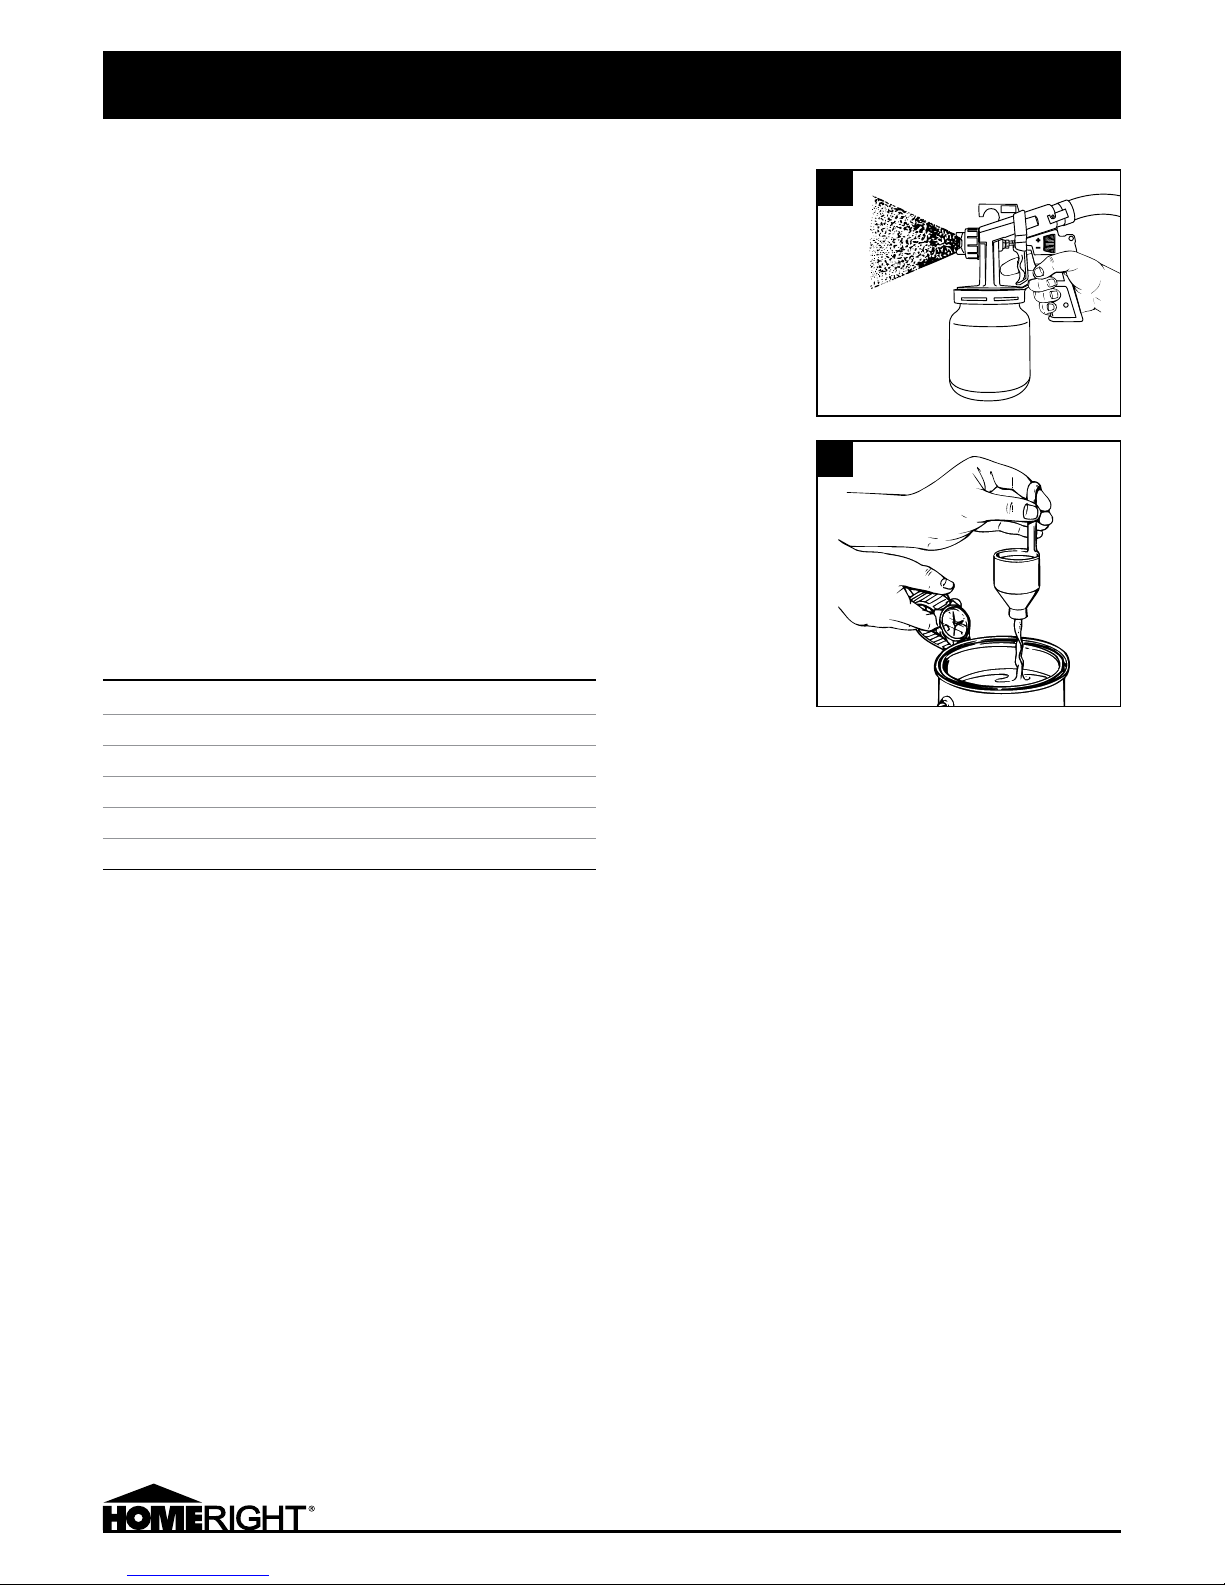
Use the viscosity cup (included) and the chart below to determine whether you’ll need to thin the
material you’re using:
1. Dip the viscosity cup fully into the liquid you intend to spray.
2. Lift the viscosity cup out of the liquid, and, holding the cup over the paint or stain can, time
how long it takes for the liquid to drain out of the cup. This is known as the liquid’s run-out
time. If it takes longer than the time shown on the chart for the liquid to leave the viscosity
cup, thin the liquid until the run-out time falls within the time bracket shown for the liquid
you’re using.
3. When you’ve completed this process, clean the viscosity cup with warm, soapy water if
you’re using a water-based product or per the manufacturer’s instructions if you’re using an
oil-based product.
RUN-OUT TABLE AND THINNING CHART
Material (Oil- or Water-based) Run-Out Time (seconds)
Clear Sealer No thinning required
Enamel 25 to 40
Polyurethane No thinning required
Primer 30 to 45
Stain No thinning required
Varnish 20 to 50
NOTES:
• Be sure pick-up tube is inserted tightly into the intake port.
• Thin material according to the procedure outlined above.
• Before each use, check the Brass Fluid Nozzle and Brass Fluid Needle for dried paint.
Keep Brass Fluid Needle clean.
• Always thoroughly clean the sprayer after each use.
(See CLEAN UP AND MAINTENANCE, page 9.)
• Turn control knob counterclockwise for less flow — see Page 6 Step 7 for more detail.
• Strain old paint or stain before using.
• Slowly stir paint or stain. To prevent air bubbles, do not shake stain or paint.
HOW TO USE (CONTINUED)
A
B
8
FINISH MAX PRO FINE FINISH SPRAYER (C800850) ENGLISH
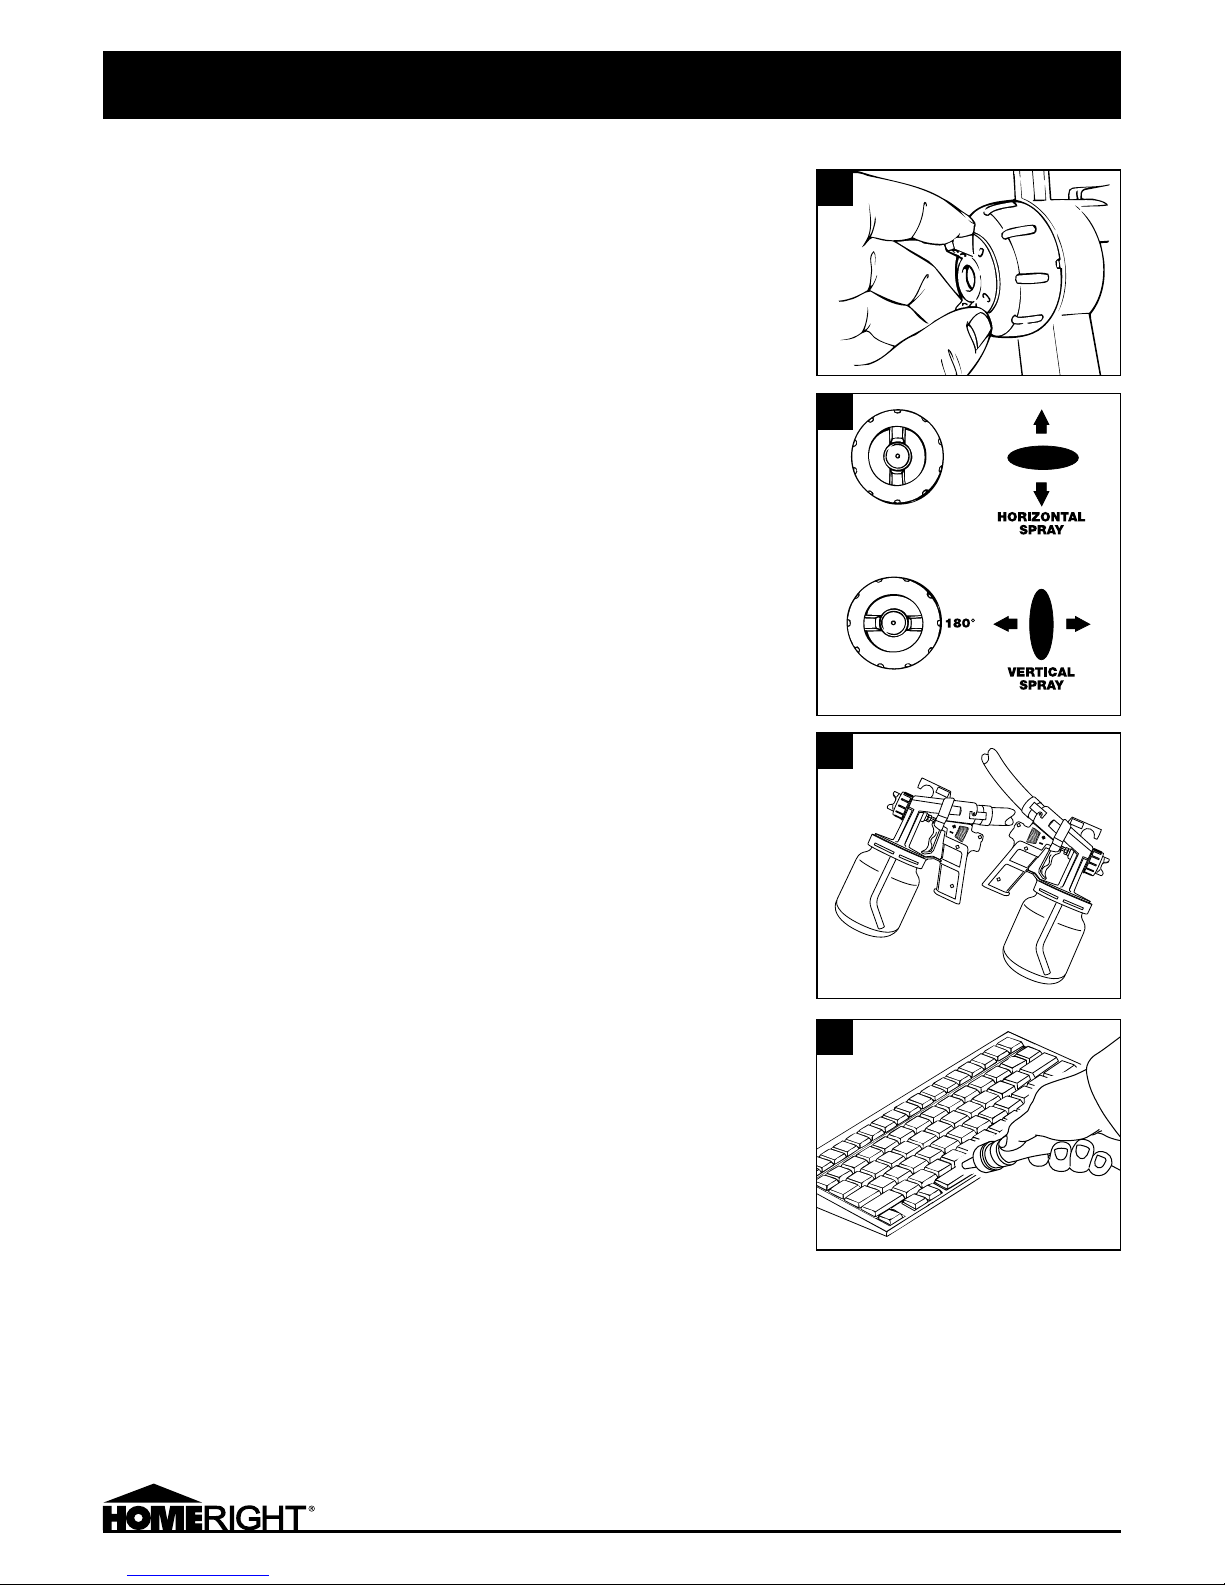
ADJUSTING THE SPRAY PATTERN
By turning the wings of the tip, the Finish Max Pro Fine Finish Sprayer sprays in one of two
patterns: horizontal or vertical. (See Figure D.) DO NOT engage the trigger while turning the tip,
and be sure not to spray toward you, as this could cause injury. (See Figure C & D)
SPRAYING INSTRUCTIONS
Caution: Do not twist electrical cord. Make sure heavy objects are not placed on it.
Keep electrical cord away from heat and sharp objects. To avoid a tripping hazard,
make sure cord is not in a heavy traffic area. Do not use the cord if it is damaged.
Use appropriate breathing protection, eye protection, gloves and clothing.
1. Make sure the container is empty and dry.
2. Pour paint or stain into the container.
3. Be sure the pick-up tube is inserted tightly in the intake port and the tube’s angle
is as you want it. (Figure E.)
4. Affix the container to the sprayer by turning the container counterclockwise.
5. Refer back to “Practice First” on pg 6. Follow Steps 5 thru 8, keeping in mind you are now
spraying paint or stain. If, after making adjustments, you still are not satisfied with the spray
pattern, refer to TROUBLESHOOTING on page 10.
6. Hold the sprayer 4 to 10 inches from the surface to be painted. While the angled pick-up
tube permits you to spray in an upward or downward direction, try to tilt the sprayer as little
as possible. Do not tip more than 45 degrees when motor is switched off.
7. Overlap each stroke by about 1/3 of the spray pattern.
NOTE: If you stop spraying for 30 minutes or longer: Before continuing, retest the spray pattern
by spraying on newspaper or cardboard. If you are unable to adjust the spray pattern properly,
it is possible the stain or paint material has started to dry. If this happens, clean the sprayer.
See CLEAN UP INSTRUCTIONS.
NOTE: If the spray pattern still is not correct, you may need to thoroughly clean the nozzle and
needle. To keep the unit spraying properly, you should expect to clean it after dispensing each
five to nine gallons of paint or stain. After cleaning, reassemble the parts.
AIR BLOWING NOZZLE
The air blowing nozzle is a breeze-dusting device, suitable for dusting computer heat sinks,
keyboards, air conditioner filter meshes and all kinds of precision instruments. (See Figure F.)
However it is NOT suitable for liquid spraying.
HOW TO USE (CONTINUED)
C
D
F
E
D
9
FINISH MAX PRO FINE FINISH SPRAYER (C800850) ENGLISH
DO NOT ALLOW SPRAYED MATERIAL TO DRY IN SPRAY GUN,
ALWAYS CLEAN WITHIN 30 MINUTES OF USE
Proper clean up is essential to keep your sprayer in optimum working condition. Dried by-products will
act like glue and cause moving parts to stick or holes to plug. Failure to properly clean your sprayer will
damage the unit. Take the time to clean your sprayer immediately after each use.
Run cleaning solution through unit
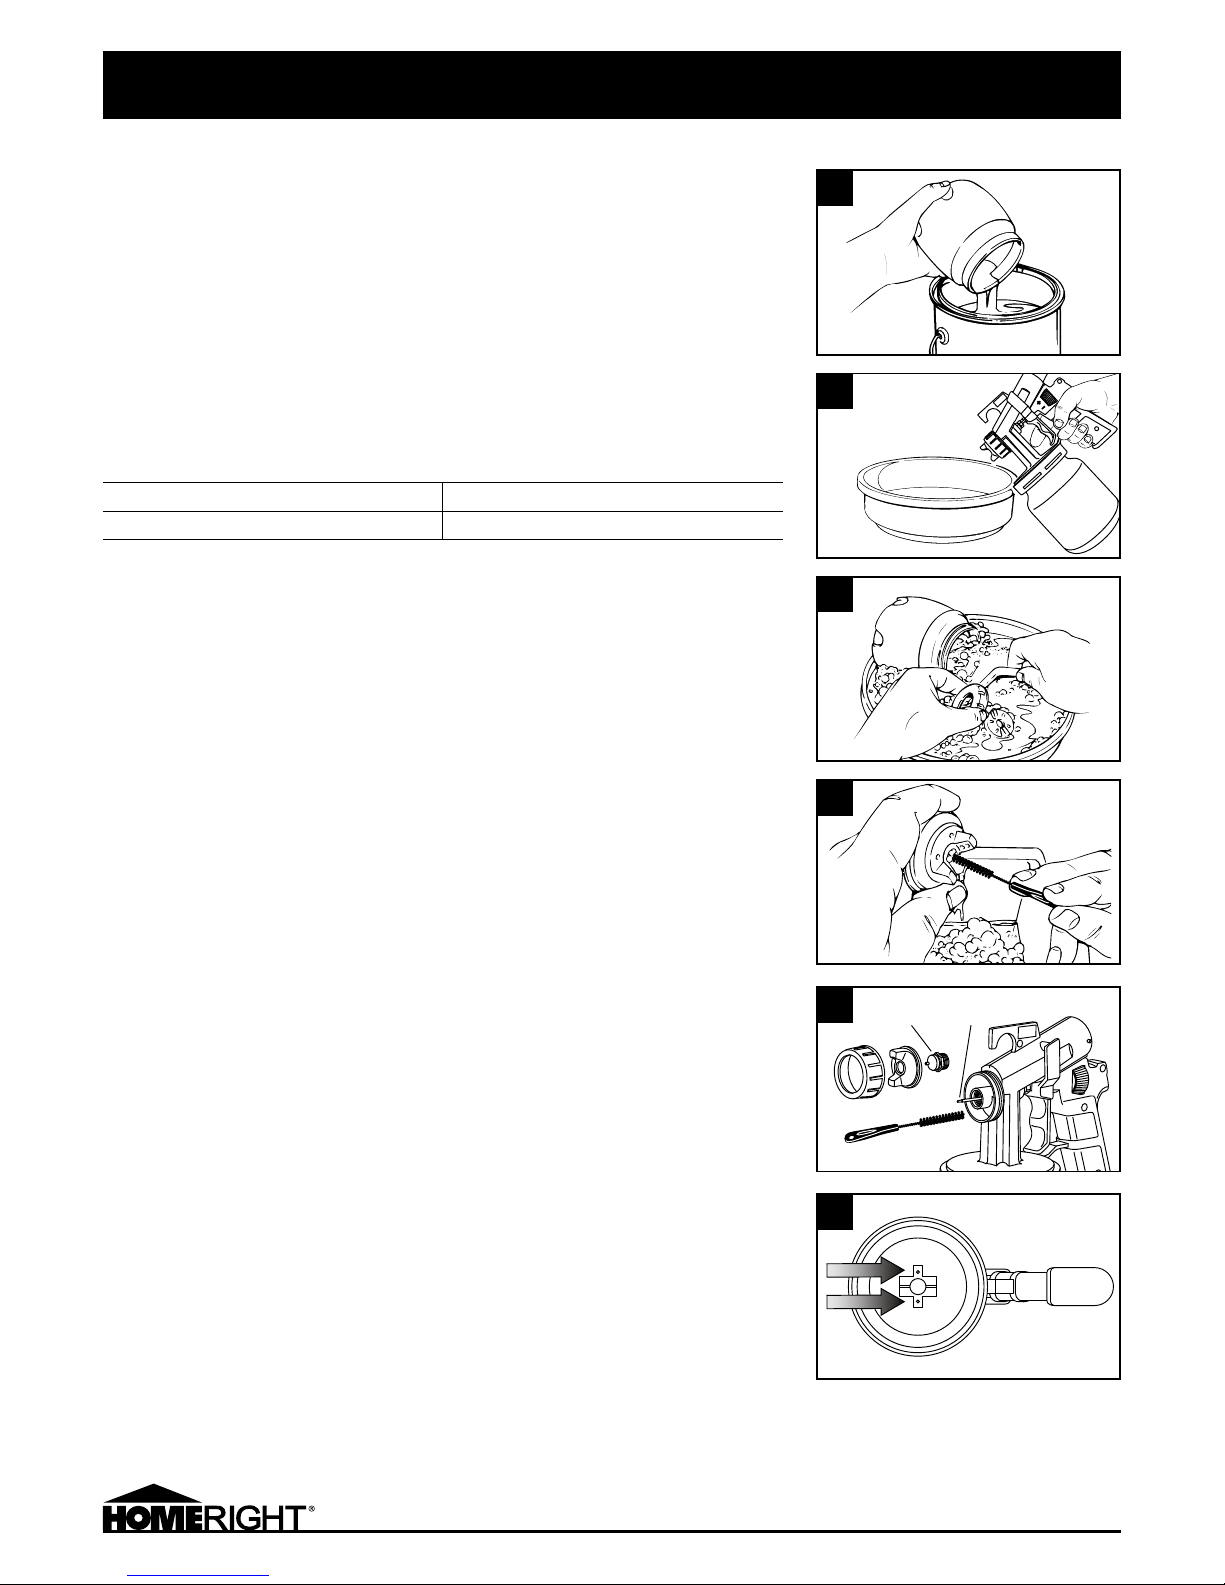
1. Unplug the sprayer from electrical outlet. Pull trigger on spray gun, hold trigger down for a few
seconds, this allows material inside unit to flow back into container.
2. Empty any remaining material from container (see figure A).
3. Fill container with a small amount of cleaning solution.
MATERIAL CLEANING SOLUTION
Latex Warm soapy water
Oil-Based Use manufacturer’s recommendation
4. Plug Sprayer into an electrical outlet. Turn Turbine on.
5. Spray cleaning solution and run solution through unit until clean (see figure B).
6. Unplug the sprayer from electrical outlet.
7. Remove container and properly discard any remaining cleaning solution.
Clean all removable Spray Gun Components in warm soapy water (see figures C & D).
8. Container
9. Pick-up tube
10. Air Cap and Nut
11. Paint Cup Gasket found in the spray gun cap
12. Spray tip. Unscrew and remove the air cap and nut. Use an 17 mm wrench or socket to unscrew
the Brass Fluid Nozzle. (use a counterclockwise motion)
Clean the Spray gun housing, brass fluid nozzle and fluid needle housing in warm soapy water
before reassembly
13. Use the brush provided to clean housing around needle (see figure E).
14. Thoroughly clean needle
15. There are two air holes deeply seated in the pick-up tube housing. (see figure F). Inspect holes
after the housing has been cleaned. If holes are clogged, it may be necessary to use a long piece
of straightened wire (a paperclip is ideal) to remove debris, be careful not to enlarge holes.
Reassemble
16. Make sure all components are thoroughly dried.
17. Place a drop of oil on the shank of the needle between the trigger and the front of the gun.
18. Insert brass fluid nozzle. Place air cup and screw on air nut.
19. Install pick up tube.
20. Inspect Paint Cup Gasket to ensure it is undamaged and then insert into cup.
21. Screw on container.
CLEAN UP & MAINTENANCE
A
1
B
C
D
E
F
Brass
Fluid
Nozzle
Needle
Assembly

10
FINISH MAX PRO FINE FINISH SPRAYER (C800850) ENGLISH
TROUBLESHOOTING
PROBLEM CAUSE REMEDY
Sags or runs A. Too much paint.
B. Gun moving too slowly.
C. Paint too thin.
D. Gun held at incorrect angle or too close to
painting surface.
E. Spray overlaps too much.
A. Turn paint control knob counterclockwise.
B. Move gun faster.
C. Add unthinned paint to achieve correct time
through viscosity test cup.
D. Hold gun at right angle to the painting surface at a
distance of 4-10 inches.
E. Overlap spray by approximately 1/3 width of spray
pattern.
Dry spray A. Insufficient paint coming from the spray gun.
B. Gun held too far from surface.
C. Overspray from a preceding section when gun
is not held at right angle to painting surface.
D. Spray patterns not well overlapped.
A. Turn paint control knob clockwise.
B. Hold gun at a distance of 4-10 inches or closer for
small objects.
C. Hold gun at right angle to the painting surface.
D. Overlap spray by approximately 1/3 width of spray
pattern.
Striped or uneven coverage A. Gun tilted or not held at right angle to painting
surface.
B. Dirt or burrs on air-cap or paint tip cause heavy
top and bottom pattern.
C. Spray patterns not well overlapped.
A. Hold the gun at right angle to painting surface.
B. Clean or replace air-cap or paint tip.
C. Overlap spray by approximately 1/3 width of
spray pattern.
Spitting or spraying lumps A. Solid particles in paint.
B. Loose pick up tube.
A. Strain paint.
B. Ensure pick up tube is firmly pushed into place.
Weak or no spray A. Low volume of paint from container due to
blocked air passageway in spray gun body.
B. Paint not thin enough.
C. Lid gasket missing/dirty.
A. Clean passageway (3 mm vent holes in the
container lid).
B. Add the appropriate amount of solvent to the
paint. Add only a small amount of solvent to the
paint at one time.
C. Replace/clean lid washer.
Top-or bottom-heavy pattern or
heavy right or left side pattern
A. Horn holes partially blocked.
B. Obstruction on paint tip or dirt on air cap seat
or paint tip seat.
A. Determine if obstruction is on air cap or paint
tip by making a test pattern, rotating air cap half
turn, and spraying another test pattern. If defect is
inverted, obstruction is on air cap.
B. Clean air cap with non-metallic instrument. If
obstruction is on paint tip, check for fine burring
which can be removed with 600 wet or dry
sandpaper. For dried paint inside, open and wash.
Fluttering spray A. Lack of paint.
B. Blocked paint passages.
C. Damaged paint nozzle or needle.
C. Lid gasket missing/dirty.
A. Refill container.
B. Clean.
C. Clean needle set or replace if necessary.
D. Clean/replace lid washer.
Paint leaking from guide nut A. Loose guide nut.
B. Worn guide washer.
A. Tighten guide nut.
B. Replace guide washer.
Paint leaking from front
of gun.
Needle not seated properly due to:
A. Worn or damaged paint nozzle.
B. Dirt or dried paint in nozzle.
C. Guide washer too tight preventing needle
from seating.
D. Broken spring.
E. Scored or damaged needle.
A. Replace nozzle.
B. Clean nozzle.
C. Loosen guide washer.
D. Replace spring.
E. Replace needle.
 Loading...