

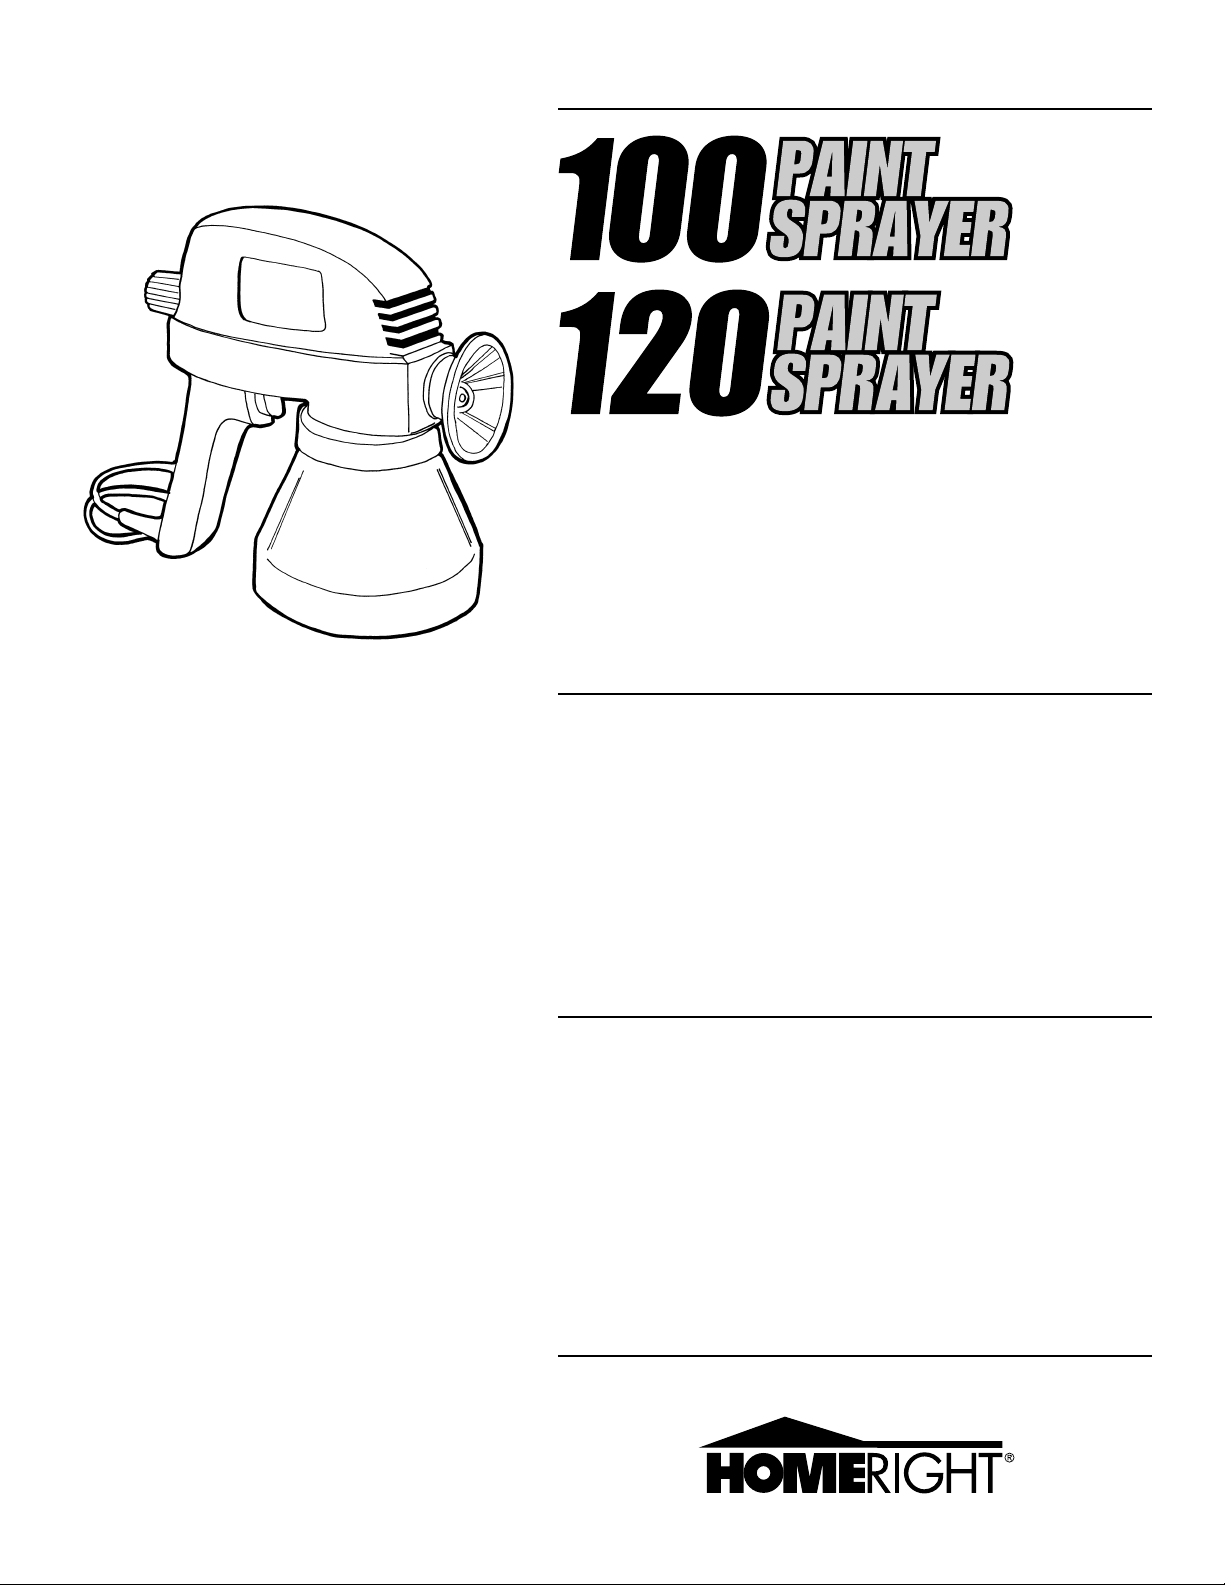
HomeRight 100, 120 User guide
Instruction Booklet
SAVE THESE INSTRUCTIONS
READ AND UNDERSTAND THIS OWNER'S MANUAL BEFORE
OPERATING YOUR AIRLESS SPRAYER.
For Household Use Only
KEEP CHILDREN AWAY FROM WORKING AREA.
Rociadores de pintura modelos 100 y 120
Folleto de instrucciones
CONSERVE ESTAS INSTRUCCIONES
LEA Y ENTIENDA ESTE MANUAL DEL PROPIETARIO ANTES
DE OPERAR SU ROCIADORA SIN AIRE.
Para el uso de la casa solamente
MANTENGA A LOS NIÑOS ALEJADOS DEL ÁREA DE
TRABAJO.
Pulvérisateur à peinture, modèles 100 et 120
Livret d'instructions
CONSERVEZ CES DIRECTIVES
L'UTILISATEUR DOIT LIRE ET COMPRENDRE LE GUIDE DU
PROPRIÉTAIRE AVANT DE FAIRE FONCTIONNER LE
PULVÉRISATEUR À HAUTE PRESSION.
Pour l'usage de ménage sevlement
TENEZ LES ENFANTS ÉLOIGNÉS DE L'AIRE DE TRAVAIL.
100 and 120 Paint Sprayer Operating Instructions
Like other power tools airless sprayers are safe when properly used
but can be dangerous if misused. It is the responsibility of the owner
to read all instructions, warnings, and safety precautions before
operating the unit and to use the unit properly. Failure to do so may
result in personal injury or loss of life and product damage.
Do not try to repair (or disassemble) the unit yourself. Repairs should
be performed by a qualified shop familiar with this unit or returned to
HomeRight (see warranty). This unit is to be used with authorized
parts only. Parts that do not comply with the specifications and safety
devices of the manufacturer, the user assumes all risks and liabilities.
WARNINGS
●
Do not operate sprayer without fluid in it.
●
Do not leave your sprayer unclean or allow materials to dry in the pump.
●
Do not spray any textured materials containing particles or fibers such
as metallic paints, fire retardant paints.
●
Do not use sprayer outside if raining.
●
Do not use sprayer below garage floor or grade level.
Hazard: Injection Injury - the airless sprayer pumps materials at
high pressure and can pierce skin and underlying tissues, leading to
serious injury or amputation.
Do not treat injection injuries as a simple cut. Injection injuries can
lead to amputation. Seek a physician's help immediately.
●
Never aim the sprayer at any part of the body.
●
Never allow any part of the body to come into contact with liquid stream.
●
Never put hand in front of gun. Gloves will not prevent injection injuries.
●
Never leave sprayer unattended or plugged in while cleaning.
●
Never remove tip guard while spraying.
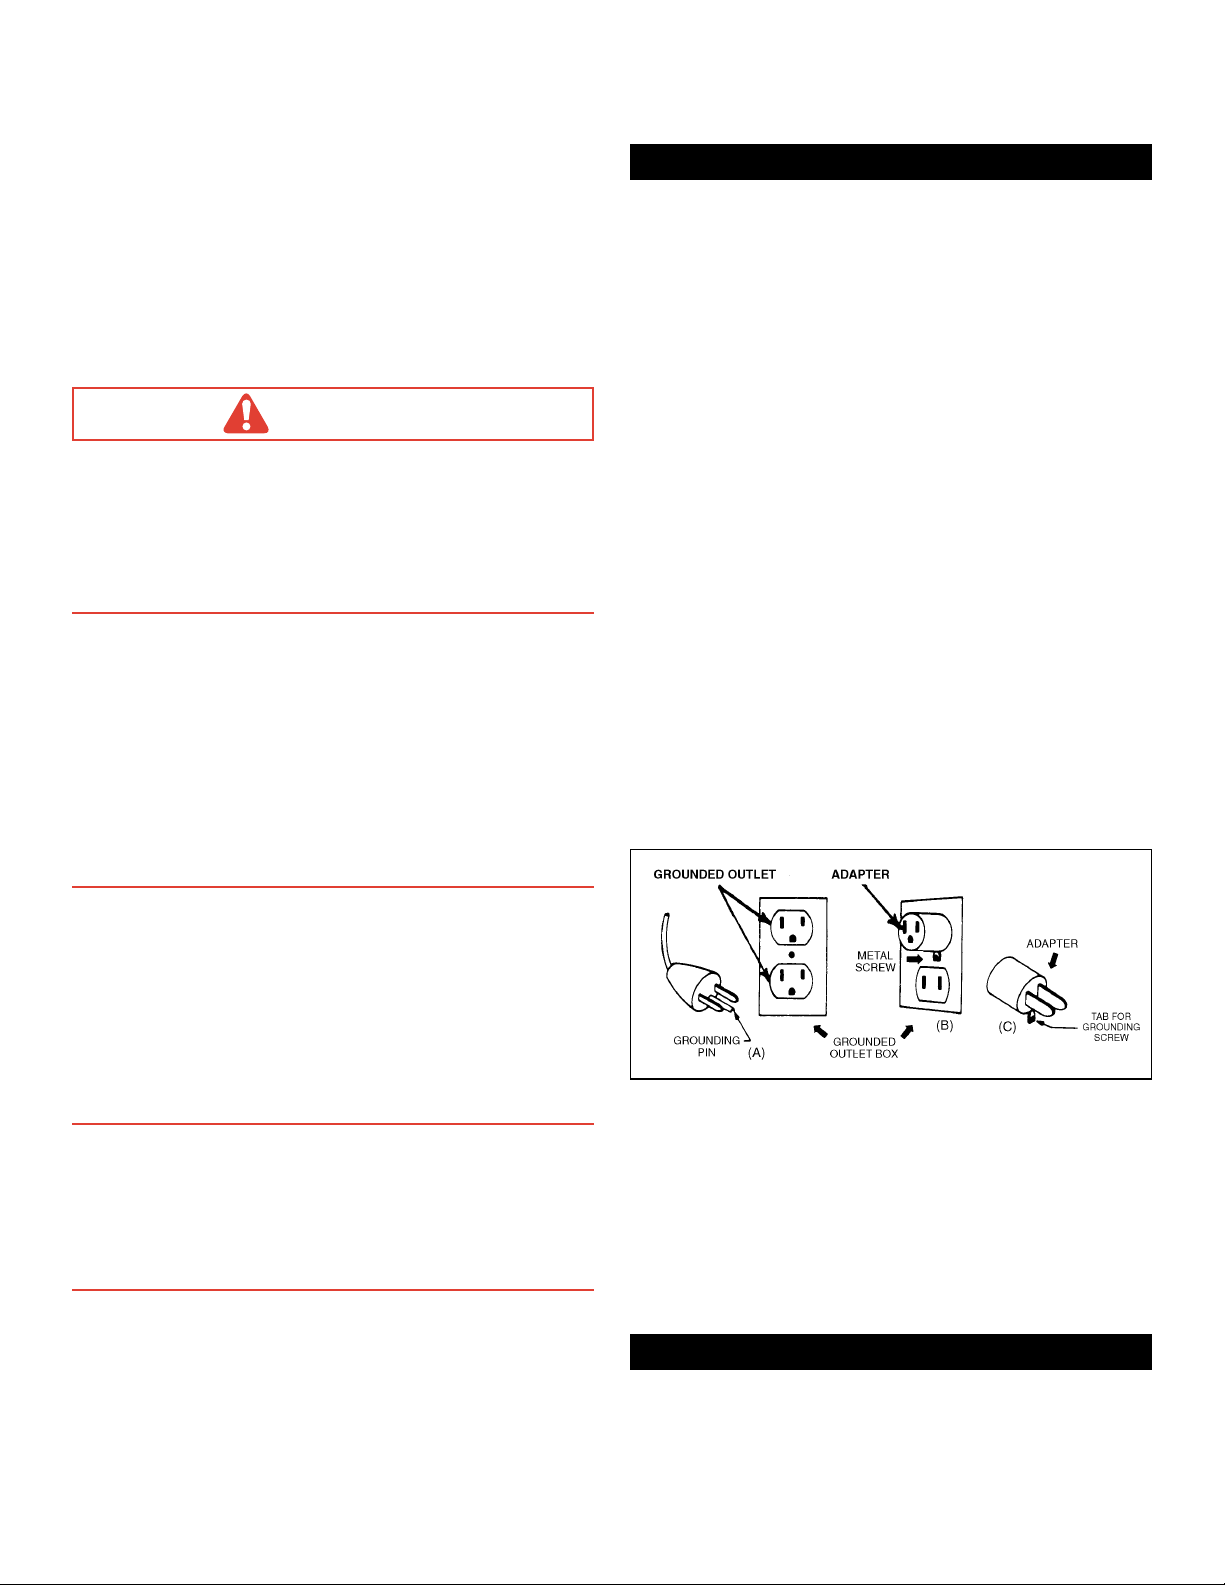
GROUNDING INSTRUCTIONS
The airless sprayer must be grounded. In the event of an electrical
short circuit, grounding reduces the risk of electrical shock by
providing an escape wire for the electric current. This product is
equipped with a cord having a grounding wire with an appropriate
grounding plug. The plug must be plugged into an outlet that is
properly installed and grounded in accordance with all local codes and
ordinances.
DANGER - Improper use of the grounding plug can result in a risk of
electric shock.
If repair or replacement of the cord or plug is necessary, do not
connect the grounding wire to either flat blade terminal. The wire with
insulation having an outer surface that is green with or without yellow
stripes is the grounding wire.
Check with a qualified electrician or serviceman if the grounding
instructions are not completely understood, or if in doubt as to
whether the product is properly grounded. Do not modify the plug
provided; if it will not fit the outlet, have the proper outlet installed by
a qualified electrician.
This product is for use on a normal 120 volt circuit, and has a
grounding plug that looks like the plug illustrated in sketch A. A
temporary adapter, which looks like the adapter illustrated in sketches
B & C, may be used to connect the plug to a 2-pole receptacle as
shown in sketch B if a properly grounded outlet is not available. The
temporary adapter should only be used until a properly grounded
outlet (sketch A) can be installed by a qualified electrician. The green
colored rigid ear, lug, or the like extending from the adapter must be
connected to a permanent ground such as a properly grounded outlet
box cover. Whenever the adapter is used, it must be held in place by a
metal screw.
Hazard: Explosion or Fire - Stain and solvent fumes can explode or
ignite, causing property damage and/or severe injury.
●
Keep area well ventilated. Exhaust and introduce fresh air to keep
fumes from accumulating in work area.
●
Do not spray in areas where there are ignition sources, static
electricity sparks, pilot lights, heaters, hot objects, cigarettes, open
flames.
●
Have fire extinguishing equipment present and in good working order.
●
Follow safety instructions and warnings of material manufacturers.
Hazard: Hazardous Vapors - Stain, paints, solvents, insecticides,
varnishes, and other materials may be harmful if inhaled, causing
severe nausea, fainting, or poisoning.
●
Use a mask or respirator when spraying when there is a chance of
inhaling vapors.
●
Use protective eyewear.
Extension Cords
Use only a 3-wire extension cord that has a 3-blade grounding plug
and a 3-slot receptacle that will accept the plug. Make sure your
extension cord is UL/ETL listed and is in good condition. When using
an extension cord, be sure to use one that is heavy enough for the
current - for lengths less than 50 feet use a #18 AWG. or heavier, for
more than 50 feed use #16 AWG. If in doubt use a heavier gauge. The
smaller the gauge the heavier the cord. An undersized cord will cause
a drop in line voltage resulting in loss of power and possible damage
to the product.
STORAGE
Make sure unit is clean and dry before storing. Store in a dry location.
The electrical cord should not be crimped during storage to prevent
damage.
2
100 and 120 Paint Sprayer Operating Instructions
PRACTICE FIRST
Practice spraying water on newspaper or cardboard. This will give you the feel of the sprayer and all
its features. Follow the instructions for adjusting to the proper spray pattern.
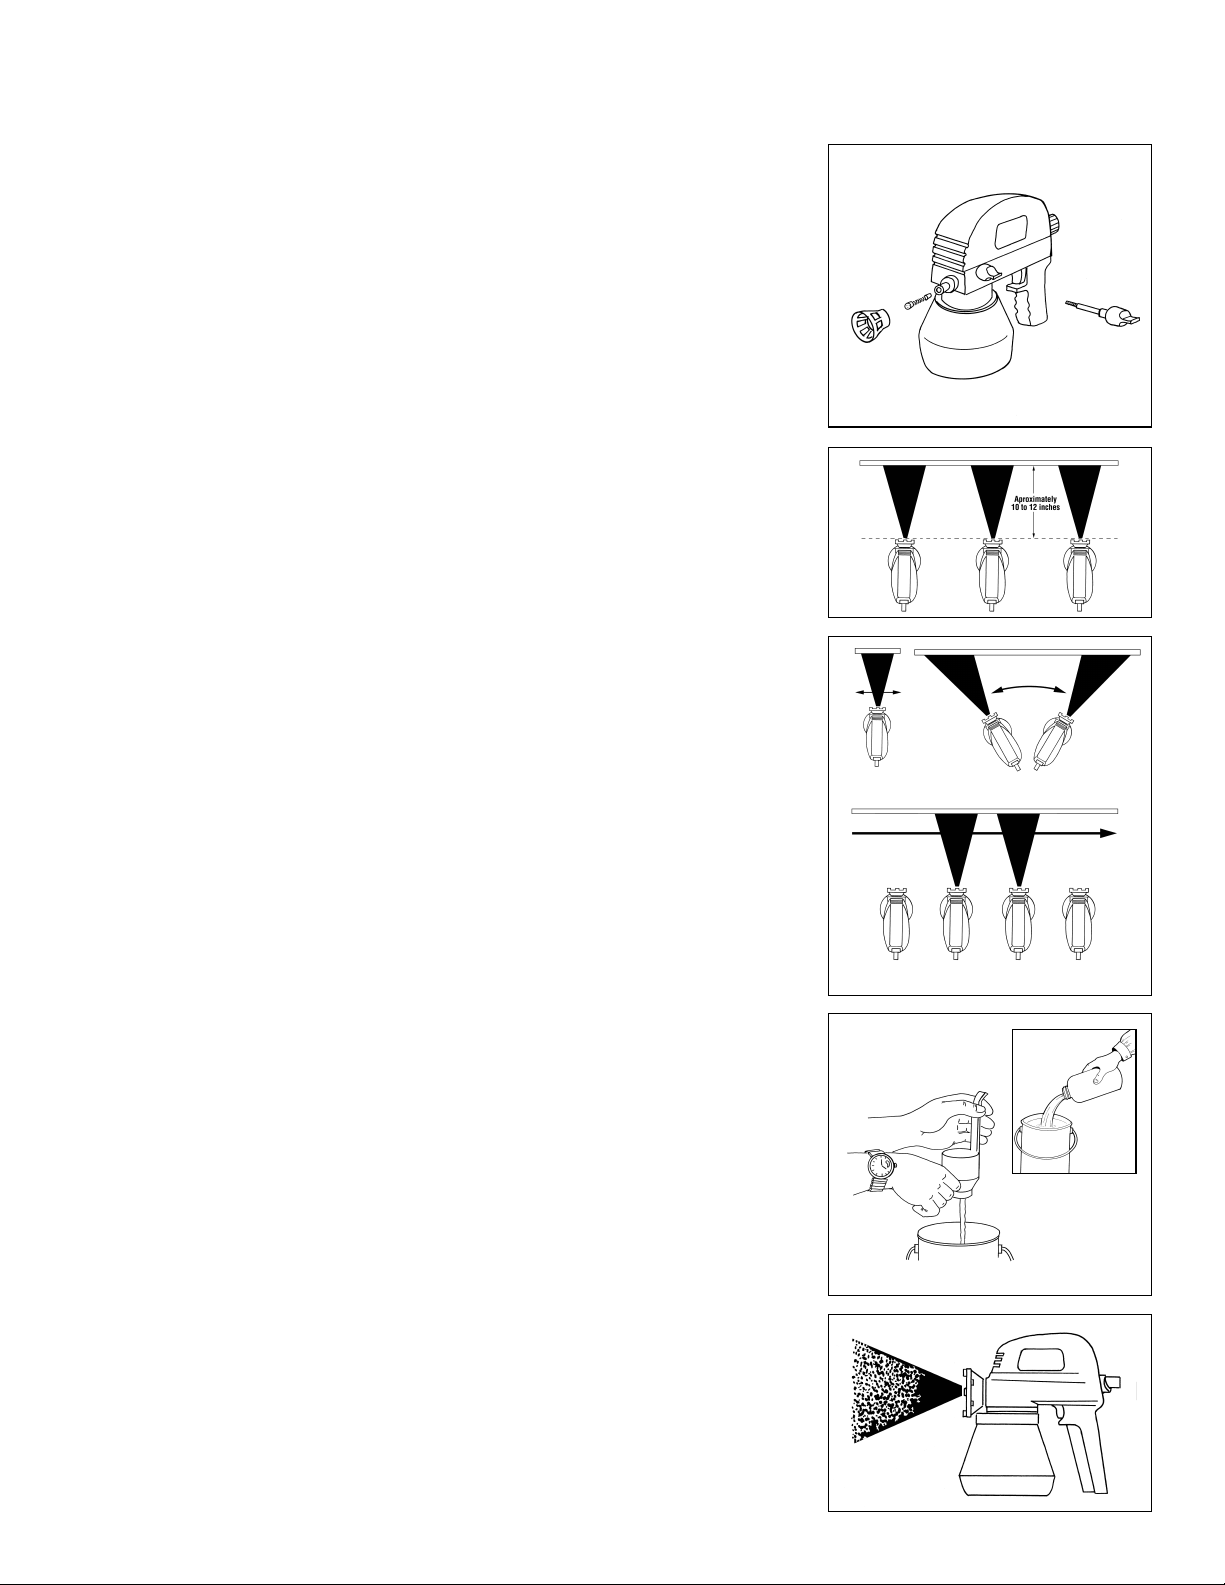
1. Check the following: See Figure A.
a. Atomizer valve assembly is in cartridge.
b. Spray nozzle is screwed on tightly
c. Pick-up tube with filter is inserted tightly into tall cylinder port of pump housing.
2. Fill container with water.
3. Plug in sprayer
4. Press trigger. Allow a few seconds for the pump to spray material.
5. As you spray, notice the difference in spray volume and spray pattern while adjusting the control
knob. Adjust the control knob until you get the best possible spray pattern.
NOTE: The best distance for spraying is 10" -12". Too far away may cause excessive over spraying and
too close may cause excessive paint build-up. See Figure B.
6. Keep a stiff wrist. Do not arch your wrist at the beginning or the end of the stroke. Do not stop the
motion of the unit while spraying. The path of the sprayer must pass beyond the area being painted
and the flow of paint must be triggered on and off as the sprayer passes into and out of the spraying
area. See Figure C.
Stopping the motion of the sprayer or swinging into a new stroke pattern while paint is being delivered
will result in heavy paint build-up at the edges of the stroke.
THINNING MATERIALS
In order for your sprayer to operate properly it is important to make sure the material is thin enough
to be sprayed. Paint should be thinned by adding the appropriate material recommended by the paint
manufacturer.
For latex paints, use a lubricant additive, or water, to prevent excess piston wear and possible seizure
of the piston. Floetrol (brand name) is a lubricant additive that should be added before thinning paint
with water, then if further thinning is needed add water.
Following is a general thinning guide using the viscosity cup provided (Figure D). Because materials
differ from brand to brand, this guide can only be a place to start. The final guide to correctly thinned
paint is achieving the proper spray pattern. See Figure E.
The final guide to correctly thinned paint is achieving the proper spray pattern.
Material General Thinning Guide
Stains - Oil Use as is, unthinned
Stains - Latex 10-25 seconds
Latex Paint 35-45 seconds
Latex Primer 35-45 seconds
Oil Base Paint 15-25 seconds
Insecticides Use as is, unthinned
Water Sealer Use as is, unthinned
Always follow the coverage rate recommended by the manufacturer regardless of the thinning required.
Notes:
1. Additional thinning may be required when using the suction tube and/or the flexible spray extension.
2. Old paint or stain should be strained before using.
3. Stir paint slowly, do not shake to prevent air bubbles.
4. Be sure suction tube is tightly inserted in correct intake port.
5. Thin material to proper viscosity.
6. Use the correct spray tip for the material being used.
7. Check spray tip and atomizer valve for wear.
8. Always clean and oil sprayer thoroughly after each use.
When a low humming sound is heard, usually the piston has seized, immediately stop pressing
on the trigger, or damage to the motor can occur.
Correct Incorrect
Start Trigger Release End
Thin materials
A
B
C
as needed
D
E
3
100 and 120 Paint Sprayer Operating Instructions
SPRAYING INSTRUCTIONS
1. Appropriate breathing protection, eye protection, gloves and clothing should be used.
2. Begin spraying, adjust the control knob to get the best spray pattern, continue to spray on newspaper
or cardboard.
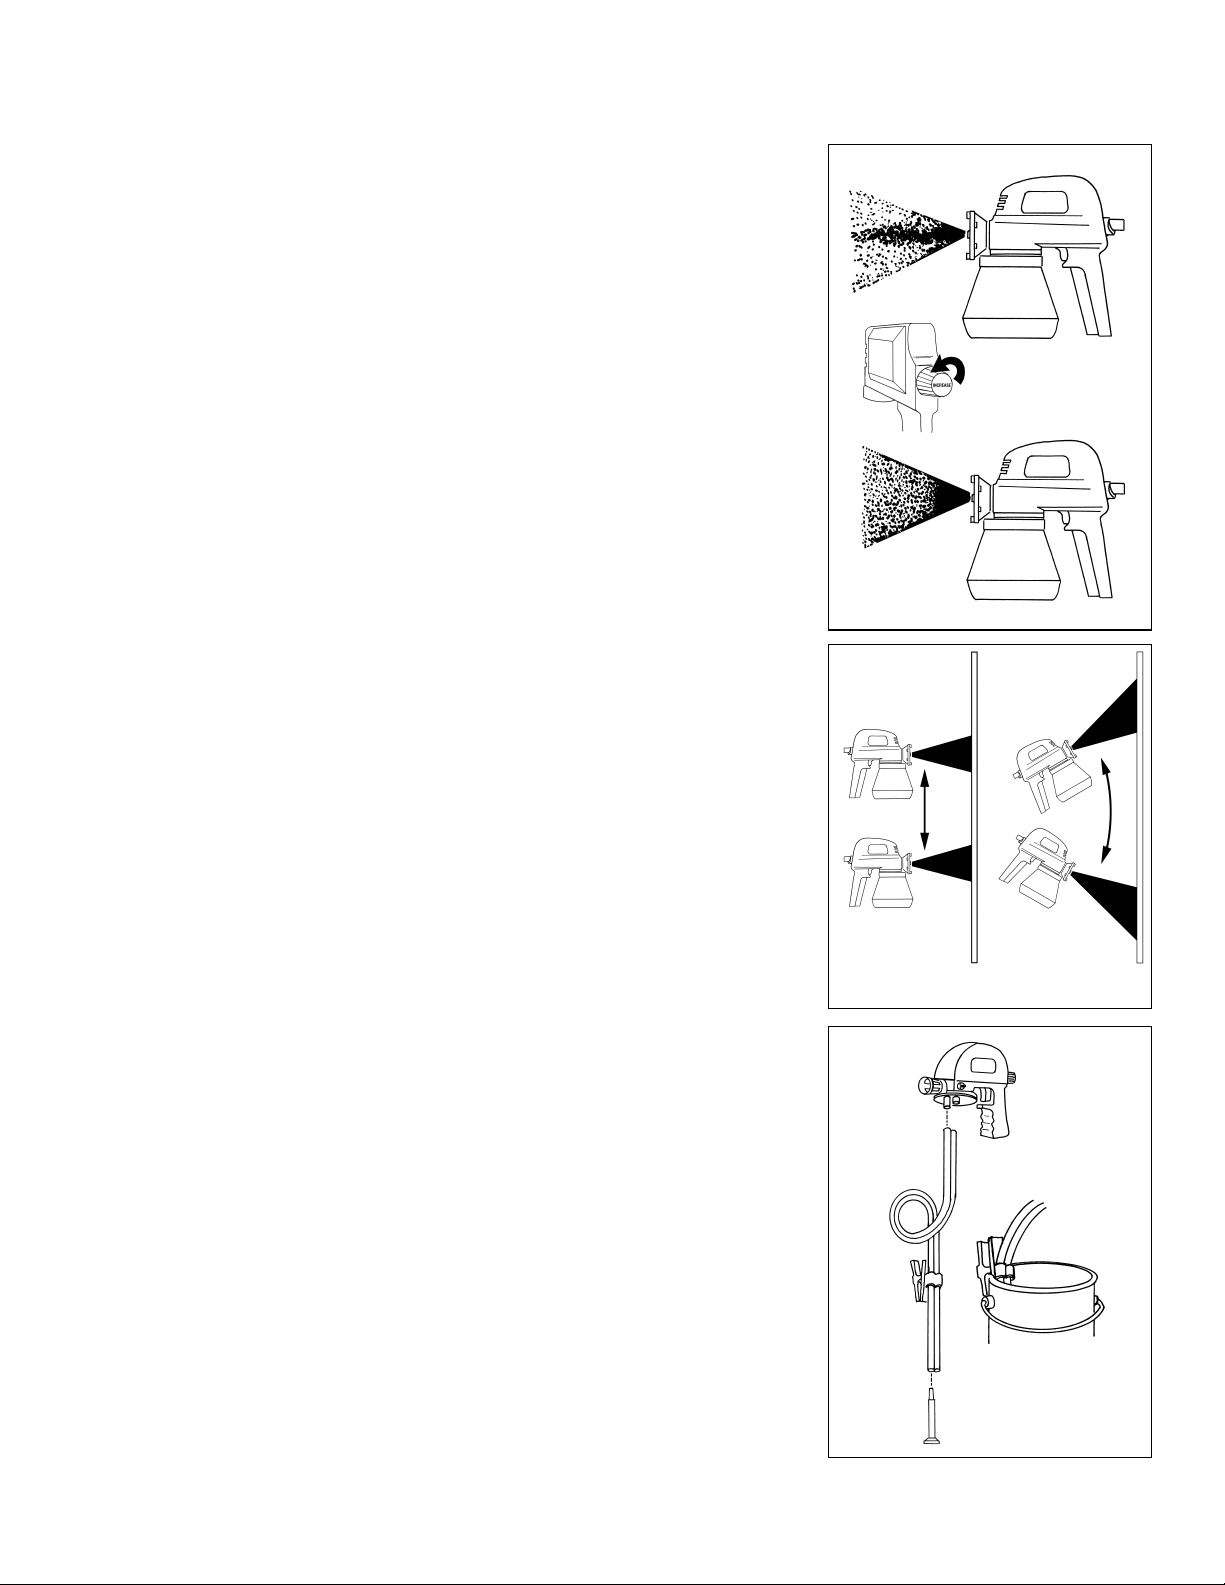
A pattern with heavy spray in center, means the pressure is too low (Figure F1). Adjust the control knob
by turning counterclockwise to increase pressure. The paint should be evenly spread over the surface.
See Figure F2.
3. If the spray pattern is not correct, change the nozzle.
4. If the spray pattern is still not correct, disassemble the spray nozzle and inspect the atomizer valve
assembly. If the valve is excessively worn, (normally scratch marks around the outside) replace the
atomizer valve assembly.
5. If the spray pattern is still not correct, a thorough cleaning of the nozzle, atomizer valve assembly,
and pump assembly may be required. Cleaning every 5-9 gallons of paint may be necessary for
correct spraying. After cleaning, reassemble the parts.
6. Hold the sprayer 10-12 inches from the surface to be stained. Keep the sprayer parallel to the
ground without pointing it up or down. See Figure G.
NOTE:
• TILTING THE AIRLESS SPRAYER IS NOT RECOMMENDED.
• TO AVOID RUNS AND SAGS DO NOT SPEED UP OR SLOW DOWN WHILE MOVING THE SPRAYER.
7. Overlap each stoke about 1/3 of the spray pattern.
8. To spray inside corners, spray the adjoining walls or surface first. The over spray will paint the
corner.
9. When you spray an outside corner, point the nozzle of the sprayer in towards the surface. This will
prevent paint from being sprayed past the corner and onto surfaces you do not want painted.
Caution: Do not twist electrical cord, make sure heavy objects are not placed on electrical cord. Keep
electrical cord away from heat and sharp objects. Make sure cord is not in a traffic area to avoid
tripping of persons. Do not use if cord is damaged.
IMPORTANT
Should a low humming sound and/or irregular spray pattern occur while spraying, immediately
remove plug from electrical source and thoroughly clean. This will prevent the motor from overheating
and causing damage to the sprayer. (See cleaning instructions).
Note:
• If you stop spraying for 30 minutes or longer, retest the spray pattern by spraying on newspaper or
cardboard. If you are unable to adjust the spray pattern properly, there is a possibility that the paint
has started to dry. If this happens, it is time to clean the sprayer. (See cleaning instructions).
• Keep vent in pump housing clean. If paint should dry and clog hole, your sprayer will not function
properly.
F1
F2
Correct Incorrect
G
USING THE SUCTION TUBE KIT WITH THE PAINT SPRAYER 100/120
1. Remove the container and pick up tube with filter from the sprayer.
2. Slide dual tubing onto the two open cylinder ports on the sprayer.
3. Insert pick up tube with filter into other end of dual tubing making sure pick up tube is opposite the
longest open cylinder port. See Figure H.
4. Immerse tube into material and secure to side of container using the retainer clamp.
Note: To reduce the time the sprayer runs without material, hold the sprayer below the fluid level when
priming the sprayer, this will speed up the time the material is drawn through the tube. The materials
may need additional thinning if the sprayer will not prime.
Note: Normal priming time is 1 minute for material to travel from container to sprayer. If it takes longer
than 2 minutes stop and clean sprayer.
Cleaning the Suction Tube
1. To clean your sprayer run water or solvent through the suction tube until clear.
2. Disassemble the fittings at both ends of the suction tube before any remaining material can dry.
3. Thoroughly clean the adapter fitting, pick up tube and filter.
4
H
100 and 120 Paint Sprayer Operating Instructions
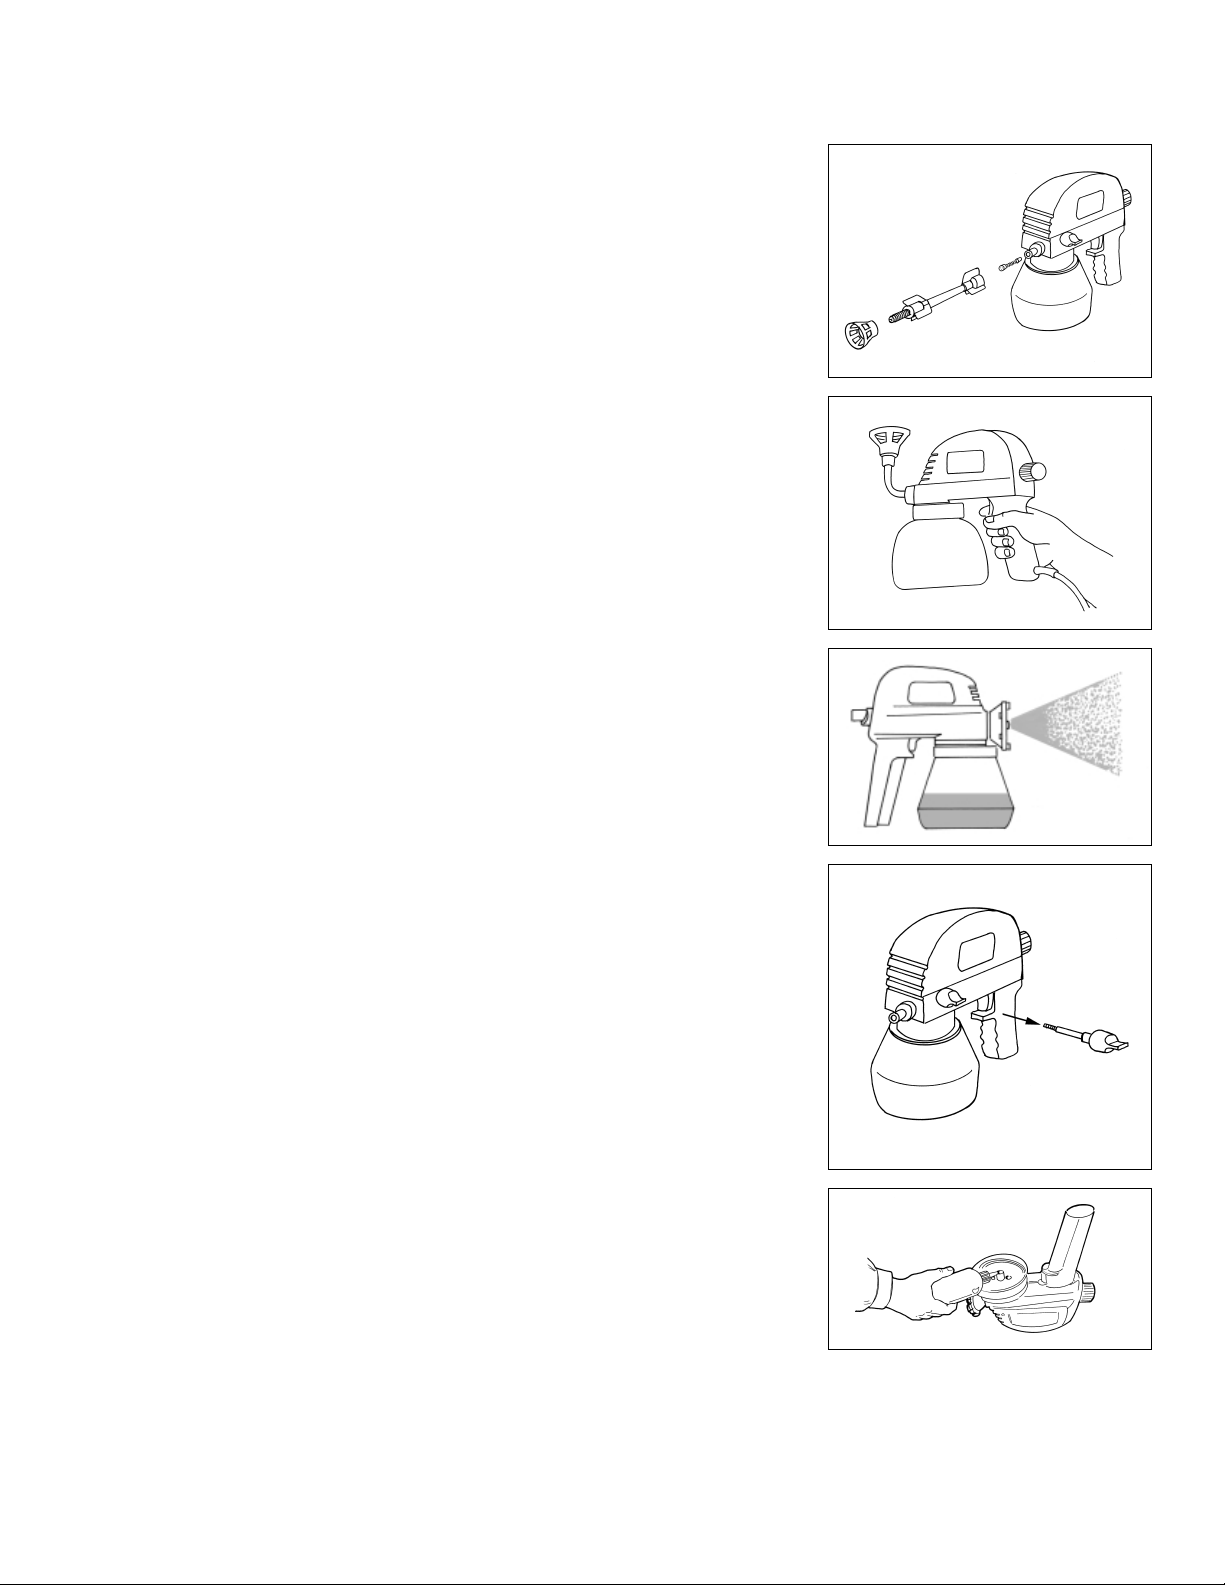
USING THE FLEXIBLE EXTENSION (Optional Accessory for Paint Sprayer 100)
The flexible extension can be bent at any angle to make spraying floors, ceilings, overhangs, or hard
to reach areas easier. Using the flexible extension will prevent tilting of the sprayer.
Note: Tilting of the sprayer is not recommended as it may cause leakage.
1. Release spray tip by turning it counterclockwise. Remove the atomizer head from sprayer and check
for wear. The atomizer valve assembly should remain in cartridge.
2. Attach flexible extension end onto the sprayer.
3. Screw the spray nozzle onto the flexible extension, leaving the atomizer valve in place. See Figure I.
4. Bend the adjustable flexible extension to the position which is required for painting, this can be up,
down, or sideways. See Figure J.
Cleaning the flexible extension
1. To clean the flexible extension, spray water or solvent through the sprayer until clean.
2. Disassemble nozzle and atomizer valve to finish cleaning.
3. If you are using the suction tube, you will need to cover the materials to avoid a film forming and
drying out.
Note: Before returning to project, practice first and adjust the spray pattern.
4. If using the paint container, empty any remaining material. Fill approximately 1/2 full with appropriate
cleaning solution; for latex use warm soapy water; for oil based use solvent recommended by the
material manufacturer.
I
SHORT TERM CLEAN UP
Use these instructions if you are not going to be spraying for 30 minutes or longer but will continue
the project.
1. Unplug electrical cord. Remove cylinder housing and clean piston, cylinder and nozzle.
2. Before returning to project, practice first and adjust the spray pattern.
LONG TERM CLEAN UP
If you are finished with the project or are not going to use the sprayer the next day you must follow
these instructions for proper clean up. Never store sprayer longer than overnight without cleaning.
Failure to properly clean sprayer will cause damage.
1. Unplug sprayer.
2. Empty any remaining material from the container. Fill approximately 1/2 full with appropriate cleaning
solution; for latex use warm soapy water; for oil based use solvent recommended by the material
manufacturer. See Figure K.
3. Plug in sprayer.
4. Trigger the sprayer until cleaning solution comes through the sprayer for several seconds.
5. Remove container and properly discard the cleaning solution.
Cleaning pump housing:
1. Turn thumb knob counterclockwise to unscrew. Remove. See Figure L.
2. Pull down and forward on front of sprayer to remove cartridge housing.
3. Remove all parts, thoroughly clean with appropriate solution. Lubricate all moving parts with
WD-40 or any lightweight oil.
Re-assembly:
1. Reinsert cylinder pump assembly into sprayer. Place cover on housing. Insert thumb screw and
tighten.
2. Turn sprayer upside down, then put in a small amount of light oil such as brand WD-40 into the
suction hole and trigger briefly. This prevents the piston and cylinder from rusting. See Figure M.
J
K
L
M
5
 Loading...