


Easy Start
HL100E HomePlug Ethernet Adaptor
Easy Start
Version 1.0
CONTENTS
1 Introduction to HL100E HomePlug Ethernet Adaptor . .……. 2
1.1 Package Contents……. . . . .. . . . . . . . . . . . . . . . . . . . . . . . 2
1.2 Important Safety Instructions. . . . . . . . . . . . . . . . . . . . . . . . 3
2 Installation and Connection . . . . . . . . . . . . . . . . . . . . . . . . . . 4
2.1 System Requirements . . . . .. . . . . . . . . . . . . . . . . . . . . . . . .4
2.2 Installation and Uninstallation of Configuration Utility . . .……4
2.3 Connection and Light indicators . . . . . . . . . . . . . . . . . . . . . . .5
3 All about the Home Network . . . . . . . . . . . . . . . . . . . . . . . . . . . .6
3.1 Configuring the Computer . . . . . . . . . . . . . . . . . . . . . . . . . . . .6
3.2 Examples of Applications . . . . . . . . . . . . . . . . . . . . . . . . . . . . .8
3.3 Care Instructions . . . . . . . . . . . . . . . . . . . . . . . . . . . . . . . . . . .10
3.4 Frequently Asked Questions . . . . . . . . . . . . . . . . . . . . . . . . . .10
4 Configuration Utility User Guide . . . . . . . . . . . . . . . . . . . . . . . .11
5 Technical Data . . . . . . . . . . . . . . . . . . . . . . . . . . . . . . . . . . . . . .15
Product warranty does not apply to damage caused by lightning, power surges or wrong voltage usage.
Page 1 of 15

Easy Start
1 Introduction to HL100E HomePlug Ethernet Adaptor
One of the major drawbacks in setting up home network is the absence of required wiring inside the
house to interconnect networked computers. In recent years several technologies have attempted
to address the issue. The most prominent technology so far is the family of WIFI (802.11 X)
products. Recently, however, another technology called HomePlug has come forth. It uses
electrical grids, already available inside walls to transmit data from computer to computer.
HomePlug technology modulates computer data in a way to enable them use power grid as a
medium of transmission from point to point. Using this technology, two computers have a virtual
Ethernet connection without the need to be physically connected to each other.
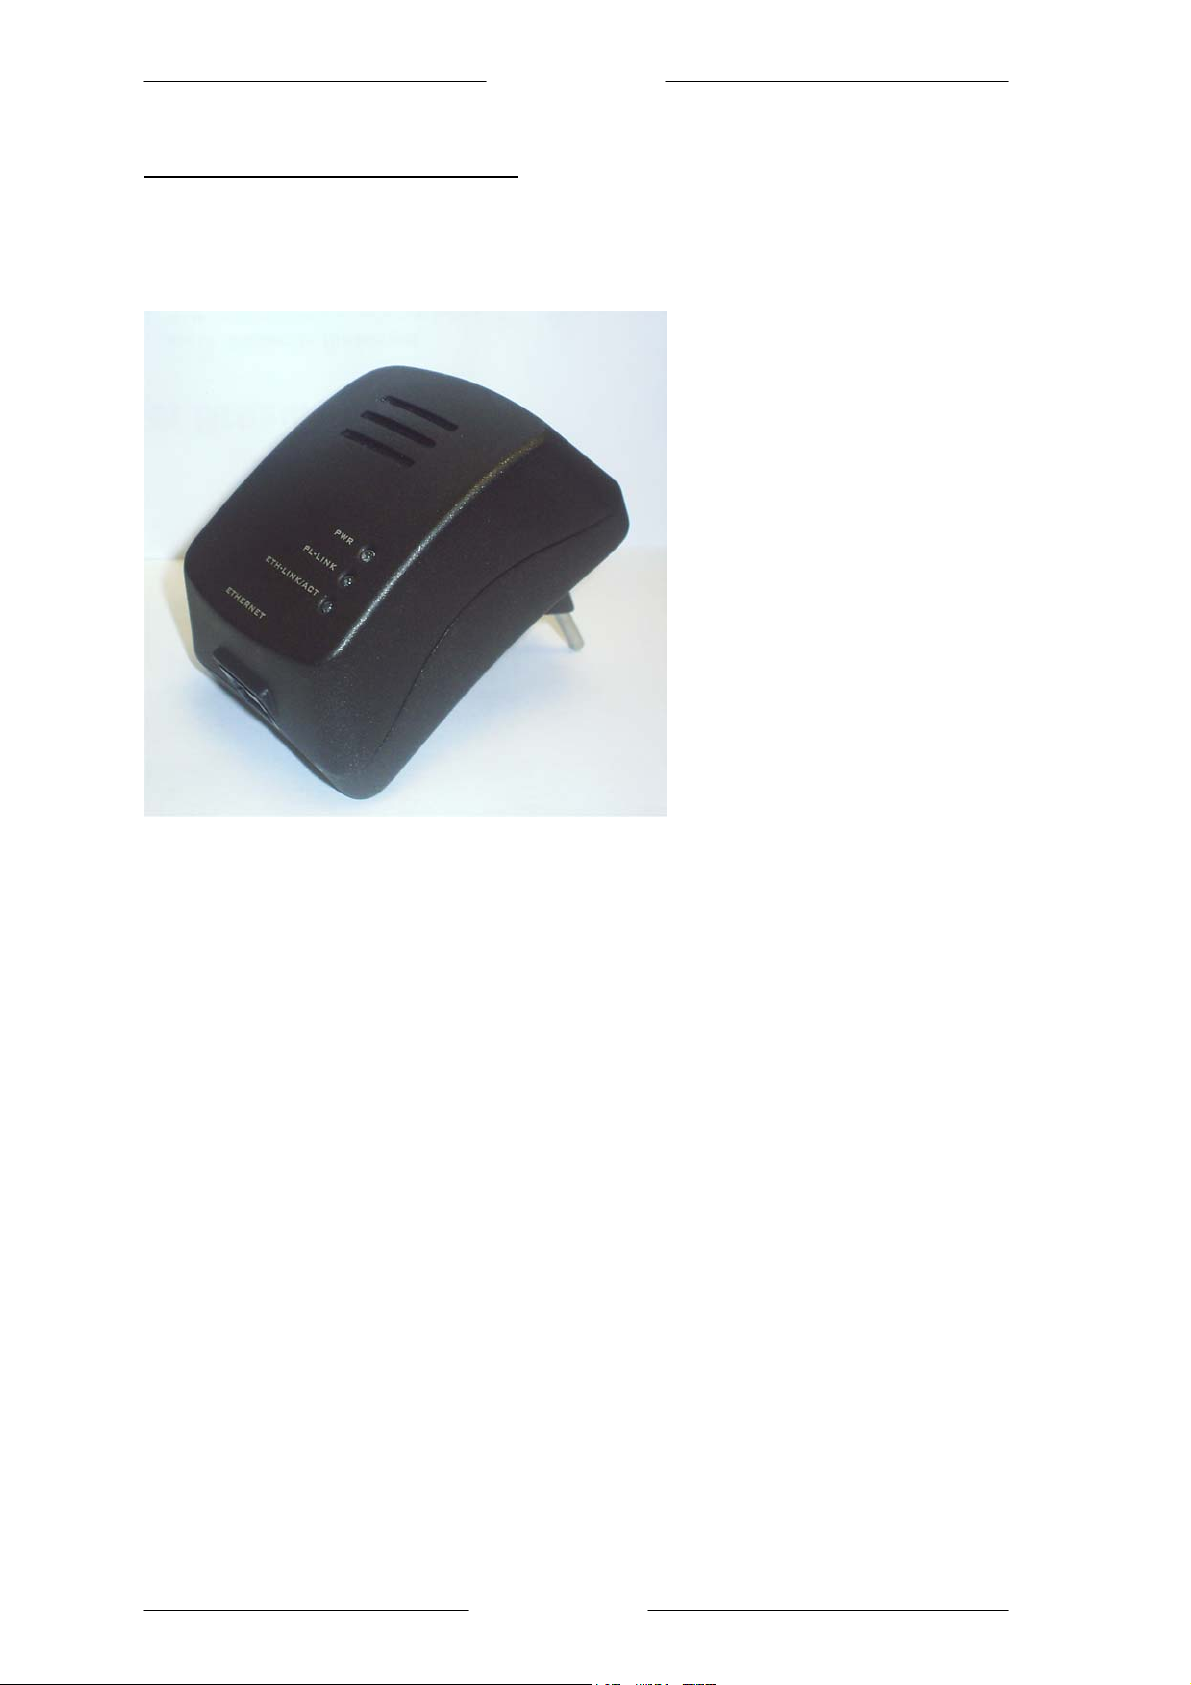
The HL100E HomePlug Ethernet Adaptor has 3 indicator lights (LEDs) and an Ethernet port. The
LEDs depict the connection status, as well as other information, enabling detailed diagnosis of
system malfunction. The Ethernet port is to connect to a device in the home network. The HL100E
HomePlug Ethernet Adaptor has a standard power plug for connection to a power outlet. There are
three main kinds of power plugs:
• HL100E (UK) – 3 pins UK plug with integrated 230V AC power supply.
• HL100E (EUR) – 2 pins Euro plug with integrated 230V AC power supply.
HL100E (US) – 2 pins US plug with integrated 120V AC power supply.
•
Computer networking in the office or at home has the following advantages:
1. Share centrally stored data
2. Share one printer
3. Multi-access to one Internet connection
4. Multi-user games over the network.
1.1 Package Contents
Make sure that you have the following items. If any of the items is damaged or missing, please
contact your dealer immediately.
HL100E HomePlug Ethernet Adaptor (Qty:2) Easy Start (Qty:1)
Configuration Utility Installation CD (Qty:1) CAT-5 UTP Straight Ethernet Network
cable (RJ-45) (Qty:2)
Page 2 of 15

Easy Start
1.2 Important Safety Instructions
Please read these instructions carefully:
1. Unplug the HL100E HomePlug Ethernet Adaptor from the wall outlet before cleaning. Do not use
liquid cleaners or aerosol cleaners. Use a damp cloth for cleaning.
2. Do not use the HL100E HomePlug Ethernet Adaptor near water.
3. The HL100E HomePlug Ethernet Adaptor should never be placed near or over a radiator or heat
register, or in a built-in installation unless proper ventilation provided.
4. The HL100E HomePlug Ethernet Adaptor should be operated from the type of power indicated
on the marking label. If you are not sure of the type of power available, consult your dealer or
local power company.
5. The HL100E HomePlug Ethernet Adaptor relies on the building’s electrical installation for
short-circuit (over current) protection. Ensure that a fuse or circuit breaker no larger than 120
VAC or 230 VAC (depends on the power supply type in your country) is used on the phase
conductors (all current-carrying conductors).
6. Plug the HL100E HomePlug Ethernet Adaptor directly into a 120V AC or 230V AC (depends on
the power supply type in your country) wall outlet. Do not use an extension cord between the
adapter and the AC power source.
7. Do not attempt to service the HL100E HomePlug Ethernet Adaptor yourself, as opening or
removing covers may expose you to dangerous voltage points or other risks as well as ruin
product warranty. Refer all servicing to qualified service personnel.
8. Unplug the HL100E HomePlug Ethernet Adaptor from the wall outlet and refer the product to
qualified service personnel for the following conditions:
- If liquid has been spilled into the product.
- If the product has been exposed to rain or water.
- If the product does not operate normally when the operating instructions are followed.
- If the product exhibits a distinct change in performance.
Page 3 of 15

Easy Start
2 Installation and Connection
2.1 System Requirements
HL100E HomePlug Ethernet Adaptor is applicable with all TCP/IP operating systems with Ethernet
port. Drivers are not required for this adapter. But the supplied Configuration Utility software to
assign the network password operates only with Windows operating systems.
Your computer must meet the following requirements in order to use the HL100E HomePlug
Ethernet Adaptor Configuration Utility:
Operating systems:
Windows 98SE, Windows Me, Windows 2000 or Windows XP with Ethernet connection
•
Pentium II 300 MHz MMX-Compatible PC or greater
•
At least 64MB hard disk space and memory
•
CD-ROM drive
•
Note: Your computer or the device to which you want to connect the HL100E HomePlug
Ethernet Adaptor must have an Ethernet port, i.e. a network card or a network adaptor.
2.2 Installation and Uninstallation of Configuration Utility
Simple Installation:
1. Connect the HL100E HomePlug Ethernet Adaptor to the computer or the device with the
Ethernet cable.
2. Connect the HL100E HomePlug Ethernet Adaptor to the Power Outlet.
3. Install the Configuration Utility. The Configuration Utility Installation CD has auto run
feature. If the Configuration Utility Installation CD auto run fails, please run the Setup.exe file
in the CD.
4. Follow the on screen instructions to install the Configuration Utility.
Please refer to Page 11 for the Configuration Utility User Guide.
Note: 1) Before connecting the HL100E HomePlug Ethernet Adaptor, please note its
Security ID / Device Password and keep it available for configuration of the
network.
2) No drivers are required for installation of the HL100E HomePlug Ethernet Adaptor.
Uninstallation:
1. To uninstall the Configuration Utility, go to the Control Panel of your system.
2. Open the Add/Remove Programs.
3. Select and double click on the PowerPacket Utilities in the Add/Remove Programs
Properties.
4. Follow the on screen instructions to uninstallation the Configuration Utility.
Page 4 of 15
Easy Start
2.3 Connection and Indicator Lights
The HL100E HomePlug Ethernet Adaptor has three lights indicator (LEDs) and an Ethernet
port:
PWR: Lights up when connected to AC power supply.
PL-LINK: Lights up when detected and connected with another HomePlug adaptor
within the network.
ETH-LINK/ACT: Lights up when connected to the Ethernet port of the computer or other
Ethernet devices.
Flashes during data transfer.
ETHERNET: This is the connection point for connecting it to a computer or other devices with
Ethernet port
.
Page 5 of 15

Easy Start
3 All about the Home Network
This chapter contains important and useful information on networks—from the configuration of your
computer to examples of applications to general tips.
3.1 Configuring the Computer
Now that you have successfully connected and installed your HL100E HomePlug Ethernet
Adaptor, we show you how to configure your computer correctly and how to check existing settings.
3.1.1 Windows 98 and Windows Me
1. Open the properties of the LAN connection on the connected computers by selecting
Start Settings Control Panel Network
2. Click the entry for the TCP/IP protocol of the network adaptor and on Properties. Enable the
option 'Obtain an IP address automatically'. You can ignore all other options: they either
remain empty or retain their default settings. Close the dialogs with OK.
Note: If you cannot find an entry similar to 'TCP/IP' or 'TCP/IP -> Network Adaptor Name' or
'Internet Protocol (TCP/IP)', you must install the TCP/IP protocol. Under Add select 'Protocol' and
click Add again. In the next dialog box under 'Manufacturer' select 'Microsoft' and under 'Network
Protocol' select 'TCP/ IP'.
3. If you use a router for Internet access, you will still need to configure it, because the router
dials into the Internet, not the computer.
Under Start Settings Control/Panel Internet Option select the
‘Connections’ tab and enable the 'Never dial a connection' option. Close the dialogs with OK.
3.1.2 Windows 2000
1. Open the properties of the LAN connection on the connected computers by selecting
Start Settings Control Panel Network and Dial-up Connections. Click with
the right mouse button on the corresponding LAN connection and select 'Properties'.
2. Click the entry for the TCP/IP protocol of the network adaptor and on Properties. Enable the
option 'Obtain an IP address automatically'. You can ignore all other options: they either
remain empty or retain their default settings. Close the dialogs with OK.
Page 6 of 15

Easy Start
Note: If you cannot find an entry similar to 'TCP/IP' or 'TCP/IP -> Network Adaptor Name' or
'Internet Protocol (TCP/IP)', you must install the TCP/IP protocol. Under Install select
'Protocol' and click Add. In the next dialog box select 'Internet Protocol (TCP/IP)' and confirm
with OK.
3. If you use a router for Internet access, you will still need to configure it, because the router
dials into the Internet, not the computer.
Under Start Settings Control Panel Network and Dial-up Connections,
and enable the 'Never dial a connection' option. Close the dialogs with OK.
3.1.3 Windows XP
The Windows XP start menu can be configured in different ways. See the Windows XP
documentation for more information.
1. Open the properties of the LAN connection on the connected computers.
Select Start Control Panel Network and Internet Connections. Click with
the right mouse button on the corresponding LAN connection and select 'Properties'.
2. Click the entry for the TCP/IP protocol of the network adaptor and on Properties. Enable
the option 'Obtain an IP address automatically'. You can ignore all other options: they
either remain empty or retain their default settings. Close the dialogs with OK.
Note: If you cannot find an entry similar to 'TCP/IP' or 'TCP/IP -> Network Adaptor Name' or
'Internet Protocol (TCP/IP)', you must install the TCP/IP protocol. Under Install select
'Protocol' and click Add. In the next dialog box select 'Internet Protocol (TCP/IP)' and confirm
with OK.
3. If you use a router for Internet access, you will still need to configure it, because the router
dials into the Internet, not the computer.
Under Start Settings Control/Panel Internet Options, select the
'Connections' tab and enable the 'Never dial a connection' option. Close the dialogs with
OK.
Note: Other Internet applications such as e-mail clients may also need this information. This
generally involves changing a setting with a name like 'Connect to' or similar to 'LAN'.
Page 7 of 15

Easy Start
3.2 Examples of Applications
This section demonstrates some of the application scenarios.
3.2.1 Home Networking-option 1
Workstation with Internet connection over an ADSL/Cable modem
3.2.4 Home Networking—option 2
Networking for Online Gaming.
Page 8 of 15

Easy Start
3.2.3 Home Networking—option 3
Networking for several workstations with one Internet connection over an ADSL/Cable modem
router.
3.2.2 Home Networking-option 4
Networking for several workstations with one Internet connection over an ADSL/Cable router
and an ADSL/Cable modem.
Page 9 of 15

Easy Start
3.3 Care Instructions
Network Volume
The maximum number of HomePlug adaptors in a single-family house is theoretically 253
connections, but in practice no more than 10 devices should be transferring data
simultaneously.
Network Security
Normally the electric meter forms a physical barrier, i.e. only devices connected to this meter
can be part of the network and benefit from the phase coupling. We strongly recommend that
you use the HL100E HomePlug Ethernet Adaptor internal device encryption. It is configured
with the HL100E HomePlug Ethernet Adaptor Configuration Utility (refer to the Appendix on
Page 11).
How to Use Passwords Correctly
You can improve your security substantially by following some important rules regarding the
use of passwords.
• Keep your passwords as secret as possible.
• Never write a password down. Popular, but completely unsuitable storage options include
• Do not pass on your password unnecessarily.
• Select a random password. Use random strings of letters and numbers. Passwords from
• Change the password regularly or immediately if you feel it has been compromised.
• Passwords should be changed as frequently as possible. This requires a little effort, but
Note: Always use the internal device encryption (the network password) for security. It can be
configured using the HL100E HomePlug Configuration Utility (please refer to Page 11 for the
Configuration Utility User Guide).
notebooks, wallets and text files in computers.
common language usage are not secure.
increases your security considerably. Even if only the slightest indication of a leak exists,
the password should be changed.
3.3 Frequently Asked Questions
Please refer to the FAQ.html file located in the \Manuals folder on the Configuration Utility
Installation CD for the HL100E HomePlug Ethernet Adaptor frequently asked questions
(FAQ).
Page 10 of 15

Easy Start
4 Configuration Utility User Guide
Running the Utility:
To run the utility, double click the PowerPacket Configuration Utility icon on your desktop.
Device dialog screen:
In the text list box, it reports back all devices that are found locally connected to the computer
where the utility is running. In most cases, one device only is listed.
In case you have more, click on one of them and hit Connect. Make sure that the State box
indicates that your PC is connected to the same device. Now you are ready to manage the
powerline network connected to this device, ensure its privacy and measure its data rate
performance.
Press the Refresh button to refresh the search of the powerline devices connected to your
computer. The progress bar will change into a status bar indicating the network average data
rate.
Page 11 of 15

Easy Start
The color of the bar reflects the average performance of the powerline network:
• Green: Excellent performance
• Yellow: Fair performance
• Red: Poor performance
Network dialog screen:
The Network dialog screen provides detailed information about your powerline network.
The text list box shows all HomePlug devices found on your powerline network identified by
their MAC addresses. A second column indicates their data rate measurements in Mbps.
Click on the Scan Powerline Network button to refresh the listed information.
Important Note:
In case a HomePlug device in your home is not listed in the screen above, make sure that its
Network Password has not been made private previously with a different password than your
current private network password.
You can always reset a HomePlug Network Password to the universal one by running the
PowerPacket Configuration Utility on the PC attached to this device and choose
“HomePlug” as the network password.
Page 12 of 15

Security dialog screen:
Easy Start
All HomePlug devices are shipped using “HomePlug” as a Network Password. The
Security dialog screen allows you to change this Network Password and set your own
private password and apply it to the HomePlug device connected to the computer where the
utility is running.
Click on the Restore Default button to restore the original Network Password “HomePlug”
and apply it locally.
Click on the Set Local button to change the network password locally.
Important Note:
Your private Network Password must have between 4 and 24 characters. The password is
case sensitive. The Network Password can include any letters of the alphabet, numbers or
punctuation marks. Remember the Network Password as it will be needed when adding
other devices to the network later.
Page 13 of 15

Advanced dialog screen:
Easy Start
The Advanced dialog screen allows you to set up a network password remotely on other
HomePlug devices through the powerline.
Type your private network password into the Network Password text box.
The other devices on the network with HomePlug capabilities will have a Security ID/Device
Password printed on the device itself. Find the passwords for all devices you want to manage
and type them one by one into the Device Password text box and Click on the Add button.
This will add the passwords to Remote Passwords text list box and set them to the currently
defined Network Password.
Important Note:
The device must be present on the powerline in order for the password to be confirmed and
added to the Remote Passwords list.
The Status indicates whether each device is successfully set to the Network Password. An
“OK” indicates success while “Fail” indicates a failure.
Click on the Set All button to apply your private network password to all devices that are listed
in the Remote Passwords text list box and to your local device connected to the computer
where the utility is running as well.
Select a password and Hit the Remove button to remove it from the list.
Page 14 of 15

Easy Start
5 Technical Data
The table below shows the Technical Specifications of the HL100E HomePlug Ethernet
Adaptor.
HL1OOE HomePlug Ethernet Adaptor
Standards
Protocols CSMA/CA MAC control
Transfer rate 14 Mbps
Transfer procedure Asynchronous
Modulation OFDM, DQPSK, DBPSK, ROBO Carrier
Frequency Band 4.3 Mhz to 20.9 Mhz band
Range Up to 5000 square feet
Security 56 bit DES
Platform Support OS Independent with TCP/IP protocol
LED Indicators 1x Power LED
HomePlug connection Standard power plug
Computer interface RJ45
Power consumption 5.8W
Power supply Integrated 230V AC Supply via Power
Temperature Storage: -25°C -70°C
Environment Suitable for room temperature, 27°C,
System requirements
(for Configuration Utility)
External Connectors 1 x Electrical Power Socket
Dimension Plastic housing
Weight Approx 180g
© Copyright Aug 2004. All Rights Reserved.
P/N: 040-311319-101 (Ref:HL100E)
10Base-T Ethernet, IEEE 802.3
10 Mbps Auto MDI / MDIx Support
14 Mbps HomePlug 1.0 compatible
Modulation Support
installed and with Ethernet port
1x Powerline Link Status LED
1x Ethernet Link/Activity Status LED
Socket for Europe/UK Model
Integrated 120V AC Supply via Power
Socket for US Model
Operation: suitable for room temperature,
27°C
10-90% humidity (non-condensing)
Ethernet interface
Windows 98SE, Windows Me, Windows
2000, Windows XP
1 x RJ45 for 10Base-T Ethernet
(AutoMDI/MDI-X)
92mm x 66mm x 45mm(height x width x
depth)
Page 15 of 15
 Loading...