


Installations- und
Bedienungsanleitung (S. 2)
Installation and
operating manual (p. 26)
RS485 LAN Gateway,
Hutschienenmontage:
RS485 LAN Gateway,
for mounting on DIN rails:
HMW-LGW-O-DR-GS-EU

1. Ausgabe Deutsch 03/2013
Dokumentation © 2013 eQ-3 Ltd., Hong Kong
Alle Rechte vorbehalten. Ohne schriftliche Zustimmung des Herausgebers darf dieses Handbuch auch
nicht auszugsweise in irgendeiner Form reproduziert
werden oder unter Verwendung elektronischer, mechanischer oder chemischer Verfahren vervielfältigt oder
verarbeitet werden.
Es ist möglich, dass das vorliegende Handbuch noch
drucktechnische Mängel oder Druckfehler aufweist.
Die Angaben in diesem Handbuch werden jedoch
regelmäßig überprüft und Korrekturen in der nächsten
Ausgabe vorgenommen. Für Fehler technischer oder
drucktechnischer Art und ihre Folgen übernehmen wir
keine Haftung.
Alle Warenzeichen und Schutzrechte werden anerkannt.
Printed in Hong Kong.
Änderungen im Sinne des technischen Fortschritts
können ohne Vorankündigung vorgenommen werden.
103850 / V 1.0
2

Inhaltsverzeichnis
1 Hinweise zu dieser Anleitung .............. 4
2 Gefahrenhinweise ......................4
3 Funktion . . . . . . . . . . . . . . . . . . . . . . . . . . . . . . 6
4 Allgemeine Systeminformation zu HomeMatic. 9
5 Allgemeine Hinweise zum Bussystem . . . . . . 10
5.1 Allgemeine Hinweise zur Installation .......10
5.2 Topologie des Bussystems............... 10
6 Installation ........................... 11
7 Einbinden ins Netzwerk (LAN) ............19
8 Werkseinstellungen des Gerätes
wieder herstellen ......................21
9 Deinstallation .........................23
10 Wartung und Reinigung .................23
11 Lieferumfang .........................24
12 Technische Daten...................... 24
3
1 Hinweise zu dieser Anleitung
Lesen Sie diese Anleitung sorgfältig, bevor Sie Ihre
HomeMatic Komponenten in Betrieb nehmen. Bewahren Sie die Anleitung zum späteren Nachschlagen auf!
Wenn Sie das Gerät anderen Personen zur Nutzung
überlassen, übergeben Sie auch diese Bedienungsanleitung.
Benutzte Symbole:
Achtung! Hier wird auf eine Gefahr hingewiesen.
Hinweis. Dieser Abschnitt enthält zusätzliche
wichtige Informationen!
2 Gefahrenhinweise
Das Gerät ist Teil einer Gebäudeinstallation.
Bei der Planung und Errichtung von elektrischen Anlagen sind die einschlägigen Normen
und Richtlinien des Landes zu beachten, in
dem die Anlage installiert wird.
Arbeiten an und in Niederspannungsanlagen
dürfen nur von einer Elektro-Fachkraft (nach
4
VDE 0100) erfolgen. Dabei sind die geltenden Unfallverhütungsvorschriften zu beachten. Zur Vermeidung
eines elektrischen Schlages schalten Sie vor Arbeiten
am Gerät die
abschalten).
Netzspannung
Bei Nichtbeachtung der Installationshinweise
können Brand oder andere Gefahren entstehen (siehe Abschnitt 6).
Betreiben Sie das Gerät nur in Innenräumen
und vermeiden Sie den Einuss von Feuchtigkeit, Staub sowie Sonnen- oder andere Wärmebestrahlung. Jeder andere Einsatz als in
dieser Bedienungsanleitung beschrieben ist
nicht bestimmungsgemäß und führt zu Garantie und Haftungsausschluss.
Öffnen Sie das Gerät nicht, es enthält keine
durch den Anwender zu wartenden Teile. Das
Öffnen des Gerätes birgt die Gefahr eines
Stromschlages. Im Fehlerfall schicken Sie das
Gerät an den Service.
Beachten Sie beim Anschluss an die Geräte klemmen die hierfür zulässigen Leitungen und
Leitungsquerschnitte.
frei (Sicherungsautomat
5
Es ist strikt darauf zu achten, dass alle Anschlussleitungen räumlich getrennt von netzspannungsführenden Leitungen verlegt werden (z. B. in eigenen Kabelkanälen oder
Installationsrohren).
Beachten Sie die Installationsvorschriften für
Installationen in Verteilersystemen
(DIN VDE 0100-410).
3 Funktion
Das HomeMatic RS485 Gateway ermöglicht die Kommunikation zwischen HomeMatic Wired-Geräten und
der HomeMatic Zentrale CCU2. Die Verbindung zur
Zentrale wird per Ethernet hergestellt. Die Kommunikation zu den angeschlossenen Geräten erfolgt über
das HomeMatic Wired-Protokoll.
6
Power
Reset
HMW-LGW-O-DR-GS-EU
A
1.3B1.7
+24 V
1.4
GND
1.8
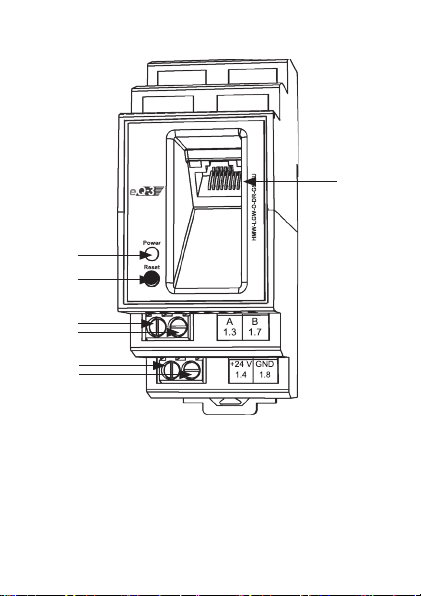
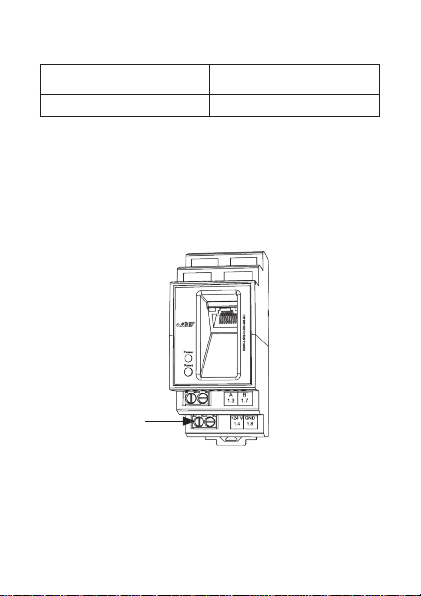
Übersicht
A
B
D
E
F
G
(A) Power-LED
(B) Reset-Taste
(C) Ethernet-Buchse
(D) Bus A
(E) Bus B
(F) Spannungsversorgung (+24 V)
(G) Masse (GND)
C
7
Das Gerät wird komfortabel auf einer Standard-
CCU2
Hutschiene in einer Elektroverteilung montiert. Durch
Anlernen des HomeMatic RS485 Gateways an die
HomeMatic Zentrale kann das HomeMatic Wired
System exibel von überall im Haus gesteuert werden.
Die Kommunikation zwischen dem Gateway und der
Zentrale ist über die im Haus bauseits vorhandene
Netzwerk-Infrastruktur möglich, wodurch eine Verbindung über zusätzliche Busleitungen im Haus nicht
nötig ist.
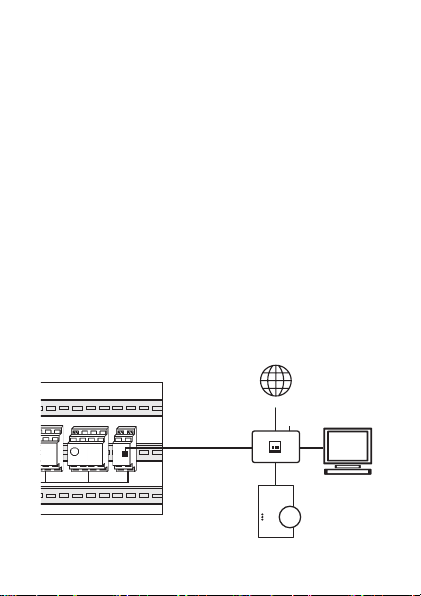
Die Kommunikation zwischen Gateway und Zentrale
ist über zwei Varianten möglich:
1. Netzwerk-Installationskabel (Hutschienen-Patchfelder/Module):
Wired
Gateway
Internet
LAN
PC
Power
Internet
Info
8
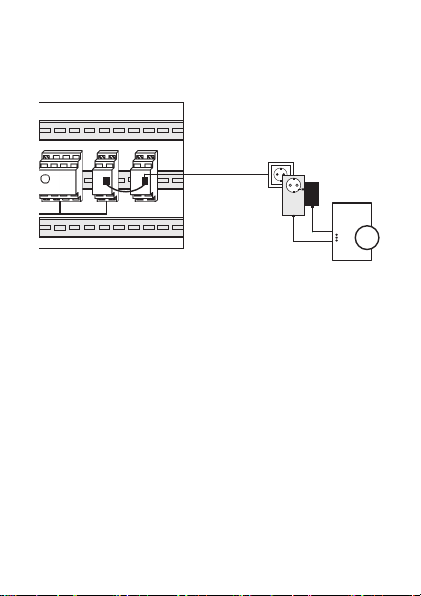
2. Powerline-Kommunikation über 230V-Verkabe-
lung (DINrail Powerline-Adapter):
Gateway
Wired
Powerline
230 V
Powerline
Netzteil
Power
Internet
Info
CCU2
4 Allgemeine Systeminformation
zu HomeMatic
Dieses Gerät ist Teil des HomeMatic Haussteuersystems. Alle im System installierten Geräte werden
mit einer Standardkonguration ausgeliefert. Darüber
hinaus ist die Funktion der Geräte über ein Programmiergerät und Software kongurierbar. Welcher weitergehende Funktionsumfang sich daraus ergibt, und
welche Zusatzfunktionen sich im HomeMatic System
im Zusammenspiel mit weiteren Komponenten ergeben, entnehmen Sie bitte dem HomeMatic Systemhandbuch. Alle technischen Dokumente und Updates
nden Sie stets aktuell unter www.HomeMatic.com.
9

5 Allgemeine Hinweise zum Bus-
system
5.1 Allgemeine Hinweise zur Installation
Beim Anschluss des RS485-Busses sind die A-Klemmen (1.3), die B-Klemmen (1.7), die 24 V Spannungsversorgung (1.4) und die Masseklemme (1.8) der
Module einer Unterverteilung (max. 127 Stück) jeweils
miteinander zu verbinden. Ein Busabschluss ist für
diese Installation immer erforderlich.
5.2 Topologie des Bussystems
Für eine bessere Übersicht sollten die HomeMatic
Wired-Komponenten immer gruppenweise in Unterver-
teilungen montiert werden. Wie viele Unterverteilungen
angemessen sind, hängt dabei von der Art und Größe
des zu realisierenden Projektes ab und ist individuell
festzulegen. Es ist auf jeden Fall zu empfehlen, auf
jeder Etage mindestens eine Unterverteilung zu installieren. Bei größeren Gebäuden kann es auch sinnvoll
sein, mehrere Verteilungen pro Etage (z.B. separat für
jeden Flur) vorzusehen. Zwischen den Verteilern ist
die Busverkabelung und eine Masseverkabelung zu
installieren. Entsprechend sind alle Last- und Steuerleitungen sternförmig zu den entsprechenden Unterverteilungen zu führen.
10
Die Stromversorgung erfolgt über ein 24V-Hutschienen-Netzteil (24 VDC Netzteil mit stabilisierter
Ausgangsspannung) entsprechend der Anzahl und
Gesamtstromaufnahme aller vorhandenen Module
in der jeweiligen Unterverteilung dimensioniert. Bitte
entnehmen Sie die Daten der Leistungsaufnahme für
einzelne Geräte der jeweiligen Bedienungsanleitung.
6 Installation
Beachten Sie die Installationsvorschriften für
das Errichten von Niederspannungsanlagen
gemäß DIN VDE 0100-410.
Die Installation darf ausschließlich von
Personen mit einschlägigen elektrotechnischen Kenntnissen und Erfahrungen
vorgenommen werden.
Wenden Sie sich an einen Elektroinstallateur!
Erforderliche Fachkenntnisse für die Installation:
Für die Installation sind insbesondere folgende Fachkenntnisse erforderlich:
11
• Die anzuwendenden „5 Sicherheitsregeln“:
- Freischalten;
- gegen Wiedereinschalten sichern;
- Spannungsfreiheit feststellen;
- Erden und Kurzschließen;
- benachbarte, unter Spannung stehende
Teile abdecken oder abschranken;
• Auswahl des geeigneten Werkzeuges, der Messge-
räte und ggf. der persönlichen Schutzausrüstung;
• Auswertung der Messergebnisse;
• Auswahl des Elektro-Installationsmaterials zur
Sicherstellung der Abschaltbedingungen;
• IP-Schutzarten;
• Einbau des Elektroinstallationsmaterials;
• Art des Versorgungsnetzes (TN-System, IT-System,
TT-System) und die daraus folgenden Anschlussbedingungen (klassische Nullung, Schutzerdung,
erforderliche Zusatzmaßnahmen etc.)
Durch eine unsachgemäße Installation gefährden Sie Ihr eigenes Leben und das Leben der
Nutzer der elektrischen Anlage.
Mit einer unsachgemäßen Installation riskieren
Sie schwere Sachschäden, z.B. durch Brand.
Es droht für Sie die persönliche Haftung bei
Personen- und Sachschäden.
12
Es ist strikt darauf zu achten, dass alle Anschlussleitungen räumlich getrennt von netzspannungsführenden Leitungen verlegt werden (z.B. in eigenen Kabelkanälen oder
Installationsrohren). Alternativ können für diese
niederspannungsführenden Leitungen doppelt
isolierte Netzkabel verwendet werden.
Die maximalen Leitungslängen aller ange-
schlossenen Leitungen sind je nach verwendeter Leitung unterschiedlich. Eine Länge von
50 m darf allerdings nicht überschritten werden.
Für den sicheren Betrieb muss das Gerät in
einen Stromkreisverteiler entsprechend VDE
0603, DIN 43871 (Niederspannungsunterverteilung (NSUV)), DIN 18015-x eingebaut werden. Die Montage muss auf einer Tragschiene
(Hutschiene, DIN-Rail) lt. EN50022 erfolgen.
Installation und Verdrahtung sind entsprechend VDE 0100 (VDE 0100-410, VDE 0100510 usw.) durchzuführen. Es sind die Vorschriften der Technischen Anschlussbestimmungen (TAB) des Energieversorgers zu
berücksichtigen.
13

Zur Installation gehen Sie wie folgt vor:
• Setzen Sie das HomeMatic RS485 Gateway oben
mit den Rastnasen auf die Hutschiene auf.
• Verrasten Sie das Gerät, indem Sie es nach unten
drücken.
• Achten Sie darauf, dass die Rastnasen komplett
einrasten und das Gerät fest auf der Schiene sitzt.
• Isolieren Sie die Drahtenden der Leitung zum Netz-
teil und der Busleitung auf eine Länge von 8 mm ab,
ohne dabei die blanke Ader zu verletzen.
14
Beachten Sie die zugelassenen Leitungsquerschnitte:
Power
Reset
HMW-LGW-O-DR-GS-EU
A
1.3B1.7
+24 V
1.4
GND
1.8
starre Leitung [mm2] exible Leitung mit
Aderendhülse [mm2]
0,14 – 2,50 0,14 – 1,5
• Verdrahten Sie das HomeMatic RS485 Gateway
zur Spannungsversorgung mit dem Netzteil an den
Klemmen 1.4 (24 VDC) und 1.8 (GND). Achten Sie
dabei strikt auf den polaritätsrichtigen Anschluss an
den Klemmen.
15

• Schließen Sie das HomeMatic RS485 Gateway mit
Power
Reset
HMW-LGW-O-DR-GS-EU
A
1.3B1.7
+24 V
1.4
GND
1.8
Power
Reset
HMW-LGW-O-DR-GS-EU
A
1.3B1.7
+24 V
1.4
GND
1.8
dem RS485-BUS an die Klemmen 1.3 (A) und 1.7
(B) an.
• Stecken Sie das beiliegende Ethernet-Kabel in die
dafür vorgesehene Buchse (C).
16

Um eine sichere Bedienung des Gerätes gewährleisten zu können, wird ein Ethernetkabel
mit mindestens der Kategorie 5 (CAT5 FTP)
benötigt.
• Vergewissern Sie sich, dass alle Anschlüsse fest
und sicher in den Installationsklemmen xiert sind.
Die Integration eines HomeMatic Wired RS485
Busabschluss Widerstandes ist zwingend
erforderlich.
17

Anschluss- und Installationsbeispiel:
A
B
+24V / SELV
GND
Klemme Funktion
1.3 RS485-BUS, Leitung A
1.4 Versorgungsspannung, +24 V
1.7 RS485-BUS, Leitung B
1.8 Versorgungsspannung, Masse (GND),
Massebezug für alle Eingänge
18

7 Einbinden ins Netzwerk (LAN)
Um eine Kommunikation zwischen Ihrer HomeMatic
Zentrale und den HomeMatic Wired-Geräten herzustellen, muss das HomeMatic Wired RS485 Gateway
ins Netzwerk eingebunden werden. Dazu gehen Sie
bitte wie folgt vor:
Einrichten über die HomeMatic Zentrale
• Öffnen Sie die Bedienoberäche WebUI in Ihrem
Webbrowser.
• Klicken Sie in der Bedienoberäche WebUI auf
„Einstellungen“ „Systemsteuerung“ „LAN-
Gateway Konguration“.
• Klicken Sie im nächsten Fenster unter „Allgemeine
Einstellungen“ auf den Button „Hinzufügen“.
• Wählen Sie im nächsten Fenster den Typ „Wired:
HomeMatic RS485 Gateway“ aus. Geben Sie anschließend die Seriennummer und den Sicherheits-
19

schlüssel Ihres HomeMatic Wired RS485 Gateways
ein. Diese können Sie den Aufklebern auf Ihrem
HomeMatic Wired RS485 Gateway entnehmen und
später ändern.
• Bestätigen Sie Ihre Eingaben mit „OK“ und klicken
Sie im nächsten Fenster auf „Übernehmen“.
• Das Gateway wurde erfolgreich ins Netzwerk eingebunden, wenn die IP-Adresse angezeigt wird und
der Status „verbunden“ ist.
• Starten Sie abschließend Ihre HomeMatic Zentrale
neu.
20

Um einzelne HomeMatic Wired Geräte in das
System einbinden zu können, gehen Sie bitte
wie in den dazugehörigen Bedienungsanleitungen beschrieben vor.
Einzelheiten zu Netzwerkproblemen (z. B. kein
DHCP) nden Sie im FAQ-Bereich auf der
Website www.HomeMatic.com
8 Werkseinstellungen des Ge-
rätes wieder herstellen
Die Werkseinstellungen des HomeMatic RS485
Gateways können manuell wieder hergestellt werden.
Dabei gehen alle Einstellungen und Informationen
verloren.
Bevor Sie die Werkseinstellungen des Gerätes
wieder herstellen, löschen Sie es zuerst aus der
HomeMatic Bedienoberäche WebUI.
Um die Werkseinstellungen wieder herzustellen,
gehen Sie wie folgt vor:
• Drücken Sie die Reset-Taste für ca. 6 Sekunden.
Die schnell blinkende LED zeigt den Löschmodus
an.
21

Power
Reset
HMW-LGW-O-DR-GS-EU
A
1.3B1.7
+24 V
1.4
GND
1.8
> 6 Sek.
Power
Reset
HMW-LGW-O-DR-GS-EU
A
1.3B1.7
+24 V
1.4
GND
1.8
•
Lassen Sie die Taste los.
• Drücken Sie die Taste erneut für ca. 3 Sekunden,
bis die LED sehr langsam blinkt.
> 3 Sek.
• Lassen Sie die Taste los.
• Die LED erlischt nach kurzer Zeit und die Werksein-
stellungen des Gerätes sind wieder hergestellt.
22

9 Deinstallation
• Zur Demontage des HomeMatic RS485 Gateways
lösen Sie zunächst die Verdrahtungen.
• Drücken Sie die Lasche an der unteren Rückseite
des Gerätes mit einem Schlitzschraubendreher
nach unten und nehmen Sie das Gerät mit einer
Schwenkbewegung von der Hutschiene ab.
10 Wartung und Reinigung
Das Produkt ist wartungsfrei. Überlassen Sie eine
Reparatur einer Fachkraft.
23

11 Lieferumfang
• HomeMatic RS485 LAN Gateway (montagefertig)
• Ethernetkabel
• Installations- und Bedienungsanleitung
12 Technische Daten
Kurzbezeichnung: HMW-LGW-O-DR-GS-EU
Versorgungsspannung: 24 V / DC / SELV
Stromaufnahme: 100 mA (max.)
Leistungsaufnahme im
Ruhebetrieb: 0,75 W
Schutzart: IP20
Umgebungstemperatur: 0-50 °C
Gehäuseabmessungen: Standard-Hutschienen
(B x H x T) gehäuse mit 2 TE Breite
Gewicht: 76 g
Netzwerk: Ethernet, 10/100 Base-T
Kommunikation: RS485-Bus
Schutzklasse: III
Technische Änderungen, die zur Verbesserung
dienen, sind vorbehalten.
24
35 x 87 x 64 mm

Entsorgungshinweis:
Gerät nicht im Hausmüll entsorgen! Elektronische Geräte sind entsprechend der Richtlinie über Elektro- und Elektronik-Altgeräte über
die örtlichen Sammelstellen für ElektronikAltgeräte zu entsorgen.
Das CE-Zeichen ist ein Freiverkehrszeichen,
das sich ausschließlich an die Behörden
wendet und keine Zusicherung von Eigenschaften beinhaltet.
25

1st English edition 03/2013
Documentation © 2013 eQ-3 Ltd., Hong Kong
All rights reserved. This manual may not be reproduced in any format, either in whole or in part, nor may
it be duplicated or edited by electronic, mechanical
or chemical means, without the written consent of the
publisher.
Typographical and printing errors cannot be excluded.
However, the information contained in this manual is
reviewed on a regular basis and any necessary cor-
rections will be implemented in the next edition. We
accept no liability for technical or typographical errors
or the consequences thereof.
All trademarks and industrial property rights are acknowledged.
Printed in Hong Kong. Translation of original manual.
Changes may be made without prior notice as a result
of technical advances.
103850 / V 1.0
26

Table of contents
1 Information about this manual ............28
2 Hazard information.....................28
3 Function . . . . . . . . . . . . . . . . . . . . . . . . . . . . . 30
4 General system information about HomeMatic 33
5 General information about the bus system...34
5.1 General information on the installation...... 34
5.2 Topology of the bus system ..............34
6 Installation ...........................35
7 Integration into network (LAN) . . . . . . . . . . . . 42
8 Restoring the factory settings............. 43
9 Disassembly..........................45
10 Maintenance and cleaning ...............45
11 Scope of supply .......................46
12 Technical data ........................46
27

1 Information about this manual
Read this manual carefully before beginning operation
with your HomeMatic components. Keep the manual
handy for later consultation! If you hand over the device to other persons for use, please hand over the
operating manual as well.
Symbols used:
Attention! This indicates a hazard.
Note. This section contains important additional information.
2 Hazard information
The device described is part of a building
installation. When planning and setting up
electrical systems, the pertinent standards and
regulations of the respective country of installation are to be observed.
Work on and in low-voltage installations is only
permitted by qualied electricians (in accordance with VDE 0100). Applicable accident
28

prevention regulations must be complied with whilst
such work is being carried out. Disconnect the power
to devices before working on them to prevent electrocution (switch circuit breaker).
Ignoring installation instructions can cause
res or other hazards (see sec. 6).
The device may only be operated indoors and
must be protected from the effects of damp
and dust, as well as solar or heat radiation.
Using the device for any purpose other than
that described in this operating manual does
not fall within the scope of intended use and
shall invalidate any warranty or liability.
Do not open the device: it does not contain
any components that need to be serviced by
the user. There is a risk of electrical shock by
opening the device. In the event of an error,
please return the device to our service department.
When connecting to the device terminals, take
the permissible cables and cable cross sections into account.
29

It is absolutely essential to ensure that all
connecting cables are laid so that they are
physically separate from cables carrying mains
voltage (e.g. in separate cable ducts or wiring
conduits).
Observe the installation instructions for installation in distribution systems (DIN VDE 0100-
410).
3 Function
The HomeMatic RS485 Gateway enables communication between HomeMatic Wired devices and the
HomeMatic CCU2. Connection between Gateway and
CCU2 is established via Ethernet. The communication
to connected devices is established via the HomeMatic
Wired Protocol.
30

Power
Reset
HMW-LGW-O-DR-GS-EU
A
1.3B1.7
+24 V
1.4
GND
1.8
Overview
A
B
D
E
F
G
(A) Power LED
(B) Reset button
(C) Ethernet port
(D) Bus A
(E) Bus B
(F) Power supply (+24V)
(G) GND
C
31

The device can be comfortably mounted on a DIN rail
in an electrical distribution board. By teaching-in the
HomeMatic RS485 Gateway to the HomeMatic Central
Control Unit, the HomeMatic Wired system can be
exibly controlled from everywhere in the house. The
communication between the Gateway and the Central
Control Unit can be performed via the existing network
infrastructure in the house. Thus, a connection via
additional bus lines is not necessary.
The communication between the Gateway and the
Central Control Unit can be performed in two ways.
1. Network installation cable (DIN rail patch elds/
modules):
Wired
Gateway
Internet
LAN
PC
Power
Internet
Info
CCU2
32

2. Powerline communication via 230V cabling (DIN
rail powerline adapter):
Gateway
Wired
Powerline
230 V
Powerline
Power supply unit
Power
Internet
Info
CCU2
4 General system information
about HomeMatic
This device is a component of the HomeMatic Home
Control System. All devices are delivered in a stan-
dard conguration. The functionality of the device
can also be congured with a programming device
and software. The additional functions that can be
made available in this way and the supplementary
functions provided by the HomeMatic system when it
is combined with other components are described in
the HomeMatic System Manual. All current technical
documents and updates are provided at www.HomeMatic.com.
33

5 General information about the
bus system
5.1 General information on the installation
When connecting the RS485 bus, the A terminals
(1.3), the B terminals (1.7), the 24 V power supply and
the ground terminal (1.8) of the modules of a sub-
distribution (max. 127 segments) are to be connected
with one another. A bus terminator is always required
for this installation.
5.2 Topology of the bus system
The HomeMatic Wired components should always be
mounted in groups of sub-divisions to provide a better
overview. The number of sub-divisions that is appropriate depends on the type and size of the project and is
to be dened accordingly. Installing at least one sub-
division on each level is recommended. Larger buildings may require planning several sub-divisions per
level (e.g. separate for every oor). Bus cabling and a
ground cable have to be installed between the distributors. All load and control wiring should also be run in a
star format to the respective sub-divisions.
The power is supplied via a 24V DIN rail power supply
unit (24V VDC power supply with stabilized output voltage) according to the number and total current con34

sumption of all existing modules. You will nd further
details regarding the power consumption of the single
devices in the corresponding operating manual.
6 Installation
Observe the installation instructions for installations in distribution systems (DIN VDE 0100-
410).
Only to be installed by persons with the
relevant electro-technical knowledge and
experience.
Contact an electrical installer!
Specialist knowledge required for installation:
The following specialist knowledge is particularly important during installation:
• The ‚5 safety rules‘ to be used:
- Disconnect from mains;
- Safeguard from switching on again;
- Check that system is de-energised;
- Earth and short circuit;
- Cover or cordon off neighbouring live parts;
35

• Select suitable tool, measuring equipment and, if
necessary, personal safety equipment;
• Evaluation of measuring results;
• Selection of electrical installation material for safe-
guarding shut-off conditions;
• IP protection types;
• Installation of electrical installation material;
• Type of supply network (TN system, IT system, TT
system) and the resulting connecting conditions
(classical zero balancing, protective earthing, required additional measures etc.).
Incorrect installation can put your own life at
risk and the lives of other users of the electrical
system.
Incorrect installation also means that you are
running the risk of serious damage to property,
e.g. because of a re. You may be personally
liable in the event of injuries or damage to
property.
It is absolutely essential to ensure that all
connecting cables are laid so that they are
physically separate from cables carrying mains
voltage (e.g. in separate cable ducts or wiring
conduits). Alternatively, it is possible to use
36

double insulated mains cables for the cables carrying
mains voltage.
The maximum lengths of all connected cables
varies depending on the type of cable used.
However, a length of 50 m must never be
exceeded.
For secure operation, the device has to be
installed in a power distribution panel according to VDE 0603, DIN 43871 (low-voltage
sub-distribution board), DIN 18015-x. The
installation must be made on a mounting rail
(DIN rail) according to EN50022. Installation
and wiring have to be performed according to
VDE 0100 (VDE 0100-410, VDE 0100-510
etc.). The technical connection conditions of
the energy supply company have to be considered.
For installation, please proceed as follows:
• Place the HomeMatic RS485 Gateway with the
spring latch onto the DIN rail from above.
• Latch the device on the DIN rail by pressing down.
37

• Make sure that the spring latch is completely latched and that the device is seated solidly on the rail.
• Strip 8 mm from the ends of the cables leading to
the power supply unit and the bus cable, without
damaging the exposed wires.
Observe the permissible cable cross sections.
Rigid cable [mm2] Flexible cable with fer-
0.14 – 2.50 0.14 – 1.5
• Wire the HomeMatic RS485 Gateway for the power
supply with the power supply unit of terminal 1.4 (24
VDC) and 1.8 (GND). Make sure that the connections are made with correct polarity on the terminals.
38
rule [mm2]

Power
Reset
HMW-LGW-O-DR-GS-EU
A
1.3B1.7
+24 V
1.4
GND
1.8
• Then connect the HomeMatic RS485 Gateway to
Power
Reset
HMW-LGW-O-DR-GS-EU
A
1.3B1.7
+24 V
1.4
GND
1.8
terminals 1.3 (A) and 1.7 (B) using the RS485 bus.
• Insert the supplied Ethernet cable into the corresponding socket (C).
39

Power
Reset
HMW-LGW-O-DR-GS-EU
A
1.3B1.7
+24 V
1.4
GND
1.8
To ensure secure operation of the device, an
Ethernet cable of at least category 5 (CAT5
FTP) is required.
• Ensure that all connections are fastened securely to
the installation terminals.
The integration of a HomeMatic RS485 bus
terminator is required.
40

Connection and installation example:
A
B
+24V / SELV
GND
Terminal Function
1.3 RS485 Bus (Bus A)
1.4 Supply voltage, +24 V
1.7 RS485 Bus (Bus B)
1.8 Supply voltage, ground (GND), ground
reference for all inputs
41

7 Integration into network (LAN)
To establish communication between your HomeMatic Central Control Unit and the HomeMatic Wired
devices, the HomeMatic RS485 Gateway has to be
integrated into the network. To do this, proceed as
follows:
Conguration via HomeMatic Central Control Unit
• Open the „WebUI“ user interface in your browser.
• In the WebUI, please click „Settings“ „System
control“ „LAN Gateway Settings“.
• In the next window under „General settings“, please
click on „Add“.
• In the next window, select the type „Wired: HomeMatic Wired RS485 Gateway“. Afterwards, enter
the serial number and the security key of your
HomeMatic Wired RS485 Gateway. These can be
found on the stickers of your HomeMatic RS485
Gateway. The security code can be changed afterwards.
• Please conrm with „OK“ and in the next window
with „Save“.
• The Gateway has been integrated successfully into
the network if the IP address is displayed and the
status is „Connected“.
42

• Afterwards, restart your HomeMatic Central Control
Unit.
To integrate single HomeMatic Wired devices
into your system, please proceed as described
in the corresponding operating manuals.
Further information about network problems
(e.g. no DHCP) can be found in the FAQs of
the website www.homematic.com.
8 Restoring the factory settings
The factory settings of the HomeMatic RS485 Gateway can be restored manually. If you do this, you will
lose all your settings.
Before restoring the factory settings, please
delete the device from the user interface WebUI
rst.
To restore the factory settings, please proceed as
follows:
• Press the reset button for approx. 6 seconds. The
quickly ashing LED indicates „delete mode“.
43

Power
Reset
HMW-LGW-O-DR-GS-EU
A
1.3B1.7
+24 V
1.4
GND
1.8
> 6 sec.
Power
Reset
HMW-LGW-O-DR-GS-EU
A
1.3B1.7
+24 V
1.4
GND
1.8
•
Release the button.
• Press the button again for approx. 3 seconds until
the LED ashes very slowly.
> 3 sec.
• Release the button.
• The LED expires after a short time and the factory
settings of the device will be restored.
44

9 Disassembly
• Before disassembling the HomeMatic RS485 Gateway, disconnect the wiring.
• Press down the clip at the back of the device with
a slotted screwdriver and remove the device from
the rail.
10 Maintenance and cleaning
The product does not require any maintenance. Repairs are only to be done by trained professionals.
45

11 Scope of supply
• HomeMatic RS485 Gateway (ready for installation)
• Ethernet cable
• Installation and Operating Manual
12 Technical data
Short name: HMW-LGW-O-DR-GS-EU
Power supply: 24 V / DC / SELV
Max. power consumption: 100 mA (max.)
Standby power consumption:
Degree of protection: IP20
Ambient temperature: 0-50 °C
Housing dimensions: Standard DIN rail
(W x H x D) housing with
35 x 87 x 64 mm
Weight: 76 g
Network: Ethernet, 10/100Base-T
Communication: RS485 Bus
Protection class: III
We reserve the right to make any technical
changes that constitute an improvement to the
device.
46
0.75 W
2 units width

Instructions for disposal:
Do not dispose of the device with regular
domestic waste. Electronic equipment must
be disposed of at local collection points for
waste electronic equipment in compliance with
the Waste Electrical and Electronic Equipment
Directive.
The CE sign is a free trading sign addressed
exclusively to the authorities and does not
include any warranty of any properties.
47

eQ-3 AG
Maiburger Straße 29
D-26789 Leer
www.eQ-3.de
48
 Loading...