


Bedienungsanleitung (S. 4)
Operating manual (p. 17)
Funk-Wassermelder:
Radio water sensor:
HM-Sec-WDS-2

1. Ausgabe Deutsch 07/2013
Dokumentation © 2013 eQ-3 Ltd., Hong Kong
Alle Rechte vorbehalten. Ohne schriftliche Zustimmung des Herausgebers darf dieses Handbuch auch
nicht auszugsweise in irgendeiner Form reproduziert
werden oder unter Verwendung elektronischer, mechanischer oder chemischer Verfahren vervielfältigt oder
verarbeitet werden.
Es ist möglich, dass das vorliegende Handbuch noch
drucktechnische Mängel oder Druckfehler aufweist.
Die Angaben in diesem Handbuch werden jedoch
regelmäßig überprüft und Korrekturen in der nächsten
Ausgabe vorgenommen. Für Fehler technischer oder
drucktechnischer Art und ihre Folgen übernehmen wir
keine Haftung. Alle Warenzeichen und Schutzrechte
werden anerkannt.
Printed in Hong Kong.
Änderungen im Sinne des technischen Fortschritts
können ohne Vorankündigung vorgenommen werden.
131838 / V 1.0
2

Inhaltsverzeichnis
1 Hinweise zu dieser Anleitung ..............4
2 Gefahrenhinweise ......................4
3 Funktionsweise des Funk-Wassermelders ...5
Allgemeine Systeminformation zu HomeMatic
4
Allgemeine Hinweise zum Funkbetrieb
5
6 Platzierung und Inbetriebnahme ...........9
6.1 Allgemeine Platzierungshinweise........... 9
6.2 Batterien einlegen, Aufstellung.............9
6.2.1 Batterien wechseln .....................10
6.2.2 Verhalten nach dem Einlegen der Batterien.. 11
6.3 Anlernen.............................12
7 Betriebshinweise für Direktbetrieb mit
HomeMatic-Aktor . . . . . . . . . . . . . . . . . . . . . . 14
8 Zurücksetzen in den Auslieferungszustand ..14
9 Wartung und Reinigung .................15
10 Technische Daten...................... 16
..7
.......8
3
1 Hinweise zu dieser Anleitung
Lesen Sie diese Anleitung sorgfältig, bevor Sie ihre
HomeMatic-Komponenten in Betrieb nehmen.
Bewahren Sie die Anleitung zum späteren Nachschlagen auf!
Wenn Sie das Gerät anderen Personen zur Nutzung
überlassen, übergeben Sie auch diese Bedienungsanleitung.
Benutzte Symbole:
Achtung! Hier wird auf eine Gefahr hingewiesen.
Hinweis. Dieser Abschnitt enthält zusätzliche
wichtige Informationen!
2 Gefahrenhinweise
Öffnen Sie das Gerät nicht, es enthält keine durch
den Anwender zu wartenden Teile. Betreiben Sie das
Gerät nur in Innenräumen und vermeiden Sie den
Einuss von Feuchtigkeit, Staub sowie Sonnen- und
andere Warmebestrahlung.
4
3 Funktionsweise des Funk-
Wassermelders
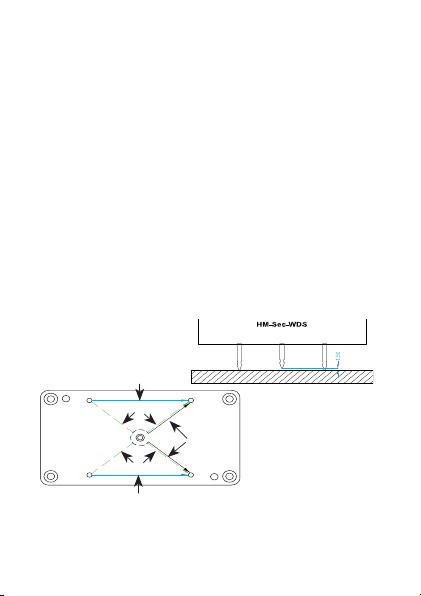
Der Funk-Wassermelder verfügt über fünf Messelektroden, über die auf zwei Messstrecken Bodenfeuchtigkeit und ein Wasserstand ab 1,5 mm Höhe
unterschiedlich detektiert wird (Differenzierung nur
bei Einsatz einer HomeMatic-Zentrale möglich). Eine
Auswerteschaltung wandelt den detektierten Zustand
in HomeMatic-Funkbefehle um.
Das Gerät ist batteriebetrieben und so exibel und
ortsunabhängig einsetzbar.
Sensorelektroden und Messstrecken
(C)
(B)
(A)
(B)
(C)
(A) – Messstrecken Wasserstand ab 1,5 mm
(B/C) – Messstrecken Bodenfeuchte
5

Anzeige- und Bedienelemente, Batteriehalter
A
BC
(A) – Anlerntaste
(B) – Batteriehalterung
(C) – Geräte-LED
6

4 Allgemeine Systeminformation
zu HomeMatic
Dieses Gerät ist Teil des HomeMatic-Haussteuersystems und arbeitet mit dem bidirektionalen BidCoS
Funkprotokoll.
Alle Geräte werden mit einer Standardkonguration
ausgeliefert. Darüber hinaus ist die Funktion des
Gerätes über ein Programmiergerät und Software
kongurierbar. Welcher weitergehende Funktionsumfang sich damit ergibt, und welche Zusatzfunktionen
sich im HomeMatic-System im Zusammenspiel mit
weiteren Komponenten ergeben, entnehmen Sie bitte
der gesonderten Kongurationsanleitung oder dem
HomeMatic-Systemhandbuch.
Alle technischen Dokumente und Updates nden Sie
stets aktuell unter www.HomeMatic.com.
®
7

5 Allgemeine Hinweise zum
Funkbetrieb
Die Funk-Übertragung wird auf einem nicht exklusiven
Übertragungsweg realisiert, weshalb Störungen nicht
ausgeschlossen werden können.
Weitere Störeinüsse können durch Schaltvorgänge,
Elektromotoren oder defekte Elektrogeräte hervorgerufen werden.
Die Reichweite in Gebäuden kann stark von der im
Freifeld abweichen. Außer der Sendeleistung und
den Empfangseigenschaften der Empfänger spielen
neben Umwelteinüssen wie Luftfeuchtigkeit bauliche/
abschirmende Gegebenheiten vor Ort eine wichtige
Rolle.
Hiermit erklärt die eQ-3 Entwicklung GmbH, dass sich
dieses Gerät in Übereinstimmung mit den grundlegenden Anforderungen und den anderen relevanten
Vorschriften der Richtlinie 1999/5/EG bendet.
Die vollständige Konformitätserklärung nden Sie
unter www.HomeMatic.com.
8

6 Platzierung und Inbetriebnahme
6.1 Allgemeine Platzierungshinweise
Der Einsatzort des Funk-Wassermelders sollte sich
nahe dem zu überwachenden bzw. zu schützenden
Geräten bzw. in den kritischen Bereichen benden.
Dabei sollte der Funk-Wassermelder direkt auf ebenen
Flächen der jeweiligen Böden stehen und nicht auf
Unterlagen, Teppichen u.ä.
Zusätzlich ist darauf zu achten, dass sich der
Funk-Wassermelder in der Empfangsreichweite des
zugeordneten Aktors bzw. der HomeMatic-Zentrale
bendet. Dazu sollte ein Empfangstest zu unterschiedlichen Tageszeiten erfolgen, um auch eventuelle
Funkstörungen zu unterschiedlichen Tageszeiten
berücksichtigen zu können.
6.2 Batterien einlegen, Aufstellung
•
Öffnen Sie das Gerät durch Lösen der vier Deckelschrauben und nehmen Sie den Deckel ab.
•
Lösen Sie die vier Kunststoffschrauben der Abdeckung und nehmen Sie diese ab.
• Legen Sie zwei LR6-Batterien (Mignon/AA) polrichtig entsprechend den Polaritätsmarkierungen
9
in die Batteriehalter (B) ein und befestigen Sie
die Abdeckung wieder mit den vier Kunststoffschrauben.
• Nehmen Sie das Anlernen entsprechend Kapitel
6.3 vor.
• Setzen Sie den Gehäusedeckel auf das Gerät
auf. Achten Sie dabei darauf, dass die NeoprenDeckeldichtung sauber und komplett umlaufend
in der Deckelnut liegt und nicht gequetscht wird.
• Verschrauben Sie den Deckel mit den vier Deckelschrauben.
6.2.1 Batterien wechseln
Vorsicht! Explosionsgefahr bei unsachgemäßem
Austausch der Batterie.
Verbrauchte Batterien gehören nicht in
den Hausmüll! Entsorgen Sie diese in
Ihrer örtlichen Batteriesammelstelle!
Erfolgt beim Senden keine Reaktion des zu steuernden Gerätes oder wird der Blinkcode für leere
Batterien angezeigt so sind die verbrauchten Batterien
wie im vorhergegangenen Kapitel beschrieben gegen
zwei neue Batterien des Typs LR6 auszutauschen.
10

Beachten Sie dabei die richtige Polung der Batterien.
6.2.2 Verhalten nach dem Einlegen der Batterien
Nach dem Einlegen der Batterien führt das Gerät
einen Selbsttest durch. Dies dauert ca. 2 Sekunden.
Danach erfolgt die Initialisierung. Den Abschluss bildet
die LED-Test-Anzeige: rot, grün, orange für jeweils
eine halbe Sekunde.
Tritt ein Fehler auf, wird dies durch rotes Blinken
signalisiert!
Danach sendet das Gerät eine Statusmeldung -
signalisiert durch orangefarbenes Aueuchten der
Geräte-LED.
Ist der Funk-Wassermelder angelernt, folgt danach
ein rotes oder grünes Blinken, je nachdem, ob der
Empfang bestätigt wurde oder nicht.
Einmal langes, zweimal kurzes
Blinken, Pause
(2 Wiederholungen
Einmal langes, einmal kurzes
Blinken, Pause (endlos)
Batteriespannung
zu gering
Funk-Wassermelder defekt
11

Bei zu niedriger Batteriespannung wird, sofern es der
Spannungswert noch zulässt, trotzdem der FunkWassermelder aktiviert und ist betriebsbereit. Je nach
Beanspruchung kann evtl. nach kurzer Erholungszeit
der Batterien wieder mehrfach gesendet werden.
Bricht beim Senden die Spannung wieder zu weit zusammen, wird wieder der entsprechende Fehlercode
angezeigt.
6.3 Anlernen
Bitte lesen Sie diesen Abschnitt erst vollständig, bevor
sie mit dem Anlernen beginnen!
Mit dem Funk-Wassermelder HM-Sec-WDS können
HomeMatic Aktoren, wie z.B. der Funk-Schalter
gesteuert werden. Dazu ist vorher ein Anlernprozess
durchzuführen. Alle HomeMatic-Geräte verfügen dazu
über eine Anlerntaste und eine Geräte-LED.
Soll nun der Funk-Wassermelder z.B. an einen FunkSchalter angelernt werden, ist folgende Prozedur
durchzuführen:
• Anlerntaste am Funk-Schalter drücken, bis die
LED anfängt, rot zu blinken. Dies dauert ca. 4
Sekunden.
• Anlerntaste am Funk-Wassermelder kurz drü-
12

cken. Die Geräte-LED blinkt für einige Sekunden
orange.
Der Anlernvorgang kann durch erneutes kurzes
Drücken der Anlerntaste abgebrochen werden,
die Geräte-LED leuchtet dann rot auf.
• Ist der Funk-Wassermelder erfolgreich angemeldet, blinkt die Geräte-LED grün. Die Länge des
Blinkens ist abhängig vom Kongurationsfortschritt.
Ist der Anlernversuch nicht erfolgreich verlaufen,
so blinkt die Geräte-LED rot.
• Wenn kein Anlernen erfolgt, wird der Anlern-
modus automatisch nach 20 Sekunden beendet.
Ist der Funk-Wassermelder bereits an eine
Zentrale angelernt und damit für direktes
Anlernen gesperrt, kann er zwar wie oben beschrieben
in den Anlernmodus gebracht werden, nach Drücken
einer Bedientaste leuchtet die Geräte-LED jedoch für 2
Sekunden rot auf. Es ist kein direktes Anlernen
Um den Funk-Wassermelder an einer
möglich!
anderen Zentrale anzulernen, ist dieser, wie in Kapitel
8 beschrieben, in den Auslieferungszustand zu
versetzen.
13

7 Betriebshinweise für Direkt betrieb mit HomeMatic-Aktor
Bei einem Direktbetrieb mit einem HomeMatic-Aktor
ndet keine Differenzierung zwischen Feuchte- und
Wasserstandsmeldung statt!
Sobald der Alarmzustand nicht mehr vorliegt, erhält
der Aktor einen Ausschaltbefehl. So führen z. B. kurzfristig auftretende Zustände, wie Dampf oder Tau, nicht
zu einem dauerhaften Alarmzustand.
8 Zurücksetzen in den
Auslieferungszustand
Halten Sie die Anlerntaste für mindestens 4 Sekunden
gedrückt. Die Geräte-LED beginnt, langsam rot zu
blinken. (Wollen Sie an dieser Stelle das Zurücksetzen
abbrechen, können Sie das mit einem kurzen erneuten
Tastendruck auf die Anlerntaste tun, oder Sie warten
15 Sekunden. In beiden Fällen stoppt das langsame
rote Blinken.)
Zum Zurücksetzen des Geräts drücken Sie nun erneut
für mindestens 4 Sekunden die Anlerntaste. Die LED
beginnt nun währenddessen schneller rot zu blinken.
Ein Loslassen der Anlerntaste schließt den Rücksetzvorgang ab und zur Bestätigung des Zurücksetzens
14

leuchtet die LED für etwa 3 Sekunden dauerhaft rot
auf.
Mögliche Fehlermeldungen:
(Dieser Fehler kann nur auftreten, wenn Sie
eine Zentrale besitzen und das Gerät an diese
Zentrale angelernt haben.) Beginnt die LED
nach 5 Sekunden Tastenbetätigung nicht zu
blinken, sondern leuchtet dauerhaft auf, kann das
Gerät nicht zurückgesetzt werden! In diesem Falle ist
die Verschlüsselung mit einem vom Auslieferungsschlüssel verschiedenen System-Sicherheitsschlüssel
aktiv. Um den Sensor zurückzusetzen, müssen sie die
Kongurationssoftware der Zentrale zum Zurücksetzen benutzen! Der Vorgang ist in der Anleitung zur
Zentralen-Software beschrieben.
9 Wartung und Reinigung
Reinigen Sie das Gehäuse und die Elektroden mit
einem weichen und trockenen Tuch. Für die Entfernung von stärkeren Verschmutzungen kann das Tuch
leicht mit Wasser angefeuchtet werden. Verwenden
Sie keine lösungsmittelhaltigen Reinigungsmittel,
das Kunststoffgehäuse und die Beschriftung können
dadurch angegriffen werden.
15

10 Technische Daten
Funkfrequenz: 868,3 MHz
Typ. Freifeldreichweite: 100 m
Stromversorgung: 2 x 1,5-V-LR6-Batterie
Batterielebensdauer: bis zu 3 Jahre
Schutzart: IP65
Abmessungen (B x H x T): 115 x 65 x 55 mm
Technische Änderungen vorbehalten.
Entsorgungshinweis
Gerät nicht im Hausmüll entsorgen!
Elektronische Geräte sind entsprechend der
Richtlinie über Elektro-und Elektronik-Altgeräte über die örtlichen Sammelstellen für
Elektronik-Altgeräte zu entsorgen.
Das CE-Zeichen ist ein Freiverkehrszeichen,
das sich ausschließlich an die Behörden
wendet und keine Zusicherung von
Eigenschaften beinhaltet.
16
(Mignon/AA)

st
1
English edition 07/2013
Documentation © 2013 eQ-3 Ltd., Hong Kong
All rights reserved. This manual may not be reproduced in any format, either in whole or in part, nor may
it be duplicated or edited by electronic, mechanical
or chemical means, without the written consent of the
publisher.
Typographical and printing errors cannot be excluded.
However, the information contained in this manual is
reviewed on a regular basis and any necessary cor-
rections will be implemented in the next edition. We
accept no liability for technical or typographical errors
or the consequences thereof. All trademarks and
industrial property rights are acknowledged.
Printed in Hong Kong.
Changes may be made without prior notice as a result
of technical advances.
131838 / V 1.0
17

Table of contents
1 Information about this manual ............19
2 Hazard information.....................19
3 How the radio water sensor works ........20
4 General information about ...............22
the HomeMatic system.................. 22
5 General information about ............... 23
radio operation ........................23
6 Positioning and start-up . . . . . . . . . . . . . . . . . 24
6.1 General information about positioning . . . . . . 24
6.2 Inserting batteries, installation ............24
6.2.1 Replacing batteries..................... 25
6.2.2 Response once the batteries have been in-
serted ...............................26
6.3 Teaching-in...........................27
7 Information about direct opera- ...........29
tion with a HomeMatic actuator ...........29
8 Resetting to the initial state ..............29
9 Maintenance and cleaning ..............30
10 Technical specications .................31
18

1 Information about this manual
Read this manual carefully before starting to use your
HomeMatic components. Keep the manual so you can
refer to it at a later date should you need to.
If you hand over the device to other persons for use,
please hand over the operating manual as well.
Symbols used:
Attention!
This indicates a hazard.
Note. This section contains important
additional information!
2 Hazard information
Do not open the device: it does not contain any
components that need to be serviced by the user. The
device may only be operated indoors and must be
protected from the effects of damp and dust, as well as
from solar and other methods of heat radiation.
19

3 How the radio water sensor
works
The radio water sensor features ve measuring electrodes which alternately detect the ground humidity
and a water level of above 1.5 mm via two measurement paths (a distinction can only be made between
the two different message types if a HomeMatic central
control unit is used). Decoding circuitry converts the
detected status into HomeMatic radio commands. The
device is battery-operated, meaning it can be used
exibly and in any location.
Sensor electrodes and measurement paths
(C)
(B)
(A)
(B)
(A) – Paths for measuring a water level of above 1.5 mm
(B/C) – Paths for measuring ground humidity
20
(C)

Indicators and controls, battery holder
A
(A) – Teach-in button
(B) – Battery holder
(C) – Device LED
BC
21

4 General information about
the HomeMatic system
This device is part of the HomeMatic home control
system and works with the bi-directional BidCoS
wireless protocol.
All devices are delivered in a standard conguration.
However, the device functionality can be congured
by means of software and a programming unit. For
information on the additional functions that can be
made available in this way and on the supplemen-
tary functions which you can benet from by using
the HomeMatic system in conjunction with other
components, please refer to the separate conguration
instructions or to the HomeMatic system manual.
You can nd the latest versions of all technical
documents and the latest updates at
www.HomeMatic.com.
22
®

5 General information about
radio operation
Radio transmission is performed on a non-exclusive
transmission path, which means that there is a possibility of interference occurring.
Switching operations, electrical motors or defective
electrical devices can also cause interference.
The range of transmission within buildings can differ
greatly from that available in the open air. Besides the
transmitting power and the reception characteristics of
the receiver, environmental factors such as humidity
in the vicinity have an important role to play, as do onsite structural/screening conditions.
eQ-3 Entwicklung GmbH hereby declares that this
device complies with the essential requirements and
other relevant regulations of Directive 1999/5/EC.
You can nd the full declaration of conformity at www.
HomeMatic.com.
23

6 Positioning and start-up
6.1 General information about positioning
The radio water sensor should be installed near to the
devices to be monitored and protected, or in critical
areas.
It should be placed directly on a level section of the
oor in question, not on a base, carpet, or similar
surface.
You must also ensure that the radio water sensor is
located within the reception range of the assigned
actuator or the HomeMatic central control unit. You
should run a reception test at various times of day in
order to detect any wireless malfunctions that may
occur at different times.
6.2 Inserting batteries, installation
•
Open the device by releasing the four cover screws
and removing the cover.
• Unscrew the four plastic screws on the inside cover
and remove it.
• Insert two LR6 batteries (mignon/AA) into the
battery holder (B), observing the correct polarity as
marked, and use the four plastic screws to reattach
24

the inside cover.
• Teach-in the device as per Section 6.3.
• Attach the housing cover to the device. Ensure
that the neoprene cover seal is clean, that it is
properly seated in the groove all the way around
the cover and that it is not pinched at any point.
• Use the four cover screws to screw the cover on.
6.2.1 Replacing batteries
Caution! There is a risk of explosion if the batteries are
not replaced correctly.
Used batteries should not be disposed
of with regular domestic waste! Instead,
take them to your local battery disposal
point!
If the equipment being controlled does not respond
when a signal is sent or if the ashing code indicating an empty battery appears, follow the instructions
contained in the previous subsection to replace the old
batteries with two new ones of type LR6.
You must observe the correct battery polarity.
25

6.2.2 Response once the batteries have been
inserted
Once the batteries have been inserted, the device will
perform a self-test, which will take about two seconds.
Initialisation is carried out once the self-test has
nished. The LED test display will indicate that initialisation is complete: the LED will light up red, green and
orange in that order, for half a second each!
If an error occurs, this is indicated by the LED ashing
red.
The device then sends a status message, which is
indicated by the device LED lighting up orange.
If the radio water sensor has been taught-in, the LED
will then ash red or green to indicate whether or not
the message has been received.
One long ash, two short
ashes, pause (repeated
twice)
One long ash, one short
ash, pause (continuous)
26
Battery voltage
too low
Radio water sensor
is defective

If the battery voltage is too low, the radio water sensor
will still be activated and made ready for operation,
provided that the voltage value permits it.
Depending on the particular load, it may be possible
to send transmissions again repeatedly, once the batteries have been allowed a brief recovery period. If the
voltage drops too far again during transmission, the
corresponding error code will be displayed once more.
6.3 Teaching-in
Please read this entire section before starting to carry
out the teach-in procedure!
The HM-Sec-WDS radio water sensor can be used to
control HomeMatic actuators, such as radio switches.
In order to do this, a teach-in process must rst be
carried out. All HomeMatic devices feature a teach-in
button and a device LED for this purpose. If the radio
water sensor is to be taught-in to a radio switch, for
example, the following procedure must be performed:
• Press the teach-in button on the radio switch until
the LED starts to ash red, which will take about
four seconds.
• Briey press the teach-in button on the radio
water sensor.
27

The device LED will ash orange for a few
seconds.
The teach-in procedure can be aborted by press-
ing the teach-in button again briey (the device
LED will then turn red).
• Once the teach-in procedure has been completed successfully for the radio water sensor,
the device LED will ash green. How long the
LED ashes for depends upon the conguration
progress.
If the teach-in attempt has failed, the device LED
will ash red.
• If no teaching-in is carried out, teach-in mode will
be exited automatically after 20 seconds.
If the radio water sensor has already been
taught-in to a central control unit and is thus
blocked for direct teach-in, it can still be put into
teach-in mode as described above, but the device LED
will light up red for two seconds when a button is
pressed. Direct teach-in is not possible! To teach-in the
radio water sensor to another central control unit, reset
it to the initial state, as described in Section 8.
28

7 Information about direct opera tion with a HomeMatic actuator
If the device is operated directly with a HomeMatic
actuator, no distinction is made between the humidity
and water level messages!
As soon as the alarm status is exited, the actuator
receives a switch-off command. This means that tem-
porary conditions such as steam or dew, for example,
do not result in a permanent alarm status.
8 Resetting to the initial state
Press and hold the teach-in button for at least four
seconds. The device LED starts to slowly ash red. (If
you want to cancel the reset procedure at this point,
you can either press the teach-in button again briey
or wait for 15 seconds. In both cases, the slow red
ashing will stop.)
To reset the device, now press and hold the teach-in
button for at least another four seconds.
The LED will now start to ash red faster. Release the
teach-in button to complete the reset procedure; the
LED lights up red continuously for around three sec-
onds to conrm that the reset has been successful.
29

Possible error messages:
(This error can only occur if you have a central
control unit to which you have taught-in the
device.) If the LED does not start to ash
when the button has been held down for ve
seconds, but lights up continuously instead, the device
cannot be reset! In this case, coding is activated
using a system security key that differs from the one
supplied with the product. To reset the sensor, you will
have to use the conguration software for resetting
the central control unit! The procedure to follow is
described in the manual for the central control unit
software.
9 Maintenance and cleaning
Clean the housing and the electrodes using a soft and
dry cloth. You may dampen the cloth a little with water
in order to remove more stubborn marks. Do not use
any detergents containing solvents, as they could corrode the plastic housing and label.
30

10 Technicalspecications
Radio frequency: 868.3 MHz
Typ. open air range: 100 m
Power supply: 2 x 1.5 V LR6 batteries
(mignon/AA)
Battery life: up to three years
Degree of protection: IP65
Dimensions (W x H x D): 115 x 65 x 55 mm
Subject to technical alterations.
Instructions for disposal
Do not dispose of the device with regular
domestic waste. Electronic devices must be
disposed of in accordance with the Waste
Electrical and Electronic Equipment Directive
via local disposal points for electronic waste.
The CE Marking is simply an ofcial symbol
relating to the free movement of a product; it
does not warrant a product’s characteristics.
31

32
 Loading...