


Bedienungsanleitung (S. 2)
Operating Manual (p. 12)
Funk-Kohlendioxid Sensor:
Radio-controlled sensor
for carbon dioxide:
HM-CC-SCD

1. Ausgabe Deutsch 09/2009
Dokumentation © 2009 eQ-3 Ltd., Hong Kong
Alle Rechte vorbehalten. Ohne schriftliche Zustimmung des
Herausgebers darf dieses Handbuch auch nicht auszugsweise
in irgendeiner Form reproduziert werden oder unter Verwendung
elektronischer, mechanischer oder chemischer Verfahren vervielfältigt oder verarbeitet werden.
Es ist möglich, dass das vorliegende Handbuch noch drucktechnische Mängel oder Druckfehler aufweist. Die Angaben in diesem
Handbuch werden jedoch regelmäßig überprüft und Korrekturen
in der nächsten Ausgabe vorgenommen. Für Fehler technischer
oder drucktechnischer Art und ihre Folgen übernehmen wir keine
Haftung.
Alle Warenzeichen und Schutzrechte werden anerkannt.
Printed in Hong Kong
Änderungen im Sinne des technischen Fortschritts können ohne
Vorankündigung vorgenommen werden.
85719 / V 1.1
2

Inhaltsverzeichnis
1 Hinweise zu dieser Anleitung ........................4
2 Gefahrenhinweise .................................4
3 Funktion.........................................5
4 Allgemeine Systeminformation zu HomeMatic ..........6
5 Allgemeine Hinweise zum Funkbetrieb ................6
6 Inbetriebnahme/Bedienung .........................7
6.1 Gerätestart.......................................7
6.2 Kohlendioxid-Referenzwertmessung und Abgleich ......7
6.3 Anlernen.........................................8
7 Zurücksetzen in den Auslieferungszustand.............9
8 Verhalten nach Spannungswiederkehr................10
9 Wartung und Reinigung ...........................10
10 Technische Daten ................................11
3
1 Hinweise zu dieser Anleitung
Lesen Sie diese Anleitung sorgfältig, bevor Sie ihre HomeMatic
Komponenten in Betrieb nehmen.
Bewahren Sie die Anleitung zum späteren Nachschlagen auf!
Wenn Sie das Gerät anderen Personen zur Nutzung überlassen,
übergeben Sie auch diese Bedienungsanleitung.
Benutzte Symbole:
Achtung! Hier wird auf eine Gefahr hingewiesen.
Hinweis. Dieser Abschnitt enthält zusätzliche wichtige
Informationen!
2 Gefahrenhinweise
Öffnen Sie das Gerät nicht, es enthält keine durch den
Anwender zu wartenden Teile. Das Öffnen des Gerätes
birgt die Gefahr eines Stromschlages.
Betreiben Sie das Gerät nur in Innenräumen und vermeiden Sie
den Einfluss von Feuchtigkeit, Staub sowie Sonnen- oder andere
Wärmebestrahlung.
Bestimmungsgemäßer Einsatz
Der HomeMatic Funk-Kohlendioxid Sensor misst den Kohlendioxid-Gehalt der Luft. Sobald der CO
Wert überschreitet, wird ein Schaltbefehl gesendet.
Jeder andere Einsatz ist nicht bestimmungsgemäß und führt zu
Garantie- und Haftungsausschluss. Dies gilt auch für Umbauten
und Veränderungen.
-Gehalt einen definierten
2
4
3 Funktion
Der Funk-Kohlendioxid Sensor wird dazu genutzt, den CO2Gehalt im Raum zu messen. Der Sensor befindet sich in einem
Zwischenstecker-Gehäuse und ist somit netzversorgt. Sobald
der CO
-Gehalt einen definierten Wert überschreitet, wird ein
2
Schaltbefehl an angelernte HomeMatic Aktoren gesendet. Der
CO
-Gehalt wird weiterhin gemessen, entsprechend wird nach
2
20 bzw. 10 Minuten ein weiterer Schaltbefehl gesendet. Sehen
Sie dazu das folgende Beispiel.
Beispiel:
Wenn der Luftgütesensor zur CO
WinMatic angelernt ist, wird dadurch, das der Sensor bei hohem
CO
-Gehalt einen Schaltbefehl auslöst, die WinMatic für 20 Minu-
2
ten das Fenster zum Lüften öffnen. Sollte danach der CO
der Luft geringer, die Luft also frischer sein, wird die WinMatic
-Messung z. B. direkt an eine
2
-Gehalt
2
das Fenster automatisch schließen. Falls die Luft sich nach den
ersten 20 Minuten Lüften nicht verbessert hat, würde das Lüften
für 10 Minuten verlängert werden.
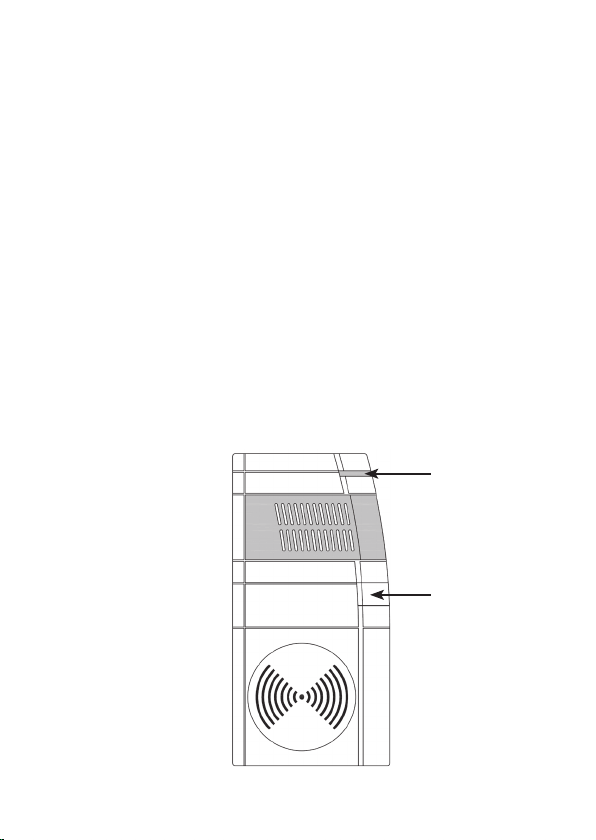
A
B
A Geräte-LED
B Anlerntaste
5

4 Allgemeine Systeminformation zu
HomeMatic
Dieses Gerät ist Teil des HomeMatic Haussteuersystems und
arbeitet mit dem bidirektionalen BidCoS
Alle Geräte werden mit einer Standardkonfiguration ausgeliefert.
Darüber hinaus ist die Funktion des Gerätes über ein Programmiergerät und Software konfigurierbar. Welcher weitergehende
Funktionsumfang sich damit ergibt, und welche Zusatzfunktionen sich im HomeMatic System im Zusammenspiel mit weiteren
Komponenten ergeben, entnehmen Sie bitte dem HomeMatic
Systemhandbuch.
Alle technischen Dokumente und Updates finden Sie stets aktuell
unter www.HomeMatic.com.
®
Funkprotokoll.
5 Allgemeine Hinweise zum Funkbetrieb
Die Funk-Übertragung wird auf einem nicht exklusiven Übertragungsweg realisiert weshalb Störungen nicht ausgeschlossen
werden können.
Weitere Störeinflüsse können hervorgerufen werden durch
Schaltvorgänge, Elektromotoren oder defekte Elektrogeräte.
Die Reichweite in Gebäuden kann stark von der im
Freifeld abweichen. Außer der Sendeleistung und den
Empfangseigenschaften der Empfänger spielen Umwelteinflüsse wie Luftfeuchtigkeit neben baulichen Gegebenheiten
vor Ort eine wichtige Rolle.
Hiermit erklärt die eQ-3 Entwicklung GmbH, dass sich dieses Gerät in Übereinstimmung mit den grundlegenden Anforderungen
und den anderen relevanten Vorschriften der Richtlinie 1999/5/EG
befindet.
Die vollständige Konformitätserklärung finden Sie unter
www.HomeMatic.com.
6

6 Inbetriebnahme/Bedienung
6.1 Gerätestart
Zur Inbetriebnahme genügt es, das Gerät in eine Steckdose im
hausinternen 230-V-Stromnetz einzustecken. Danach führt das
Gerät einen Selbsttest durch. Dies dauert ca. 2 Sekunden.
Nach der Initialisierung des Gerätes erfolgt eine LED-Testanzeige: rot, grün, orange für jeweils eine halbe Sekunde. Tritt ein
Fehler auf, wird dies durch ein rotes Blinken signalisiert.
Danach erfolgt eine Aufwärmphase des Sensors von 15 Minuten.
Dabei blinkt die Geräte-LED grün.
Die Aufwärmphase lässt sich durch einen kurzen Tastendruck
(kürzer als 4 Sekunden) abbrechen. Dies kann z. B. erfolgen, um
gleich nach Inbetriebnahme einen Aktor an den Sensor anzulernen. Dabei sollte vor einer weiteren Verwendung des Gerätes ein
Neustart durch eine Unterbrechung der Spannungsversorgung
erfolgen. Ziehen Sie dazu einfach das Gerät für einige Sekunden
aus der Steckdose heraus.
6.2 Kohlendioxid-Referenzwertmessung
und Abgleich
Der Funk-Kohlendioxid Sensor führt innerhalb von 24 Stunden
eine automatische Referenzwertmessung und -speicherung
durch.
Der Abgleich eines Referenzwertes kann auch jederzeit manuell
durchgeführt werden. Dazu wird der Sensor Frischluft ausgesetzt. Der Abgleich wird wie folgt ausgeführt:
•HaltenSiedieAnlerntastelanggedrückt(längerals4Sekun-
den). Die Geräte-LED beginnt, langsam rot zu blinken.
•MiteinemweiterenkurzenTastendruck(kürzerals4Sekunden)
der Anlerntaste wird der Frischluftabgleich durchgeführt. Dies
wird durch ein grünes Leuchtsignal der Geräte-LED quittiert.
7
6.3 Anlernen
Bitte lesen Sie diesen Abschnitt erst vollständig, bevor
Sie mit dem Anlernen beginnen.
Damit Funk-Komponenten miteinander kommunizieren können,
müssen Sie aneinander angelernt werden. Zum Anlernen müssen
die beiden zu verknüpfenden Geräte in den Anlernmodus gebracht werden.
Zum Anlernen gehen Sie wie folgt vor:
•HaltenSiedieAnlerntastekurzgedrückt.DieGeräte-LEDblinkt
für einige Sekunden orange. Der Anlernvorgang kann durch
erneutes kurzes Drücken der Anlerntaste abgebrochen werden,
die Geräte-LED leuchtet dann rot auf.
•DanachistdasanzulernendeGerätebenfallsindenAnlernmo-
dus zu versetzen. Sind beide Geräte gleichzeitig im Anlernmodus, lernen sie sich aneinander an.
•IstderFunk-KohlendioxidSensorerfolgreichangelernt,blinkt
die Geräte-LED grün. Die Länge des Blinkens ist abhängig vom
Konfigurationsfortschritt. Ist der Anlernversuch nicht erfolgreich
verlaufen, so blinkt die Geräte-LED rot.
•WennkeinAnlernenerfolgt,wirdderAnlernmodusautomatisch
nach 20 Sekunden beendet.
Ist der Funk-Kohlendioxid Sensor bereits an eine Zentrale
angelernt und damit für direktes Anlernen gesperrt,
kann er zwar wie oben beschrieben in den Anlernmodus
gebracht werden, nach Drücken einer Bedientaste leuchtet die
Geräte-LED jedoch für 2 Sekunden rot auf. Es ist kein direktes
Anlernen möglich. Um den Funk-Kohlendioxid Sensor direkt an
eine andere Zentrale/HomeMatic Komponente anzulernen, ist
dieser in den Auslieferungszustand zu versetzen.
Im Zusammenhang mit einer Zentrale muss das Anlernen über
die WebUI erfolgen.
8

7 Zurücksetzen in den
Auslieferungszustand
Das Gerät kann in den Auslieferungszustand zurückversetzt
werden. Dabei werden alle Informationen über angelernte Komponenten gelöscht.
Zum Zurücksetzen gehen Sie wie folgt vor:
•HaltenSiedieAnlerntastelanggedrückt(längerals4Sekun-
den). Die Geräte-LED beginnt, langsam rot zu blinken. Wollen
Sie an dieser Stelle das Zurücksetzen abbrechen, warten Sie
15 Sekunden. In diesem Fall stoppt das langsame rote Blinken.
•ZumZurücksetzendesGerätsdrückenSiedieAnlerntaste
erneut lang (länger als 4 Sekunden). Die LED beginnt nun
währenddessen schneller rot zu blinken. Ein Loslassen der
Anlerntaste schließt den Rücksetzvorgang ab und zur Bestätigung des Zurücksetzens leuchtet die LED für etwa 3 Sekunden
dauerhaft rot auf.
Mögliche Fehlermeldungen: Der folgende Fehler kann nur auf-
treten, wenn Sie eine Zentrale besitzen und das Gerät an
diese angelernt haben.
Beginnt die LED nach 5 Sekunden Tastenbetätigung nicht
zu blinken, sondern leuchtet dauerhaft auf, kann das Gerät nicht
zurückgesetzt werden. In diesem Falle ist die Verschlüsselung
mit einem vom Auslieferungsschlüssel verschiedenen SystemSicherheitsschlüssel aktiv. Um den Sensor zurückzusetzen,
müssen sie die Konfigurationssoftware der Zentrale zum Zurücksetzen benutzen. Der Vorgang ist in der Anleitung zur ZentralenSoftware beschrieben.
9

8 Verhalten nach Spannungswiederkehr
Nach dem Einstecken des Geräts führt es einen Selbsttest durch.
Dies dauert ca. 2 Sekunden. Danach erfolgt die Initialisierung.
Den Abschluss bildet die LED-Test-Anzeige: rot, grün, orange für
jeweils eine halbe Sekunde.
Tritt ein Fehler auf, wird dies durch rotes Blinken signali-
siert (einmal lang, einmal kurz, Pause).
Danach sendet das Gerät eine Statusmeldung - signalisiert durch
orangefarbenes Aufleuchten der Geräte-LED.
Ist der Funk-Kohlendioxid-Sensor an eine andere HomeMatic
Komponente angelernt, folgt danach ein rotes oder grünes
Blinken, je nachdem, ob der Empfang bestätigt wurde (grün)
oder nicht (rot).
9 Wartung und Reinigung
Trennen Sie das Gerät vor der Reinigung von der Spannungsversorgung, ziehen Sie es dazu einfach aus der Steckdose heraus.
Reinigen Sie das Gehäuse und die Elektroden mit einem weichen
und trockenen Tuch. Für die Entfernung von stärkeren Verschmutzungen kann das Tuch leicht mit Wasser angefeuchtet
werden. Verwenden Sie keine lösungsmittelhaltigen Reinigungsmittel, das Kunststoffgehäuse und die Beschriftung können
dadurch angegriffen werden.
10

10 Technische Daten
Sende-/ Empfangsfrequenz: 868,30 MHz
Freifeldreichweite: bis zu 100 m
Spannungsversorgung: 230 V / 50 Hz
Standby-Verbrauch: 1,2 W
Schutzart: IP 20
Gehäuse: PBT
Gehäusefarbe: Reinweiß mit silberner Blende
Abmessungen
(H x B x T, ohne Stecker): 125 x 63 x 40 mm
Entsorgungshinweis
Gerät nicht im Hausmüll entsorgen! Elektronische Geräte
sind entsprechend der Richtlinie über Elektro- und
Elektronik-Altgeräte über die örtlichen Sammelstellen
für Elektronik-Altgeräte zu entsorgen.
Das CE-Zeichen ist ein Freiverkehrszeichen, das sich
ausschließlich an die Behörden wendet und keine
Zusicherung von Eigenschaften beinhaltet.
11

1. Issue English 09/2009
Documentation © 2009 eQ-3 Ltd., Hong Kong
All rights reserved. This manual may not be reproduced in any
format, either in whole or in part, nor may it be duplicated or
edited by electronic, mechanical or chemical means, without the
written consent of the publisher.
Typographical and printing errors cannot be excluded. However,
the information contained in this manual is reviewed on a regular
basis and any necessary corrections will be implemented in the
next edition. We accept no liability for technical or typographical
errors or the consequences thereof.
All trademarks and industrial property rights are acknowledged.
Printed in Hong Kong.
Changes may be made without prior notice as a result of
technical advances.
85719 / V 1.1
12

Table of contents
1 Information about this manual ......................14
2 Hazard information ...............................14
3 Function........................................15
4 General system information about HomeMatic.........16
5 General information about radio operation ............16
6 Start-up/Operation ...............................17
6.1 Device start-up ..................................17
6.2 Carbon dioxide reference value measurement
and calibration...................................17
6.3 Teaching-in .....................................18
7 Resetting to the initial state ........................19
8 Response to power recovery .......................20
9 Maintenance and cleaning .........................20
10 Technical data ...................................21
13

1 Information about this manual
Read these instructions carefully before starting to use your
HomeMatic components.
Keep the manual handy so you can refer to it at a later date! If
you hand over the device to other persons for use, please hand
over the operating manual as well.
Symbols used:
Attention! This indicates a hazard.
Note. This section contains additional important
information!
2 Hazard information
Do not open the device: it does not contain any
components that need to be serviced by the user. There
is a risk of electric shock if the device is opened.
The device may only be operated indoors and must be protected
from the effects of damp and dust, as well as solar or other
methods of heat radiation.
Intended use
The HomeMatic radio-controlled sensor for carbon dioxide
measures carbon dioxide content in the air. As soon as the CO
content exceeds a defined level, a switching command is sent
out.
Using the device for anything other than its intended purpose will
invalidate all warranty and liability claims. This also applies to
any conversion or modification work.
2
14

3 Function
The radio-controlled sensor for carbon dioxide is used to
measure the C
adapter housing and runs on the mains power supply. As soon as
the C
O2 content exceeds a defined level, a switching
command is sent to taught-in HomeMatic actuators. The C
content continues to be measured; a second switching command
is sent accordingly after 20 minutes and 10 minutes respectively.
The following example illustrates the process.
Example:
If the air quality sensor for C
directly on a WinMatic, for example, when the sensor sends a
switching command on account of the high C
WinMatic will open the window for 20 minutes to ventilate the
room. Should the C
other words, if the air becomes fresher), the WinMatic will close
the window automatically. If the air does not improve after the
first 20 minutes of ventilation, the window will be kept open for a
further 10 minutes.
O2 content in a room. The sensor is located in an
O2
O2 measurement has been taught-in
O2 content, the
O2 content in the air drop after this time (in
A
B
A Device LED
B Teach-in button
15

4 General system information about
HomeMatic
This device is part of the HomeMatic home control system and
works with the bi-directional BidCoS
All devices are delivered in a standard configuration. The
functionality of the device can also be configured with a
programming device and software. The additional functions that
can be made available in this way and the supplementary
functions provided by the HomeMatic system when it is
combined with other components are described in the
HomeMatic System Manual.
All current technical documents and updates are provided at
www.HomeMatic.com.
®
wireless protocol.
5 General information about radio
operation
Radio transmission is performed on a non-exclusive
transmission path, which means that there is a possibility of
interference occurring.
Interference can also be caused by switching operations,
electrical motors or defective electric devices.
The range of transmission within buildings can differ
greatly from that available in the open air. Besides the
transmitting power and the reception characteristics of
the receiver, environmental influences such as humidity in the
vicinity and local structures also play an important role.
eQ-3 Entwicklung GmbH hereby declares that this device
complies with the essential requirements and other relevant
regulations of Directive 1999/5/EC.
The full declaration of conformity is provided at
www.HomeMatic.com.
16

6 Start-up/Operation
6.1 Device start-up
To start up the device, simply plug it into a socket outlet in the
indoor 230 V mains power supply. The device then runs a
self-test, which takes approximately 2 seconds. Following device
initialisation, the LED is tested: it lights up red, green and orange
for half a second each. If an error occurs, the LED will flash red.
The 15-minute sensor warm-up phase then follows,
during which time the device LED flashes green.
The warm-up phase can be aborted by pressing and then
releasing (within 4 seconds) the button. The warm-up phase
might be aborted, for example, to teach in an actuator to the
sensor immediately after start-up. In this case, before continuing
operation, the device should be restarted by disconnecting and
then reconnecting the power supply. To do this, simply unplug
the device from the socket for a few seconds.
6.2 Carbon dioxide reference value measurement
and calibration
The radio-controlled sensor for carbon dioxide automatically
measures and saves a reference value within 24 hours.
A reference value can also be calibrated manually at any time. To
do this, expose the sensor to fresh air, then perform calibration
as follows:
•Pressandholddowntheteach-inbutton(formorethan4
seconds). The device LED starts to slowly flash red.
•Pressandreleasethebuttonagain(within4seconds)to
perform fresh air calibration. This is acknowledged by the
device LED turning green.
17

6.3 Teaching-in
Please read this entire section before starting the
teach-in procedure.
In order to enable communication between radio components,
the devices have to be taught-in to one another. To execute the
teach-in procedure, both of the devices to be linked must be in
teach-in mode.
To teach-in, proceed as follows:
•Pressandreleasethechannelbutton(within4seconds).The
device LED will flash orange for a few seconds. The teach-in
procedure can be aborted by pressing the
teach-in button again briefly (the device LED will then turn red).
•Thedevicetobetaught-inthenalsoneedstobeswitched
to teach-in mode. If both devices are in teach-in mode at the
same time, each will be taught-in to the other.
•Oncetheteach-inprocedurehasbeencompletedsuccessfully
for the radio-controlled sensor for carbon dioxide, the device
LED will flash green. How long the LED flashes for depends
upon the configuration progress. If the teach-in attempt has
failed, the device LED will flash red.
•Ifnoteaching-iniscarriedout,teach-inmodewillbeexited
automatically after 20 seconds.
If the radio-controlled sensor for carbon dioxide has
already been taught-in to a central control unit and is
thus blocked for direct teach-in, it can still be put into
teach-in mode as described above, but the device LED will light
up red for two seconds when a button is pressed. Direct teach-in
is not possible. To teach-in the radio-controlled sensor for
carbon dioxide to another central control unit/HomeMatic
component, reset it to the initial state. The WebUI must be used
for teaching-in to a central control unit.
18

7 Resetting to the initial state
The device can be reset to the initial state. Doing this deletes all
information relating to taught-in components.
To reset, proceed as follows:
•Pressandholddowntheteach-inbutton(formorethan4
seconds). The device LED starts to slowly flash red. If you wish
to abort the reset at this point, wait 15 seconds. The slow red
flashing will stop.
•Toresetthedevice,pressandholddowntheteach-inbutton
again (for more than 4 seconds). The LED will now start to flash
red faster. Release the teach-in button to complete the reset
procedure; the LED lights up continuously for around three
seconds to confirm that the reset has been successful.
Possible error messages: The following error can only occur if
you have a central control unit to which you have
taught-in the device.
If the LED does not start to flash when the button has
been held down for 5 seconds, but lights up continuously
instead, the device cannot be reset. In this case, coding is
activated using a system security key that differs from the one
supplied with the product. To reset the sensor, you will have to
use the configuration software for resetting the central control
unit. The procedure to follow is described in the manual for the
central control unit software.
19

8 Response to power recovery
When the device is plugged in it runs a self-test, which takes
approximately 2 seconds. Initialisation is carried out once the
self-test has finished. The LED test display will indicate that
initialisation is complete: the LED will light up red, green and
orange in that order, for half a second each.
In the event of an error, the LED will flash red (one long
flash, one short flash, pause).
The device then sends a status message, which is indicated by
the device LED lighting up orange.
If the radio-controlled sensor for carbon dioxide has been
taught-in to another HomeMatic component, the LED will then
light up red or green, depending upon whether reception was
confirmed (green) or not (red).
9 Maintenance and cleaning
The device must be disconnected from the power supply before
cleaning (to do this, simply unplug it from the socket). Clean the
housing and the electrodes using a soft and dry cloth. You may
dampen the cloth a little with water in order to remove more
stubborn marks. Do not use any detergents containing solvents,
as they could corrode the plastic housing and label.
20

10 Technical data
Transmit/receive frequency: 868.30 MHz
Open air range: Up to 100 m
Power supply: 230 V/50 Hz
Standby consumption: 1.2 W
Degree of protection: IP 20
Housing: PBT
Housing colour: Pure white with silver
Dimensions
(H x W x D, without plug): 125 x 63 x 40 mm
Instructions for disposal
Do not dispose of the device with regular domestic
waste. Electronic devices are to be disposed of in
accordance with the Waste Electrical and Electronic
Equipment Directive via the local collection point for
waste electronic devices.
The CE sign is a free trade sign addressed exclusively to
the authorities and does not warrant any properties.
masking frame
21

222324


eQ-3 AG
Maiburger Straße 29
D-26789 Leer
www.eQ-3.com
 Loading...