

Page 1
Montage- und Bedienungsanleitung
Für die Montage sind keinerlei Werkzeuge erforderlich.
Um den Stellantrieb zu montieren, gehen Sie wie folgt vor:
• Prüfen Sie, ob ihr Ventil dem Gewindemaß M30x1,5mm entspricht. Wir empfehlen dafür die Verwendung der Ventilschablone (zu finden im Downloadbereich unter www.eQ-3.de). Weicht das Gewindemaß ab, benötigen Sie einen
entsprechenden Ventiladapter.
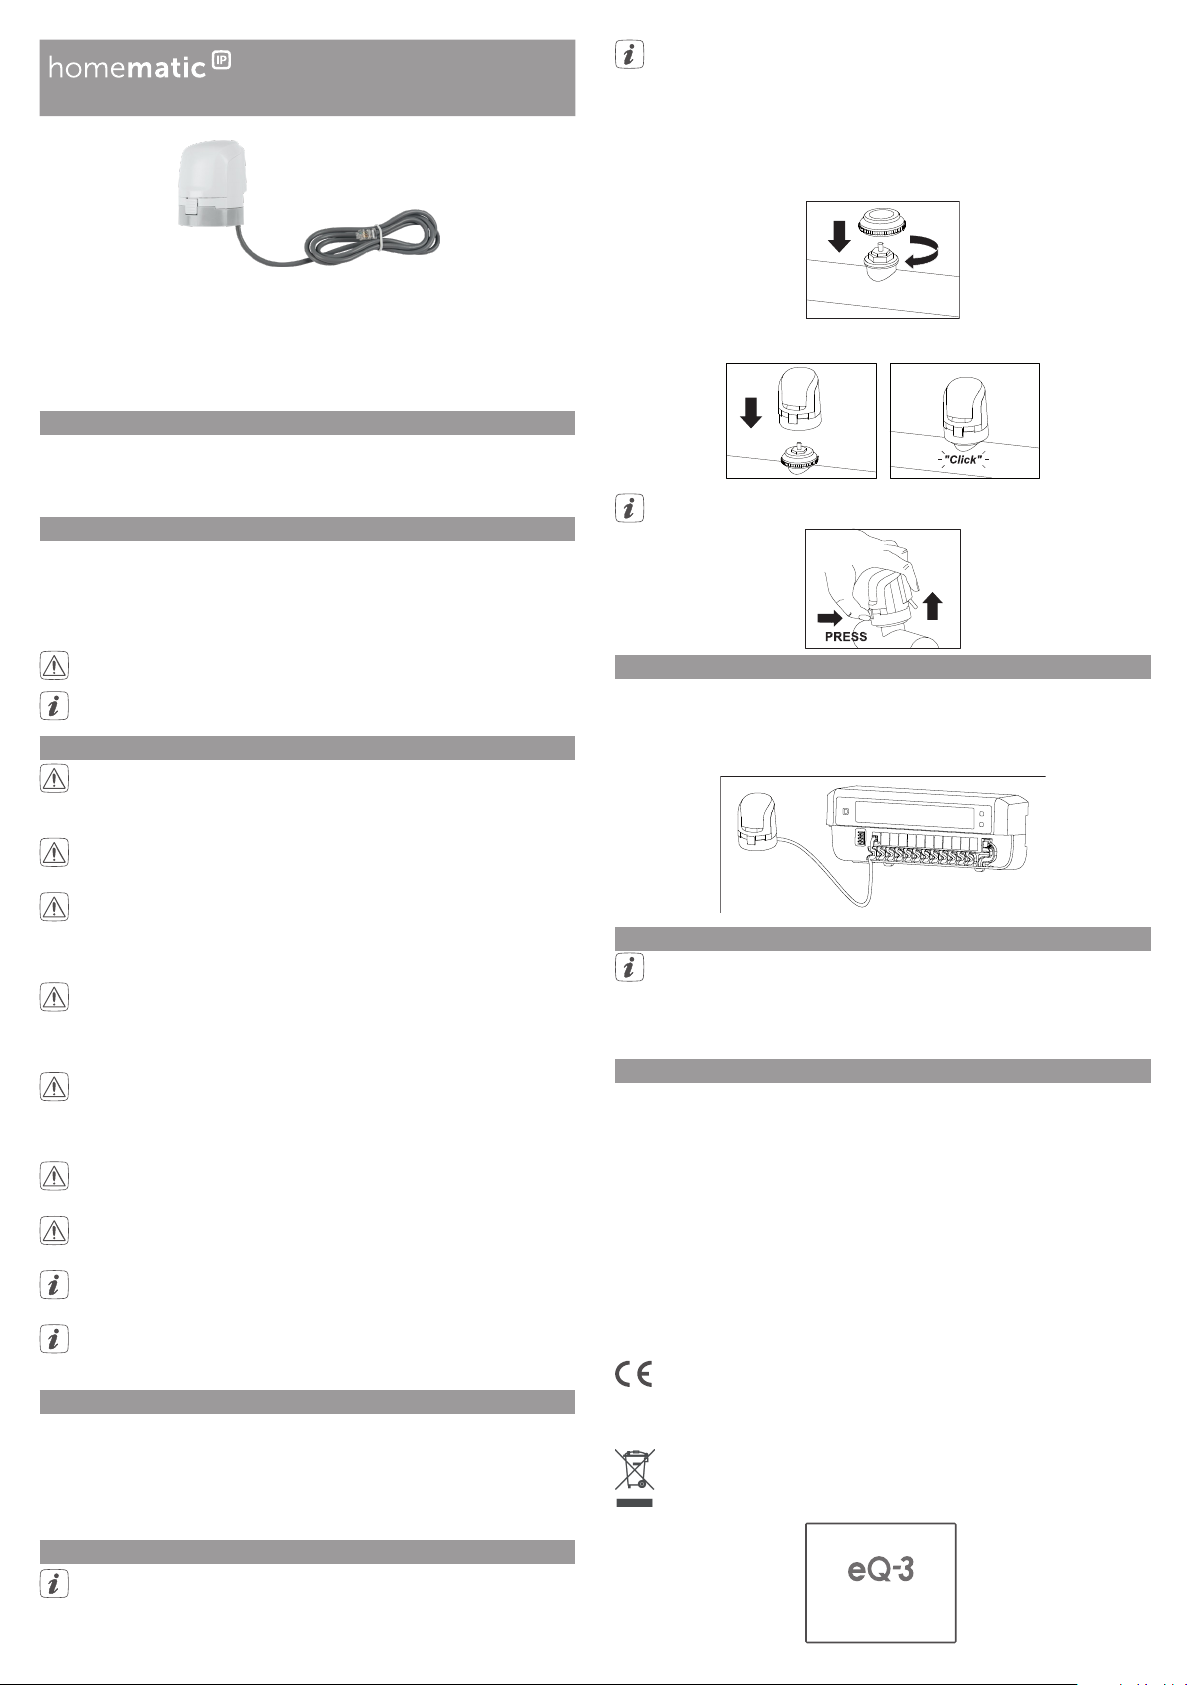
• Drehen Sie den beiliegenden Ventiladapter (VA 80) auf das Ventil auf.
Homematic IP Stellantrieb – motorisch
HmIP-VDMOT
Dokumentation © 2018 eQ-3 AG, Deutschland
Alle Rechte vorbehalten. Printed in Hong Kong. Änderungen vorbehalten.
153305 // V1.0 (08/2018)
1. Lieferumfang
Homematic IP Stellantrieb – motorisch
Ventiladapter VA 80 (Gewindemaß M30 x 1,5 mm)
Bedienungsanleitung
2. Hinweise zu dieser Anleitung
Lesen Sie diese Anleitung sorgfältig, bevor Sie das Gerät in Betrieb nehmen.
Bewahren Sie die Anleitung zum späteren Nachschlagen auf! Wenn Sie das
Gerät anderen Personen zur Nutzung überlassen, übergeben Sie auch diese
Anleitung.
Benutzte Symbole:
Achtung! Hier wird auf eine Gefahr hingewiesen.
Hinweis. Dieser Abschnitt enthält zusätzliche wichtige Informationen.
3. Gefahrenhinweise
Önen Sie das Gerät nicht. Es enthält keine durch den Anwender zu
wartenden Teile. Lassen Sie das Gerät im Fehlerfall von einer Fachkraft
prüfen.
Aus Sicherheits- und Zulassungsgründen (CE) ist das eigenmächtige
Umbauen und/oder Verändern des Gerätes nicht gestattet.
• Setzen Sie den Stellantrieb auf den Adapter auf. Achten Sie darauf, dass der
Stellantrieb vollständig einrastet.
Um das Gerät zu demontieren, drücken Sie die Verrastung ein und
nehmen Sie den Stellantrieb vom Adapter ab.
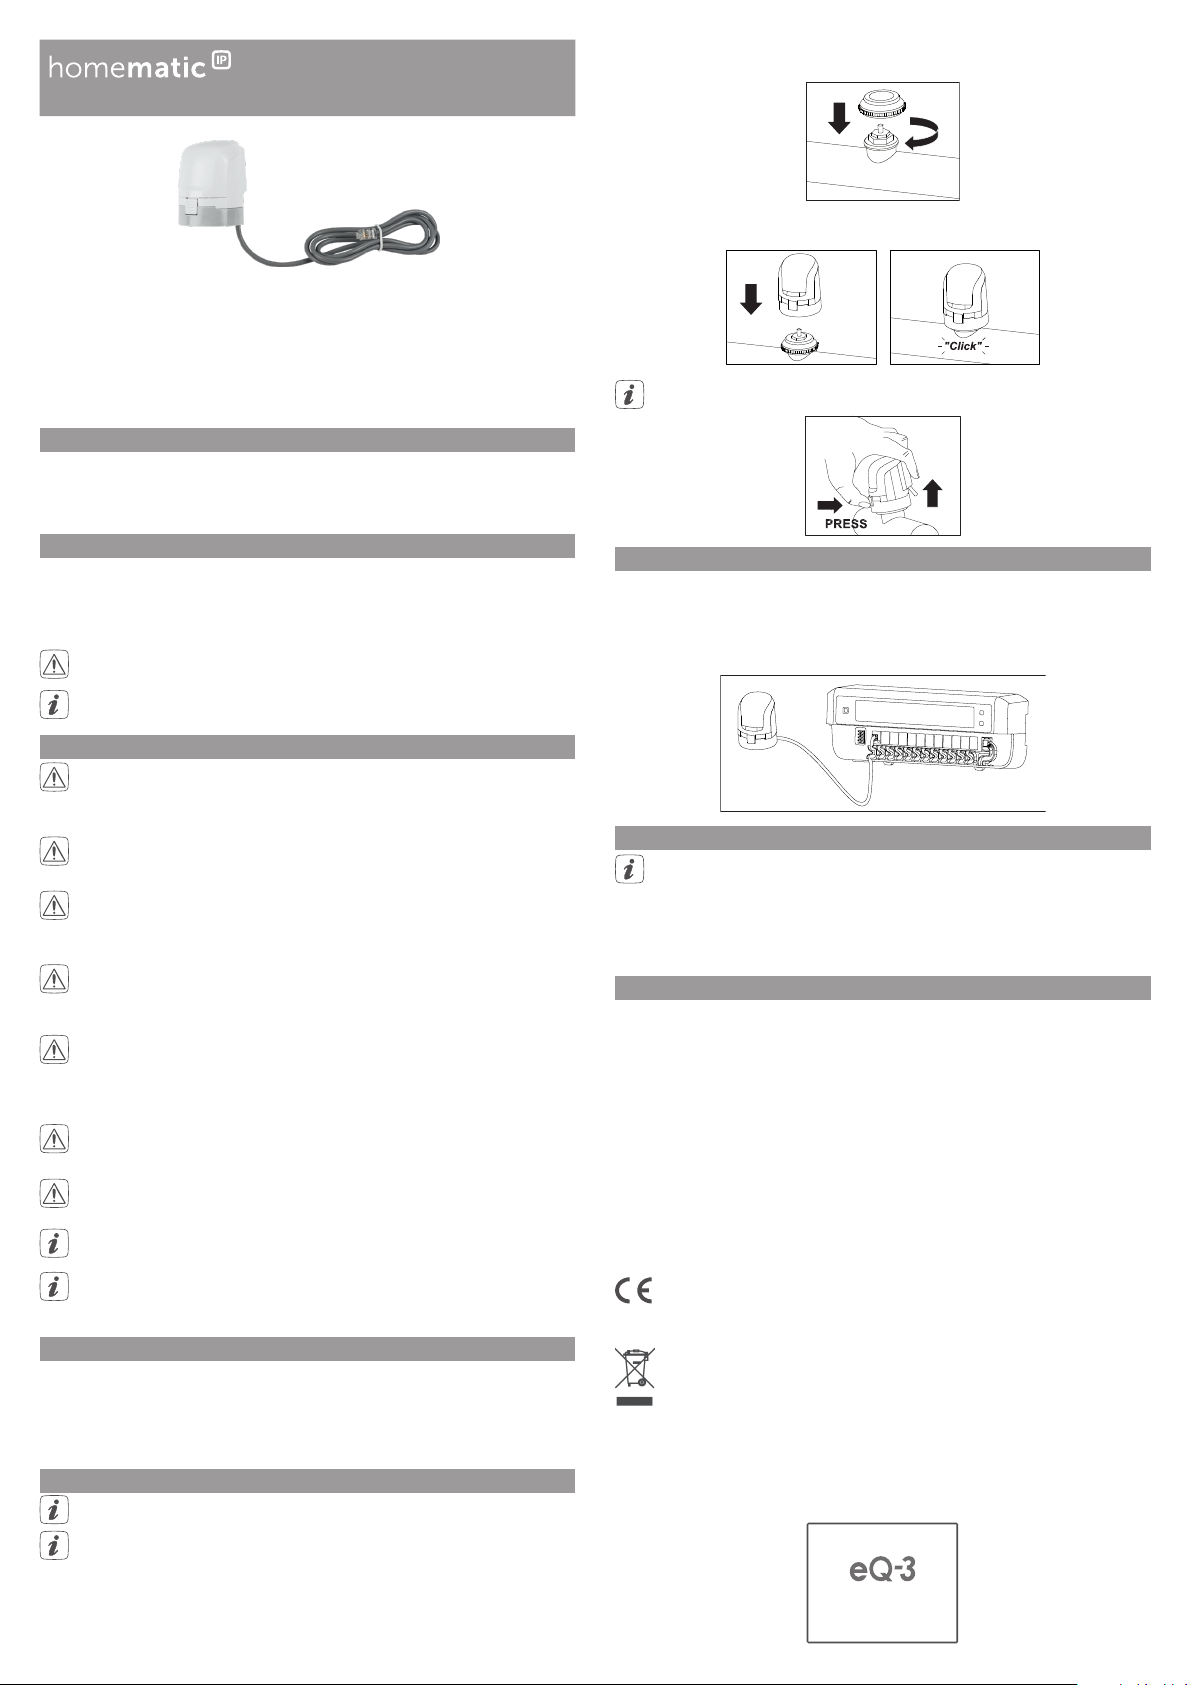
6. Anschluss an einen Fußbodenheizungsaktor
Zur Regelung der Raumtemperatur müssen Sie den Stellantrieb direkt
an den HomematicIP Fußbodenheizungsaktor – 12-fach, motorisch
(HmIP-FALMOT-C12) anschließen. Gehen Sie dazu wie folgt vor:
• Schließen Sie das Anschlusskabel des Stellantriebs an die dafür vorgesehene
Klemmstellen des Fußbodenheizungsaktors an.
Betreiben Sie das Gerät nur in trockener sowie staubfreier Umgebung,
setzen Sie es keinem Einfluss von Feuchtigkeit, Vibrationen, ständiger
Sonnen- oder anderer Wärmeeinstrahlung, Kälte und keinen mechanischen Belastungen aus.
Das Gerät ist kein Spielzeug! Erlauben Sie Kindern nicht damit zu spielen.
Lassen Sie das Verpackungsmaterial nicht achtlos liegen. Plastikfolien/-tüten, Styroporteile etc. können für Kinder zu einem gefährlichen
Spielzeug werden.
Bei Sach- oder Personenschäden, die durch unsachgemäße Handhabung oder Nichtbeachten der Gefahrenhinweise verursacht werden,
übernehmen wir keine Haftung. In solchen Fällen erlischt jeder Gewährleistungsanspruch! Für Folgeschäden übernehmen wir keine Haftung!
Das Gerät darf nur für ortsfeste Installationen verwendet werden. Das
Gerät ist sicher innerhalb einer festen Installation zu fixieren.
Bei erkennbaren Schäden am vorhandenen Thermostat/Ventilantrieb, am
Ventil oder an den Heizungsrohren wenden Sie sich an einen Fachmann.
Das Gerät ist nur für den Einsatz in wohnungsähnlichen Umgebungen
geeignet.
Jeder andere Einsatz, als der in dieser Bedienungsanleitung beschriebene, ist nicht bestimmungsgemäß und führt zu Gewährleistungs- und
Haftungsausschluss.
4. Funktion
Der Homematic IP Stellantrieb – motorisch ermöglicht die Einstellung
der Ventilposition und somit die Wasser-Durchflussmenge, wodurch die
Raumtemperatur geregelt wird.
Der Antrieb ist in Verbindung mit einem HomematicIP Fußbodenheizungsaktor – 12-fach, motorisch (HmIP-FALMOT-C12) zu betreiben.
5. Montage
Der Stellantrieb kann in beliebiger Position (z. B. über Kopf) montiert
werden.
7. Wartung und Reinigung
Das Gerät ist wartungsfrei. Überlassen Sie eine Reparatur einer Fachkraft.
Reinigen Sie das Gerät mit einem weichen, sauberen, trockenen und fusselfreien Tuch. Verwenden Sie keine lösemittelhaltigen Reinigungsmittel, das
Kunststogehäuse und die Beschriftung können dadurch angegrien werden.
8. Technische Daten
Geräte-Kurzbezeichnung: HmIP-VDMOT
Versorgungsspannung: 3,3 VDC, SELV
Stromaufnahme: 120 mA max.
Schutzart: IP20
Schutzklasse: III
Umgebungstemperatur: 0 bis 50 °C
Wirkungsweise: Typ 1
Anschluss: M30 x 1,5 mm
Verschmutzungsgrad: 2
Linearer Hub: 4,3 ±0,3 mm
Abmessungen: 44 x 54 x 50 mm (ohne Anschlusskabel)
Gewicht: 80 g
Technische Änderungen vorbehalten.
Das CE-Zeichen ist ein Freiverkehrszeichen, das sich ausschließlich an
die Behörden wendet und keine Zusicherung von Eigenschaften
beinhaltet.
Entsorgungshinweis
Gerät nicht im Hausmüll entsorgen! Elektronische Geräte sind entsprechend der Richtlinie über Elektro- und Elektronik-Altgeräte über die
örtlichen Sammelstellen für Elektronik-Altgeräte zu entsorgen.
Bevollmächtigter des Herstellers:
Manufacturer’s authorised representative:
eQ-3 AG
Maiburger Straße 29
26789 Leer / GERMANY
www.eQ-3.de
Page 2
Installation and Operating Manual
sponding adapter.
• Attach the supplied valve adapter (VA 80) to the valve.
• Attach the valve drive to the adapter. Make sure that the valve drive engages
properly.
Homematic IP Valve Drive – motorised
HmIP-VDMOT
Documentation © 2018 eQ-3 AG, Germany
All rights reserved. Translation from the original version in German.
Printed in Hong Kong. Subject to modifications.
153305 // V1.0 (08/2018)
1. Package contents
Homematic IP Valve Drive – motorised
Valve adapter VA 80 (thread size M30 x 1.5 mm)
User manual
2. Information about this manual
Read this manual carefully before starting to use the device. Keep the manual
so you can refer to it at a later date if you need to. If you hand over the device
to other persons for use, please hand over this manual as well.
Symbols used:
Attention! This indicates a hazard.
Please note: This section contains important additional information.
3. Hazard information
Do not open the device. It does not contain any parts that can be
maintained by the user. If you have any doubts, have the device checked
by an expert.
For safety and licensing reasons (CE), unauthorized change and/or
modification of the device is not permitted.
The device may only be operated in dry and dust-free environment and
must be protected from the eects of moisture, vibrations, solar or other
methods of heat radiation, cold and mechanical loads.
The device is not a toy; do not allow children to play with it. Do not leave
packaging material lying around. Plastic films/bags, pieces of polystyrene,
etc. can be dangerous in the hands of a child.
We do not assume any liability for damage to property or personal injury
caused by improper use or the failure to observe the hazard information.
In such cases, any claim under warranty is extinguished! For consequential damages, we assume no liability!
The device may only be used for fixed installations. The device must be
securely attached within a fixed installation.
In case of visible damage of the existing radiator/valve drive, valve or
heating pipes, please contact a specialist.
The device may only be operated within residential buildings.
Using the device for any purpose other than that described in this
operating manual does not fall within the scope of intended use and shall
invalidate any warranty or liability.
4. Function
With the Homematic IP Valve Drive – motorised you can control the valve position and thus regulate the water flow rate to regulate the room temperature.
The valve has to be operated in connection with a Homematic IP Floor Heating Actuator – 12 channels, motorised (HmIP-FALMOT-C12).
To disassemble the device press the catch and remove the valve drive
from the adapter.
6. Connection to the floor heating actuator
For the regulation of the room temperature, the valve drive must be connected directly to the Homematic IP Floor Heating Actuator – 12 channels,
motorised (HmIP-FALMOT-C12). To do this, please proceed as follows:
• Connect the connecting cable of the valve drive to the clamp terminals of
the floor heating actuator.
7. Maintenance and cleaning
The product does not require any maintenance. Enlist the help of an
expert to carry out any repairs.
Clean the device using a soft, lint-free cloth that is clean and dry. Do not use
any detergents containing solvents, as they could corrode the plastic housing
and label.
8. Technical specifications
Device short name: HmIP-VDMOT
Supply voltage: 3.3 VDC, SELV
Current consumption: 120 mA max.
Degree of protection: IP20
Protection class: III
Ambient temperature: 0 to 50 °C
Method of operation: Type 1
Connection: M30 x 1.5 mm
Pollution degree: 2
Linear travel: 4.3 ±0.3 mm
Dimensions: 44 x 54 x 50 mm (without connecting cable)
Weight: 80 g
Subject to technical changes.
The CE sign is a free trading sign addressed exclusively to the
authorities and does not include any warranty of any properties.
Instructions for disposal
Do not dispose of the device with regular domestic waste! Electronic
equipment must be disposed of at local collection points for waste
electronic equipment in compliance with the Waste Electrical and
Electronic Equipment Directive.
5. Installation
The valve drive can be installed in any position (e.g. upside down).
For installation, no tools are required.
To install the valve drive, proceed as follows:
• Make sure if the valve drive fits to the thread size M30 x 1.5mm. We recommend to use the valve template available for download in the download
area of www.eQ-3.com. If the valve drive diers, you will need a corre-
Bevollmächtigter des Herstellers:
Manufacturer’s authorised representative:
eQ-3 AG
Maiburger Straße 29
26789 Leer / GERMANY
www.eQ-3.de
 Loading...