

Page 1

Istruzioni per l’uso p. 2
Operating manual p. 20
Bedienungsanleitung S. 37
Attuatore radio singolo,
spina intermedia tipo L
Wireless Switch Actuator 1-channel,
plug adapter type L
Funk-Schaltaktor 1-fach,
Zwischenstecker Typ L
HM-LC-Sw1-Pl-DN-R4
Page 2

Volume di fornitura
Quantità Articolo
1x Attuatore radio HomeMatic singolo, spina intermedia
tipo L
1x Istruzioni per l’uso
1. Edizione in italiano 10/2014
Documentazione © 2014 eQ-3 AG, Germania
Tutti i diritti riservati. È vietata la riproduzione di questo manuale o di
sue parti in qualsiasi forma o la sua duplicazione o modica con l’utilizzo di processi elettronici, meccanici o chimici senza la previa approvazione scritta da parte del produttore.
Non si escludono imperfezioni dovute alla tecnica di stampa o errori di
stampa in questo manuale. Le informazioni qui contenute sono comun-
que costantemente vericate e le eventuali correzioni sono rese note
nell’edizione successiva. Si declina qualsiasi responsabilità per errori
di tipo tecnico o di stampa e per le loro conseguenze.
Sono riconosciuti tutti i marchi depositati e i diritti d’autore.
Stampato ad Hong Kong.
Possono aver luogo modiche ai sensi dello sviluppo tecnico e senza
preavviso.
Indice
1 Note su queste istruzioni ..............................4
2 Indicazioni sui pericoli ................................4
3 Funzione e vista d’insieme dell’apparecchio ...............7
4 Informazione generale di sistema sull’HomeMatic...........8
5 Messa in funzione ...................................8
5.1 Semplici funzioni di impiego sull’apparecchio ..............8
5.2 Apprendimento......................................8
5.2.1 Apprendimento ad apparecchi HomeMatic ................9
5.2.2 Apprendimento a una centrale HomeMatic ...............10
6 Modalità d’uso .....................................13
7 Ripristino delle impostazioni di fabbrica ..................14
8 Messaggi di errore e feedback del LED dell’apparecchio ....15
8.1 Codici lampeggio ...................................15
8.2 Visualizzazione dello stato di funzionamento..............15
8.3 Duty Cycle ........................................16
9 Comportamento dopo il ritorno della tensione . . . . . . . . . . . . .16
10 Manutenzione e pulizia...............................17
11 Informazioni generali sul servizio radio ..................17
12 Dati tecnici ........................................18
141150 / V 1.1
2
3
Page 3
Note su queste istruzioni
1 Note su queste istruzioni
Leggere attentamente queste istruzioni prima di mettere in funzione i
componenti HomeMatic. Conservare questo manuale per future consultazioni! Se si afda l’utilizzo dell’apparecchio ad altre persone si prega di consegnare anche queste istruzioni per l’uso.
Indicazioni sui pericoli
Per ragioni di sicurezza o di omologazione (CE) non sono
ammesse modiche costruttive o di altro genere del prodotto.
Impiegare l’apparecchio solo in ambienti interni e non esporlo
a umidità, a vibrazioni, a irradiazioni solari permanenti o ad
altre fonti di calore, al freddo e a sollecitazioni meccaniche.
Simboli impiegati:
Attenzione! Qui è segnalato un pericolo.
Nota. Questo paragrafo contiene altre informazioni importanti!
Nota. Questo capitolo contiene inoltre altre importanti
informazioni sull’impiego dell’apparecchio in collegamento alla
centrale HomeMatic.
2 Indicazioni sui pericoli
Per danni materiali o corporali, causati da un utilizzo improprio
o dalla mancata osservanza delle indicazioni sui pericoli, non
assumiamo alcuna responsabilità. In suddetti casi si estingue
ogni rivendicazione di garanzia! Per danni indiretti non
assumiamo alcuna responsabilità!
Non aprire mai l’apparecchio: non contiene parti che possono
essere riparate. L’apertura dell’apparecchio comporta il
pericolo di una scossa elettrica. In caso di danni inviarlo al
servizio assistenza.
Non utilizzare l’apparecchio se dall’esterno siano riconoscibili
danni, ad esempio sulla scatola, su elementi di controllo o sulle
prese o vi sia un guasto funzionale. In caso di dubbio far
controllare l’apparecchio da un tecnico specializzato o dal
nostro servizio assistenza.
L’apparecchio non è un giocattolo, evitare pertanto che
bambini ne facciano un tale uso. Non lasciare incustoditi il
materiale di imballaggio, le pellicole/i sacchetti di plastica, le
parti di polistirolo, ecc., potrebbero diventare un pericoloso
giocattolo per i bambini.
Prima del collegamento di un’utenza fare attenzione ai dati
tecnici, in particolare alla potenza d’interruzione massima
ammessa del relè e al tipo di utenza da collegare! Tutte le
indicazioni di carico si riferiscono a carichi ohmici! Caricare
l’apparecchio solo no al limite della capacità indicato. Un
sovraccarico può comportare la sua distruzione, un incendio o
un infortunio elettrico.
L’apparecchio deve essere collegato solo a una presa di rete
facilmente accessibile In caso di pericolo l’apparecchio va
staccato dalla presa di rete.
Impiegare la spina intermedia HomeMatic sono in prese di rete
sse con contatti di protezione, non in prese multiple o cavi di
prolunga.
Non collegare apparecchi terminali alla spina intermedia
HomeMatic, la cui accensione inavvertita potrebbe causare
incendi o altri danni (ad esempio in un ferro da stiro).
Staccare di principio la spina dell’apparecchio da quella
intermedia HomeMatic prima di apportare modiche all’apparecchio stesso (ad esempio se si sostituisce la lampadina).
4
5
Page 4
Indicazioni sui pericoli
Posare i cavi in modo tale che non provochino situazioni di
pericolo per le persone e gli animali domestici.
L’apparecchio non è idoneo all’attivazione. Il carico non è
scollegato dalla rete in modo galvanico.
Pulirlo solo dopo la rimozione dalla presa con un panno di lino
asciutto, che può essere inumidito in caso di sporco ostinato.
Per la pulizia non usare detergenti che contengano solventi.
Fare attenzione che non penetri umidità all’interno dell’apparecchio.
Funzione e vista d’insieme dell’apparecchio
3 Funzione e vista d’insieme
dell’apparecchio
L’attuatore radio HomeMatic singolo, spina intermedia consente la
commutazione via radio di apparecchi collegati.
L’apparecchio può essere montato rapidamente e senza impiego di
attrezzature e una volta inserito nella presa è subito pronto per l’uso.
Con l’attuatore radio sono possibili sia un impiego semplice sull’apparecchio, sia anche l’apprendimento di più apparecchi (ad esempio
telecomando radio HomeMatic). Il LED dell’apparecchio segnala ad
esempio gli stati di funzionamento e i messaggi di errore.
Qualsiasi altro impiego non descritto nelle presenti istruzioni
per l’uso non è conforme alle disposizioni e comporta
l’esclusione della responsabilità e la perdita dei diritti di
garanzia. Questo vale anche per ricostruzioni e modiche.
L’apparecchio è stato concepito solo per uso privato.
Le spine intermedie HomeMatic non devono essere
inserite una dopo l’altra.
Apparecchi con alimentatori elettronici (ad esempio televisori o
lampadine a LED ad alto voltaggio) non congurano alcun
carico ohmico. Essi possono determinare correnti di transitorio
superiori a 100 A. L’inserimento di tali utenze comporta una
prematura usura dell’attuatore.
L’apparecchio è adatto solo all’impiego in ambienti abitativi o
analoghi.
6
In collegamento con la centrale HomeMatic CCU2 l’attuatore radio può
essere congurato individualmente tramite la supercie d’impiego WebUI e può essere impiegata l’intera entità funzionale. Si possono ad
esempio impostare la durata di accensione e di spegnimento dell’apparecchio e il tempo di ritardo dell’accensione e dello spegnimento delle
utenze collegate.
A
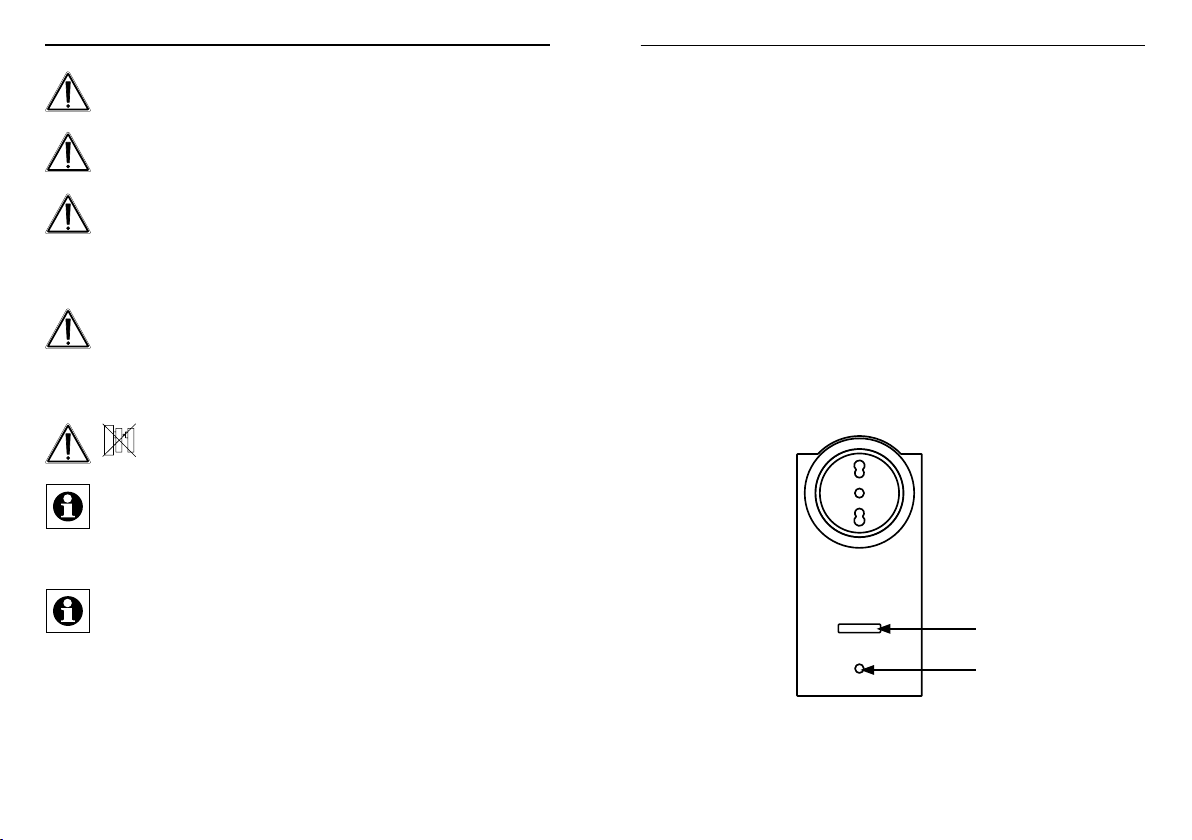
B
(A) - Pulsante canali
(B) - LED apparecchio
7
Page 5
Informazione generale di sistema sull’HomeMatic
4 Informazione generale di sistema
sull’HomeMatic
Questo apparecchio è parte del sistema di comando in casa e funziona
con il protocollo radio bidirezionale BidCoS®.
Tutti gli apparecchi sono forniti di una congurazione standard. La sua
funzione è inoltre congurabile mediante un apparecchio di program-
mazione e software. Quale ulteriore entità di funzionamento ne risulti
e quali funzioni supplementari risultino nel sistema HomeMatic, nella
combinazione con altri componenti, è riportato veda nel manuale Ho-
meMatic WebUI.
Tutta la documentazione tecnica e gli update sono sempre attualizzati
nel campo di download al sito www.homematic.com.
5 Messa in funzione
5.1 Semplici funzioni di impiego sull’apparecchio
• Inserire nella presa l’attuatore radio.
L’apparecchio è subito pronto per l’uso e può essere assegnato a una
centrale HomeMatic (oppure ad altri apparecchi HomeMatic).
Messa in funzione
comunicare con altri componenti HomeMatic (ad esempio un telecoman
do radio HomeMatic) l’apparecchio deve essere dapprima assegnato.
L’attuatore radio può essere associato ad altri apparecchi HomeMatic o
alla centrale HomeMatic:
5.2.1
Apprendimento ad apparecchi HomeMatic
Se si desidera associare l’attuatore radio a uno o più apparecchi, è ne
cessari portare i due apparecchi da collegare nella modalità di apprendimento. Procedere nel modo seguente:
Nell’operazione mantenere una distanza minima di 50 cm fra gli
apparecchi HomeMatic.
Attivare dapprima la modalità di apprendimento sull’attuatore radio.
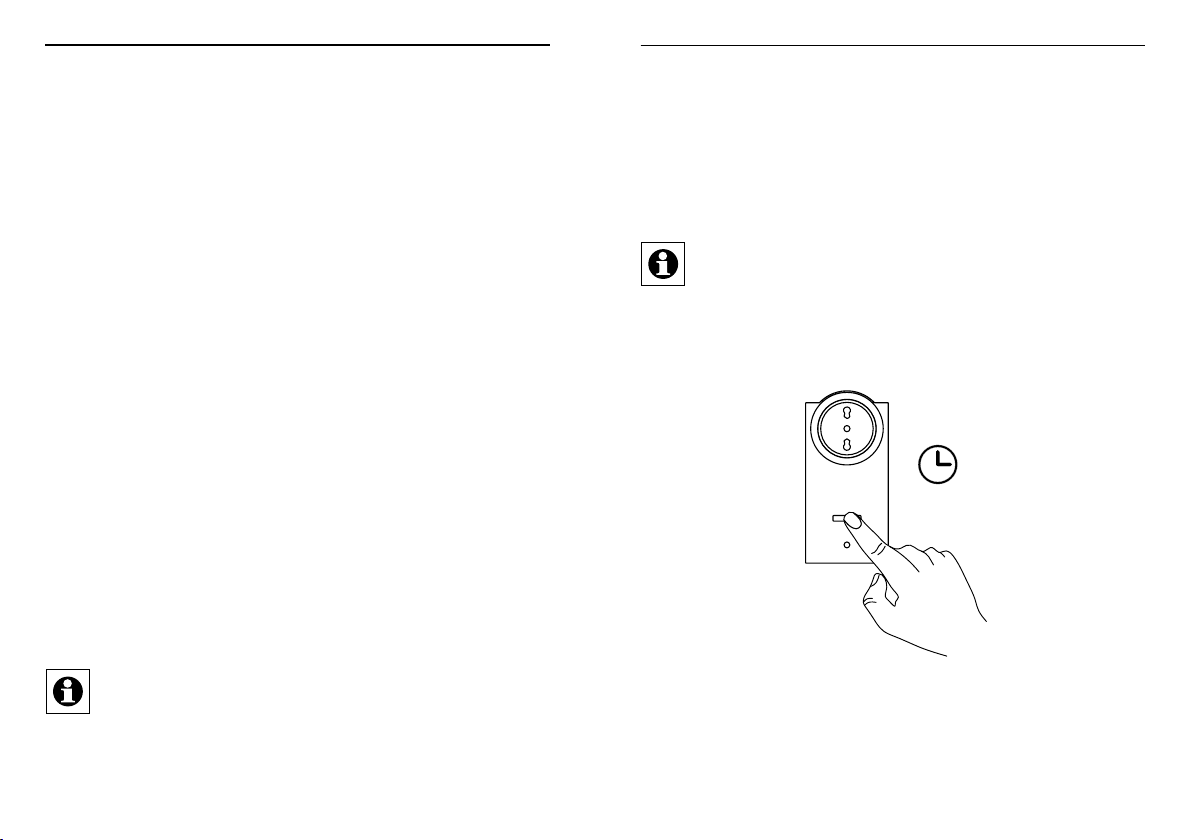
• Tenere premuto il pulsante (A) per almeno 4 secondi. Un lampeggio
lento del LED dell’apparecchio (B) segnala la modalità di apprendi
mento. Il tempo di apprendimento ammonta a max. 20 secondi.
-
-
-
L’apparecchio è dotato di un pulsante canali (A), che con una breve
pressione può essere impiegato per il comando (accensione o spegnimento) di utenze collegate.
Per utilizzare e congurare l’apparecchio nella sua funzionalità completa
nel sistema HomeMatic è necessario dapprima eseguirne l’apprendi
mento (cfr. capitolo „5.2 Apprendimento“ a pagina 8).
-
5.2 Apprendimento
Leggere no alla ne questo paragrafo prima di iniziare l’apprendimento.
Per integrare l’attuatore radio nel sistema HomeMatic e afnché possa
8
> 4 s
• Portare ora l’apparecchio, che si desidera associare all’attuatore
radio (ad esempio un telecomando radio HomeMatic, v. gura che
segue), nella modalità di apprendimento. Togliere la copertura del
vano battere e premere brevemente con un oggetto appuntito sul
9
Page 6
Messa in funzione
tasto di apprendimento.
• Dopo tale procedura il LED dell’apparecchio dell’attuatore radio si
spegne.
Una volta eseguito l’apprendimento può essere accesso e spento l’attuatore radio, ad esempio con un telecomando radio HomeMatic.
Se l’apprendimento non viene eseguito, la relativa modalità
viene ultimata automaticamente dopo 20 secondi. Se altri
apparecchi si trovano in tale modalità, gli stessi vengono
associati.
5.2.2 Apprendimento a una centrale HomeMatic
Per comandare e congurare su base software e agevolmente
• l’apparecchio,
• collegarlo direttamente ad altri apparecchi o
• per poterlo usare in programmi della centrale,
Messa in funzione
Ogni apparecchio può essere associato solo a una centrale.
Nell’operazione mantenere una distanza minima di 50 cm fra
gli apparecchi HomeMatic e la centrale.
Per l’apprendimento dell’apparecchio alla centrale procedere nel modo
che segue:
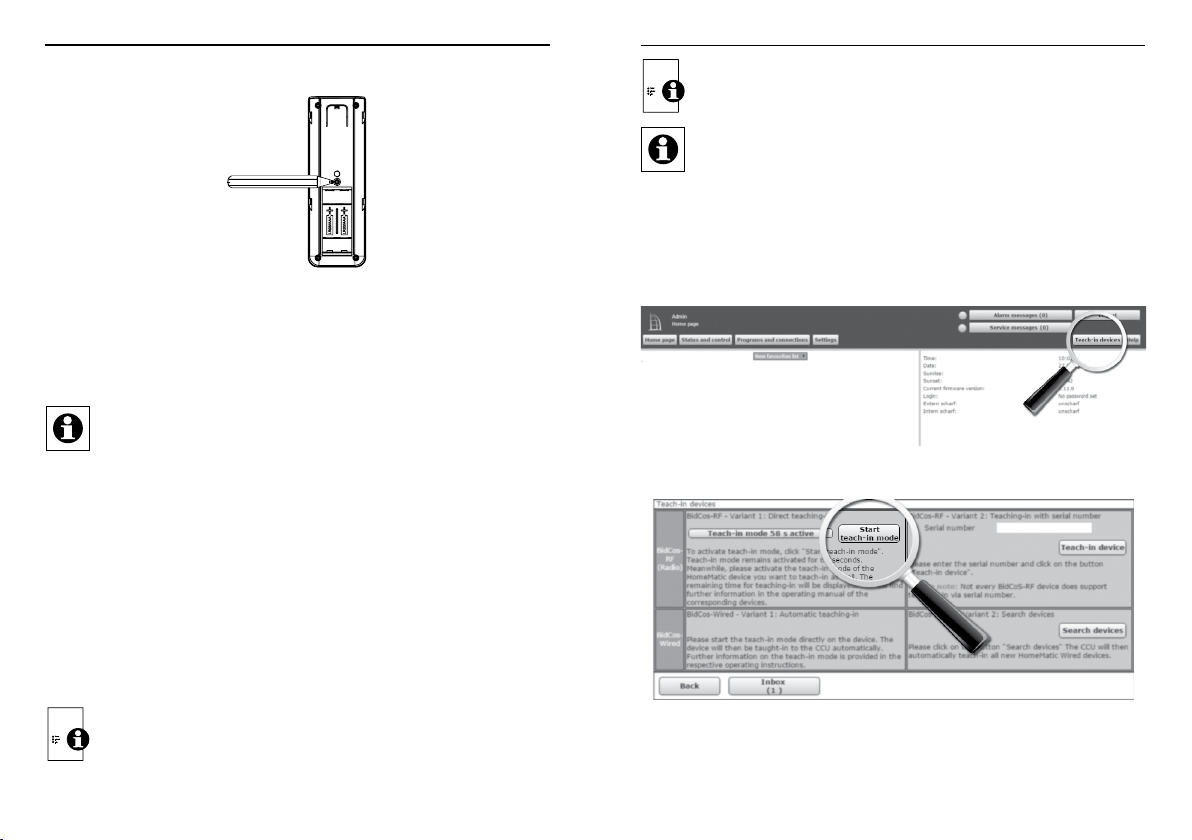
• aprire la supercie di comando WebUI nel navigatore. Cliccare
sul pulsante “Apprendimento apparecchi” nel settore destro dello
schermo.
• Per attivare la modalità di apprendimento, nella nestra successiva
cliccare su “Modalità di apprendimento BidCoS-RF”.
è dapprima necessario associarlo alla centrale HomeMatic. L’appren-
dimento di nuovi apparecchi alla centrale ha luogo tramite la supercie
d’impiego “WebUI”.
Non appena un apparecchio è associato a una centrale,
mediante quest’ultima può essere collegato ad altri apparecchi.
10
• La modalità di apprendimento rimane attiva per 60 secondi. Il campo delle informazioni visualizza il tempo di apprendimento restante.
11
Page 7
Messa in funzione
• Entro tale intervallo portare anche l’attuatore radio nella modalità
apprendimento. Tenere premuto il pulsante (A) per almeno 4 secondi. Un lampeggio lento del LED dell’apparecchio (B) segnala la
modalità di apprendimento.
Modalità d’uso
attribuire l’apparecchio o i canali a un locale. Si ha dapprima la possibilità di impostare la durata di accensione o di spegnimento dell’apparecchio e il tempo di ritardo nell’accensione o nello spegnimento delle
utenze collegate.
Successivamente l’apparecchio può essere comandato e congurato
tramite la WebUI, collegato direttamente ad altri apparecchi o utilizzato
in programmi della centrale. Particolari in proposito sono riportati nel
manuale WebUI di HomeMatic (disponibili nel campo di download della
pagina www.homematic.com).
> 4 s
• Dopo breve tempo compare l’apparecchio di nuovo associato nella
posta in entrata della supercie di comando. Il pulsante “Posta in
entrata” visualizza quanti apparecchi sono stati associati.
• Se necessario associare altri apparecchi ripetendo per ognuno di
essi i passaggi precedentemente descritti.
• Congurare gli apparecchi di nuovo associati nella posta in entrata
come descritto nel paragrafo „Congurazione di apparecchi di nuo-
vo associati“.
Congurazione di apparecchi di nuovo associati
Dopo che l’attuatore radio è stato associato alla centrale HomeMatic,
lo stesso viene spostato nella “Posta in entrata”. Qui l’apparecchio e i
relativi canali devono essere dapprima congurati in modo che siano
disponibili i compiti di comando e di congurazione. Dare un nome e
12
6 Modalità d’uso
Dopo l’apprendimento e la congurazione è possibile comandare l’attuatore radio, ad esempio con un telecomando radio HomeMatic associato e in questo modo accendere e spegnere utenze collegate (v.
gura successiva).
Luce
accesa
Luce
spenta
13
Page 8
Ripristino delle impostazioni di fabbrica
7 Ripristino delle impostazioni di fabbrica
Le impostazioni di fabbrica dell’attuatore radio possono essere ripristinate. In questo caso tutte le impostazioni e informazioni vanno perse.
Per ripristinare le impostazioni di fabbrica procedere nel modo seguente:
• tenere premuto il pulsante canali (A) per almeno quattro secondi
no a che il LED dell’apparecchio (B) non inizia a lampeggiare
lentamente.
• Rilasciare il tasto.
> 4 s
• Premere di nuovo il pulsante canali (A) per quattro secondi no a
che il LED dell’apparecchio (B) non comincia a lampeggiare velocemente.
• Rilasciare il tasto.
• Il LED dell’apparecchio si spegne.
• Le impostazioni di fabbrica sono ora ripristinate.
Messaggi di errore e feedback del LED dell’apparecchio
8 Messaggi di errore e feedback del LED
dell’apparecchio
8.1 Codici lampeggio
Diversi stati dell’attuatore radio vengono visualizzati tramite un lampeggio rosso del LED dell’apparecchio (B):
Sequenza Signicato Soluzione
Lampeggio lento Modalità di apprendi-
Lampeggio veloce Le impostazioni di
1 x lungo, 1 x breve
lampeggio
1 x lungo, 2 x breve
lampeggio
mento attiva o stadio
iniziale per il ripristino
delle impostazioni di
fabbrica.
fabbrica sono ora ripristinate.
Raggiunto limite d'invio (Duty-Cycle)
Apparecchio difettoso Rivolgersi al pro-
8.2 Visualizzazione dello stato di funzionamento
Non appena l’attuatore radio è acceso, il LED dell’apparecchio (B)
emette una luce continua.
Dopo la congurazione dell’attuatore radio tramite la centrale o un tool
di programmazione il LED dell’apparecchio, oltre a quelli descritti, visualizza gli ulteriori stati dell’apparecchio (ad esempio ritardo nell’accensione e nello spegnimento e durata degli stessi).
/
/
Vedi capitolo „8.3
Duty Cycle“ a pagina 16
prio rivenditore
specializzato.
14
15
Page 9
Comportamento dopo il ritorno della tensione
8.3 Duty Cycle
Manutenzione e pulizia
10 Manutenzione e pulizia
Il Duty Cycle descrive una limitazione del tempo di trasmissione, regolata per legge, di apparecchi nella gamma 868 MHz. Scopo di questa
regolazione è quello di garantire il funzionamento di tutti gli apparecchi
nel campo 868 MHz.
Nel campo di frequenza 868 MHz da noi utilizzato il tempo massimo di
trasmissione di ogni apparecchio ammonta all’1 % di un’ora (quindi 36
secondi in un’ora). Al raggiungimento del limite di 1 % gli apparecchi
non devono più trasmettere no a che non è trascorsa la limitazione
di tempo. In conformità a questa direttiva, gli apparecchi HomeMatic
vengono sviluppati e prodotti al 100 % conformi alle norme.
Nel funzionamento normale il Duty Cycle di regola non viene raggiunto. Questo può tuttavia accadere in casi singoli alla messa in esercizio
o alla prima installazione di un sistema a causa di processi di appren-
dimento amplicati o di intensità radio. Un superamento del limite del
Cycle Limits viene visualizzato da un lampeggio, una volta lungo, una
volta breve, del LED dell’apparecchio e può manifestarsi con una funzione momentaneamente mancante dell’apparecchio. Dopo breve tempo (max. 1 secondo) la funzione è ripristinata.
9 Comportamento dopo il ritorno della tensione
Dopo aver inserito l’apparecchio in una presa o dopo il ritorno della tensione di rete, l’attuatore radio esegue un autotest. Qualora sia rilevato un
errore, ciò è segnalato dal lampeggio del LED dell’apparecchio (v. capi
tolo „8.1 Codici lampeggio“ a pagina 15). Questo si ripete di continuo e
l’apparecchio non inizia la sua funzione vera e propria.
Se il test è eseguito senza rilevare errori, l’attuatore invia un telegramma
via radio con la sua informazione di stato. Afnché al ritorno della tensio
ne (ad esempio dopo una caduta di tensione di rete o uno spegnimento) non tutti gli attuatori HomeMatic procedano contemporaneamente a
un invio, prima di tale invio l’attuatore radio attende un tempo casuale di
ritardo. In questo frangente il LED dell’apparecchio lampeggia lentamen
te in rosso. Se il tempo di ritardo è molto breve, il lampeggio è appena
percettibile.
-
-
-
Il prodotto è senza manutenzione. In caso di riparazione rivolgersi ad
un tecnico specializzato. Pulire la stazione con un panno morbido, pulito, asciutto e senza peluzzi. Per rimuovere segni di sporco maggiori
si può inumidire leggermente il panno con acqua tiepida. Non utilizzare
detergenti a base solvente che potrebbero danneggiare l’involucro di
plastica e le iscrizioni della stazione.
11 Informazioni generali sul servizio radio
La trasmissione radio avviene su un canale di trasmissione non esclusivo; non si possono pertanto escludere segnali di disturbo. Altri disturbi possono essere causati da processi di commutazione, da elettromotori o da apparecchi elettrici difettosi.
La portata all’interno di edici può essere molto diversa da
quella all’aria aperta. Oltre alla prestazione di trasmissione e
alle caratteristiche di ricezione del ricevitore, hanno un ruolo
molto importante anche i fattori climatici, come p.e. l’umidità,
oppure le condizioni architettoniche in luogo.
Se nell’attuatore radio viene attivata la “Trasmissione sicura”
(AES) ciò signica:
• maggiore disponibilità di comunicazione,
• i gruppi attuatori non possono più eseguire comandi contempora-
neamente.
Altre informazioni sulla trasmissione sicura (AES) sono riportare nel
manuale WebUI di HomeMatic al sito www.homematic.com.
Con la presente la eQ-3 AG dichiara che questo apparecchio è conforme ai requisiti base e alle altre prescrizioni rilevanti della normativa
1999/5/EG.
La dichiarazione di conformità completa può essere consultata al sito
www.homematic.com.
16
17
Page 10

Dati tecnici
12 Dati tecnici
Contrassegno dell’apparecchio: HM-LC-Sw1-Pl-DN-R4
Tensione di alimentazione: 230 V / 50 Hz
Corrente assorbita 16 A max.
Potenza assorbita nel funzionamento a riposo: 0,6 W
Tipo di carico: carico ohmico
Potenza di interruzione massima: 3680 W
Relè: contatto di chiusura, a 1 polo, contatto µ
Radiofrequenza: 868,3 MHz
Periodicità di avviamento: 40000 (16 A, carico ohmico)
Categoria di ricezione: SRD category 2
Portata radio tipica all’aperto: 300 m
Duty Cycle: < 1 % per h
Modalità operativa: S1
Tipo di interruttore: interruttore montato indipendente
Tipo di protezione: IP20
Classe di protezione: I
Modo di azione: Tipo 1
Tensione di tenuta a impulso: 2500 V
Grado di contaminazione: 2
Temperatura ambiente: -10 °C no a +35 °C
Dimensioni (L x A x P): 59 x 122 x 40 mm (senza spina)
Peso: 176 g
Con riserva di modiche tecniche.
Dati tecnici
Indicazioni di smaltimento
Non smaltire l’apparecchio con i riuti domestici! Gli apparecchi elettronici devono essere smaltiti in conformità con la normativa sugli apparecchi elettrici ed elettronici usati ed essere
consegnati presso un apposito centro di raccolta.
Dichiarazione di conformità
Il marchio CE è un contrassegno del mercato libero che si ri-
volge esclusivamente agli enti ufciali e che non rappresenta
una garanzia delle caratteristiche.
In caso di domande tecniche sull’apparecchio, si prega di
rivolgersi al proprio rivenditore specializzato.
18
19
Page 11

Package contents
Quantity Item
1x HomeMatic Wireless Switch Actuator 1-channel, plug
adapter type L
1x Operating manual
1st English edition 10/2014
Documentation © 2014 eQ-3 AG, Germany
All rights reserved. Translation from the original version in German.
This manual may not be reproduced in any format, either in whole or
in part, nor may it be duplicated or edited by electronic, mechanical or
chemical means, without the written consent of the publisher.
Typographical and printing errors cannot be excluded. However, the
information contained in this manual is reviewed on a regular basis and
any necessary corrections will be implemented in the next edition. We
accept no liability for technical or typographical errors or the consequences thereof.
All trademarks and industrial property rights are acknowledged.
Printed in Hong Kong
Changes may be made without prior notice as a result of technical advances.
Table of contents
1 Information about this manual .........................22
2 Hazard information..................................22
3 Function and device overview .........................25
4 General information about the HomeMatic system .........26
5 Start-up...........................................26
5.1 Simple operating functions on the device.................26
5.2 Teaching-in........................................26
5.2.1 Teaching-in directly in to HomeMatic devices .............27
5.2.2 Teaching-in to a HomeMatic Central Control Unit ..........28
6 Operation . . . . . . . . . . . . . . . . . . . . . . . . . . . . . . . . . . . . . . . . .31
7 Restore factory settings . . . . . . . . . . . . . . . . . . . . . . . . . . . . . .32
8 Error codes and device LED feedback...................33
8.1 Flash codes .......................................33
8.2 Operational status display ............................33
8.3 Duty cycle.........................................33
9 Behaviour after power recovery ........................34
10 Maintenance and cleaning ............................34
11 General information about radio operation................35
12 Technical specications ..............................35
141150/V 1.1
20
21
Page 12

Information about this manual
1 Information about this manual
Please read this manual carefully before beginning operation with your
HomeMatic components. Keep the manual so you can refer to it at a
later date if you need to. If you hand over the device to other persons
for use, please hand over the operating manual as well.
Hazard information
For safety and licensing reasons (CE), unauthorized change
and/or modication of the product is not permitted.
The device may only be operated indoors and must be
protected from the effects of moisture, vibrations, solar or other
methods of heat radiation, cold and mechanical loads.
Symbols used:
Attention! This indicates a hazard.
Note. This section contains important additional information.
Note. This section contains additional important information
about using the device in connection with the HomeMatic
Central Control Unit.
2 Hazard information
We do not assume any liability for damage to property or
personal injury caused by improper use or the failure to
observe the hazard information. In such cases any claim under
warranty is extinguished! For consequential damages, we
assume no liability!
Do not open the device. It does not contain any parts that can
be maintained by the user. There is a risk of electric shock if
the device is opened. In the event of an error, have the device
checked by an expert.
Do not use the device if there are signs of damage to the
housing, control elements or connecting sockets, for example,
or if it demonstrates a malfunction. If you have any doubts,
have the device checked by an expert.
The device is not a toy; do not allow children to play with it. Do
not leave packaging material lying around, plastic lms/bags,
pieces of polystyrene etc., can be dangerous in the hands of a
child.
Please take the technical data (in particular the maximum
permissible switching capacity of the relay and the type of load
to be connected) into account before connecting a load! All
load data relates to resistive loads! Do not exceed the capacity
specied for the device. Exceeding this capacity could lead to
the destruction of the device, to a re or to an electrical
accident.
The device may only be connected to an easily accessible
power socket outlet. In case of danger, disconnect the device
from the power socket outlet.
Only use the HomeMatic Switch Actuator with properly installed
wall outlets with earth contacts and not with multiple socket
outlets or extension cables.
Do not connect devices into the HomeMatic Switch Actuator
which could cause re or other types of damage in unattended
operation (e.g. irons).
Remove the plug of the connected device from the HomeMatic
Switch Actuator, whenever you make changes or modications
to the device (e.g. replacing light bulbs).
22
23
Page 13

Hazard information
Always lay cables in such a way that they do not become a risk
to people and domestic animals.
The device has not been designed to support safety disconnection. The load is not isolated from the mains.
Before cleaning the device, unplug it from the socket outlet.
Use a dry linen cloth to clean the device. If the device is
particularly dirty, you can slightly dampen the cloth to clean it.
Do not use any detergents containing solvents for cleaning
purposes. Make sure that no moisture will ingress into the
housing.
Using the device for any purpose other than that described in
this operating manual does not fall within the scope of intended
use and shall invalidate any warranty or liability. This also
applies to any conversion or modication work. The device is
intended for private use only.
Do not connect multiple plug adapters into one another.
Devices with electronic power supply units (e.g. TV or high
voltage LED light sources) are no ohmic loads. They can
generate inrush currents with more than 100 A. Switching such
kind of loads may lead to premature wear of the actuator.
The device may only be operated whitin residential buildings.
Function and device overview
3 Function and device overview
The HomeMatic Wireless Switch Actuator 1-channel, plug adapter enables switching of connected devices via radio.
The device can be easily mounted without tools - after the device has
been plugged in, it is immediately ready for use. The wireless switch
actuator enables easy operation directly on the device. Alternatively,
multiple HomeMatic devices (e.g. HomeMatic remote controls) can be
assigned. Information about the current operating status or error messages is given be the device LED.
In connection with the HomeMatic Central Control Unit CCU2 the wireless switch actuator can be individually congured via the WebUI user
interface and the full range of functions can be used. The maximum
switch on and off duration as well as a delay time for switching connected devices on and off can be individually adjusted.
A
B
24
(A) - Channel button
(B) - Device LED
25
Page 14

General information about the HomeMatic system
4 General information about the HomeMatic
system
This device is part of the HomeMatic home control system and works
with the bidirectional BidCoS
All devices are delivered in a standard conguration. The functionality
of the device can also be congured with a programming device and
software. The additional functions that can be made available in this
way and the supplementary functions provided by the HomeMatic system when it is combined with other components are described in the
HomeMatic WebUI Manual.
All current technical documents and updates are provided in the download area at www.homematic.com.
®
wireless protocol.
5 Start-up
5.1 Simple operating functions on the device
• Insert the wireless switch actuator into a socket.
The device is immediately ready for operation and can be taught-in to a
HomeMatic CCU (or to other HomeMatic devices).
Via the channel button (A), connected loads can be controlled (switch
on and off) with a short button press.
Before being able to use and congure your device in the HomeMatic
system, the switch actuator has to be taught-in rst (see sec. „5.2 Tea
ching-in“ on page 26).
-
Start-up
remote control), you must teach it in rst. You can teach-in the switch ac
tuator directly to other HomeMatic devices or to the HomeMatic Central
Control Unit:
5.2.1
Teaching-in directly in to HomeMatic devices
If you want to teach-in the switch actuator to one or more HomeMatic
devices, the teach-in mode of both devices has to be activated rst. To
do this, proceed as follows:
During teach-in, please make sure you maintain a distance of at
least 50 cm between the devices.
Activate the teach-in mode of your switch actuator.
• Therefore, press and hold the channel button (A) for at least 4 sec-
onds. The device LED (B) will ash slowly to indicate that teach-in
mode is active. The teach-in time is 20 seconds.
> 4 s
-
5.2 Teaching-in
Please read this entire section before starting the teach-in
procedure.
To integrate the switch actuator into your HomeMatic system and en
able it to communicate with other HomeMatic devices (e.g. HomeMatic
26
-
• Now put the device you wish to teach-in to the switch actuator
(e.g. HomeMatic remote control, see the following g.) into teach-
in mode. Remove the battery compartment cover and press the
teach-in button briey using a pointed object.
27
Page 15

Start-up
• After teaching-in, the device LED of the switch actuator will stop
ashing.
After successfully teaching-in the device, it can be switched on and off
e.g. by a HomeMatic remote control.
If no teach-in operations are carried out, teach-in mode is
exited automatically after 20 seconds. If other devices are also
in teach-in mode, they will be taught-in.
Start-up
Each device can only be taught-in to one Central Control Unit.
During teach-in, please make sure you maintain a distance of
at least 50 cm between the HomeMatic devices and the
Central Control Unit.
To teach-in your device to the Central Control Unit, proceed as follows:
• Open the “WebUI” user interface in your browser. Click the “Teachin devices” button on the right-hand side of the screen.
5.2.2 Teaching-in to a HomeMatic Central Control Unit
Your device can be conveniently
• controlled and congured,
• connected directly to other devices or
• used in Central Control Unit programs
by using the HomeMatic software “WebUI”. Therefore, your switch actuator has to be taught-in to the HomeMatic Central Control Unit rst.
New devices are taught-in to the Central Control Unit via the HomeMatic „WebUI“.
As soon as a device has been taught-in to a Central Control
Unit, it can only be connected to other components via this
unit.
28
• To activate teach-in mode, click “Start teach-in mode” in the next
window.
• Teach-in mode remains activated for 60 seconds. An information
29
Page 16

Start-up
box shows how much teach-in time remains.
• Meanwhile, please activate the teach-in mode of your switch actuator to teach-in as well. Therefore, press and hold the channel button (A) for at least 4 seconds. The device LED (B) will ash slowly
to indicate that teach-in mode is active.
> 4 s
• After a short time, the newly taught-in device will appear in the inbox of your software interface. The button „Inbox (x new devices)“
indicates how many new devices have been taught-in successfully.
• If required, you can teach-in additional devices by repeating the
steps described above for each device.
• Now congure the newly taught-in devices in the inbox as described in section „Conguring newly taught-in devices“ .
Operation
Now you can use the „WebUI“ user interface to control your device,
congure it, connect it directly to other devices, or use it in central control unit programs. Please refer to the HomeMatic WebUI Manual for
more details (you can nd this in the „Downloads“ area of the website
www.homematic.com).
6 Operation
After teaching-in and conguring the device, you can control the switch
actuator e.g. with a connected remote control to switch on and off connected loads (see the following g.).
Conguring newly taught-in devices
Once you have taught-in your switch actuator to the HomeMatic Cen-
tral Control Unit, it will be moved to the inbox. Here, you must congure
the device and its associated channels in order to make them avail-
able for operating and conguration tasks. Give the device a name
and assign the device/channels to a room. You can individually adjust
the switch on and off duration of the device as well as a delay time for
switching connected devices on and off.
30
Lights on
Lights off
31
Page 17

Restore factory settings
7 Restore factory settings
The factory settings of the switch actuator can be restored manually. If
you do this, you will lose all your settings.
Error codes and device LED feedback
8 Error codes and device LED feedback
8.1 Flash codes
Various actuator states are indicated by the device LED (B):
To restore the factory settings, please proceed as follows:
• Press and hold down the channel button (A) for at least four
seconds until the device LED (B) will slowly start ashing.
• Release the button again.
> 4 s
• Press and hold down the channel button (A) again for at least 4
seconds until the device LED (B) will quickly start ashing.
• Release the button again.
• The device LED stops ashing.
• The factory settings of the device are now restored.
Flashing sequence Meaning Solution
Slow ashing Teach-in mode
Fast ashing The factory settings
1 x long, 1 x short
ashing
1 x long, 2 x short
ashing
activated or stage
before restoring the
factory settings
of the device will be
restored.
Transmit limit (duty
cycle) reached
Device defective Please contact your
/
/
please see sec. „8.3 Duty
cycle“ on page 33
specialist dealer.
8.2 Operational status display
The device LED (B) lights up permanently as soon as the switch actuator is switched on.
After conguring the switch actuator with the Central Control Unit or
a programming tool, the device LED indicates other device states besides those described (e.g. switch on and off delay or duration).
8.3 Duty cycle
The duty cycle is a legally regulated limit of the transmission time of
devices in the 868 MHz range. The aim of this regulation is to safeguard the operation of all devices working in the 868 MHz range.
In the 868 MHz frequency range we use, the maximum transmission
time of any device is 1% of an hour (i.e. 36 seconds in an hour). Devices must cease transmission when they reach the 1% limit until this
time restriction comes to an end. HomeMatic devices are designed and
32
33
Page 18

Behaviour after power recovery
produced with 100% conformity to this regulation.
During normal operation, the duty cycle is not usually reached. However, repeated and wireless-intensive teach-in processes mean that it
may be reached in isolated instances during start-up or initial installation of a system. If the duty cycle is exceeded, this is indicated by one
long and one short red ash of the device LED, and may manifest itself
in the device temporarily working incorrectly. The device starts working
correctly again after a short period (max. 1 hour).
9 Behaviour after power recovery
After the device has been inserted to a socket or after power recovery the
switch actuator performs a self-test/restart. The device LED will ash if an
error is detected during this check (see sec. „8.1 Flash codes“ on page
33). This is repeated continuously and the device does not perform its
function.
If the test is completed without errors, the switch actuator transmits a
wireless telegram containing its status information. To prevent all Home
Matic actuators from transmitting at the same time when power is recovered (after a mains power failure or a disconnection, for example), there
is a random delay before the switch actuator transmits. During this time,
the device LED ashes slowly. If the delay is very short, this ashing may
be almost imperceptible.
-
10 Maintenance and cleaning
The product does not require any maintenance. Enlist the help of an
expert to carry out any repairs. Clean the product using a soft, lint-free
cloth that is clean and dry. You may dampen the cloth a little with lukewarm water in order to remove more stubborn marks. Do not use any
detergents containing solvents, as they could corrode the plastic housing and label.
General information about radio operation
11 General information about radio operation
Radio transmission is performed on a non-exclusive transmission path,
which means that there is a possibility of interference occurring. Interference can also be caused by switching operations, electrical motors
or defective electrical devices.
The range of transmission within buildings can differ greatly
from that available in the open air. Besides the transmitting
power and the reception characteristics of the receiver,
environmental factors such as humidity in the vicinity have an
important role to play, as do on-site structural/screening
conditions.
If “secure transmission” (AES) is activated for the switch
actuator, this implies:
• increased volume of communication trafc
• actuator groups are unable to execute commands simultaneously.
Please refer to the HomeMatic WebUI Manual at www.homematic.com
for further information on secured operation.
eQ-3 AG hereby declares that this device complies with the essential
requirements and other relevant regulations of Directive 1999/5/EC.
You can nd the full declaration of conformity at www.homematic.com.
12 Technical specications
Device short description: HM-LC-Sw1-Pl-DN-R4
Supply voltage: 230 V/50 Hz
Current consumption: 16 A (max.)
Power consumption in standby: 0.6 W
Load type: ohmic load
Maximum switching capacity: 680 W
Relay: NO contact, 1-pole, µ contact
34
35
Page 19

Technical specications
Radio frequency: 868.3 MHz
Switching cycle: 40000 (16 A, ohmic load)
Receiver category: SRD category 2
Typ. open area RF range: 300 m
Duty cycle: < 1 % per h
Operating mode: S1
Switch type: independently mounted switch
Degree of protection: IP20
Protection class: I
Method of operation: Type 1
Withstand voltage: 2500 V
Degree of pollution: 2
Ambient temperature: -10 °C to +35 °C
Dimensions (W x H x D): 59 x 122 x 40 mm (not incl. plug)
Weight: 176 g
Subject to technical changes.
Instructions for disposal
Do not dispose of the device with regular domestic waste.
Electronic equipment must be disposed of at local collection
points for waste electronic equipment in compliance with the
Waste Electrical and Electronic Equipment Directive
.
Information about conformity
The CE Marking is simply an ofcial symbol relating to the free
movement of a product; it does not warrant a product’s characteristics.
For technical support, please contact your retailer.
Lieferumfang
Anzahl Artikel
1x HomeMatic Funk-Schaltaktor 1-fach, Zwischenstecker
Typ L
1x Bedienungsanleitung
1. Ausgabe Deutsch 10/2014
Dokumentation © 2014 eQ-3 AG, Deutschland
Alle Rechte vorbehalten. Ohne schriftliche Zustimmung des Herausgebers darf dieses Handbuch auch nicht auszugsweise in irgendeiner Form reproduziert werden oder unter Verwendung elektronischer,
mechanischer oder chemischer Verfahren vervielfältigt oder verarbeitet
werden.
Es ist möglich, dass das vorliegende Handbuch noch drucktechnische
Mängel oder Druckfehler aufweist. Die Angaben in diesem Handbuch
werden jedoch regelmäßig überprüft und Korrekturen in der nächsten
Ausgabe vorgenommen. Für Fehler technischer oder drucktechnischer
Art und ihre Folgen übernehmen wir keine Haftung.
Alle Warenzeichen und Schutzrechte werden anerkannt.
Printed in Hong Kong
Änderungen im Sinne des technischen Fortschritts können ohne Vorankündigung vorgenommen werden.
36
141150 / V 1.1
37
Page 20

Hinweise zu dieser Anleitung
Inhaltsverzeichnis
1 Hinweise zu dieser Anleitung ..........................39
2 Gefahrenhinweise ..................................39
3 Funktion und Geräteübersicht .........................42
4 Allgemeine Systeminformation zu HomeMatic.............43
5 Inbetriebnahme ....................................43
5.1 Einfache Bedienfunktionen am Gerät....................43
5.2 Anlernen..........................................43
5.2.1 Anlernen an HomeMatic Geräte........................44
5.2.2 Anlernen an eine HomeMatic Zentrale...................45
6 Bedienung ........................................48
7 Werkseinstellungen wiederherstellen....................49
8 Fehler- und Rückmeldungen der Geräte-LED . . . . . . . . . . . . .50
8.1 Blinkcodes ........................................50
8.2 Anzeige des Betriebszustandes........................50
8.3 Duty Cycle ........................................51
9 Verhalten nach Spannungswiederkehr...................51
10 Wartung und Reinigung ..............................52
11 Allgemeine Hinweise zum Funkbetrieb ..................52
12 Technische Daten...................................53
1 Hinweise zu dieser Anleitung
Lesen Sie diese Anleitung sorgfältig, bevor Sie Ihre HomeMatic Komponenten in Betrieb nehmen. Bewahren Sie die Anleitung zum spä-
teren Nachschlagen auf! Wenn Sie das Gerät anderen Personen zur
Nutzung überlassen, übergeben Sie auch diese Bedienungsanleitung.
Benutzte Symbole:
Achtung! Hier wird auf eine Gefahr hingewiesen.
Hinweis. Dieser Abschnitt enthält zusätzliche wichtige
Informationen!
Hinweis. Dieser Abschnitt enthält zusätzliche wichtige
Informationen zur Verwendung des Gerätes in Verbindung mit
der HomeMatic Zentrale.
2 Gefahrenhinweise
Bei Sach- oder Personenschäden, die durch unsachgemäße
Handhabung oder Nichtbeachten der Gefahrenhinweise
verursacht werden, übernehmen wir keine Haftung. In solchen
Fällen erlischt jeder Gewährleistungsanspruch! Für Folgeschäden übernehmen wir keine Haftung!
Öffnen Sie das Gerät nicht. Es enthält keine durch den
Anwender zu wartenden Teile. Das Öffnen des Gerätes birgt
die Gefahr eines Stromschlages. Im Fehlerfall lassen Sie das
Gerät von einer Fachkraft prüfen.
38
Verwenden Sie das Gerät nicht, wenn es von außen erkennbare
Schäden z. B. am Gehäuse, an Bedienelementen oder an den
Anschlussbuchsen bzw. eine Funktionsstörung aufweist. Lassen
Sie das Gerät im Zweifelsfall von einer Fachkraft prüfen.
39
Page 21

Gefahrenhinweise Gefahrenhinweise
Aus Sicherheits- und Zulassungsgründen (CE) ist das eigenmäch-
tige Umbauen und/oder Verändern des Produkts nicht gestattet.
Verlegen Sie Kabel stets so, dass diese nicht zu Gefährdungen
für Menschen und Haustiere führen können.
Betreiben Sie das Gerät nur in Innenräumen und setzen Sie es
keinem Einuss von Feuchtigkeit, Vibrationen, ständiger
Sonnen- oder anderer Wärmeeinstrahlung, Kälte und keinen
Das Gerät ist nicht zum Freischalten geeignet. Die Last ist
nicht galvanisch vom Netz getrennt.
mechanischen Belastungen aus.
Reinigen Sie das Gerät nur nach Entfernen aus der Steckdose
Das Gerät ist kein Spielzeug, erlauben Sie Kindern nicht damit
zu spielen. Lassen Sie das Verpackungsmaterial nicht achtlos
liegen, Plastikfolien/-tüten, Styroporteile, etc., könnten für
Kinder zu einem gefährlichen Spielzeug werden.
mit einem trockenen Leinentuch, das bei starken Verschmut-
zungen leicht angefeuchtet sein kann. Verwenden Sie zur
Reinigung keine lösemittelhaltigen Reinigungsmittel. Achten
Sie darauf, dass keine Feuchtigkeit in das Geräteinnere
gelangt.
Beachten Sie vor Anschluss eines Verbrauchers die technischen Daten, insbesondere die maximal zulässige Schaltleistung des Relais und Art des anzuschließenden Verbrauchers!
Alle Lastangaben beziehen sich auf ohmsche Lasten! Belasten
Sie das Gerät nur bis zur angegebenen Leistungsgrenze. Eine
Überlastung kann zur Zerstörung des Gerätes, zu einem Brand
Jeder andere Einsatz als der in dieser Bedienungsanleitung
beschriebene ist nicht bestimmungsgemäß und führt zu
Gewährleistungs- und Haftungsausschluss. Dies gilt auch für
Umbauten und Veränderungen. Das Gerät ist ausschließlich
für den privaten Gebrauch gedacht.
oder elektrischen Unfall führen.
HomeMatic Zwischenstecker dürfen nicht hintereinander
Das Gerät darf nur an eine leicht zugängliche Netz-Steckdose
gesteckt werden.
angeschlossen werden. Bei Gefahr ist das Gerät aus der
Netz-Steckdose zu ziehen.
Geräte mit elektronischen Netzteilen (z. B. Fernseher oder
Hochvolt-LED-Leuchtmittel) stellen keine ohmschen Lasten
Verwenden Sie den HomeMatic Zwischenstecker nur in fest
installierten Steckdosen mit Schutzkontakten, nicht in
Steckdosenleisten oder mit Verlängerungskabeln.
dar. Sie können Einschaltströme von über 100 A erzeugen.
Schalten solcher Verbraucher führt zu vorzeitigem Verschleiß
des Aktors.
Schließen Sie keine Endgeräte an den HomeMatic Zwischenstecker an, deren unbeaufsichtigtes Einschalten Brände oder
andere Schäden verursachen könnte (z. B. Bügeleisen).
Ziehen Sie grundsätzlich den Stecker des Endgerätes aus dem
HomeMatic Zwischenstecker, bevor Sie Veränderungen am
Endgerät vornehmen (z. B. Glühlampenwechsel).
40
Das Gerät ist nur für den Einsatz in wohnungsähnlichen
Umgebungen geeignet.
41
Page 22

Funktion und Geräteübersicht Allgemeine Systeminformation zu HomeMatic
3 Funktion und Geräteübersicht
Der HomeMatic Funk-Schaltaktor 1-fach, Zwischenstecker ermöglicht
das Schalten von angeschlossenen Geräten per Funk.
Das Gerät kann schnell und ohne Werkzeug montiert werden und ist
nach dem Einstecken in die Steckdose sofort betriebsbereit. Mit dem
Funk-Schaltaktor ist sowohl eine einfache Bedienung am Gerät als
auch das Anlernen von mehreren HomeMatic Geräten (z. B. HomeMatic Funk-Fernbedienung) möglich. Die Geräte-LED signalisiert z. B.
Betriebszustände und Fehlermeldungen.
In Verbindung mit der HomeMatic Zentrale CCU2 kann der FunkSchaltaktor über die WebUI Bedienoberäche individuell konguriert
und der volle Funktionsumfang genutzt werden. Sie können bspw. die
maximale Ein- bzw. Ausschaltdauer des Gerätes sowie eine Verzögerungszeit für das Ein- bzw. Ausschalten angeschlossener Verbraucher
einstellen.
A
4 Allgemeine Systeminformation zu
HomeMatic
Dieses Gerät ist Teil des HomeMatic Haussteuersystems und arbeitet
mit dem bidirektionalen BidCoS
Alle Geräte werden mit einer Standardkonguration ausgeliefert. Darüber hinaus ist die Funktion des Gerätes über ein Programmiergerät
und Software kongurierbar. Welcher weitergehende Funktionsumfang
sich damit ergibt, und welche Zusatzfunktionen sich im HomeMatic
System im Zusammenspiel mit weiteren Komponenten ergeben, ent-
nehmen Sie bitte dem HomeMatic WebUI Handbuch.
Alle technischen Dokumente und Updates nden Sie stets aktuell im
Downloadbereich unter www.homematic.com.
®
Funkprotokoll.
5 Inbetriebnahme
5.1 Einfache Bedienfunktionen am Gerät
• Stecken Sie den Funk-Schaltaktor in die Steckdose.
Das Gerät ist sofort betriebsbereit und kann an eine HomeMatic Zentrale (oder an andere HomeMatic Geräte) angelernt werden.
Das Gerät verfügt über eine Kanaltaste (A), die über einen kurzen Tastendruck zur Bedienung (ein- bzw. ausschalten) von angeschlossenen
Verbrauchern genutzt werden kann.
Um das Gerät in seinem vollen Funktionsumfang in Ihrem HomeMatic
System nutzen und kongurieren zu können, müssen Sie es zunächst
Anlernen (vgl. Kapitel „5.2 Anlernen“ auf Seite 43).
5.2 Anlernen
B
(A) - Kanaltaste
(B) - Geräte-LED
Bitte lesen Sie diesen Abschnitt vollständig, bevor Sie mit dem
Anlernen beginnen.
Damit der Funk-Schaltaktor in Ihr HomeMatic System integriert wird und
42
43
Page 23

Inbetriebnahme Inbetriebnahme
mit anderen HomeMatic Komponenten (z. B. einer HomeMatic FunkFernbedienung) kommunizieren kann, muss das Gerät zunächst ange
lernt werden. Sie können den Funk-Schaltaktor an andere HomeMatic
Geräte oder an die HomeMatic Zentrale anlernen:
5.2.1 Anlernen an HomeMatic Geräte
Wenn Sie den Funk-Schaltaktor an ein oder mehrere Geräte anlernen
möchten, müssen die beiden zu verknüpfenden Geräte in den Anlernmo
-
dus gebracht werden. Dafür gehen Sie wie folgt vor:
Halten Sie beim Anlernen einen Mindestabstand von 50 cm
zwischen den HomeMatic Geräten ein.
• Nach dem Anlernvorgang erlischt die Geräte-LED des Funk-
Aktivieren Sie zunächst den Anlernmodus am Funk-Schaltaktor.
Schaltaktors.
• Halten Sie die Kanaltaste (A) für mindestens 4 Sekunden gedrückt.
Langsames Blinken der Geräte-LED (B) signalisiert den Anlernmo
dus. Die Anlernzeit beträgt max. 20 Sekunden.
-
Nach erfolgreichem Anlernen können Sie den Funk-Schaltaktor z. B.
mit einer HomeMatic Funk-Fernbedienung ein- und ausschalten.
Wenn kein Anlernen erfolgt, wird der Anlernmodus automatisch
nach 20 Sekunden beendet. Benden sich andere Geräte im
Anlernmodus, werden diese angelernt.
> 4 s
• Versetzen Sie jetzt das Gerät, das Sie an den Funk-Schaltaktor
anlernen möchten (z. B. eine HomeMatic Funk-Fernbedienung, s.
nachfolgende Abbildung), in den Anlernmodus. Nehmen Sie die
Batteriefachabdeckung ab und drücken Sie kurz mit einem spitzen
Gegenstand auf die Anlerntaste.
44
5.2.2 Anlernen an eine HomeMatic Zentrale
Um Ihr Gerät softwarebasiert und komfortabel
• steuern und kongurieren,
• direkt mit anderen Geräten verknüpfen oder
• in Zentralenprogrammen nutzen zu können,
muss es zunächst an die HomeMatic Zentrale angelernt werden. Das
Anlernen neuer Geräte an die Zentrale erfolgt über die HomeMatic Be-
dienoberäche „WebUI“.
Sobald ein Gerät an eine Zentrale angelernt ist, kann es nur
noch über diese mit anderen Geräten verknüpft werden.
45
Page 24

Inbetriebnahme Inbetriebnahme
tor in den Anlernmodus. Halten Sie die Kanaltaste (A) für mindeJedes Gerät kann immer nur an eine Zentrale angelernt
werden.
stens 4 Sekunden gedrückt. Langsames Blinken der Geräte-LED
(B) signalisiert den Anlernmodus.
Halten Sie beim Anlernen einen Mindestabstand von 50 cm
zwischen den HomeMatic Geräten und der Zentrale ein.
Zum Anlernen Ihres Gerätes an die Zentrale gehen Sie wie folgt vor:
• Öffnen Sie die WebUI-Bedienoberäche in Ihrem Browser. Klicken
Sie auf den Button „Geräte anlernen“ im rechten Bildschirmbereich.
> 4 s
• Nach kurzer Zeit erscheint das neu angelernte Gerät im Postein-
• Um den Anlernmodus zu aktivieren, klicken Sie im nächsten Fen-
ster auf „BidCoS-RF Anlernmodus“.
gang Ihrer Bedienoberäche. Der Button „Posteingang“ zeigt dabei
an, wie viele neue Geräte erfolgreich angelernt wurden.
• Lernen Sie ggf. weitere Geräte an, indem Sie die vorher beschriebenen Schritte für jedes Gerät wiederholen.
• Kongurieren Sie nun die neu angelernten Geräte im Posteingang
wie im Abschnitt „Neu angelernte Geräte kongurieren“ beschrie-
ben.
Neu angelernte Geräte kongurieren
Nachdem Sie Ihren Funk-Schaltaktor an die HomeMatic Zentrale angelernt haben, wird er in den „Posteingang“ verschoben. Hier muss Ihr
Gerät und die dazugehörigen Kanäle zunächst konguriert werden,
damit es für Bedien- und Kongurationsaufgaben zur Verfügung steht.
Vergeben Sie einen Namen und ordnen Sie das Gerät bzw. die Kanäle
• Der Anlernmodus ist für 60 Sekunden aktiv. Das Infofeld zeigt die
aktuell noch verbleibende Anlernzeit.
• Versetzen Sie innerhalb dieser Anlernzeit auch den Funk-Schaltak-
einem Raum zu. Sie haben zusätzlich die Möglichkeit, die Ein- bzw.
Ausschaltdauer des Gerätes sowie eine Verzögerungszeit für das Einbzw. Ausschalten angeschlossener Verbraucher einzustellen.
46
47
Page 25

Bedienung Werkseinstellungen wiederherstellen
Anschließend können Sie Ihr Gerät über die WebUI steuern und kongurieren, direkt mit anderen Geräten verknüpfen oder in Zentralenprogrammen nutzen. Einzelheiten hierzu entnehmen Sie bitte dem Home-
Matic WebUI Handbuch (zu nden im Downloadbereich der Website
www.homematic.com).
6 Bedienung
Nach dem Anlernen und Kongurieren können Sie den Funk-Schaltaktor z. B. mit einer angelernten HomeMatic Funk-Fernbedienung steuern und so angeschlossene Verbraucher an- und ausschalten (s. nach-
folgende Abbildung).
Licht an
Licht aus
7 Werkseinstellungen wiederherstellen
Die Werkseinstellungen des Funk-Schaltaktors können manuell wiederhergestellt werden. Dabei gehen alle Einstellungen und Informationen verloren.
Um die Werkseinstellungen wiederherzustellen, gehen Sie wie folgt
vor:
• Halten Sie die Kanaltaste (A) für mindestens vier Sekunden
gedrückt, bis die Geräte-LED (B) langsam zu blinken beginnt.
• Lassen Sie die Taste wieder los.
> 4 s
• Drücken Sie nun die Kanaltaste (A) erneut für vier Sekunden, bis
die Geräte-LED (B) schnell zu blinken beginnt.
• Lassen Sie die Taste wieder los.
• Die Geräte-LED erlischt.
• Die Werkseinstellungen des Gerätes sind nun wiederhergestellt.
48
49
Page 26

Fehler- und Rückmeldungen der Geräte-LED Verhalten nach Spannungswiederkehr
8 Fehler- und Rückmeldungen der
Geräte-LED
8.1 Blinkcodes
Verschiedene Zustände des Funk-Schaltaktors werden durch rotes
Blinken der Geräte-LED (B) angezeigt:
Blinkfolge Bedeutung Lösung
Langsames Blinken Anlernmodus aktiv
Schnelles Blinken Die Werkseinstel-
1 x langes, 1 x
kurzes Blinken
1 x langes, 2 x
kurzes Blinken
oder Vorstufe zum
Wiederherstellen der
Werkseinstellungen
lungen des Gerätes
wurden wiederhergestellt
Sende-Limit (Duty-Cycle) erreicht
Gerät defekt Bitte wenden Sie sich
8.2 Anzeige des Betriebszustandes
Sobald der Funk-Schaltaktor eingeschaltet ist, leuchtet die Geräte-LED
(B) dauerhaft.
Nach Konguration des Funk-Schaltaktors über die Zentrale oder über
ein Programmiertool zeigt die Geräte-LED neben den beschriebenen
noch zusätzliche Zustände des Gerätes an (z. B. Ein- bzw. Ausschaltverzögerung sowie Ein- bzw. Ausschaltdauer).
/
/
Siehe Kapitel „8.3
Duty Cycle“ auf Seite
51
an Ihren Fachhändler.
8.3 Duty Cycle
Der Duty Cycle beschreibt eine gesetzlich geregelte Begrenzung der
Sendezeit von Geräten im 868 MHz Bereich. Das Ziel dieser Regelung
ist es, die Funktion aller im 868 MHz Bereich arbeitenden Geräte zu
gewährleisten.
In dem von uns genutzten Frequenzbereich 868 MHz beträgt die maximale Sendezeit eines jeden Gerätes 1 % einer Stunde (also 36 Sekunden in einer Stunde). Die Geräte dürfen bei Erreichen des 1 %-Limits
nicht mehr senden, bis diese zeitliche Begrenzung vorüber ist. Gemäß
dieser Richtlinie, werden HomeMatic Geräte zu 100 % normenkonform
entwickelt und produziert.
Im normalen Betrieb wird der Duty Cycle in der Regel nicht erreicht.
Dies kann jedoch in Einzelfällen bei der Inbetriebnahme oder Erstinstallation eines Systems durch vermehrte und funkintensive Anlernprozesse der Fall sein. Eine Überschreitung des Duty Cycle Limits wird
durch einmal langes und einmal kurzes Blinken der Geräte LED angezeigt und kann sich durch temporär fehlende Funktion des Gerätes
äußern. Nach kurzer Zeit (max. 1 Stunde) ist die Funktion des Gerätes
wiederhergestellt.
9 Verhalten nach Spannungswiederkehr
Nach dem Einstecken des Gerätes in eine Steckdose oder nach Wiederkehr der Netzspannung führt der Funk-Schaltaktor einen Selbsttest
durch. Sollte dabei ein Fehler festgestellt werden, so wird dieses durch
Blinken der Geräte-LED dargestellt (s. Kapitel „8.1 Blinkcodes“ auf Seite
50). Dieses wiederholt sich kontinuierlich und das Gerät nimmt seine
eigentliche Funktion nicht auf.
Sollte der Test ohne Fehler durchlaufen, sendet der Funk-Schaltaktor ein
Funktelegramm mit seiner Statusinformation aus. Damit bei Spannungs
wiederkehr (etwa nach Netzspannungsausfall oder Abschaltung) nicht
alle HomeMatic Aktoren gleichzeitig senden, wartet der Funk-Schaltaktor
eine zufällige Verzögerungszeit vor dem Senden. In dieser Zeit blinkt die
Geräte-LED langsam rot. Ist die Verzögerungszeit sehr kurz, kann es
sein, dass das Blinken kaum wahrnehmbar ist.
-
50
51
Page 27

Wartung und Reinigung Technische Daten
10 Wartung und Reinigung
12 Technische Daten
Das Produkt ist wartungsfrei. Überlassen Sie eine Reparatur einer
Fachkraft. Reinigen Sie das Produkt mit einem weichen, sauberen,
trockenen und fusselfreien Tuch. Für die Entfernung von stärkeren
Verschmutzungen kann das Tuch leicht mit lauwarmem Wasser angefeuchtet werden. Verwenden Sie keine lösemittelhaltigen Reinigungsmittel, das Kunststoffgehäuse und die Beschriftung kann dadurch angegriffen werden.
11 Allgemeine Hinweise zum Funkbetrieb
Die Funk-Übertragung wird auf einem nicht exklusiven Übertragungsweg realisiert, weshalb Störungen nicht ausgeschlossen werden können. Weitere Störeinüsse können hervorgerufen werden durch Schaltvorgänge, Elektromotoren oder defekte Elektrogeräte.
Die Reichweite in Gebäuden kann stark von der im Freifeld
abweichen. Außer der Sendeleistung und den Empfangseigenschaften der Empfänger spielen Umwelteinüsse wie Luftfeuchtigkeit neben baulichen Gegebenheiten vor Ort eine
wichtige Rolle.
Wird beim Funk-Schaltaktor die „gesicherte Übertragung“
(AES) aktiviert, bedeutet dies:
• höheres Kommunikationsaufkommen,
• Aktor-Gruppen können nicht mehr gleichzeitig Befehle ausführen.
Weitere Informationen zur gesicherten Übertragung (AES) nden Sie
im HomeMatic WebUI Handbuch unter www.homematic.com.
Hiermit erklärt die eQ-3 AG, dass sich dieses Gerät in Übereinstimmung mit den grundlegenden Anforderungen und den anderen rele-
vanten Vorschriften der Richtlinie 1999/5/EG bendet.
Die vollständige Konformitätserklärung nden Sie unter
www.homematic.com.
Geräte-Kurzbezeichnung: HM-LC-Sw1-Pl-DN-R4
Versorgungsspannung: 230 V/50 Hz
Stromaufnahme: 16 A max.
Leistungsaufnahme Ruhebetrieb: 0,6 W
Lastart: ohmsche Last
Maximale Schaltleistung: 3680 W
Relais: Schließer, 1-polig, µ-Kontakt
Funkfrequenz: 868,3 MHz
Schaltspiele: 40000 (16 A, ohmsche Last)
Empfängerkategorie: SRD Category 2
Typ. Funk-Freifeldreichweite: 300 m
Duty Cycle: < 1 % pro h
Betriebsart: S1
Schaltertyp: unabhängig montierter Schalter
Schutzart: IP20
Schutzklasse: I
Wirkungsweise: Typ 1
Stehstoßspannung: 2500 V
Verschmutzungsgrad: 2
Umgebungstemperatur: -10 °C bis +35 °C
Abmessungen (B x H x T): 59 x 122 x 40 mm (ohne Stecker)
Gewicht: 176 g
Technische Änderungen vorbehalten.
52
53
Page 28

Technische Daten Technische Daten
Entsorgungshinweis
Gerät nicht im Hausmüll entsorgen! Elektronische Geräte sind
entsprechend der Richtlinie über Elektro- und Elektronik-Altgeräte über die örtlichen Sammelstellen für Elektronik-Altgeräte
zu entsorgen.
Konformitätshinweis
Das CE-Zeichen ist ein Freiverkehrszeichen, das sich ausschließlich an die Behörden wendet und keine Zusicherung
von Eigenschaften beinhaltet.
Bei technischen Fragen zum Gerät, wenden Sie sich bitte an
Ihren Fachhändler.
54
55
Page 29

56
Bevollmächtigter des Herstellers:
Manufacturer’s authorised representative:
eQ-3 AG
Maiburger Straße 29
26789 Leer / GERMANY
www.eQ-3.de
 Loading...