

Model
Language
Page
Material Size(W*H)
Date
Part No.
V-U5545NB.ALSEWWD
English
16
Color(cover/body)
100g
2006.9.14 Songrui
3828FI5859B
Designer
Description
Chage Record
No. Date
1
2
3
4
5
6
7
8
9
Change content
ECO No.
2/1
225x310
service manual
Designer
Confirm

VACUUM CLEANER
SERVICE MANUAL
MODEL: U1000
CAUTION
BEFORE SERVICING THE VACUUM CLEANER
READ THE SAFETY PRECAUTIONS IN THIS MANUAL.

2
CONTENTS
IMPORTANT SAFEGUARDS
...............................................................................
3
VACUUM CLEANER DESCRIPTION
..................................................................
4
SPECIFICATIONS
................................................................................................
4
PARTS
..................................................................................................................
4
REPLACEMENT INSTRUCTIONS
......................................................................
5
TROUBLESHOOTING
.........................................................................................
8
REMOVING CLOGS
............................................................................................
9
DISASSEMBLY
..................................................................................................
10
SCHEMATIC DIAGRAM
....................................................................................
14
EXPLODED VIEW
..............................................................................................
15

3
IMPORTANT SAFEGUARDS
1. Disconnect power supply before servicing and/or cleaning the unit.
2. Do not leave appliance plugged in. Unplug from outlet when not in use or before servicing.
3. Do not use outdoors or on wet surfaces. Do not pick up water or wet materials.
4. Do not handle plug or appliance with wet hands.
5. Do not allow it to be used as a toy. Close attention is necessary when used by or near children.
6. Use only as described in this manual. Use only attachments recommended by manufacturer.
7. Do not use with damaged cord or plug. If the supply cord is damaged, it must be replaced by the manufacturer
or an Authorized Service Center or a similarly qualified person in order to avoid a hazard.
8. Do not pull or carry by the power cord as a handle, close door on cord, or pull the cord around sharp edges or
corners. Do not run appliance over the cord. Keep the cord away from heated surfaces.
9. Do not unplug by pulling the cord. To unplug, grasp the plug, not the cord.
10. Do not put any object into openings. Do not use with any opening blocked. Keep free from dust, lint, hair and
anything that may reduce air flow.
11. Keep hair, loose clothing, fingers, and all parts of body away from the openings and moving parts.
Do not use vacuum cleaner to pick up sharp, hard objects, small toys, pins, etc.
12. Do not pick up anything that is burning or smoking, such as cigarettes, matches, or hot ashes.
13. Do not use to pick up flammable or combustible liquid or vapors such as gasoline or use in areas where they
may exist.
14. Do not use vacuum cleaner without dust bag and/or filters in place.
15. Always turn off all controls before unplugging.
16. Do not keep vacuum cleaner on chairs, tables, etc. Extra care must be taken when cleaning stairs.
17. Always unplug the unit or turn off the switch when the unit automatically stops unintentionally.
If you don’t, the cleaner could re-start unintentionally.
Polarized plug: This appliance has a polarized plug (one blade is wider than the other). As a safety feature to
reduce the risk of electric shock, this plug is intended to fit in polarized outlet only one way. If the plug does not fit
fully into the outlet, reverse the plug. If still does not fit, contact a qualified electrician. Do not attempt to defeat this
safety feature.
Thermal protector: This vacuum cleaner has a special thermostat that protects the vacuum cleaner in case of
motor overheating. If the cleaner suddenly shuts off, turn off the switch and unplug the vacuum cleaner. Check the
vacuum cleaner for a possible source of overheating such as a full bag, a blocked hose or clogged filter. If these
conditions are found, fix them and wait at least 30 minutes before attempting to use the vacuum cleaner. After the
30 minutes period, plug the vacuum cleaner back in and turn on the switch. If the vacuum cleaner still does not
run, contact a qualified electrician.
THIS PRODUCT IS FOR HOUSEHOLD USE ONLY
WARNING
Your safety is important to us. To reduce the risk of fire, electrical shock, injury to persons, or damage when
using your vacuum cleaner, follow basic safety precautions, including the following:
4
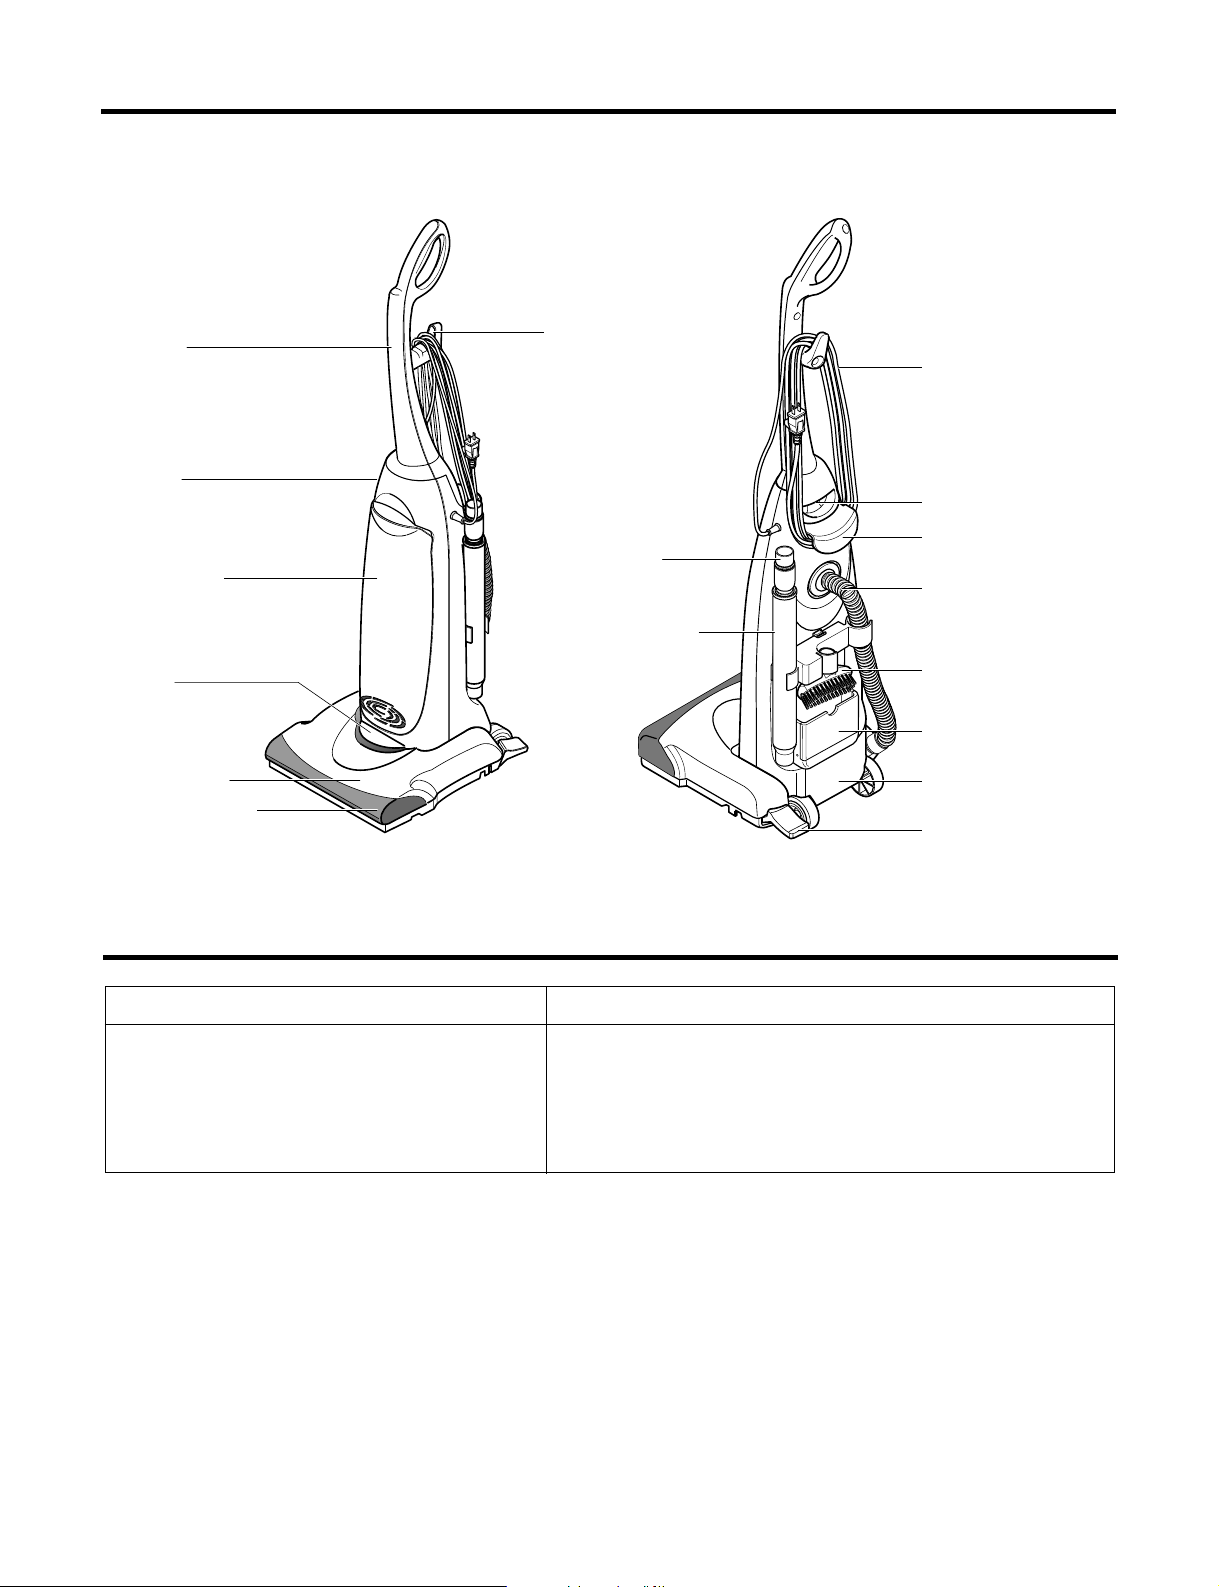
VACUUM CLEANER DESCRIPTION
SPECIFICATIONS
Handle
Quick Release
Cord Hanger
Dust Cover
Head Cover
Furniture Guard
Lamp
(Not Shown)
Switch
Lower Cord Retainer
Power Cord
Carrying Handle
Body Base
Handle Release
Pedal
Extension Wand
Crevice Tool
Hose
Dusting Brush
Accessory Cabinet
Model U1000
Power supply 120V
Ampacity 12A
Dimension/upright position (WxDxH)
approx. 335 x 1138 x 322 mm
Cord length 30'
Weight (approx.) 15lbs
5
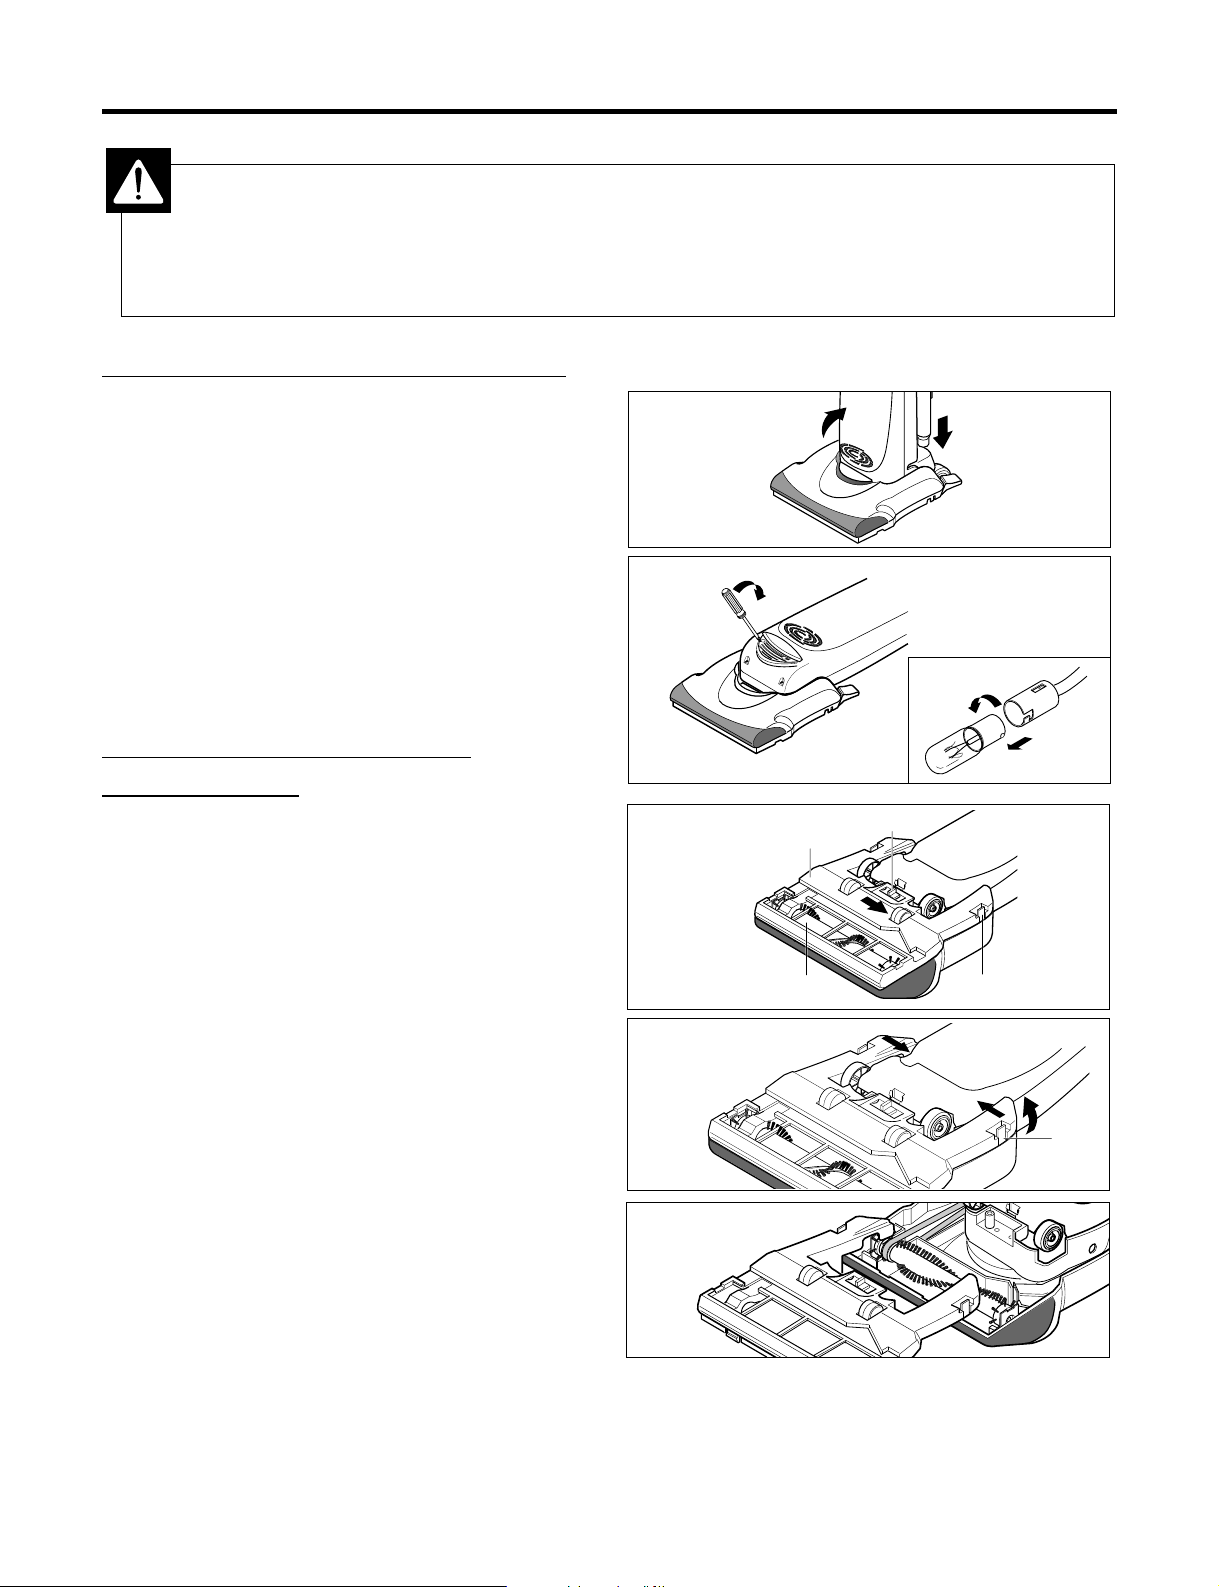
R
eplacing
the Hea
d Lig
ht Bulb
Unplug the vacuum cleaner.
Place the handle to parallel position. (Fig. A)
Unscrew and remove the light cover. (Fig. B)
To remove old bulb, push it in toward bulb socket
while turning counter-clockwise, then remove. (Fig. C)
Use a bayonet base bulb having the rating of 15~20W.
To install a new bulb, push it in toward the bulb socket
and turn it clockwise.
Replace the light cover and secure it with screws.
R
emo
ving/Installing the
Bottom Plate
Before replacing any parts, disconnect the vacuum
cleaner from the electrical outlet.
To remove the bottom plate, slide latch off as shown in
the figure. (Fig. A)
Pushing the locking tabs toward the center of the
vacuum cleaner, pull the bottom plate away from the
nozzle housing. (Fig. B)
To install the bottom plate, hook the front end of
bottom plate into the slots on the front of nozzle.
(Fig. C)
Press the bottom plate until the locking tabs snap into
place then slide the latch to secure.
REPLACEMENT INSTRUCTIONS
To Remove
Agitator
Bottom Plate
Tabs
Tabs
Latch
WARNING
Electrical Shock or Personal Injury Hazard
Disconnect electrical supply before servicing or cleaning the unit. Failure to do so could result in electrical
shock or personal injury from the vacuum cleaner suddenly starting.
A
A
B
B
C
C
A
A
B
B
C
C

6
Repl
acing
Belt an
d/o
r Agitat
or
Check the belt and agitator frequently. If they are
broken or worn out, replace them.
Turn the unit over and remove the bottom plate as
described in R
emovi
ng/
Installi
ng the B
ottom
Plate
section.
To remove the belt or agitator, grasp the both ends of
agitator and lift it slowly. Remove the belt from agitator
pulley and motor shaft. If the belt was broken, be sure
all pieces are removed.
Loop the new belt around the motor shaft and agitator
pulley.
Reinsert the agitator making sure that both ends of the
agitator fit in the groove of the nozzle head.
After installing the agitator, turn it by hand making sure
that the belt is not twisted or pinched and all parts turn
freely.
Replace the bottom plate as described in the
Removing/Installing the Bottom Plate section.
Replacing Exhaust Filter
This exhaust filter must be replaced when dirty.
Pull outward on the dust cover grip to remove dust
cover. (Fig. A)
Replace exhaust filter and close the dust cover.
(Fig. B)
WARNING
Electrical Shock or Personal Injury Hazard
Disconnect electrical supply before servicing or cleaning the unit. Failure to do so could result in electrical
shock or personal injury from the vacuum cleaner suddenly starting.
WARNING
Personal Injury Hazard
Be careful when removing the agitator as the belt
tension is high.
Failure to do so could result in personal injury
from the agitator releasing quickly and snapping
away.
The motor shaft may be very hot!
A
A
B
B
Motor Shaft
Agitator
Motor Shaft
Agitator
Belt
Hepa Cartridge Exhaust Filter

7
R
eplacing
Filter
Bag
Check the filter bag from time to time. When excessive
dirt accumulates, your cleaner may not operate
effectively.
If the cleaner does not seem to have adequate
suction, check the filter bag.
DISCONNECT THE VACUUM CLEANER FROM
THE ELECTRICAL OUTLET.
Pull the dust cover grip forward and remove the dust
cover from the cleaner. (Fig. A)
Grasp the filter bag collar and pull it out.
Attach a new filter bag onto the bag holder holding the
filter bag collar and pushing back as shown in the
figure. (Fig B)
Insert the tabs on the bottom of dust cover into the
grooves on the dust compartment. (Fig. C)
Rotate the dust cover up into the closed position and
press it until the hook snaps into place.
Replacing Secondary Filter
Secondary filter is located inside the dust
compartment. When installing or changing the filter
bag, always check this filter. When the filter becomes
dirty, replace filter and install new filter.
To remove this filter, open the dust cover and pull the
filter out from the bottom of dust compartment.
To install new secondary filter, slide the new filter back
into place. It should be fully inserted into the
projections of the bottom of dust compartment.
WARNING
Electrical Shock or Personal Injury Hazard
Disconnect electrical supply before servicing or cleaning the unit. Failure to do so could result in electrical
shock or personal injury if the vacuum cleaner starts suddenly.
A
A
B
B
C
C
D
D

8
Problem
Cleaner won't run.
Cleaner won't pick
up.
Dust escapes the
filter bag.
Possible cause
1. Not firmly plugged in
2. No voltage in wall outlet
3. On/Off switch not turned on
4. Blown fuse
5. Thermal protector operated
1. Broken or worn belt
2. Worn agitator brush
3. Full or clogged filter bag
4. Hole in hose
5. Dust cover improperly installed
6. Belt not installed on motor shaft
1. Filter bag improperly installed
2. Torn filter bag
Possible solution
1. Plug in firmly.
2. Check fuse or breaker.
3. Push On/Off switch.
4. See authorized service center.
5. Unplug, turn off and allow to cool. See page 3.
1. Replace belt.
2. Replace agitator.
3. Change filter bag.
4. Replace hose.
5. Properly install
6. Install belt on motor shaft.
1. Install filter bag properly.
2. Replace filter bag.
Problem
Cleaner won’t run.
Suction power is
low.
Vibration and
noise.
Possible cause
1. Blown fuse
2. Failure of connection or electrical parts such as
power cord, motor, switch, lead wire, etc.
3. Agitator or other rotating parts are blocked.
(When motor doesn’t rotate while power is
supplied)
1. Motor is broken or blocked.
2. Air flow is clogged.
1. Loose parts.
2. Unbalanced motor shaft.
3. Clogged air flow.
4. Unbalanced agitator or loose parts of agitator.
5. Improper installation of belt and agitator.
Possible solution
1. Replace fuse.
2. Repair and replace electrical parts.
3. Remove clogs or foreign objects.
1. Repair or change the motor. Check
the carbon brush of motor. Remove
foreign objects from impeller, if
clogged.
2. Remove foreign objects.
1. Tighten securely.
2. Repair or change the motor.
3. Remove foreign objects.
4. Change or repair agitator.
5. Install properly.
MINOR PROBLEM
Review this chart to find out a possible solution if a minor problem occurs. This chart is given in owner’s
manual for customer’s reference. Check the unit according to this chart before servicing.
MAJOR PROBLEM
If problem isn’t solved using the minor problem chart, please check the unit using this chart.
TROUBLESHOOTING

9
REMOVING CLOGS
If the vacuum cleaner does not seem to have
adequate suction, first check to see if the filter bag is
full.
If the filter bag is not full, check the hose and
extension wand.
Visually inspect the hose and the opening of the head
cover into which the hose is inserted. (Fig. A)
If the clog still exists, make sure to turn the vacuum
cleaner off and unplug the power cord. Turn the
vacuum cleaner over to expose the underside. Check
the agitator area and suction inlet. (Fig. B)
Return the vacuum to the upright position before
plugging into the electrical outlet.
WARNING
Electrical Shock or Personal Injury Hazard
Disconnect electrical supply before servicing or cleaning the unit. Failure to do so could result in electrical
shock or personal injury from the vacuum cleaner suddenly starting.
A
A
B
B
Extension
Wand
Agitator
Suction Inlet
Hose
Opening

10
St
ep 1: Di
sassembl
ing
handle
a
nd cord
hange
r.
Remove screw and pull out the handle.
Remove screw and disassemble cord hanger, spring
and washer.
S
tep 2: Disassembling suction
release valve
Remove dust cover from the cleaner.
Push the end of valve strongly to detach the valve
body from the packing.
Then remove the packing from dust cover.
When reassembling the valve to the dust cover,
assembly cap, spring and valve body first. Then pressfit.
DISASSEMBLY
Handle
Bolt Hole
Handle
Packing
Valve
Body
WARNING
Electrical Shock or Personal Injury Hazard
Disconnect electrical supply before servicing or cleaning the unit. Failure to do so could result in electrical
shock or personal injury from the vacuum cleaner suddenly starting.
Cord
Hanger
Spring
Screw
Packing
Cap
Washer
Valve
Body
Spring
Press-Fit
(Rotate and Push)

11
DISASSEMBLY
Ste
p 3:
Disassem
bling ho
se
Remove the lower end of stretch hose from the
cleaner.
Open dust cover and remove filter bag.
Unhook the hose collar inside the dust chamber, and
pull the hose strongly to remove.
WARNING
Electrical Shock or Personal Injury Hazard
Disconnect electrical supply before servicing or cleaning the unit. Failure to do so could result in electrical
shock or personal injury from the vacuum cleaner suddenly starting.
A
A
BB--1
1
BB--2
2
C
C
D
D

12
Step
4: D
isassemb
ling hea
d o
f
t
he clean
er(agita
tor,
belt, pe
dal
as
sembly,
etc.)
Turn the cleaner over to exposure the underside.
To remove the bottom plate, unscrew(optional) and
slide latch off as shown in the figure.
Pushing the locking tabs toward the center of the
vacuum, pull the bottom plate away from the nozzle
housing.
Remove the belt from motor shaft, then grasp the ends
of agitator and lift it slowly.
Unscrew and remove the pedal assembly.
Pull the left side of the head cover off the body, then
remove right side of the head cover.
Push the right edge of connector pipe to turn and set
the position to remove.
Side connector pipe of the head cover.
DISASSEMBLY
Agitator
Scrow(Optional)
Tabs
Tabs
Latch
Belt
Agitator
Push
Pedal
Assembly
Head
WARNING
Electrical Shock or Personal Injury Hazard
Disconnect electrical supply before servicing or cleaning the unit. Failure to do so could result in electrical
shock or personal injury from the vacuum cleaner suddenly starting.
A
A
B
B
C
C
D
D
E
E

13
Step
5:
Disassem
bling bo
dy of
th
e cleane
r(motor,
sw
itch, fu
se,
e
tc.)
Disassemble head (Refer to Step 4).
Unscrew and remove the body cover from the body
base.
Disconnect wires and remove motor.
Disconnect wires and disassemble switch, fuse and
power cord.
Switch
Motor
WARNING
Electrical Shock or Personal Injury Hazard
Disconnect electrical supply before servicing or cleaning the unit. Failure to do so could result in electrical
shock or personal injury from the vacuum cleaner suddenly starting.

14
SCHEMATIC DIAGRAM
M
Motor
Thermal Protector
Switch
LiveNeutral
•
: CONNECTED BY/WITH
– TERMINAL AND RECEPTACLE
– CONNECTOR
– NYLON CONNECTOR

15
EXPLODED VIEW
3 BLOCK
1 BLOCK
2 BLOCK
6 BLOCK 4 BLOCK
5 BLOCK
149307
535502
152002
335508
235501
252311
239401
333001
545111
335504
549311
130401
143701
533001
546601
149702
650632
535251
149901
C1WZZ1
549323
349702
152311
252301
336501
166011
336502
143701
139204
164111
135503
650581
548742
543701
542801
149321
542702
452151
149322
149306
149703
152302
168612
168611
146602
249011
146811
139203
139202
140361
549328
559731
530583
546403549323
548741
652031
130901
344001

P/NO : 3828FI5859B
 Loading...