

Page 1
Sommer_Evo_V9_EN
Installation and operating instructions 1 - 25
sprint evolution
Page 2

– 2
Contents
General information ......................................................3
Symbols ........................................................................................... 3
Safety instructions ............................................................................ 3
General ...................................................................................... 3
Storage ...................................................................................... 3
Operation ................................................................................... 3
Radio remote control ................................................................. 3
Rating plate ................................................................................ 3
Normal use ....................................................................................... 3
Maximum door dimensions.* ............................................................ 4
Technical data .................................................................................. 4
EU manufacturers´ declaration ........................................................ 4
EU conformity declaration ................................................................ 4
Scope of delivery .............................................................................. 5
Preparations for installation .........................................6
Safety instructions ............................................................................ 6
Tools required ................................................................................... 6
Personal protective equipment ......................................................... 6
Installing a wicket door safety facility or release lock ....................... 6
Installation ...................................................................... 7
Safety instructions ............................................................................ 7
Door types and special accessories* ............................................... 7
Installation tips ................................................................................. 7
Pre-installation ................................................................................. 8
Installation ........................................................................................ 9
Fitting and connecting push-buttons ...............................................11
Installing the socket outlet ...............................................................11
Commissioning ............................................................ 12
Safety instructions .......................................................................... 12
Setting door OPEN + CLOSED end positions ............................... 12
Teaching in drive ............................................................................ 12
Checking emergency release ......................................................... 13
Checking force setting .................................................................... 13
Programming of hand-held transmitter ........................................... 13
Attaching instruction label .............................................................. 13
Attaching warning sign ................................................................... 14
Operation / handling .................................................... 15
Safety instructions .......................................................................... 15
Opening door ................................................................................. 15
Closing door ................................................................................... 15
Pulse sequence of door movement ................................................ 15
Emergency release ........................................................................ 15
Control reset ................................................................................... 15
Interim stop .................................................................................... 16
Safety stop 1(force cut-off) ...................................................... 16
Safety stop 2(safety input) ....................................................... 16
Overload protection ........................................................................ 16
Operation following a power failure ................................................ 16
Radio remote control receiver ........................................................ 16
Safety instructions ................................................................... 16
Description of display and push-buttons .................................. 16
Programming of hand-held transmitter .................................... 17
Deleting the hand-held transmitter key from
the radio receiver ..................................................................... 17
Deleting a channel from the radio receiver .............................. 17
Clearing radio receiver memory ............................................... 17
Connecting an external aerial ........................................................ 17
What is push-button 2 used for? .................................................... 17
Functions and connections ....................................... 18
General information ........................................................................ 18
Obstacle recognition (DIP 1, 2 + 3) ................................................ 18
Drive behaviour upon opening the door ................................... 18
Drive behaviour upon closing the door .................................... 18
Connecting light barrier .................................................................. 18
Connecting push-button 2 (DIP 2) .................................................. 18
Connecting warning lamp (DIP 4) .................................................. 18
Direct socket unit (push-button 1) .................................................. 19
Early warning time (DIP 5) ............................................................. 19
Backjump (DIP 6) ........................................................................... 19
Defi ned opening and closing(DIP 7) .............................................. 19
Partial opening (DIP 8) ................................................................... 19
Connecting an external aerial ........................................................ 20
TorMinal interface ........................................................................... 20
Trolley board .................................................................................. 20
Maintenance and care ................................................. 21
Important information ..................................................................... 21
Cleaning chain and drive unit rail ................................................... 21
Changing bulbs .............................................................................. 21
Changing fuses(connecting warning lamp) .................................... 21
Regular checks .............................................................................. 22
Miscellaneous .............................................................. 23
Disassembly ................................................................................... 23
Disposal ......................................................................................... 23
Warranty and after-sales service ................................................... 23
Troubleshooting ..........................................................24
Further troubleshooting tips ........................................................... 24
Page 3
– 3
Symbols
CAUTION SYMBOLS:
Indicates a potential risk! Failure to follow instructions may
result in serious injuries or damage!
NOTE SYMBOLS:
Information, useful advice!
Refers to the relevant illustration in the introduction or
main text.
Safety instructions
General
These installation and operating instructions must be read, understood
and observed by the person who is installing, operating or maintaining
the system.
Installation, connection and initial operation of the drive mechanism
may only be carried out by qualifi ed specialists.
Only install the drive mechanism to correctly aligned and weight-bal-
anced doors. An incorrectly aligned door could cause serious injury or
damage to the drive mechanism.
The manufacturer cannot be made liable for any damage or disruptions
to operation occurring due to non-compliance with the installation and
operating instructions.
Ensure that these installation and operating instructions are located in
an easily accessible place in the garage.
Observe and comply with the locally applicable accident prevention
regulations and standards.
Observe and comply with the directive on 'Power-driven Windows,
Doors and Gates - BGR 232' issued by the Employers' Liability Insurance Association. (valid for the given user in Germany)
Always disconnect the drive mechanism from the power supply before
carrying out any work.
Only use the manufacturer's original spare parts, accessories and fi xing
material.
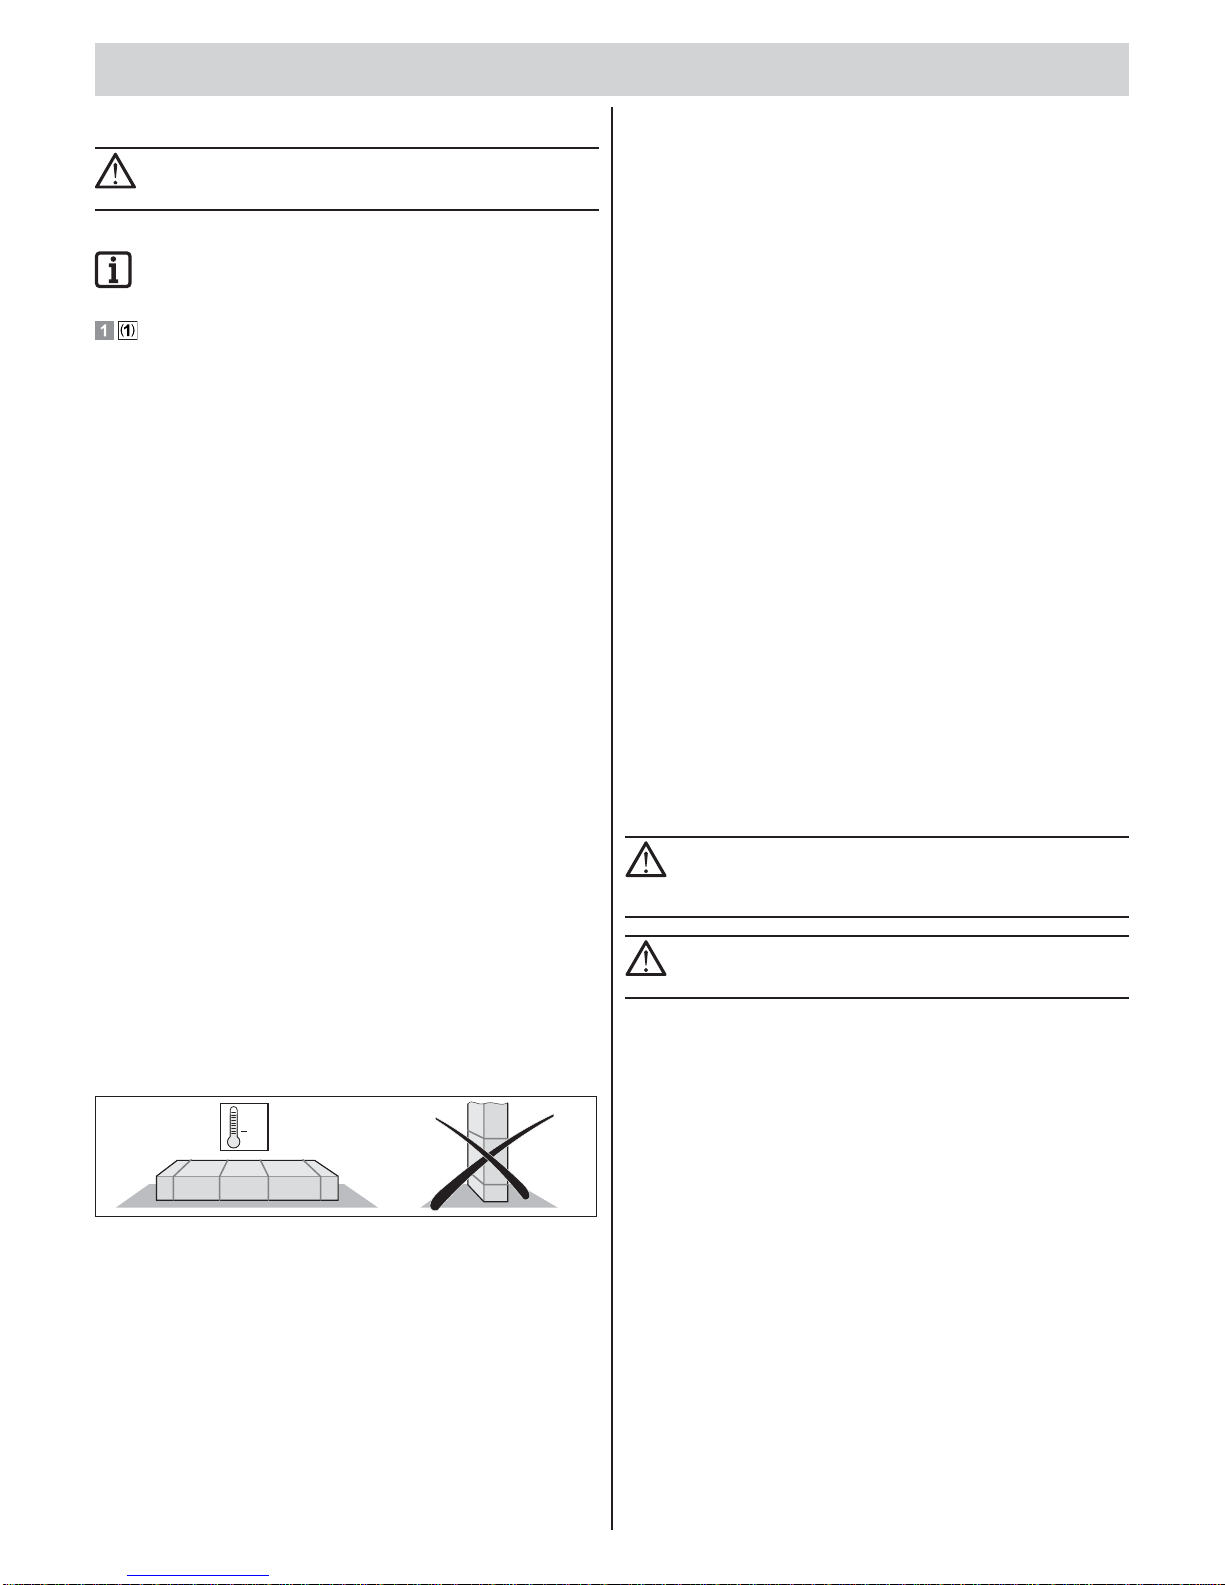
Storage
The drive mechanism may only be stored indoors, in a dry, sealed envi-
ronment at an ambient temperature of between -20°C and +50°C.
The drive mechanism should be stored horizontally.
+50°
20°
Operation
The drive mechanism may only be operated after a risk-free force toler-
ance has been set. Select the lowest possible force tolerance to reduce
the risk of injury.
Keep your hands clear of any moving door or any moving parts.
Keep children, disabled persons and animals away from the door.
Only drive into and out of the garage when the door is fully opened.
Risk of persons trapping or cutting themselves in/on the door system's
moving parts or edges where it closes.
If the door is not equipped with a small, fl ap door, or if there is no
alternative access to the garage, install an emergency release system
(emergency release lock or control cable) that can be activated from
the outside.
Radio remote control
The radio remote control may only be used for equipment and systems
in which defective remote operation of the transmitter or radio receiver
does not constitute a risk to people, animals or property, or in cases
where this risk is eliminated by means of additional safety facilities.
The user must be made aware of the fact that the remote control of
equipment with accident risk potential may only occur, if at all, when the
equipment concerned is clearly visible.
Radio remote control may only be used if movement of the door can
be supervised and there are no persons or objects in the area of
movement.
Store the manual remote control in such a way that there is no risk of it
being accidentally operated by, for instance, children or animals.
The operator of this radio-controlled equipment is in no way protected
from interference from other telecommunications systems and facilities
(e.g. other radio-controlled equipment that is licensed to operate at the
same frequency range). If serious interference is encountered, please
contact your nearest telecommunications offi ce with interference meas-
uring facilities (radio signal localisation)!
Do not use the manually-operated remote control near locations or in-
stallations that are susceptible to radio interference (airports, hospitals).
Rating plate
The rating plate is located on the cover of the control housing.
Exact type designation and date of manufacture (month/year) of the
drive can be found on the rating plate.
Normal use
CAUTION! RISK OF SERIOUS DAMAGE TO DRIVE!
Do not open or close the door with the drive system without
fi rst adjusting the balance weight (springs tensions). Otherwise, the motor (gear system) might be seriously damaged.
CAUTION! RISK TO LIFE AND LIMB!
Remove all ropes and loops that are required for the manual
operation of the door.
The drive is designed for the exclusive purpose of opening and closing
doors. Any other use does not constitute normal use. The manufacturer
accepts no liability for damage resulting from use other than normal
use. The user accepts sole responsibility for any risk thereby incurred.
The warranty ceases to apply in this case.
Doors operating automatically with a drive must comply with the stand-
ards and directives valid at the given time: e.g. EN 12604, EN 12605.
The drive system may only be operated if it is in proper working order.
Always follow standard safety procedures and adhere to the instructions in this installation and operating manual.
Any defects that may impair the safe operation of the equipment should
be eliminated without delay.
The door must be stable and twist-proof, i.e. it should not bend or twist
during opening or closing operations.
The drive mechanism is unable to compensate for any defects in the
door or for its incorrect installation.
Only use the drive mechanism in a dry, indoor environment where there
is no risk of explosion.
Do not use drive in rooms where a hostile environment prevails
(e.g. salty air).
General information
Page 4
General information
– 4
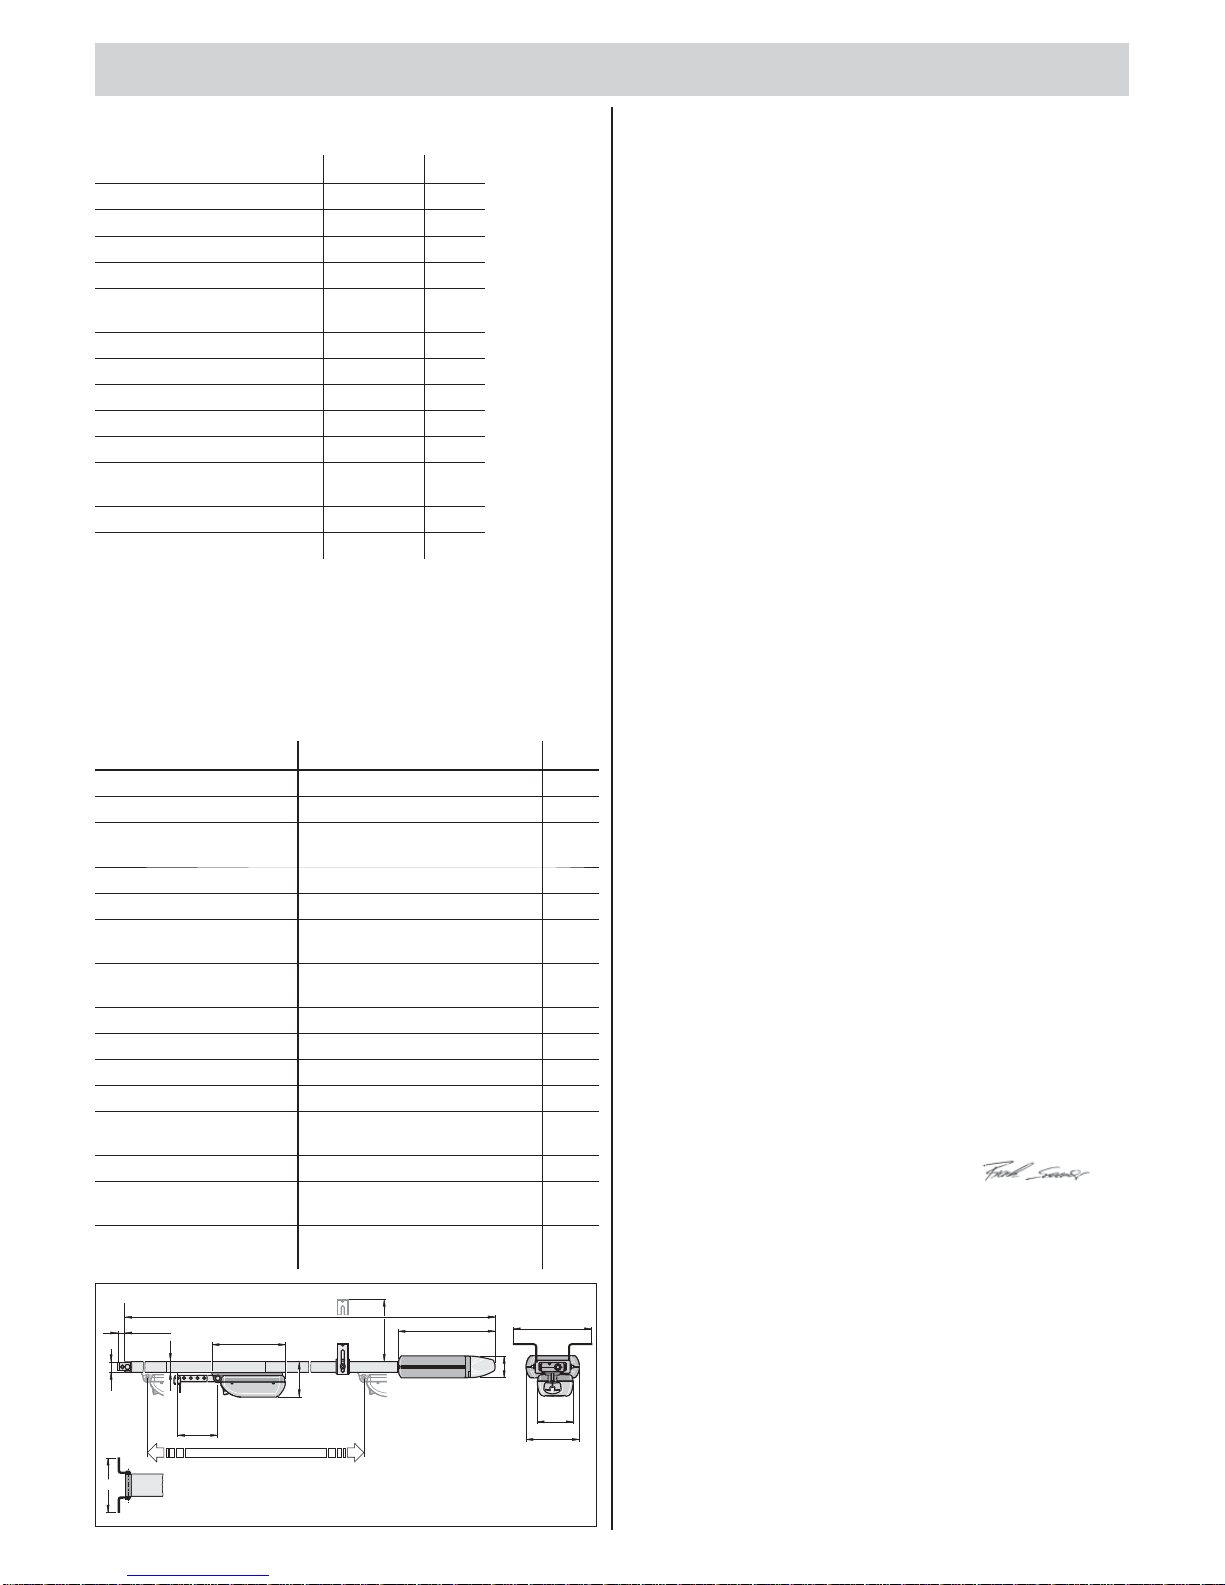
Maximum door dimensions.*
Unit
Maximum width
Up-and-over-door 4000 mm
Sectional door 4000 mm
Side hinged door ** 2800 mm
Side-opening sectional door or
sectional horizontal sliding door
2350 mm
Up-and-over, canopy door 3500 mm
Height (approx.)
Up-and-over-door 2600 mm
Sectional door 2350 mm
Side hinged door ** 2800 mm
Side-opening sectional door or
sectional horizontal sliding door
2300 mm
Up-and-over, canopy door 1900 mm
Operating time 15 %
* door conforming to EN 12604, EN 12605
** with standard side hinged door fi ttings prod. no. 1501.
If a higher door is required, rails of the respective length must be
ordered or install rail extensions. Please contact your stockist for
more information.
Technical data
Unit
Rated voltage 230 V/AC
Rated frequency 50 Hz
Light max. 32.5 V, max. 34 W, BA 15s
alternatively 24 V, 21 W, BA 15s
Operating temperature range
-20 - +50 °C
Protection class IP 20
Workplace-specifi c emis-
sion value
< 75 dBA - drive only
Max. traction and pressure
force:
550 N
Rated traction 165 N
Rated current consumption:
0,7 A
Rated power consumption: 140 W
Maximum speed: 160 mm/s
Power consumption, standby:
~ 7 W
Weight: 18,0 kg
Packaging drive
(L x W x H):
1090 x 178 x 158 mm
Packaging rail 2600
(L x W x H):
1980 x 240 x 180 mm
max.22,5
max.
214
176
375
30
3530
310
252
75
120
170
35
245
115
2600
EU manufacturers´ declaration
The company
SOMMER Antriebs- und Funktechnik GmbH
Hans-Böckler-Straße 21-27
D-73230 Kirchheim/Teck
herewith declares that its drive:
sprint evolution•
complies with the following directives:
Machine Directive 98/37/EC•
Low Voltage Directive 73/23/EEC•
EU Electromagnetic Compatibility Directive 73/23/EEC•
Above all, the following standards/draft standards were applied:
EN 12 453:2000, EN 13849-1:2006•
EN 60335-1:2002 (+A1:2004, +A11:2004)•
Please note:
The door system may not be commissioned until such time as it has been
established that the system in which the given drive is to be installed satisfi es the specifi cations of all relevant EU directives.
Kirchheim, 2009-10-01 Gerd Schaaf
Managing Director
EU conformity declaration
The company
SOMMER Antriebs- und Funktechnik GmbH
Hans-Böckler-Straße 21-27
D-73230 Kirchheim/Teck
declares herewith that the product designated below complies with the
relevant fundamental requirements as per Article 3 of the R&TTE Directive
1999/E/EC, insofar as the product is used correctly, and that the following
standards apply:
Product:
RF Remote Control for Doors & Gates
Type:
RM04-868-2RM03-868-4, RX01-868-2/4, RFSDT-868-1, RFSW-868-1,
RM02-868-2, RM06-868-2, RM04-868-1, RM02-868-2-TIGA, RM08-868-2,
RM01-868, RM02-434-2, RM03-434-4, RM04-434-2
The relevant guidelines and standards are:
ETSI EN 300220-1:09-2000, -3:09-2000•
ETSI EN 301489-1:07-2004, -3:08-2002•
DIN EN 60950-1:03-2003•
Kirchheim, 2009-08-04 Frank Sommer
Managing Director
Page 5
General information
– 5
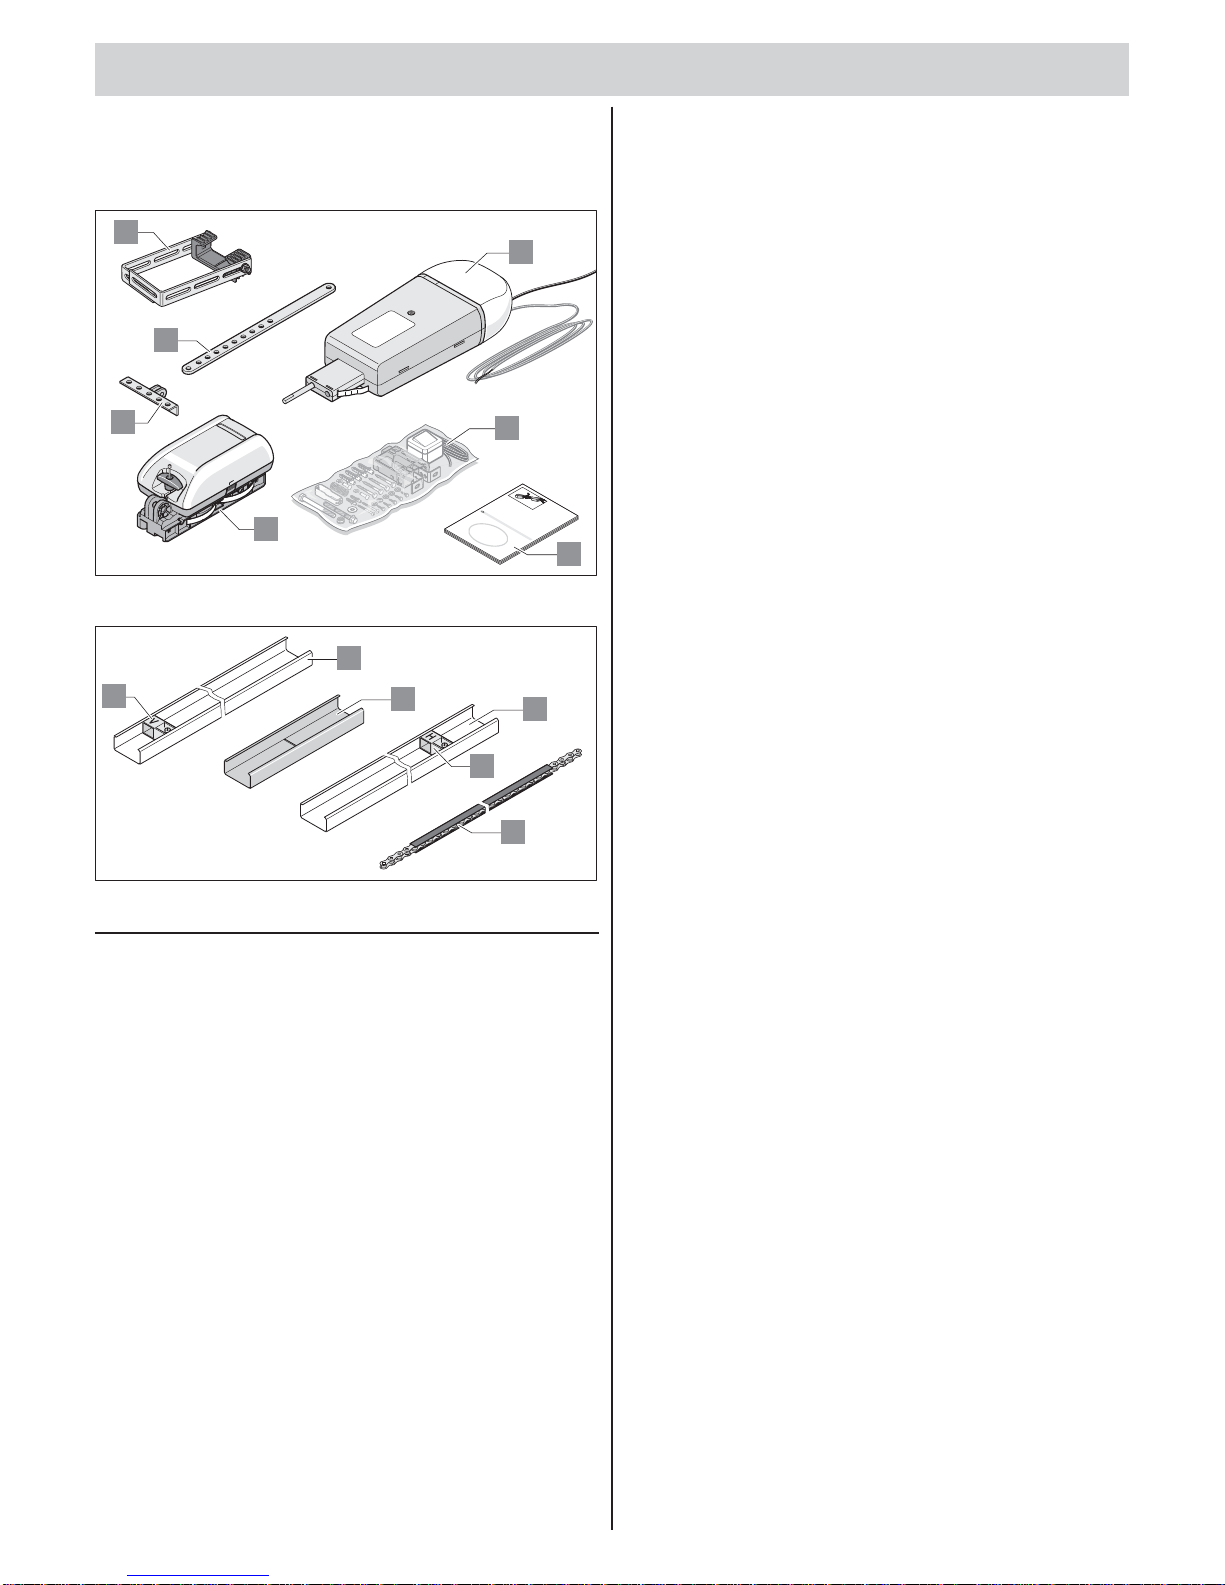
Scope of delivery
The scope of delivery may vary according to the type of drive supplied.
Package 1
Mont
ag
e
un
d
Betriebs
s
anleitung
1
-3
0
D
D
sprint
evolution
7
2
6
1
5
4
3
Package 2
12
8
10
9
11
8
Item Component Quantity
1. Control housing
(push-button line, mains cable, illumination)
1
2. Trolley 1
3. Door fi tting bracket 1
4. Connecting arm 1
5. Ceiling mount 1
6. Assembly kit 1
7. Installation and operating instructions 1
8. C-rails (uncoated) 2
9. Slide-on module (uncoated) 1
10. Switch trigger "H" 1
11. Switch trigger "V" 1
12. Chain in chain case 1
Page 6
– 6
Safety instructions
The power cable supplied as standard may be neither shortened nor
lengthened.
The voltage of the power source must correspond to that indicated on
the drive's rating plate.
All devices requiring external connection must be equipped with safe
contact separation as per IEC 364-4-41 to isolate them from the mains
voltage supply.
Live parts of the drive (voltage-carrying parts e.g. C-rails) may not be
connected to earth or to the live parts or protective conductors of other
circuits.
IEC 364-4-41 must be observed when laying the external device
conductors.
CAUTION! RISK TO LIFE AND LIMB!
Remove all ropes and loops that are required for the manual
operation of the door.
Tools required
Mit SOMMER sind Sie immer gut ausger
ichtet!
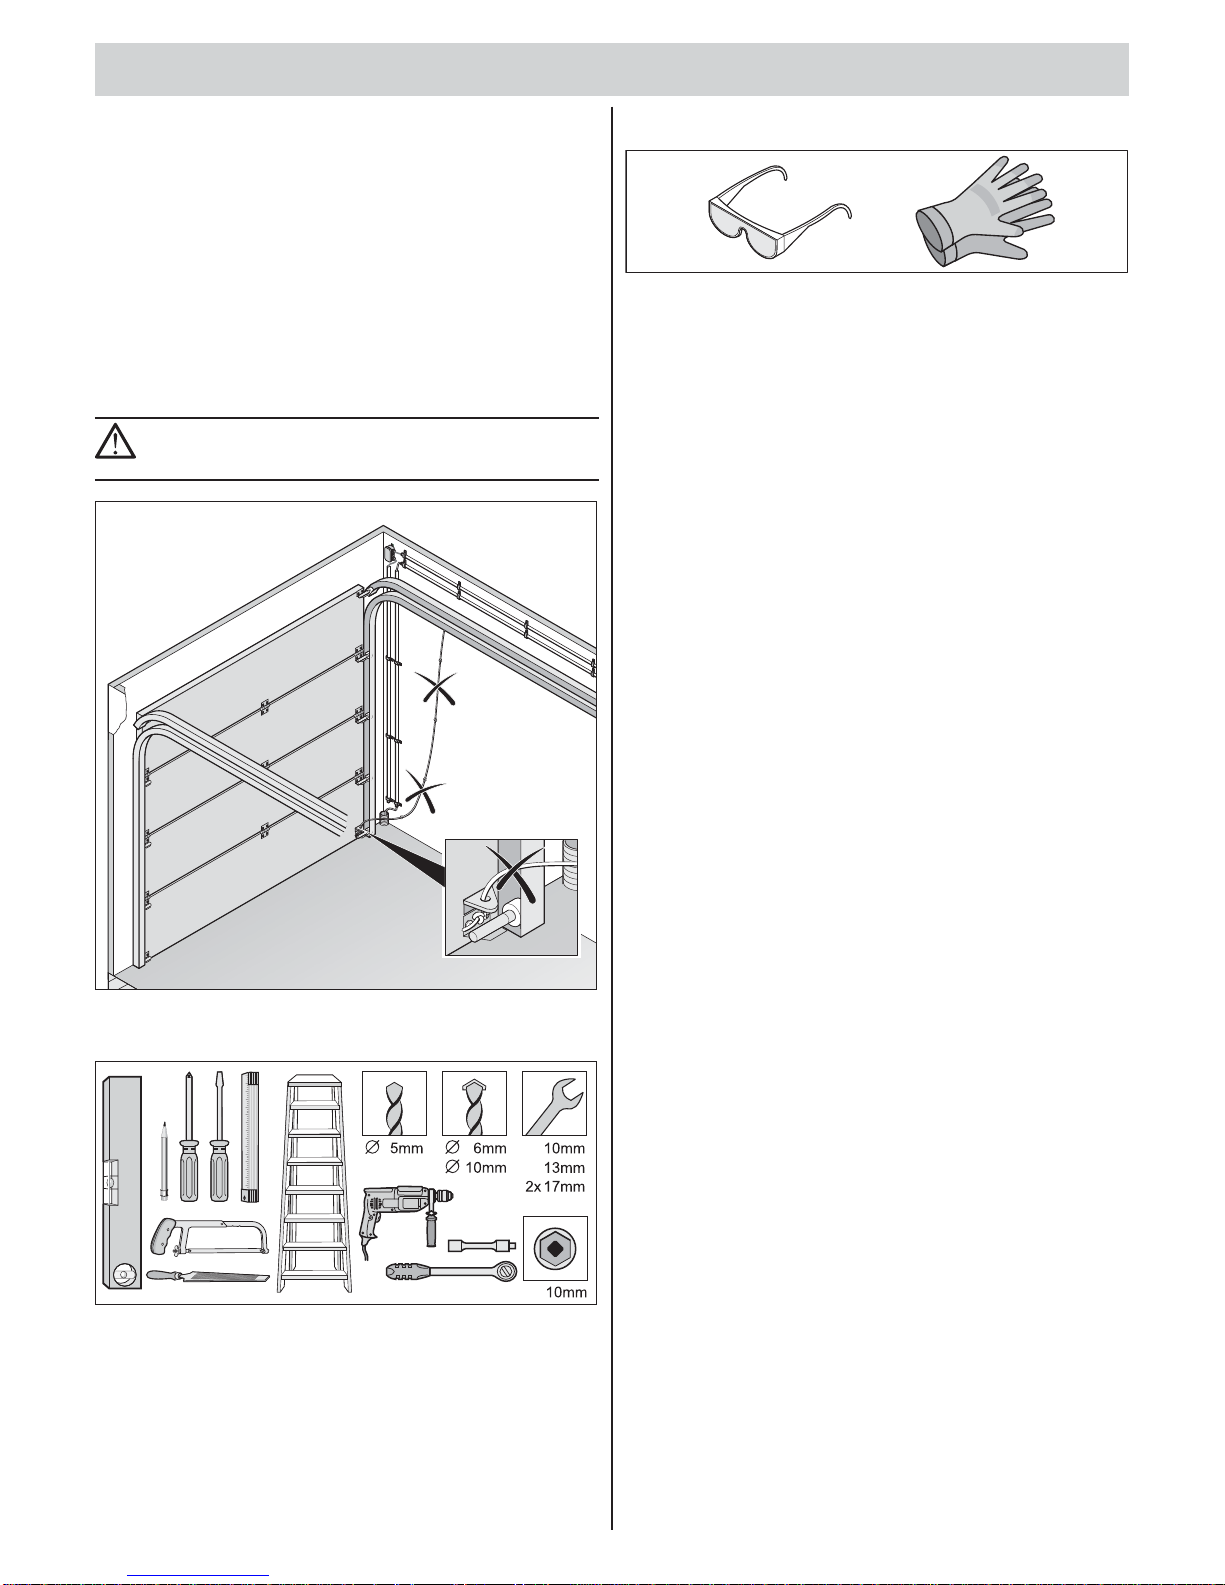
Personal protective equipment
Protective goggles (for drilling)
Protective gloves (e.g. for handling cut perforated steel strips)
Installing a wicket door safety
facility or release lock
The door is fi tted with a wicket door, but no wicket door safety facility•
Install a wicket door safety facility (see "Accessories" instructions).
The door has no wicket door and the garage has no separate entrance•
Install a release lock or Bowden wire to facilitate release from the
outside (see "Accessories" instructions).
Preparations for installation
Page 7
– 7
Safety instructions
Installation, connection and initial operation of the drive mechanism
may only be carried out by qualifi ed specialists.
Do not operate the door when people, animals or objects are in its area
of movement.
Keep children, disabled persons and animals away from the door.
Safety goggles should be worn when drilling the mounting holes.
Cover the drive mechanism up when drilling to ensure it does not get
soiled.
CAUTION
The walls and ceiling must be fi rm and stable. Only fi t the
drive mechanism to a correctly aligned door. A door that has
not been aligned correctly can cause serious injuries.
Doors must be stable because they are subjected to high traction and
pressure forces. Light doors made of plastic or aluminium must be
strengthened before installation if necessary. Ask your specialist retailer
for advice.
Remove door locking system or disable same.
Only use approved fi xing materials (e.g. screws, plugs). Ensure the fi xing
material is appropriate for the material the ceilings and walls are made of.
Check that the door runs easily.
The door must be balanced.
TEST:
Manually open the door half-way. It must stay still in this
position. If the door moves downwards or upwards, mechanically readjust it. Ask your specialist retailer for advice.
Check the distance between the highest door position (THP, see fi g. 11)
and the ceiling. The distance between THP and the lower edge of the C-rail
must be between minimum 5 mm and maximum 65 mm, whereby the push
rod must be at an angle of max. 30° (see fi g. 11)! If the clearance is less
than is permissible, the drive mechanism must be moved back and an
extended drive rail fi tted. Ask your local stockist for advice.
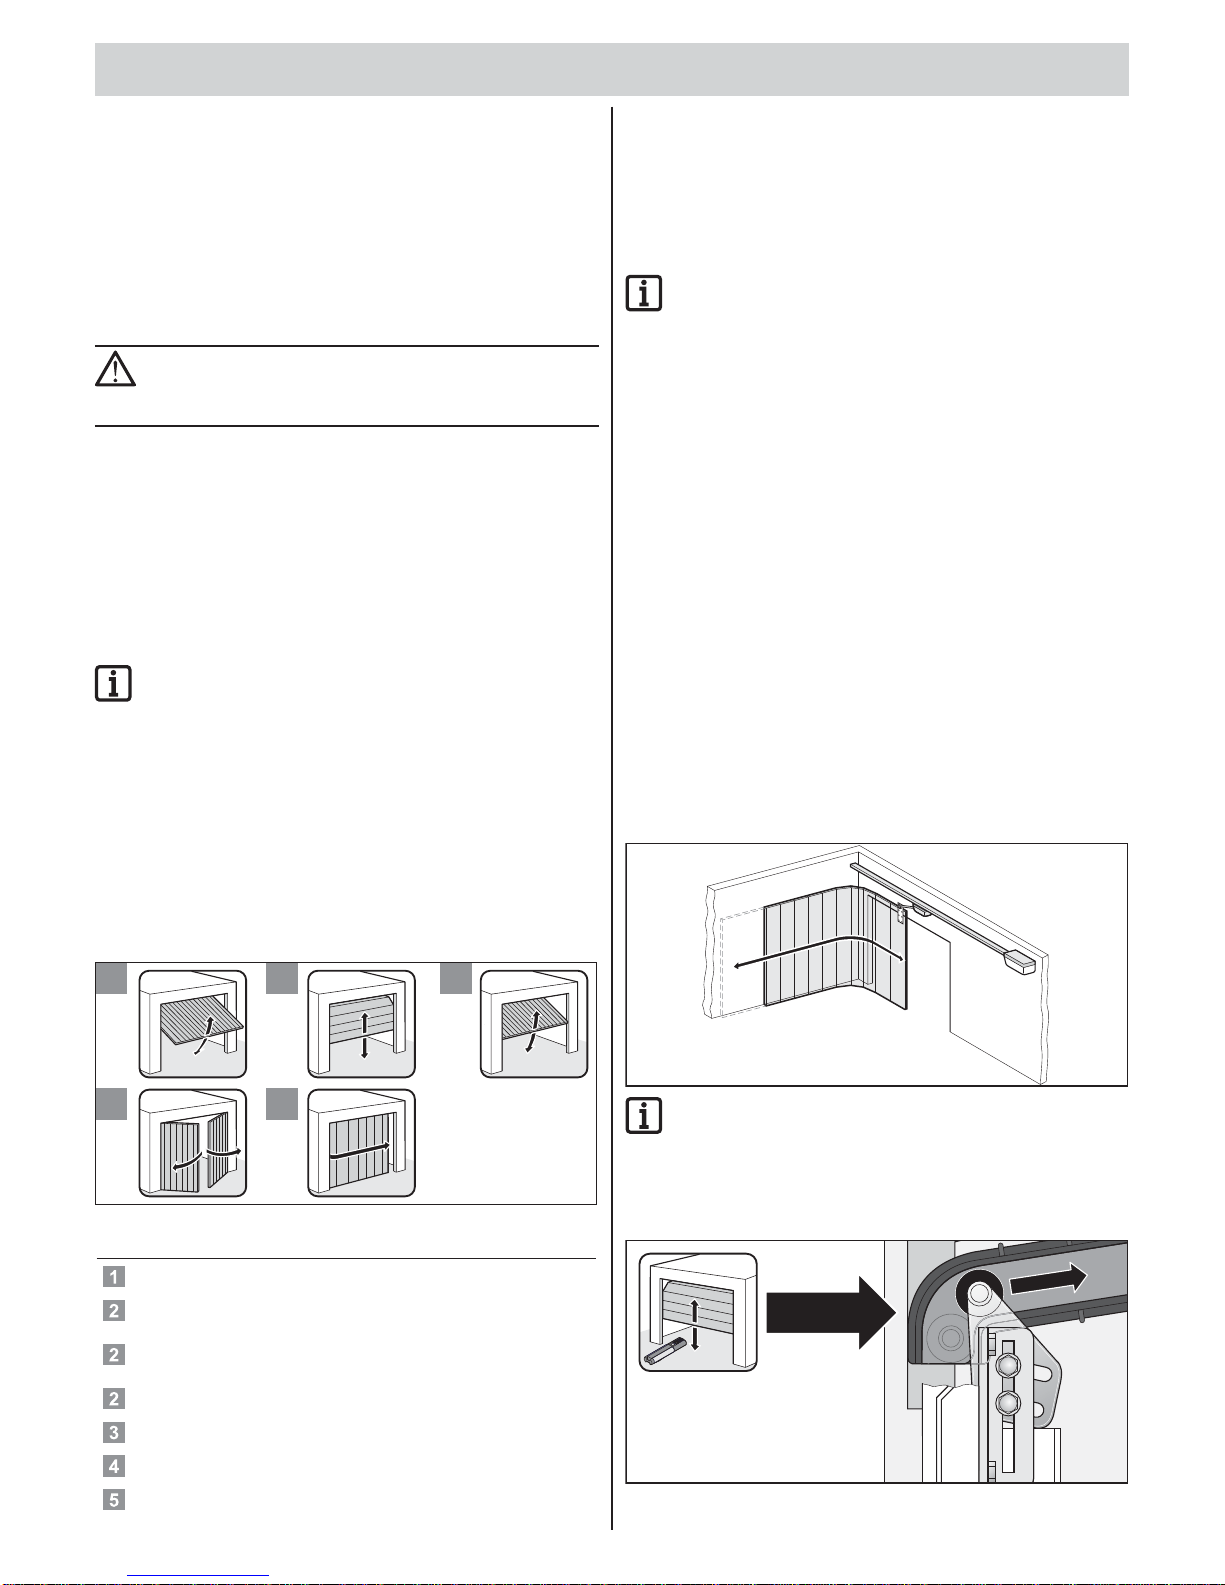
Door types and special accessories*
* Accessories are not included in the delivery
123
45
No. Door type Accessories
Up-and-over-door No special accessories required
Sectional door with single
runner rail
Sectional door fi tting with
boomerang*
Sectional door with double
runner rail
Sectional door fi tting without
boomerang
Sectional overhead door No special accessories required
Up-and-over, canopy door Tilting arm **
Side hinged door Side hinged door fi ttings *
Sectional horizontal sliding door,
side-opening sectional door
Please consult specialist retailer
Installation tips
Check that all the parts have been supplied before you start installation •
work in order to save time and unnecessary work if a part is missing.
Installation work can be carried out quickly and reliably by two persons.•
It is important to note that the door does not bend as a result and jam in •
the guide rails.
CHECK:
Open and close the door several times by hand holding it at
the point where you intend fi tting the drive mechanism. If the
door can be moved in this way without diffi culty (in compli-
ance with the above forces), then the drive mechanism can be
fi tted at this point.
Emergency release
If the garage has no separate entrance (e.g. wicket door), the user must be
able to operate the emergency release mechanism from the outside.
This is why the emergency release should be run to the outside where
it can be activated via a Bowden wire or a release lock. The backjump
(DIP switch 6 ON) must always be switched on in this case. See chapter
"Functions and connections - backjump (DIP 6)"
Up-and-over-door
As the mechanical lock of a door with a drive mechanism has to be dismantled or deactivated, it is possible to open the door manually up to approx.
50 mm depending on the door construction. To counter this, spring latches
can be fi tted and these lock the door in addition to the drive. These spring
latches are connected to the drive via a locking set in order to fi rst unlock
the spring latches before a drive opens the door when opening the door.
Side hinged door, sectional horizontal sliding door or
side-opening sectional door
In the case of drives that push open a door of the above-mentioned type
(see fi g. below), the connections made in the direct socket unit must be
swapped around as follows: See chapter "Functions and connections direct socket unit (push-button 1)"
Other pulse generators include: hand-held transmitters,
funkcodys, radio-operated interior switches and key-operated
switches. In the case of the hand-held transmitters, funkcodys and radio-operated interior switches, no cable need be run
to the drive. Contact your local dealer for advice.
Adjustment of the top roller in a sectional door
Installation
Page 8
Installation
– 8
Pre-installation
Open both packages and check the scope of delivery.
PLEASE NOTE!
Dispose of packaging material according to the applicable
statutory regulations.
CAUTION!
The plastic chain is not packaging - do not remove!
Ensure the chain is always fully clipped in to the chain case
and that all parts of the chain case are pushed together so
that they are fl ush.
Remove both C-rails (8), slide-on module (9) and control housing (1) from
the packaging (see chapter "General information - scope of delivery"),
lay out in the garage (control housing (1) is inside the garage) and have
tools to hand.
CAUTION!
Make sure all components are not placed directly on the hard
base. Use cardboard, sheets or such to provide a soft base.
1
a
b
1
4
2
3
3
4
2
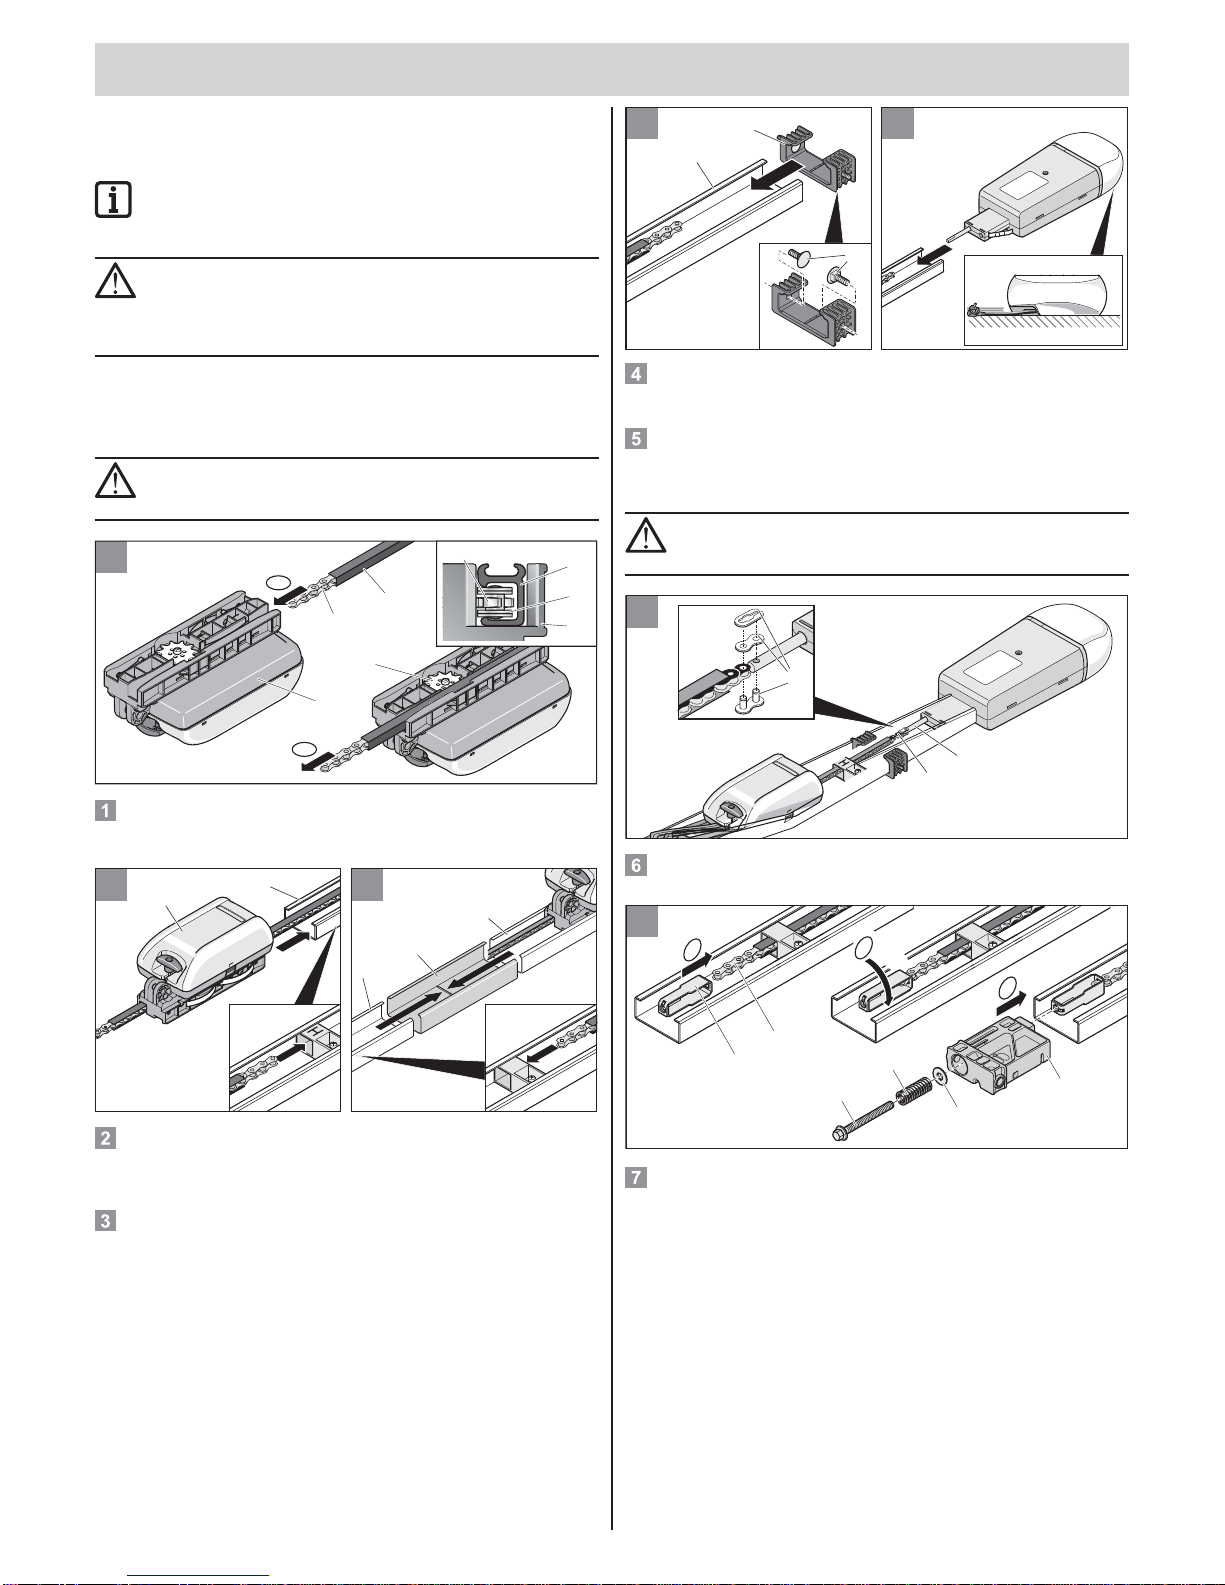
1
Slide the chain (2) into the trolley (1) from behind. In doing so, ensure
that the profi led side of the chain case (3) is facing upwards, so that the
chain (2) runs correctly over the toothed wheel (4).
V
2 3
1
2
2
1
1
Position the contact springs of the trolley. Push the trolley (1) with the
chain in the rails (2) with the red switch trigger marked "H". The tip of
the switch trigger must point towards the trolley (1). Push the chain
through the opening in the red switch trigger "H".
Slide the two rails (1) on the slide-on module (2) as far as they will go.
You now have a single continuous rail. When pushing together the rails,
ensure that the chain is caught by the red switch trigger "V". The tip of
the switch trigger must point towards the trolley (1).
4 5
1
2
3
Insert screws (3) into the ceiling bracket (2). Slide the ceiling bracket
with inserted screws onto the rear end of the rail. The switch trigger "H"
is located at the rear end of the rail.
Slide the control housing onto the rear end of the rail as far as it will go,
in doing so, positioning the contact springs of the trolley. Ensure that
the chain fi xing bolts of the control housing are on the same side as the
chain case in the rail.
CAUTION !
The cable guide must be on the bottom of the control
housing.
6
1
2
3
Use the chain connecting link (3) to connect the chain (1) with the chain
fi xing bolts of the control housing (2).
7
a
c
90°
b
1
2
3
4
5
6
V
V
a) Fit the tensioning element (1) into the chain (2)
b) Turn the tensioning element 90°.
c) Slide the plug-in unit (6) onto the rail and push the tensioning
element through it. Position the washer (5) and spring (4) on the
tensioning screw (3) and screw it into the tensioning element.
Page 9

Installation
– 9
8
10mm
V
9
17mm 17mm
1
2
4
3
V
Tighten the chain as far as the mark (arrow).
Use screw (1) and nut (3) to fi x the two camber brackets (2) to the
plug-in unit (4), but do not yet tighten fully.
10
1
2
3
4
Use nut (4) and toothed lock washer (3) to fi t the two steel brackets (1)
to the ceiling bracket (2).
Installation
CAUTION!
Use a non-slip, stable stepladder!
THP
THP
11
5-
65mm
min. 35mm
THPTHP
11
5-
65mm
min.
35mm
11
max. 30°
PLEASE NOTE
If the distance between the ceiling and the lower edge of the
C-rail is greater than 245 mm, then extend the suspension
bracket (with perforated steel strip).
PLEASE NOTE
Please note that this distance might be smaller, if the door
handle is located at the centre of the door. Ensure that the
door movement is not obstructed.
Determine the door´s highest up-position (THP):
Open the door and measure the smallest clearance (min. 35 mm)
between the top edge of the door and the ceiling. The distance between
THP and the lower edge of the C-rail must be between minimum 5 mm
and maximum 65 mm, whereby the push rod must be at an angle of
max. 30°!
Page 10

Installation
– 10
12
S
30
min.15
30
15
15
D
½
½
½
½
½
½
VMVMVM
13
PLEASE NOTE!
For installation on the ceiling (D), drill holes at distances of
15 mm, if possible. Smaller angle of inclination of the fi xing
brackets.
The drive mechanism can be mounted on lintel (S) or ceiling (D).
Measure front centre point (VM) of door and mark on door and on lintel
or ceiling.
15
½½½
½
HMHMHM
15
VM
74mm 74mm
10mm
65mm
14
THP
Make a mark 74 mm to right and left of centre of door (VM) at same
height on lintel or ceiling (see fi g. 12).
Drill two holes (Ø 10 x 65 mm deep).
PLEASE NOTE!
When safety goggles when drilling!
Check thickness of ceiling, particularly in the case of prefabricated garages!
Open door. Transfer door centre mark (HM) on to the ceiling.
Close door.
PLEASE NOTE
Protect control housing (6) from damage!
16
2
6
4
5
31
Insert plug (1). Life up drive mechanism (2) at the front. Secure lintel
fi tting (3) at front with two screws (4) and plain washers (5).
1
HM
3
2
5
4
B
600
0
1
17 18
CAUTION!
Always mount the drive in parallel to the runner rails of
the door.
HM
Lift up drive.
Align ceiling bracket (1). It should be located within a range of
B = 0 ... 600 mm.
Align drive mechanism horizontally to rear centre of door (HM).
Mark position of holes. Drill two holes (Ø 10 x 65 mm deep).
PLEASE NOTE!
Wear safety goggles when drilling! Check the thickness of the
ceiling, especially in the case of prefabricated garages!
Insert plug (1). Fit two screws (2) with plain washers (3).
Tighten screws (2).
Align C-rail (4) at the correct height (use a spirit level if necessary).
If necessary, move screws (5). Tighten screws (5).
Page 11

Installation
– 11
19
2
3
5
4
3
N
1
2
4
8
7
3
6
5
1
20
N
PLEASE NOTE
Use screws that are appropriate to the door material.
Wear safety goggles when drilling!
Mount connecting arm (1):
Insert the long bolt (2) and slide on the securing clip (3).
Attach the door fi tting bracket (4) to the connecting arm (1) using the
short bolt (5) and slide on the securing clip (3).
Pull once on the emergency release wire (N). The trolley (1) is
disengaged. Tighten screw (8) on the lintel fi tting.
Push the trolley (1) with the connecting arm (2) as far forward as
possible (3). If necessary, release the switch trigger (4).
Align the door fi tting bracket (5) to the door centre mark (VM) and mark
5 drill holes. Drill 5 holes (Ø 5 mm).
Insert 5 hexagon-head screws (6) and tighten securely.
Release the switch trigger (4) and push right up to the trolley (7).
Tighten the switch trigger (4) screw securely.
4
N
1
2
6
4
3
21
5
PLEASE NOTE
Trim (e.g. saw off and debur) the projecting part of the ceiling
bracket (4).
Release the rear switch trigger (1) and push all the way to the back until
the stop (2). Open the door (3) manually.
Push the switch trigger (1) right up to the trolley (5). Securely tighten
the screw on the switch trigger (1).
Fitting and connecting pushbuttons
CAUTION!
Position the push-button in such a way that the operator can
see the door, while he/she is not inside the operating area of
the door.
PLEASE NOTE
Never run the push-button cable (length 7 m) along a power
cable as this can cause the control unit to malfunction. The
control unit is shipped with the push-button cable connected.
Lay push-button cable and secure in position.
1,6m
2
1
22
Install push-button (1) in an appropriate, easily accessible location
inside the garage. Minimum height from fl oor: 1.6 m
Install the push-button cable (2) in the garage. Connect end of cable to
the push-button (1).
Installing the socket outlet
CAUTION!
Socket may only be installed by a qualifi ed electrician. Protect
socket with a fuse (16 A slow-blow type). Observe all applicable regulations (e.g. VDE, etc.)!
23
ca.
0,5m
11
3
2
Install socket (1) on ceiling at a distance of approx. 0.5 metres to the
control housing (2).
Install and connect the line from the power socket (1) to the power mains.
CAUTION!
Do not plug the power supply (3) into the socket outlet yet!
approx. 0.5m
Page 12

– 12
Safety instructions
RISK OF INJURY!
The force setting is relevant to the system's safety and must
therefore be carried out with due care and attention. An excessively high force setting can injure people and/or animals
and damage property.
Select as low a force setting as possible to ensure that obstacles are identifi ed in a fast, safe manner.
RISK OF SUDDEN CLOSING OR OPENING!
When the emergency release is actuated, the door might
suddenly be opened or closed, due to a damaged spring or
incorrect balance weight. This might damage or even destroy
the drive unit.
PLEASE NOTE!
Once the drive has been installed, the person responsible for
installation has to issue an EU Conformity Declaration for the
door system in accordance with Machine Directive 98/37/EC
as well as fi tting the CE seal and the rating plate.
This also applies to doors installed for private purposes and
in cases where the drive has been retrofi tted to a manual
door. These instructions as well as the drive's installation and
operating instructions should be kept by the user for reference purposes.
Setting door OPEN + CLOSED end
positions
PLEASE NOTE!
While adjusting the settings, open and close the gate manually.
Do not operate it with the engaged drive system.
The distance over which the drive mechanism moves the door can be
increased/reduced by using the switch trigger (V + H).
Check that the door opens and closes completely. If it does not, its travel or
the end positions must be adjusted.
H
N
1
1
N
V
Door CLOSED end position
Release the trolley. Pull once on the emergency release wire (N). 1.
It must be possible to slide the trolley back and forth by hand.
Manually close the door.2.
Release the switch trigger (V) and slide it towards the trolley until it clicks.3.
The end switch switches on
Secure the switch trigger (V).4.
Door OPEN end position
Manually open the door.1.
Release the switch trigger (H) and slide it towards the trolley until it clicks.2.
The end switch switches on
Secure the switch trigger (H).3.
Manually close the door.4.
Lock the trolley (1) :
Pull once on the emergency release wire (N).1.
Move the trolley by hand slightly forwards until the 2.
chain wheel engages with a loud clicking sound.
Teaching in drive
The control has an automatic force setting. Whenever the door “OPENS”
or “CLOSES”, the control unit automatically reads in the force required and
memorises it when the end position is reached.
CAUTION!
Before connecting the power supply, ensure that the voltage
of the power source corresponds to that indicated on the
drive´s rated plate.
Plug in the power supply.1.
Lamp (2) fl ashes
1
2
PLEASE NOTE
The fi rst movement of the drive after the power is connected
must be “door OPEN”. If this is not the case, exchange the
wires to terminals 3 + 4.
Press the push-button (1).2.
The door opens to end position "door OPEN".
Press the push-button (1).3.
The door closes until end position "door CLOSED".
Resetting the control unit. The control reset is carried out in accordance 4.
with the procedure for the given drive type: See chapter "Operation/
handling - control reset".
Carry out the following procedure twice:
Press the push-button (1) once.1.
Door opens as far as the switch trigger (H, door OPEN)
Lamp (2) fl ashes
Press the push-button (1) once.2.
Door closes as far as the switch trigger (V, door CLOSED)
Lamp (2) fl ashes
When all force values are read and saved, the lamp (2) ceases 3.
fl ashing.
The drive has been "taught" successfully!
Checking the end positions door OPEN + CLOSED
The trolley of the drive system can be extended or shortened by means of
the switch triggers.
Check that the door opens and closes completely. If it does not, readjust
the trolley.
Commissioning
Page 13

Commissioning
– 13
1
2
Actuate the control device (e.g.: push-button, hand-held transmitter, etc.) 1.
once.
The door opens to end position "door OPEN".
Check that the door has reached the desired end position.2.
Readjust the end positions if necessary. See chapter "Commissioning
- setting door OPEN + CLOSED end positions".
Checking emergency release
PLEASE NOTE!
With sectional doors, or doors with ceiling guides, you have
the option of activating the backjump with DIP switch 6 in
order to offl oad the operator and door mechanisms. Easier
operation of the emergency release.
N
V
1
Close the door with the drive.1.
Pull the emergency release (N) once.2.
If the emergency release cannot be operated, loosen the end switch (V)
and move it in direction (1).
Open the door with the drive and close it again. Test the emergency 3.
release.
Checking force setting
Whenever the door is opened or closed, the control unit compares the
memorised force setting with the force actually needed and automatically
adjusts the memorised setting accordingly when the given end position is
reached.
Check: See chapter "Maintenance and care - regular checks".
Programming of hand-held
transmitter
PLEASE NOTE!
Prior to the initial programming of the hand-held transmitters,
clear the memory of the radio receiver.
5
2
3.1
3.2
1
7
8
6
5
3.1
3.2
1
Clearing radio receiver memory
Press and hold the programming key (1).1.
After 5 seconds, the LED (3.1 or 3.2) fl ashes.
After another 10 seconds, the LED is constantly on (3.1 or 3.2).
After a total of 25 seconds, all LEDs are on (3.1 + 3.2).
Release the programming key (1). All channel data has been deleted.2.
Programming of hand-held transmitter
Press the programming key (1).1.
1 x for channel 1, LED (3.1) is on ▫
2 x for channel 2, LED (3.2) is on ▫
If no other code signal is transmitted within 10 seconds, the radio
receiver switches to standard operation.
Press and hold desired hand-held transmitter key (5) until the LED 2.
(3.1 / 3.2) is off (depending on the selected channel).
The LED is off - the programming process is completed.
The hand-held transmitter has transmitted the radio codes to the
radio receiver.
Continue with programming the other hand-held transmitters. To do 3.
this, repeat the above steps. The maximum number of memory blocks
is 112 per radio receiver.
Aborting programming:
repeatedly press the programming key (1) until all LEDs are off.
Attaching instruction label
N
4
6502V
000-1720
06-0-O
C
E_R
ev.A
1x1x1
x
1x1x1
x
465
02V00
0-172006
-0
-O
CE_R
ev
.A
A
B
N
Attach the instruction label for the operation of the emergency release to
the emergency release rope.
Page 14

Commissioning
– 14
Attaching warning sign
1.
1.
2.
2.
Attach the warning signs (text + triangle sign) at a position where they are
clearly visible, e.g. beside the push-button (warning triangle) and on the
door leaf (text + warning triangle).
Page 15

– 15
Safety instructions
Keep children, disabled persons and animals away from the door.
Keep your hands clear of any moving door or any moving parts.
Only drive into and out of the garage when the door is fully opened.
Risk of persons trapping or cutting themselves in/on the door system's
moving parts or edges where it closes.
Opening door
1
Press push-button (1) or hand-held transmitter key once to open the door.1.
With door "OPEN", press the push-button (1) again.2.
The door stops moving (dependent on the DIP switch 7).
Press the push-button (1) again.3.
The door closes (dependent on the DIP switch 7).
Closing door
Press push-button (1) or hand-held transmitter key once to close the door.1.
With door "CLOSE", press the switch (1) again.2.
The door stops moving (dependent on the DIP switch 7).
Press the push-button (1) again.3.
The door opens (dependent on the DIP switch 7).
Pulse sequence of door movement
Adjust the pulse sequence with DIP switch 7.
1x
1x
1x
1x
STOP STOP
2
1
O
N
D
IP
3
4
5
6
8
7
T
1
DIP 7 OFF, default settings for all drives
(see illustration):
open - stop - close - stop - open - ...•
DIP 7 ON:
Push-button 1: open - stop - close - stop - ...•
Push-button 2: close - stop - close - stop - ...•
Emergency release
CAUTION!
The emergency release may only be used in the event of an
emergency, (power failure, failure of drive, etc.) to open or
close the door. Do not use it to open and close the door in
other situations. This could damage the door or the drive
mechanism.
RISK OF SUDDEN CLOSING OR OPENING!
When the emergency release is actuated, the door might
suddenly be opened or closed, due to a damaged spring or
incorrect balance weight. This might damage or even destroy
the drive unit.
PLEASE NOTE
Engaging or disengaging the drive can occur in any door
position.
N
Pull once on the emergency release wire (N).1.
the drive mechanism disengages and the door can be opened
manually.
Pull once again on the emergency release wire (N).2.
the drive mechanism locks and the door can only be moved with
the drive.
PLEASE NOTE!
Door is fi tted with a wicket door but no safety mechanism
for the wicket door - retro-fi t wicket-door safety mechanism
(see 'Accessories' instructions).
Door has no wicket door and garage no second entrance install release lock or Bowden wire providing outside release
access (see 'Accessories' instructions).
Control reset
T1
1324
24V/1.0A
supply
safety
+
2
1
Press switch (1) until the light bulb (2) goes out.1.
Light bulb (2) out - force setting deleted
Release the switch (1).2.
Light bulb (2) fl ashes - control reset successful
Operation / handling
Page 16

Operation / handling
– 16
The light bulbs may differ depending on the DIP switch:
DIP switch 4 ON,•
light bulb (2) is on after the control reset
DIP switch 4 OFF,•
light bulb (2) fl ashes after the control reset.
PLEASE NOTE!
After a control reset, the drive must be programmed again.
Interim stop
If an interim stop occurs due to the operation of a push-button or the handheld transmitter, the drive unit stops immediately. The next command given
sends the drive in the opposite direction. See 'Operation/handling - pulse
sequence of door movement' section.
Safety stop 1
(force cut-off)
When the automatic force cut-off is activated, the drive stops or reverses.
The next command given sends the drive in the opposite direction.
See 'Operation/handling - pulse sequence of door movement' section.
Safety stop when door closes - door reverses•
Safety stop when door opens - door stops•
Safety stop 2
(safety input)
When the safety input is tripped (e.g. someone crosses light barrier), the
drive stops, reverses or opens, depending on the given DIP switch setting:
See chapter "Functions and connections - obstacle recognition" for a
description of the setting options and DIP switches.
Default settings DIP switch 1 and 3 OFF:
safety input tripped when door closes: door reverses•
safety input tripped when door opens: no response (door opens)•
Overload protection
If the drive mechanism is subjected to excessive strain when opening or
closing the door, this is recognised by the control unit which then stops the
drive mechanism. After approx. 20 seconds or a control reset, the control
deactivates the overload protection.
The drive mechanism can now recommence normal operation.
Operation following a power failure
The force values remain saved even during a power failure. The fi rst move-
ment of the drive after the power is connected must be “door OPEN”.
Radio remote control receiver
HOMELINK COMPATIBLE!
If your vehicle is equipped with a Homelink system (version 7),
you can reach our drive/radio receiver at 868.6 MHz. With
holder Homelink systems, you must use a different frequency
(40.685 or 434.42 MHz). For more information, please visit:
"http://www.eurohomelink.com"
Safety instructions
To ensure safe operation, local safety regulations relevant to the equip-
ment concerned must be observed! Information regarding this can
be obtained from electricity suppliers, the VDE and employers' liability
insurance associations.
The operator of this radio-controlled equipment is in no way protected
from interference from other telecommunications systems and facilities
(e.g. other radio-controlled equipment that is licensed to operate at the
same frequency range).
Try replacing the batteries should reception problems be encountered.
Description of display and push-buttons
5
2
6
3.1
3.2
1
7
7
8
6
5
2
6
4
3.1
3.2
1
1
Setting button - puts the radio receiver in a given operating mode:
self-learn•
delete•
normal•
2
Internal aerial
3
LEDs - display which channel has been selected.
3.1 LED channel 1•
3.2 LED channel 2•
4
Connection for external aerial
If the radio range of the internal aerial is not suffi cient, you have
the option to connect an external aerial.
5
Hand-held transmitter key
6
External aerial
7
Storage module for radio codes (448) can be plugged in.
Page 17

Operation / handling
– 17
Programming of hand-held transmitter
Press the programming key (1)1.
1 x for channel 1, LED (3.1) is on ▫
2 x for channel 2, LED (3.2) is on ▫
If no other code signal is transmitted within 10 seconds, the radio
receiver switches to standard operation.
Press and hold desired hand-held transmitter key (5) until the LED 2.
(3.1 / 3.2) is off (depending on the selected channel).
The LED is off - the programming process is completed.
The hand-held transmitter has transmitted the radio codes to the
radio receiver.
Continue with programming the other hand-held transmitters. To do 3.
this, repeat the above steps. The maximum number of memory blocks
is 112 per radio receiver.
Aborting programming:
repeatedly press the programming key (1) until all LEDs are off.
Deleting the hand-held transmitter key
from the radio receiver
If a user of a multi-user garage facility moves house and wants to take
his manual remote control with him, then all the codes of the given user's
manual remote control have to be deleted from the radio receiver.
For security reasons, each key and each key combination of the hand-held
transmitter should be deleted!
Press and hold the programming key (1) for 5 seconds.1.
An LED fl ashes (doesn´t matter which).
Release the programming key (1).2.
Radio receiver is in delete mode.
Press a key on the hand-held transmitter, the code of which is required 3.
to be deleted.
LED goes out. Deletion process complete.
Repeat procedure for all the keys and key combinations.4.
Deleting a channel from the radio
receiver
Press and hold the programming key (1).1.
1 x for channel 1, LED (3.1) is on ▫
2 x for channel 2, LED (3.2) is on ▫
After 5 seconds, the LED (3.1 or 3.2) fl ashes.
After another 10 seconds, the LED is constantly on (3.1 or 3.2).
Release the programming key (1).2.
Deletion process complete.
Clearing radio receiver memory
If a hand-held transmitter is lost, then for security reasons all channels on
the receiver have to be deleted! After this has been done, all the hand-held
transmitter controls must be re-set into the receiver.
Press and hold the programming key (1).1.
After 5 seconds, the LED (3.1 or 3.2) fl ashes.
After another 10 seconds, the LED is constantly on (3.1 or 3.2).
After a total of 25 seconds, all LEDs are on (3.1 + 3.2).
Release the programming key (1). All channel data has been deleted.2.
Connecting an external aerial
An external aerial can be fi tted if the possible range with the radio receiver's
internal aerial is insuffi cient.
Connect the external aerial (6) to the terminal (4), see chapter "Operation/
handling - description of display and push-buttons".
The aerial cable must not exert any mechanical load on the radio receiver.
Fit strain relief.
What is push-button 2 used for?
Defi ned opening and closing (2-channel operation). This enables the door
to be opened using one push-button, and closed using another.
Should this function be used, a 2nd push-button can be connected. For settings see chapter "Functions and connections - connecting push-button 2"
as well as chapter "Functions and connections - defi ned opening and clos-
ing (DIP 7)" and "partial opening (DIP 8)"
Page 18

– 18
General information
If the DIP switch is set to OFF; all auxiliary functions are switched off.
Cable length max. 10 m with terminal: 9 + 10, 11 + 12
Cable length max. 30 m with terminal: 5 + 6, 7 + 8
Obstacle recognition (DIP 1, 2 + 3)
Drive behaviour upon opening the door
If the door meets an obstacle (force cut-off) or if the safety input is interrupted (person triggering the light barrier), this is detected by the drive
system, depending on the position of the DIP switch 1.
DIP switch 1
OFF No response in the event of a safety input interruption. In the
event of a force cut-off, the door is halted.
ON Drive stops door
Drive behaviour upon closing the door
If the door meets an obstacle (force cut-off) or if the safety input is interrupted (person triggering the light barrier), this is detected by the drive
system, depending on the position of the DIP switches 2 + 3.
DIP switch 2: Safety connection function
OFF Opener contact for light barrier
ON Push-button contact for push-button 2
(partial opening, defi ned opening and closing)
DIP switch 3: Behaviour of drive with door closing
OFF Drive stops and opens the door a little, reversal
ON Drive stops and opens the door completely
Connecting light barrier
Permissible cable cross-section: max. 0.75 mm².
8
9
10 11
12
7
2
1
ON
DIP
3
4
5
6
8
7
+
NO
COM
NO
TX RX
COM
Terminal 7 + 8 Safety connection, only if DIP switch 2 OFF
Terminal 9 + 10 controlled DC 24 V, max. 0.1 A
Terminal 9: DC 24 V•
Terminal 10: Earth•
Settings: See chapter "Functions and connections - obstacle recognition
(DIP 1, 2 + 3)".
Connecting push-button 2 (DIP 2)
Permissible cable cross-section: max. 0.75 mm².
CAUTION
Use the contact only for potential-free normally closed
contacts. External voltage may damage or even destroy the
control unit.
Connect push-button 2 if the functions described below are required:
defi ned opening and closing•
partial opening•
CAUTION!
When using push-button 2 there is no further safety connec-
tion available.
8
9
10 11
12
7
2
1
ON
DIP
3
4
5
6
8
7
Terminal 7 + 8
Connection for push-button 2, only if DIP switch 2 ON
Connecting warning lamp (DIP 4)
Permissible cable cross-section: max. 0.75 mm².
8
910
11
12
7
2
1
ON
DIP
3
4
5
6
8
7
Terminal 11 + 12 uncontrolled DC 24 V (max. 34 Volt), max 1 A
DIP switch 4
OFF connected warning lamp fl ashes (control unit generates fl ashing)
ON door status indicator
is lit when door is not closed•
is out when door is closed•
Functions and connections
Page 19

Functions and connections
– 19
Direct socket unit (push-button 1)
PLEASE NOTE
Swap connections (terminal 3 + 4) around if drive is to be
used with a side hinged door.
Permissible cable cross-section: max. 1.5 mm².
2
3
45
6
1
Terminal 1 + 2 Transformer
Terminal 3 C-rail
Terminal 4 Chain
Terminal 5 + 6 Push-button contact (push-button 1)
CAUTION
Use the contact (terminal 5 + 6) only for potential-free nor-
mally closed contacts. External voltage may damage or even
destroy the control unit.
Early warning time (DIP 5)
The warning lamp starts to fl ash after push-button is pressed or the hand-
held transmitter is operated, before the drive starts. If the push-button is
pressed again or the hand-held transmitter operated during the 3 seconds,
the early warning period is ended prematurely.
The early warning time functions in conjunction with both internal lighting
and with a connected warning lamp.
DIP switch 5
OFF deactivated
ON activated, internal lighting and warning lamp with fl ash for
3 seconds
Backjump (DIP 6)
PLEASE NOTE!
With sectional doors, or doors with ceiling guides, you have
the option of enabling the backjump with DIP switch 6 in order
to offl oad the operator and door mechanisms. Easier opera-
tion of the emergency release.
This feature serves the purpose of supporting door and drive mechanism.
The drive mechanism moves briefl y back in a door OPEN direction once it
has reached the door CLOSED end position.
DIP switch 6
OFF deactivated
ON activated
Defi ned opening and closing
(DIP 7)
PLEASE NOTE!
With this function, push-button 1 / radio channel 1only opens
the door and push-button 2 / radio channel 2 closes the door.
1
2
Push-button 1 / radio channel 1 open and push-button 2 / radio channel 2
close the door. This function can also be used with just 2 push-buttons or
with just a hand-held transmitter.
Requirement:
DIP switch 8 OFF•
2 push-buttons connected (DIP switch 2 ON) or 2 hand-held transmitter •
buttons programmed.
2
1
ON
3
4
5
6
87
DIP switch 7
OFF deactivated
ON activated
Partial opening (DIP 8)
This function opens the door partially, depending on the given setting.
Ideas for use: garage ventilation, opening of side-opening door for personal
access, to name but a few. Partial opening can also occur using just two
push-buttons or just the manual remote control.
2
1
ON
3
4
5
6
8
7
DIP switch 8
OFF deactivated
ON activated, DIP switch 7 not functioning
Partial opening with 2 push-buttons
Fit additional push-button and connect as push-button 2 to terminals 1 + 2.
Push-button 1• always opens door fully.
If the door has been partially opened by pressing push-button 2, it can
be fully opened by pressing push-button 1.
Push-button 2• only carries out partial opening when the door is closed.
Should the door have been fully opened using push-button 1 or partially
opened with push-button 2, it can be closed by again pressing pushbutton 2.
Page 20

Functions and connections
– 20
Procedure:
Closing door.1.
DIP switch 8 ON: activates partial opening.2.
Always leave DIP switch 8 in ON position; the OFF position auto-
matically deletes the partial opening function that has been set.
Press push-button 2 (opens door from CLOSED end position).3.
door opens until such time as push-button 2 is pressed again or
OPEN end position has been reached.
Press push-button 2 when the desired position has been reached.4.
Close door by pressing push-button 2.5.
Partial opening has been memorised and door is opened to
set position by pressing push-button 2. Set DIP switch 8 to
OFF position to delete partial opening setting.
Partial opening via hand-held transmitter
(2-channel operation)
Teaching in 2 hand-held transmitters. E.g. push-button 1 on to radio channel 1 and push-button 2 on to channel 2
Radio channel 1 always has the same function as push-button 1•
Radio channel 2 always has the same function as push-button 2•
Connecting an external aerial
Supplied vacant as standard
2
1
O
N
DIP
3
4
5
6
8
7
TorMinal interface
See TorMinal operating instructions
2
1
ON
3
4
5
6
7
Trolley board
5
2
1
4
6
7
8
3
Terminal 1 Power supply to chain
Terminal 2 Power supply to rail
Terminal 3 + 4 End switch Door OPEN
Terminal 5 Motor cable
Terminal 6 Motor cable
Terminal 7 + 8 End switch Door CLOSED
Page 21

– 21
Important information
DANGER!
Never use a hose or a high-pressure cleaner to spray down
the drive or the control housing.
Always disconnect the drive mechanism from the power supply before
carrying out any work.
Never use lyes or acids for cleaning purposes.
Wipe drive clean with a dry cloth as required.
Keep your hands clear of any moving door or any moving parts.
Risk of persons trapping or cutting themselves in/on the door system's
moving parts or edges where it closes.
All fi xing screws on the drive should be properly checked and tightened
if necessary.
Check the door at least annually, in accordance with the manufacturer’s
instructions.
Cleaning chain and drive unit rail
7
8
The chain (7) or the drive rail (8) is dirty - clean it with a cloth.1.
If required, lubricate the chain (7) and the drive rail (8) with conductive 2.
oil. Do not use grease!
PLEASE NOTE!
Recommended oil types: Ballistol, WD40 contact spray
Changing bulbs
Disconnect plug from the socket.1.
A/B/C
2
3
Remove light diffuser (2).2.
Turn bulb (3) anticlockwise and remove.3.
Fit new bulb (32.5 Volt, 34 Watt, BA 15s or 24 Volt, 21 Watt, BA 15s) 4.
and turn clockwise until it locks into position.
Changing fuses
(connecting warning lamp)
Disconnect plug from the socket.1.
1
2
3
8
9
10 11
12
7
5
Remove light diffuser (2).2.
Remove screws (1).3.
Pull out the control (3).4.
Replace defective fuse, all fuses are 1 A fast acting.5.
Fuse (5) for connecting warning lamp, terminal 11 + 12
Maintenance and care
Page 22

Maintenance and care
– 22
Regular checks
Check safety devices regularly, every year at the very least, to ensure they function correctly. Refer to EN 12453:2000.
Safety devices that are sensitive to pressure (e.g. safety switch unit) should be checked every four weeks to ensure they function correctly,
see EN 60335-2-95:11-2005.
Check Behaviour yes/no Possible cause Remedial action
Force cut-off
Use 50 mm object to stop
door wing from closing.
Drive reverses when contact
with object is made
yes Automatic cut-off of •
supply is working as it
should
Leave all settings as they are.•
no Door incorrectly adjusted• Have door correctly adjusted by a person •
qualifi ed to do so!
Emergency release
Adopt procedure described in
chapter "Operation/handling emergency release".
Emergency release can be
activated easily (pull 1x,
operator is unlocked)
yes Everything in order!•
no Drive stops door.•
Door and drive compo-•
nents are strained.
Emergency release is •
defective. Door jam
Adjust door CLOSED end switch or activate •
backjump (DIP switch 6 ON).
Repair emergency release•
Check door. Refer to maintenance instruc-•
tions for the door.
Safety switch unit, if
provided
Open/close door whilst, at
same time, operating safety
switch unit
Door behaves in accordance
with setting of DIP switch
1,2 or 3.
yes Everything in order !•
no Broken cable, •
loose terminal
DIP switch maladjusted•
Switch unit defective•
Check wiring, tighten terminal connection.•
Correctly adjust DIP switch•
Take door drive mechanism out of operation •
and ensure it cannot restart by accident.
Contact after-sales service!
Light barrier, if provided
Open/close door whilst,
at same time, interrupting
the light barrier.
Door behaves in accordance
with setting of DIP switch
1,2 or 3.
yes Everything in order!•
no Broken cable, •
loose terminal
DIP switch maladjusted•
Light barrier soiled•
Light barrier maladjusted •
(bent bracket)
Light barrier defective•
Check wiring, tighten terminal connection.•
Correctly adjust DIP switch•
Clean light barrier•
Correctly adjust light barrier•
Take door drive mechanism out of operation •
and ensure it cannot restart by accident.
Contact after-sales service!
Page 23

– 23
Disassembly
IMPORTANT!
Observe safety instructions!
The sequence of operations is identical to that described in the Section entitled "Installation" but in reverse order. The setting procedures described
are not applicable.
Disposal
Observe appropriate local regulations!
Warranty and after-sales service
The warranty granted complies with statutory requirements. Contact your
local stockist for any warranty claims.
Warranty entitlements only apply to the country in which the given drive
was purchased.
Batteries, fuses and bulbs are not covered by the warranty.
If you require after-sales service, spare parts or accessories, please contact your specialist retailer.
We have made every effort to ensure that these instructions are as clear
and concise as possible. However, if you have any queries or wish to comment on this document, please contact us with your suggestions:
Fax.: 0049 / 7021 / 8001-403
email: doku@sommer.eu
Miscellaneous
Page 24

– 24
Further troubleshooting tips
HOMELINK COMPATIBLE!
If your vehicle is equipped with a Homelink system (version 7), you can reach our drive/radio receiver at 868.6 MHz. With holder
Homelink systems, you must use a different frequency (40.685 or 434.42 MHz). For more details, visit www.eurohomelink.com or contact your local stockist.
IMPORTANT!
Many problems can be solved by a control reset (deletion of force values) and subsequent reprogramming of the operator!
Should you be unable to fi nd and eliminate the fault with the help of this table, then take the following steps:
Perform a control reset (delete force setting) on the control.•
Disconnect any accessories that may have been connected (e.g. light barrier).•
Set all DIP switches to default settings.•
If settings have been changed using the TorMinal, carry out a control unit reset using the TorMinal.•
Check all connections at the direct plug-type adapters and the terminal bar, and retighten them, if necessary.•
To eliminate drive faults, follow the instructions in the table below If you are encountering any diffi culties, contact your stockist or visit the
“http://www.sommer.eu” for support.
Fault Possible cause Remedial action
Lamp fl ashes Drive is not programmed, no force
values saved.
Teaching the drive. See chapter "Commissioning - teaching the
drive".
Drive mechanism inoperative, lamp not lit No mains power Connect mains supply plug.
No control unit installed Install control unit.
Fuse in garage circuit has blown Replace the fuse. Use a different appliance, e.g. electric drill,
to check the supply.
Lamp is not lit when door closes
and opens
Bulb defective
Replace bulb. See chapter "Maintenance and care - changing bulbs".
Drive does not function Control unit installed incorrectly Slot control unit correctly into socket unit.
Light barrier interrupted Eliminate interruption.
Safety switch unit (8.2 kOhm) defective
or DIP switch 2 ON
Replace safety switch unit; set DIP switch 2 to OFF.
Fraba system activated but light barrier
or safety switch unit (8.2 kOhm) connected
Deactivate Fraba system, DIP switch 2 OFF.
Drive does not function when operated
using hand-held transmitter
Battery in hand-held transmitter is fl at Change battery.
Hand-held transmitter has not been
taught in to radio receiver.
Programming of hand-held transmitter.
Wrong radio frequency Check frequency (868/434 MHz without external aerial).
Command is permanently present as
push-button is jammed.
Release push-button or replace hand-held transmitter.
Drive does not function when operated
using push-button
Push-button not connected or defective Connect push-button or replace.
Door stops when closing, moves approx.
10 cm in reverse direction then stops
Obstacle has tripped automatic force
switch-off
Remove obstacle; open door completely.
Incorrect force values "taught" or force
tolerance is too low
Delete force values and repeat teach-in procedure.
Switch-trigger set incorrectly Reset switch-trigger; see chapter "Commissioning - setting door
OPEN + CLOSED end positions".
Door defective or door settings incorrect
(e.g. spring shaft)
Have door adjusted correctly or repaired by a person qualifi ed to
do so.
Door stops when opening, moves
approx. 10 cm in reverse direction
then stops
Obstacle has tripped automatic force
switch-off
Remove obstacle. Use push-button to close the door completely.
Incorrect force values "taught" or force
tolerance is too low
Delete force values and repeat teach-in procedure.
Switch-trigger set incorrectly Reset switch-trigger; see chapter "Commissioning - setting door
OPEN + CLOSED end positions".
Troubleshooting
Page 25

Troubleshooting
– 25
Fault Possible cause Remedial action
Door stops when opening Connected light barrier interrupted and
DIP switch 1 on ON
Eliminate interruption or set DIP switch 2 to OFF.
Drive does not close door Power supply to light barrier inter-
rupted.
Check connection•
Replace fuse•
Power supply to drive interrupted The fi rst command issued after restoration of the mains supply
results in the drive opening the gate fully.
Drive opens door but then no further
reaction to a command given via pushbutton or hand-held transmitter
Safety input tripped
(e.g. light barrier defective)
Remove obstacle from light barrier•
Repair light barrier•
Direct socket unit not plugged in correctly•
End switch "Door CLOSED" in the trolley defective
Replace end switch.
The drive closes the door; subsequently
no response to pressing of button or
hand-held transmitter
End switch "Door OPEN" in the trolley
defective
Replace end switch.
Connected warning lamp does not
light up
Fuse defective Replace fuse, see chapter "Maintenance and care - changing fuses
(connecting warning lamp)".
Bulb defective
Replace bulb, see chapter "Maintenance and care - changing bulbs".
Opening or closing speed varies Drive starts slowly and then picks up
speed
'Soft run' mode - completely normal.
Chain rail dirty Clean rail and re-lubricate, see chapter "Maintenance and care -
cleaning chain and drive unit rail"
Chain rail lubricated with unsuitable oil Clean rail and re-lubricate, see chapter "Maintenance and care -
cleaning chain and drive unit rail".
Incorrect chain tension Tighten chain; see chapter "Installation - pre-installation".
Drive does not terminate 'Learn'
sequence
End positions set incorrectly Adjust end positions, see chapter "Commissioning - setting door
OPEN + CLOSED end positions".
Only radio receiver!
All LEDs fl ashing
All memory positions are occupied
(max. 112)
Delete all hand-held transmitters no longer in use•
Install additional radio receiver.•
LED 3.1 or 3.2 is continuously on Radio signal is being received;
hand-held transmitter button might be
defective.
Remove battery from the hand-held transmitter•
Wait until the external signal decays.•
LED 3.1 or 3.2 is on Radio receiver is in 'teaching' mode
and expects a code signal from a handheld transmitter.
Press desired button on hand-held transmitter.
 Loading...