


H
OM
E
G
Y
M
SA-006SM
U
ser
In
str
u
ctions

SAFETY INSTRUCTIONS
WARNING :
To reduce the risk of serious injury,read the following safety instructions before
using the product.
1.Read all the instructions in this manual before using the product.Only use this product in the manner described
in this manual.Keep this manual for the entire life of the product.
2.This device must be assembled by one or two adults.
3.It is the responsibility of the owner to ensure that all users of this product are properly informed as to how to
use this product safety.
4.This product is intended for domestic use only.Do not use this product in any commercial,rental,or institutional
setting.
5.Use this product indoors,away from humidity and dust,on a flat,hard surface and in a sufficiently large space.
Make sure that there is enough room to move around the equipment safely.To protect the floor,lay a rug
underneath the product.
6.The user is responsible for ensuring proper care and maintenance of the equiment .After the product has been
assembled,and prior to each use,check that the fastner are properly tightened and that none are protruding.
Check the condition of the parts that are the most subjust to waer and tear.
7.Do not store this product in a damp place(e.g.edge of a pool,bathroom etc.)
8.Wear athletic shoes to protect your feel while exercising.Do not wear loose or baggy clothing,since it may get
caught in the machine. Take off all jewelry.
9.Put your hair up so that it dose not get in the way during exercise.
10.If you feel any pain or if you become dizzy while exercising,stop immediately,rest,and consult a physician.
11.Keep children and pets away from the product at all times.
12.Keep your hands and feet away from moving parts.
13.Before undertaking this exercise program , you must consult a doctor to be sure there are no counter-indications,
particularly if you have not participated in sports for several years.
14.Do not exceed the limits of the adjusting mechanisma.
15.Do not try to repair this product yourself.
16.While exercising ,do not arch your back. Keep your back straight.
17.Any assembly/disassembly of the product must be done carefully.
18.Maximum user weight:242 lbs.-110 kg.
1

Before starting any exercise or conditioning program you should consult with your personal physician to see if you
require a complete physical exam. This is especially important if you are over the age of 35, have never exercised
before, are pregnant, or suffer from any illness.
CARE AND MAINTENANCE:
In order to prevent perspiration from damaging the seat cover, use a towel or wipe off the seat cover after each use.
Lightly grease the moving parts to improve their functioning and prevent unnecessary wear and tear.
CAUTION
Read all warning affixed to the product.
Read precautions and instructions in this manual before using this equipment.
Keep this manual for future reference.
2

Assembly
01 03 04 05
07 08 09 10 11 12
13 14 15
19 20 21
31
49
55
61
67
¢
10×56mm
M8×15mm
M12
M12
M10×20mm
M10 M10
M10×65mm M10×60mm
M8
M8×65mm
M8×40mm
M8
M10×45mm
0602
16 17 18
22 23 24
25 26 27 28 29 30
32 33 34 36
37 38 40 41 4239
43 44 45 46 47 48
50 51 52 53 54
6058 59
57
56
62 63 64 65 66
M12×120mm
3

Assembly
P
ARTS LIST
Item # Description
Q’
ty
Item # Description
Q’
ty
1
Front Base Frame
1pcs
34 Mid-empty Plug 2pcs
2 Back Base Frame 1pcs
3 Main Frame 1pcs
4 Front Suppor t Frame 1pcs
5 Leg Extension Frame 1pcs
6 Weight Guide Tube 2pcs
7 Selector Shaft 1pcs
8 Seat Frame 1pcs
9 Upper Cross Beam 1pcs
10 Press Arm(R) 1pcs
11 Press Arm(L) 1pcs
12 Foam Pipe 2pcs
13 Low Pull 1pcs
14 High Pull 1pcs
15 Hand Bar 2pcs
16 Press Bar 1pcs
17 Pulley U 1pcs
18 Reverse U 1pcs
19 Volitant U 2pcs
20 Seat Cushion 1pcs
21 Back Cushion 1pcs
22 Weight Plate 9pcs
23 Top Weight Plate 1pcs
24 Selector Shaft Pin 1pcs
25 Selector Shaft Bush 1pcs
26 Weight Selector Pin 1pcs
27 Rubber Cushion 2pcs
28 Prsee Pin 1pcs
29 Big Foam 2pcs
30 Short Foam 4pcs
31 Pulley
13pcs
32 38 Square End Plug 4pcs
33 Handle Bar Grip 8pcs
Note
36 45 Outside-End Plug 2pcs
37 Pulley Fastness Bush(Big) 4pcs
38 Pulley Fastness Bush(Small) 4pcs
39 45 Square End Plug 5pcs
40 40 Square End Plug 2pcs
41 40*20 End Plug 2pcs
42
Ø25
End Plug 4pcs
43 Pipe Plug 1pcs
44 Rubber Bumper 1pcs
45 38 Square Outside-End Plug 2pcs
46 Round Plug 2pcs
47 Pothook 4pcs
48 Oil Bush(big) 4pcs
49 Oil Bush(small) 2pcs
50 Cable 3750mm 1pcs
51 Cable 2720mm 1pcs
52 Cable 2370mm 1pcs
53 Chain 2pcs
54 M10*20 Hex Bolt 6pcs
55 M8*15 Hex Bolt 4pcs
56 M10*65 Hex Bolt 13pcs
57 M10*60 Hex Bolt 4pcs
58 M10*45 Hex Bolt 9pcs
59 M12*120 Hex Bolt 1pcs
60 M8*65 Hex Bolt 2pcs
61 M8*40 Hex Bolt 2pcs
62 Washer M12 4pcs
63 Washer M10 58pcs
64 Washer M8
10pcs
65 Nylon Nut M12 3pcs
66 Nylon Nut M10 26pcs
67 Nylon Nut M8 2pcs
Some of the above accessories are pre-fitted to the master
component. They may not be
supplied separately.
4

Assembly
Carefully unpack each component, checking against the parts list that
you have all the necessary parts to complete the assembly of your
product.
Please note that as part of our production checking and for your convenience, all tube caps where necessary have been
fitted in the pre-packing stage.
Stage A.
1). Lay the Back Base Frame (02) flat on the floor .Place the 2 Weight Guide T
ubes (06) into the 2 outer holes in the Back Base
Frame (02), Screw them with 2 x M10 x 20mm (54),2 x M10 W
ashers(63).
2). Connect the Front Base Frame (01) and the Back Base Frame (02) to
gether using 2 x M10 x 65mm Hex Bolts (56), 4 x M10
W
ashers (63) and 2 x M10 Nylon Nuts (66).
3). Connect the Main Frame (03) and the Front Base Frame (01) to
gether using 2 x M10 x 65mm Hex Bolts (56), 4 x M10
W
ashers (63) and 2 x M10 Nylon Nuts (66).
03
06
56
36
35
02
01
66
63
66
63
63
56
54
5
Assembly
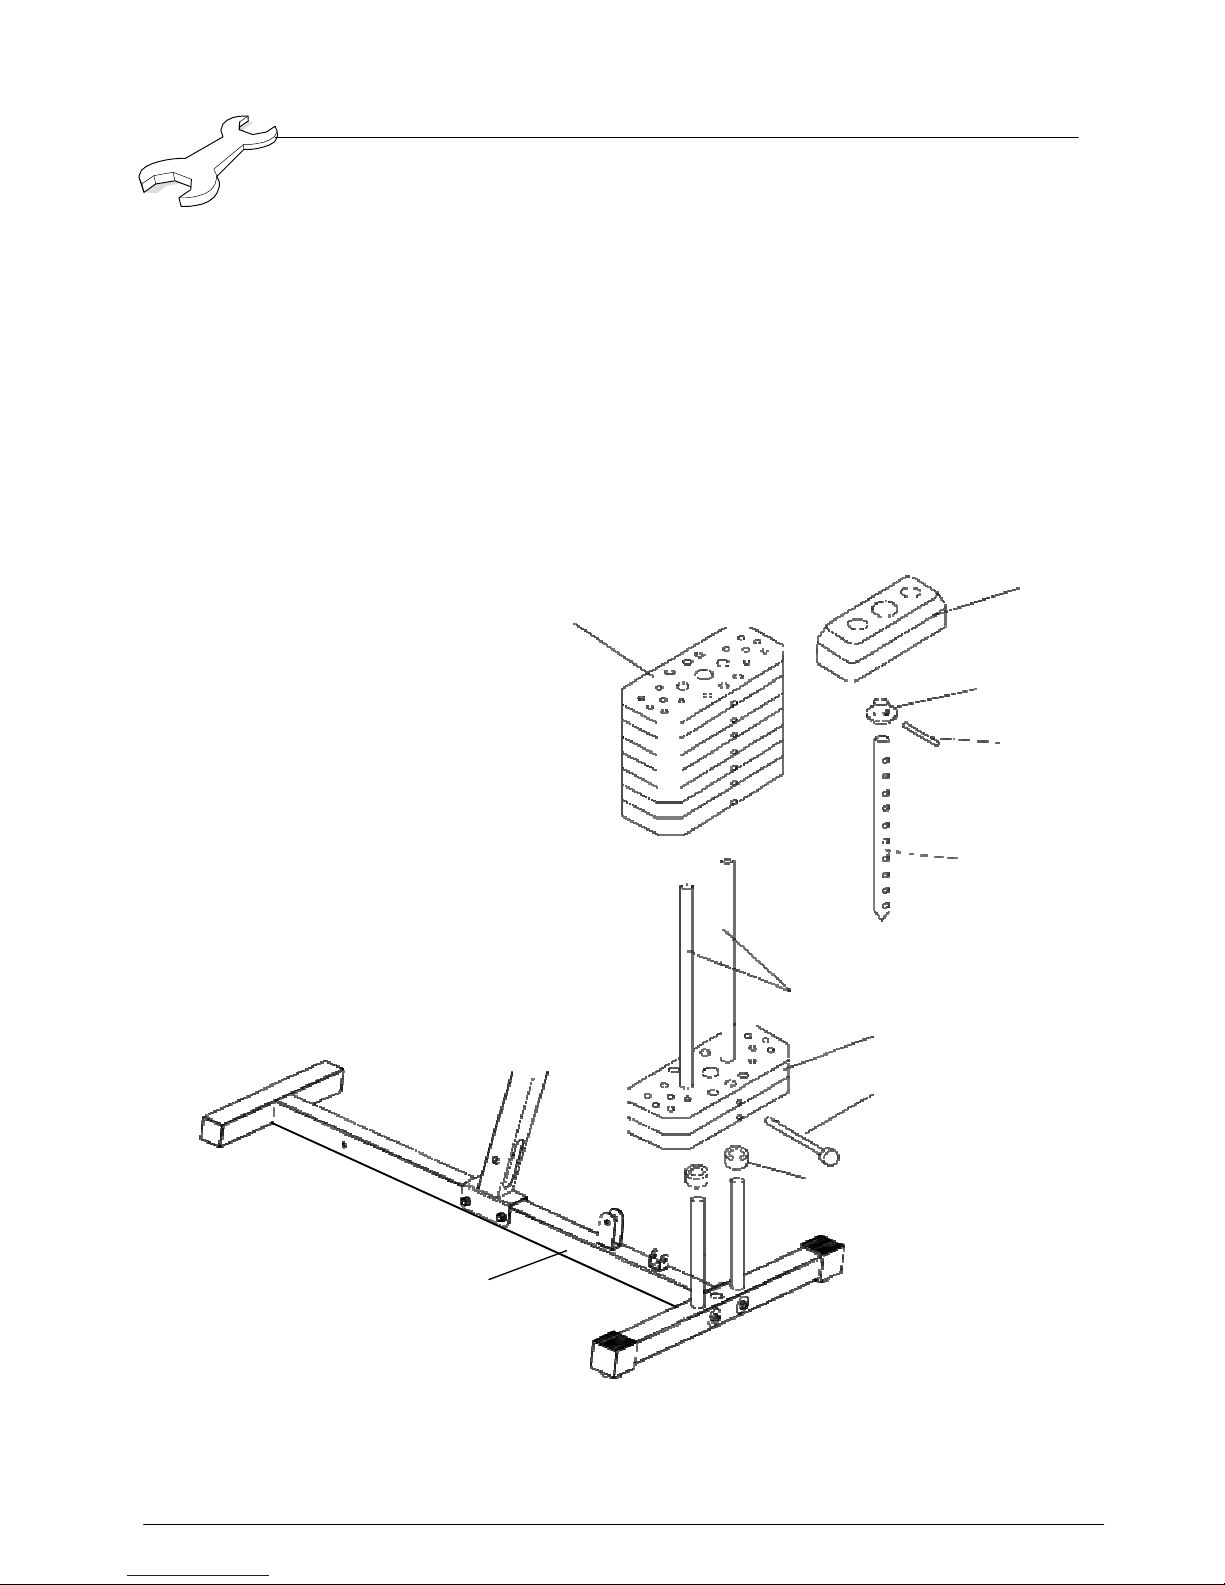
Stage B.
4). Slide the 2 Rubber Cushion (27) onto the Weight Guide Tubes (06) followed by the 9 Weight Stacks (22).
5). Take the Selector Shaft (07) and fit the Selector Shaft Bush (25) and Selector Shaft Pin (24) as shown. Slide the Top
Weight Plate (23) onto the Weight Guide Tubes (06) and locate the Selector Shaft (07) in position, setting the Top Weight
Plate (23) onto the top of the Weight Plate (22). Use the Weight Selector Pin (26) to select the desire weight.
23
22
25
24
07
06
22
26
27
01
6

Assembly
Stage C.
6). Lay the Upper Cross Beam (09) onto the Main Frame (03) and connect them using 2 x M10 x 65mm Hex Bolts (56), 4 x
M10 Washers (63) and 2 x M10 Nylon Nuts (66).
7). Connect the Weight Guide Tube(06) to the Upper Cross Beam (09) using 2 x M10 x 20mm Hex Bolt (54),
2 x
M10 Washers
(63).
8). Screw the Rubber Bumper (44) to the Main Frame (03) as shown.
9).Connect
the Press Pin (28) to the Main Frame (03) using M8 x 40mm Hex Bolts (61), 2 x M8 Washers (64) and M8 Nylon
Nuts (67).
10). Connect the Volitant U (19) to the Main Base (03) using 2 x M10 x 65mm Hex Bolt (56), 4 x M10 Washers (63) and
2 x M10 Nylon Nuts (66).
39
63
56
28
44
64
61
54
63
39
67
66
63
09
56
19
19
03
06
63
39
66
7

Assembly
Stage D.
11).
Put all tube caps (41) x 2,(45) x 1 and (40) x 2 into the each tube as shown.
12). Put 4 x the Oil Bush(big)(48) into the Press Bar (16) as shown..
41
16
48
48
40
40
48
StageE.
48
45
13). Connect the Press Bar (16) to the Upper Cross Beam (09) using M12 x 120mm Hex Bolt (59), 2 x M12 Washers (62) and
M12 Nylon Nuts (65).
14). Put the Big Foam (29) x 2 onto the Press Arm(R)(10) and Press Arm(L)(11),then through Mid-empty Plug (34) x 2 , assemble
the Handle Bar Grip (33) x 2 as shown.
15). Connect the Press Arm(L)(11) and Press Arm(R)(10) to the Press Bar (16) using 2 x M12 Washers (62) and 2 x M12 Nylon
Nuts (65).
16). Connect the 2 x Hand Bar (15) to the Press Arm(L)(11) and Press Arm(R)(10) using 2 x M10 x 20 Hex Bolts (54) and 2 x M10
M10 Washers (63).
62
65
09
59
16
65
62
32
10
11
15
54
29
29
34
8

Assembly
Stage F.
17). Fit the Back Cushion (21) to the Main Frame (03) using 2 x M8 x 65mm Hex Bolts (60) and 2 x M8 Washers (64).
18). Connect the Front Support Frame (04) to the Front Base Frame(01) using M10 x 65 Hex Bolt (56),2 x M10 Washers
(63) and M10 Nylon Nut (66).
19). Connect the Seat Frame (08) to the Main Frame (03) and the Front Support Frame (04) using 2 x M10 x 65 Hex Bolts
(56),M10 x 60 Hex Bolt (57),6 x M10 Washers (63) and 3 x M10 Nylon Nuts (66).
20). Connect the Leg Extension Frame (05) to the Seat Frame (08) using M10 x 60 Hex Bolt (57) , 2 x M10 Washers (63)
and M10 Nylon Nut (66).
21). Fit the Seat Cushion (20) to the Seat Frame (08) using 4 x M8 x 15mm Hex Bolts (55) and 4 x M8 Washers (64).
60
30
42
20
12
21
30
42
60
64
63
66
63
56
08
64
55
66
30
63
42
57
32
12
42
30
66
63
05
57
04
56
45
66
32
63
9

52
3
3
Assembly
09
66
63
63
52
58
37
66
63
37
63
31
56
66
09
63
63
58
31
03
31
52
52
31
66
63
63
58
50
10
46
51
51
31
66
63
63
58
18
63
31
58
50
47
53
64
67
64
01
50
61
05
31
66
63
38
8
03
50
63
7
50
31
66
66
31
50
63
56
01
37
6
56
63
58
10

Assembly
CABLE
ASSEMBLY
22).START WITH THE TOP LONG CABLE 2370mm (52)
START BY THREADING THE END OF THE CABLE WITHOUT THE BALL OVER PULLEY NO.1,OVER PULLEY NO.2,
DOWN AND AROUND PULLEY NO.3 IN PULLEY NO.1,OVER PULLEY NO.2,DOWN AND AROUND PULLEY NO.3 IN
FLOATING PULLEY LOCK,UP AND OVER PULLEY NO.4 AND DOWN AND ATTACH TO WEIGHT STACK WITH M12
BOLT & WASHER AS SHOWN.
23).START THE BOTTOM MEDIUM SIZE CABLE 3750mm (50)
START BY THREADING THE END OF THE CABLE WITHOUT THE BALL UNDER PULLEY NO.5,UNDER PULLEY NO.6,
UP AND AROUND PULLEY NO.7, IN FLOATING PULLEY BLOCK,DOWN AND UNDER PULLEY NO.8, UP AND AROUND
PULLEY NO.9 IN FLOATING PULLEY LOCK,DOWN AND WITH HOOK, CHAIN TO END OF CABLE
24).CONNECT THE PRESS ARM CABLE 2720mm (51)
TAKE PRESS ARM CABLE AND FIT ONE END TO PEC DEC ARM AS PICTURE,THEN THREAD THE OTHER END OF
CABLE OVER PULLEY NO.10 DOWN AND AROUND PULLEY NO.11 , UP & OVER PULLEY NO.12 ,CABLE TO PRESS
ARM AS PICTURE.
25).FIT THE HIGH PULL (14) AND LOW PULL(13)
1
2
Note
4
10,12
3
IF YOU FIND THAT THE CABLES ARE
9
NOT LONG ENOUGH,USE THE CHAIN
AS AN EXTENSION WITH
POTHHOOK
AS CONNECTORS.
11
7
5
8
6
11

Assembly
Correct Shackle Indication
12
A
B
Point A: This position can not assemble with
Shackle.
Point B: This is correct shackle assembled
position.
The shackle connected with cable and hook
where fixed on bottom tube. Please refer
drawing in page 10.
Point C: Incorrect shackle position.
If you assembled in wrong position, you will
see the first upper weight stacks can not
touch second one.
Point D: Correct Shackle Position
Assembled shackle which connect with cable
and fixes holes where in bottom tube by
hook.
C
D
E
 Loading...