

Page 1
HOME
easy
HE-306
Home Easy Plug-In
V1.0
Self Adhesive Strips: make sure the surface is free from dirt and grease. Remove the
protective strips form the back of the bell push and push firmly against the door
frame or wall.
RE-INVENTING THE HOME
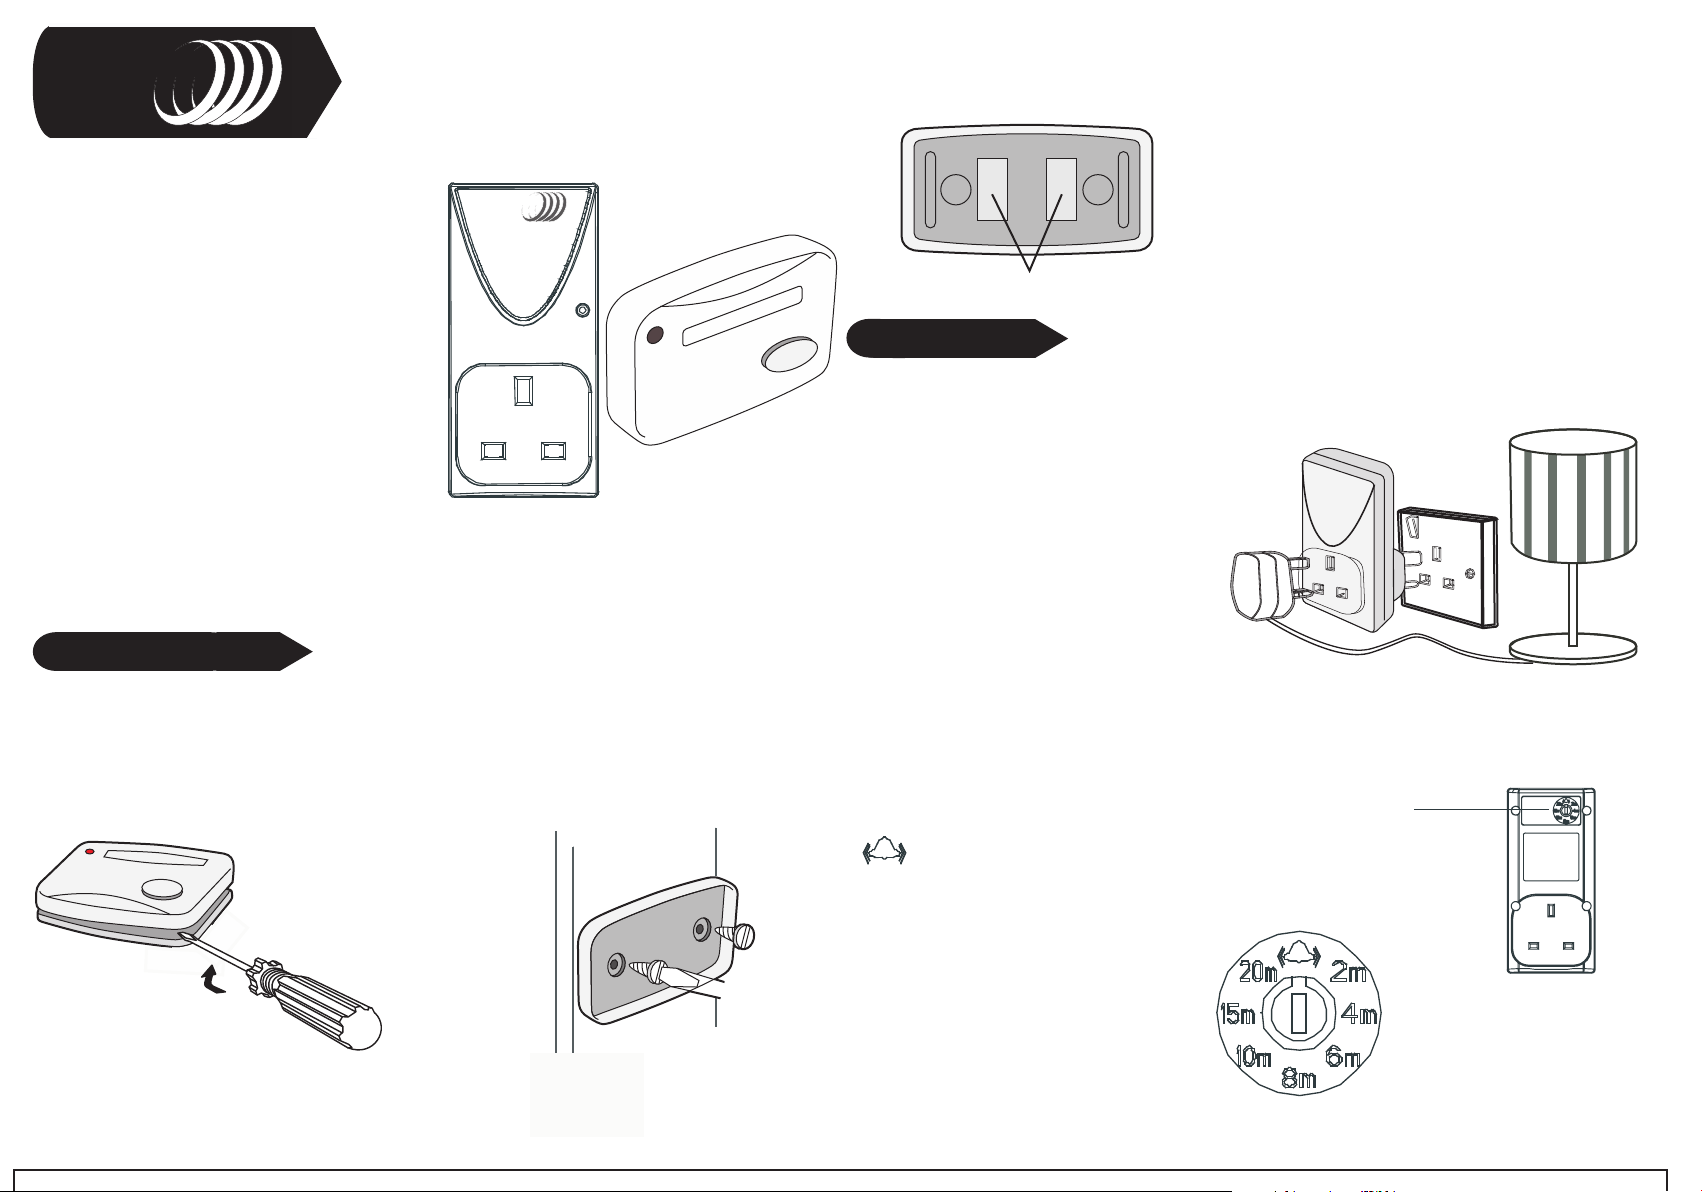
The HE-306 Plug-in Door Chime adds extra
control to your HomeEasy products.
When the bell push is pressed a wire free
signal is sent to the plug-in door chime,
activating the "Ding Dong" alert and a
selectable light setting. The operating
range of the HE-306 is up to 40metres
(open distance), allowing you to plug the
chime unit into virtually any socket in the
home.
The transmission range of the wire free signal can be reduced if the signal is
transmitted through a number of walls or ceilings. Metal surfaces and UPVC door
frames can also affect the operating range.
Door Chime
HOME
easy
Installation Guide:
Important: mounting the bell push unit onto a UPVC door frame or metal surface will
reduce the operating range and may cause the units to work intermittently.
1. The bell push can be attached to the door frame or adjacent brick surface using
either the self adhesive tabs or using screws & wall plugs provided.
3. When the bell push is pressed, the plug-in door
chime receiver will sound and switch the socket
"On" for between 2min and 20min. Ideal for
switching on table light for added security
Self Adhesive Strips
(Incandescent lighting only).
Setup :
When the bell push is pressed, the plug-in door chime receiver will sound alert and
switch the On socket for between 2min and 20min.
Ideal for switching on table light for added
security (Incandesent lighting only).
Plug the plug-in chine into a standard 3
pin socket and switch the power on, the
chime unit now needs to be paired with
the bell push
(See Pairing/Deleting Bell Push &
Chime).
The plug-in chime has 7 timer settings and one visual alert. Using a small
screwdriver rotate the dial on the back of the plug-in chime to select the
required time.
Visual Alert
- Socket switch On/Off 4 times
Timer Select
2. Unclip the cover from the bell push and using the 2 holes on the back of the Bell
Push casing as a template (pierce holes as required), mark and drill the fixing holes
and then attach the bell push using the screws provided.
Timer Settings
2M - 2minutes
4M - 4 minutes
6M - 6 minutes
8M - 8 minutes
10M - 10 minutes
15M - 15 minutes
20M - 20 minutes
The chime will always make a "Ding Dong" sound
when the bell push is pressed.
Page 2
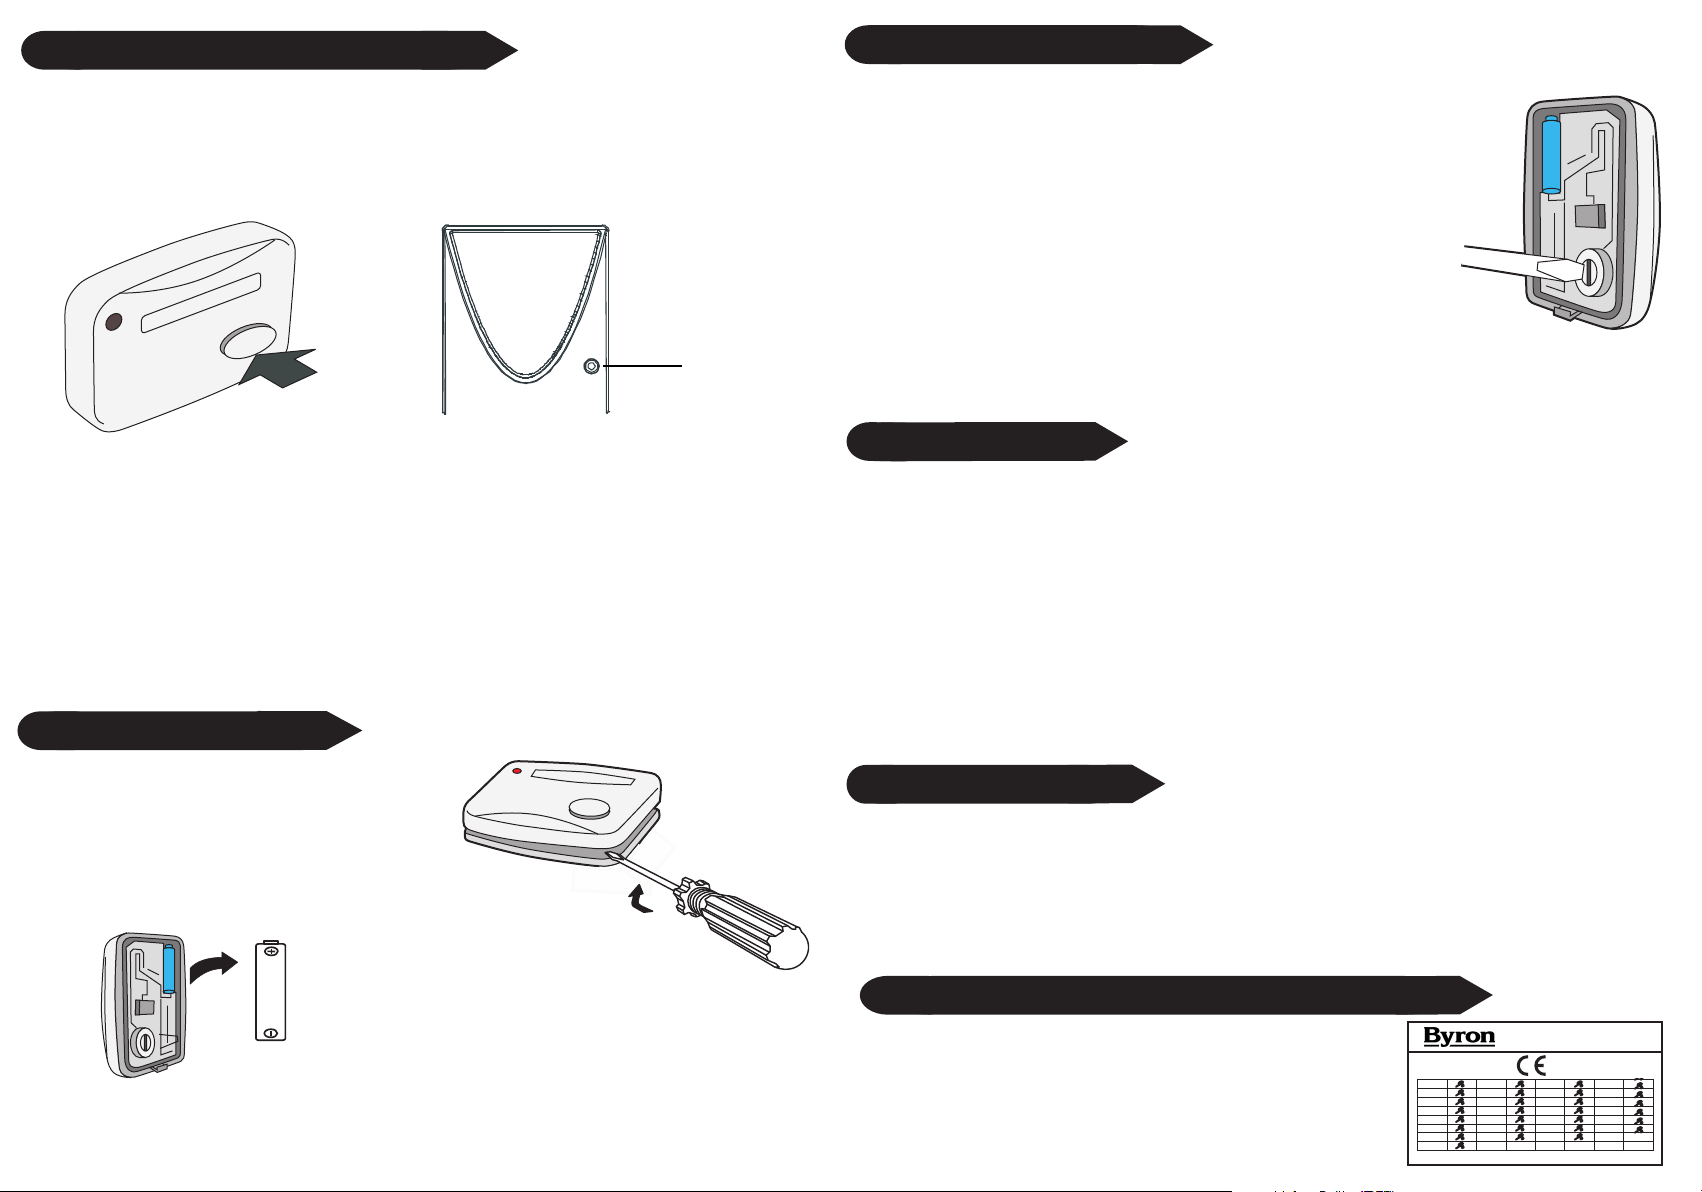
Pairing/Deleting Bell Push & Chime:
Bell Push Code Setting:
To pair the bell push with the plug-in chime receiver, insert the plug-in chime unit into a
plug socket and switch on the power, now press the "Learn" button. The LED will start to
flash, now press the button on the bell push, the LED will stop flashing. The units are now
paired together place your selected electrical product into the receiver socket; you can now
test the units by pressing the bell push.
Learn
Press
Bell Push
Deleting Bell Push:
To delete a bell Push that has been paired with a plug-in chime receiver, simply press the
"Learn" button. The LED will start to blink; press the bell push button, the LED will blink twice
to confirm that the bell push has been removed from the receiver sockets memory.
Reset Plug-In Chime:
To reset the plug-in chime unit, press and hold the learn button for more than 6 seconds, the
LED will start to flash quickly. Release the button and then press the "Learn" button again for a
further 6 seconds, the LED will blink twice to confirm the plug-in chime has been reset.
plug-In Chime
Changing Batteries:
The bell push comes from the factory on a pre-set digital code. However,
should your chime activate intermittently for no reason at all, it's possible that a
similar unit is operating nearby on the same digital code. To resolve the
problem you need to change the digital code in the back of the bell push.
1. Delete the bell push from the memory from the plug-in chime units
memory (See Deleting Bell Push ).
2. Remove the back of the bell push and using a small screw driver, rotate
the digital code select dial to an new setting, this can be any new
position.
3. You now need to pair the bell push back with the plug-in door chime.
See Pairing/Deleting Bell Push & Chime.
tion :
ec
elp S
H
No Activation: Check the battery level and polarity, replace with new
batteries if necessary
Check to make sure that the bell push is paired the plug-in door chime
unit.
Is the Plug-in door chime within the operating range,
see RF range help.
RF Range: The radio signals operating distance is reduced when the signal has to pass
through walls. The radio signals achieve a range of 40m; this can be reduced depending on
the type of material.
1. Unclip the front cover from the front of the Bell
Push using a small screw driver.
2. Remove the battery and replace using a new
'23A' battery, making sure the polarity is correct.
23A 12V
Always dispose of old batteries in an
environmentally responsible way
3. Replace the front cover making sure the clips are correctly aligned and firmly push the
case together.
Product Specification:
Wire Free Bell Push: HE-306T
Battery: 23A (included)
Range: 40Metres (Open Distance)
Frequency: 433.92MHz
Warning: Never Exceed the Product Specification
Plug-in Door Chime Receiver: HE-306R
Input: 230-240V ~AC
Load: 300W (Incandesent)
Frequency: 433.92MHz
Indoor Use Only
Contact: Helpline: 0845 2301 231
Contact Details:
C H Byron
34, Sherwood Rd
Aston Fields
Bromsgrove
B60 3DR
Tel: 0845 2301231
Fax: 01527 57701
Web: www.chbyron.com
E-mail:
support@chbyron.com
433MHz
R&TTE
APPROVED
A
IRL
B
DK
FIN
F
D
GR
LT
CH Byron Electrical United Kingdom. www.chbyron.com
I
L
NL
P
E
S
0560
UK
BG
CZ
EST
H
IS
LV
SLO
CH
RO
M
N
SK
PL
 Loading...