

Page 1
HOME
easy
RE-INVENTING THE HOME
The HomeEasy remote control Timer allows you to add
the following extra features to your HomeEasy products:
-12 Programmable memory Settings
-Security Mode
-Single and Daily Timer Functions
-24Hr Timer Display
-30 Metre Wire Free Range
-CR2032/23A Battery (Included)
HOME
easy
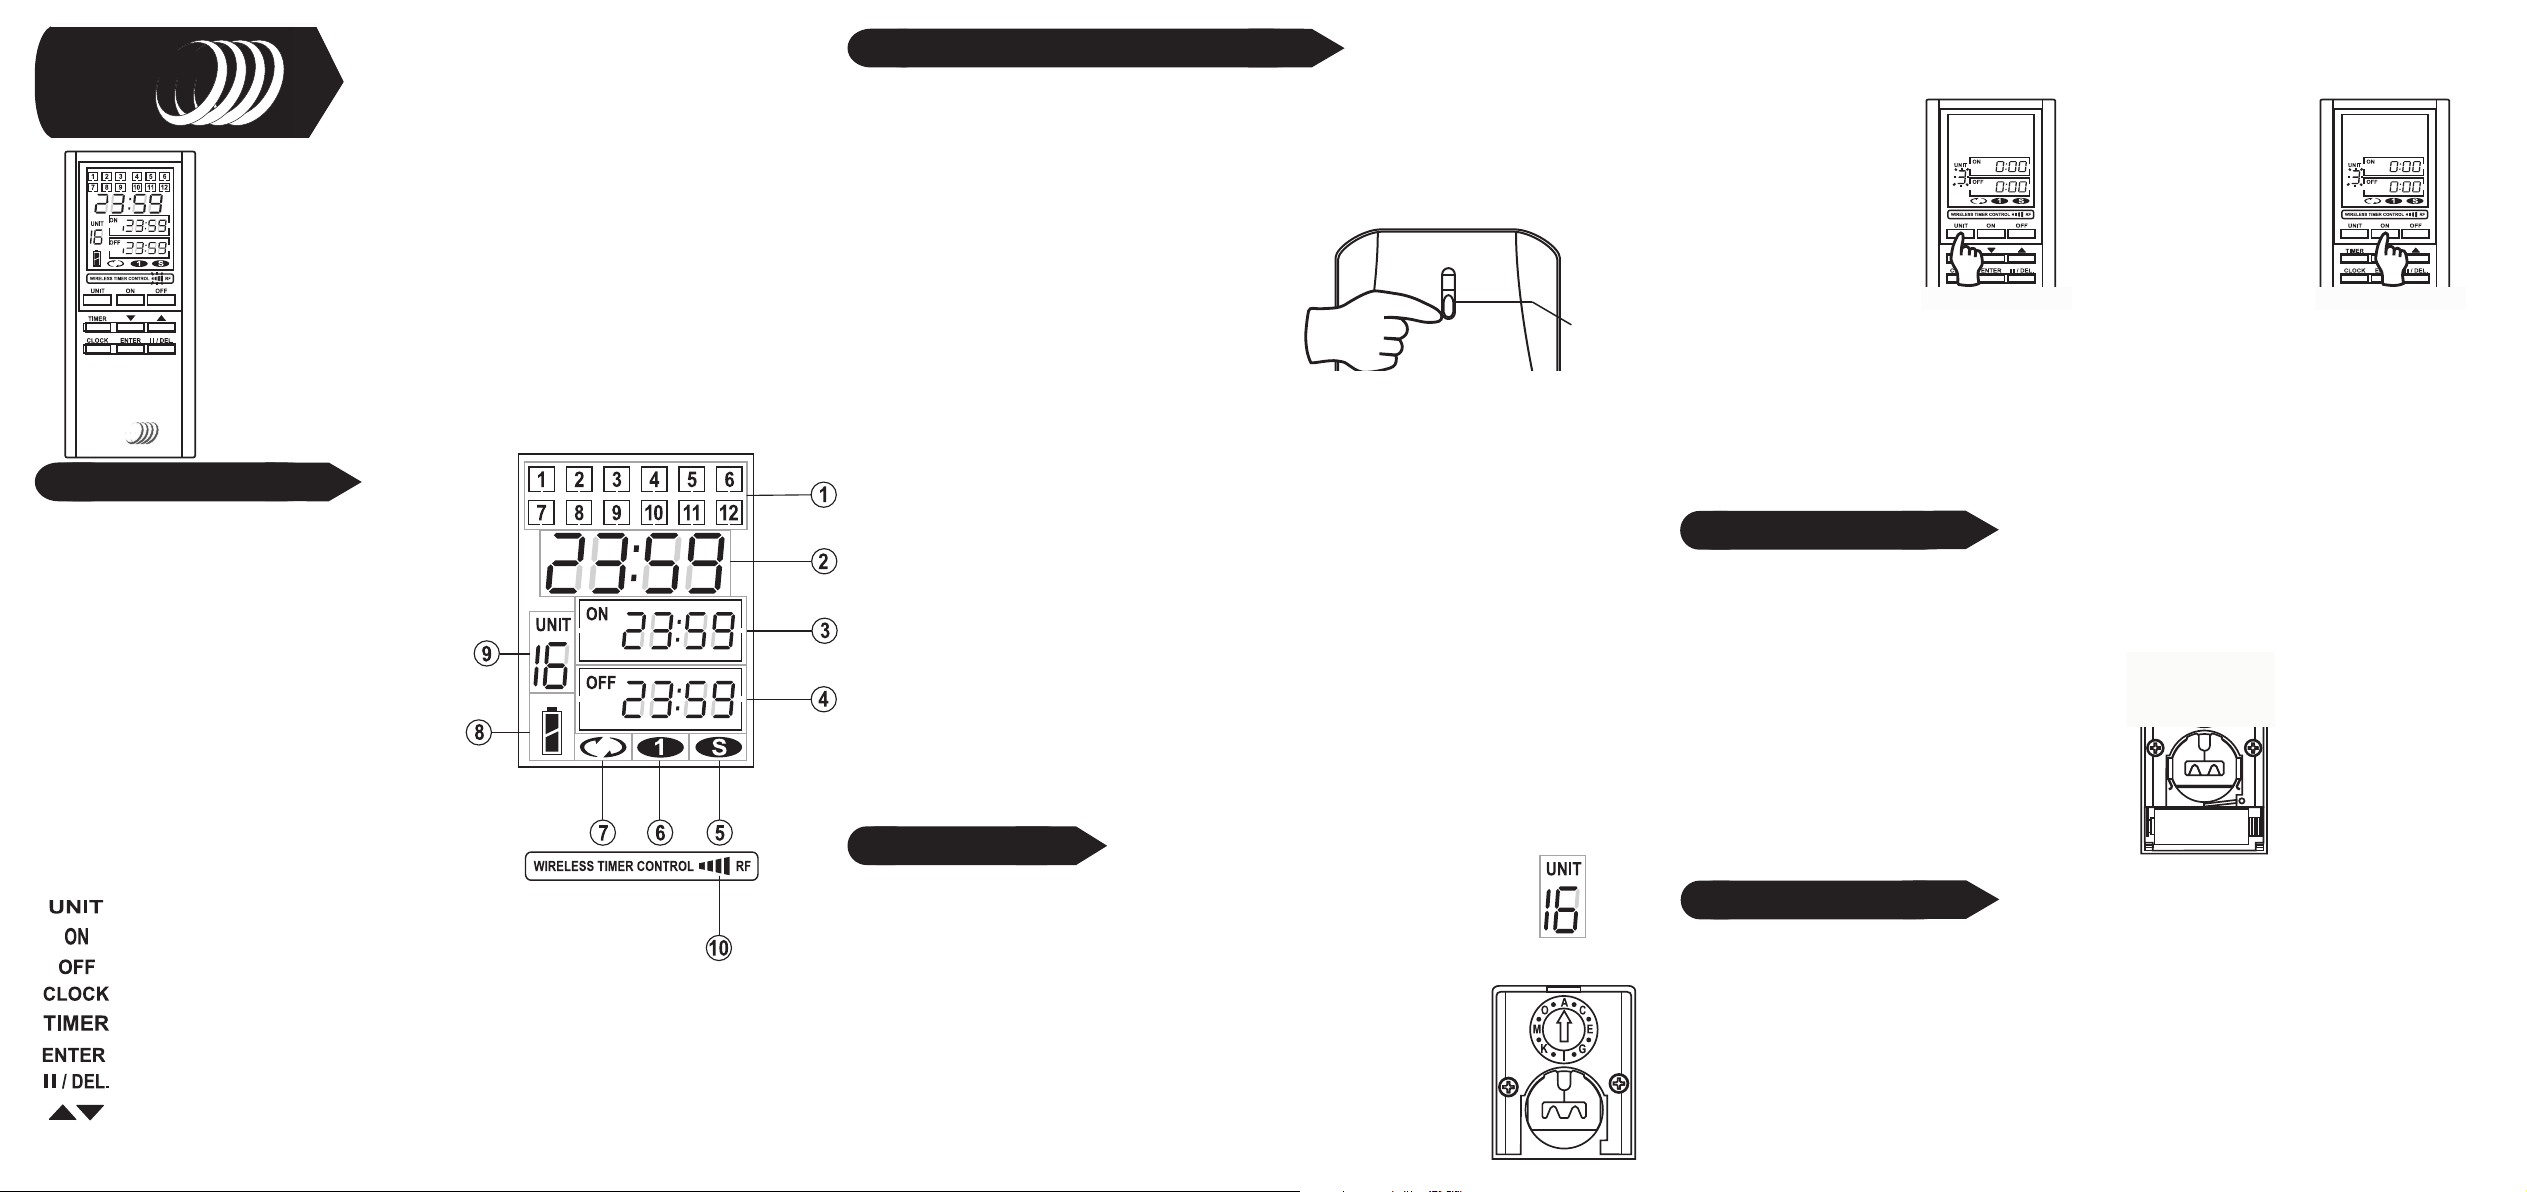
Display Functions:
Functions:
1: 12 Programmable Memory Spaces
2: 24Hr Time
3: Timer Setting "On"
4: Timer Setting "Off"
5: Security Mode
6: Timer Mode - Single Timer Setting
7: Timer Mode - Daily Timer Setting
8: Low Battery Warning
9: Unit Code Display
10: Transmission Indicator Signal
HE-200/210/220
Remote Control Timer
LCD Display
V1.0
Pairing/Deleting with Remote Control:
Up to Six remote control units can be paired with each receiver socket or
module. To program a socket insert the unit into a plug socket and switch on
the power, now press the "Learn" button . The LED will start to flash, now
press the selected "ON" button on the remote control, the LED will stop
flashing. The units are now paired together, you can test this by pressing the
selected "ON/OFF" button
Learn
Always refer to the original instruction when using with additional products
Deleting Remote Control:
To delete a remote control that has been paired with a HomeEasy receiver
socket, simply press the "Learn" button . The LED will start to blink; press the
"Off" button on the remote control, the LED will blink twice to confirm that the
remote control has been removed from the receiver sockets memory.
Remote Socket reset:
To delete all the remote control units from the memory of the receiver socket,
hold the "Learn" button for more than 6 seconds, the LED will start to blink
continuously. Press the learn button again, the LED will blink twice to confirm
the deletion of all remote controls form the receiver memory.
Unit Setting:
Dimming Receiver Sockets HE220:
To dim a compatible receiver socket.
1. Select the unit by
pressing the "unit"
button until the
correct number is
displayed on the
screen.
2. Press the "On"
button and then
press "On" again.
Never exceed 300W
maximum load.
HE210 & HE-220
3. The dimmer will start to dim the light unit till it reaches zero, then the
unit will start to increase the light up to the maximum level. To set the
desired level, press the "On" button.
4. Press the "Off" button to switch the receiver unit off.
Changing Batteries:
Remove the battery cover form the back of the remote control.
The HE-200 includes 2 batteries:
LCD Display: 1 x CR2032 -Byron SX100 (Included)
RF Transmission: 1 x 23A - Byron SD100 (Included)
Remove the required battery and replace with new, making sure the
K
polarity matches the internal markings.
G
I
+
_
Receiver Select
Switch "On" Selected Receiver
Switch "Off" Selected Receiver
Clock Setting
Program Timer/View
Enter
Delete/Pause
Select Up/Down
The HE-200 Remote Control Timer can be paired to 16
separate receiver units, select the unit code by pressing
the unit button.
The HE-200 comes with a preset to Group code A. When
using additional remote control timers you will need to
select a new group code.
To select a new group code, remove the battery cover and
using a small screw driver, rotate the group dial to a new
setting e.g. Group B
Product Specification:
Remote Control: HE-200
Battery: 3v Cr2032 & 12V 23A
Range: 30 Metres (Open Distance)
Frequency: 433.92MHz
Indoor Use Only
Warning: Never Exceed the Product Specification
Receiver Socket: HE-202
Input: 230V ~ 50Hz
Max Load: 300W (Incandescent)
Frequency: 433.92MHz
Indoor Use Only
Page 2
Switching On/Off :
Setting Timer :
Help Section :
1. Select the unit by
pressing the "unit"
button until the
correct number is
displayed on the
2. Press the "On"
button, the receiver
socket will switch on.
Never exceed 300W
maximum load.
screen.
3. Press the "Off" button to switch the receiver unit off.
Setting Clock
The remote control displays the time in a 24hr format, to set the time.
1. Press and hold the
clock button for +3sec.
The hrs will now start
to flash
2. Use the
buttons to select
the hours and
press Enter.
The HE-200 remote control timer can store up to 12 different timer
programs, ideal for switching on lights throughout the home for added
security.
To program the remote control:
1. Press and hold the "Timer" button for 3 seconds, the
display will show the 12 available memory spaces. Use
the arrows keys to select a memory space, the display
will also show any programmed times already saved.
Press "Enter" to select the program space.
2. Select the required unit from using the "Up/Down"
arrows e.g. if the socket to be programmed is
programmed to unit code 2, select unit 2 on the display
and press "Enter". Only one unit code can be selected
per program.
3. The start or On time will start to flash, use the arrow keys to select the hours
and press enter to select the min.
Now select the finish or off time.
Help: Occasionally interference from receiver sockets plugged into adjacent wall
sockets or when used with transformers (low voltage products) can affect the
operating range.
Try placing one of the receiver sockets in another wall socket. For low voltage
products, place the transformer as far away form the receiver socket as possible.
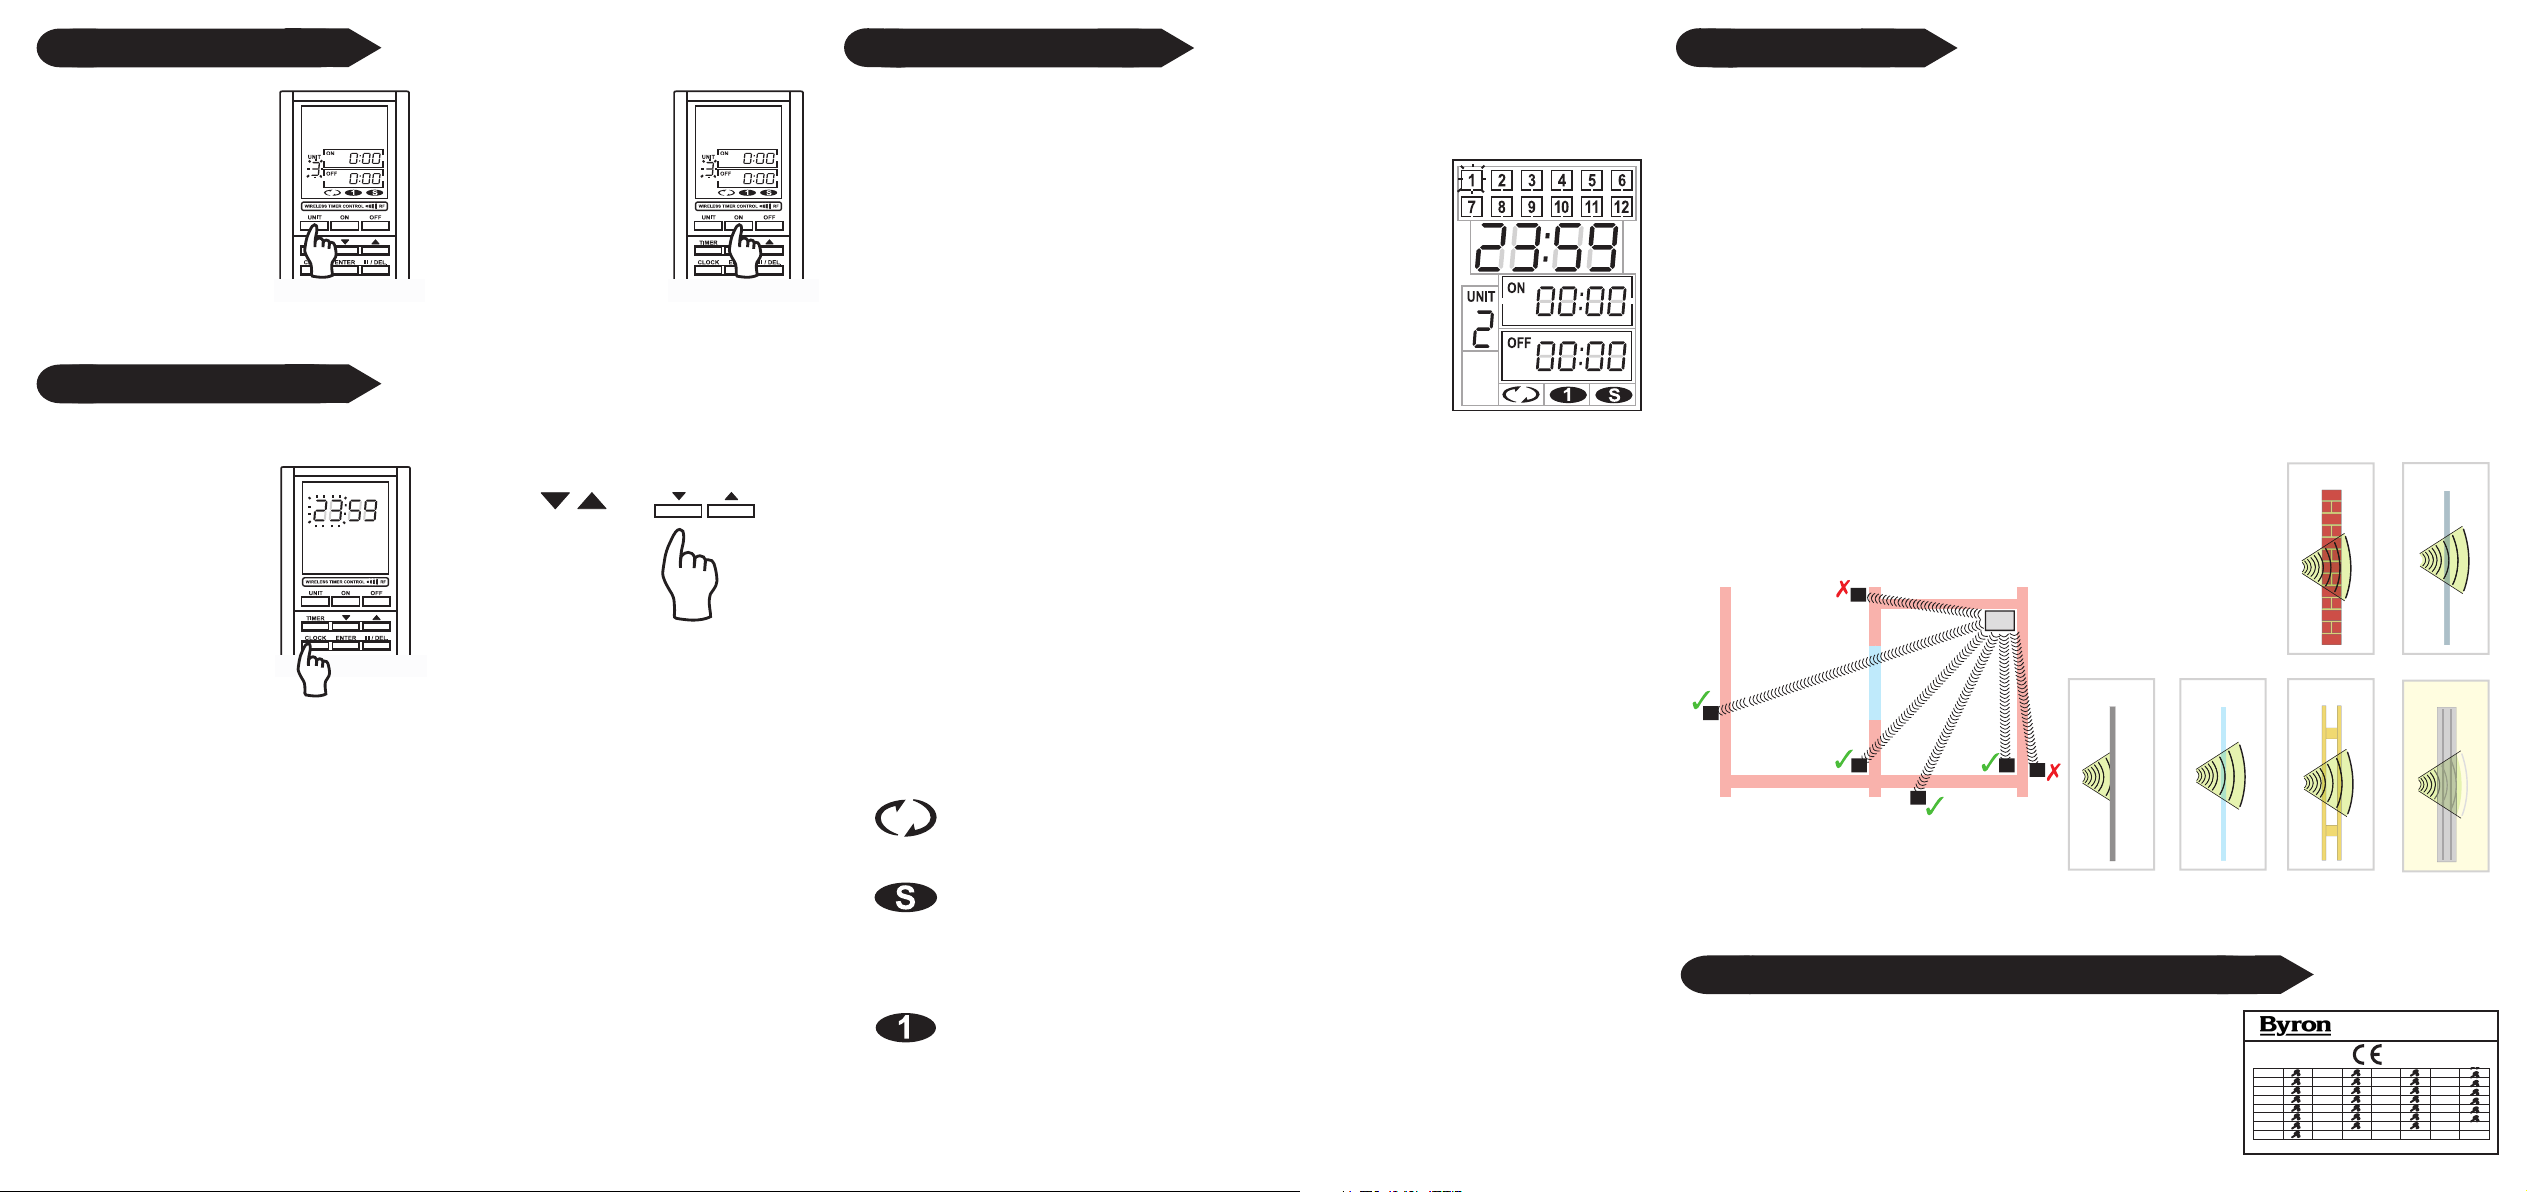
RF Range: The radio signals operating distance is reduced when the signal has
to pass through walls. The radio signals achieve a range of 30m inside a building;
this can be reduced depending on the type of material
Range
Reduction Guide:
METAL
GLASS
BRICK
10 - 40%
TIMBER
PLASTICS
10 - 15%
CONCRETE
3. The minutes will now start to flash, set using the up and
down arrows to select the minutes and then press enter.
4. Finally select the program mode using the arrows keys and press enter to
confirm.
Daily Timer Setting: Activates the program daily
Security Setting: Selecting the security mode will switch the
receiver units "On/Off" randomly through out the set time.
On = between 40Min - 2Hrs
Off = between 40Min - 3Hrs
Single Timer: Activates the program for a single time only.
90%
Contact: Helpline: 0845 2301 231
Contact Details:
C H Byron
34, S herwood Rd
Aston Fields
Bromsgrove
B60 3DR
Tel: 0845 2301231
Fax: 01527 550001
Web: www.chbyron.com
E-mail:
support@chbyron.com
5 - 15%
10 - 40%
R&TTE
APPROVED
A
IRL
B
DK
FIN
F
D
GR
LT
CH Byron Electrical United Kingdom. www.chbyron.com
I
L
NL
P
E
S
40- 80%
433MHz
0560
UK
BG
CZ
EST
H
IS
LV
SLO
CH
RO
M
N
SK
PL
 Loading...