

HoMedics WFL-ROC User Manual

Instruction Manual and
Warranty Information
WFL-ROC
ILLUMINATED TABLETOP RELAXATION FOUNTAIN
ROCK
GARDEN
TM
El manual en español
empieza en la página 9
©2006 HoMedics, Inc. y sus compañías afiliadas, reservados todos los derechos. HoMedics® es una
marca registrada de HoMedics, Inc. y sus compañías afiliadas. Envirascape™ es una marca comercial de
HoMedics Inc. y sus compañías afiliadas. Reservados todos los derechos.
IB-WFLROC
GARANTÍA LIMITADA POR UN AÑO
(Válida únicamente en los EE.UU.)
HoMedics, Inc., garantiza este producto contra defectos en material y mano
de obra durante el período de un año a partir de la fecha de compra, con las
excepciones que se detallan a continuación.
Esta garantía de producto de HoMedics no cubre daños causados por un uso
inadecuado, abuso, accidente, la conexión de accesorios no autorizados,
la alteración del producto o cualquier otra condición sin importar cual sea
que se encuentre fuera del control de HoMedics. Esta garantía es válida
únicamente si el producto es comprado y operado en los EE.UU. Un producto
que requiera modificación o adaptación para habilitar su funcionamiento en
cualquier país que no sea aquél para el que fue diseñado, fabricado,
aprobado y/o autorizado, o la reparación de productos dañados por estas
modificaciones no está cubierta bajo esta garantía. HoMedics no será
responsable de ningún tipo de daños incidentales, consecuentes o
especiales. Todas las garantías implícitas, incluyendo, entre otras, aquellas
garantías implícitas de idoneidad y comerciabilidad, están limitadas a la
duración total de un año a partir de la fecha de compra original.
Para obtener un servicio cubierto por la garantía para su producto HoMedics,
puede entregar la unidad personalmente o enviarla por correo junto con su
recibo de compra fechado (como prueba de la compra), el franqueo pagado,
junto con un cheque o una orden de pago por el monto de $5.00, pagadero
a HoMedics, Inc. para cubrir los gastos de manipulación.
Una vez recibido, HoMedics reparará o reemplazará su producto, según lo
que sea apropiado, y se lo enviará con el franqueo pagado. Si es apropiado
remplazar su producto, HoMedics lo remplazará por el mismo producto o un
producto similar de acuerdo con las opciones de HoMedics. La garantía es
válida únicamente a través del Centro de servicio HoMedics. El servicio
realizado a este producto por cualquier otro diferente al Centro de servicio
HoMedics anulará la garantía.
Esta garantía le proporciona derechos legales específicos. Es posible que
usted tenga derechos adicionales que pueden variar de un estado a otro.
Debido a las regulaciones de ciertos estados, es posible que algunas de las
limitaciones y exclusiones no se apliquen en su caso.
PPoorr mmááss iinnffoorrmmaacciióónn ccoonn rreessppeeccttoo aa nnuueessttrraa llíínneeaa ddee pprroodduuccttooss eenn llooss EEEE..UUUU..,,
vviissíítteennooss eenn:: wwwwww..hhoomme
eddiiccss..ccoomm
Dirección postal:
HoMedics
Service Center Dept. 168
3000 Pontiac Trail
Commerce Township, MI
48390
Correo electrónico:
cservice@homedics.com
Teléfono:
800-466-3342
WFL-ROC_SP.qxd 2/14/06 12:14 PM Page 1

The sounds of nature soothe
human nature
Thank you for purchasing EnviraScape, HoMedics’ tabletop
relaxation fountain. This, like the entire HoMedics product line,
is built with high-quality craftsmanship to provide you with
years of dependable service. We hope that you will find it to
be the finest product of its kind.
EnviraScape enables you to create an all-encompassing environment with sound. The sound of flowing water enhances
your environment by releasing negative ions, and promoting
relaxation. Only EnviraScape offers you the luxury of these vital
benefits with its creative design which adds beauty to any
indoor environment.
EnviraScape Features
Innovative, Artistic Design
Enhances the environment at home or at work.
4 Water-flow Speeds
Select the pace that meets your mood.
Durable Electrical Water Pump
Can be operated from any indoor electrical outlet.
Easy to Assemble
Assembles in minutes with simple, illustrated instructions.
IMPORTANT SAFETY INSTRUCTIONS:
When using an electrical appliance, basic precautions should
always be followed, including the following:
READ ALL INSTRUCTIONS BEFORE USING
DANGER
- To reduce the risk of electric shock:
• Always unplug the appliance from the electrical outlet
immediately after using and before cleaning.
• Do not reach for an appliance that has fallen into water.
Unplug it immediately.
• Do not place or store appliance where it can fall or be pulled
into a tub or sink. Do not place in or drop into water or other
liquid.
• Do not connect to any voltage other than that shown on the
pump.
• Do not pump flammable liquids.
• Do not use water above 90
o
.
2
WARNING - To reduce the risk of burns, fire, electric shock or
injury to persons:
• An appliance should never be left unattended when plugged
in. Unplug from outlet when not in use and before putting on
or taking off parts or attachments.
• Close supervision is necessary when this appliance is used
by or near children, invalids or disabled persons.
• Use this appliance only for its intended use as described in
this manual. Do not use attachments not recommended by
HoMedics; specifically any attachments not provided with
the unit.
• Never operate this appliance if it has a damaged cord, plug,
pump, cable or housing. If it is not working properly, if it has
been dropped or damaged, return it to Homedics Service
Center for examination and repair.
• Keep cord away from heated surfaces.
• Never drop or insert any object into any opening.
• Do not operate where aerosol (spray) products are being
used or where oxygen is being administered.
• Do not carry this appliance by supply cord or use cord as
handle.
• To disconnect, remove plug from outlet.
• This appliance is designed for indoor use only.
Do not use outdoors.
SAVE THESE INSTRUCTIONS
Caution – Please read all instructions
carefully before operating.
• Never leave the appliance unattended, especially if children
are present.
• Never cover the appliance when it is in operation.
• This unit should not be used by children without
adult supervision.
• Connect the pump with the proper voltage as indicated
on the pump label.
• Always keep the cord away from high temperature and fire.
• Unplug the pump from power source before cleaning,
maintenance or disassembling.
CAUTION CONTINUED
• To get the best flowing effect, product must be placed on a
flat surface and should never be placed on an electrical
appliance.
• Never let pump run dry, as this will shorten life of the pump.
• Do not lift, carry, hang, or pull the pump by the power cord.
• Operate with freshwater only.
• Operate pump completely submerged for proper cooling.
3
CAUTION:
The pump must
be completely
submerged in
water. If the
pump is
making noises,
most likely it is
not completely
submerged in
water.
CAUTION:
Only set the
fountain and
fountain parts
on waterproof
surfaces
WFL-ROC_SP.qxd 2/14/06 12:14 PM Page 3
• The electrical cord of this product cannot be replaced. If it
sustains damage, you must stop using this product immediately and return it to the HoMedics Service Center for repair.
(See the warranty section for HoMedics address.)
• Disconnect the appliance from supply mains before
putting hands into water.
Assembly and Instructions for Use
1. Unpack the product. Wipe off dust with a damp cloth.
2. Familiarize yourself with the pump. The pump speed is controlled by the switch located at the front of the pump. The
speed is indicated by a plus (+) and minus (-) sign. To
increase the speed, move the switch slowly downward in
the direction of the plus sign. You will hear a click as the
switch moves to each speed level. At its highest speed level,
the switch will cease to move any further. To decrease the
pump speed, move the switch upward toward the minus
sign. Similarly, at its lowest speed, the switch will cease to
move any further (Fig 9). NOTE: It is recommended the
pump be set at its highest speed during assembly and later
adjusted to a lower setting if desired. Be sure to unplug the
pump before adjusting the speed setting.
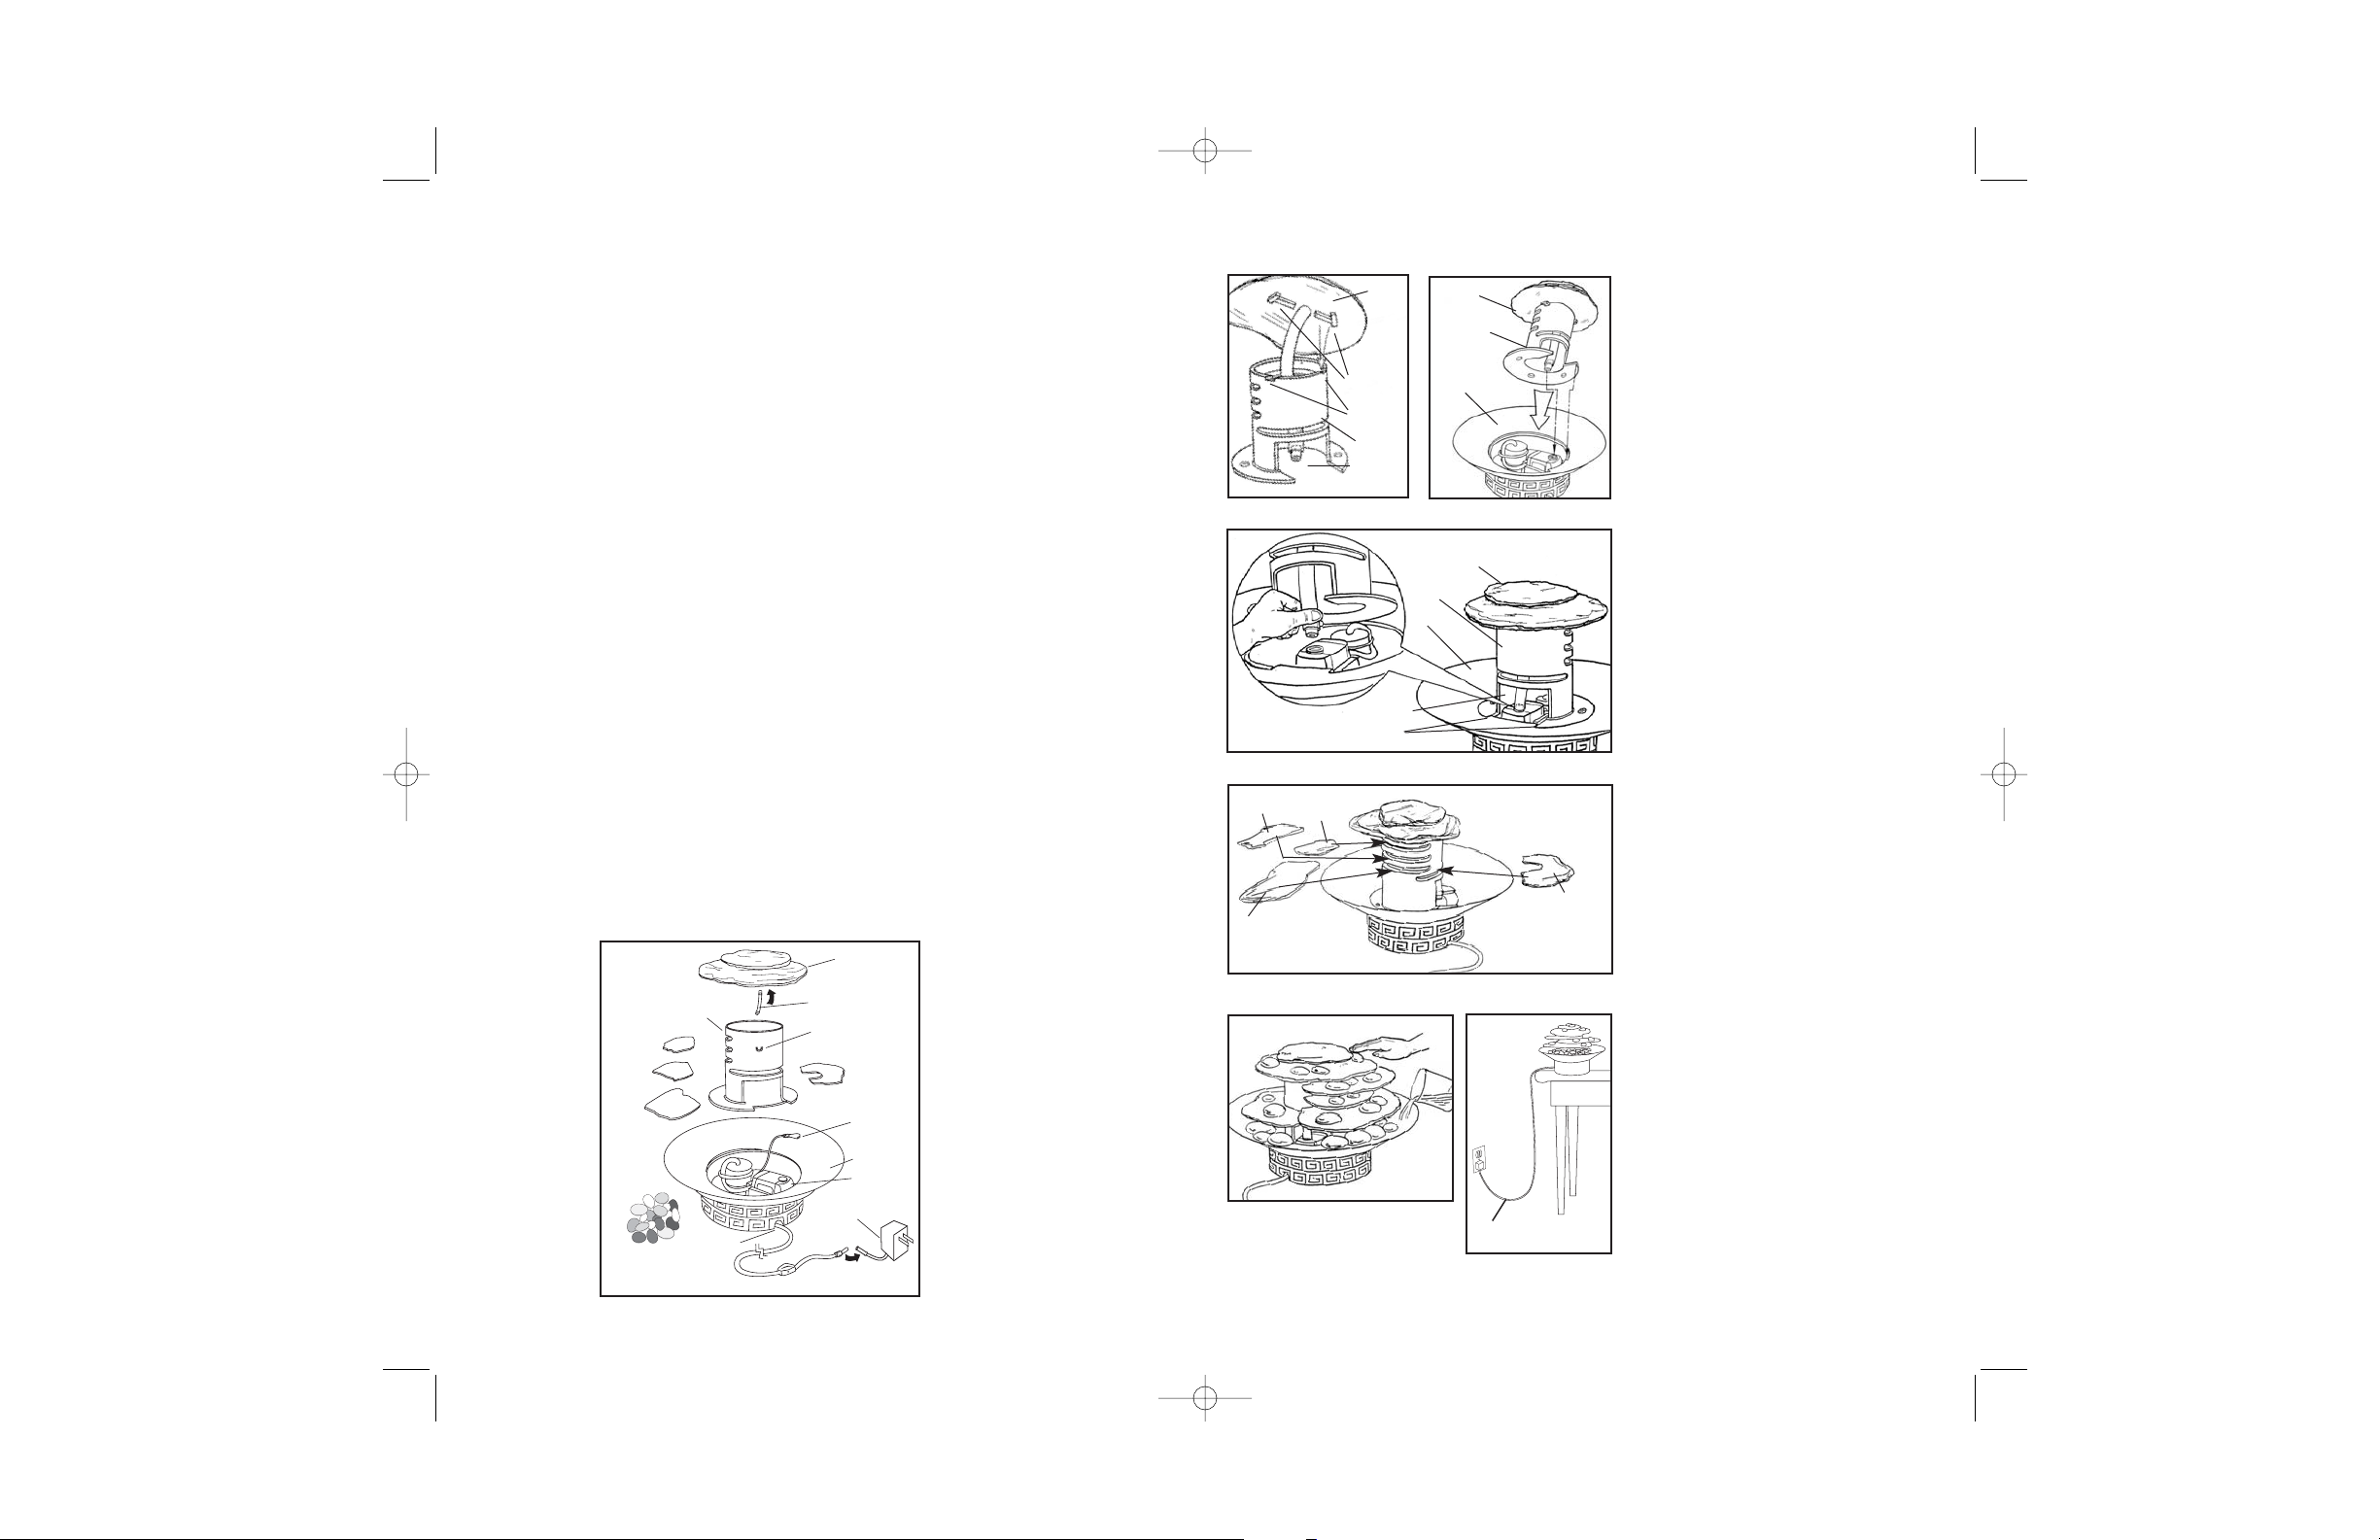
3. Lead the cord through the cord slot on the bottom of the
Base (A). This will ensure that the unit is balanced when
placed on a flat surface. Attach the A/C adaptor jack to the
base power cord. DO NOT plug into outlet at this time. See
Figure 1.
4. Slide the waterproof light into the socket clip attached at the
inner side of the slate holder (C).
5. Attach the large end of the tube to the connector located
under the Top Slate (B). See figure 1.
4 5
6. Take the tube on the bottom side
of the Top Slate (B) and place it
through the Slate Holder (C). Place
this all the way so that you can see
the tube through the opening on
the back of the Slate Holder (C).
See Figure 2. NOTE: When placing
the top slate (B) onto the slate
holder (C) be sure to line up the
top slate notches with the slate
holder cut-outs.
7. Place the Slate Holder (C) with the
Top Slate attached (B) evenly
across the Base (A). Connect the
small end of the tube to the pump.
See Figures 3 and 4. NOTE: When
placing slate holder (C) onto Base
(A), be sure to line up the opening
of slate holder (C) with the notches
on Base (A).
8. Insert the Slate (D) into the “U”
shaped slot (lowest) on the back of
the Slate Holder (C), to cover the
pump. Insert Slates (E, F, G) into
the Slate Holder as illustrated in the
diagram. See Figure 5. NOTE: This
is the slate positioning that we recommend. The slates are interchangeable and will fit into any of
the slots on the Slate Holder. The
slates can be arranged differently by pulling the slates in or out - the
fountain will produce different water
patterns and sounds.
9. Arrange the stones provided onto
the base and slates. See Figure 6.
10.Look through the opening on the
back of the slate holder and fill the
entire bottom of the base, up to the
bottom Slate Holder, with clean water.
Water should be visible through the
back opening in the slate holder but
should not be rising above the bottom of the Slate Holder.
11.Plug the cord into 120V household
outlet. The fountain is controlled by
the switch located on the power
cord. If pump doesn’t operate, rotate
in-line switch once to turn “on” and
once more to turn “off”. NOTE:
Ensure that the electrical cord loops
below the electrical outlet to form a
‘Drip Loop’ (Fig. 7). This will prevent
water from running down the cord
into the electrical outlet.
Figure 2
C
B
Figure 3
A
B
C
Figure 6
Figure 4
Figure 5
A
B
C
D
E
F
G
Cut-outs
Notches
Figure 1
Opening
Notches
Opening
Drip Loop
Figure 7
WFL-ROC_SP.qxd 2/14/06 12:14 PM Page 5
Slate (E)
Slate (F)
Slate (G)
Stones
Slate Holder
Cord Slot
Light Socket Clip (C)
Switch
(B) Top Slate
Tube
(D) U-Shaped Slate
Waterproof light
(A) Base
Pump
Adaptor
 Loading...