

Page 1

limited warranty
year
1
Mail to:
HoMedics
Service Center Dept. 168
3000 Pontiac Trail
Commerce Township,
MI 48390
Email:
[email protected]
One Year Limited Warranty
(Valid in USA only)
HoMedics, Inc., guarantees this product free from defects in material
and workmanship for a period of one year from the date of purchase,
except as noted below.
This HoMedics product warranty does not cover damage caused by
misuse or abuse, accident, the attachment of any unauthorized
accessory, alteration to the product, or any other conditions
whatsoever that are beyond the control of HoMedics. This warranty is
effective only if the product is purchased and operated in the USA. A
product that requires modification or adaptation to enable it to operate
in any country other than the country for which it was designed,
manufactured, approved and/or authorized, or repair of products
damaged by these modifications is not covered under warranty.
HoMedics shall not be responsible for any type of incidental,
consequential or special damages. All implied warranties, including
but not limited to those implied warranties of fitness and
merchantability, are limited in the total duration of one year from the
original purchase date.
To obtain warranty service on this product, either hand deliver or mail
the unit and your dated sales receipt (as proof of purchase), postpaid,
along with a check or money order in the amount of $10.00 payable to
HoMedics, Inc. to cover handling.
Upon receipt, HoMedics will repair or replace, as appropriate, the
product and return it to you, postpaid. Warranty is solely through
HoMedics Service Center. Service of this product by anyone other
than HoMedics Service Center voids warranty.
This warranty provides you with specific legal rights. You may have
additional rights which may vary from state to state. Because of
individual state regulations, some of the above limitations and
exclusions may not apply to you.
RELAXATION CANDLE FOUNTAIN
™
ENVIRASCAPE
SCAPE
GLOWING
TIERS
For more information regarding our product line in the USA, please visit:
www.homedics.com
©2001 HoMedics, Inc. or its affiliated companies, all rights reserved.
HoMedics® is a registered trademark of HoMedics Inc. or its affiliated companies.
EnviraScape™ is a trademark of HoMedics Inc. or its affiliated companies.
IB-WFCAN21-A
Instruction Manual and
Warranty Information
WF--CAN21
Page 2

Caution:
• Never leave a
lit candle
unattended.
•Always keep
burning
candles away
from children
and pets.
• Always burn
candles on a
sturdy, level
surface.
• Do not move
candle while it
is lit.
•Always keep
candle away
from drafts,
vents and
flammable
objects.
• Never cover the
top of the
fountain or the
candle with any
object.
• Do not move
fountain when
the candle wax
is liquid.
The sounds of mother nature soothe
human nature
Thank you for purchasing the HoMedics’ EnviraScape Glowing Tiers
Candle Relaxation Fountain. Like the entire line of HoMedics products, it is built with high-quality craftsmanship to provide you with
years of dependable service. We hope you find it to be the finest
product of its kind.
EnviraScape enables you to create an all-encompassing environment
with sound. The sound of flowing water enhances your environment by
releasing negative ions, and promoting relaxation. Only EnviraScape
offers you the luxury of these vital benefits. Through its creative design,
beauty is added to any indoor environment.
EnviraScape Features
Attractive Water Fountain
Includes vanilla scented candles.
Innovative, Artistic Design
Enhances the environment at home or at work.
Variable Water Flow Speeds
Controls the speed that meets your mood.
Durable Electrical Water Pump
Can be operated from any indoor 120 volt A/C electrical outlet.
Easy to Assemble
Assembles in minutes with simple, illustrated instructions.
IMPORTANT SAFETY INSTRUCTIONS:
When using an electrical appliance, basic precautions should
always be followed, including the following:
READ ALL INSTRUCTIONS BEFORE USING
DANGER
• Always unplug the appliance from the electrical outlet immediately
after using and before cleaning.
• Do not reach for an appliance that has fallen into water. Unplug it
immediately.
• Do not place or store appliance where it can fall or be pulled into a
tub or sink. Do not place in or drop into water or other liquid.
• To reduce the risk of electric shock, connect only to a 120 volt A/C
household outlet. Do not connect to any voltage other than that
shown on the pump.
• Do not pump flammable liquids through the water pump.
• Do not use water above 90 degrees Fahrenheit.
- To reduce the risk of electric shock:
Caution:
The pump must
be completely
submerged in
water. If the
pump is making
noises, most
likely it is not
completely
submerged
in water.
Caution:
Only set the
fountain and
fountain parts
on waterproof
surfaces.
WARNING
injury to persons:
• An appliance should never be left unattended when plugged in.
Unplug unit from outlet when not in use and before putting on or
taking off parts or attachments.
• Close supervision is necessary when this appliance is used by or
near children, invalids or disabled persons.
• Use this appliance only for its intended use as described in this
manual. Do not use attachments not recommended by HoMedics,
specifically any attachment not provided with the unit.
• Do not operate this appliance if it has a damaged cord or plug, if it
is not working properly, if it has been dropped or damaged, or if
the cord has been dropped into water. Return it to the HoMedics
Service Center for examination and repair.
• Keep cord away from heated surfaces.
• Never drop or insert any object into any opening unless otherwise
directed in this instruction manual.
• Do not operate where aerosol spray products are being used or
where oxygen is being administered.
• Do not carry this appliance by the electrical cord or use the cord
as a handle.
• To disconnect, remove plug from outlet.
• This appliance is designed for indoor use only. Do not use outdoors.
- To reduce the risk of burns, fire, electric shock or
SAVE THESE INSTRUCTIONS
Caution – Please read all instructions
carefully before operating.
• Never leave appliance unattended while operating the unit,
especially if children are present.
• Never cover unit when it is in operation.
• Connect the pump only to 120 volt A/C household outlet as
indicated on the pump label.
• Always keep the cord away from high temperatures.
• Unplug the water pump from the power source before cleaning,
performing maintenance, or disassembling.
• To get the most efficient flowing effect, product must be placed on
a level and sturdy surface before using, and should not be placed
on any type of electrical appliance.
• Never let the water pump run without water. This will shorten the
life of the pump.
• Operate with freshwater (tap water) only. The pump is not
equipped to run with saltwater (sea water).
• Operate pump completely submerged for proper cooling.
• Always keep the cord away from high temperature and fire.
2
3
Page 3
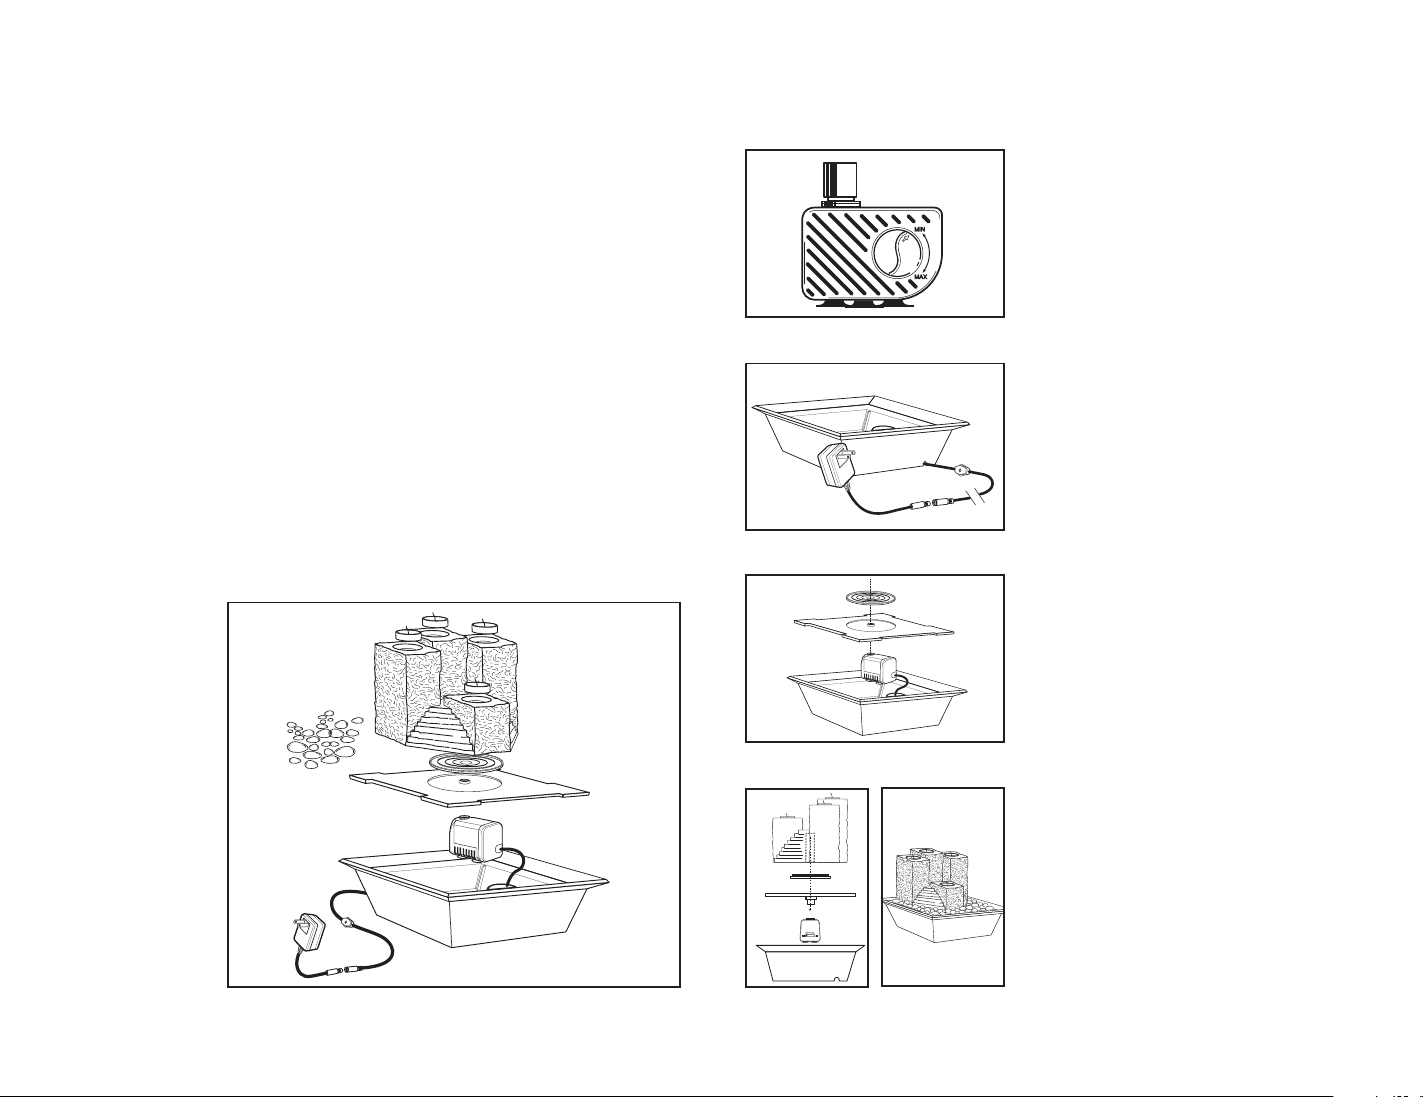
WAX FOUNTAIN TOP
RUBBER MAT
PLATFORM
WATER PUMP
POWER CORD
ROCKS
1067 HO WF-CAN21
FIG 5
• The electrical cord of this product cannot be replaced. If it sustains
damage, you must stop using the appliance immediately and
return it to the HoMedics Service Center for examination and
repair. (See the warranty section for HoMedics address).
• Disconnect the appliance from the electrical outlet before putting
hands into water.
Assembly and Instructions for Use
1. Remove all contents from packaging and inspect to make sure
all components have been received (Fig. 1):
• Base with attached electrical cord and water pump
• Wax fountain top • Rubber mat
• Polished river rocks • Platform
• 12 tea lights • Adaptor
2. Wipe any dust off the interior and exterior of the base and top
and rinse river rocks under water.
3. Familiarize yourself with the pump. The pump speed is
controlled by the dial located at the front of the pump. The speed
is indicated by a “min” and “max”. To increase the speed, move
the dial clockwise in the direction of the “max”. At its highest
speed level, the dial will cease to move any further. To decrease
the pump speed, move the dial counterclockwise toward the
“min” sign. Similarly, at its lowest speed, the dial will cease to
move any further (Fig. 2).
Figure 1
Figure 2
Figure 3
Figure 4
Figure 5
Figure 6
NOTE: It is recommended the pump be set at its
highest speed during assembly and later adjusted to
a lower setting if desired. Be sure to unplug the pump
before adjusting the speed setting.
4. Place the fountain base on a sturdy, level surface
in the desired location, ensuring its electrical cord
will sufficiently reach an electrical outlet. Once
assembled, the fountain may be difficult to move
due to splashing. Once in the desired location,
lead the power cord attached to the base through
the notch at the bottom of the base to ensure the
base sits level without wobbling.
Adaptor jack to the base power cord.
Attach the A/C
Do NOT plug
in at this time (Fig. 3).
5. Add clean water to the base until the water level
is even with the top of the notches on the inside
of the base.
6. Connect the pump to the tube protruding from
the bottom side of the platform (Fig. 4).
7. Place the platform in the base, resting on the
notches. Set rubber mat in the circular recessed
center of the platform (Fig. 4).
8. Set wax fountain top onto the rubber mat, on the
platform, alligning the hole of the platform with
the hole in the wax fountain top (Fig. 5).
9. Place 1 tea light in each of the 4 depressions on the
top of the candle (Fig. 6).
10. Place rocks around fountain top on platform being
careful not to let them fall into the base cavity
(Fig. 6).
11. Plug the A/C adaptor into a 120V household outlet.
The fountain is controlled by the switch located on
the power cord. If pump doesn’t operate, rotate in
line switch once to turn “on” and once more to turn
“off”.
NOTE: If you can hear the pump gurgling or
making sounds, you have not added enough water
to cover (submerge) the pump.
12. It will be necessary to add water occasionally due
to evaporation.
NOTE: Always add water when fountain is “OFF”
to avoid overflow.
13. Light tea lights carefully.
NOTE: Tea lights will need to be replaced
periodically, as they burn down.
4 5
Page 4
Maintenance:
• To clean the pump:
Unplug the fountain from the electrical outlet. Remove the
pump from the base of the fountain. Use a small brush or
stream of water to remove any debris.
• To keep water clean:
Periodically change the water and clean the product according
to the water condition. Keeping the water clean prevents the
water from becoming sticky and forming micro-organisms. An
algaecide or humidifier/vaporizer treatment can be added to
help keep it clean.
• To clean hard water deposits from
the base or rocks:
Soak the base and rocks in a mixture of vinegar and water to
clean and remove any mineral build-up.
• Keeping the water at an optimum
level:
Add water periodically to keep water level at an optimum level
to avoid shortening the life of the water pump. Fountain
should be “OFF” when refilling to avoid overflow.
NOTE: Never let the water pump run without water. This will
also shorten the life of the water pump.
• Fountain Storage:
When not in use for long periods of time, unplug the fountain
from the electrical outlet, empty the water and store in a cool,
dry place.
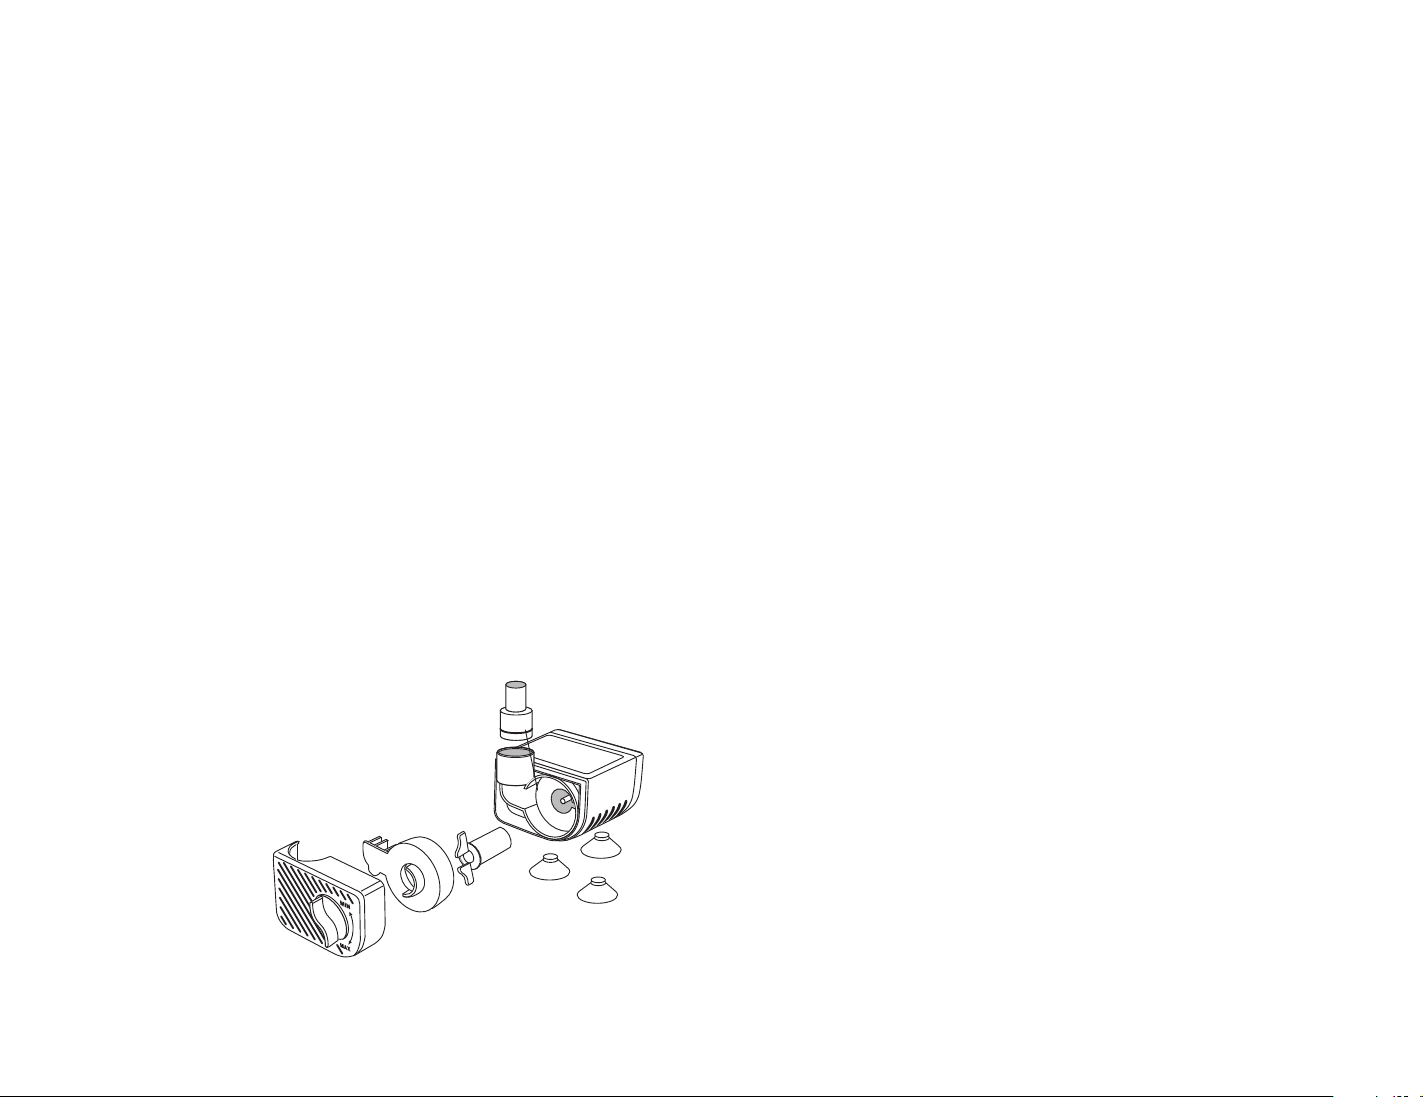
Figure 7
Pump Inlet
Tubing
Impeller
Housing
Caution:
All servicing of
this fountain must
be performed by
authorized
HoMedics service
personnel only.
Attention:
For best results,
please operate
pump completely
submerged.
Keep the water
level above
the minimum
water level
AT ALL TIMES.
Troubleshooting:
• If the pump fails to operate, check
the following:
Check the household circuit breaker or plug unit into a different
outlet to make sure the water pump is getting electrical power.
NOTE: Always disconnect the unit from the electrical outlet
before handling the water pump.
Check the water pump discharge and tubing for kinks and
obstructions. Algae build-up can be flushed out in any faucet.
Remove the water pump inlet to access the impeller area. Turn
the impeller to ensure it is not broken or jammed (Fig. 7).
Monthly maintenance will add to the life of your water pump.
NOTE: Make sure that the electrical cord loops below the electrical outlet to form a “drip loop”. This will prevent water from running down the cord into the electrical outlet.
• If the pump is loud, gurgles, spews,
or “burps”:
Check the water level to make sure the water pump has enough
water to function.
NOTE: The pump must be completely submerged in water.
• Obtaining a desired water level:
Check the water level daily in the first week to measure the rate of
evaporation. Refill with water as needed.
• If water is splashing outside
the fountain:
Rocks that are hit by water and also touch the edge of the base
will cause water to splash outside of the base and contribute to
the splash factor. Expect some splash to occur as you get the
rocks organized.
NOTE: If splashing continues, rearrange the rocks by moving
them away from the edge of the base. If this does not help, adjust
the flow control valve to a lower setting.
• If water is flowing unevenly:
Check to see if the fountain is on a level surface. Then, run fingers
across fountain surface to help spread the water distribution.
Front
Plate
Suction
Feet
Flow
Control
Lever
76
 Loading...