

Page 1

Garantía limitada por un año
HoMedics vende sus productos con la intención de que no tengan defectos de fabricación ni de mano
de obra por un plazo de un año a partir de la fecha de compra original, con las siguientes excepciones.
HoMedics garantiza que sus productos no tendrán defectos de material ni de mano de obra bajo
condiciones de uso y servicio normales. Esta garantía se extiende únicamente a consumidores y no a
distribuidores.
Para obtener servicio para su producto HoMedics, envíe por correo el producto y su recibo de compra
fechado (como comprobante de compra), con franqueo pago, a la siguiente dirección:
HOME TOUCH PRODUCTS WARRANTY CENTER
Dept. 168, SUITE 3
Dirección postal:
HOME TOUCH PRODUCTS
Warranty Center
Dept. 168, Suite 3
43155 W. Nine Mile Rd.
Novi, MI 48375
correo electrónico:
cservice@hometouchproducts.com
Teléfono:
Lunes - Viernes
8:30am - 7:00pm (ET)
1.800.466.3342
©2010 HOME TOUCH PRODUCTS y sus compañías afiliadas, reservados todos los derechos. Home Touch®, PerfectSteam®, y
STEAM ON DEMAND® son marcas registradas de HOME TOUCH PRODUCTS, Inc. y sus compañías afiliadas.
43155 W. NINE MILE RD.
NOVI, MI 48375
No se aceptarán pagos contra entrega.
HoMedics no autoriza a nadie, incluyendo, pero sin limitarse a, distribuidores, posteriores consumidores
compradores del producto a un distribuidor, o compradores remotos, a obligar a HoMedics de forma
alguna más allá de las condiciones aquí establecidas. La garantía de este producto no cubre daños
causados por uso inadecuado o abuso, accidente, conexión de accesorios no autorizados, alteración
del producto, instalación inadecuada, reparaciones o modificaciones no autorizadas, uso inadecuado
de la fuente de energía/electricidad, cortes de energía, caída del producto, funcionamiento incorrecto o
daño de una pieza de funcionamiento debido al no cumplimiento del mantenimiento recomendado por
el fabricante, daños durante el transporte, robo, descuido, vandalismo, condiciones climáticas, pérdida
de uso en el período durante el cual el producto está en una instalación de reparación o a la espera de
piezas o reparación, o cualquier otra condición, sin importar cual sea, que se encuentre fuera del control
de HoMedics.
Esta garantía es válida únicamente si el producto es comprado y operado en el país en el cual se compró
el producto. Un producto que requiera modificaciones o adaptación para habilitar su funcionamiento
en cualquier país que no sea aquél para el que fue diseñado, fabricado, aprobado y/o autorizado, o la
reparación de productos dañados por estas modificaciones no están cubiertos bajo esta garantía.
LA GARANTÍA AQUÍ ESTABLECIDA SERÁ LA ÚNICA Y EXCLUSIVA GARANTÍA. NO HABRÁ NINGUNA
OTRA GARANTÍA EXPRESA NI IMPLÍCITA, INCLUYENDO NINGUNA GARANTÍA DE COMERCIALIZACIÓN
O APTITUD NI NINGUNA OTRA OBLIGACIÓN POR PARTE DE LA COMPAÑÍA CON RESPECTO A
PRODUCTOS CUBIERTOS POR ESTA GARANTÍA. HOMEDICS NO TENDRÁ RESPONSABILIDAD
ALGUNA POR NINGÚN DAÑO INCIDENTAL, CONSECUENTE NI ESPECIAL. BAJO NINGÚN CONCEPTO
ESTA GARANTÍA REQUERIRÁ MÁS QUE LA REPARACIÓN O CAMBIO DE ALGUNA PIEZA O PIEZAS
QUE SE HALLEN DEFECTUOSAS DENTRO DEL PERÍODO DE VIGENCIA DE ESTA GARANTÍA. NO SE
EFECTUARÁN REEMBOLSOS. SI NO HAY PIEZAS DE REPUESTO DISPONIBLES PARA LOS MATERIALES
DEFECTUOSOS, HOMEDICS SE RESERVA EL DERECHO DE REALIZAR SUSTITUCIONES EN VEZ DE
REPARAR O CAMBIAR.
Esta garantía no se extiende a la compra de productos abiertos, usados, reparados, embalados otra vez
y/o abiertos y vueltos a cerrar, incluyendo entre otras cosas la venta de dichos productos en sitios de
remate por Internet y/o la venta de dichos productos por revendedores o mayoristas. Todas y cada una
de las garantías cesarán y terminarán inmediatamente con respecto a cualquier producto o pieza del
mismo que estén reparados, cambiados, alterados o modificados sin el consentimiento previo explícito
y por escrito de HoMedics.
Esta garantía le proporciona derechos legales específicos. Es posible que usted tenga derechos
adicionales que pueden variar de un país a otro. Debido a las regulaciones de ciertos países, es posible
que algunas de las limitaciones y exclusiones no se apliquen en su caso.
Por más información con respecto a nuestra línea de productos en los EE.UU., visítenos en:
www.homedics.com
Reservados todos los derechos.
IB-PS350
PerfectSteam Professional
®
commercial garment steamer
a
e
k
a
t
e
s
a
e
l
P
Register
Your Pro duc t At:
www.homedics.com/register
Your valuable input regarding
this product will help us
create the products you
will want in the future.
Instruction Manual and
El manual en español
empieza a la página 15
Warranty Information
M
o
m
e
n
t
N
o
w
PS-350
Page 2

IMPORTANT SAFETY INSTRUCTIONS:
WHEN USING ELECTRICAL PRODUCTS, BASIC SAFETY
PRECAUTIONS SHOULD ALWAYS BE FOLLOWED, INCLUDING
THE FOLLOWING:
READ ALL INSTRUCTIONS BEFORE USING.
WARNING -
or injury to persons:
• Burns could occur from touching hot metal parts, hot water, or steam. Use care
when you turn a steam appliance upside down – there may be hot water in the
reservoir.
• To reduce the risk of contact with hot water emitting from steam vents, check
appliance before each use by holding it away from body and operating steam
button.
• Use appliance only for its intended use.
• To reduce the risk of electric shock, do not immerse the appliance in water or other
liquids.
• Never yank cord to disconnect from outlet; instead, grasp plug and pull to
disconnect.
• Do not allow cord to touch hot surfaces. Let appliance cool completely before
putting away. Loop cord loosely around appliance when storing.
• Always disconnect appliance from electrical outlet when filling with water or
emptying, and when not in use.
• Do not operate appliance with a damaged cord, or if the appliance has been
dropped or damaged. To reduce the risk of electric shock, do not
disassemble or attempt to repair the appliance, take it to a qualified service person
for examination and repair. Incorrect reassembly or repair could cause a risk of fire,
electric shock, or injury to persons when the appliance is used.
To reduce the risk of burns, fire, electric shock,
• Close supervision is necessary for any appliance being used by or near children. Do
not leave appliance unattended while connected.
• To reduce the likelihood of circuit overload, do not operate another high wattage
appliance on the same circuit.
• If an extension cord is absolutely necessary, a 20 ampere rated cord should be
used. Cords rated for less amperage may overheat. Care should be taken to
arrange the cord so that the cord cannot be pulled or tripped over.
SAVE THESE INSTRUCTIONS
2 3
Page 3
Grounding Pin
Adapter
Grounded
Outlet
Figure A
Tab for
Grounding
Screw
Figure B
Grounding Instructions
This product must be grounded. If it should malfunction or
breakdown, grounding provides a path of least resistance for the
electric current to reduce the risk of electric shock. This product is
equipped with a cord having an equipment grounding conductor and
a grounding plug. The plug must be plugged into an appropriate
outlet that is properly installed and grounded in accordance with all
local codes and ordinances.
DANGER-
Improper connection of the equipment-grounding conductor
can result in a risk of electric shock. Check with a qualified
electrician or serviceman if you are in doubt as to whether
the product is properly grounded. Do not modify the plug
provided with the product - if it will not fit the outlet, you may
temporarily use an adapter (such as the one shown in Figure
B) until you have a proper outlet (such as the one shown in
Figure C) installed by a qualified electrician.
To reduce the risk electric shock:
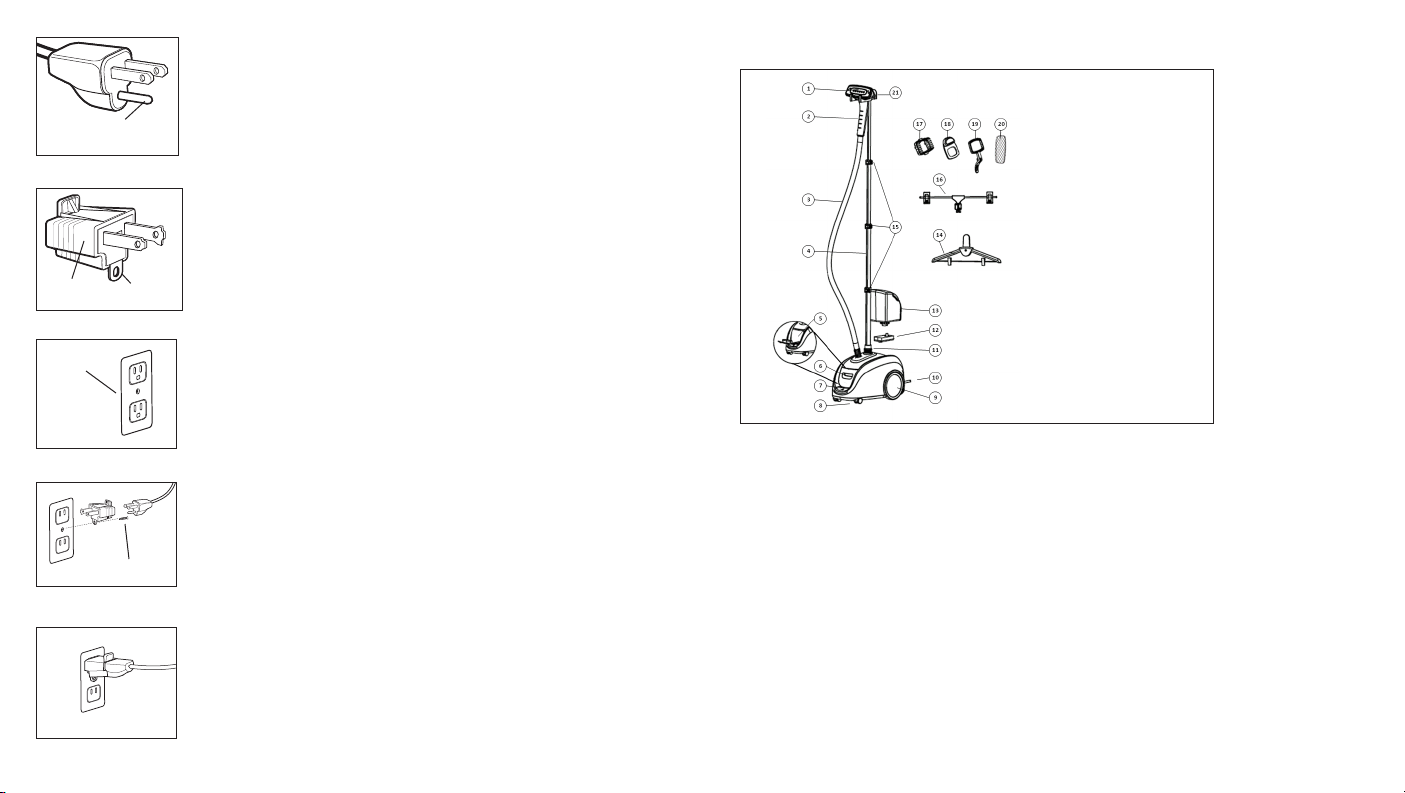
Product Information
1. Steam Nozzle
2. Steam Nozzle Handle
3. Steam Hose
4.Telescoping Pole
5. Accessory Storage Compartment
6. Accessory Door
7. Foot press illuminated ON/OFF Switch
8. Front Casters
9. Rear Wheels
10. Power Cord
11. Pole Nut
12. Water Filter
13. Water Tank
14. Clothes Hanger with Clips
15. Clips
16. Lower Hanger with Clips
17. Fabric Brush
18. Lint Brush
19. Crease Tool
20. Cloth Cover (quantity 4)
21. Hanger Attachment
Figure C
Metal Screw
Figure D
Figure E
This product is for use on a nominal 120-volt circuit, and has a
grounding plug that looks like the plug illustrated in Figure A.
A temporary adapter that looks like the adapter illustrated in Figure B
may be used to connect this plug to a 2-pole receptacle as shown in
Figure D if a properly grounded outlet is not available. The temporary
adapter should be used only until a properly grounded outlet Figure
C can be installed by a qualified electrician. The tab for grounding
screw Figure B extending from the adapter must be connected to a
permanent ground such as a properly grounded outlet box cover.
Whenever the adapter is used, it must be held in place by a metal
screw. See Figures D and E.
4 5
Figure 1
PerfectSteam Professional Features
• Pressurized steam system for instant wrinkle removal
• Steam on Demand® steam pause
• 7 steam output settings at your fingertip
• 45 second heat-up
• Easy fill water tank provides 3 hours of continuous steam
• Collapsible upper hanger with clips
• Lower hanger with clips
• Accessory storage compartment
• 5 foot flexible steam hose
• Telescoping pole
• Auto-off with automatic reset
• Water filter
• Stainless steel steam nozzle
• Includes fabric brush, lint brush, crease tool and nozzle cloth covers
• For household use
Page 4
Assembly Instructions
STEAM
STEAM
STEAM
STEAM
STEAM
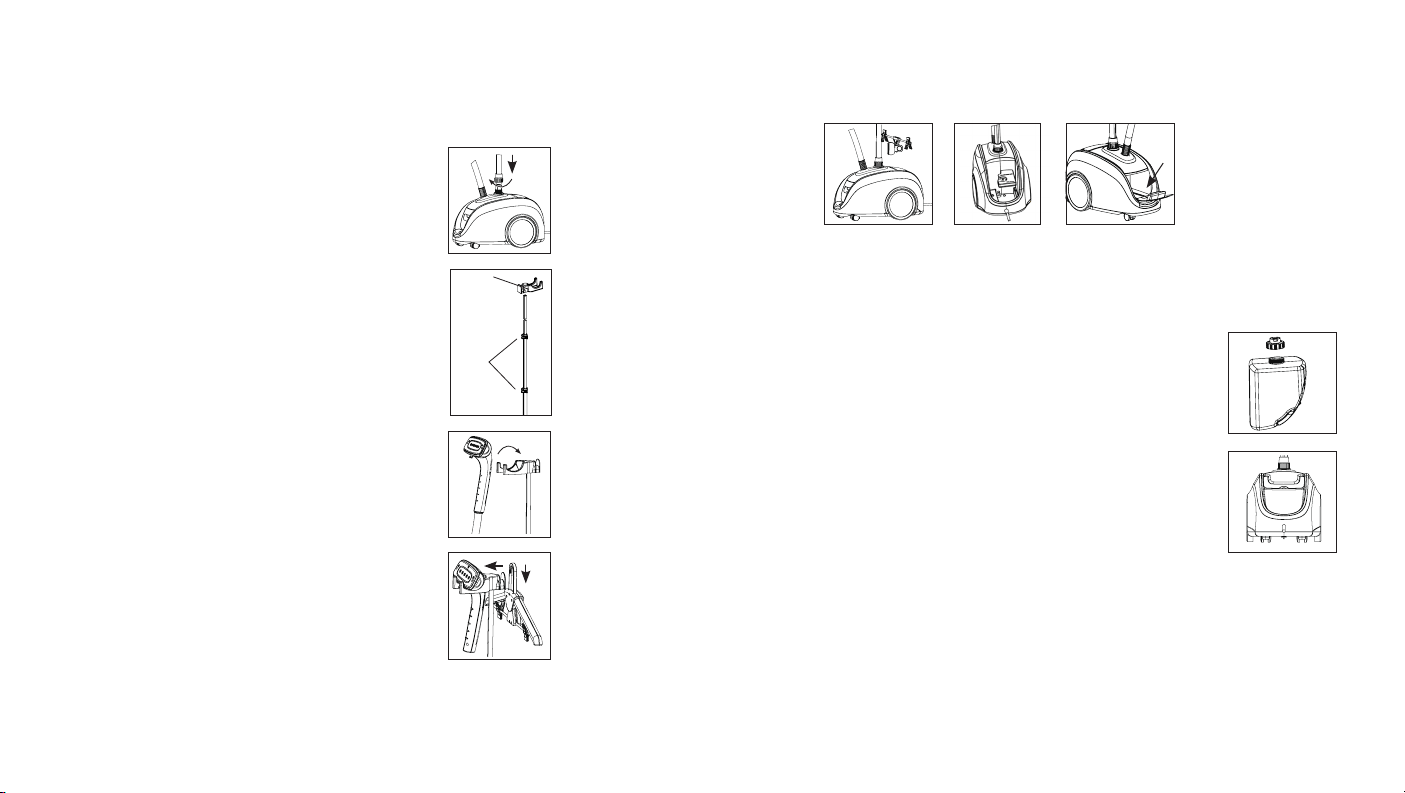
Carefully remove all contents from the packaging and inspect the product
to make sure all components have been received (Figure 1).
1. Insert the Telescoping Pole into the
steamer. Align the pole grooves with
the grooves inside the pole base and
push down. Hand tighten the Pole Nut
by turning clockwise (Figure 2).
2. Fully extend the Telescoping Pole. Open
the 3 Clips on the pole and pull upwards
(Figure 3). Close the clips and make
sure the pole is securely locked into
place.
3. Attach the Hanger Attachment. Align
the tabs in the Hanger Attachment with the
grooves on the pole and push down
(Figure 3).
4. Hang the Steam Nozzle Handle on the
Hanger Attachment (Figure 4).
5. Place the Clothes Hanger with Clips
on the Hanger Attachment and gently
push down (Figure 5). Expand the Clothes
Hanger by raising each side until it locks
into place.
6. Clip the Lower Hanger on the Telescoping
Pole (Figure 6).
7. Place the Water Filter inside the water
reservoir by aligning the water filter outlet
with the hole in the water reservoir and push
down to secure (Figure 7).
NOTE:
• The steamer will not operate without the
water filter.
Hanger
Attachment
Clips
Figure 2
Figure 3
Figure 4
Figure 5
8. The fabric brush, lint brush, crease tool, and cloth covers may be stored inside the
on-board storage compartment (Figure 8).
Figure 6 Figure 7 Figure 8
Instructions for Use
Before Beginning
Read all instructions including Important Safety Instructions and Warnings before use.
Filling the Water Tank
1. Turn the water tank upside down and unscrew
the cap (Figure 9).
2. Hold the tank under clean cool tap water and fill
to the desired level. DO NOT fill past the MAX FILL line.
3. Once the tank is filled, screw the cap back on and
turn over. Place the water tank in the
steamer water tank cavity. Make sure it is sitting
securely (Figure 10).
NOTE:
• Only fill the tank with clean cool water. DO NOT use
HOT water.
• If the water in your area is extremely hard or has high mineral
content, only use demineralized or distilled water.
• Do not use any additives in the water such as fabric softeners, scents, bleach,
and starch. They will damage the garment steamer and your garment.
Figure 9
Figure 10
6 7
Page 5
Using the Steamer
Always check fabric labels for recommendations before steaming. Test color fastness in
an inconspicuous spot. Some fabrics can be steamed better from the underside of the
material. Heavy fabrics may require repeated steaming. Never steam a garment while it
is being worn.
1. Do not operate the steamer without water in the water tank.
2. Be sure the steamer nozzle is placed on the hanger attachment (Figure 4).
3. Plug the steamer cord into a 120V AC electrical outlet.
4. Hang the garment to be steamed on the steamer’s collapsible
hanger. Attach the bottom of the garment to the low hanger clips
to keep it taut.
5. Press the foot press ON/OFF switch to the ON position.
The switch will illuminate (Figure 11).
6. A beep will sound indicating the steamer is ready for use.
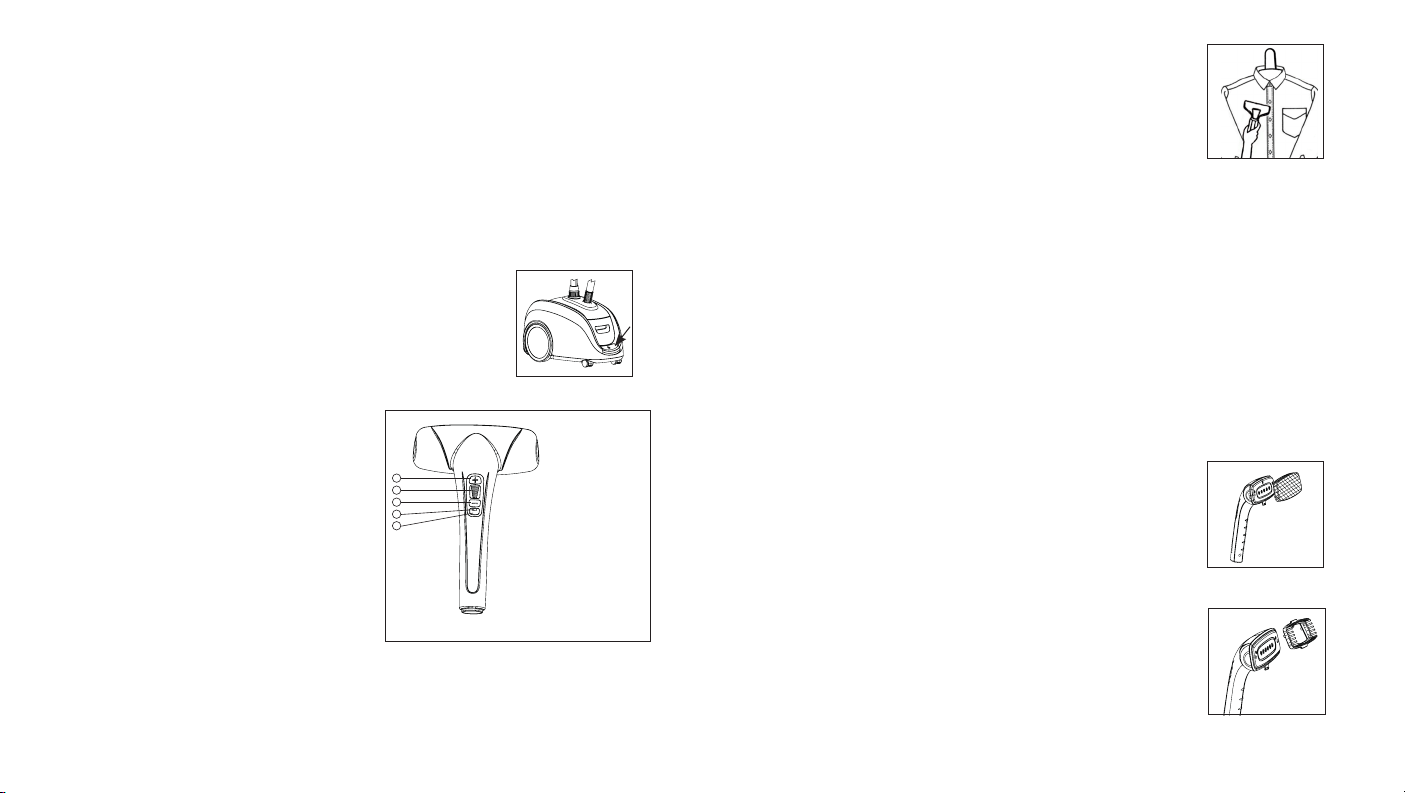
7. After the beep sounds push the Steam on Demand button to turn on
the steam. The light glows green. Press the Steam on Demand button
to turn off the steam. The light turns off (Figure 12).
8. Once continuous steam emits from the steam nozzle, adjust the
pressurized steam
settings to the desired intensity. The + button
increases the steam intensity. The – button
decreases the steam intensity (Figure 12).
The default steam intensity is medium setting 4.
1
2
3
4
5
1. Plus button increases
STEAM
steam intensity
2. LCD display shows steam
intensity setting
3. Minus button decreases
steam intensity
4. Light
5. Steam on Demand button
pauses the steam
Figure 11
Figure 12
9. Lightly press the steam nozzle against the
garment and steam in a vertical motion starting
from the top of the garment to the bottom (Figure 13).
Always keep the hose and nozzle elevated above the
steamer and in a vertical position.
NOTE:
• The steamer will make a pumping sound during operation. This is
Figure 13
normal.
• A beep will sound when the tank is empty.
10. The Steam on Demand button pauses the steam. This button can be used when
repositioning, changing a garment, or during interruptions to prolong steam output
(Figure 12).
NOTE:
• Allow a few seconds for the boiler to cool down and the steam to stop after pressing
the steam on demand button.
• If the steam on demand button is activated for several minutes, it will take up to 25
seconds for the steam to resume.
Using Attachments
When attaching or changing attachments, be sure the unit is off, unplugged, and completely cool to avoid contact with hot water.
Cloth Nozzle Covers
The cloth nozzle cover can be used to soften the pressurized
steam intensity.
• Place the cloth cover over the steam nozzle (Figure 14).
• Steam in a downward motion from top to bottom.
Fabric Brush
The fabric brush opens the fabric weave for better steam penetration
on heavily wrinkled garments.
• Attach the fabric brush by lining up the notches on the
fabric brush with the holes on the steam nozzle. Gently
push into place (Figure 15).
• Steam in a downward motion from top to bottom gently
brushing the fabric.
Figure 14
Figure 15
8 9
Page 6

Crease Tool
The crease tool sets crisp creases.
• The crease tool snaps onto the steam nozzle by aligning the
crease tool slot with the steam nozzle tab (Figure 16).
• Pull the crease tool trigger to open the crease tool.
• Place the garment between the crease tool and steam nozzle
and release the trigger.
• Steam in a downward motion from top to bottom to set a
crease.
Lint Brush
The lint brush removes lint and pet hair from garments.
• Attach the lint brush by lining up the lint brush notches
with the holes on the steam nozzle. Gently push into place
(Figure 17).
• Steam in a downward motion from top to bottom gently
brushing the fabric.
• Clean the lint brush by brushing in the opposite direction
on an old cloth.
After Use
1. Push the foot press ON/OFF button OFF and unplug the steamer.
2. Allow the steamer to cool for at least 30 minutes.
3. Empty the water tank and allow it to air dry before replacing the cap and placing it back
on the steamer.
4. Remove the water filter and empty any excess water from the water cavity by tipping
over a sink. Place the water filter back into the water reservoir.
Figure 16
Figure 17
Storage
This garment steamer collapses for convenient storage (Figure 18).
1. Push the clothes hanger button to collapse the hanger.
2. Unlock the pole clips (Figure 3), collapse the pole and re-lock
the clips.
3. Coil the steam hose.
4. Store in a cool, dry place.
Replacing the Water Filter
1. Replace the water filter after 40 hours of usage to avoid mineral
build-up.
2. Only use Home Touch replacement water filter, model PS-WF350.
3. Remove the water tank, remove the old water filter and replace with a new filter.
4. See Assembly Instructions number 7.
5. Replacement water filters may be ordered on our website www.homedics.com
or by dialing Consumer Relations Monday – Friday, 8:30AM – 7:00 PM (EST)
at 1.800.466.3342
Figure 18
Cleaning and Maintenance
1. Periodically run the garment steamer on the highest steam output (setting 7) to
keep the steam jets free of residue.
2. Do not attempt to clean when hot. Be sure the steamer is turned OFF and
unplugged.
3. Clean exposed parts with a soft, slightly damp cloth. To remove stains, use a mild
soap.
4. Never use detergents, excess water, treated cloths, harsh cleaning agents, or
spray cleaners.
5. Do not immerse the steamer in water.
6. Do not attempt to disassemble, or open the steamer casing as this will void your
warranty.
10 11
Page 7

Problem Solving
PROBLEM CAUSE SOLUTION
ON/OFF switch does not
illuminate when pushed
Steamer fails to heat Steamer not plugged in Plug into electrical outlet
No Steam Steamer not plugged-in Plug into electrical outlet
Steamer not plugged in Plug into electrical outlet
Circuit overload Check household fuse
Foot press ON/OFF
switch not in “ON”
position
Steam on Demand button
not in “ON” position
Water tank is low or empty Check water tank to be
box and reset the circuit
breaker or replace the
fuse. Do not operate
another high wattage
appliance on the same
circuit
Press the toe touch
ON/OFF switch on the
steamer body
Press the Steam on
Demand button located
on the steamer handle. It
will glow green.
sure it is full. See filling the
water tank on page 7.
PROBLEM CAUSE SOLUTION
Steamer beeps Water tank is empty Re-fill the water tank
Steamer nozzle spits
water
Steamer has reached
heating temperature
Water filter not installed Install water filter per
Steam intensity too high Reduce steam intensity to
The steam nozzle and
hose are not being used
in a vertical position
Push the Steam on
Demand button to begin
your steaming session
Assembly Instruction #7
on page 6
a lower setting
Hold the steam nozzle
and hose vertically
12 13
Page 8

Mail To:
HOME TOUCH PRODUCTS
Warranty Center
Dept. 168, Suite 3
43155 W. Nine Mile Rd.
Novi, MI 48375
E-mail:
cservice@hometouchproducts.com
Phone:
Monday - Friday
8:30am - 7:00pm (ET)
1.800.466.3342
HoMedics sells its products with the intent that they are free of defects in manufacture and workmanship
for a period of one year from the date of original purchase, except as noted below. HoMedics warrants
that its products will be free of defects in material and workmanship under normal use and service. This
warranty extends only to consumers and does not extend to Retailers.
To obtain warranty service on your HoMedics product, mail the product and your dated sales receipt (as
proof of purchase), postpaid, to the following address:
HOME TOUCH PRODUCTS WARRANTY CENTER
Dept. 168, SUITE 3
43155 W. NINE MILE RD.
NOVI, MI 48375
No COD’s will be accepted.
HoMedics does not authorize anyone, including, but not limited to, Retailers, the subsequent consumer
purchaser of the product from a Retailer or remote purchasers, to obligate HoMedics in any way
beyond the terms set forth herein. This warranty does not cover damage caused by misuse or abuse;
accident; the attachment of any unauthorized accessory; alteration to the product; improper installation;
unauthorized repairs or modifications; improper use of electrical/power supply; loss of power;
dropped product; malfunction or damage of an operating part from failure to provide manufacturer’s
recommended maintenance; transportation damage; theft; neglect; vandalism; or environmental
conditions; loss of use during the period the product is at a repair facility or otherwise awaiting parts or
repair; or any other conditions whatsoever that are beyond the control of HoMedics.
This warranty is effective only if the product is purchased and operated in the country in which the
product is purchased. A product that requires modifications or adoption to enable it to operate in any
other country than the country for which it was designed, manufactured, approved and/or authorized, or
repair of products damaged by these modifications is not covered under this warranty.
THE WARRANTY PROVIDED HEREIN SHALL BE THE SOLE AND EXCLUSIVE WARRANTY. THERE
SHALL BE NO OTHER WARRANTIES EXPRESS OR IMPLIED INCLUDING ANY IMPLIED WARRANTY OF
MERCHANTABILITY OR FITNESS OR ANY OTHER OBLIGATION ON THE PART OF THE COMPANY WITH
RESPECT TO PRODUCTS COVERED BY THIS WARRANTY. HOMEDICS SHALL HAVE NO LIABILITY FOR
ANY INCIDENTAL, CONSEQUENTIAL OR SPECIAL DAMAGES. IN NO EVENT SHALL THIS WARRANTY
REQUIRE MORE THAN THE REPAIR OR REPLACEMENT OF ANY PART OR PARTS WHICH ARE FOUND
TO BE DEFECTIVE WITHIN THE EFFECTIVE PERIOD OF THE WARRANTY. NO REFUNDS WILL BE GIVEN.
IF REPLACEMENT PARTS FOR DEFECTIVE MATERIALS ARE NOT AVAILABLE, HOMEDICS RESERVES
THE RIGHT TO MAKE PRODUCT SUBSTITUTIONS IN LIEU OF REPAIR OR REPLACEMENT.
This warranty does not extend to the purchase of opened, used, repaired, repackaged and/or resealed
products, including but not limited to sale of such products on Internet auction sites and/or sales of
such products by surplus or bulk resellers. Any and all warranties or guarantees shall immediately cease
and terminate as to any products or parts thereof which are repaired, replaced, altered, or modified,
without the prior express and written consent of HoMedics.
This warranty provides you with specific legal rights. You may have additional rights which may vary
from country to country. Because of individual country regulations, some of the above limitations and
exclusions may not apply to you.
For more information regarding our product line in the USA, please visit: www.homedics.com
Limited One Year Warranty
PerfectSteam Professional
®
commercial garment steamer
m
o
m
e
n
n
u
e
s
e
m
ó
T
t
o
a
h
o
r
Registre
su producto en:
www.homedics.com/register
Su valioso aporte sobre este
producto nos ayudará a
crear los productos que
desee en el futuro.
a
© 2010 HOME TOUCH PRODUCTS and its affiliated companies, all rights reserved. Home Touch®, PerfectSteam®, and
STEAM ON DEMAND® are registered trademarks of HOME TOUCH PRODUCTS, Inc. and its affiliated companies.
All rights reserved.
IB-PS350
Manual de instrucciones e
Información de garantía
PS-350
Page 9

IMPORTANTES INSTRUCCIONES
DE SEGURIDAD:
CUANDO UTILIZA PRODUCTOS ELÉCTRICOS,
SIEMPRE SE DEBEN SEGUIR CIERTAS PRECAUCIONES
BÁSICAS DE SEGURIDAD, COMO LAS SIGUIENTES:
LEA TODAS LAS INSTRUCCIONES ANTES DE USAR.
ADVERTENCIA - Para reducir el riesgo de quemaduras,
incendio, choque eléctrico o lesiones a las personas
• Es posible que se queme si toca las partes metálicas calientes, el agua caliente o el
vapor. Tenga cuidado cuando coloca un artefacto a vapor con la parte superior hacia
abajo; puede haber agua caliente en el depósito de agua.
• Para reducir el riesgo de contacto con el agua caliente que sale de las aberturas para
el vapor, verifique el artefacto antes de cada uso sosteniéndolo alejado de su cuerpo
y presionando el botón de vapor.
• Use el artefacto solamente para el uso para el cual fue diseñado.
• Para reducir el riesgo de choque eléctrico, no sumerja el artefacto en agua ni en
otros líquidos.
• Nunca tire del cable para desconectar del tomacorriente; en lugar de eso, tome el
enchufe y tire para desconectar.
• No deje que el cable toque superficies calientes. Deje que el artefacto se enfríe por
completo antes de guardarlo. Enrolle el cable alrededor del dispositivo, sin ajustarlo,
cuando lo guarde.
• Siempre desconecte el artefacto del tomacorriente cuando lo llene de agua o cuando lo
vacíe, y cuando no se encuentre en uso.
• No haga funcionar el artefacto con un cable dañado, o si el artefacto se cayó o se dañó.
:
Para reducir el riesgo de choque eléctrico, no desarme ni intente reparar el artefacto;
llévelo con un profesional de servicio calificado para que lo examine y lo repare.
El rearmado o la reparación incorrectos podrían causar un riesgo de incendio,
choque eléctrico o lesión a las personas cuando usen el artefacto.
• Es necesaria una atenta supervisión sobre cualquier artefacto usado por o cerca
de un niño. No deje el artefacto sin supervisión mientras se encuentra conectado.
• Para reducir la probabilidad de sobrecarga del circuito, no haga funcionar ningún
otro artefacto de alto vataje en el mismo circuito.
• Si realmente resulta necesario un cable de extensión, se debe usar un cable
de clasificación de amperaje de 20. Es posible que los cables con menor clasificación
de amperaje se sobrecalienten. Se debe tener cuidado al acomodar el cable para
que nadie tire de él o se tropiece con éste.
GUARDE ESTAS INSTRUCCIONES
16 17
Page 10

Patilla de conexión a tierra
Figura A
Lengüeta
para
tornillo de
Adaptador
conexión
a tierra
Figura B
Tomacorriente
con conexión
a tierra
Figura C
Tornillo de metal
Figura D
Figura E
Instrucciones de conexión a tierra
Este producto debe ser conectado a tierra. Si llegara a funcionar
incorrectamente o a descomponerse, la conexión a tierra proporciona
una ruta de mínima resistencia para la corriente eléctrica reduciendo
así el riesgo de choque eléctrico. Este producto está equipado con
un conductor de conexión a tierra y un enchufe de conexión a tierra.
El enchufe debe estar enchufado en un tomacorriente apropiado que
esté adecuadamente instalado y conectado a tierra de acuerdo con
todos los códigos y ordenanzas locales.
PELIGRO - Para reducir el riesgo
de choque eléctrico
Una conexión inadecuada del conductor de conexión a tierra
puede dar como resultado un riesgo de choque eléctrico.
Verifique con un electricista calificado o un técnico de servicio
si duda si el producto está conectado a tierra adecuadamente.
No modifique el enchufe proporcionado con el producto; si no
calza en el tomacorriente, puede usar un adaptador en forma
temporal (como el que se muestra en la Figura B) hasta que
un electricista calificado le instale un tomacorriente adecuado
(como el que se muestra en la Figura C).
Este producto está diseñado para ser utilizado en un circuito de
120 voltios nominales, y tiene un enchufe de conexión a tierra que se
ve como el que se ilustra en la Figura A. Si no hay un tomacorriente
disponible con conexión a tierra, se puede utilizar un adaptador
temporal que se ve como el adaptador ilustrado en la Figura B para
conectar este enchufe a un receptáculo bipolar como se muestra en
la Figura D. El adaptador temporal se debe utilizar sólo hasta que un
electricista calificado pueda instalar un tomacorriente apropiado con
conexión a tierra, Figura C. La lengüeta para tornillo de conexión a
tierra, Figura B, que se extiende del adaptador, debe ser conectada
a un conector de descarga a tierra permanente como puede ser una
tapa de caja de tomacorriente conectada adecuadamente a tierra.
Cada vez que se utilice el adaptador, el mismo debe ser mantenido
en su lugar con un tornillo metálico. Ver Figuras D y E.
:
18 19
Información del producto
1. Boquilla de vapor
2. Mango de la boquilla de vapor
3. Manguera de vapor
4. Barra plegable
5. Compartimento para guardar
accesorios
6. Puerta para accesorios
7. Interruptor de encendido/apagado
(ON/OFF) iluminado de prensa
a pedal
8. Rueditas frontales
9. Ruedas traseras
10. Cable de corriente
11. Tuerca de la barra
12. Filtro de agua
13. Tanque de agua
14. Gancho para ropa con pinzas
15. Pinzas
16. Gancho con pinzas inferior
17. Cepillo para tela
18. Cepillo para pelusas
19. Utensilio para pliegues
20. Funda de tela (cantidad 4)
21. Accesorio para gancho
Figura 1
Características profesionales de PerfectSteam
• Sistema de vapor a presión para eliminar arrugas de manera instantánea
• Botón para detener el vapor de Steam on Demand®
• 7 configuraciones de emisión de vapor al alcance de su mano
• Se calienta en 45 segundos
• El tanque de agua de fácil llenado proporciona 3 horas de vapor continuo
• Gancho con pinzas superior plegable
• Gancho con pinzas inferior
• Compartimento para guardar accesorios
• Manguera de vapor flexible, de 5 pies
• Barra plegable
• Apagado y reinicio automáticos
• Filtro de agua
• Boquilla de vapor de acero inoxidable
• Incluye cepillo para tela, cepillo para pelusas, utensilio para pliegues y fundas de tela para la
boquilla
• Para uso doméstico
Page 11

Instrucciones de armado
STEAM
STEAM
STEAM
STEAM
STEAM
Retire cuidadosamente todos los elementos del paquete e inspeccione el
producto para asegurarse de haber recibido todas las piezas (Figura 1).
1. Introduzca la barra plegable en la plancha
a vapor. Alinee las ranuras de la barra con
las de la base de la barra y presione hacia
abajo. Ajuste manualmente la tuerca de la
barra girándola hacia la derecha (Figura 2).
2. Extienda totalmente la barra plegable. Abra
las 3 abrazaderas de la barra y tire hacia
arriba (Figura 3). Cierre las abrazaderas y
asegúrese de que la barra se encuentre
trabada de forma segura en el lugar.
3. Cuelgue el accesorio para gancho. Alinee
las pestañas en el accesorio para gancho
con las ranuras sobre la barra y presione
hacia abajo (Figura 3).
4. Cuelgue el mango de la boquilla de vapor
en el accesorio para gancho (Figura 4).
5. Coloque el gancho para ropa con pinzas
sobre el accesorio para gancho y presione
con suavidad hacia abajo (Figura 5).
Expanda el gancho para ropa elevando
cada lado hasta que se trabe en su lugar.
6. Enganche el gacho inferior en la barra
plegable (Figura 6).
7. Coloque el filtro de agua dentro del
depósito de agua alineando la salida del
filtro de agua con el orificio en el depósito
de agua y presione hacia abajo para fijar
(Figura 7).
NOTA:
• La plancha a vapor no funciona sin el filtro
de agua.
Accesorio
para gancho
Pinzas
Figura 2
Figura 3
Figura 4
Figura 5
8. Se pueden guardar el cepillo para tela, cepillo para pelusas, utensilio para pliegues y
fundas de tela dentro del compartimento para guardar integrado (Figura 8).
Figura 6 Figura 7 Figura 8
Instrucciones de uso
Antes de comenzar
Lea todas las instrucciones antes de usar, incluyendo las Instrucciones y advertencias
de seguridad importantes.
Llenado del tanque de agua
1. Voltee el tanque de agua y desatornille la tapa (Figura 9).
2. Coloque el tanque bajo un chorro de agua fría y limpia,
y llene hasta el nivel que desee. NO lo llene por encima de la
línea de LLENADO MÁXIMO.
3. Una vez que el tanque esté lleno, enrosque la tapa nuevamente
y voltéelo. Coloque el tanque de agua en la cavidad del tanque
de agua de la plancha a vapor. Asegúrese de que esté colocado
en forma segura (Figura 10).
NOTA:
• Use solo agua fría limpia para llenar el tanque. NO use
agua caliente.
• Si en su área el agua es demasiado dura o tiene un contenido mineral
alto, use únicamente agua desmineralizada o destilada.
• No use aditivos en el agua tales como suavizantes, aromatizantes,
blanqueadores y almidón. Dañarán la plancha a vapor y a su prenda.
Figura 9
Figura 10
20 21
Page 12

Uso de la plancha a vapor
Revise siempre las recomendaciones de las etiquetas de la tela antes de planchar al vapor.
Pruebe la inalterabilidad del color en un lugar donde pase inadvertido. Algunas telas se
planchan mejor al vapor poniéndolas al revés. Las telas pesadas probablemente deban ser
planchadas al vapor varias veces. Nunca planche al vapor una prenda que tenga puesta.
1. No haga funcionar la plancha a vapor sin agua en el tanque de agua.
2. Asegúrese de que la boquilla de la plancha a vapor esté en el accesorio para
gancho (Figura 4).
3. Enchufe el cable de la plancha a vapor en un tomacorriente de 120 voltios de CA.
4. Cuelgue la prenda a planchar en el gancho plegable de la plancha a vapor.
Sostenga la parte de abajo de la prenda con las pinzas del gancho inferior,
para mantenerla tensa.
5. Presione el interruptor de encendido y apagado (ON/OFF) de prensa
a pedal y déjelo en la posición de encendido (ON). El interruptor se
iluminará (Figura 11).
6. Sonará un pitido indicando que la plancha a vapor está lista para usar.
7. Luego de que suene el pitido, presione el botón de disparo de vapor
para encender el vapor. La luz brillará de color verde. Presione el
botón de disparo de vapor para apagar el vapor.
La luz se apaga (figura 12).
8. Una vez que comienza a salir vapor en forma
continua de la boquilla de vapor, ajuste la
configuración del vapor a presión a la intensidad
deseada. El botón “+” aumenta la intensidad
del vapor. El botón “–” disminuye la intensidad
del vapor (Figura 12). La intensidad de vapor
1
2
3
4
5
STEAM
por defecto es la media, 4.
1. El botón de “más” aumenta
la intensidad del vapor
2. La pantalla LCD muestra
la intensidad de vapor
configurada
3. El botón de “menos”
disminuye la intensidad
del vapor
4. Luz
5. El botón de disparo de vapor
detiene la salida de vapor
Figura 11
Figura 12
9. Toque apenas la prenda con la boquilla de vapor y plánchela con
un movimiento vertical comenzando desde la parte superior de
la prenda hasta la parte inferior (Figura 13). Siempre mantenga la
manguera y la boquilla elevadas por encima de la plancha a vapor
y en posición vertical.
NOTA:
• La plancha hará un ruido de bombeo durante el funcionamiento.
Figura 13
Esto es normal.
• Cuando el tanque esté vacío, se escuchará un pitido.
10. El botón de disparo de vapor detiene la salida de vapor. Este botón se puede utilizar
cuando se recoloca, cuando se cambia una prenda o durante las interrupciones para
extender la emisión de vapor (Figura 12).
NOTA:
• Espere unos segundos hasta que se enfríe la caldera y deje de salir vapor luego
de presionar el botón de disparo de vapor.
• Si el botón de disparo de vapor se mantiene activado durante varios minutos,
el vapor tardará hasta 25 segundos en volver a salir.
Uso de los accesorios
Cuando coloque o cambie los accesorios, asegúrese de que la unidad esté apagada,
desenchufada y totalmente fría para evitar el contacto con el agua caliente.
Fundas de tela para la boquilla
La funda de tela para la boquilla se puede utilizar para suavizar
la intensidad del vapor a presión.
• Coloque la funda de tela sobre la boquilla de vapor (Figura 14).
• Planche con un movimiento de arriba hacia abajo.
Cepillo para tela
El cepillo para tela abre la trama de las telas para que penetre mejor
el vapor en prendas muy arrugadas.
• Adjunte el cepillo para tela alineando las muescas del cepillo
con los orificios de la boquilla de vapor. Empuje suavemente
hasta que quede en su lugar (Figura 15).
• Planche con un movimiento de arriba hacia abajo cepillando
suavemente la tela.
Figura 14
Figura 15
22 23
Page 13

Utensilio para pliegues
El utensilio para pliegues permite formar pliegues perfectos.
• El utensilio para pliegues calza en la boquilla de vapor, alineando
la ranura del utensilio con la pestaña de la boquilla (Figura 16).
• Tire del gatillo del utensilio para pliegues para abrirlo.
• Coloque la prenda entre el utensilio para pliegues y la boquilla
de la plancha a vapor y suelte el gatillo.
• Planche con un movimiento de arriba hacia abajo para crear
un pliegue.
Cepillo para pelusas
El cepillo para pelusas quita las pelusas y los pelos de mascotas de
las prendas.
• Adjunte el cepillo para pelusas alineando las muescas del cepillo con
los orificios de la boquilla de vapor. Empuje suavemente hasta que
quede en su lugar (Figura 17).
• Planche con un movimiento de arriba hacia abajo cepillando
suavemente la tela.
• Limpie el cepillo para pelusas en la dirección opuesta, sobre un paño viejo.
Luego del uso
1. Presione apagado (OFF) en el interruptor de encendido y apagado (ON/OFF) de prensa
a pedal y desenchufe la plancha.
2. Deje que la plancha a vapor se enfríe durante al menos 30 minutos.
3. Vacíe el tanque de agua y deje que se seque al aire antes de volver a taparlo y colocarlo
en la plancha.
4. Retire el filtro de agua y quite todo el exceso de agua de la cavidad de agua inclinando la
plancha sobre una pileta. Coloque el filtro de agua nuevamente en el depósito de agua.
Figura 16
Figura 17
Guardado
Esta plancha a vapor se pliega para almacenar de forma práctica
(Figura 18).
1. Presione el botón del gancho para ropa para plegar el gancho.
2. Destrabe las abrazaderas de la barra (Figura 3), pliegue la barra
y vuelva a trabar las abrazaderas.
3. Enrolle la manguera a vapor.
4. Guárdela en un lugar fresco y seco.
Cambio del filtro de agua
1. Cambie el filtro de agua después de 40 horas de uso para evitar la
acumulación de minerales.
2. Use únicamente repuestos de filtro de agua Home Touch, modelo PS-WF350.
3. Retire el tanque de agua, retire el filtro de agua viejo y cámbielo por un filtro nuevo.
4. Vea las Instrucciones de armado N.º 7.
5. Es posible encargar filtros de agua de repuesto en nuestro sitio web www.homedics.com
o llamando a Atención al consumidor, de lunes a viernes, de 8:30 a.m. – 7:00 p.m. (EST)
al 1.800.466.3342
Figura 18
Limpieza y mantenimiento
1. Haga funcionar la plancha periódicamente a la velocidad de emisión de vapor más alta
(configuración 7) para mantener los chorros de vapor libres de residuos.
2. No intente limpiarla cuando esté caliente. Asegúrese de que la plancha a vapor esté
apagada y desenchufada.
3. Limpie las partes expuestas con un paño suave, apenas húmedo. Para quitar manchas,
use un jabón suave.
4. Nunca use detergentes, agua en exceso, paños tratados, agentes de limpieza fuertes
ni limpiadores en aerosol.
5. No sumerja la plancha en agua.
6. No intente desarmarla, ni abrir la carcasa de la plancha ya que esto anulará su garantía.
24 25
Page 14

Resolución de problemas
PROBLEMA CAUSA SOLUCIÓN
El interruptor de
encendido y apagado
(ON/OFF) no se ilumina
cuando se lo presiona
La plancha a vapor
no calienta
No libera vapor La plancha a vapor no
La plancha a vapor
no está enchufada
Sobrecarga del circuito Revise la caja de fusibles
La plancha a vapor
no está enchufada
El interruptor de
encendido/apagado "ON/
OFF" de la prensa a pedal
no está en la posición de
encendido (ON)
está enchufada
El botón de disparo de
vapor (Steam on Demand)
no está en la posición de
encendido (ON)
El tanque de agua tiene
poca carga o está vacío
Enchufe en el
tomacorriente
y vuelva a configurar el
disyuntor o reemplace el
fusible. No haga funcionar
ningún otro artefacto de
alto voltaje en el mismo
circuito
Enchufe en el
tomacorriente
Presione el interruptor de
encendido/apagado (ON/
OFF) que se encuentra en
el cuerpo de la plancha
Enchufe en el
tomacorriente
Presione el botón de
disparo de vapor (Steam
on Demand) ubicado en
el mango de la plancha
a vapor. Brillará de color
verde.
Revise el tanque de
agua para asegurarse de
que esté lleno. Consulte
Llenado del tanque de
agua en la página 21.
PROBLEMA CAUSA SOLUCIÓN
La plancha emite pitidos El tanque de agua está
La boquilla de la plancha
expulsa agua
vacío
La plancha a vapor ha
alcanzado la temperatura
de calentamiento
El filtro de agua no está
instalado
La intensidad del vapor es
demasiado alta
La manguera y la boquilla
de vapor no se están
usando en posición
vertical
Vuelva a llenar el tanque
de agua
Presione el botón de
disparo de vapor para
comenzar la sesión de
planchado al vapor
Instale el filtro de agua
según las instrucciones
de armado N.º 7 de la
página 20
Baje la intensidad del
vapor a una velocidad
menor
Sostenga la boquilla de
vapor y la manguera de
forma vertical
26 27
 Loading...