

HoMedics PED-1200 operation manual

PEDICURE CALLUS REMOVER
PLEASE TAKE A
MOMENT NOW
..........................
REGISTER YOUR PRODUCT AT:
www.homedics.com/register
YOUR VALUABLE INPUT REGARDING
THIS PRODUCT WILL HELP US CREATE
THE PRODUCTS YOU WILL WANT
IN THE FUTURE.
INSTRUCTION MANUAL AND WARRANTY INFORMATION
ONE YEAR LIMITED WARRANTY
PED-1200
READ ALL INSTRUCTIONS BEFORE USE
SAVE THESE INSTRUCTIONS FOR FUTURE REFERENCE
IMPORTANT SAFEGUARDS:
WHEN USING ELECTRICAL PRODUCTS, ESPECIALLY WHEN CHILDREN ARE PRESENT, BASIC
SAFETY FEATURES SHOULD ALWAYS BE FOLLOWED, INCLUDING THE FOLLOWING
• Use this appliance for the intended use as described in this booklet. DO NOT use attachments
not recommended by HoMedics.
• Excessive use could lead to the product’s excessive heating and shorter life. Should this occur,
discontinue use and allow the unit to cool before operating.
• DO NOT attempt to repair the appliance. There are no user serviceable parts. For service,
contact HoMedics Consumer Relations.
• Do not place or store appliance where it can fall or be pulled into a bath or sink. Do not place in
or drop into water or other liquid.
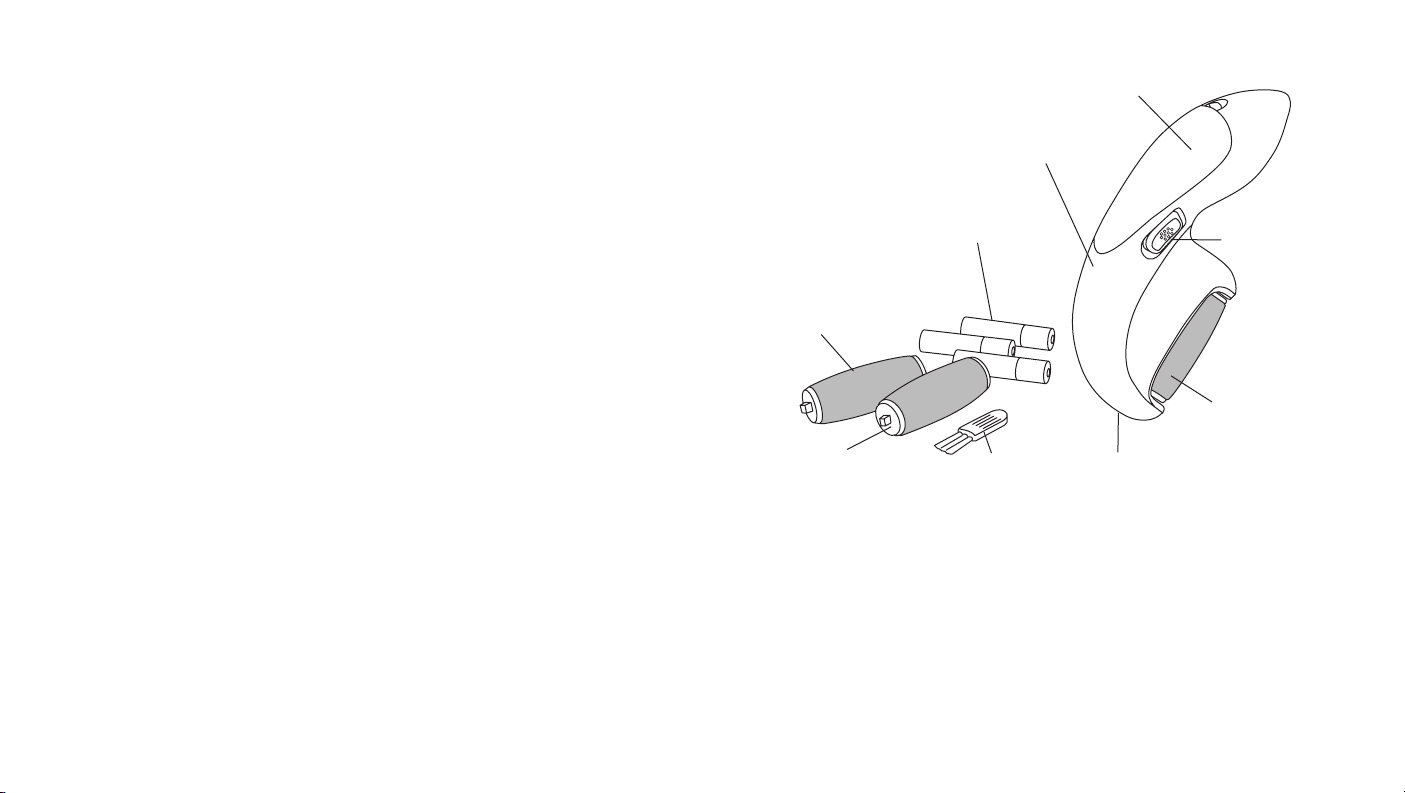
PEDICURE CALLUS REMOVER
BATTERY COMPARTMENT
MAIN BODY
3X AAA
BATTERIES
POWER SWITCH
SAFETY CAUTIONS:
PLEASE READ THIS SECTION CAREFULLY BEFORE USING THE APPLIANCE.
• If you are susceptible to allergic reactions or if you have circulatory problems, consult a
physician before using this product.
• Do not use on irritated, sunburned or chapped skin, or on any area with dermatological
problems.
• Do not apply over skin eruptions, warts, moles or varicose veins.
• Individuals with pacemakers and pregnant women should consult a doctor before using this
appliance. Not recommended for use by Diabetics.
• DO NOT use on an infant, invalid or on a sleeping or unconscious person. DO NOT use on
insensitive skin or on a person with poor blood circulation.
• If you feel any discomfort while using this appliance, discontinue use and consult your doctor.
• This product should NEVER be used by any individual suering from any ailments that would
limit the user’s capacity to operate the controls.
• Please ensure that all hair, clothing and jewelry are kept clear of moving parts of the product at
all times.
COARSE ROLLER:
PINK EDGE
FINE ROLLER:
GREY EDGE
EXTRA COARSE ROLLER:
WHITE EDGE
CLEANING
BRUSH
RELEASE
BUTTON
UNIQUE FEATURES & SPECIFICATIONS
DIAMOND CRYSTAL ROLLERS
Coarse, extra coarse, and fine
2 SPEED SETTINGS
Hi and Lo
ERGONOMIC SHAPE
For comfort while using
BATTERY OPERATED
Uses 3 “AAA” batteries (included)
2 3
HOW TO USE
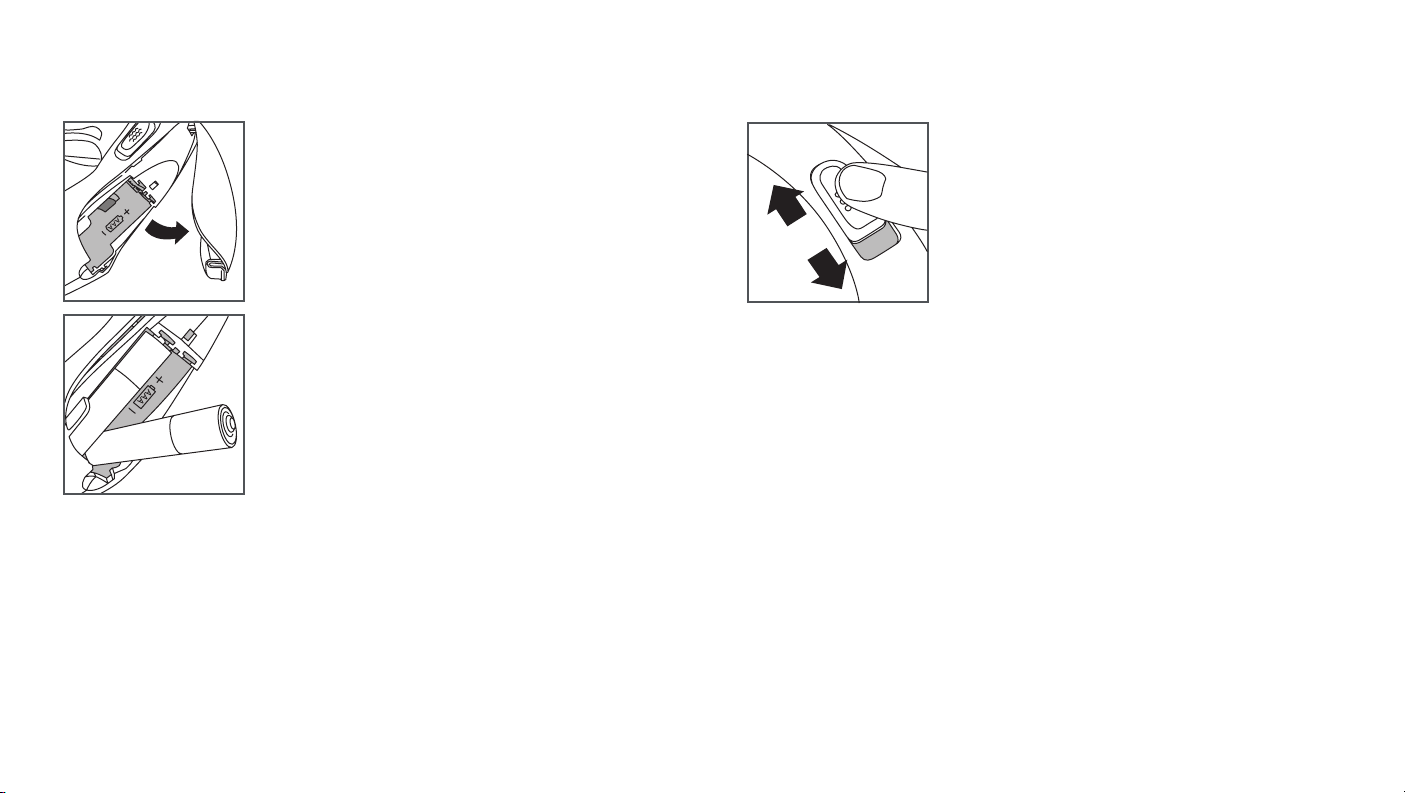
INSERTING THE BATTERIES
1. Open the battery compartment.
2. Insert batteries observing the polarity signs (+ and -) inside the
battery compartment. NOTE: The batteries are stacked with
one of the batteries behind the other two.
3. Close the battery compartment
HOW TO USE
1. Before use, ensure that your feet are clean and dry.
2. Use the switch to select a power setting;
3. For sensitive skin, or softer skin use the LO setting
4. For harder skin use the HI setting
HI
OFF
Cautions
Before use, make sure that the roller is in good condition. Any malformation, distortion or damage
may cause skin injury.
DO NOT APPLY EXCESS PRESSURE OR CAUSE THE MOTOR TO STOP ROTATING. FOR BEST
RESULTS, RUN THE UNIT GENTLY OVER THE SKIN. THIS WILL ENSURE SOFT, SAFE AND
SMOOTH REMOVAL OF DEAD SKIN.
OFF
LO
LO
5. Using light pressure place the surface of roller onto the heel
or sole of your foot and gradually move the device around to
target areas of hard skin. Do not use on a single area for more
than 4 seconds at a time.
6. Check the results throughout. Once you are happy with the
results turn the switch to OFF.
7. Rinse your feet with clean water & dry before applying your
favorite foot cream.
4 5
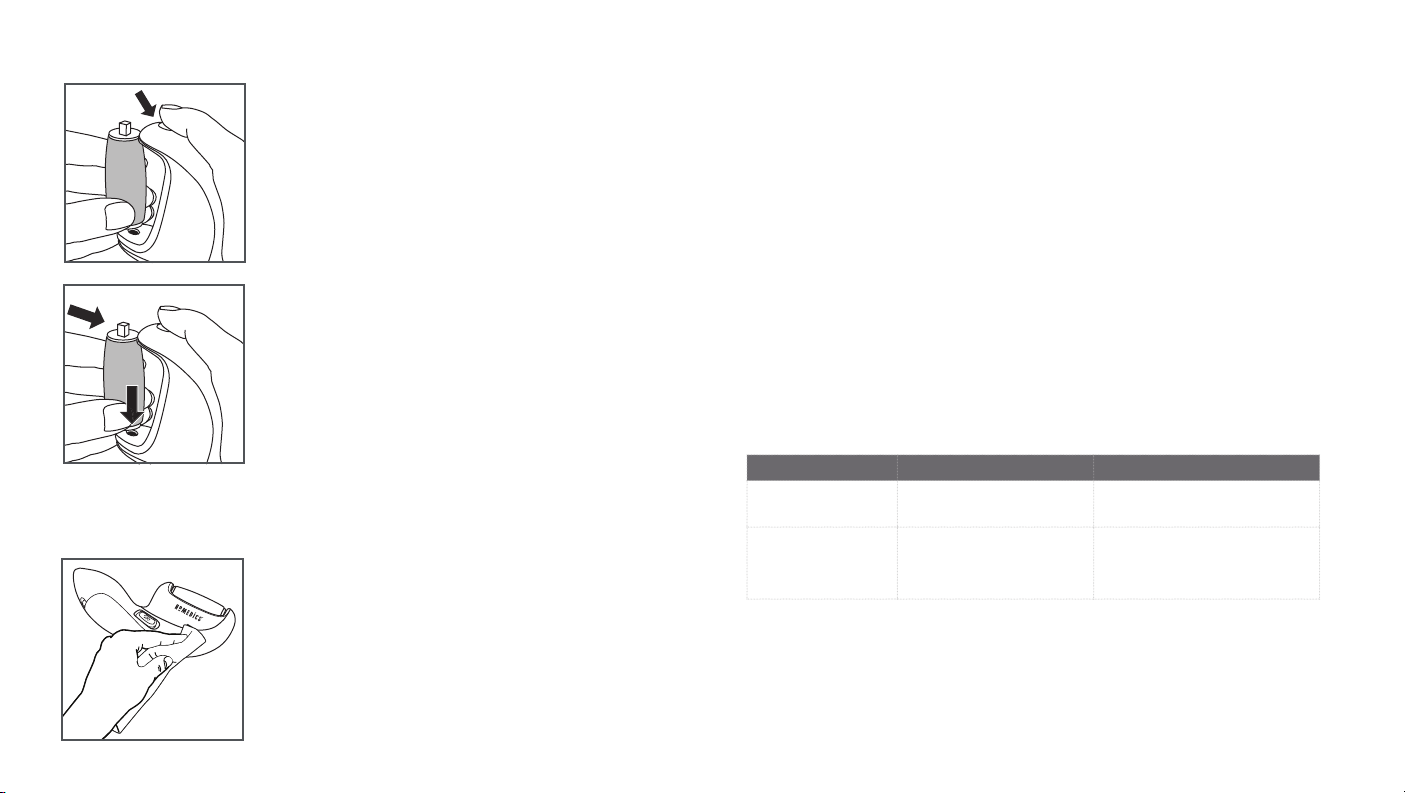
CHANGING THE ROLLERS
TO REMOVE THE ROLLER
1. Ensure the switch is in the OFF position.
2. With one hand press the release button on the side of
thedevice.
3. With the other hand lift out the roller.
TIP: It’s easier to lift the roller out from the end closest to the
release button.
TO INSERT A NEW ROLLER
1. Loosely position one of the roller pins into the recess on the
end furthest from the release button.
2. Push the other end of the roller into place using the groves
to guide it into position.
3. The roller will secure into place with a click
CLEANING AND CARE
Always turn the device o and remove the batteries before cleaning.
TO CLEAN THE SURFACE
Clean the surface of the unit with a clean, damp, soft cloth
• NOTE: Never allow water or any other liquids to come in
contact with the unit
• Only clean the rollers with the supplied brush
• Never use abrasive cleaners to clean the unit
CLEANING AND CARE
TO STORE
• Remove batteries if equipment is not going to be used for ex tended periods of time.
• Place the components into its box and store in a safe, dryplace
BATTERY PRECAUTIONS
• Do not mix old and new batteries.
• Use only the size and type of batteries specified.
• Do not dispose of batteries in fire. Batteries may explode or leak.
• When installing batteries, observe proper +/- polarities. Incorrect installation of battery may
cause damage to the unit.
• Do not mix alkaline, standard (carbon-zinc), or rechargeable (ni-cad, ni-mh, etc) batteries.
• Clean the battery contacts and also those of the device prior to battery installation.
• Remove used batteries promptly.
• If the unit is not going to be used for a long period of time, remove batteries to prevent
damage due to possible battery leakage.
• Recycle or dispose of properly in accordance with all local, state, province, and country
regulations.
TROUBLESHOOTING
PROBLEM POSSIBLE CAUSE SOLUTION
Motor power seems
reduced
Roller surface appears
worn or less abrasive
• Low batteries • Replace the batteries
• Dirty
• Roller needs replacing
• Brush clean with cleaning brush
(included)
• Replace the roller
6 76 7
 Loading...