

Page 1

M
A
o
e
m
k
e
a
T
e
s
a
e
l
P
Register
Your Product At:
www.homedics.com/register
Your valuable input regarding this
product will help us create
the products you will
want in the future.
n
t
N
o
w
El manual en
español empieza
a la página
Sleepy Snail
soothing sounds, lights and projection
Instruction Manual and
Warranty Information
Congratulations!
Thank you for purchasing the MyBaby, by HoMedics SoundSpa Sleepy
Snail. The SoundSpa Sleepy Snail soothes your baby through gentle
lights, sounds and projection.
SoundSpa
Features:
• 5 Natural sounds: Rain, Ocean, Heartbeat, Summer Night and White Noise
• 5 Lullabies: Twinkle, Twinkle, Rock-A-Bye-Baby, Cradle Song, Fur Elise, Hush Little Baby
• Auto-timer lets you choose how long sounds play – 15, 30, 60 minutes or continuously
• Picture projection
• Color changing lights
• 2 Projection scenes: Bugs, Animals
• Volume control adjusts the volume of the lullabies or natural sounds
• Stand supports Snail when not in crib
IMPORTANT SAFETY INSTRUCTIONS:
When using an electrical appliance, basic precautions should always be followed, including the following:
READ ALL INSTRUCTIONS BEFORE USING
DANGER - To reduce the risk of electric shock:
• Do not reach for an appliance that has fallen into water.
• Do not place or store appliance where it can fall or be pulled into a tub or sink. Do not place in or
drop into water or other liquid.
WARNING - To reduce the risk of burns, fire, electric shock or injury to persons:
• This product is not for use by children. For adult use only.
• Use this appliance only for its intended use as described in this manual. Do not use attachments not
recommended by HoMedics; specifically any attachments not provided with the unit.
• Never operate this appliance if it has a damaged housing. If it is not working properly, if it has been
dropped or damaged, return it to HoMedics Service Center for examination and repair.
• Never drop or insert any object into any opening.
• Do not operate where aerosol (spray) products are being used or where oxygen is being administered.
• This appliance is designed for indoor use only. Do not use outdoors.
• Only set on dry surfaces. Do not place on surface wet from water or cleaning solvents.
MYB-S500
SAVE THESE INSTRUCTIONS
Caution – Please read all instructions carefully before operating.
• Never cover the appliance when it is in operation.
1 4 5 6
Page 2

WARNING: All packing material, such as tape, packaging locks, and sticker tags are not part of this
toy, and should be discarded for your child’s safety.
NOTE: Please keep this instruction manual as it contains important information.
How To Install Batteries:
• This product takes 3 C batteries. Do not use rechargeable batteries.
• Open the battery panel door on the bottom of the toy (Fig. 1a) using a coin to unscrew the door screw.
• Insert batteries into compartment in the direction shown, with the negative (-) end pointed back into
the compartment (Fig 1b).
• Replace battery door and use coin to secure the battery door screw.
NOTE: When sounds or light become faint or stop, it is time for an adult to change the batteries.
Caution: All servicing of this product must be performed by authorized HoMedics Service Personnel only.
Listening to the Sounds/Melodies:
• To turn the sounds on, press the POWER button on the top right panel (Fig. 2).
• Sounds will gradually increase to last played volume.
• To change sounds or melodies, press either the Sounds or Melodies button until you hear the sound or
melody you want. The Sound Button will toggle between the 5 Sounds. The Melodies Button will toggle
between the 5 melodies.
• To turn off Sounds or Melodies, press the POWER button.
NOTE: When the unit is turned on, it will always default to the last sound used.
Using the Lights Display function:
• To turn the Lights Display on, press the LIGHTS button on the top left panel (Fig. 3).
• The lights will turn on and begin random display of colors.
• To increase the brightness, press the LIGHTS button a 2nd time.
• To turn the Lights Display off, press the LIGHTS button a 3rd time.
NOTE: Lights Display will automatically turn off after 5 minutes.
Figure 1a –
Battery Door On
Figure 1b –
Battery Door Off
Buttons Overview
The controls for Sounds are located on the right side of the Snail (Fig. 2). The controls for the
Lights and Projection features are located on the left side of the snail (Fig. 3). The Projection Selection knob is
located at the top of the projection piece (Fig. 4).
Auto-timer
Melodies
Sounds
Volume -/+
Power
Figure 2
30
60
15
Figure 3
Projection
Lights
Using the Projection function:
• To turn the Projection on, press the PROJECTION button on the top left panel (Fig. 3).
• The image projection will turn on and projecting images onto the ceiling. 3 individual images will fade in and
out in a sequence (see Changing Scenes to switch between image scenes).
• To increase the brightness, press the PROJECTION button a 2nd time.
• To turn the Projection off, press the PROJECTION button a 3rd time.
NOTE: Projection will automatically turn off after 5 minutes.
Changing Scenes:
• To change from one image scene to another, turn the rotation disk on the top of the
projector (Fig 4).
• Turn the rotation disk until you feel a light “snap” to indicate the disk is locked in its
proper position.
• To switch back to previous scene, rotate the opposite direction until you feel the
same light “snap”.
Figure 4
• There are two image scenes: “bugs” and “animals”.
32
Page 3
Using Attachment Straps:
IMPORTANT: Please check the unit frequently to ensure it is still secure.
NOTE: Do not attach to playpens or mesh walls.
The attachment straps are not intended for use as a toy. Please make sure the attachment straps are out of
reach from children.
1. To secure the Snail to a crib, first ensure the straps are positioned correctly on the back of the product
(Fig. 5). The square part of the strap should sit evenly against the body of the Snail. The straps slide
under the Position Bar.
2. With the straps properly positioned, place the Snail up against the top rail of the crib, with Snail facing
into the crib.
3. The straps will loop around the top bar, with the ends coming back against the Snail’s body (Fig 6).
4. Press the peg on the square part of each strap through the hole in the strap end as shown (Fig 7).
Make sure the peg is fully inserted through the hole. You should feel a slight “pop” as the peg
securely positions into the strap hole.
5. Press lightly but firmly down on the product body to ensure it is securely attached to the crib.
6. Use attached strings to tie Snail securely to the crib (Fig 6).
Position Bar
Figure 5
IMPORTANT: Check the unit frequently to ensure it is still secure. Failure to attach to crib in the exact
manner shown may result in product falling into crib. Take care to follow directions exactly.
Figure 6 Figure 7
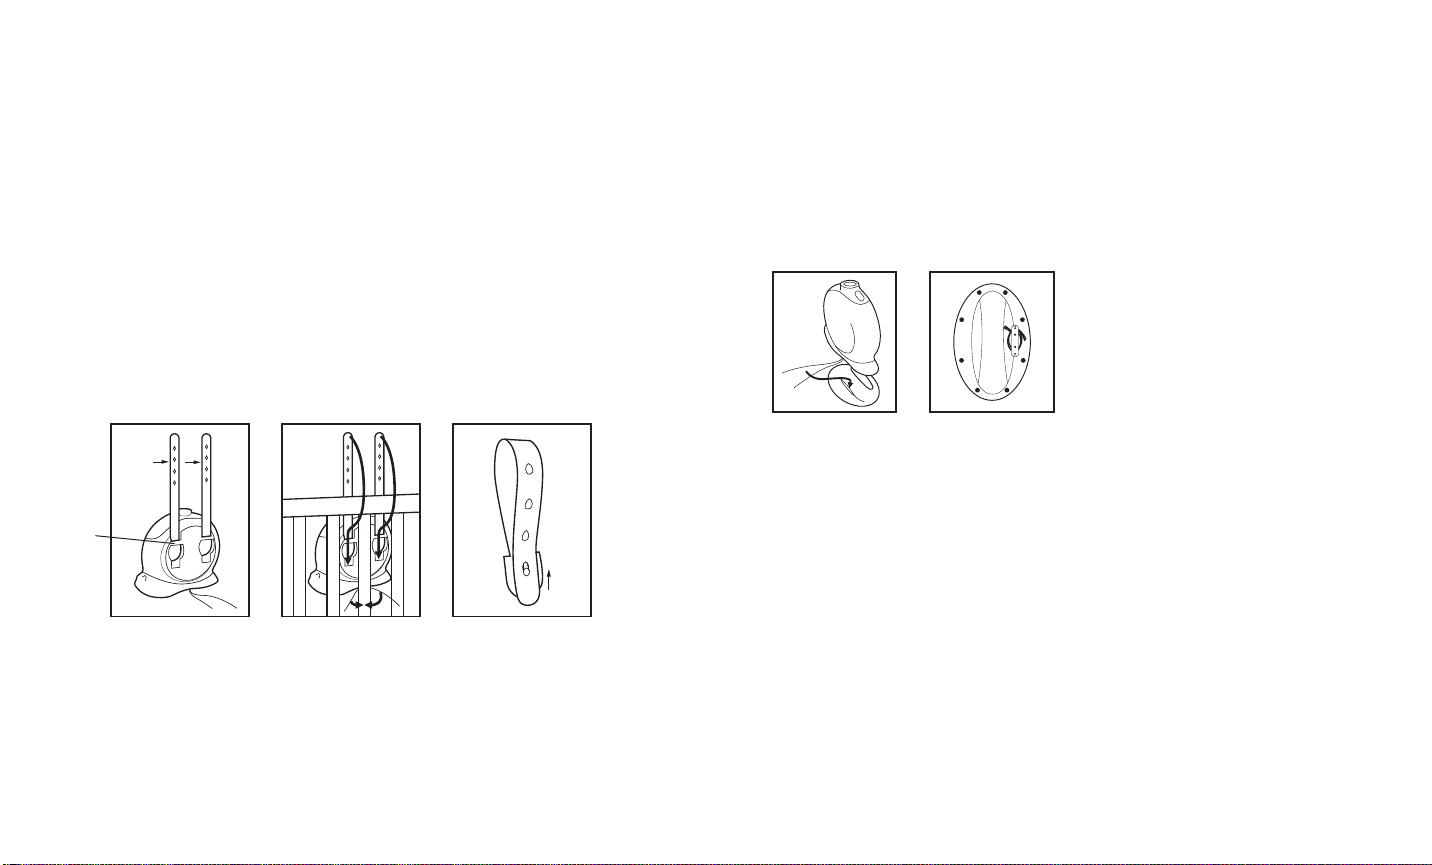
Using the Snail Base:
1. When not attached to a crib, the Sleepy Snail may be placed on the included base for added stability.
2. Note the arrow showing which direction the Snail face should point (Fig 8).
3. Push the strings through the base, into the side of the middle base section that has the string loop
guide (Fig 9).
4. Loop the strings loosely around the loop guide to secure them.
5. Set Snail and base onto a smooth flat surface out of reach of child. Press down lightly to ensure the
Snail is secured in base.
Figure 8
Figure 9
Care:
• Keep the unit clean by wiping it with a clean, slightly damp cloth.
• Do not immerse this product. Keep away from moisture and water.
• Remove batteries from battery compartment if product will not be used for an extended period of time.
• Keep the device out of direct sunlight for extended periods of time and away from any source of direct heat.
• Do not drop product onto hard surfaces.
Trouble Shooting:
If the unit stops working please check the following before calling Homedics Consumer Relations for support.
• Using a coin, open the battery compartment door to access the batteries
• Remove the batteries.
• Wait 1 minute, and then replace the batteries. Ensure the batteries are inserted in the correct
polarity positions.
• Press the POWER button to turn on. The product should now work correctly.
• If the device still does not function, open the battery compartment and replace all batteries with
new batteries.
If the problem persists, contact Homedics Consumer Relations at 1.800.466.3342 or
email Support at cservice@homedics.com.
Page 4

Battery Precautions:
• Use only the size and type of batteries specified.
• When installing batteries, observe proper +/- polarities. Incorrect installation of batteries may cause
damage to the unit.
• Do not mix old and new batteries.
• Do not mix alkaline, standard (carbon-zinc) or rechargeable (ni-cad, ni-mh, etc.) batteries.
• Do not dispose of batteries in fire. Batteries may explode or leak.
• If the unit is not going to be used for a long period of time, remove batteries to prevent damage due
to possible battery leakage.
• Clean the battery contacts and also those of the device prior to battery installation.
• Dispose of properly in accordance with all state, province and country regulations.
• Replace all batteries at the same time.
• Remove depleted batteries from the unit promptly. Dispose of used batteries safely. Keep all batteries
away from children. Batteries are small objects and could be ingested. If swallowed, contact a
physician at once.
NOTE: This device complies with Part 15 of the FCC Rules. Operation is subject to the following two
conditions: (1) this device may not cause harmful interference, and (2) this device must accept any
interference received, including interference that may cause undesired operation.
NOTE: The manufacturer is not responsible for any radio or TV interference caused by
unauthorized modifications to this equipment. Such modifications could void the user authority to
operate the equipment.
NOTE: This equipment has been tested and found to comply with the limits for a Class B digital
device, pursuant to Part 15 of the FCC Rules. These limits are designed to provide reasonable
protection against harmful interference in a residential installation. This equipment generates,
uses, and can radiate radio frequency energy and, if not installed and used in accordance with the
instructions, may cause harmful interference to radio communications. However, there is no guarantee
that interference will not occur in a particular installation. If this equipment does cause harmful
interference to radio or television reception, which can be determined by turning the equipment o and
on, the user is encouraged to try to correct the interference by one or more of the following measures:
• Reorient or relocate the receiving antenna.
• Increase the separation between the equipment and receiver.
• Connect the equipment into an outlet on a circuit different from that to which the receiver is connected.
• Consult the dealer or an experienced radio/TV technician for help.
For service or repair,
do not return this unit
to the retailer. Contact
HoMedics Consumer
Relations at:
Email:
cservice@
homedics.com
Phone:
1-800-466-3342
Business Hours:
8:30am-7pm ET
Monday-Friday
Distributed by
HoMedics, LLC
3000 Pontiac Trail
Commerce Township, MI
48390
Printed in China
LIMITED ONE YEAR WARRANTY
HoMedics sells its products with the intent that they are free of defects in manufacture and
workmanship for a period of one year from the date of original purchase, except as noted below.
HoMedics warrants that its products will be free of defects in material and workmanship under
normal use and service. This warranty extends only to consumers and does not extend to Retailers.
To obtain warranty service on your HoMedics product, contact a Consumer Relations
Representative by telephone at 1-800-466-3342 for assistance. Please make sure to have the
model number of the product available.
HoMedics does not authorize anyone, including, but not limited to, Retailers, the subsequent
consumer purchaser of the product from a Retailer or remote purchasers, to obligate HoMedics
in any way beyond the terms set forth herein. This warranty does not cover damage caused by
misuse or abuse; accident; the attachment of any unauthorized accessory; alteration to the product;
improper installation; unauthorized repairs or modifications; improper use of electrical/power
supply; loss of power; dropped product; malfunction or damage of an operating part from failure
to provide manufacturer’s recommended maintenance; transportation damage; theft; neglect;
vandalism; or environmental conditions; loss of use during the period the product is at a repair
facility or otherwise awaiting parts or repair; or any other conditions whatsoever that are beyond the
control of HoMedics.
This warranty is effective only if the product is purchased and operated in the country in which
the product is purchased. A product that requires modifications or adoption to enable it to operate
in any other country than the country for which it was designed, manufactured, approved and/
or authorized, or repair of products damaged by these modifications is not covered under this
warranty. THE WARRANTY PROVIDED HEREIN SHALL BE THE SOLE AND EXCLUSIVE WARRANTY.
THERE SHALL BE NO OTHER WARRANTIES EXPRESS OR IMPLIED INCLUDING ANY IMPLIED
WARRANTY OF MERCHANTABILITY OR FITNESS OR ANY OTHER OBLIGATION ON THE PART
OF THE COMPANY WITH RESPECT TO PRODUCTS COVERED BY THIS WARRANTY. HOMEDICS
SHALL HAVE NO LIABILITY FOR ANY INCIDENTAL, CONSEQUENTIAL OR SPECIAL DAMAGES. IN
NO EVENT SHALL THIS WARRANTY REQUIRE MORE THAN THE REPAIR OR REPLACEMENT OF
ANY PART OR PARTS WHICH ARE FOUND TO BE DEFECTIVE WITHIN THE EFFECTIVE PERIOD
OF THE WARRANTY. NO REFUNDS WILL BE GIVEN. IF REPLACEMENT PARTS FOR DEFECTIVE
MATERIALS ARE NOT AVAILABLE, HOMEDICS RESERVES THE RIGHT TO MAKE PRODUCT
SUBSTITUTIONS IN LIEU OF REPAIR OR REPLACEMENT.
This warranty does not extend to the purchase of opened, used, repaired, repackaged and/or
resealed products, including but not limited to sale of such products on Internet auction sites and/
or sales of such products by surplus or bulk resellers. Any and all warranties or guarantees shall
immediately cease and terminate as to any products or parts thereof which are repaired, replaced,
altered, or modified, without the prior express and written consent of HoMedics.
This warranty provides you with specific legal rights. You may have additional rights which may
vary from state to state. Because of individual state regulations, some of the above limitations and
exclusions may not apply to you.
For more information regarding our product line in the USA, please visit: www.homedics.com
e-mail: cservice@homedics.com
Monday - Friday
8:30am - 7:00pm (ET)
1.800.466.3342
HoMedics, MyBaby and SoundSpa are trademarks of HoMedics, LLC.
©2012 HoMedics, LLC. All Rights Reserved.
IB-MYBS500
Page 5

o
m
m
e
n
n
t
u
o
e
s
e
m
ó
T
Registre
su producto en:
www.homedics.com/register
Su valioso aporte sobre este
producto nos ayudará a
crear los productos que
desee en el futuro.
a
h
o
r
a
El manual en
español empieza
a la página
SoundSpa
Sleepy Snail
sonidos, luces y proyecciones relajantes
Instruction Manual and
Warranty Information
MYB-S500
¡Felicitaciones!
Gracias por comprar el Caracol dormilón MyBaby SoundSpa de
HoMedics. El Caracol dormilón SoundSpa tranquiliza a su bebé con
luces, sonidos y proyecciones tenues.
Características:
• 5 sonidos naturales: lluvia, océano, latidos del corazón, noche de verano y ruido blanco.
• 5 canciones de cuna: Estrellita dónde estás; Rock-A-Bye-Baby; Canción de cuna; Para Elisa; Cállate niña.
• El autotemporizador permite seleccionar la duración de los sonidos: 15, 30, 60 minutos o de manera
ininterrumpida.
• Proyección de imágenes.
• Luces que cambian de color.
• 2 escenas de proyección: insectos y animales.
• El control de volumen ajusta el volumen de las canciones de cuna o de los sonidos naturales.
• El soporte permite sostener el caracol cuando no se lo coloca en la cuna.
INSTRUCCIONES DE SEGURIDAD IMPORTANTES:
Cuando use un artefacto eléctrico, siempre se deben tener en cuenta algunas precauciones básicas, que
incluyen las siguientes:
LEA TODAS LAS INSTRUCCIONES ANTES DE USAR EL PRODUCTO
PELIGRO - Para reducir el riesgo de choque eléctrico:
• No intente recoger un artefacto que haya caído al agua.
• No coloque ni guarde un artefacto donde pueda caerse o ser empujado dentro de una tina o lavabo. No
lo coloque ni lo deje caer en agua ni en ningún otro líquido.
ADVERTENCIA - Para reducir el riesgo de quemaduras, incendio, choque eléctrico o lesiones a las personas:
• Este producto no está diseñado para ser usado por niños. Solamente deben usarlo personas adultas.
• Utilice este artefacto solamente con el objetivo para el cual fue diseñado y como se describe en
este manual. No use accesorios no recomendados por HoMedics, en especial accesorios que no se
proporcionan con la unidad.
• Nunca haga funcionar este artefacto si tiene el armazón dañado. Si no está funcionando
adecuadamente, si se ha caído o dañado, envíelo al Centro de servicio de HoMedics para que se lo
examine y repare.
• Nunca deje caer el artefacto ni inserte ningún objeto en ninguna abertura.
• No lo encienda si se están utilizando productos de rociado por aerosol o si se está administrando oxígeno.
• Este artefacto está diseñado únicamente para su uso en interiores. No lo use en exteriores.
• Colóquelo únicamente sobre superficies secas. No lo coloque sobre superficies mojadas con agua o
solventes de limpieza.
GUARDE ESTAS INSTRUCCIONES
Precaución – sírvase leer todas las instrucciones con atención antes de poner en funcionamiento el artefacto.
• Nunca cubra el artefacto mientras esté en funcionamiento.
1 4 5 6
Page 6

ADVERTENCIA: Todo el material de embalaje, como cintas, trabas de embalaje y etiquetas autoadhesivas no forma
parte de este juguete y deben ser desechado para la seguridad de su hijo.
NOTA: Guarde este manual de instrucciones ya que contiene información importante.
Cómo instalar las baterías:
• Este producto funciona con 3 baterías tipo C. No use baterías recargables.
• Abra la puerta del panel de baterías que se encuentra en la parte inferior del juguete (Fig. 1a) utilizando una
moneda para aflojar el tornillo de la puerta.
• Coloque las baterías en el compartimiento en la dirección indicada, con el extremo de polaridad negativa (-) en
dirección al interior del compartimiento (Fig. 1b).
• Vuelva a cerrar la puerta del panel de baterías y utilice una moneda para asegurar el tornillo.
NOTA: cuando el sonido o la luz se vuelven tenues o se detienen, un adulto debe cambiar las baterías.
Precaución: Todo servicio de este producto debe ser realizado únicamente por personal de servicio autorizado
de HoMedics.
Figure 1a –
Puerta del panel de
baterías cerrada
Figure 1b –
Puerta del panel de
baterías abierta
Descripción general de los botones
Los controles de sonido están ubicados en el costado derecho del caracol (Fig. 2). Los controles de las
funciones de luces y proyección están ubicados en el costado izquierdo del caracol (Fig. 3). La perilla de
selección de proyección está ubicada en la parte superior de la pieza de proyección (Fig. 4).
Auto-timer
(autotemporizador)
Melodies
(melodías)
Sounds
(sonidos)
Volume -/+
(volumen +/-)
Power
(encendido/
apagado)
Figure 2
30
60
15
Figure 3
Projection
(proyección)
Lights
(luces)
Cómo escuchar los sonidos/las melodías:
• Para activar los sonidos, presione el botón POWER (encendido/apagado) que se encuentra en el panel
superior derecho (Fig. 2).
• Los sonidos aumentarán gradualmente de volumen hasta llegar al último volumen reproducido.
• Para cambiar de sonido o melodía, presione el botón Sounds (sonidos) o el botón Melodies (melodías) hasta
escuchar el sonido o la melodía que desee. El botón Sounds (sonidos) alternará entre las 5 opciones de
sonido. El botón Melodies (melodías) alternará entre las 5 opciones de melodías.
• Para apagar los sonidos o las melodías, presione el botón POWER (encendido/apagado).
NOTA: Cuando se encienda la unidad, siempre volverá a reproducir el último sonido usado.
Cómo usar la función de exhibición de luces:
• Para activar la función de exhibición de luces, presione el botón LIGHTS (luces) que se encuentra en el panel
superior izquierdo (Fig. 3).
• Se encenderán las luces y comenzará una exhibición aleatoria de colores.
• Para aumentar el brillo, presione el botón LIGHTS (luces) por segunda vez.
• Para desactivar la función de exhibición de luces, presione el botón LIGHTS (luces) por tercera vez.
NOTA: La función de exhibición de luces se desactivará automáticamente después de 5 minutos.
Cómo usar la función de proyección:
• Para activar la función de proyección, presione el botón PROJECTION (proyección) que se encuentra en el
panel superior izquierdo (Fig. 3).
• Se activará la proyección de imágenes y estas comenzarán a reproducirse en el cielorraso. Aparecerán y
desaparecerán lentamente 3 imágenes individuales siguiendo una secuencia (vea la sección Cómo cambiar
de escena para alternar entre una escena y otra).
• Para aumentar el brillo, presione el botón PROJECTION (proyección) por segunda vez.
• Para desactivar la función de proyección, presione el botón PROJECTION (proyección) por tercera vez.
NOTA: La función de proyección se desactivará automáticamente después de 5 minutos.
Cómo cambiar de escena:
• Para cambiar de una escena a otra, gire el disco que se encuentra en la parte superior
del proyector (Fig. 4).
• Gire el disco hasta que escuche un “chasquido” ligero que indica que el disco está en
la posición correcta.
• Para volver a la escena anterior, gire el disco en dirección opuesta hasta escuchar el
mismo “chasquido” ligero.
• Hay dos opciones de escenas: “insectos” y “animales”.
Figure 4
32
Page 7

Uso de las correas accesorias:
IMPORTANTE: Revise la unidad frecuentemente para asegurarse de que aún esté bien sujeta.
NOTA: no la enganche a corralitos o paredes de malla.
Las correas accesorias no son para usar como juguete. Asegúrese de que las correas accesorias estén fuera del
alcance de los niños.
1. Para asegurar el caracol a la cuna, primero asegúrese de que las correas estén correctamente colocadas en
la parte posterior del producto (Fig. 5). La parte cuadrada de la correa debe quedar ubicada uniformemente
contra el cuerpo del caracol. Las correas se deslizan por abajo de la barra de posición.
2. Con las correas correctamente ubicadas, coloque el caracol contra la baranda superior de la cuna, en
dirección a la cuna.
3. Las correas se enlazarán alrededor de la barra superior y sus extremos quedarán contra el cuerpo del caracol (Fig. 6).
4. Presione el pasador que se encuentra en la parte cuadrada de cada correa por el orificio del extremo de la
correa, como se muestra (Fig. 7). Asegúrese de que el pasador haya atravesado totalmente el orificio. Usted
debería escuchar un “estallido” ligero cuando el pasador quede colocado de manera segura en el orificio de
la correa.
5. Presione ligera, aunque firmemente, el cuerpo del producto para asegurarse de que esté bien enganchado a
la cuna.
6. Utilice las cuerdas accesorias para atar el caracol a la cuna de manera segura (Fig. 6).
Barra de
posición
Figure 5
IMPORTANTE: Revise la unidad frecuentemente para asegurarse de que aún esté bien sujeta. Si no engancha
el producto a la cuna exactamente como se muestra, este podría caer dentro de la cuna. Siga las instrucciones
con exactitud.
Figure 6 Figure 7
Cómo usar la base del caracol:
1. Si el Caracol dormilón no se engancha a una cuna, se puede colocar sobre la base que se suministra con
el producto para mayor estabilidad.
2. Observe la flecha que indica en qué dirección debe mirar la cara del caracol (Fig. 8).
3. Tire de las cuerdas por la base, hacia el interior de la sección central de la base que tiene la guía para el
lazo de la cuerda (Fig. 9).
4. Enlace las cuerdas sin apretar alrededor de la guía para el lazo a fin de asegurarlas.
5. Coloque el caracol y la base sobre una superficie plana y pareja, fuera del alcance del niño. Presione
suavemente para asegurarse de que el caracol haya quedado fijo sobre la base.
Figure 8
Figure 9
Cuidado:
• Mantenga limpia la unidad pasándole un paño limpio y apenas húmedo.
• No sumerja este producto. Manténgalo alejado de la humedad y el agua.
• Quite las baterías del compartimiento si el producto no se utilizará durante un período prolongado.
• Mantenga el dispositivo fuera de la luz solar directa por períodos prolongados y alejado de cualquier fuente
de calor directo.
• No deje caer el producto sobre superficies duras.
Diagnóstico y resolución de problemas:
Si la unidad deja de funcionar, verifique lo siguiente antes de llamar a Relaciones con el Consumidor de
HoMedics para obtener ayuda.
• Con una moneda, abra la puerta del compartimiento de las baterías para acceder a las mismas.
• Quite las baterías.
• Espere 1 minuto y vuelva a colocar las baterías. Asegúrese de que las baterías estén colocadas en las
posiciones de polaridad correctas.
• Presione el botón POWER (encendido/apagado) para encender la unidad. Ahora el producto debería
funcionar correctamente.
• Si el dispositivo aún no funciona, abra el compartimiento de las baterías y cambie todas las baterías por
baterías nuevas.
Si el problema persiste, comuníquese con Relaciones con el Consumidor de HoMedics llamando al
1-800-466-3342 o escribiendo al Servicio de Soporte a cservice@homedics.com.
Page 8

Precauciones sobre las baterías:
• Use únicamente el tamaño y tipo de baterías especificado.
• Cuando coloque las baterías, tenga en cuenta las polaridades adecuadas +/-. Si coloca las baterías de
manera incorrecta se puede dañar la unidad.
• No mezcle baterías usadas y baterías nuevas.
• No mezcle baterías alcalinas, estándar (carbón-zinc) ni recargables (níquel-cadmio, níquel-metal hidruro, etc.).
• No arroje las baterías al fuego, pueden explotar o perder líquido.
• Si la unidad no se va a usar durante un período prolongado, retire las baterías para evitar daños debido a
posibles pérdidas de las baterías.
• Limpie los contactos de las baterías y los del dispositivo antes de instalar las baterías.
• Deséchelas adecuadamente de acuerdo con todas las reglamentaciones estatales, provinciales y nacionales.
• Cambie todas las baterías al mismo tiempo.
• Quite las baterías agotadas de la unidad rápidamente. Deseche las baterías usadas de forma segura.
Mantenga todas las baterías fuera del alcance de los niños. Las baterías son objetos pequeños y podrían
tragarlas. Si las tragan, póngase en contacto con un médico inmediatamente.
NOTA: Este dispositivo cumple con la sección 15 de las normas de la FCC. El funcionamiento está sujeto
a las dos condiciones siguientes: (1) este dispositivo no puede causar interferencias perjudiciales y (2) este
dispositivo debe aceptar cualquier interferencia que reciba, incluso la interferencia que pueda causar un
funcionamiento no deseado.
NOTA: El fabricante no se responsabiliza por ninguna interferencia de radio o televisión provocada por
modificaciones no autorizadas que se realicen a este equipo. Tales modificaciones podrían anular la
autoridad del usuario para utilizar el equipo.
NOTA: Este equipo ha sido probado y se ha comprobado que cumple con los límites para un dispositivo
digital de Clase B, conforme a la sección 15 de las normas de la FCC. Estos límites están diseñados para
proporcionar protección razonable contra interferencias perjudiciales en una instalación residencial. Este
equipo genera, utiliza y puede irradiar energía de radiofrecuencia, y si no se instala y se utiliza de acuerdo
con las instrucciones, puede causar interferencia perjudicial en las comunicaciones de radio. Sin embargo,
no existe ninguna garantía de que no se producirá interferencia en una instalación particular. Si este equipo
causa efectivamente interferencia perjudicial a la recepción de radio o televisión, lo cual puede determinarse
encendiendo y apagando el equipo, se recomienda que el usuario intente corregir la interferencia mediante
una o más de las siguientes medidas:
• Vuelva a orientar o ubicar la antena de recepción.
• Aumente la distancia entre el equipo y el receptor.
• Conecte el equipo en un tomacorriente de un circuito diferente del que esté conectado el receptor.
• Consulte con el distribuidor o con un técnico experto en radio/televisión para obtener ayuda.
No devuelva esta unidad al
distribuidor para obtener
servicio o reparación.
Comuníquese con Relaciones
con el Consumidor de
HoMedics en:
Correo electrónico:
cservice@ homedics.com
Teléfono:
1-800-466-3342
Horario comercial:
8:30 a. m. a 7 p. m. hora del
este, de lunes a viernes
Distribuido por
HoMedics, LLC
3000 Pontiac Trail
Commerce Township, MI
48390
Impreso en China
GARANTÍA LIMITADA POR UN AÑO
HoMedics vende sus productos con la intención de que no tengan defectos de fabricación ni de
mano de obra por el plazo de un año a partir de la fecha de compra original, con las siguientes
excepciones. HoMedics garantiza que sus productos no tendrán defectos de material ni de mano
de obra en condiciones de uso y servicio normales. Esta garantía se extiende únicamente a
consumidores y no a minoristas.
Para obtener servicio del producto HoMedics en garantía, comuníquese con un representante de
Relaciones con el Consumidor llamando al 1-800-466-3342 para obtener asistencia. Asegúrese
de tener a mano el número de modelo del producto.
HoMedics no autoriza a ninguna persona, incluidos, entre otros, minoristas, posteriores
consumidores, compradores del producto a un minorista o compradores remotos, a obligar a
HoMedics de ninguna otra forma más allá de las condiciones aquí establecidas. La garantía
de este producto no cubre daños causados por uso inadecuado o abuso; accidente; conexión
de accesorios no autorizados; alteración del producto; instalación inadecuada; reparaciones o
modificaciones no autorizadas; uso inadecuado de la fuente de energía/electricidad; cortes de
energía; salida del producto del mercado; funcionamiento incorrecto o daño de una pieza de
funcionamiento debido al no cumplimiento del mantenimiento recomendado por el fabricante;
daños durante el transporte; robo; descuido; vandalismo; condiciones climáticas; pérdida de uso
en el período durante el cual el producto está en una instalación de reparación o a la espera de
piezas o reparación; o cualquier otra condición, sin importar cuál sea, que se encuentre fuera del
control de HoMedics.
Esta garantía es válida solamente si el producto se compra y se utiliza en el país en que se
compra. Un producto que requiera modificaciones o adaptación para habilitar su funcionamiento
en cualquier otro país que no sea aquel para el que fue diseñado, fabricado, aprobado y/o
autorizado; o la reparación de productos dañados por estas modificaciones no está cubierto en
esta garantía. LA GARANTÍA QUE SE PROPORCIONA EN EL PRESENTE DOCUMENTO SERÁ LA
GARANTÍA ÚNICA Y EXCLUSIVA. NO EXISTIRÁN OTRAS GARANTÍAS EXPRESAS NI IMPLÍCITAS,
QUE INCLUYEN CUALQUIER GARANTÍA IMPLÍCITA DE COMERCIALIZACIÓN O APTITUD, NI
NINGUNA OTRA OBLIGACIÓN POR PARTE DE LA COMPAÑÍA CON RESPECTO A LOS PRODUCTOS
CUBIERTOS POR ESTA GARANTÍA. HOMEDICS NO TENDRÁ RESPONSABILIDAD ALGUNA POR
NINGÚN DAÑO INCIDENTAL, CONSECUENTE NI ESPECIAL. EN NINGÚN CASO ESTA GARANTÍA
REQUERIRÁ MÁS QUE LA REPARACIÓN O EL REEMPLAZO DE CUALQUIER PIEZA O PIEZAS
QUE SE DETERMINE QUE TIENEN DEFECTOS DENTRO DEL PERÍODO DE VIGENCIA DE LA
GARANTÍA. NO SE ENTREGARÁN REEMBOLSOS. SI NO HAY PIEZAS DE REPUESTO DISPONIBLES
PARA LOS MATERIALES DEFECTUOSOS, HOMEDICS SE RESERVA EL DERECHO DE REALIZAR
SUSTITUCIONES DEL PRODUCTO EN LUGAR DE REPARAR O CAMBIAR PIEZAS.
Esta garantía no se extiende a la compra de productos abiertos, usados, reparados, vueltos a
empacar y/o vueltos a sellar, que incluyen, entre otras cosas, la venta de dichos productos en
sitios de remate por Internet y/o la venta de dichos productos por revendedores o mayoristas.
Todas y cada una de las garantías cesarán y terminarán inmediatamente con respecto a cualquier
producto o pieza del mismo que se haya reparado, cambiado, alterado o modificado sin el
consentimiento previo explícito y por escrito de HoMedics.
Esta garantía le proporciona derechos legales específicos. Es posible que usted tenga derechos
adicionales que pueden variar de un estado a otro. Debido a las regulaciones de ciertos estados, es
posible que algunas de las limitaciones y exclusiones mencionadas arriba no se apliquen en su caso.
Para obtener más información con respecto a nuestra línea de productos en los Estados Unidos,
visítenos en: www.homedics.com o escríbanos a: cservice@homedics.com
De lunes a viernes,
de 8.30 a. m. a 7 p. m. hora del este
1.800.466.3342
HoMedics, MyBaby y SoundSpa son marcas comerciales de HoMedics, LLC. ©2012 HoMedics,
LLC. Todos los derechos reservados.
IB-MYBS500
 Loading...