

HoMedics HUM-WM75 User Manual
Dirección postal:
HoMedics Service Center
Dept. 168, Suite 3
43155 West Nine Mile Rd
Novi, MI 48375
correo electrónico:
cservice@homedics.com
HoMedics vende sus productos con la intención de que no tengan defectos de fabricación ni de mano
de obra por un plazo de un año a partir de la fecha de compra original, con las siguientes excepciones.
HoMedics garantiza que sus productos no tendrán defectos de material ni de mano de obra bajo
condiciones de uso y servicio normales. Esta garantía se extiende únicamente a consumidores y no a
distribuidores.
Para obtener servicio para su producto HoMedics, envíe por correo el producto y su recibo de compra
fechado (como comprobante de compra), con franqueo pago, a la siguiente dirección:
HoMedics Service Center
Dept. 168, Suite 3
43155 West Nine Mile Rd
Novi, MI 48375
No se aceptarán pagos contra entrega.
HoMedics no autoriza a nadie, incluyendo, pero sin limitarse a, distribuidores, posteriores consumidores
compradores del producto a un distribuidor, o compradores remotos, a obligar a HoMedics de forma
alguna más allá de las condiciones aquí establecidas. La garantía de este producto no cubre daños
causados por uso inadecuado o abuso, accidente, conexión de accesorios no autorizados, alteración
del producto, instalación inadecuada, reparaciones o modificaciones no autorizadas, uso inadecuado
de la fuente de energía/electricidad, cortes de energía, caída del producto, funcionamiento incorrecto o
daño de una pieza de funcionamiento debido al no cumplimiento del mantenimiento recomendado por
el fabricante, daños durante el transporte, robo, descuido, vandalismo, condiciones climáticas, pérdida
de uso en el período durante el cual el producto está en una instalación de reparación o a la espera de
piezas o reparación, o cualquier otra condición, sin importar cual sea, que se encuentre fuera del control
de HoMedics.
Esta garantía es válida únicamente si el producto es comprado y operado en el país en el cual se compró
el producto. Un producto que requiera modificaciones o adaptación para habilitar su funcionamiento
en cualquier país que no sea aquél para el que fue diseñado, fabricado, aprobado y/o autorizado, o la
reparación de productos dañados por estas modificaciones no están cubiertos bajo esta garantía.
LA GARANTÍA AQUÍ ESTABLECIDA SERÁ LA ÚNICA Y EXCLUSIVA GARANTÍA. NO HABRÁ NINGUNA
OTRA GARANTÍA EXPRESA NI IMPLÍCITA, INCLUYENDO NINGUNA GARANTÍA DE COMERCIALIZACIÓN
O APTITUD NI NINGUNA OTRA OBLIGACIÓN POR PARTE DE LA COMPAÑÍA CON RESPECTO A
PRODUCTOS CUBIERTOS POR ESTA GARANTÍA. HOMEDICS NO TENDRÁ RESPONSABILIDAD
ALGUNA POR NINGÚN DAÑO INCIDENTAL, CONSECUENTE NI ESPECIAL. BAJO NINGÚN CONCEPTO
ESTA GARANTÍA REQUERIRÁ MÁS QUE LA REPARACIÓN O CAMBIO DE ALGUNA PIEZA O PIEZAS
QUE SE HALLEN DEFECTUOSAS DENTRO DEL PERÍODO DE VIGENCIA DE ESTA GARANTÍA. NO SE
EFECTUARÁN REEMBOLSOS. SI NO HAY PIEZAS DE REPUESTO DISPONIBLES PARA LOS MATERIALES
DEFECTUOSOS, HOMEDICS SE RESERVA EL DERECHO DE REALIZAR SUSTITUCIONES EN VEZ DE
REPARAR O CAMBIAR.
Esta garantía no se extiende a la compra de productos abiertos, usados, reparados, embalados otra vez
y/o abiertos y vueltos a cerrar, incluyendo entre otras cosas la venta de dichos productos en sitios de
remate por Internet y/o la venta de dichos productos por revendedores o mayoristas. Todas y cada una
de las garantías cesarán y terminarán inmediatamente con respecto a cualquier producto o pieza del
mismo que estén reparados, cambiados, alterados o modificados sin el consentimiento previo explícito
y por escrito de HoMedics.
Esta garantía le proporciona derechos legales específicos. Es posible que usted tenga derechos
adicionales que pueden variar de un país a otro. Debido a las regulaciones de ciertos países, es posible
que algunas de las limitaciones y exclusiones no se apliquen en su caso.
Por más información con respecto a nuestra línea de productos en los EE.UU., visítenos en:
© 2003-2010 HoMedics, Inc. y sus compañías afiliadas, reservados todos los derechos. HoMedics® es
una marca registrada de HoMedics, Inc. y sus compañías afiliadas. StyleSpa™ son marcas registradas de
LIMITADA UNA GARANTÍA DE AÑO
www.homedics.com
HoMedics, Inc. y sus compañías afiliadas. Reservados todos los derechos.
IB-HUMWM75
M
A
o
e
m
k
a
T
e
s
a
e
l
P
Register
Your Product At:
www.homedics.com/register
Your valuable input regarding this
product will help us create
the products you will
want in the future.
e
n
t
N
o
w
El manual en español empieza
a la página 16
Cool & Warm Mist
Ultrasonic Humidifier
Instruction Manual and
Warranty Information
HUM-WM75

IMPORTANT SAFETY INSTRUCTIONS:
WHEN USING ELECTRICAL PRODUCTS, ESPECIALLY WHEN CHILDREN ARE
PRESENT, BASIC SAFETY PRECAUTIONS SHOULD ALWAYS BE FOLLOWED,
INCLUDING THE FOLLOWING:
READ ALL INSTRUCTIONS BEFORE USING
DANGER
• Always unplug the appliance from the electrical outlet immediately after using and
before cleaning.
• DO NOT reach for an appliance that has fallen into water. Unplug it immediately.
• DO NOT use while bathing or in shower.
• DO NOT place or store appliance where it can fall or be pulled into a tub or sink.
• DO NOT place in or drop into water or other liquid.
• NEVER use pins or other metallic fasteners with this appliance.
• Keep dry – DO NOT operate in a wet or moist condition.
• DO NOT use water above 86˚ Fahrenheit.
WARNING
SHOCK OR INJURY TO PERSONS:
• An appliance should never be left unattended when plugged in. Unplug from outlet
when not in use and before putting on or taking off parts or attachments.
• Close supervision is necessary when this appliance is used by or near children,
invalids or disabled persons.
• Use this appliance only for its intended use as described in this manual.
• NEVER operate this appliance if it has a damaged cord or plug, if it is not working
properly, if it has been dropped or damaged, or dropped into water. Return it to
HoMedics' Product Return Center for examination and repair.
– TO REDUCE THE RISK OF ELECTRIC SHOCK:
- TO REDUCE THE RISK OF BURNS, FIRE, ELECTRIC
2 3
• Keep cord away from heated surfaces.
• NEVER drop or insert any object into any opening.
• DO NOT operate where aerosol (spray) products are being used or where oxygen is
being administered.
• Always place the humidifier on a firm, flat, level surface.
• Please hold the water tank firmly with both hands when carrying a full tank of water.
• NEVER use humidifier in an environment where explosive gases are present.
• DO NOT place the humidifier near heat sources, such as a stove and do not
expose the humidifier to direct sunlight.
• DO NOT carry this appliance by the power cord or use cord as handle.
• To disconnect, turn all controls to the "OFF" position, then remove plug from outlet.
• This appliance is designed for personal, non-professional use only.
• DO NOT use outdoors. For indoor use only.
• DO NOT overfill with water.
SAVE THESE INSTRUCTIONS
CAUTION
BEFORE OPERATION.
• Never cover the appliance when it is in operation.
• Always keep the cord away from high temperature and fire.
• Perform regular maintenance of the Ultrasonic Nebulizer.
• Avoid contact with detergent to your mouth and eyes. If contact occurs,
use clean water to wash immediately. If serious, contact poison control
or seek medical treatment.
• Never use detergent to clean the Ultrasonic Nebulizer that is not recommended
by the manufacturer.
• Never scrape the Ultrasonic Nebulizer with a hard object to clean.
– PLEASE READ ALL INSTRUCTIONS CAREFULLY

Operation and Maintenance
• Do not repair or adjust the unit. Servicing must be performed by professional or
qualified personnel.
• Do not operate any appliance with an aging, knotted or damaged cord or plug, the
replacement must be performed by the manufacturer, service center or qualified
professional personnel.
• Stop use if there is an unusual noise or smell. Servicing should be performed by
qualified personnel only.
• Humidifier should be unplugged when not in use for a long period of time.
• Do not touch the water in the main unit or the parts in the water when the unit is on.
• Never operate unit without water in the tank. Only use water in the tanks.
• Never add any additive to the water that is not produced or under the supervision
of the manufacturer.
• Do not wash, adjust or move the humidifier without first unplugging the unit from its
electrical outlet.
• Keep the appliance out of reach from children. Do not allow children to use the
appliance without supervision.
Unique Features and Specifications
Ultrasonic Technology
This humidifier uses ultrasonic high frequency technology to convert the water into
1-5 million super particles that are dispersed into the air evenly. These particles then
combine with the ions generated by the humidifier to moisten the air.
Oscillating Head
The humidifier features a motorized nozzle that automatically oscillates 120°. The
oscillating head can also be stopped at any point in the oscillation cycle to target the
mist in a specific direction.
Warm or Cool Mist Option
Choose either warm or cool mist for customized comfort.
Auto Shut Off Protection
When the tank is empty the unit will shut off automatically.
Advanced Multi-Protection
The humidifier shuts off automatically if the water tank is removed
OR unit is overloaded.
Ultrasonic Nebulizer
The humidifier utilizes special spray techniques and the ultrasonic nebulizer is easy to
clean for lifetime use.
Voltage
120V / 60Hz
Watts
115
Tank Capacity
1.4 gallon – 5.11 liter
4 5
HEAT
COOL
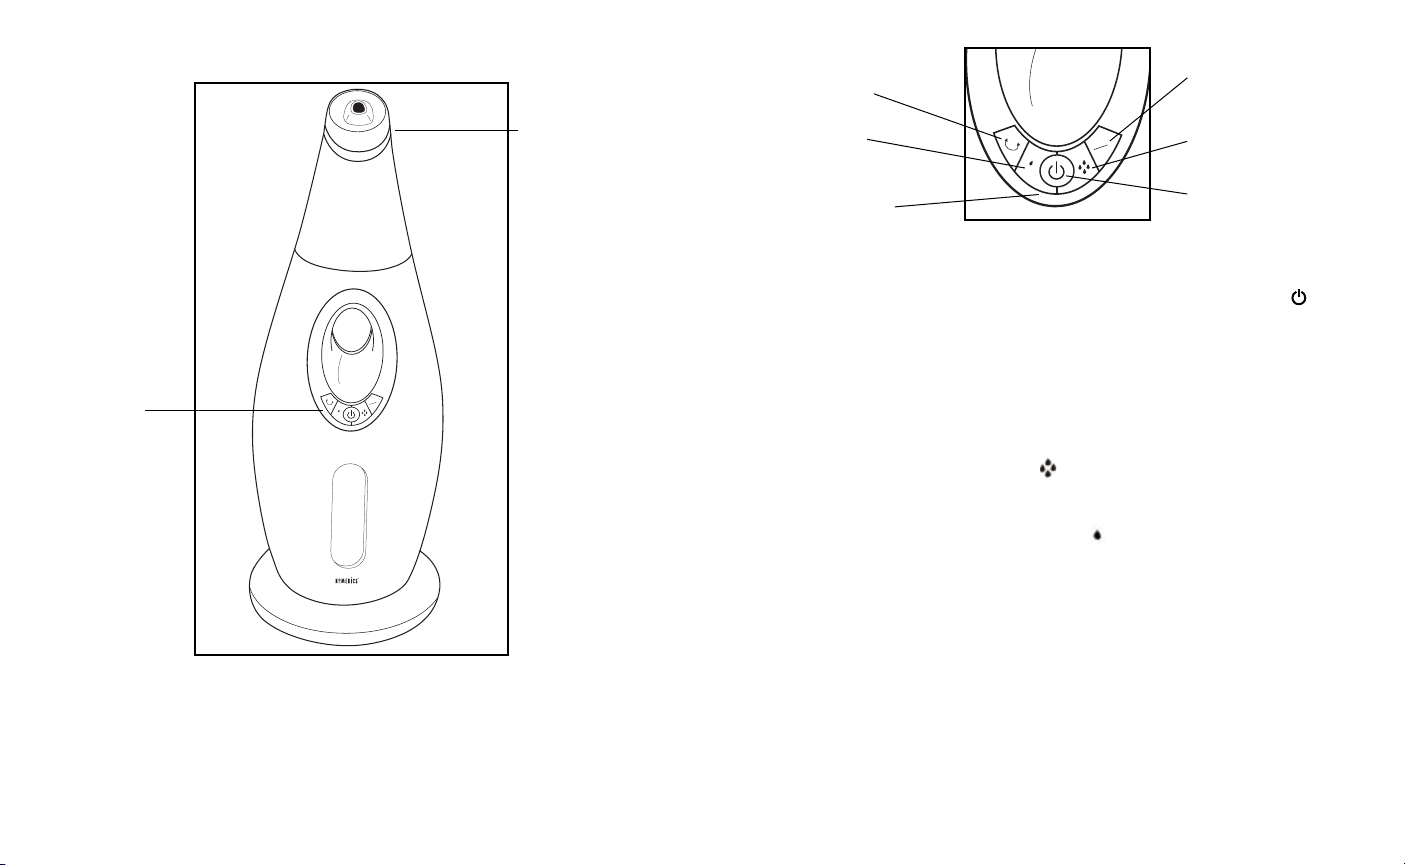
Cool & Warm Mist Ultrasonic Humidifier
HEAT
COOL
Oscillating
ON/OFF Button
Warm/Cool Mist Button
Oscillating Head &
Nozzle
Control Panel
Fig.1
How To Use
CAUTION: This appliance has a polarized plug (one blade wider than the
other). To reduce the risk of shock, this plug is intended to fit only one
way in a polarized outlet. If the plug does not fit fully in the outlet, reverse
the plug. If it still does not fit, contact a qualified electrician.
DO NOT attempt to defeat this safety feature. To do so could result in an
electric shock hazard.
6 7
Mist Decrease
Button
Warm/Cool Mist
Indicator Light Ring
Power Knob
P
lug unit in to a 120 volt AC electrical outlet. Push the POWER ON/OFF ( )
Mist Increase
Button
Power ON/OFF Button
Fig.2
button to turn unit on.
ATTENTION: When the water in the tank is almost empty, the power will shut off to
indicate to the user to refill water.
Mist Increase and Decrease
There are 7 different levels of mist output from Lowest to Highest. To increase the
mist output, press the MIST INCREASE ( ) button until the desired mist output is
reached. When the maximum mist output has been reached, the indicator ring light
will blink once and will blink each time the MIST INCREASE button is pressed.
To decrease mist, press the MIST DECREASE ( ) button until the mist has
decreased to the output level desired. When the minimum mist output level has
been reached, the indicator ring light will blink once and will blink each time the MIST
DECREASE button is pressed. (Fig.2)
Warm and Cool Mist Control
The humidifier is equipped with the option to select warm or cool mist. Each time
the unit is turned on it will start producing cool mist. The Warm/Cool mist indicator
ring will glow with a blue light. To select Warm Mist, press the WARM/COOL MIST
button. When warm mist is selected, the mist indicator ring will change from blue
to red and warm mist will start being produced. To return to cool mist, press the
WARM/COOL MIST button again. The mist indicator ring will change from red to
blue. (Fig.2)
Oscillation
When the humidifier is producing mist, press the OSCILLATION ON/OFF ( ) button
to turn on the motorized oscillation feature. The nozzle at the top of the unit will
oscillate in a 120° range from side to side. To target the nozzle and mist in a fixed
direction, press the OSCILLATION ON/OFF ( ) button when the nozzle is at the
desired position and the nozzle will stop and direct mist to the desired area only.
(Fig.2)
NOTE: The oscillation feature will not operate if the humidifying function is not
operating. Oscillation feature will only work when mist is being produced.
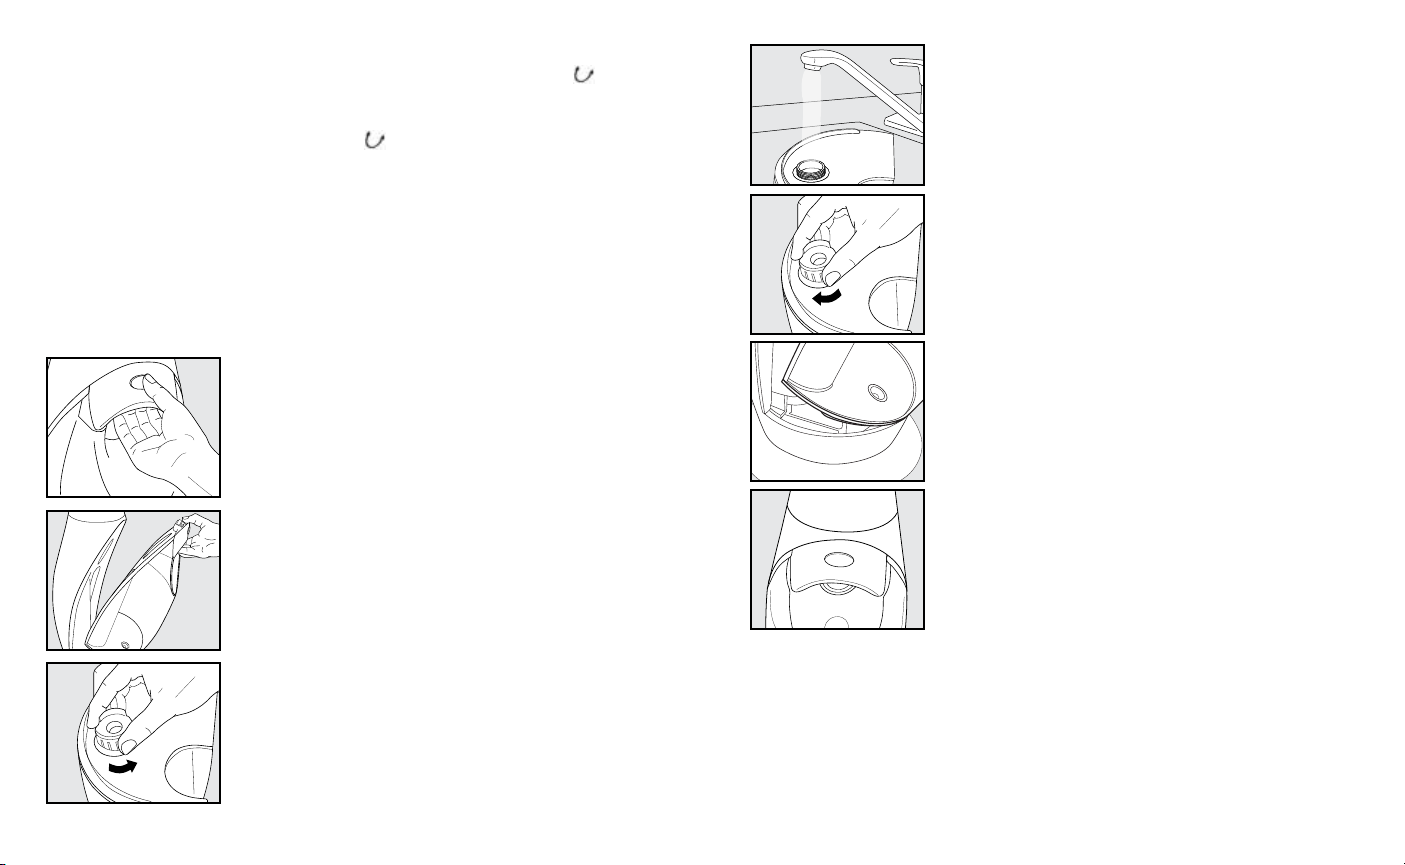
How To Fill
CAUTION: Before filling unit with water, turn power off and unplug unit from outlet.
4. FIll the water tank with clean, cool (not cold) tap
water. We recommend using distilled water if you
live in a hard water area.
Fig.6
5. Replace the tank cap by turning clockwise
until tight.
Fig.7
1. To release the tank from the unit, place your
ngers with your palm facing upward into the
recess in the tank handle. Press the tank release
button with your thumb.
Fig.3
2. Pull the water tank away from the humidier base
by the handle and remove the water tank from the
base by lifting it up and away.
Fig.4
3. Turn the tank upside down – remove the tank cap
by turning it counter-clockwise.
Fig.5
8 9
6. Install the tank back on the base of the unit. Make
sure the tank is rmly seated in the base.
Fig.8
7. Press the tank handle into the base of the
humidier. You will know that the tank is locked into
place when the locking mechanism clicks and the
tank release button is in a raised position.
Fig.9
 Loading...