

INSTRUCTION MANUAL AND WARRANTY INFORMATION
1-YEAR LIMITED WARRANTY
HDS-3000

IMPORTANT SAFEGUARDS:
WHEN USING AN ELECTRICAL PRODUCT, BASIC PRECAUTIONS SHOULD ALWAYS BE FOLLOWED, INCLUDING
THE FOLLOWING:
READ ALL INSTRUCTIONS BEFORE USING.
WARNING –
TO EARDRUMS, ESPECIALLY IN YOUNG CHILDREN:
• Close supervision is necessary when this product is used by, on, or near children, invalids, or
disabled persons.
• Use this product only for its intended use as described in this manual. Do not use attachments not recommended by HoMedics.
• DO NOT place or store this product where it can fall or be dropped into a tub or sink.
• DO NOT place or drop into water or any other liquid.
• Not for use by children. THIS IS NOT A TOY.
• NEVER operate this product if it has a damaged cord, plug, cable, or housing.
• Keep away from heated surfaces.
• Only set on dry surfaces. Do not place on surface wet from water or cleaning solvents.
DO NOT PLACE SPEAKER TOO CLOSE TO EARS. MAY CAUSE DAMAGE
SAVE THESE INSTRUCTIONS
CAUTION
• NEVER leave the product unattended, especially if children are present.
• NEVER cover the product when it is in operation.
• This unit should not be used by children without adult supervision.
• Always keep the product away from high temperature and fire.
– PLEASE READ ALL INSTRUCTIONS CAREFULLY BEFORE OPERATING.
2

ASSEMBLY AND INSTRUCTIONS FOR USE
Unpack the unit carefully. Remove all the accessories from the carton. Do not remove any labels or
stickers on the bottom of the unit or adapter. Before setting up the unit, verify that the following
contents are present:
• Deep Sleep
• AC adapter and power cord x 1
®
Revitalize Dual Alarm Clock x 1
BACKUP BATTERY
This alarm clock is equipped with a battery backup feature (1 CR-2032 battery included
and installed) to keep the clock time and alarm settings during a power outage. The battery
compartment is located on the bottom of the unit for easy access (a small Phillips-head screwdriver
is required, not included). Please be sure to remove the pull tab before first use.
POWER SOURCE
This unit is supplied with an AC adapter; take the following steps to connect the adapter:
1. Unwind the power cord of the AC adapter to its full length.
2. Connect the AC adapter to the DC5v input on the back of the device.
3. Plug the other end of the AC adapter into an outlet (100V – 240VAC 50/60 Hz).
NOTE: Connecting this system to any other power source may cause damage to the system. For
sufficient ventilation, keep other objects at least 4 inches away from the unit.
OVERVIEW
DEEP SLEEP® REVITALIZE PACKAGE CONTAINS:
• Deep Sleep® Revitalize Dual Alarm Clock
• AC Adapter
• Welcome Card
• Instruction Manual and Warranty Information
3
BUTTONS & CONTROLS
PLAY/PAUSE
SELECT
SLEEP SOUNDS
AUTO-OFF TIMER
SELECT SLEEP
THERAPY
PROGRAMS
4
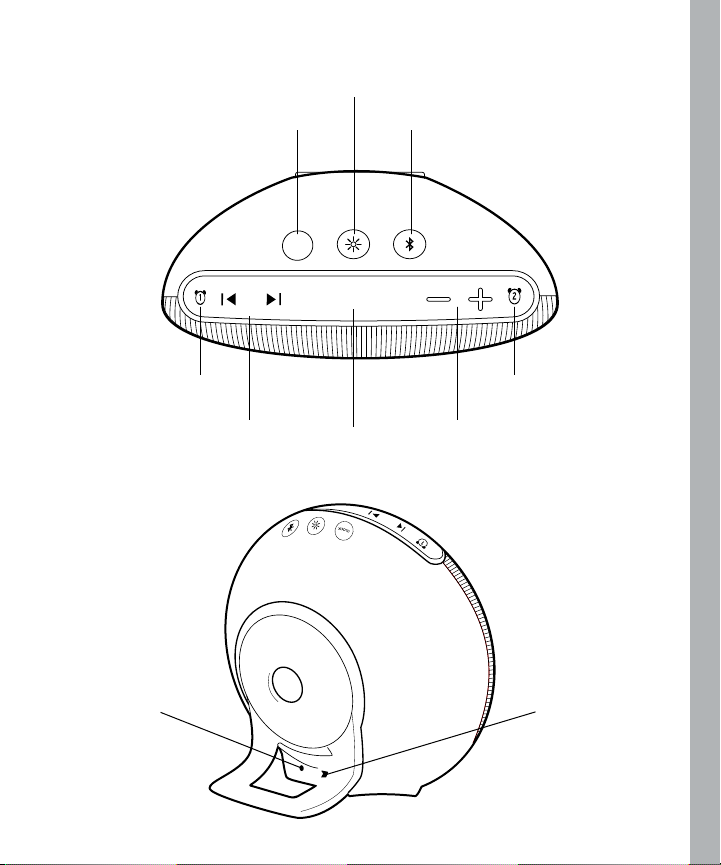
BUTTONS & CONTROLS
CLOCK
TRACK
SNOOZE
TRACK
CLOCK
SET
DIMMER
BLUETOOTH
®
AC ADAPTER
ALARM
1
PREVIOUS/
NEXT
TRACK
10-MIN
SNOOZE
5
ALARM
2
VOLUME +/-
USB CHARGING
PORT

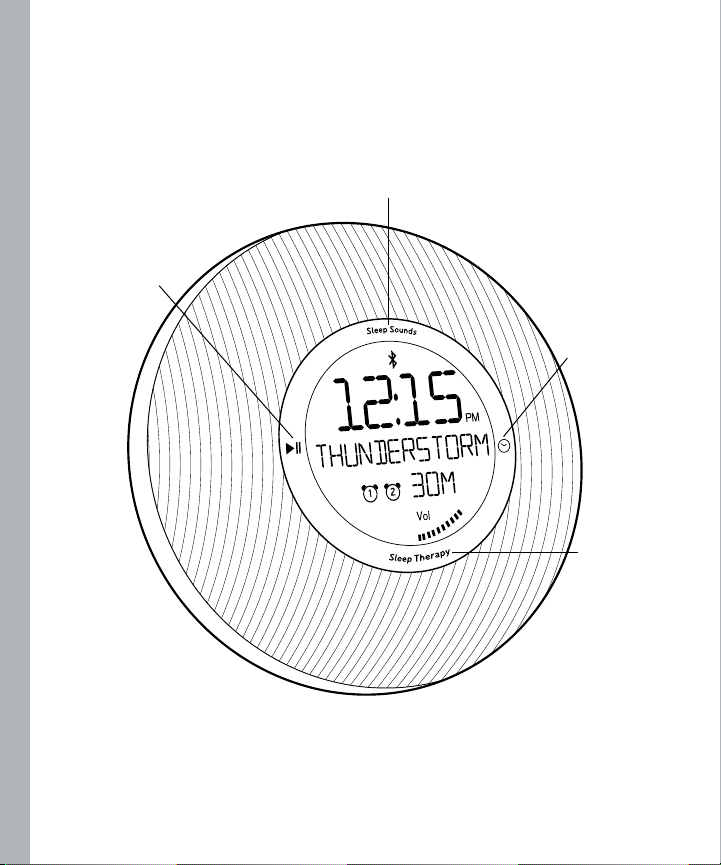
DISPLAY FEATURES
CURRENT TIME
SELECTED
SLEEP SOUND
ALARM
1 ON
ALARM
2 ON
BLUETOOTH
CONNECTED
1 2
Vol
PM
AUTO-OFF
TIMER
VOLUME
6
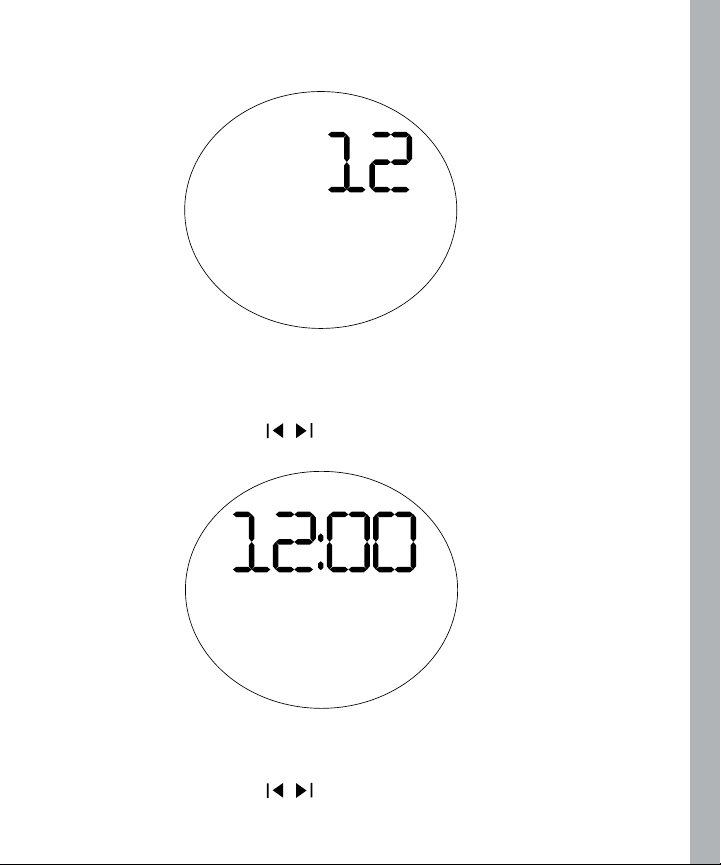
SETTING THE CLOCK
PM
1. Long press the “CLOCK” button for 3 seconds to enter the clock setting mode. 12 PM will flash
on the screen.
2. Short press volume +/- or track
to choose between a 12- or 24-hour time format.
/
PM
3. Short press “CLOCK” to confirm. The hour will begin flashing.
4. Short press volume +/- or track
to choose the hour. (In the 12-hour format, continue
/
cycling through the hours to choose between AM or PM hours.)
7
5. Short press “CLOCK” to confirm. The minutes will begin flashing.
6. Press volume +/- or track
7. Short press “CLOCK” to confirm. The clock is now set.
NOTE: To exit clock setting mode at any time, either long press the “CLOCK” button or wait for 10
seconds.
to choose the minutes.
/
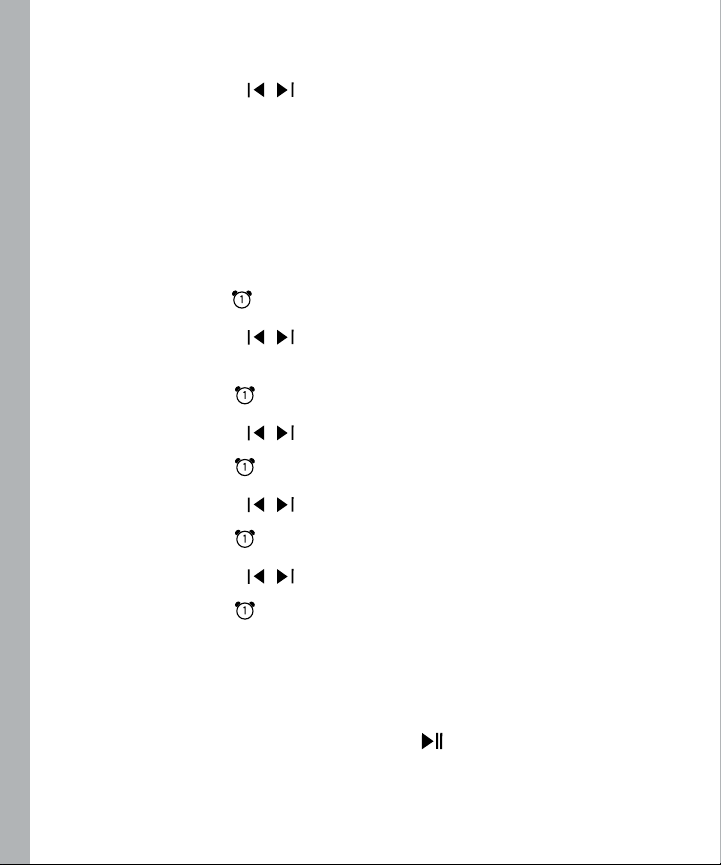
SETTING THE ALARM
Deep Sleep® Revitalize has 2 alarm settings so you can set 2 different wake-up times. When
setting each alarm, you’ll set the alarm time and corresponding wake sound and volume.
1. Long press the alarm 1
2. Press volume +/- or track
through the hours to choose between AM or PM.)
3. Short press the alarm 1
4. Press volume +/- or track
5. Short press the alarm 1
6. Press volume +/- or track
7. Short press the alarm 1
8. Press volume +/- or track
9. Short press the alarm 1
10. Repeat for alarm 2 if desired.
When the alarm sounds you may:
button. 12:00 AM will flash on the screen.
to choose the hour. (In the 12-hour format, continue cycling
/
button to confirm. The minutes will begin flashing.
to choose the minutes.
/
button to confirm. “SOUND” will begin flashing.
to choose a wake sound.
/
button to confirm. “VOLUME” will begin flashing.
to choose the volume.
/
button to confirm. Alarm 1 is now set.
• SNOOZE: Press the “SNOOZE” button. Your sleep time will be extended by 10 minutes.
• RESET: Turn the alarm off by touching the play/pause
The alarm clock will automatically reset for the next day in its current mode. The alarm bell
icon will remain displayed to indicate the alarm is set.
8
button on the front of the device.
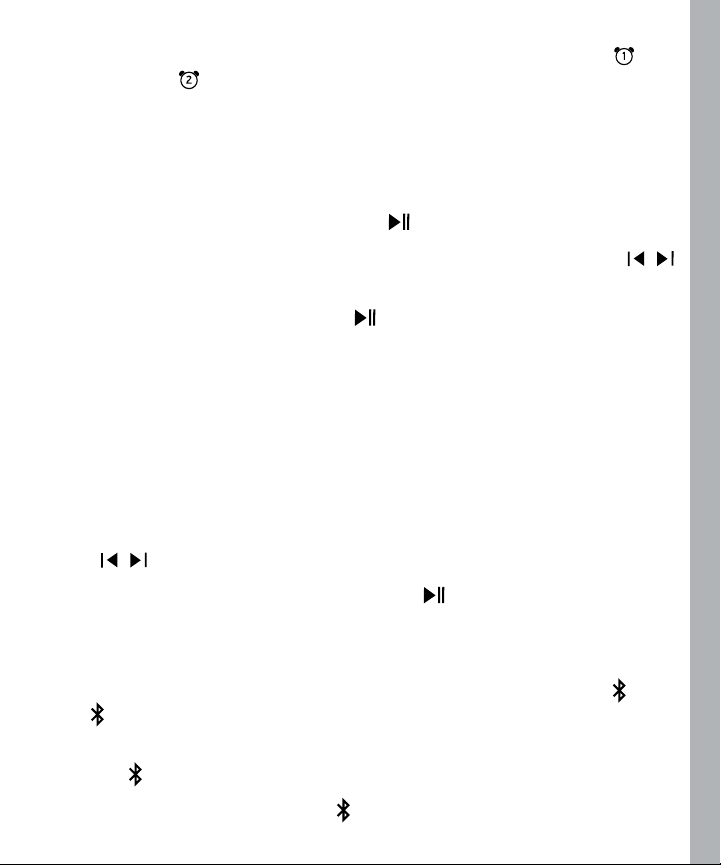
• OFF: To completely turn off the alarm so it is not set for the next day, press the alarm 1
button or alarm 2
button for the corresponding alarm.
PLAY SLEEP SOUNDS AND MEDITATION
Choose from a selection of nature sounds, white noise tones, and meditations to trigger your brain’s
ability to quickly relax and fall asleep. The “Sleep Sounds” button is located on the front of the
device above the screen.
1. Touch the “Sleep Sounds” button or the play/pause
2. To select a different sleep sound, touch the “Sleep Sounds” button again or use the track
buttons.
button to play a sleep sound.
/
3. To pause a sleep sound, touch the play/pause
button.
PLAY SLEEP THERAPY PROGRAMS
Sleep Therapy programs are scientifically engineered to help you fall asleep and stay asleep. Each
Sleep Therapy program begins with 20 minutes of either a nature sound or guided sleep meditation
to help you relax and fall asleep. The sound then gently transitions to brown noise, which plays for
the remainder of the night, masking loud noises and helping you achieve your deepest sleep. The
“Sleep Therapy” button is located on the front of the device below the screen.
1. Touch the “Sleep Therapy” button to choose a Sleep Therapy program.
2. To select a different Sleep Therapy program, touch the “Sleep Therapy” button again or use the
track
3. To pause a Sleep Therapy program, touch the play/pause
/
buttons.
button.
STREAM VIA BLUETOOTH
Connect to any smart device to stream your own music.
1. To connect your Bluetooth-enabled device with the HDS-3000, long press the Bluetooth
The
symbol will begin flashing.
2. Follow the steps on your Bluetooth-enabled device to pair to HDS-3000. Once paired, the
Bluetooth
3. While streaming, short press the Bluetooth
symbol will stop flashing.
button to unpair.
9
button.
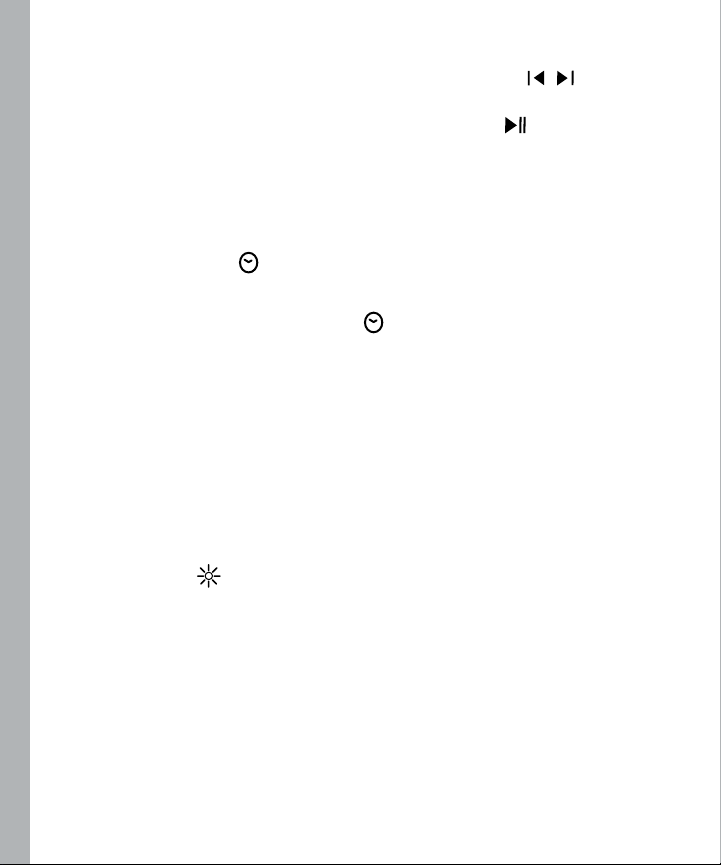
Once paired you may:
• CHANGE TRACKS: Use your Bluetooth-enabled device or push the track
Deep Sleep
®
Revitalize.
• PAUSE: Use your Bluetooth-enabled device or touch the play/pause
®
Sleep
Revitalize.
buttons on the
/
button on the Deep
AUTO-OFF TIMER
When you’re listening to a nature sound or streaming over Bluetooth, you may set a timer so the
unit will automatically turn off.
1. Touch the auto-off timer
the corresponding display changes to the time of your choice: 15, 30, or 60 minutes.
button, located on the front right-hand side of the device, until
2. To cancel the timer, touch the auto-off timer
button until the timer display is no longer
present, which indicates the timer is no longer set.
CHARGING YOUR SMART DEVICE
A convenient USB port is available on the back of the Deep Sleep® Revitalize to charge your
devices. Use the cable that came with your device to charge.
NOTE: Not all devices are compatible with the USB port. If your device does not charge when
connected to the USB port, continue using the power adapter that came with your device.
DIMMING THE DISPLAY
The display can be dimmed to make the light more comfortable for a good night’s sleep.
1. Press the dimmer
brightness, including turning completely off. Continue pressing the button to view the display
again.
button and the display brightness will adjust over 4 levels of
10

MAINTENANCE
TO STORE: You may leave the unit on display, or you can store it in a cool, dry place.
TO CLEAN: Use only a soft, dry cloth to clean the enclosure of the unit. NEVER use liquids or
abrasive cleaners to clean.
FCC DISCLAIMER
This equipment complies with FCC radiation exposure limits set forth for an uncontrolled
environment. This transmitter must not be co-located or operating in conjunction with any other
antenna or transmitter. This equipment should be installed and operated with minimum distance
20cm between the radiator& your body.
This device complies with Part 15 of the FCC Rules. Operation is subject to the following two
conditions: (1) This device may not cause harmful interference, and (2) this device must accept any
interference received, including interference that may cause undesired operation.
This equipment has been tested and found to comply with the limits for a Class B digital device,
pursuant to Part 15 of the FCC Rules. These limits are designed to provide reasonable protection
against harmful interference in a residential installation. This equipment generates, uses, and can
radiate radio frequency energy and, if not installed and used in accordance with the instructions,
may cause harmful interference to radio communications. However, there is no guarantee that
interference will not occur in a particular installation. If this equipment does cause harmful
interference to radio or television reception, which can be determined by turning the equipment
off and on, the user is encouraged to try to correct the interference by one or more of the following
measures:
• Reorient or relocate the receiving antenna.
• Increase the separation between the equipment and receiver.
• Connect the equipment into an outlet on a circuit different from that to which the receiver is
connected.
• Consult the dealer or an experienced radio/TV technician for help.
Changes or modifications not expressly approved by HoMedics could void the user’s authority to
operate the equipment. The device has been evaluated to meet general RF exposure requirement.
The device can be used in portable exposure condition without restriction.
11

IC CAUTION ICID: RSS-GEN ISSUE 4 NOVEMBER 2014
This device complies with Innovation, Science, and Economic Development ISEDC license-exempt
RSS standard(s). Operation is subject to the following conditions: (1) This device may not cause
interference, and (2) This device must accept any interference, including any that may cause
undesired operation of the device.
This device complies with RF exposure guidelines, users can obtain Canadian information on
RF exposure and compliance. The equipment should be installed and operated with minimum
distance 20cm between the radiator & your body.
This Class B digital apparatus complies with Canadian ICES-003.
12

CAUTION
This product contains a coin / button cell battery. If the coin / button cell battery is swallowed, it
can cause severe internal burns in just 2 hours and can lead to death.
Keep new and used batteries away from children.
If the battery compartment does not close securely, stop using the product and keep it away from
children.
If you think batteries might have been swallowed or placed inside any part of the body, seek
immediate medical attention.
Maximum radio-frequency power: 2.66dBm
Bluetooth Frequency range: 2.402GHz-2.480GHz
13
 Loading...