

Homedics DWS-400 Instruction Manual
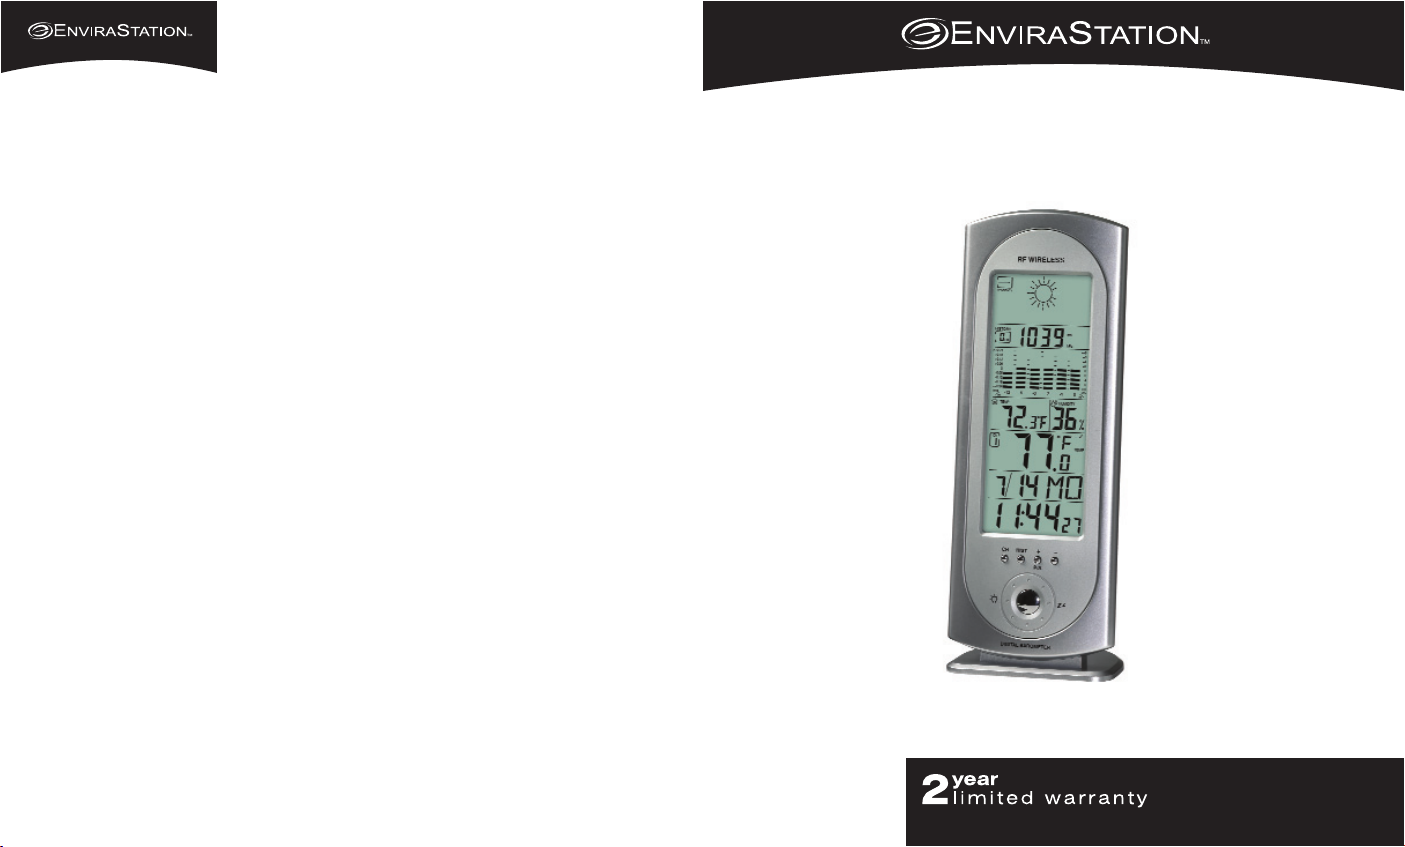
Weather Station
Wireless Operation
Instruction Manual and
Warranty Information
DWS-400
El manual en
español empieza a
la página 13
© 2003 HoMedics, Inc. y sus compañías afiliadas, reservados todos los derechos. Envirastation™ es una
marca comercial de HoMedics Inc. y sus compañías afiliadas. Reservados todos los derechos.
GARANTÍA LIMITADA POR DOS AÑOS
(Válida únicamente en los EE.UU.)
HoMedics garantiza este producto contra defectos en material y mano de
obra durante el período de dos años a partir de la fecha original de
compra con las excepciones que se detallan a continuación.
Esta garantía de producto de HoMedics no cubre daños causados por un
uso inadecuado, abuso, accidente, la conexión de accesorios no autorizados, la alteración del producto o cualquier otra condición sin importar
cual sea que se encuentre fuera de nuestro control. Esta garantía es
válida sólo si el producto es comprado y usado en los EE.UU. Esta
garantía no cubre un producto que requiera modificación o alteración
para que pueda usarse en cualquier otro país distinto del país por el cual
fue diseñado, fabricado, aprobado y/o autorizado, o la reparación de productos dañados a causa de estas modificaciones. HoMedics no será
responsable de ningún tipo de daños incidentales, consecuentes o especiales. Todas las garantías implícitas, incluyendo entre otras aquellas
garantías implícitas de idoneidad y comerciabilidad, están limitadas a la
duración total de dos años a partir de la fecha de compra original.
Para obtener un servicio cubierto por la garantía para su producto
HoMedics, puede entregar la unidad personalmente o enviarla por correo
junto con su recibo de compra fechado (como prueba de la compra), el
franqueo pagado, junto con un cheque o una orden de pago por el
monto de $5.00, pagadero a HoMedics, Inc. para cubrir los gastos de
manipulación.
Una vez recibido, HoMedics reparará o reemplazará su producto, según
lo que sea apropiado y se lo enviará con el franqueo pagado. Si es
apropiado reemplazar su producto, lo reemplazaremos con uno igual o
comparable, a opción nuestra. La garantía es válida únicamente a través
de nuestro Centro de servicio. El servicio realizado a este producto por
cualquier otro diferente al Centro de servicio HoMedics anulará la
garantía.
Esta garantía le proporciona derechos legales específicos. Es posible que
usted tenga derechos adicionales que pueden variar de un estado a otro.
Debido a las regulaciones de los diferentes estados, es posible que
algunas de las limitaciones y exclusiones no se apliquen en su caso.
Dirección postal:
Envirastation
Consumer Relations
Service Center Dept. 168
3000 Pontiac Trail
Commerce Township, MI
48390
correo electrónico:
cservice@envirastation.com

BEFORE YOU BEGIN:
1. IMPORTANT: Insert batteries into the home receiver unit first, then the
remote sensor.
2. Place the home unit as close as possible to the remote unit. This will
help with synchronization between the remote sensor and the home unit.
3. REMEMBER: Once you are ready to position your remote sensor and
home unit, ensure that the distance is not outside the effective transmission range (100 feet). Some building materials and location of the
home unit or remote sensor can affect transmission quality and range.
Try various locations for best results.
BATTERY INSTALLATION
Home Receiver:
Lift off the battery cover on the back of the unit. Install 2 “AA” alkaline
batteries included according to the polarity indicated. Close the battery
cover.
Remote Sensor
:
Remove the attached bracket stand. Loosen the 2 screws securing the
battery cover with a small screwdriver and remove. Insert 2 “AA” alkaline
batteries included according to the polarity direction indicated. Depress the
C/F button to select either Centigrade or Fahrenheit temperature reading.
Ensure the black gasket is properly seated in the housing and then replace
the cover. Tighten the 2 screws to secure.
NOTE: There are no consumer serviceable parts.
(See Warranty section for contact information.)
GETTING STARTED
SETTING UP THE WIRELESS THERMOMETER
If you encounter any difficulties in setting up your wireless thermometer
system, please contact Consumer Relations.
• For the first installation, always insert batteries into the home unit FIRST
and then the remote sensor(s). (See BATTERY INSTALLATION section)
• Your new RF Thermometer is built with security code technology, the
home unit will learn the code of the first remote sensor and log it in as
channel 1. Channel 2 and Channel 3 will be registered in the same way if
additional sensors are used. This unit can monitor up to 3 separate
sensors.
• Once a channel is registered, it will not accept any new sensors. However,
registered channels can be erased by removing the batteries in the
remote sensor or the home unit.
• When replacing batteries for the remote sensor- Remember to clear the
corresponding channel of the home unit by removing the batteries. –OR–
Select the respective channel of the sensor by pressing the CHANNEL
button. Hold the CHANNEL button for 3 seconds to clear the registration.
• Press the Tx button on the back of remote sensor to verify the RF reception.
• It is recommended to test the units next to each other to ensure that both
the remote sensor and home receiver are properly synchronized.
NOTE: Keep the remote sensor out of direct sunlight and rain. Do not
mount on metal surface.
SETTING UP THE BAROMETER
When powering up, the pressure/altitude display will show “Auto” and
“Meter” for 60 seconds. It will automatically calculate and display the current
altitude above sea level. Please compare the displayed altitude value (in
meters) against the exact altitude you obtain from a local authority. Enter
your value if the displayed value is not exactly correct.
To reset or recalibrate, please follow these steps:
1. Hold “Pressure/Altitude” key for 3 seconds.
2. Select Meter or Feet by pressing the “Pressure/Altitude” button. Press
“HIST” to confirm.
3. Press “Pressure/Altitude” and “ P/A- ” to enter the altitude value (-100 m
to 2500 m).
4. Press “HIST” to confirm and exit.
2
3

5
8. Select Minute - Use the “ + , - ” buttons located on the back of the
home receiver to adjust minute setting. Press “SET” button to confirm
your selection.
9. Select World Time Offset - Use the “ + , - ” buttons located on the back
of the home receiver to adjust “World Time Offset”. Press “SET” button
to confirm your selection.
SETTING ALARM TIME
This unit features two alarms (Alarm 1 and Alarm 2). To select one press the
“CLEAR/AL” button to scroll through alarm settings, press “+, ”. Your
selection will be shown on the display. To enter alarm time:
1. Hold the “CLEAR/AL” button for 3 seconds. Press “ + , - ” to enter the
desired Hr/ Min values and press “CLEAR/AL” to confirm setting.
2. To view alarm time - Press “CLEAR/AL” button. Alarm time will display
for 5 seconds and then resume to normal clock thereafter.
3. The home receiver will provide either a daily alarm, which lasts for 1
minute or a snooze mode where the alarm will repeat every 10 minutes
until manually cleared (see SNOOZE/LIGHT section below).
4. To turn alarm(s) off for extended periods, press “+, ” to deselect both
Alarm 1 and Alarm 2.
SNOOZE/ LIGHT
1. Press the “SNOOZE/ LIGHT” button (Zz/ light icon button) for an
extended backlight.
2. In snooze alarm mode, press this button to trigger a repetitive snooze
alarm.
3. When normal alarm mode is selected, press any button on the back of
the unit to turn off alarm for one day.
MAX/ MIN MEMORY SETTINGS
1. Press ”MAX/ MIN“ button to view the maximum values (In/Outdoor
Temp., Humidity, Pressure) for 5 seconds. Press again to view the
minimum values.
2. To clear the memory record, press “CLEAR/AL” button while the
respective values are displayed on screen.
To select between mb/hPa and inHg, hold “ P/A- ” key for 3 seconds.
To view air pressure for the past 12 hours, press the “HIST” button to scroll
through the hourly readings. The respective values can only be available
after the barometer has recorded the pressure data in the past 12 hours.
Push any other button to cancel the “view history” selection.
The spectrum bar chart indicates the pressure changes (range from -8 to
+8 hPa mb) hourly over the past 12 hours.
SETTING THE CLOCK & CALENDAR
Hold “SET” button for 3 seconds to enter clock set.
1. Select 12 Hour or 24 Hour Setting - Using the “ + , - ” buttons located
on the back of the home receiver. Press “SET” button to confirm your
selection.
2. Select Fahrenheit/Centigrade - Use the “ + , - ” buttons located on the
back of the home receiver to adjust setting. Press “SET” button to
confirm your selection.
3. Select Year - Use the “ + , - ” buttons located on the back of the home
receiver to adjust year setting. Press “SET” button to confirm your
selection.
4. Select Month - Use the “ + , - ” buttons located on the back of the
home receiver to adjust month setting. Press “SET” button to confirm
your selection.
5. Select Day - Use the “ + , - ” buttons located on the back of the home
receiver to adjust day setting. Press “SET” button to confirm your
selection.
6. Select Language - Use the “ + , - ” buttons located on the back of the
home receiver to adjust language setting. Press “SET” button to confirm
your selection.
LANGUAGE
GE = German
EN = English
FR = French
IT = Italian
7. Select Hour - Use the “ + , - ” buttons located on the back of the home
receiver to adjust hour setting. Press “SET” button to confirm your
selection.
4
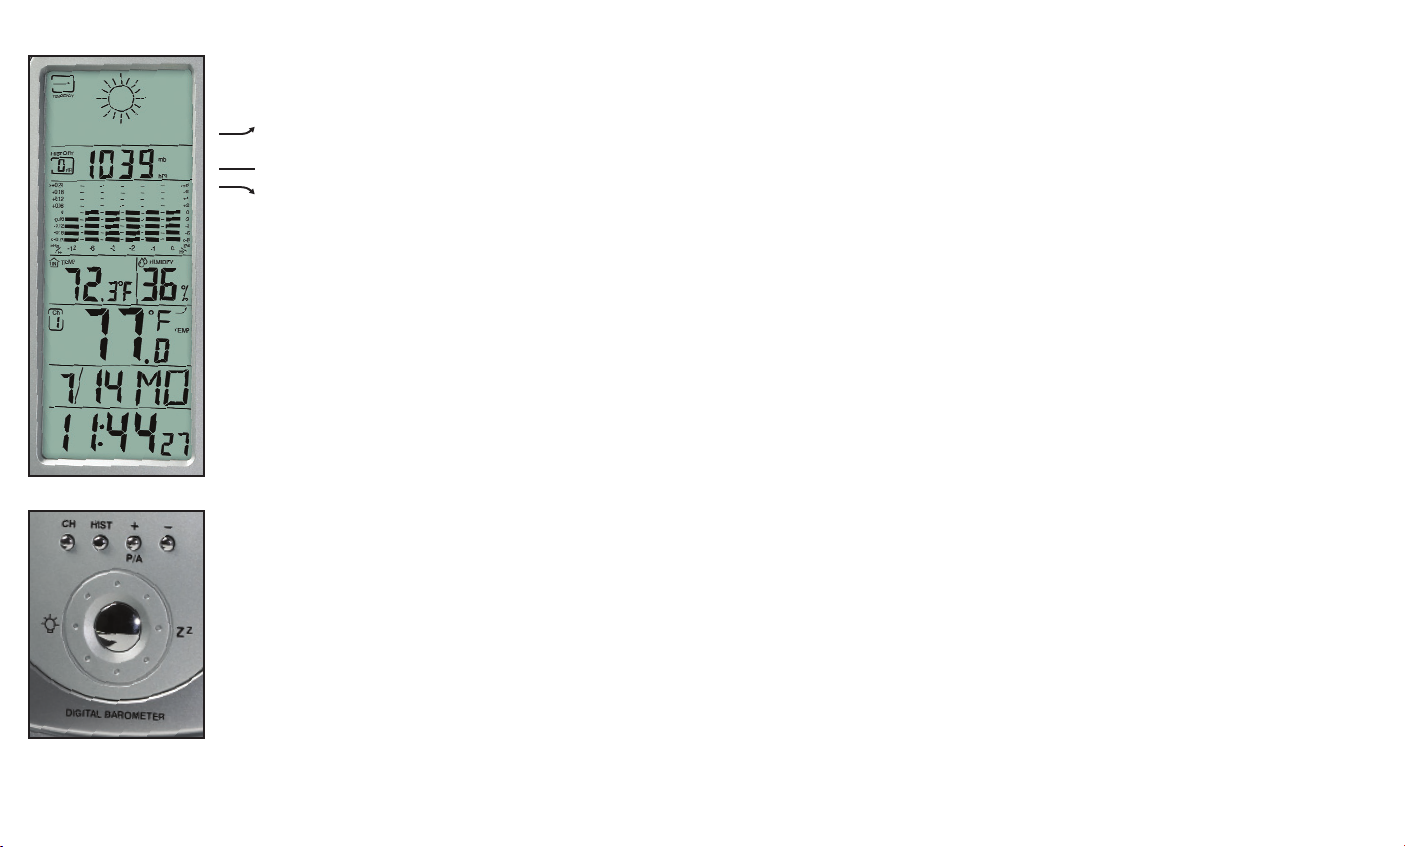
TEMPERATURE, PRESSURE AND HUMIDITY
TREND INDICATORS:
You will see one of 3 icons;
will indicate Rising readings if it changes more than
1 degree or 1% relative humidity in an hour
will indicate Steady readings
will indicate Falling conditions if it is more than
1 degree 1% relative humidity in an hour
These readings are refreshed every hour.
TEMPERATURE ALERT
Press “ALERT” to turn temperature & humidity alert on
and off.
1. Hold “ALERT” button for 3 seconds to enter the alert
setting mode. The indoor icon will flash.
2. Press “ +, - ” to select the between indoor temperature or
remote sensor to be alerted to. The display will blink to
confirm your sensor selection. Press “ALERT” to confirm
your selection. The Upper pointer and the value on the
LCD display will flash, enter the desired upper limit with
the “ +, - ” buttons, press “ALERT” to confirm your
selection and then go to the lower limit setting.
3. The Lower pointer and value will flash, enter the desired
lower limit with
“ +, - ” buttons, press “ALERT” to confirm and exit.
4. You may enter an alert setting for the indoor temp and for
each of the remote sensors.
5. When temperature hits the limit of your preset levels, the
Upper/Lower pointers and the temperature of the
respective channel (indoor or remote sensor) will flash
and an audible alarm will sound. Press any button on the
home receiver to acknowledge and stop the alarm.
6
WEATHER FORECAST WITH STORM ALERT
The built-in sensor will read the atmospheric pressure and calculate the
weather conditions of the next 12 hours. These conditions will be displayed
as; Sunny, Partial Sunny, Cloudy, Rainy, Stormy, Icy at the top of the LCD
display.
LOW BATTERY INDICATION
Low battery indication is available for the home receiver and the remote
sensor. Replace the batteries and follow the setup procedure as mentioned
in this instruction manual.
MOUNTING INSTRUCTIONS
Both the Home Unit and Remote Sensor come with a table stand or they can
be wall mounted.
Table Top For the home unit, simply attach the stand provided.
For the remote sensor, simply fold out the attached stand from the mounting
bracket.
Wall Mounting For the Home Unit - Remove the table top stand from the bottom of the unit.
Fix a screw into the desired wall and place the home unit onto the screw
using the back side hanging hole.
For the Remote Sensor - Fix two screws into the desired hanging location
using the mounting bracket holes on the remote sensor as a template.
Ensure that the screws are placed vertically (in a straight line up/down)
along the surface and that there is proper distance between each screw to
hang the mounting bracket. Align the hanging holes of the mounting bracket
with the two screws and place unit onto the screws.
7
 Loading...