

HoMedics BPW-260 User Manual
Por servicio o reparación,
no devuelva esta unidad
al distribuidor. Póngase en
contacto con Relaciones
con el Consumidor de
HoMedics por el:
Correo:
HoMedics, Inc.
Service Center
Dept. 168
3000 Pontiac Trail
Commerce Township,
MI 48390
Correo electrónico:
cservice@homedics.com
Teléfono:
1-800-466-3342
Horario comercial:
8:30 am a 5pm
Hora del Este
De lunes a viernes
Distribuido por
®
HoMedics, Inc.
3000 Pontiac Trail
Commerce Township,
MI 48390
Impreso en China
LA GARANTÍA AQUÍ ESTABLECIDA SERÁ LA ÚNICA Y EXCLUSIVA GARANTÍA.
NO HABRÁ NINGUNA OTRA GARANTÍA EXPRESA NI IMPLÍCITA, INCLUYENDO
NINGUNA GARANTÍA DE COMERCIALIZACIÓN O APTITUD NI NINGUNA OTRA
OBLIGACIÓN POR PARTE DE LA COMPAÑÍA CON RESPECTO A PRODUCTOS
CUBIERTOS POR ESTA GARANTÍA. HOMEDICS NO TENDRÁ RESPONSABILIDAD
ALGUNA POR NINGÚN DAÑO INCIDENTAL, CONSECUENTE NI ESPECIAL. BAJO
NINGÚN CONCEPTO ESTA GARANTÍA REQUERIRÁ MÁS QUE LA REPARACIÓN
O CAMBIO DE ALGUNA PIEZA O PIEZAS QUE SE HALLEN DEFECTUOSAS
DENTRO DEL PERÍODO DE VIGENCIA DE ESTA GARANTÍA. NO SE EFECTUARÁN
REEMBOLSOS. SI NO HAY PIEZAS DE REPUESTO DISPONIBLES PARA LOS
MATERIALES DEFECTUOSOS, HOMEDICS SE RESERVA EL DERECHO DE
REALIZAR SUSTITUCIONES EN VEZ DE REPARAR O CAMBIAR.
Esta garantía no se extiende a la compra de productos abiertos, usados,
reparados, embalados otra vez y/o abiertos y vueltos a cerrar, incluyendo entre
otras cosas la venta de dichos productos en sitios de remate por Internet y/o
la venta de dichos productos por revendedores o mayoristas. Todas y cada una
de las garantías cesarán y terminarán inmediatamente con respecto a cualquier
producto o pieza del mismo que estén reparados, cambiados, alterados o
modificados sin el consentimiento previo explícito y por escrito de HoMedics.
Esta garantía le proporciona derechos legales específicos. Es posible que usted
tenga derechos adicionales que pueden variar de un país a otro. Debido a las
regulaciones de ciertos países, es posible que algunas de las limitaciones y
exclusiones no se apliquen en su caso.
Por más información con respecto a nuestra línea de productos en los EE.UU.,
©2009-2010 HoMedics, Inc. y sus compañías afiliadas, reservados
visítenos en: www.homedics.com
todos los derechos. HoMedics es una marca registrada de
HoMedics, Inc. y sus compañías afiliadas. Smart Measure™ y
Voice Assist™ son marcas registradas de HoMedics Inc. y sus
Reservados todos los derechos.
compañías afiliadas.
IB-BPW260A
P/N: 323101251 VER:001
El manual
en español
empieza en la
página 42
Automatic Wrist
Blood Pressure Monitor
with Voice Assist™
BPW-260
BPW-260_A.indd 1-2BPW-260_A.indd 1-2 12/7/09 4:48 PM12/7/09 4:48 PM

TABLE OF CONTENTS
INTRODUCTORY INFORMATION:
Important Product Notices and
Safety Instructions .....................................3
About Blood Pressure ................................6
What is Blood Pressure?
Why Measure Your Blood Pressure?
Blood Pressure Standard ...........................7
How This Blood Pressure
Monitor Works .............................................8
USAGE INFORMATION:
Name/Function of Each Part ....................10
Display Explanations ................................11
Installing Batteries ...................................13
Date & Time Set Procedure ......................15
Using the Voice Assist™ Talking
Function .....................................................16
Applying the Cuff ......................................19
Correct Measurement Posture ................20
Measurement Procedure ..........................21
Risk Category Index .................................26
Irregular Heartbeat Detector (IHB) .........27
Recalling Values from Memory ................28
Clearing Values from Memory .................30
Important Notes Regarding Your
Blood Pressure Measurement .................31
Care, Maintenance & Cleaning ................33
Potential for Electromagnetic
Interference ...............................................35
Troubleshooting ........................................36
Specifications ...........................................37
5 Year Limited Warranty ...........................39
21
BPW-260_A.indd 1-2BPW-260_A.indd 1-2 12/7/09 4:48 PM12/7/09 4:48 PM

IMPORTANT PRODUCT NOTICES AND
SAFETY INSTRUCTIONS
When using your blood pressure monitor, basic
precautions should always be followed. Please
read and follow all instructions and warnings before
using this product. Save these instructions for future
reference.
• Please note that this is a home healthcare
product only and it is not intended to serve as
a substitute for the advice of a physician or
medical professional.
• Do not use this device for diagnosis or treatment
of any health problem or disease. Measurement
results are for reference only. Consult a
healthcare professional for interpretation of
blood pressure measurements. Contact your
physician if you have or suspect any medical
problem. Do not change your medications
without the advice of your physician or
healthcare professional.
• This product is not suitable for people with
arrhythmias. This device may have difficulty
determining the proper blood pressure for
individuals with irregular heartbeat, diabetes,
poor circulation of blood, kidney problems or
for users who have suffered from a stroke.
• Consult your physician before measuring
blood pressure at the wrist if you have any of
the following conditions: Severe hypertension,
severe diabetes, severe arteriosclerosis, severe
kidney disease or vascular disease that may
compromise circulation.
• The pulse display is not suitable for checking the
frequency of heart pacemakers.
• Electromagnetic interference: The device contains
sensitive electronic components. Avoid strong
electrical or electromagnetic fields in the direct
vicinity of the device (e.g. mobile telephones,
microwave ovens). These may lead to temporary
impairment of measurement accuracy.
• Use blood pressure monitor only for its
intended use.
• Do not wrap the cuff around body parts other
than your wrist.
43
BPW-260_A.indd 3-4BPW-260_A.indd 3-4 12/7/09 4:48 PM12/7/09 4:48 PM

• Not for use by or on persons under the age of 18
• Use only 1.5V AAA alkaline batteries for power
supply.
Blood pressure measurements determined with this
device are equivalent to those obtained by a trained
observer using the cuff/stethoscope auscultatory
method, within the limits prescribed by the American
National Standard, Manual, electronic, or automated
sphygmomanometers.
ABOUT BLOOD PRESSURE
What is Blood Pressure?
Blood pressure is the pressure exerted on the artery
walls while blood flows through the arteries. The
pressure measured when the heart contracts and
sends blood out of the heart is systolic (highest)
blood pressure. The pressure measured when the
heart dilates with blood flowing back into the heart
is called diastolic (lowest) blood pressure.
Why Measure Your Blood Pressure?
Among today’s various health problems, those
associated with high blood pressure are very common.
High blood pressure dangerously correlates with
cardiovascular diseases. Therefore, blood pressure
monitoring is important for identifying those at risk.
65
BPW-260_A.indd 5-6BPW-260_A.indd 5-6 12/7/09 4:48 PM12/7/09 4:48 PM

BLOOD PRESSURE STANDARD
The table below is criteria for hypertension that
is publicly available from the National Heart Lung
and Blood Institute at the U.S. National Institutes of
Health (NIH) (http://www.nhlbi.nih.gov/health/dci/Diseases/
Hbp/HBP_WhatIs.html)
blood pressure readings against these established
criteria to determine if they may be potentially at
increased risk.
This table is applicable to most adults aged 18 and
older. Blood pressure tends to go up and down,
even in people who normally don’t have high
readings. If your numbers stay above the “normal”
range most of the time, you may be at increased
risk and should consult your physician.
Category
Normal Less than 120 and Less than 80
Prehypertension 120-139 or 80-89
High Blood Pressure
Stage 1 140-159 or 90-99
Stage 2 160 or higher or 100 or higher
Although one can easily find where their own blood
pressure readings fall on this table, this monitor
comes equipped with a Risk Category Index that
. Users can compare their own
Systolic (mmHg) Diastolic (mmHg)
automatically compares each reading to this criteria
and provides a helpful cue if your reading falls into
one of the stages that could potentially indicate
increased risk. See page 26 for more information
on this feature.
Please note that cues provided by this monitor are
only intended to assist you in using this table. The
table and cues are only provided for convenience
to have access to the NIH information. They are
not a substitute for a medical examination by your
physician. It is important for you to consult with your
physician regularly. Your physician will tell you your
normal blood pressure range as well as the point at
which you may actually be considered to be at risk.
HOW THIS BLOOD PRESSURE MONITOR
WORKS
This monitor uses Smart Measure™ technology to detect
your blood pressure. With one touch of a button, the cuff
will automatically inflate to block the blood flow through
your artery. Next, the deflation process starts. Smart
Measure™ technology enables the monitor to automatically
inflate and deflate at the appropriate level for each
individual. Please note that any muscle movement during
inflation or deflation will cause measurement error. When
87
BPW-260_A.indd 7-8BPW-260_A.indd 7-8 12/7/09 4:48 PM12/7/09 4:48 PM
measurement is complete, the monitor will display
your systolic pressure, diastolic pressure, and pulse
readings.
The monitor automatically finds where your
measurement results fall on the NIH’s National Heart
Lung and Blood Institute’s table and provides a cue
if your reading falls into one of the stages that could
potentially indicate increased risk. Please refer to
page 26 for more information on this feature.
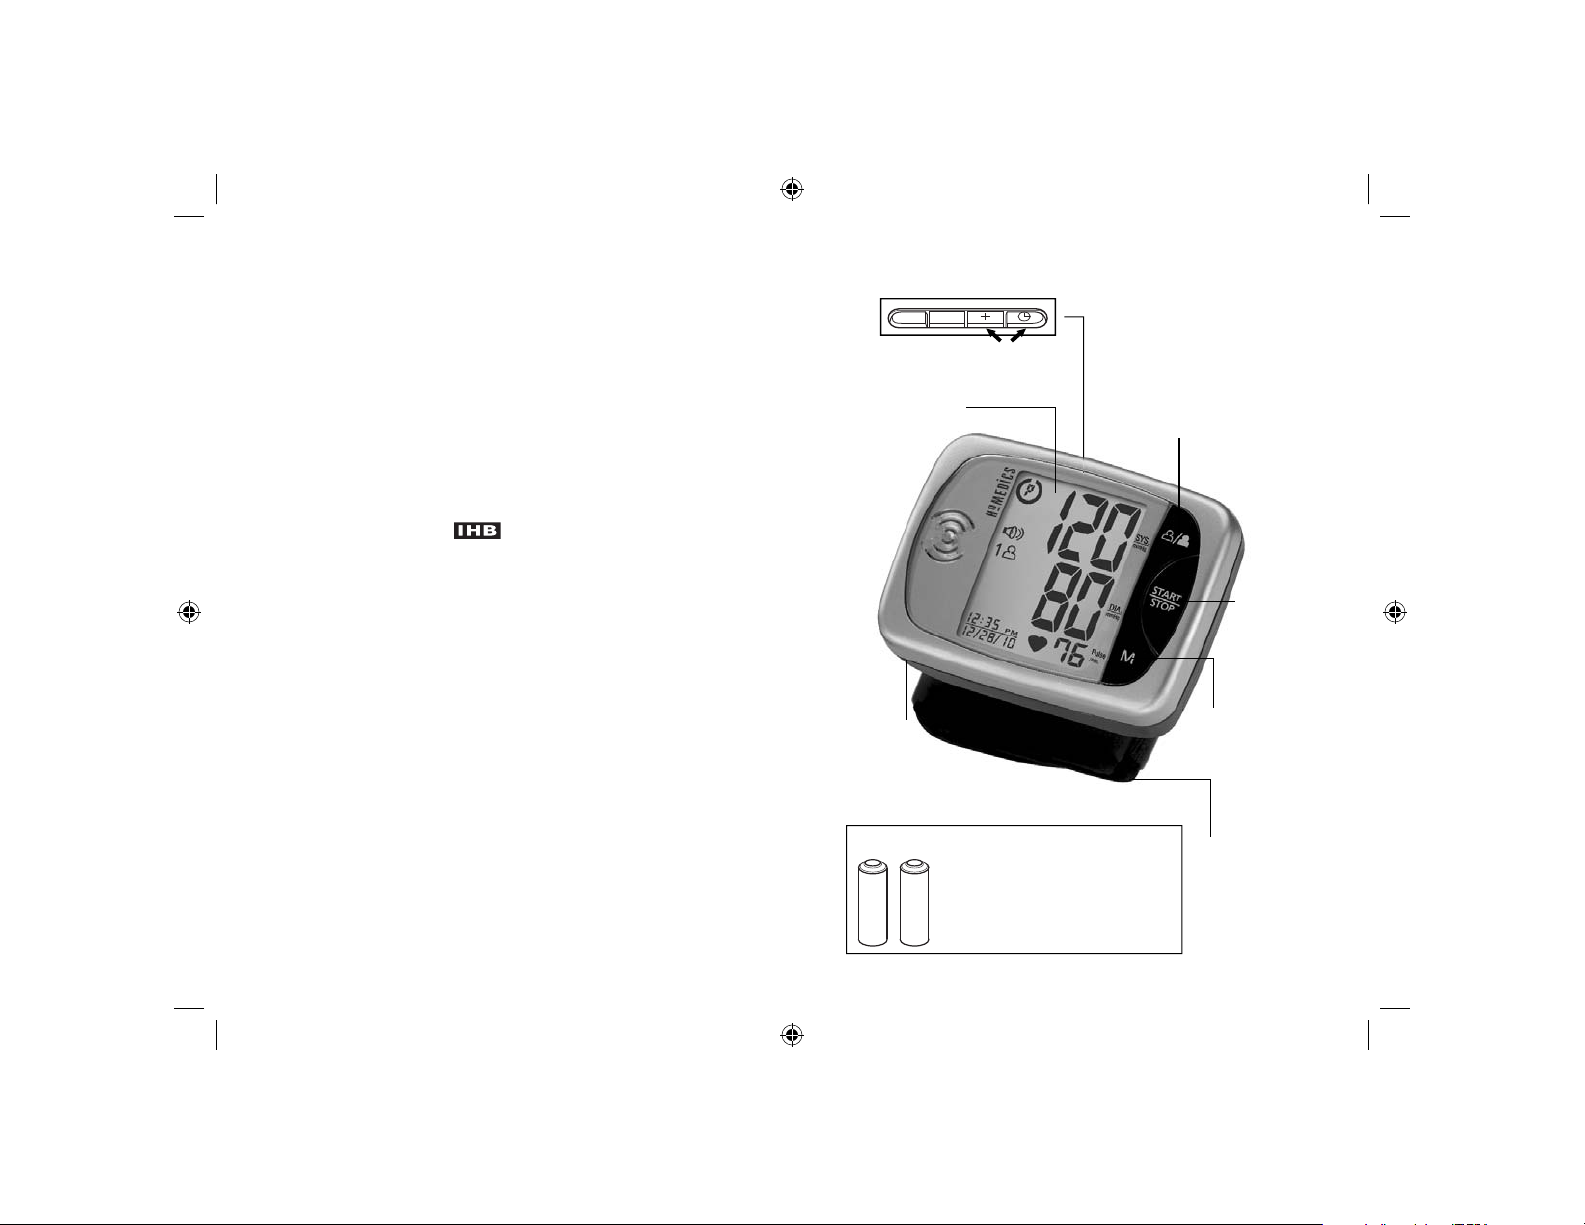
NAME/FUNCTION OF EACH PART
TALKING
LANGUAGE
MODE
12 3
LCD Display
1. LANGUAGE Button
2. TALKING MODE Button
3. Date/Time Set Buttons
User-Select
Button
The appearance of the
icon indicates that a
pulse irregularity consistent with an irregular heartbeat
was detected during measurement. Refer to page
27 for more information on the Irregular Heartbeat
Detector.
Battery
Cover
Accessories for unit :
2 “AAA” size, 1.5V alkaline
batteries included in the
carrying case with the unit.
109
BPW-260_A.indd 9-10BPW-260_A.indd 9-10 12/7/09 4:48 PM12/7/09 4:48 PM
START/
STOP
Button
Memory Recall
Button
Wrist Cuff
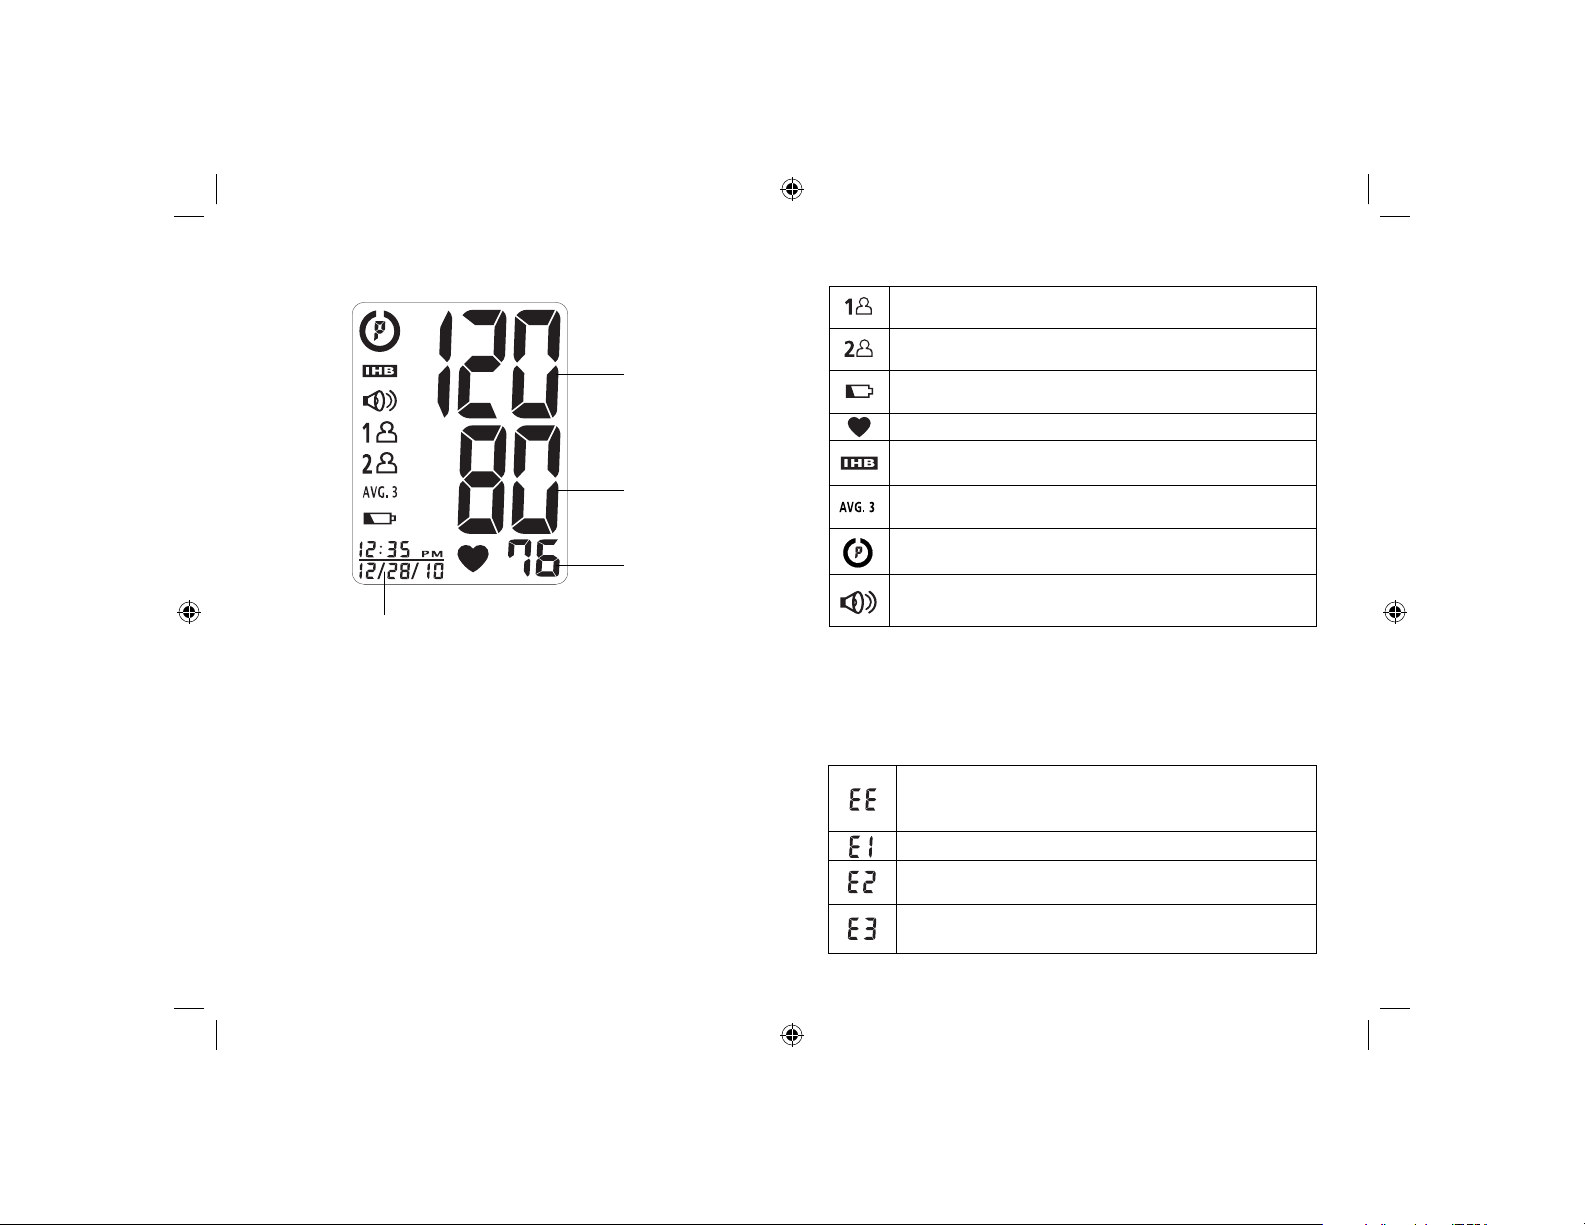
DISPLAY EXPLANATIONS
Display Symbols:
User 1: Appears when the monitor is operated by User 1
Date/Time Indicator
Systolic
Pressure
Diastolic
Pressure
Pulse
Rate
User 2: Appears when the monitor is operated by User 2
Weak Battery Symbol: Appears when batteries should
be replaced
Pulse Symbol: Shows the pulse rate per minute
Irregular Heartbeat Detector: Refer to page 27 for more
information.
Memory Average: Displays average of last 3 readings
Risk Category Index: See page 26 for more information.
Talking Feature On Symbol: Appears when talking
function is activated. (Speaker ON)
If any of the following letters and numbers appear in the
area that systolic pressure should be displayed, an error
has occurred with your reading. See Troubleshooting
section of this manual for more information.
Measurement Error: Measure again. Wrap
the cuff correctly and keep wrist steady during
measurement.
Air Circuit Abnormality: Measure again.
Pressure Exceeding 300 mmHg: Switch the unit
off to clear, then measure again.
Error Determining Measurement Data: Measure
again.
1211
BPW-260_A.indd 11-12BPW-260_A.indd 11-12 12/7/09 4:48 PM12/7/09 4:48 PM

INSTALLING BATTERIES
1. The battery cover is located
along the bottom side of the
monitor. Remove battery cover
by pressing down and pulling
away from the monitor.
2. Install batteries according to
the polarity indications inside
the compartment (as shown
in figure 2). Battery Type: 2
Alkaline LR03 (AAA) size
3. Insert the other battery,
according to the polarity
indications inside the
compartment (as shown in
figure 3).
Replace the batteries if:
1.
2.
3.
1. The weak battery symbol appears on the display.
2. Nothing appears on the display when the power is
switched on.
As the supplied batteries are for test only, they may
be discharged earlier than batteries you buy in stores.
Replace all batteries at one time (as simultaneous set).
Use only 1.5V AAA alkaline batteries. Remove batteries
when unit is not in use for extended periods of time.
Date and time will need to be reset if batteries are
removed or replaced. Clean contacts on battery and
in battery compartment with a soft dry cloth each time
you install batteries.
Note: Batteries are hazardous waste. Do not
dispose of them together with the household
garbage.
4. Replace the cover by inserting
4.
it back into place.
1413
BPW-260_A.indd 13-14BPW-260_A.indd 13-14 12/7/09 4:48 PM12/7/09 4:48 PM
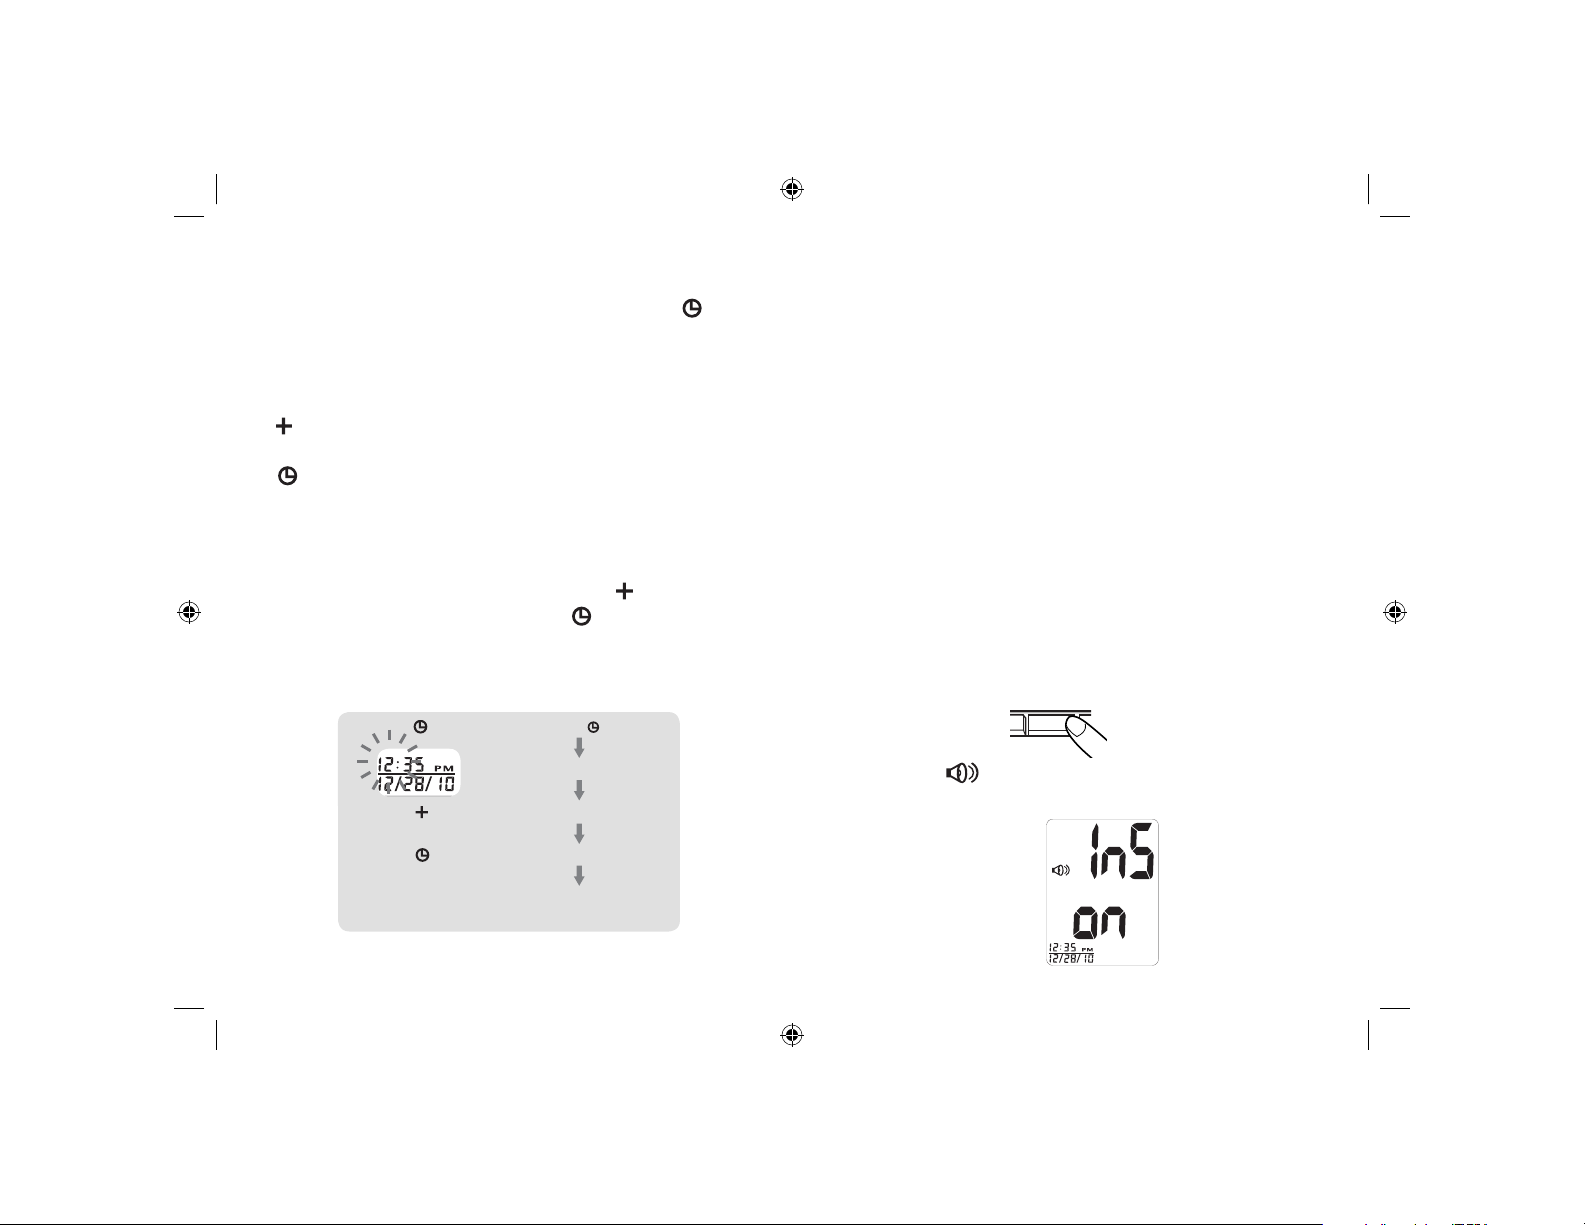
DATE & TIME SET PROCEDURE
1. To adjust the date/time, press the Set button
located on the top of the monitor.
2. The display will show a blinking number showing
the HOUR. Change the HOUR by pressing the
button. Each press will increase the number
by one in a cycling manner. Press the Set button
again to confirm the entry, and the screen
will show a blinking number representing the
MINUTE.
3. Change the MINUTE, MONTH, DAY and YEAR as
described in Step 2 above, using the button
to change the numbers and the button to
confirm the entries.
Press the button
USING THE VOICE ASSIST™
TALKING FUNCTION
The Voice Assist feature will guide you through the
measurement procedure and also announce results
after your reading. The Voice Assist™ Talking Function
is not a substitute for reading and understanding the
instruction manual.
The Voice Assist feature has 3 modes:
• Instructions On Mode - Announces instructions
and results
• Instructions Off Mode - Announces results only
• Quiet Mode - No voice
Setting the Voice Assist Mode:
1. Press the Talking mode button on the top of the
monitor. Each press of the Talking Mode button will
cycle through the different modes.
TALKING
GE
MODE
blinking HOUR
increasing HOUR
confirm the entry
repeat process to set MINUTE,
MONTH, DAY and YEAR
BPW-260_A.indd 15-16BPW-260_A.indd 15-16 12/7/09 4:48 PM12/7/09 4:48 PM
2. When the appears with the letters “InS ON”, this
indicates the monitor is in “Instructions On” Mode.
1615
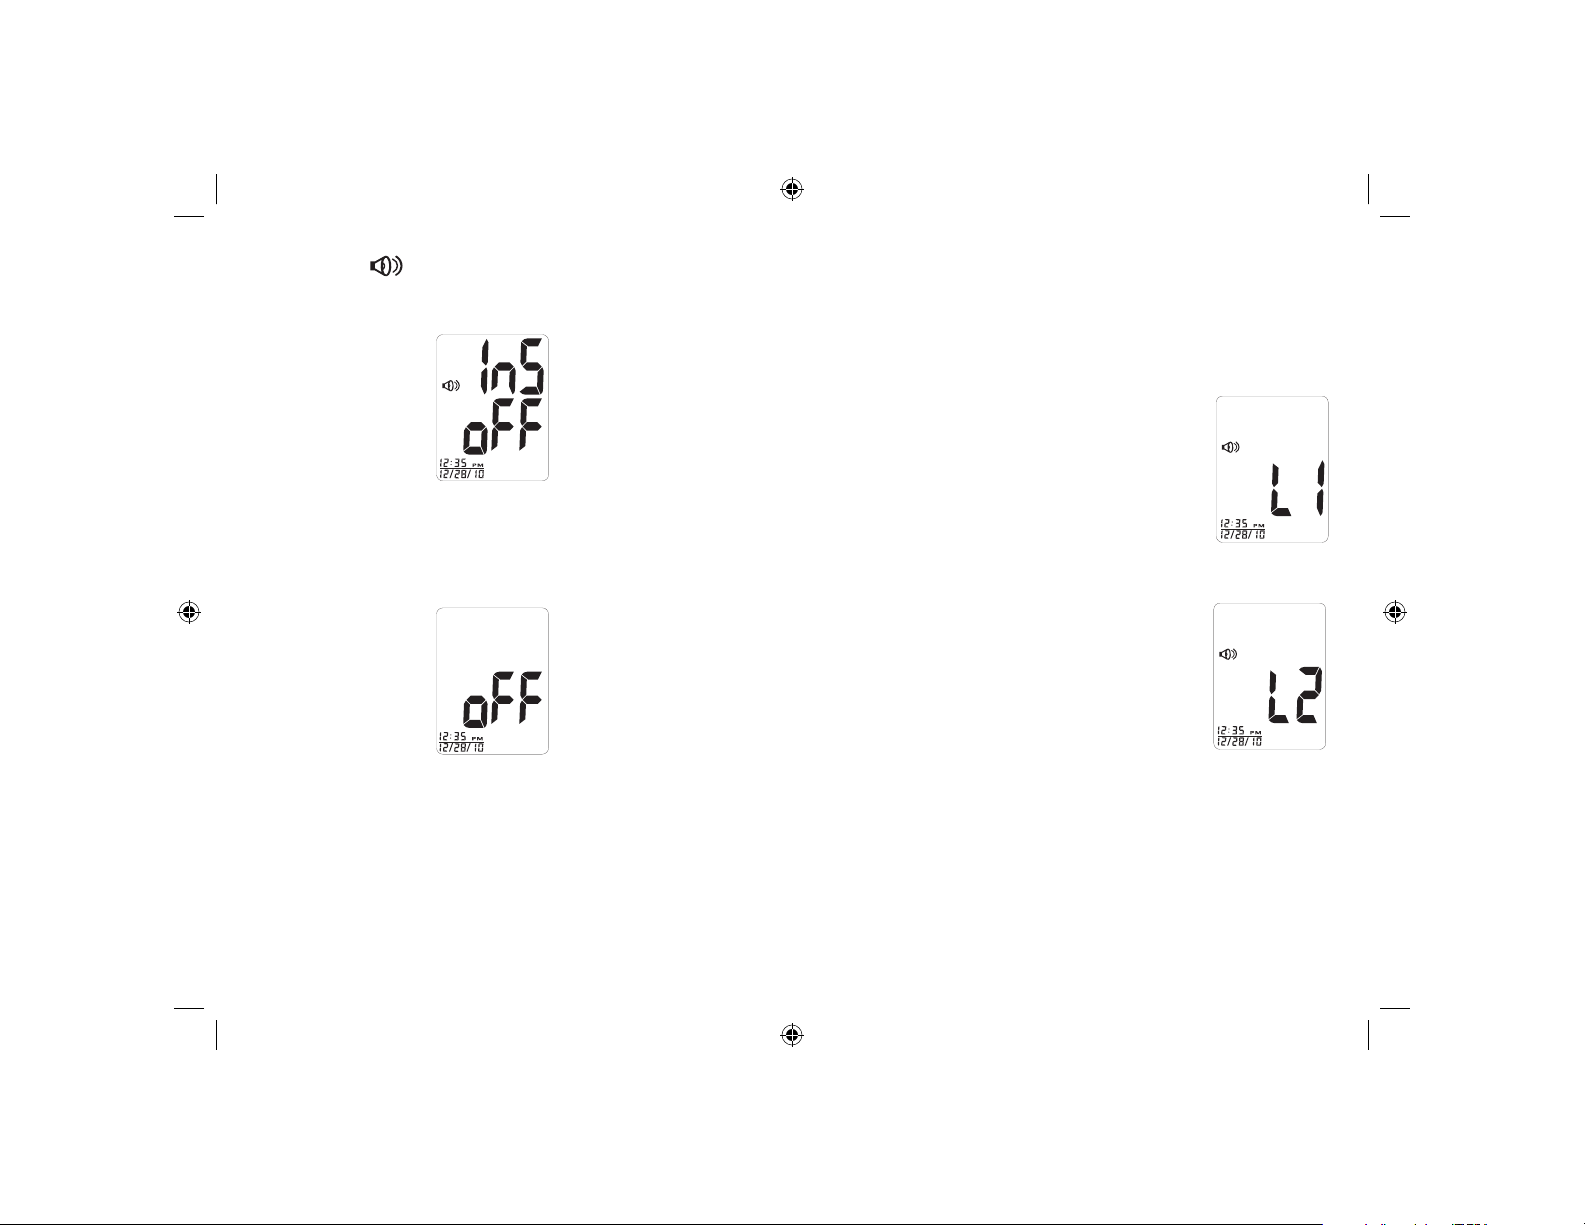
3. When the
appears with the letters “InS oFF”,
this indicates the monitor is in “Instructions Off”
Mode.
4. When just the letters “oFF” appear, the monitor is
in “Quiet Mode”.
Setting the Language:
The Voice Assist talking function announces results
in English or Spanish. To change the language, press
the Language button on the top of the monitor.
English language will display L1
Spanish language will display L2
17 18
BPW-260_A.indd 17-18BPW-260_A.indd 17-18 12/7/09 4:48 PM12/7/09 4:48 PM
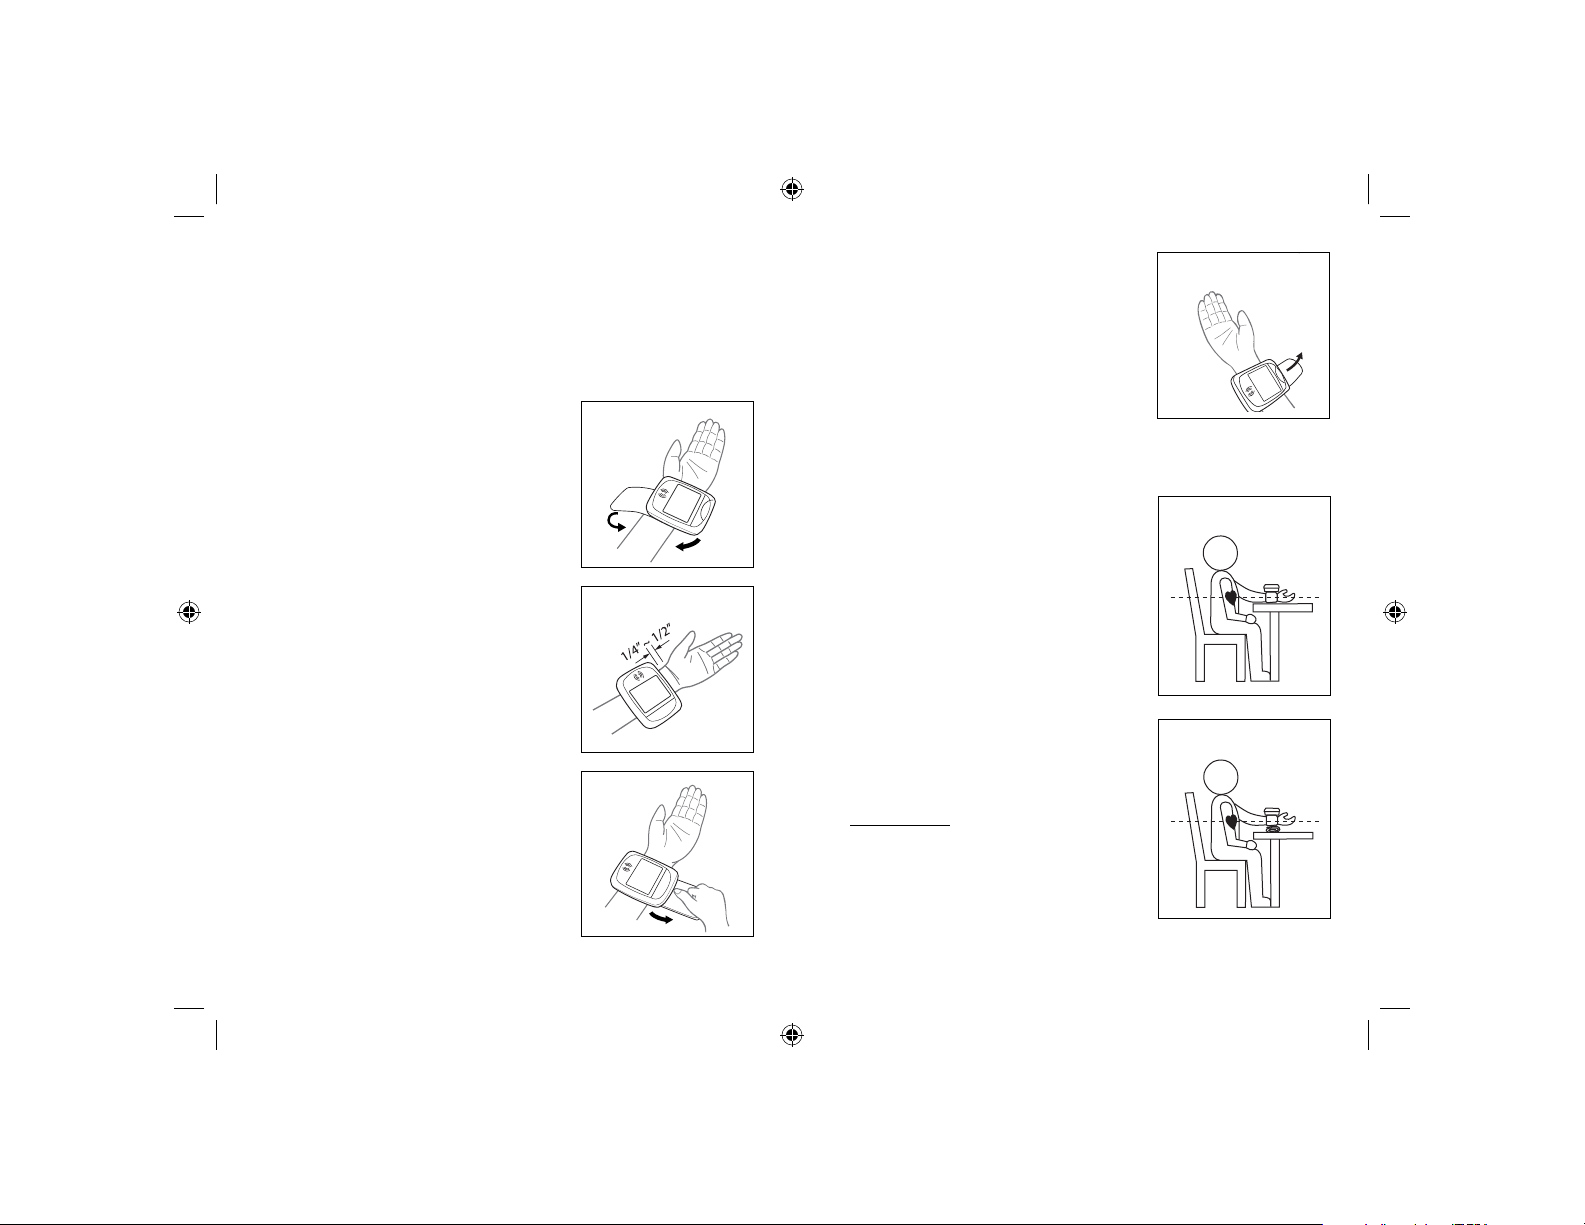
APPLYING THE CUFF
1. Remove all watches, wrist jewelry, etc. prior to
attaching the wrist monitor. Clothing sleeves should
be rolled up and the cuff should be wrapped
around bare skin for correct measurements.
5. If your physician has diagnosed
you with poor circulation in your
left arm, place the cuff around
your right wrist as shown in
Fig. D.
Fig. D
2. Apply cuff to left wrist with palm
facing up as shown in Fig. A.
3. Make sure the edge of the cuff is
about 1/4”~1/2” (1 cm) from the
palm as shown in Fig. B.
4. In order to insure accurate
measurements, fasten the hook
and loop strap securely around
your wrist so there is no extra
space between the cuff and the
wrist as shown in Fig. C. If the
cuff is not wrapped tight enough,
the measurement values will not
be accurate.
19 20
Fig. A
Fig. B
Fig. C
CORRECT MEASUREMENT POSTURE
1. Place your elbow on a table so
that the cuff is at the same level
as your heart as shown in Fig. A.
Relax your entire body, especially
between your elbow and fingers.
Note: Your heart is located slightly
below your armpit.
2. If the cuff is not at the same level
as your heart or if you cannot
keep your arm completely still
throughout the reading, use a
soft object such as a folded towel
to support your arm as shown in
Fig. B.
3. Turn your palm upwards.
Fig. A
Fig. B
BPW-260_A.indd 19-20BPW-260_A.indd 19-20 12/7/09 4:48 PM12/7/09 4:48 PM
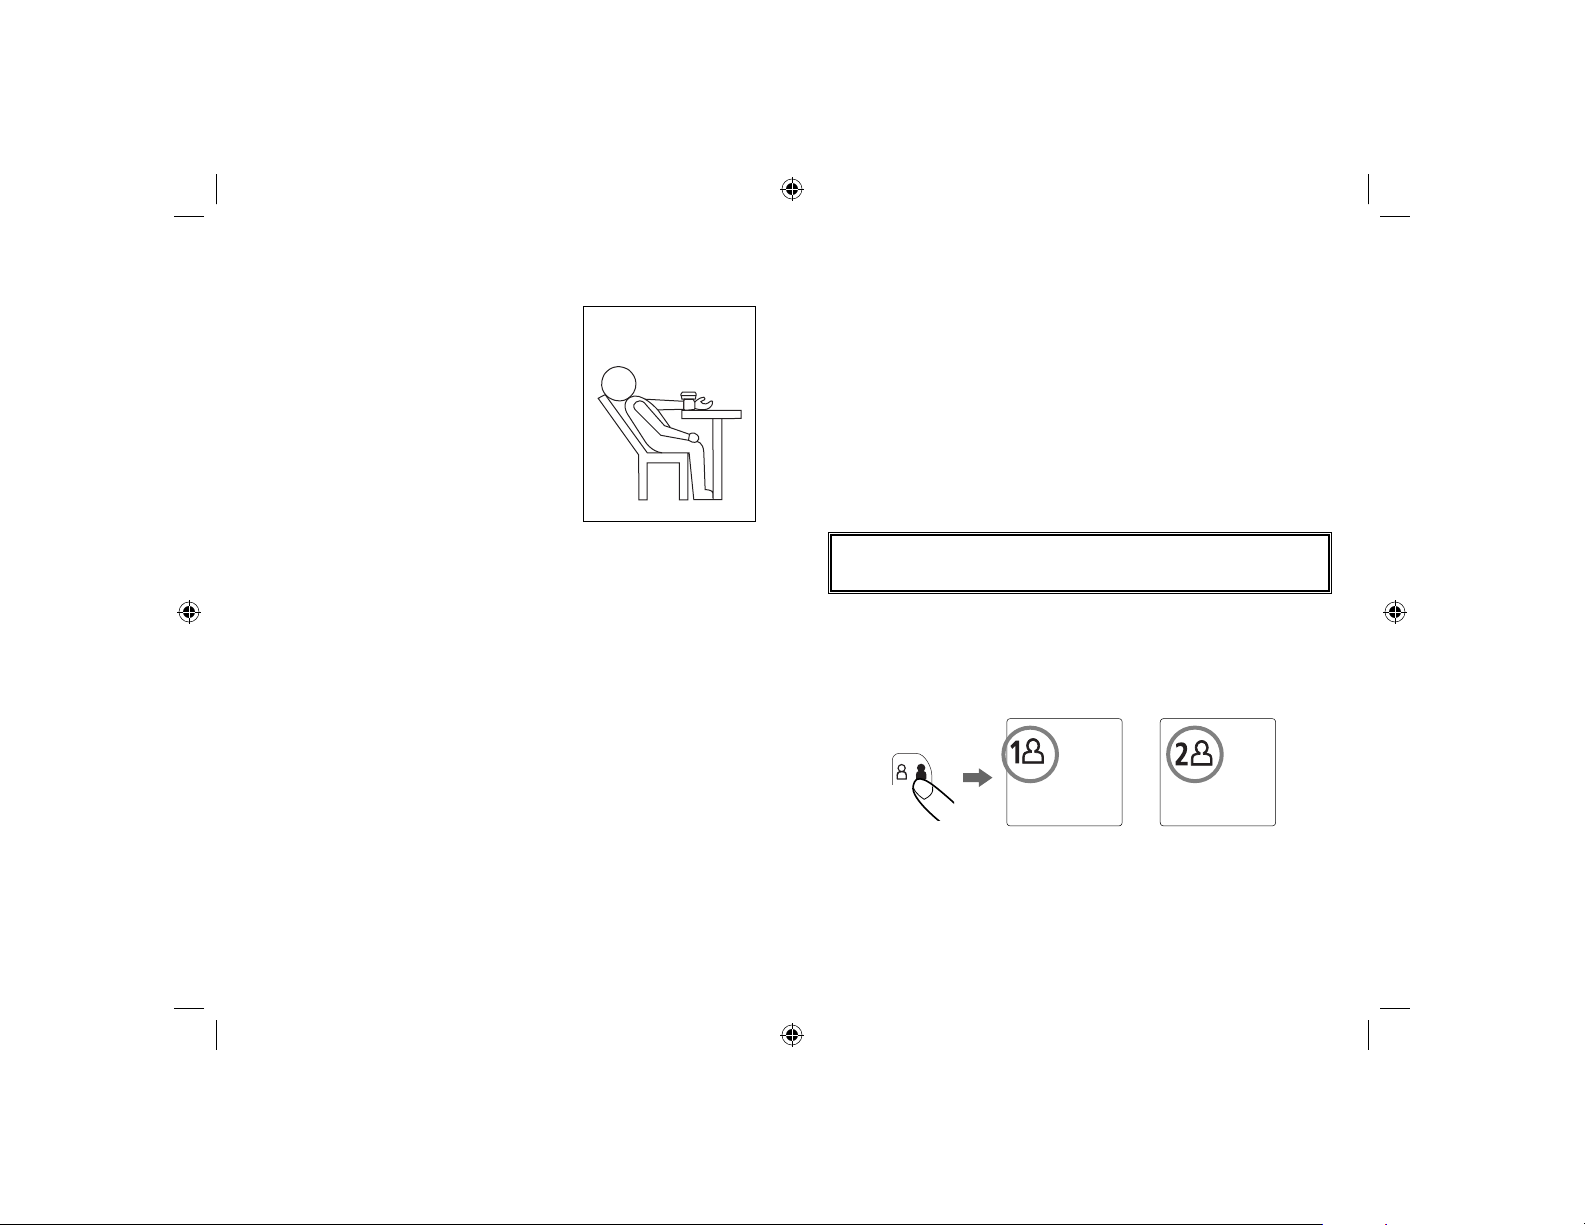
4. Sit upright in a chair, and take 5-6 deep breaths.
Avoid leaning back while the
measurement is being taken as
shown in Fig. C.
Fig. C
(X)
MEASUREMENT PROCEDURE
Important Notes:
• Before a measurement, it is suggested that you sit
quietly for 15 minutes as measurements taken during
a relaxed state will have greater accuracy. You should
not be physically tired or exhausted while taking a
measurement.
• During the measurement, do not talk or move your
arm or hand muscles.
• See page 31 for additional notes regarding your
blood pressure measurement.
If you are using this blood pressure monitor for the first
time, please remove the protective film from the screen.
• Position the monitor at the same level as your heart
during measurement to ensure accurate readings.
• Blood pressure changes with every heartbeat and is in
constant fluctuation throughout the day.
• Blood pressure measurement can be affected by the
position of the user, his or her physiologic condition
and other factors. For greatest accuracy, wait 1 hour
after exercising, bathing, eating, drinking beverages
with alcohol or caffeine, or smoking to measure
blood pressure.
21
BPW-260_A.indd 21-22BPW-260_A.indd 21-22 12/7/09 4:48 PM12/7/09 4:48 PM
1. Press the User Select button to choose User 1 or
User 2.
/
After the user number is selected, press the START/
STOP button to confirm the chosen user.
OR
22
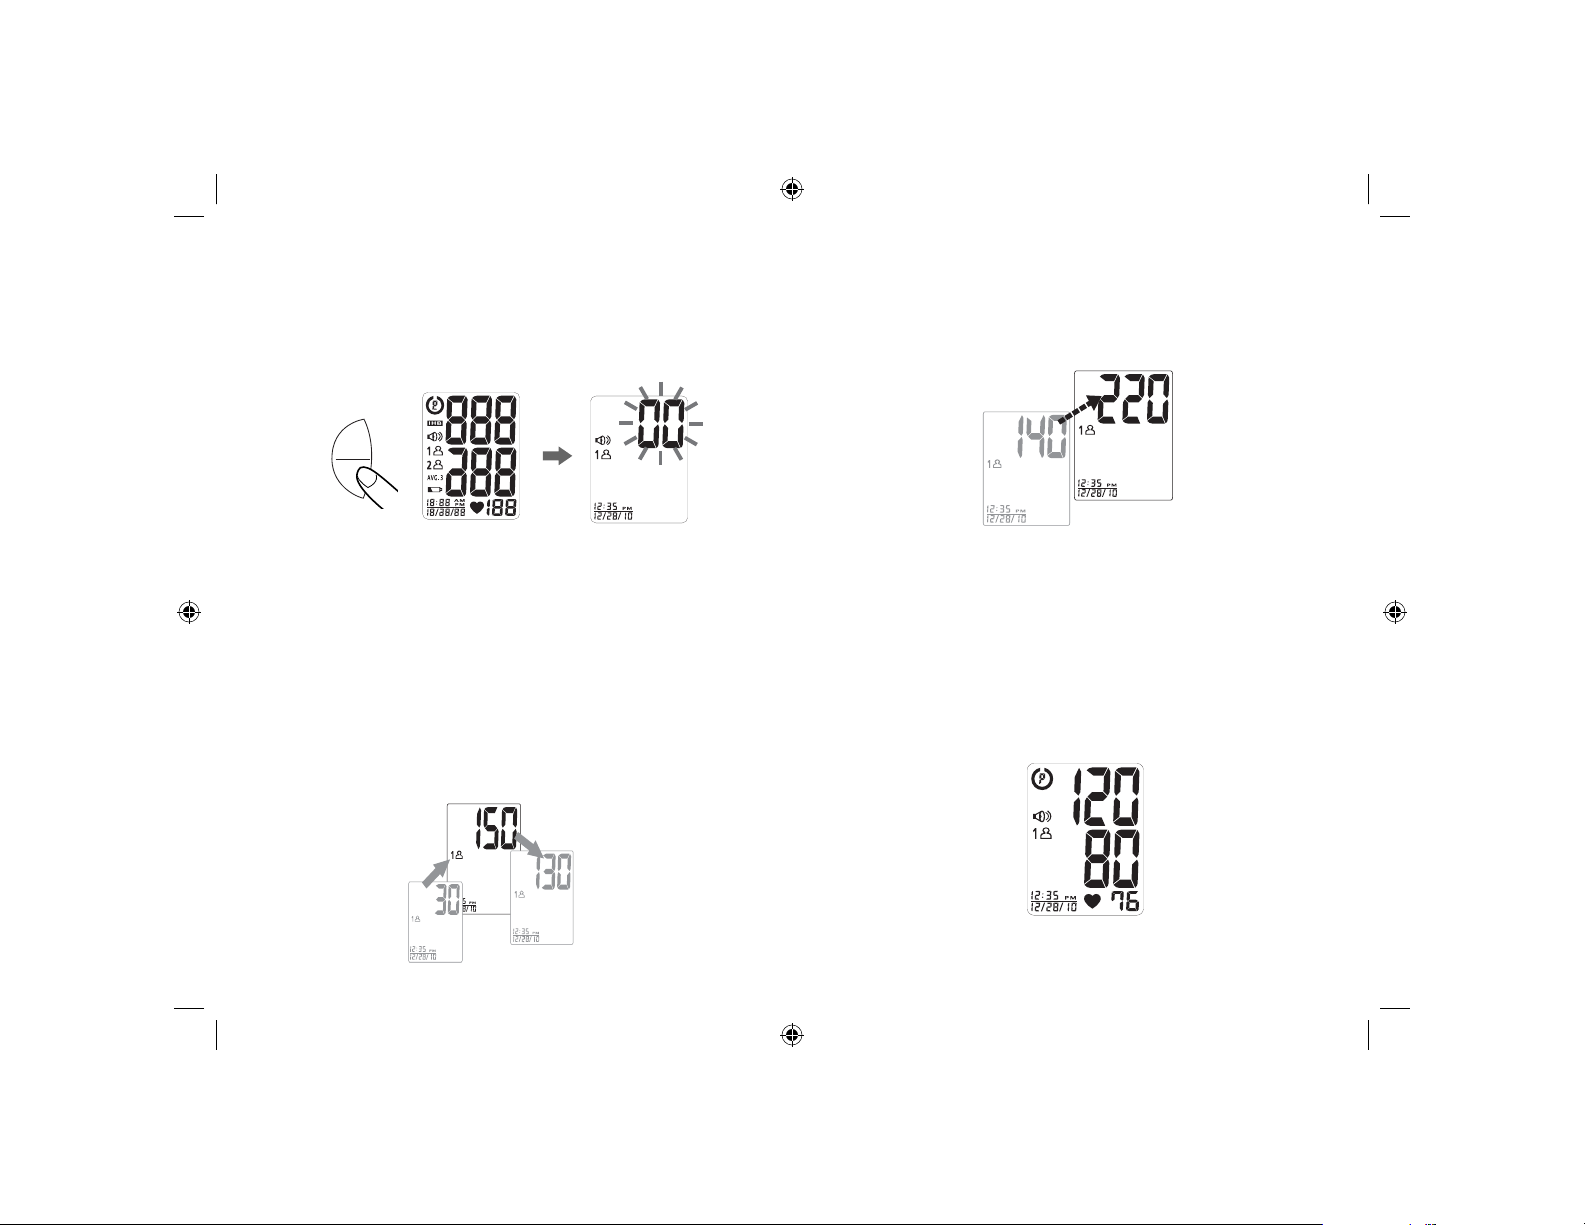
2. With the cuff wrapped around your wrist, press the
START/STOP button. Do not inflate the cuff unless
it is wrapped around your wrist. All digits will light
up, checking the display functions. The checking
procedure will be completed after about 3 seconds.
START
STOP
Note: If using the Voice Assist™ “Instructions On”
mode, you will be prompted to press the
START/STOP button again before measurement
begins.
3. After all symbols disappear, the display will show “00”.
The monitor is “Ready to Measure” and will
automatically inflate the cuff to begin measurement.
The cuff will then begin deflating as measurement
continues.
Note: The monitor will re-inflate automatically if the
system detects that your body requires more
pressure for measurement.
. When the measurement is completed, the cuff
will deflate entirely and systolic pressure, diastolic
pressure and pulse will be shown simultaneously
on the LCD screen. The measurement is then
automatically stored into memory.
23
BPW-260_A.indd 23-24BPW-260_A.indd 23-24 12/7/09 4:48 PM12/7/09 4:48 PM
24
 Loading...