

Page 1
®
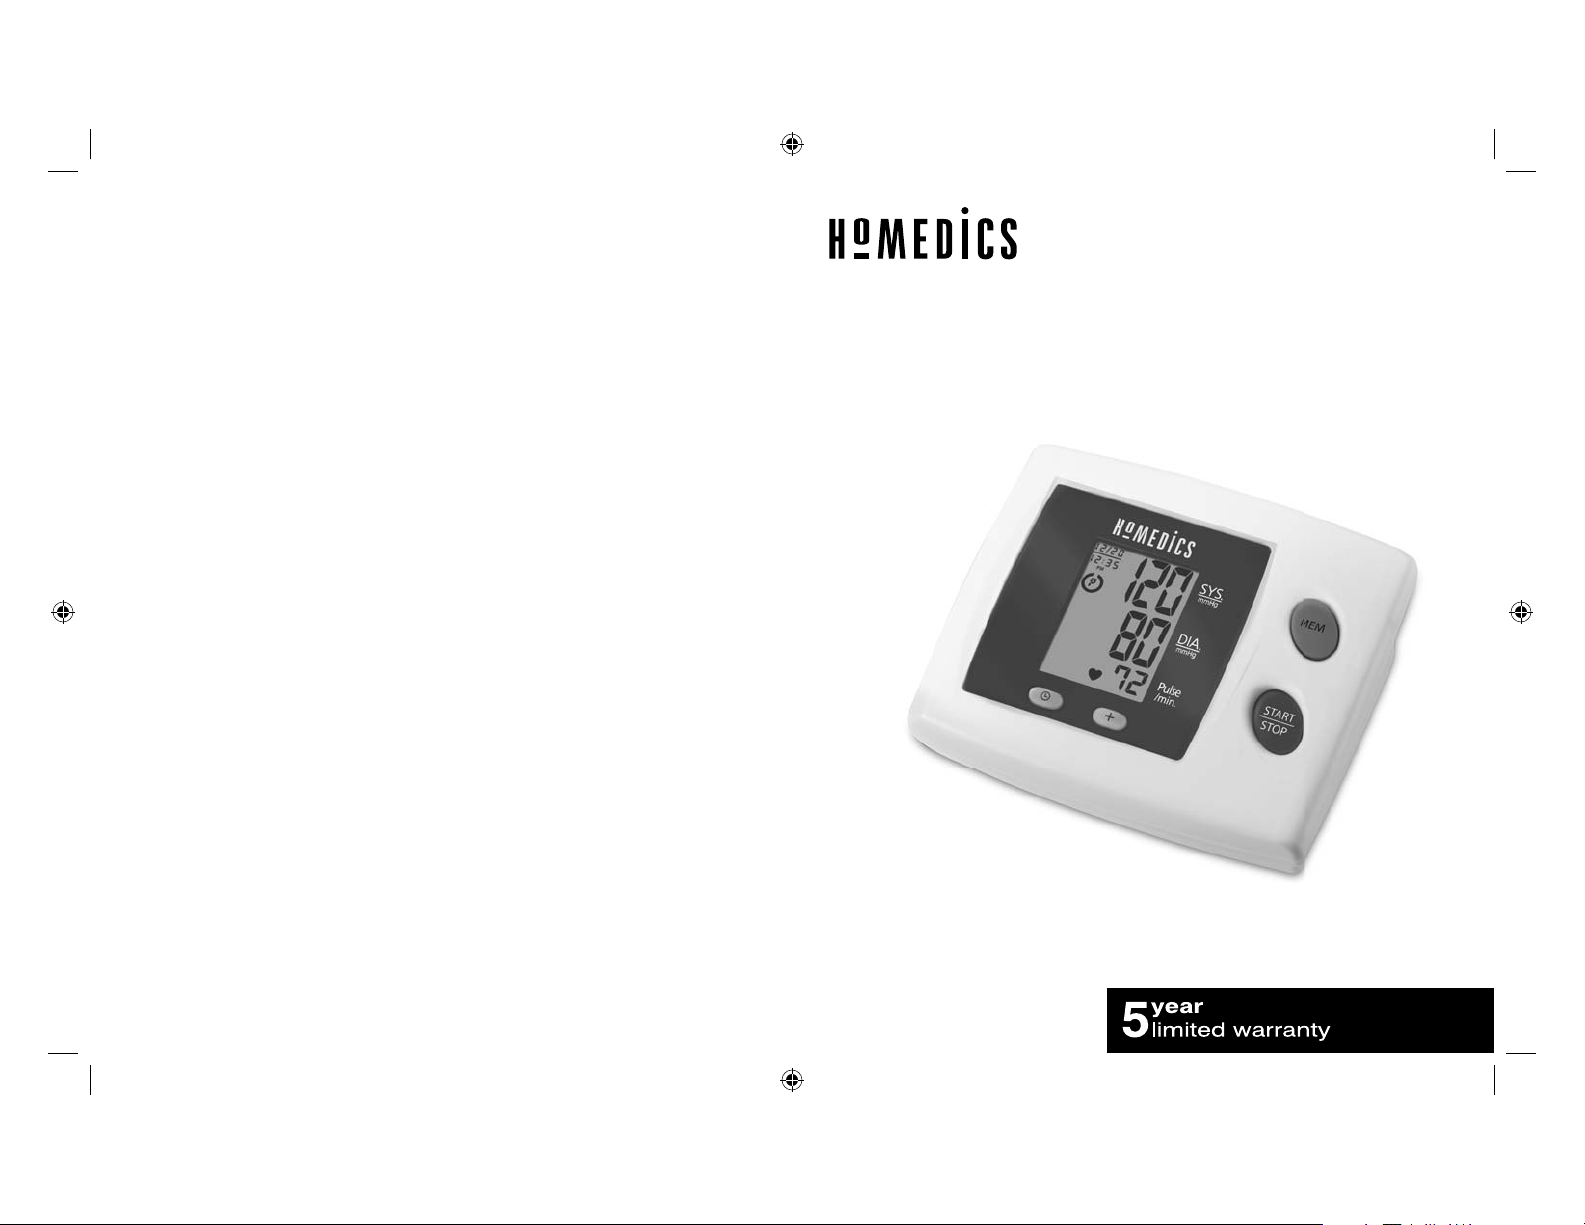
Manual Inflate
Blood Pressure Monitor
BPS-060
El manual en español
empieza en la página 30
BPS-060_B.indd 1-2BPS-060_B.indd 1-2 5/01/10 1:27 PM5/01/10 1:27 PM
Page 2

TABLE OF CONTENTS
INTRODUCTORY INFORMATION:
Important Product Notices and Safety Instructions ......... 3
About Blood Pressure ......................................................... 5
What is Blood Pressure?
Why Measure Your Blood Pressure?
Blood Pressure Standard ....................................................5
How This Blood Pressure Monitor Works ......................... 7
USAGE INFORMATION:
Name/Function of Each Part ............................................... 8
Display Explanations ........................................................... 9
Installing Batteries ............................................................ 11
Date & Time Set Procedure ............................................... 13
Using The Arm Cuff ........................................................... 14
Measurement Procedure ................................................... 18
Risk Category Index .......................................................... 21
Recalling Values from Memory ......................................... 22
Clearing Values from Memory .......................................... 22
Important Notes Regarding Your
Blood Pressure Measurement .......................................... 23
Care, Maintenance & Cleaning ......................................... 24
Potential for Electromagnetic Interference ..................... 26
Troubleshooting ................................................................. 27
Specifications .................................................................... 28
5 Year Limited Warranty .................................................... 29
1 2
BPS-060_B.indd 3-4BPS-060_B.indd 3-4 5/01/10 1:27 PM5/01/10 1:27 PM
Page 3

®
IMPORTANT PRODUCT NOTICES AND SAFETY
INSTRUCTIONS
When using your blood pressure monitor, basic precautions
should always be followed. Please read and follow all instructions
and warnings before using this product. Save these instructions
for future reference.
• Please note that this is a home healthcare product only and
it is not intended to serve as a substitute for the advice of a
physician or medical professional.
• Do not use this device for diagnosis or treatment of any health
problem or disease. Measurement results are for reference
only. Consult a healthcare professional for interpretation
of pressure measurements. Contact your physician if you
have or suspect any medical problem. Do not change your
medications without the advice of your physician or healthcare
professional.
• Proper cuff size is critical for accurate measurements. Follow
the instructions in this manual and printed on the arm cuff to
ensure the appropriate size of cuff is being used.
• This device may have difficulty determining the proper blood
pressure for individuals with diabetes, poor circulation of blood,
kidney problems or for users who have suffered from a stroke.
• The pulse display is not suitable for checking the frequency of
heart pacemakers.
• Electromagnetic interference: The device contains
sensitive electronic components. Avoid strong electrical or
electromagnetic fields in the direct vicinity of the device (e.g.
mobile telephones, microwave ovens). These may lead to
temporary impairment of measurement accuracy.
• Use blood pressure monitor only for its intended use.
• Do not wrap the cuff around body parts other than your arm.
• Not for use by or on persons under the age of 18.
• Use only 1.5V AA alkaline batteries for power supply.
Blood pressure measurements determined with this device are
equivalent to those obtained by a trained observer using the cuff/
stethoscope ausculatory method, within the limits prescribed by
the American National Standard, Manual, electronic, or automated
sphygmomanometers.
3 4
BPS-060_B.indd 5-6BPS-060_B.indd 5-6 5/01/10 1:27 PM5/01/10 1:27 PM
Page 4

ABOUT BLOOD PRESSURE
What is Blood Pressure?
Blood pressure is the pressure exerted on the artery
walls while blood flows through the arteries. The pressure
measured when the heart contracts and sends blood
out of the heart is systolic (highest) blood pressure. The
pressure measured when the heart dilates with blood
flowing back into the heart is called diastolic (lowest)
blood pressure.
Why Measure Your Blood Pressure?
Among today’s various health problems, those associated
with high blood pressure are very common. High blood
pressure dangerously correlates with cardiovascular
diseases. Therefore, blood pressure monitoring is
important for identifying those at risk.
BLOOD PRESSURE STANDARD
The table on page 6 is criteria for hypertension that is
publicly available from the National Heart Lung and Blood
Institute at the U.S. National Institutes of Health (NIH)
(http://www.nhlbi.nih.gov/health/dci/Diseases/Hbp/HBP_WhatIs.html). Users
can compare their own blood pressure readings against
these established criteria to determine if they may be
potentially at increased risk.
Category
Normal Less than 120 and Less than 80
Prehypertension 120-139 or 80-89
High Blood Pressure
Stage 1 140-159 or 90-99
Stage 2 160 or higher or 100 or higher
Systolic (mmHg) Diastolic (mmHg)
This table is applicable to most adults aged 18 and older.
Blood pressure tends to go up and down, even in people
who normally don’t have high readings. If your numbers
stay above the “normal” range most of the time, you may
be at increased risk and should consult your physician.
Although one can easily find where their own blood
pressure readings fall on this table, this monitor comes
equipped with a Risk Category Index that automatically
compares each reading to this criteria and provides a
helpful cue if your reading falls into one of the stages that
could potentially indicate increased risk. See page 21 for
more information on this feature.
Please note that cues provided by this monitor are only
intended to assist you in using this table. The table and
cues are only provided for convenience to have access to
the NIH information. They are not a substitute for a medical
examination by your physician. It is important for you to
consult with your physician regularly. Your physician will tell
you your normal blood pressure range as well as the point
at which you may actually be considered to be at risk.
5 6
BPS-060_B.indd 7-8BPS-060_B.indd 7-8 5/01/10 1:27 PM5/01/10 1:27 PM
Page 5
HOW THIS BLOOD PRESSURE
MONITOR WORKS
This manual inflate digital blood pressure monitor provides
systolic pressure, diastolic pressure and pulse readings
quickly and easily. Once the cuff is inflated, the monitor
will determine your blood pressures by analysis of your
pressure oscillations. When the measurement is completed,
the device will deflate the cuff and display your systolic
pressure, diastolic pressure and pulse readings.
The monitor automatically finds where your measurement
results fall on the NIH’s National Heart Lung and Blood
Institute’s table and provides a cue if your reading falls into
one of the stages that could potentially indicate increased
risk. Please refer to page 21 for more information on this
feature
.
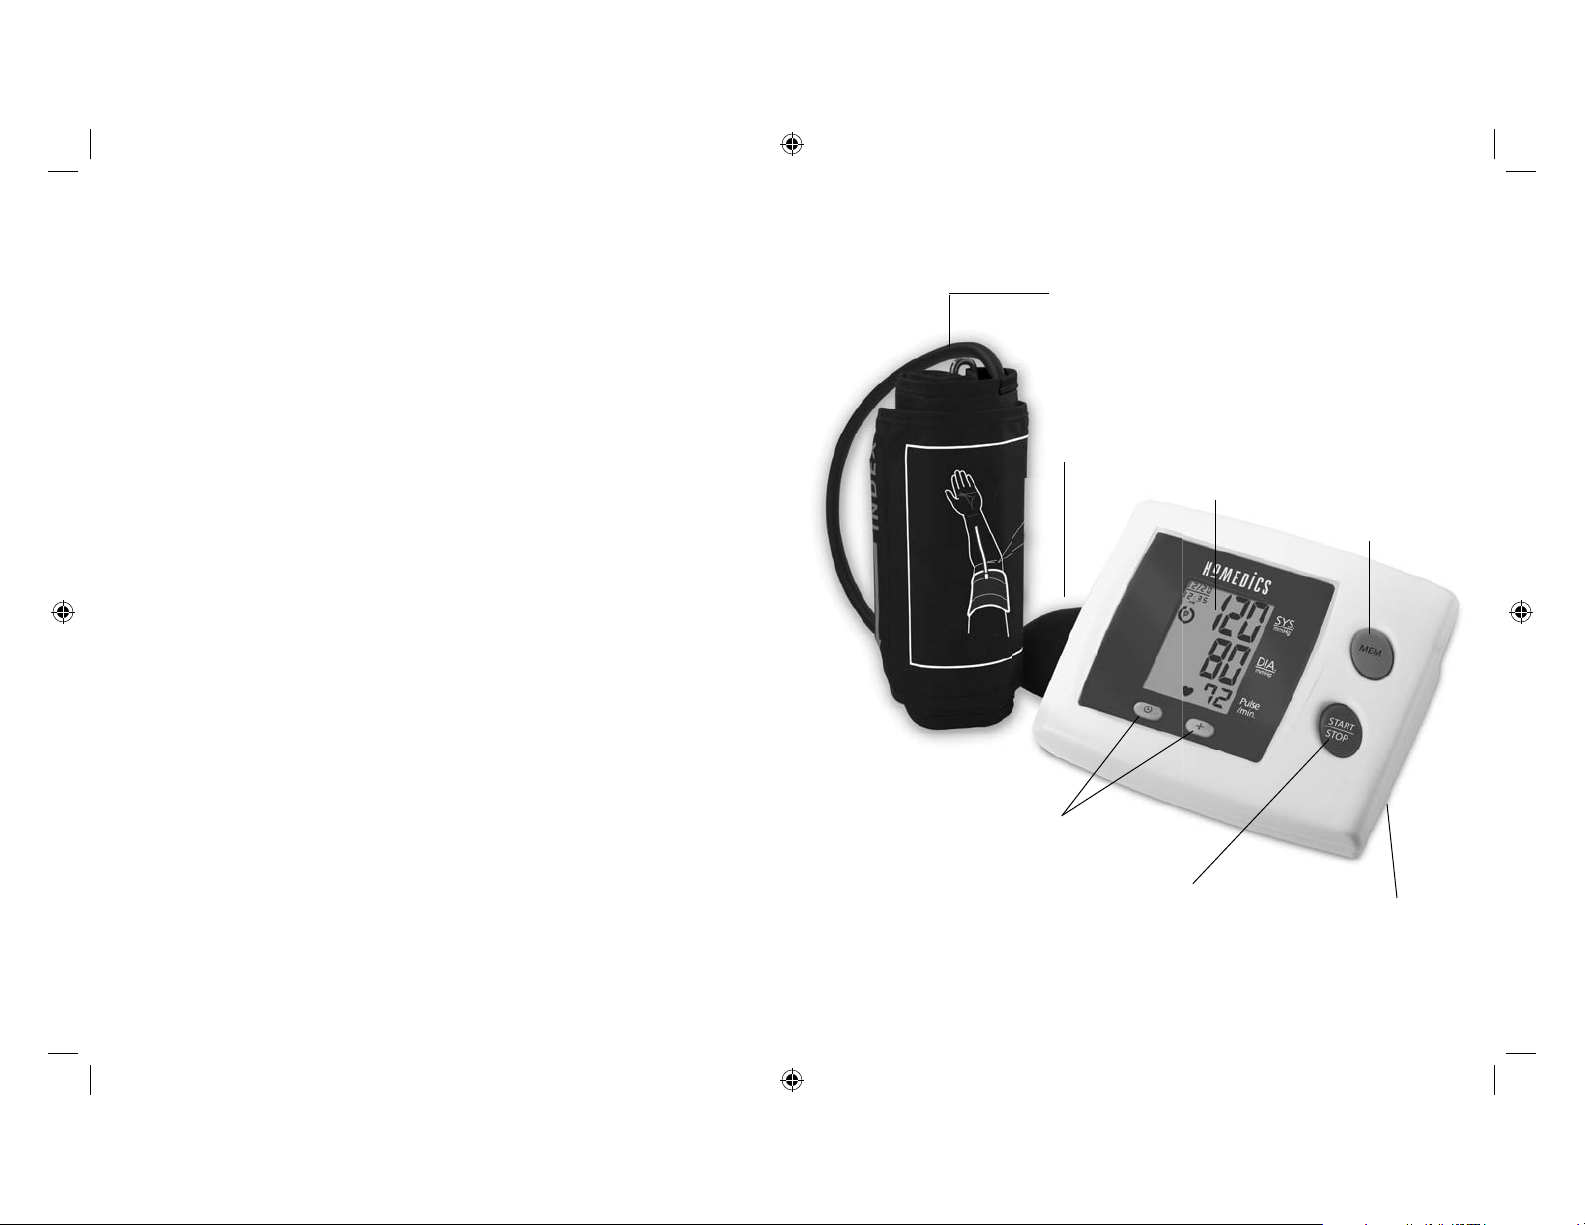
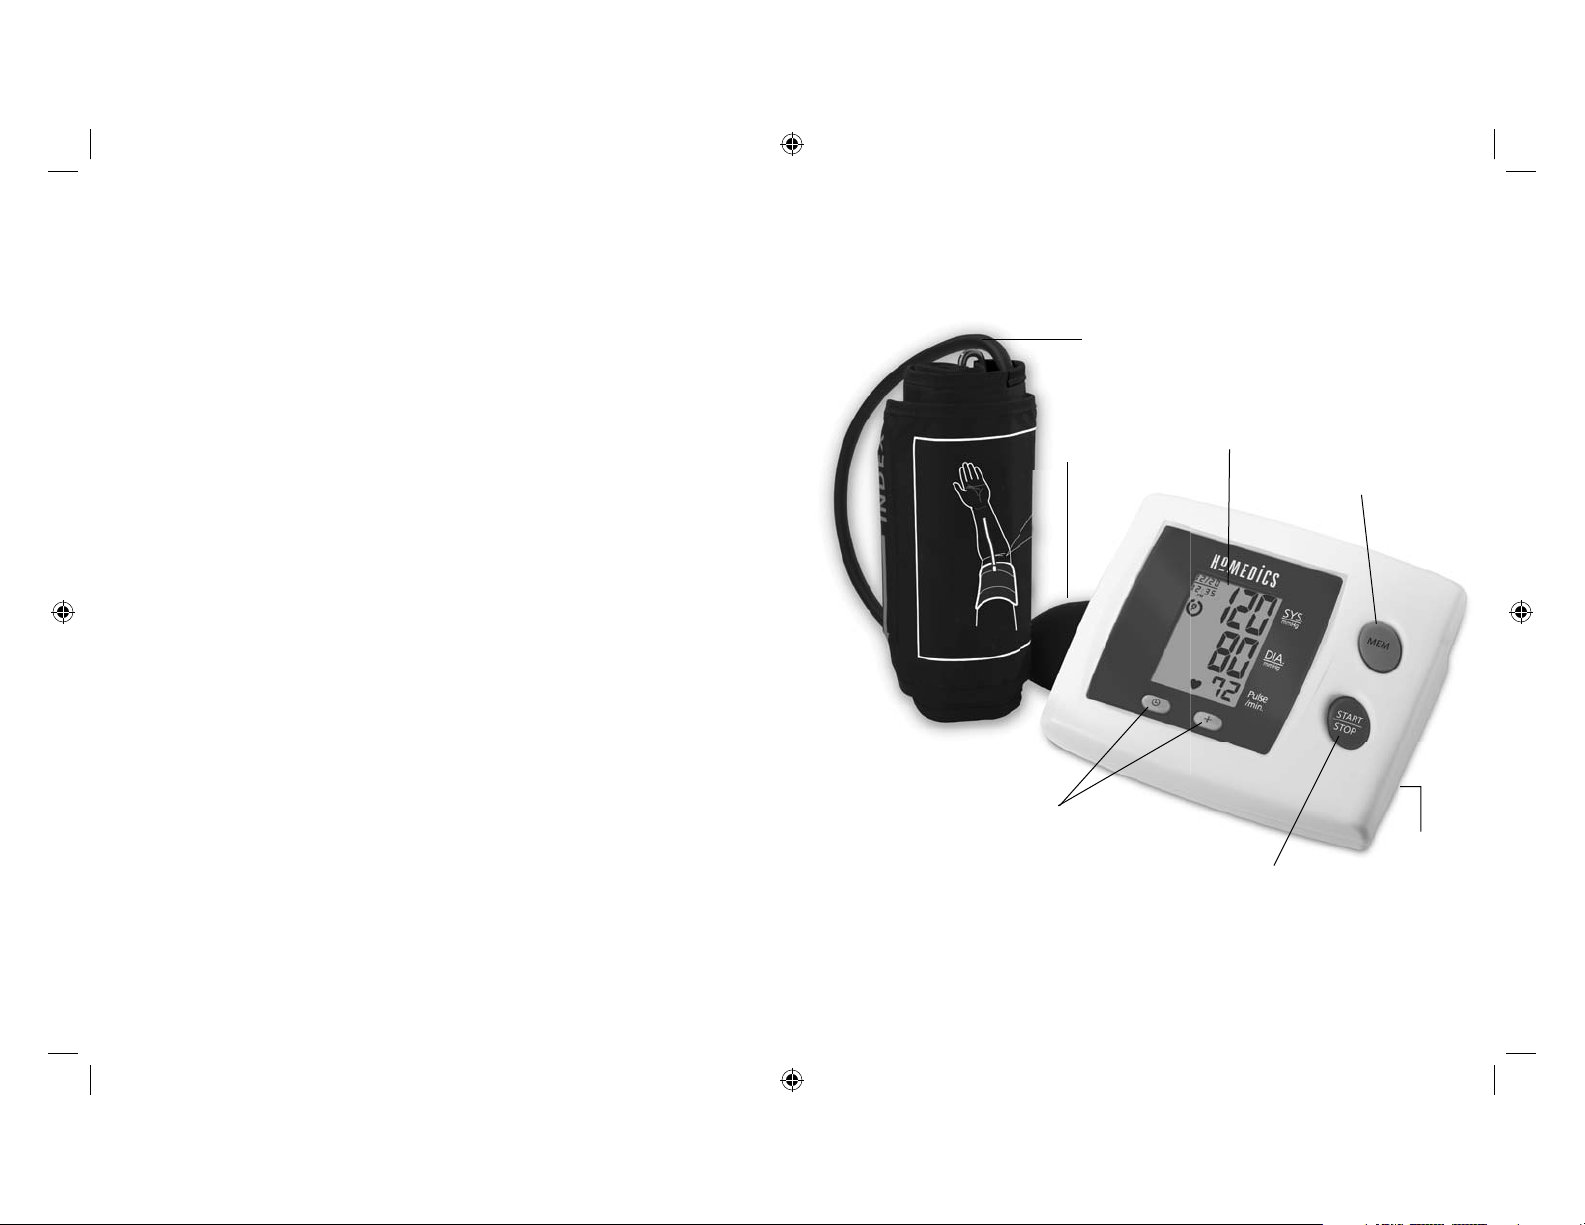
NAME/FUNCTION OF EACH PART
Cuff Tube
Inflation Bulb
Arm Cuff
LCD
Display
Memory Recall
Button
Date/Time
Set Buttons
START/STOP Button
7 8
BPS-060_B.indd 9-10BPS-060_B.indd 9-10 5/01/10 1:27 PM5/01/10 1:27 PM
Battery Cover
( Located on bottom
of unit)
Page 6
DISPLAY EXPLANATIONS
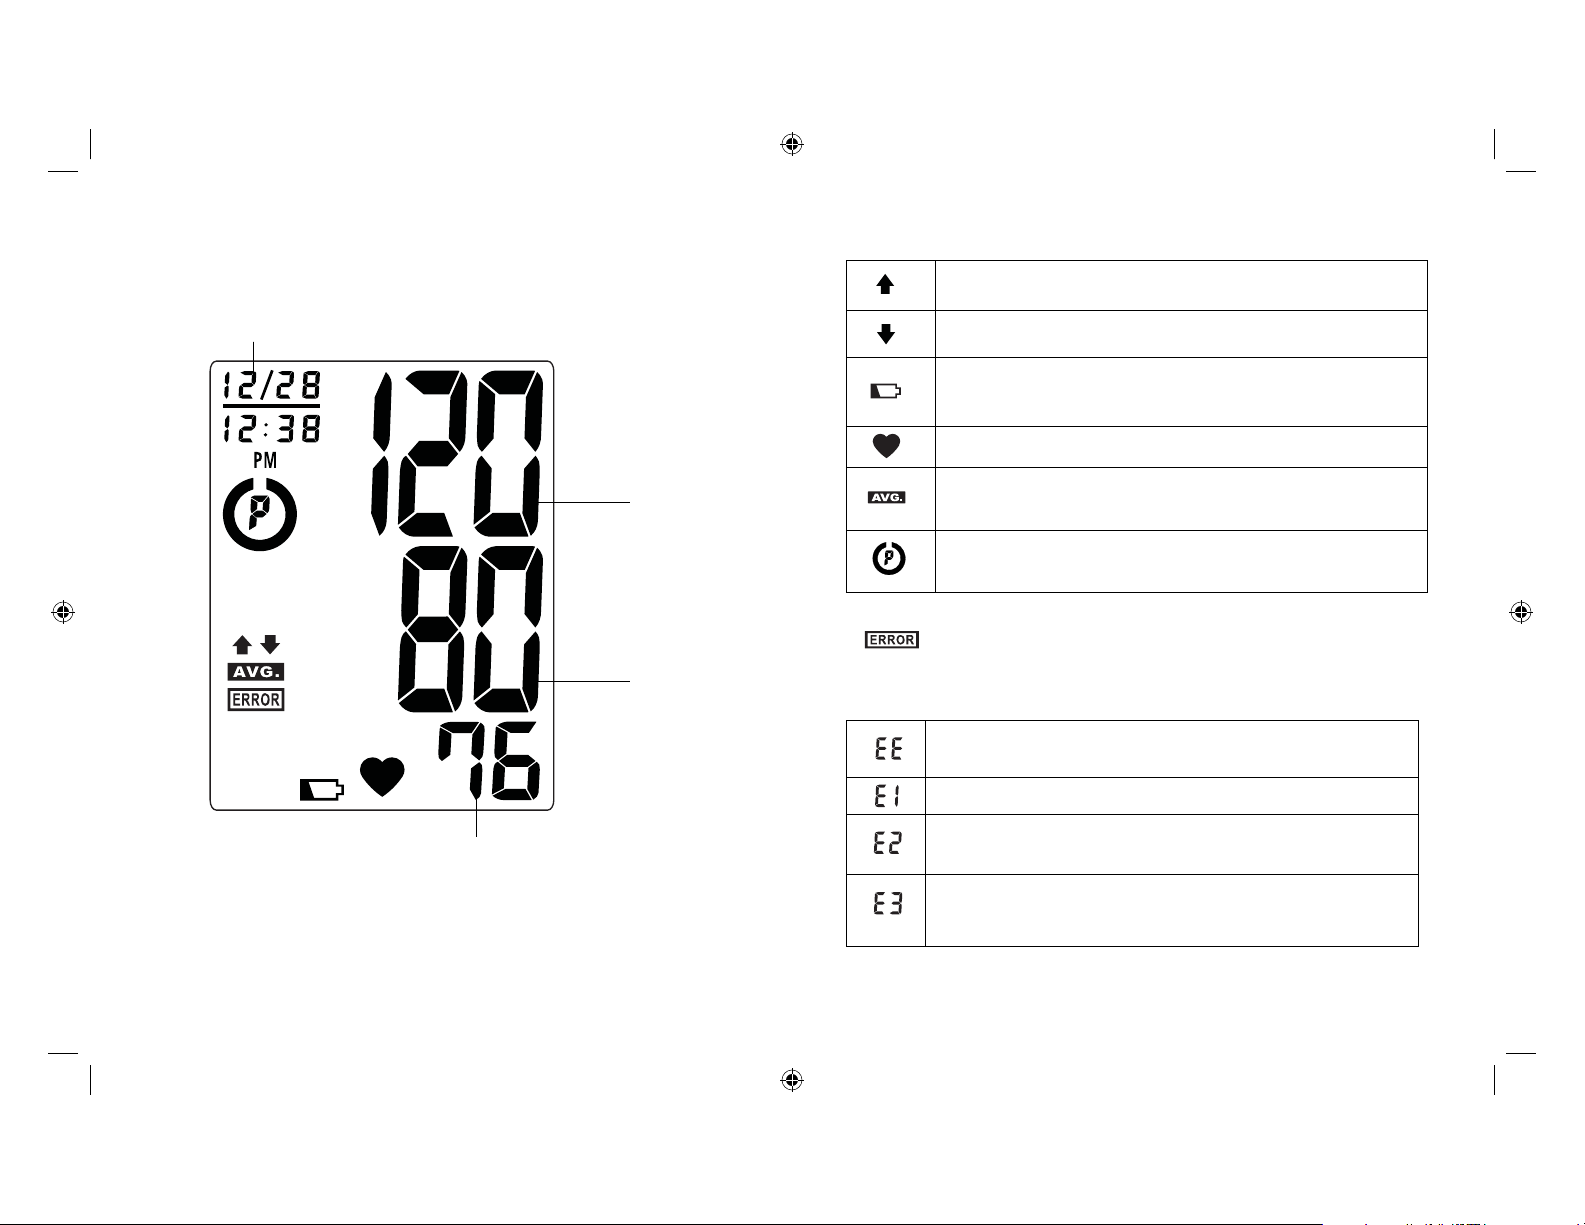
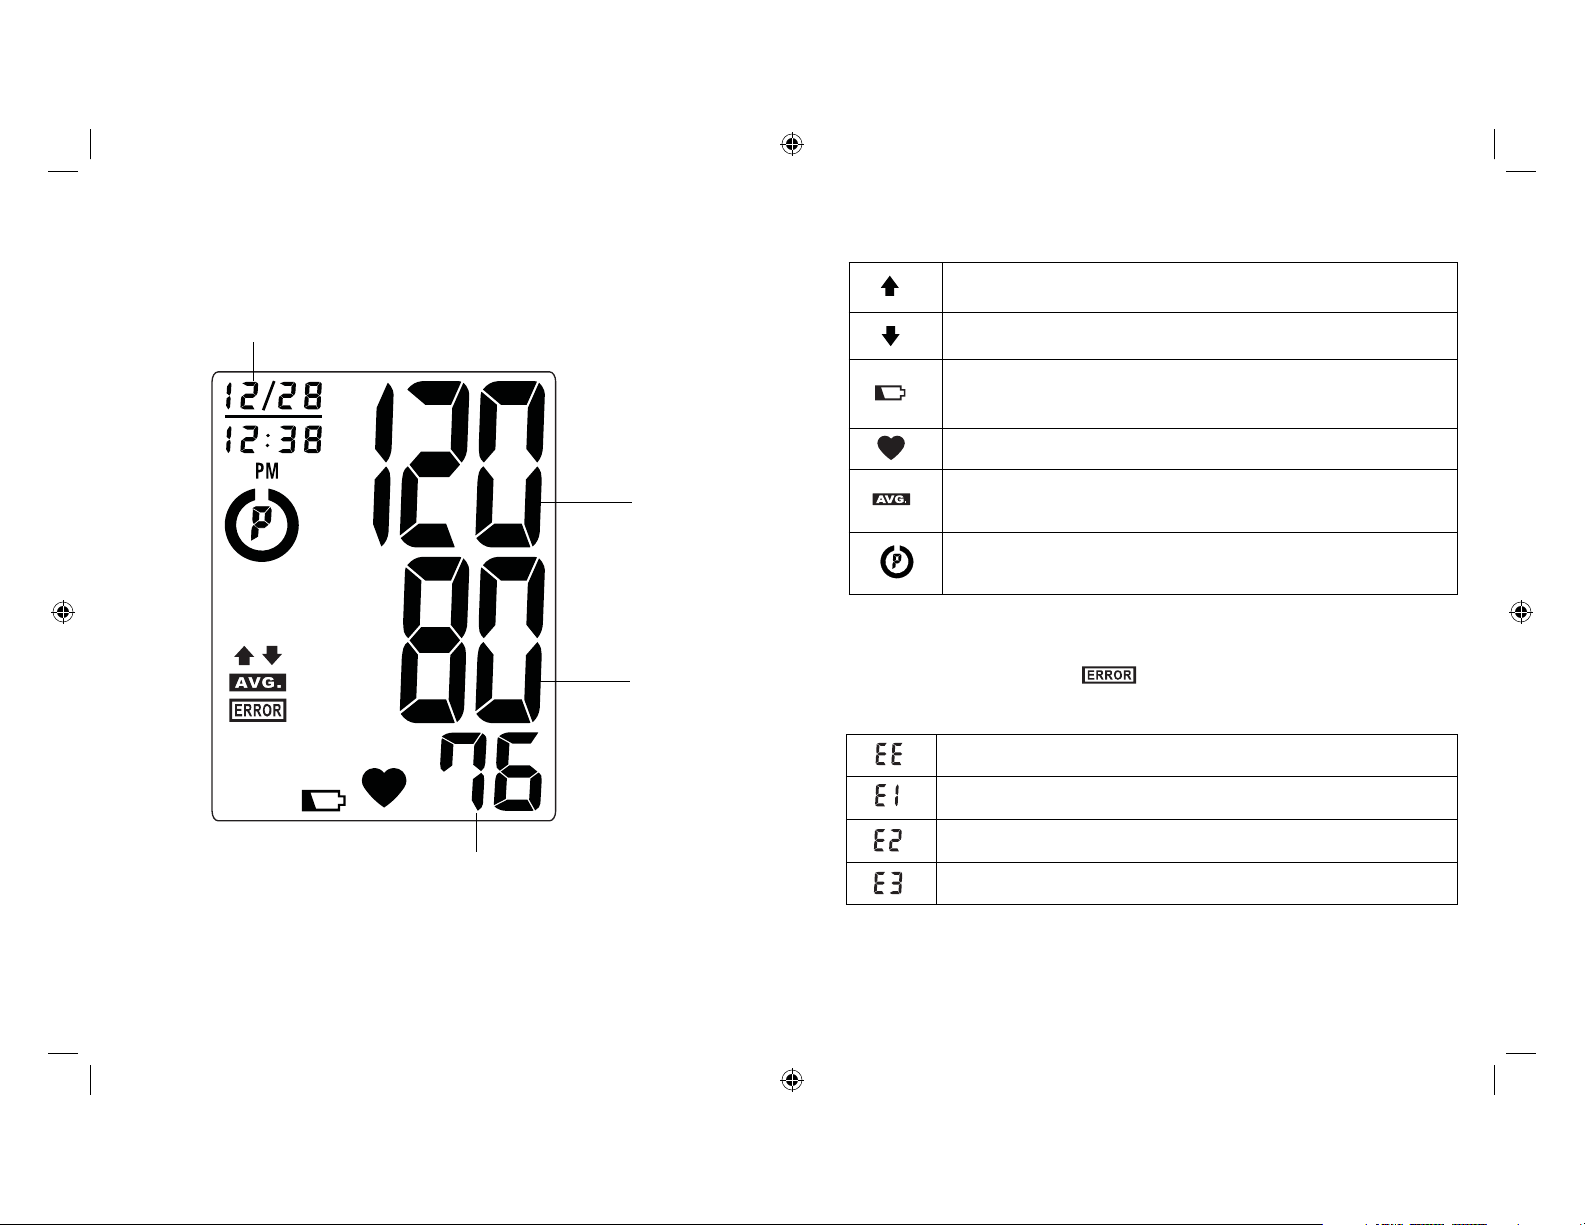
Display Symbols:
Inflation Symbol: Appears when cuff requires inflation.
Date/Time Indicator
Heart Rate
Systolic
Pressure
Diastolic
Pressure
Deflation Symbol: Appears when cuff is deflating.
Weak Battery Symbol: Appears when batteries should
be replaced.
Pulse Symbol: Shows the heart rate per minute.
Memory Average: Displays average of last 3 readings.
Risk Category Index: See page 21 for more information.
If and any of the following letters and numbers appear in the
area that systolic pressure should be displayed, an error has occurred
with your reading. See Troubleshooting section of this manual for more
information.
Measurement Error: Measure again. Wrap the cuff
correctly and keep arm steady during measurement.
Air Circuit Abnormality: Check cuff connection. Measure again.
Pressure Exceeding 300 mmHg: Turn the unit off to clear,
then measure again.
Error Determining Measurement Data: Measure again.
9 10
BPS-060_B.indd 11-12BPS-060_B.indd 11-12 5/01/10 1:27 PM5/01/10 1:27 PM
Page 7
INSTALLING BATTERIES
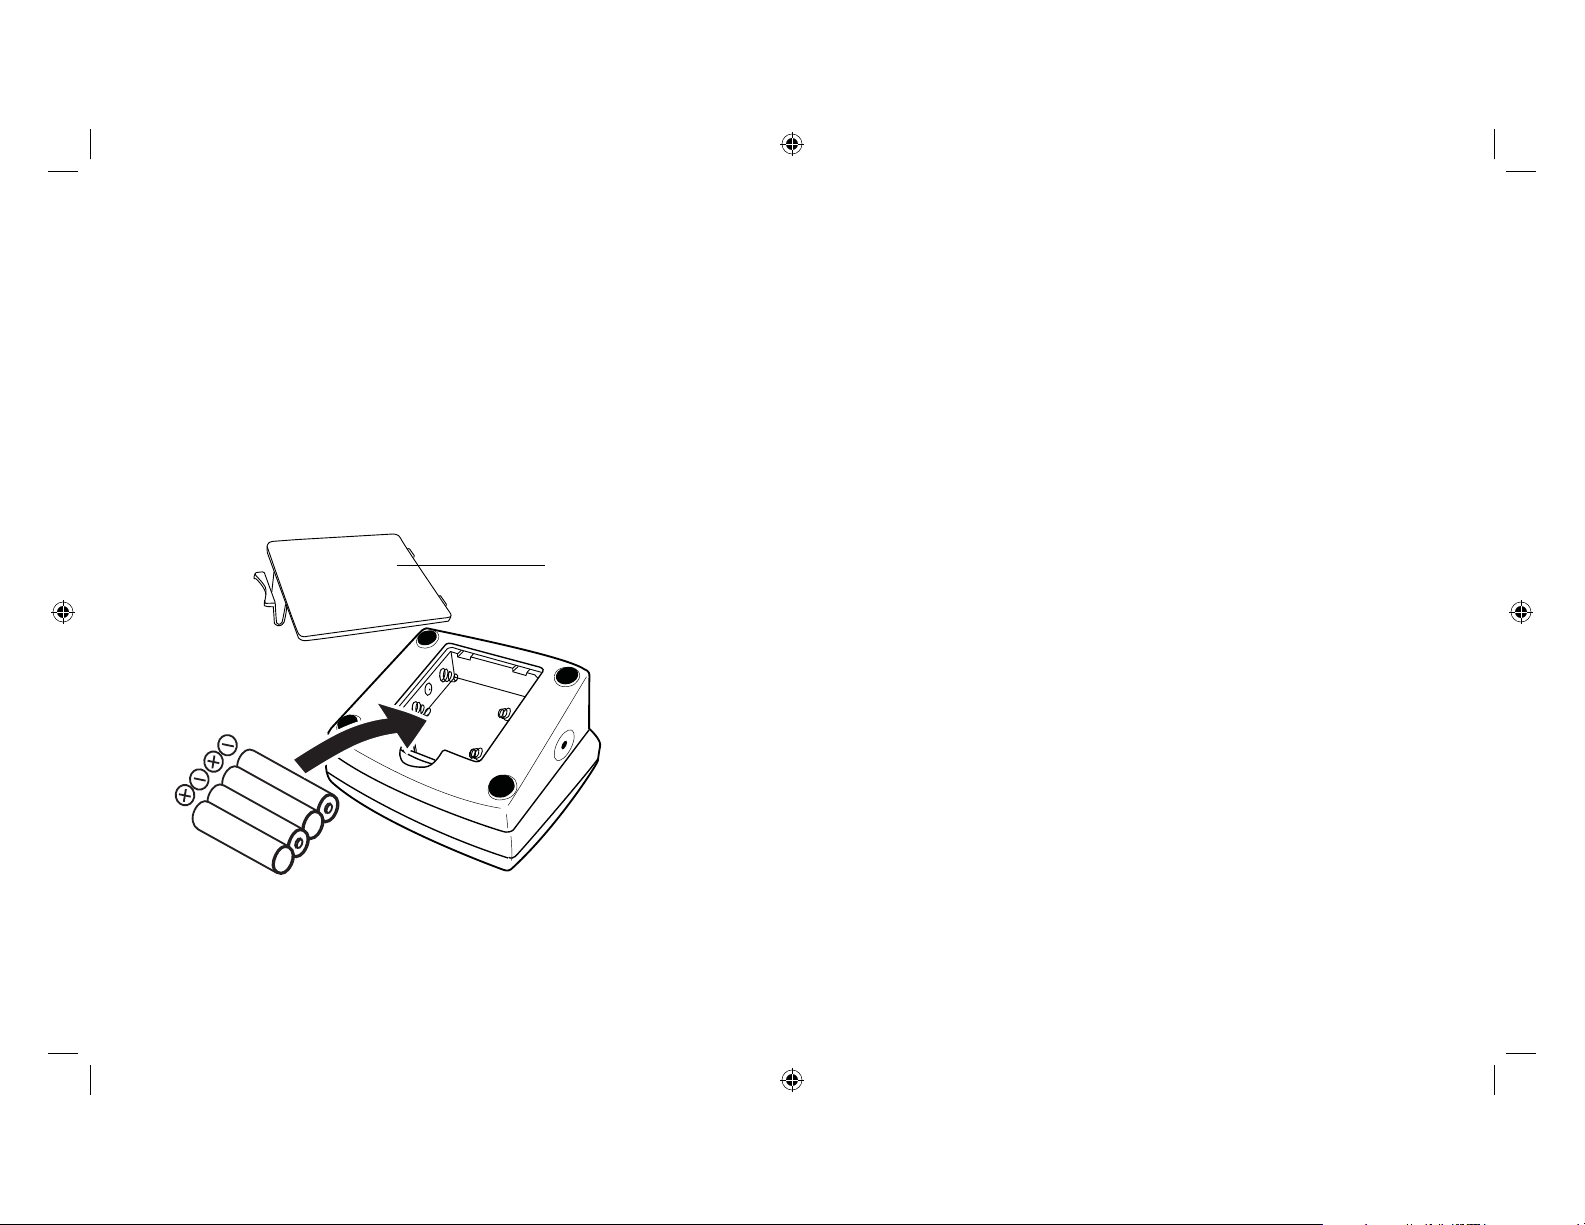
1. Press down on latch and lift the battery cover towards
you to open the battery compartment.
2. Install or replace 4 “AA” sized batteries in the battery
compartment according to the indications inside the
compartment.
3. Replace the battery cover by clicking in the bottom
hooks first, then push in the top end of the battery
door.
Battery
Cover
Replace the batteries if:
1. The weak battery symbol appears on the display.
2. Nothing appears on the display when the power is
switched on.
As the supplied batteries are for test only, they may be
discharged earlier than batteries you buy in stores. Replace
all batteries at one time (as simultaneous set). Use only
1.5V AA alkaline batteries. Remove batteries when unit is
not in use for extended periods of time. Date and time will
need to be reset if batteries are removed or replaced. Clean
contacts on battery and in battery compartment with a soft
dry cloth each time you install batteries.
Note: Batteries are hazardous waste. Do not dispose of
them together with the household garbage.
11 12
BPS-060_B.indd 13-14BPS-060_B.indd 13-14 5/01/10 1:27 PM5/01/10 1:27 PM
Page 8
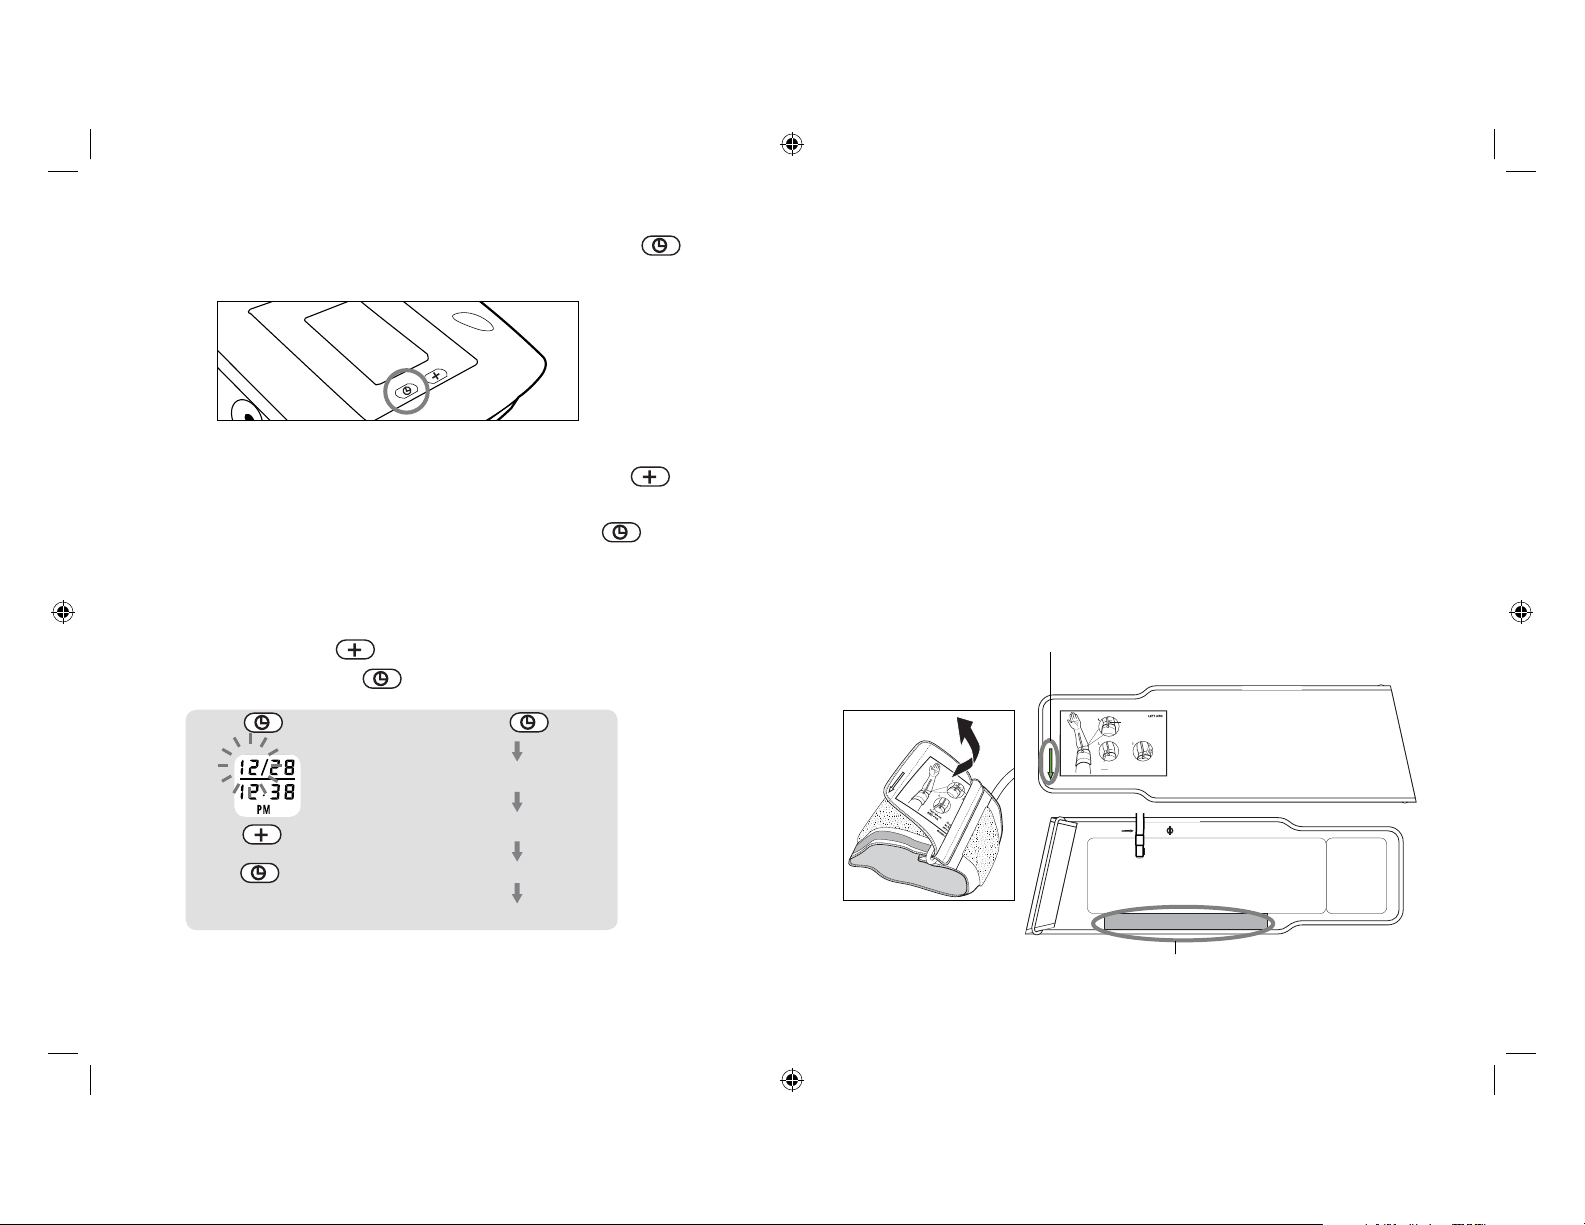
DATE & TIME SET PROCEDURE
1. To adjust the date/time, press the Set button .
2. The display will show a blinking number showing
the date. Change the month by pressing the
button. Each press will increase the number by one
in a cycling manner. Press the Set button again
to confirm the entry, and the screen will show a
blinking number representing the day of the month.
3. Change the date and time as described in Step 2
above, using the button to change the numbers
and the Set button to confirm the entries.
Press the button
blinking month
USING THE ARM CUFF
Very Important: Proper cuff size is critical to accurate
measurement.
This monitor comes with a Standard Size arm cuff that
fits arms with circumferences of 9”–13” (23 cm – 33 cm).
This cuff is suitable for your use if the colored arrow
falls within the solid color line as shown below.
If the arrow falls outside of the solid color line, you
will need a cuff with another circumference. Contact
HoMedics Consumer Relations at 1-800-466-3342.
Colored Arrow
Position cuff
edge 0.6
˝
–
1.0˝
(1.5
–
ARROW MUST FALL
FALL
UST
ELLOW BAND
Y
RROW M
HIN
A
WIT
WITHIN YELLOW BAND
2.5cm) above elbow.
Center t
Fit cuff s
ube over
e
curely. Allow room for
middle of arm.
two fingers
to fit bet
ween the cuff
and your arm.
MODEL# PP-BPCUFF5
Center tube over
increasing month
middle of arm
confirm the entry
repeat process to set date and time
Solid Colored Line
13 14
BPS-060_B.indd 15-16BPS-060_B.indd 15-16 5/01/10 1:27 PM5/01/10 1:27 PM
Page 9
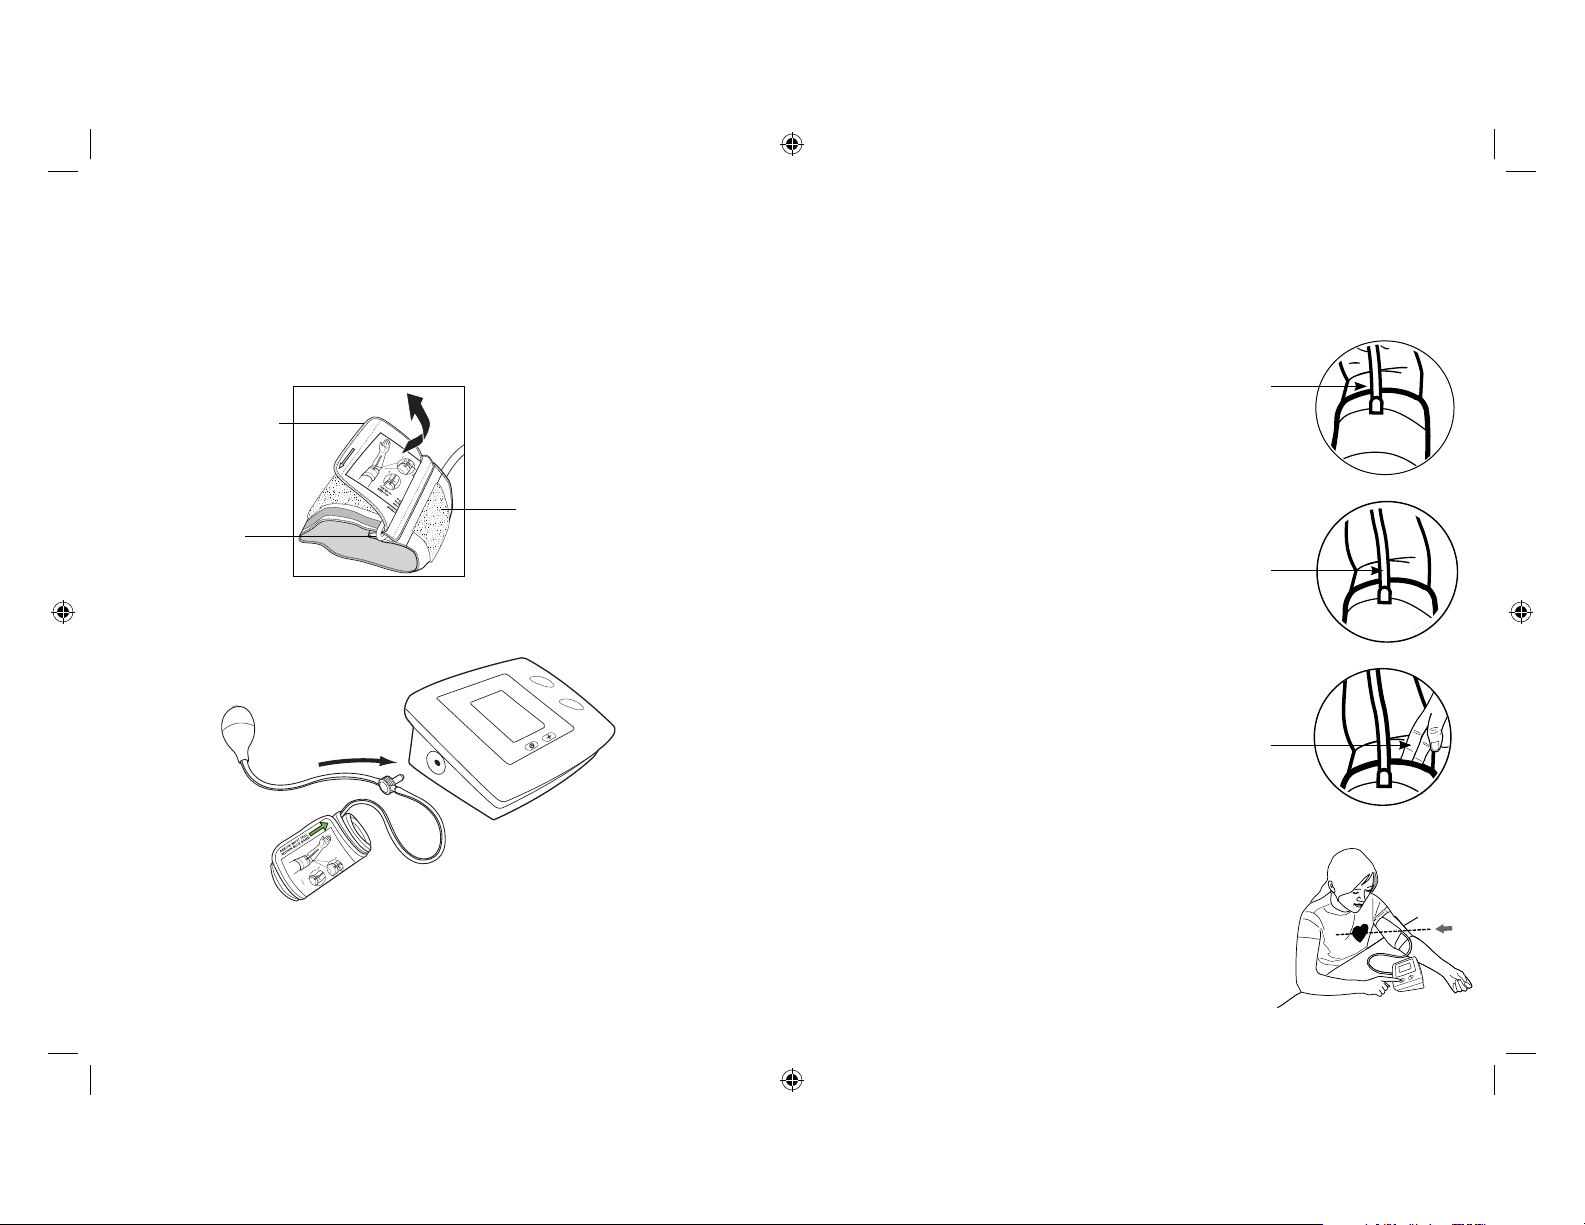
1. If the cuff is not assembled, pass the end of the
P
ositio
n
cuff
ed
g
e
0
.6˝
–
1.
0˝
(
1.
5
–
2.
5cm)
a
bo
v
e
e
l
bo
w
Cente
r
tube
ov
e
r
middle of arm.
cuff furthest away from the tubing through the metal
D-ring in order to form a loop. The smooth side
without the felt material should be on the inside of
the cuff loop.
End of cuff
D-ring
FALL
YELLOW BAND
RROW MUST
HIN
A
WIT
Felt Material
on the outside
of cuff
2. Plug the cuff tube into the left side of the unit.
Insert plug here
3. Open the arm cuff so that your arm may be placed
through it.
4. Remove tight fitting clothing from around
your upper left arm.
5. Position cuff edge 0.8-1.2
inches (2-3 cm) above elbow.
6. Center tube over middle of arm.
7. Pull the end of the cuff so that it tightens
evenly around your arm. Press the hook
and loop material together to secure.
Allow room for 2 fingers to fit between the
cuff and your arm.
8. Lay your arm on a table (palm upward)
so the cuff is at the same height as your
heart. Make sure the tube is not kinked.
15 16
BPS-060_B.indd 17-18BPS-060_B.indd 17-18 5/01/10 1:27 PM5/01/10 1:27 PM
Page 10
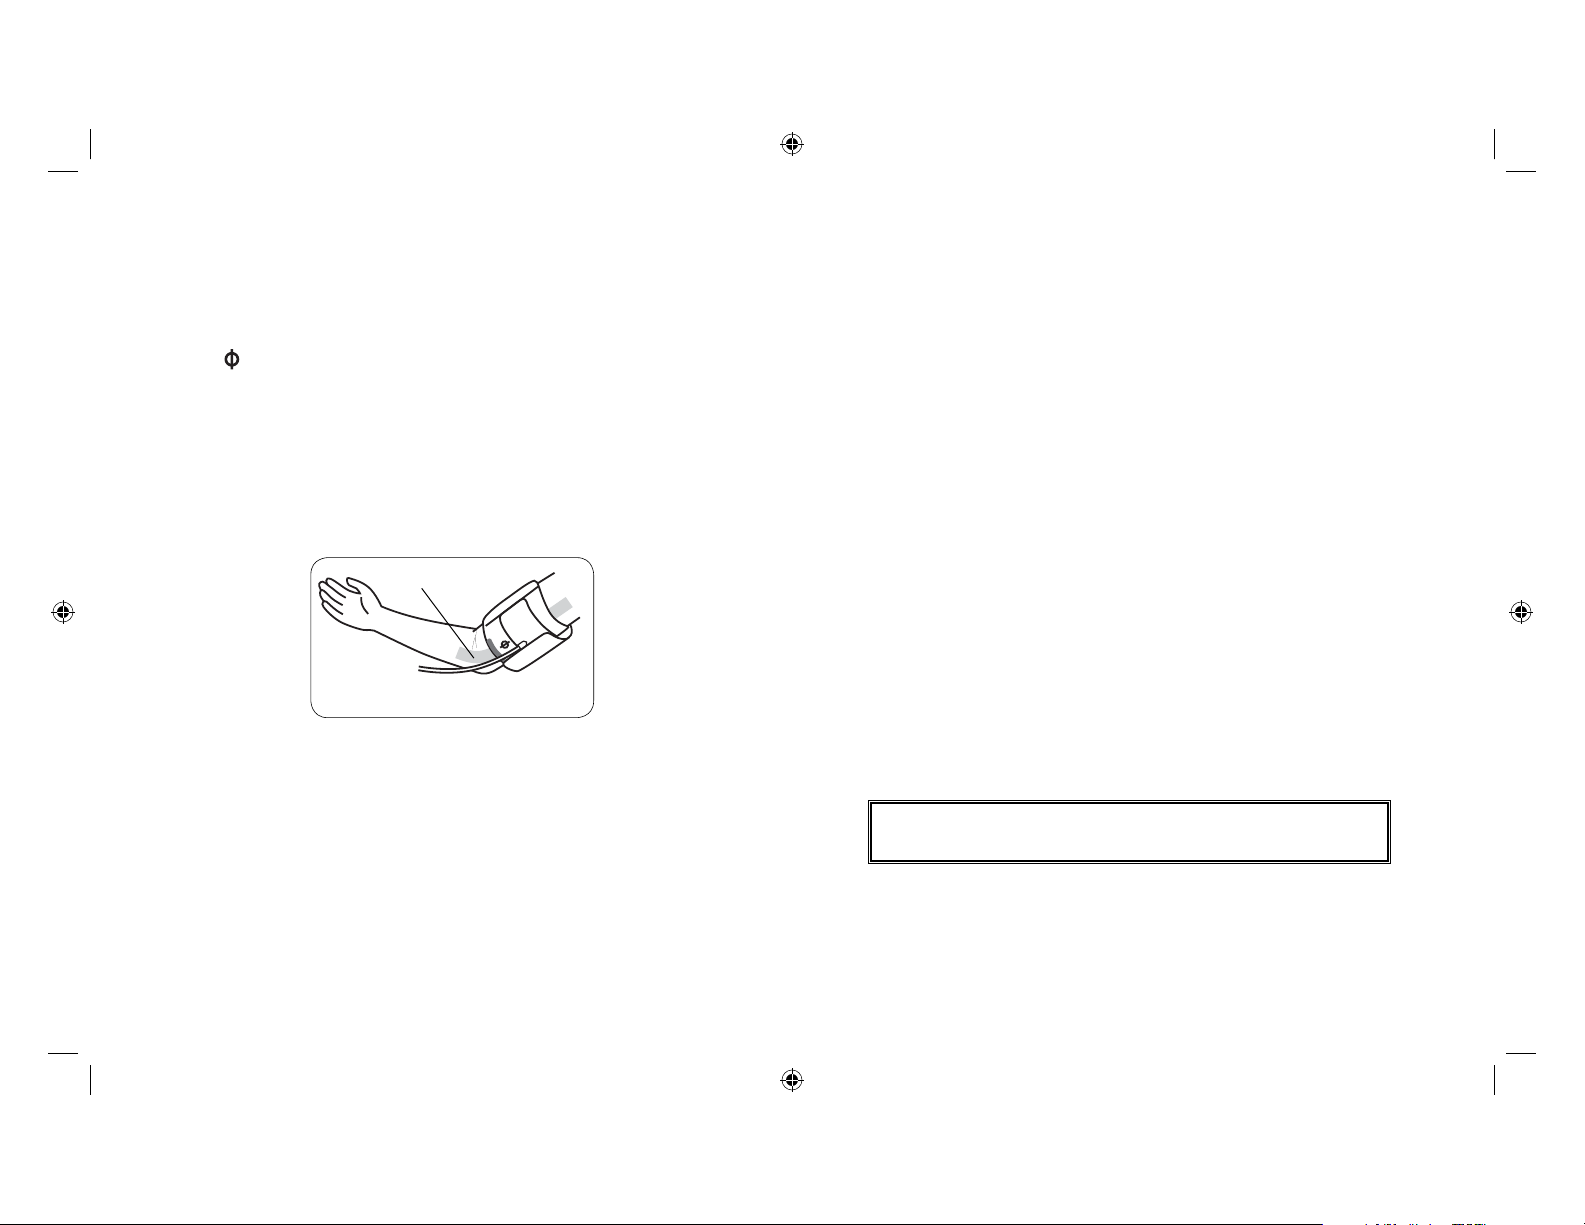
Note:
If it is not possible to fit the cuff to your left arm, it
can also be placed on your right arm. However, all
measurements should be made using the same arm.
To use on the right arm, you must position the artery
symbol “ ” over the main artery. Locate the main artery by
pressing with two fingers approximately 1” (2 cm) above
the bend of your elbow on the inside of your right arm.
Identify where the pulse can be felt the strongest.This is
your main artery.
Main Artery
MEASUREMENT PROCEDURE
Important Notes:
• Blood pressure changes with every heartbeat and is
in constant fluctuation throughout the day.
• Blood pressure measurement can be affected by the
position of the user, his or her physiologic condition
and other factors. For greatest accuracy, wait 1
hour after exercising, bathing, eating, drinking
beverages with alcohol or caffeine, or smoking to
measure blood pressure.
• Before measurement, it is suggested that you sit
quietly for 15 minutes as measurements taken
during a relaxed state will have greater accuracy.
You should not be physically tired or exhausted
while taking a measurement.
• During the measurement, do not talk or move your
arm or hand muscles.
• See page 23 for additional notes regarding your
blood pressure measurement.
If you are using this blood pressure monitor for the first
time, please remove the protective film from the screen.
17 18
BPS-060_B.indd 19-20BPS-060_B.indd 19-20 5/01/10 1:27 PM5/01/10 1:27 PM
Page 11
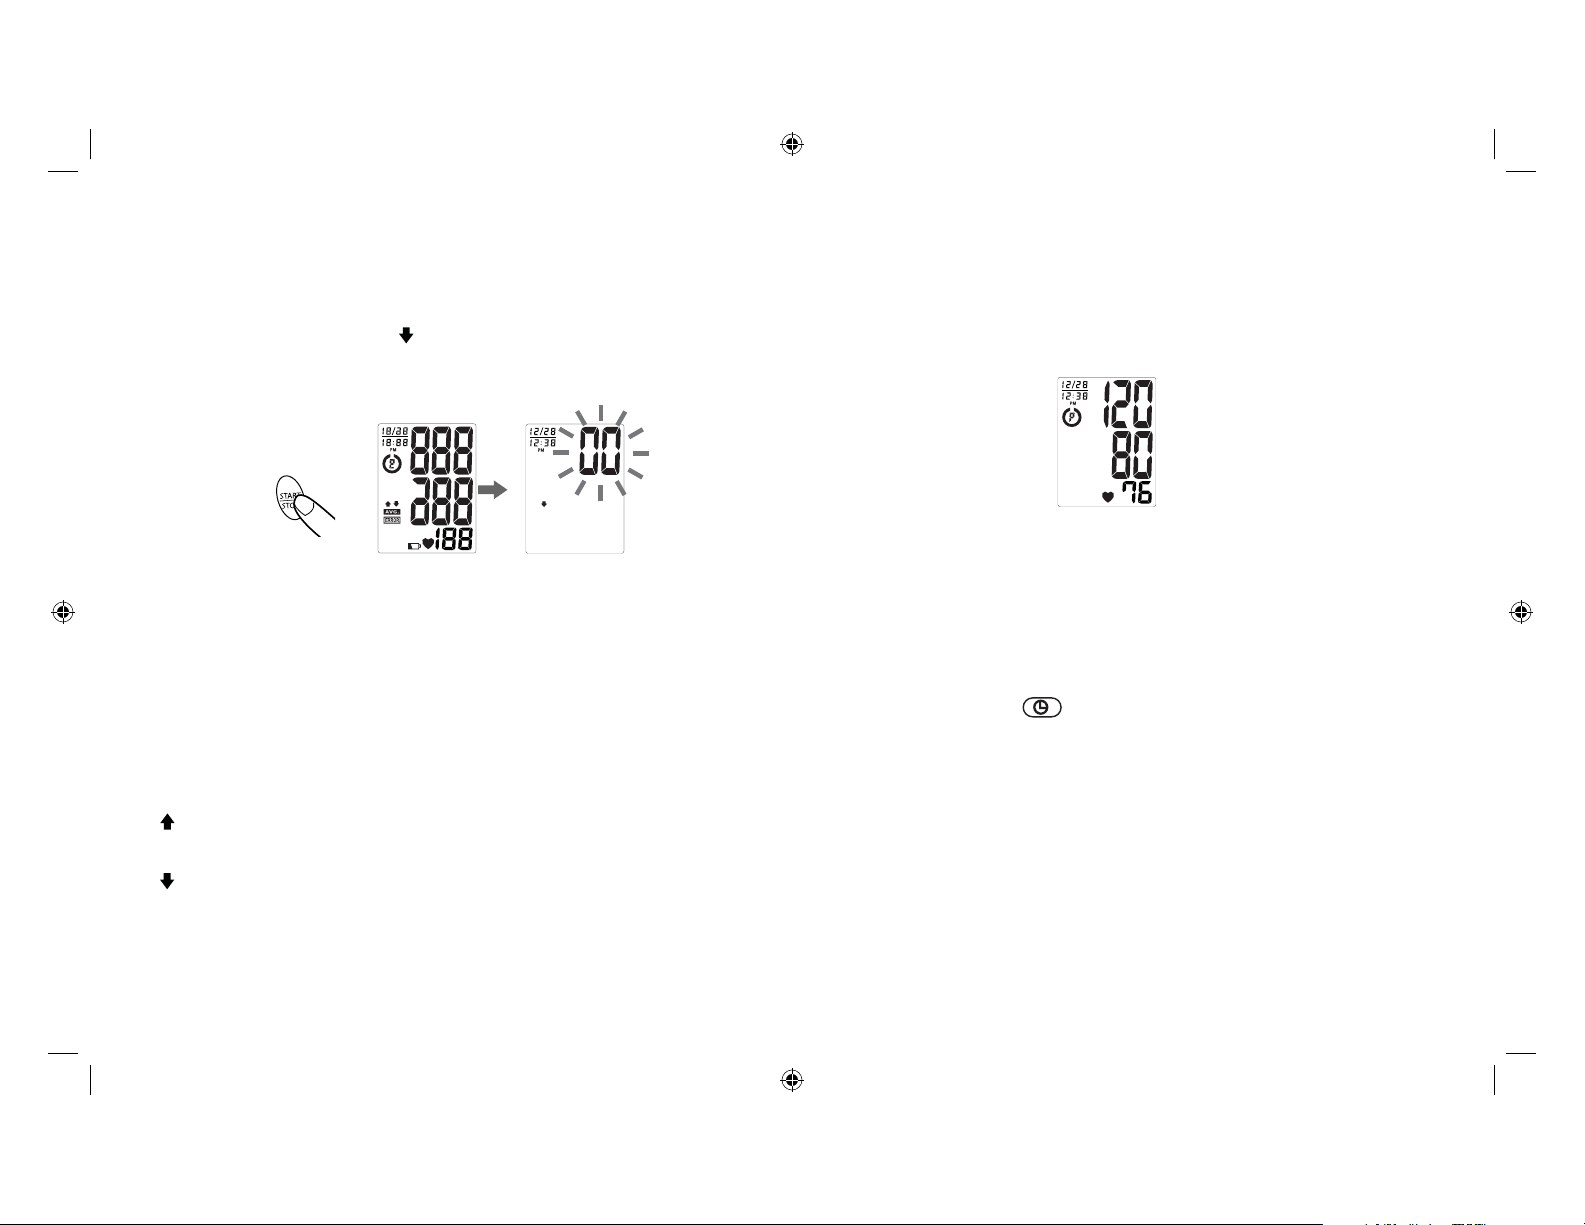
1. With the cuff wrapped around your arm, press the START/
STOP button. Do not inflate the cuff unless it is wrapped
around your arm. All digits will light up to check the display
functions. The checking procedure will be completed after
about 3 seconds. The ( ) arrow will appear momentarily
and then the display will show a “00”. The monitor is
“Ready to Measure” at this point.
2. Using the hand of the arm that does not have the cuff on
it (this will be your right hand if wearing the cuff on your
left arm), squeeze the inflation bulb and continue pumping
until the pressure reading on the display reaches 140
mmHg. The cuff will then begin slowly deflating as part of
the measurement process.
If the pressure in the cuff is not enough, an upward arrow
(
) will appear, directing you to continue pumping. It is
recommended that you pump until the downward arrow
( ) appears.
3. When the measurement is completed, the cuff will
deflate entirely. Systolic pressure, diastolic pressure and
pulse will be shown simultaneously on the LCD screen.
The measurement is then automatically stored into
memory.
Note:
1. This monitor automatically turns off approximately 1
minute after last operation. You may also press the
START/STOP button to turn the unit off.
2. To interrupt the measurement, you may press the
START/STOP button (recommended), “MEM”, or
Date/Time Set
buttons. The cuff will deflate
immediately after a button is pressed.
19 20
BPS-060_B.indd 21-22BPS-060_B.indd 21-22 5/01/10 1:27 PM5/01/10 1:27 PM
Page 12
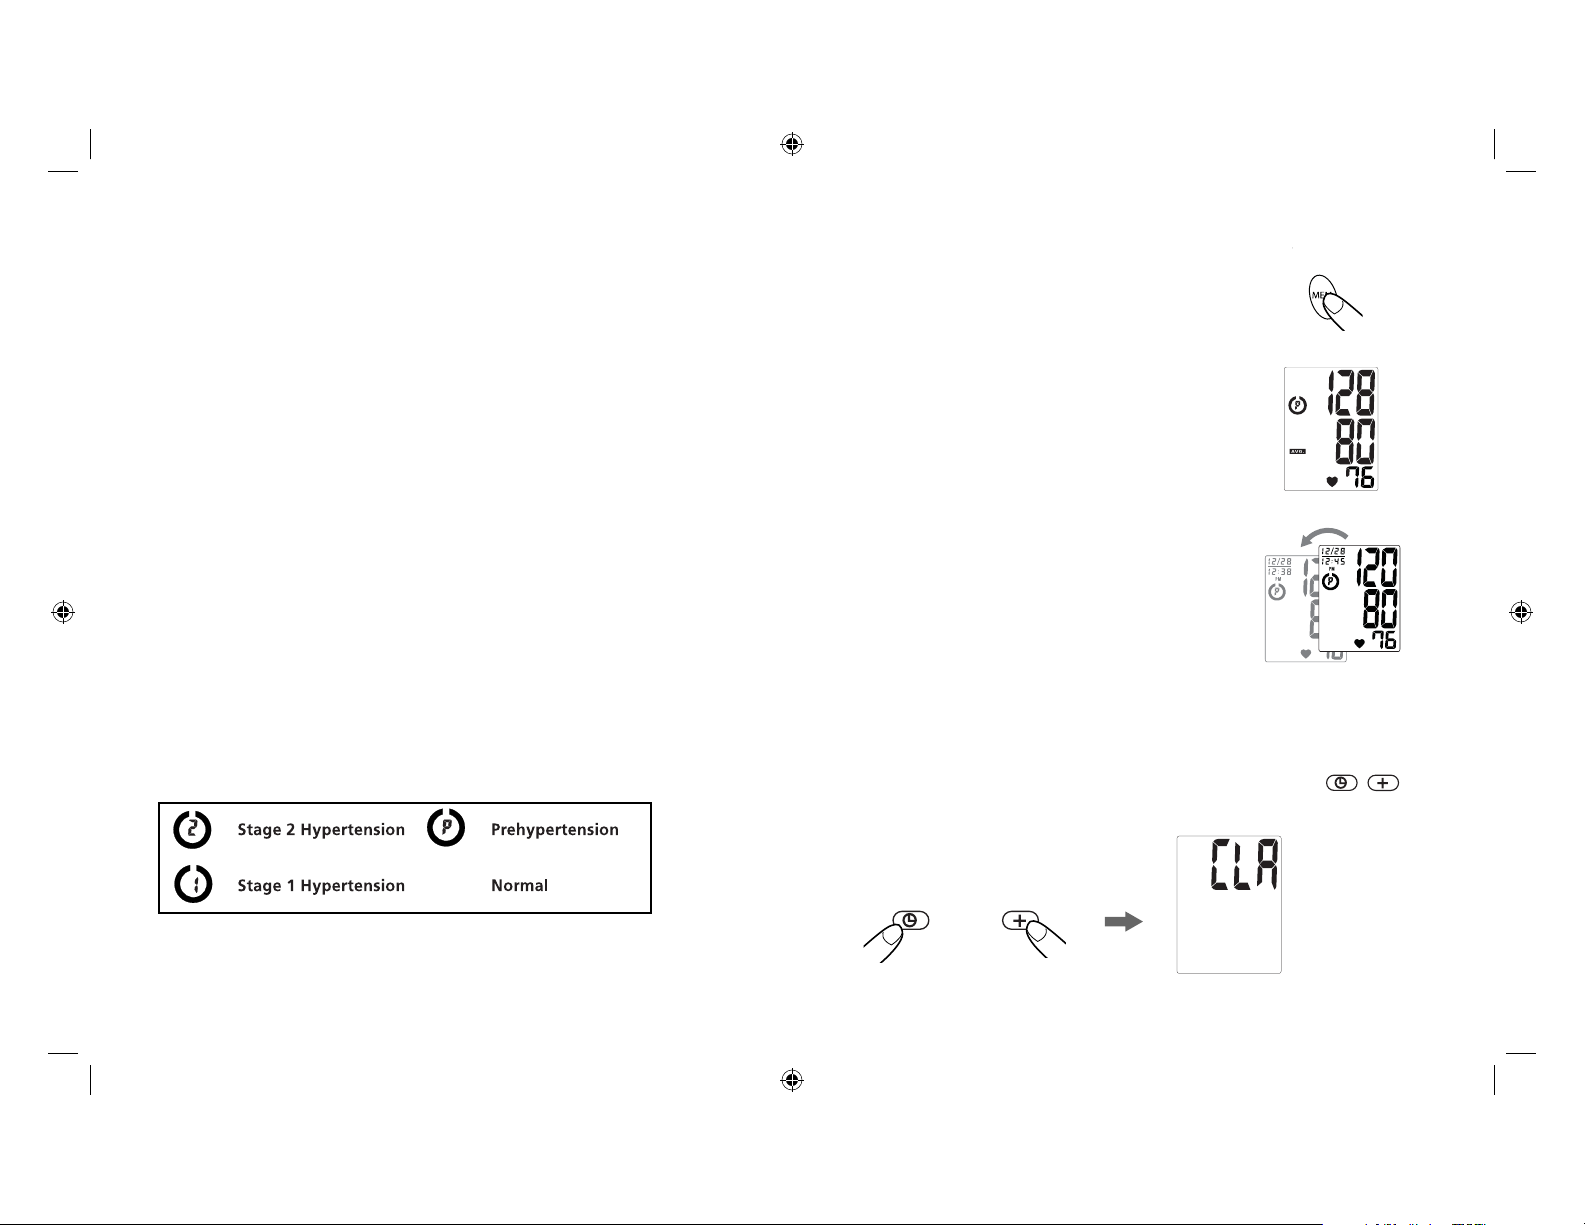
RISK CATEGORY INDEX
This monitor comes equipped with a Risk Category
Index that automatically compares each reading
to criteria established by the U.S. National Institute
of Health’s (NIH) National Heart Lung and Blood
Institute as described earlier in this manual, and
provides a helpful cue if your reading falls into one of
the stages that could potentially indicate increased
risk. No cue is shown if the reading falls in the
normal range as defined by NIH. Please note that
cues provided by this monitor are only intended to
assist you in using this table. The table and cues
are only provided for convenience to have access
to the NIH information. They are not a substitute
for a medical examination by your physician. It is
important for you to consult with your physician
regularly. Your physician will tell you your normal
blood pressure range as well as the point at which
you may actually be considered to be at risk.
RECALLING VALUES FROM MEMORY
1. Press the “MEM” button to
access the memory.
2. The monitor will first
display the calculated
average applied to the last 3
memories.
3. Every new press of the “MEM”
button will recall a previous
reading. The latest reading will
be recalled first.
CLEARING VALUES FROM MEMORY
Press and hold the date & time set buttons(
) at
the same time while in memory mode and the data will
be erased automatically.
(No Symbol)
and
21 22
BPS-060_B.indd 23-24BPS-060_B.indd 23-24 5/01/10 1:27 PM5/01/10 1:27 PM
Page 13

IMPORTANT NOTES REGARDING YOUR BLOOD
PRESSURE MEASUREMENT
• Take your reading in a comfortable environment
as measurements can be affected by hot or cold
temperatures. Take your blood pressure at normal
body temperature.
• Do not move or talk during measurement as this can
elevate readings.
• Do not move or cross legs during measurement. Keep
feet flat on floor.
• Do not touch cuff or monitor during measurement
procedure.
• It is suggested that you take your measurements at
the same time each day and use the same arm for
consistency.
• Users should wait a minimum of 5 minutes before
taking additional measurements. More time may be
necessary depending upon your physiology.
• The measurement results that users receive are for
reference only. If users have any blood pressure
concerns, please consult a physician.
• Once inflation reaches 300 mmHg, the unit will
deflate automatically for safety reasons.
23 24
• This device may have difficulty determining the
proper blood pressure for users with diabetes, poor
circulation of blood, kidney problems, or for users
who have suffered a stroke.
CARE, MAINTENANCE & CLEANING
1. Clean the blood pressure monitor body and cuff
carefully with a slightly damp, soft cloth. Do not press.
Do not wash cuff or use chemical cleaner on it. Never
use thinner, alcohol or petrol (gasoline) as cleaner.
2. Leaky batteries can damage the unit. Remove
the batteries when the unit will not be used for a
long time.
3. If the unit is stored near freezing, allow it to acclimate
to room temperature before use.
4. This blood pressure monitor is not field serviceable.
You should not use any tool to open the device
nor should you attempt to adjust anything inside
the device. If you have any problems with this
device, please contact HoMedics Consumer
Relations (contact information can be found on the
warranty page).
5. Do not immerse the unit in water as this will result in
damage to the unit.
6. Do not subject the monitor and cuff to extreme
temperatures, humidity, moisture, and direct sunlight.
Protect from dust.
BPS-060_B.indd 25-26BPS-060_B.indd 25-26 5/01/10 1:27 PM5/01/10 1:27 PM
Page 14

7. Do not fold the cuff and tubing tightly.
8. Do not disassemble the monitor or cuff. If in need of
repair, refer to the warranty section of this manual.
9. Do not subject the monitor to extreme shocks (do not
drop on floor).
10. Do not inflate the cuff unless wrapped around arm.
11. Do not wrap the cuff around body parts other than
your arm.
12. Do not drop or insert any object into any opening or
hose.
13. To avoid accidental strangulation keep this product
away from children. Do not drape tube around neck.
14. This monitor may not meet its performance
specifications if stored or used outside of these
temperature and humidity ranges:
• Storage Environment • Operating Environment
Temperature:
-4°F~158°F (-20°C~70°C)
Humidity:
less than 90% RH
Temperature:
50°F~104°F (10°C ~40°C)
Humidity:
15% ~ 90% RH
POTENTIAL FOR
ELECTROMAGNETIC INTERFERENCE
To avoid inaccurate results caused by electromagnetic
interference between electrical and electronic equipments,
do not use the device near a cell phone or microwave
oven.
25 26
BPS-060_B.indd 27-28BPS-060_B.indd 27-28 5/01/10 1:27 PM5/01/10 1:27 PM
Page 15

TROUBLESHOOTING
If any abnormality arises during use, please check the following points
SYMPTOMS
Unit does not turn
on when the START/
STOP
button is pushed.
EE measurement
error symbol shown
on display or the
blood pressure
value is displayed
excessively low
(or high).
E1 error symbol
shown on display
E2 error symbol
shown on display
E3 error symbol
shown on display
Note: If the unit still does not work, contact HoMedics Consumer
Relations. Under no circumstance should you disassemble or
attempt to repair the unit by yourself. Contact information for
HoMedics Consumer Relations Department can be found on
the warranty page.
POSSIBLE
CAUSES
Batteries have
run down.
Battery polarities
have been positioned
incorrectly.
Cuff has been placed
incorrectly.
Did you talk or move
during measurement?
Shaking of the arm
with the cuff on.
Air circuit abnormality.
Cuff tube may not be
plugged into monitor
correctly.
Inflation pressure
exceeding 300 mmHg.
Error determining
measurement data.
CORRECTION
Replace them with
two new AA alkaline
batteries.
Re-insert the batteries
in the correct
positions.
Wrap the cuff properly
so that it is positioned
correctly.
Measure again.
Keep arm steady
during measurement.
Check cuff connection.
Measure again.
Turn the unit off, then
measure again.
Measure again.
SPECIFICATIONS
Power Source:
Measurement
Method:
Measurement Range:
Accuracy:
Pressure Sensor:
Inflation:
Deflation:
Memory Capacity:
Auto-shut-off:
Operation
Environment:
Storage Environment:
Weight:
Arm Circumference:
Dimensions:
Note: These specifications are subject to change without notice.
Four 1.5V DC (AA) batteries
Oscillometric
Pressure: 40~280 millimeters mercury (mmHg)
Pulse: 40~199 beats/minute
Pressure: ±3 mmHg
Pulse: ±5% of reading
Semi-conductor
Manual Inflation
Automatic Pressure release valve
60 memories
1 minute after last button operation
Temperature: 50°F~104°F (10°C ~40°C)
Humidity: 15% – 90% R.H.
Temperature: -4°F~158°F (-20°C~70°C)
Humidity: Less than 90% R.H.
.43 lbs/193 grams (without batteries)
Standard size adult arm cuff:
9”–13” (23 – 33 cm)
5”(L) x 4.1”(W) x 2.7”(H)
126mm(L) x 105mm(W) x 68mm(H)
Internally Powered equipment
Type BF Equipment
IPx0-No special protection against the
ingress of water
Not suitable for use in presence of flammable
anesthetic mixture with air, oxygen or
nitrous oxide.
Continuous operation with short-time loading.
27 28
BPS-060_B.indd 29-30BPS-060_B.indd 29-30 5/01/10 1:27 PM5/01/10 1:27 PM
Page 16
For service or repair,
®
do not return this unit
to the retailer. Contact
HoMedics Consumer
Relations at:
Mail:
HoMedics, Inc.
Service Center
Dept. 168
3000 Pontiac Trail
Commerce Township, MI
48390
Email:
cservice@
homedics.com
Phone:
1-800-466-3342
Business Hours:
8:30am-5pm ET
Monday-Friday
Distributed by
HoMedics, Inc.
3000 Pontiac Trail,
Commerce Township, MI
48390
Printed in China
®
HoMedics sells its products with the intent that they are free of defects in manufacture and
workmanship for a period of five years from the date of original purchase, except as noted
below. HoMedics warrants that its products will be free of defects in material and workmanship under normal use and service. This blood pressure monitor meets the simulated
measurement cycles test requirement per EN1060-3, part 8.10. This warranty extends only to
consumers and does not extend to Retailers.
To obtain warranty service on your HoMedics product, mail the product and your dated sales receipt
(as proof of purchase), postpaid, to the following address:
HoMedics Consumer Relations
Service Center Dept. 168
3000 Pontiac Trail
Commerce Township, MI 48390
No COD’s will be accepted.
HoMedics does not authorize anyone, including, but not limited to, Retailers, the subsequent con-
sumer purchaser of the product from a Retailer or remote purchasers, to obligate HoMedics in any
way beyond the terms set forth herein. This warranty does not cover damage caused by misuse or
abuse; accident; the attachment of any unauthorized accessory; alteration to the product; improper
installation; unauthorized repairs or modifications; improper use of electrical/power supply; loss of
power; dropped product; malfunction or damage of an operating part from failure to provide manufacturer’s recommended maintenance; transportation damage; theft; neglect; vandalism; or environmental conditions; loss of use during the period the product is at a repair facility or otherwise awaiting
parts or repair; or any other conditions whatsoever that are beyond the control of HoMedics.
This warranty is effective only if the product is purchased and operated in the country in which the
product is purchased. A product that requires modifications or adoption to enable it to operate in any
other country than the country for which it was designed, manufactured, approved and/or authorized,
or repair of products damaged by these modifications is not covered under this warranty.
THE WARRANTY PROVIDED HEREIN SHALL BE THE SOLE AND EXCLUSIVE WARRANTY. THERE
SHALL BE NO OTHER WARRANTIES EXPRESS OR IMPLIED INCLUDING ANY IMPLIED WARRANTY
OF MERCHANTABILITY OR FITNESS OR ANY OTHER OBLIGATION ON THE PART OF THE
COMPANY WITH RESPECT TO PRODUCTS COVERED BY THIS WARRANTY. HOMEDICS SHALL
HAVE NO LIABILITY FOR ANY INCIDENTAL, CONSEQUENTIAL OR SPECIAL DAMAGES. IN NO
EVENT SHALL THIS WARRANTY REQUIRE MORE THAN THE REPAIR OR REPLACEMENT OF ANY
PART OR PARTS WHICH ARE FOUND TO BE DEFECTIVE WITHIN THE EFFECTIVE PERIOD OF THE
WARRANTY. NO REFUNDS WILL BE GIVEN. IF REPLACEMENT PARTS FOR DEFECTIVE MATERIALS
ARE NOT AVAILABLE, HOMEDICS RESERVES THE RIGHT TO MAKE PRODUCT SUBSTITUTIONS IN
LIEU OF REPAIR OR REPLACEMENT.
This warranty does not extend to the purchase of opened, used, repaired, repackaged and/or resealed
products, including but not limited to sale of such products on Internet auction sites and/or sales of
such products by surplus or bulk resellers. Any and all warranties or guarantees shall immediately
®
cease and terminate as to any products or parts thereof which are repaired, replaced, altered, or
modified, without the prior express and written consent of HoMedics.
This warranty provides you with specific legal rights. You may have additional rights which may vary
from country to country. Because of individual country regulations, some of the above limitations and
exclusions may not apply to you.
For more information regarding our product line in the USA, please visit: www.homedics.com
©2008-2010 HoMedics, Inc. and its affiliated companies, all rights reserved. HoMedics is a
registered trademark of HoMedics, Inc. and its affiliated companies. All rights reserved.
LIMITED FIVE YEAR WARRANTY
P/N: 323101247 VER: 001
IB-BPS060B
®
Monitor de Presión Sanguínea
de Inflado Manual
BPS-060
BPS-060_B.indd 31-32BPS-060_B.indd 31-32 5/01/10 1:27 PM5/01/10 1:27 PM
Page 17

ÍNDICE
INFORMACIÓN INICIAL:
Avisos importantes del producto
e instrucciones de seguridad .................................. 33
Sobre la presión sanguínea ..................................... 35
¿Qué es la presión sanguínea?
¿Por qué medir la presión sanguínea?
Estándar de presión sanguínea .............................. 35
Cómo funciona este monitor de presión
sanguínea .................................................................. 37
INFORMACIÓN DE USO:
Nombre/Función de cada pieza ............................... 38
Explicaciones de la pantalla .................................... 39
Instalación de las pilas ............................................ 41
Procedimiento de configuración
de fecha y hora ......................................................... 42
Uso del brazalete ...................................................... 43
Procedimiento de medición ..................................... 46
Índice de Categoría de Riesgo ................................ 49
Cómo recuperar los valores de la memoria ........... 50
Cómo borrar los valores de la memoria ................. 50
Notas importantes con respecto a las
mediciones de presión sanguínea .......................... 51
Cuidado, mantenimiento y limpieza ........................ 52
Potencial de interferencia con electromagnética .. 54
Diagnóstico y resolución de problemas ................. 55
Especificaciones ....................................................... 56
Garantía limitada por cinco años ............................ 57
31 32
BPS-060_B.indd 33-34BPS-060_B.indd 33-34 5/01/10 1:27 PM5/01/10 1:27 PM
Page 18

®
AVISOS IMPORTANTES DEL PRODUCTO
E INSTRUCCIONES DE SEGURIDAD
Cuando utilice su monitor de presión sanguínea, debe seguir siempre
las precauciones básicas. Sírvase leer y seguir todas las instrucciones y
advertencias antes de utilizar este producto. Guarde estas instrucciones
para referencia futura.
• Observe que éste es un producto doméstico de cuidado de la salud
únicamente y no está diseñado para servir como sustituto de los
consejos de un médico ni profesional médico.
• No utilice este dispositivo para el diagnóstico ni tratamiento
de ningún problema de salud ni enfermedad. Los resultados de
medición son de referencia únicamente. Consulte a un profesional
del cuidado de la salud para conocer la interpretación de las
mediciones de la presión. Póngase en contacto con su médico si
tiene un problema médico o sospecha que lo tiene. No cambie sus
medicinas sin el consejo de su médico o profesional de la salud.
• El tamaño adecuado del brazalete es fundamental para obtener
mediciones precisas. Para asegurarse de que usa la talla correcta
del brazalete, siga las instrucciones de este manual y las que están
impresas en el brazalete.
• Este dispositivo puede tener dificultad para determinar la correcta
presión sanguínea para las personas con diabetes, mala circulación,
trastornos renales o usuarios que han sufrido una apoplejía.
• La pantalla de pulso no es adecuada para verificar la frecuencia de
los marcapasos.
• Interferencia electromagnética: el dispositivo contiene
componentes electrónicos sensibles. Evite los campos eléctricos
o electromagnéticos fuertes cercanos al dispositivo (por ejemplo,
teléfonos celulares, hornos de microondas). Éstos pueden causar la
imposibilidad temporal de medir con precisión.
• Utilice el monitor de presión sanguínea únicamente para el uso para
el cual fue diseñado.
• No coloque el brazalete en otra parte de su cuerpo que no sea el
brazo.
• No apto para ser usado por o con personas menores de 18 años.
• Solo use pilas alcalinas AA de 1.5V como fuente de energía.
Las mediciones de la presión sanguínea que se determinen con
este dispositivo son equivalentes a las obtenidas por un observador
capacitado que use el método de auscultación con brazalete/
estetoscopio, dentro de los límites prescritos por el Estándar
nacional de los EE.UU., Esfigmomanómetro manual, electrónico o
automatizado.
33 34
BPS-060_B.indd 35-36BPS-060_B.indd 35-36 5/01/10 1:27 PM5/01/10 1:27 PM
Page 19

SOBRE LA PRESIÓN SANGUÍNEA
¿Qué es la presión sanguínea?
La presión sanguínea es la presión que se ejerce en las paredes de
la arteria cuando la sangre fluye por las arterias. La presión medida
cuando el corazón se contrae y sale la sangre es la presión sanguínea
sistólica (la mayor). La presión medida cuando el corazón se dilata y
entra la sangre se llama presión sanguínea diastólica (la menor).
¿Por qué medir la presión sanguínea?
Entre los varios problemas de salud de hoy, los asociados con la
hipertensión son muy comunes. La hipertensión se relaciona de manera
peligrosa con las enfermedades cardiovasculares. Por lo tanto, controlar
la presión sanguínea es importante para identificar a las personas en
riesgo.
ESTÁNDAR DE PRESIÓN SANGUÍNEA
La tabla que aparece a continuación son los criterios para la
determinación de la hipertensión que están disponibles de forma
pública en el National Heart Lung and Blood Institute en los National
Institutes of Health (NIH) de los EE.UU.
(http://www.nhlbi.nih.gov/health/dci/Diseases/Hbp/HBP_WhatIs.html).
Los usuarios pueden comparar sus propias lecturas de presión
sanguínea con estos criterios establecidos para determinar si es posible
que corran un mayor riesgo.
Esta tabla se aplica a la mayoría de los adultos mayores de 18 años.
La presión sanguínea tiende a subir y bajar, incluso en personas que
normalmente no tienen lecturas altas. Si sus resultados permanecen
por encima del rango “normal” la mayoría del tiempo, es posible que
corra un riesgo mayor y debería consultar a su médico.
Categoría
Normal menor que 120 Y menor que 80
Prehipertensión 120-139 O 80-89
Hipertensión
Etapa 1 140-159 O 90-99
Etapa 2 160 o mayor O 100 o mayor
Si bien uno puede encontrar fácilmente en esta tabla en dónde está su
propia lectura de la presión sanguínea, este monitor viene equipado
con un Índice de categoría de riesgo que compara automáticamente
cada lectura a estos criterios y brinda una guía útil si su lectura queda
dentro de una de las etapas que posiblemente podrían indicar un
mayor riesgo. Vea la página 49 para obtener más información.
Note que las guías que proporciona este monitor están destinadas
únicamente para asistirlo en el uso de esta tabla. La tabla y las guías
se proporcionan únicamente por practicidad para tener acceso a la
información de los NIH. No son un sustituto de un examen médico
realizado por su médico. Es importante que consulte con su médico
regularmente. Su médico le dirá su rango normal de presión sanguínea
además del punto en el que usted puede ser considerado realmente en
riesgo.
Sistólica (mmHg)
Diastólica (mmHg)
35 36
BPS-060_B.indd 37-38BPS-060_B.indd 37-38 5/01/10 1:27 PM5/01/10 1:27 PM
Page 20
CÓMO FUNCIONA ESTE MONITOR
DE PRESIÓN SANGUÍNEA
Este monitor digital de presión sanguínea de inflado manual
proporciona rápida y fácilmente lecturas de presión sistólica, presión
diastólica y pulso. Una vez inflado el brazalete, el monitor determina
su presión sanguínea analizando las oscilaciones de de su presión.
Cuando la medición esté completa, el dispositivo desinfla el brazalete
y muestra las lecturas de presión sistólica, presión diastólica y pulso.
El monitor encuentra automáticamente en dónde se encuentran sus
resultados en la tabla del Instituto Nacional del Corazón, los Pulmones
y la Sangre de los NIH y brinda una guía si su lectura entra en una de
las etapas que podría indicar un mayor riesgo. Vea la página 49 para
obtener más información.
NOMBRE/FUNCIÓN DE CADA PIEZA
Tubo del
brazalete
Bulbo de inflado
Brazalete
Pantalla
LCD
Botón de
recuperar memoria
Botones de definición de fecha/hora
Tapa de
Botón de START/STOP
(COMENZAR/DETENER)
37 38
BPS-060_B.indd 39-40BPS-060_B.indd 39-40 5/01/10 1:27 PM5/01/10 1:27 PM
las pilas
(parte
inferior de
la unidad)
Page 21
EXPLICACIONES DE LA PANTALLA
Símbolos de la pantalla:
Símbolo de inflado: Aparece cuando es necesario inflar el brazalete.
Indicador de fecha/hora
Rítmo Cardiaco
Presión
sistólica
Presión
diastólica
Símbolo de desinflado: Aparece cuando es necesario desinflar
el brazalete.
Símbolo de pilas bajas: aparece cuando tiene que cambiar las pilas.
Símbolo de pulso: muestra el rítmo cardiaco por minuto.
Promedio de memoria: muestra un promedio de al menos 3 lecturas.
Índice de Categoría de Riesgo: Vea la página 49 para obtener más
información.
Si aparece alguno de los siguientes números o letras en el área donde se debe
mostrar la presión sistólica con , ha ocurrido un error en la lectura. Vea
la sección Diagnóstico y resolución de problemas de este manual para obtener
más información.
Error de medición: Mida nuevamente. Vuelva a colocarse el brazalete
y mantenga el brazo quieta durante la medición.
Irregularidad en el circuito de aire: Verifique la conexión del
brazalete. Mida nuevamente.
Presión superior a 300 mmHg: Apague la unidad para borrar, luego
vuelva a medir.
Error al determinar datos de medición: Medida otra vez.
39 40
BPS-060_B.indd 41-42BPS-060_B.indd 41-42 5/01/10 1:27 PM5/01/10 1:27 PM
Page 22
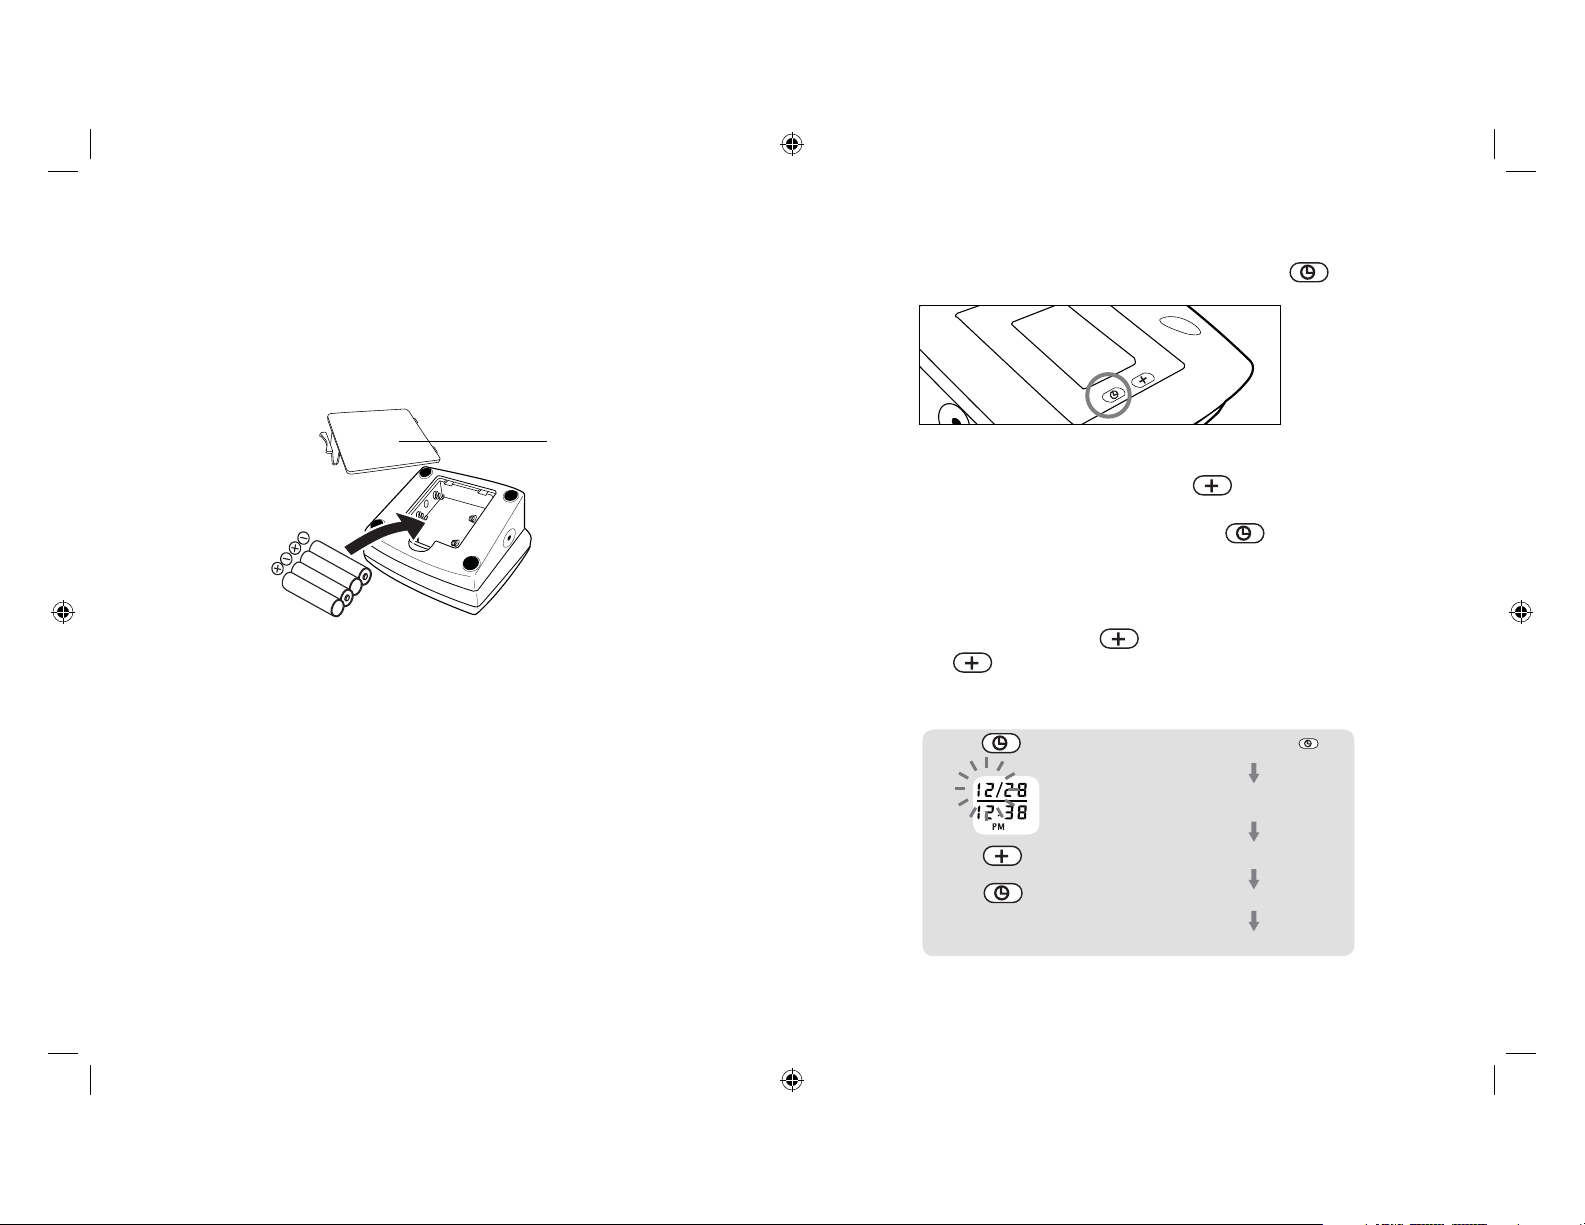
INSTALACIÓN DE LAS PILAS
1. Presione el seguro y levante la tapa de las pilas hacia usted
para abrir el compartimiento de las pilas.
2. Instale o reemplace las 4 pilas “AA” en el compartimiento de
las pilas según las indicaciones dentro del compartimiento.
3. Vuelva a colocar la tapa de las pilas enganchando la parte
inferior primero, luego presione el extremo superior de la
tapa de las pilas.
Tapa del compartimiento
de las pilas
Reemplace las pilas si:
1. El símbolo de pilas bajas aparece en la pantalla.
2. No aparece nada en la pantalla cuando enciende
el dispositivo.
Como las pilas que se suministran son de prueba únicamente,
puede que se descarguen antes que las pilas que compra en
la tienda. Cambie todas las pilas al mismo tiempo (como parte
de un solo juego, no por separado). Solo use pilas alcalinas
AA de 1.5V. Saque las pilas cuando la unidad no esté en uso
durante mucho tiempo. Si se quitan o sustituyen las baterías,
es necesario reingresar fecha y hora. Limpie los contactos de
la pila y del compartimiento para pilas con un paño suave cada
vez que instale pilas.
Nota: las pilas son desechos peligrosos. No las deseche junto
con la basura doméstica.
41 42
PROCEDIMIENTO DE CONFIGURACIÓN
DE FECHA Y HORA
1. Para ajustar la fecha/hora, presione el botón Set .
2. La pantalla mostrará un número intermitente que indica la fecha.
Cambie el mes presionando el botón
Cada vez que lo presione aumentará en uno el número
de manera cíclica. Presione el botón Set nuevamente
para confirmar la definición, y la pantalla mostrará un número
intermitente que representa el día del mes.
3. Cambie la fecha y la hora según lo que se describe en el Paso
2 anterior, usando el botón para cambiar los números y el
botón Set para confirmar las definiciones.
presione el botón
confirme la definición
repita el proceso para definir la fecha y la hora
.
mes intermitente
mes aumentando
BPS-060_B.indd 43-44BPS-060_B.indd 43-44 5/01/10 1:27 PM5/01/10 1:27 PM
Page 23
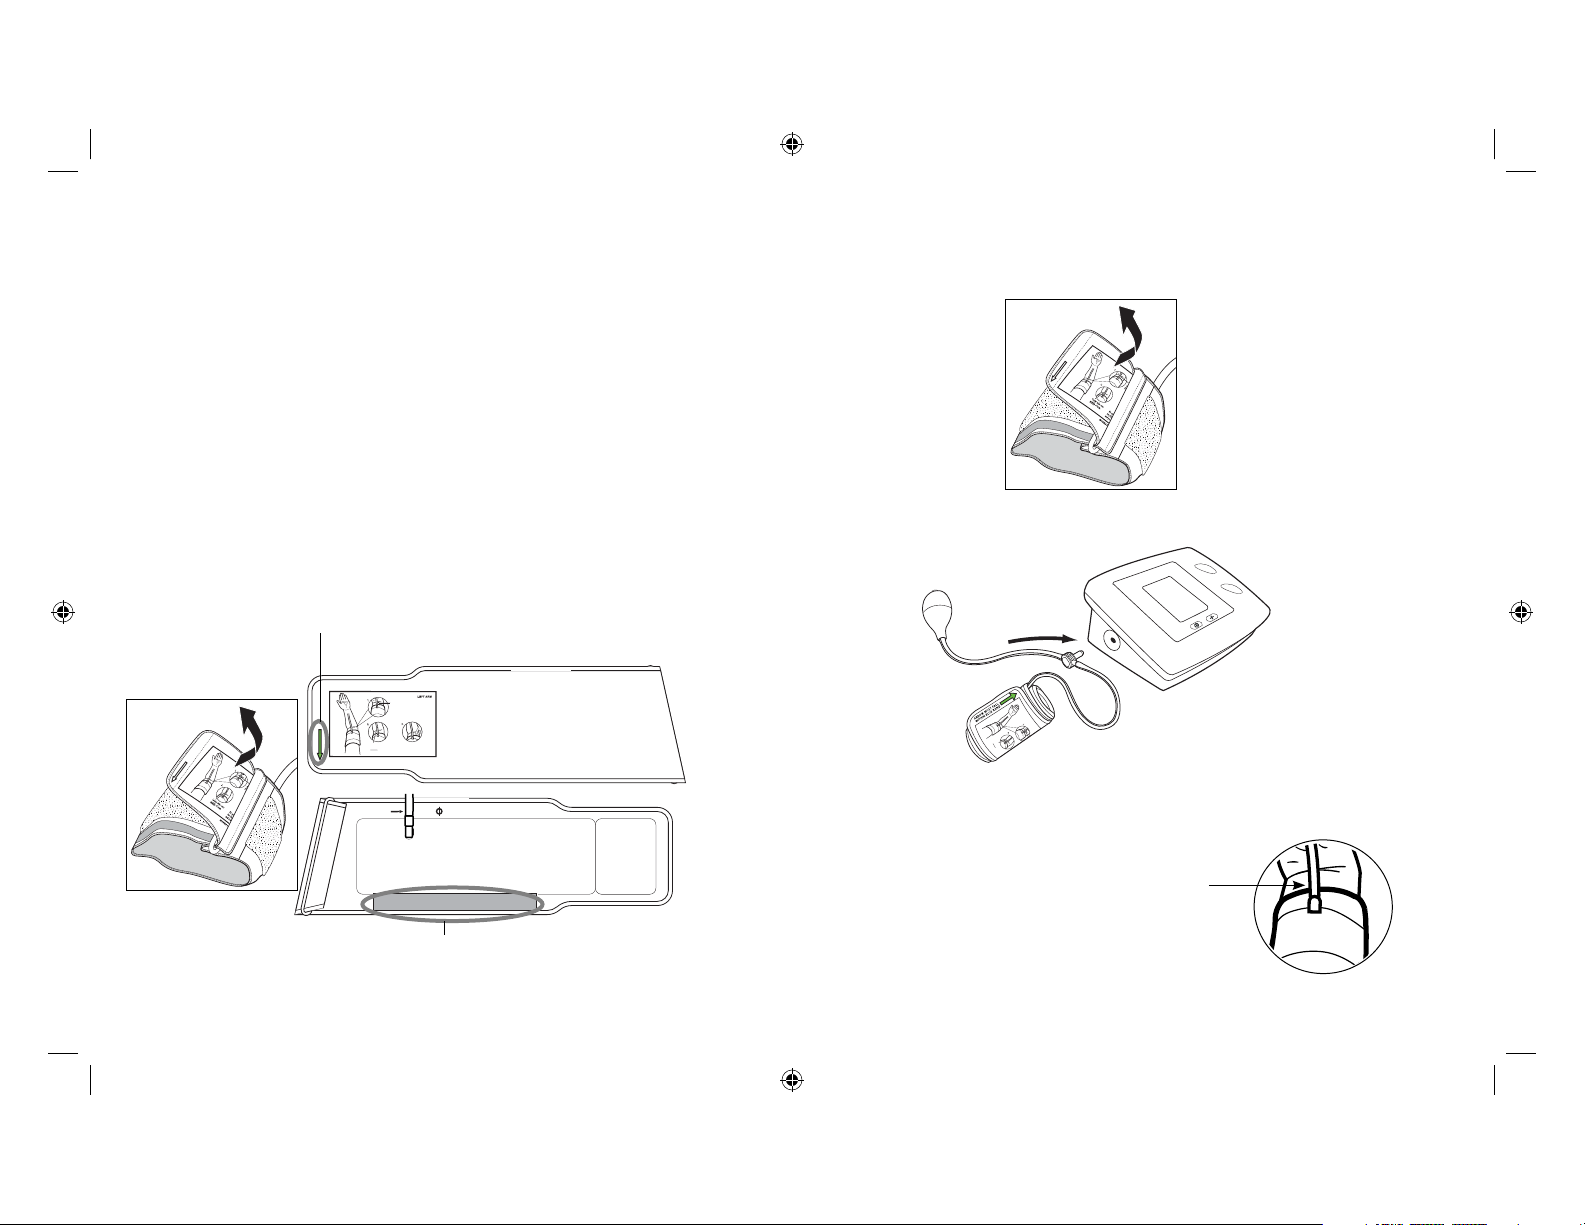
USO DEL BRAZALETE
P
ositio
n
cu
f
f
edge 0.6˝
–
1.0˝
(1.
5
–
2.
5c
m
) a
bo
v
e
elbo
w
Center
tu
be
over
m
iddle of arm.
Muy importante: El tamaño adecuado del brazalete
es fundamental para obtener mediciones precisas.
Este monitor incluye un brazalete de tamaño estándar que sirve
para los brazos con una circunferencia entre 9” hasta 13” (de
23 a 33 cm).
Este brazalete es adecuado para su uso si la flecha de color se
encuentra dentro de la línea de color sólido que se muestra a
continuación.
Si la flecha de color se encuenta fuera de la línea de color
sólido, necesita un brazalete de otra circunferencia. Póngase
en contacto con Homedics Consumer Relations, al tel.
1-800-466-3342.
Flecha de Color
Position cuff
edge 0.6
˝
–
1.0˝
(1.5
–
Cente
middle of arm.
Center tube over
middle of arm
2.5cm) above elbow.
Fit
r
c
tube over
u
ff securely. Allow room for
two fingers
to fit bet
ween the cu
ff
and your arm.
MODEL# PP-BPCUFF5
ARROW MUST FALL
FALL
ELLOW BAND
Y
RROW MUST
HIN
A
WIT
WITHIN YELLOW BAND
1. Si el brazalete no está armado, pase el extremo del brazalete que
se encuentra más lejos del tubo a través del anillo metálico en D,
para formar un aro. El lado suave y sin el material de felpa, debe
encontrarse en el lado interior del aro formado por el brazalete.
UST FALL
ELLOW BAND
Y
RROW M
A
WITHIN
2. Conecte el tubo del brazalete en el costado izquierdo de la unidad.
Introduzca el
enchufe aquí
3. Abra el brazalete para colocarlo alrededor de su brazo.
4. Retire la ropa apretada de la parte superior del brazo izquierdo.
5. Coloque el borde del brazalete
de 0,8” a 1,2” (2-3 cm) arriba del codo.
Línea de Color Sólido
43 44
BPS-060_B.indd 45-46BPS-060_B.indd 45-46 5/01/10 1:27 PM5/01/10 1:27 PM
Page 24

6. Centre el tubo en la mitad del brazo.
7. Hale el extremo del brazalete para que
quede ajustado y parejo alrededor de su
brazo. Presione el cierre de gancho y aro
para asegurarlo. Deje espacio suficiente
para que 2 dedos quepan entre el
brazalete y su brazo.
8. Ponga el brazo en una mesa (con la palma
hacia arriba) de modo que el brazalete esté
a la misma altura que el corazón. Asegúrese de
que el tubo no haga codos.
Nota:
Si no es posible colocar el brazalete en su brazo izquierdo, también
lo puede colocar en su brazo derecho. Sin embargo, todas las
mediciones deben realizarse usando el mismo brazo. Para uso en el
brazo derecho, debe posicionar el símbolo de arteria “ ” sobre la
arteria principal. Ubique la arteria principal presionando con dos dedos
aproximadamente 1” (2 cm) por encima del doblez del codo
del lado interior del brazo
derecho. Identifique dónde
se siente más fuerte el pulso.
Ésa es la arteria principal.
Arteria principal
PROCEDIMIENTO DE MEDICIÓN
Notas importantes:
• La presión sanguínea cambia con cada latido del corazón
y está en constante fluctuación durante todo el día.
• La medición de la presión sanguínea puede verse afectada
por la posición del usuario, sus condiciones fisiológicas
y demás factores. Para obtener la mayor precisión en la
medición de la presión sanguínea, espere 1 hora después de
hacer ejercicio, bañarse, comer, tomar bebidas con alcohol o
cafeína o fumar.
• Antes de la medición, se sugiere que se siente tranquilo
durante 15 minutos ya que las mediciones realizadas durante
un estado relajado tendrán una mayor precisión. No debe
estar físicamente cansado ni extenuado cuando realiza la
medición.
• Durante la medición, no hable ni mueva los músculos
del brazo ni la mano.
• Vea la página 51 para obtener notas adicionales con respecto
a la medición de su presión sanguínea.
Si usted está usando este monitor de tensión arterial por primera vez, por favor quite la película protectora de la pantalla.
45 46
BPS-060_B.indd 47-48BPS-060_B.indd 47-48 5/01/10 1:27 PM5/01/10 1:27 PM
Page 25

1. Con el brazalete puesto en el brazo, presione el botón START/STOP
(COMENZAR/DETENER). No infle el brazalete a menos que esté
puesto en el brazo. Todos los dígitos se encenderán para verificar
las funciones de la pantalla. El procedimiento de verificación se
completará después de aproximadamente 3 segundos.
La flecha ( ) aparece momentáneamente y luego la pantalla
muestra un “00”. Ahora el monitor está “listo para la medida”.
2. Usando la mano del brazo que no tiene puesto en brazalete (este es
su brazo derecho si tiene puesto el brazalete en el brazo izquierdo),
apriete el bulbo de inflado y continúe bombeando hasta que la
lectura de presión en la pantalla alcance el valor de 140 mmHg.
Luego, como parte del proceso de medición, el brazalete empieza a
desinflarse lentamente.
Si la presión del brazalete no es suficiente, aparece una flecha
hacia arriba ( ), para que usted siga bombeando.Se recomienda
bombear hasta que aparezca la flecha hacia abajo ( ).
3. Cuando la medición esté completa, el brazalete se desinfla
por completo. Se mostrarán simultáneamente las lecturas de presión
sistólica, presión diastólica y pulso en la pantalla LCD. La medida se
almacenará automáticamente en la memoria.
Nota:
1. Este monitor se apaga automáticamente aproximadamente 1 minuto
después de la última operación. También puede presionar el botón
de START/STOP (COMENZAR/ DETENER) para apagar la unidad.
2. Para interrumpir la medición, puede presionar los botones
START/STOP (COMENZAR/DETENER) (recomendado),
“MEM”, o configurar Fecha/Hora . El brazalete se
desinflará inmediatamente después de presionar el botón.
47 48
BPS-060_B.indd 49-50BPS-060_B.indd 49-50 5/01/10 1:27 PM5/01/10 1:27 PM
Page 26
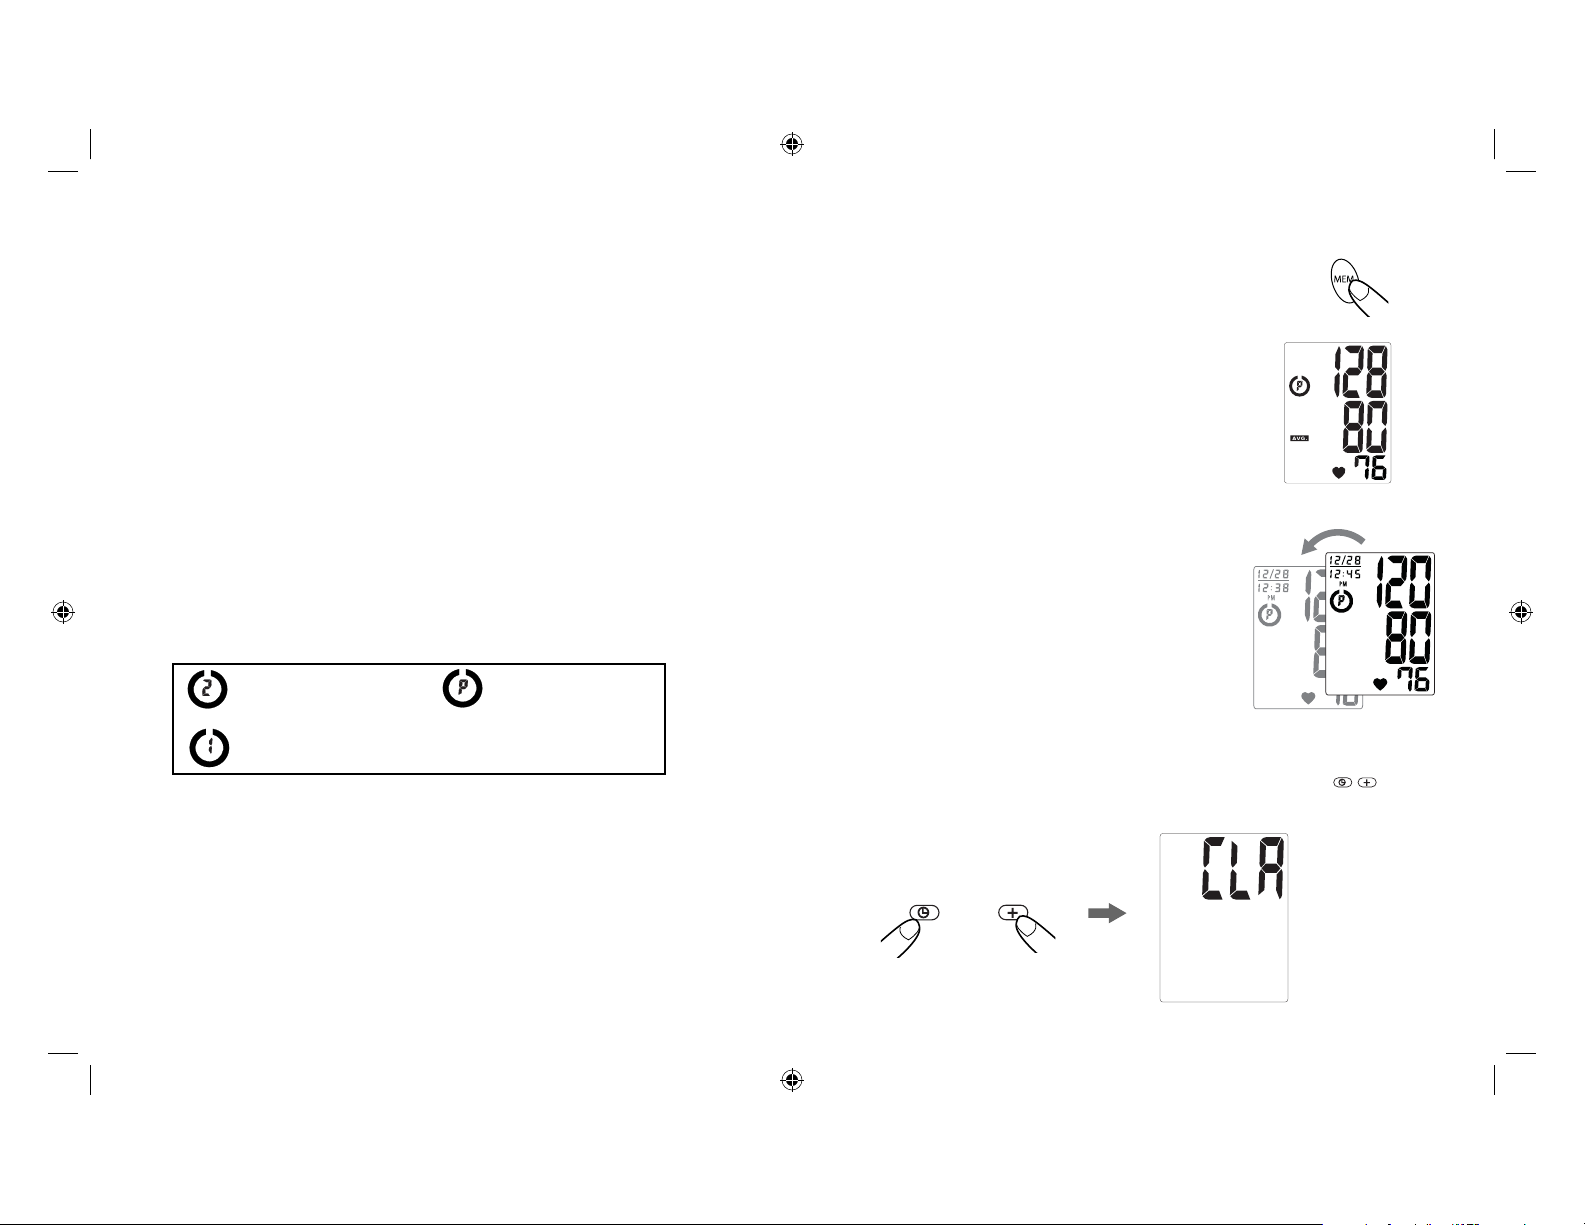
ÍNDICE DE CATEGORÍA DE RIESGO
Este monitor viene equipado con un Índice de categoría de
riesgo que compara automáticamente cada lectura al criterio
establecido por el National Heart Lung and Blood Institute
de los National Institutes of Health (NIH) de EE.UU. como se
describió anteriormente en este manual y brinda una guía útil
si su lectura entra en una de las etapas que podrían indicar
un mayor riesgo. No se muestra ninguna guía si la lectura
entra en el rango normal según lo definido por los NIH. Note
que las guías que proporciona este monitor están destinadas
únicamente para asistirlo en el uso de esta tabla. La tabla y las
guías se proporcionan únicamente por practicidad para tener
acceso a la información de los NIH. No son un sustituto de un
examen médico realizado por su médico. Es importante que
consulte con su médico regularmente. Su médico le dirá su
rango normal de presión sanguínea además del punto en el
que usted puede ser considerado realmente en riesgo.
Etapa 2 de hipertensión
Prehipertensión
CÓMO RECUPERAR LOS VALORES DE LA MEMORIA
1. Presione el botón “MEM” para
acceder a la memoria.
2. El monitor mostrará primero el
promedio calculado aplicado a las
últimas 3 memorias.
3. Cada vez que presiona el botón
“MEM” se recuperará una lectura
previa. La última lectura será la
primera en recuperarse.
Etapa 1 de hipertensión
Normal
(sin símbolo)
CÓMO BORRAR LOS VALORES DE LA MEMORIA
Mantenga presionado los botones de fecha y tiempo ( )
en el modo de memoria, y los datos guardados serán borrados
automáticamente.
y
49 50
BPS-060_B.indd 51-52BPS-060_B.indd 51-52 5/01/10 1:27 PM5/01/10 1:27 PM
Page 27

NOTAS IMPORTANTES CON RESPECTO A LAS
MEDICIONES DE PRESIÓN SANGUÍNEA
• Tome su lectura en un entorno cómodo ya que las medidas
pueden verse afectadas por las temperaturas calurosas o
frías. Tome su presión sanguínea a una temperatura corporal
normal.
• No se mueva ni hable durante la medición ya que esto puede
elevar las lecturas.
• No mueva ni cruce las piernas durante la medición. Mantenga
los pies bien apoyados sobre el piso.
• No toque el brazalete ni el monitor durante el procedimiento
de medición.
• Le sugerimos que tome las mediciones todos los días a
la misma hora y en el mismo brazo, para establecer una
coherencia.
• Los usuarios deberán esperar un mínimo de 5 minutos antes
de tomar más mediciones. Dependiendo de su complexión
fisiológica, es posible que necesite más tiempo.
• Los resultados de las mediciones que los usuarios reciben
son únicamente para referencia. Si los usuarios tienen
inquietudes en cuanto a su presión sanguínea, deberán
consultar a un médico.
• Una vez que esté inflada a 300 mmHg, la unidad se
desinflará automáticamente por motivos de seguridad.
• Este dispositivo puede tener dificultad para determinar la
correcta presión sanguínea para usuarios con diabetes,
mala circulación, trastornos renales o usuarios que han
sufrido una apoplejía.
CUIDADO, MANTENIMIENTO Y LIMPIEZA
1. Limpie el cuerpo del monitor de presión sanguínea
y el brazalete con cuidado con un paño suave, apenas
húmedo. No lo apriete. No lave el brazalete ni utilice
un limpiador químico para limpiarlo. Nunca utilice
diluyentes, alcohol ni petróleo (gasolina) para limpiarlo.
2. Las pilas con pérdidas pueden dañar la unidad. Retire las
pilas si el producto no se va a utilizar por un largo tiempo.
3. Si la unidad se guarda junto a lugares fríos, permita que se
adapte a la temperatura ambiente antes de usarla.
4. No podrá realizar por su cuenta el servicio de este monitor
de presión sanguínea. No utilice ninguna herramienta para
abrir el dispositivo ni intente ajustar nada en el interior
del mismo. Si tiene problemas con este dispositivo,
póngase en contacto con Relaciones con el Consumidor
de HoMedics (encontrará la información de contacto en la
página de la garantía).
5. No sumerja la unidad en el agua ya que puede dañarla.
6. No exponga el monitor ni el brazalete a temperaturas
o humedad extremas ni a la luz solar directa. Proteja
del polvo.
7. No doble el brazalete ni el tubo demasiado apretados.
8. No desarme el monitor ni el brazalete. Si alguno de los
componentes necesita reparación, consulte la sección de
la garantía de este manual.
9. No exponga el monitor a golpes extremos
(no lo deje caer al suelo).
10. No infle el brazalete a menos que esté puesto en el brazo.
11. No coloque el brazalete en otra parte de su cuerpo que no
sea el brazo.
12. No lo deje caer ni inserte ningún objeto en ninguna
abertura ni manguera.
51 52
BPS-060_B.indd 53-54BPS-060_B.indd 53-54 5/01/10 1:27 PM5/01/10 1:27 PM
Page 28

13. Para evitar estrangulaciones accidentales, mantenga este
producto lejos de niños y no cuelgue el tubo del cuello.
14. Este monitor puede no cumplir con sus especificaciones de
rendimiento si se guarda o se utiliza fuera de estos rangos
de temperatura y humedad:
• Ambiente para guardar • Ambiente de funcionamiento
Temperatura:
-4°F~158°F (-20°C~70°C)
Humedad:
Menos de 90% HR
Temperatura:
50°F~104°F (10°C ~40°C)
Humedad:
15% ~ 90% HR
POTENCIAL DE INTERFERENCIA
ELECTROMAGNÉTICA
Para evitar resultados incorrectos provocados por
la interferencia electromagnética entre los equipos
eléctricos y electrónicos, no use el dispositivo
cerca de un celular o un horno microondas.
53 54
BPS-060_B.indd 55-56BPS-060_B.indd 55-56 5/01/10 1:27 PM5/01/10 1:27 PM
Page 29
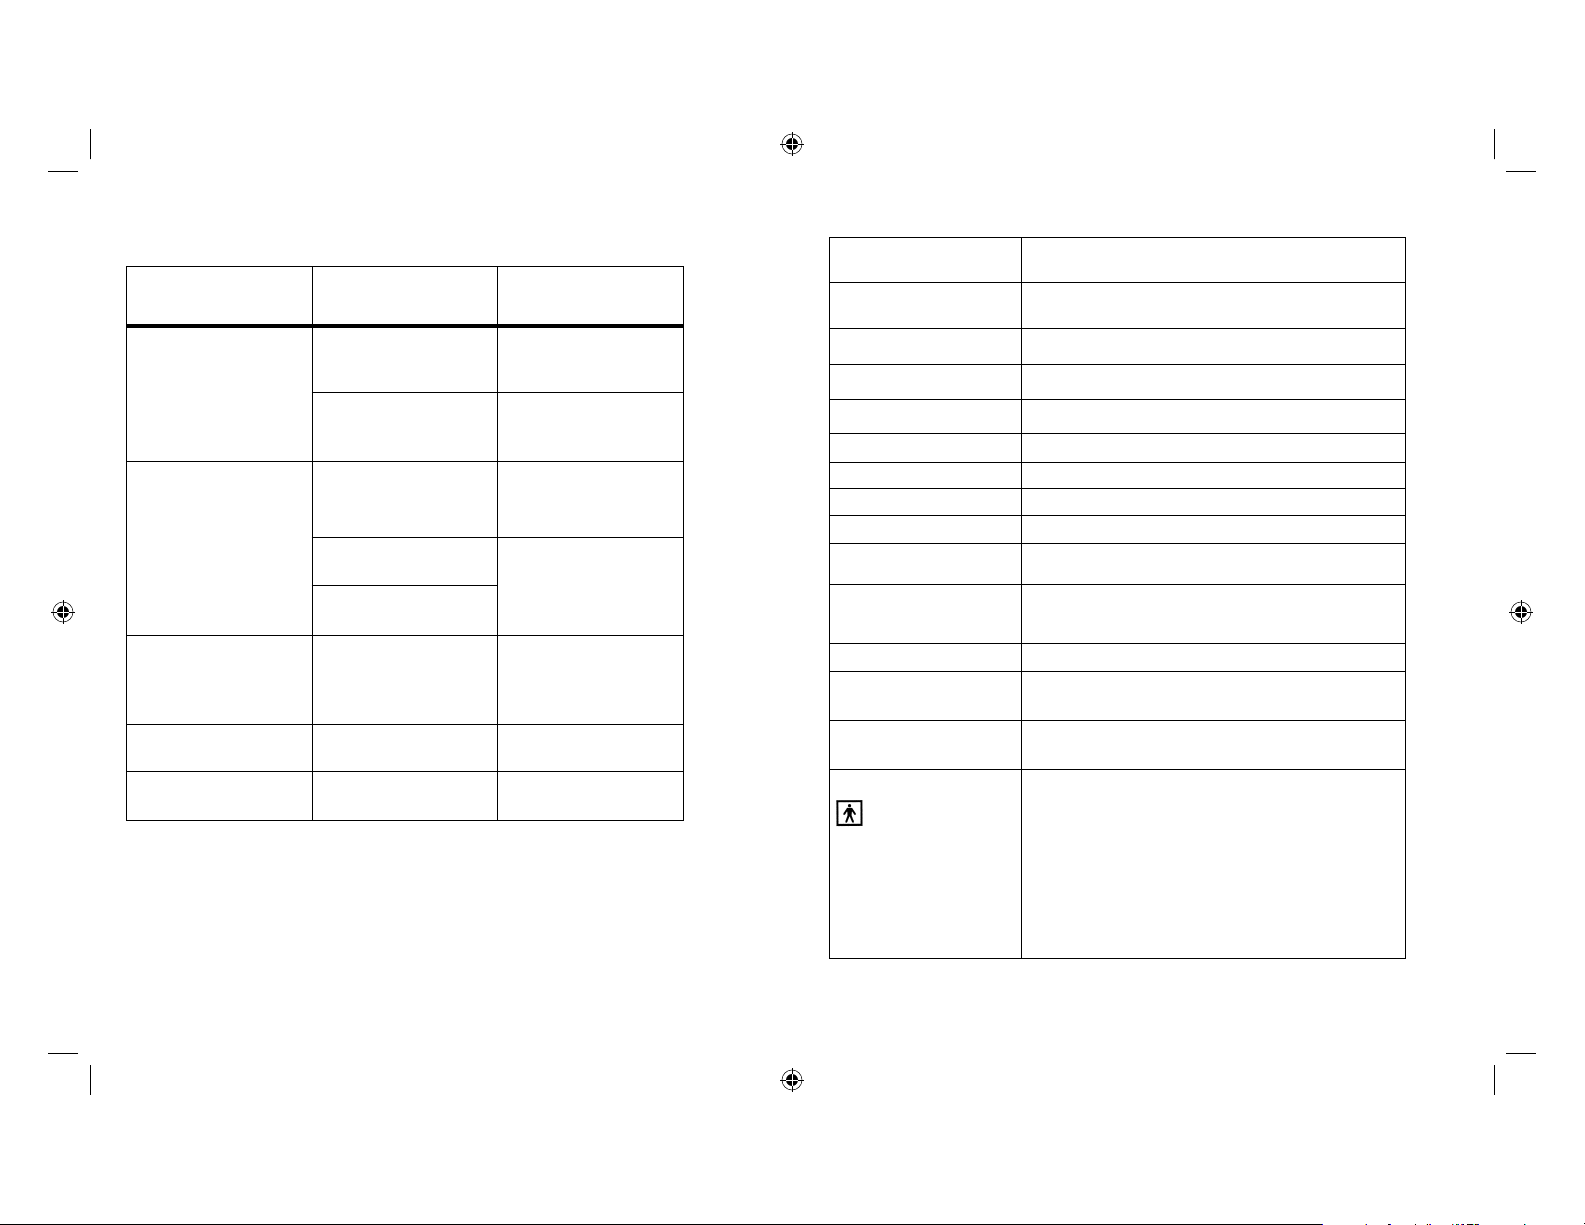
DIAGNÓSTICO Y RESOLUCIÓN DE PROBLEMAS
Si aparece alguna anomalía durante el uso, sírvase verificar los siguientes
puntos
SÍNTOMAS
La unidad no se
enciende cuando
presiono el botón
START/STOP
(COMENZAR/
DETENER).
Aparece el símbolo
de error de medición
EE en la pantalla o
el valor de presión
sanguínea mostrado
es excesivamente bajo
(o alto).
Aparece el símbolo de
error E1 en la pantalla
Aparece el símbolo de
error E2 en la pantalla
Aparece el símbolo de
error E3 en la pantalla
Nota: si la unidad aún sigue sin funcionar, póngase en contacto con
Relaciones con el Consumidor de HoMedics. Bajo ningún concepto
deberá desarmar ni intentar reparar la unidad por su cuenta. Podrá
encontrar la información de contacto del Departamento de Relaciones
con el Consumidor de HoMedics en la página de garantía.
CAUSAS
POSIBLES
Se han acabado
las pilas.
Los polos de las pilas
no se han colocado
correctamente.
El brazalete no
se ha colocado
correctamente.
¿Habló o se movió
durante la medición?
Sacudió el brazo con el
brazalete colocado.
Irregularidad en el
circuito de aire. Puede
que el tubo del brazalete
no esté correctamente
conectado al monitor.
La presión de inflado
excede los 300 mmHg.
Error al determinar datos
de medición.
SOLUCIÓN
Cambie por dos pilas AA
alcalinas nuevas.
Vuelva a colocar
las pilas en la posición
correcta.
Envuelva el brazalete
adecuadamente para que
pueda colocarse en forma
correcta.
Mida nuevamente.
Mantenga el brazo firme
durante la medición.
Verifique la conexión
del brazalete.
Mida nuevamente.
Apague la unidad,
luego vuelva a medir.
Mida nuevamente.
ESPECIFICACIONES
Fuente de energía:
Método de medición:
Rango de medición:
Precisión:
Sensor de presión:
Inflado:
Desinflado:
Capacidad de memoria:
Apagado automático:
Ambiente de
funcionamiento:
Ambiente para guardar:
Peso:
Circunferencia del brazo:
Dimensiones:
Nota: estas especificaciones están sujetas a cambios sin previo aviso.
Cuatro pilas (AA) de 1,5V CC
Oscilométrico
Presión: 40~280 milímetros mercurio (mmHg)
Pulso: 40~199 latidos/minuto
Presión: ±3 mmHg
Pulso: ±5% de la lectura
Semiconductor
Inflado manual
Válvula de liberación de presión automática
60 memorias
1 minuto despué de haber presionado algún botón por última vez
Temperatura: 50°F~104°F (10°C ~40°C)
Humedad: 15%–90% HR [humedad relativa]
Temperatura: -4°F~158°F (-20°C~70°C)
Humedad: Menos de 90% HR [humedad relativa]
0,43 lbs/193 gr (sin pilas)
Brazalete tamaño estándar para adulto: 9”–13”
(23 – 33 cm)
5”(L) x 4,1”(A) x 2,7”(H)
126mm(L) x 105mm(A) x 68mm(H)
Este dispositivo utiliza baterías
Equipo tipo BF
IPx0 - Ninguna protección especial contra la entrada
de agua
No apto para uso en presencia de mezcla
anestésica inflamable con aire, oxígeno u óxido
nitroso.
Operación continua con tiempo de carga reducido
55 56
BPS-060_B.indd 57-58BPS-060_B.indd 57-58 5/01/10 1:27 PM5/01/10 1:27 PM
Page 30

®
® ®
Por servicio o reparación,
no devuelva esta unidad
al distribuidor. Póngase en
contacto con Relaciones
con el Consumidor de
HoMedics por el:
Correo:
HoMedics, Inc.
Service Center
Dept. 168
3000 Pontiac Trail
Commerce Township,
MI 48390
Correo electrónico:
Teléfono:
1-800-466-3342
Horario comercial:
8:30am a 5pm Hora
del Este
De lunes a viernes
Distribuido por
®
GARANTÍA LIMITADA POR CINCO AÑOS
HoMedics vende sus productos con la intención de que no tengan defectos de fabricación ni de
mano de obra por un plazo de cinco años a partir de la fecha de compra original, con las siguientes
excepciones. HoMedics garantiza que sus productos no tendrán defectos de material ni de mano de
obra bajo condiciones de uso y servicio normales. Este monitor de presión sanguínea cumple con
los requisitos de la prueba de ciclos de medición simulada según la norma EN1060-3, parte 8.10.
Esta garantía se extiende únicamente a consumidores y no a distribuidores.
Para obtener servicio para su producto HoMedics, envíe por correo el producto y su recibo de compra fechado (como comprobante de compra), con franqueo pago, a la siguiente dirección:
HoMedics Consumer Relations
Service Center Dept. 168
3000 Pontiac Trail
Commerce Township, MI 48390
No se aceptarán pagos contra entrega.
HoMedics no autoriza a nadie, incluyendo, pero sin limitarse a, distribuidores, posteriores consumi-
dores compradores del producto a un distribuidor, o compradores remotos, a obligar a HoMedics
de forma alguna más allá de las condiciones aquí establecidas. La garantía de este producto no
cubre daños causados por uso inadecuado o abuso, accidente, conexión de accesorios no autorizados, alteración del producto, instalación inadecuada, reparaciones o modificaciones no autorizadas, uso inadecuado de la fuente de energía/electricidad, cortes de energía, caída del producto,
funcionamiento incorrecto o daño de una pieza de funcionamiento debido al no cumplimiento
del mantenimiento recomendado por el fabricante, daños durante el transporte, robo, descuido,
vandalismo, condiciones climáticas, pérdida de uso en el período durante el cual el producto está
en una instalación de reparación o a la espera de piezas o reparación, o cualquier otra condición, sin
importar cual sea, que se encuentre fuera del control de HoMedics.
Esta garantía es válida únicamente si el producto es comprado y operado en el país en el cual
se compró el producto. Un producto que requiera modificaciones o adaptación para habilitar su
funcionamiento en cualquier país que no sea aquél para el que fue diseñado, fabricado, aprobado
y/o autorizado, o la reparación de productos dañados por estas modificaciones no están cubiertos
bajo esta garantía.
LA GARANTÍA AQUÍ ESTABLECIDA SERÁ LA ÚNICA Y EXCLUSIVA GARANTÍA. NO HABRÁ NINGUNA OTRA GARANTÍA
EXPRESA NI IMPLÍCITA, INCLUYENDO NINGUNA GARANTÍA DE COMERCIALIZACIÓN O APTITUD NI NINGUNA OTRA
OBLIGACIÓN POR PARTE DE LA COMPAÑÍA CON RESPECTO A PRODUCTOS CUBIERTOS POR ESTA GARANTÍA.
HOMEDICS NO TENDRÁ RESPONSABILIDAD ALGUNA POR NINGÚN DAÑO INCIDENTAL, CONSECUENTE NI
ESPECIAL. BAJO NINGÚN CONCEPTO ESTA GARANTÍA REQUERIRÁ MÁS QUE LA REPARACIÓN O CAMBIO DE
ALGUNA PIEZA O PIEZAS QUE SE HALLEN DEFECTUOSAS DENTRO DEL PERÍODO DE VIGENCIA DE ESTA GARANTÍA.
NO SE EFECTUARÁN REEMBOLSOS. SI NO HAY PIEZAS DE REPUESTO DISPONIBLES PARA LOS MATERIALES
DEFECTUOSOS, HOMEDICS SE RESERVA EL DERECHO DE REALIZAR SUSTITUCIONES EN VEZ DE REPARAR O
CAMBIAR.
Esta garantía no se extiende a la compra de productos abiertos, usados, reparados, embalados otra vez y/o abiertos
y vueltos a cerrar, incluyendo entre otras cosas la venta de dichos productos en sitios de remate por Internet y/o la
venta de dichos productos por revendedores o mayoristas. Todas y cada una de las garantías cesarán y terminarán
inmediatamente con respecto a cualquier producto o pieza del mismo que estén reparados, cambiados, alterados o
modificados sin el consentimiento previo explícito y por escrito de HoMedics.
Esta garantía le proporciona derechos legales específicos. Es posible que usted tenga derechos adicionales que pueden variar
de un país a otro. Debido a las regulaciones de ciertos países, es posible que algunas de las limitaciones y exclusiones no se
apliquen en su caso.
Por más información con respecto a nuestra línea de productos en los EE.UU., visítenos en:
www.homedics.com
HoMedics, Inc.
3000 Pontiac Trail,
Commerce Township, MI
48390
©2008-2010 HoMedics, Inc. y sus compañías afiliadas, reservados todos los derechos.
HoMedics es una marca registrada de HoMedics, Inc. y sus compañías afiliadas.
Reservados todos los derechos.
IB-BPS060B
PN/ 323101247 VER:001
Impreso en China
BPS-060_B.indd 59-60BPS-060_B.indd 59-60 5/01/10 1:27 PM5/01/10 1:27 PM
 Loading...