

Homedics BPA-450WGN User Manual [nl]
limited warranty
lifetime
by
PPoorr ss eerrvv iicciioo oo
by
by
rree ppaa rraa cc iióónn ,, nnoo
dd eevvuu eellvvaa eesstt aa uu nniiddaa dd
aa ll ddiisstt rriibbuu iidd oorr..
PPóó nngg aassee eenn ccoonn ttaaccttoo
ccoo nn RReellaacciioo nnee ss cc oonn eell
CCoo nnssuu mmiidd oorr dd ee
HHooMMeedd iicc ss ppoo rr eell::
CCoo rrrr ee oo::
HHooMMeedd iicc ss ,, IInn cc..
SSee rrvviiccee CCee nntt eerr
DDeepp tt.. 116688
33 00 0000 PPoonn ttiiaa cc TTrraa iill
CCoo mmmm eerrcc ee TTooww nnsshh iipp,,
MMII 44 88 3399 00
Correo electrónico:
cservice@homedics.com
TTeelléé ffoonn oo::
11 --88 00 00--4466 66 -- 333344 22
HHoorr aarriioo ccoo mmee rrcciiaall ::
88 ::33 00aa mm aa 55ppmm HHoo rraa
dd ee ll EEsstt ee
DDee lluunn eess aa vviieerrnn eess
Distribuido por:
Homedics para
Walgreen
Company
Deerfield, IL
60015-4681
©2008 HoMedics, Inc. y sus compañías afiliadas, reservados todos los derechos. HoMedics es una
Impreso en China
marca registrada de HoMedics, Inc. y sus compañías afiliadas. Smart Sense™ y Smart Fit™ son marcas
HoMedics vende sus productos con la intención de que no tengan defectos de fabricación ni de mano de
obra durante la vida del comprador original a partir de la fecha de compra original, con las
siguientes excepciones. HoMedics garantiza que sus productos no tendrán defectos de material ni de
mano de obra bajo condiciones de uso y servicio normales. Esta garantía se extiende únicamente a consumidores y no a distribuidores.
Para obtener servicio para su producto HoMedics, envíe por correo el producto y su recibo de compra
fechado (como comprobante de compra), con franqueo pago, a la siguiente dirección:
HoMedics Consumer Relations
Service Center Dept. 168
3000 Pontiac Trail
Commerce Township, MI 48390
No se aceptarán pagos contra entrega.
HoMedics no autoriza a nadie, incluyendo, pero sin limitarse a, distribuidores, posteriores consumidores
compradores del producto a un distribuidor, o compradores remotos, a obligar a HoMedics de forma
alguna más allá de las condiciones aquí establecidas.
La garantía de este producto no cubre daños causados por uso inadecuado o abuso, accidente, conexión
de accesorios no autorizados, alteración del producto, instalación inadecuada, reparaciones o
modificaciones no autorizadas, uso inadecuado de la fuente de energía/electricidad, cortes de energía,
caída del producto, funcionamiento incorrecto o daño de una pieza de funcionamiento debido al no
cumplimiento del mantenimiento recomendado por el fabricante, daños durante el transporte, r
descuido, vandalismo, condiciones climáticas, pérdida de uso en el período durante el cual el producto
está en una instalación de reparación o a la espera de piezas o reparación, o cualquier otra condición,
sin importar cual sea, que se encuentr
Esta garantía es válida únicamente si el producto es comprado y operado en el país en el cual se compró
el producto. Un producto que requiera modificaciones o adaptación para habilitar su funcionamiento en
cualquier país que no sea aquél para el que fue diseñado, fabricado, aprobado y/o autorizado, o la
reparación de pr
LA GARANTÍA AQUÍ ESTABLECIDA SERÁ LA ÚNICA Y EXCLUSIVA GARANTÍA. NO HABRÁ NINGUNA OTRA
GARANTÍA EXPRESA NI IMPLÍCITA, INCLUYENDO NINGUNA GARANTÍA DE COMERCIALIZACIÓN O
APTITUD NI NINGUNA OTRA OBLIGACIÓN POR PARTE DE LA COMPAÑÍA CON RESPECTO A PRODUCTOS
CUBIERTOS POR ESTA GARANTÍA. HOMEDICS NO TENDRÁ RESPONSABILIDAD ALGUNA POR NINGÚN
DAÑO INCIDENTAL, CONSECUENTE NI ESPECIAL. BAJO NINGÚN CONCEPTO ESTA GARANTÍA REQUERIRÁ
MÁS QUE LA REPARACIÓN O CAMBIO DE ALGUNA PIEZA O PIEZAS QUE SE HALLEN DEFECTUOSAS
DENTRO DEL PERÍODO DE VIGENCIA DE ESTA GARANTÍA. NO SE EFECTUARÁN
REEMBOLSOS. SI NO HAY PIEZAS DE REPUESTO DISPONIBLES PARA LOS MATERIALES DEFECTUOSOS,
HOMEDICS SE RESERVA EL DERECHO DE REALIZAR SUSTITUCIONES EN VEZ DE REPARAR O CAMBIAR.
Esta garantía no se extiende a la compra de productos abiertos, usados, reparados, embalados otra vez
y/o abier
remate por Internet y/o la venta de dichos productos por revendedores o mayoristas. Todas y cada una de
las garantías cesarán y terminarán inmediatamente con respecto a cualquier producto o pieza del mismo
que estén reparados, cambiados, alterados o modificados sin el consentimiento previo explícito y por
escrito de HoMedics.
Esta garantía le proporciona derechos legales específicos. Es posible que usted tenga derechos
adicionales que pueden variar de un país a otro. Debido a las regulaciones de ciertos países, es
posible que algunas de las limitaciones y exclusiones no se apliquen en su caso.
Por más información con respecto a nuestra línea de productos en los EE.UU., visítenos en: www.homedics.com
oductos dañados por estas modificaciones no están cubiertos bajo esta garantía.
tos y vueltos a cerrar, incluyendo entre otras cosas la venta de dichos productos en sitios de
GG AARR AA NN TT ÍÍAA LL IIMM IITTAA DD AA DDEE PPOORR VV IIDDAA
e fuera del control de HoMedics.
registradas de HoMedics Inc. y sus compañías afiliadas.
Reservados todos los derechos.
obo,
IB
-BPA450WGND
Ultra-Deluxe Automatic
Blood Pressure Monitor
BPA-450WGN
El manual en español
empieza en la página 34

TABLE OF CONTENTS
INTRODUCTORY INFORMATION:
Important Product Notices and Safety
Instructions . . . . . . . . . . . . . . . . . . . . . . . . . . . . .3
About Blood Pressure . . . . . . . . . . . . . . . . . . . .5
What is Blood Pressure?
Why Measure Your Blood Pressure?
Blood Pressure Standard . . . . . . . . . . . . . . . . . .5
How This Blood Pressure Monitor Works . . . . .7
USAGE INFORMATION:
Name/Function of Each Part . . . . . . . . . . . . . . . .8
Display Explanations . . . . . . . . . . . . . . . . . . . . .9
Installing Batteries . . . . . . . . . . . . . . . . . . . . . .11
Using the AC Adapter . . . . . . . . . . . . . . . . . . . .12
Date & Time Set Procedure . . . . . . . . . . . . . . .13
Applying the Cuff . . . . . . . . . . . . . . . . . . . . . . .14
Measurement Procedure . . . . . . . . . . . . . . . . .17
Risk Category Indicator . . . . . . . . . . . . . . . . . .20
Using the Memory Function . . . . . . . . . . . . . . .22
Clearing Values from Memory . . . . . . . . . . . . .24
Important Notes Regarding Your
Blood Pressure Measurement . . . . . . . . . . . . .25
Recalibration Service . . . . . . . . . . . . . . . . . . . .26
Care, Maintenance & Cleaning . . . . . . . . . . . . .27
Potential for Radio/Television Interference . .29
Troubleshooting . . . . . . . . . . . . . . . . . . . . . . . .30
Specifications . . . . . . . . . . . . . . . . . . . . . . . . . .31
Lifetime Limited Warranty . . . . . . . . . . . . . . . .32
1
2

• The pulse display is not suitable for checking the
by
frequency of heart pacemakers.
• Electromagnetic interference: The device contains sensi-
IMPORTANT PRODUCT NOTICES AND SAFETY
INSTRUCTIONS
When using your blood pressure monitor, basic precautions
should always be followed. Please read and follow all instructions and warnings before using this product. Save these
instructions for future reference.
• Please note that this is a home healthcare product only and it
is not intended to serve as a substitute for the advice of a
physician or medical professional.
• Do not use this device for diagnosis or treatment of any
health problem or disease. Measurement results are for reference only. Consult a healthcare professional for interpretation
of pressure measurements. Contact your physician if you
have or suspect any medical problem. Do not change your
medications without the advice of your physician or healthcare professional.
• Proper cuff size is critical for accurate measurements. Follow
the instructions in this manual and printed on the arm cuff to
ensure the appropriate size of cuff is being used.
• This product is not suitable for people with arrythmias. This
device may have difficulty determining the proper blood
pressure for individuals with diabetes, poor
circulation of blood, kidney problems or for users who have
suffered from a stroke.
3
tive electronic components. Avoid strong
electrical or electromagnetic fields in the direct vicinity of
the device (e.g. mobile telephones, microwave ovens).
These may lead to temporary impairment of measurement accuracy.
• Use blood pressure monitor only for its intended use.
• Do not wrap the cuff around body parts other than your
arm.
• This unit is intended for use in measuring the blood pressure
and pulse rate of adults. Do not use this device on infants or
those who cannot express their own
consent. This unit should not be operated by children.
• Do not plug or unplug the adapter power cord with wet
hands.
Blood pressure measurements determined with this device
are equivalent to those obtained by a trained observer using
the cuff/stethoscope ausculatory method, within the limits
prescribed by the American National Standard,
electronic, or automated sphygmomanometers
Manual,
.
4

ABOUT BLOOD PRESSURE
Systolic (mmHg) Diastolic (mmHg)
Stage 2 Hypertension >160 >100
Stage 1 Hypertension 140~159 90~99
Prehypertension 120~139 80~89
Normal <120 <80
_ _
What is Blood Pressure?
Blood pressure is the pressure exerted on the artery
walls while blood flows through the arteries. The
pressure measured when the heart contracts and
sends blood out of the heart is systolic (highest)
blood pressure. The pressure measured when the
heart dilates with blood flowing back into the heart
is called diastolic (lowest) blood pressure.
Why Measure Your
Blood Pressure?
Among today’s various health problems, those
associated with high blood pressure are very common.
High blood pressure dangerously correlates with
cardiovascular diseases. Therefore, blood pressure
monitoring is important for identifying those at risk.
Categories for Blood Pressure Levels in Adults
For adults 18 and older who are not on medicine for high blood
pressure, are not having a short-term serious illness, and do not
have other conditions, such as diabetes and kidney disease.
To determine category of risk when systolic and diastolic readings fall
into two areas, use the higher of the two numbers for classification.
There is an exception to the above definition of high blood
pressure for people with diabetes and chronic kidney disease.
A blood pressure of 130/80 mmHg or higher is considered high
blood pressure for those individuals.
This monitor comes equipped with a Risk Category
Indicator to visually indicate the assumed risk level of
each reading based upon these standards. See page
20 for more information on this feature.
BLOOD PRESSURE STANDARD
The U.S. Department of Health and Human Services
and the National Institutes of Health
a blood pressure standard that identifies areas of lowand high-risk blood pressure. This standard, however,
is a general guideline as an individual’s blood pressure
varies among different people, age groups, etc.
5
have developed
It is important that you consult with your physician
regularly. Your physician will tell you your normal
blood pressure range as well as the point at which
you will be considered at risk.
For reliable monitoring and reference of blood pressure,
keeping long-term records is recommended.
6

HOW THIS BLOOD PRESSURE
MONITOR WORKS
This monitor uses Smart Sense™ Technology to detect
your blood pressure. With one touch of a button, the
cuff will automatically inflate to block the blood flow
through your artery. Next, the deflation process starts.
Smart Sense™ Technology enables the monitor to
automatically inflate and deflate to the appropriate level
for each individual. Please note that any muscle movement during inflation or deflation will cause measurement error. When measurement is complete, the monitor will display your systolic pressure, diastolic pressure, and pulse readings.
NAME/FUNCTION OF EACH PART
LCD Display
Smart Fit™
Arm Cuff
Air Tube
and Connector
Based upon your measurement results, the monitor's
Risk Category Indicator will alert you if your reading
falls into the pre-hypertension, stage 1 hypertension, or
stage 2 hypertension categories. See page 20 for more
information on the Risk Category Indicator.
Memory
Selector Button
(Located on top)
Memory Recall Button
START/STOP Button
Other Accessories Included :
Battery
Cover
(Located
on bottom
of unit)
User-Select Button
1 12V DC Output AC Adapter and 4 “AA” size,
1.5V alkaline batteries
Note: Please unload the batteries when operating
with the AC adapter for an extended period of time.
87
Date/Time Set Buttons
(Located on side of unit)
Original Document Name: AM-LD-01-V6
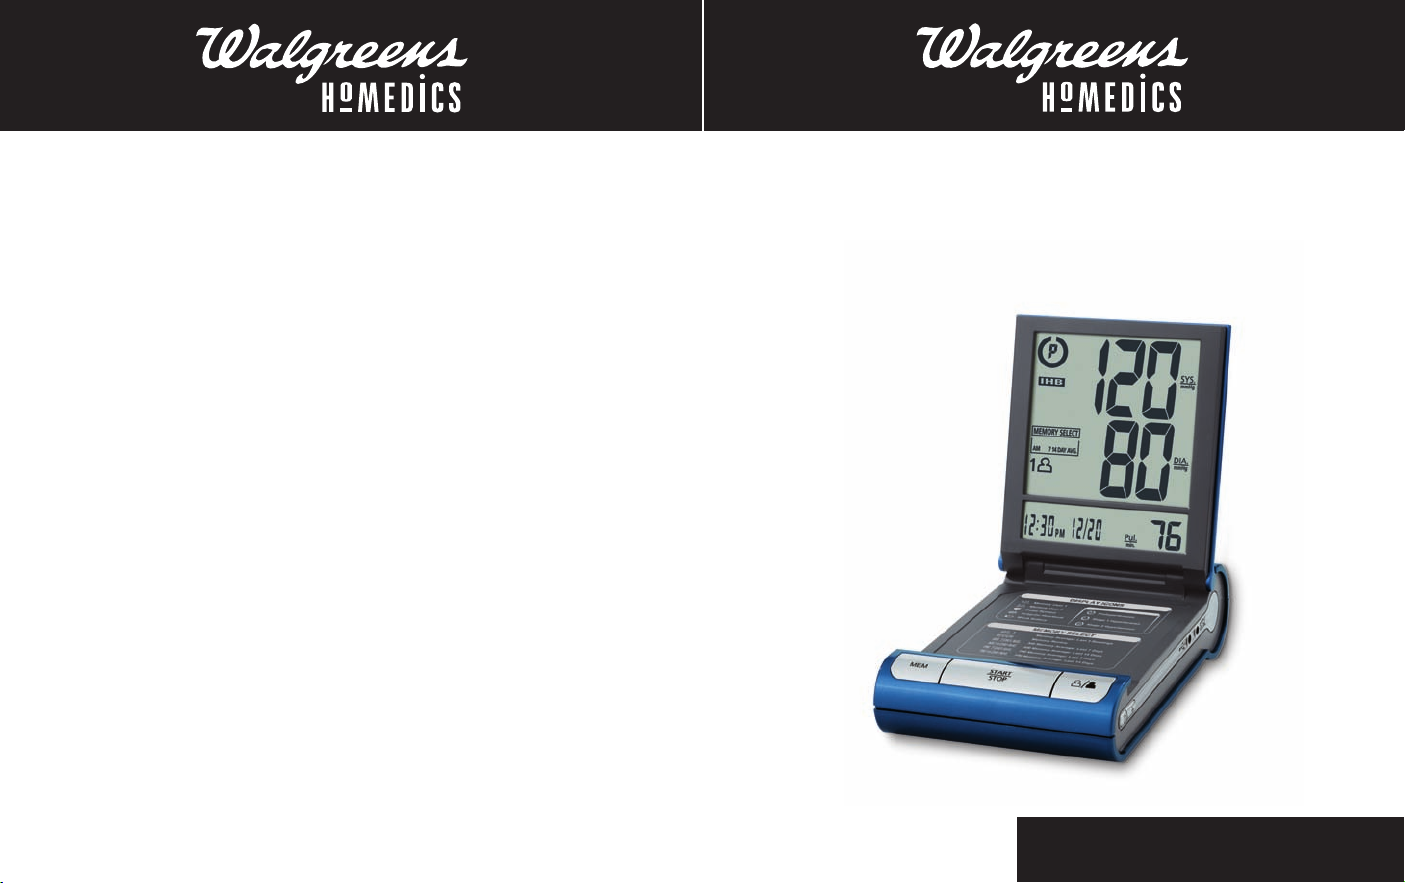
Display Symbols:
DISPLAY EXPLANATIONS
Date/Time Indicator
Pulse Rate
Systolic
Pressure
Diastolic
Pressure
User 1: Appears when the monitor is operated by User 1.
User 2: Appears when the monitor is operated by User 2.
Weak Battery Symbol: Appears when batteries should be
replaced.
Pulse Symbol: Shows the pulse rate per minute.
Important Health Bulletin: See page 21 for more information.
Risk Category Indicator: Compares readings against blood
pressure guidelines. See page 20 for more information.
Memory Select: Identifies memory mode. See page 22 for
more information.
If any of the following letters and numbers appear in the area that
diastolic pressure should be displayed, an error has occurred
with your reading. See Troubleshooting section of this manual for
more information.
Measurement Error: Measure again. Wrap the cuff
correctly and keep arm steady during measurement.
Measurement Error: Measurement result exceeds
measurement range. Measure again.
Air Circuit Abnormality: Check cuff connection. Measure again.
Pressure Exceeding 300 mmHg: Turn the unit off to clear,
then measure again.
Data Error: Remove and reload the batteries.
Recalibration Alert: Recalibration recommended. See
page 25 for information.
9
10
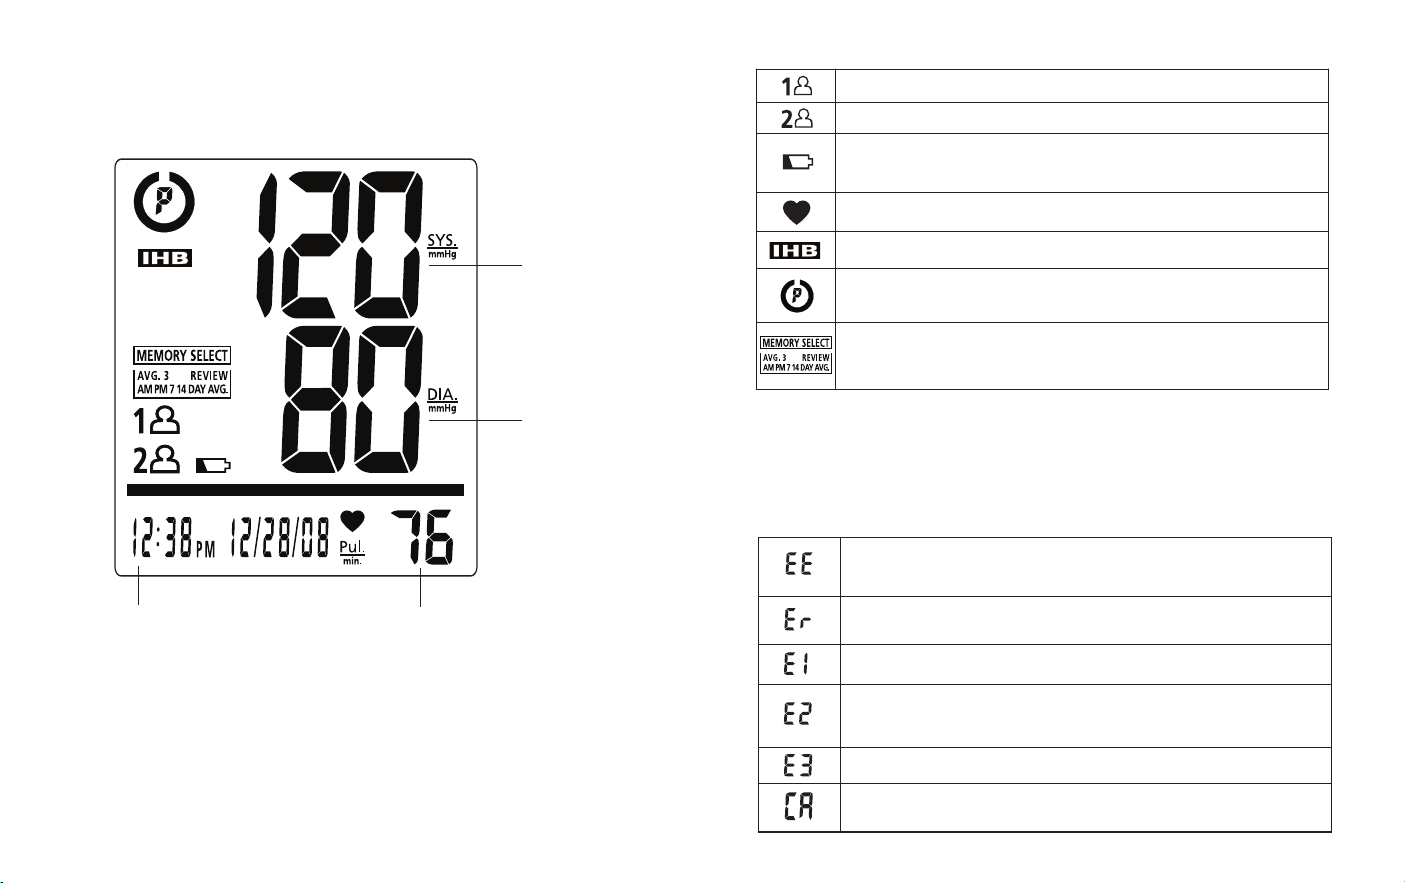
INSTALLING BATTERIES
Note: It is recommended that you use batteries only
for travelling or when it is not possible to use the
AC adapter.
1. Press down on latch and lift the battery cover
towards you to open the battery compartment.
2. Install or replace 4 “AA” sized batteries in the
battery compartment according to the indications
inside the compartment.
3. Replace the battery cover by clicking in the
bottom hooks first, then push in the top end of
the battery door.
Battery
Cover
As the supplied batteries are for test only, they may be
discharged earlier than batteries you buy in stores.
Replace the batteries in pairs. Remove batteries when
unit is not in use for extended periods of time.
Note: Batteries are hazardous waste. Do not dispose
of them together with the household garbage.
USING THE AC ADAPTER
Note: • Please unload the batteries when operating
with the AC adapter for an extended period
of time. Leaving the batteries in the compartment for a long time may cause leakage,
which may lead to damage of the unit.
• No batteries are needed when operating with
the AC adapter.
1. Connect the AC adapter with the AC adapter jack
in the back of the unit as shown below.
2. Please use only the AC adapter included with
this monitor.
Replace the batteries if:
1. The weak battery symbol appears on the display.
2. Nothing appears on the display when the power is
switched on.
11
AC Adapter
Input: 120V 60Hz
Output: 12V DC 500mA
Connect AC
adapter here
12
DATE & TIME SET PROCEDURE
Original Document Name: AM-LD-01-V6
2~
3
cm
(0.
8”
~1.2
”)
P
os
it
i
on
cuf
f
e
d
ge
0
.8
–
1.
2
in
che
s (2
–
3cm
)
a
b
o
v
e
e
l
b
o
w.
F
i
t
cu
ff
A
l
l
o
w
to
f
a
nd
C
en
mi
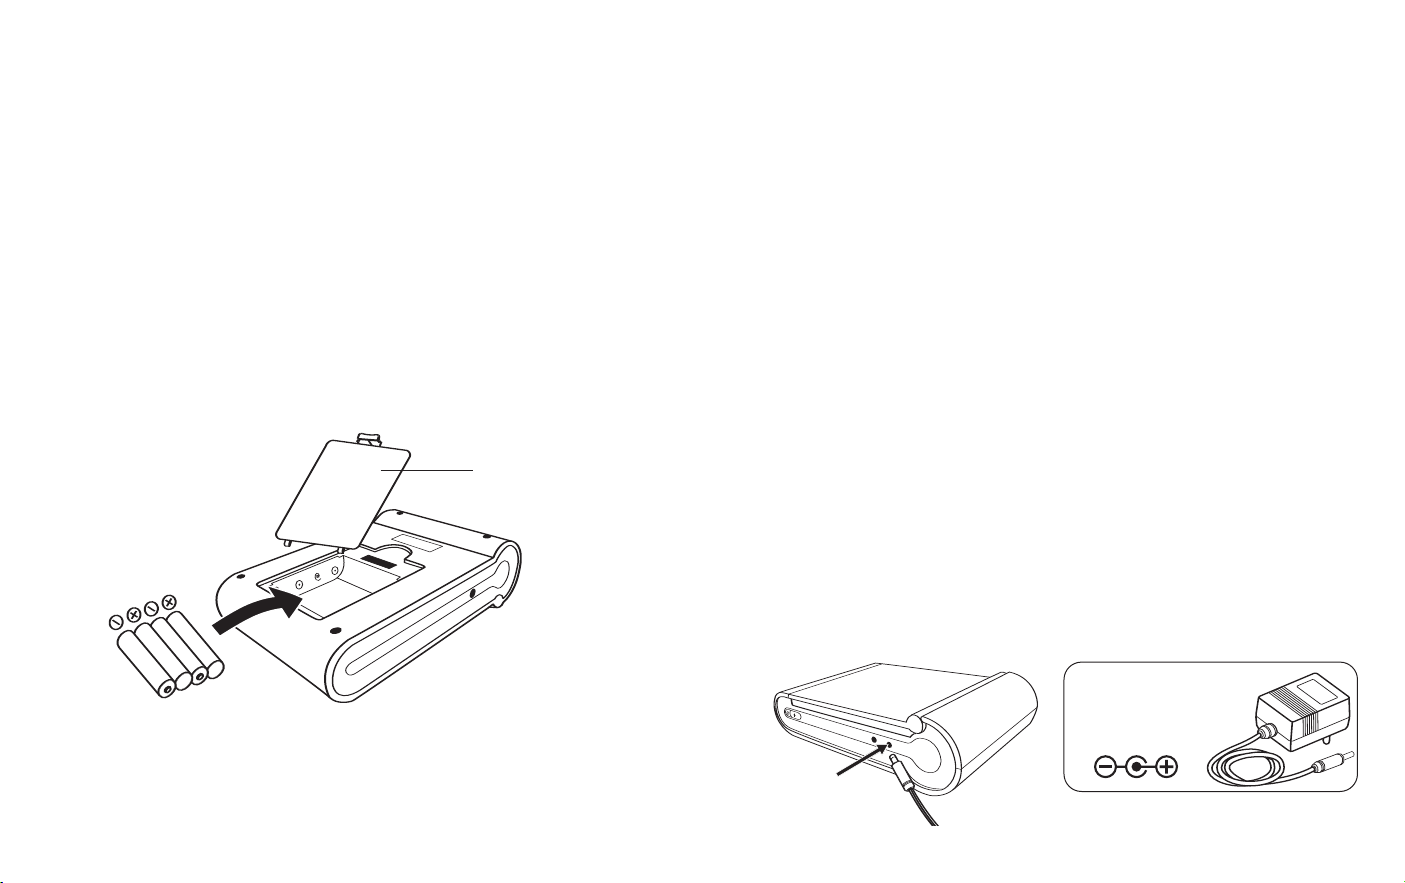
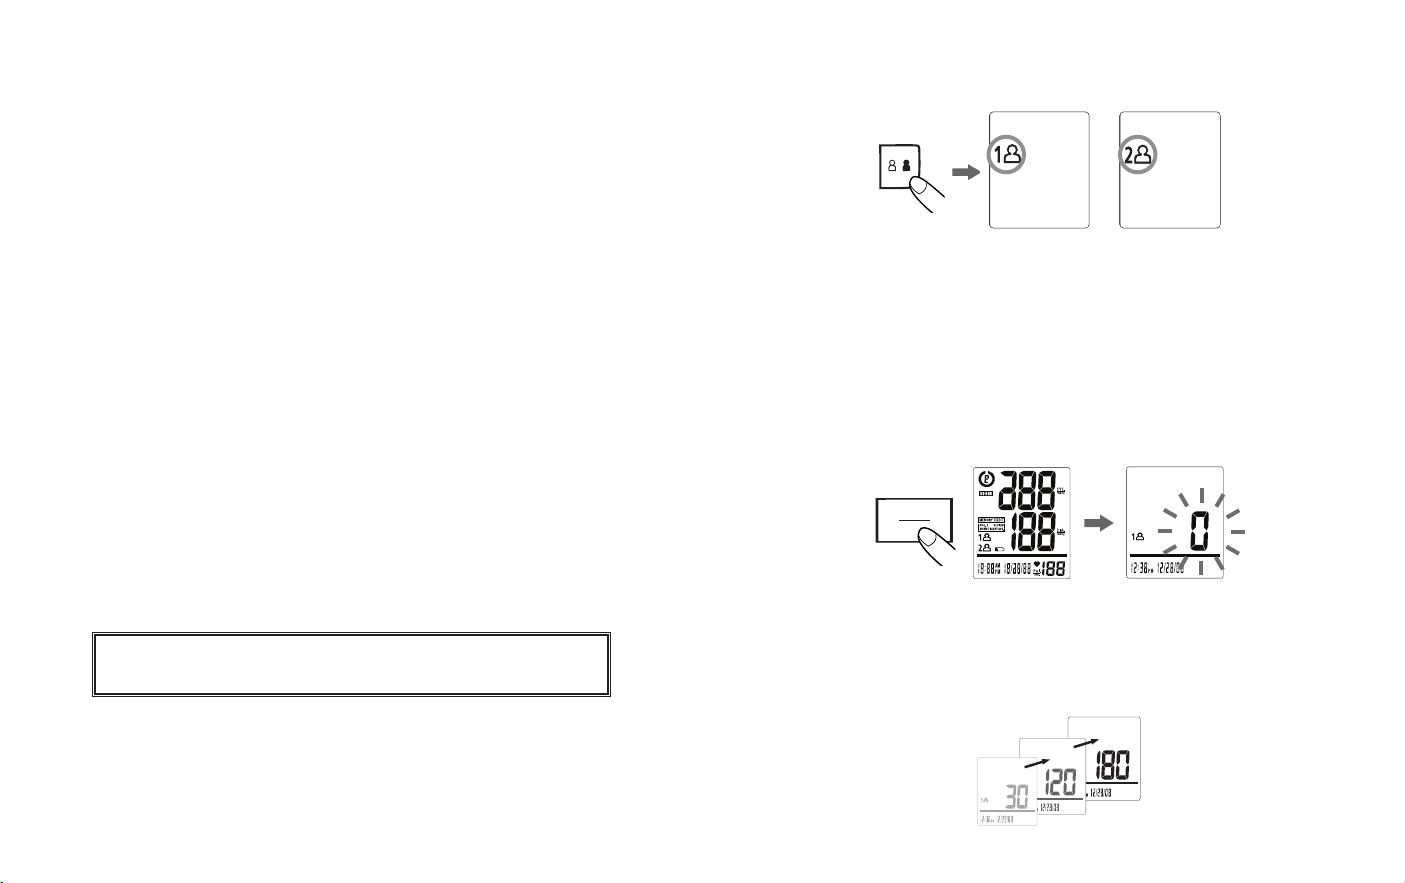
1. To adjust the date/time, press the Set button ,
located on the side of the monitor.
2. The display will show a blinking number showing
the hour. Change the hour by pressing the
button. Each press will increase the number by one
in a cycling manner. Press the Set button again
to confirm the entry, and the screen will show a blinking number representing the minutes.
3. Change the time and date as described in Step 2
above, using the
button to change the num-
bers and the Set button to confirm the entries.
4. A “0” will reappear as the blood pressure monitor is
ready for measurement again.
Press the button
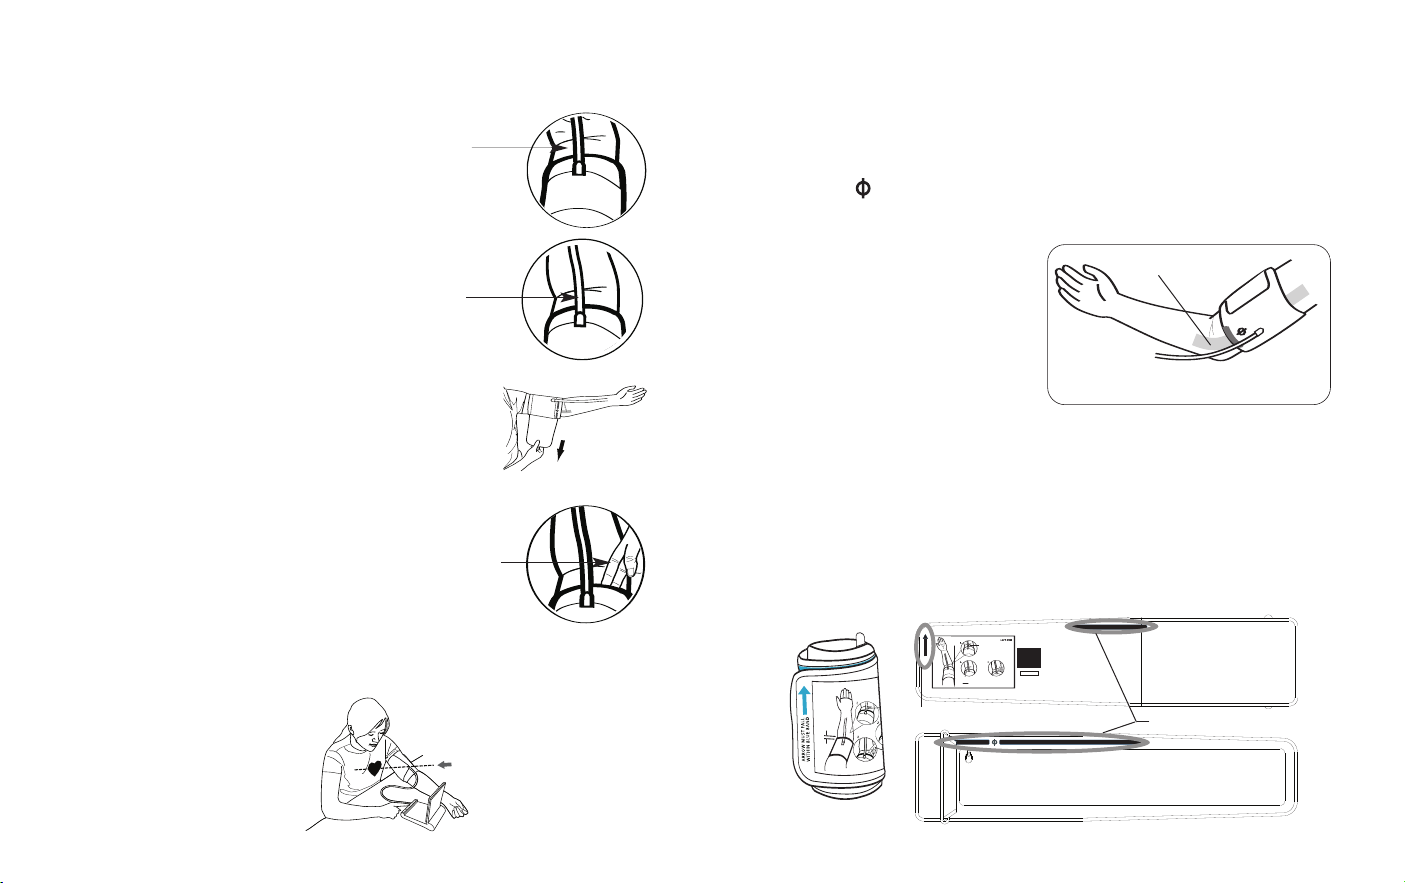
APPLYING THE CUFF
1. If the cuff is not assembled, pass the end of the
cuff furthest away from the tubing through the
metal D-ring in order to form a loop.
End of cuff
D-ring
2. Plug the cuff tube into the left side of the unit.
blinking hour
Insert plug here
increasing hour
confirm the entry
repeat process to set time and date
13
14
Note:
Artery M
2~3
cm
(0.
8”~
1.2
”)
Pos
iti
on
cuf
f e
dge
0.8
–
1.2
inc
hes (2
–
3cm
)
abov
e e
lbo
w.
Fit
cuf
f s
ecu
rel
y.
All
ow
roo
m f
or
2 f
ing
ers
to
fit
be
twe
en
the
cuf
f
and
yo
ur
arm
.
A
RRO
W MU
S
T
F
AL
L
W
I
T
H
I
N
B
L
U
E
B
A
ND
Center tube
over middle
of arm
Model# PP-BPCUFF7
Latex free
Pos
ition cu
ff
edge
0.8
˝
–
1.2
˝
(2
–
3cm
)
abo
ve
elb
ow.
Cen
ter
tu
be
ove
r
midd
le
of
arm
.
Fit
cu
ff
se
cur
ely
. A
ll
ow
roo
m f
or
two
finge
rs
to
fit
be
twe
en
the
cu
ff
and
you
r a
rm.
8.7-18.1 Inches
22-46 Centimeters
One Size
Cu Fits:
3. Remove tight fitting clothing from around your
upper left arm.
If it is not possible to fit the cuff to your left arm, it
can also be placed on your right arm. However, all
measurements should be made using the same arm.
4. Position cuff edge 0.8-1.2
inches (2-3cm) above elbow.
To use on the right arm, you must position the artery
symbol “ ” over the main artery. Locate the main
artery by pressing with two fingers approximately 1"
(2 cm) above the bend
5. Center tube over middle of arm.
of your elbow on the
Main Artery
inside of your right arm.
Identify where the pulse
6. Pull the end of the cuff so that it tightens
evenly around your arm.
can be felt the strongest.
This is your main artery.
Very Important: Proper cuff size is critical to accurate
Press the hook
and loop material together to secure.
Allow room for 2 fingers to fit between
the cuff and your arm.
measurement. This cuff is suitable for your use if
the arrow falls within the solid color line as shown
below.
If the Arrow falls outside of the Solid Color Line,
you will need a cuff with other circumferences. Contact
HoMedics Consumer Relations regarding additional
cuff sizes.
7. Lay your arm on a table (palm upward) so the cuff is
at the same height as your heart. Make sure the
tube is not kinked.
Arrow
Solid Color Line
15
16
MEASUREMENT PROCEDURE
/
START
STOP
/
Important Notes:
• Blood pressure changes with every heartbeat and is
in constant fluctuation throughout the day.
• Blood pressure measurement can be affected by the
position of the user, his or her physiologic condition
and other factors. For greatest accuracy, wait 1
hour after exercising, bathing, eating, drinking
beverages with alcohol or caffeine, or smoking
to measure blood pressure.
• Before measurement, it is suggested that you sit
quietly for 15 minutes as measurements taken
during a relaxed state will have greater accuracy.
You should not be physically tired or exhausted
while taking a measurement.
• During the measurement, do not talk or move your
arm or hand muscles.
• See page 25 for additional notes regarding your
blood pressure measurement.
If you are using this blood pressure monitor for the first
time, please remove the protective film from the screen.
1. Press the
User Select Button to choose User 1
or User 2.
OR
After the user number is selected, press the
START/STOP button to confirm the chosen user.
2. With the cuff wrapped around your arm, press the
START/STOP button. Do not inflate the cuff unless it
is wrapped around your arm. All digits will light up to
check the display functions. The checking procedure
will be completed after about 2 seconds.
3. After all symbols disappear, the display will
show a blinking “0”. The monitor is
“Ready to
Measure” and will automatically inflate the
cuff to start measurement.
1817
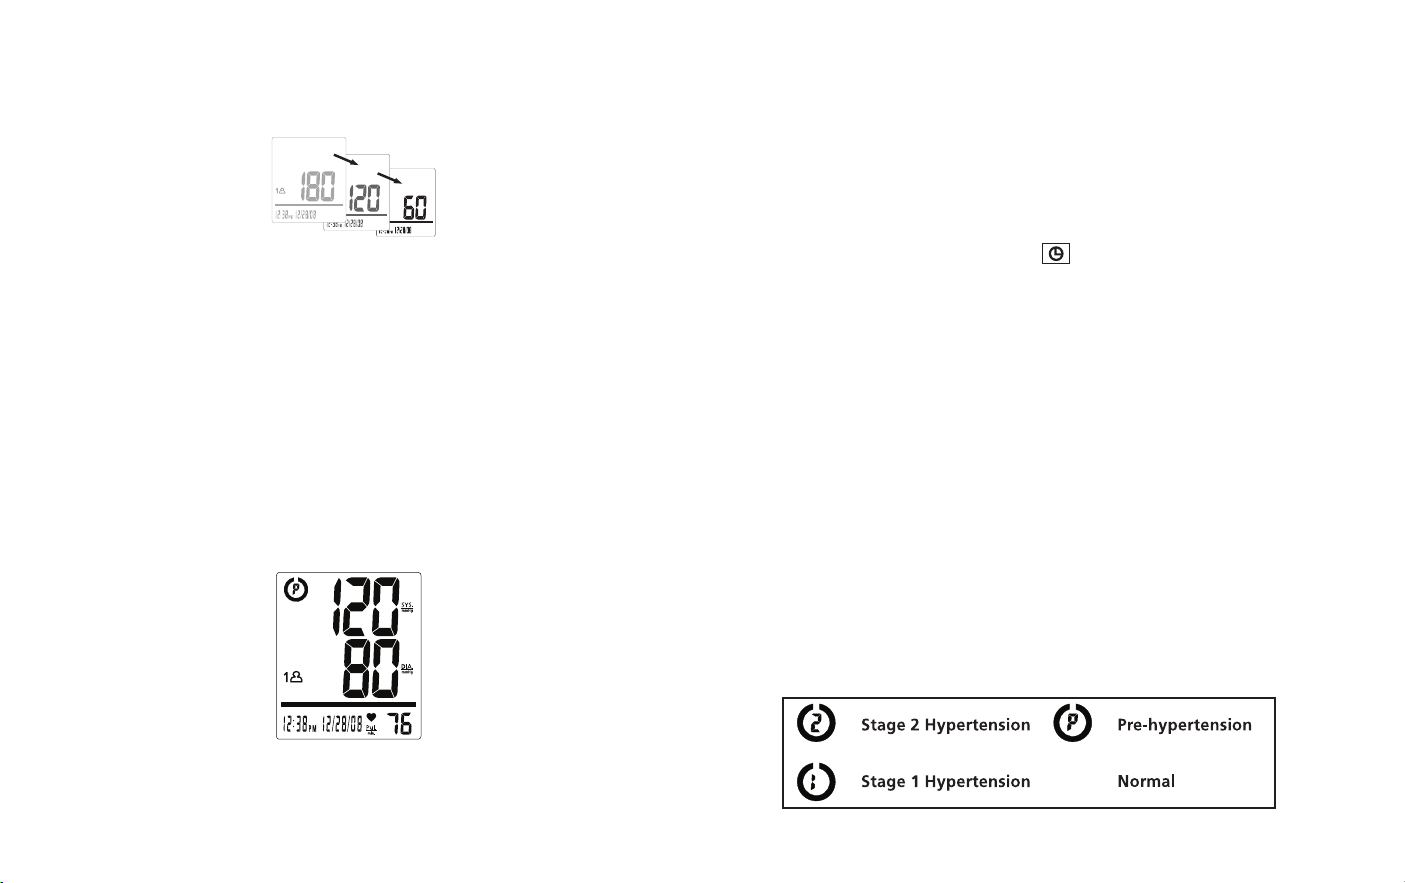
4. Once your systolic pressure is determined, the monitor
Original Document Name: AM-LD-01-V6
(No Symbol)
will begin deflating to measure your diastolic pressure.
Note: This monitor will re-inflate automatically if the
system detects that your body requires more
pressure for measurement.
5. When the measurement is completed, the cuff will
deflate entirely. Systolic pressure, diastolic pressure
and pulse will be shown simultaneously on the LCD
screen.
stored into memory.
The measurement is then automatically
Note:
1. This monitor automatically turns off approximately 1
minute after last operation. You may also press the
START/STOP button to turn the unit off.
2. To interrupt the measurement, you may press the
START/STOP (recommended), “MEM”, UserSelect
or Date/Time Set buttons. The cuff will
deflate immediately after a button is pressed.
RISK CATEGORY INDICATOR
The U.S. Department of Health and Human
Services and the National Institutes of Health have
developed a blood pressure standard classifying
blood pressure ranges into 4 stages. This unit is
equipped with an innovative blood pressure classification indicator, which visually indicates the assumed
risk level (normal, prehypertension, stage 1 hypertension, or stage 2 hypertension) of each reading.
Symbols are described below and classifications follow the guidelines as described earlier in this manual
(page 5).
2019
 Loading...